Thursday, July 27, 2023

Exporting data from a MySQL database using SELECT…INTO OUTFILE

This article is part of Robert Sheldon's continuing series on Learning MySQL. To see all of the items in the series, click here.

In the previous article in this series, I introduced you to the MySQL LOAD DATA statement, which lets you retrieve data from a plain text file and insert it into a table. In this article, I cover the SELECT…INTO OUTFILE statement, a type of SELECT statement that includes the INTO OUTFILE clause. The clause lets you export data from one or more MySQL tables into a plain text file, providing a counterpart to the LOAD DATA statement.

Building a SELECT…INTO OUTFILE statement is relatively straightforward. The main part of the SELECT statement (without the INTO OUTFILE clause) is like any other SELECT statements, except for a couple minor considerations. And the INTO OUTFILE clause itself is fairly easy to construct. Perhaps the biggest issue you’ll run into is not having the permissions necessary to save a file to the target folder, which I discuss later in the article. Otherwise, you should have little problem getting started with the INTO OUTFILE clause.

In this article, I show you multiple examples that demonstrate how the clause works so you have a foundation in how to use it to export data. Most of the examples are built with basic SELECT statements, so they should be fairly easy for you to try out. If you have any questions about the SELECT statement itself (other than the INTO OUTFILE clause), refer to an earlier article in this series that introduces you to the statement.

Note: The examples in this article are based on a local instance of MySQL that hosts a very simple database and tables. The last section of the article—“Appendix: Preparing your MySQL environment”—provides information about how I set up my system and includes the SQL script for creating the database and tables on which the examples are based.

Introducing the SELECT…INTO OUTFILE statement

Before we jump into the examples, you should have a basic understanding of the INTO OUTFILE clause and how it fits into a SELECT statement. The following syntax shows the elements that make up the clause:

SELECT statement_elements
INTO OUTFILE 'file_name'
[FIELDS
  [TERMINATED BY 'string']
  [[OPTIONALLY] ENCLOSED BY 'char']
  [ESCAPED BY 'char']]
[LINES
  [STARTING BY 'string']
  [TERMINATED BY 'string']];

The SELECT statement itself is shown only with statement_elements placeholder, which represents all the elements that can potentially be included in a SELECT statement, other than the INTO OUTFILE clause. For the most part, you can create just about any type of SELECT statement. The main caveat is that you should not use an INTO OUTFILE clause in a nested SELECT statement because that statement must return its results to the outer statement.

The MySQL documentation also states that MySQL places “constraints on the use of INTO within UNION statements.” Unfortunately, the documentation does not state what those constraints might be. I was able to run a UNION statement that included an INTO OUTFILE clause tagged onto the end of the statement, and it created the file just fine. However, when I placed the clause just before the first FROM clause, I received an error stating that the INTO clause must be placed at the end of the UNION statement, so perhaps “constraints” applies primarily to the clause’s placement.

In the syntax above, the INTO OUTFILE clause is placed after all the other SELECT statement elements. Strictly speaking, you don’t have to place the clause at the end of the statement (except for a UNION statement or other set operators like INTERSECT and EXCEPT). For example, you can place the clause before the FROM clause or before a locking clause such as FOR UPDATE. According to MySQL documentation, however, the end of the statement is the preferred position. In fact, placing the clause before a locking clause is deprecated as of MySQL 8.0.20, and if you try to do this, you’ll receive a warning message. I recommend that you place the clause at the end of your SELECT statements, as the documentation advises.

Now let’s return to the INTO OUTFILE clause itself. The clause starts by specifying the name of the target file that will hold the result set returned by the SELECT statement. In most cases, this will be a full pathname that points to a location on the MySQL host. If the path is not included, the file will be saved to the folder that holds the database data.

When specifying the INTO OUTFILE clause, you can also include one or more export options, which you define in the optional FIELDS clause and LINES clause. The two clauses are syntactically identical to the ones used for the LOAD DATA statement and work much the same way. The FIELDS clause supports one or more of the following three options:

  • The TERMINATED BY option specifies the string used in the text file to terminate each field. The string can be one or more characters. The default value is \t for tab, which means that tabs are used to separate field values.
  • The ENCLOSED BY option specifies the character used in the text file to enclose all or some values in the text file. If you include the OPTIONALLY keyword, the ENCLOSED BY character applies only to values with a string data type, such as CHAR, BINARY, TEXT, or ENUM. The default value for the ENCLOSED BY option is an empty string, indicating that no fields are enclosed by an ENCLOSED BY character.
  • The ESCAPED BY option specifies the character used in the text file to escape special characters. The default value is a backslash (\), which is used in MySQL to escape special characters, including the backslash itself. Many programming languages also use the backslash to escape characters.

The FIELDS clause is itself optional. If you include it, you must specify at least one of the three options. The LINES clause is also optional. It supports either one or both of the following two options:

  • The STARTING BY option specifies the common prefix used at the beginning of each line in the text file. The default value is an empty string, indicating that no specific prefix is used.
  • The TERMINATED BY option specifies the string used in the text file to terminate each line. The string can be one or more characters. The default value is \n, which refers to a newline character (linefeed). The system on which you’re working might require a different setting. For example, \n works fine on Mac computers, but you might need to use \r\n on Windows system.

If you include both the FIELDS clause and LINES clause, the FIELDS clause must come first. I recommend that you review the MySQL topic LOAD DATA Statement to learn more about the various elements that go into the INTO OUTFILE clause.

Outputting MySQL data to a file

Now that you have a basic understanding of the INTO OUTFILE syntax, let’s start into the examples, which should help you better understand the information above. The most basic SELECT…INTO OUTFILE statement is one that includes only a SELECT clause and an INTO OUTFILE clause, without any export options. The following SELECT statement saves four values (two strings and two integers) to the values01.txt file:

SELECT 'abc', 123, 'def', 456
INTO OUTFILE 'values01.txt';

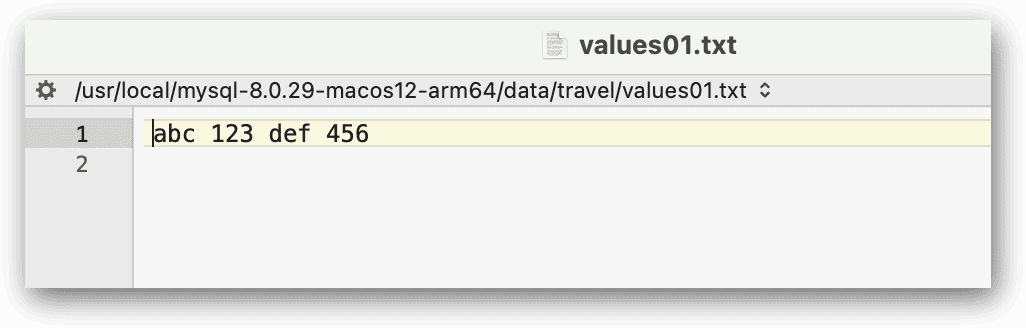
The SELECT clause defines the four values, and the INTO OUTFILE clause specifies that name of the new file. The file cannot already exist when you run this statement. It if does, you will receive an error. If it does not exist, MySQL creates the file and inserts the values returned by the SELECT statement. The following figure shows the file opened in BBEdit.

Note: depending on your configuration, you may receive an error such as:

INTO OUTFILE 'values01.txt'

Error Code: 1290. The MySQL server is running with the --secure-file-priv option so it cannot execute this statement

when you execute this statement. You can see this security setting using:

SHOW VARIABLES LIKE "secure_file_priv";

This will show you a path that has been set up for you to securely use from the server. You may need to prefix your .txt file names with the path that is returned. Or you can change the setting in your config file to be "" and your file will be output to any location on the server where it has rights to.


When you use the INTO OUTFILE clause, MySQL creates the file on the computer where MySQL is running. There is no way to save the file to another computer unless the remote computer can be accessed via a network-mapped path on the host system.

You might have noticed in the preceding example that the filename is specified without the full pathname. When you don’t specify a pathname, MySQL creates the file in the database directory, which in this case, is the travel directory because you’re working in the travel database. The travel directory stores the data files for the airplanes and manufacturers tables. (Note: on the editor’s Windows machine the file was located in: C:\ProgramData\MySQL\MySQL Server 8.0\Data\travel).

If you’re using a MySQL instance that is not under your control, you might find that database administrators or other stakeholders do not want you to save files to the database directory, in which case, you’ll need to use a different folder. To save the output file elsewhere, you must specify the full pathname in the INTO OUTFILE clause. In addition, the target directory must be configured with the proper write permissions. If you receive an “OS errno 13 – Permission denied” error message when you try to run your statement, you’ll know that something is wrong with the directory permissions.

Another issue that you might have to contend with is that the account you use to log into MySQL must be granted the FILE privilege in order to read and write files on the MySQL host. Without this privilege, you’ll receive an access denied error message when attempting to run your statements. If you’re trying out the examples in this article, chances are you’re running them against a MySQL host that you control, so you can set up the necessary permissions yourself. If you don’t control the host, you’ll need to work with a database or system administrator to get you set up.

With all that in mind, the rest of examples assume that you’ll be targeting a location other than the database directory when defining your INTO OUTFILE clause and that you have all the necessary permissions in place. The next example is similar to the previous one, but it now specifies the full directory path:

SELECT 'abc', 123, 'def', 456
INTO OUTFILE '/Users/user1/data/values02.txt';

The INTO OUTFILE clause now points the /Users/user1/data/ directory instead of the database folder. However, you can specify whatever directory works for you. (You can also use whatever filename you like.) If you’re working on a Windows system, you should specify pathname backslashes as either forward slashes or double backslashes.

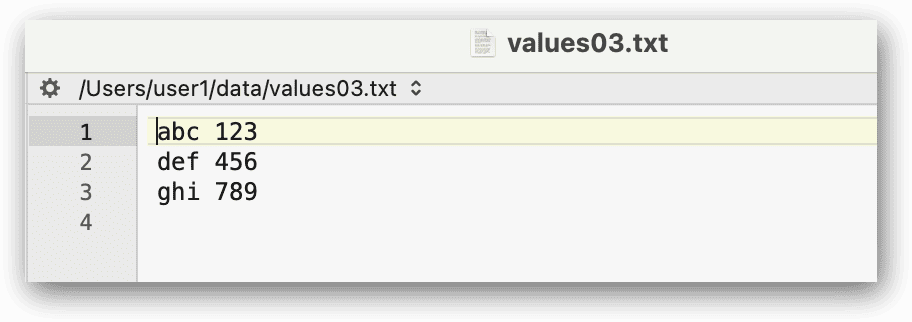
Most SELECT statements include a FROM clause that retrieves data from a table or another type of table structure, such as a VALUES clause or table subquery. For example, the FROM clause in following SELECT statement include a VALUES clause that creates a table with two columns and three rows, which are outputted to the values03.txt file:

SELECT *
FROM (VALUES 
  ROW('abc', 123), 
  ROW('def', 456), 
  ROW('ghi', 789)) AS tbl
INTO OUTFILE '/Users/user1/data/values03.txt';

When you run the statement, MySQL creates the file and populates it with the returned values, as shown in the following figure:
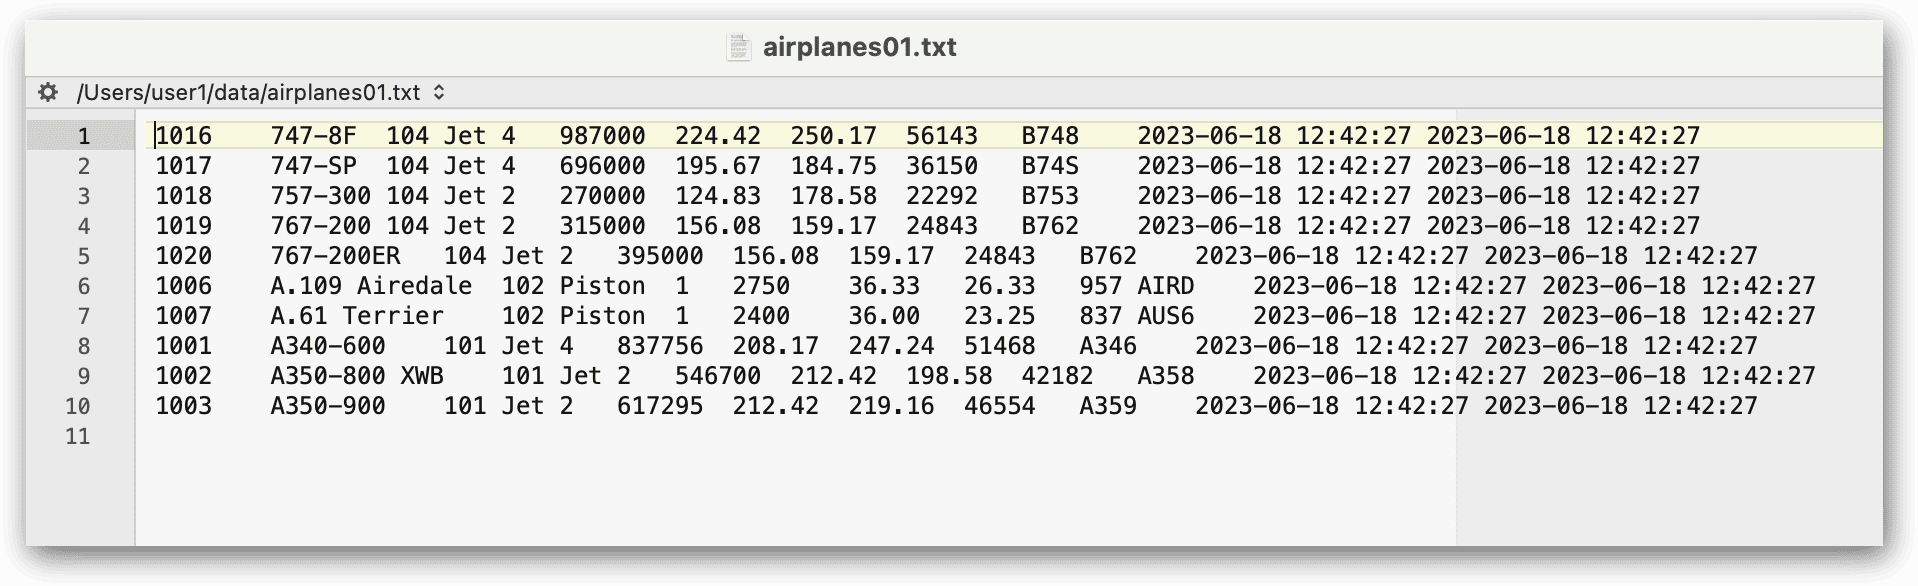
Of course, you can also retrieve data from a regular table and output it to a text file, which is how you’ll most likely be using the INTO OUTFILE clause. For example, the following SELECT statement retrieves data from the airplanes table and outputs those results to the airplanes01.txt file:

SELECT * FROM airplanes
ORDER BY plane
LIMIT 10
INTO OUTFILE '/Users/user1/data/airplanes01.txt';

The SELECT statement sorts the data by the plane column and limits the results to the first 10 rows. Because the SELECT clause includes only an asterisk (*), the statement returns all of the table’s columns and saves them to the airplanes01.txt file, as shown in the following figure.
The MySQL TABLE statement also supports the INTO OUTFILE clause. Because of this, you can recast the preceding SELECT statement as the following TABLE statement, which returns that same results as the previous example but saves them to the airplanes02.txt file:

TABLE airplanes
ORDER BY plane
LIMIT 10
INTO OUTFILE '/Users/user1/data/airplanes02.txt';

The TABLE statement is fairly limited in scope and supports only a few clauses, including ORDER BY and LIMIT. The statement can be useful when you want to return all columns and either all rows or a certain number of rows. That said, you’ll usually want more control over your queries, which is why you’ll likely be using the SELECT statement. The statement lets you specify which columns to return, and it provides additional clauses, such as WHERE and GROUP BY. For example, the following SELECT statement limits the results to specific columns and types of planes:

SELECT plane, engine_type, engine_count, max_weight, plane_length
FROM airplanes
WHERE engine_type = 'jet'
ORDER BY plane
INTO OUTFILE '/Users/user1/data/jets01.txt';

Now the results are much more targeted, as reflected in the jets01.txt file, which is shown in the following figure.
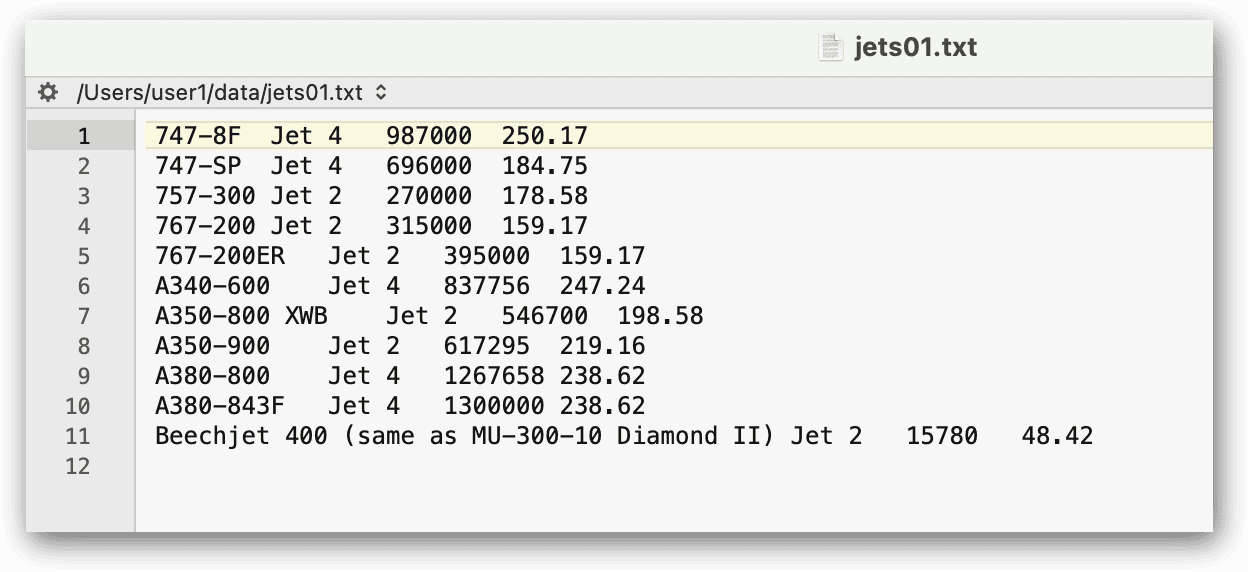
As expected, the file contains only those rows whose engine_type value equals jet. The data is also limited to the five specified columns: plane, engine_type, engine_count, max_weight and plane_length.

Working with the INTO OUTFILE export options

As mentioned earlier, the INTO OUTFILE clause supports multiple export options. The options let you better control how the returned data is saved to the output file. If you don’t specify any export options, MySQL uses the default options, such as using tabs to separate values and not enclosing the values in quotes or other characters.

If the previous statement were redefined to include the export options and their default values, it would look like the following SELECT statement:

SELECT plane, engine_type, engine_count, max_weight, plane_length
FROM airplanes
WHERE engine_type = 'jet'
ORDER BY plane
INTO OUTFILE '/Users/user1/data/jets02.txt'
  FIELDS TERMINATED BY '\t' ENCLOSED BY '' ESCAPED BY '\\'
  LINES TERMINATED BY '\n' STARTING BY '';

The statement returns the same results as the previous one. The only difference is that the INTO OUTFILE clause explicitly defines the export options, using their default values. However, suppose you want to use a comma instead of a tab as the field terminator, and you want to enclose string values in double quotes. To do this, you can modify the export options as follows:

SELECT plane, engine_type, engine_count, max_weight, plane_length
FROM airplanes
WHERE engine_type = 'jet'
ORDER BY plane
INTO OUTFILE '/Users/user1/data/jets03.txt'
  FIELDS TERMINATED BY ',' OPTIONALLY ENCLOSED BY '"' ESCAPED BY '\\'
  LINES TERMINATED BY '\n' STARTING BY '';

The FIELDS TERMINATED BY option now specifies a comma as its value, and the ENCLOSED BY option specifies a double quote as it value. The clause also includes the OPTIONALLY keyword, which limits its application to string values. Although this SELECT statement and the preceding one return the same data, the output file now looks much different, as shown in the following figure.
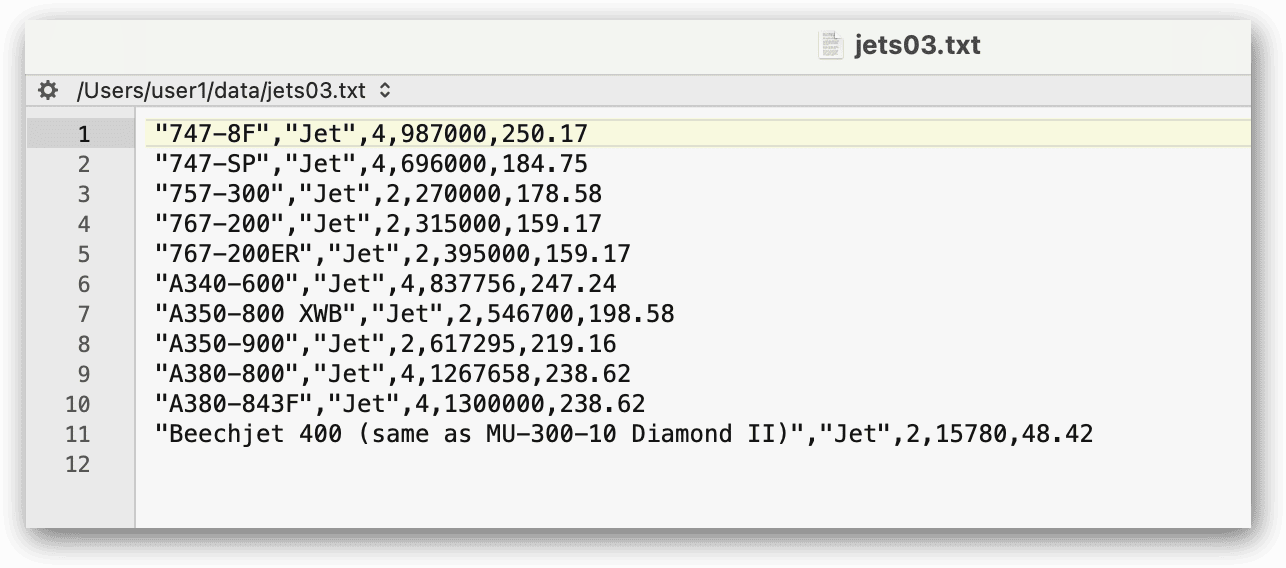
Each string value is enclosed in double quotes, and the fields are separated by commas. If you want, you can use the .csv extension for the file, rather than .txt. The results would be the same. You should use whichever file extension best supports your requirements.

Now suppose you want to add a prefix to the beginning of each row. You can easily do this by changing the value of the STARTING BY option. For example, the following SELECT statement replaces the empty string with xxx : (including the trailing space):

SELECT plane, engine_type, engine_count, max_weight, plane_length
FROM airplanes
WHERE engine_type = 'jet'
ORDER BY plane
INTO OUTFILE '/Users/user1/data/jets04.txt'
  FIELDS TERMINATED BY ',' OPTIONALLY ENCLOSED BY '"' ESCAPED BY '\\'
  LINES TERMINATED BY '\n' STARTING BY 'xxx : ';

Now each line in the file starts with the specified prefix, even though the result set itself is still the same, as shown in the following figure.
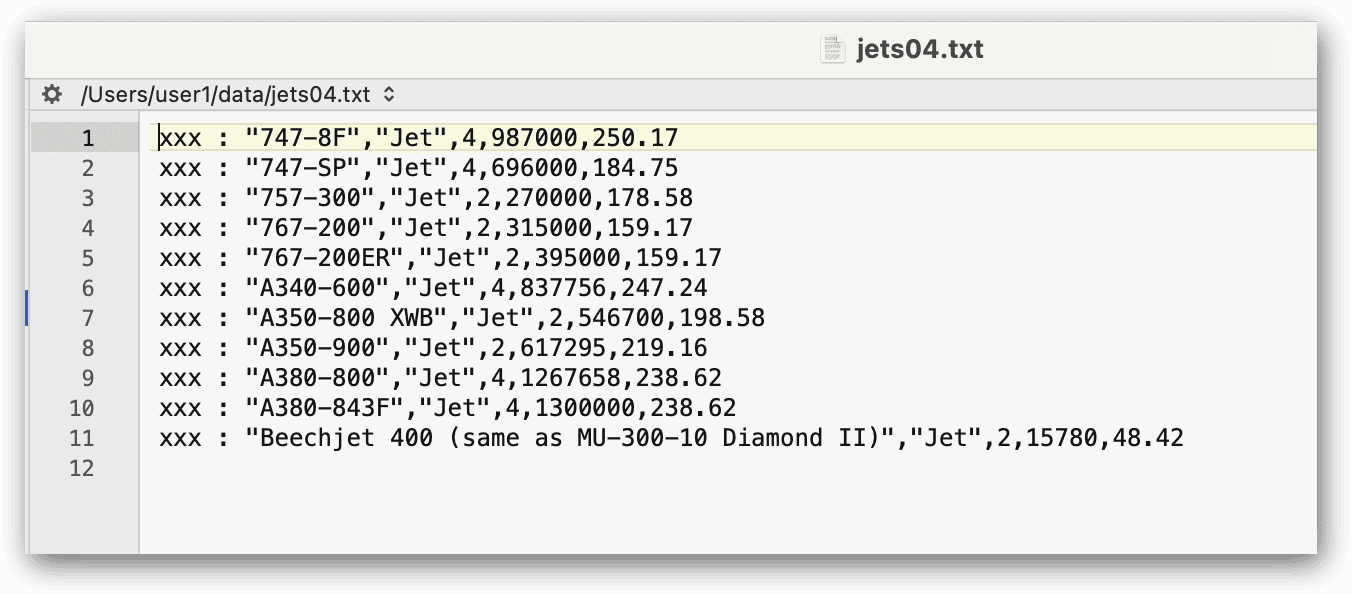
A prefix can be useful if you’re working with an application or system that needs to be able to clearly delineate the beginning of each row. It’s also useful if you want to add information before the prefix but want it clearly distinguished from the core data so the data can be imported without issue. For example, someone might need to add a comment to the text file after it has been generated:

xxx : "747-8F","Jet",4,987000,250.17
xxx : "747-SP","Jet",4,696000,184.75
xxx : "757-300","Jet",2,270000,178.58
verify listing xxx : "767-200","Jet",2,315000,159.17
xxx : "767-200ER","Jet",2,395000,159.17
xxx : "A340-600","Jet",4,837756,247.24
xxx : "A350-800 XWB","Jet",2,546700,198.58

An application or process that reads that file, such as the MySQL LOAD DATA statement, can ignore everything up to and including the xxx : prefix, importing only the actual data.

Mixing things up

The examples up to this point used the default LINES TERMINATED BY value (\n), which meant that each row started on a new line, making it easy to distinguish one row from the next. There might be times, however, when you want to terminate each row in some other way. For example, the following SELECT statement uses a semi-colon (;) as the LINES TERMINATED BY value:

SELECT plane, engine_count, max_weight, wingspan, plane_length
FROM airplanes
WHERE engine_type = 'jet'
ORDER BY plane
INTO OUTFILE '/Users/user1/data/jets05.txt'
  FIELDS TERMINATED BY ',' OPTIONALLY ENCLOSED BY '"' ESCAPED BY '\\'
  LINES TERMINATED BY ';';

Because a semi-colon is used to terminate each row, the data is saved to the file as a single row. The following figure shows part of the results as they’re saved to the jets05.txt file. Even though the data is in a single row, the values are still distinguishable from each other, with commas separating the values and semi-colons separating the rows.

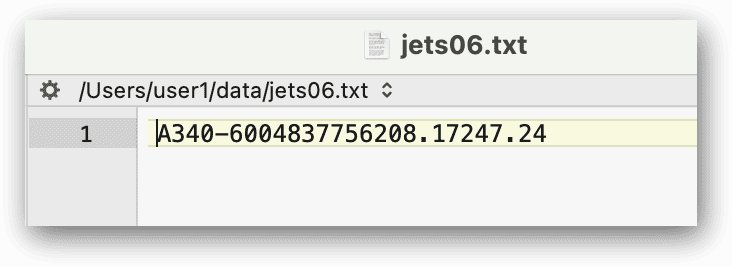
The SELECT and TABLE statements also support the INTO DUMPFILE clause. The clause can be used in place of the INTO OUTFILE clause, but only if the query returns a single row. For example, the following SELECT statement returns one row from the airplanes table and saves it to the jets06.txt file:

SELECT plane, engine_count, max_weight, wingspan, plane_length
FROM airplanes
WHERE plane_id = 1001
INTO DUMPFILE '/Users/user1/data/jets06.txt';

The challenge with the INTO DUMPFILE clause is that it writes the data without any field or row terminators and without escaping any characters, running all the values together in a single row, as shown in the following figure. For this reason, the clause is usually best suited to retrieving a single BLOB value and storing it into a file.
The INTO OUTFILE clause is much more flexible, and you can use it with a wide range of SELECT statements. For example, the following SELECT statement joins the manufacturers and airplanes tables, groups the data based on the manufacturer_id values, and then aggregates the values from several columns:

SELECT a.manufacturer_id, m.manufacturer, 
  COUNT(*) AS plane_count,
  ROUND(AVG(a.wingspan), 2) AS avg_span, 
  ROUND(AVG(a.plane_length), 2) AS avg_length
FROM airplanes a INNER JOIN manufacturers m
  ON a.manufacturer_id = m.manufacturer_id
GROUP BY a.manufacturer_id
ORDER BY m.manufacturer
INTO OUTFILE '/Users/user1/data/manufacturers01.txt'
  FIELDS TERMINATED BY ',' OPTIONALLY ENCLOSED BY '"';

The INTO OUTFILE clause saves the data to the manufacturers01.txt file, as shown in the following figure:
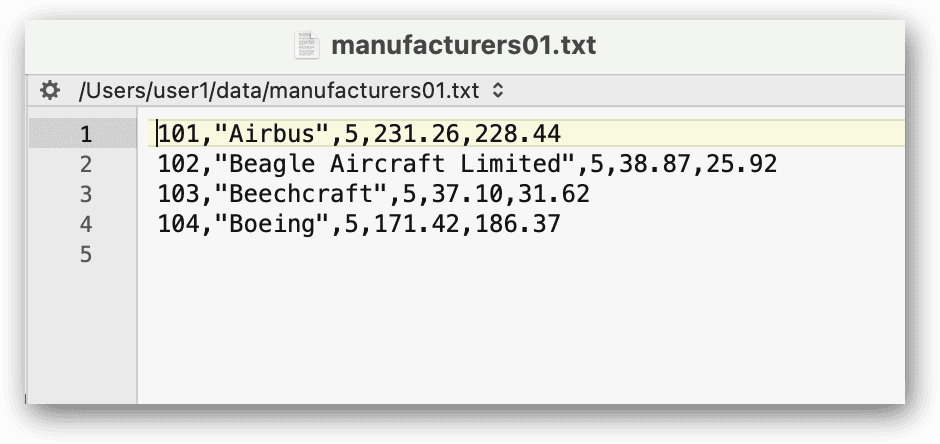
Although the data has been grouped and aggregated, the INTO OUTFILE clause still treats the results like it did the early examples: commas separate the field values, each row starts on a new line, and string values are enclosed in double quotes. As you can see, you can just as easily export the results from a more complex query as you can a simply query.

Getting started with exporting data in MySQL

The INTO OUTFILE clause can provide you with an extremely useful tool for exporting data. Because you can include it in your SELECT and TABLE statements, you can easily export data wherever you normally run SQL queries, which means you can also automate and schedule export operations.

You should be aware, however, that there are other ways to export data. One approach is to run a mysql or mysqldump command at a command prompt and direct the results to a file. You can also use the features built into a MySQL client to export data. For example, MySQL Workbench lets you export data directly from the search results and save them as JSON, CSV, XML, HTML, or other formats. Workbench also includes an Export and Import wizard that steps you though the process of exporting data.

Although you have plenty of options for exporting MySQL data, the INTO OUTFILE clause can still be very useful. You can easily tag it onto your existing SELECT statements, making it possible to use it repeatedly (keeping in mind that it will not overwrite an existing file). You can also set up your output files so the LOAD DATA statement can later be used to import the data. The better you understand how the INTO OUTFILE clause works, the better you can take advantage of this simple yet effective tool.

Appendix: Preparing your MySQL environment

When creating the examples for this article, I used a Mac computer that was set up with a local instance of MySQL 8.0.29 (Community Server edition). I also used MySQL Workbench to interface with MySQL.

The examples in this article retrieve data from the travel database and export the data to individual text files on that computer. The database contains manufacturers table and the airplanes table, which includes a foreign key that references the manufacturers table. This is the same database and tables you saw in previous articles in this series. If you plan to try out the examples, start by running the following script against your MySQL instance:

DROP DATABASE IF EXISTS travel;
CREATE DATABASE travel;
USE travel;
CREATE TABLE manufacturers (
  manufacturer_id INT UNSIGNED NOT NULL,
  manufacturer VARCHAR(50) NOT NULL,
  create_date TIMESTAMP NOT NULL DEFAULT CURRENT_TIMESTAMP,
  last_update TIMESTAMP NOT NULL 
    DEFAULT CURRENT_TIMESTAMP ON UPDATE CURRENT_TIMESTAMP,
  PRIMARY KEY (manufacturer_id) );
CREATE TABLE airplanes (
  plane_id INT UNSIGNED NOT NULL,
  plane VARCHAR(50) NOT NULL,
  manufacturer_id INT UNSIGNED NOT NULL,
  engine_type VARCHAR(50) NOT NULL,
  engine_count TINYINT NOT NULL,
  max_weight MEDIUMINT UNSIGNED NOT NULL,
  wingspan DECIMAL(5,2) NOT NULL,
  plane_length DECIMAL(5,2) NOT NULL,
  parking_area INT 
    GENERATED ALWAYS AS ((wingspan * plane_length)) STORED,
  icao_code CHAR(4) NOT NULL,
  create_date TIMESTAMP NOT NULL DEFAULT CURRENT_TIMESTAMP,
  last_update TIMESTAMP NOT NULL 
    DEFAULT CURRENT_TIMESTAMP ON UPDATE CURRENT_TIMESTAMP,
  PRIMARY KEY (plane_id),
  CONSTRAINT fk_manufacturer_id FOREIGN KEY (manufacturer_id) 
    REFERENCES manufacturers (manufacturer_id) );

The script will create the travel database and add the manufacturers and airplanes tables in the proper order to accommodate the foreign key defined in the airplanes table. After you the create the tables, you can then run the following INSERT statements:

INSERT INTO manufacturers (manufacturer_id, manufacturer)
VALUES (101,'Airbus'), (102,'Beagle Aircraft Limited'), 
  (103,'Beechcraft'), (104,'Boeing');
INSERT INTO airplanes 
  (plane_id, plane, manufacturer_id, engine_type, engine_count, 
    wingspan, plane_length, max_weight, icao_code)
VALUES
  (1001,'A340-600',101,'Jet',4,208.17,247.24,837756,'A346'),
  (1002,'A350-800 XWB',101,'Jet',2,212.42,198.58,546700,'A358'),
  (1003,'A350-900',101,'Jet',2,212.42,219.16,617295,'A359'),
  (1004,'A380-800',101,'Jet',4,261.65,238.62,1267658,'A388'),
  (1005,'A380-843F',101,'Jet',4,261.65,238.62,1300000,'A38F'),
  (1006,'A.109 Airedale',102,'Piston',1,36.33,26.33,2750,'AIRD'),
  (1007,'A.61 Terrier',102,'Piston',1,36,23.25,2400,'AUS6'),
  (1008,'B.121 Pup',102,'Piston',1,31,23.17,1600,'PUP'),
  (1009,'B.206',102,'Piston',2,55,33.67,7500,'BASS'),
  (1010,'D.5-108 Husky',102,'Piston',1,36,23.17,2400,'D5'),
  (1011,'Baron 56 TC Turbo Baron',103,'Piston',2,37.83,28,5990,'BE56'),
  (1012,'Baron 58 (and current G58)',103,'Piston',2,37.83,29.83,5500,'BE58'),
  (1013,'Beechjet 400 (same as MU-300-10 Diamond II)',103,'Jet',2,43.5,48.42,15780,'BE40'),
  (1014,'Bonanza 33 (F33A)',103,'Piston',1,33.5,26.67,3500,'BE33'),
  (1015,'Bonanza 35 (G35)',103,'Piston',1,32.83,25.17,3125,'BE35'),
  (1016,'747-8F',104,'Jet',4,224.42,250.17,987000,'B748'),
  (1017,'747-SP',104,'Jet',4,195.67,184.75,696000,'B74S'),
  (1018,'757-300',104,'Jet',2,124.83,178.58,270000,'B753'),
  (1019,'767-200',104,'Jet',2,156.08,159.17,315000,'B762'),
  (1020,'767-200ER',104,'Jet',2,156.08,159.17,395000,'B762');

The INSERT statements first populate the manufacturers table and then the airplanes table. Be sure to run the statements in the order shown here because of the foreign key constraint.


The post Exporting data from a MySQL database using SELECT…INTO OUTFILE appeared first on Simple Talk.


from Simple Talk https://ift.tt/oXJWuNB
via

Tuesday, July 25, 2023

Querying PostgreSQL: Learning PostgreSQL with Grant

Writing queries to retrieve the data from a database is probably the single most common task when it comes to working with data. Working with data in PostgreSQL is no exception. Further, PostgreSQL has an incredibly rich, wide, and varied set of mechanisms for retrieving data. From standard SELECT… FROM… WHERE to windowing functions and recursive queries, PostgreSQL has it all. I honestly can’t do it justice in a single article. Further, since so much of this functionality is effectively identical to where I’m more comfortable, SQL Server, I’m not turning this into a PostgreSQL 101 on the SELECT statement.

Instead, for this series, I’m just going to assume I may have more than one article on querying PostgreSQL. For this entry in the series, I’m going to focus on the core behaviors of SELECT, FROM and WHERE with an emphasis on what’s different from SQL Server. This won’t be a fundamental how-to on querying PostgreSQL, but instead an exploration of the gotchas you’re likely to experience coming in with existing knowledge of how you think these things should work. And hoo boy, there’s some fun stuff in there. Let’s get stuck in.

In the sample database I’ve created as a part of this ongoing series, I created a couple of schemas and organized my tables within them. If you wish to execute the code or look at the data structures, the code is in my ScaryDBA/LearningPostgreSQL repository here. The objects and database you will need can be created/reset using the CreateDatabase.sql script, then adding sample data using the SampleData.sql script. After executing that script, execute the Sample The rest of the code in this article is in the  10_Select folder.

FROM

I actually love how the PostgreSQL document defines what you’re doing in the FROM clause:

Trivial table expressions simply refer to a table on disk, a so-called base table, but more complex expressions can be used to modify or combine base tables in various ways.

While I wouldn’t myself define it this way, I find it to be interestingly more accurate than simply saying “table.” However, since you can make a query on a table expression, it is more than simply saying “tables.” Not all the definitions are useful though. Take this further explanation of what defines a table expression:

The result of the FROM list is an intermediate virtual table that can then be subject to transformations by the WHERE, GROUP BY, and HAVING clauses and is finally the result of the overall table expression.

It sounds like the FROM clause is a temporary table or something. Yet, I know (reading ahead in the docs) that execution plans in PostgreSQL are similar to SQL Server and this description leads us down a path: virtual table, that’s not accurate, depending on the whole query, structures involved and statistics. While it can help to visualize this way, it certainly is not implemented this way.

However, the rest is what I expect. List table names, and/or, define a table through a sub-SELECT. Aliasing, everything, pretty much the way it works in T-SQL because that’s the way it works in the ANSI SQL Standard, to which PostgreSQL complies very closely.

JOIN

So much of the FROM clause in PGSQL is the same as T-SQL. The first big difference is in the use of JOIN operations. The standard join operators are the same: INNER, LEFT/RIGHT OUTER, CROSS, FULL OUTER. These all perform the same logical functions. The fun stuff is in the internal syntax. Such as the USING clause:

SELECT
r.radio_name,
m.manufacturer_name 
FROM
radio.radios r
JOIN radio.manufacturers m
USING (manufacturer_id);

The first time I did this, and it worked, it honestly felt like black magic. Of course, for true black magic, we’d have to use the NATURAL clause:

SELECT
r.radio_name,
m.manufacturer_name 
FROM
radio.radios r
NATURAL JOIN radio.manufacturers m;

Basically, PostgreSQL figures out, based on naming and data type, which are the common columns between two tables, so you don’t have to define the JOIN criteria at all. Also note that I left off the syntactic sugar of INNER. PostgreSQL figured out what I wanted, just like SQL Server does. I like this standard which also allows me to do this:

SELECT
a.antenna_name,
ab.band_id
FROM
radio.antenna a
NATURAL LEFT JOIN radio.antennabands ab;

Also worth noting, the AS word is optional. Personally, I prefer it, but I’m currently using DBeaver which supplies an alias (similar to SQL Prompt) but leaves off the AS key word.

Natural joins are a nice feature but beware that if your naming standard allows you to have the same name in multiple tables (for example a Name or Description column), you may not get the results you expect. Also, worth noting is if the tables do not contain a column with the same name, you will get the same results as if you use a CROSS JOIN. Hence this is something I would rarely use in production code but will be very nice doing ad hoc querying.

LATERAL

In addition to subqueries, there are also table valued functions. There are some differences in how they work, but the devil there is in the details, not the larger behaviors. When using subqueries and functions, you can get the T-SQL equivalent of a CROSS APPLY by using the PostgreSQL version, LATERAL.

SELECT
b.band_name,
rl.radio_name
FROM
radio.bands b,
LATERAL (
SELECT
*
FROM
radio.radios r
JOIN radio.radiobands rb
ON
r.radio_id = rb.radio_id
WHERE
b.frequency_start_khz < 146) rl;

Just like CROSS APPLY in T-SQL, you basically get a functional loop. By that I mean that for each row in the radio.bands table, you’ll get an execution of the LATERAL query. Any columns referenced from the outer tables (in this case radio.bands), will be available as parameters to the query.

The example above could be rewritten just using a traditional join to get the same results. However, when it comes time to start to use functions with parameters to return data, LATERAL becomes very useful. You can also use LEFT JOIN LATERAL to get the equivalent of a LEFT JOIN in the execution.

WHERE

Apart from unique PostgreSQL functions within the WHERE clause, it’s basically the same as T-SQL. No real weird surprises in functionality. For example, you can use the WHERE clause to define join criteria instead of using ON. However, just like in T-SQL, if you do this with an OUTER JOIN, you’re effectively turning it into an INNER JOIN (yes, I know that’s not the complete story, but it is, basically, what happens).

Mind you, the sheer number of value expressions as well as functions and operators is daunting. I’m not going to attempt to explain even a partial listing of what’s possible. Suffice to say, you can do a lot of things in the WHERE clause in PostgreSQL that you simply can’t in SQL Server. For example, in T-SQL, you have the LIKE operator to search a string for similar values. In PostgreSQL you also get SIMILAR TO <regular expression> and POSIX <regular expression>.

SELECT

I chose the order, FROM, WHERE, SELECT, because in PostgreSQL, as in SQL Server, this is the actual order of operations. In a simple query, you simply define where the data is originating: FROM. Then you apply filters to that data: WHERE. Finally, you decide what is being returned, SELECT.

By the nature of how a query works, all the examples I’ve listed so far show the basics of the SELECT operation. It’s very much the same as in T-SQL. I can specify columns from the defined tables and use the alias of those tables to make the code clearer (and shorter). In fact, most behaviors I’m used to, I can see: DISTINCT, WITH, UNION, ORDER BY and more.

However, there are some really interesting behaviors. For example, if you leave off a column alias like this:

SELECT
rb.radio_id + rb.band_id
FROM
radio.radiobands rb;

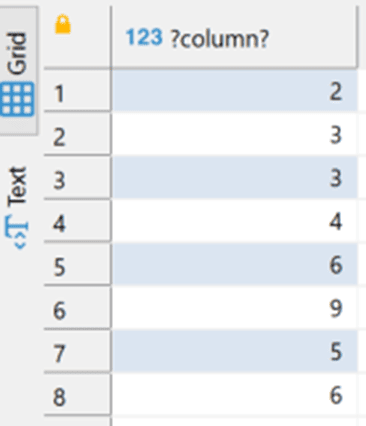
You get a name automatically, “?column?“:

There are also some really interesting functions and clauses that change the way queries behave. For example, LIMIT, works very similarly to TOP:

SELECT
r.radio_name
FROM
radio.radios r
LIMIT 3;

Since there is no TOP operator, this is what you would use. However, there’s a wrinkle. You can actually add OFFSET to this and then it will return 3 rows, starting at the row you specify:

SELECT
r.radio_name
FROM
radio.radios r
LIMIT 3 OFFSET 2;

Just like TOP, if you don’t specify the order, you can get inconsistent results.

Another one is FETCH. It works a lot like LIMIT (SQL Server has OFFSET (part of the ORDER BY clause and FETCH clauses, but the syntax is quite different):

SELECT
r.radio_name
FROM
radio.radios r
ORDER BY
r.radio_name DESC 
FETCH NEXT 3 ROWS ONLY;

I can use the OFFSET in the same way. However, I get some additional behavior too. Instead of ONLY, I can tell it WITH TIES. In that case, if more than one value meets the top 3 criteria, we’ll get any ties, meaning, possibly, more than 3 rows, depending on how many rows match.

There are several additional differences and some other unique behaviors, but that’s most of the big stuff. I could spend a lot of time talking about the differences in window functions and locking, but there’s enough there to make independent articles just on those topics, so I’ll skip them here.

Conclusion

Mostly, when querying PostgreSQL, I just start typing and most of the time it works. There really are more similarities than differences. However, the differences are worth noting, especially when it comes to something like TOP vs. LIMIT/FETCH. Overall, these are small things, but they will act as a gotcha when you’re writing your code.


The post Querying PostgreSQL: Learning PostgreSQL with Grant appeared first on Simple Talk.


from Simple Talk https://ift.tt/T56x9W7
via

Thursday, July 20, 2023

Optimizing Queries in MySQL: Optimizing Updates

In the previous parts of these MySQL optimization series, we’ve told you how queries work on a high level, then dived deeper into the power of SELECT and INSERT statements. In this blog, I will cover some of the ways to optimize modifying your data too.

UPDATE Queries – the Basics

As the name of the statement suggests, UPDATE queries provide us with the ability to make changes to our existing data. The UPDATE statement modifies the values of rows in a table and in its most basic form, looks like so:

UPDATE demo_table 
SET [column] = [‘value’] 
WHERE [specific details] [LIMIT x]

Where:

  • The column after the SET option defines the specific column we want to update. It’s worth noting that we can update the values of multiple columns as well by specifying them after we specify the value of the first column.
  • [specific details] refer to the details after the WHERE clause. This part of the query is mostly used to update a specific set of columns matching a given condition, for example WHERE id > 500 would update all of the rows with an ID higher than 500. These conditions are known as the predicate of the query.
  • [LIMIT x] allows us to update only the specified number of rows (LIMIT 100 would only update 100 rows, 200 would update 200 rows, etc.) We can also specify an offset to start from: LIMIT 100,200 would update 100 rows starting from the 100th row. An ORDER BY option will order the results according to a given clause, add an ASC|DESC option and you will be able to sort the rows in an ascending or a descending order.

These are the basics of the UPDATE statement – as you can tell, these queries are nothing fancy, but their performance can be made better by following a couple of tips.

Optimizing UPDATE Queries

Most MySQL DBAs know that indexes make UPDATE statements slow – however, while this statement is true, there’s much more to updating data than just that. When updating data, we need to keep the following things in mind:

  • Indexing – Indexes have positive and negative effects on UPDATE statements. This is because an UPDATE is logically a two-step process. One to find the row to modify, the another to modify the data.
    • Positive – At the same time, if you are updating a small number of rows (most UPDATE statements only affect 1 row, usually accessed by a primary key indexed value), indexes improve performance by improving access to the rows that need to be modified.
    • Negative – Indexes can slow UPDATE statements down when you modify columns that are indexed. This is because when an index is in place and an UPDATE query is running, the UPDATE needs to update the data in the index and the data itself – that’s some additional overhead right then and there.
  • Partitions – as a rule, partitions slow down UPDATE and DELETE operations making SELECT statements faster in return, and they also have a couple of caveats unique to themselves:
    • Partitioning integers – Suppose that we partition tables by range and a partition A holds integers that are less than 1000, and a partition B holds integers from 1001 to 2000. Then, suppose that we update our data with a query like so:
      UPDATE `demo_table`
      SET `partitioned_column` = 1500
      ;
      Such a query means that if the values in the column originally resided in the partition A, they would now be located in the partition B – the update would switch the partitioned column from partition A to partition B. For some, that may be a source of confusion, so it’s useful to keep that in mind.
    • Beware of NULL values– if you insert a row having the value of NULL into a specific partition and then want to update your partitions, beware that the row will reside in the lowest partition possible. For more information on how partitioning handles NULL values, refer to the documentation on handling NULL values in partitioning.
  • Locking – if we lock the table, perform many updates one by one (we can use the LIMIT or WHERE clauses to achieve this goal), and then unlock the table, the speed of the queries will likely be much faster than running a single UPDATE query that updates many rows at once. Such an approach would look like this (replace x with the name of your table and column with the name of your column. Feel free to update as many rows in one go as you want):
LOCK TABLE [WRITE|READ] x;

UPDATE x SET column = ‘value’ LIMIT 0,50000;
UPDATE x SET column = ‘value’ LIMIT 50000,100000;
UPDATE x SET column = ‘value’ LIMIT 100000,150000;
...
UNLOCK TABLE x;

It is also worth noting that locks have two types – one can either lock the table for writing (INSERT queries) or for reading (SELECT queries) if clauses WRITE or READ are specified. Locking tables for reads or writes means just that – all INSERT or SELECT operations will fail to complete if a specific (writing or reading) lock is in place and everything will be OK once the lock is released (once the table is unlocked.)

Also, keep in mind that if you use the MyISAM engine and use LOCK TABLE queries in the same fashion, your UPDATE statements will be faster because the key cache (MyISAM’s equivalent of the InnoDB buffer pool) will only be flushed after all of the UPDATE queries are completed.

  • WHERE and LIMIT – the WHERE and (or) LIMIT clauses can dramatically speed up the performance of UPDATE queries too since they would limit the number of rows that would be updated. Always remember to specify them if you don’t need to update the entire table.
  • The load of your database – finally, beware of the usage and load of your database before updating data. Updating data at 1AM at night will likely be a better option than updating it at peak usage times if you’re updating data in a live environment. The aim of this approach is to ensure that the database has to put in as little effort as possible.

If you come across a situation where you need to update bigger sets of data (millions of rows and above), it’s also a good idea to keep additional tips in mind. We walk you through these below.

Optimizing UPDATE Queries for Bigger Data Sets

If you’re updating a column and have a lot of data to update, there’s a neat workaround you can employ by making use of a DEFAULT clause. Perform these steps (replace demo_table with your table name and only include columns that you want to keep the data from in the new table.):

  1. Issue a query such as:
    SELECT username,email,registration_date
    FROM demo_table
    INTO OUTFILE ‘/tmp/backup.txt’;
    This will take a backup that doesn’t come with much overhead when re-importing (SELECT INTO OUTFILE statements remove the clutter that comes with INSERT queries and only backs up raw data – you might need to use FIELDS TERMINATED TO to specify a delimiter that tells MySQL where one column ends and the other begins. Refer to the documentation for more information.)
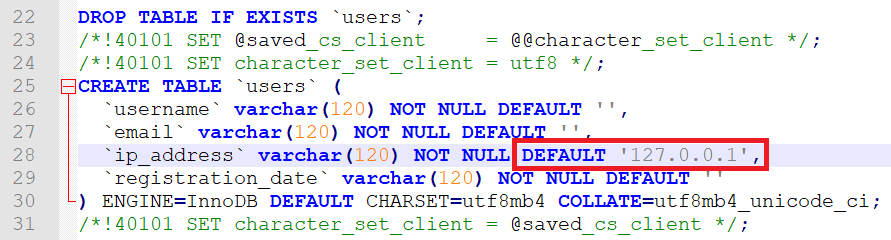
  2. Create a table identical to the one you’re working with by running a SHOW CREATE TABLE statement, then setting the default value of a column you need to update – here we set the default value of the column ip_address:
  3. Re-import the partial backup without specifying the column with the default value inside of the operation (it will be populated by default.) Specify IGNORE if there are more fields in the file than the amount of columns in the database and specify a FIELDS TERMINATED BY option at the end of the query if the fields are terminated by a character too:
    LOAD DATA INFILE ‘/tmp/backup.txt’ IGNORE
    INTO TABLE users (username,email,registration_date);
    Such an approach is exceptionally useful for cases involving huge amounts of data that need to be updated to the same value: this operation will always be significantly faster than running an UPDATE query because that way MySQL will think that the column is already populated by default. Additionally, as LOAD DATA INFILE is able to skip certain operations involving overhead, millions of rows can be updated in a matter of seconds. For more details, refer to the documentation of MySQL or our coverage of LOAD DATA INFILE.

ALTER vs. UPDATE in MySQL

The advice above should be a good starting point for those of you who frequently update data – however, always keep in mind that as MySQL develops, new issues arise too. For example, did you know that even though ALTER and UPDATE are two different queries, one of them updates data, but another one updates structures, including columns (changes their data types, names, etc.)?

That’s why you need to familiarize yourself with ALTER too: for frequent readers of this blog this query won’t cause many problems, but those who aren’t too familiar with its internals should always keep in mind that when ALTER is being run, copies of the table are being made in the background. ALTER works like this (for the purposes of this example, we will assume the table that is being modified is called “A” and a new table is called “B”):

  • A copy of the table A is made – it’s called table B.
  • All data within the table A is copied into table B.
  • All of the necessary operations (changes) are performed on table B.
  • The table B is switched with the table A.
  • Table B is destroyed

For some, the steps defined above are the primary reason behind the struggle around storage – some developers are quick to point out that they’re “running out of space for no apparent reason” when an ALTER query is in progress – that’s the reason why.

UPDATE Queries in MyISAM

It’s widely known that MyISAM is obsolete, but if you find yourself using MyISAM instead of InnoDB or XtraDB for your COUNT(*) queries (MyISAM stores the row count inside of its metadata which isn’t the same for InnoDB), look into the following settings:

  • key_buffer_size is the equivalent to innodb_buffer_pool_size – the bigger this value is, the faster UPDATE statements will finish.
  • If you find yourself using LOAD DATA INFILE to update data, look into the bulk_insert_buffer_size parameter. Since MyISAM uses this parameter to make LOAD DATA INFILE faster, it’s recommended you increase its size. This parameter is also used whenever ALTER statements are being run. As we’ve already explained above, such statements are not exactly UPDATE queries, but they can be used to update column names instead of data within them.

If you must run UPDATE operations on MyISAM, you should be wary of updating rows to a value larger than their specified length since MySQL documentation states that doing so may split the row and would require you to occasionally run OPTIMIZE TABLE queries. Finally, consider switching your storage engine to InnoDB or XtraDB as MyISAM is only a fit for running simple COUNT(*) queries – since the storage engine holds the number of rows inside of its metadata, it can return results quickly, while InnoDB cannot.

Summary

At the end of the day, updating data isn’t rocket science – MySQL documentation states that all update statements can be optimized just like SELECT queries just with an overhead of a write, plus additional writes if you modify indexed columns. All of the advice given above resonates with that – indexes slow down UPDATE statements, retrieving data when the database isn’t at its peak is a good decision, delaying updates and performing many updates in a row later on is a way to go too, and LOAD DATA INFILE is significantly faster than INSERT INTO as well.

Optimizing UPDATE operations in MySQL may not be a piece of cake – but it isn’t rocket science either. Some basic knowledge does indeed go a long way – familiarize yourself with the internals and the advice above, read the documentation, and your database should be well on its way to quickly perform UPDATE operations.

However, simple UPDATEs never saved a database from disaster – read up on other articles in these series and learn how to improve the speed of SELECT, INSERT, and DELETE queries, and until next time.


The post Optimizing Queries in MySQL: Optimizing Updates appeared first on Simple Talk.


from Simple Talk https://ift.tt/CrN81l9
via

Tuesday, July 18, 2023

A Beginners Guide to MySQL Replication Part 3: Multi-Source Replication

Welcome back to the world of MySQL Replication! If you’ve been following this series, thank you for your support! And if you’re new here, welcome! Before we dive in, I suggest checking out the first part of the series to get up to speed.

In this article, we’ll explain multi-source replication in a way that’s easy to understand. We’ll look at how to set up the MySQL replication process, how to stop and reset it if needed, and the advantages of using this technique. So, let’s get to the exciting part, shall we?

WHAT IS MULTI-SOURCE REPLICATION?

MySQL’s multi-source replication allows a replica server to receive data from multiple source servers. Let’s say you have a replica server at your workplace, and there are multiple source servers in different locations, you need a way to directly receive data from these source servers to your replica server. This is where the multi-source replication technique comes into play. It allows you to efficiently gather data from various sources and consolidate it on your replica server.

But, how does this work?

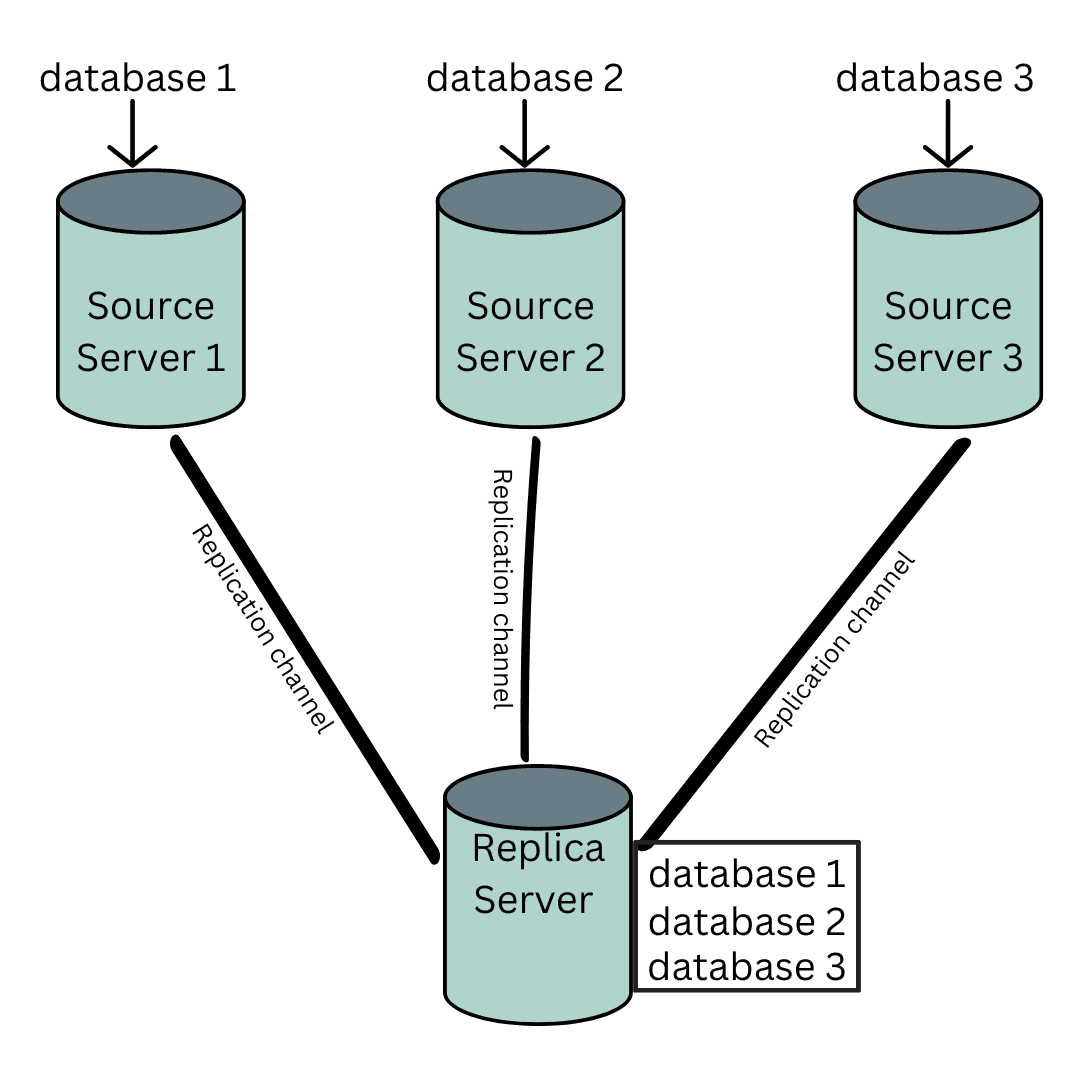
For a replica server to be able to receive data from multiple source servers, it creates multiple paths(channels) where each path is linked to an individual source server, this is how data is transferred from multiple source servers to the replica server.

Each replication path has its own I/O thread which helps in performance and memory management, one or more SQL threads, and relay logs. It is worth mentioning that each replication path must have its own unique name and cannot be null, and the maximum number of paths that can be created by a replica server in a multi-source replication topology is 256.

Some things to note..

MySQL’s multi-source replication is a great technique, however, here are some of the problems that may be considered when using multi-source replication:

1. MySQL’s multi-source replication does not carry out conflict resolution. It is the responsibility of the application or the user to implement conflict resolution logic when using multi-source replication. It does not provide built-in mechanisms to resolve conflicts that may arise when data from multiple sources is replicated to a single replica server.

2. MySQL’s multi-source replication does not support setting up multiple paths from a single source server to the replica server.


SETTING UP MULTI-SOURCE REPLICATION

To set up multi-source replication in MySQL, you are required to set any number of source servers of your choice starting with a minimum of two source servers. This involves specifying the necessary connection details, such as the hostnames or IP addresses, authentication credentials, and other replication options. If you had been following up with this series, you probably already know how to set up your source and replica servers by now, but if you don’t, then you can refer back to the previous part of this series. Here are the steps required:

1. Set up any number of source servers (minimum of 2): For this article, we would be setting up 3 source servers and a replica. The replica server replicates one database from each source, that is:

  • Database1 from source server 1
  • Database2 from source server 2
  • Database3 from source server 3
  • Replica server

2. Configure your source servers to use the binary log position-based replication: You can also use the GTID-based replication, but since we started this article with using the binary log based replication, we would stick with that.

Remember that, to set up the source servers using binary log file position, it is important to make sure that the binary logging is enabled and a unique non-zero server_id is set up for each source server. This is so that we can identify each source server in the replication topology. MySQL uses a default server ID of 1, but we can change this using the following command:

SET GLOBAL server_id =30;


3. Create a user account for all the source servers: A user account is required for all the source servers to ensure that the replica server is able to connect to each source. There are two ways to do this, you can use the same account on all source servers OR you can create different accounts for each source server.

If an account is created solely for replication purposes, then the account needs only the REPLICATION SLAVE privilege. This can be done using the following query:

CREATE USER ‘aisha@replicahost’ IDENTIFIED BY ‘password’;

GRANT REPLICATION SLAVE ON *.* TO ‘aisha@replicahost’;


4. Configure a replication path for each source server: To configure a replication path(channel) for each source server in MySQL, we first need to ensure that the replica server and multi-source server are properly set up. This will allow us to identify the specific source servers from which we intend to replicate data. However, the configuration process involves setting up several essential parameters:

SOURCE_HOST: This parameter specifies the hostname or IP address of the source server that you want to configure as the replication source. In this case, it is set to “source_server1”.

SOURCE_USER: This parameter specifies the username of the replication user account on the source server. It should be a user account with the necessary replication privileges. 

SOURCE_PASSWORD: This parameter specifies the password for the replication user account on the source server. It is the password associated with the user.

SOURCE_LOG_FILE: This parameter specifies the name of the binary log file on the source server from where replication should start. It identifies the position in the source server’s binary log where the replication process will begin. 

SOURCE_LOG_POS: This parameter specifies the position within the binary log file (SOURCE_LOG_FILE) where the replication process should start. 

FOR CHANNEL: This parameter specifies the name of the replication channel for which the source server configuration is being changed. It helps identify and differentiate multiple replication channels. 

The following command is applicable for MySQL version 8.0.23 or greater

--Replication path for source server 1

CHANGE REPLICATION SOURCE TO SOURCE_HOST=”source_server1”, 
SOURCE_USER=”aisha”, SOURCE_PASSWORD=”password”, 
SOURCE_LOG_FILE=”source_server1-bin.000005”, 
SOURCE_LOG_POS=30 FOR CHANNEL “source_server1”;
--Replication path for source server 2

CHANGE REPLICATION SOURCE TO SOURCE_HOST=”source_server2”, 
SOURCE_USER=”aisha”,SOURCE_PASSWORD=”password”, 
SOURCE_LOG_FILE=”source_server2-bin.000006”,
SOURCE_LOG_POS=130 FOR CHANNEL “source_server2”;
--Replication path for source server 3

CHANGE REPLICATION SOURCE TO SOURCE_HOST=”source_server3”, 
SOURCE_USER=”aisha”, SOURCE_PASSWORD=”password”,
SOURCE_LOG_FILE=”source_server3-bin.000007”,
SOURCE_LOG_POS=60 FOR CHANNEL “source_server3”;

For MySQL version 8.0.23 or less, the following command is applicable:

--Replication path for source server 1

CHANGE MASTER TO MASTER_HOST=”source_server1”, 
MASTER_USER=”aisha”, MASTER_PASSWORD=”password”, 
MASTER_LOG_FILE=”source_server1-bin.000005”, 
MASTER_LOG_POS=130 FOR CHANNEL “source_server1”;
--Replication path for source server 2

CHANGE MASTER TO MASTER_HOST=”source_server2”, 
MASTER_USER=”aisha”, MASTER_PASSWORD=”password”,
MASTER_LOG_FILE=”source_server2-bin.000006”,  
MASTER_LOG_POS=220 FOR CHANNEL “source_server2”;
--Replication path for source server 3

CHANGE MASTER TO MASTER_HOST=”source_server3”, 
MASTER_USER=”aisha”, MASTER_PASSWORD=”password”,
MASTER_LOG_FILE=”source_server3-bin.000007”, 
MASTER_LOG_POS=30 FOR CHANNEL “source_server3”;


5. Replicate the database: The next step would be to make the replica server replicate the database of our choice, that is, database1, database2, and database3. This can be achieved using the CHANGE REPLICATION FILTER statement. The CHANGE REPLICATION FILTER statement applies a replication filtering rule to the replica server.

--To replicate the database of our choice

CHANGE REPLICATION FILTER REPLICATE_WILD_DO_TABLE=(‘database1.%’) FOR CHANNEL “source_server1”;

CHANGE REPLICATION FILTER REPLICATE_WILD_DO_TABLE=(‘database2.%’) FOR CHANNEL “source_server2”;

CHANGE REPLICATION FILTER REPLICATE_WILD_DO_TABLE=(‘database3.%’) FOR CHANNEL “source_server3”;


INITIATING THE MULTI-SOURCE REPLICATION PROCESS

Once the configuration has been set up, we would need to start our multi-source replica servers in order to get it to work. Initiating the multi-source replication process involves setting up and configuring the necessary components to enable the replica server to receive data from multiple source servers.

To begin, you’ll need to identify the source servers from which you want to replicate data. These source servers can be located in different locations or environments. You can choose to start all the paths(channels) by using the following command:

--To start paths/channels for MySQL version 8.0.23 or less

START SLAVE;
--To reset all paths/channels for MySQL version 8.0.23 or greater

START REPLICA;

You can also select specific paths to start by using the following command:

--To start a specific path/channel for MySQL version 8.0.23 or less

START SLAVE FOR CHANNEL “source_server1”;

START SLAVE FOR CHANNEL “source_server2”;

START SLAVE FOR CHANNEL “source_server3”;
--To start a specific path/channel for MySQL version 8.0.23 or greater

START REPLICA FOR CHANNEL “source_server1”;

START REPLICA FOR CHANNEL “source_server2”;

START REPLICA FOR CHANNEL “source_server3”;

To verify that the channels have started, we can use the SHOW SLAVE/REPLICA STATUS command:

--To start a specific path/channel for MySQL version 8.0.23 or less

SHOW SLAVE STATUS FOR CHANNEL “source_server1”;

SHOW SLAVE STATUS FOR CHANNEL “source_server2”;

SHOW SLAVE STATUS FOR CHANNEL “source_server3”;
--To start a specific path/channel for MySQL version 8.0.23 or greater

SHOW REPLICA STATUS FOR CHANNEL “source_server1”;

SHOW REPLICA STATUS FOR CHANNEL “source_server2”;

SHOW REPLICA STATUS FOR CHANNEL “source_server3”;


STOPPING THE MULTI-SOURCE REPLICATION PROCESS

When you decide to stop or halt the multi-source replication process, it means you want to temporarily or permanently suspend the replication of data from the source servers to the replica server. To stop the multi-source replica servers, we can use the STOP REPLICA/SLAVE statement. This statement allows us to stop all channels.

--To stop all paths/channels for MySQL version 8.0.23 or less

STOP SLAVE;
--To stop all paths/channels for MySQL version 8.0.23 or greater

STOP REPLICA;

If you wish to only stop a specific channel, the FOR CHANNEL statement is used:

--To stop a specific path/channel for MySQL version 8.0.23 or greater

STOP REPLICA FOR CHANNEL “source_server1”;

STOP REPLICA FOR CHANNEL “source_server2”;

STOP REPLICA FOR CHANNEL “source_server3”;
--To stop a specific path/channel for MySQL version 8.0.23 or less

STOP SLAVE FOR CHANNEL “source_server1”;

STOP SLAVE FOR CHANNEL “source_server2”;

STOP SLAVE FOR CHANNEL “source_server3”;


RESETTING THE MULTI-SOURCE REPLICATION PROCESS

Resetting the multi-source replication process involves restoring the replication setup to a known state, typically after encountering issues or when you need to start the replication process from scratch. To reset the multi-source replica servers, the RESET SLAVE/REPLICA statement is used. This allows us to reset all the channels.

--To reset all paths/channels for MySQL version 8.0.23 or less

RESET SLAVE;
--To reset all paths/channels for MySQL version 8.0.23 or greater

RESET REPLICA;

If your intention is only to reset a specific channel, the FOR CHANNEL statement is used:

--To reset a specific path/channel for MySQL version 8.0.23 or less

RESET SLAVE FOR CHANNEL “source_server1”;

RESET SLAVE FOR CHANNEL “source_server2”;

RESET SLAVE FOR CHANNEL “source_server3”;
--To reset a specific path/channel for MySQL version 8.0.23 or greater

RESET REPLICA FOR CHANNEL “source_server1”;

RESET REPLICA FOR CHANNEL “source_server2”;

RESET REPLICA FOR CHANNEL “source_server3”;

The RESET REPLICA statement only allows the replica clear its relay log, and forget its replication position but does not change any replication parameters. If you wish to clear all the replication parameters, use the following command:

--To reset all replication parameters
-- for MySQL version 8.0.23 or greater 

RESET REPLICA ALL;
--To reset all replication parameters for MySQL version 8.0.23 or less

RESET SLAVE ALL;


BENEFITS OF MULTI-SOURCE REPLICATION

MySQL’s multi-source replication is useful for many applications, such as:

  1. Real-time updates from multiple databases can be seamlessly received by the replica server.
  2. Data can be efficiently transmitted to the replica server through multiple routes.
  3. It is well-suited for data warehousing purposes, facilitating the consolidation of data from various sources.
  4. Processing power is optimally utilized, resulting in improved efficiency.
  5. Multiple data sources can be replicated without the need for automatic conflict resolution, allowing for flexibility in handling conflicts at the application level.
  6. Database size is minimized, avoiding unnecessary duplication of data across multiple replica servers.

CONCLUSION

Multi-source replication means that a replica server can have more than one source server. This offers a powerful and flexible solution for efficiently consolidating data from multiple sources onto a single replica server. By enabling real-time updates, allowing data transmission through multiple paths, and facilitating data warehousing, it optimizes processing power and reduces database bloat. While it requires application-level conflict resolution, the benefits of multi-source replication make it a valuable tool for achieving centralized data management and synchronization. With multi-source replication, MySQL empowers organizations to effectively handle diverse data sources and enhance their overall data replication strategy.


The post A Beginners Guide to MySQL Replication Part 3: Multi-Source Replication appeared first on Simple Talk.


from Simple Talk https://ift.tt/YhFD4fv
via

Monday, July 17, 2023

Managing Test Data for Database Development

In coming up with a strategy for managing test data, first you need to understand what the many test requirements are likely to be for the particular database you are developing. Next, you need to create all the different categories of test data required to suite test requirements and, finally, work out how to manage it in a way that allows a test-driven approach to development.

When learning about relational databases, we all tend to use ‘toy’ databases such as Pubs, AdventureWorks, NorthWind, or ClassicModels. This is fine, but it is too easy to assume that one can then do real-world database development in the same way. You have your database full of data and just cut code that you then test. From a distance, it all seems so easy.

In fact, rapid and effective database development usually requires a much more active approach to data. You need to work out how to test your work as you go, and to test continuously. For that, you need appropriate data with the right characteristics, in the suitable quantity. You also need to plan how to ensure that, when you make changes to the database, or even minor changes to its settings, all business processes continue to work correctly. In Agile terms you need a test-first methodology, fast feedback loop, and iterative development. You should never cut some SQL Code and only then think to yourself “I wonder how I’ll be able to test this?“.

Imagine, for example, that I need to create a routine that does a ‘sentiment analysis’ of customer feedback. Before I start coding, I’ll need a good test harness and the right test data sets, meaning carefully curated data to suit the requirements of the tests. Could I use entirely generated data? Of course not, because I’m investigating human behavior. Would I use masked data from customers? No, because there is always a risk that some fact mentioned in a message could still identify the customer. In any case, if it is a new feature, there may be insufficient existing data.

I would need a plan before I start. I would use as much customer feedback as possible that is in the public domain – a bottomless pit of human sentiment. I’d get each message rated by a panel of experts. Success would need to be measured and tested by the non-parametric correlation between the machine’s rating and the panel’s rating. Test data isn’t homogenous, like baked beans or oxtail soup. It must conform to the recipe appropriate to the task and that is a special skill, and probably explains why test-driven database development isn’t as prevalent as it should be.

To develop reliable databases, we must test as we develop. To do that, we need a ‘canteen’ system of managing development data that provides developers with immediate access to the appropriate data with which to test. Without getting the data first, and a criterion for success, there can be little progress.

Principles and challenges common to all test-data management

Once, when I was doing a database-driven application for a vast retail bank, I was told that it takes twice as long to test an application as it does to do the development work. That’s true, but only if you don’t plan your test data requirements very carefully, and if testing is postponed until release. The task can be daunting, but with good management and curation of the right sort of data for each stage of the process, testing will not hold up development significantly.

To explain why so many different types of data are necessary, for each of the various phases of creating a working database, we’ll need to spell out why the curation and management of data for testing is such an important task.

Sourcing the data

It isn’t usually prudent or effective to use live data for routine testing for two reasons. Firstly, a production-based dataset doesn’t allow us to check whether the database functionality reacts appropriately with ‘boundary condition’ data and ‘negative’ data (which can include both unanticipated but valid data as well as illegitimate data), because it is already ‘filtered’. It would be like testing your ability to sort sheep from goats when all you have is sheep.

Secondly, it can present data protection and security issues that aren’t always easy to solve. It’s a hard task to ensure that sensitive or confidential information is appropriately masked or anonymized to comply with privacy regulations. Masking can be successful but must avoid skewing the distribution and must prevent ‘inference attack’. This requires time and effort. Sometimes, it is tricky to fix a bug that only happens with the live system, but it pays to use the standard procedure of doing this within the staging DMZ environment using, when required by law or industry-standard, only staff who have had the necessary security screening.

There are occasions when there is no alternative to using anonymized live data for development work. Often, this will be a representative subset extracted from the entire data in the production environment. This reduces the amount of data you need to store and load while maintaining the integrity and relevance for testing purposes. To do this, data must be masked in various ways to anonymize it sufficiently to comply with data protection regulations and to safeguard data privacy. However, data that has been masked is, technically speaking, just pseudonymized unless the foreign table references are also juggled to prevent inference attacks. The conditions under which pseudonymized data is held are considerably stricter than for fully anonymized data.

Data distributions and means

The data that you use for testing must be as similar as possible to the data that is used, stored, or transformed by the database. It is relatively easy to measure the distribution of the live data in a production database and to mimic this distribution in the generated data. All the popular relational databases use data distribution and statistics to optimise the query plan for each SQL query. While the implementation of this optimisation varies between relational databases, it is always there. For numeric data, it isn’t just the distribution that must be right, but also the mean or average value. A date field, for example, would cause problems if was wildly out. Quantities in a shopping basket would need to be realistic.

If you don’t provide a realistic workload while testing, you are likely to miss necessary indexes or provide indexes that are worse than useless. ‘Tuning’ has to be done with a realistic workload which is why it is that it is so often only in the Staging part of deployment that performance problems surface. One might think that one could therefore just postpone performance tuning to Staging, but unfortunately a procedure or function can easily contain code that expects a particular distribution of data for a process. If developed with incorrectly distributed test data, this can slow to a crawl when presented with real data.

Understanding the database constraints

A well-designed relational database will have constraints for the data that can define the range of valid entries for each column (or combination of columns). They prevent bad data from reaching the database tables. Obviously, the data that you generate must conform with these constraints, otherwise the data import will fail. This means that if you opt for use of a data generation tool, it must be able to generate data that complies with these constraints. The constraints that cause trouble will be FOREIGN KEY constraints and CHECK constraints, which can be defined at the table-level, and involve several columns.

Special data types

Not all databases stick to the classic relational data types, especially when it comes to ‘document data’ such as XML or JSON. Geographic data types can also be tricky, and image data too can cause problems.

Row-level relationships

The intrinsic problem of data generation and masking is that the data within a row has its own relationships. People are born before they die. In a database of suppliers, a French manufacturer will likely have a French address. Row-level constraints deal with the problems of checking for inconsistent data within a single record, so on a well-constructed database, you may even be unable to load masked or generated data that isn’t consistent.

Data formats

You’ll be testing data inputs, perhaps simulating a connection from an application that uses a JDBC or ODBC connection. The data could be required by the test rig in one of a range of formats such as JSON, CSV or XML, depending on the computer language or script being used as a test rig. Inputs like this will be very different from table data because they will be the data as it existed in the application(s) before your validation and verification checks that you perform as it is transformed into relational data and inserted into tables.

Post-processed data

Just like a quiz, when testing a process, you need to be able to verify that you got the ‘right answer’. This means being able to compare the data after it is transformed by the process with a dataset that represents what the post-processed data should look like, to ensure that they match.

For example, |if you are creating invoices, dispatch notes and so on from a shopping cart, you need the correct versions, the ‘right answer’, to check against. These datasets of ‘post-processed’ data should be routinely checked for their accuracy.

Data storage

It may come as a surprise that this can become an issue. The problem is that there is no common, defined standard for storing datasets. CSV, the most prevalent medium used, has never been defined in an official industry standard. This means that it isn’t always usable between RDBMSs because of differences in the way that the comma and inverted commas are ‘escaped’ between RDBMSs. There is no common understanding of ‘escaping’ CSV between tools, applications, scripts and databases. Using the tab-delimited version of CSV can avoid this, if supported, unless you use the tab delimiter within data, of course.

Even after surmounting all this, the way that complex data such as images is rendered in text form can vary between RDBMSs. Some database systems, such as SQL Server, have clever, compressed proprietary file types that are fast and easy to load. This is fine up to the point where you need to load the data into an application in order to modify or update it, as required for data management, because they can’t be read into anything but a database using the same RDBMS. Heaven only knows how you would ever write test data in that format other than using an intermediary database.

What categories of test data do I need?

Even when working on a new database feature in isolation (i.e., in a branch), there is a wide range of requirements for test data, depending on what you aim to achieve. The test regime for integration and regression testing is very different from the requirements of unit testing.

For the former, you need standard data sets that allow you to check that the result of any process produces the correct result. You can’t do this with data that changes between test sessions because the post-processed dataset that represents the correct result can only created by hard graft, expertise and checking. For example, the result generated by the database application must be checked either against a result generated by a human or by an entirely independent, verified process.

The same goes for performance testing. You can’t ensure that the new features you’re about to deploy won’t degrade performance, unless you measure on standard data under the same circumstances, just changing the database code.

Just about any type of test will need test data that includes unexpected or unlikely inputs. Database developers are constantly surprised by the ways that data can shame them unless they are careful to include ‘negative’ and ‘boundary’ test data. Specialist Test Engineers have rich collections of such data that can humble any developer.

The following are the main categories of tests data we’ll need to be able to generate and manage:

Positive test data: this is data that can be checked before and after a database process to ensure that the process has changed the data correctly. This is done to ensure that the system behaves correctly under normal conditions.

Negative test data: A characteristic of any type of test data is that it needs to include ‘negative data’ to test your assumptions about what the data is likely to include. There should be both unexpected input values and invalid or ‘bad’ input”. For example, a test dataset of personal names should always include a few ‘rogue’ (but legitimate) surnames such as Null or O’Brien. Negative test data is designed to identify potential vulnerabilities, boundary cases, and the resilience of the database. The tests will use this data to ensure that unexpected data is handled correctly, and that the database is protected from bad data by means of ‘sanity checks’ and database constraints.

Boundary test data: This type of test-data uses values that test the boundaries of the business rules for acceptable ranges or limits, and the range of values that make sense and can be accommodated. The test will use this data to ensure that the database handles these boundary conditions correctly. Boundary testing will assess the database’s ability to validate data, check ranges and operate boundary constraints.

Process check data: This is the data that is used, mainly for integration tests, to check that a database process actually does what it is intended to do. Normally, it includes the data as it is before the process, and the data after the process is executed correctly.

Penetration test data: Security test data has little in common with other types. It will involve strings that could expose SQL Injection vulnerabilities, lists of overused passwords, and many data tricks used by hackers to take control of a database. It is used to assess the security measures implemented in the database and other software components or systems. As well as the more obvious SQL injection tests, it will check for robust credentials, and sensible access controls. The aim of this sort of testing is to identify vulnerabilities, potential breaches, and ensure compliance with security standards and regulations.

Realistic test data: This is positive data, perhaps seasoned with some negative and boundary data, but realistic in both appearance and distribution. In order to check a database’s indexing strategies, for example, the data must have the same characteristics as the data that the production system will handle. For this to be useful, it must be available in varying quantities for the various demands of performance testing, stress testing and integration testing.

What are the different types of tests?

I cover the various types of test and their data requirements in more detail in this article on using Flyway: Testing Databases: What’s Required?

Unit test: This focusses on the features under development. The unit test ensures that the feature behaves as expected according to the specification under all conditions, including bad data, or even penetration attempts. A unit test harness will usually be stored with the build code for the components being tested so that changes and bug-fixes can be done quickly.

Regression Test: Whenever changes created in a branch are merged into the parent database development branch, there is always a chance that it will introduce unintended side effects or regressions. To check for this, the existing functionality must be tested by running every process to ensure that the existing features of the database continue to work correctly. Existing tests are reused, with existing standard data. This aims to catch any defects or issues that may have been introduced as a result of the merge.

Integration Test: This type of test will involve end-to-end checks of the database’s integration with other participating databases, applications, middleware, APIs, or external systems. To make sure that the database functions as expected in a broader system context.

Performance Test: Performance test-data is used to measure and evaluate the database’s performance characteristics, such as response time, throughput, and resource utilization. It includes test data that represents the expected usage patterns and workloads. Performance testing helps identify performance bottlenecks, scalability limitations, and optimization opportunities.

Stress Test: Stress test data is designed to evaluate the performance, scalability, and robustness of the database under high load or stressful conditions. It involves simulating large volumes of data, concurrent user activity, or extreme data scenarios to assess how the database handles such stress factors. Stress testing helps identify performance bottlenecks, resource limitations, and potential issues under heavy workloads.

So, what’s involved in Test Data Management?

The demands of continuous integration and release make it increasingly likely that database teams will aim to make testing part of the general development culture rather than delegating to a specialist role. This requires important tasks to be done as part of database development, particularly with the management of the test data and supporting the use of continuous testing.

Test data generation

This is the task of providing the test data in the first place, a process we’ve discussed at some length already. It is only part of the broader task of test data management.

Test data maintenance

Test data has to be managed because it must be reused on every release. It takes time and effort to produce, to check, and to slice into subsets when necessary. It will also need to be updated and corrected when necessary. It will need to be changed to conform with changes in the current version of the database.

Test data validation

There are two types of validation that are required. The primary one is to create the data that is used to check whether a database process was successful in producing the result that is considered by all the ‘stakeholders’ to be correct. The other type of data validation checks that the data meets the test requirements of the development team. The most obvious requirement is ‘completeness’ in terms of whether it is able to test for all the errors that could conceivably happen.

Test data archiving

Each version of a database will have differences in that data that is inserted into it, because tables are amended, added and removed. If you need to work on a previous version of a database for, by way of an example, tracking down the history of a bug, you need the appropriate data as well as the source.

Test data security

An important task for test engineers nowadays is to ensure that data anonymization via masking is effective. This requires exploratory tests to ensure that it is impossible to identify any individuals within the database by means of ‘inference attacks’ where individuals have two unusual characteristics that together can identify them, and by doing so can lead to further identifications.

Summary

Test data management has become more complex because of tighter legislation concerning the use of personal, financial, or sensitive data for database development. However, it is also due to the better integration of specialist roles into the development process. This has led to greater and more sophisticated demands for a ‘canteen’ system for accessing the test data required for development and debugging.

Database development has moved on from a time when database testing was done as a separate activity from database development. Although it’s a conceptually simple model, it led to a wilderness of failed releases. It also didn’t encourage the move towards developing the techniques necessary to support test-driven development of databases, which was important for rapid releasing.

Developers need test support right through the typical development cycle, especially for unit testing and integration testing. Both types of tests require almost all of the range of test data and creating these test data sets requires the skills and cunning of the test specialist. By encouraging Test specialists to facilitate testing throughout the development cycle, rather than working in isolation, development teams were able to move to a system that made it easier to create and use test harnesses, to check a release candidate in advance of a release, and to provide rapid patches for test failures.

Not only has the development cycle become more rapid, but unit test data now serves as supplementary documentation of the expected behavior of the database code. By having a comprehensive suite of such tests, it becomes easier for developers to understand the codebase, collaborate with other team members, and make changes confidently without fear of breaking existing functionality.

Further reading

  1. But the Database Worked in Development! Preventing Broken Constraints
  2. But the Database Worked in Development! Checking for Duplicates
  3. Getting normally distributed random numbers in TSQL
  4. A series of articles on statistical calculations in SQL:
    1. Statistics in SQL: Pearson’s Correlation
    2. Statistics in SQL: Kendall’s Tau Rank Correlation
    3. Statistics in SQL: Simple Linear Regressions
    4. Statistics in SQL: The Kruskal–Wallis Test
    5. Statistics in SQL: The Mann–Whitney U Test
    6. Statistics in SQL: Student’s T Test
  5. My current set of articles about test data management during Flyway development.


The post Managing Test Data for Database Development appeared first on Simple Talk.


from Simple Talk https://ift.tt/3a5JqIU
via

Saturday, July 15, 2023

Microtask Queues in Node.js Event Loop

Node.js is a popular JavaScript runtime designed to execute JavaScript code outside the web browser environment. Node.js is built on top of the V8 engine, which powers Google Chrome. Node.js uses an event-driven, non-blocking I/O model that makes it scalable and efficient for building real-time applications.

Node.js Event Loop is one of the important features that allow Node.js to be highly efficient in handling asynchronous operations. The Node.js Event Loop is a single-threaded loop that continuously processes events and callbacks in a non-blocking way. The event loop consists of several components:

  1. Timers: Handles timer functions like setTimeout() and setInterval().
  2. Pending callbacks: Handles I/O callbacks like network requests, file system operations, and other asynchronous operations.
  3. Idle, prepare: Internal use only.
  4. Polling: Retrieves I/O events and file system operations from the operating system.
  5. Close callbacks: Executes callbacks that were scheduled by functions.
  6. Check: Allows developers to execute callbacks that were scheduled by setImmediate() immediately after the poll phase completes.

When the Node.js application starts, the event loop runs in a loop, continuously processing events and callbacks. The event loop starts by checking the timer queue and executing any expired timer callbacks. Then it moves to the pending callback queue and executes any pending callbacks. After that, the event loop enters a polling phase where it waits for new events or callbacks to be added to the queue; the event loop resumes execution and processes the new event or callback. While the event loop is an efficient mechanism for handling I/O operations, it can become a bottleneck when dealing with a large number of microtasks.

Microtasks are small units of work that can be executed immediately after the current event loop iteration completes. When many microtasks are queued up, they can cause the event loop to block, leading to poor application performance. Node.js provides a microtask queue that enables developers to manage the execution of microtasks more efficiently. Microtasks are processed in order, one after the other, until the queue is empty.

A queue is a data structure that stores a collection of elements in a linear order, where the initial element added to the queue is the first one to be removed. This ordering is known as the “first-in, first-out” (FIFO) principle. In other words, the elements of the queue are processed in the same order they were added. Queues are used in many areas of computer science, such as operating systems, networking, and data processing. They are useful in scenarios where you need to manage a collection of tasks that need to be executed in a specific order.

What are Microtasks Queues?

Microtask queues are features of the Node.js event loop that allow developers to manage the execution of small, high-priority tasks that need to be executed immediately after the current event loop iteration completes, which means that they do not need to wait for other tasks to complete before being executed. This ensures the microtask is executed immediately without blocking the event loop. In addition, they provide a way to manage the execution of microtasks more efficiently by ensuring that they are executed in a timely and predictable manner. This is important in applications that require real-time communication or high-performance I/O operations.

By using microtask queues, developers can prioritize the execution of high-priority tasks and ensure they are executed promptly. This can improve the performance of Node.js applications and make them more responsive to user inputs. Microtasks are designed to be lightweight, with minimal processing time and a low overhead cost. They are used for processing state changes, such as updating a user interface or changing the state of an application.

The microtask queue is divided into two:

  • process.nextTick()
  • Promises

To understand microtask queues better, let us look at some code examples.

Using Promises

Promises are a popular way to handle asynchronous operations in Node.js. When a promise is resolved or rejected, the callback function is added to the microtask queue.

For example:

const promise = new Promise((resolve, reject) => {
  setTimeout(() => {
    resolve('Done!');
  }, 1000);
});
promise.then((result) => {
  console.log(result);
});
console.log('Start!');

In this example, you create a new Promise that resolves after 1 second. The callback function passed to the then() method is added to the microtask queue. When the Promise is resolved, the callback function is executed immediately.

The output of this code will be:

Start!
Done!

As you can see, the console.log('Start!') statement is executed first, followed by the console.log(result) statement, which is the result of the resolved Promise.

Using process.nextTick()

The process.nextTick() method is used to add a callback function to the microtask queue that is executed immediately after the current function completes. Here is an example:

function main() {
  console.log('Start!');
  process.nextTick(() => {
    console.log('Text!');
  });
  console.log('End!');
}
main();

You define a function called main() that adds a callback function to the microtask queue using process.nextTick(). When main() is called, the output will be:

Start!
Done!
End!

The console.log('Text!') statement is executed immediately after the console.log('End!') statement because it was added to the microtask queue using process.nextTick().

Differences Between Microtasks and Macrotasks

Macrotasks are tasks that are executed on the event loop after the current macrotask has completed.

The main difference between microtasks and macrotasks is their priority and execution order. Microtasks have a higher priority than macrotasks and are executed before the next macrotask is processed. This means that microtasks have a more immediate effect on the application’s state.

Another difference is their execution context. Microtasks are executed in the same context as the current macrotask, whereas macrotasks are executed in a separate context.

Here is a tabular comparison of the differences between Microtasks and Macrotasks:

Microtasks

Macrotasks

Executed immediately

Scheduled to be executed in the future

Higher priority than macrotasks

Lower priority than microtasks

Can be queued in the event loop multiple times

Cannot be queued in the event loop multiple times

Used to handle time-sensitive tasks

Used to handle non-time-sensitive tasks

Does not block the event loop

Can block the event loop

By understanding the differences between microtasks and macrotasks, you can optimize the performance of your Node.js application and ensure it runs smoothly.

Implementing Microtask Queues in Node.js

To implement a microtask queue in Node.js, you need to create a Promise and use the Promise.resolve() method to add a microtask to the queue.

// Creating a Promise
const promise = Promise.resolve();
// Adding a microtask to the queue
promise.then(() => {
  console.log('This is a microtask!');
});

Firstly, you create a Promise using the Promise.resolve() method. This creates a new Promise object that is immediately resolved with a value of undefined. Then, you use the then() method to add a callback function to the Promise. When the Promise is resolved, this callback function will be executed as a microtask.

When the microtask is executed, it logs the message “This is a microtask!” to the console.

Now that you understand how to create and use microtask queues in Node.js, let’s look at a more practical example of using microtask queues in a real-world Node.js application.

In a Node.js application, we can use microtask queues to perform certain tasks immediately after the current task completes. For example, you can use microtask queues to update the UI after a user clicks a button or to perform some other action that requires immediate attention.

Let’s look at examples of how to use microtask queues in a Node.js application:

// Creating a function that returns a Promise
function doSomethingAsync() {
  return new Promise((resolve, reject) => {
    // Simulating an asynchronous operation
    setTimeout(() => {
      resolve('Done!');
    }, 1000);
  });
}
// Using microtask queues to perform a task after the Promise resolves
doSomethingAsync().then((result) => {
  console.log(result);
  Promise.resolve().then(() => {
    console.log('This is a blog!');
  });
});

In the code example above, you first create a function called doSomethingAsync() that returns a Promise that resolves after one second using the setTimeout() method.

Next, you use the then() method to add a callback function that logs the result of the Promise to the console.

After logging the result of the Promise, you use Promise.resolve() to add a microtask to the queue. This microtask will be executed immediately after the current task completes and will log the message “This is a blog!” to the console.

In a web application, there can be scenarios where we need to update the user interface based on some user action or data changes. For example, when a user clicks on a button, you may want to make an API call to fetch some data and then update the UI with the result. However, making an API call can take some time, and you don’t want to block the UI thread while waiting for the response. In such cases, you can use microtask queues to schedule the UI update after the API call has been completed. Here’s an example:

// Define a function to make an API call
async function fetchData() {
  const response = await fetch('https://some-api.com/data');
  const data = await response.json();
  return data;
}
// Define a function to update the UI
function updateUI(data) {
  // Update the UI with the data
}
// Handle button click event
document.getElementById('button').addEventListener('click', async () => {
  const data = await fetchData();
  process.nextTick(() => updateUI(data));
});

In this example, you have a button on the web page that, when clicked, makes an API call to fetch some data. After the data is received, you use process.nextTick() to add the UI update function to the microtask queue, so it will be executed after the current operation completes. This ensures that the UI update is always executed after the data has been fetched, regardless of how long the API call takes to complete.

In a Node.js application, it is common to use database migrations to keep the database schema up-to-date with the application code. However, running database migrations can take some time, and you don’t want to block the application while the migrations are running. In such cases, you can use microtask queues to schedule the migrations after the current operation is completed. For example:

// Define a function to run database migrations
async function runMigrations() {
  // Run database migrations
}
// Define a function to start the server
async function startServer() {
  await runMigrations();
  // Start the server
}
// Start the server
startServer();

Here, you have a function called "runMigrations()" that runs the database migrations. You want to run the migrations before starting the server, but you don’t want to block the application while the migrations are running. To achieve this, you can simply call runMigrations() before starting the server. However, this will block the application until the migrations are completed. To avoid this, you can use process.nextTick() to add the runMigrations() function to the microtask queue, so it will be executed after the current operation completes. This ensures that the migrations are always executed before the server is started, but without blocking the application.

Best practices for working with Microtask Queues

  • Keep Microtasks Short: Microtasks are designed to be fast. They should not perform complex or time-consuming operations. If a microtask takes too long to execute, it can block the event loop and cause performance issues. To ensure microtasks are fast, limit their scope to the necessary operations they need to perform.
  • Avoid Unnecessary Recursion: If recursion is necessary, consider using a separate worker thread to handle the recursive operation.
  • Avoid Infinite Loops: When working with microtasks, ensure that the loop has clear exit conditions and does not run indefinitely.
  • Use Promises for Error Handling: If an error occurs in a microtask, it can be handled using a promise. For example:
const promise = Promise.resolve();
      promise.then(() => {
       throw new Error('error in microtask');
      }).catch((err) => {
        console.error(err);
      });
  • The catch block will handle any errors that occur in the microtask.
  • Test your code: As with any code, it’s essential to test your microtask queue implementation thoroughly. Use automated testing tools to ensure that your code is working correctly and efficiently. Test for edge cases and ensure that your code handles unexpected input correctly.

Conclusion

Microtask are essential features of the Node.js Event Loop that can improve your Node.js applications. Microtask Queues are scheduled on a separate queue with higher priority than other task queues in the event loop and are executed immediately after the event loop phase completes. By optimizing your code, you can ensure your application performs well under heavy load. Remember to use microtasks for small, synchronous operations that need to be executed immediately and use built-in microtask APIs whenever possible.

The post Microtask Queues in Node.js Event Loop appeared first on Simple Talk.


from Simple Talk https://ift.tt/XYgwy1n
via