Thursday, January 31, 2019

Improve the Performance of Your Azure SQL Database (and Save Money!) with Automatic Tuning

Azure can create sticker shock for some companies as they venture into the cloud. As a database administrator, it is your job to fine-tune your environment to mitigate those costs the best you can.

Azure SQL Database Purchasing Models

Microsoft gives you two purchasing models for your Azure SQL Databases (SQL DB), a DTU (Database Transaction Unit) and a vCore based model (logical CPU’s). Both options allow you to scale up or down based on your compute and storage requirements. Regardless of which model you choose, performance tuning can save you money when using SQL DB.

DTU (s) measure  “a blended measure of CPU, memory, and data I/O and transaction log I/O” that Microsoft uses to help estimate which DTU based Service Tier you should be using. By reducing your I/O, memory or CPU consumption, you utilize less DTUs or cores and thus can step down service tiers. Stepping down service tiers helps to save money.

Stepping down tiers in the portal is just a matter of going into your SQL DB configuration, choosing a lower tier and clicking Apply.

You will see in the in the notifications on the Right side that your scaling is in progress with no downtime.

Azure Automation Runbooks

It’s all about reducing the resources you consume. Just like On-Prem databases, Azure databases need performance tuning. However, unlike most On-Prem environments Azure makes it easy to scale down SQL DB processing resources without any downtime. On top of that, it allows you to save thousands of dollars a month while doing it.

For instance, consider a common scenario we have all seen. Most environments have some type of ETL process that loads data into a database used for reporting. In most of these cases, this can be a resource-intensive process requiring a very high DTU service tier to accomplish this potentially periodic data load. What if you could scale your environment to a higher DTU service tier  to meet this load demand and then scale it down when not needed? Imagine how much money you could save the company. In a recent talk with a friend of mine, he was able to implement such a process so that his company’s monthly Azure SQLDB bill went from $55k a month to $21k. That’s an astronomical saving (note this a very large environment).  

Let’s look at another scenario. Imagine if you worked for a company that has higher seasonal demands like retail or tax companies. Wouldn’t it be beneficial to be able to add more servers to your environment to handle the workload during your highest demand times? Azure lets you add servers, at will, as well as remove them. For instance, you could spin up additional servers to handle your four-month tax season and then turn them off the remaining nine months of the year. With on-premises hardware, you can’t just return the hardware during slow months to save money, unlike Azure where you can simply turn them off.

Using Azure Automation Runbooks makes the process of scaling your environment easy. As a database administrator, you can easily automate scaling your Azure SQL Database vertically according to any schedule you define even multiple times a day. If your environment has predictable peak times, you can simply move your workload to higher compacity levels during those hours and decrease your levels during off times. Here is a resource for scaling using a scheduled auto scale.

If scaling down based on workload doesn’t fit your environment and you are still looking for ways to save money, start index tuning. An easy place to start is by looking at your heaviest I/O consumption queries, and you can use the Azure SQL Database Query Performance Insights to help you identify these. Reducing the number of reads is the goal. The fewer reads you have, the less I/O and memory consumption you use and the smaller the DTU service tier you need.  This is fine for monitoring each Azure SQL Database, but for insights on your entire estate, across cloud and on-premises, then a tool like SQL Monitor is needed.

Automated Tuning

If index tuning is not something you do well, Azure SQL Database includes an Automated Tuning option that you can enable, and it will create indexes (and potentially remove newly created, underutilized indexes) for you. Let’s dive into that further.

Managing indexes are a big part of a Database Administrators job whether it’s in Azure or on-premises. Indexes provide an essential way to performance tune queries, doing it right can be a time-consuming process. Microsoft has long given us DBA tools and suggestions to help tune databases, to fix queries with indexes, and many times they were of questionable merit. We have all seen the dreaded dta_index names in a database and rolled our eyes knowing that sometimes these indexes are not what is needed or create duplicates. While the Database Tuning Advisor, has gotten better over time, it is still not a tool more senior DBAs use. Microsoft made big steps in helping DBAs with performance with the introduction of Query Store in both Azure SQL Database and SQL Server 2016. Query Store collects execution and run-time performance information including plan regressions. Microsoft has taken an additional leap with the introduction of Automatic Tuning. Automatic Tuning is an intelligent performance tuning service which is the results of machine learning processes being applied directly to data generated by Query Store.

By continuously monitoring queries, Automatic Tuning can quickly and intelligently improve their performance. Since it is based on machine learning, it adapts to changing workloads and therefore is better at index recommendations than previously.  You can enable it to Create Indexes, Drop Indexes and Force the Last Good Plan on the database level (which is the feature that is available in SQL Server 2017), so it’s not an all or nothing feature. I prefer not to have things automatically done, so given that you can set index creation or plan correction to allow you to manually apply recommendations using the portal is a great feature.  According to Microsoft, there is a benefit to having it automatically making changes. They state: “The benefits of letting the system autonomously apply tuning recommendations for you is that in such case it automatically validates there exists a positive gain to the workload performance, or otherwise if a regression is detected it will automatically revert the tuning recommendation.” When manually applying suggestions the reversal mechanism is not available.

To Enable Automatic Tuning

Log in to the Azure Portal

Go to your SQL Database and click on it

On the menu to the left Choose Automatic Tuning

Here you can toggle on and off each option separately. When I first started using it, I tended not to let it DROP indexes, now that I am more familiar with it, I realize it only drops those it created and knows based on AI knows if they are useful or not. The fact that Automatic Tuning was developed and tested over millions of different real-world workloads in Azure makes this a very promising feature for me. But like any good database administrator testing and seeing the results in your environment is key.

Automatic tuning options available in Azure SQL Database are:

Option

Description

CREATE INDEX 

Identifies indexes that may improve the performance of your workload, creates indexes, and automatically verifies that performance of queries has improved

DROP INDEX 

Identifies redundant and duplicate indexes daily, except for unique indexes, and indexes that were not used for a long time (>90 days).

FORCE LAST GOOD PLAN 

Identifies SQL queries using an execution plan that is slower than the previous good plan, and queries using the last known good plan instead of the regressed plan.

If you choose not to use the GUI you can enable these using T-SQL as well.

ALTER DATABASE current SET AUTOMATIC_TUNING = AUTO | INHERIT | CUSTOM

ALTER DATABASE current SET AUTOMATIC_TUNING (FORCE_LAST_GOOD_PLAN = ON, CREATE_INDEX = DEFAULT, DROP_INDEX = OFF)

The force_last_good_plan flag will work in SQL Server 2017 as well.

When you choose to enable DROP INDEX and APPLY it will remind you of the following.

This image from MSDN shows what recommendations look like in Azure. It keeps a very nice history, so you can follow the changes over time on the Performance recommendations page. To manually run the recommendations, you can click on any one of them and then click View Script to have a script to run against your database.

http://sqlespresso.com/wp-content/uploads/2018/08/recommendations.png

http://sqlespresso.com/wp-content/uploads/2018/08/Auto-Tune2.jpg.png

Recommendations sometimes are not applied right away as Azure makes sure it does not interfere with the workload and may hold them. Again, Microsoft is making strides to better their processes which I applaud. You will see several “states” of recommendations shown in the table below from MSDN. This is a big win for me.

State

Description

Pending

Apply recommendation command has been received and is scheduled for execution.

Executing

The recommendation is being applied.

Verifying

Recommendation was successfully applied, and the service is measuring the benefits.

Success

Recommendation was successfully applied, and benefits have been measured.

Error

An error occurred during the process of applying the recommendation. This can be a transient issue, or possibly a schema change to the table and the script is no longer valid.

Reverting

The recommendation was applied but has been deemed non-performant and is being automatically reverted.

Reverted

The recommendation was reverted.

Conclusion

So far, I think Microsoft is on the right track with this. I look forward to seeing what else they come up with. Creating and managing your indexes is one of the simplest ways to reduce Azure related costs, and Microsoft has built-in the tools to help. You’ll be surprised how quickly you can make an impact on your bottom line with Index tuning.

These are only some ways you can save money on your monthly Azure bill. Sticker shock can be a real thing with companies venturing into the cloud. It is the database administrators’ job to constantly monitor works loads and find ways to reduce that cost. If the sticker shock becomes an issue remind them that Azure SQL DB saves in many ways.

Azure SQL DB reduces administrative and hardware costs as well. SQL DB has no hardware, operating systems or database software that you must manage. It provides built-in high availability and disaster recovery, database backups, and manages all your upgrades. Therefore, there is no need for redundant hardware, extensive backup storage, and no downtime windows. The cost savings can be substantial.


The post Improve the Performance of Your Azure SQL Database (and Save Money!) with Automatic Tuning appeared first on Simple Talk.


from Simple Talk http://bit.ly/2TmYEA3
via

Wednesday, January 30, 2019

What is the purpose of your organization? A lesson in DevOps

I’ve been speaking a lot on the topic of DevOps lately, and there’s a question I like to ask.

What is the purpose of your organization?

I get all kinds of answers.

“We make software that delights our customers and makes their jobs easier.”

“Our company makes low-cost widgets. “

“We make the best gizmos around.”

My answer to these is always a single word: WRONG!

So, what, you may ask, is the correct answer?

The purpose of any organization is to make money.

I realize that may sound a bit mercenary but think about it. Why do you get up and go to work every day? To get that paycheck at the end of the week. You may love your job, but I suspect if you quit getting paid, you’d soon be spending your days at a place that was friendlier to your wallet.

The purpose of your job is to make money. What you do for a job is how you make money. Likewise, the answers I received all indicated how organizations make money. Making money is the goal, not making software, or widgets, or even gizmos.

At this point, I’m sure someone is ready to bring up the subject of non-profit organizations. Think about it, when was the last time you heard of a non-profit that wasn’t trying to raise money? They don’t need to make a profit, but they do need to make money.

Now that we’ve established the true goal of your organization is, in fact, to make money, the next question would logically be:

How do I know if my organization is making money?

This question is a bit more difficult to answer, as most organizations have their own measurements. Some of these will generally include some combination of these items:

  • Revenue
  • Market share
  • Profitability
  • Accounts receivable
  • Time to market
  • Customer retention
  • Inventory

Each metric can be a bit deceptive, as they are often made up of a collection of other measurements. As a first step, find out the overall goals of your organization. It’s amazing how few people outside the executive management structure know or understand these goals.

After learning the overall goals, learn the measurements that go into making each goal. What data is needed in order to measure against the list of organizational goals?

With this list in hand, you are ready to ask yourself the next question.

Does what I am doing contribute toward achieving these goals?

If not, then stop! You don’t have time to waste on work that doesn’t contribute to the success of your organization. In fact, by working on non-goal activities, you are actually hurting your company.

Knowing how your activities affect organizational goals can be critically important in the DevOps decision making process. In organizations that have embraced the DevOps culture, small teams look at a list of requests and decide which requests will make it into the next sprint/release cycle.

But how do they determine which items need to be included? All too often it is because someone is screaming loudly for their feature, because it has been on the list for quite some time, or because it “sounds like fun to do.”

With the list of company goals in hand, teams have a way to measure the importance of each request. The team should be asking which goal (or goals) will this request positively contribute to. Typically, the work with the most impact gets first priority.

This way of making decisions has other benefits. First, it gives us a way to measure effectiveness. After each feature has been released, the measurements it was supposed to have aided should be looked at to see if the feature did indeed have a positive outcome. This guides the team in future decision-making processes.

It can also be used as a way of fending off the people who walk in demanding their feature gets worked on next because “it’s important.” Having your goal list allows you to challenge them. Make them justify against the list of measurements how their feature will contribute to the company success. Who knows, maybe it will! But you won’t know unless you ask.

Bear in mind some requests may be measured in terms of negative impact. For example, if a company’s customer order entry system goes down, the company loses X number of thousands of dollars per hour. Knowing this figure, “X,” can help justify the cost of a secondary server, or allocating time to work on keeping your servers patched and up to date.

While it seems obvious, being reminded that “making money” is the purpose of your organization can be a great tool for focus. Knowing the measurements used to determine if we’re meeting our goal, we can make our daily decisions based on measurable outcomes and have the satisfaction of knowing we did indeed make a positive impact on our organization.

Commentary Competition

Enjoyed the topic? Have a relevant anecdote? Disagree with the author? Leave your two cents on this post in the comments below, and our favourite response will win a $50 Amazon gift card. The competition closes two weeks from the date of publication, and the winner will be announced in the next Simple Talk newsletter.

The post What is the purpose of your organization? A lesson in DevOps appeared first on Simple Talk.


from Simple Talk http://bit.ly/2BcstvV
via

Using a Server List to Control PowerShell Scripts

As I started to use PowerShell more and more, one of the reasons I found it useful, as have many DBAs, is that it permits running the same script across multiple servers. The scripts in my last article took advantage of this capability.

One of the reasons I automate is because I hate to repeat work. But here is a potential problem. What happens when I have 20 different scripts to perform various audits, updates and the like of my SQL Servers and I now add a new SQL Server to the mix?

Well, if I haven’t planned things out, I now need to update 20 different scripts. And I have to hope I get them all right! That sounds like more work than I care to do.

In this post, I’m going to show you two possible solutions you can use to make your life easier: one using a simple text file imported into an array and the second using JSON to store additional data related to each server.

String and Arrays Primer

Before I begin, I want to explore a bit how PowerShell handles strings and how to create arrays. PowerShell has multiple ways to create an array, but initially, I want to create an array of strings, and my preferred way is to use the explicit syntax, but I will demonstrate both.

Run the following script in the PowerShell ISE:

$explicitArray = @("one","two","three")
Write-Host "explicit: " $explicitArray
$implicitArray = "one","two","three"
Write-Host "implicit:  $implicitArray"

You should get output like:

Note that the two statements act the same way. However, I prefer using the explicit syntax as it makes it more obvious that I’m working with an array. If you look closely, you will notice that in the case of writing out the $implicitArray, instead of concatenating it to the output for Write-Host, I put it inside the double-quotes. PowerShell is smart enough to expand the variable inside double-quotes. Note that single-quotes will treat the string exactly as shown and will not expand the variable.

Write-Host 'implicit:  $implicitArray'

Note also that you can write out a string directly, without Write-Host simply by referencing it. However, in this case, you have to use a+ to perform concatenation.

"explicit direct write: " + $explicitArray
"implicit direct write: $implicitArray"

Now that I’ve covered some string and array basics, I will dive into how to use arrays and more to help automate your servers.

Create a Server List

Before you can begin, create a small file in your home directory called sqlserverlist.txt and put in the following:

one
two
three

Save the file. To read the file back, you can run

get-content -Path ".\sqlserverlist.txt"

One issue you may realize right away is that if you are not in the right directory, you may get an error like the following:

You can solve that by hardcoding the path:

get-content -Path "c:\temp\sqlserverlist.txt"

Slight Detour: Environment Variables

I want to take a slight detour here and remind you of my last article where I demonstrated that you could use get-psdrive to see a list of objects that PowerShell can access.

get-psdrive

You may notice two interesting names, Env and Variable. Again, as a reminder, PowerShell treats everything as an object and Env is an object you can access.

On your system run the following command:

get-childitem ENV:

You will see it returns a list of your environment variables. So, any environment variable set on your machine can be used within a PowerShell Script.

If you run

get-childitem Variable:

You will see a list of all the variables currently within your PowerShell session. Some of these are set by PowerShell, and the rest are the ones you created.

To access your environment variables, you need to tell PowerShell you want to access that object as follows:

$ENV:variable

For example, $ENV:COMPUTERNAME should return the name of your computer.

Detour Ends

If you want to keep the above file in your home directory you can also use a hardcoded path or dynamically generate one as follows:

get-content -Path "$env:HOMEDRIVE$env:HOMEPATH\sqlserverlist.txt"

Note here you are taking advantage of the fact that when using double quotes, PowerShell will expand variables inside the string. Of course, you can put the file wherever works best for your needs.

You can take advantage of any environment variables you want that are set on your machine or by your domain login to access files in a common location.

So now you’re a step closer to having a central repository of all your servers in a simple text file.

The next step is to assign the values to an array as follows:

$serverlist = @(get-content  -Path "$env:HOMEDRIVE$env:HOMEPATH\sqlserverlist.txt")

Note here I used the explicit definition of an array as it makes it more clear to me later on that I’m creating an array of strings, not simply assigning the contents of this file to a simple string.

Next run:

foreach ($server in $serverlist)
{
    write-host "server: $server"
}

You should have the following results, just as you would expect:

Obviously instead of write-host you could substitute a SQLcmd (if you run this now, you’ll get errors since since the file doesn’t contain real server names at this point):

$serverlist = @(get-content  -Path "$env:HOMEDRIVE$env:HOMEPATH\sqlserverlist.txt") 
import-module sqlps
foreach ($sqlserver in $serverlist) 
{
cd sqlserver:\sql\$sqlserver
ls logins -force| select-object name,ispasswordexpired, MustChangePassword, isdisabled, passwordexpirationenabled | format-table
}

You should recognize this script from the previous article, but this time instead of explicitly creating the array in the script, it’s now reading in from an external file. This means that, if you add a server to your network, you only need to update a single file, sqlserverlist.txt and all your scripts should work as before, but now also work on the new server.

That’s definitely an improvement over updating 20 different scripts every time you add or remove a server from your network. However, if you’re like most companies, you may have servers in different groups that you need to treat differently. For example, you might need to treat Production servers differently from Dev servers. You also might want to do things differently depending on the version of the OS or SQL Server.

Objects to the Rescue

Once again the key to the solution is to think in terms of objects. Specifically, your SQL Server is more than simply a name; it’s an object and should be treated as one.

Up until now, all the scripts you’ve run have used built-in objects. However, you can also create your own objects. Like string handling, there are multiple ways to create an object. For now, though, I will show you how to create an object explicitly. Once you get the hang of it, you can use some of the other methods of creating objects that use less verbiage.

Run the following code to create an object:

$serverObject = New-Object -TypeName psobject
$serverObject | Add-Member -MemberType NoteProperty -Name ComputerName -Value "one"
$serverObject | Add-Member -MemberType NoteProperty -Name Environment -Value "Production"
$serverObject | Add-Member -MemberType NoteProperty -Name SQLVersion -Value "2016"
$serverObject | Add-Member -MemberType NoteProperty -Name OSVersion -Value "2012"

If you then run:

Write-Host $serverObject

You should see:

You can also run:

$serverObject | gm | ogv

Now you should see:

You will notice that your object automatically has some methods built in.

For example, if you run:

$serverobject.GetType()

You will see:

Notice the base type is a System.Object.

If you run:

$explicitArray.GetType()

You will get

This makes sense, because $explicitArray is an array. It was explicitly created above. Additionally, if you run:

$implicitArray.GetType()

You will get the same results:

In other words, PowerShell is smart enough to recognize that both objects, $explicitArray and $implicitArray are objects of type System.Array, even though you created them using different syntax.

You may find yourself using the .GetType() method often to keep track of what type of objects you are working with.

Finally run:

Write-host $serverObject.ComputerName

You should see:

If you type

write-host $serverobject.Environment

You should see:

You now have an object that provides more than simply the name of a server. You can add more properties if you want, but the ones here are enough for moving forward.

To make use of this object, you will need to save it to a file.

Your first inclination might be to do something like:

$serverObject | out-file -FilePath "$env:HOMEDRIVE$env:HOMEPATH\sqlserverobjectlist.txt"

That appears to work until you look at the file and see:

This output is not ideal. With some effort, you could get rid of the header information, but then you might face other issues. For example what if your Environment for another server is called Dev and QA. This means you can’t rely on spaces to delimit your properties. You can perhaps then wrap your properties in single quotes and do other fancy stuff, but very quickly this becomes complex. I’d prefer a simpler solution.

JSON is the rage among all the kids these days, and this provides a simple and convenient solution.

Run:

ConvertTo-Json $serverObject

You should see the following:

If you pipe that to Out-file as follows:

ConvertTo-Json $serverObject | out-file -FilePath "$env:HOMEDRIVE$env:HOMEPATH\sqlserverobjectlist.json"

Now if you look at the output file you will see:

This output looks useful.

To continue, replace the contents of the file that was created with this JSON:

[
{
    "ComputerName":  "one",
    "Environment":  "Production",
    "SQLVersion":  "2016",
    "OSVersion":  "2012"
},
{
    "ComputerName":  "two",
    "Environment":  "DEV",
    "SQLVersion":  "2016",
    "OSVersion":  "2012"
},
{
    "ComputerName":  "three",
    "Environment":  "TEST",
    "SQLVersion":  "2017",
    "OSVersion":  "2012"
}
]

Notice now you still have three servers, but you have more complete information about them. Save the above file.

Now run the following:

Get-Content -Raw -Path "$env:HOMEDRIVE$env:HOMEPATH\sqlserverobjectlist.json" | ConvertFrom-Json

You should see the following output:

Now you’ve made progress!

Assign that input to a variable:

$serverobjlist = Get-Content -Raw -Path "$env:HOMEDRIVE$env:HOMEPATH\sqlserverobjectlist.json" | ConvertFrom-Json

Now you can actually do something useful:

$serverobjlist = Get-Content -Raw -Path "$env:HOMEDRIVE$env:HOMEPATH\sqlserverobjectlist.json" | ConvertFrom-Json
foreach ($server in $serverobjlist) 
{
    if ($server.environment -eq "Production")
    {
        Write-host "$($server.ComputerName) is a production server"
    }
    else
    {
        Write-Host "$($server.ComputerName) is a $($server.Environment) server"
    }
    if ($server.SQLVersion -lt "2017")
    {
        Write-Host "$($server.ComputerName) doesn't have the latest and greatest. Send email to finance to request money to upgrade!"
    }
}


You could have more useful commands in there, but this shows how you can do different things depending on the environment or version. One thing that you should notice is that you have to wrap the $server.ComputerName and $server.Environment in parenthesis preceded by an additional $. This seems strange, but the reason is to force the $server object to expand the property and then treat that as a variable to embed in the string. If you left off the encapsulation, you would see something like:

This is because PowerShell would expand the entire object and then append the string .computername to it.

The above script is a bit silly but illustrates how you can use the $server.environment property to perform useful operations. Most likely though, you will want to use the same script, but in different environments.

Save the following script to a file called Server Script with passed in parameter.ps1.

if ($args.count -eq 0)
{
    Write-Host "You must enter an environment name!"
    return
}
else
{
    $environment = [string]$args[0]
    $serverobjlist = Get-Content -Raw -Path "$env:HOMEDRIVE$env:HOMEPATH\sqlserverobjectlist.json" | ConvertFrom-Json
    foreach ($server in $serverobjlist) 
    {
        if ($server.Environment -eq $environment)
        {
            Write-Host "The following operation will be done on server $($Server.ComputerName)"
        }
    }
}

If you simply run the script from within the Windows Powershell ISE, you should get

This makes sense since you did not pass in an environment name.

From the lower command window in ISE enter

& '.\Server Script with passed in parameter.ps1' "DEV"

The & is telling the ISE that you’re calling a script.

You should see:

Here are two changes you can make to the script:

param([string]$environment)
if ($environment -eq "")
{
    Write-Host "You must enter an environment name!"
    return
}
else
{
    $serverobjlist = Get-Content -Raw -Path "$env:HOMEDRIVE$env:HOMEPATH\sqlserverobjectlist.json" | ConvertFrom-Json
    foreach ($server in $serverobjlist | where-object {$_.Environment -eq $environment})
    {
            Write-Host "The following operation will be done on server $($Server.ComputerName) in the $environment Environment"
    }
}

Note in the first, there is a new block, which has to be the first block in the file, a param block. In this case, it only specifies a single parameter called $environment. However, you could specify multiple parameters (such as $OSVersion or $SQLVersion). You can also assign default values if you wish.

The advantage of this solution is, when you’re typing the command from the PowerShell Command Line, if you enter – after the command, you will be prompted for the parameter name. This makes it much easier for a new user to know what parameters are required. As long as you enter the full parameter name as shown below, you can enter parameters in any order you want. This reduces errors.

Save the modified script to Server Script with passed in parameter version 2.0.ps1 and run the next command in the ISE command window:

& '.\Server Script with passed in parameter version 2.0.ps1' -environment "dev"

And you should get:

The second change made was to pipe the loop through a Where-object cmdlet. This lets you reduce the verbiage a bit. Either this method or the previous one will give the same results, but this shortens the script a bit. I tend to prefer this method.

This also allows one more minor change:

param([string]$environment)
if ($environment -eq "")
{
    Write-Host "You must enter an environment name!"
    return
}
else
{
    $serverobjlist = Get-Content -Raw -Path "$env:HOMEDRIVE$env:HOMEPATH\sqlserverobjectlist.json" | ConvertFrom-Json
    foreach ($server in $serverobjlist | where-object {$_.Environment -in $environment.split(",")})
    {
            Write-Host "The following operation will be done on server $($Server.ComputerName) in the $($Server.Environment) Environment"
    }
}

Notice the user of .split(“,”) on the $environment variable, and I’ve changed the output string to use $($Server.Environment) value since now it is specific to the server in question.

This allows you to run the following after saving the new file:

& '.\Server Script with passed in parameter version 3.0 with split.ps1' -environment "dev,production"

You should see:

This allows you to run the script against more than one environment at the same time. One caveat is, in this case, you must wrap your list of environments in quotes.

Conclusion

This article has given you the tools to take any existing PowerShell Scripts you’ve created to manage your SQL Servers and expand them so you can maintain a central list of SQL Servers. You can also store related information control how the scripts run based on the environment or other factors.


The post Using a Server List to Control PowerShell Scripts appeared first on Simple Talk.


from Simple Talk http://bit.ly/2TqAfcV
via

Monday, January 28, 2019

Introduction to SQL Server Security — Part 2

The series so far:

  1. Introduction to SQL Server Security — Part 1
  2. Introduction to SQL Server Security — Part 2

One of the most important tasks that DBAs must perform when managing a SQL Server database is to ensure that authorized users can access the data they need and carry out the necessary operations on that data. To this end, SQL Server includes a number of components for authenticating users and authorizing them to access objects at the server, database, and schema levels, while preventing unauthorized users from doing anything they should not.

In the first article in this series, I introduced you to authentication and authorization as part of a larger discussion about SQL Server security. In this article, I dig deeper into these topics and provide some examples that demonstrate how to implement basic access controls on a SQL Server 2017 instance.

Note, however, that authentication and authorization are huge topics. For this reason, you might also want to refer to a couple of other Simple Talk articles, one that I wrote and the other by Phil Factor:

You should also refer to Microsoft documentation as necessary to ensure you fully understand what types of access you’re granting to your users and what tasks they can and cannot perform. A good place to start is with Security Center for SQL Server Database Engine and Azure SQL Database, which covers a number of important aspects of SQL Server security, including access control.

Getting Started with Authentication and Authorization

SQL Server provides three types of components for controlling which users can log onto SQL Server, what data they can access, and which operations they can carry out:

  • Principals: Individuals, groups, or processes granted access to the SQL Server instance, either at the server level or database level. Server-level principals include logins and server roles. Database-level principals include users and database roles.
  • Securables: Objects that make up the server and database environment. The objects can be broken into three hierarchical levels:
    • Server-level securables include such objects as databases and availability groups.
    • Database-level securables include such objects as schemas and full-text catalogs.
    • Schema-level securables include such objects as tables, views, functions, and stored procedures.
  • Permissions: The types of access permitted to principals on specific securables. You can grant or deny permissions to securables at the server, database, or schema level. The permissions you grant at a higher level of the hierarchy also apply to children and grandchildren objects, unless you specifically deny those permissions at the lower level.

Together, these three component types provide a structure for authenticating and authorizing SQL Server users. You must grant each principal the appropriate permissions it needs on specific securables to enable users to access SQL Server resources. For example, if the sqluser01 database user needs to be able to query data in the Sales schema, you can grant the SELECT permission to that user on the schema. The user would then be able to query each table and view within the schema.

In most cases, you’ll take some or all of the following steps to provide users with the access they need to SQL Server resources:

  1. At the server level, create a login for each user that should be able to log into SQL Server. You can create Windows authentication logins that are associated with Windows user or group accounts, or you can create SQL Server authentication logins that are specific to that instance of SQL Server.
  2. Create user-defined server roles if the fixed server roles do not meet your configuration requirements.
  3. Assign logins to the appropriate server roles (either fixed or user-defined).
  4. For each applicable server-level securable, grant or deny permissions to the logins and server roles.
  5. At the database level, create a database user for each login. A database user can be associated with only one server login. You can also create database users that are not associated with logins, in which case, you can skip the first four steps.
  6. Create user-defined database roles if the fixed database roles do not meet your configuration requirements.
  7. Assign users to the appropriate database roles (either fixed or user-defined).
  8. For each applicable database-level or schema-level securable, grant or deny permissions to the database users and roles.

You will not necessarily have to carry out all these steps, depending on your particular circumstances. For example, you might not need to create any user-defined roles at the server or database levels. In addition, you do not need to follow these steps in the exact order. You might grant permissions to server logins or database users when you create them, or you might create server roles and database roles before creating the logins or users. The steps listed here are meant only as a guideline.

The examples in the following sections walk you through the process of creating principals and assigning permissions to them for specific securables. All the examples use T-SQL to carry out these operations. You can also use features built into the SQL Server Management Studio (SSMS) interface to perform many of these tasks, but knowing the T-SQL can make it easier to repeat steps and add them to your scripts.

Creating Server Logins

SQL Server supports four types of logins: Windows, SQL Server, certificate-mapped, and asymmetric key-mapped. For this article, I focus on Windows and SQL Server logins, using the CREATE LOGIN statement to define several logins. Because logins exist at the server level, you must create them within the context of the master database.

A Windows login is associated with a local Windows account or domain account. When you create the login, you must specify the Windows account, preceded by the computer name or domain name and a backslash. For example, the following CREATE LOGIN statement defines a login based on the winuser01 local user account on the win10b computer:

USE master;
GO
CREATE LOGIN [win10b\winuser01] FROM WINDOWS 
WITH DEFAULT_DATABASE = master, DEFAULT_LANGUAGE = us_english;
GO

The statement must include the FROM WINDOWS clause to indicate that this is a Windows login. In this case, the statement also includes an optional WITH clause, which specifies a default database and language.

If you’re creating a login based on a domain account, replace the computer name with the domain name, following the same format:

[<domain_name>\<windows_account>]

You should also use this format if creating a login based on a Windows group. For example, the following CREATE LOGIN statement creates a login based on wingroup01, a group defined on the local Windows computer:

CREATE LOGIN [win10b\wingroup01] FROM WINDOWS 
WITH DEFAULT_DATABASE = master, DEFAULT_LANGUAGE = us_english;
GO

By creating a login based on a group, you can provide the same level of access to any user within that group, while letting Windows and SQL Server handle authenticating and authorizing the individual users.

You can also use the CREATE LOGIN statement to define a SQL Server login (one that is not associated with a Windows account), in which case, do not include the FROM WINDOWS clause. However, you must include a WITH clause that specifies a password, as shown in the following example:

CREATE LOGIN sqluser01 
WITH PASSWORD = 'tempPW@56789' 
  MUST_CHANGE, CHECK_EXPIRATION = ON,
  DEFAULT_DATABASE = master, DEFAULT_LANGUAGE = us_english;
GO

For the password, you can provide a string value, as I’ve done here, or a hashed value, along with the HASH keyword. You can also define additional options. In this case, the WITH clause includes the MUST_CHANGE option to force the user to change the password when first logging into SQL Server. The clause also sets the CHECK_EXPIRATION option to ON, which means that the password expiration policy will be enforced on this login.

Once you’ve created a login, you can use the GRANT statement to grant permissions to that login. For example, the following statement grants the IMPERSONATE ANY LOGIN permission to the winuser01 and sqluser01 users, allowing them to run T-SQL statements within the context of another user:

GRANT IMPERSONATE ANY LOGIN TO [win10b\winuser01], sqluser01;
GO

After you’ve granted permissions to a principal, you can use the sys.server_principals and sys.server_permissions catalog views to verify that the permissions have been configured correctly:

SELECT pr.principal_id, pr.name, pe.state_desc, pe.permission_name  
FROM sys.server_principals pr INNER JOIN sys.server_permissions pe 
  ON pr.principal_id = pe.grantee_principal_id
WHERE pr.principal_id = SUSER_ID('win10b\winuser01')
  OR pr.principal_id = SUSER_ID('sqluser01');

The SELECT statement joins the two catalog views and filters the results by the two logins, using the SUSER_ID built-in function to retrieve each login’s principal identification number. Figure 1 shows the data returned by the SELECT statement.

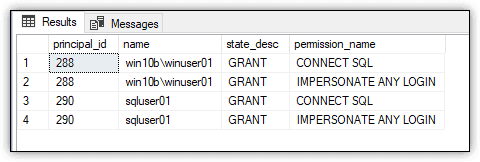
Figure 1. Viewing permissions assigned to SQL Server principals

The results show that both users have been assigned the IMPERSONATE ANY LOGIN permission, along with the CONNECT SQL permission, which is assigned by default to all logins to enable them to connect to the SQL Server instance.

Creating Server Roles

A server role makes it possible for you to group logins together in order to more easily manage server-level permissions. SQL Server supports fixed server roles and user-defined server roles. You can assign logins to a fixed server role, but you cannot change its permissions. You can do both with a user-defined server role.

Creating and configuring a user-defined server role is very straightforward. You create the role, grant permissions to the role, and then add logins—or you can add the logins and then grant the permissions. The following T-SQL takes the first approach:

CREATE SERVER ROLE devops;
GRANT ALTER ANY DATABASE TO devops; 
ALTER SERVER ROLE devops ADD MEMBER [win10b\winuser01];
GO

The CREATE SERVER ROLE statement defines a server role named devops. If you want to specify an owner for the server role, you can include an AUTHORIZATION clause. Without the clause, the login that executes that statement becomes the owner.

The GRANT statement grants the ALTER ANY DATABASE permission to the devops role, which means that any members of that role will acquire that permission. The ALTER SERVER ROLE statement adds the winuser01 login to the devops role.

That’s all there is to it. You can then use the sys.server_principals and sys.server_permissions catalog views to verify that the permissions on the devops role have been set up correctly:

SELECT pe.state_desc, pe.permission_name  
FROM sys.server_principals pr INNER JOIN sys.server_permissions pe 
  ON pr.principal_id = pe.grantee_principal_id
WHERE pr.principal_id = SUSER_ID('devops');

The statement’s results should confirm that that devops role has been granted the ALTER ANY DATABASE permission.

You can also confirm that the winuser01 login has been added to the devops role by using the sys.server_role_members and sys.server_principals catalog views:

SELECT rm.member_principal_id, pr.name  
FROM sys.server_role_members rm INNER JOIN sys.server_principals pr 
  ON rm.member_principal_id = pr.principal_id
WHERE rm.role_principal_id = SUSER_ID('devops');

The results from the SELECT statement should indicate that the winuser01 login has been added to the devops role and that no other logins are included. Of course, in a real-world scenario, you would be adding multiple logins to a user-defined server role. Otherwise, there would be little reason to create it.

Creating Database Users

After you’ve set up your server-level logins, you can create database users that map back to those logins, whether they’re Windows or SQL Server logins. You can also create database users that do not map to logins. These types of logins are generally used for contained databases, impersonation, or development and testing.

SQL Server provides the CREATE USER statement for creating database users. You must run this statement within the context of the database in which the user is being defined. For example, the following T-SQL creates a user in the WideWorldImporters database and then assigns the ALTER permission to the user on the Sales schema:

USE WideWorldImporters;
GO
CREATE USER [win10b\winuser01];
GRANT ALTER ON SCHEMA::Sales TO [win10b\winuser01]; 
GO

The winuser01 user is based on the win10b\winuser01 login. When you create a database user that has the same name as a login, you do not need to specify the login. However, if you want to create a user with a different name, you must include the FOR LOGIN or FROM LOGIN clause, as in the following example:

CREATE USER winuser03 FOR LOGIN [win10b\winuser01];
GRANT ALTER ON SCHEMA::Sales TO winuser03; 
GO

You can create only one user in a database per login. If you want to try out both these statements, you’ll need to drop the first user before creating the second. The examples that follow are based on the win10b\winuser01 user.

The two preceding examples also include a GRANT statement that assigns the ALTER permission to the user on the Sales schema. As a result, the user will be able to alter any object within that schema. Notice that the statement includes the SCHEMA::Sales element. When you grant a permission on a specific object, you must specify the type of object and its name, separated by the scope qualifier (double colons).

In some GRANT statements, the securable is implied, so it does not need to be specified. For instance, in an earlier example, you granted the ALTER ANY DATABASE permission to the devops role. Because you granted this permission at the server level for all database objects at that level, you did not need to specify a securable.

After you’ve granted permissions to a database user, you can use the sys.database_principals and sys.database_permissions catalog views to verify that the permissions have been configured correctly:

SELECT pe.state_desc, pe.permission_name  
FROM sys.database_principals pr INNER JOIN sys.database_permissions pe 
  ON pr.principal_id = pe.grantee_principal_id
WHERE pr.principal_id = USER_ID('win10b\winuser01');

Notice that the WHERE clause uses the USER_ID function and not the SUSER_ID function, which was used in the earlier examples. The USER_ID function returns the user principal ID, rather than the login principal ID. Figure 2 shows the results returned by the SELECT statement. In addition to the ALTER permission, the user is automatically granted the CONNECT permission:

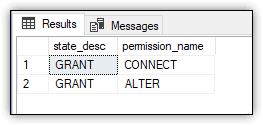
Figure 2. Viewing permissions assigned to winuser01

Creating a database user that’s associated with a SQL Server login is just as simple as creating a user based on a Windows login, especially when you use the same name, as in the following example:

CREATE USER sqluser01;
GO

The CREATE USER statement creates the sqluser01 user, but this time, the example grants no permissions. As a result, the user receives only the CONNECT permission, which you can verify by running the following SELECT statement:

SELECT pe.state_desc, pe.permission_name  
FROM sys.database_principals pr INNER JOIN sys.database_permissions pe 
  ON pr.principal_id = pe.grantee_principal_id
WHERE pr.principal_id = USER_ID('sqluser01');

You can also create a user based on a Windows account even if you don’t create a login. For example, the following statement creates the winuser02 user that’s associated with the win10b\winuser02 account on the local computer:

CREATE USER [win10b\winuser02];
GO

Creating a user in this way makes it possible to support contained databases, which do not use server logins. Once again, you can verify that the user has been granted only the CONNECT permission by running the following SELECT statement:

SELECT pe.state_desc, pe.permission_name  
FROM sys.database_principals pr INNER JOIN sys.database_permissions pe 
  ON pr.principal_id = pe.grantee_principal_id
WHERE pr.principal_id = USER_ID('win10b\winuser02');

SQL Server also lets you create a user that is not associated with either a login or Windows account. To do so, you must include the WITHOUT LOGIN clause, as shown in the following example.

CREATE USER sqluser02 WITHOUT LOGIN;
GO

Creating a user without a login can be useful for development and testing. More importantly, it can be used with SQL Server’s impersonation capabilities. Users can authenticate to SQL Server under their own credentials and then impersonate the user account that’s not associated with a login. In this way, the authentication process can be monitored, but specific types of permissions can be granted to the unassociated user.

Creating Database Roles

A database role is a group of users that share a common set of database-level permissions. As with server roles, SQL Server supports both fixed and user-defined database roles. To set up a user-defined database role, you must create the role, grant permissions to the role, and add members to the role (or add members and then grant permissions). The following example demonstrates how to set up the dbdev role:

CREATE ROLE dbdev;
GRANT SELECT ON DATABASE::WideWorldImporters TO dbdev;
ALTER ROLE dbdev ADD MEMBER [win10b\winuser01];
ALTER ROLE dbdev ADD MEMBER sqluser01;
GO

The CREATE ROLE statement creates the database role. The GRANT statement grants the role the SELECT permission on the database. The two ALTER ROLE statements add the winuser01 and sqluser01 users to the role.

You can verify that the SELECT permission has been granted to the role by running the following SELECT statement:

SELECT pe.state_desc, pe.permission_name  
FROM sys.database_principals pr INNER JOIN sys.database_permissions pe 
  ON pr.principal_id = pe.grantee_principal_id
WHERE pr.principal_id = USER_ID('dbdev');

In some cases, you might want to see the effective (cumulative) permissions granted to a principal on a securable. A simple way to do this is to use the fn_my_permissions table-valued function, specifying the securable and its type.

The trick to using this function is to call it within the execution context of the specific user. To do so, you must first issue an EXECUTE AS statement and then, after running your SELECT statement, issue a REVERT statement, as shown in the following example:

EXECUTE AS USER = 'win10b\winuser01'; 
SELECT * FROM fn_my_permissions ('Sales.BuyingGroups', 'OBJECT'); 
REVERT;  
GO

The fn_my_permissions function takes two arguments: the target securable and the type of securable. In this case, the target securable is the Sales.BuyingGroups table, and the securable type is OBJECT, which includes schema-level securables such as tables, views, and stored procedures. Figure 3 shows the results returned by the SELECT statement.

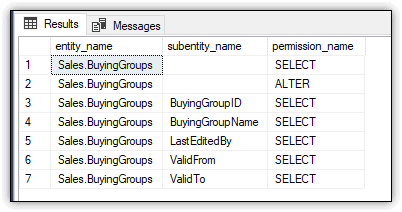
Figure 3. Viewing effective permissions for winuser01

As you’ll recall from the previous section, the ALTER permission was granted to winuser01 after the user was created, and the SELECT permission was granted to the role after it was created. Notice that each of the table’s columns is also assigned the SELECT permission.

Now run the same SELECT statement within the execution context of the sqluser01 user:

EXECUTE AS USER = 'sqluser01'; 
SELECT * FROM fn_my_permissions ('Sales.BuyingGroups', 'OBJECT'); 
REVERT;  
GO

The SELECT statement returns the results shown in Figure 4, which are specific to the user specified in the EXECUTE AS statement.

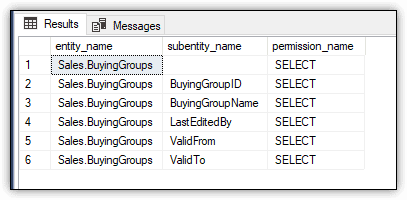
Figure 4. Viewing effective permissions for sqluser01

This time, the ALTER permission is not included in the results because that permission was never granted to that user.

Digging into Permissions

Several of the examples so far have used the GRANT statement to assign permissions to principals, but SQL Server actually provides three T-SQL statements for working with permissions:

  • Use a GRANT statement to enable principals to access specific securables.
  • Use a DENY statement to prevent principals from accessing specific securables. A DENY statement overrides any granted permissions.
  • Use a REVOKE statement to remove permissions that have been granted to principals on specific securables.

Permissions are cumulative in that the user receives all permissions granted specifically to the database user as well as to its associated login. Also, if the user has been assigned to a database role or if the login has been assigned to a server role, the user receives the role permissions as well.

Permissions are also transitive, based on the hierarchical nature of the server, database, and schema securables. For example, if you grant the UPDATE permission to a user for a specific database, the user will also be granted the UPDATE permission on all schemas and schema objects such as tables and views.

In addition, some permissions are covering, that is, they include multiple permissions under a single name. A good example of this is the CONTROL permission, which includes such permissions as INSERT, UPDATE, DELETE, EXECUTE, and several others. For instance, the following GRANT statement grants the CONTROL permission to sqluser01 for the Sales schema:

GRANT CONTROL ON SCHEMA::Sales TO sqluser01;

After granting the CONTROL permission, you can again use the fn_my_permissions function to view the effective permissions for that user on the Sales schema:

EXECUTE AS USER = 'sqluser01'; 
SELECT * FROM fn_my_permissions ('Sales', 'SCHEMA'); 
REVERT;  
GO

Figure 5 shows the results returned by the SELECT statement.

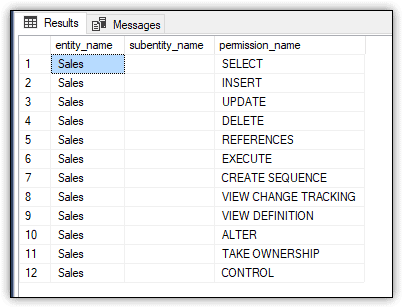
Figure 5. Viewing effective permissions on the Sales schema

The SELECT permission was granted to the user at the database level through the dbdev role and at the schema level as part of the CONTROL permission, as are the rest of the permissions shown in the results. You can also view the effective permissions on an object within the Sales schema by using the following SELECT statement:

EXECUTE AS USER = 'sqluser01'; 
SELECT * FROM fn_my_permissions ('Sales.BuyingGroups', 'OBJECT'); 
REVERT;  
GO

In this case, the fn_my_permissions function specifies the BuyingGroups table as the target object. As a result, the SELECT statement now returns 25 rows of permissions on that table for sqluser01. Figure 6 shows the first 13 rows from that result set.

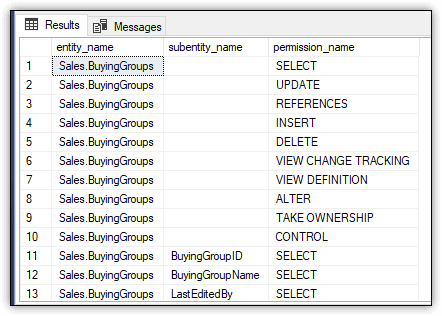
Figure 6. Viewing effective permissions on the BuyingGroups table

As you can see, covering permissions help simplify the process of granting access to the database objects. Without them, your GRANT statements would look more like the following:

GRANT SELECT, INSERT, UPDATE, DELETE, REFERENCES, 
EXECUTE, CREATE SEQUENCE, VIEW CHANGE TRACKING, 
VIEW DEFINITION, ALTER, TAKE OWNERSHIP, CONTROL
ON SCHEMA::Sales TO sqluser01;

You can also deny permissions on securables. This can be useful when you want to grant permissions at a higher level in the object hierarchy but want to prevent those permissions from extending to a few of the child objects. For example, you can deny the CONTROL permission to sqluser01 on an individual table within the Sales schema, as shown in the following example:

DENY CONTROL ON OBJECT::Sales.BuyingGroups TO sqluser01;

When you deny the CONTROL permission, you deny all permissions that are part of CONTROL, including the SELECT permission. You can verify this by running the following SELECT statement:

EXECUTE AS USER = 'sqluser01'; 
SELECT * FROM fn_my_permissions ('Sales.BuyingGroups', 'OBJECT'); 
REVERT;  
GO

The SELECT statement returns an empty result set, indicating that sqluser01 no longer has any type of permissions on the BuyingGroups table.

The DENY permission takes precedence over all granted permissions, no matter where in the object hierarchy permissions are granted or denied. However, denying permissions on one object does not impact other objects unless they’re child objects. For example, the following SELECT statement shows that all permissions are still intact on the CustomerCategories table in the Sales schema:

EXECUTE AS USER = 'sqluser01'; 
SELECT * FROM fn_my_permissions ('Sales.CustomerCategories', 'OBJECT'); 
REVERT;  
GO

However, if you deny permissions on an object that contains child objects, the permissions are also denied on the child objects. For instance, the following DENY statement denies sqluser01 the ALTER permission on the Sales schema:

DENY ALTER ON SCHEMA::Sales TO sqluser01;

If you now run the following SELECT statement, you’ll find that the ALTER permission is no longer granted at the Sales schema:

EXECUTE AS USER = 'sqluser01'; 
SELECT * FROM fn_my_permissions ('Sales', 'SCHEMA'); 
REVERT;  
GO

You’ll get the same results if you check the effective permissions on one of the objects in the Sales schema, such as the CustomerCategories table:

EXECUTE AS USER = 'sqluser01'; 
SELECT * FROM fn_my_permissions ('Sales.CustomerCategories', 'OBJECT'); 
REVERT;  
GO

Once again, the ALTER permission is no longer listed.

In some cases, you will need to roll back the permissions that have been granted on an executable, in which case, you can use the REVOKE statement. For example, the following REVOKE statement removes the CONTROL permission from the Sales schema for sqluser01:

REVOKE CONTROL ON SCHEMA::Sales TO sqluser01;

After revoking the CONTROL permission, you can once again use the fn_my_permissions function to view the effective permissions for that user on the Sales schema:

EXECUTE AS USER = 'sqluser01'; 
SELECT * FROM fn_my_permissions ('Sales', 'SCHEMA'); 
REVERT;  
GO

This time, only the SELECT permission is listed. That’s because this permission was granted separately at the database level as part of the dbdev role. You can also verify the effective permissions on the CustomerCategories table:

EXECUTE AS USER = 'sqluser01'; 
SELECT * FROM fn_my_permissions ('Sales.CustomerCategories', 'OBJECT'); 
REVERT;  
GO

Once again, the results indicate that only the SELECT permission has been granted on this table, as shown in Figure 7.

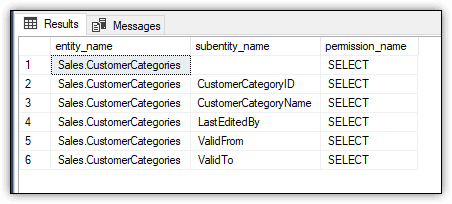
Figure 7. Viewing effective permissions on the CustomerCategories table

When working with permissions, be careful not to confuse the DENY statement with the REVOKE statement. You could end up unintended consequences when users receive permissions from multiple sources, as in the examples above. For example, if you had denied sqluser01 the CONTROL permission to the Sales schema, rather than revoke the permission, the user would no longer have SELECT permissions to the schema and its objects.

Controlling Access to SQL Server Data

Controlling access to SQL Server becomes an increasingly complex process as more users are added and the data structure itself becomes more complicated. Your goal should be to limit users to the least amount of privileges they need to do their jobs. Don’t grant the CONTROL permission on the database when they need only the SELECT permission on a couple of tables. At the same time, don’t make more work for yourself than necessary. If a user needs the SELECT permission on all tables in a schema, grant the permission at the schema level.

SQL Server provides the ability to grant users the access they need at the level they need it. The GRANT, DENY, and REVOKE statements—along with the wide assortments of permissions (230 in SQL Server 2016 and 237 in SQL Server 2017)—make it possible to implement controls at a very granular level, while still providing the flexibility necessary to accommodate access at a higher level in the object hierarchy. However, controlling access takes careful planning and implementation. This is not the time for shortcuts or casual one-offs. The more diligently you control data access, the better for everyone and the more precise the control you have over the data.

The post Introduction to SQL Server Security — Part 2 appeared first on Simple Talk.


from Simple Talk http://bit.ly/2HCdUYp
via

Tuesday, January 22, 2019

The BI Journey: The Analyst

AdventureWorks, the famous bicycle and accessories seller, has hired a new intern who joined the North American regional sales department. Ruthie, who is studying for a degree in IT, landed the internship to work for the Sales Manager Stephen as an analyst among other roles. Energetic and enthusiastic as she is, Ruthie is always on the lookout to provide value and help her boss do his job better. Recently over lunch, Stephen was telling Ruthie about how his friend’s finance company was looking at analytics to help drive business while wondering how it could probably help sales at AdventureWorks and help him make informed decisions.

Ideas

Ruthie was at once taken up by the idea and decided to do some research. She soon found out about the value of data, and how analytics could help gain insights into the business, which in turn could be used to take appropriate action or make informed decisions about the business’ direction. She called one of the database administrators at AdventureWorks and requested a set of sales data. After a bit of reluctance and mumbling about data security, the DBA, Dan, gave her a dataset that he had pulled out of the sales database, warning her to be aware of the security of the data. Ruthie immediately got to work.

After some research, she decided to use Power BI since she could get started fast for free, and for the plethora of learning and support materials that were available on the Internet. After spending a couple of days familiarizing herself with the tool, she was ready to start. The data she received was an Excel spreadsheet with sales transactions and another Excel spreadsheet with a few entities which were part of the sales process.

Figure 1: Sheets from Excel Sources (sales.xlsx and entities.xlsx)

The first task that she knew she had to do was to create a dataset from these files to facilitate building her very first “dashboard,” essentially a Power BI report. The AdventureWorks’ first ever venture into Business Intelligence. Something that Ruthie nor Stephen had realized.

Business intelligence, in a lot of cases, starts within departments of an organization. However, not many know about it in the wider organization. These initiatives are usually performed by analysts with some support from IT using Excel. The success of these initiatives has mixed results. It is up to those driving these initiatives to keep evolving it by improving it to provide more value.

Data Access

The sales transactions data was a crude combination of sales order header and detailed records, with IDs of each entity that were supplied in the entities file. The entities file had a sheet each for the following entities:

  • Products
  • SalesPersons
  • Customers

Going through the products sheet, Ruthie saw that it was a quick dump, just like the sales transactions without much formatting. There were three columns called “Name” with different values for the same record. She quickly figured that one was for the products’ actual names, the other was the products’ subcategories, and the third was the products’ categories. Ruthie gave a thankful smile that Dan had given a little thought to the data he had given her despite his grouchiness. She figured that she will have to analyze the rest of the sheets, as well as the sales transaction thoroughly so that she could profile data as being part of a hierarchy, how they related with data from other tables, if data was completely available, so on and so forth, before she could start to create her reports. Other than that, to Ruthie, it looked like the files had enough information for her to get started with.

Figure 2: Sample data from Sales transaction file (Sales.xlsx)

Figure 3: Sample data from Entities file – Products sheet (Entities.xlsx)

Figure 4: Entities file – SalesPersons sheet (Entities.xlsx)

Figure 5: Sample data from Entities file – Customers sheet (Entities.xlsx)

Getting access to data is one of the first steps in analytics. Despite being a simple step as assumed by most, especially in a corporate setting, obtaining data access is a tedious process. The major reason for this being the security of data. Would a DBA want to put the organization’s data in the hands of an intern? No. Therefore, until the value is shown through business intelligence and becomes a necessity, you usually would only be blessed with a small subset of it.

Data Preparation

What Ruthie had in mind, as would so many others who were new to building reports was of a flat dataset that combined data from all the sheets from both the files, without the columns that she thought were not necessary or not valuable enough to report on. She also decided to focus on just one business activity for her pilot for a quick win: sales orders analysis.

To get started on her dataset, Ruthie opened Power BI Desktop on her PC and connected to the sales.xlsx file. She used the Power Query Editor to build the query to structure her dataset.

She then performed the following general steps:

  1. Chose the fields that she felt were important for analysis
    (including the ID fields of the entities, since she knew she this was the only link to the entities in the Entities file)
  2. Formatted the fields with appropriate data types

Figure 7: Cleansed sales orders

She could then analyze the number of sales orders (by counting SalesOrderID), the quantity of items ordered (by summing up OrderQty), and the value of items ordered (by calculating it using OrderQty, UnitPrice, and UnitPriceDiscount).

By adding a custom column to calculate the order value and getting rid of the UnitPrice and UnitPriceDiscount, she now had what she needed in terms of data to measure.

Figure 8:Cleansed sales orders with OrderValue as a calculated column

She felt this was good enough for now and should now bring in the entities. She once again pulled up the Power Query Editor and connected to the Entities.xlsx file and chose all the sheets. She then performed the same two steps she performed on the sales.xlsx files. She then performed several more steps on the queries to end up with simple results for each entity query. The following images show what the results of these queries look like.

Figure 9:Cleansed Customers

Figure 10: Cleansed SalesPersons

Figure 11: Cleansed Products

Each query contains the ID along with the name of the entity, except for Products, which contains two additional columns for subcategories and categories for the products. She then merged the entities with the entity queries with the sales query and removed the ID columns.

The final query looks like this, a big fat sales orders table with relevant entities columns:

Figure 12: Sales Orders

Prepping and modeling data are probably the most time-consuming tasks when building a business intelligence solution. Data needs to be profiled and checked for all sorts of errors, business logic validated, and then structured and formatted. It will probably also need to be combined with other tables to make up the perfect model for reporting.

Now that the data structure is in place, Ruthie began building the report. She came up with a Sales Order Analysis dashboard which depicts the number of orders, the value of orders and the number of items sold. The dashboard has doughnut chart-based depictions of the three metrics by product category and by salespersons. The product category doughnuts allow for drill through to the Detail page, which shows a detailed analysis of the selected product category.

Figure 13: Sales Order Analysis “dashboard”

Figure 14: Detailed Sales Order Analysis page

The report shows some basic metrics, with detailed analysis. It, however, does the job, and Ruthie believed this would be good enough to get Stephen interested and his head sparking off ideas. She also included a phone view of the report, so that Stephen could see what was going on with sales wherever he was.

Getting to this point with the report was not a straightforward activity. Data was first tried out on the canvas several times with different visuals to build a story.

A close up of a logo Description generated with high confidence

Figure 15: Sales Order Analysis on phone view

Ruthie did not waste time before showing this to Stephen. She quickly scheduled a meeting before Stephen left for the day, and ran him through the entire report, and even showed him how he could whip up his own report quite easily off the data structure she had built.

Stephen was quite impressed, especially since it just took a couple of days’ effort to get to this point. He was already shooting off ideas in his head as Ruthie guided him through the report. He could see so much potential in this type of solution where Ruthie had not relied on IT’s help too much, and the ability to build reports himself as long as he had the data set-up.

Tweaking for Value

He remembered that he used an Excel spreadsheet to store monthly sales targets that he set for all his sales representatives. He had never used it to measure the sales representatives’ performance effectively; he only used it to draw out the monthly targets based on the previous years’ sales patterns before sending it to the sales representatives – it was all just manual. Maybe he could ask Ruthie to include this spreadsheet into the mix and see if she could come up with more valuable insights.

He also found that switching between the two years to compare the previous year’s sales against this year’s sales was cumbersome, and he could not gauge how well sales were doing this year compared to the last. He quickly put down a list of improvements he would like to see in the next version of the report and handed it down to Ruthie.

Ruthie sighed. Stephen had not shown any enthusiasm nor excitement, except for the grunting sound he made when he kept clicking on the Year slicer switching back and forth between the previous and current year repeatedly. But then she held that piece of paper he had handed her. It was an impressive set of requirements: he wouldn’t want her to do all that if he didn’t find the solution appealing.

The list:

  • A better way of comparing the current year against the previous year
  • Use my targets spreadsheet. I want to measure each of the reps’ sales against it
  • Get proper naming, I can’t stand words stuck together, and I want to understand the dataset better if I was to do my own reporting
  • I want to see territory-wise as well. Will be nice on a map! I don’t know if you could do that
  • It would be nice to see which reps are more motivated. You know if they were single would they perform better, or if they were younger would they not be too enthusiastic, you know that kind of thing
  • And Ruthie, make sure numbers are properly formatted. I don’t know if one thing is in dollars or quantity!
  • Sales trends for the last five years would be a good thing too

Ruthie smiled to herself and packed her backpack. She planned to spend her weekend working on the report. It was way more interesting than the movie marathon she had planned with her BFFs. But just before she left for the day, she stopped by the DBA’s cubicle. Dan was usually in the office until late. She asked him if she could have more data and got into a conversation about analytics with him. Dan said he would see if he could send her the data before he left for the day but was in no mood to talk about analytics. He thought it was great that organizations were getting into it, but his passion was automating whatever he could with PowerShell. He gave her the contact information of a local analytics guy who worked a lot with the community; he said George would surely be happy to talk to her about it and that he would give George a heads up. The ever-enthusiastic Ruthie didn’t waste time contacting George who was more than ready to help and set up to meet for breakfast at the local coffee shop.

George was already at the coffee shop after his morning jog when Ruthie got there. He liked those who took up technology with a zing, especially if it was analytics. He took a look at the dataset Ruthie had built, shook his head slightly, then nodded at it. He looked at the list Stephen had given her and then proceeded to explain how to build a proper dataset. He called it a semantic model, something Ruthie thought sounded pretentious but decided to go along with since, after all, he was an expert.

An Expert’s Advice

George explained that the dataset that she had created was good enough for the current scenario but would soon become cumbersome when she needed to mash up data with more data sources. The best example he pointed was the targets spreadsheet that Stephen had given. The granularity of the current data set was product + customer + salesperson + date; the combination of each entity that makes up your transaction. The granularity of the targets spreadsheet, however, is product category + salesperson + month. Hence, these cannot be combined into one query (or table). He quickly tutored how to structure the data using a technique called dimensional modeling, which divides the data into facts and dimensions. Facts were those columns that she would measure or analyze, whereas dimensions were those columns that you used to analyze by. It was the entities that turned into dimensions, and you often you could group up dimensions within a single table itself such as the product dimension having the product name, product subcategory and product category. Or the date dimension which would contain the date, week, month, quarter and year columns. He drew up the semantic model for Ruthie’s case, and explained that once she’d got a correctly designed data model, then reporting on top of that would be very flexible; reports could be drawn up to answer different types of questions that get asked.

George also gave Ruthie a few more tidbits of best practices and advice when building a semantic model:

  • Create measures (using DAX) and hide relevant fact columns
  • On measure tables, ensure that only measures are made visible
  • On dimension tables, ensure only columns that make sense for analysis are made visible
  • ID columns, regardless of measure or dimension table, should be hidden
  • Format measures appropriately with currency symbols, thousand separators, percentages, etc.
  • Create hierarchies out of columns for users to easily use them in reports
  • Name tables and columns with proper business jargon, while formatting them to give maximum user-friendliness

Towards noon, while Ruthie got ready to start work back at her apartment, she received an email from Dan. He had created views on top of all the tables that she needed and had also created a special credential for her to access all this. Ruthie was content and started on her work.

When it comes to getting business value out of a business intelligence solution, there are a few cycles that one would have to go through. This includes new data points, change of visuals, and sometimes the underlying data model itself, along with changes to the user interface. This section outlined what can be expected when it comes to tweaking a self-service business intelligence solution, plus provided some rules and best practices that should be followed.

Aftermath

On Monday morning, Ruthie was super excited to show Stephen the results of her project. She had covered almost everything that he had asked her to.

The impressed Stephen spent most of the day understanding the analysis, playing around with the reports, and noting down feedback and changes that he wanted. He was now seeing real value: he could see which of his salespeople were pulling their weight, which products were successful in which regions, and how healthy his KPIs as a sales manager were. Throughout the course of the next few days, Stephen and Ruthie spent time perfecting the little solution. What they now had was a business intelligence solution built in-house using self-service.

When it comes to business intelligence, a solution need not be a comprehensive solution that spans multiple technologies, or multiple services, or many weeks of requirements gathering, or many months of development. The ultimate criterion is that it gives value fast. Hence, even a Power BI based model with a couple of reports, if done right, can be sufficient. However, today’s solution will not suffice tomorrow. The needs of business users keep changing; the questions they ask keep changing; the answers they seek keep changing. These changes may require more data from new and complex sources, and that’s when you start looking for new technologies or methods to help support the new requirements if necessary. Business Intelligence and Analytics, consequently, are evolutionary. It is a journey an organization needs to take.


The post The BI Journey: The Analyst appeared first on Simple Talk.


from Simple Talk http://bit.ly/2HmPyBt
via