Thursday, May 30, 2019

Reporting Services Basics: Creating Your First Report

The series so far:

  1. Reporting Services Basics: Overview and Installation
  2. Reporting Services Basics: Creating Your First Report

In the previous article in the series, I explained a bit about the history and architecture of SSRS and helped you get a development environment set up. Now it’s time to start building your first report. The reports in this article are based on the AdventureWorks2017 database, which you should have restored if you followed along with the earlier article.

Solutions and Projects

For those of you familiar with working in Visual Studio, you will already understand the concept of solutions and projects. A solution contains one or more project, and the projects may be of all the same or different project types. For example, I was working on a business intelligence project a few years ago and had four different types of projects in my solution, one of which was an SSRS project. Figure 1 shows what my solution looked like.

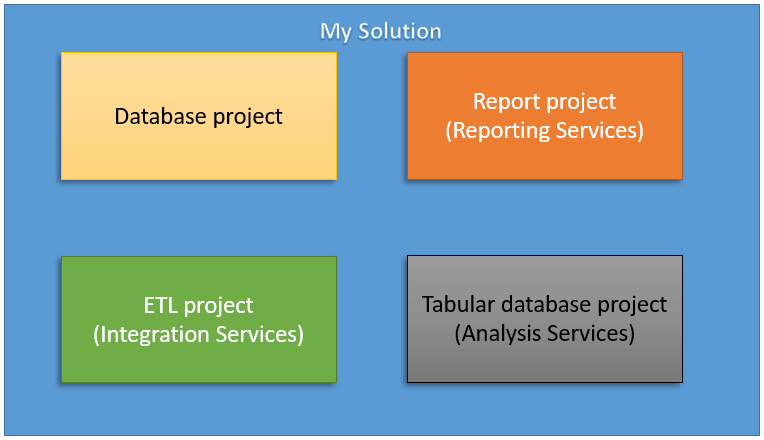
Figure 1: My BI project organization

In theory, you could have one solution and one project for all the work you do for years developing reports, but that is not very practical. Typically, you might have a project for one topic area, project, or department. It’s up to you (or your manager) how you organize you work.

There are two ways to create an SSRS project, either manually or with a wizard. I will show you the wizard method in this article, which sets up the project as you create a report.

Using the Report Wizard

The report wizard is not the best way to create a report, but it is a nice way for beginners to SSRS to get started. Generally, the reports you create through the wizard won’t meet any but the most basic development requirements, but do not discount it entirely. It will allow you to get a report up and running with zero code and zero property setting, and the resulting report often makes a good starting point for more complicated reports. Once you’ve created a report with the Report Wizard, you are free to modify it further as you wish, just as for a report you create from scratch, manually.

Your very first report project, MyFirstProject, demonstrates how to create a report with grouping levels, including one of the dynamic features, collapsing and expanding sections. The result is not perfect, but it is a good start.

To create a report project with the wizard, follow these steps:

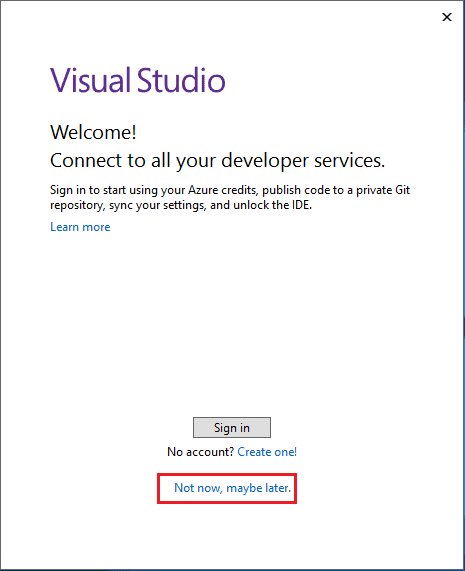
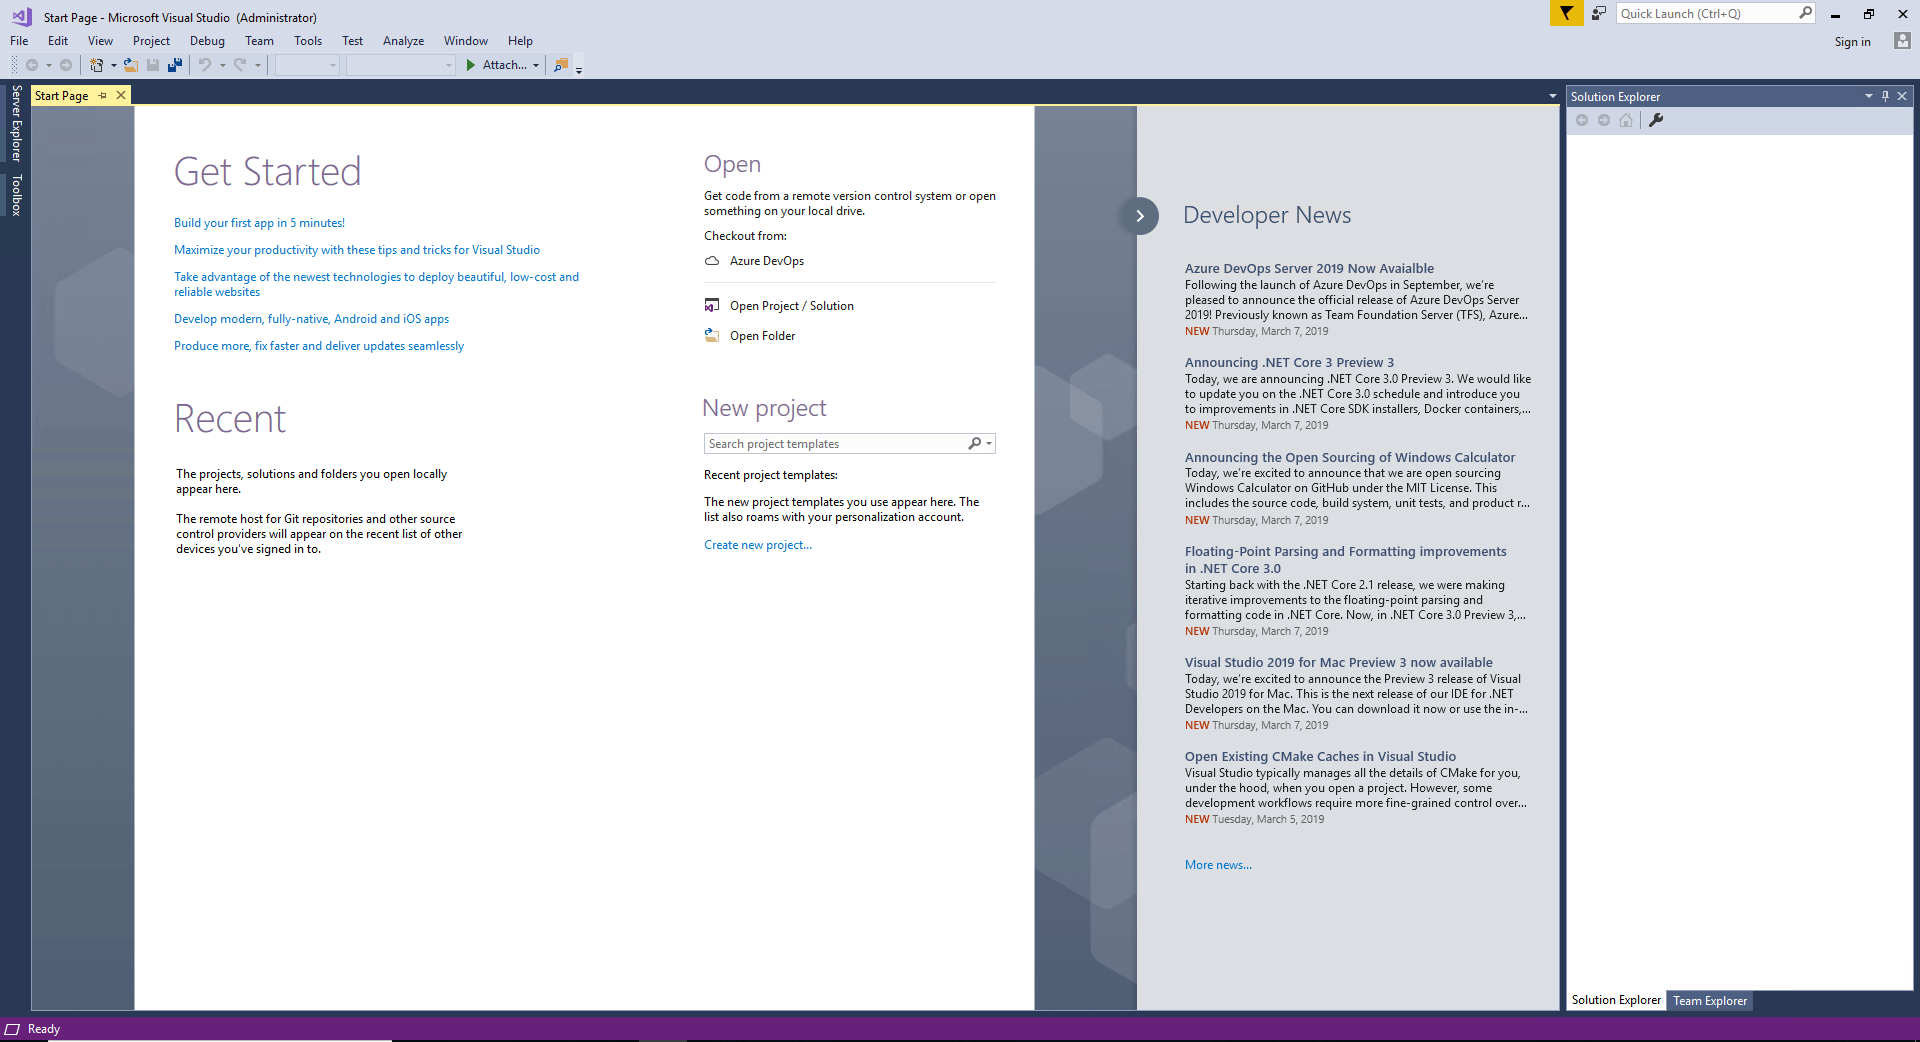
  1. Search for and launch Visual Studio (SSDT). If this is the first time you have run Visual Studio, you’ll be greeted by this screen. You will be prompted to sign in to the online developer services. For now, just click Not now, maybe later.

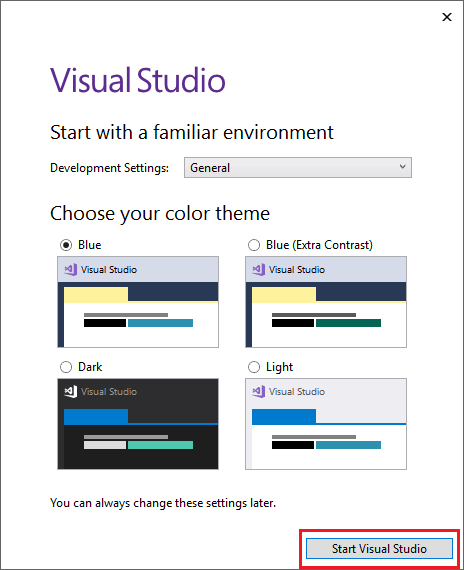
  1. You can select which color theme you would like to use. Select one and click Start Visual Studio.

  1. When Visual Studio opens, you’ll see a screen that looks like this:

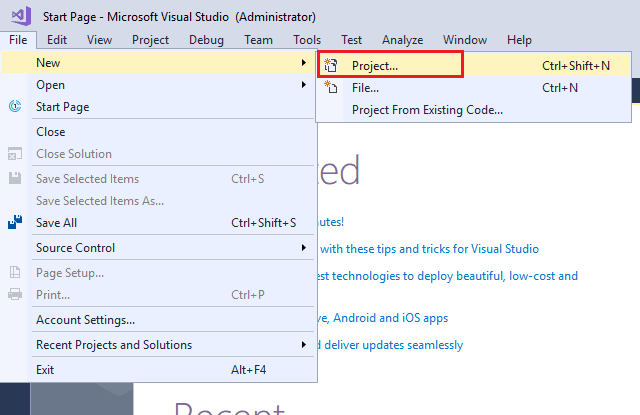
  1. To create the project, select File New Project…

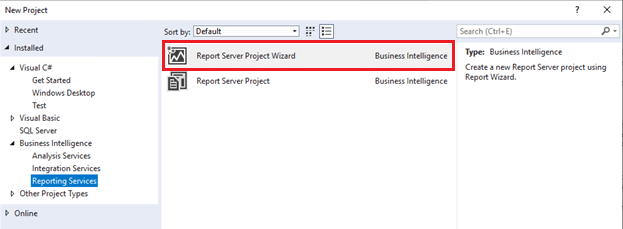
  1. Look for the Reporting Services templates in the Business Intelligence section and select Report Server Project Wizard. (You may have to look around; when I recently installed SSRS, Reporting Services didn’t end up in that section.)

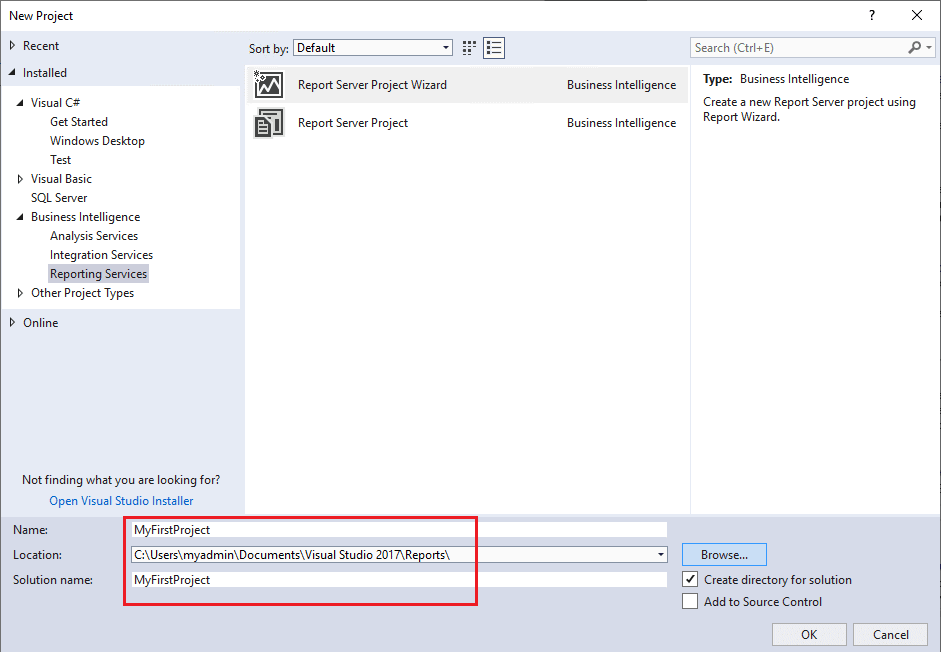
  1. Fill in a name for the project and location. Notice that the Solution name will automatically be the same as the project name. You can override that if you wish.

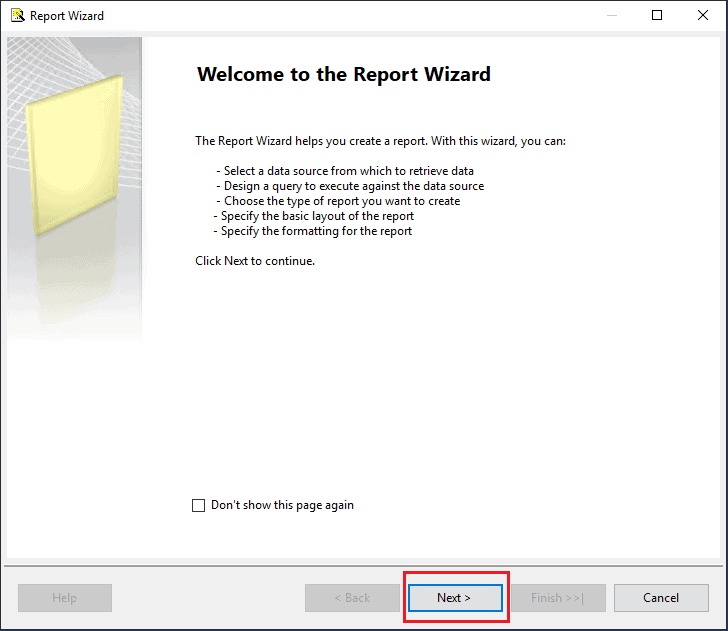
  1. Click OK, which will launch the wizard. Click Next on the introduction page.

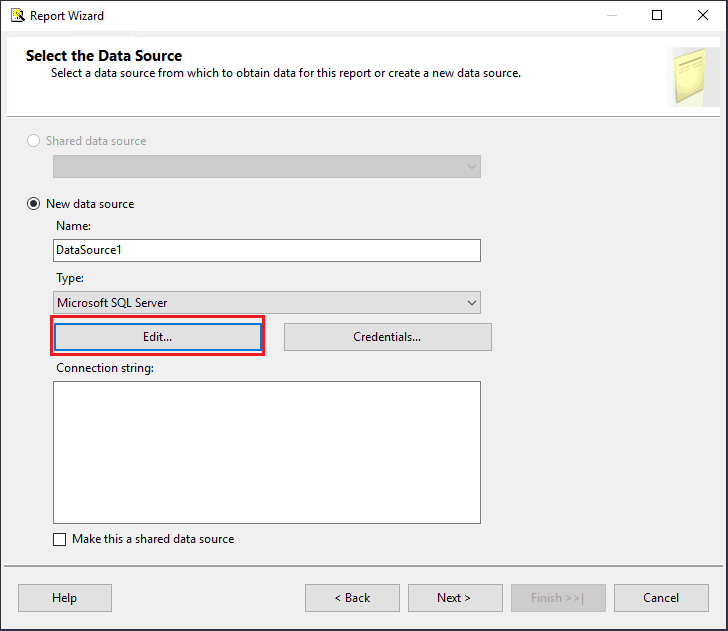
  1. On the Select the Data Source page, you will set up a new data source. You’ll learn more about data sources and datasets in the next article in this series. Click the Edit button.

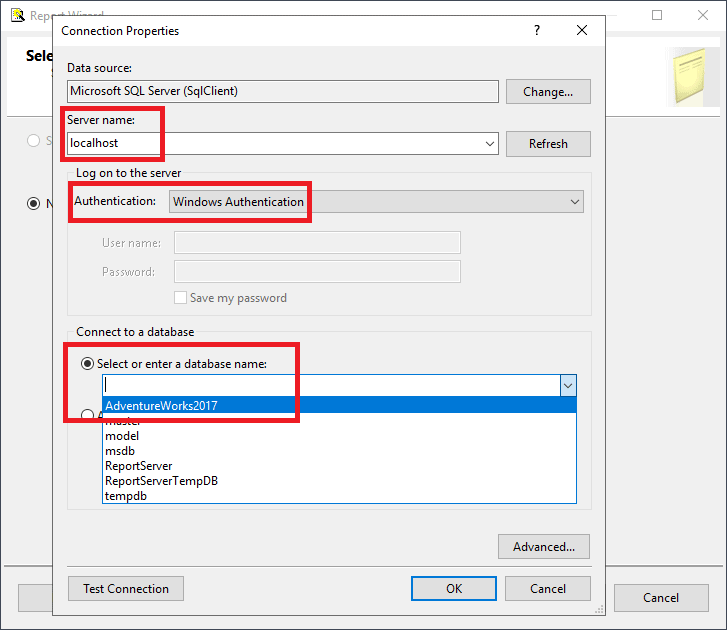
  1. This brings up the Connection Properties window. Enter the SQL Server name, and, if local, you can type in localhost. If you have a named instance, you will need to use this syntax: [computername]\[instancename].
  2. Leave the Authentication setting at Windows Authentication.
  3. Click the dropdown to find the AdventureWorks2017 database.

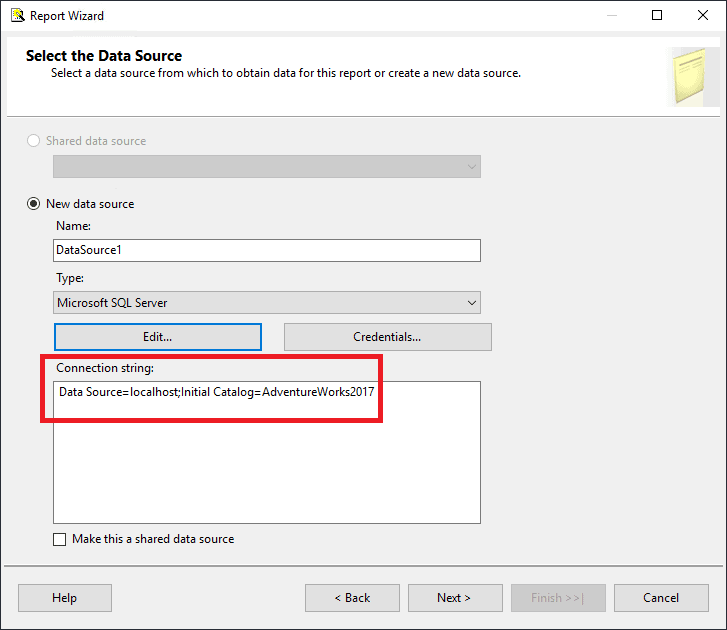
  1. Click OK to save the connection properties. You’ll now see the Connection string in the dialog.

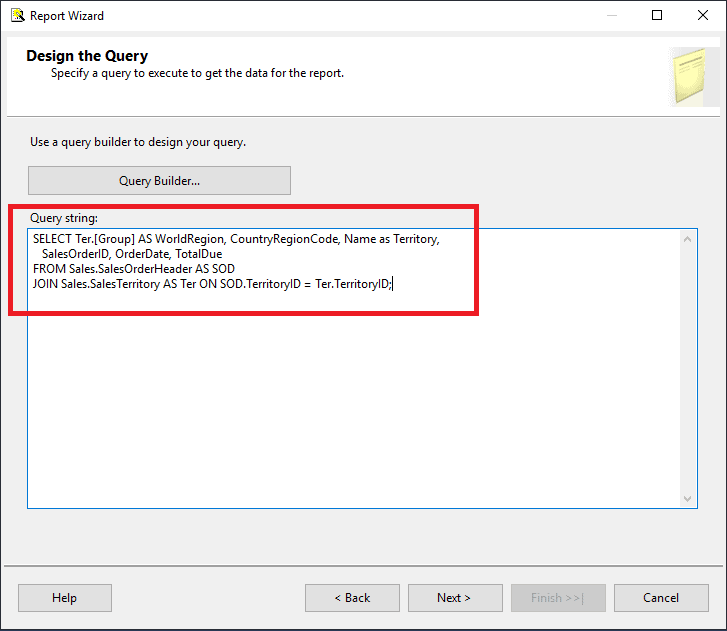
  1. Click Next to move to the Design the Query page. There is a Query Builder which you can use, or just write your query in SSMS to make sure it runs as expected. In this case, I’m providing a query for you. Paste this query into the Query string window:
SELECT Ter.[Group] AS WorldRegion, 
    CountryRegionCode, 
    Name as Territory, 
    SalesOrderID, 
    OrderDate, 
    TotalDue 
FROM Sales.SalesOrderHeader AS SOD
JOIN Sales.SalesTerritory AS Ter 
    ON SOD.TerritoryID = Ter.TerritoryID;

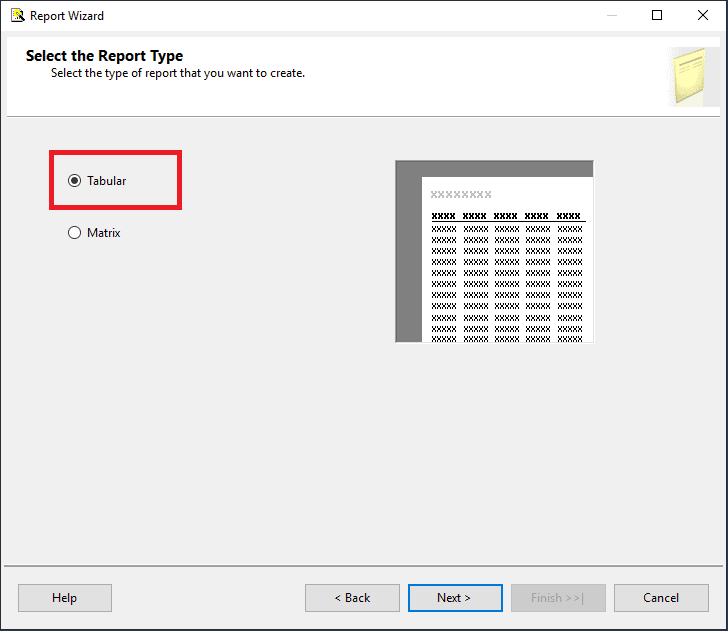
  1. Click Next to move to the next screen where you can select either a Tabular or Matrix report. A Matrix report is like a pivot table in Excel. For now, select Tabular.

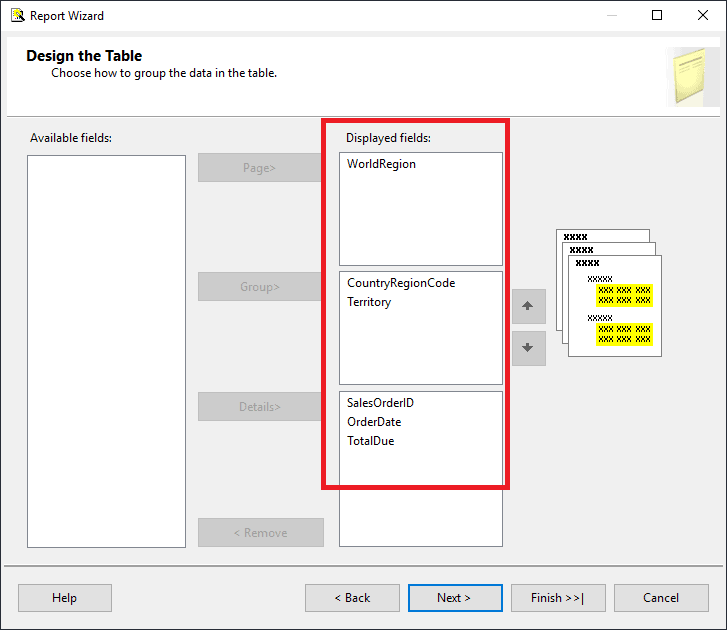
  1. Click Next to move to the Design the Table screen. I’ll tell you what to do here, but when you are creating a real report, you will need to figure out how the grouping levels, if any, need to be arranged before you start working on the report. Select the fields and move them to the proper areas.


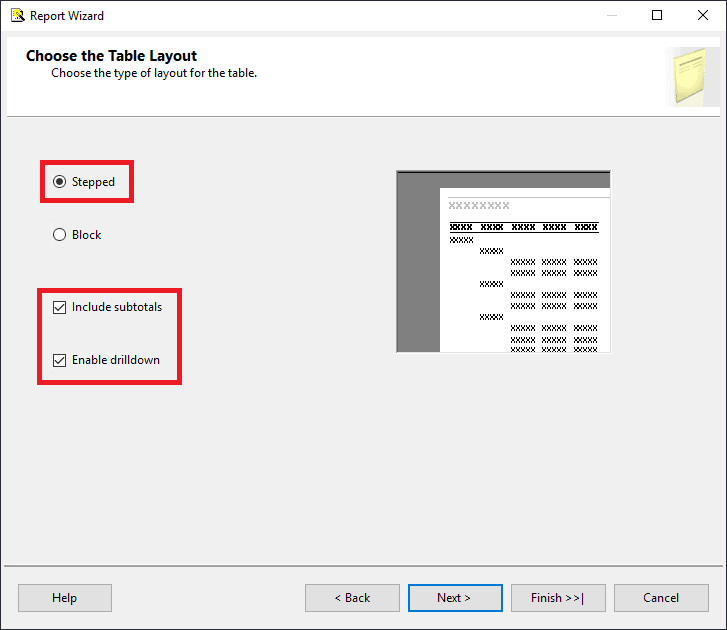
  1. Click Next to move to the Choose the Table Layout page. You have the choice of Stepped or Block. Click each to see how the report layout will look. For this example, choose Stepped and also select Include subtotals and Enable drilldown.

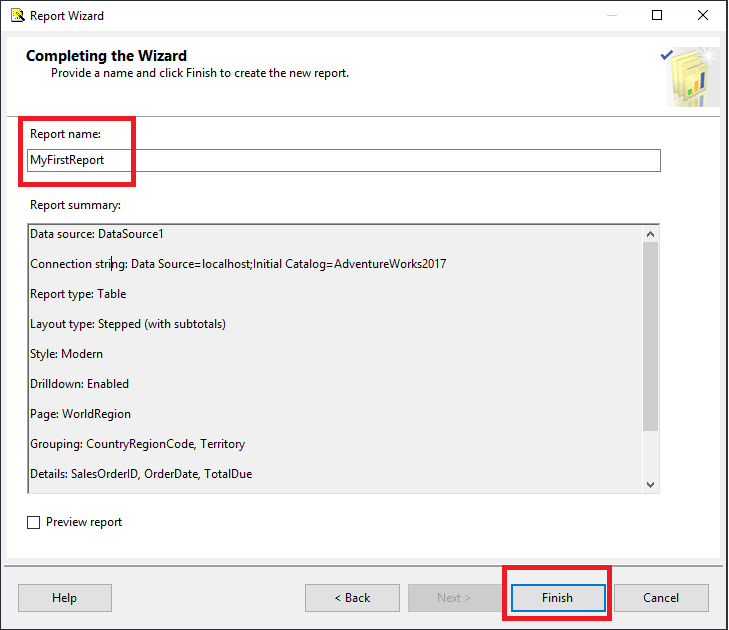
  1. Click Next to move to the Completing the Wizard page. Here you should add a Report name and click Finish to build the report.

Viewing the Wizard Report

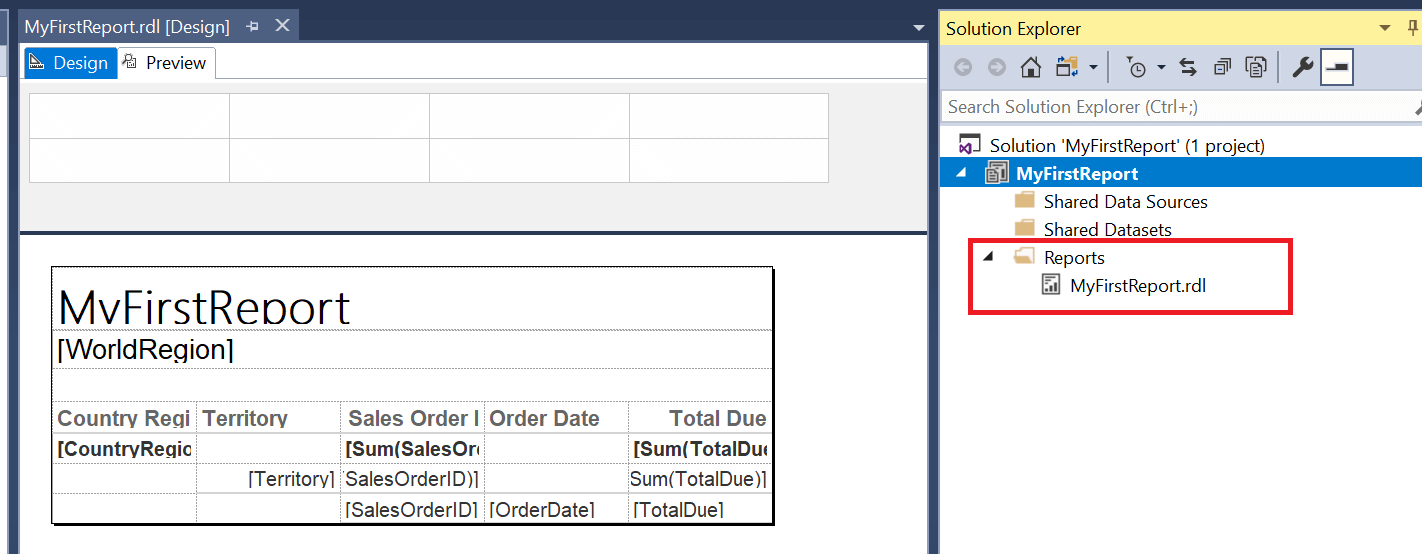
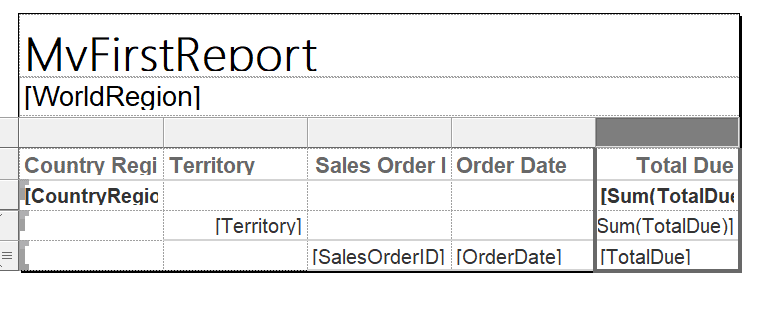
Once the wizard creates the report, you’ll see the definition and the report listed in the Solution Explorer.

To view how the report looks when it’s run, click the Preview tab at the top.

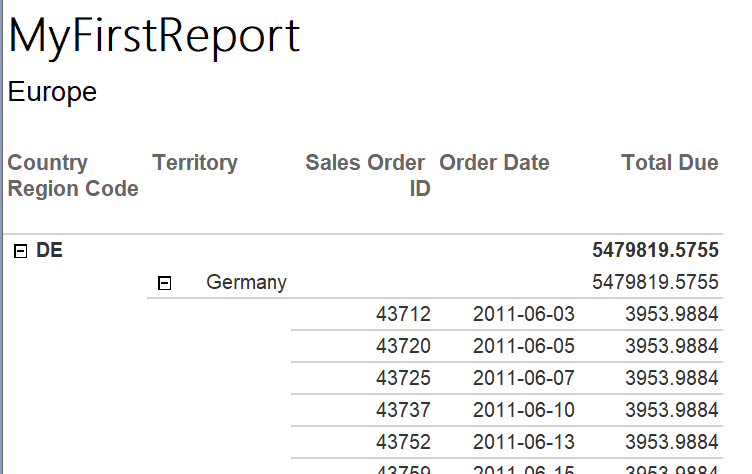
When previewing, SSRS will combine the report definition with the actual data. The interesting thing about this report is that you selected Enable drilldown, so the sections are collapsed.

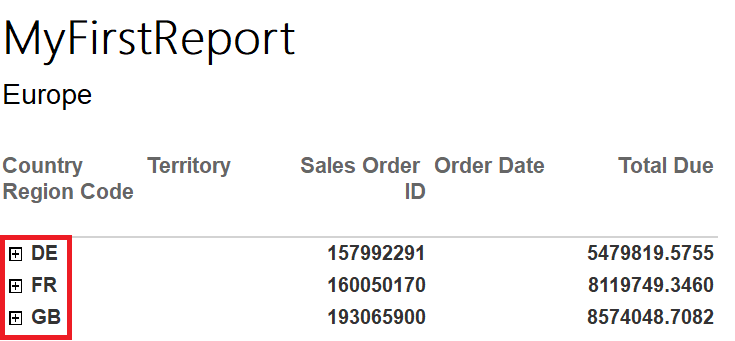
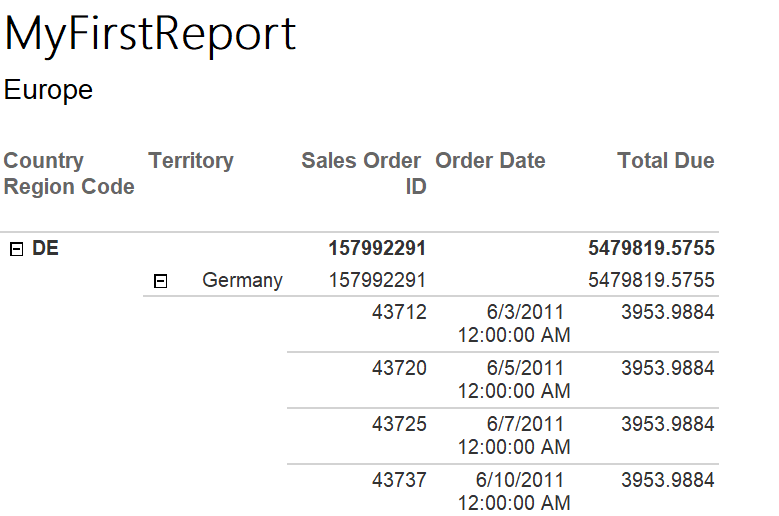
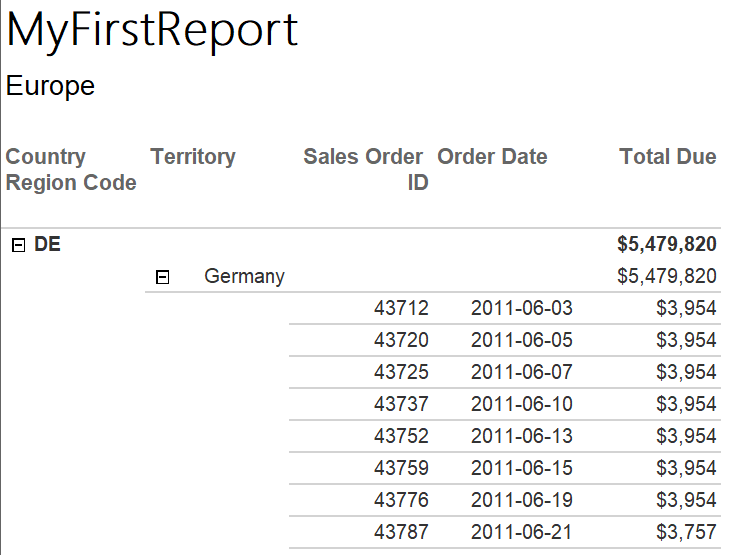
Click the first plus sign to expand the section. You’ll see that there is another section that can be expanded to see the details.

Cleaning up the Wizard Report

The wizard successfully created a report, but there are some things to clean up. For example, wouldn’t it be nice to format the currency fields? You might also want to add some color to the report.

Here is a list of items that must be cleaned up before the report is useful:

  • Remove totals and subtotals from Sales Order ID fields
  • Format date fields
  • Format currency fields
  • Adjust widths

Selecting the cell you wish to modify is one of the trickiest things about formatting reports. You can select the cell, the contents of the cell, or even a portion of contents of the cell. I’ve had good luck by clicking the edge of the cell when I want to select it for formatting. It might take some practice, but don’t give up!

You need to remove all the total and subtotals from the Sales Order ID column. In addition to the header, the only one you should keep is the one in the Detail row, which is at the bottom of the report. You may be able to see that the two to be removed are formulas which start with [SUM.

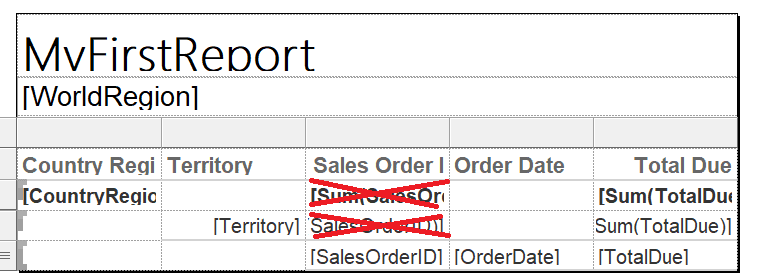
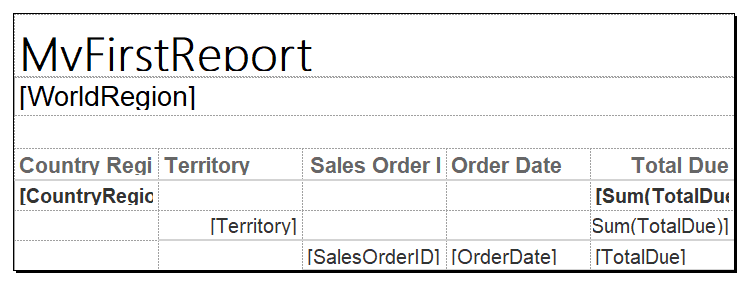
Select each cell and click Delete to remove the two formulas.

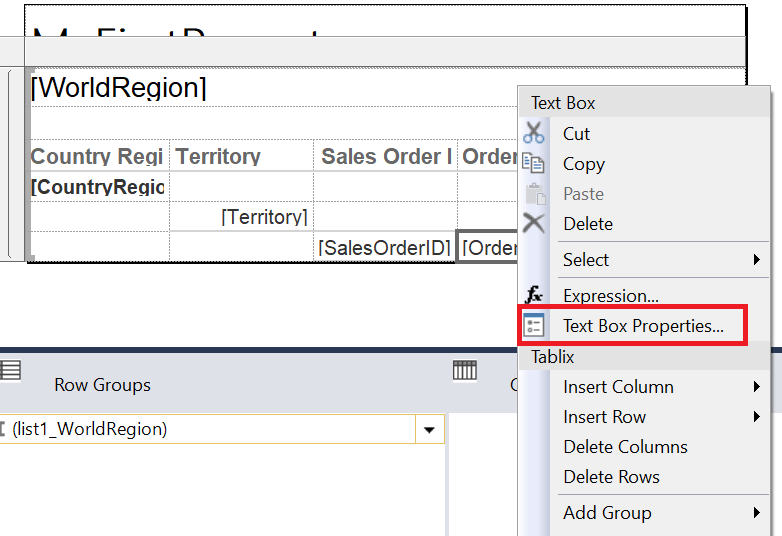
The next item in the list is to format the dates. All the dates in the AdventureWorks database are the old DateTime data type and has 12:00 am for each time. There is no reason to show these times. The easiest way to format is to right-click on the cell so that the context menu pops up. Select Text Box Properties…

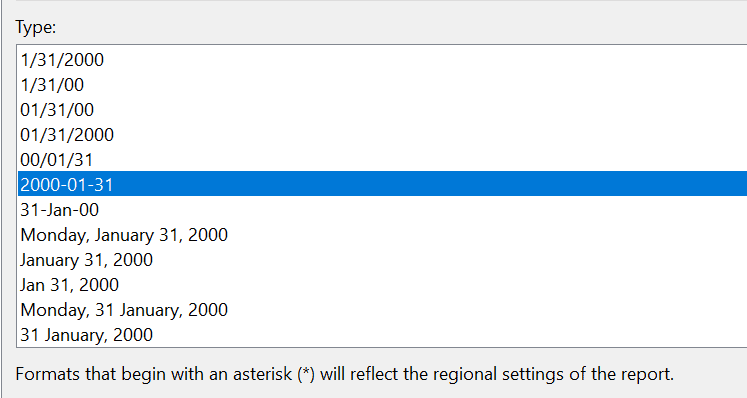
The Text Box Properties dialog has quite a few options. You’ll learn more about them as you read through the series, but for now select Number Date.

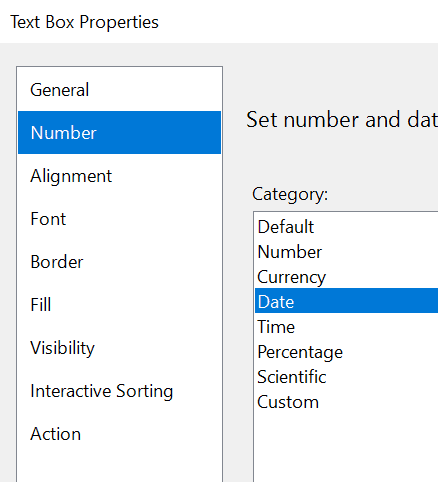
You’ll see a list of many date formats. Select one of them that displays only the date and click OK.

It’s a good idea to preview the report as you go, so take a look now by clicking the Preview tab. You’ll need to also expand the plus signs to see the all the changes.

Back in design view, it’s now time to format the three currency cells. The only way to use the Text Box Property dialog is to format each of them separately. I’ll show you a trick that will save you some time, especially if you have several of them to format.

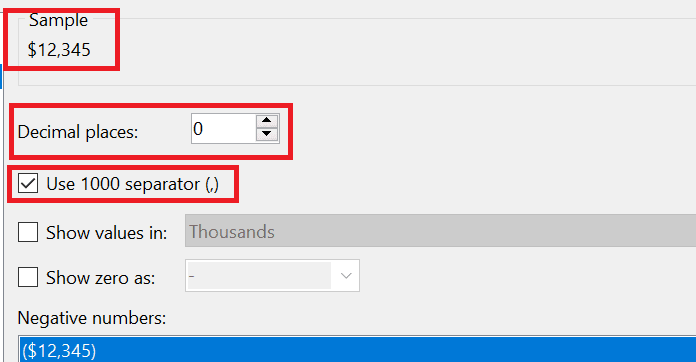
Right-click on one of the Total Due cells and select Text Box Properties… Navigate to Number Currency. If you just click OK at this point, it will format the cell to your local currency, but you might want to change the Decimal Places to 0 and select Use 1000 separator or make some other changes. You’ll see a sample of the format at the top.

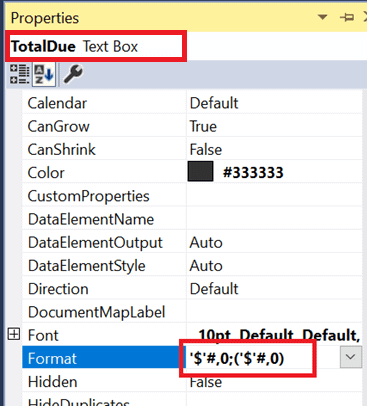
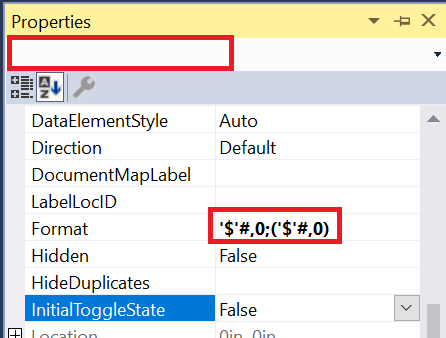
Click OK to save the format. In order to save time, you will copy the format to the other currency cells. While the cell you formatted is selected, bring up the Properties window by clicking F4. Note that this is not the same as the Text Box Properties. The cell’s name is shown at the top of the window.

Scroll down until you find the Format property. Select the text and copy to the Clipboard.

Now select the other currency cells. You can select multiple cells by holding down the CTRL key. You can also select entire columns if that is helpful. In this case, select the Total Due column by clicking the column handle.

Open the Properties window again and paste the formula into the Format property. Since multiple cells are selected, the name is blank.

Preview the report to view the currency cell formatting.

Switch back to design view. The last thing on the list is to adjust widths. You will probably want to expand the Sales Order ID column. Select the column and then drag the right side of it over to expand the cell slightly.

Changing Fonts and Colors

It’s simple to change font properties and background colors, and SSRS gives you three ways to do it. You can use the Text Box Property dialog box, the Properties window, or menu items at above the design window.

Select the report name text box at the top of the report. Select a different font name and size.

Select the background icon, highlighted above, and choose a different color. Click OK. You can also format entire rows or columns by selecting a handle. Select the row handle for the header row and then format with Italics. Format any other items as desired and then preview the report.

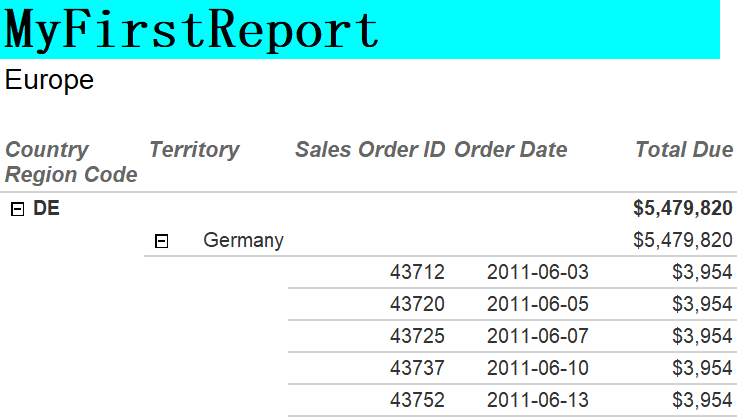
Try formatting a single cell with the Text Box Properties dialog or the Properties window. You may find that the menu items are the easiest when it comes to formatting the fonts and colors.

Print Layout Mode

One of the most frustrating things about previewing the report is that you can’t really tell how the report will look when printed or exported to PDF. To solve this issue, you can switch to Print Layout mode while viewing the report in preview.

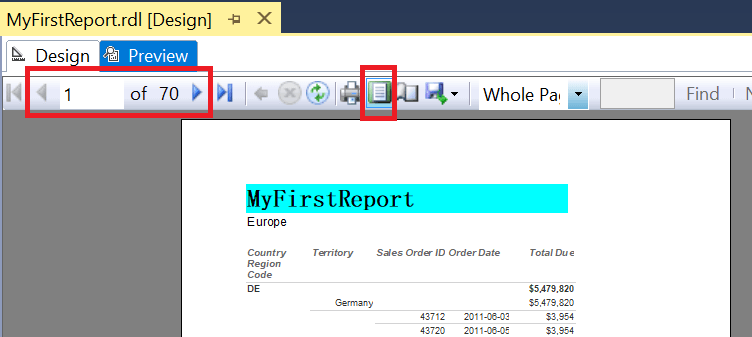
It’s critical that you view the report this way and even scroll to the next page in order to make sure that the report width fits properly on the page, and that it doesn’t leave strange blank pages between populated pages.

This report fits perfectly on the page, so to see the problem, switch back to design view. Grab the right edge of the report and pull it several inches to the right, leaving quite a bit of white space.

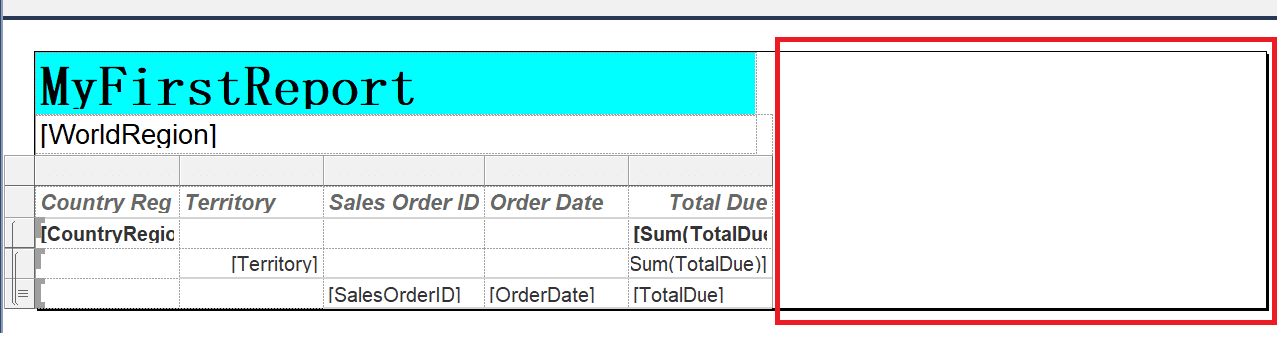
Go back into preview mode. Make sure that Print Layout is toggled off so that you can expand the DE and Germany sections. Switch to Print Layout and scroll a few pages. You’ll see that every other page is blank! This is due to width of the page even though the right side is not populated with any data.

Another thing that you may need to do from time to time is to change the print layout. If the report is fairly wide, you can change to landscape or even switch to a different size paper, such as legal, if your company uses that size. Switch back to design view and select Report Report Properties from the menu. Here you can switch the Orientation between Portrait and Landscape, change the paper size, and modify the report margins.

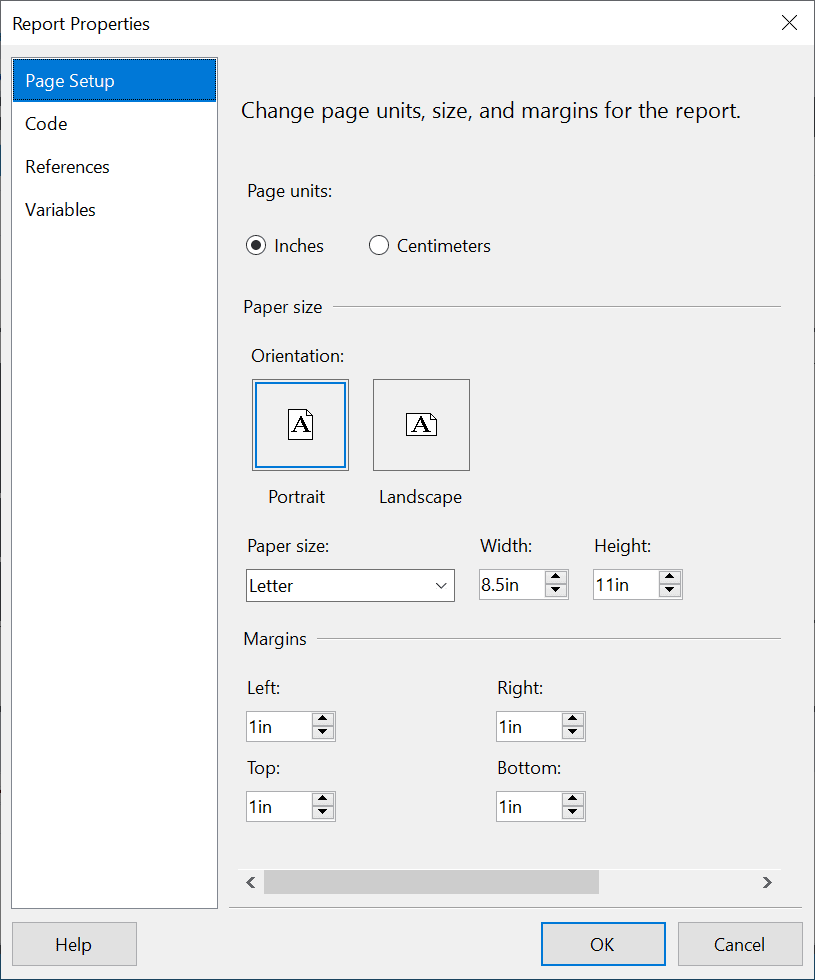
One more tool at your disposal is the ruler which you can turn on from Report View Ruler. Make sure that your report width plus the Left and Right margins do not exceed the width of your paper.

It may take some trial and error, but don’t stop working until you are sure that the report will print properly.

Launching the Wizard from the Solution Explorer

Now that you’ve created a report with the wizard, you should be able to see it in the Solution Explorer, typically on the right of the screen.

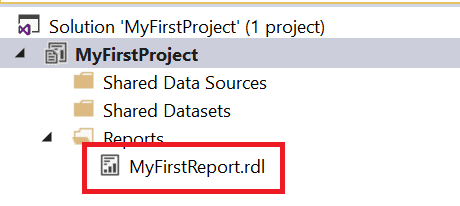
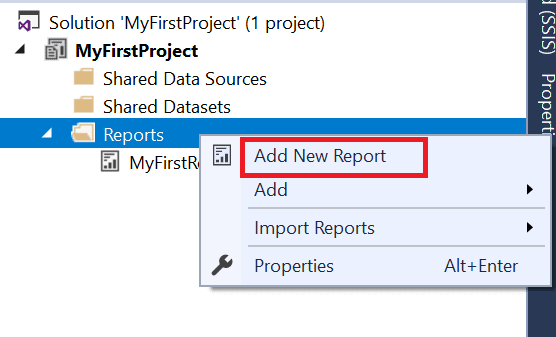
If you close the report definition, you can open it by double-clicking the name here. Another thing you might want to do is to create another report. If you would like to launch the wizard again, all you have to do is to right-click the Reports folder and select Add new report.

Instead, if you would like to create a report manually, choose Reports Add New Item Report. Creating a new report this way will be covered in the next article.

What if you close the project and want to open it again later? There are several ways to do that.

Open Visual Studio…

  • Click the name of the project on the Start Page under Recent

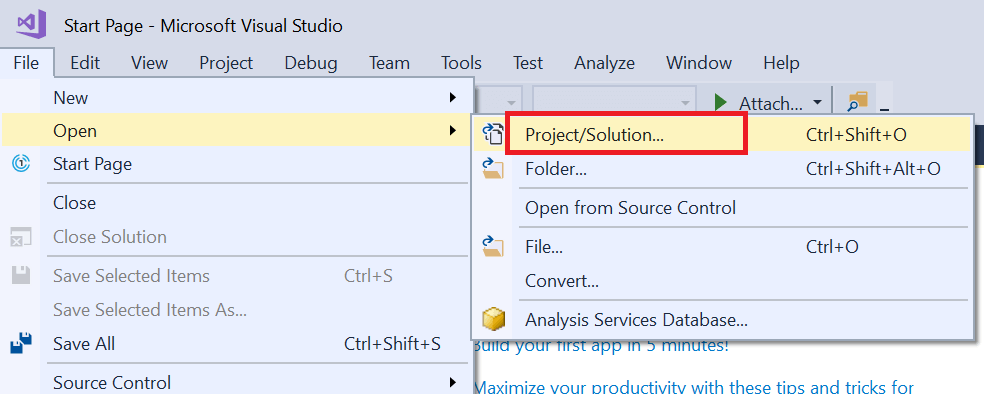
  • From the menu, select File Open and then navigate to the solution on your hard drive.

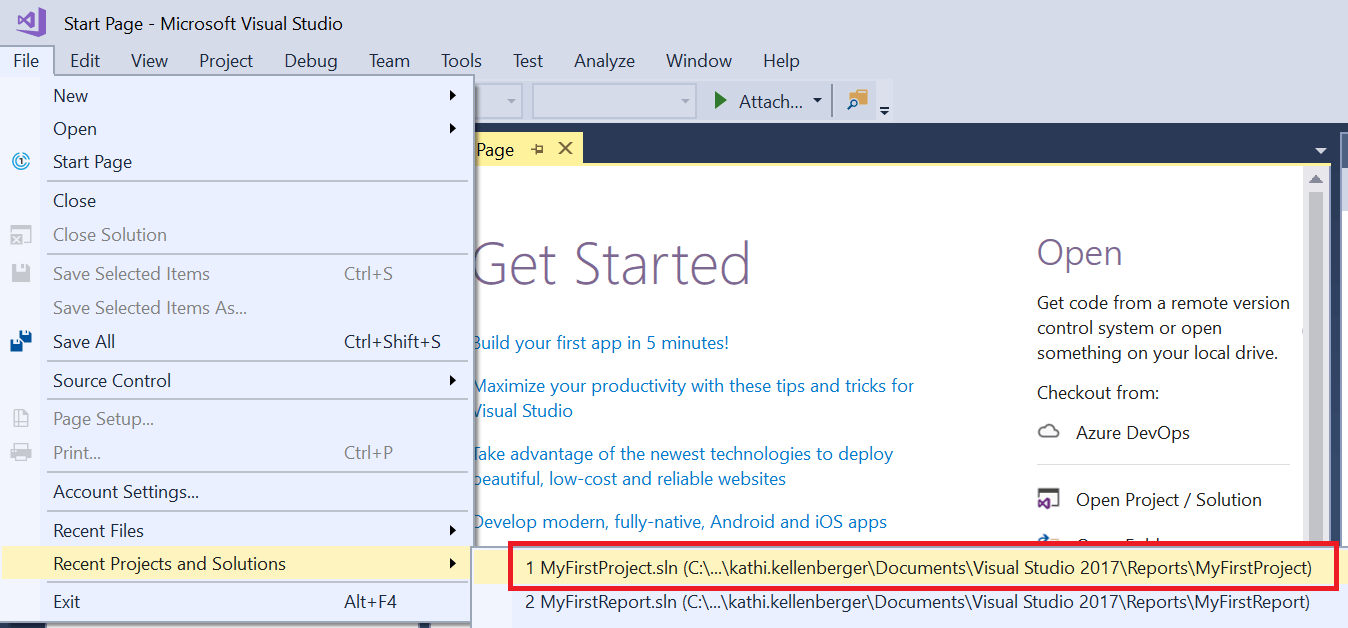
  • From the menu, select File Recent Projects and Solutions and then select it from the list.

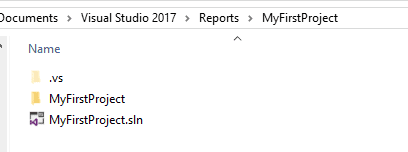
You could also navigate using the file explorer and double-click the sln file which will also launch Visual Studio, but this is more difficult than the other methods.

Be sure to save your solution once you are done working.

Conclusion

In this article, you created a report using the wizard, learned about formatting and how to make sure that your report fits properly on the page when printed. The Report Wizard is a nice way to get started, but you will probably realize that there are many limitations soon enough and not become dependent upon it.

In the next article, you’ll learn about data sources, datasets, and create a report from scratch without using the wizard.

The post Reporting Services Basics: Creating Your First Report appeared first on Simple Talk.


from Simple Talk http://bit.ly/2I8rFel
via

Unit Testing, Databases, and You

One of the biggest complaints I experience is that of developers and end users who run into bugs. GASP! It’s a four-letter word (only because I pluralized it, right, but it counts). When one reflects on those bugs, one of the biggest causes for them boils down to “The unknown.” You can point the finger at requirements, configuration, design, etc., but so many times, those items will all boil down to…

  • I didn’t know that should be a requirement
  • Who would have thought to talk to the DBA about how that database was configured?
  • Why would we have designed a table relationship like that?
  • Who would have guessed that Carl would win the lottery and leave the company?

These issues and questions can’t be solved with a tool, which is usually the first place people go. What I would like to talk about is how unit testing can get you thinking in a way that will encourage more discussion and, hopefully, find the underlying cause of some of these bugs earlier.

I am not going to bore you with the definition of what unit testing is. (Here’s a link to Wikipedia Unit Testing if you want to read it) What it boils down to is this question: Does my code do what it says it is supposed to do? Unit testing breaks down the requirements, either explicitly defined or implied by how your code is defined. You can get into a discussion over different methodologies of testing (Test Driven, Behavior Driven, etc.), but I am going to save that discussion for another day. The focus here is on code accuracy. If the requirement is to write some code to calculate a person’s age, will it return the person’s age? At face value, this is a pretty simple request, especially in SQL. However, what about the quirks that live deeper in that request? Will the code work if someone enters an invalid date format? Will the code work if someone enters a date that is in the future? How about if the person was born in the 1800s? These are types of questions that can be answered by unit testing. Another aspect is that it ensures that if someone changes your code, that it will still work as it was intended to do. How many times have you heard someone say “Oh, that’s an easy change” and once the change is made chaos ensues? While unit tests can’t provide absolute confidence, they can go a long way in making you certain that when something is changed, it will throw an error when it isn’t working like it was originally designed.

How Unit Testing Works

So, how does it do this? Unit testing is a way of taking those questions and presenting them in small, quick and understandable tests that will answer each of those questions independently of one another and independently of anything else other than the code you wrote. Before jumping into the complexities of unit testing, here are some core fundamentals:

  • Fast – unit tests can’t take a long time to run. The longer things run, the longer it takes to write the code since the developer will have to wait to know if a correction is needed.
  • Repeatable – unit tests have to be executed multiple times with ease so that you can make code adjustments and rerun the test to determine if the requirement has been met
  • Self-Checking – unit tests have to result in a single, binary result. Unit tests pass or fail; there is no gray area
  • Timely – unit tests cannot take a disproportionately long time to write compared to the code being tested
  • Isolation – unit tests cannot rely on outside data, objects, people or processes

Why are these important? I would argue that they are not just important, but they are critical to database unit testing. Ask yourself these questions:

  • If the unit tests take hours to run, will developers really find value in running them if they are sitting around waiting for a test to complete rather than coding?
  • If a unit test takes hours to clear data and rerun data in order to perform a test, will developers really go through the effort of determining how to do that just to pass some tests?
  • If a unit test result has to be interpreted by complex scenarios or require getting end users interpretations each time, will developers want to spend time doing that instead of coding?
  • If a unit test takes days to write to validate that a number isn’t a letter, will developers see any value to writing the unit test?
  • If a unit test has to rely on someone else’s availability or wait on a vendor to provide data that won’t be ready for weeks, will a developer want to be told to be patient and find something else to do?

The answers to these questions should all be “no.” Developers need to be able to do their jobs and not be weighed down by these situations. Unit testing needs to and does address these scenarios.

The way in which unit testing achieves the goals of those fundamentals is by utilizing frameworks. Just like any other technology, a framework provides functionality and patterns for working through a problem. Specifically, for databases, there are several frameworks to choose from. There are implications that depend on the framework you select. One of the implications is the language in which the tests are written. The tests in some frameworks are written in SQL or C#, while others may use their own proprietary language. This will affect the learning curve necessary to start writing tests and should be based on the skillsets of the people that will be responsible for writing and maintaining the tests.

You should also look at how the framework interacts with other technologies, specifically how it integrates with objectives like continuous improvement/continuous deployment and DevOps. If the tool doesn’t have any way to integrate to your tooling, you may need to develop a custom integration between systems to make this work. Whereas another framework may work with standards like MS Unit or NUnit out of the box which are widely adopted by many CI/CD platforms.

Some of the common features that should be included in a framework are stub/mock/fake functionality, assertions and test suites. Stub/mock/fake functionality refers to the ability of the testing framework to allow for creating database objects that resemble an object that is being tested. For example, faking a database table would allow a table to exist that resembles all or at least some of the schema of the original table. This allows unit tests to be written to be isolated from the original object and isolated from existing data that may exist in the table. Assertions are predefined methods that are used to provide binary results for testing conditions. They are methods that provide for the comparison of objects, comparison of data, or comparison of expected outcomes.

The last item would be test suites functionality, which is the ability to group tests that evaluate the same objects together so that test can be executed quickly and provide a binary result to indicate that the object unit tests all passed or if there was a failure that indicates that the object is not suitable for deployment. These features are necessities for unit test development, which will be apparent when you start writing unit tests.

Unit Testing and Databases

So far, the discussion has focused around some basics about unit testing and some of the implications they have on databases. This hasn’t really given any insight to why this is important to database centric development. I don’t want to glaze over this by assuming that everyone has an understanding of unit testing value. So think back to a time when you wrote your last stored procedure. You were probably given some sort of requirement, or at the very least someone gave you a vague request for something. The stored procedure probably used tables that had foreign keys on them between tables both involved and not involved with the code that you had to write to get the results you needed. On top of that, the data in the tables doesn’t have all the data in them to support being able to see the results of the query to validate that your stored procedure works. With that in mind, consider how you could approach the development of that stored procedure. You are generally left with a few options:

  1. You can use your expertise and build the query as best you can without having any supporting data or only the data that you have at that time
  2. You can spend a bunch of time trying to update or insert data into the tables to support the scenario you have
  3. You can try to build tables in a sandbox environment that closely resemble the original tables with data that you need
  4. You can ask someone to load data into the databases that meet all of the requirements of the scenario that your stored procedure needs to use

With each of these approaches, there are risks and repercussions. In option #1, if you build the procedure without data, you are not going to have high confidence that there aren’t any errors or typos in your code. In option #2, you will spend time going through and mocking up data that could lead down a rabbit hole of ancillary tables that have to be updated in order to satisfy constraints. You also risk creating data in the database that does not adhere to other standards or states of data, which leads to bugs or false bugs and potential instabilities. In option #3, if you build things in a sandbox, there is a risk that you don’t build the objects in such a way that it resembles the environment closely enough and your design may be flawed. You would also potentially have issues where moving your code from the sandbox to the development area could cause conflicts or typos. Lastly, in option #4, this could be time intensive as you may need to wait for the users to create the data, they may need more information to build out all the necessary data to satisfy system requirements, or they may have competing requests that will delay your development. The other issue that all four of these scenarios have in common is that they aren’t easily repeatable and require separate documentation in order for other developers or testers to maintain and execute.

So how does unit testing address this? One of the most impactful ways that unit tests address this is through the use of fake/stub/mock objects. Because our development is directly impacted and driven by the data, the ability to craft our own test data at will allows us to write tests that ensure our code operates correctly. In the scenario outlined previously, the tables that are involved in the stored procedure can be faked. This means that during the execution of the test, and only during the execution of the test, a table is created with the same name that is structurally identical to the table used in the stored procedure. The important difference is that the tables that are created during this process do not have any data in them and do not have any foreign keys or any other constraints. This enables all kinds of possibilities because you can fill the fake table with only the data that is needed in order to verify the conditions of the procedure. You won’t need to populate any unnecessary foreign keys; you won’t need to populate any unnecessary fields in the table that are not being used by the stored procedure, and as mentioned earlier it is completely automated. That means the existing data and constraints will be quickly moved, replaced with the data needed for the test, and then when the test is completed the previous data and constraints will be moved back to table and it will look like nothing happened to the table at all. This makes the entire development process easier and infinitely easier to validate that is doing what it needs to do. This is a very basic example of how faking functionality can become a huge asset to unit testing. Other scenarios could be having to fake a function used within the stored procedure, a stored procedure within a stored procedure, or a database view used in the stored procedure. This capability alone will save you time and make writing tests very easy!

You are probably saying to yourself, “Why wouldn’t everyone be writing unit tests if it was this easy”? The answers to that vary, but largely, I believe it is due to the lack of tools to incorporate the database into the development life cycle. That lack of tools is definitely changing due largely to the rise of DevOps, Agile, CI/CD and other methodologies that strive for automation, iterative development and continual improvement. If things change frequently, you can’t spend hours or days doing regression testing. This lack of tools has established a culture of exclusion. I have heard things like “oh, we can’t do that because it’s in a table” or “that a function we call in the database, it just works”. Those kinds of statements somehow granted database development a pass for a long time, but now that data is at the heart of so many decisions, it’s imperative to have verified confidence in what is designed and developed. In addition, I will hear a lot of the same excuses:

  • The stored procedure code is too complex to test.
    • If it’s that complex, maybe it should be broken down into a manageable size. No one likes a giant stored procedure that takes hours to read and understand what is happening.
  • The test I would have to write for that is too complex.
    • If it’s that complex then what you wrote is probably too complex and needs to be broken down.
  • I don’t know how to write a test.
    • That’s what software development is all about, learning new things. As new things come out, we need to embrace learning them and putting them to work in our processes, not ignoring them and hoping they go away.
  • I don’t have time to write a test.
    • One way or another, you will find time. Either it will break at some point and you will have to make time to identify what is broke and fix it with everyone watching you (including the CEO/VP/Director) or you will get fired, and then you have TONS of time on your hands.
  • I don’t know what tests to write.
    • This is a topic all-in-of-itself as there are a few different methods for determining what tests to write. You can always start with discussing the requirements with the business, testers, or analysts to determine what tests are necessary.

Conclusion

The important thing to learn from this is that unit testing is important and, in some way, shape, or form you should incorporate it into your development practices. No matter if you are the only database person in your company or if there are 5000 people in your company. No matter if you have one database or 1000 databases. The application of unit testing allows you to ensure once you write something, it can be verified and then when it needs to change you can verify that all of the tests that previously passed will continue to pass. That will give you confidence that your changes will be more accurate and less likely to break other things that rely on your code. That will inevitably help you sleep at night, enjoy your vacations more and be more confident in what you develop.


The post Unit Testing, Databases, and You appeared first on Simple Talk.


from Simple Talk http://bit.ly/2WE8nH6
via

Scripting out SQL Server Data as Insert statements via PowerShell

As a companion script with my recent article about  Scripting out several databases on a server, here is a similar  script that either scripts out the data for  the SQL Server tables you specify  as insert statements, or else as  native BCP files if they are too large for insert statements.

The purpose of scripting out the insert statements is that you can create a table that is designed for static data and fill it with the required data in the same script.   This can then be placed in source control and  the table will be filled with the data on build. Because this is only realistic with small tables, I’ve added the option to use native BCP. This is faster and takes between a quarter and a fifth of the disk space. 

I use wildcards to specify the databases because they are more intuitive for Ops people than RegExes, but obtusely, I use a Regex for the specification of the tables. This is because you can’t specify a list of alternatives in a Wildcard whereas it is easy with a RegEx.

<# script for writing out data from one or more databases either in insert statements
(useful for scripting small tables of static data) or in native BCP files.
You can use it to script the table followed by the data-insertion script if you set 
    'scriptSchema' = $true
Other types of BCP output are easy to do by altering the BCP parameters in the 
script slightly.
You can specify which tables you want to script out via a regex. You can use wildcards
to specify the databases
   #>

$Filepath = 'PathToWhereToStoreThem' # local directory to save build-scripts to
$DataSource = 'MySQLServerInstance' # server name and instance
$Databases = @('A*','MyDbase','Pubs') <# the databases to copy from. wildcard comparison *, ?
 [a-d](range) and [and](set of chars) #>
$SQLUserName = 'PhilFactor'#leave blank if Windows auth
$TablesRegex = '.*' # Regex match to specify tables
$UseBCP =$false;

# set "Option Explicit" to catch subtle errors
set-psdebug -strict
$ErrorActionPreference = "stop" # you can opt to stagger on, bleeding, if an error occurs
#load the sqlserver module
$popVerbosity = $VerbosePreference
$VerbosePreference = "Silentlycontinue"
# the import process is very noisy if you are in verbose mode
Import-Module sqlserver -DisableNameChecking #load the SQLPS functionality
$VerbosePreference = $popVerbosity
# get credentials if necessary
if ($SQLUserName -ne '') #then it is using SQL Server Credentials
{
  $SqlEncryptedPasswordFile = `
  "$env:USERPROFILE\$($SqlUserName)-$($SQLInstance).txt"
  # test to see if we know about the password in a secure string stored in the user area
  if (Test-Path -path $SqlEncryptedPasswordFile -PathType leaf)
  {
    #has already got this set for this login so fetch it
    $Sqlencrypted = Get-Content $SqlEncryptedPasswordFile | ConvertTo-SecureString
    $SqlCredentials = `
    New-Object System.Management.Automation.PsCredential($SqlUserName, $Sqlencrypted)
  }
  else #then we have to ask the user for it
  {
    #hasn't got this set for this login
    $SqlCredentials = get-credential -Credential $SqlUserName
    $SqlCredentials.Password | ConvertFrom-SecureString |
    Set-Content $SqlEncryptedPasswordFile
  }
}

$ms = 'Microsoft.SqlServer'
$My = "$ms.Management.Smo" #
if ($SQLUserName -eq '') #dead simple if using windows security
{ $s = new-object ("$My.Server") $DataSource }
else # if using sql server security we do it via a connection object
{
  $ServerConnection = new-object "$ms.Management.Common.ServerConnection" (
    $DataSource, $SQLUsername, $SqlCredentials.Password)
  $s = new-object ("$My.Server") $ServerConnection
}
if ($s.Version -eq $null) { Throw "Can't find the instance $Datasource" }
$CreationScriptOptions = new-object ("$My.ScriptingOptions")
<# this is only needed if we are doing insert statements #>
$MyPreferences = @{
  'ScriptBatchTerminator' = $true; # this only goes to the file
  'ToFileOnly' = $true; #no need of string output as well
  'ScriptData' = $true;
  'scriptSchema' = $false;
  'Encoding' = [System.Text.Encoding]::UTF8;
}
$MyPreferences.GetEnumerator() |
  Foreach{ $Name = $_.name; $CreationScriptOptions.$name = $_.Value }

$possibilities = $s.Databases | select name
$DatabaseList = @()
$DatabaseList += $databases |
where { $_ -Notlike '*[*?]*' } |
where { $possibilities.Name -contains $_ }
$DatabaseList += $databases |
   where { $_ -like '*[*?]*' } |
     foreach{ $wildcard = $_; $possibilities.Name | where { $_ -like $wildcard } }
$DatabaseList | Sort-Object -Unique |
  foreach {
  write-verbose "now doing $($_)"
  $TheDatabase = $s.Databases[$_]
  
  $TheDatabase.Tables | where { $_.IsSystemObject -eq $false -and $_.name -match $tablesRegex } |
    foreach{
    <# calculate where it should be saved #>
    $directory = "$($FilePath)\$($s.Name)\$($TheDatabase.Name)\Data"
    <# check that the directory exists #>
    if (-not (Test-Path -PathType Container $directory))
    {
      <# we create the  directory if it doesn't already exist #>
      $null = New-Item -ItemType Directory -Force -Path $directory;
    }
    if ($UseBCP -eq $true) <# then we are doing a Native BCP#>
    {
      if ($SQLUserName -eq '')<# OK. Easy, a trusted connection #>
      {
        #native format -n, Trusted connection -T
        BCP "$($_.Schema).$($_.Name)"  out  "$($directory)\$($_.Schema)_$($_.Name).bcp"   `
          -n -T "-d$($TheDatabase.Name)"  "-S$($s.Name)"
      }
      else <# if not a trusted connection we need to provide a userid and password #>
      {
      $progress='';
        $Progress=BCP "$($_.Schema).$($_.Name)"  out  "$($directory)\$($_.Schema)_$($_.Name).bcp"  `
          -n "-d$($TheDatabase.Name)"  "-S$($s.Name)"  `
          "-U$($s.ConnectionContext.Login)" "-P$($s.ConnectionContext.Password)"
      }
      Write-verbose "Writing out to $($_.Schema).$($_.Name) $($directory)\$($_.Schema)_$($_.Name).bcp
      $progress"
      if (-not ($?)) # if there was an error
      {
        throw ("Error with data export of $($directory)\$($_.Schema)_$($_.Name).bcp ");
      }
      
    }
    else <# we are doing insert statements #>
    {
      $CreationScriptOptions.Filename =   `
        "$($FilePath)\$($s.Name)\$($TheDatabase.Name)\Data\$($_.Schema)_$($_.Name)_Data.sql";
      $scripter = new-object ("$My.Scripter") ($s)
      $scripter.Options = $CreationScriptOptions
      $scripter.EnumScript($_.Urn)
    }
  }
}
"I have done my best to obey, Master. "

I always think, each time I script a way of getting data from SQL Server, that it will be my last, but there always seems to be a new requirement that pops up. This time, it was for a script that would produce not only the table build statement but also the data insert statement. It is possible to do this in SSMS, though if you need to do more than a couple of tables it can get boring. It is possible to script any routine operation that you perform in SSMS because both PowerShell and SSMS use the SMO library to achieve their ends.  I personally would prefer to use a multi-statement VALUES derived table to insert data, because it is faster and more versatile. What? You want me to provide a routine that scripts out a table as a  multi-statement query? Maybe one day.


The post Scripting out SQL Server Data as Insert statements via PowerShell appeared first on Simple Talk.


from Simple Talk http://bit.ly/2YXg9JC
via

Wednesday, May 29, 2019

Introduction to SQL Server Security — Part 6

The series so far:

  1. Introduction to SQL Server Security — Part 1
  2. Introduction to SQL Server Security — Part 2
  3. Introduction to SQL Server Security — Part 3
  4. Introduction to SQL Server Security — Part 4
  5. Introduction to SQL Server Security — Part 5
  6. Introduction to SQL Server Security  Part 6
  7.  

SQL Server offers a wide range of tools for ensuring that your environment remains secure and that privacy is protected. In the last article in this series, I covered some of the system views and functions that can help you safeguard that environment.

In this article, I continue the discussion by providing an overview of five other important features: SQL Server Configuration Manager, server-level facets, the sp_configure system stored procedure, the SQL Vulnerability Assessment tool, and the SQL Data Discovery & Classification tool. As with any SQL Server tools, the better you understand how to use these features, the more effectively you can protect your databases and the data they contain.

SQL Server Configuration Manager

SQL Server Configuration Manager is a Microsoft Management Console snap-in that lets you manage the services, network protocols, and network connectivity configurations associated with a SQL Server instance. Through this tool, you can start, pause, resume, or stop services, or you can view or change service properties. You can also enable or disable connection protocols, force protocol encryption, or configure SQL Server to listen on a specific port, pipe, or network protocol.

Figure 1 shows SQL Server Configuration Manager with the SQL Server Services node selected. You can navigate through any of the nodes, as well as drill into specific services or configurations, where you can view or modify property settings.

Figure 1. Viewing services and configurations in SQL Server Configuration Manager

To access a component’s properties, double-click the listing in the right pane. For example, one of the services shown in Figure 1 is SQL Server (SQLSRV16), which is a running instance of SQL Server 2016. When I double-click the service, the SQL Server (SQLSRV16) Properties dialog box appears, as shown in Figure 2.

Figure 2. Viewing service details in SQL Server Configuration Manager

The options available in the Properties dialog box depend on the selected service or configuration. In this case, the dialog box opens to the Log On tab, where you can start, stop, pause, and restart the service. You can also change the service account or update the password.

The other tabs provide additional options. For example, on the Service tab, you can set the service to start automatically, specify that the service must be started manually, or disable the service altogether.

SQL Server Configuration Manager is a good place to start for handling services, network protocols, and network connectivity configurations all in one interface. The interface is simple to use and is a lot easier than wading through all a system’s services to find those specific to SQL Server.

SQL Server Configuration Facets

In SQL Server Management Studio (SSMS), you can configure several server-wide facets related to SQL Server security. A facet is a collection of logical properties that apply to a specific area of management.

To access the server-level facets, right-click the SQL Server instance name in Object Explorer and then click Facets. When the View Facets dialog box appears, select the Surface Area Configuration facet from the Facet drop-down list. The main window displays the properties associated with the selected facet, as shown in Figure 3.

Figure 3. Accessing the Surface Area Configuration facet

As the name suggests, the Surface Area Configuration facet provides quick access to surface area configuration settings. Here you can enable or disable features as necessary, the idea being that you should disable any unnecessary features to reduce the surface area. For example, you can configure the SqlMailEnabled property, which supports legacy applications that exchange email messages with the database engine.

Another useful facet is Server Security, which is shown in Figure 4. Here you can enable or disable security-related properties that apply at the server-level, such as the CrossDBOwnershipChainingEnabled property, which controls cross-database ownership chaining. Currently, the property is set to False, so chaining is not permitted.

Figure 4. Accessing the Server Security facet properties

In the View Facets dialog box, you can also access a number of other facets, such as Server Audit and Server Configuration. Facets provide a quick and easy way to adjust settings from within SSMS. However, you can also use the sp_configure stored procedure to set database engine options, which provides more flexibility for controlling SQL Server settings.

SQL Server sp_configure Stored Procedure

The sp_configure system stored procedure lets you view or modify server-wide configuration settings. When used to modify a setting, the stored procedure is often executed in conjunction with a RECONFIGURE statement, which applies the new setting immediately to the server environment—if the setting is dynamic. If it’s not dynamic, the new setting does not take effect until the SQL Server service has been restarted.

You can use the sys.configurations system view to determine whether a setting is dynamic. The view also returns other important information about configuration settings. The following SELECT statement uses the sys.configurations view to return details about the server-wide configuration settings available to the current SQL Server instance:

USE master;
GO
SELECT * FROM sys.configurations;

Figure 5 shows part of the results returned by the SELECT statement on my system, a local instance of SQL Server 2017. The statement returns a total of 77 rows.

Figure 5. Viewing all server-wide configuration options

In addition to the name and description of each setting, the sys.configurations view returns several other columns, which have implications when using the sp_configure stored procedure:

  • The value column is the option’s configured value.
  • The minimum column is the option’s permitted minimal value.
  • The maximum column is the option’s permitted maximum value.
  • The value_in_use column is the value currently in effect. This value can be different from the one in the value column if the value has been set but not yet committed.
  • The is_dynamic column specifies whether the configuration setting is dynamic. A dynamic setting has a value of 1.
  • The is_advanced column indicates whether the option is an advanced option. An advanced option has a value of 1. The sp_configure stored procedure can access advanced options only if the show advanced options setting has been enabled.

You’ll get a better sense of the implications of these columns as you work through this article. However, first, run the following EXECUTE statement, which calls the sp_configure stored procedure without any parameters:

EXEC sp_configure;

When you call the procedure without parameters, it returns a list of server-wide configuration options. Figure 6 shows part of the results returned on my system. The statement returned 23 rows in all.

Figure 6. Viewing non-advanced server-wide configuration options

The procedure’s config_value column maps to the value column returned by the sys.configurations view, and the procedure’s run_value column maps to the view’s value_in_use column.

The reason that sp_configure returns only 23 rows on my system is because the show advanced options setting was not enabled. To enable the setting and then view the results, run the following set of T-SQL statements:

EXEC sp_configure 'show advanced options', '1';
GO
RECONFIGURE;
GO
EXEC sp_configure;

The first EXECUTE statement runs the sp_configure stored procedure and sets the value of the show advanced options setting to 1. When you use the stored procedure to update an option value, you must first specify the option name and then the new value, both in single quotes and separated by a comma.

After you reset the value, you can run a RECONFIGURE statement to apply the value immediately. This is possible because the show advanced options setting is a dynamic option, that is, the is_dynamic value is set to 1.

The last step is to again call the sp_configure stored procedure without parameters to return a list of available configuration settings. This time, the EXECUTE statement returns all 77 settings, just like the sys.configurations view.

In some cases, SQL Server doesn’t allow you to use the RECONFIGURE statement to apply a value to a configuration setting, even if that value falls within the permitted minimum and maximum values. To see how this works, start by retrieving information about the recovery interval (min) setting, which determines the maximum recovery interval in minutes:

EXEC sp_configure 'recovery interval (min)';

When you call sp_configure and specify only the setting name, it returns information about the setting without making any changes. In this case, the stored procedure returns 0 as both the configured and run values, 0 as the minimum allowed value, and 32767 as the maximum allowed value.

Based on this information, it would seem that you should be able to set the option’s value to 120 minutes, as in the following example:

EXEC sp_configure 'recovery interval (min)', '120';
GO
RECONFIGURE;
GO

However, when you run the statement, SQL Server returns the following message:

Recovery intervals above 60 minutes not recommended. Use the 
RECONFIGURE WITH OVERRIDE statement to force this configuration.

For certain configuration settings, SQL Server determines what might be an acceptable range, even if the setting supports a greater range. In some cases, you can override this behaviour by using a RECONFIGURE WITH OVERRIDE statement, rather than just RECONFIGURE:

EXEC sp_configure 'recovery interval (min)', '120';
GO
RECONFIGURE WITH OVERRIDE;
GO

This time around, SQL Server returns a more favorable message:

Configuration option 'recovery interval (min)' changed 
from 120 to 120. Run the RECONFIGURE statement to install.

The RECONFIGURE WITH OVERRIDE statement can be useful in cases when you need to bypass the usual safeguards, but be careful when using this option. Setting a value incorrectly can seriously impact SQL Server’s configuration, so proceed with caution.

In the meantime, if you want to reset the recovery interval (min) setting back to its original value, run the following statements:

EXEC sp_configure 'recovery interval (min)', '0';
GO
RECONFIGURE;
GO

The configuration setting should now have the same value it had when you first verified the setting’s values.

SQL Vulnerability Assessment

SQL Vulnerability Assessment is a tool available in SSMS that lets you scan a database for potential vulnerabilities. The scan runs a number of security checks and then presents them in a report that shows which checks failed and which ones passed. For the failed checks, the tool also provides actionable steps for resolving the issue.

The security checks are derived from a set of rules based on Microsoft best practices that are specific to permissions, configurations, and data protections. The rules focus on security issues that present the biggest data risks and that reflect many of the requirements necessary to meet compliance standards.

To launch a SQL Vulnerability Assessment scan, right-click the database in Object Explorer, point to Tasks, point Vulnerability Assessment, and click Scan for Vulnerabilities. The assessment results appear in their own tab in the main SSMS window, categorised by those that passed and those that failed.

Figure 7 shows the assessment results I received when I scanned the WideWorldImporters sample database on my system. The security checks shown in the figure are the ones that failed. The tool categorises failed checks as High Risk, Medium Risk, and Low Risk.

Figure 7. Viewing failed assessments in a vulnerability report

The figure also indicates that the tool performed 54 security checks in all and that six of them failed. To view the security checks that passed, select the Passed tab, which is shown in Figure 8.

Figure 8. Viewing passed assessments in a vulnerability report

You can drill into any of the security checks for more details. For example, the last failed security check shown in Figure 7 is VA1282, which is titled Orphan roles should be removed. If you expand the security check and scroll to the bottom, you’ll find the recommended remediation and remediation script, as shown in Figure 9.

Figure 9. Viewing the recommended remediation for a failed assessment

The SQL Vulnerability Assessment tool also lets you adjust a security check’s baselines. For example, you might decide that you do not want to drop the orphan roles shown in Figure 9 because you plan to use them in the near future. In this case, you can approve the security check as a baseline so it won’t show as failed in subsequent scans.

To approve a baseline, expand the security check as you did above but do not scroll down. At the top of the description, click the Approve as Baseline option, which is shown in Figure 10.

Figure 10. Approving baselines for a failed assessment

After you set the baseline, rerun the scan. The results should now indicate that only five checks failed. In addition, the VA1282 security check should be listed on the Passed tab, as shown in Figure 11.

Figure 11. Rerunning a vulnerability assessment report

The SQL Vulnerability Assessment tool provides you with a quick and easy way to track and remediate potential database vulnerabilities, helping you meet compliance and privacy standards while reducing potential security risks.

SQL Data Discovery & Classification

Microsoft has also recently added the Data Discovery & Classification tool to SSMS. The tool provides a mechanism for discovering and classifying potentially sensitive information in a database. From these classifications, you can run a report that can be used for compliance and auditing purposes.

The process of classifying sensitive data starts by using the Data Discovery & Classification feature to run a scan against the target database. To run a scan, right-click the database in Object Explorer, point to Tasks, and then click Classify Data. A tab will open in the main SSMS window, showing that the scan is in progress.

When the scan is complete, the tab will display the number of columns with recommended classifications. Figure 12 shows the tab after I ran the scan against the WideWorldImporters database. In this case, the Data Discovery & Classification tool has provided classification recommendations for 92 columns.

Figure 12. Running a SQL Data Discovery & Classification report

If you click the information message that shows the number of recommendations, the tab will display the list of columns, with recommendations for the information type and sensitivity label. Figure 13 shows a partial list of the column recommendations.

Figure 13. Viewing the recommended classifications in a report

For each recommended column, you can accept the Information Type value and Sensitivity Label value or choose from the list of available values. In addition, you must select the check box associated with each column that you want to classify and then click Apply selected recommendations.

On my system, I selected the checkbox associated with the first six columns shown in Figure 13 and kept the recommended values for the first two. For the other four, I changed the Sensitivity Label value to Highly Confidential – GDPR and then clicked Accept selected recommendations. This left me with six classified columns.

The Data Discovery & Classification tool also lets you manually classify columns. To add a manual classification, click Add Classification at the top of the tab. When the Add Classification form appears (to the right of the tab), set up your classification. For example, I added the classification shown in Figure 14.

Figure 14. Adding a classification

All classifications that you accept or add manually are listed in the tab, as shown in Figure 15. Here you can further modify them or delete them. Whether or not you make any changes, you must specifically save the classifications to retain them with the database. To do so, click Save at the top of the tab.

Figure 15. Viewing the approved classifications

The Data Discovery & Classification tool also lets you generate reports that show how the columns have been classified. To generate a report, click View Report at the top of the tab. Figure 16 shows the report I generated on my system after setting up the seven classifications.

Figure 16. Generating a data classification report

You can drill into details about the classifications in the grid at the bottom of the report. For example, the Application schema includes six classifications. If you expand the schema, you can view the individual columns and their classifications.

More SQL Server Security Tools

SQL Server provides plenty of other tools beyond what I’ve discussed here or in the other articles in this series. For example, SQL Server offers SQL Server Audit, row-level security, and policy-based management, features that have been well-covered by Feodor Georgiev, Louis Davidson, and Dennes Torres, respectively.

Encryption also plays an important role in SQL Server security, taking a variety of forms, including column-level encryption and transparent data encryption. I wrote a series about several encryption-related topics a while back:

The better you understand the tools available to you for securing your database environment, the more effectively you can protect privacy, meet compliance requirements, and safeguard your data at all levels. It might take a bit of time to get comfortable with some of these tools, but the investment you make now could well be worth the effort in the future.

The post Introduction to SQL Server Security — Part 6 appeared first on Simple Talk.


from Simple Talk http://bit.ly/2I4DcLz
via