Wednesday, November 27, 2019

How Does Accelerated Database Recovery Work?

I still remember the time our “Senior Architect” got so frustrated at a long-running transaction filling up the log files that he just deleted the darn things, causing SQL Server to spew memory dumps until we DBAs put the instance out of its misery. Managing log files can be hard, and correctly sizing them isn’t just a challenge for the clueless. You must take the effect of Rebuilds, ALTERs, and other operations on the logs into careful account. Moreover, size isn’t the only lurking log-related threat. You’ve probably heard (if not lived through) horror stories of days-long rollbacks or snails-pace recoveries.

Accelerated Database Recovery (ADR), new with SQL Server 2019 and Azure SQL Database, is meant to help here. It’s worth learning about, because it’s likely to become a commonly used feature, and is in fact required for Hyperscale. For those who don’t have time to dive into the whitepaper, or who want more details than in Microsoft’s introduction, this article is meant to function as a primer to how it works. I’m going to assume basic knowledge about logging and recovery, and I’m also going to oversimplify some parts. The article illustrates (and animates!) how ADR works and how Microsoft optimized the feature.

The starting line is a realization that keeping old versions of rows can help log-related pain points. How does ADR use row versioning to solve these? Read on!

Versions to the Rescue

Begin with a rollback, where one session makes a number of changes but then aborts. This is how it typically works:

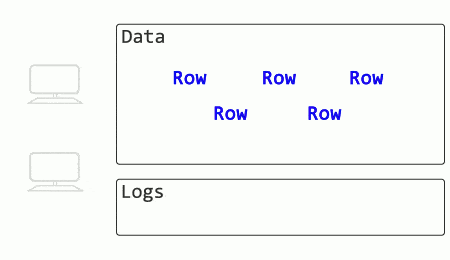
See how another session’s SELECT is blocked until the rollback process completes? When an UPDATE rolls back, other queries have to wait until the modifications are undone before they can select data (with exceptions for existing isolation levels that use versioning).

What if SQL Server stored old row versions?

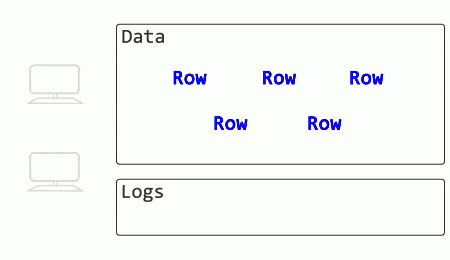
The rollback in this case is effectively instant (merely marking a particular transaction as aborted). The SELECT no longer has to wait for change reversal to finish and locks to release but can read the older, committed record.

Recovery after a restart or a restore is a more complicated process. When a database is recovered, there’s no guarantee about data on disk. Some committed transactions may need to be redone, and some in-flight transactions may need to be aborted and their changes rolled back. This occurs across multiple phases:

  • Analysis (figuring out changes that matter)
  • Redo (replaying changes)
  • Undo (reversing changes)

Important side note here, since some misleading graphics are floating around: data modification only occurs for changes since the last checkpoint – earlier Redo activity is for locks. Here’s roughly what Recovery looks like now, with gross omissions and oversimplifications.

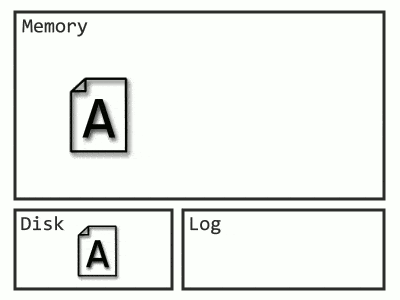
The process has to go all the way back to the start of the oldest transaction, which, if you have junior developers, could be a very long time ago.

Imagine it with row versions:

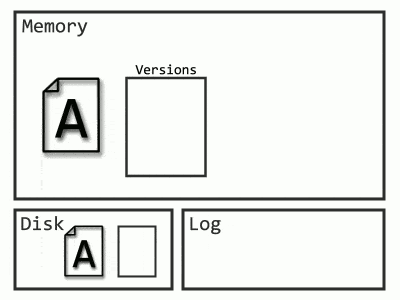
Now Recovery only needs to start from the latest checkpoint, and the Undo phase is unnecessary, as queries can begin selecting data from the old versions (remember how versions helped with rollbacks). Even more exciting, since those log records before the checkpoint aren’t needed, SQL Server can throw them out as soon as they’re no longer required (read: after they’re backed up).

The potential benefits are now apparent: versioning can help with rollback, versioning can help with recovery, and versioning can even eliminate the risk of log file explosion during a large transaction.

Three New Structures: PVS, ATM, and S-Log

The potential benefits of versioning are large – what does it take to make it a reality? Three new important structures emerge as solutions to important challenges, each of which is critical to understanding ADR. Other minor objects and a host of cleanup processes exist as well but are tied to these central additions.

Persistent Version Store (PVS)

The first issue is with the original way versioning is implemented with isolation levels that use versioning: versions don’t survive a restart. In database lingo, they’re not durable. Versions live in tempdb, and when the server restarts, tempdb gets rebuilt. And that just won’t do for recovery, since recovery is often from a restart that would have wiped tempdb clean, taking those critical versions with it.

The solution to this is to make versions durable, or persistent, thus the name Persistent Version Store (PVS). Instead of being written to tempdb, they are instead stored in a table in the database, and their creation is logged to make them recoverable.

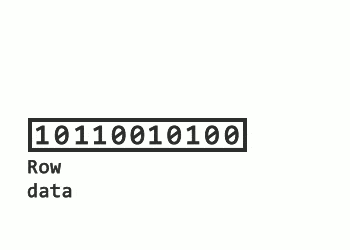
Versions work mostly the same as before. Every row has transaction information, and if necessary, a pointer to the older version in the version store. I would visualize it like this:

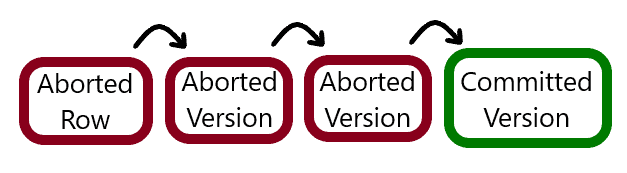
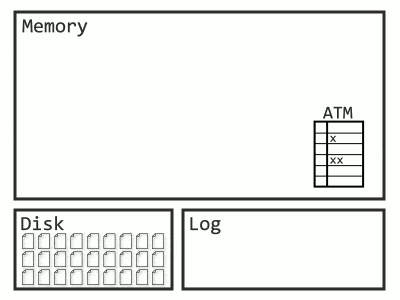
Aborted Transaction Map (ATM)

Versioning sounds promising, but this leads to another missing piece. How does a query know which row to read in the presence of an aborted transaction? The solution is to track which transactions were aborted, not just which ones are ongoing. This way, every time a query looks at a row, it checks whether the row was modified by an aborted transaction. The list of aborted transactions is called the Aborted Transaction Map. It’s implemented as a hash table, and I imagine it like below:

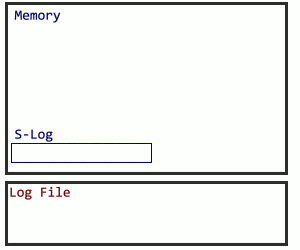
Secondary Log (S-Log)

The solution is making good progress, but there’s another problem (get used to this). Most transactions sent to SQL Server are composed of various smaller operations, and not everything can be versioned. For example, a large insert may add many rows which include versioning information, but will also require space allocations that get tracked in pages impossible to version. In the case of an operation that can’t be versioned, there are two main options: 1) Make it a short, independent transaction and clean it up later if needed. 2) Log it anyways and follow the traditional Redo/Undo recovery process.

But following the traditional logging method, even for a subset of logged activity, runs the risk of undoing the progress. What happens to logs before a checkpoint? How will the database recover? In this case, Microsoft sets up a secondary structure in concert with the log file named the S-Log. The secret sauce for the S-Log is what happens during a checkpoint. SQL Server locates all S-Log records from before the checkpoint, and adds them all together after the checkpoint, making the old log records safe to truncate. Here’s how I visualize it:

Optimizing the New Structures

There are now sufficient pieces in place for functional Accelerated Database Recovery. Versions are made durable in the Persistent Version Store to survive restarts, aborted transactions are tracked in the Aborted Transaction Map, and the S-Log captures unversionable actions and guarantees they’re accessible after the most recent checkpoint. These are the three main components: PVS, ATM, and S-Log.

These structures all add overhead. Real-world performance matters, so how can they be optimized? Microsoft doesn’t want a tagline of “ADR: It Just Runs Slower.”

PVS is probably the component with the most optimization. The first issue to be wary of is a case where repeated aborted transactions push the actual, committed row further and further down the version chain.

In this situation, instead of aborted transactions pushing the last committed data further away, the updating query will check transaction status before making a new version. If the row on page belongs to an aborted transaction, the new row will overwrite it, while keeping the pointer to the older, committed row.

Another optimization for PVS is in how it does versioning. Since creating a new version in the PVS pages takes a separate transaction and stores data on a separate page, it sometimes makes sense to store the version within the original row itself. This is done with a differential appended to the row, looking something like below (again, with criminal oversimplification).

Moreover, funneling all database versions into a single table sounds like a recipe for contention. Microsoft is aware of this, however, and say they partition accessors and preallocate space, in addition to making the PVS table append-only.

The ATM has performance tweaks as well. A system with numerous rollbacks would experience a bloated, inefficient ATM. To mitigate this, sufficiently small transactions (measured by transaction log size) are rolled back immediately, instead of leaving transaction info in the map for later cleanup.

Optimizations of the S-Log are focused on keeping it small – both by limiting what goes into it and by constant cleaning to minimize its memory footprint. Remember that the S-Log is for operations that aren’t viable for versioning. Probably the most significant contributor to these would be allocation operations. In what should be a familiar strategy by now, these are instead committed immediately, with a background process tasked with undoing any mistakes. Deallocations can’t be committed immediately, but are deferred instead of logged, again with a background process assigned for cleanup.

The other big risk for S-Log explosion would come from locks. For various reasons, locks are logged in SQL Server. Under ADR, the number of these is reduced. Only the highest level locks are logged in the S-Log. To make sure recovery still works correctly during the S-Log process, a new locking object is introduced to make sure no incorrect reads occur.

Cleanup Processes

What happens to versions that are no longer needed? Will the Aborted Transaction Map continue to grow indefinitely? The size of these new structures has performance implications as well, so background cleanup tasks are required.

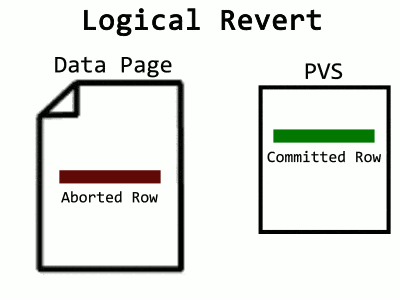
You may have noticed the process called Logical Revert in Microsoft’s explanation of ADR. Because it’s inefficient to leave aborted rows hanging around in data pages, there’s a cleanup process for this too. In the case where the data page contains an aborted row while the committed version is in the PVS (or an in-row version), Logical Revert will overwrite the aborted row with the committed, effectively moving the committed row back. I visualize it like this:

Over time, the ATM will fill up, and a background task cleans it. For an aborted transaction to be removed from the map, all of its aborted rows left in pages need Logical Revert applied to them. Cleaning one transaction at a time would require a way to determine which pages a transaction touched. Log records would allow that, except in ADR, SQL Server is truncating log records early. Instead, what happens is a scan of the entire database – at least, the pages containing rows from aborted transactions. PFS pages now track which data pages contain aborted rows, allowing a faster sweep. Also, instead of worrying about constant additions to the ATM, a snapshot of it is taken at the beginning, and when the sweep completes, all transactions present in the snapshot are removed. What’s that? Too many words? Fine, have an animation:

PVS pages use their own hash map as well, but this stores the most recent transaction per page. The oldest transaction necessary for Snapshot Isolation and the oldest transaction in the ATM are both tracked. Any PVS page with a max transaction earlier than both of these is safe to clean up. Since the PVS is append-only, cleanup occurs by deallocating the page.

The S-Log, as an in-memory structure, is also critical to keep lean. The in-memory records are needed for transactions that might rollback, while the on-disk logs are for recovery. As such, any S-Log for a transaction that can’t roll back is eligible for removal. There are two cleanup processes here. The first occurs at checkpoints, where S-Log records for transactions older than the oldest active transaction are removed. The second is a background scan that looks for S-Logs related to inactive transactions and removes them.

Summary

You can now review the key points:

  • Long rollbacks, long recovery, and bloated log files are problems
  • Versioning can solve these problems
  • To do so, it needs the PVS, ATM, and S-Log
  • These structures have optimizations to make them faster
  • These structures use numerous deferred cleanup processes

I would also summarize as below. If you want to check yourself after reading this, try to recreate the grid from memory.

Major Structure

PVS

ATM

S-Log

Purpose

Makes versions durable

Tracks Aborted Transactions

Allows logging for unversionable changes

Optimizations

In-row versions. Table design. Abort overwrites.

Short transaction rollbacks

Most unversionable changes moved to deferred cleanup.

Cleanup

Hash map transaction tracking, page deallocation.

Whole database sweep, PFS tracking, ATM snapshot

Background and checkpoint cleanup for unneeded S-Logs

By now, it should be obvious that ADR isn’t a magic go-faster option, (nor is NOLOCK by the way, despite what certain developers seem to believe.) There’s storage overhead, compute overhead, and a myriad of deferred cleanup processes.

After the number of log-related incidents I’ve suffered, I’m ready to say these are tradeoffs I’m willing to make. Moreover, I don’t even get a say if I want to use some newer cloud offerings like Hyperscale. I believe there are two critical components to supporting a product: the ability to Google well and actually understanding how it works. Since Stack Exchange doesn’t have answers on ADR failure modes yet, I’ll do my best to be prepared, and I hope this serves as a useful primer for you too.


The post How Does Accelerated Database Recovery Work? appeared first on Simple Talk.


from Simple Talk https://ift.tt/2rqMhcY
via

Thursday, November 21, 2019

SSRS is Still Around

The other day, a friend asked me if Microsoft is discontinuing SQL Server Reporting Services (SSRS) now that Power BI is the premier MS reporting and dashboarding tool. It seems like more organizations are finding fewer reasons to use SSRS due to the ease of use and features of Power BI. Despite all the news about the general availability of SQL Server 2019, I had not heard any recent news about SSRS, so I could only say that I didn’t know.

SSRS has been around since 2004 and started life as an add-in for SQL Server 2000. I heard about it at Pass Summit 2003 and deployed it in my department at work as soon as I could get it. My first project involved building reports for our trouble-ticket system. The reports were originally in MS Access pointing to data in a SQL Server database. At the time, each manager had their own copy of the reports and had tweaked them over time, so the managers were getting different answers when running the same reports. Figuring out exactly what the reports should return and recreating them in SSRS turned out to be a brilliant solution to an annoying problem.

Word of the success quickly spread, and soon managers from other departments began requesting reports from their own systems. As a busy DBA, I had too much work to do to keep up with all these requests, so I created a one-day class to teach SSRS to a handful of others. After leaving that firm almost 10 years ago, I’ve only been on a couple of projects where I needed to use SSRS, but I continue to teach beginning SSRS classes and wrote a beginning SSRS book a few years ago.

While I do have quite a bit of affection for SSRS, I also understand that technology changes at a fast pace and nothing lasts forever. I did a quick search to find out if there was some news. I found an article published in late October talking about features released with SQL Server 2019 Reporting Services. They include:

  • Azure SQL Managed Instance support: This means the SSRS database catalog only. The SSRS server must be hosted in an Azure VM or on-premises.
  • Power BI Premium dataset support: Publish reports that connect to a Power BI dataset.
  • AltText (alternative text) for report elements: These are tooltips supported by screen reader technology.
  • Azure Active Directory Application Proxy support: Let Azure manage your web application proxy to allow secure access via the Power BI Mobile app.
  • Transparent Database Encryption (TDE): You can now encrypt your SSRS catalog database with TDE.
  • Microsoft Report Builder update: This version is compatible with 2016, 2017, and 2019 versions of SSRS.

While there is nothing life changing in the new features, unless you spot something that you need, this shows that  Microsoft is still investing in SSRS. SSRS is still here, at least for now.


The post SSRS is Still Around appeared first on Simple Talk.


from Simple Talk https://ift.tt/2pFj8ua
via

Understanding Azure Storage Options

Azure can be a complicated mess of alphabet soup with all the acronyms Microsoft uses to define options within the cloud structure. In this article, I am going to decipher some of that for you starting with storage and redundancy. I’ll cover types of storage accounts, supported services, what performance tiers work with each storage account, and what kind of access you have with those storage types.

Azure Storage offers several different types of options. Both storage accounts and managed disks are part of the offerings—typically you’re going to use storage accounts for programmatic storage access, whereas managed disks will be used for your Infrastructure as a Service VMs. There are unmanaged disked available for VMs as well, but that’s not recommended at all. Unmanaged disks means that you will manage the storage account and not Azure. It is actually a file (.vhd) residing on a Azure Storage account and not an ARM file. Adversely, with managed disk all you have to do is specify whether you want Premium or Standard and the size of the disk and Azure creates and manages the disk for you. Simplifing the entire process. I only mention it here so that you know the difference. It is important to note unmanaged is again not recommend and an older way of doing things.

Let’s start with Data Access Tiers for Azure Blob Storage which are part of storage accounts.

Azure offers Data Access Tiers to storage such as Hot, Cool and Archive, which has the potential to save you money.

  • Hot gives you the ability to optimize your storage for frequently accessed data.
  • Cool is optimized for more infrequently accessed data. Data must remain for a minimum of 30 days. Removal before then will incur a charge.
  • Archive is rarely accessed and kept in storage for a minimum of 180 days.

You can use Cool storage is for things like short term back-up and recovery solutions which are not accessed until needed but can be accessed immediately when required. This will save you money compared to Hot storage. To save even more money, you can place things like long term back-ups, compliance data, or rarely used data on Archived storage. The expectation is that you will keep the data here long term and won’t require immediate retrieval. Think of this like sending your tape backups to Iron Mountain. You’ll need to wait for the data to be mounted which would take considerable time (up to 14 hours), but you will pay a much lower storage rate. However, keep in mind, if you take data out too soon, you will be charged an early delete fee of the retention period-days stored * rate.

Another item to understand before diving into other options is supported services. There are five Storage Services available.

  • Azure Blobs or block blobs are content libraries of unstructured data that are randomly accessed from anywhere. This can also be streamable data like videos or audio. This is commonly used for log files, backups and disaster recovery files.
  • Azure Files are fully managed files share which are accessed using  Server Message Block (SMB) protocol. These can be on both the cloud or on-premises and accessed by the cloud. Meaning this acts like a local file share. Both on prem users and cloud users can access files easily. These are a great solution for moving your local file shares to the cloud as well as “lifting and shifting” data to the cloud.
  • Azure Queues are used to store messages using HTTP or HTTPs. Typically, you use these to queue up work and process it asynchronously like Service Broker.
  • Azure Tables store structured schema-less flexible NoSQL data. This is typically a lower-cost option for storing data you need to get to fast for web apps, address books, device information and metadata according to Microsoft.
  • Azure Disks are managed virtual hard disks (VHD). They are similar to on-prem virtual disk but only virtualized and managed by Azure. Just like on-prem, you can get Ultra Disk, Premium or Standard Solid-State drives or just a Standard hard disk drive. If you are using SQL Server, or any other I/O intensive application you should only use Ultra or Premium disks. Even the Standard SSD offering will not meet the I/O needs of a small database but might be suitable for test and development environments.

Now that you understand the storage services, I’ll talk about the disaster recovery or data replication offerings for your data. Here is where acronyms can really cause confusion. I am not going to deep dive into any of these, because each could be a blog of its own. The goal here is to have a general understanding so you can be familiar with some high-level terminology that comes with Azure storage. It’s important to note that some of these options are only valid for standard storage—premium and ultra disks do not support geo-redundant storage (they do support zone redundant storage), and that you should not use geo-replicated storage for databases, as the data replication is asynchronous which means there is no guarantee of consistency. This may however can be a good option for things like backups.

Azure offers different types of data redundancy for storage. I affectionally refer to this as alphabet soup.

  • LRS – Locally-redundant storage. You get three copies of your data which is maintained within the same primary data center. It’s replicated synchronously and is a simple low-cost option. Think of this as three different server racks in the same building.
  • ZRS- Zone-redundant storage. Like LRS you get three copies of your data geared toward high availably replicated synchronously to 3 Azure availability zones in a primary region. Zones are in different physical locations or different data centers.
  • GRS- Geo-redundant storage. This allows your data to be stored in different geographic areas of the country or world. Again, you get three copies of the data within a primary region, but it goes one step further and places three additional asynchronous copies in another region. For example, you can now have a copy in Virginia and in California to protect your data from fires or hurricanes depending on the coast.
  • RA-GRS- Read Access Geo-redundant storage. This is GRS but adds a read-only element that allows you to have read access for things like reporting.
  • In PREVIEW – GZRS Geo zone redundant storage. This is the top tier for those that need both high availability and maximum durability, according to Microsoft. This is a combination of GRS and ZRS but replicates synchronously. When this goes live it will be a great option for database files, and can gives us, as database admins confidence that our data will be available when needed.
  • In PREVIEW – RA-GZRS Read Access Geo zone redundant storage. Piggybacking on the one above it adds a layer of readability to your secondaries.

Now that you have a very general understanding of the storage tiers let’s bring it all together and see what Azure offers (as of now, things change all the time) within their five types of storage accounts.

  • General-purpose v2 is the most basic account and offers all five storages services. It will cover majority of Azure storage needs.
  • General-purpose v1 same as v2 but does not support Hot, Cold or Archived data access tiers nor Zone redundancy replication options. This is considered legacy and should not be your first choice.
  • BlockBlobStorage is a premium tier but goes not support geo-redundancy. According to Microsoft It’s for scenarios with high transactions rates, using smaller objects, or requiring consistently low storage latency. It allows you to upload and access data in large blobs efficiently. This one is kind of new to me; you can read more here.
  • File Storage is a premium tier for files only, and like BlockBlobStorage, it too does not support geo-redundancy.
  • BlobStorage is very similar to General-purpose v2 in which it has Hot, Cold, and Archive data access and is available for standard performance tier but does not offer Zone redundancy.

Now, hopefully, when you look at the below image taken from Microsoft documentation which gives us the full line of options you have a better idea of what you’re viewing. Deciphering each Azure storage option is not easy. Be sure to consider all facets described above before choosing your storage options that best fit your company’s needs.

This article is meant to help you gain a general understanding of the terminology used. Always be sure to research your Azure options before you make decisions when it comes to the cloud. Some options may have caveats or not be available in all regions.


The post Understanding Azure Storage Options appeared first on Simple Talk.


from Simple Talk https://ift.tt/37njTsO
via

Wednesday, November 13, 2019

Introduction to DevOps: 10 Guidelines for Implementing DevOps

The series so far:

  1. Introduction to DevOps: The Evolving World of Application Delivery
  2. Introduction to DevOps: The Application Delivery Pipeline
  3. Introduction to DevOps: DevOps and the Database
  4. Introduction to DevOps: Security, Privacy, and Compliance
  5. Introduction to DevOps: Database Delivery
  6. Introduction to DevOps: 10 Guidelines for Implementing DevOps

Throughout this series, I’ve touched upon various aspects of the DevOps application delivery model, covering such topics as the delivery pipeline, security as an integrated process, and the importance of incorporating database deployments into application delivery. This article ties up the series by providing ten important guidelines for implementing DevOps in your data center. Although each DevOps environment is unique to an organization—addressing its specific needs and circumstances—these guidelines can offer a starting point for planning and implementing your DevOps strategy, discussing many of the considerations to take into account along the way.

1. Build an effective DevOps culture.

You might be tempted to view this first guideline as nothing more than introductory fluff to round out the article, and certainly many teams implement DevOps before fully appreciating the value of an effective culture. Failure to establish and encourage the right culture will inevitably translate to an excruciating and inefficient DevOps process or, worse still, a complete operations meltdown.

Implementing DevOps in any organization requires a shift in thinking, a new mindset that values communication and collaboration over inflexible roles and siloed teams that can’t see beyond their own borders. Those who participate in the DevOps process must be willing to work together and recognize that they’re accountable for application delivery from beginning to end and that they have a stake in the outcome.

To establish such a culture, you need a firm commitment from management and other leadership that clearly demonstrates a willingness to dedicate the time and resources necessary to establish and encourage transparent communications, information sharing, cross-team collaboration, and a general attitude that application delivery is everyone’s responsibility.

2. Take baby steps when getting started.

DevOps is not an all-or-nothing proposition. You do not need to revamp your entire operation overnight. Forget about the massive implementation scheme and instead take small steps toward achieving your goals. A DevOps implementation requires thorough planning and careful rollout while taking into account business needs that can evolve over time. For this, you need plenty of leeway.

You should be thinking long-term toward full implementation and not try to accomplish everything in a couple of months, especially for a large-scale operation. Rushing a DevOps implementation can be as big a mistake as failing to establish the right culture. You need time to assess requirements, train participants, choose the right tools, and deploy the infrastructure. Trying to implement DevOps before you’re prepared can result in buggy applications, compromised data, and a lot of wasted time and money.

When planning your DevOps implementation, it’s better to start small than risk the entire operation. For example, you don’t need to automate every task at once or move all your applications to DevOps at the same time. You can start by automating one or two processes or by developing smaller, less critical apps. After you’ve succeeded with one phase, you can then move on to the next.

3. Plan and document your development projects.

For any DevOps project, your development process should start with a thorough planning phase to ensure that development efforts run efficiently, remain on schedule, and come in under budget. All teams involved with application delivery—including development, testing, and operations—should participate in the planning process.

As part of this process, you should set realistic milestones, taking into account the time necessary to implement new tools and infrastructure and to allow those who are new to DevOps to adjust to a different way of working. Development efforts should focus on small, incremental changes, with more frequent release cycles. This approach can lead to releases that are more reliable and predictable while helping to avoid issues that can complicate and disrupt the application delivery process.

In addition, DevOps teams should document all necessary information throughout the planning and application delivery processes. Proper documentation is crucial to establishing a culture of collaboration and communication. It helps team members understand the systems, what has changed, what caused specific issues, and how to resolve those issues. Detailed documentation can also help improve subsequent release cycles for the current project and better streamline operations for future projects.

4. Take a security-first approach to DevOps.

Security, compliance, and privacy should be factored into your DevOps processes from the beginning and continue through all phases of application delivery, whether planning your applications, setting up infrastructure, writing code, or deploying to production. Security should not be treated as an afterthought, or a segregated phase squeezed into the application delivery process right before deployment, or worse still after the application goes live. Security must be integrated into all phases, implemented continuously, and treated as a priority by all team members.

As with application development, automated testing can be integral to ensuring that data remains secure and protected, with checks performed during each release cycle. If a test exposes a potential issue, it can be tagged for a security review, and the issue addressed quickly by developers before that application has an opportunity to find its way into production. In addition, peer code reviews should look for potential security and compliance issues, along with application-specific concerns.

DevOps teams should also take the steps necessary to secure the DevOps environment and processes themselves, such as storing all code in a secure source control repository, isolating the DevOps systems in a secure network, verifying all third-party code, or adhering to the principles of least privilege. There are, in fact, several best practices an organization should follow to implement continuous DevOps security, and teams must commit to ensuring those practices are always being followed.

5. Implement a code management strategy.

All DevOps teams should be using a source control solution that versions and protects files. The solution should provide a single source of truth for all files and ensure that they have a record of who changed what while providing easy access to any specific version of the application. But version control alone is not enough. You must also ensure that you check in all relevant files—not only application code, but also configuration and change scripts, test scripts, database deployment scripts, reference data, and any other files relevant to application delivery.

A code management strategy should also address how to handle branching, which lets developers work on different features simultaneously, without stepping all over each other. You’ll have to determine the best approach to branching based on your organization’s requirements. Just be sure that the source control solution you choose contains branching tools that are robust and sophisticated enough to ensure that branching works in your favor, rather than complicating operations.

You should also take into account other considerations when planning your code management strategy. For example, you might want to implement a policy that requires developers to check in their code at least once a day, or more often if necessary. Infrequent check-ins can complicate operations unnecessarily and slow down the development effort. Also, be sure that source code and other critical files are not being managed directly on local workstations or network shares. Again, everything should be in source control.

6. Automate, automate, automate.

For DevOps to be effective, you must automate as many operations as possible and practical. The more operations that can be automated—especially the mundane, time-consuming, repetitive ones—the more efficient the overall process and the fewer the risks. Where possible, avoid manual one-off tasks in favor of repeatable operations that can be automated (keeping in mind the second guideline about taking baby steps).

You won’t be able to eliminate all manual processes, but try to make them the exception, rather than the rule. Manual processes can slow development efforts or bring them to a halt, such as when a developer stops working on code to set up a virtual machine or implement a database environment.

Most standardized DevOps operations can now be automated, helping to improve efficiency and speed up application delivery. An automated operation can be used multiple times by multiple team members in multiple circumstances. In addition, the operation can be altered and improved to address changing business requirements. Test automation is a good example of this. You can write unit tests that kick off automatically when updated code is checked into source control. The tests can run as often as necessary, and they can be updated as needed to accommodate new requirements.

7. Think continuous everything.

In the world of DevOps, application delivery is not a one-time operation but rather an ongoing process that makes it possible to continuously update and improve the application until it reaches the end of its lifecycle. As with automation, continuous practices must be ongoing and deeply integrated into the DevOps environment. DevOps is not so much a linear process as it is a continuous flow of consecutive iterations that last until the application is no longer being actively developed or maintained.

Discussions about the continuous nature of DevOps often focus on continuous integration, delivery, and deployment because of the pivotal roles they play in defining the DevOps pipeline. Continuous integration, for example, makes it possible for developers to check in frequent code changes and know that those changes are automatically verified so they can be immediately incorporated into the codebase.

But continuous integration does not operate in a vacuum. It goes hand-in-hand with continuous testing, which validates the code by running automated tests that have been predefined to look for specific issues, making it possible to identify problems early in the development process, when they’re much easier to address. Also important to continuous integration—and the DevOps environment in general—are continuous security, monitoring, and feedback, which ensure that projects stay on track, DevOps processes work efficiently, and sensitive data is not put at risk.

8. Make quality assurance a priority.

One of the foundations of effective QA is automated, continuous testing that’s integrated into the DevOps pipeline. The software should be tested at each phase of the application development process, with development and testing done in tandem, beginning with the first code check-in. In addition, the testing strategy should incorporate the environment in which the application will be running, such as verifying that the correct software versions are installed or that environmental variables are properly configured.

Other factors critical to effective QA are continuous monitoring and feedback. You must be able to track the application’s health in order to identify any issues with the application or the environment in which it runs, even as the application scales. You should also be tracking the DevOps infrastructure itself in order to optimize application delivery and alert the team to any issues in the delivery process.

DevOps teams should consider using key performance indicators (KPIs) that measure such metrics as failure rates, time to resolution, completed operations, incomplete tasks, milestones accomplished, or any other factors that can help the team understand and improve operations and the application. Teams might also consider automatic dashboards that provide real-time insights into the environment and development efforts. When planning your DevOps infrastructure and projects, be sure you include QA experts to ensure that no aspect of QA is being overlooked.

9. Manage your environments.

Application planning must take into account the environments in which the application will be developed, tested, staged, and deployed to production. For example, you’ll likely need separate environments for developing an application so developers can work on different parts of the application without conflicting with each other. The same goes for testing. Different environments are usually needed to ensure the accuracy of the testing processes. Then there are the environments needed for staging and deploying the application, which can vary depending on the deployment model.

To address environmental requirements, many DevOps teams are now implementing infrastructure as code (IaC), a process of automating infrastructure creation. To incorporate IaC into your DevOps processes, you start by writing scripts that define the infrastructure necessary to support your application. For example, a script might provision a virtual machine, configure its operating system, install a database management system, apply security updates, and carry out several other operations.

With IaC, the application code and configuration scripts are linked together, rather than the application being tied to a single machine or cluster. The configuration scripts run automatically whenever the application is deployed. IaC ensures that the application environment is always the same, no matter where that environment runs while eliminating the need to set up environments manually. IaC also allows you to create as many temporary environments as necessary to support the application development process while ensuring that everyone is working in the same environment.

10. Choose the right tools and technologies.

To implement a successful DevOps environment, you need tools that increase efficiency and simplify tasks. But keep in mind the second guideline about taking baby steps. You don’t need every DevOps tool out there, and you don’t need to implement every chosen tool at once. Select your tools carefully, looking for those that integrate easily with other systems, facilitate automation, foster communication and collaboration, and provide visibility into your DevOps environment and processes.

A DevOps environment can require a wide range of tools. A source control solution is, of course, a given, but you’ll also need tools for automating infrastructure, monitoring systems and applications, integrating security, tracking tasks and development cycles, managing database releases, and carrying out several other processes. Fortunately, many vendors now offer solutions that support DevOps application delivery, but they differ, so you’ll need to evaluate them carefully.

As part of this process, you should take into account the architectures and technologies you’ll be employing. I’ve already pointed to IaC as an essential strategy, but there are other technologies that can also be effective in supporting DevOps, such as containers or microservices, all of which require their own set of tools. In addition, you should evaluate the extent to which you might be using cloud technologies to augment or host your DevOps operations and how to integrate systems between platforms.

Tailor-made DevOps

There are, of course, other considerations than what I’ve discussed here, and those that I have discussed could easily justify articles of their own. Even so, what I’ve covered should help you get started in planning your DevOps strategy and provide an overview of some of the factors to take into account as part of that process.

Keep in mind, however, that each DevOps implementation is unique and should be tailored to your organization’s specific needs and circumstances. Although DevOps has proven a valuable strategy for many organizations, there is no one-size-fits-all approach to implementing DevOps, and even if there were, there would be no guarantee that each implementation would work exactly the same in all circumstances. A DevOps environment should be designed to fit your organization’s requirements and improve application delivery, not make the process more difficult for everyone involved.

The post Introduction to DevOps: 10 Guidelines for Implementing DevOps appeared first on Simple Talk.


from Simple Talk https://ift.tt/32CY8Bv
via

Tuesday, November 12, 2019

Working with Identity Server 4

Identity Server 4 is the tool of choice for getting bearer JSON web tokens (JWT) in .NET. The tool comes in a NuGet package that can fit in any ASP.NET project. Identity Server 4 is an implementation of the OAuth 2.0 spec and supports standard flows. The library is extensible to support parts of the spec that are still in draft.

Bearer JWT tokens are preferable to authenticate requests with a backend API. The JWT is stateless and aids in decoupling software modules. The JWT itself is not tied to the user session and works well in a distributed system. This reduces friction between modules since it does not share dependencies like a user session.

In this take, I’ll delve deep into Identity Server 4. This OAuth implementation is fully compatible with the spec. I’ll start from scratch with an ASP.NET Web API project using .Net Core. I’ll stick to the recommended version of .NET Core, which is 3.0.100 at the time of this writing. You can find a working sample of the code here.

To begin, I’ll use CLI tools to keep the focus on the code without visual aids from Visual Studio. To fire up an ASP.NET Web API project, create a new project folder, change directory into it, and do:

dotnet new webapi

The tooling should scaffold a project you can run. Add Identity Server 4 as a dependency:

dotnet add package IdentityServer4 --version 3.0.1

Doing this from Visual Studio works too if that is preferred. With this, I am ready to begin the integration of Identity Server 4 into this project. In the code samples, I’ll ignore using statements unless necessary to put more focus on the integration itself.

OAuth Token Grant Type Flows

Identity Server 4 supports flows such as authorization code with hybrid and implicit grant types. It supports device code for use cases that lack a browser. For this tutorial, I’ll focus on the most useful flows to protect resources:

  • Client Credentials: When the client application is acting on its own behalf. Think of it as robots talking to other robots.
  • Resource Owner Password Credentials: Exchange user credentials such username and password for an access token. The token uniquely identifies a person requesting access to protected resources. Think of it as an identity card you carry around to gain privileged access.
  • Refresh Token: Request a new access token when the current access token becomes invalid or expires. Think of it as a long-lived token, and a way to renew access.

The use case is a person can log in with valid credentials to get tokens. As the access token expires, they can request new tokens with the refresh token. For applications where no one is driving the request, a client credential token can gain access.

Identity Server 4 Client Configuration

To get Identity Server 4 up off the ground, begin with client configuration. In OAuth lingo, a client is the uniquely identifiable app making token requests. Each client can set up allowed grant types and client scopes. These two decide which tokens the client can get from the identity provider. The identity provider is the authentication authority for generating and validating tokens.

Declare a ClientStore class with the following implementation:

public class ClientStore
{
  public static IEnumerable<ApiResource> GetApiResources()
  {
    return new List<ApiResource>
    {
      new ApiResource("all", "all")
    };
  }

  public static IEnumerable<IdentityResource> GetIdentityResources()
  {
    return new List<IdentityResource>
    {
      new IdentityResources.OpenId()
    };
  }

  public static IEnumerable<Client> GetClients()
  {
    return null;
  }
}

I’ll revisit GetClients as I flesh out client configuration for each grant type. There are scopes for client credential tokens in ApiResource. For resource owner tokens, it needs scopes in IdentityResource. Allowed scopes must appear here first before any one client can use them. Identity Server 4 supports client configuration from a back-end database. It comes with Entity Framework as the data access layer. For this project, I’ll stick to in-memory client configuration. The focus is on generating tokens.

Client registration goes in configuration that adds Identity Server 4 to this project. Open the Startup class in a code editor and then:

services.AddIdentityServer(options => options.IssuerUri = "localhost")
  .AddInMemoryApiResources(ClientStore.GetApiResources())
  .AddInMemoryIdentityResources(ClientStore.GetIdentityResources())
  .AddInMemoryClients(ClientStore.GetClients())
  .AddDeveloperSigningCredential(false);

I’m using a temporary signing credential to sign JWTs coming from this identity provider. Passing in false makes it to where the key does not persist on disk. This means it changes every time the app boots up. Identity Server 4 offers asymmetric RSA keys for local development. Asymmetric means there two separate keys. One private key to sign JWTs coming from the identity provider. One public so client apps can validate JWTs and check that they come from the right authority.

Token Request/Response

The Client Credential flow has the following request type:

  • grant_type: This must be set to client_credential
  • client_id: Uniquely identifies the client requesting tokens
  • client_secret: Secret password only known to the client making the request
  • scope: List of requested scopes that will go in the JWT to access protected resources

The Resource Owner Password Credential flow has the following request type:

  • grant_type: This must be set to password
  • username: The person’s username credential
  • password: The person’s password credential
  • client_id: The target client app they’re login into
  • client_secret: The target client’s secret
  • scope: Must be set to openid to request the access token. To get a refresh token, add offline_access.

And finally, the Refresh Token flow has the following request type:

  • grant_type: This must be set to refresh_token
  • client_id: The client app id where the access token came from
  • client_secret: The client app secret, which comes from the client app itself
  • refresh_token: The original refresh token that comes with the access token

Because all these flows have a lot in common, I’ll reduce this down to a single C# type. This frees me from having to repeat myself with all the different grant types.

For example:

public class TokenRequest
{
  [FromForm(Name = "username")]
  public string Username { get; set; }
  [FromForm(Name = "password")]
  public string Password { get; set; }
  [FromForm(Name = "grant_type")]
  public string GrantType { get; set; }
  [FromForm(Name = "scope")]
  public string Scope { get; set; }
  [FromForm(Name = "refresh_token")]
  public string RefreshToken { get; set; }
}

I opted to get request values from a form POST request because Identity Server 4 reads client id/secret data from a form content type. The client id/secret are not part of this TokenRequest since it reads it off the raw request.

All grant type flows have the following response:

  • access_token: A valid JWT. Comes with a sub claim for tokens that identify a person.
  • refresh_token: Optional token for renewing the access token
  • token_type: Must be set to “Bearer”
  • expires_in: Token lifetime set in seconds
  • error: Error code in case of a Bad Request response
  • error_description: Optional descriptive message of the error code

In plain C#, this looks like this:

public class TokenResponse
{
  [JsonProperty("access_token", DefaultValueHandling = DefaultValueHandling.Ignore)]
  public string AccessToken { get; set; }
  [JsonProperty("refresh_token", DefaultValueHandling = DefaultValueHandling.Ignore)]
  public string RefreshToken { get; set; }
  [JsonProperty("token_type", DefaultValueHandling = DefaultValueHandling.Ignore)]
  public string TokenType { get; set; }
   [JsonProperty("expires_in", DefaultValueHandling = DefaultValueHandling.Ignore)]
  public int? ExpiresIn { get; set; }
  [JsonProperty("error", DefaultValueHandling = DefaultValueHandling.Ignore)]
  public string Error { get; set; }
  [JsonProperty("error_description", DefaultValueHandling = DefaultValueHandling.Ignore)]
  public string ErrorDescription { get; set; }
}

Use a Newtonsoft attribute to format the JSON content-type response. Note DefaultValueHandling is set to ignore to allow as many token responses without clobbering the response.

Token Provider

It’s time to generate tokens in Identity Server 4. I’ll abstract this with an ITokenProvider interface:

public interface ITokenProvider
{
  Task<TokenResponse> GetToken(TokenRequest request);
}

One caveat is to avoid adding too many layers of indirection in front of Identity Server 4. At some point, the code might roll out its own security or reinvent the wheel. Here, I’m only adding this token provider and letting the library do the hard work.

Create a TokenProvider class that implements ITokenProvider with the following dependencies:

private readonly ITokenRequestValidator _requestValidator;
private readonly IClientSecretValidator _clientValidator;
private readonly ITokenResponseGenerator _responseGenerator;
private readonly IHttpContextAccessor _httpContextAccessor;

These dependencies have the following using statements:

using IdentityServer4.ResponseHandling;
using IdentityServer4.Validation;

Because Identity Server 4 works well with .NET Core, it knows how to get dependencies. Be sure to add them to the constructor and the library will do the rest of the job. This comes from service configuration in Startup when it calls AddIdentityServer. This is all thanks to .NET Core by putting dependency injection front and center. Dependencies are mockable, so it’s easy to write unit tests.

To implement the interface, do:

public async Task<TokenResponse> GetToken(TokenRequest request)
{
  var parameters = new NameValueCollection
  {
    { "username", request.Username },
    { "password", request.Password },
    { "grant_type", request.GrantType },
    { "scope", request.Scope },
    { "refresh_token", request.RefreshToken },
    { "response_type", OidcConstants.ResponseTypes.Token }
  };

  var response = await GetIdpToken(parameters);

  return GetTokenResponse(response);
}

Parameters are pass-through values since it already knows about the different grant types. I’m picking values straight from TokenRequest and placing it in a NameValueCollection. The response_type says which kind of token it gets in the response. I’m setting this to Token because I want an access token.

The private method GetIdpToken gets a TokenResponse from Identity Server 4. Because the name clashes with our own token response, set a using alias:

using IdpTokenResponse = IdentityServer4.ResponseHandling.TokenResponse;

Then, declare the private method as:

private async Task<IdpTokenResponse> GetIdpToken(NameValueCollection parameters)
{
  var clientResult = await _clientValidator.ValidateAsync(_httpContextAccessor.HttpContext);

  if (clientResult.IsError)
  {
    return new IdpTokenResponse
    {
      Custom = new Dictionary<string, object>
      {
        { "Error", "invalid_client" },
        { "ErrorDescription", "Invalid client/secret combination" }
      }
    };
  }

  var validationResult = await _requestValidator.ValidateRequestAsync(parameters, clientResult);

  if (validationResult.IsError)
  {
    return new IdpTokenResponse
    {
      Custom = new Dictionary<string, object>
      {
        { "Error", validationResult.Error },
        { "ErrorDescription", validationResult.ErrorDescription }
      }
    };
  }

  return await _responseGenerator.ProcessAsync(validationResult);
}

This does two things, validate client id/secret and token request, and generate tokens. Client id/secret data comes from HttpContext because it reads it off the raw request. Errors get placed in a custom dictionary for later retrieval.

With the IdpTokenResponse set, do the mapping to the TokenResponse:

private static TokenResponse GetTokenResponse(IdpTokenResponse response)
{
  if (response.Custom != null && response.Custom.ContainsKey("Error"))
  {
    return new TokenResponse
    {
      Error = response.Custom["Error"].ToString(),
      ErrorDescription = response.Custom["ErrorDescription"]?.ToString()
    };
  }

  return new TokenResponse
  {
    AccessToken = response.AccessToken,
    RefreshToken = response.RefreshToken,
    ExpiresIn = response.AccessTokenLifetime,
    TokenType = "Bearer"
  };
}

As mentioned, the TokenType must be set to a bearer type. This lets consuming apps know it’s meant as a bearer token. If there are any errors, set the Error and ErrorDescription property when available.

This completes token generation so go ahead and close this file. Note I’m writing pass-through code and letting Identity Server 4 do its work.

Token Endpoint

Add a TokenController with the following dependency:

private readonly ITokenProvider _tokenProvider;

Because it needs to know how to inject this dependency, put this in the Startup class:

services.AddTransient<ITokenProvider, TokenProvider>();

For now, the controller class should look like this:

[ApiController]
[Route("[controller]")]
public class TokenController
{
  private readonly ITokenProvider _tokenProvider;

  public TokenController(ITokenProvider tokenProvider)
  {
    _tokenProvider = tokenProvider;
  }
}

This means the endpoint will be /token to make token requests. In the TokenController put in place the form POST request:

[HttpPost]
public async Task<ActionResult<TokenResponse>> Post([FromForm] TokenRequest request)
{
  var response = await _tokenProvider.GetToken(request);

  if (!string.IsNullOrEmpty(response.Error))
  {
    return new BadRequestObjectResult(response);
  }

  return response;
}

The FromForm attribute makes it so this grabs the TokenRequest from a form POST. Note the quick check for an error and the 400 Bad Request response. The spec says it must be set to 400. It may respond with a 401 Unauthorized when client id/secret validation fails. And, it must respond with a 401 when client id/secret fails and is sent via the header. Because I’m sending client data through a form post, I’m keeping this simple.

Since Newtonsoft formats the JSON response, be sure to add support for this:

dotnet add package Microsoft.AspNetCore.Mvc.NewtonsoftJson --version 3.0.0

Then register it:

services.AddControllers().AddNewtonsoftJson();

Also, I’m going to disable HTTPS redirection that comes with the project. I don’t want to have to deal with local certificates and whatnot. So, find this in Startup and remove this from the project:

app.UseHttpsRedirection();

This allows local dev tools like curl.exe which don’t support HTTPS redirection to work. One caveat is the spec does say the token endpoint must require TLS encryption. This is to avoid sending credentials in cleartext. Keep this in mind when the project is ready to ship.

With the token endpoint ready to serve requests. It’s time to start generating tokens. It’d be good to see each grant type sending back tokens.

Client Credential Token

The good news is most of the code is already in place. To finish this, it needs a client configuration that allows client credential tokens. Open up ClientStore, make sure it’s in the GetClients method where it returns null and replace it with this:

new Client
{
  ClientName = "Client Credential Flow",
  ClientId = "client_credential_flow",
  AllowedGrantTypes = GrantTypes.ClientCredentials,
  ClientSecrets =
  {
    new Secret("client_credential_flow_secret".Sha256())
  },
  AllowedScopes =
  {
    "all"
  },
  AllowOfflineAccess = false,
  AccessTokenLifetime = 60
}

The client secret itself gets hashed in the client store. Identity Server 4 treats client secrets like a password, so it must be hashed. Storing passwords in plain text will not work, so note the call to Sha256. The AllowedGrantTypes is set to the flow it can support. This means this client can only respond with client credential tokens. Each client configuration must have at least one scope. I’m using “all” as a default scope to indicate a catch-all scope. Setting AllowOfflineAccess to false means this client does not support refresh tokens. Identity Server 4 does not allow refresh tokens in the client credentials flow. Client credential tokens are suitable for one-time use with a short lifetime.

Go ahead and fire up this project with dotnet watch run. I like running .Net Core projects in watch mode, so it refreshes automatically. This means every time there’s a code change, it rebuilds and runs automatically.

You can use Postman to send requests to the endpoint, which is the tool I recommend. Because I don’t want to hit you with a bunch of fuzzy images from Postman, I’m using curl.exe. This CLI tool ships with the latest public release of Windows 10.

To get client credential tokens from this endpoint, do:

curl.exe -d "grant_type=client_credentials&
    scope=all&client_id=client_credential_flow&
    client_secret=client_credential_flow_secret"
  http://localhost:5000/token

Note all the required parameters to get client cred tokens are there. This curl command needs to go in a single line. Everything in the double quotes shouldn’t have any spaces.

If you don’t see a response, check that there isn’t any HTTPS redirection. Curl has an

--include flag that shows response headers. The default project template responds with a 307 Temporary Redirect response which is not supported.

This is what the response looks like:

{
  "access_token": "eyJhbG…E60uIFh-LE5Pi-HNdaSslPaZdxyDHVkk5NA",
  "token_type": "Bearer",
  "expires_in": 60
}

Resource Owner Token

The resource owner token flow has the following client configuration:

new Client
{
  ClientName = "Resource Owner Flow",
  ClientId = "resource_owner_flow",
  AllowedGrantTypes = GrantTypes.ResourceOwnerPassword,
  ClientSecrets =
  {
    new Secret("resource_owner_flow_secret".Sha256())
  },
  AllowedScopes =
  {
    IdentityServerConstants.StandardScopes.OpenId,
    IdentityServerConstants.StandardScopes.OfflineAccess
  },
  AllowOfflineAccess = true,
  RefreshTokenUsage = TokenUsage.ReUse,
  AccessTokenLifetime = 60,
  RefreshTokenExpiration = TokenExpiration.Absolute,
  AbsoluteRefreshTokenLifetime = 300
}

The AllowedScopes must be set to OpenId. If it needs to support refresh tokens, add the OfflineAccess scope. Token lifetime expirations are set in seconds.

This token flow is not quite ready yet. Requesting tokens throws an error saying it needs IResourceOwnerPasswordValidator. This interface is straightforward, and it’s what validates user credentials.

Put in place this interface like this:

public class ResourceOwnerPasswordValidator : IResourceOwnerPasswordValidator
{
  public Task ValidateAsync(ResourceOwnerPasswordValidationContext context)
  {
    if (context.Request.Raw["password"] != "password" ||
        context.Request.Raw["username"] != "username")
    {
      return Task.CompletedTask;
    }

    context.Result.IsError = false;
    context.Result.Subject = GetClaimsPrincipal();

    return Task.CompletedTask;
  }

  private static ClaimsPrincipal GetClaimsPrincipal()
  {
    var issued = DateTimeOffset.Now.ToUnixTimeSeconds();

    var claims = new List<Claim>
    {
      new Claim(JwtClaimTypes.Subject, Guid.NewGuid().ToString()),
      new Claim(JwtClaimTypes.AuthenticationTime, issued.ToString()),
      new Claim(JwtClaimTypes.IdentityProvider, "localhost")
    };

    return new ClaimsPrincipal(new ClaimsIdentity(claims));
  }
}

Then, add it to Startup:

services.AddTransient<IResourceOwnerPasswordValidator, ResourceOwnerPasswordValidator>();

The code above needs the following using statement:

using IdentityServer4.Validation;

I’m using a poor man’s credential validator to short-circuiting the logic when it fails. In a real project, be sure to check against a stored hash in a database. If the credentials are valid, set IsError to false and set the Subject. The Subject includes the subject or “sub” claim for this JWT. This is what ties the JWT to a living person. Here I’m sticking a random Guid, but it can be the user id from the database. Identity Server 4 requires all these three claims in the generated JWT.

Restart the .Net Core watcher, so it picks up the new file. Then run curl to get tokens:

curl.exe -d "username=username&password=password&
    grant_type=password&scope=openid+offline_access&
    client_id=resource_owner_flow&
    client_secret=resource_owner_flow_secret"
  http://localhost:5000/token

The token response looks like this:

{
  "access_token": "eyJhbG…KhGxlF3Rc7VSyoGm3pym-2d2qbASP6sMQ",
  "refresh_token": "GVP13…Xsy1Vu4M",
  "token_type": "Bearer",
  "expires_in": 60
}

Going to jwt.io and pasting the access token shows the following:

{
  "nbf": 1570057549,
  "exp": 1570057609,
  "iss": "localhost",
  "client_id": "resource_owner_flow",
  "sub": "5312e20a-280b-4396-bebc-ae9d2c171d55",
  "auth_time": 1570057549,
  "idp": "localhost",
  "scope": [
    "openid",
    "offline_access"
  ]
}

In this JWT, the exp, client id, and sub are of interest. The exp stands for expiration in Unix epoch time. The client id is the originating app, and sub is the person’s identity.

Refresh Token

To get a refresh token, it needs the refresh token that comes with the resource owner token response. Do this to get a new access token:

curl.exe -d "grant_type=refresh_token&
    client_id=resource_owner_flow&
    client_secret=resource_owner_flow_secret&
    refresh_token=GVP13…Xsy1Vu4M"
  http://localhost:5000/token

In Identity Server 4 the refresh token can expire. There are options for when the refresh token expires. In this case, the client is set to absolute expiration every five minutes. Once refresh tokens expire, it gets kicked off the store and fails the request validation.

This is what the refresh token response looks like:

{
  "access_token": "eyJhbG…V35dNQn Tbq2bUfnjHaBzFQcamfAd_hU3A",
  "refresh_token": " GVP13…Xsy1Vu4M ",
  "token_type": "Bearer",
  "expires_in": 60
}

This refresh token remains the same after each access token renewal. This is because the client configuration is set to ReUse. The spec says the identity provider can reuse the refresh token. Or, return a brand-new refresh token. It’s up to whatever makes one feel more secure.

Putting It All Together

Now that this identity provider is overflowing with tokens. It is time to secure an endpoint with a bearer token. The scaffold puts in a place a dummy controller that does weather forecasting. Find WeatherForecastController and open it, I’ll come back to this later.

To enable bearer JWT token authentication, add the following NuGet package:

dotnet add package Microsoft.AspNetCore.Authentication.JwtBearer --version 3.0.0

In Startup, add this middleware:

services.AddAuthentication(options =>
{
  options.DefaultScheme = JwtBearerDefaults.AuthenticationScheme;
  options.DefaultAuthenticateScheme = JwtBearerDefaults.AuthenticationScheme;
  options.DefaultChallengeScheme = JwtBearerDefaults.AuthenticationScheme;
})
.AddJwtBearer(options =>
{
  options.TokenValidationParameters = new TokenValidationParameters
  {
    ValidateAudience = false,
    ValidateLifetime = true,
    LifetimeValidator = (notBefore, expires, securityToken, validationParameter) =>
      expires >= DateTime.UtcNow
  };

  options.RequireHttpsMetadata = false;
  options.Authority = "http://localhost:5000";
});

This tells the client app where the authentication authority is so it can validate JWTs. The LifetimeValidator is a lambda expression that rejects expired tokens. I’m disabling HTTPS because I only plan to run this in local.

Client apps need a well-known configuration endpoint that comes from the identity provider. This is how they read the public key and validate tokens.

To include the well-known config endpoint that comes from Identity Server 4:

app.UseIdentityServer();

Feel free to poke around this endpoint. Go to http://localhost:5000/.well-known/openid-configuration in the browser.

With this, add an Authorize attribute to the Get method in WeatherForecastController. Strip out any dependencies from this class such as ILogger. Project scaffolding can add unnecessary dependencies in this class. Make sure the project is running in watch mode then fire off the following request:

curl -H "Authorization: Bearer eyJhbGciOiJS…7YghdwNxLQ"
  http://localhost:5000/weatherforecast

Accessing this endpoint without a bearer token returns a 401 response. The request also gets rejected after the token expires.

Below is the typical use case for all these tokens. I’ll begin with resource owner tokens, call the protected endpoint, and refresh the token. Then, use client credential tokens to access the same endpoint.

Conclusion

Identity Server 4 is the best tool for generating bearer tokens. It comes with client credential, resource owner, and refresh tokens. Client configuration dictates which token flows are allowed with grant type and scopes. Startup configuration in .NET Core makes the integration easier. Bearer token authentication can go in any API endpoint by setting the right authority. The well-known config endpoint in the identity provider is how APIs validate tokens.


The post Working with Identity Server 4 appeared first on Simple Talk.


from Simple Talk https://ift.tt/2qNsvIb
via

Monday, November 11, 2019

The Ignite Conference Brought News and Changes

The first week of November was a big week for Microsoft. They made many announcements at the Ignite conference about what’s new and what will be available in the near future. It was also the week of PASS Summit, the largest Microsoft Data Platform conference in the world. PASS Summit was a fantastic conference as always, but we missed many of the folks who attended Ignite instead. Another bad thing about the two conferences landing the same week, is that, not only were new things announced, some of them were rolled out in Azure at the same time.

The biggest news for the data platform that week was the general availability of SQL Server 2019. SQL Server 2019 has many new features including a memory optimized tempdb, UTF-8 character encoding, Big Data Clusters, improvements to the optimizer such as Batch Mode on Rowstore, and much, much more.

While the announcement about SQL Server 2019 was important, many database professionals work on more than on-premises servers. Some of us are working in Azure with SQL VMs, Azure SQL Database, Power BI, machine learning and more. There was important news from Ignite and PASS Summit no matter your interest.

While I’m not a data scientist, I am very interested in machine learning and the machine learning tools available on Azure. In fact, my PASS Summit session, Azure Machine Learning 101, was about the drag-n-drop feature to prepare the data and test out algorithms to easily build a predictive machine learning model. The week before PASS Summit and Ignite, the feature was called Visual Interface for Azure Machine Learning service.

On Tuesday of PASS Summit, I intended to spend a couple of hours rehearsing my session but was in for a big surprise. The feature I planned to demonstrate was no longer in Azure. It was replaced with a new feature called Azure Machine Learning Studio. This is a separate site that provides end-to-end functionality for the data scientist, so they do not need to see everything in Azure. This new feature is similar but also a bit different than what I had planned to demo. (This is not the same as the Azure Machine Learning Studio Workspace that has been available for a few years.)

I spent the day Tuesday trying to learn the new feature to be ready for my session on Friday. I was a bit panicked but thankful that I found out about the changes a few days in advance. Fortunately, I figured out enough to have a nice session.

I’m not the only speaker who ran into changes that week affecting their sessions, and it happens when demonstrating on Azure not only during a big announcement week. I’ve been fortunate that I haven’t had a demo crash and burn due to changes that I didn’t know about.

Technology changes quickly in today’s world, especially in the cloud. It’s an exiting time to work in technology…if you can keep up!


The post The Ignite Conference Brought News and Changes appeared first on Simple Talk.


from Simple Talk https://ift.tt/32E0ZtT
via

Tuesday, November 5, 2019

Creating a Shader in Unity

Have you ever looked at a game and wondered how it achieved its appearance? Perhaps it looked like it was ripped straight from a comic book or the world was drawn perfectly to convey an eerie atmosphere. There are three components that create the look of the game, them being textures, materials, and shaders. Textures are simple images, which is what the material can use to define a surface. Shaders are small scripts that hold the mathematical calculations of every pixel rendered in game and are largely based on the lighting input and configuration of materials. Shaders can play a pivotal role in creating unique and interesting visuals for a project.

To create a shader, one must be prepared to do a little graphics programming. Here, the aim will be to get your feet wet with a Unity shader of your own creation. The code in this shader will specify what to do with the very vertices that make up the triangles which in turn make up the geometry the material is applied to. By the end you should be able to create a material from this shader that draws an object in a wireframe. You can also change its color, the wire thickness and its transparency to get exactly the look you want in the object.

Creating the Shader

As of this writing, Unity has unveiled a new program called Unity Hub, which is where project creation will occur. Start by selecting the New button in the top right.

Figure 1: Creating a new project in Unity Hub.

Project creation proceeds as usual from here. Give it a name, select the type of project, and designate a location for the project. Once you have finished, click the create project button to begin.

Figure 2: Project creation

Of course, in order to test out any shader you create, you’ll first need an object or two. Here two objects will be made, a cube and a sphere, using the Create menu in the Hierarchy.


Figure 3: Creating objects

To better view the objects, increase their scale to five, then place them anywhere you’d like. The example below places the Cube object at -3, 1.5, 2 position and rotates its x axis by 45 and its y axis by 25. Your Sphere object can be placed at 5, 1.5, 0 position with no rotation.


Figure 4: Cube object’s placement, rotation, and scale.

The environment is now set, which means it’s time to begin creating the shader. Create your new shader by right clicking in the Assets window and selecting Create->Shader->Standard Surface Shader.

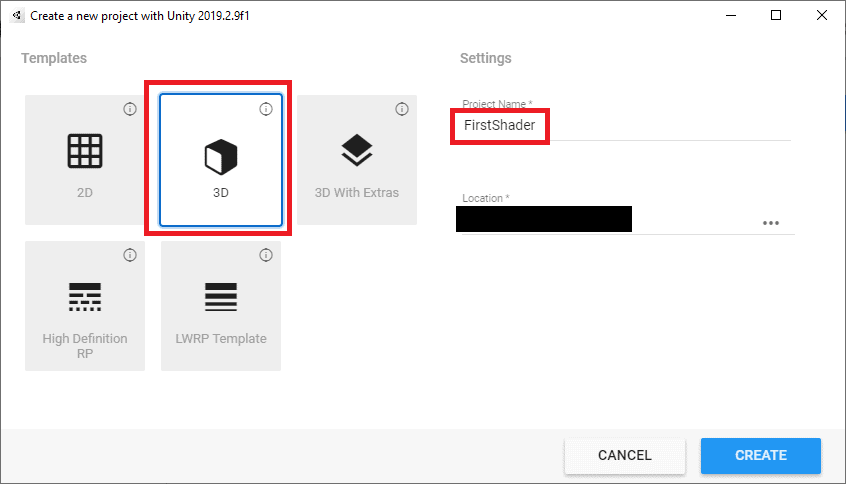
Figure 5: Creating a new shader.

You may name the shader whatever you wish, but the remainder of this writing will refer to this shader as MyShader. Now that this has been created, double click the newly created shader file to open Visual Studio and begin the coding process.

The Code

To recap, the shader in question will draw objects in a wireframe. For the uninitiated, a wireframe is a 3D model that is drawn with only the vertices and lines. There will be no textures or lighting on these wireframe objects. That removes some problems you would ordinarily have to figure out, but it presents some new ones as well. Drawing a series of triangles in code can yield its own set of challenges. Not only that, but the wireframe shader will have a slight glow to it as well as some user defined thickness and transparency.

Back to Visual Studio, you can see that the code here is not like what you usually program in Unity. There are some parts that use Unity’s Shaderlab, a language for writing shaders, while others incorporate more traditional C for Graphics (Cg) and C# code with a heavy leaning towards Cg. There are some familiar elements such as structs and void functions while on other lines you’ll see syntax like SubShader and LOD. Those will be explained as they come, but this writing will largely be focused on the Cg and C# elements. Now that the environment has been established, it’s time to get to work on the wireframe shader.

For starters, you can go ahead and delete all code currently within the shader. The shader you’re about to make will be created from scratch to more easily understand how all its parts come together. Once that’s done, enter the following:

Shader "Simple Talk/Wireframe Tutorial"
{
}

All this first line does is set the menu location for the shader. When editing any material there is a Shader menu you can navigate to select which shader this material will use. In this case, MyShader is found at SimpleTalk->Wireframe Tutorial. This will be demonstrated after you finish coding the shader. Speaking of which, it’s time to begin the shader creation proper, starting with property declarations. This will go within the Shader pair of curly braces.

Properties
{
        _Color("Color", Color) = (1, 1, 1, 1)
        _Wireframe("Wireframe thickness", Range(0.0, 0.005)) = 0.0025
        _Transparency("Transparency", Range(0.0, 1)) = 0.5
}

The general structure of a property is the variable name, the property’s designation in the editor, what kind of property it is, and then a default value. For example, the first variable is given the name _Color while in the editor it will display as whatever is in the quotations. Then you specify that it will be of the Color value type and give it a default color of white. _Wireframe and _Transparency are a little different in that their value types are given as a range of floats. This means in the Unity editor those variables can be edited by moving a slider.

Next comes the SubShader, which defines rendering passes and optionally can set up any state common to all passes. In other words, it’s the part that makes the shader what it is. The SubShader goes inside the Shader under the Properties section.

SubShader{
     Tags { "Queue" = "Transparent" "RenderType" = "Transparent" }
     LOD 200
}

At this point, the script should look like the below figure:

Figure 6: The shader so far.

Since you want the material born from this shader to be transparent, you give it both the render type of transparent as well as the queue in its tags. If you wanted a shader that still had a full object with wires around it, you would remove the queue tag to do so. As the ability to change the material’s transparency will be available, you need to let Unity know that the object is able to fade. You might wonder why you wouldn’t just set the color to have an alpha of zero to achieve the same effect. The reason is simple – it doesn’t affect anything. Materials appear to ignore the alpha value in the color selection on primarily focus on the RGB values. At that point, the biggest reason to keep the alpha value is tradition.

Tags can also be queried later in other C# scripts for whatever purpose you may need. This is similar to the typical tagging system seen when creating an object in Unity. Finally, there’s the LOD line with a number beside it. LOD stands for Level Of Detail and controls, you guessed it, the level of detail in the material. For example, if an object has a material that makes it look like a concrete tile, the LOD controls how nice looking that concrete tile can be. You would typically have multiple LOD options for various computer builds but since this is a wireframe shader it’s reasonable to assume that the material derived from this shader could run on a toaster.

Within SubShader you now must create a Pass. All the prep work is out of the way, meaning Pass will contain the code that defines the material’s appearance.

Pass
{
        Blend SrcAlpha OneMinusSrcAlpha
        Cull Back
}

And here’s how the script looks now:

Figure 7: The shader with Pass included.

The Blend line exists to create transparent objects and nothing more. Cull Back is you telling Unity to not render polygons facing away from the viewer. There is also Cull Front, which does the opposite of Back and stops the rendering of polygons facing the viewer, and Cull Off which draws all polygons regardless if they are currently being viewed. This example chose Cull Back with the belief that it looks better but you may adjust this as you wish.

It’s now time to put those properties to use in some functions and structs. Before beginning, you’ll need to let Unity know that Cg is in use until otherwise noted by adding the following in Pass:

CGPROGRAM

Then, under that create the following:

#pragma vertex vertexFunction
#pragma fragment fragmentFunction
#pragma geometry geometryFunction
#include "UnityCG.cginc"

The rest of the code all goes inside the Pass section. The pragma statements are very much like method declarations that you may normally find in a C# script. They will be defined later on in the coding process. At the end there’s an include statement, which lets the editor know you’ll be using some commonly used helper functions from that library. Now to create a couple structs:

struct v2g
{
        float4 pos : SV_POSITION;
};
struct g2f
{
        float4 pos : SV_POSITION;
        float3 bary : TEXCOORD0;
};

v2g stands for vector 2 geometry and contains a single variable – a float4 named pos, with SV_POSITION being what’s known as a semantic. Semantics is how you explain to the editor what the variable’s “intent” is. In this case, the intent is to output the clip space position of a vertex, this way the GPU knows where on screen to place pixels. The next struct, g2f (standing for geometry 2 fragment) has all the same info as v2g but with an additional float3 named bary which uses the TEXCOORD0 semantic. TEXCOORD0 is simply the first UV coordinate in the shader, given as a float3 in this example but can also be done with float2 or float4.

v2g vertexFunction(appdata_base v)
{
        v2g o;
        o.pos = UnityObjectToClipPos(v.vertex);
        return o;
}

Earlier you wrote some pragma statements, which acted effectively as function declarations. It’s time to give those functions a little code to execute. First up is vertexFunction which, as the name suggests, gets the various vertexes ready for the next two functions. Then comes geometryFunction:

[maxvertexcount(3)]
void geometryFunction(triangle v2g IN[3], 
     inout TriangleStream<g2f> triStream)
{
        g2f o;
        o.pos = IN[0].pos;
        o.bary = float3(1, 0, 0);
        triStream.Append(o);
        o.pos = IN[1].pos;
        o.bary = float3(0, 0, 1);
        triStream.Append(o);
        o.pos = IN[2].pos;
        o.bary = float3(0, 1, 0);
        triStream.Append(o);
}

Here the different triangles that make up an object are being drawn. This is possibly the busiest function in the whole script, though you’ll notice a pattern – a few lines of code are being repeated, just with different elements in the IN array and the bary value from the g2f struct being given different float3 values each time. There’s also an attribute at the top of the function specifying that the maximum vertex count per shape is three, which makes sense as it is triangles being drawn and thus only need three vertexes per triangle. The last step remaining is to change the object based on the color, thickness and transparency values the user enters.

float _Wireframe;
fixed4 _Color;
float _Transparency;
fixed4 fragmentFunction(g2f i) : SV_Target
{
        float value = min(i.bary.x, (min(i.bary.y, i.bary.z)));
        value = exp2(-1 / _Wireframe * value * value);
        fixed4 col = _Color;
        col.a = _Transparency;
        return col * value;
}
ENDCG

You’ll notice the three variables kicking things off look awfully familiar. They share the name of the properties declared early in the script. Why the repeat? Remember that you’re currently working in the CGPROGRAM section and it needs to take in the properties defined early on to make any use of them. You can see their use implemented in fragmentFunction, where the object is given its assigned color, wireframe thickness, and transparency. Finally, the script ends with ENDCG, which tells Unity that Cg is not being used any longer.

All the code needed to give objects a wireframe appearance is complete. Save your work and go back to the Unity editor. If there are errors, they will appear in the Inspector window upon selecting the shader file in the Assets window.

Putting the Shader to Use

First, you’ll need to create a material that uses this shader. The easiest way to do this is to right click the shader file in the Assets window and navigate to Create->Material.

Figure 8: Creating a new material with MyShader

Name the material whatever you wish, then navigate to the Inspector window. If you look at the top of the Inspector window you can see the path Simple Talk/Wireframe Tutorial in the Shader menu. Selecting that drop down menu brings up the following:

Figure 9: The Shader menu. You can see Simple Talk as an option.

In this menu you can select from any number of shaders, for this material, including the one just created. If you navigate to Simple Talk->WireFrame Tutorial you will select MyShader as the shader to base this material off of. Since you right clicked the shader and created the material from the context menu, this is not needed. However, you could still use this menu if you accidentally chose the wrong shader.

In a preview window at the bottom of the Inspector window you can see how the material will look on an object. Go ahead and assign a color to it. You can also specify how thick you want the lines to be and how transparent the object is.

Figure 10: Changing material properties.

Your cube and sphere will need the material applied to them in order to better see the material, and by extension the shader, in action. Select an object and find its Mesh Renderer component in the Inspector. Under Materials there is a space to click and drag your new material in.

Figure 11: Setting object material.

Once you’ve done that, the project is finished, and you should see your objects take on its wireframe appearance. You can try playing with the values in the material to get different appearances.

Figure 12: Cube and Sphere with new material.

Conclusion

As shaders go this is perhaps one of the more basic ones you can create. Still, pat yourself on the back for dipping your toe into graphics programming. One way you can expand on this knowledge is to study and recreate the default shaders in Unity. All you need to do is create a new shader file, open the code in Visual Studio and have a look around. Or, you can get experimental and try coming up with your own unique shaders.

The post Creating a Shader in Unity appeared first on Simple Talk.


from Simple Talk https://ift.tt/2oNJNob
via