Tuesday, April 27, 2021

SQL Server security – Providing a security model using user-defined roles

When developing an application that accesses SQL Server, you need to set up a security model, so each user gets the access they need based on their job duties. Some applications require the same access for all users, while other application might require different security access rights based on the role a user has in the organization. The best practice for providing user access is to use role-based security. SQL Server provides user-defined Server and Database roles for defining security rules for different user security needs. This article will discuss how to use user-defined server and database roles to provide secure access to SQL Server resources.

What is Role-Based Security?

Role-based security is the concept of providing each application user access to the SQL Server resources they need by being a member of a role. A role is an object in SQL Server that contains members, much like a Windows group contains members. When a user is a member of a role, they inherit the permissions associated with the role.

When role-based security is used, the actual access permissions to SQL Server resources are granted to a role and not a specific user. Role-based security reduces the amount of administration work needed to grant and manage security when multiple application users require the same access to SQL Server resources. Once a role has been set up, and the appropriate permissions have been granted, it is just a simple matter of adding users to the role to provide them with the same security access. Without using roles, an administrator would need to grant the same permissions to each user, thus causing additional administration work. There is also the possibility of making an error, resulting in some users getting the wrong set of permissions.

Since SQL Server 2012, Microsoft has provided two different types of user-defined roles: Server and Database. The user-defined server roles provide security access to server resources. In contrast, user-defined database roles provide access to database resources.

User-Defined Server Roles

User-defined server roles are created at the server level and allow you to assign a specific set of server-level permissions to the role. One example of where a user-defined server role would be useful is to limit the server-level access that a junior DBA might have. By creating a server-level role, you could provide a junior DBA with access to only those server resources they need to perform their Junior DBA duties without giving them full server access via the sysadmin fixed server role.

To demonstrate how to create a server-level user-defined role with limited server permissions, I will create a user-defined server role named Junior DBA. As the name implies, this user-defined role will be set up with a limited set of server rights for a junior DBA. I want this Junior DBA user-defined role to only have access to view databases and server state information.

The first step to setting up the Junior DBA user-defined role is to create the role. The new role can be created using TSQL or SSMS. Listing 1 shows the TSQL code to create this role.

Listing 1: Creating a user-defined server role

CREATE SERVER ROLE [Junior DBA] AUTHORIZATION SA;

The code in Listing 1 only creates the role and gives the ownership of this role to the account SA, by providing the AUTHORIZATION keyword followed by the login SA. If the authorization keyword and login were omitted, then my login would have owned this user-defined server role. This TSQL code has only created the role but did not assign any server rights to the new role.

I could have also created this server role using SSMS by performing the following steps.

  1. Open up Object Explorer and connect to the server where the new server role needs to be created.
  2. Expand the Security folder.
  3. Right-click on the Server Role item and select the New Server Role… item from the pop-up menu.

If I had used the SSMS steps to create my Junior DBA role, then the New Server Role window in Figure 1 would have been displayed.

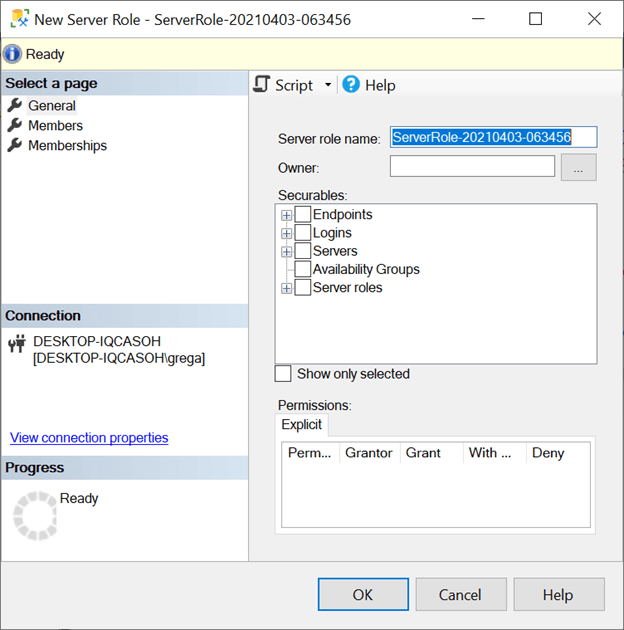
Figure 1: New Server Role window

As you can see, SSMS automatically generated a user-defined role name of ServerRole-20210403-063456. Since this isn’t the name I want for my role, I now need to type over that automatically generated name with my role name of Junior DBA and enter dbo in the owner field. At this point, I could click on the OK button, and this role would be created, just as if I ran the TSQL code in Listing 1. But since I want my new Junior DBA role to have some rights, let me move on and show you how to assign rights to this new role using SSMS.

In Figure 1, the Securables section on the right side of the window has a list of server-level rights that can be granted to a user-defined role. For this demonstration, I’m only going to give my junior DBA role the following rights: view any database, view any definition, and view server state information. To give these rights, I first click on the Servers item and then scroll down and grant permissions to those view rights I want my junior DBA to have. After doing this, my New Server Role window looks like what is shown in Figure 2.


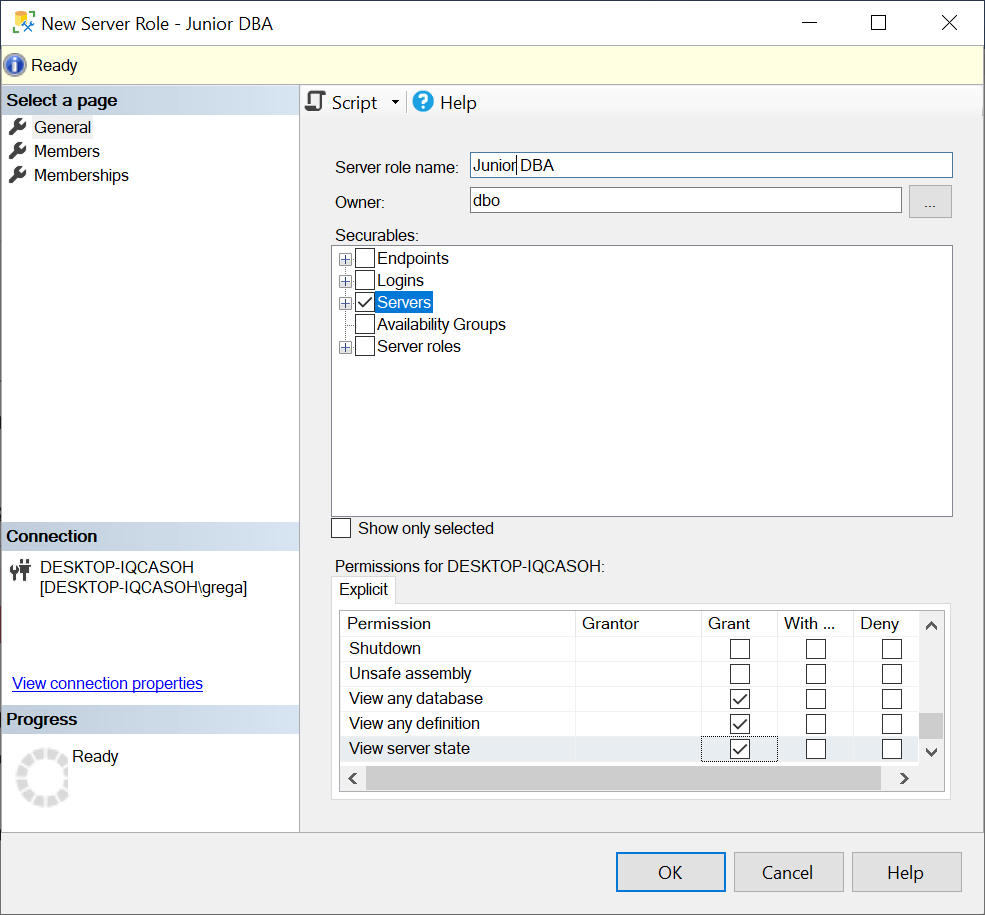
Figure 2: Junior DBA user-defined role with permission

The last step needed to create my new Junior DBA role with these rights is to click on the OK button.

The rights I provided to my new junior DBA role using SSMS could have also been granted using TSQL by running the script in Listing 2.

Listing 2: TSQL to grant permissions to the Junior DBA role

USE [master];
GO
GRANT VIEW ANY DATABASE TO [Junior DBA];
GRANT VIEW ANY DEFINITION TO [Junior DBA];
GRANT VIEW SERVER STATE TO [Junior DBA];
GO

At this point, the new user-defined server role Junior DBA role has only been created and doesn’t contain any members. Before I can add members, I need to create a login for my junior DBA. For this demo, I will create a SQL authenticated login named JD using the TSQL code in Listing 3.

Listing 3: Creating my JD login

USE [master]
GO
CREATE LOGIN [JD] WITH PASSWORD=N'Junior', 
                       DEFAULT_DATABASE=[master], 
                       CHECK_EXPIRATION=OFF, CHECK_POLICY=OFF
GO

To make the JD login a member of the Junior DBA role, I could use SSMS to make it a member of this role from the properties of the login or the role. I can also use the TSQL code in Listing 4.

Listing 4: Adding member to a new server role

ALTER SERVER ROLE [Junior DBA] ADD MEMBER [JD]

I have not seen server roles used that much in the real world, but user-defined server roles provide value when you want to create a role that has limited server-level permissions.

User-Defined Database Roles

User-defined database roles are for setting up different security profiles at the database level. For example, suppose you have an application with different kinds of security needs based on each user’s role in the organization. By using user-defined roles, you could set up a different role for each of the different security profiles needed by your application.

To show how user-defined database roles can provide database users access to database resources, I will add three different database users to the AdventureWorks2019 database. Each user has a different set of access rights to support a hypothetical sales application. The SalesForce application requires 3 different security profiles to support the security model needed. Each security profile will have a different set of security permissions. For each security profile, I will set up a different user-defined role and then assign to each new role the required permissions. The user-defined roles will be called: SalesManager, ProductionControl, and SalesPerson.

The SalesManager user-defined role will need access to control all resources in the AdventureWorks2019 database. The ProductionControl user-defined role will need to have rights to insert, update, and deleted data in any tables in the Production schema and will need read access to all other tables in the AdventureWorks2019 database. The last profile, SalesPerson, will need access to insert, update and delete information in all tables in the Sales schema tables and have read access to all other tables in the AdventureWorks2019 database.

In order to show how to add databases users to each of these different user-defined roles, I will create the following logins and AdventureWorks2019 database users: Tom, Dick, and Sally. These logins and users will be created using the TSQL Code in Listing 5.

Listing 5: Creating Logins and Database Users

USE [master]
GO
-- Create Logins
CREATE LOGIN [Tom] WITH PASSWORD=N'Salesman', 
                       DEFAULT_DATABASE=[AdventureWorks2019], 
                       CHECK_EXPIRATION=OFF, CHECK_POLICY=OFF;
CREATE LOGIN [Dick] WITH PASSWORD=N'ProductionControl', 
                       DEFAULT_DATABASE=[AdventureWorks2019], 
                       CHECK_EXPIRATION=OFF, CHECK_POLICY=OFF;
CREATE LOGIN [Sally] WITH PASSWORD=N'SalesManager', 
                       DEFAULT_DATABASE=[AdventureWorks2019], 
                       CHECK_EXPIRATION=OFF, CHECK_POLICY=OFF;
GO
USE AdventureWOrks2019;
GO
-- Create Database Users
CREATE USER [Tom] FOR LOGIN [Tom] WITH DEFAULT_SCHEMA=[dbo];
GO
CREATE USER [Dick] FOR LOGIN [Dick] WITH DEFAULT_SCHEMA=[dbo];
GO
CREATE USER [Sally] FOR LOGIN [Sally] WITH DEFAULT_SCHEMA=[dbo];
GO

Since the SalesManager role will need access to all resources in the database, they will be setup with db_owner permissions. To create the SalesManager role and grant it permissions, I will perform the following steps using SSMS:

  1. Open up Object Explorer
  2. Expand the AdventureWorks2019 database
  3. Expand the Security folder
  4. Right-click on the Role item and then mouse over the New item in the menu displayed to bring up the next menu, where I then click on the New Database Role… menu item.

After completing these steps, the Database Role – New window in Figure 3 will be displayed.

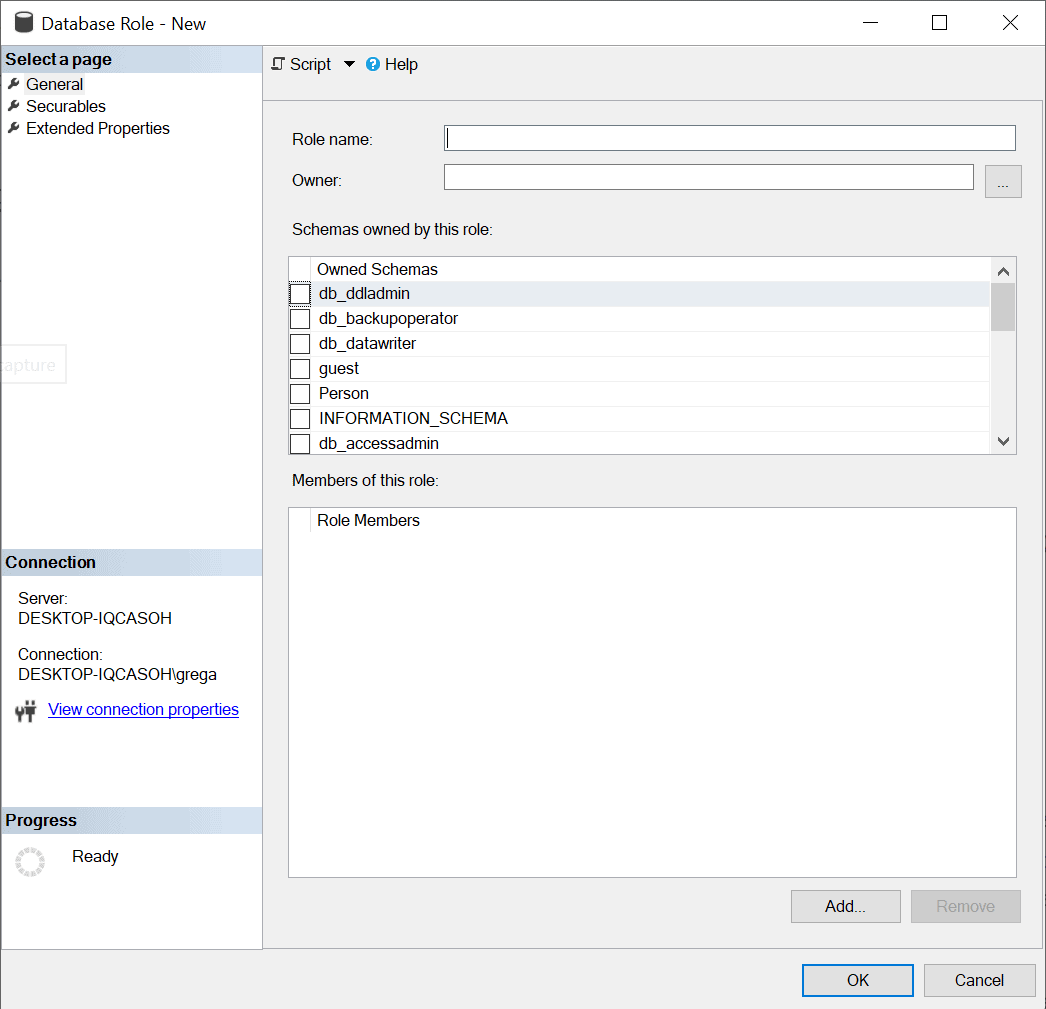
Figure 3: New Database Role Window

With the General tab selected on the left, I will enter SalesManager in the Role name field on the right. Since I want dbo to own this new role, I enter dbo in the owner field. To add members to this role, I click on the Add button. Doing this brings up the Select Database User or Role window, where I will then use the Browse button to select Sally to be added as a member to this new role, as shown in Figure 4.

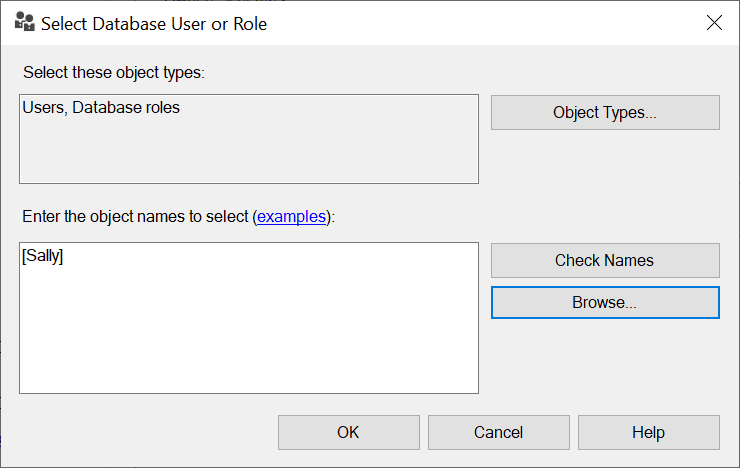
Figure 4: Adding Sally as a member

To finish adding Sally as a member to this new role definition, I click on the OK button. Upon doing this, the window in Figure 5 is displayed.

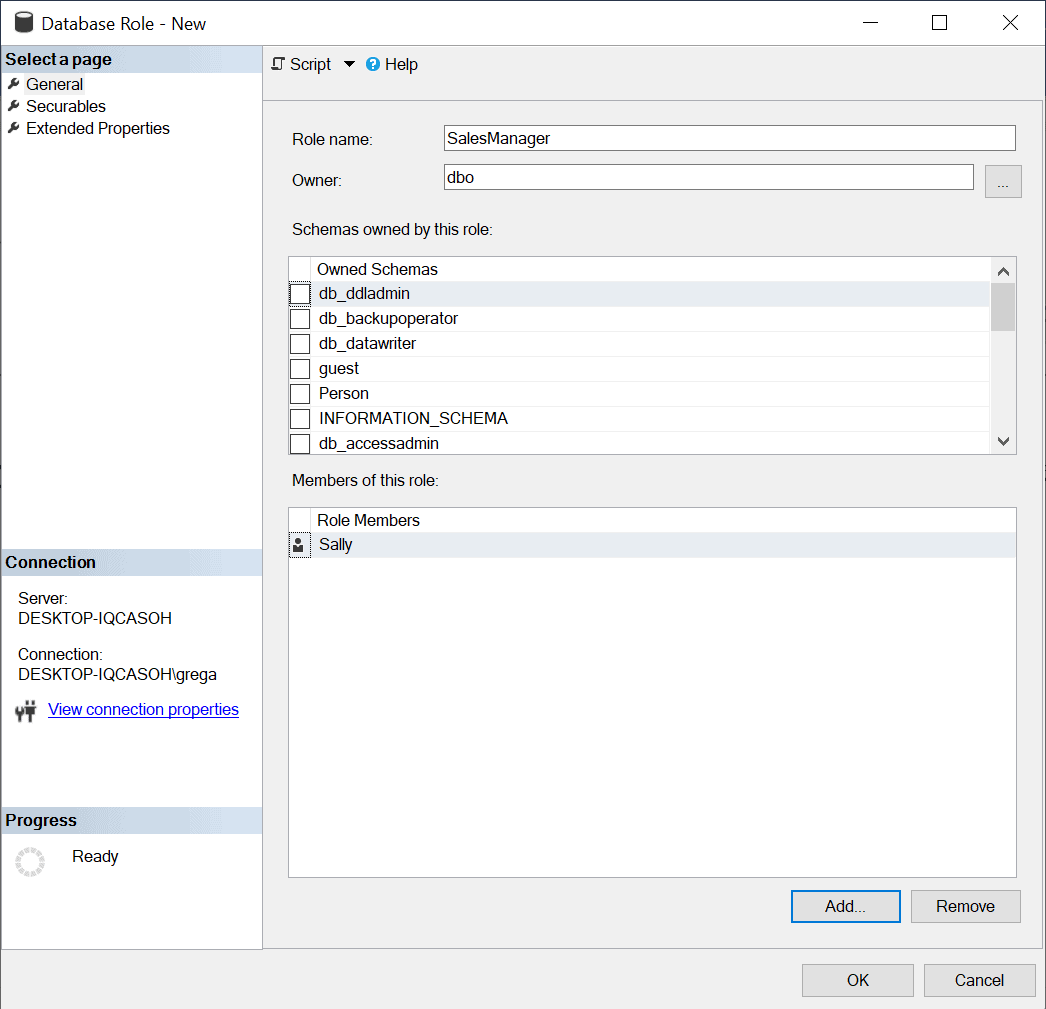
Figure 5: New Database Role with Sally as a member

To finish creating this role, I click on the OK button. At this point, all I’ve done is create a new role named SalesManager that has Sally as the sole member of this role. Alternatively, I could have used the script in Listing 6 to create the SalesManager role.

Listing 6: Creating SalesManager role with Sally as a member

USE [AdventureWorks2019];
GO
CREATE ROLE [SalesManager] AUTHORIZATION [dbo];
GO
ALTER ROLE [SalesManager ADD MEMBER [Sally];
GO

To finish setting up this role, I will need to grant permissions. Since the SalesManager needs to be able to manage all resources in the database, I will give this role the same permissions as the fixed database role db_owner. The easiest way to accomplish this is to make the SalesManager role a member of the db_owner fixed database role, which is accomplished by running the code in Listing 7.

Listing 7: Adding SalesManger roles as a member of the db_owner role

USE [AdventureWorks2019]
GO
ALTER ROLE [db_owner] ADD MEMBER [SalesManager]
GO

The next security profile to set up for my hypothetical application is ProductionControl. User Dick will be a member of this role, and the role needs to have SELECT, INSERT, UPDATE, and DELETE rights to all tables in the Production Schema, as well as need read access to all tables in the AdventureWorks2019 database. To create this role, add Dick as a member, and provide the necessary permissions, I will run the code in Listing 8.

Listing 8: Setting up the ProductionControl user-defined database role

USE [AdventureWorks2019];
GO
CREATE ROLE [ProductionControl] AUTHORIZATION [dbo];
GO
ALTER ROLE [ProductionControl] ADD MEMBER [Dick];
GO
GRANT DELETE ON SCHEMA::[Production] TO [ProductionControl];
GRANT INSERT ON SCHEMA::[Production] TO [ProductionControl];
GRANT SELECT ON SCHEMA::[Production] TO [ProductionControl];
GRANT UPDATE ON SCHEMA::[Production] TO [ProductionControl];
GO
ALTER ROLE [db_datareader] ADD MEMBER [ProductionControl];
GO

The final security profile I need to set up for my hypothetical application is SalesPerson. For this security profile, I will be created a user-defined database role name SalesPerson. I will add the database user Tom as a member to this role. This role will need SELECT, INSERT, UPDATE, and DELETE permissions to all tables in the Sales schema and will need read access to all tables in the AdventureWorks2019 database. To create this role and all the necessary permissions, I will run the script in Listing 9.

Listing 9: Creating the SalesPerson user-defined role

USE [AdventureWorks2019];
GO
CREATE ROLE [SalesPerson] AUTHORIZATION [dbo];
GO
ALTER ROLE [SalesPerson] ADD MEMBER [Tom];
GO
GRANT DELETE ON SCHEMA::[Sales] TO [SalesPerson];
GRANT INSERT ON SCHEMA::[Sales] TO [SalesPerson];
GRANT SELECT ON SCHEMA::[Sales] TO [SalesPerson];
GRANT UPDATE ON SCHEMA::[Sales] TO [SalesPerson];
GO
ALTER ROLE [db_datareader] ADD MEMBER [SalesPerson];
GO

By using database roles for each of these different security profiles, I can now easily provide similar permissions to any new database users that might need any one of these security profiles. To give a new database user the same permissions as what either Tom, Dick, or Sally have, all that would be needed is to make them a member of the appropriate user-defined role. Having the permissions to database objects in a user-defined role simplifies the amount of security work a DBA needs to do and ensures two database users have the same security permissions provided they are in the same user-defined database role.

Security Profiles Using User-Defined Roles

User-defined roles is a great way to provide the same security setup to multiple logins or database users that need the same security requirements. With user-defined roles, you set it up once, and then each time someone needs the same rights as the role, you just make them a member of the role. When a user is a member of a role, they inherit the permission associated with the role. User-defined roles minimize the administration work while ensuring members have the same security permission. If you have an application that is used by many users and requires different security profiles for different groups of users, then user-defined roles are the best way to set up and administer these different security profiles.


The post SQL Server security – Providing a security model using user-defined roles appeared first on Simple Talk.


from Simple Talk https://ift.tt/3aGAmvp
via

Monday, April 26, 2021

Malta Data Saturday and Our New Era

The Malta Data Saturday is finishing. I still need to compile the numbers, but the comments and feedback are great. Let’s talk a bit about the story of this conference and I hope this story can provide it’s 2 cents to the build of our new era, at least starting many discussions about do’s and don’ts on new era conferences. Specially for community members and event organizers, I believe it will worth reading.

The story needs to start when I arrived on this beautiful island. When I arrived, Slawomir, the creator of MMDPUG (Malta Microsoft Data Platform User Group), was leaving to Poland. When I contacted him willing to help the existing group in Malta, he saw the opportunity to keep the group alive (but let’s he talk about in the comments).

Challenges faced and overcome, the local meetings were working fine. However, I believed Malta would never see a SQL Saturday: The physical space and the usual amount of attendees were not good for that. Or, maybe, I was with the wrong view, coming from a place where I organized four SQL Saturday with 300 in person attendees each (but yes, it was reducing a bit along the years).

When the pandemic hit us and SQL Saturdays became virtual, that was Malta’s chance. A virtual SQL Saturday. I filled the request and waited. That’s when things got worse and PASS Died. Malta would never have a SQL Saturday.

When a great community team created Data Saturday concept and portal, it was Malta’s chance. I had no doubt and scheduled the Malta Data Saturday.

After having many experiences speaking in conferences all around the world, the purpose was to make something different. Give a step ahead for our new era conference in challenging times when we were barely leaving the home.

Firsts, let’s jump and introduce the team. Me and Slawomir could not handle the conference alone, we need more volunteers for the Conference. After a call for volunteers, the ones who jumped in were: Deepthi Goguri, Vinicius, Karina, Diogo and Jaqueline. Besides Deepthi, who was also a speaker, all the others are Brazilians, who faced huge language barriers to help with the conference. 

The ideas used on the conference were not mine, I can’t have full credit for them. Our experiences inspire us to go beyond and I hope the Malta Data Saturday will become an experience to inspire many to go way beyond as well.

Where I got my inspiration: 

  • The hosting format used by Azure Lowlands conference was great, I thought I could do that and go beyond.
  • The videos created for each speaker by Stephen Simon for each speaker at C# Corner SQL Server Virtual Conference
  • The fun relationship between Brazilian speakers, making fun of each other on the conferences. Diogo Nogare, Fabiano Amorim and the disappeared Felipe Ferreira know what I’m talking about.

What the pandemic brought to us

When the community was focused on in-person conferences, it made total sense for the speakers to build a set of some sessions, 5 or not much more, and repeat these sessions in different conferences around the world, spreading the technical knowledge.

For the attendees, they should be present on the conference, in-person, or miss the opportunity to learn.

The online conferences changed everything.

The conferences started recording the sessions, so there was no meaning for the speakers to repeat the same sessions, because they would be recorded and available for everyone to watch.

The attendees had no need to be present, the conferences became a new Tech Netflix service (yes, I copied this idea from someone else).

However, although everyone were aware of the change, most people didn’t want to change. The speakers continue providing the same sessions around the world (guilty!) and the conferences still want attendees for the live conference.

All these scenarios lead us to one of the biggest challenges: A lot of noise. There are a lot of online conferences, every week, many each week. The attendee can be present to the conference, but if not, he can watch the recordings later, no concern about that.

This appears to be a series of activities without a course. Where this takes us?

It reminds me something from the past. Most universities in Brazil are used to a yearly conference called Tech Week. The classes in the entire week are replaced by technical presentations delivered by people from the market. I delivered technical sessions on many of these conferences and I started thinking about: How could I use this opportunity to bring something more than just similar sessions every year ? How could I use this opportunity to create a learning progress among the conferences, something from beginning to expert?

I never managed to solve this problem, because it had to be a team work and I never managed to have a team betting on the same idea.

It seems to me  the change from in-person to online conferences caused the same scenario, maybe a bit worse: The conferences have the chance to become more than conferences, to become a kind of progressive work to take anyone who wold like from the beginning to the expert level.

Otherwise, the conferences will continue repeating themselves, becoming only a lot of noise the attendees needs to cut throw to find something important to them.

Cut throw the noise

This was the main challenge, cut throw the marketing noise of lots of conferences around the world. 

I’m not sure if we managed to cut throw the noise or not. Besides that, this is an unpleasant task for me. It’s about image, creating an image for the conference. I don’t like images or marketing, I prefer to live based on results than on images, so I try to get as far as these tasks as I can, but there are some times it’s not possible.

I used 3 methods to cut throw the noise:

  • Link the conference with well-known companies. I manage to make this link with Betsson, RedGate and Microsoft, but this end up being too close to the conference date
  • Make a happy hour using some of the methods planned for the conference. This didn’t attract the amount of attendees I expected
  • Make a lot of noise

Conference: Base Definition

We were trying to make the conference fun, like a happy hour and still a learning experience way beyond Netflix style of recording sessions.

Implemented Features

  • Videos for the introduction of each speaker
  • Host activities similar as a broadcaster
  • Fun and inspirational videos played during the breaks
  • Speaker’s interview made in a fun way, turning the conference more fun and the speakers closer to the attendees
  • Every speaker who submitted was invited to appear on the back stage at any moment, helping with the interviews
  • Live Kahoots with prizes
  • Off-Line Kahoot competition with prizes
  • Treasure Hunt using the map of Malta

Features we decided to implement, but are already becoming common;

  • Voting for the sessions
  • Conference running on multiple time zones
  • Make banners for the speakers
  • Carefully built powerpoint templates
  • Session Recordings

We are still analyzing the results of the conference, we don’t know exactly what worked, what failed because we executed wrong or what failed from the concept (but yes and thank you, the lots of positive feedback already tell us we did a lot right).

Let’s talk more about each item, other conferences can get inspiration and go beyond what we did.

Videos for the introduction of each speaker

We were in doubt about producing serious videos or make a lot of fun. If we decide by the fun videos, we would need the approval of each speaker. However, the limitation of the tool we were using, Animaker, didn’t gave us this opportunity, so we decided to go for serious videos and use the questions for the fun.

Produce the videos was a huge challenge, but Slawomir was up to the task.


Fun and inspirational videos during the breaks

I have some Microsoft videos with me, fun videos I watched for the first time around 2002, showing a view of the future. I thought it would be a great idea not only show these videos, but show videos with a current view of the future and compare in a simple way “If Microsoft was right 20 years ago, we should bet on their future view”

I’m not totally sure about the result and effect these videos during the break had. We also probably had some problems when showing them, this is something that still needs to be analysed.


Speakers Interview

We researched about each speaker and we created a set of questions we should ask to each speaker. Some of the questions were planned to be fun, interesting and to trigger some stories. I heard some stories myself during the interviews I made.

I’m not sure how successful we were, but I’m proud of this format and result. I believe this can bring the speakers closer to the attendees and make the conference less formal and more fun.


Speakers invited to the backstage

We had some situations where speakers accepted the invite, were present at the backstage establishing conversation, talking with each other and about future events. In my opinion, another success, this created a very friendly environment.


Kahoots with Prizes

Kahoots are a great way to make a happy hour. We even created a happy hour event for one week before to show how the conference would be. Out idea was to use online and offline kahoots as a learning addition, capable of really transforming a weekend conference in a fun and in deep learning experience.

We planned to use Microsoft Learn custom collections together the Kahoot, but this didn’t work very well.


Treasure Hunt

I think it’s a very different way of fun and also a contribution to the community, since it will be exposing the country and convincing people to come here on the summer! 

We were not able (not enough time) to build the links using some tool such as bit.ly, so I don’t know the real result of this new approach


PowerPoint Templates

Every conference uses powerpoint templates, there is no news on this. However, every conference use templates on different ways, sometimes only providing some basic slides and expecting a copy/past.  This sometimes give trouble when applying the template, requiring many adjustments to the powerpoint.

I tried to improve the the template to make it the easiest to apply possible. First, as an improvement, second, because in the end I was only able to provide the template two days before the conference. If I couldn’t make it easy to apply, no one would use it.

The secret was to make everything based on a master slide and layouts, even providing a dotx file. It was very easy to apply, except by the font-size, a problem that I had to submit to support and I’m still waiting for a conclusion.

I believe it worked well, most speakers applied the template. Any feedback about if it was easier or not it will be very useful.

Speaker Banners

I created a custom app to build banners for each speaker/session based on the sessionize information. It’s interesting, but probably I used very bad methods to insert the speaker picture inside the banner. I had to customize the position for each speaker. Even so, it saved some time.

Multiple Time zones

This really gave us a lot of work and, for our surprise, not many people really attended the session on different time zones. Were they expecting the sessions to be recorded?

Session Recordings

Yes, we recorded the sessions. However, we are not sure if we should make the recordings immediately available. This would be only feeding the attendees behavior to turn the conferences into a netflix shop. We are thinking if we should limit the access only to the ones who registered for the conference for some months, or if we would be shooting our own feet. Suggestions are appreciated.

Conference Tools

EventBrite

EventBrite is great for the attendees registration. Some of the benefits:

  • Integrates with Mailchimp, the attendees can opt-in to receive newsletters
  • Integrates with facebook, we can be publish the events to a facebook page
  • Provides mailing for the attendees
  • Doesn’t integrate very well with meetup
  • Provides a customizable event page for online conferences
  • The event page requires user registration for access to lives, videos and event information
  • The design of event page is not so much customizable or beautiful

DataSaturday Portal

The data saturday portal is great and one of the best features is to show the schedule from the sessionize adjusted to the user timezone.

Kahoot

For NGO’s related to training, such as user groups, Kahoot has a school license plan cheaper than the regular plan. There is a limitation of having a single host for the Quiz

StreamYard

StreamYard has some very interesting features to control the backstage, that’s the main reason we choose it. It lacks some iteration features other tools such as teams have, but we can’t have everything.

StreamYard brodcasts to many different destinations, such as facebook, twitch, youtube and so on. Only the paid version can broadcast to multiple destinations, but maybe there would be workarounds for that. 

Attendees can make questions on the destination platform. The questions appear on the StreamYard backstage.

We can only change the background if we are already using a green screen, that’s a limitation. I had to use XSplit Vcam to solve this. Probably I need to learn more about OBS. I bet that’s the tool used by Magnus to make those interesting live streamings.

XSplit VCam

It’s a very simple tool to create a virtual webcam. It captures your webcam image, allow us to work the image and transmits it to a virtual webcam. 

It’s useful to craate a fake background in any other streaming tool that usually doesn’t support changing the background.

Sessionize

Most conferences already use this site nowadays. From the call for speakers to the schedule builder

SurveyMonkey

On the last minute I decided to use SurveyMonkey for the session evaluations and conference evaluations. I’m not sure it was a good decision, since the limit of evaluations on the free version is too low.

Mailchimp

Mailchimp is great to manage e-mail deliveries to user group members, it gives us way more control to built newsletters and campaigns and follow up the results.

The only problem is being too expensive when the number of registered users increase

Custom google maps

The ability to create custom google maps is very interesting and open space to games, such as treasure hunt

Animaker

The Animaker was great to build the speaker’s video, but it has a download limit of the videos, what made the work limited.

Conclusion

Everything that worked and didn’t work on the conference is a great experience for the new ones to come and I hope this experience can be reproduced and made better by other conference organizers. Maybe this small post can even be a starting point for further discussions about the future of conferences on the new world ?

The post Malta Data Saturday and Our New Era appeared first on Simple Talk.


from Simple Talk https://ift.tt/32MHmTd
via

SQL Server plan cache mining – Plan attributes

The execution plan cache in SQL Server is a treasure trove of information about queries that have recently executed. In addition to query text and execution plan details, a wide variety of statistics, options, and parameters are available to research, if needed. This information may not always be needed for troubleshooting a performance challenge, but when it is, knowing where to go and how to use it can be a massive time saver.

In this article, the attributes stored in the plan cache will be explored and structured into an easily consumable format. This can assist in researching unusual query behavior, such as poor performance, frequent recompiles, or anomalous results.

What is in the execution plan cache?

To understand and use information from the execution plan cache, a (very) brief review of the plan cache, its purpose, and usage is helpful.

Processing a query in SQL Server requires that an execution plan be created and used. The plan provides instructions that detail how to retrieve, join, sort, and read/write data so that the results are what was requested by the query. When a query performs poorly, the execution plan can provide detail as to how it executed and why the query optimizer chose the plan that it did. A plan can be viewed directly in SQL Server Management Studio by turning it on in the GUI, like this:

Turn on Execution Plan

Once enabled, an example query can be executed:

SELECT
        Product.ProductID
FROM Production.Product
WHERE Product.Name = 'External Lock Washer 3';

From here, a new tab appears, containing the execution plan:

Execution Plan tab

Clicking on the tab reveals the execution plan details:

Execution plan

From here, further details such as row counts, IO, and CPU, can be found. Every shred of data that can be viewed here (and much more) is also available in system views that can be analyzed using T-SQL.

While a graphical plan is useful for manual troubleshooting of problems, using views allows for bulk analysis and the ability to automate some aspects of performance monitoring and performance tuning.

Microsoft provides extensive documentation on execution plans. If needed, this is a good place to start. Many useful articles have also been written on the topic, such as this excellent introduction by Grant Fritchey.

Using Dynamic Management Views to Analyze Execution Plans

There are a handful of system views and functions that provide valuable data about execution plans and related metrics. They are:

Sys.dm_exec_query_plan: This function provides the execution plan XML for a given plan_handle.

Sys.dm_exec_sql_text: A function that returns the text of a SQL statement for a given sql_handle.

Sys.dm_exec_query_stats: Contains a wealth of statistics for cached execution plans, such as timing, CPU, IO, row counts, and more.

Sys.dm_exec_cached_plans: Contains basic usage information about currently cached execution plans, including object type, size, and a count of plan uses.

Sys.dm_exec_plan_attributes: Details about how a plan was generated, such as compatibility level and SET options.

These views each provide useful data about queries that have executed in SQL Server and some or all may be needed to answer specific questions about them.

Note that these views only provide information about execution plans that are currently in the cache. No history is provided. As soon as a plan is removed from the cache, these views will no longer return information about it.

Similarly, if the SQL Server service is restarted or the plan cache cleared, then these views would also become empty (until queries were executed and they began to fill again). As such, treat these views as a transient window into SQL Server’s operation, and polling them repeatedly may be needed to fully understand an ongoing optimization challenge.

Example Execution Plan Details

To illustrate how to view this data, a simple example will be provided:

SELECT
        Product.ProductID,
        Product.Name,
        Product.Color, 
        SalesOrderDetail.SalesOrderID,
        SalesOrderDetail.OrderQty,
        SalesOrderDetail.UnitPrice
FROM Production.Product 
INNER JOIN Sales.SalesOrderDetail
ON SalesOrderDetail.ProductID = Product.ProductID
WHERE Product.Name = 'External Lock Washer 3';

This query returns an ID for a single product in this table:

ProductID 403

Now that this query has been executed, some of the views above can be queried to illustrate that the plan for this query is indeed in the plan cache and can be viewed accordingly:

SELECT dm_exec_cached_plans.plan_handle,
       dm_exec_sql_text.text,
           dm_exec_query_plan.query_plan,
           database_name = databases.name,
           dm_exec_query_stats.creation_time,
           dm_exec_query_stats.last_execution_time
FROM sys.dm_exec_cached_plans
    CROSS APPLY sys.dm_exec_sql_text(plan_handle)
    CROSS APPLY sys.dm_exec_query_plan(plan_handle)
    INNER JOIN sys.dm_exec_query_stats
        ON dm_exec_query_stats.plan_handle = 
         dm_exec_cached_plans.plan_handle
        LEFT JOIN sys.databases
        ON databases.database_id = dm_exec_query_plan.dbid
WHERE dm_exec_sql_text.text LIKE '%External Lock Washer 3%'

The filter ensures that only the most recent query that is being tested is included in the results. This query begins in dm_exec_cached_plans and joins in to other views to retrieve the query text, execution plan and the creation/last execution times, and the database name:

Plan results

Plan_handle provides a unique identifier that can be using in other system views/functions to expand on the data returned. The query plan is XML and can be clicked on in SQL Server Management Studio to view its graphical representation.

From this starting point, many different metrics, properties, and details can be gathered by using these views to group, filter, and return additional columns describing a query’s execution.

NOTE: If a server has Optimize for ad-hoc workloads enabled, then queries in this article may need to be run multiple times to create a full plan (not a stub) in the cache. Additionally, if the test server is experiencing plan cache pressure, plans may not reside in cache for long before being evicted. For these reasons, if results are not displaying as expected while working through this article, rerun this (or any) test query to generate more data in the cache to work with.

Digging into Plan Attributes

Of the various system views and functions that have been discussed so far, sys.dm_exec_plan_attributes is by far the most poorly documented and least used. Therefore, this is an excellent opportunity to learn about its contents and how to better view the data exposed in the view!

To ensure that expectations are set, feel free to view the Microsoft documentation on this view. Makes perfect sense, right? To begin, all columns returned by the function can be viewed like this:

DECLARE @plan_handle UNIQUEIDENTIFIER;
SELECT
        @plan_handle = dm_exec_cached_plans.plan_handle
FROM sys.dm_exec_cached_plans
CROSS APPLY sys.dm_exec_sql_text(plan_handle)
WHERE dm_exec_sql_text.text LIKE '%External Lock Washer 3%'
SELECT
        dm_exec_cached_plans.plan_handle,
        dm_exec_plan_attributes.*
FROM sys.dm_exec_cached_plans
OUTER APPLY sys.dm_exec_plan_attributes(plan_handle)
WHERE cacheobjtype = 'Compiled Plan'
AND dm_exec_cached_plans.plan_handle = @plan_handle
ORDER BY dm_exec_plan_attributes.attribute;

This query pulls the plan handle for a single query of interest and returns all attributes for that plan:

Plan attributes plan cache mining

To make use of any of these attributes requires decoding and understanding its contents. The remainder of this article will be dedicated to a handful of attributes within sys.dm_exec_plan_attributes and how to make the most of them.

NOTE: Throughout this article, a filter is added to dm_exec_cached_plans to filter for “Compiled Plan” only. Attributes are also available for plan stubs, parse trees, and other objects that are stored in the cache. Therefore, for data collection purposes, there may be value in changing or removing this filter to expand the scope of these scripts.

Compatibility Level

A simple attribute to view is compatibility level:

SELECT
        dm_exec_plan_attributes.attribute,
        dm_exec_plan_attributes.value,
        COUNT(*) AS execution_plan_count
FROM sys.dm_exec_cached_plans
OUTER APPLY sys.dm_exec_plan_attributes(plan_handle)
WHERE cacheobjtype = 'Compiled Plan'
AND dm_exec_plan_attributes.attribute = 'compat_level'
GROUP BY dm_exec_plan_attributes.attribute, 
     dm_exec_plan_attributes.value
ORDER BY dm_exec_plan_attributes.attribute, 
     dm_exec_plan_attributes.value;

This returns a row per compatibility level for all plans currently in the cache:

Compat level

This is an excellent example of how attributes can be checked at a high level, and then if anything unexpected is found, further research could be conducted to determine the sources of unexpected compatibility levels. For example, some details for a specific compatibility level can be returned like this:

SELECT
        dm_exec_cached_plans.plan_handle,
        dm_exec_cached_plans.usecounts,
        dm_exec_plan_attributes.attribute,
        dm_exec_plan_attributes.value,
        dm_exec_sql_text.text AS query_text,
        databases.name AS database_name
FROM sys.dm_exec_cached_plans
CROSS APPLY sys.dm_exec_query_plan(plan_handle)
LEFT JOIN sys.databases
ON databases.database_id = dm_exec_query_plan.dbid
OUTER APPLY sys.dm_exec_plan_attributes(plan_handle)
CROSS APPLY sys.dm_exec_sql_text(plan_handle)
WHERE cacheobjtype = 'Compiled Plan'
AND dm_exec_plan_attributes.attribute = 'compat_level'
AND dm_exec_plan_attributes.value = 150;

The results provide some additional information about any execution plan that was generated using compatibility level 150 (SQL Server 2019):

Plan and attribute

Additional columns can be added from their respective views/functions to learn more about the query and its origin if more details are needed.

Research like this could be especially useful during or after a SQL Server upgrade project to ensure that queries are executing using the expected compatibility level. Note that the compatibility mode shown here is that of the database where the T-SQL (and therefore the execution plan) originated. If the plan source is a stored proc or function, the compatibility level returned will be that of the database containing the proc/function.

For a full list of compatibility modes, Microsoft provides extensive detailed documentation.

Set Options

The SET options used when an execution plan is generated can have a wide array of implications on how the query executes. Settings such as ANSI_NULLS, QUOTED_IDENTIFIER, ARITH_ABORT, and others fundamentally alter the rules followed by the optimizer and how data is processed by SQL Server. This ultimately means that the results of a query can vary based on these settings and unexpected settings can even lead to errors.

Query settings are established when a connection is made to SQL Server, and defaults are defined at both the server and database level to manage them. An application running a query can specify a setting at the time of the connection, which will force that setting instead of the defaults. Because of this complexity, it is not hard for queries to be executed with unexpected settings. It can also be challenging to track down the culprit, when needed.

The same query with different SET options will generate different execution plans, therefore bloating the cache with repeated copies of the same query. Some SET options can trigger recompilations if changed during the middle of a batch, thus wasting resources recompiling what should have been a perfectly valid execution plan. This is because execution plans are generated using the settings provided by the connection string when a session was first created. If those connection settings change at a later time, then any execution plans using the old settings would no longer be valid for subsequent queries in that batch.

To further complicate the matter, this data is stored in a single row per execution plan within dm_exec_plan_attributes and is encoded in a numeric bitmap. The set options can be viewed for our previous test query using the following query:

SELECT
        dm_exec_plan_attributes.attribute,
        dm_exec_plan_attributes.value,
        dm_exec_sql_text.text AS query_text,
        databases.name AS database_name
FROM sys.dm_exec_cached_plans
CROSS APPLY sys.dm_exec_query_plan(plan_handle)
LEFT JOIN sys.databases
ON databases.database_id = dm_exec_query_plan.dbid
OUTER APPLY sys.dm_exec_plan_attributes(plan_handle)
CROSS APPLY sys.dm_exec_sql_text(plan_handle)
WHERE cacheobjtype = 'Compiled Plan'
AND dm_exec_plan_attributes.attribute = 'set_options'
AND dm_exec_sql_text.text LIKE '%External Lock Washer 3%';

The results are as follows:

The SET options are indicated with a single number: 4347. This is a sum of predefined bits where each bit indicates a specific set option where 1 is ON and 0 is OFF. The Microsoft documentation link at the beginning of this section provides a complete list of SET options and the bits they map to. There are 19 SET options identified at the time of this article’s writing, therefore, they will not be copied here in detail. Some are version-specific, and therefore may not apply to older versions of SQL Server.

Using the list provided by Microsoft, it can be determined (slowly) that 4347 equates to the following SET options being turned ON:

ARITH_ABORT (4096)
ANSI_NULL_DFLT_ON (128)
QUOTED_IDENTIFIER (64)
ANSI_NULLS (32)
ANSI_WARNINGS (16)
CONCAT_NULL_YIELDS_NULL (8)
ParallelPlan (2)
ANSI_PADDING (1)

4096 + 128 + 64 + 32 + 16 + 8 + 2 + 1 = 4347

This is a mess! Without an automated process to provide easy-to-read results, we are destined to make mathematical or clerical errors and misread this data.

The following query takes all cached plans and converts their SET options into a list of columns, each with the name of the SET option and a 1 or 0 to indicate its status for its respective plan:

WITH CTE_SET_OPTIONS_PIVOT AS (
        SELECT plan_handle, objtype, pvt.set_options 
           AS set_options_sql_variant, 
           CAST(pvt.set_options AS INT) AS set_options
        FROM (SELECT
                        dm_exec_cached_plans.plan_handle,
                        dm_exec_cached_plans.objtype,
                        dm_exec_plan_attributes.attribute,
                        dm_exec_plan_attributes.value
                  FROM sys.dm_exec_cached_plans
                  OUTER APPLY sys.dm_exec_plan_attributes(plan_handle)
                  WHERE cacheobjtype = 'Compiled Plan') PLAN_ATTRIBUTES
        PIVOT (MAX(PLAN_ATTRIBUTES.value) FOR PLAN_ATTRIBUTES.attribute 
             IN ([set_options])) AS pvt),
CTE_SET_OPTIONS AS (
        SELECT
                set_options,
                objtype,
                COUNT(*) AS plan_count
        FROM CTE_SET_OPTIONS_PIVOT
        GROUP BY set_options, objtype),
CTE_RESULTS AS (
        SELECT
                set_options,
                objtype,
                plan_count,
                262144 AS divider,
                CAST('' AS VARCHAR(MAX)) AS bitwise_result,
                set_options AS set_options_intermediary
        FROM CTE_SET_OPTIONS
        UNION ALL
        SELECT
                set_options,
                objtype,
                plan_count,
                CAST(divider / 2 AS INT) AS divider,
                CASE WHEN set_options_intermediary >= divider
                        THEN bitwise_result + '1'
                        ELSE bitwise_result + '0'
                END AS bitwise_result,
                CASE WHEN set_options_intermediary >= divider
                        THEN set_options_intermediary - divider
                        ELSE set_options_intermediary
                END AS set_options_intermediary
        FROM CTE_RESULTS
        WHERE divider >= 1)
SELECT
        set_options,
        objtype,
        plan_count,
        bitwise_result,
        CASE WHEN SUBSTRING(bitwise_result, 1, 1) = '1' 
        -- Applies To: SQL Server 2012 (11.x) to SQL Server 2019 (15.x)
        THEN 1 ELSE 0 END AS ROWCOUNT_262144, 
        CASE WHEN SUBSTRING(bitwise_result, 2, 1) = '1' 
        -- Indicates that the database option PARAMETERIZATION 
        --was set to FORCED when the plan was compiled.
        THEN 1 ELSE 0 END AS UPON_131072, 
        CASE WHEN SUBSTRING(bitwise_result, 3, 1) = '1' 
        THEN 1 ELSE 0 END AS LanguageID_65536,
        CASE WHEN SUBSTRING(bitwise_result, 4, 1) = '1' 
        THEN 1 ELSE 0 END AS DATEFORMAT_32768,
        CASE WHEN SUBSTRING(bitwise_result, 5, 1) = '1' 
        THEN 1 ELSE 0 END AS DATEFIRST_16384,
        CASE WHEN SUBSTRING(bitwise_result, 6, 1) = '1' 
        THEN 1 ELSE 0 END AS NUMERIC_ROUNDABORT_8192,
        CASE WHEN SUBSTRING(bitwise_result, 7, 1) = '1' 
        THEN 1 ELSE 0 END AS ARITH_ABORT_4096,
        -- Indicates that the query was submitted by internal 
        --system stored procedures.
        CASE WHEN SUBSTRING(bitwise_result, 8, 1) = '1' 
        THEN 1 ELSE 0 END AS ResyncQuery_2048, 
        CASE WHEN SUBSTRING(bitwise_result, 9, 1) = '1' 
        -- Indicates that the plan contains single row 
        --optimization for AFTER trigger delta tables.
        THEN 1 ELSE 0 END AS TriggerOneRow_1024,
        -- Indicates that the plan does not use a work table to 
        --implement a FOR BROWSE operation.
        CASE WHEN SUBSTRING(bitwise_result, 10, 1) = '1' 
        THEN 1 ELSE 0 END AS NoBrowseTable_512,         
        CASE WHEN SUBSTRING(bitwise_result, 11, 1) = '1' 
        THEN 1 ELSE 0 END AS ANSI_NULL_DFLT_OFF_256,
        CASE WHEN SUBSTRING(bitwise_result, 12, 1) = '1' 
        THEN 1 ELSE 0 END AS ANSI_NULL_DFLT_ON_128,
        CASE WHEN SUBSTRING(bitwise_result, 13, 1) = '1' 
        THEN 1 ELSE 0 END AS QUOTED_IDENTIFIER_64,
        CASE WHEN SUBSTRING(bitwise_result, 14, 1) = '1' 
        THEN 1 ELSE 0 END AS ANSI_NULLS_32,
        CASE WHEN SUBSTRING(bitwise_result, 15, 1) = '1' 
        THEN 1 ELSE 0 END AS ANSI_WARNINGS_16,
        CASE WHEN SUBSTRING(bitwise_result, 16, 1) = '1' 
        THEN 1 ELSE 0 END AS CONCAT_NULL_YIELDS_NULL_8,
        CASE WHEN SUBSTRING(bitwise_result, 17, 1) = '1' 
        THEN 1 ELSE 0 END AS FORCEPLAN_4,
        CASE WHEN SUBSTRING(bitwise_result, 18, 1) = '1' 
        -- Indicates that the plan paralleism options have changed.
        THEN 1 ELSE 0 END AS ParallelPlan_2, 
        CASE WHEN SUBSTRING(bitwise_result, 19, 1) = '1' 
        THEN 1 ELSE 0 END AS ANSI_PADDING_1
FROM CTE_RESULTS
WHERE divider = 0
ORDER BY plan_count DESC

This (big) query manages the following tasks:

  1. Convert the set_options label into a column header with its value as data beneath it.
  2. Aggregates by SET options and object type.
  3. Uses a recursive CTE to process each bit for the SET options and convert the numeric representation into a binary bitmap (1s and 0s).
  4. Uses a CASE statement to evaluate each BIT and return a column header for each with the values beneath it.

The results look like this:

Adhoc plan

This allows quick and easy review of the results. The column headers are written to match Microsoft’s documentation exactly.

A query like this performs a similar function to the compatibility level check above, allowing a high-level query to see all of the SET options combinations that are present on a server quickly. Using that data, it can be determined if a problem exists, and if so, query for more detailed data to determine the application that is generating the anomalous connection settings.

DATEFORMAT and DATEFIRST

These settings affect how dates are processed and will directly impact the results of any math involving them. Therefore, unexpected values will eventually result in bad data and/or errors when invalid dates are processed.

Viewing this data in sys.dm_exec_cached_plans is straightforward:

SELECT
        dm_exec_cached_plans.objtype,
        dm_exec_cached_plans.plan_handle,
        dm_exec_plan_attributes.attribute,
        dm_exec_plan_attributes.value
FROM sys.dm_exec_cached_plans
OUTER APPLY sys.dm_exec_plan_attributes(plan_handle)
WHERE cacheobjtype = 'Compiled Plan'
AND attribute = 'date_format'
ORDER BY dm_exec_plan_attributes.attribute;

Interpreting it requires a bit more work:

Date format attribute

What does 1 mean? Presumably it means that dates are ordered Month/Day/Year, as is the default on my server. Other values can be tested via experimentation:

SET DATEFORMAT 'dmy';
SELECT TOP 1 * from Production.Product;

This alters the date format to another common format – Day/Month/Year. The results in the DMV are as follows:

Date format attribute

The new query (run a few times) correlates with a date format of 2. Further testing provides the following range of values:

Date Format

DATEFORMAT Attribute Value

MMDDYY

1

DDMMYY

2

YYMMDD

3

YYDDMM

4

MMYYDD

5

DDYYMM

6

While an application may provide localization options for its users, allowing them to enter dates using different formats, it is important that this data is entered into SQL Server using the correct date format. This is a task that is better handled by the application, rather than the database. This avoids the error-prone need to adjust date format settings on-the-fly when modifying dates within a database.

If an invalid date format is suspected, checking the execution plan cache to ensure that all values are consistent and match the expected format in the chart above can confirm if a problem exists and allow further data to be pulled from the cache to troubleshoot and resolve the discrepancy.

The date_first attribute returns the first day of the week, which is important when performing date calculations on weekdays, or when describing data between different localities that may have Sunday or Monday as the first day of the week.

Values for this attribute range from 1 (Monday) through 7 (Sunday). The SQL Server default is 7 (Sunday). The server-wide setting can be returned with this statement:

SELECT @@DATEFIRST;

Similar to earlier, the following query returns this attribute for all cached queries:

SELECT
        dm_exec_cached_plans.objtype,
        dm_exec_cached_plans.plan_handle,
        dm_exec_plan_attributes.attribute,
        dm_exec_plan_attributes.value
FROM sys.dm_exec_cached_plans
OUTER APPLY sys.dm_exec_plan_attributes(plan_handle)
WHERE cacheobjtype = 'Compiled Plan'
AND attribute = 'date_first'
ORDER BY dm_exec_plan_attributes.attribute;

The results show that all plans in my local cache are set to the default of 7:

This setting can be adjusted on my local connection via this statement:

SET DATEFIRST 1;

When a few dummy queries are run, followed by the query against the plan cache from above, the results show mixed values for the date_first attribute:

If an application is seeing anomalous values for calculations involving the day of the week (DW), then checking this attribute is a great test to ensure that there is not an unexpected setting of it being passed in via a connection string.

Other Attributes

At the time of this writing, there are 30 documented attributes stored in sys.dm_exec_plan_attributes. The list is likely to grow as new SQL Server features are released that impact plan generation and need to be documented.

While it is impractical to review all of these attributes as many are either mundane or infrequently used, there are a few others that are worth a brief mention:

dbid

This is the database that the plan references, which typically will be the database that the batch originated.

sql_handle

This GUID can be used to link execution plans to their underlying SQL text, which can be found in sys.dm_exec_sql_text. Since query text can get large, many developers and administrators will hash it to allow common queries to be grouped together, without the need to maintain potentially massive amounts of text.

inuse_exec_context

This one is interesting as it can provide the number of currently executing batches that are using this execution plan. It’s a good way to measure concurrency for a plan and how often it is reused at a finer granularity than via sys.dm_exec_query_stats.

SQL Server plan cache mining

SQL Server maintains an extensive treasure trove of detail regarding execution plans and the metadata relating to them. Using the dynamic management views referenced in this article, it is possible to understand how a query was executed and some details that can impact performance, results, and execution plan reuse.

While the function dm_exec_plan_attributes is not the easiest system object to consume, saving and using pre-written queries can save immense time, especially when a performance problem is identified that requires immediate attention.

Since runtime connection settings can differ from system or database defaults, being able to quickly identify those differences can assist in resolving application bugs or find rogue queries that are not behaving as expected.


The post SQL Server plan cache mining – Plan attributes appeared first on Simple Talk.


from Simple Talk https://ift.tt/3gCBNi7
via

Tuesday, April 20, 2021

How different roles view database DevOps

Redgate released the 2021 State of Database DevOps Report in February, and I wrote a short article talking about the key insights from the report. More recently, I decided to take a deeper look at the data, especially how folks from different roles answered the survey questions.

To simplify my analysis, I grouped respondents into four roles:

  • Technical leaders
  • Architects and business analysts
  • Database administrators
  • Developers

Change is the only constant in technology, and the past year has accelerated change for many industries and organizations. Practically overnight, just about everyone who could began working remotely. In many cases, IT workers already used laptops configured with VPN, so the transition was not always difficult when it came to the tech.

For technical teams, communication, teamwork, and productivity suffered in many cases. When asked, respondents in technical leadership positions were less likely (21%) than other roles (24%, 22%, and 23% respectively) to report that team productivity and performance were positively impacted by changes due to Covid-19. They were also more likely to report that there was mostly a negative impact (20% vs 13%, 11%, and 13%). There are many factors in play here, but leadership is probably more likely to see the overall picture than individual contributors. Respondents in leadership roles were also less optimistic about how well the business performed in the last 12 months, personal productivity due to remote working, and that new ways of working will continue after the pandemic is over.

Surveys, including this one, have shown a correlation between DevOps and high performance of software delivery. (The 2019 Accelerate DevOps report software delivery metrics are deployment frequency, lead time, time to restore, and failure rate.) When looking at the challenges in the way of improving these metrics, technical leaders were most likely to answer “Insufficient automation in the release processes” (39%) while database administrators were more likely to say “Challenges to work on legacy/undocumented application code” (41%). Over time, teams can work to increase the automation of processes as they discover blockers and become more proficient. Legacy and undocumented code are problems that are tough to tackle. Often legacy systems are part of critical processes and can’t be touched without caution.

The development world has embraced DevOps, but often databases are left behind. Redgate asked respondents about the main driver for automating the delivery of database changes as part of a wider DevOps process, the top answer for three of the roles was “To increase the speed of delivery of database changes.” Technical leaders (22%), database administrators (25%), and architects and business analysts (23%) were most likely to select this answer. Developers, on the other hand, were most likely to say “To free up developers’ time for more added value work“ (22%). It’s likely that leaving the database out of DevOps is causing the most problems for developers, and people in the other roles may not realize how much of an impact it causes for devs.

When asked about challenges for integrating databases into DevOps processes, “Synchronizing application and database changes” was the top answer for technical leaders (33%), architects and business analysts (35%), and developers (35%). Database administrators were more likely to say “Overcoming different approaches to application and database development” (33%). When databases are not part of the same DevOps pipeline, database changes can become the bottleneck preventing application changes from proceeding. Bringing databases to DevOps presents a different set of challenges since most databases can’t be just replaced as code files can. Another interesting observation is that database administrators were less likely to report “Preserving and protecting business critical data” as the biggest challenge (16%). Technical leaders (20%), architects and business analysts (20%), and developers (19%) were all more concerned about data loss. DBAs have the knowledge and tools to protect data that those in other roles may not be aware of.

DevOps isn’t about a team or department; it must become part of the organization’s culture. The way that any individual sees DevOps, however, depends on their perspective. Leaders may see the entire forest while those closer to the code and data may see just the trees. DevOps is also about communication; as it improves, all stakeholders move closer to a common view.


Commentary Competition

Enjoyed the topic? Have a relevant anecdote? Disagree with the author? Leave your two cents on this post in the comments below, and our favourite response will win a $50 Amazon gift card. The competition closes two weeks from the date of publication, and the winner will be announced in the next Simple Talk newsletter.

The post How different roles view database DevOps appeared first on Simple Talk.


from Simple Talk https://ift.tt/3ar0v0W
via

Monday, April 19, 2021

Denormalization in Production: Common Problem and Solution

After a young developer (or database developer) learns about normalization, the quality of his databases increases a lot, there is no doubt about that.

However, sometimes we need some denormalization, even in production databases. I faced some experienced developers that, although, they would agree this should be analyzed in a case-by-case scenario, they never saw an example of this situation.

There is a very simple and common example of this situation and we can even go beyond the example and draw some simple rules about this.

First, one small disclaimer: People with way more knowledge about modelling than me may argue denormalization in production doesn’t really exist. The fields below are, in fact, two different information.  We are used to put the same name to them and therefore, we think they are the same information. Sometimes we even drop one of them from the database.

However, these are only two different ways to look to the same thing and achieve the same result. In my opinion, looking into this as denormalization is easier.

What’s wrong with the model below

This is a classic model about products and orders. Of course, the model is simplified, but the challenge is to notice what is wrong with this model. Does it appear Ok?

The problem:

What happens with the record of old orders when the company decides to raise the price of the products ?

Probably you already guessed the result: Every time a raise in prices happens, this affects old orders as well, destroying the data.

The Solution: Denormalization

It’s easy to solve this problem: When we register an order, we need to copy the price together the order, as a static value.

The new model will be like this:

Why Denormalization?

According to the 3rd normal form, we can’t have any transitive dependency between any field and the primary key. In other words, the primary key of a table needs to uniquely identify all the field values, the values should not be linked to any other field.

The UnitPrice field in the OrderDetail table has a dependency with ProductId field, which is not part of the OrderDetail primary key. This establishes a transitive dependency and due to that, this table is not in the 3rd normal form

How to Identify these scenarios

In order to identify these situations when we face them, we can look for one specific scenario in our database model. This scenario is easier to identify if we apply a BI point of view.

From a BI point of view, we have facts happening in our business and these facts are defined by many linked information to them, the dimensions.

The order is a fact, something that happens in our business. The product is a dimension linked to the fact. An order was made, and this order is related to a product.

The fact is static along the time and that’s what highlights our problem and solution. The information related to the fact can’t change. So, the price from the moment of the order needs to stay static. That’s when we will know we need to “copy” the price from the Product table to the OrderDetail table.

Everything is a misunderstanding

Some people could say this is not denormalization at all, it’s just a misunderstanding. They consider the price of the product on the Product table is not the same information as the price of the product in the OrderDetail table. They have a different lifecycle, different meaning. The fact they will have the same value for a while is not important at all.

I, in my humble opinion, prefer the first point of view, based on the idea of facts. It’s easy to identify and follow.

Conclusion

I’m not a book worm about detailed concepts on database modelling. In case I missed something, feel free to add on the comments. However, I believe this is a practical approach to identify a scenario where denormalization is needed in production. I already found developers get confused with this.


The post Denormalization in Production: Common Problem and Solution appeared first on Simple Talk.


from Simple Talk https://ift.tt/32thj3m
via

Friday, April 16, 2021

Using MySQL with Unity

SQL is the language of data management, and Unity is a game engine. The two seem to have very different goals, with one focusing on managing a database while the other is built primarily for the creation of video games. Can the two work together? As is so often the case in the world of programming, the answer is a resounding “yes.” As far as the games industry is concerned, databases are most useful in applications that require items like leader boards, stat tracking, and more. While a single-player focused adventure game may not need database integration, a massive racing game with thousands of players might.

With this in mind, a demonstration is in order. An app will be created that can receive the high scores stored within a MySQL database as well as put new data into it. Within the app itself, the top five players and their scores will be displayed. A variety of tools will be used to accomplish this. This demonstration uses WampServer and phpMyAdmin to create the database, PHP for server scripts, and of course, Unity and C# for app creation. If you’re more comfortable with other database management and creation tools, then those should work just as well for this project.

Database creation

Start by creating your database. Open your database management program of choice and create a new database, giving it the name highscores.

Creating a new database in WAMP using phpMyAdmin

Figure 1: Creating a new database in WAMP using phpMyAdmin

Next, create a table containing the data needed. Since the goal is just to display the player’s name and their score, you can leave the table at that. Go into the SQL tab and enter the following SQL command to create this table:

CREATE TABLE scores (
   name VARCHAR(15) NOT NULL DEFAULT 'anonymous',
   score INT(10) UNSIGNED NOT NULL DEFAULT 0
)
ENGINE=MyISAM

It’s recommended that you enter in some data for testing the application. While you could simply enter five new scores within the Unity app itself, it’ll be easier to test high score retrieval if there’s already some data within the database. You can use the below SQL command to quickly add some test data.

INSERT INTO scores (name, score) VALUES ('John', 100), 
('Sally', 110), ('Phil', 90), ('Katy', 130), ('Jack', 150)

Now that the database is set up, you’ll need some PHP scripts to both retrieve and insert data into the database. These scripts will act something like the communicator between Unity and the MySQL database.

Server scripts – display.php

First, inside your server (this example’s file path is the WampServer folder, then www folder), create a folder named HighScoreGame for storing your PHP scripts. Then create a new PHP script called display and place it within this folder. Open the file in a code editor such as Notepad++ and enter the following code. Note that you may have to change the values of hostname, username, and password depending on your configuration.

$hostname = 'localhost';
$username = 'root';
$password = '';
$database = 'highscores';
 
try 
{
        $dbh = new PDO('mysql:host='. $hostname .';dbname='. $database, 
         $username, $password);
} 
catch(PDOException $e) 
{
        echo '<h1>An error has occurred.</h1><pre>', $e->getMessage()
            ,'</pre>';
}
 
$sth = $dbh->query('SELECT * FROM scores ORDER BY score DESC LIMIT 5');
$sth->setFetchMode(PDO::FETCH_ASSOC);
 
$result = $sth->fetchAll();
 
if (count($result) > 0) 
{
        foreach($result as $r) 
        {
                echo $r['name'], "\n _";
                echo $r['score'], "\n _";
        }
}

This script is pretty straightforward. It’s just establishing a connection to the database before going through the scores table and retrieving the top five scores and their respective players. You’ll notice the echo statements at the end add in a newline and underscore. These might seem like strange additions to the results, but they will actually be used to help organize and display the results in a nice looking manner in the Unity app.

Server scripts – addscore.php

The next PHP script will be called addscore. As the name implies, this script will be responsible for adding data to the highscores database. All data that addscore tries to insert into the database will originate from within the Unity app. Like before, you may need to edit some of the variables to accommodate your specific setup. The important thing to note is the value of secretKey, which can be anything you like so long as the Unity app uses this value as well. This is because it will be used later on to create a secure hash which verifies that the scores being sent are indeed coming from the Unity app. If the Unity app uses a different value, then the script will not insert the input.

$hostname = 'localhost';
$username = 'root';
$password = '';
$database = 'highscores';
$secretKey = "mySecretKey";
 
try 
{
        $dbh = new PDO('mysql:host='. $hostname .';dbname='. $database, 
           $username, $password);
} 
catch(PDOException $e) 
{
        echo '<h1>An error has ocurred.</h1><pre>', $e->getMessage() 
            ,'</pre>';
}
 
$hash = $_GET['hash'];
$realHash = hash('sha256', $_GET['name'] . $_GET['score'] . $secretKey);
        
if($realHash == $hash) 
{ 
        $sth = $dbh->prepare('INSERT INTO scores VALUES (null, :name
            , :score)');
        try 
        {
                $sth->bindParam(':name', $_GET['name'], 
                  PDO::PARAM_STR);
                $sth->bindParam(':score', $_GET['score'], 
                  PDO::PARAM_INT);
                $sth->execute();
        }
        catch(Exception $e) 
        {
                echo '<h1>An error has ocurred.</h1><pre>', 
                 $e->getMessage() ,'</pre>';
        }
}

To keep things tidy, make sure this script is within the same folder as display. Once you have this code prepared, it’ll be time to open up Unity and begin creating the app that your users would use.

Unity App – User Interface

Now comes the part where the Unity app is made. This section is focused on making the user interface, which means using the editor to place buttons, input fields, and text. Start by creating a new project from the Unity Hub.

Creating a new project in Unity

Figure 2: Creating a new project in Unity

Any of the templates will work fine for this project, but the example here will use the basic 3D template. Give the project a name and set the location, then click the Create button.

Figure 3: Project name, template, and location

Figure 3: Project name, template, and location

This app’s user interface is a little involved, consisting of nine elements total. There are two buttons, one for retrieving the top five scores from a database and the other for sending a new score. Speaking of sending, there are two input fields asking for a name and score. There will also be a few text labels, with two of them containing the names and scores of the top five players. Start by creating the elements, and then they’ll be positioned in a way that looks appealing.

To create user interface (UI) elements, click the Create button in the Hierarchy window, indicated by the plus icon with a downward arrow next to it. From there, select UI, and then the UI element of choice. You will need five Text objects, two Input Field objects, and two Button objects.

Figure 3: Project name, template, and location

Figure 4: Creating UI objects

Next, you’ll position and resize the objects. Doing this requires editing properties in the Rect Transform component, located in the Inspector window while an object is selected. Changing the values is as simple as selecting the designated field and changing the value within it. Alternatively, you can use the Scene window to click and drag objects where you want them.

Setting the location, size, and name of an object

Figure 5: Setting the location, size, and name of an object

Below is a table listing all the objects and the position and size values of each object you’ve just created. They have also been assigned names to help you know which object is which. If you wish to match the names, then renaming the object is done by right clicking the object and choosing Rename. Additionally, what type of object each item is will be noted in this table.

Name

Object Type

Pos X

Pos Y

Width

Height

NameResults

Text

-365

50

162

297

ScoreResults

Text

-202

50

162

297

NameField

Input Field

245

58

160

30

ScoreField

Input Field

245

-36

160

30

NameFieldLabel

Text

108

58

103

30

ScoreFieldLabel

Text

108

-35

103

30

InputDirections

Text

246

148

274

51

SendScoreButton

Button

240

-130

170

65

RefreshHighScoreButton

Button

-287

-130

170

65

Table 1: All UI elements and their positions and sizes

Now all the objects need some proper placeholder text. This can be adjusted by selecting an object in the Hierarchy window, then navigating to the Text component in the Inspector window. For NameResults and ScoreResults, those can be left with empty text for now. You’ll need to edit their placeholder text for the input fields, which is found by clicking the arrow next to their name in the Hierarchy. This brings up all child objects found under the parent.

Revealing child objects

Figure 6: Revealing child objects

Find Placeholder, then edit the text to say “Enter Player’s Name.” Do the same with ScoreField, but the text should say “Enter Player’s Score” instead. Next, find the text objects being used to label the input fields, and change their text to reflect which field is being edited. For InputDirections, you’ll ask the player to “Enter a New Score!” To make it stand out a little more, adjust the font size property to thirty for InputDirections. Finally, the text for the buttons should be changed to better indicate what the buttons do. Starting with the SendScoreButton object, click the arrow next to it to show the child Text object. Enter the text “SEND SCORE” and fill in the button by adjusting the text size to twenty-five. As for the RefreshHighScoreButton, that button’s text can say “REFRESH HIGH SCORES” and be given a size of twenty. Once you’re finished, the user interface should look similar to the one seen in figure 7.

The finished UI

Figure 7: The finished UI

While not required, if you wish to change the alignment and size of any other text, all you need to do is find the Text component in each object and adjust the size, alignment, and other properties to your liking. After that, all that’s left before returning to coding is making the scripts themselves. You will need just a single C# scripts, called HighScoreControl. Creating scripts is done by right-clicking in the Assets window and navigating to Create->C# Script. This script will be called HighScoreControl.

Creating a new C# script

Figure 8: Creating a new C# script

Once you have created your script, open it by double clicking the script in the Assets window.

Unity App – HighScoreControl script

The HighScoreControl script is responsible for both sending and retrieving data to and from the MySQL database. Of these two actions, getting the scores is likely the easiest, as it involves creating a UniyWebRequest to send an HTTP request. That’s the point in which the display PHP script from earlier comes in. The server script will be executed and send data back into Unity to later display in the UI created earlier. Posting a new score follows a similar pattern, but requires you use the POST method to send data to addscore.php. Before doing this, the user’s input is also hashed using the SHA256 algorithm as a basic security measure. In real-world applications, you would likely need to do more than just hash your values to secure them. But, for the purpose of this example, this process will be kept simple. Once the values are sent through the HTTP request, addscore will handle the process of adding the score to the database.

For this script to function correctly, you’ll need the following using statements added at the top of your script:

using System;
using System.Collections;
using System.Security.Cryptography;
using System.Text.RegularExpressions;
using UnityEngine;
using UnityEngine.Networking;
using UnityEngine.UI;

Within the HighScoreControl class itself, add these variables:

private string secretKey = "mySecretKey";
public string addScoreURL = 
        "http://localhost/HighScoreGame/addscore.php?";
public string highscoreURL = 
         "http://localhost/HighScoreGame/display.php";
public Text nameTextInput;
public Text scoreTextInput;
public Text nameResultText;
public Text scoreResultText;

You may recognize the secretyKey value from the addscore.php script. Make sure that this value matches the version seen in addscore exactly. Additionally, the two URL strings will be used to point Unity to where the server scripts are so data can be sent and retrieved from the database using those PHP scripts. Finally, four Text objects are set up in code. These will be used to change the text seen in the UI. Later on, Unity will be told which objects in the editor are to be changed using these variables.

Next come two methods, one for getting scores, the other for sending. These will be the methods tied to your buttons in the UI. Both methods start coroutines that will soon be defined, while quickly resetting some text to their defaults.

public void GetScoreBtn()
{
nameResultText.text = "Player: \n \n";
scoreResultText.text = "Score: \n \n";
StartCoroutine(GetScores());
}
public void SendScoreBtn()
{
  StartCoroutine(PostScores(nameTextInput.text, 
     Convert.ToInt32(scoreTextInput.text)));            
  nameTextInput.gameObject.transform.parent.GetComponent<InputField>().text = "";
  scoreTextInput.gameObject.transform.parent.GetComponent<InputField>().text = "";
}

Speaking of coroutines, now would be a good time to go ahead and create the first one. The GetScores coroutine, as the name implies, will be responsible for communicating with the MySQL database in order to retrieve the top five scores along with player names currently stored in the database. As mentioned before, an HTTP request will be sent to communicate with the display.php script, which will then query the database. This PHP script will organize the data before Unity wetakes that data and separates the returned information to neatly fit it into the texts of nameResultText and scoreResultText. Those curious underscores found in the echo statements at the end of display will be used to more easily separate this data.

IEnumerator GetScores()
{
        UnityWebRequest hs_get = UnityWebRequest.Get(highscoreURL);
        yield return hs_get.SendWebRequest();
        if (hs_get.error != null)
                Debug.Log("There was an error getting the high score: "
                + hs_get.error);
        else
        {
                string dataText = hs_get.downloadHandler.text;
                MatchCollection mc = Regex.Matches(dataText, @"_");
                if (mc.Count > 0)
                {
                        string[] splitData = Regex.Split(dataText, @"_");
                        for (int i =0; i < mc.Count; i++)
                        {
                                if (i % 2 == 0)
                                        nameResultText.text += 
                                        splitData[i];
                                else
                                        scoreResultText.text += 
                                        splitData[i];
                        }
                }
        }
}

Next comes PostScores, which will handle the process of putting new data into the database. It takes two parameters which correspond to the inputs in the UI input fields. It will first hash the input along with the secret key, then construct a POST URL to send the player’s name and score with alongside the newly created hash. Like with GetScore, another HTTP request is sent, this time calling upon addscore.php to enter the new data into the database. The PHP script handles the rest from there, comparing the hash it received with the one it creates using similar data before inserting the data.

IEnumerator PostScores(string name, int score)
{
        string hash = HashInput(name + score + secretKey);
        string post_url = addScoreURL + "name=" + 
           UnityWebRequest.EscapeURL(name) + "&score=" 
           + score + "&hash=" + hash;
        UnityWebRequest hs_post = UnityWebRequest.Post(post_url, hash);
        yield return hs_post.SendWebRequest();
        if (hs_post.error != null)
                Debug.Log("There was an error posting the high score: " 
                + hs_post.error);
}

PostScores is still looking for the HashInput method at this point, so you’ll need to finish the script by adding this method. All it’s doing is taking a single input string, which is constructed using the player’s name, score, and your secret key, and constructing a hash based on that string using the SHA256 algorithm. It will then return this hash to PostScores to be sent in the HTTP request.

public string HashInput(string input)
{
        SHA256Managed hm = new SHA256Managed();
        byte[] hashValue =      
            hm.ComputeHash(System.Text.Encoding.ASCII.GetBytes(input));
        string hash_convert = 
             BitConverter.ToString(hashValue).Replace("-", "").ToLower();
        return hash_convert;
}

The HighScoreControl script is now complete. Be sure to save your work, then return to the Unity editor for a few final tasks.

Unity app – Finishing UI

Start by attaching the HighScoreControl script to the Main Camera object, as seen in figure 9.

Assigning HighScoreControl to Main Camera

Figure 9: Assigning HighScoreControl to Main Camera

Make sure Canvas is expanded to show all the UI elements underneath it, then drag the Text objects of both NameField and ScoreField into Name Text Input and Score Text Input, respectively. Then bring NameResults to Name Result Text, and ScoreResults to Score Result Text.

Setting all HighScoreControl fields

Figure 10: Setting all HighScoreControl fields

Next, choose the SendScoreButton and assign it the SendScoreBtn method. To do this, navigate to the Button component in the Inspector window and find the OnClick event list. There, click the plus icon to add a new event.

Creating a new OnClick event

Figure 11: Creating a new OnClick event

Drag the Main Camera object into the object field. Why the Main Camera object in particular? Because it’s the object with the HighScoreControl script attached to it.

Assigning an object to get the function from

Figure 12: Assigning an object to get the function from

Click on the No Function drop down menu, and then navigate to HighScoreControl->SendScoreBtn to set the method for this button.

Assigning the button function

Figure 13: Assigning the button function

Do the same for the RefreshHighScoreButton object, using the GetScoreBtn method instead. Once you’ve done that, try out the project using the play button at the top of the editor. Start by seeing if you can retrieve the current set of high scores. Then, try entering a score of your own, then refresh the top five to see the change.

The completed app using MySQL with Unity

Figure 14: The completed app

Using MySQL with Unity

A database can be easily made to store all kinds of data, whether it be interesting stats from various players or rankings. Now that you’ve been shown how to set up a basic database with a Unity app, you can expand this knowledge by experimenting with different database value types, multiple tables, and more. On the Unity side, you can try using data from a database to change a game in different ways. For instance, what if a player of higher rank meets one of a lower rank? What would you change within the game itself to reflect this scenario? While Unity is designed as a game engine, there’s also applications outside of video games that you can use it for that utilize these same database integration concepts. There’s much that can be done with this tech, some knowledge, and a little creativity.

If you liked this article, you might also like Saving Game Data with Unity.

The post Using MySQL with Unity appeared first on Simple Talk.


from Simple Talk https://ift.tt/3uWXEoi
via