Tuesday, January 8, 2019

Getting Started with GraphQL in ASP.NET

GraphQL has been around for a while and is proving its value. It is not, unlike what’s been spread about, a framework or just a ready-tool for dealing with HTTP-based searches. Just like REST is a specification to access resources that partially expose the business models in client-server applications, GraphQL is a cleaner, more flexible way to execute and fetch specific data from the server.

In other words: ask for hat you need, get exactly that. That’s the anthem of GraphQL. Instead of having tons of different REST endpoints to provide access to every resource via a different HTTP request, you can do the same thing with only a single request, along with a smarter (smaller – just what you need) response body, getting summarized data from different resources.

It also comes with a strong type system, encapsulated in a syntax that resembles JSON. Also, you don’t need to worry about versioning the endpoints since you can deprecate your fields once they become old. And it is available for all the major languages for both client and server sides. Because of its committed community, you can find many different open source clients and projects being broadly supported around the world.

General Architecture

Think about graphs. In theory, they are used to mathematically model the relations two objects have in common. In GraphQL, you start to join this concept with a query language in order to fetch/send all the data you need with no more endpoints.

In a common REST API, developers grab information from endpoints that represent a single and understandable source of information, a resource. Usually, they return a lot of data, most of this not necessary for the current operation, making the whole conversation too verbose. Plus, since each resource hosts different data, you’d need to go through many of them to catch everything turning the calling to the server too chatty:
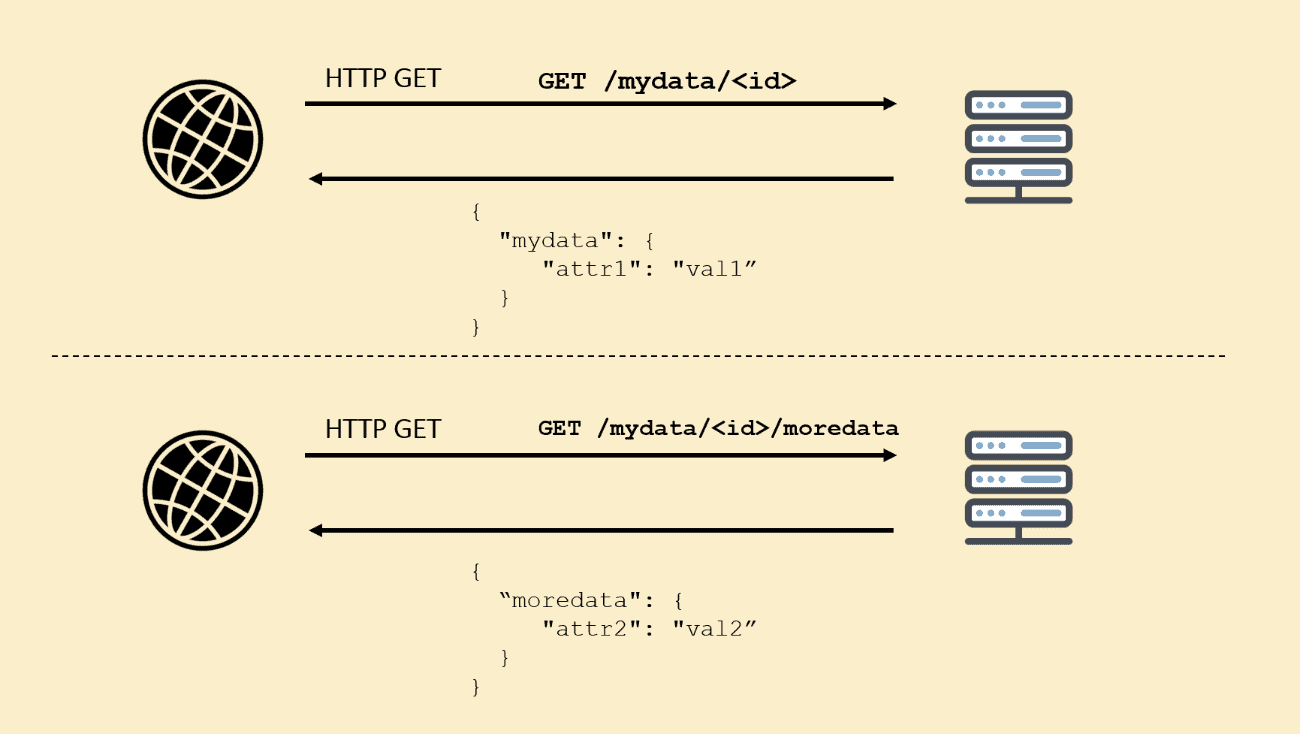
GraphQL, on the other hand, summarizes everything the client needs at once, by allowing you to specify all the data in a query fully supported by the back-end. One single HTTP request, all the data you need in hands:
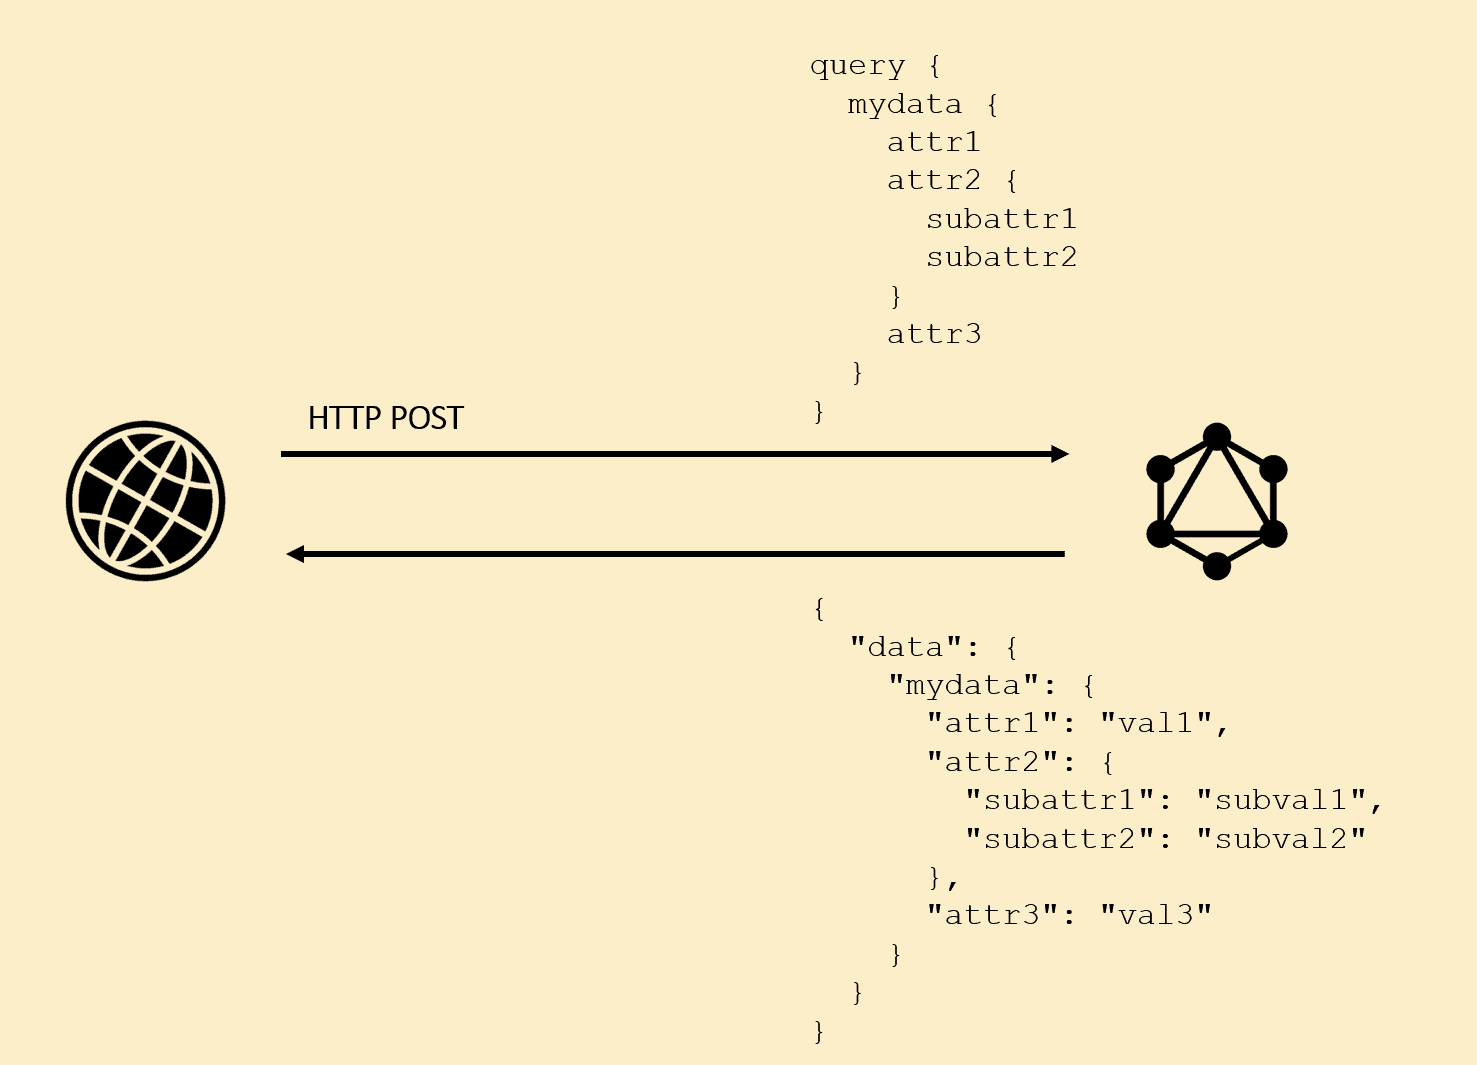
This way, GraphQL minimizes a lot of the over and under fetching issues that most modern applications deal with in addition to letting the front-end be freer to mount the request chaining the way they see it’s best.

Because of its HTTP-based nature, GraphQL also benefits from all the out-of-the-box features that REST did, including the stateless state, patterns, free from tech stack and heavily embraced by the community. Also, you can create your APIs within any supported language, just the same way you would with the clients. Most of the big platforms already support it.

Another important feature that comes with GraphQL are the resolvers. They basically allow the extraction of data from different sources and integrate the data into the same response. It is useful when you want to connect data that relates to the query objects are being fetched now, while accessing resources sometimes even via remote calls to other services. This architectural design, of course, can lead to slowness depending on the way you make each call. Remember, even though it’s a great feature to use, each integration you have in a single query can lead to more and more delay to the user’s response, so be careful just the same way you should be when designing REST web services. Finally, you also have to remember that a query still has to fetch relatable data, which means that a query that searches for a user data has nothing to do with your stockroom’s system data. So, keep anchored to your original design and make data design meaningful.

Demo Project

You have an idea about GraphQL basics, and now it’s time to practice with a relatable example. For this, you will go through an example that explores a comparison between an old fashion approach (REST) vs. the same thing with GraphQL. The Simple Talk author’s page will be the front-end client of a web service that returns the data necessary to build it.
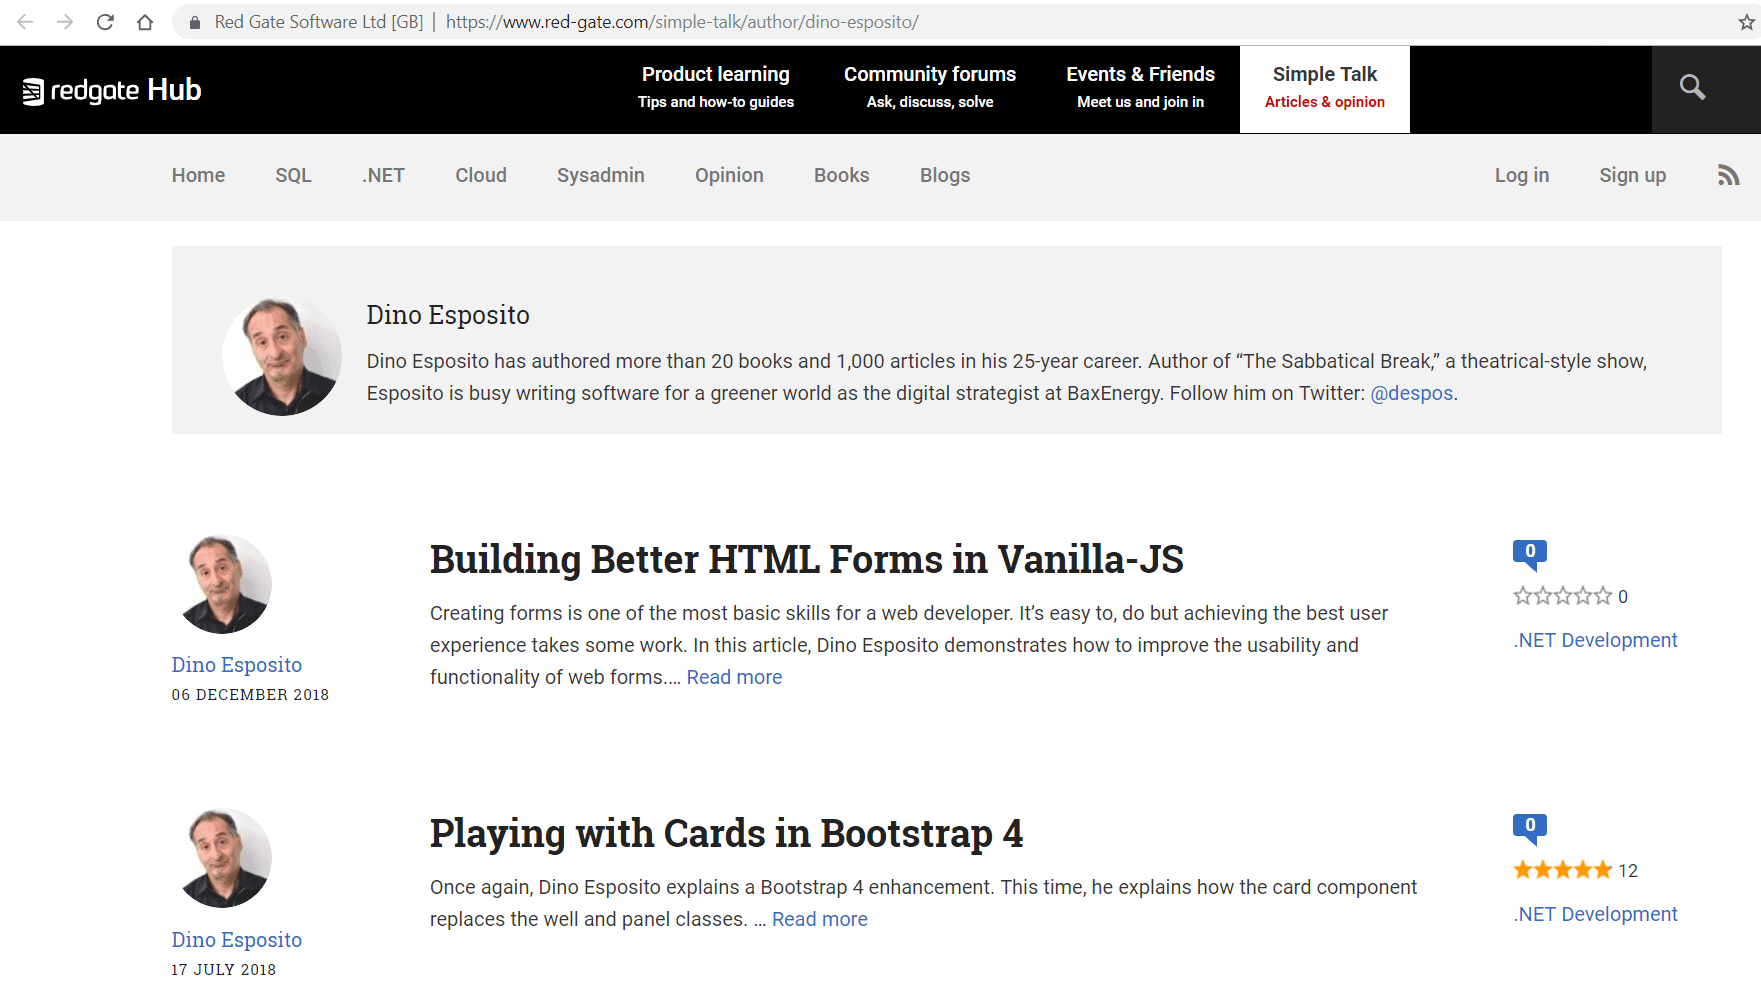
In a common REST application, you’d have the following endpoints to retrieve the JSON/XML/etc. data:

  • /authors/{id} – the core information related to user of id referenced at {id} path param;
  • /authors/{id}/posts – the posts data related to user of id referenced at {id} path param;
  • /authors/{id}/socials – the social networks related to user of id referenced at {id} path param.

Therefore, REST is so chatty. For every new compositional data, that is related to a specific user, a new endpoint that identifies it is born, meaning that a new request must happen.

Instead, using GraphQL, you’d need a query like this one:

query GetBlogData($id: Int!) {
  author(id: $id) {
    // author core data
  }
  posts(id: $id) {
    // posts list
  }
  socials(id: $id) {
    // social networks list
  }
}

Inside of each query member, you can fetch just the exact information you want. It is contrary to REST, where each endpoint would return all the information related to a post or a social network, making the whole response heavier than what you need.

Environment and Setup

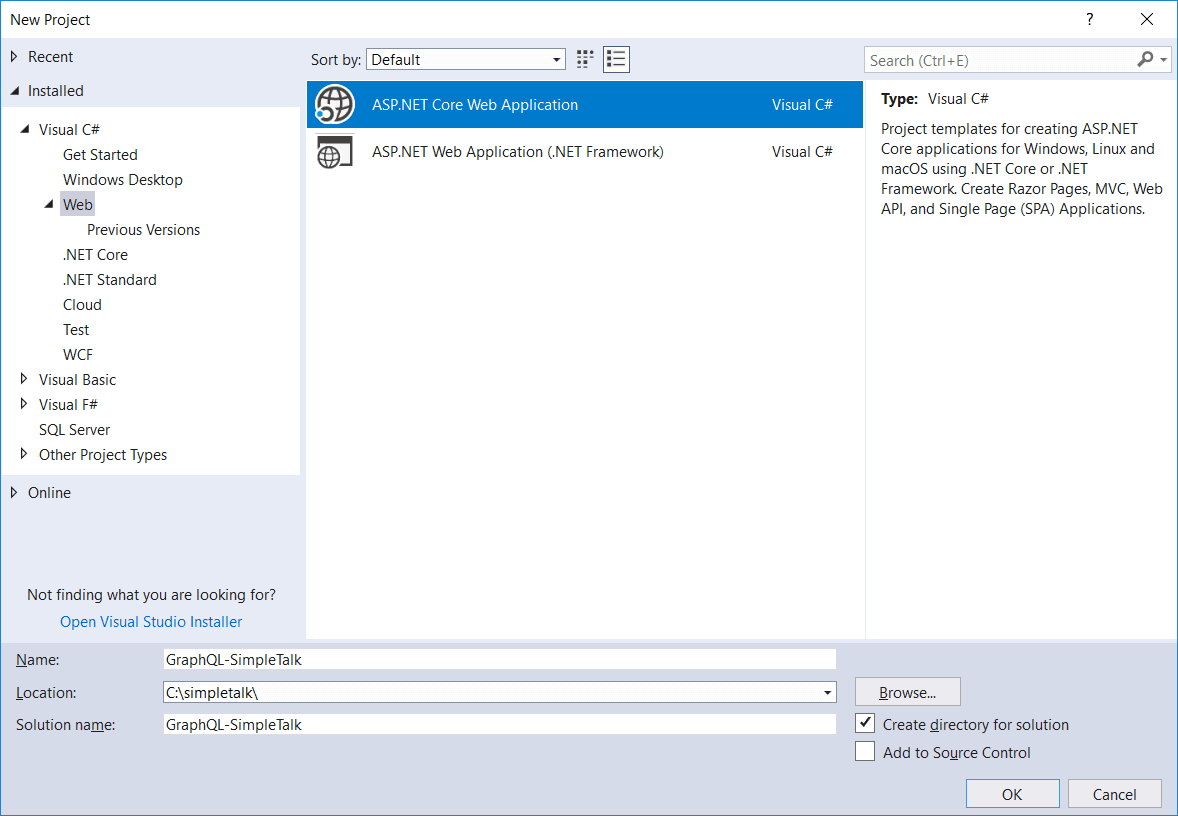
To get started, create a new ASP.NET Core Web Application called GraphQL-SimpleTalk using the New Project wizard in VS. You can use the Visual Studio Community Edition. For this, you must have the latest version of .NET Core SDK installed in your environment.
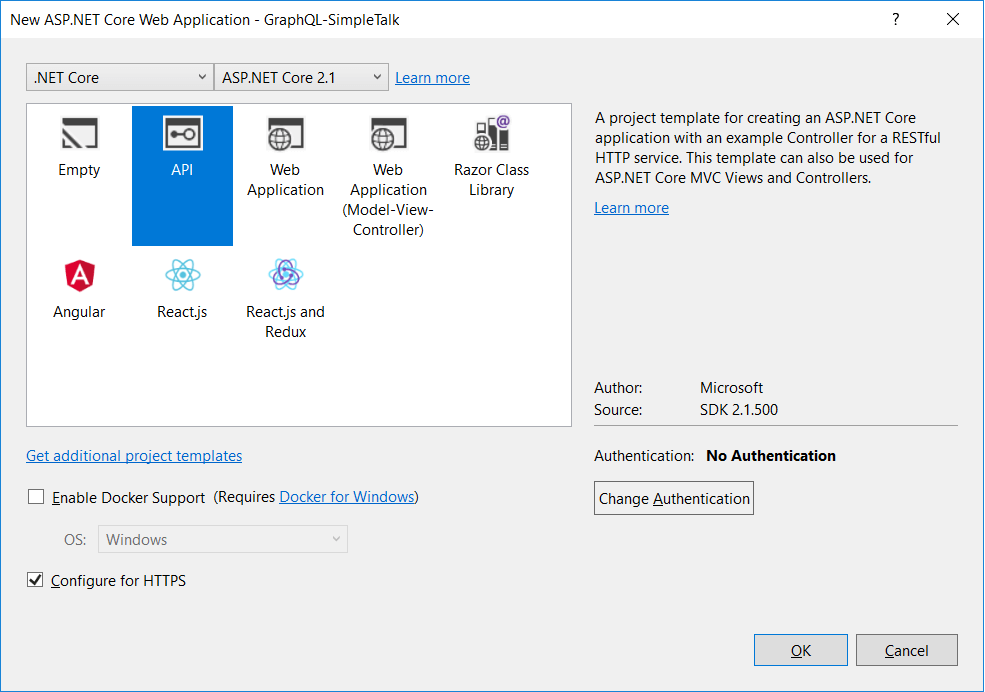
In the next screen, select the project template API.
Once with the project created, add the NuGet dependencies for GraphQL. Right-click the solution and go to NuGet manager. There, search for two dependencies:

  • GraphQL: the core, parsers, Linq adapters, etc.
  • GraphiQL: the UI necessary to perform the tests

That’s all. To simplify this article, you’ll create a service layer and manage objects in lists in memory. This way, you don’t have to worry about further integrations and details that don’t relate to the article purposes.

The Project Implementation

The first part of the project to create are the models. They’ll drive the rest of the implementation, and they are called entities (supposedly the ones that would attach to a database context). Take a look at the following diagram:
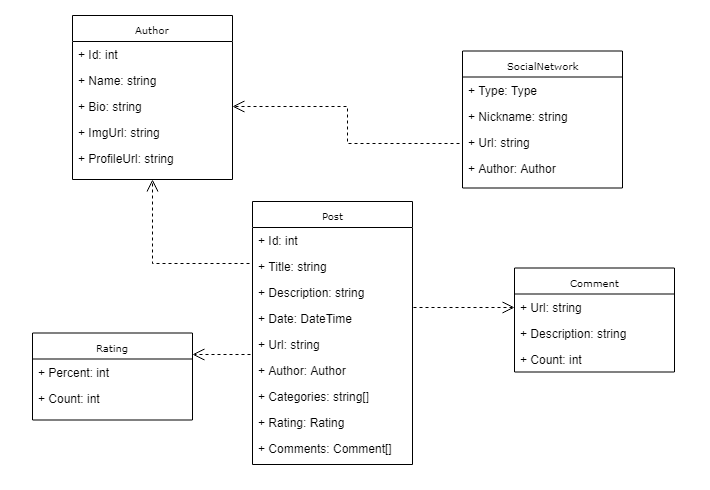
Idealistically, there would be more fields and relations happening here. However, this model keeps as close as possible to what is the ST’s authors page. Plus, the socials and posts models are separate from the author itself, since you’ll search them through the in-memory lists to return in separate service methods.

Continuing, inside the project, create a new folder Entities and create several classes.

The Author class:

namespace GraphQL_SimpleTalk.Entities
{
    public class Author
    {
        public int Id { get; set; }
        public string Name { get; set; }
        public string Bio { get; set; }
        public string ImgUrl { get; set; }
        public string ProfileUrl { get; set; }
    }
}

The Comment class:

namespace GraphQL_SimpleTalk.Entities
{
    public class Comment
    {
        public string Url { get; set; }
        public string Description { get; set; }
        public int Count { get; set; }
    }
}

The Rating class:

namespace GraphQL_SimpleTalk.Entities
{
    public class Rating
    {
        public int Percent { get; set; }
        public int Count { get; set; }
    }
}

The Post class:

using System;
using System.Collections.Generic;
namespace GraphQL_SimpleTalk.Entities
{
    public class Post
    {
        public int Id { get; set; }
        public string Title { get; set; }
        public string Description { get; set; }
        public DateTime Date { get; set; }
        public string Url { get; set; }
        public Author Author { get; set; }
        public string[] Categories { get; set; }
        public Rating Rating { get; set; }
        public List<Comment> Comments { get; set; }
    }
}

The SocialNetwork class:

namespace GraphQL_SimpleTalk.Entities
{
    public class SocialNetwork
    {
        public SNType Type { get; set; }
        public string NickName { get; set; }
        public string Url { get; set; }
        public Author Author { get; set; }
    }
    public enum SNType
    {
        INSTAGRAM, TWITTER
    }
}

Make sure to create each one of them in a separate class file. Here, you also had to change the namespace from GraphQL-SimpleTalk to GraphQL_SimpleTalk, because .NET doesn’t accept hyphens for names.

They’re just simple POJO (plain old Java objects) structural objects to simulate what you’d have in a real database-based API application. You can also turn them into DDD (Domain Driven Design) objects to host business logic or important operations for your API.

The SocialNetwork has an enum (SNType) to host the types of social media the author could possibly have. It will be interesting to demonstrate how to deal with enums in GraphQL as well.

Now, move to the service layer. You’re going to create a single service class that will provide access to the main data related to the blog. Since it’s not the focus of the project, not much time will be spent on it. Again, create a new folder Services and add the following class inside:

using GraphQL_SimpleTalk.Entities;
using System;
using System.Collections.Generic;
using System.Linq;
namespace GraphQL_SimpleTalk.Services
{
    public class BlogService
    {
        private readonly List<Author> authors = new List<Author>();
        private readonly List<Post> posts = new List<Post>();
        private readonly List<SocialNetwork> sns = new List<SocialNetwork>();
        
        public BlogService()
        {
            Author DinoEsposito = new Author
            {
                Id = 1,
                Name = "Dino Esposito",
                Bio = "Dino Esposito has authored more than 20 books and 1,000 articles in ...",
                ImgUrl = "https://secure.gravatar.com/avatar/ace158af8dfab0e682dcc70d965514e5?s=80&d=mm&r=g",
                ProfileUrl = "https://www.red-gate.com/simple-talk/author/dino-esposito/"
            };
            Author LanceTalbert = new Author
            {
                Id = 2,
                Name = "Lance Talbert",
                Bio = "Lance Talbert is a budding game developer that has been learning to program since ...",
                ImgUrl = "https://www.red-gate.com/simple-talk/wp-content/uploads/2018/01/red-gate-bio-pic.jpg",
                ProfileUrl = "https://www.red-gate.com/simple-talk/author/lancetalbert/"
            };
            authors.Add(DinoEsposito);
            authors.Add(LanceTalbert);
            Comment comment1 = new Comment
            {
                Url = "https://#",
                Description = "Bla bla bla",
                Count = 1
            };
            Comment comment2 = new Comment
            {
                Url = "https://#",
                Description = "Bla bla bla",
                Count = 4
            };
            Rating rating1 = new Rating
            {
                Percent = 98,
                Count = 1
            };
            Rating rating2 = new Rating
            {
                Percent = 95,
                Count = 5
            };
            Post FormsInVanilla = new Post
            {
                Id = 1,
                Title = "Building Better HTML Forms in Vanilla-JS",
                Description = "Creating forms is one of the most basic skills for a web developer...",
                Date = DateTime.Today,
                Url = "https://www.red-gate.com/simple-talk/dotnet/net-development/building-better-html-forms-in-vanilla-js/",
                Author = DinoEsposito,
                Comments = new List<Comment>() { comment1 },
                Rating = rating1,
                Categories = new string[] { ".NET Development" }
            };
            Post VoiceCommands = new Post
            {
                Id = 2,
                Title = "Voice Commands in Unity",
                Description = "Today, we use voice in many ways. We can order groceries...",
                Date = DateTime.Today,
                Url = "https://www.red-gate.com/simple-talk/dotnet/c-programming/voice-commands-in-unity/",
                Author = LanceTalbert,
                Comments = new List<Comment>() { comment2 },
                Rating = rating2,
                Categories = new string[] { "C# programming" }
            };
            posts.Add(FormsInVanilla);
            posts.Add(VoiceCommands);
            SocialNetwork sn1 = new SocialNetwork()
            {
                Type = SNType.INSTAGRAM,
                Author = DinoEsposito,
                NickName = "@dino",
                Url = "https://#"
            };
            SocialNetwork sn2 = new SocialNetwork()
            {
                Type = SNType.TWITTER,
                Author = DinoEsposito,
                NickName = "@dino",
                Url = "https://#"
            };
            sns.Add(sn1);
            sns.Add(sn2);
        }
        public List<Author> GetAllAuthors()
        {
            return this.authors;
        }
        public Author GetAuthorById(int id)
        {
            return authors.Where(author => author.Id == id).FirstOrDefault<Author>();
        }
        public List<Post> GetPostsByAuthor(int id)
        {
            return posts.Where(post => post.Author.Id == id).ToList<Post>();
        }
        public List<SocialNetwork> GetSNsByAuthor(int id)
        {
            return sns.Where(sn => sn.Author.Id == id).ToList<SocialNetwork>();
        }
    }
}

This is mostly boilerplate code. It spends some time to create data and feed the lists necessary to handle the main operations of getting them and sending back to the clients. Feel free to add as much data as you want to make the example even more real, or even connect to a different data source.

The get methods were built in a way to simulate the REST operations of getting each resource through a different endpoint plus the identifier of its parent.

Last, but not least, create the controller class (for the REST example) that will provide each endpoint pointed out before. Inside the Controllers folder, add the following controller class:

using GraphQL_SimpleTalk.Services;
using Microsoft.AspNetCore.Mvc;
namespace GraphQL_SimpleTalk.Controllers
{
    [Route("api/[controller]")]
    [ApiController]
    public class AuthorsController : ControllerBase
    {
        private readonly BlogService blogService;
        public AuthorsController(BlogService blogService)
        {
            this.blogService = blogService;
        }
        [HttpGet]
        public IActionResult GetAll()
        {
            return new ObjectResult(blogService.GetAllAuthors());
        }
        [HttpGet("{id}")]
        public IActionResult GetAuthorById(int id)
        {
            return new ObjectResult(blogService.GetAuthorById(id));
        }
        [HttpGet("{id}/posts")]
        public IActionResult GetPostsByAuthor(int id)
        {
            return new ObjectResult(blogService.GetPostsByAuthor(id));
        }
        [HttpGet("{id}/socials")]
        public IActionResult GetSocialsByAuthor(int id)
        {
            return new ObjectResult(blogService.GetSNsByAuthor(id));
        }
    }
}

Note how simple it is — if you’re used to dealing with REST APIs in ASP.NET, of course. The code is basically encapsulating the BlogService service to access its operations for every endpoint. For now, the code is handling only GET HTTP operations.

That’s pretty much everything we need to run the example. But, before testing, don’t forget to add the scoped declaration of the BlogService service to the Startup class, inside the ConfigureServices() method:

services.AddScoped<BlogService>();

And you also need to import the respective class:

using GraphQL_SimpleTalk.Services;

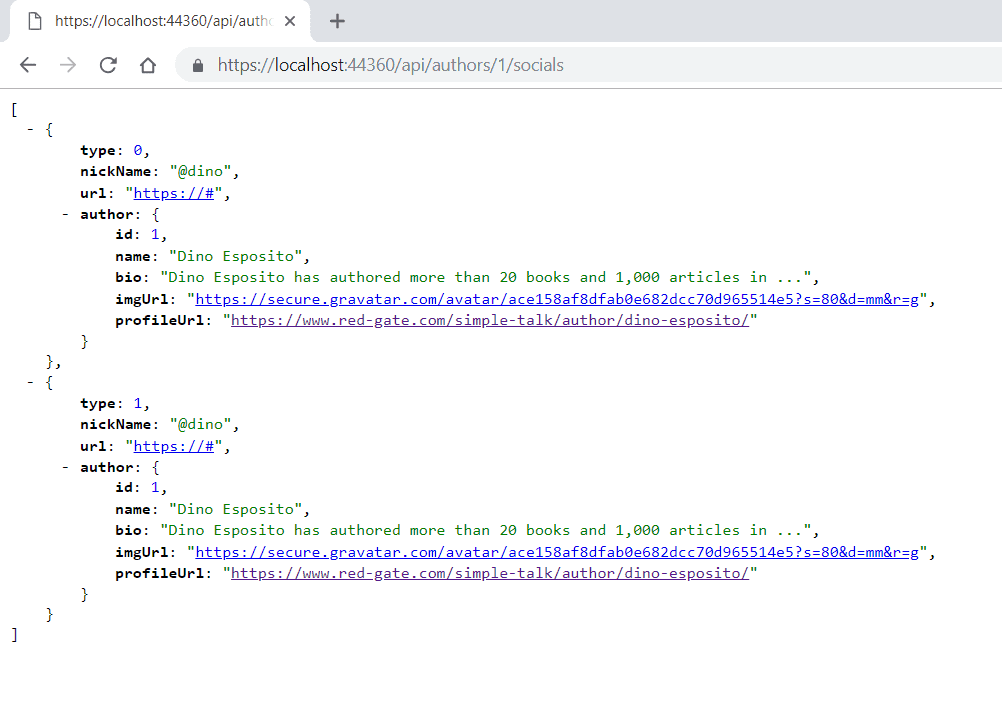
Now, start the server, go to your web browser and test each of the endpoints. Note that you may have a different port than shown here:
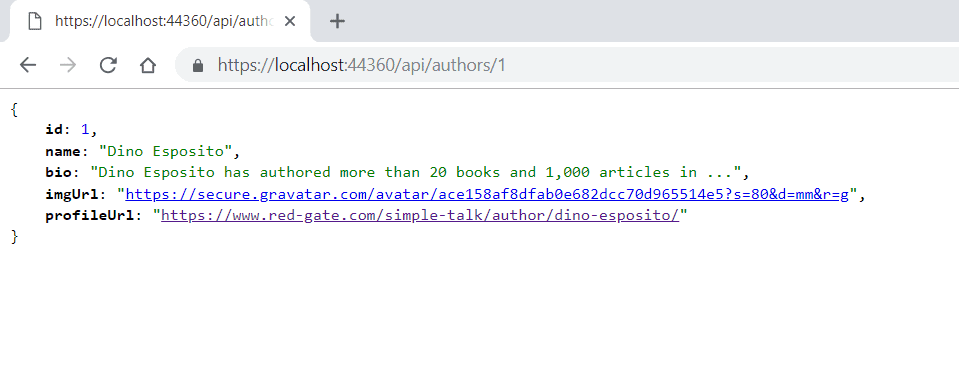
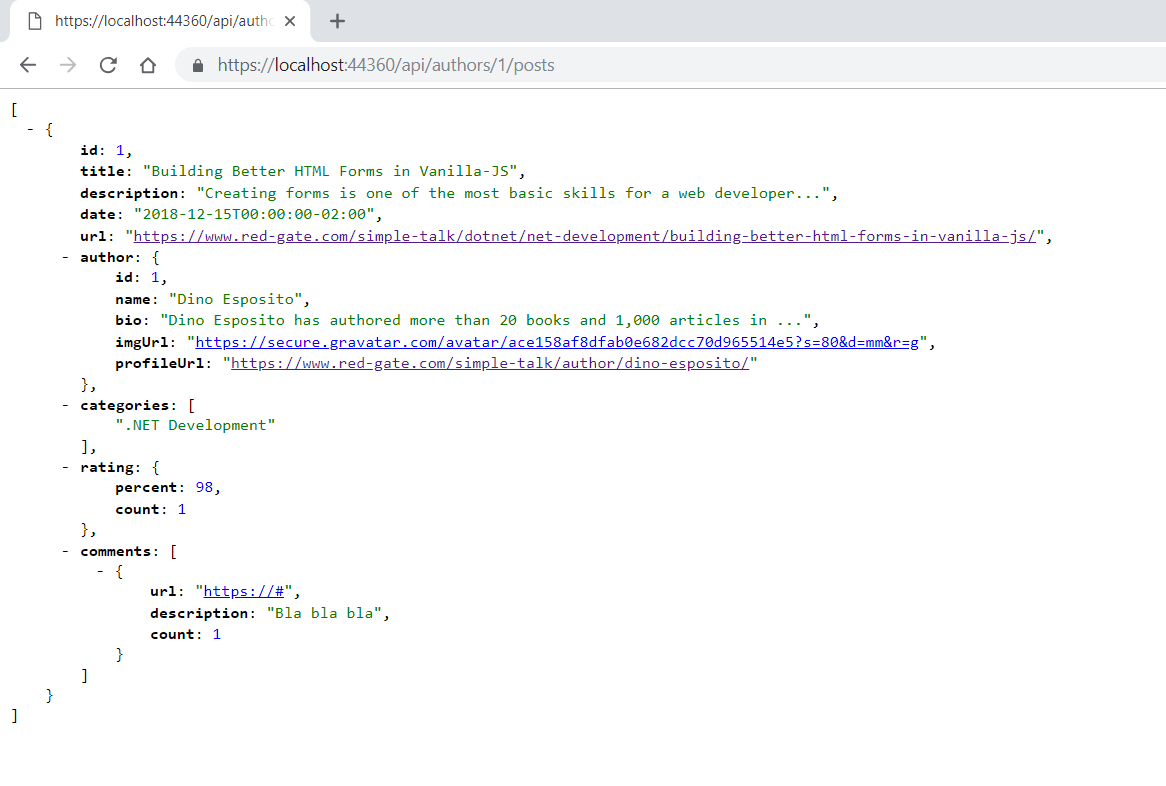
It seems simple, doesn’t it? What happens when you scale this conversational design to millions, billions of requests/responses per day?

Now to see how GraphQL addresses the same scenario.

The GraphQL Approach

Initially, set the GraphiQL up. GraphiQL (a NuGet dependency you’ve already installed) is an in-browser IDE for exploring GraphQL. It saves a lot of effort when testing GraphQL services by providing syntax highlighting, smart types, fields and query autocompletion tools, real-time error reporting and query inspecting.

Again, in the Startup class, make the following changes:

public const string GraphQlPath = "/graphql";
public void Configure(IApplicationBuilder app, IHostingEnvironment env)
{
    // ...
    app.UseGraphiQl(GraphQlPath);
}

Again, make sure to import the proper class at the beginning of the Startup class:

using GraphiQl;

This will define in what endpoint GraphiQL UI will be available.

Secondly, in order for this path be recognized as the official ruler of all GraphQL requests, you need to create a controller to manage the schema, variables and arguments. So, create the following class inside the Controllers folder:

using GraphQL;
namespace GraphQL_SimpleTalk.Controllers
{
    public class GraphQlQuery
    {
        public string OperationName { get; set; }
        public string NamedQuery { get; set; }
        public string Query { get; set; }
        public Inputs Variables { get; set; }
    }
}

This represents what a GraphQL query is. It’s kind of a limitation of the library still, since they hadn’t included this inside the graphql-dotnet. Then, create the following controller to handle all the operations:

using GraphQL;
using GraphQL.Types;
using GraphQL_SimpleTalk.Queries;
using GraphQL_SimpleTalk.Services;
using Microsoft.AspNetCore.Mvc;
using System.Threading.Tasks;
namespace GraphQL_SimpleTalk.Controllers
{
    [Route(Startup.GraphQlPath)]
    public class GraphQlController : Controller
    {
        readonly BlogService blogService;
        public GraphQlController(BlogService blogService)
        {
            this.blogService = blogService;
        }
        [HttpPost]
        public async Task<IActionResult> Post([FromBody] GraphQlQuery query)
        {
            var schema = new Schema { Query = new AuthorQuery(blogService) };
            var result = await new DocumentExecuter().ExecuteAsync(x =>
            {
                x.Schema = schema;
                x.Query = query.Query;
                x.Inputs = query.Variables;
            });
            if (result.Errors?.Count > 0)
            {
                return BadRequest();
            }
            return Ok(result);
        }
    }
}

This post method is important to summarize all the GraphQL schemas of your application in one place. Here, you have already referenced the AuthorQuery object, even though it doesn’t exist yet. The DocumentExecuter is responsible for the GraphQL query execution, sending the schema, the query itself and the variables as arguments.

Now, you must define what type of objects you’re going to query. This example gets each of the author’s data, the main query will be AuthorQuery. This will be the place to store each REST endpoint respective as a same-query operation.

To understand it better, take a look at how the final GraphQL query will look (the same we’ll use to test things in GraphiQL) :

query GetBlogData($id: Int!) {
  author(id: $id) {
    id
    name
  }
  posts(id: $id) {
    author {
      bio
    }
    categories
    comments {
      description
      count
      url
    }
  }
  socials(id: $id) {
    nickName
    type
  }
}

The first thing to notice is the parameter this query requires: the author’s id. It is going to be used for each individual operation (author, posts and socials ones) as a query argument (yes, GraphQL also allows sending arguments) that’ll define which records will be returned.

The “!” sign says that this parameter is required, otherwise the query won’t work.

Lastly, see that you’re only fetching the data from each object, to demonstrate that with GraphQL, you are the owner of the server’s responses, that is, you only get what you really want.

In graphql-dotnet, each query field (in this case: author, posts and socials) must be represented as a GraphQL.Types.ObjectGraphType in order to encapsulate each subfield definitions. Start with the AuthorType by creating the class in a new Queries\Types folder:

using GraphQL.Types;
using GraphQL_SimpleTalk.Entities;
namespace GraphQL_SimpleTalk.Queries.Types
{
    public class AuthorType : ObjectGraphType<Author>
    {
        public AuthorType()
        {
            Field(x => x.Id).Description("Id of an author");
            Field(x => x.Name).Description("Name of an author");
            Field(x => x.Bio).Description("Bio description of an author");
            Field(x => x.ImgUrl).Description("Url of an author's profile picture");
            Field(x => x.ProfileUrl).Description("Link of an author's profile");
        }
    }
}

The ObjectGraphType must receive a generic argument of the class this GraphType will configure. It’s strictly necessary that you define here each one you want to be exposed by the GraphQL query mechanism. You’re also setting the description in this type for you to notice how it appears in the final documentation in the GraphiQL interface.

It’s important to notice that for all the primitive types (string, int, etc.), you don’t need to do anything other than referencing the field at Field ‘s method. For types that you have created, you’re obligated to say which ObjectGraphType is the one managing this specific subtype. Just like you see in the next SocialNetworkType:

using GraphQL.Types;
using GraphQL_SimpleTalk.Entities;
namespace GraphQL_SimpleTalk.Queries.Types
{
    public class SocialNetworkType : ObjectGraphType<SocialNetwork>
    {
        public SocialNetworkType()
        {
            Field(x => x.NickName);
            Field<EnumerationGraphType<SNType>>("type");
            Field(x => x.Url);
            Field<AuthorType>("author");
        }
    }
}

It’s the same connotation and syntax, except for the SNType type (it will be created in the sequence). The EnumerationGraphType represents the default GraphType handler for enums in graphql-dotnet. The generic class must be provided subsequently along with the exact type name as a string. When it comes to the types, like the author, the AuthorType itself is enough.

Add the rest of the types.

The SNTypeType class:

using GraphQL.Types;
using GraphQL_SimpleTalk.Entities;
namespace GraphQL_SimpleTalk.Queries.Types
{
    public class SNTypeType : EnumerationGraphType<SNType>
    {
        public SNTypeType()
        {
            Name = "SNTypeType";
        }
    }
}

The CommentType class:

using GraphQL.Types;
using GraphQL_SimpleTalk.Entities;
namespace GraphQL_SimpleTalk.Queries.Types
{
    public class CommentType : ObjectGraphType<Comment>
    {
        public CommentType()
        {
            Field(x => x.Count);
            Field(x => x.Description);
            Field(x => x.Url);
        }
    }
}

The RatingType class:

using GraphQL.Types;
using GraphQL_SimpleTalk.Entities;
namespace GraphQL_SimpleTalk.Queries.Types
{
    public class RatingType : ObjectGraphType<Rating>
    {
        public RatingType()
        {
            Field(x => x.Count);
            Field(x => x.Percent);
        }
    }
}

The PostType class:

using GraphQL.Types;
using GraphQL_SimpleTalk.Entities;
namespace GraphQL_SimpleTalk.Queries.Types
{
    public class PostType : ObjectGraphType<Post>
    {
        public PostType()
        {
            Field(x => x.Id);
            Field(x => x.Title);
            Field(x => x.Url);
            Field(x => x.Date);
            Field(x => x.Description);
            Field<AuthorType>("author");
            Field<RatingType>("rating");
            Field<ListGraphType<CommentType>>("comments");
            Field(x => x.Categories, nullable: true);
        }
    }
}

For lists and arrays, in addition, you must use ListGraphType as the default handler. Notice, too, that the Categories field was defined as non-nullable, another possible config you’re going to use for testing.

Finally, create the AuthorQuery in the Queries folder. Even being an ObjectGraphType too, this object is the most important one, since is here where the schema is defined, as well as the resolvers you’ve seen before. There will be three fields: author, posts, and socials; each of them going through a different service method (which could possibly be another remote microservice, lambda or even data source) to fetch the data. See below the code:

using GraphQL.Types;
using GraphQL_SimpleTalk.Services;
using GraphQL_SimpleTalk.Queries.Types;
namespace GraphQL_SimpleTalk.Queries
{
    public class AuthorQuery : ObjectGraphType
    {
        public AuthorQuery(BlogService blogService)
        {
            Field<AuthorType>(
                name: "author",
                arguments: new QueryArguments(new QueryArgument<IntGraphType> { Name = "id" }),
                resolve: context =>
                {
                    var id = context.GetArgument<int>("id");
                    return blogService.GetAuthorById(id);
                }
            );
            Field<ListGraphType<PostType>>(
                name: "posts",
                arguments: new QueryArguments(new QueryArgument<IntGraphType> { Name = "id" }),
                resolve: context =>
                {
                    var id = context.GetArgument<int>("id");
                    return blogService.GetPostsByAuthor(id);
                }
            );
            Field<ListGraphType<SocialNetworkType>>(
                name: "socials",
                arguments: new QueryArguments(new QueryArgument<IntGraphType> { Name = "id" }),
                resolve: context =>
                {
                    var id = context.GetArgument<int>("id");
                    return blogService.GetSNsByAuthor(id);
                }
            );
        }
    }
}

The first important impression is the new arguments field defining a new QueryArguments for the id of an author represented as an IntGraphType.

The code snippet var id = context.GetArgument<int>("id"); is responsible for retrieving this argument based on its previous definition. The rest are just simple service calls. Also, notice that for each different type of return, the right type of the field must be outlined (e.g. ListGraphType).

It’s up to you determine if the posts and socials come directly within the author. This way, you’d implement all the searches inside of author‘s resolve parameter, however, you’d also have to have the proper attributes into the Author entity and AuthorType graph type.

GraphiQL

Time to test it! Start up the application again and access the URL: https://localhost:44360/graphql. This is the screen that’ll appear:
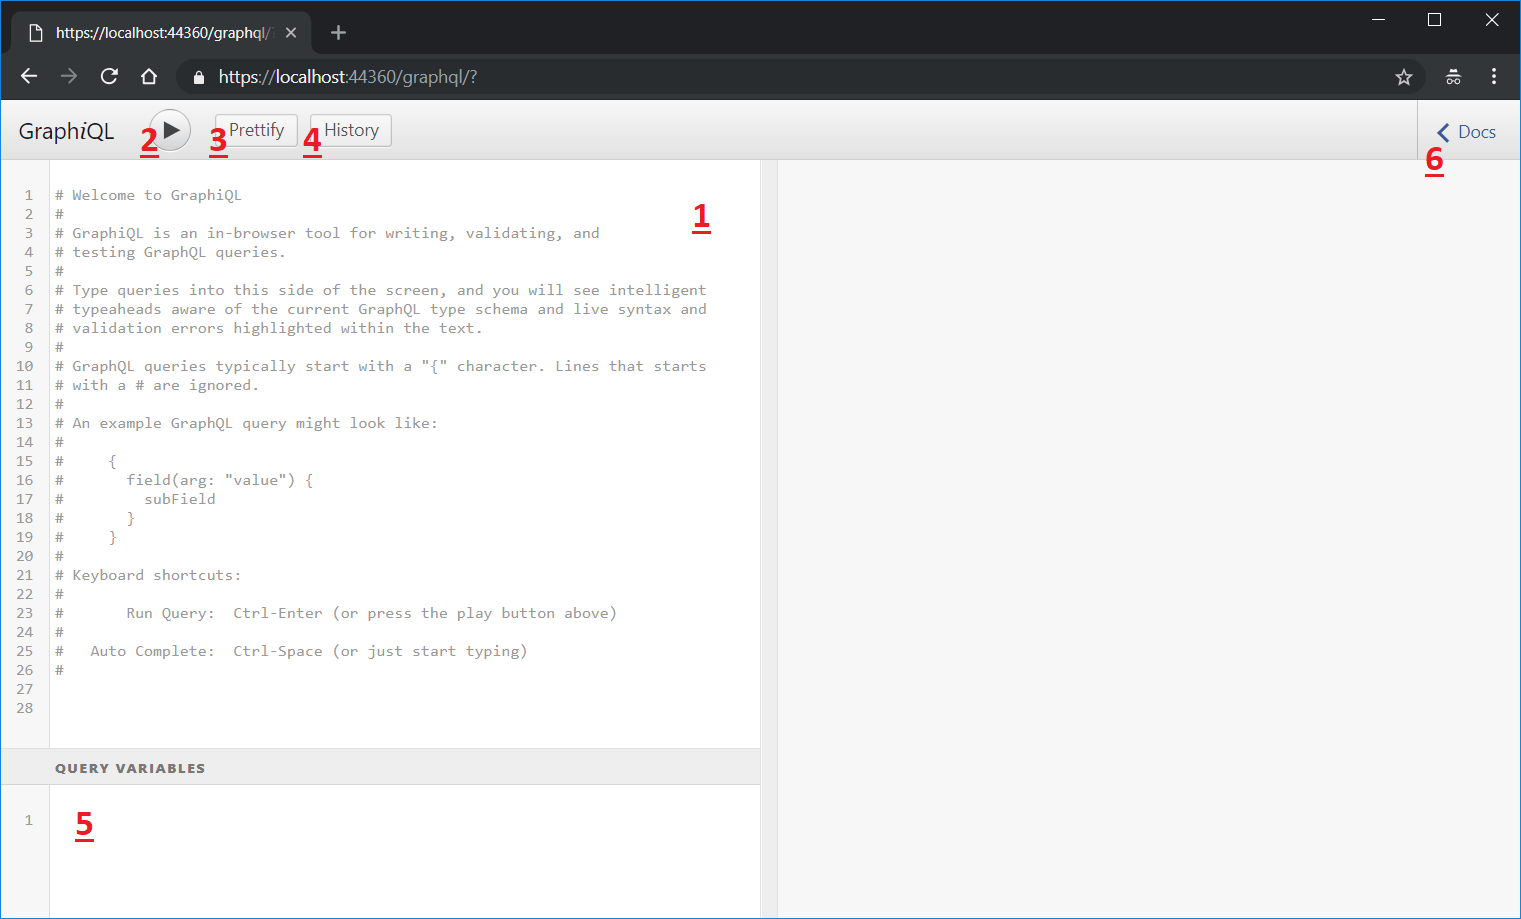
  1. The querying tool. In this box, you can type your GraphQL queries and it’ll give hints about the schema, autocomplete (“Ctrl + Escape” to trigger it), and validate the syntax;
  2. Button to run the queries;
  3. Button to prettify the code, indent;
  4. When clicked, show a side box with all the history of queries, even if you turn off the application;
  5. The box to add the query variables. They’re useful when you need to parameterize the query itself with data that comes from unknown sources;
  6. Documentation explorer. Here, you can search for query objects, its fields, arguments, types, nullability, etc.

The last item deserves a bit more of attention because it can be truly helpful when you’re accessing a GraphQL schema that you no nothing about. Have a look at the following screens:
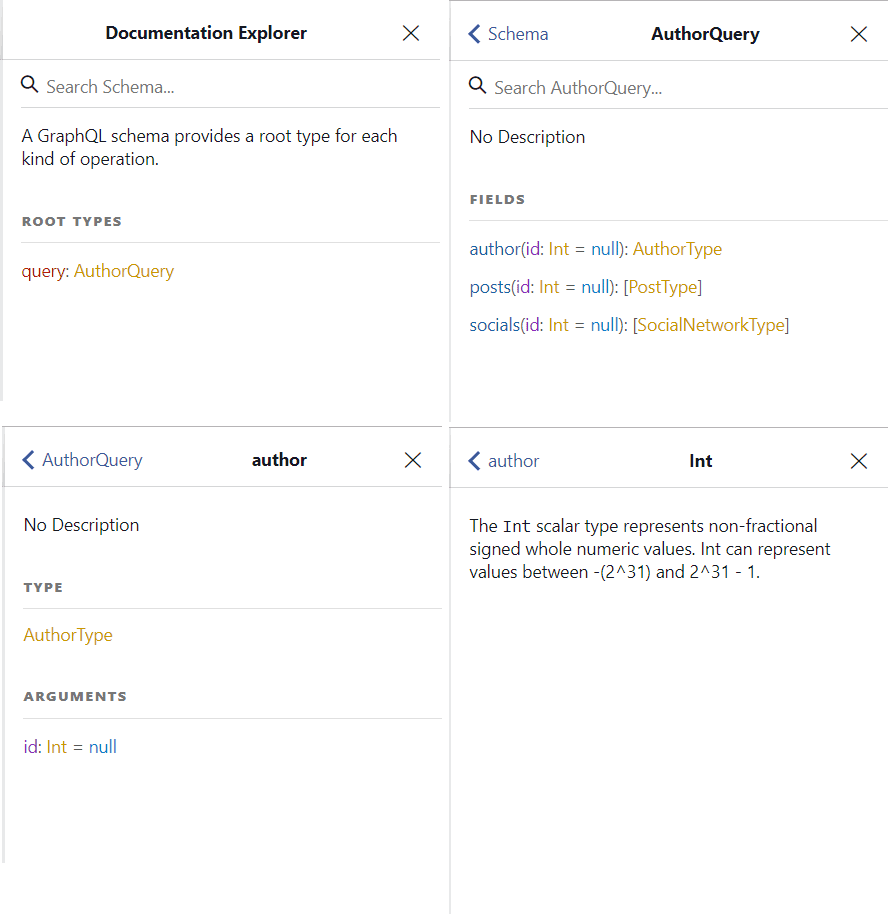
It represents the navigation upon the AuthorQuery schema. You can see docs from the list of root types (the available queries), each type’s fields (ant their respective declarations), to the arguments and even GraphQL inner types.

In the third screen, specifically, if you click in AuthorType type, you’ll see the following screen:
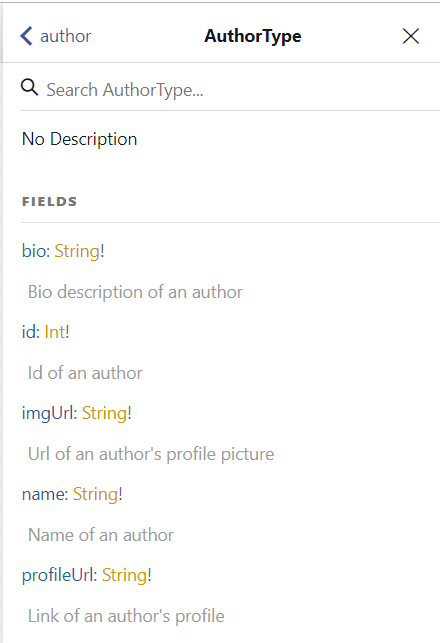
Those are the descriptions you’ve previously set at the AuthorType class. So, go ahead and customize your docs.

To see how this works, add this query to the Query window:

query GetBlogData($id: Int!) {
  author(id: $id) {
    id
    name
  }
  posts(id: $id) {
    author {
      bio
    }
    categories
    comments {
      description
      count
      url
    }
  }
  socials(id: $id) {
    nickName
    type
  }
}

You must also add the Query Variable:

{
    "id":1
}

Click the run button to try it out:
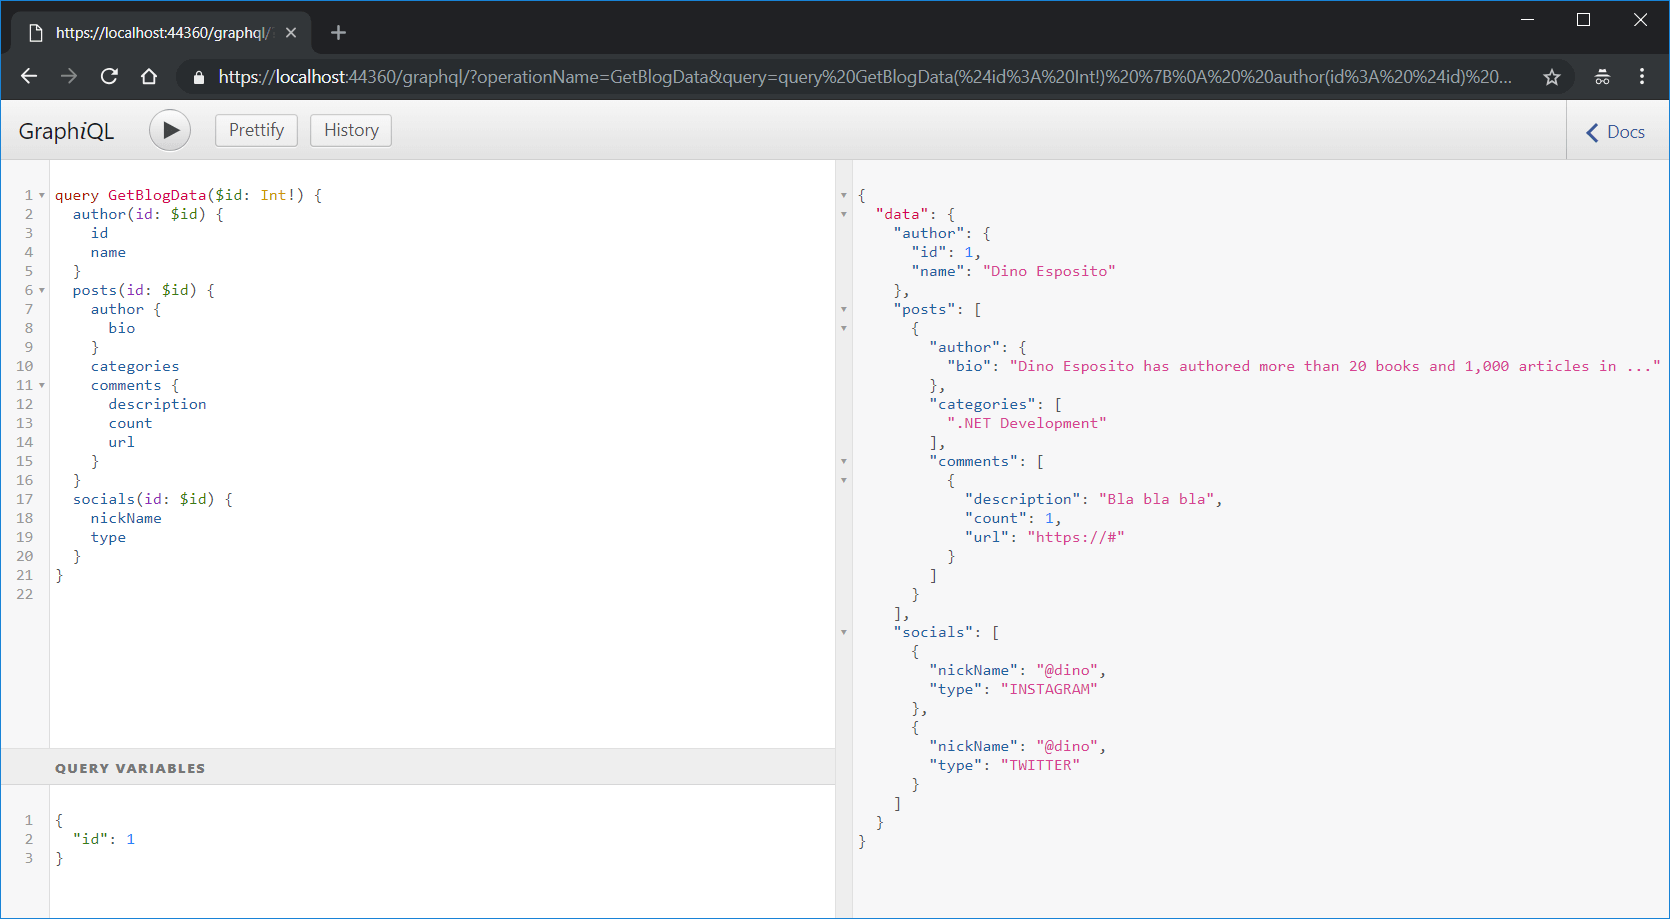
That’s the same query pointed out before. The only new thing here is the query variable id that’s passed. The results, at the right side of the screen, are pretty much everything you’ll receive from the server. If you don’t need the posts or the socials, you don’t have to add them to the query, and the resolver won’t be called just the same way.

The input variables for the query don’t have to be, necessarily, primitive values. You can specify another type to the schema, like AuthorType, and ask the clients to send a full filled author to register in your application, for example. This communication can happen with either action method, whether it is a single GET or a registration POST like you have in REST.

Summary

This article covered the main basics regarding GraphQL services exposure in ASP.NET applications. GraphQL is highly flexible and data-driven, which means that you can now focus you client development in the exact data you want to receive from the server, i.e., you’re the owner of the data you want to get.

In order to improve your skills, in addition to the official graphql-dotnet docs, graphql-dotnet also provides some sample projects with more configurations. Obviously, you can count on the official Facebook’s GraphQL specification as well as the howtographql.com popular learning courses arranged by and to the community. Best of studies!


The post Getting Started with GraphQL in ASP.NET appeared first on Simple Talk.


from Simple Talk http://bit.ly/2LYrhjP
via

Monday, January 7, 2019

Better Code Reviews with GIT

Code reviews are a huge factor in improving code quality. You can find this supported in Karl Wiegers Humanizing Peer Reviews and in Steve McConnell’s Code Complete, to name just a couple well-known sources. But how you approach a code review can mean a vast difference in its effectiveness. This article shares some tips and techniques to help you make your code reviews as effective as possible: in short getting you better feedback with less net effort.

In my earlier 4-part series, The Zen of Code Reviews, I discussed general principles and practices of code reviews, but focused on Team Foundation Server (now known as Azure DevOps Server) because that is what my team was embroiled in. Fast forward a couple years later to today–new company, new team, new environment–now heavily weighted in Git and GitHub. So this time around, I want to share some new “tips from the trenches”, revisit some prior ideas, and generally expound upon things from the Git perspective, showing you simple ideas that can improve your code quality. Since this article is focused on Git, I will primarily use Git’s term—pull request or PR for short—to refer to code reviews.

Why do you want your code reviewed? So you can get feedback from your peers on inefficient, inaccurate, invalid, inexplicable, insufficient, or otherwise sub-optimal areas of your code and then make improvements. In order to do that, your job as the author of a code review is to present your case as clearly as possible. A reviewer’s job, on the other hand, is to be able to provide useful feedback, which means that the reviewer must understand the issue that your code addresses, then peruse your changes (whether really relevant to the issue at hand or not), and finally figure out what your changes mean in context, i.e. the ramifications of those changes. As the author, you have an unfair advantage. You already know the issue that your code addresses. You know which changes are significant and which are just noise. You know most (or sometimes all) the ramifications of your changes. So why not share that valuable insight with your code reviewers?

What do I mean? In its most basic form: explain yourself. Help your reviewers help you; enlighten them on anything that is less than obvious. In doing that, you also cover the other side of the coin that is just as important: justify yourself. You are making changes to your company’s crown jewels–the code that powers your website, drives your equipment, manages your processes… whatever it may be, you need to be able to show that you have clear and useful reasons for the changes you want to make.

In Zen, part 1, I described three types of comments that all play a part in helping you explain yourself: in-code comments, code-review description, and pre-review comments. With Git, I am renaming code-review description to PR preamble and I am adding a new, fourth item to that list that is a variant of pre-review comments, but deserves to be called out separately: commit comments. The four types are summarized in this table and then explained further. These are listed in the order they would typically be used.

Type

Details

When to Use

In-code Comments

Annotate your code to explain obscure, tricky, and otherwise non-obvious bits.

Before creating your pull request, during development

Commit Comments

Break your development up into mini-milestones; commit each milestone and add a commit message describing the milestone.

Before creating your pull request, during development

Pull Request Preamble

Detailed description of the purpose of your pull request with text and pictures including: what “done” means, how to exercise it, and more.

When creating a pull request

Pre-Review Comments

Explain non-obvious changes from the prior version to the current version.

Immediately after creating a pull request but before notifying reviewers

In-code Comments

These are your usual, garden variety comments:

  • Why does your loop start with x + 2 instead of x?
  • If you wrote a function that is a variant of the Lempel–Ziv–Welch algorithm, say so.
  • When you find a handy little function that is unfortunately not in a pluggable library, certainly go ahead and paste into your file but be sure to add a URL for where you found it.

Using in-code comments has its proponents and its detractors. In fact, it is often one of those sacred cows that gets some folks riled up, like “tabs vs. spaces”, “vim vs. emacs”, etc. I submit, however, that it gets folks riled up because they are looking at the wrong question. “Are comments good or bad?” is a meaningless question until you qualify that with what kind of comment you are talking about. Some types of comments are just evil. Some are not evil at all. Thus, it definitely depends which of the 9 types of comments you mean when you ask “Are comments good or bad?” See my article Fighting Evil in Your Code: Comments on Comments for details.

Commit Comments

This is the exciting new piece I am adding for Git users, because it is so natural to work in this fashion. In my experience, the most digestible types of pull requests are those that include multiple commits (for all but the most trivial pull request), where each commit represents a sub-task or milestone along the way towards the aggregate goal of your pull request. Think of this in terms of applying the Single Responsibility Principle to building your pull request. Instead of a single commit with a commit message that reads like this…

Implemented the boojum for the cantilevered praxis:
 * Back-end database wiring
 * Exposed API on the gateway
 * Connected to GUI and command-line front-ends
Took the liberty of refactoring some back-end unit tests as 
well to make the intent more clear.
Oh, and found a couple spelling mistakes in the related 
docs--don’t those tech writers use a spell checker?

… break that up into smaller pieces. You could easily make a case for this example to use 3 pieces (one for the boojum, one for the refactoring, and one for the spelling corrections) or perhaps 5 pieces. (You could also make a case to use separate PRs instead of just separate commits, but let’s assume that the sum of these is small enough to result in a PR that is modest in size.)

What is powerful about breaking this up into separate commits is that it makes your PR much more digestible by a reviewer. Instead of having to grasp the context of changes in 15 files at once, you might have one commit that involves 5 files, another that involves just 1 file, etc. The set of commits collectively tell a story, but each “chapter” can be read one at a time. In fact, just like you might read an actual book by first skimming through the table of contents, you can similarly begin your review of a PR by skimming through the commit messages. You should then be able to get a sense of the journey that the author went on to get from the start to the end.

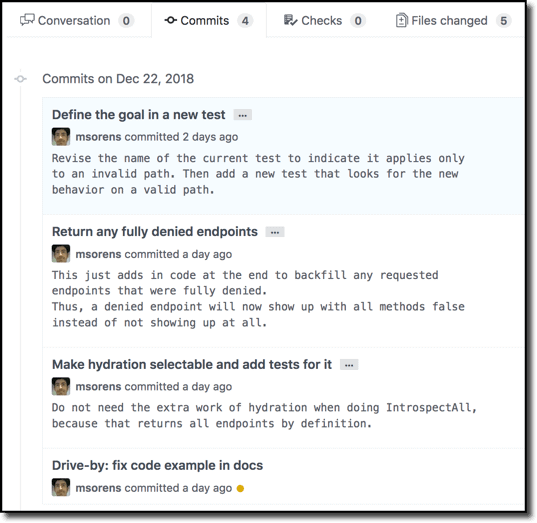
Here is a simple, real-life example. Of course, you have absolutely no context, so I will supplement the image with this short description: Using TDD (test driven development), a new test is added in the first commit. The next commit does not say explicitly, but it is implementing new behavior to make that test pass, which involves hydrating some endpoints (the details of what hydration means in this context are unimportant). This hydration needs to be used in some cases but not others, so the third commit allows for that, with both the code and the tests. The final commit, labeled a ‘drive-by’ is unrelated to the PR proper, but it is a one-line change noticed during development so I added it here just to get it done. In GitHub, here are the commits in the PR:

The commit titles tell a story as you read through them. And the details of each commit provide further color to make that story more clear to the reader.

By the way, for a great guide to writing good commit messages, see Chris Beams’ How to Write a Git Commit Message.

PR Preamble

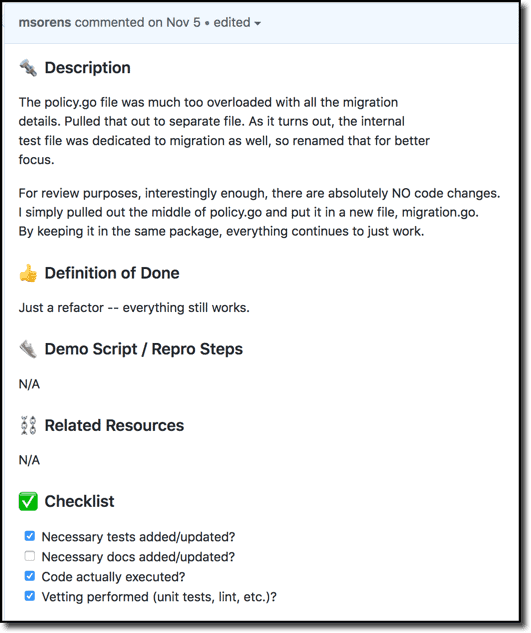
When working on GitHub and you press the button to create a pull request, you are immediately presented with a field for a title and a big empty text box for what I like to call the PR preamble. It is the starting point, the introduction, for your PR. It should include a summary of what the reader will be reviewing, details on how to exercise the code so a reviewer could prove that it works themselves, and more. You and your colleagues should agree upon a standard set of information you want all PRs to include and then store these in a PR template that pre-populates the text box when you create a new PR. See Creating a pull request template for your repository for more.

Your list of items to cover will be uniquely yours, but at a minimum I would recommend a description or summary, a definition of ‘done’ (how does one know your PR achieves its goal?), and the steps to exercise your code (how can a reader prove that your code changes do what they say?).

You should also include a checklist. The one my organization uses every day reminds the PR author to make sure that they have updated docs, added tests, run the tests, and exercised the code. I hear you scoff. But that “silly” checklist works. It substantially increases the likelihood of those “obvious” tasks getting done. I don’t have any citations to back that claim specifically for software, but there are many articles espousing the benefits of a checklist, for example, for a doctor performing a medical procedure or for a pilot readying an aircraft for takeoff. (Example: https://khn.org/news/hospital-checklist-mainbar/).

Here is an example preamble, short enough to fit in a screenshot:

Does your code touch anything in the UI? If so, include screenshots or videos. If you do include screenshots, add arrows, captions and the like to show what code has changed; there is always a lot going on in most any screen shot so, again, help the reader see what your code did.

I will often use diagrams, charts, or other images of data even when I am not working in UI-facing code, if I think it will help make my intent more clear.

Pre-review Comments

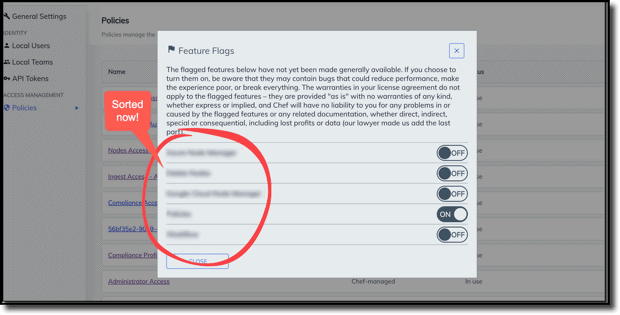
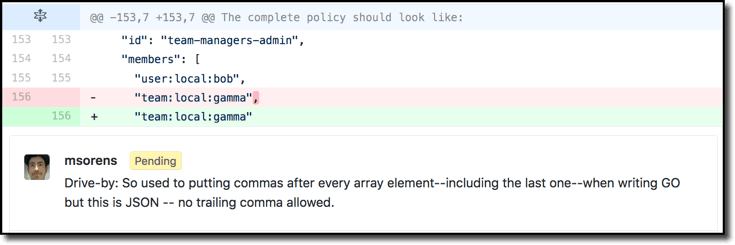
My Zen, part 1, was all about pre-review comments. That was, in fact, its title. In that article I propose that, once your PR is ready to be reviewed, you be your own first reviewer. Read through every changed line of code–not with the intent of critiquing though, rather with the intent of clarifying or explaining if something is not obvious. Pre-review comments serve a similar purpose to in-code comments; the latter also should clarify or explain the non-obvious. The important distinction, though, is that in-code comments explain things that are in the code while pre-review comments explain code that has been changed by the PR. There could certainly be overlap between the two; sometimes it is not clear cut whether a comment should be an in-code comment or a pre-review comment, in which case either will do. But consider the next example. GitHub only presents a small window of context for a given change, a couple lines before and after. In this case, just looking at that window did not seem to me to provide enough clues as to what a reviewer might be looking at, so I introduce the pre-review comment shown. In the finished code, that comment would be useless and, indeed, confusing. But here in the PR it immediately takes the guesswork out of what the reviewer is seeing.

When I wrote that previous article it was without the benefit of commit comments, described above. These add a richer dimension to tell a story, offloading a good portion of what I used to do with just pre-review comments. Commit comments make it so much simpler now to say that such-and-such is the case and applies to these specific lines in these 5 files. When I had only pre-review comments, I would have to add comments on each chunk of code in each relevant file. But these files and these chunks were interspersed with all the other things going on in the code review. So frequently you might see comments saying something like “this line is part of the change for such-and-such, described earlier”. Pre-review comments are still useful, though! They are quite helpful for notating something remarkable within a single commit. I definitely use less of them in favor of commit comments nowadays, but they still prove their value again and again.

Summary

Code reviews are vital when developing software, so understanding how to make a code review more effective and more productive is important for every developer. Besides this article, I encourage you to read my earlier 4-part series, The Zen of Code Review, with two parts devoted to authors and two parts devoted to reviewers:


The post Better Code Reviews with GIT appeared first on Simple Talk.


from Simple Talk http://bit.ly/2Fe1fbP
via

Protecting SQL Server Data Using Static Data Masking

Are you providing adequate protection to your sensitive and confidential data? I’m sure we all do our best to protect our confidential data in a production environment by allowing only approved methods to access production data. But how are you protecting your development and testing environments when they contain copies of production databases?

Generating good development and test data is a tough job. Not only that but sometimes it is tough to reproduce production data issues in generated test data. Because of these two issues and a slew of other issues, many DBAs and developers fall into the simple method of generating test data by just copying production data down to non-production environments. By definition, non-production environments are typically less secure than production environments. Developers have different, normally more elevated, rights in these lower environments which means they can see data they are not able to see in production. Because of this, it is a bad idea to copy production data to non-production environments without cleansing the data first. This is where Static Data Masking can help.

What is Static Data Masking?

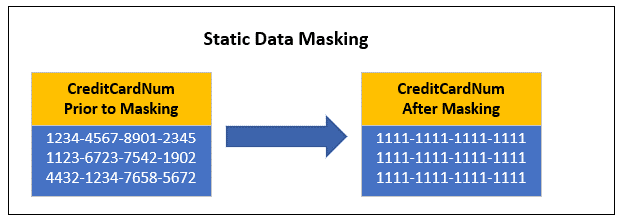
Static data masking is the process of permanently replacing sensitive data in your database with meaningless values. These meaningless values can be created by obfuscating part of or the complete column value with a generated value. Diagram 1 shows how static data masking replaces the complete CreditCardNum column value with a single generated value for all credit card numbers.


Diagram 1: Example of Single Value Static Data Masking

Performing Static Data Masking

Obscuring your sensitive data when copying your production data to non-production environments is one way to protect your confidential/sensitive production data. To help with performing static data masking, the Microsoft Security team incorporates static data masking as a new feature in SQL Server Management Studio (SSMS) 18.0 preview 5, or above. With the introduction of this new feature, you are now able to create a cloned copy of an on premises SQL Server database, where the confidential/sensitive data is statically masked in the cloned copy of the database.

Preview 5 and above of SSMS allows you to identify which columns are to be masked, and the functions that will be used in the masking operations. These masking definitions are then used to create a copy of your database that contains cleansed, statically masked data, where defined. The static data masking feature works on SQL Server 2012, or newer databases, as well as Azure SQL Database (DTU and vCore-based hosting options, excluding Hyperscale), and SQL Server on an Azure Virtual machine.

How to Get the Latest Version of SSMS

In order to learn how to perform static data masking, you first need to obtain the bits for SSMS 18.0 preview 5 or higher. To download the bits that have the static data masking feature, look at this page to find the latest download that supports Static Data Masking (at the time of the writing of this article, that was preview 6).

Run the exe to install the preview 6 bits, and you may have to reboot your machine. With the installation of the newest version of SSMS, you are ready to test out this new static data masking feature.

Methods of Masking Data

Before I can demonstrate how to mask data using SSMS Preview 6, I’ll first review the static data masking functions that are available in this new version. There are five static masking options available: NULL, single-value, shuffle, group shuffle, and string composite. The masking requirements will dictate which one of these masking functions will be used. Here’s a closer look at each of these functions.

NULL masking:

The NULL masking function will replace the original column value with a null in the cloned database. Note the masked column needs to support null columns in order to use this masking option.

Single-Value masking:

The single-value masking function replaces the original column values with a single value of your choice. Keep in mind the single value needs to be convertible to the column data type of the column being masked.

Shuffle masking:

With shuffle masking, the original column values are shuffled around. These shuffled values are then used to replace the original value in a row, with one of the shuffled values. If your original data has NULL values, you have the option of not replacing the NULL value or shuffling the NULL values around.

Group Shuffle masking:

The group shuffle masking binds multiple columns together for the shuffle operation. This function is useful when there is a relationship that you want to maintain between the multiple columns like, city, state and postal code.

String Composite masking:

String composite masking allows randomly generating masked data using a pattern. This pattern can replace and format the entire column value or only a portion of the column value. Patterns are provided using Regex-like expressions.

Sample Database for Testing Static Data Masking

In order to demonstrate creating a statically masked database, create a demo database named StaticMaskingDemo, using the T-SQL code in Script 1.

USE master;
GO
-- Drop Database 
DROP DATABASE IF EXISTS StaticMaskingDemo
GO
-- Create Sample DB
CREATE DATABASE StaticMaskingDemo;
GO 
USE StaticMaskingDemo;
GO
-- Create Sample Tables
CREATE TABLE CreditCard (
ID int,
CreditCardNum varchar(16),
SecurityCode int); 
CREATE TABLE Client ( 
ID int, 
CreditCardID varchar(16), 
ClientName varchar (50), 
BirthDate date, 
EmailAddr varchar(100), 
AddrLine varchar(60), 
City varchar (30), 
PostalCode varchar(15));
-- Populate with data
INSERT INTO CreditCard VALUES 
(1, 1000100010001000,100),
(2, 1234123412341234,123),
(3, 1111222233334444,333),
(4, 1234567890123456,456);
INSERT INTO Client VALUES 
(1, 1, 'John A. Smith','12-23-1954','JSmith@SmithWorks.com','1000 Smith Ave.','Portland','97035'),
(2, 2, 'Sally Johnson','07-12-1974','SallyJ@WLTS.gov','1234 Marine View Dr.','San Francisco','94016'),
(3, 3, 'Mary Sullivan','09-01-1972','MSS@InsComp.org','1111 Soundview Dr.','Bellingham','98225'),
(4, 4, 'Thomas J. Storm','11-17-1959','TJStorm@SutterSmith.com','2345 Water Street','Bloomington','47401');

Script 1: Create Sample Database

The script created two tables: Client and CreditCard. Table 1 contains the masking specification in to mask the sample database.

Table.Column

Masking Specifications

CreditCard.CreditCardNum

String Composite (replace first 10 digits with X’s).

CreditCard.SecurityCode

Single Value (replace all values with 123)

Client.ClientName

Shuffle

Client.BirthDate

Null

Client.EmailAddr

String Composite (keep domain, but replace portion prior to @ sign with a random value)

Client.AddrLine

Group Shuffle

Client.City

Group Shuffle

Client.PostalCode

Group Shuffle

Table 1: Masking Specification

Identifying Masking Criteria using SSMS

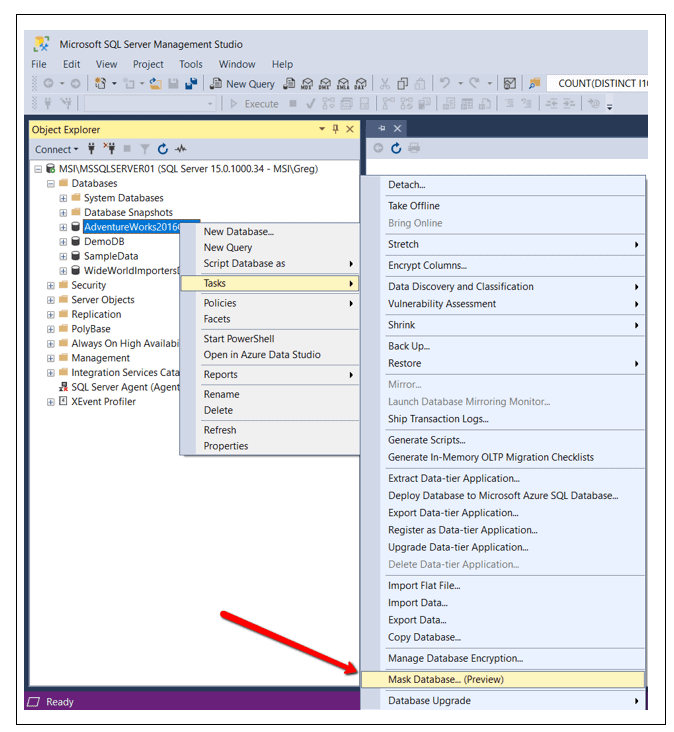
Once the database is created, make sure you are running the new version of SSMS. The new task named Mask Database… (Preview) is used to identify the masking criteria. To bring up this new task, connect to your local instance of SQL Server. Right-click on the StaticMaskingDemo database in Object Explorer. In the drop-down display, hover over the Tasks item and then finally select the Mask Database… (Preview) task from the second drop down, as pointed to by the red arrow in Figure 1.

Figure 1: Selecting the Mask Database Task

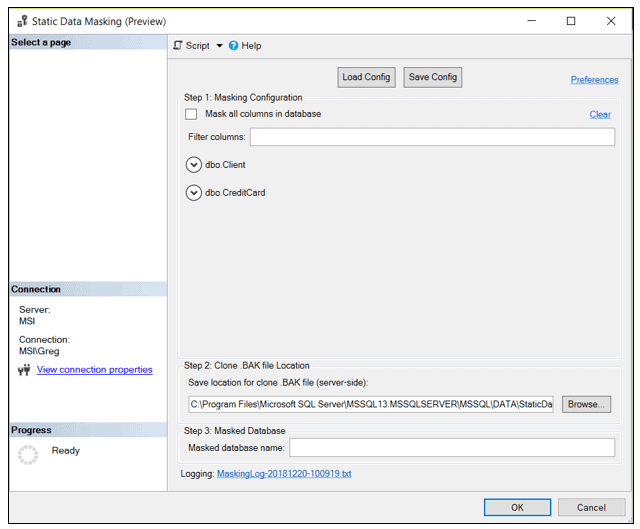
After selecting the task, the window shown in Figure 2 is displayed.

Figure 2: Static Masking Steps

Figure 2 shows that there are three steps to perform in order to identify the masking requirements for the database.

Step 1: Masking Configuration

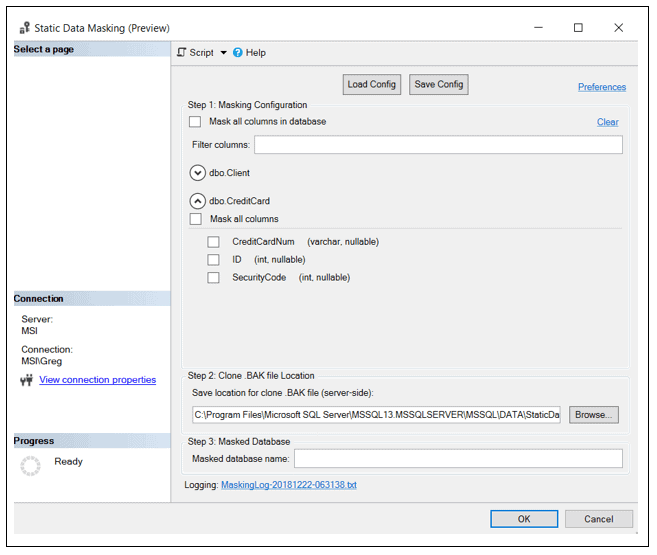
By looking in the Masking Configuration step (Step 1), you can see there are two tables contained in the database: Client and CreditCard. To specify the static data masking, start by specifying the masking configuration for the CreditCardNum column in the CreditCard table. To show the columns within CreditCard table, click on the down arrow icon, next to the table name. Upon doing this, Figure 3 is displayed.

Figure 3: Columns in CreditCard table.

Use the String Composite masking function for the CreditCardNum column and the Single Value masking function for the SecurityCode column.

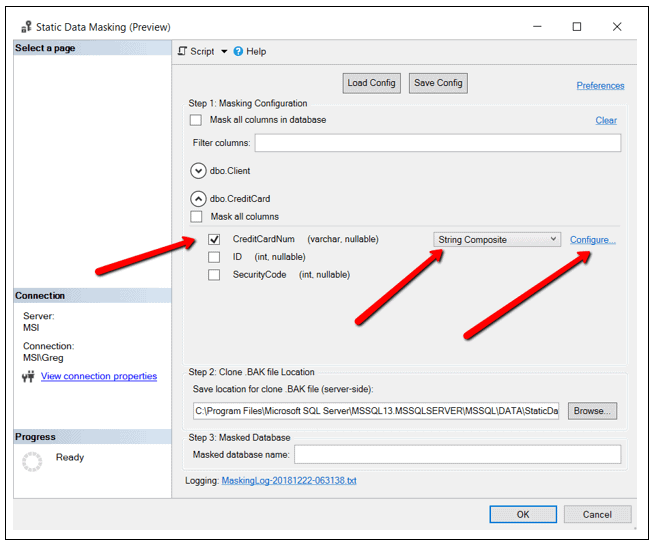
The String Composite masking function is used for the CreditCardNum column in order to show the last 6 digits of the credit card number with the first 10 digits replaced with X’s. The “advanced” masking option is needed to specify this complex masking criteria. First click on the checkbox next to the CreditCardNum column to indicate that you want to mask this column. Then select the String Composite item from the drop down. Then, finally, click on the Configure… hyperlink option as shown in Figure 4.

Figure 4: Masking criteria for CreditCardNum column

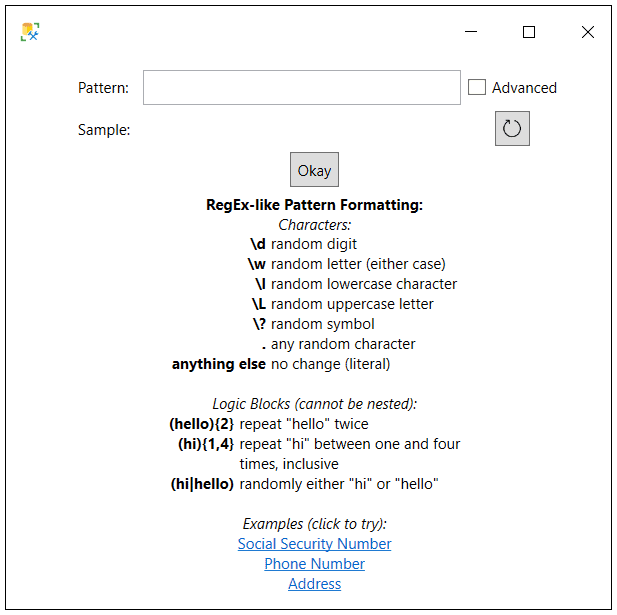
After clicking on the Configure… hyperlink, the pattern specifications window appears which is shown in Figure 5.

Figure 5: Pattern Specifications

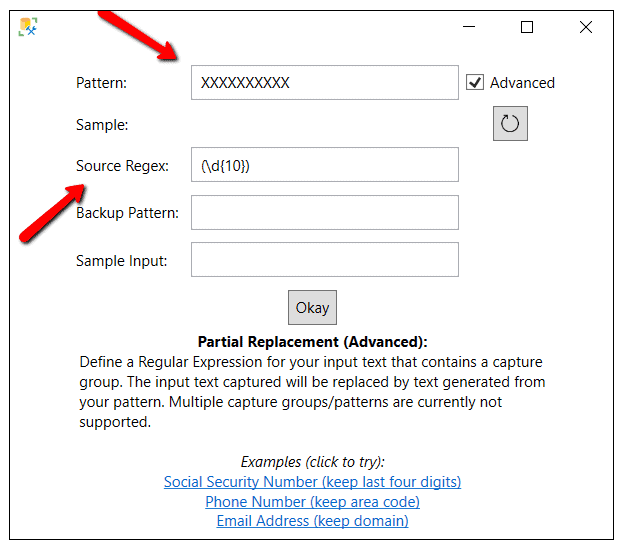
The pattern specifications window can be used to define a random value criteria based on a pattern expression. To mask part of the CreditCardNum column using a complex masking criteria, click the Advanced check box to configure more complex masking requirement.

The advanced masking specification allows you to specify the complex masking requirements. As previously stated, just the first ten characters of the CreditCardNum should be replaced with X’s. Therefore, on Figure 6 shows a Pattern of ten X’s (XXXXXXXXXX) which identifies the pattern that will be used to masked the first ten characters of the credit card number column. To identify which characters in the source will be replaced with the ten X’s, specify a Source Regex pattern value of (\d{10}). This pattern identifies the first 10 digits of the CreditCard column will be the characters replaced with the ten X’s. Figure 6 shows the window once it’s configured.

Figure 6: Advanced Masking Specifications

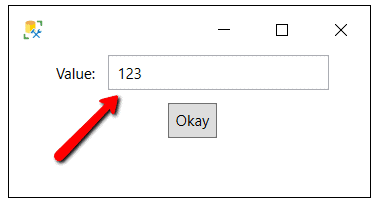
The other column to mask in the CreditCard table is SecurityCode. This column will be masked with a single value of 123 in all rows. To select this column to be masked, select the checkbox next to this column and pick the Single Value masking function. Then click on the Configure… hyperlink.

Figure 7: Single Value Specification

On the single value specification screen, enter 123 for the value. By specifying this, the SecurityCode column will be replaced with the static value of 123 on every row in the CreditCard table. Now that the static masking criteria for the CreditCard table is defined, it’s time to move on and specify the masking criteria for the Client table.

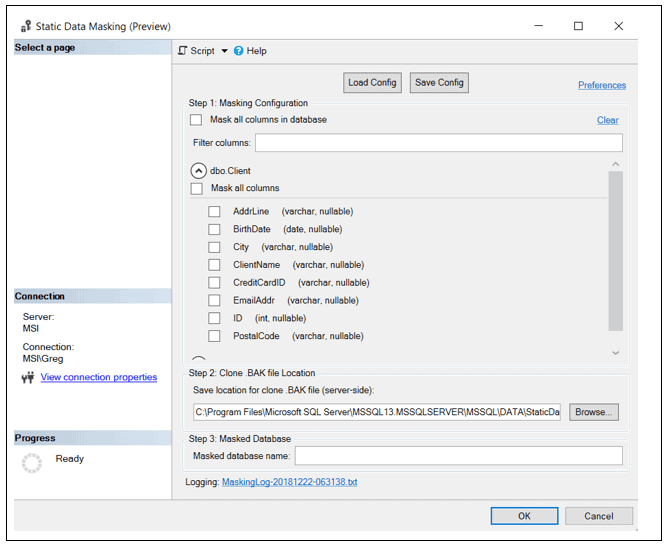
To mask the Client table, first display the columns. Figure 8 shows what is displayed.

Figure 8: Client table columns

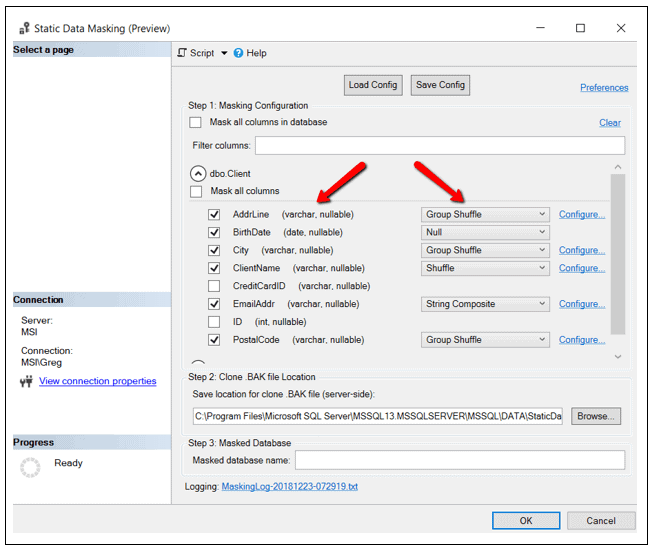
In Figure 8, you can see all the columns in the Client table. Click on the checkbox next to each column that must be masked, as identified in Table 1, and then select the appropriate masking criteria for each column as shown in Figure 9.

Figure 9: Identifying masking criteria for Client table

Figure 9 identifies all the columns and the type of masking to be performed for each column. As you can see, the Shuffle and the String Composite items support providing additional masking specifications.

To configure the Shuffle masking configuration specification for the Name column, click on the Configure… hyperlink. After clicking, the window in Figure 10 is displayed.

Figure 10: Masking Configuration for Name column.

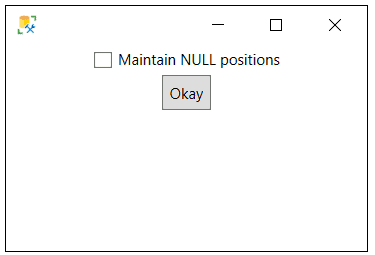
As you can see the Shuffle masking criteria only has one configuration option that can be specified, and that is to Maintain NULL positions or not. Remember the Shuffle criteria will use all the column values for masking but will shuffle the values around randomly amongst the rows. Therefore, when selecting Maintain NULL positions, any NULL values in the Name column will not be moved to different rows. When the box is not selected, then the NULL values can be moved around. For this column, leave the box unchecked.

The BirthDate column will be masked using the NULL masking specification. This specification will replace all the BirthDate column values with NULL in the cloned database.

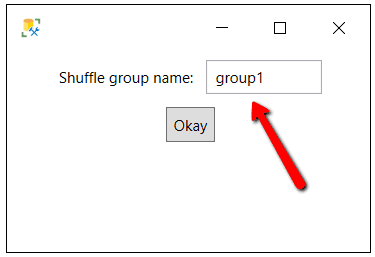
The Group Shuffle masking criteria will be used for the AddrLine, ZipCode and City columns. The group shuffle is like the shuffle option, but instead of shuffling each column value independently of the others, it randomly shuffles all the grouped column values together in the cloned database rows. Group Shuffle has a Configure… option, as well. Figure 11 shows the option when this is clicked.

Figure 11: AddrLine group shuffle configure option

The only configuration option is to name the shuffle group which is group1 by default. This shuffle group name will be used to identify all the columns that will be shuffled together. The Shuffle Group masking criteria is set on the three address columns in the Client table. By default, all three of these columns were defined with a Shuffle group name of group1. Therefore, the address attributes on each row will be shuffled together, thus making sure the address attributes stay together when they are shuffled and randomly associated with new rows. If you want to have different sets for columns grouped and shuffled together, all you would have to do is define more than one Shuffle group name.

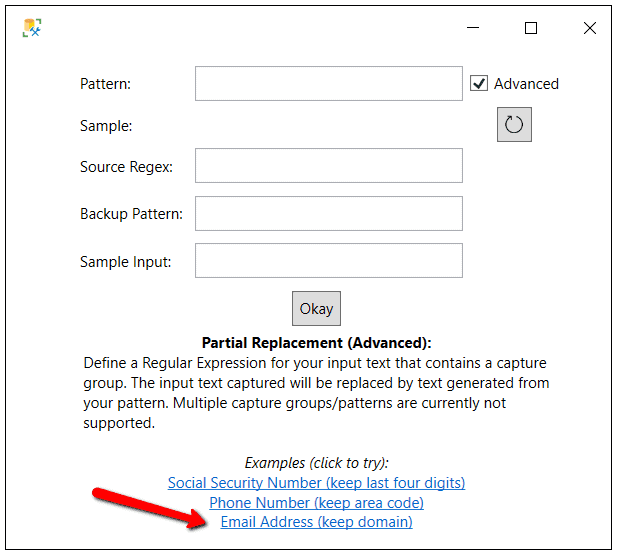
The last column to mask is the EmailAddr column. For this column, select the String Composite masking criteria. This masking criteria is used to create a masking rule where the email domain stays the same, but the address portion prior to the @ sign is set to a random pattern. To create this masking rule, click on the Configure… hyperlink next to the email address column. Then check the Advanced checkbox, and, finally, select the Email Address (keep domain) hyperlink at the bottom of the pattern window, as shown in Figure 12.

Figure 12: Email Address masking configuration

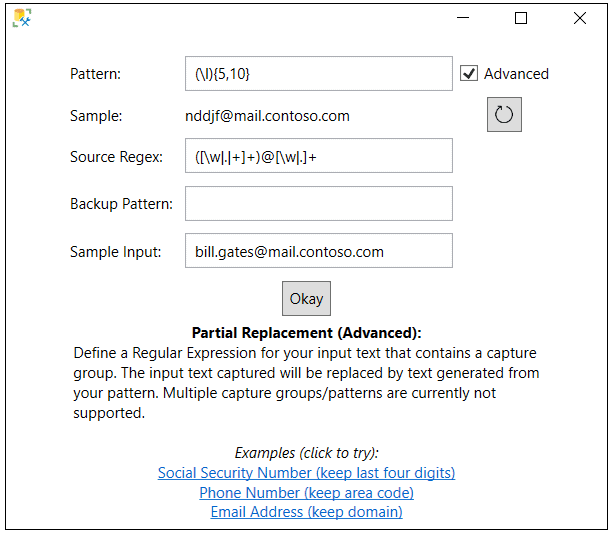
Figure 13 shows that the Pattern and Source Regex fields were populated with expressions after clicking on the email example hyperlink. These expressions define that the email address domain will be kept when this column is masked, but the email address portion prior to the @ sign will be replaced with a generated value.

Figure 13: Email masking rule

At this point, all of the masking requirements have been defined and you can move on to Step 2.

Step 2: Identify Clone Backup Location

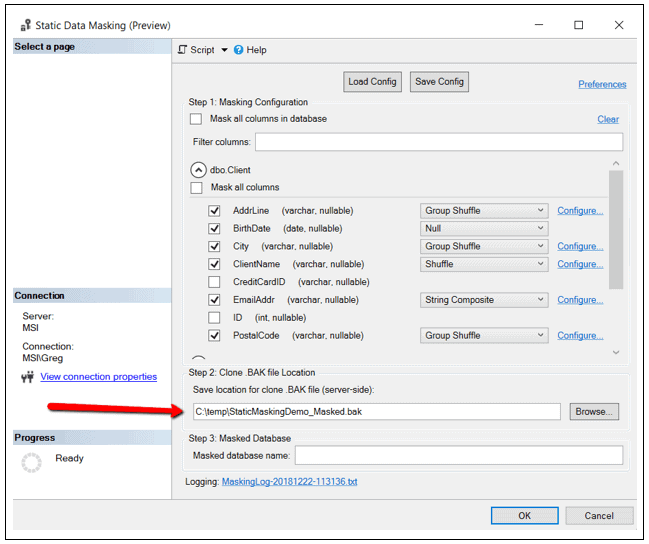
In this step, you must identify the location where you want SQL Server to save a backup the database you are trying to mask. This database backup will be used in the cloning process but does not contain masked data. In my case, I will store my backup in the C:\temp directory as shown in Figure 14.

Figure 14: Clone Backup File Location

Step 3: Identify Masked Database name

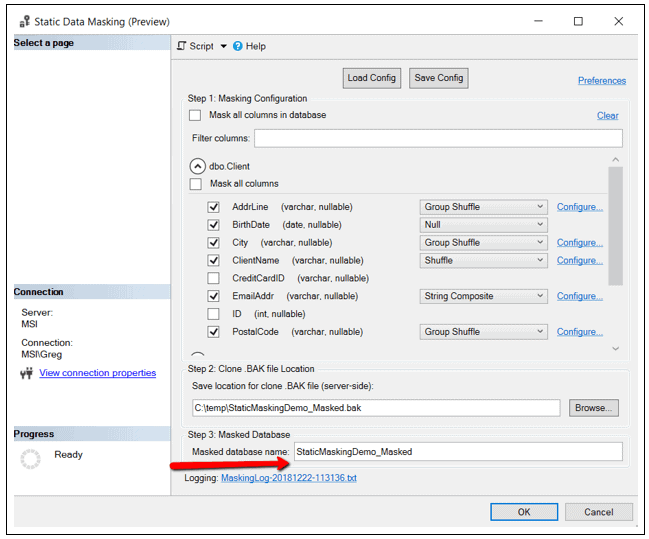
In this step, you must identify the name of the cloned database. In Figure 15, you can see I named my cloned database StaticMaskingDemo_Masked.

Figure 15: Masked database name

At this point the following has been configured:

  • Database and columns that will be masked.
  • The masking rules for each column to be masked.
  • A location and name of where to store a backup copy of the database being masked.
  • The name of the masked database.

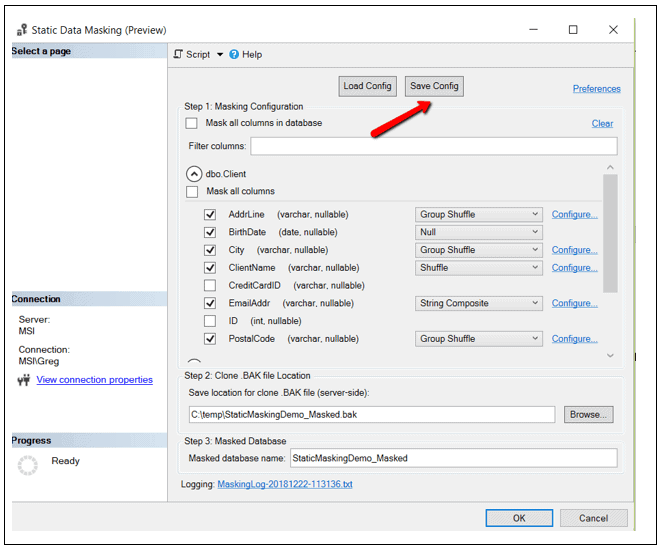
This was a lot of point, click and typing just to identify a few masking specifications. Suppose you had a bunch of tables and columns that needed to be masked. If this were the case, it would take a very long time to use the GUI method of identifying masking requirement. At this point you can save the masking configuration by click on the Save Config button as show in Figure 16.

Figure 16: Save masking configuration.

When you click on this button, you’ll be promoted for a location to store the XML that makes up the masking configuration. In this case, I stored the XML in C:\temp\StaticMaskingDemo_Masked.xml. Saving the configuration will make it easy to change the masking criteria in the future if you need to.

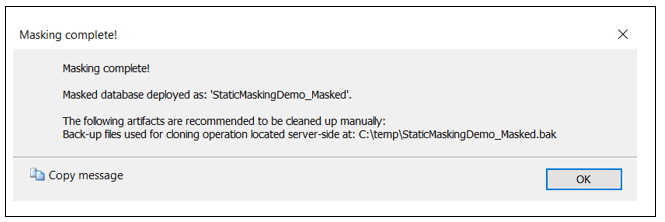
At this point, everything is in place to clone the database by clicking on the OK button. When the masking and cloning process is completed, the window in Figure 17 is displayed.

Figure 17: Masking completed!

By looking at the text in Figure 17, you can see that the cloning process actually deployed a masked database. My cloned database was stored on the same instance as the databases being cloned. In addition, a backup file that contains the masked database was created in the location that previously identified. This backup could be used to restore the masked database to another instance of SQL Server.

Validation of the Masked Database

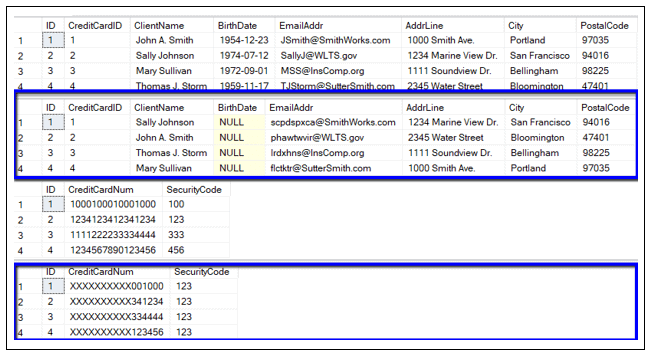
To verify that static data masking feature actually masked the data based on the masking specification, compare the original data in database StaticMaskingDemo with the cloned database named StaticMaskingDemo_Masked. To compare the data in the two databases, use the TSQL code in Script 2.

-- Original Client Data
SELECT [ID],[CreditCardID],[ClientName],[BirthDate]
      ,[EmailAddr],[AddrLine],[City],[PostalCode]
  FROM [StaticMaskingDemo].[dbo].[Client];
-- Cloned Client Data
SELECT [ID],[CreditCardID],[ClientName],[BirthDate]
      ,[EmailAddr],[AddrLine],[City],[PostalCode]
  FROM [StaticMaskingDemo_Masked].[dbo].[Client];
-- Original CreditCard Data
SELECT [ID],[CreditCardNum],[SecurityCode]
  FROM [StaticMaskingDemo].[dbo].[CreditCard];
-- Cloned Cloned CreditCard Data
SELECT [ID],[CreditCardNum],[SecurityCode]
  FROM [StaticMaskingDemo_Masked].[dbo].[CreditCard];

Script 2: TSQL code to display data from both databases

The code in Script 2 returns output similar to Figure 8.

Figure 18: Review Original and Cloned data

If you look at the masked data (outlined in blued) in Figure 18 and compare it against the original data (not outlined), you can tell the data was masked in the cloned database just as specified.

XML to Support Static Data Masking

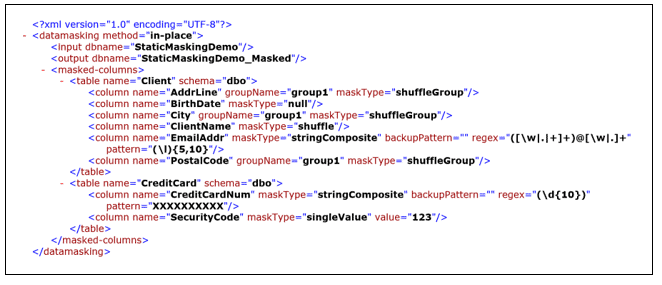
In a prior section you saved the XML configuration for the masking requirements. The configuration was stored in an XML file named: C:\temp\StaticMaskingDemo_Masked.xml. When you open that file up it looks like the text in Script 3.

Script 3: Static Data Masking XML

By reviewing this XML file, you can see that all the columns masked are identified in the XML. Each column contains the masking requirements that were identified.

If you had a really big list of tables and columns you needed to mask, you can imagine how long it might take to identify the masking requirement using the GUI interface. Not only that, if you made a mistake, re-identifying all the masking requirements manually a second time would be a real pain. Being able to identify masking requirements in an XML file will make it much easier to identify all the masking requirements manually than using the SSMS GUI.

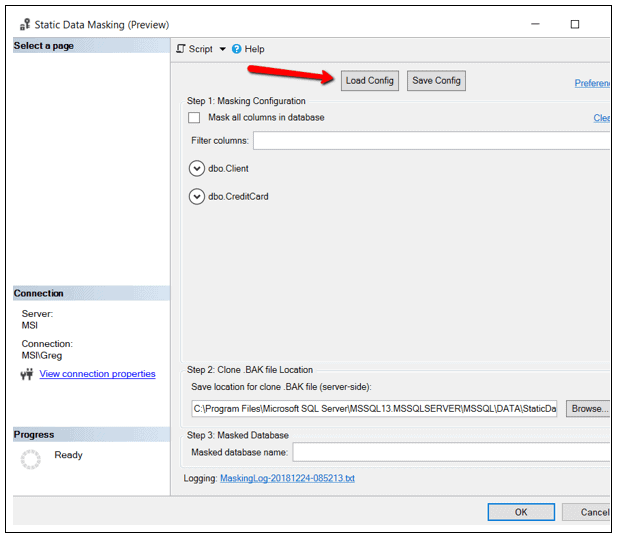
After creating or modifying this XML, you can load into SSMS. To load this XML file, just click on the Load Config button as shown in Figure 19.

Figure 19: Loading masking criteria for XML file

Limitations

Not all database/columns can be masked using the new Static Data Masking feature. Here is a list of limitations that will keep you from masking your database/column using this new Static Data Masking feature:

  • Does not support databases with temporal tables.
  • Does not mask memory optimized tables.
  • Does not mask computed columns or identity columns.
  • Does not support geometry or geography data types.
  • Does not update histogram statistics, so cloned database may still contain your confidential data in the statistics. To resolve this issue all you need to do is run the update statistic function in the new database once the masking process is completed.
  • When a masking operation fails, a masked database might be created and contain unmasked data.
  • Unmasked data could still be stored in unallocated data pages for on-premises SQL Server databases, and therefore someone could use a hex editor to view these unmasked values.

For more information about these exceptions please refer to this documentation. If you are interested in having a process that can be automated and that can use more complex rules, such as keeping certain columns synchronized across tables, take a look at Redgate’s SQL Provision.

Observations

While exploring and testing out Static Database Masking, I made the following observations:

  • It is great you don’t need to have your database on SQL Server 2019 to use the static data masking feature. The only requirement is to have SSMS 18 preview 5 or above available, and your database needs to be on SQL Server 2012 or above.
  • When you clone/mask a database, the cloned database is created on the same instance as the source database. I can see times when you will not be able to clone your production database on the instance where it lives. Therefore, I would have preferred a dialog box that would allow me to place this database on an instance other than the instance where the original database lives.
  • A FULL backup of your original database is created during the cloning/masking process. This backup is not a copy only backup, therefore it might impact your normal backup chain. I think I would have preferred this backup to be a copy only backup so it doesn’t interfere with your normal backup routine of the database being cloned/masked. I’ve reported this to Microsoft and they have informed me that this will be changed in a future release.It is easy to create complex masking rules if you are familiar with Regex expressions. Even if you are not versed in Regex expressions, the tool has examples to help you start and build your Regex expressions. Having these examples make it somewhat easier to develop masking criteria even if a person that doesn’t speak Regex fluently.
  • Using the GUI tool to specify masking requirements might be a bit cumbersome. Therefore, it might be worthwhile to consider creating masking requirement using an XML file. Using XML files to identify the masking requirements makes the cloning/Masking process much more repeatable and will make it easier when entering lots of masking requirements.
  • At the time this article was written, I could not find a way to automate the static masking process. Hopefully by the time this feature is fully baked, the static data masking team will provide you a way to automate the masking process via a script.

Obscuring Confidential Data Easily

It has always been a challenge to cleanse production data when moving a database to a non-production environment. With the new Static Data Masking feature introduction in SSMS version 18 Preview 5, a DBA or developer can now easily cleanse their confidential data, by clone production databases in non-production environments. All it takes is to specify some masking criteria manually or with an XML file, and then running your source database through the masking/cloning process. This new feature in SSMS supports masking a database provided the database is on SQL Server 2012 or above. All DBA’s and developers that are concerned about security should be looking at using this the Static Data Masking feature every time they clone a production database for a non-production environment.


The post Protecting SQL Server Data Using Static Data Masking appeared first on Simple Talk.


from Simple Talk http://bit.ly/2LTjeos
via

Thursday, January 3, 2019

The New Year Has Started, So It Must Be SQL Saturday Nashville Time!

Happy New Year everyone! Hope the holiday season’s passing finds you well rested, well fed, and ready to hit the ground running. As year’s go, it was a relatively great year last year… as far as the SQL community goes in any case. But now that 2019 has started, it is time to get back down to business…

The first bit of business for me is to dust off, update, and get ready to give a presentation for SQL Saturday Nashville in just 10 days! It is always a delight to head back to the city where I lived the longest part of my life. The food, the entertainment, the sights, and more importantly, since these SQL Saturday trips are pretty much whirlwind affairs where I never get to do much of those things… hang out with a a great group of folks at the center of the local SQL community for a day.

This year, I will be presenting a session that I haven’t done for quite a while, but I submitted it again because last year when I was doing my full day database design session, I realized how much fun it was to simply discuss the things that make a database great, because it often gets lost in the process because users don’t so much see the database as they do feel it. The goal naturally is for this to be a pleasant experience all around, so it is important to think about all different characteristics necessary for a great database.

Characteristics of a Great Relational Database

When queried, most database professionals would mention normalized as one of the most important characteristics that tell the difference between a good and bad relational database design (whether they know what the term “normalized” means or not.) Normalization is a key to great relational designs, but there is so much more to be considered. A normalized database that suffers from poor naming, too many or too few indexes, terrible interfaces, and so on can derail your design’s value to the user. In this session I will present primary characteristics of a design that differentiates between an ugly design that will have your colleagues nitpicking you to death and one that will have them singing your praises. Characteristics such as comprehendible, documented, secure, well performing, and more (including normalized, naturally) will be discussed.

If you aren’t into database design (which would be a lot of people who design databases, sadly :)), there are a lot of other great sessions by many people I call friend. I won’t even try to name them, for fear of boring you and/or leaving out someone. You can check out the slate of speakers here on the schedule: https://www.sqlsaturday.com/815/Sessions/Schedule.aspx. Suffice it to say that there are more than enough great names and sessions on the schedule that I would have driven up on a Saturday to see regardless of whether I was speaking or not (and on a day of the NFL football playoff season… this is quite an endorsement coming from me.)

Hope to see you there! Register here: https://www.sqlsaturday.com/815/EventHome.aspx, and if you can, support the event even more by registering for one of their pre-cons!


The post The New Year Has Started, So It Must Be SQL Saturday Nashville Time! appeared first on Simple Talk.


from Simple Talk http://bit.ly/2Aqi93e
via

Robotics Process Automation: The New Digital Assistant

By now, most enterprise leaders are well aware of the benefits of robotic process automation (RPA) – financial savings, improved quality and a better customer experience, just to name a few. RPA is an application of technology, governed by business logic and structured inputs, aimed at automating business processes. Using RPA tools, a company can configure software, or a “robot,” to capture and interpret applications for processing a transaction, manipulating data, triggering responses and communicating with other digital systems. With RPA, businesses can automate mundane rules-based business processes, enabling business users to devote more time to serving customers or other higher-value work.

On similar note, a case study was conducted on a Capital Approval tool (tool built for one of the customers) to verify the benefits and results of applying RPA to a business process with different roles activities. The results show that productivity improvement is the main benefit of RPA as well as time reduction achieved in this case.

Introduction

For any business process execution, different roles are involved in spending substantial time in dealing with downstream applications, i.e., Resource Planning, Customer Relationship Management (CRM), Payroll system etc.

Robotic process automation is designed to help primarily with office type functions, which requires the ability to do several types of tasks in order. This is in contrast to traditional manufacturing automation that focuses on taking one portion of a workflow or even just one task and creating a robot to specialize in it. Office work often requires the same types of repetition of jobs/task, but it is data being manipulated across downstream platforms and applications so a physical robot is not necessary. Instead a software robot is deployed with the ability to launch and operate other software. RPA works like a digital assistant for workers by clearing the onerous, simple tasks that eat up part of every office worker’s day. Simplicity and relative low costs can make RPA a more attractive solution for many companies, particularly if the company has legacy systems and applications. Robotic process automation is designed to play nice with most legacy systems and applications, making it easier to implement compared to other enterprise automation solutions.

Consider that some highly structured, routine and manual tasks could be handled by a robot, so that skilled workers have more time for value added tasks. This is the promise or Robotic Process Automation (RPA) that has emerged in the last five years as a set of software tools and automation platforms that can automate tasks on rules-based business processes. Robots in the RPA processes or systems or tools doesn’t exactly mean physical robots, but instead it means that there are software blocks or applications that can take over responsibilities or tasks from Humans. These are tasks that can be performed by robots more quickly and efficiently.

While existing capabilities of screen-scraping and macros software technology may come to mind, RPA is an evolution beyond these solutions. RPA is becoming an important automation tool driving digital transformation and the future of work. As a user-friendly and cost-effective tool, robotic process automation provides a number of advantages that are drawing interest from different organizations across many industries.

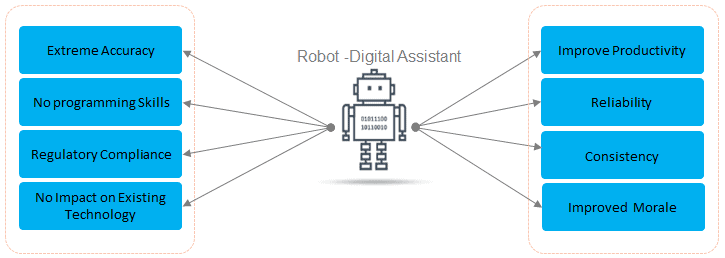
The industry benefits of RPA include –

Extreme accuracy: Bots are extremely accurate and consistent – they are much less prone to making mistakes or typos than a human worker. Higher percentages of mistakes and typos have been observed when humans are copying data or feeding other systems.

No programming skills: To configure a software robot, you don’t need to be expert in programming. As this is code-free technology, any non-technical staff can use a drag and drop process designer to set up a required bot or even record their own steps to automate a process through a process recorder feature. Once the bot is deployed, it would execute same steps.

Regulatory compliance: Bots only follow the instructions they have been configured to follow and provide an audit trail history for each step. Several aspects of compliance oversight operations can be enhanced through robot implementation. Monitoring and testing is an especially promising automation candidate. RPA’s capability to pull and aggregate data from multiple sources could also enhance the efficiency of regulatory, non-financial, and risk reporting as it can help eliminate or reduce the time-consuming processes of collecting, compiling, and cleansing, and summarizing large amounts of information. The controlled nature of bot work makes them suited to meeting even the strictest compliance standards

No impact on existing technology: RPA involves no disruption to underlying systems or technologies. Robots work across the presentation layer of existing applications just as a person does. Robots are useful for legacy systems, where APIs may not be immediately available, or in situations where organizations do not have the skilled resources to develop a deep level of integration with existing legacy applications.

Improved productivity: Robots process cycle times are fixed and more efficient and can be completed at a faster speed compared with manual process approaches where humans are involved.

Reliability: Operations can be performed 24/7 as these bots can work tirelessly and autonomously without requiring staff to manually trigger bots to initiate. If a human does need to intervene, it is to make a decision or resolve an error.

Consistency: RPA also offers the benefit of consistency of process. These bots can perform routine tasks same way each and every time based on defined captured flow.

Improved morale: RPA can handle some of the most routine tasks a business completes each day. Bots enable workers to offload manual offload tasks like filling out forms, data entry and looking up information from websites. This will improve morale in the HR and administrative areas of your business, which are crucial to helping your business grow. Employees will have more time to invest their talents in more engaging and interesting work.

Case Study

This case study was carried out on a Healthcare provider firm. As part of organizational strategy, the company created a shared platform to manage process automation, innovation and better customer experience. This was all orchestrated using BPM (Business Process Management) and hosted a number of processes.

To understand RPA and the benefits associated with it, company started by evaluating and prototyping this automation technology on some of its customer business process – Capital Approval process.

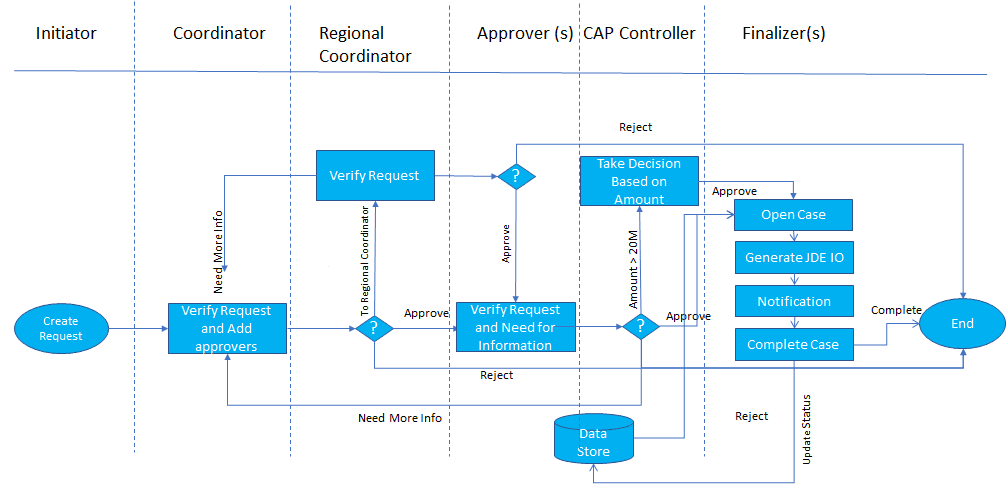
Figure 1 is the AS-IS process. Once a case is approved by all roles, then finalizers logged in to the approval digital tool to open the case and at the same time create case in JDE system with relevant detail taken from approval tool and generate the JDE IO number. This whole process is manual and often leads to error.

Figure 1: Capital Approval AS-IS process.

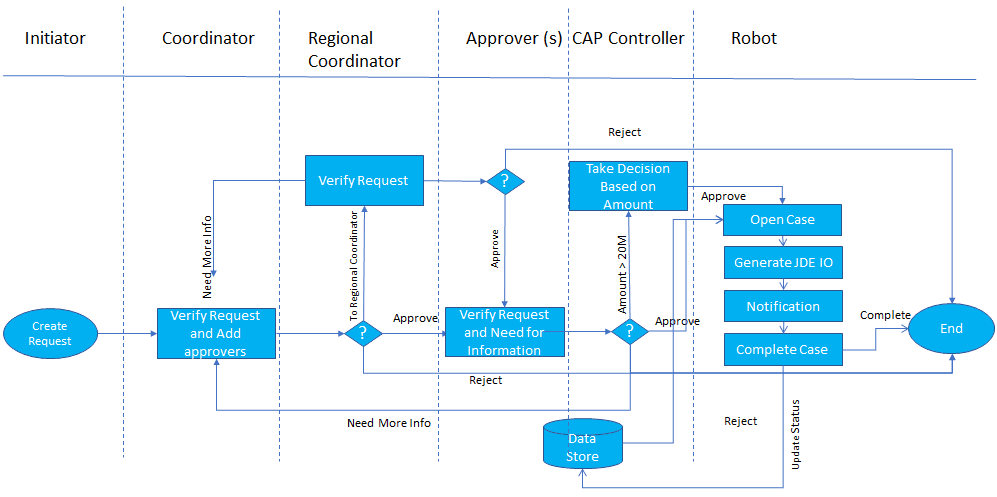
Figure 2 is the TO-BE automated process. The finalizer’s role activities were assumed by a software robot (RPA). After the case approval is done by other process roles, the robot accesses the data store, creates the case in the JDE system and generates JDE IO number, copies the JDE IO and pastes it on the approval tool to complete the case and generates notification for case completion.

Figure 2: Capital Approval TO-BE process with RPA.

Results

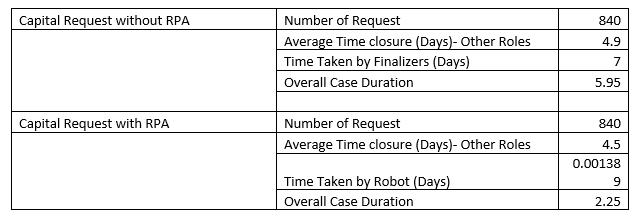
To evaluate results of TO-BE process implementation, capital request were monitored in two sets, one set with finalizers and another set without finalizers (Finalizers replaced with Robot) as finalizers activities were performed by robot. The measure used for evaluating the results was case duration for fixed number for requests. With RPA, overall duration reduced by 62% and finalizers duration reduced drastically by 99.99%. The results may vary based on the nature of the process.

The Need for an RPA Center of Excellence

We must have heard so far about technology, quality, project management and some other Center of Excellence (CoE) but not about RPA. When the number of automated processes increases, RPA becomes more complicated hence RPA requires a suitable operating and governance model for effective implementation. After RPA implementation, it doesn’t mean that we don’t need expertise to maintain robots. A CoE is essentially the way to embed RPA deeply and effectively into the organization, and to redistribute accumulated knowledge and resources across future deployments. The structure for RPA can consist of many teams across the organization and CoE can support those teams. Identify an RPA sponsor, change manager, solution architects, developers, infrastructure and service support to take on key roles in the RPA CoE and they can work across different implementation. The team needs to understand how to work well together and with stakeholders to deploy automation technology, adhere to standard processes and procedures, and measure business metrics and performance goals, including return on investment and customer satisfaction.

All automations can’t be candidates for RPA hence CoE can also work across the organization units with the primary objective of identifying processes, priorities processes for automation and then developing processes in robotic software before they go into production. They can also take care of controlling and monitoring the robot in production.

In the above case study, the RPA team interacted and collaborated with Capital tool development, support, business, testing CoE, and the change management team. This collaboration can be governed by CoE to meet strategic objectives and outcomes.

Conclusion

This article has covered what Robotic Process Automation means, the benefits that an Organization can enjoy when implementing Robotic Process Automation and also need of RPA center of excellence which can help effective implementation. When deciding on the use of RPA, companies should consider that RPA is more suitable for high volume standardized tasks that have rules and driven by fixed paths and where there is no need for subjective judgement, creativity or interpretation skills. In the above case study, the finalizer role was never involved in subjective judgement hence it was acknowledged as a suitable candidate for RPA implementation.

The main benefits of RPA are cost reduction, increasing process speed, error reduction (as robots follow the instruction which have been provided) and productivity improvement by reducing execution duration as the case study reveals.


The post Robotics Process Automation: The New Digital Assistant appeared first on Simple Talk.


from Simple Talk http://bit.ly/2SDqA2g
via

Cyber Insecurity in Pakistanin

On 26th October, almost all Pakistani television channels (followed by print and web media) were flooded with the breaking news saying that Pakistan is encountering a new layer of cybercrime scam affecting all commercial banks (more than 20 different banks having thousands of branches in country and abroad). The news in detailelaborated that some 20 thousand credit/debit cards of customers have been compromised during the last week of October with a reported loss of Rs 2.7 million. This flow of news stirred the nation as according to State Bank of Pakistan at present (last quarter 2018) there are 18,778,525 debit cards (excluding hundreds of thousands of credit cards and other ATM cards) being under usage in the country. Consequently, scores of the banks moved a step ahead and blocked myriads of international transactions through credit-debit cards. Some even temporary halted disbursement of cash via ATM machines to save their customers from any mishap.

To double check this stormy news I visited PakCERT (Pakistan’s Computer Emergency Response Team) website. PakCERT is a business concern dealing with ICT solutions in Pakistanwhich revealed that on October 26, 2018, hackers posted over 9,000 debit cards on the dark web for sale at a price ranging from $100 to $160 per card. The data was placed in two different formats. First, with a text-based credit/debit card details, like name, phone number, card number, address and even expiry of the card to facilitate the illegal purchases. The second format was skimmed stuff making it easy for someone to scan details of the cards at a compromised ATM machine.

However, on the following day, media flashed more news saying that the storm is over (probably to avoid panic). But the consequent day (31st October) brought an aftershock saying that some 12,000 more cards were uploaded on the dark web including 11,000 cards from Pakistan.

Sensing this paradoxical scenario, I decided to unfold the issue as in recent years Pakistan has faced similar incidents of cyberspace scams (among which the recent one was the worst ever) that remained active for some time and then faded away unchecked and unresolved.

Some Recent Scams

Last December, a private bank confirmed that hundreds of its bank accounts were hacked through ATM (Automatic Teller Machine) cards. The bank official later confirmed to the media that Rs 10 million had been stolen from 559 of its accounts. A couple of similar incidents were followed until FIA (Federal Investigation Agency) started a comprehensive action and arrested several foreigners for allegedly stealing data from banks with skimming devises at ATM facilities. This kind of stealing and skimming devices was a new phenomenon in Pakistan and all those arrested were foreigners. However, after a gap of eleven months, when the recent cyber scam is hovering, scores of such incidents related to ATM machines were reported. Accordingly, during last two months scores of local hackers involved in ATM hacking were arrested from different parts of the country including the federal capital. In other words, this ATM scam not confined to foreigners but local hackers in different cities have access to the same misdemeanour.

Apart from other such scams, there was one major scam in recent times. In April 2018 a ride-hailing company Careem (having operations in 13 countries in over 90 cities) announced that data of its 14 million customers and drivers was stolen in a cyber attack. However, officials of the company revealed that they have seen no evidence of fraud or misuse related to the issue. But it was a major blow for the leading online transport company in the country as most its customers quit using the app and the service to avoid any mishap to their personal data on their cell phones.

The Issue

Sensing the issue followed by contradictory news, I approached CEO PakCert Qazi Muhammad Musbahuddin and asked him if the crises is over or still looming. He replied, “At present I can’t comment on the issue as all the relevant sector or working on the issue”. He added said that no further information will be shared on this regard until complete investigation of the issue. However, soon after the issue was raised on 26th of October, Mr Qazi told Pakistan leading Television channel Dawn TV “No doubt the problem is there however we are working to assess that either bank database is compromised or another kind of security breach occurred.”

Now the question is, if government departments are working on it, no one knows about it particularly the worried customers. For example all cards (ATM, Debit, Credit Cards etc) are bank generated.

Meanwhile, most of the customers have no or little information about the digital complexities and if stuck with any technical issue find themselves in hot waters. For instance, a local customer from the provincial capital Khyber Pakhtunkhwa Province Peshawar, Adnan Afridi told me that during last week of October 70 thousand Pakistani rupees were stolen from his account but now he doesn’t know how and where to complain about it.

Commenting on the issue of Adnan Afridi and other such mishaps, Iftikhar Firdus, Bureau Chief Express Tribune Peshawar, who also has expertise on the issue, said that cyber crimeshave many types and the one related to the recent scam comes in the category of financial cyber crime. In the said case, usually hackers enter via coding in the dark net. And the problem is most of the time such entries remain untraced. In Pakistan, they are also using other tactics like calling from unknown numbers, using pressure tactics to get pin codes, etc. International hackers are even faster. On the contrary, Pakistan has little or no preparation to counter such threats, and most of the banks here have no counter mechanism. Accordingly, recent reports say that a sufficient number of customers are flexing their muscles to go for analogue transactions.

Challenge at Present

If the issue of cyber scam was something to be worried a couple of yearsago, it seems to be really alarming now. Most of the activitiesonce tackled traditionally (manually) in Pakistan are now transforming into digital and the online amphitheatre. The phenomenon like e-commerce, e-health, e-Tag and online banking, etc., which were once aliens to our economic structure are now the lifeline of the system. It’s obvious that a major part of Pakistani community is now dependent on cyberspace.

Meanwhile, most of the government functions suchas hospitals, sensitive defence offices, election commission of Pakistan, Civil Aviation System, NADRA (National Database and Registration Authority), National Assembly, Senate, Emergency Services, and even nuclear arsenals containing sensitive information are on the digital front.

However,this improvement on the national cyber world also brought with itself cyber security and cyber threat. Recent reports say Pakistan is one of the few leading countries being constantly under threat by foreign cyber offenders. Cyber security threats with recent threats to the banking sector and other relevant enterprises are hard to be avoided.

Comparison

No doubt cyber crimes and cyber insecurity are global issues, and the digital system is vulnerable to cyber attacks throughout the world. However, most of the countries respond to the issue in a smarter way, particularly in developing countries. There are various international fora for the purpose of having a quick response with highly professional staff comprising Computer Security and Incident Response Team (CSRIT), Forum for Response and Security Team (FIRST), etc. Most countries have such security watchdogs like US-CERT, CNCERT, AUS-CERT,JAPCERT, SING-CERT, etc.

Talking on the issue, a senior level official in Islamabad from United Bank Limited explained on condition of anonymity that unfortunately Pakistan’s public and private systems are neither fully automated nor fully secured. He added that unlike developed countries (US, UK, China, etc.), Pakistan don’t possess dedicated cyber warfare units and, as a result, we are more vulnerable events like the recent one as compared to developed countries.

He also gestured to another misfortune that, unlike developed countries, Pakistan don’t have international cyber space treaties with online portals such as Google or Facebook resulting in further vulnerability when any cyber space scam appears.

Government Response

Talking to a media outlet, Assistant Director FIA Cyber Crime Cell Abdul Wajid Khan Safi has said that there are some alarming reports over the issues. He added that the rapid increase have many reasons like the recent boom of social media (making people’s personnel information vulnerable), lack of awareness, and most probably the involvement of international hackers. This is whythere are some 1600 complaints registered in his covered area during last 10 months. However, FIA Cyber Crime Cell is actively addressing such complaints. He added that, on one hand, there are strict penalties being promulgatedin the laws and at the same times scores of arrests have been made in the recent past. According to Cyber Crime Law, if proven guilty, there is a 3 to 7 month imprisonment and Rs 10 million fine.

No doubt government is taking some action to fix the issue and in recent days some arrest were also made by FIA Cyber Crime Cell. In one recent incident, FIA Cyber Crime Wing arrested two hackers stealing Rs 500,000 from a private person. The gang was involved in stealing money from random banks. In another incident at Faisalabad city of Punjab province, a seven-member gang was arrested where data of about 300 customers were recovered from the gang.

However, as the magnitude of the offence is concerned, it’s not a matter of few arrests, but needing a comprehensive strategy by different concerned departments of the public and private sector.

Despite the above-mentioned steps, as magnitude of the threat is concerned, the government is still thousands of miles behind and little effort has been done to tackle the issues. There seems to be no concrete security policy or any guidelines for the public. A few months back, the Senate Standing Committee on Defence tabled a seven point agenda to improve cyber security in the country. The seven points also emphasises having a joint Asian Strategy in collaboration with neighbour states for countering these threats. But these efforts have gone unnoticed and no implementation appeared on board.

Recommendations:

Assessing the overall situation followed by talks with expertsis a prime concern. Pakistan should evolve a comprehensive cyber space strategy and implement it in letter and spirit. No doubt some progress has been made by FIA Cyber Wing, but it needs to be further expedited. PAKCERT offices should be further equipped with contemporary innovations and, if needed, its branches should be open in different units/provinces of the country.

Most of the banks have made sufficient investments for security purposes, but they need more attention and investment to strengthen their firewalls, use of anti-virus protection on their computers, and encrypted websites.

As precautions by the customers are concerned, a legal expert and lawyer at Islamabad Salahuddin Khan said that, apart from banks and other government and private organizations, the customers should adopt some precautionary measures. They should avoid sharing personnel information like CNIC number, account number, pin code, credit/debit card numbers and other such information which are the primary source for most of the hackers.

Mr Khan added, that if a person is still trapped, he or she should immediately contact Cyber Crime Cell (particularly NRC3 wing) to have the complaint either written or online.

Other experts also have the same opinion and are of the view that encrypted and anti-virus software should be updated on home computers and cell phones.

Moreover, the government should go for immediate agreements and treaties with international online portals. Experts say in presence of such agreements almost 90 percent of such cyber issues can be solved.

Continued awareness among the public with liaisons among security intuitions (FIA Cyber Crime Wing, PAKCERT, etc)will help the public bring further strength to cyber security. Adding Cyber Space and Cyber Security as a subject in the syllabus at the university level would no doubt be helpful for a safe and secure cyberspace in the country.

References

State Bank of Pakistan Quarter Analyses/Report: http://bit.ly/2LNBSOG

PakCert report on Intelligence threat:

http://bit.ly/2s8k73m

Dawn (Pakistan’s most reliable and leading English paper) Report: RS 10 million from 559 bank accounts in ATM Fraud: http://bit.ly/2B0fVsF

Data of 14 million customers of Careem Stolen:

https://cnb.cx/2s3Dvif


The post Cyber Insecurity in Pakistanin appeared first on Simple Talk.


from Simple Talk http://bit.ly/2AtFZeq
via