Tuesday, February 12, 2019

The Performance of Window Aggregates Revisited with SQL Server 2019

In 2005 and 2012, Microsoft introduced a number of windowing functions in SQL Server, like my favourite function LAG. These functions perform well, but, in my opinion, the main benefit is making complicated queries easier to write. I’ve been fascinated by these functions for years, but there is one thing about them that has bothered me, and that is the performance of window aggregate functions. Luckily, that is changing with SQL Server 2019.

What are Window Aggregate Functions?

Window aggregate functions let you add your favourite aggregate functions, like SUM, AVG and MIN, to non-aggregate queries. This lets you return the details in the results while adding in grand totals or sub-totals or any other aggregate you need. Here’s an example:

USE AdventureWorks2017;
GO
SET STATISTICS IO ON;
GO
SELECT CustomerID, SalesOrderID, OrderDate, TotalDue 
FROM Sales.SalesOrderHeader
ORDER BY CustomerID;

SELECT CustomerID, SalesOrderID, OrderDate, TotalDue, 
        SUM(TotalDue) OVER(PARTITION BY CustomerID) AS SubTotal 
FROM Sales.SalesOrderHeader
ORDER BY CustomerID;

I’m running SQL Server 2019 CTP 2.2, and the database is in 2016 compatibility mode. The first query lists the sales orders, and the second query also has a sub total for each customer. The results should look like Figure 1.
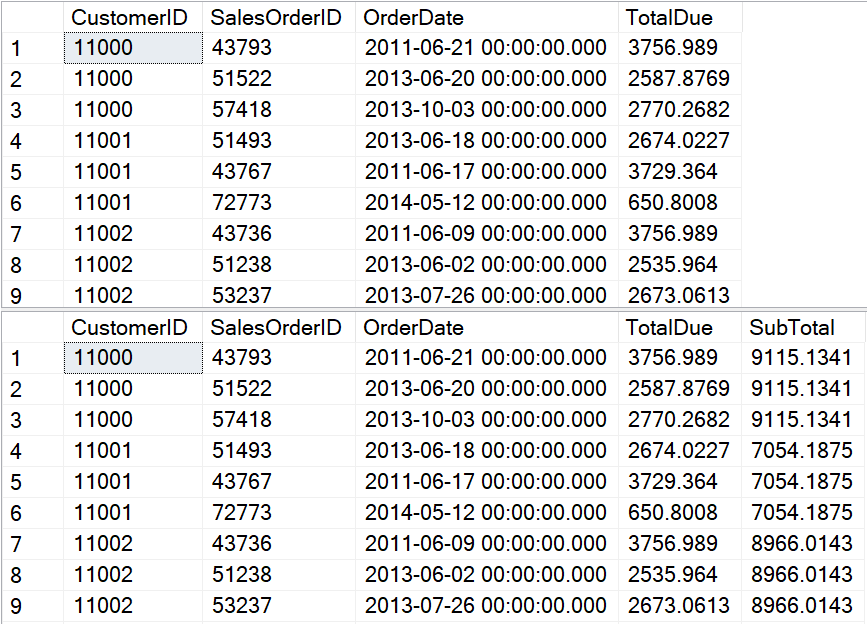
Figure 1: The partial results of the sales orders queries

I think you would have to agree that calculating the subtotal was easy to do. You just have to add the OVER clause. In this case, I wanted the subtotals for each customer, so I included PARTITION BY CustomerID. The problem with this technique is that the performance has been disappointing. In fact, I’ve been recommending that window aggregates be avoided when they must operate on a large number of rows. To show what I mean, take a look at the STATISTICS IO results in Figure 2.
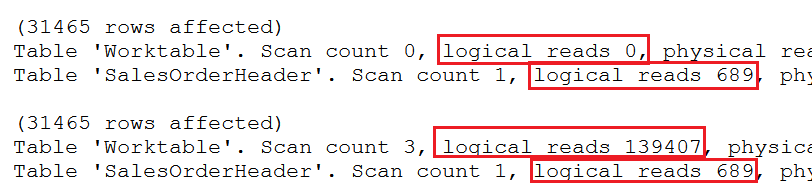
Figure 2: The logical reads for the sales orders queries

The first query has 0 logical reads for a worktable and 689 logical reads for scanning the entire table since there is no WHERE clause. The second query also takes 689 logical reads for scanning the table, and 139,407 logical reads for a worktable. That’s a big difference, but do the logical reads for a worktable affect query run times? These AdventureWorks tables are too small to see the performance impact, but it does make a difference as you’ll see in the next section.

Is the Performance Really That Bad?

To show how much the window aggregate impacts performance, the following queries use bigger tables created from Adam Mechanic’s script Thinking Big Adventure. To make sure that populating SSMS (SQL Server Management Studio) does not affect the run times, the results are saved in temp tables. Here are two queries calculating the subtotal for each product in this table of 31 million rows.

SET STATISTICS IO ON;
SET STATISTICS TIME ON;
CREATE TABLE #Products(ProductID INT, TransactionDate DATETIME, 
        Total MONEY, SubTotal MONEY);

WITH SubTotalByProduct AS (
        SELECT ProductID, SUM(Quantity * ActualCost) AS SubTotal
        FROM bigTransactionHistory 
        GROUP BY ProductID)
INSERT INTO #Products (ProductID, TransactionDate, Total, SubTotal)
SELECT STP.ProductID, TransactionDate, Quantity * ActualCost AS Total, 
     SubTotal 
FROM bigTransactionHistory AS BT 
JOIN SubTotalByProduct AS STP ON BT.ProductID = STP.ProductID; 

TRUNCATE TABLE #Products;

INSERT INTO #Products (ProductID, TransactionDate, Total, SubTotal)
SELECT ProductID, TransactionDate, Quantity * ActualCost AS Total, 
        SUM(Quantity * ActualCost) 
        OVER(PARTITION BY ProductID) AS SubTotal 
FROM dbo.bigTransactionHistory;

DROP TABLE #Products;

Since the results are stored in temp tables, the only output is the STATISTICS IO and STATISTICS TIME. The first query in this example demonstrates one of the traditional methods to get subtotals, using a CTE (common table expression) that joins to the original table. The second query creates the same results, but with a window aggregate function.

To make sure that caching didn’t affect the run time, I ran the queries twice. The statistics results of the second run can be seen in Figure 3.
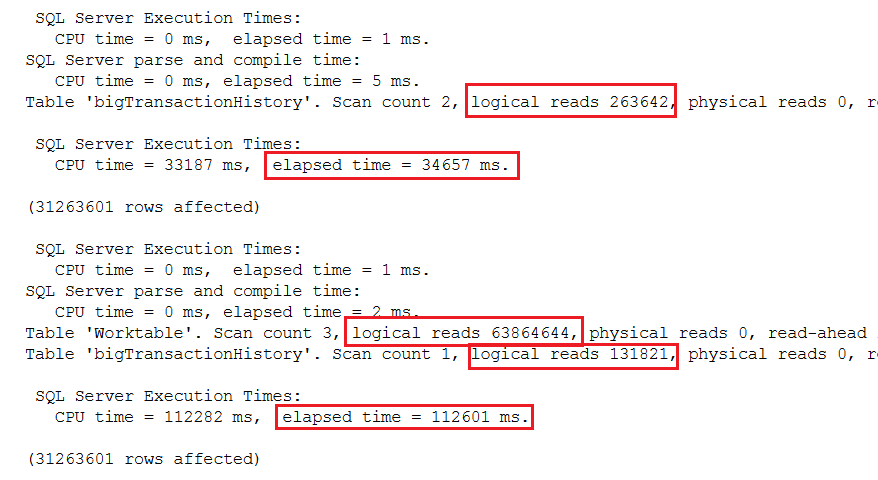
Figure 3: The results of running the test on bigTransactionHistory

The first thing to notice is that the traditional method took 35 seconds. The window aggregate function method took 156 seconds or about 2.2 minutes. You can also see a big difference in the logical reads. The traditional method took twice as many logical reads when scanning the table. That’s because the table was accessed once inside the CTE and again in the outer query. The table was scanned just once when using the window aggregate, but again, the logical reads required is much higher than just reading the table due to the worktable. As you can see, there is a big performance hit with window aggregates over traditional methods.

Batch Mode to the Rescue

In 2016, Microsoft announced an advancement in the columnstore index feature called batch mode processing. This feature also improves the performance of window aggregate queries as long as a table with a columnstore index is part of the query. If that happens naturally, wonderful! Otherwise, artificially adding a columnstore index seems like more trouble than just using the traditional query method.

To show the difference in performance, this example creates an empty temp table with a columnstore index and adds it to the query.

USE master;
GO
ALTER DATABASE AdventureWorks2017
     --Make sure it’s 2016 compat
     SET COMPATIBILITY_LEVEL = 130 WITH NO_WAIT
GO
USE AdventureWorks2017;
GO
CREATE TABLE #Products(ProductID INT, TransactionDate DATETIME, 
        Total MONEY, SubTotal MONEY);
CREATE TABLE #CS(KeyCol INT NOT NULL PRIMARY KEY, 
        Col1 NVARCHAR(25));
CREATE COLUMNSTORE INDEX CSI_CS ON #CS(KeyCol, Col1);

INSERT INTO #Products (ProductID, TransactionDate, Total, SubTotal)
SELECT ProductID, TransactionDate, Quantity * ActualCost AS Total, 
        SUM(Quantity * ActualCost) 
        OVER(PARTITION BY ProductID) AS SubTotal 
FROM dbo.bigTransactionHistory
OUTER APPLY #CS;

DROP TABLE #Products;
DROP TABLE #CS;

To see the benefits of the 2016 change, the database compatibility level was changed to 2016. The empty table #CS was created along with a columnstore index. It’s added to the query with an OUTER APPLY and doesn’t affect the results.

The performance results can be found in Figure 4:
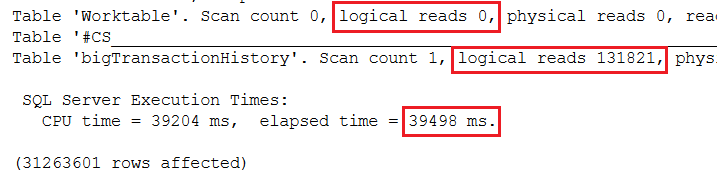
Figure 4: Including a columnstore index to improve performance

In this test, the performance was similar to the traditional CTE query. That’s great, but in my opinion the main reason to use the window aggregate is to make the query simple to write. I don’t want to add the complexity of adding an artificial columnstore index. Luckily, in 2019, batch row processing applies to some queries that could benefit from it without a columnstore index, including window aggregates! This feature is called Batch Mode on Rowstore. Here is another test, this time with 2019 compatibility level.

USE master;
GO
ALTER DATABASE AdventureWorks2017
     --Set to 2019 compat
     SET COMPATIBILITY_LEVEL = 150 WITH NO_WAIT
GO
USE AdventureWorks2017;
GO
CREATE TABLE #Products(ProductID INT, TransactionDate DATETIME, 
        Total MONEY, SubTotal MONEY);

INSERT INTO #Products (ProductID, TransactionDate, Total, SubTotal)
SELECT ProductID, TransactionDate, Quantity * ActualCost AS Total, 
        SUM(Quantity * ActualCost) 
        OVER(PARTITION BY ProductID) AS SubTotal 
FROM dbo.bigTransactionHistory;

DROP TABLE #Products;

This time, the query took just 15 seconds to run! The performance results are shown in Figure 5.
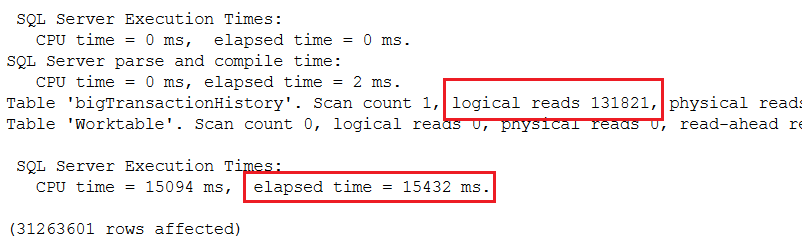
Figure 5: Using the 2019 batch mode feature

Accumulating Aggregates

To get running totals, all you have to do is add ORDER BY to the OVER clause to the window aggregate. This is easy to do and will give you the results you expect as long as the columns in the ORDER BY option of the OVER clause are unique. To drastically improve performance, you need to add the frame (ROWS BETWEEN UNBOUND PROCEEDING AND CURRENT ROW) to the OVER clause. This is intuitive and is probably left out more often than it’s included. To see the difference, this test compares using the frame to not using the frame in 2016 compatibility mode.

USE master;
GO
ALTER DATABASE AdventureWorks2017
        SET COMPATIBILITY_LEVEL = 130 WITH NO_WAIT
GO
USE AdventureWorks2017;
GO
CREATE TABLE #Products(TransactionID INT, ProductID INT, 
        TransactionDate DATETIME, 
        Total MONEY, RunningTotal MONEY);
INSERT INTO #Products (TransactionID, ProductID, TransactionDate, 
        Total, RunningTotal) 
SELECT TransactionID, ProductID, TransactionDate, 
        Quantity * ActualCost, 
        SUM(Quantity * ActualCost) 
        OVER(PARTITION BY ProductID ORDER BY TransactionID)
FROM bigTransactionHistory;

TRUNCATE TABLE #Products;

INSERT INTO #Products (TransactionID, ProductID, TransactionDate, 
       Total, RunningTotal) 
SELECT TransactionID, ProductID, TransactionDate, 
        Quantity * ActualCost, 
        SUM(Quantity * ActualCost) 
        OVER(PARTITION BY ProductID ORDER BY TransactionID
        ROWS BETWEEN UNBOUNDED PRECEDING AND CURRENT ROW)
FROM bigTransactionHistory;

DROP TABLE #PRODUCTS

The results when using 2016 compatibility mode can be seen in Figure 6.
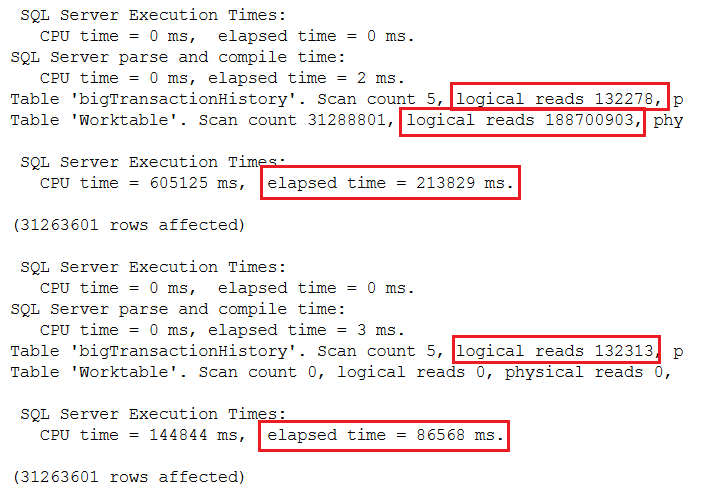
Figure 6: The results comparing using a frame with 2016 compatibility

By using the frame, the query went from almost 4 minutes to 1.4 minutes. Here’s the same test except for 2019 compatibility to take advantage of batch mode processing.

USE master;
GO
ALTER DATABASE AdventureWorks2017
        SET COMPATIBILITY_LEVEL = 150 WITH NO_WAIT
GO
USE AdventureWorks2017;
GO
CREATE TABLE #Products(TransactionID INT, ProductID INT, 
        TransactionDate DATETIME, 
        Total MONEY, RunningTotal MONEY);
INSERT INTO #Products (TransactionID, ProductID, TransactionDate, 
        Total, RunningTotal) 
SELECT TransactionID, ProductID, TransactionDate, 
        Quantity * ActualCost, 
        SUM(Quantity * ActualCost) 
        OVER(PARTITION BY ProductID ORDER BY TransactionID)
FROM bigTransactionHistory;

TRUNCATE TABLE #Products;

INSERT INTO #Products (TransactionID, ProductID, TransactionDate, 
        Total, RunningTotal) 
SELECT TransactionID, ProductID, TransactionDate, 
        Quantity * ActualCost, 
        SUM(Quantity * ActualCost) 
        OVER(PARTITION BY ProductID ORDER BY TransactionID
        ROWS BETWEEN UNBOUNDED PRECEDING AND CURRENT ROW)
FROM bigTransactionHistory;

DROP TABLE #Products;

With batch mode, there is no performance penalty due to leaving out the frame. In each case, it took less than 30 seconds to run, even faster than using the frame in 2016. Of course, you will need to include the frame if you need one that is different than the default. (See my article Introduction to T-SQL Window Functions to learn more.) Figure 7 has the performance results.
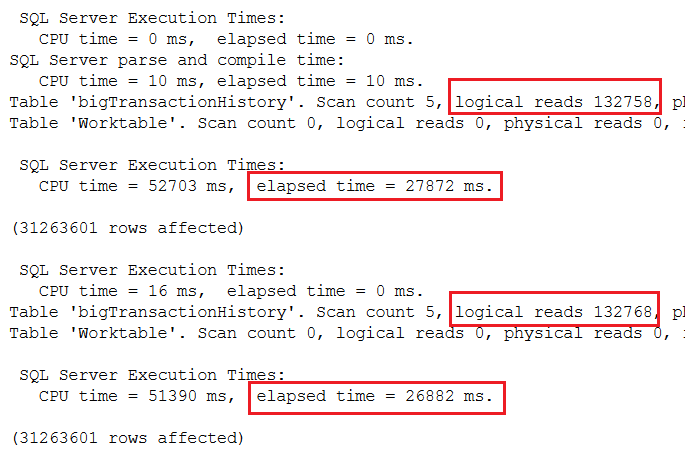
Figure 7: The results of using 2019 compatibility mode with running totals

Batch Mode on Rowstore Processing

As you can see, this new batch mode on rowstore feature dramatically improved the performance of these two window function queries. My queries ran about 7 times faster, but your results will vary. How does batch mode work? It breaks the processing down into chunks of 900 values. SQL Server reserves this for queries with aggregation and sorts when scanning a large number of rows. It’s one of several query processing improvements available with 2019 which together are called Intelligent Query Processing.

You may be wondering how to know if batch processing is used for a query. If you take a look at the execution plan, you can see the difference. Figure 8 is the execution plan for the subtotal query while in 2016 compatibility mode. To make this easier to see, I’ve split the image into two. The top shows the left side of the plan, and the bottom is the right side of the plan.
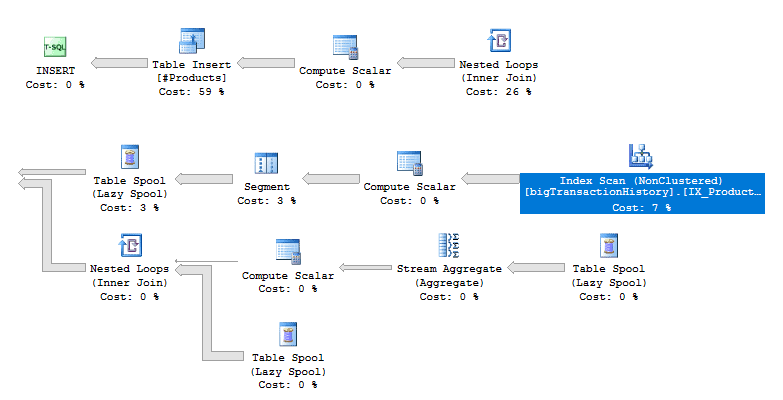
Figure 8: The execution plan for the subtotals with 2016 compatibility mode

The first interesting thing to note is that parallelism is not used even though it seems like it would be useful in a query of 31 million rows. It might be possible to rewrite the query to persuade the optimizer to parallelize the query, but that’s an article for another day.

Also notice the Table Spool operators. These are the worktables that you saw in the STATISTICS IO output. These are joined to the results using Nested Loops.

If you open the properties of the Index Scan operator (Figure 9), you’ll see that the storage is Rowstore, and the Actual Execution Mode is Row.
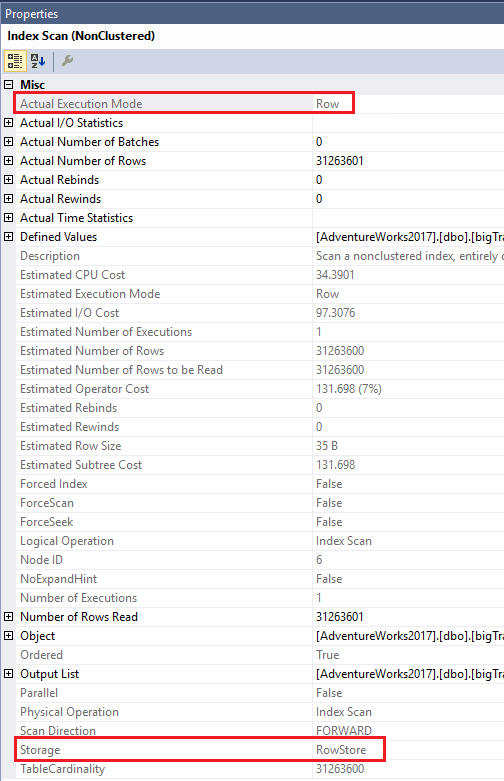
Figure 9: The properties showing Row mode

Now take a look at the execution plan in Figure 10 for the same query when in 2019 compatibility mode. Again, I have split it up to make it easier to read.
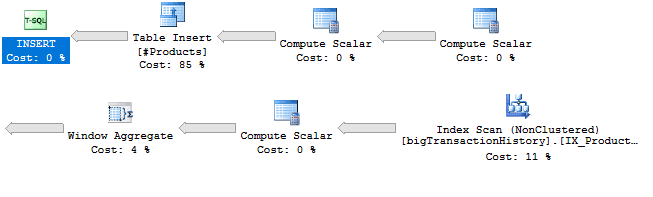
Figure 10: The plan used in 2019 compatibility mode

First, you will probably notice that this plan looks much simpler. There are no more worktables (Table Spools) and no need for the Nested Loops. There is also the new Window Aggregate operator. Hovering over the operator brings up the information shown in Figure 11.
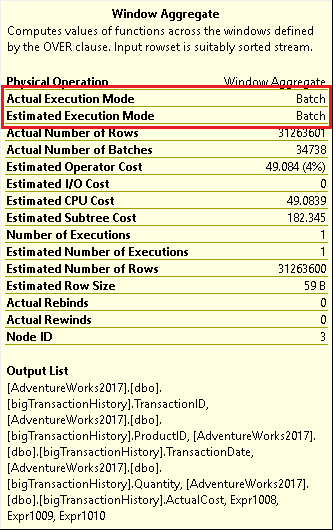
Figure 11: The Window Aggregate operator popup

You can see that batch mode was used. By looking at the properties of the Index Scan in Figure 12, you will see that batch mode was used even though the index is stored in rowstore and not in columnstore.
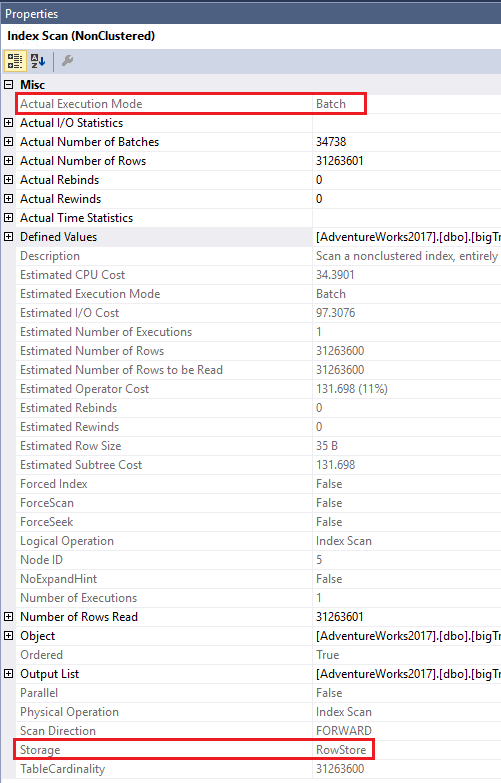
Figure 12: The Index Scan properties

As mentioned earlier, batch mode on rowstore is reserved for queries of a large size that include certain aspects such as sorting or aggregates. I wondered where the tipping point was for this query, so I decide to create a copy of the bigTransactionHistory with the same indexes, just a smaller number of random rows. I found that the tipping point was 131,072 rows for this query on this instance running in an Azure VM. It could be something entirely different for another situation.

If you are using a monitoring tool, such as Redgate’s SQL Monitor, you can see the performance history of your queries and whenever the execution plans change. Wouldn’t it be a nice surprise if a query suddenly started running 5 or 10 times more quickly as the data grew?

Conclusion

Many organizations are not going to upgrade every time there is a new version of SQL Server available. When they do upgrade, they often skip versions. The Big Data Clusters feature is getting a lot of publicity, but not every shop will need it. I think everyone is going to appreciate the new query optimizations. Batch mode on rowstore is just one of many great features that will improve performance by just upgrading to 2019 when it’s generally available.


The post The Performance of Window Aggregates Revisited with SQL Server 2019 appeared first on Simple Talk.


from Simple Talk http://bit.ly/2SO7Q3q
via

Monday, February 11, 2019

Using Auth Cookies in ASP.NET Core

Cookie-based authentication is the popular choice to secure customer facing web apps. For .NET programmers, ASP.NET Core has a good approach that is worth looking into. In this take, I will delve deep into the auth cookie using ASP.NET Core 2.1. Version 2.1 is the latest LTS version as of the time of this writing. So, feel free to follow along, I’ll assume you’re on Visual Studio or have enough C# chops to use a text editor. I will omit namespaces and using statements to keep code samples focused. If you get stuck, download the sample code found at the end.

With ASP.NET 2.1, you can use cookie-based authentication out of the box. There is no need for additional NuGet packages. New projects include a metapackage that has everything, which is Microsoft.AspNetCore.App. To follow along, type dotnet new mvc in a CLI or do File > New Project in Visual Studio.

For those of you who come from classic .NET, you may be aware of the OWIN auth cookie. You will be happy to know those same skills transfer over to ASP.NET Core quite well. The two implementations remain somewhat similar. With ASP.NET Core, you still configure the auth cookie, set up middleware, and set identity claims.

Setup

To begin, I’ll assume you know enough about the ASP.NET MVC framework to gut the scaffolding into a skeleton web app. You need a HomeController with an Index, Login, Logout, and Revoke action methods. Login will redirect to Index after it signs you in, so it doesn’t need a view. I’ll omit showing view sample code since views are not the focus here. If you get lost, be sure to download the entire demo to play with it.

I’ll use debug logs to show critical events inside the cookie authentication. Be sure to enable debug logs in appsettings.json and disable Microsoft and system logs.

My log setup looks like this:

"LogLevel": {
  "Default": "Debug",
  "System": "Warning",
  "Microsoft": "Warning"
}

Now you’re ready to build a basic app with cookie authentication. I’ll forgo HTML forms with a user name and password input fields. These front-end concerns only add clutter to what is more important which is the auth cookie. Starting with a skeleton app shows how effective it is to add an auth cookie from scratch. The app will sign you in automatically and land on an Index page with an auth cookie. Then, you can log out or revoke user access. I want you to pay attention to what happens to the auth cookie as I put authentication in place.

Cookie Options

Begin by configuring auth cookie options through middleware inside the Startup class. Cookie options tell the authentication middleware how the cookie behaves in the browser. There are many options, but I will only focus on those that affect cookie security the most.

  • HttpOnly: A flag that says the cookie is only available to servers. The browser only sends the cookie but cannot access it through JavaScript.
  • SecurePolicy: This limits the cookie to HTTPS. I recommend setting this to Always in prod. Leave it set to None in local.
  • SameSite: Indicates whether the browser can use the cookie with cross-site requests. For OAuth authentication, set this to Lax. I am setting this to Strict because the auth cookie is only for a single site. Setting this to None does not set a cookie header value.

There are cookie options for both the auth cookie and a global cookie policy. Stay alert since the cookie policy can override auth cookie options and vice versa. Setting HttpOnly to false in the auth cookie will override cookie policy options. While setting SameSite in the cookie policy overrides auth cookie options. In my demo, I’ll illustrate both scenarios, so it is crystal clear how this works.

In the Startup class, find the ConfigureServices method and type:

services.AddAuthentication(CookieAuthenticationDefaults.AuthenticationScheme)
  .AddCookie(options =>
  {
    options.Cookie.HttpOnly = true;
    options.Cookie.SecurePolicy = _environment.IsDevelopment()
      ? CookieSecurePolicy.None : CookieSecurePolicy.Always;
      options.Cookie.SameSite = SameSiteMode.Lax;
  });

This creates the middleware service with the AddAuthentication and AddCookie methods. AuthenticationScheme is useful when there is more than one auth cookie. Many instances of cookie authentication let you protect endpoints with many schemes. You supply any string value; the default is set to Cookies. Note that the options object is an instance of the CookieAuthenticationOptions class.

The SecurePolicy is set through a ternary operator that comes from _environment. This is a private property that gets set in the Startup constructor. Add IHostingEnvironment as a parameter and let dependency injection do the rest.

In this same ConfigureServices method, add the global cookie policy through middleware:

services.Configure<CookiePolicyOptions>(options =>
{
  options.MinimumSameSitePolicy = SameSiteMode.Strict;
  options.HttpOnly = HttpOnlyPolicy.None;
  options.Secure = _environment.IsDevelopment()
    ? CookieSecurePolicy.None : CookieSecurePolicy.Always;
});

Take a good look at SameSite and HttpOnly settings for both cookie options. When I set the auth cookie, you will see this set to HttpOnly and Strict. This illustrates how both options override each other.

Invoke this middleware inside the request pipeline in the Configure method:

app.UseCookiePolicy();
app.UseAuthentication();

The cookie policy middleware is order sensitive. This means it only affects components after invocation. By invoking the authentication middleware, you will get a HttpContext.User property. Be sure to call this UseAuthentication method before calling UseMvc.

Login

In the HomeController add an AllowAnonymous filter to the Login and Logout methods. There are only two action methods available without an auth cookie.

Inside the Startup class, look for the AddMvc extension method and add a global auth filter:

services.AddMvc(options => options.Filters.Add(new AuthorizeFilter()))

With the app secure, configure the cookie name and login / logout paths. Find where the rest of the CookieAuthenticationOptions are and do:

options.Cookie.Name = "SimpleTalk.AuthCookieAspNetCore";
options.LoginPath = "/Home/Login";
options.LogoutPath = "/Home/Logout";

This will cause the app to redirect to the login endpoint to sign in. However, before you can take this for a spin, you’ll need to create the auth cookie.

Do this inside the Login action method in the HomeController:

var claims = new List<Claim>
{
  new Claim(ClaimTypes.Name, Guid.NewGuid().ToString())
};

var claimsIdentity = new ClaimsIdentity(
  claims, CookieAuthenticationDefaults.AuthenticationScheme);
var authProperties = new AuthenticationProperties();

await HttpContext.SignInAsync(
  CookieAuthenticationDefaults.AuthenticationScheme,
  new ClaimsPrincipal(claimsIdentity),
  authProperties);

AuthenticationProperties drive further auth cookie behavior in the browser. For example, the IsPersistent property persists the cookie across browser sessions. Be sure to get explicit user consent when you enable this property. ExpiresUtc sets an absolute expiration, be sure to enable IsPersistent and set it to true. The default values will give you a session cookie that goes away when you close the tab or browser window. I find the default values in this object enough for most use cases.

To take this for a spin load up the browser by going to the home or Index page. Note it redirects to Login which redirects back to Index with an auth cookie.

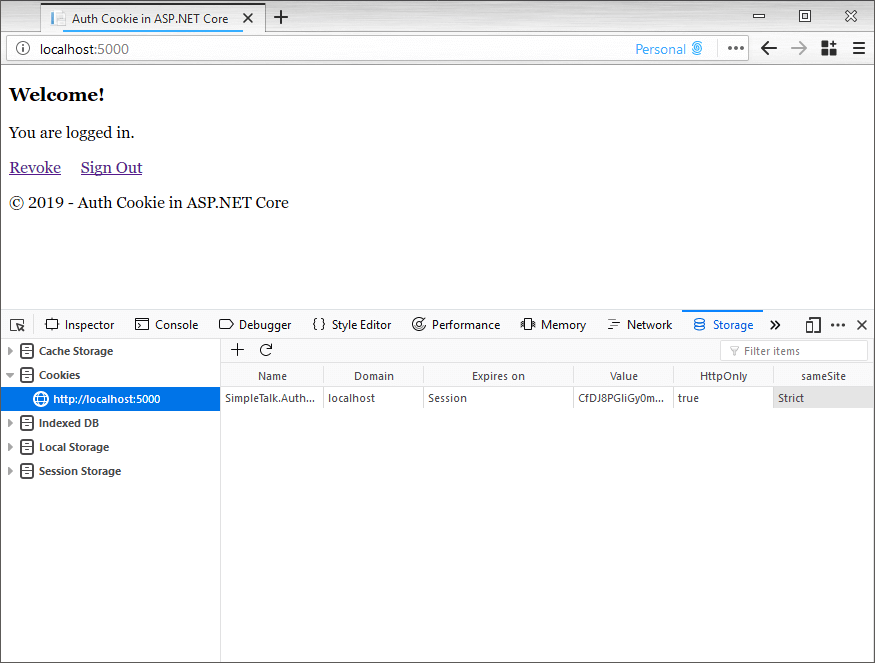
Once this loads it looks something like this. Be sure to take a good look at how the auth cookie is set:

JWT Identity Claim

Often, an auth cookie isn’t enough to secure API endpoints or microservices. For the web app to call a service, it can use a JWT bearer token to authenticate. To make the access token accessible, place it inside the identity claims.

In the Login action method within HomeController, expand the list of claims with a JWT:

var userId = Guid.NewGuid().ToString();
var claims = new List<Claim>
{
  new Claim(ClaimTypes.Name, userId),
  new Claim("access_token", GetAccessToken(userId))
};

private static string GetAccessToken(string userId)
{
  const string issuer = "localhost";
  const string audience = "localhost";

  var identity = new ClaimsIdentity(new List<Claim>
  {
    new Claim("sub", userId)
  });

  var bytes = Encoding.UTF8.GetBytes(userId);
  var key = new SymmetricSecurityKey(bytes);
  var signingCredentials = new SigningCredentials(
    key, SecurityAlgorithms.HmacSha256);

  var now = DateTime.UtcNow;
  var handler = new JwtSecurityTokenHandler();

  var token = handler.CreateJwtSecurityToken(
    issuer, audience, identity,
    now, now.Add(TimeSpan.FromHours(1)),
    now, signingCredentials);

  return handler.WriteToken(token);
}

I must caution, don’t ever do this is in production. Here, I use the user id as the signing key which is symmetric to keep it simple. In a prod environment use an asymmetric signing key with public and private keys. Client apps will then use a well-known configuration endpoint to validate the JWT.

Placing the JWT in ClaimsIdentity makes it accessible through the HttpContex.User property. For this app, say you want to put the JWT in a debug log to show off this fancy access token.

In the Startup class, create this middleware inside the Configure method:

app.Use(async (context, next) =>
{
  var principal = context.User as ClaimsPrincipal;
  var accessToken = principal?.Claims
    .FirstOrDefault(c => c.Type == "access_token");

  if (accessToken != null)
  {
    _logger.LogDebug(accessToken.Value);
  }

  await next();
});

The _logger is another private property you set through the constructor. Add ILogger<Startup> as a parameter and let dependency injection do the rest. Note the ClaimsPrincipal has a list of Claims you can iterate through. What I find useful is to look for a Type of claim like an access_token and get a Value. Because this is middleware always call next() so it doesn’t block the request pipeline.

Logout

To log out of the web app and clear the auth cookie do:

await HttpContext.SignOutAsync(
  CookieAuthenticationDefaults.AuthenticationScheme);

This belongs inside the Logout action method in the HomeController. Note that you specify the authentication scheme. This tells the sign-out method which auth cookie it needs to blot out. Inspecting HTTP response headers reveals Cache-Control and Pragma headers set to no-cache. This shows the auth cookie disables browser caching when it wants to update the cookie. The Login action method responds with the same HTTP headers.

Revocation

There are use cases where the app needs to react to back-end user access changes. The auth cookie will secure the application, but, remains valid for the lifetime of the cookie. With a valid cookie, the end-user will not see any changes until they log out or the cookie expires. In ASP.NET Core 2.1, one way to validate changes is through cookie authentication events. The validation event can do back-end lookups from identity claims in the auth cookie. Create the event by extending CookieAuthenticationEvents. Override the ValidatePrincipal method and set the event in the auth cookie options.

For example:

public class RevokeAuthenticationEvents : CookieAuthenticationEvents
{
  private readonly IMemoryCache _cache;
  private readonly ILogger _logger;

  public RevokeAuthenticationEvents(
    IMemoryCache cache,
    ILogger<RevokeAuthenticationEvents> logger)
  {
    _cache = cache;
    _logger = logger;
  }

  public override Task ValidatePrincipal(
    CookieValidatePrincipalContext context)
  {
    var userId = context.Principal.Claims
      .First(c => c.Type == ClaimTypes.Name);

    if (_cache.Get<bool>("revoke-" + userId.Value))
    {
      context.RejectPrincipal();

      _cache.Remove("revoke-" + userId.Value);
      _logger.LogDebug("Access has been revoked for: "
        + userId.Value + ".");
    }

    return Task.CompletedTask;
  }
}

To have IMemoryCache set by dependency injection, put AddMemoryCache inside the ConfigureSerices method in the Startup class. Calling RejectPrincipal has an immediate effect and kicks you back out to Login to get a new auth cookie. Note this relies on in-memory persistence which gets set in the Revoke action method. Keep in mind that this event runs once per every request, so you want to use an efficient caching strategy. Doing an expensive lookup at every request will affect performance.

Revoke access by setting the cache inside the Revoke method in the HomeController:

var principal = HttpContext.User as ClaimsPrincipal;
var userId = principal?.Claims
  .First(c => c.Type == ClaimTypes.Name);

_cache.Set("revoke-" + userId.Value, true);
return View();

After visiting the Revoke endpoint, the change does not have an immediate effect. After revocation, navigating home will show the debug log and redirect to Login. Note that landing in the Index page again will have a brand new auth cookie.

To register this event, be sure to set the EventsType in the CookieAuthenticationOptions. You will need to provide a scoped service to register this RevokeAuthenticationEvents. Both are set inside the ConfigureServices method in the Startup class.

For example:

options.EventsType = typeof(RevokeAuthenticationEvents);
services.AddScoped<RevokeAuthenticationEvents>();

The CookieValidatePrincipalContext in ValidatePrincipal can do more than revocation if necessary. This context has ReplacePrincipal to update the principal, then renew the cookie by setting ShouldRenew to true.

Session Store

Setting a JWT in the claims to have a convenient way to access identity data works well. However, every identity claim you put in the principal ends up in the auth cookie. If you inspect the cookie, you will notice it doubles in size with an access token. As you add more claims in the principal the auth cookie gets bigger. You may hit HTTP header limits in a prod environment with many auth cookies. In IIS, the default max limit is set to 8KB-16KB depending on the version. You can increase the limit, but this means bigger payloads per request because of the cookies.

There are many ways to quell this problem, like a user session to keep all JWTs out of the auth cookie. If you have current code that accesses the identity through the principal, then this is not ideal. Moving identity data out of the principal is risky because it may lead to a complete rewrite.

One alternative is to use the SessionStore found in CookieAuthenticationOptions. OWIN, for example, has a similar property. Implement the ITicketStore interface and find a way to persist data in the back-end. Setting the SessionStore property defines a container to store the identity across requests. Only a session identifier gets sent to the browser in the auth cookie.

Say you want to use in-memory persistence instead of the auth cookie:

public class InMemoryTicketStore : ITicketStore
{
  private readonly IMemoryCache _cache;

  public InMemoryTicketStore(IMemoryCache cache)
  {
    _cache = cache;
  }

  public Task RemoveAsync(string key)
  {
    _cache.Remove(key);

    return Task.CompletedTask;
  }

  public Task<AuthenticationTicket> RetrieveAsync(string key)
  {
    var ticket = _cache.Get<AuthenticationTicket>(key);

    return Task.FromResult(ticket);
  }

  public Task RenewAsync(string key, AuthenticationTicket ticket)
  {
    _cache.Set(key, ticket);

    return Task.CompletedTask;
  }

  public Task<string> StoreAsync(AuthenticationTicket ticket)
  {
    var key = ticket.Principal.Claims
      .First(c => c.Type == ClaimTypes.Name).Value;

    _cache.Set(key, ticket);

    return Task.FromResult(key);
  }
}

Set an instance of this class in SessionStore inside CookieAuthenticationOptions, these options are set in the ConfigureServices method in the Startup class. One caveat is getting an instance since it needs a provider from BuildServiceProvider. A temporary IoC container here feels hacky and pines after a better solution.

A better approach is to use the options pattern in ASP.NET Core. Post-configuration scenarios set or change options at startup. With this solution, you leverage dependency injection without reinventing the wheel.

To put in place this options pattern, implement

IPostConfigureOptions<CookieAuthenticationOptions>:

public class ConfigureCookieAuthenticationOptions
  : IPostConfigureOptions<CookieAuthenticationOptions>
{
  private readonly ITicketStore _ticketStore;

  public ConfigureCookieAuthenticationOptions(ITicketStore ticketStore)
  {
    _ticketStore = ticketStore;
  }

  public void PostConfigure(string name, 
           CookieAuthenticationOptions options)
  {
    options.SessionStore = _ticketStore;
  }
}

To register both InMemoryTicketStore and ConfigureCookieAuthenticationOptions, place this in ConfigureServices:

services.AddTransient<ITicketStore, InMemoryTicketStore>();
services.AddSingleton<IPostConfigureOptions<CookieAuthenticationOptions>,
  ConfigureCookieAuthenticationOptions>();

Make sure you make this change in the Startup class. If you peek inside Configure<CookiePolicyOptions>, for example, and crack open the code. Note the pattern; configuration runs through a singleton object and a lambda expression. ASP.NET Core uses this same options pattern under the hood. Now, firing this up in the browser and inspecting the auth cookie will have a much smaller footprint.

Conclusion

Implementing an auth cookie is seamless in ASP.NET Core 2.1. You configure cookie options, invoke middleware, and set identity claims. Sign in and sign out methods work based on an authentication scheme. Auth cookie options allow the app to react to back-end events and set a session store. The auth cookie is flexible enough to work well with any enterprise solution.


The post Using Auth Cookies in ASP.NET Core appeared first on Simple Talk.


from Simple Talk http://bit.ly/2SotRGu
via

Basic Modding with Unity

You might occasionally hear about a game that can be ‘modded.’ But what does that mean? For starters, a mod is simply a short version of the word ‘modification.’ In the context of video games, this means someone has taken time to modify a certain aspect of the game they are playing. This modification can occur by changing the model a character normally uses, editing text in the game, or changing out a music track. Some mods take it a step further by completely overhauling entire systems in the game such as the user interface or the character’s leveling mechanics.

The power of a community and the ability to mod a game cannot be overstated. Mods allow players to tweak a game to their liking, add more things to do in the game, or just provide a laugh by replacing the dragon with a cartoon pony. However, it should also be noted that allowing mods is a difficult task. There’s a reason so few games allow mods. In this article, you won’t learn how to make your game moddable to the level of a game like Skyrim, but you can learn some of the basics of implementing modding capabilities. Within Unity, you’ll be shown simple methods of allowing users to change the text in your game as well as changing the current mesh an object is using.

Setup

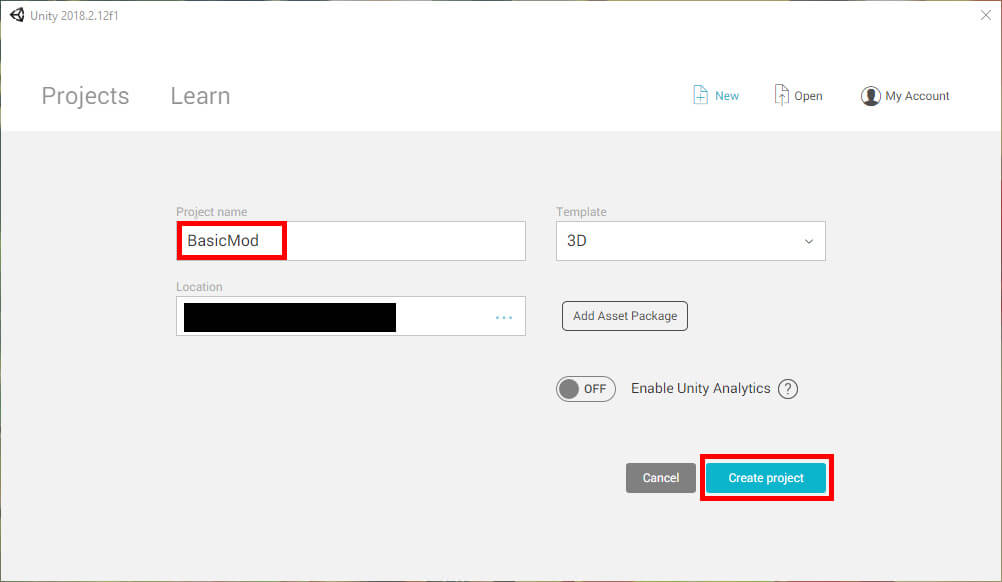
There’s nothing you need to do ahead of project creation, so just open Unity and make a new project as shown in Figure 1.

Figure 1: Creating a new project.

Name your project BasicMod, specify a file path, and make sure it’s a 3D project. Once you’ve done all that, create the project. The form should resemble Figure 2.

Figure 2: Naming the project.

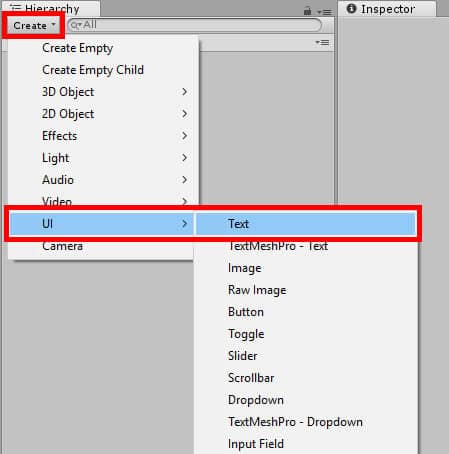
Of course, without any objects to modify there’s no game to mod at all. Start by creating some text on the screen. Go to the Hierarchy window and click the Create button. Choose UI->Text to make a text object like Figure 3.

Figure 3: Creating some text

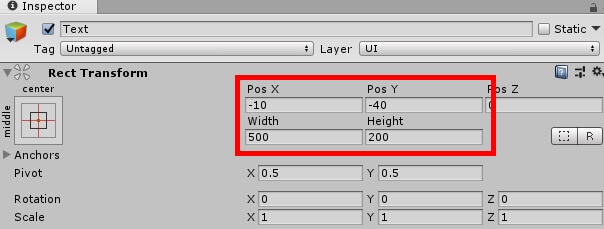
Next, you’ll need to position the text in a position where it can be easily seen. The location can be wherever you choose, but Figure 4 shows how to place the text in the upper-middle of the screen. In the Inspector window set Pos X to -10 and Pos Y to 125. Then set the Width variable to 500 and Height to 150, this way there’s plenty of space for whatever text you wish to enter.

Figure 4: Setting Text to the correct position and size

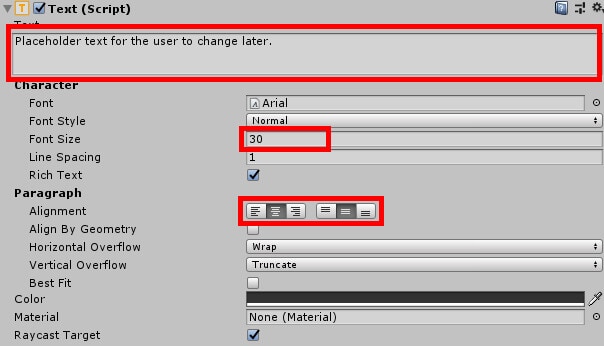
After this, create some placeholder text in the Text field. It can be whatever you wish. Finally, change any of the text properties you wish to make it easier to read. The below example in Figure 5 places the font size variable at 30 and sets the alignment to the center.

Figure 5: Setting up the text

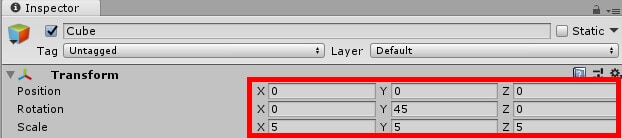
This will do for the game’s text object. Next, you’ll need a 3D object. The user may wish to change the object from a simple cube to something else. Start by clicking the Create button again in the Hierarchy. Navigate to 3D Object-Cube to create a cube object in the world. Set both its Position X and Position Y fields to 0. Change its Rotation Y field to 45 and set the scale to 5 for all three axes as shown in Figure 6.

Figure 6: The Cube object’s Transform component

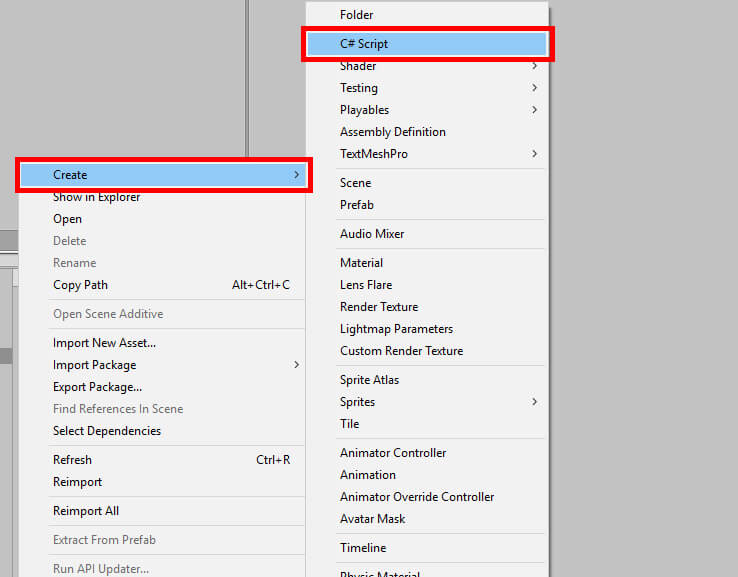
Finally, create an empty object by selecting the Create button then navigating to Create Empty. Name this new object GameManager. This is the object that will hold the script that makes this project run. There’s nothing more to do here in the Unity editor. Navigate to your Assets window and create a new C# Script as shown in Figure 7. Name this script ModScript.

Figure 7: Making a new C# script

Once created, double click ModScript to open Visual Studio and begin the coding process.

The Code

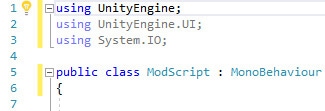
To get started, add using UnityEngine.UI; and using System.IO; to the top of the script as shown in Figure 8. System.IO is going to be very important for this project. You’ll use it to create a folder named Resources as well as employ StreamReader to read data from a file that the user creates. It will also be responsible for gathering file names, so the rest of the program knows which file to use. UnityEngine.UI also has an important job but just has less going on. This will allow you to edit the text on the Text object you created earlier.

Figure 8: All require using statements.

Only a few global variables will need to be declared for this project. Those variables are:

public Text messageText;
public MeshFilter mf;
private string pathToMods;

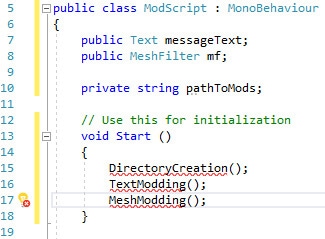
Finally, for the sake of cleanliness, you’ll have three function calls that make up the Start function. Write the following:

DirectoryCreation();
TextModding();
MeshModding();

The Update function will not see any use in this project, so you may delete it or comment it out. Once finished, the variable declarations and the Start function should look like Figure 9.

Figure 9: The code so far…

Of course, the compiler doesn’t like the fact that those three functions don’t exist. Fortunately for Visual Studio, it won’t stay that way. Start with the DirectoryCreation function.

void DirectoryCreation()
{
        pathToMods = Application.dataPath + "/Resources";
        if (!Directory.Exists(pathToMods))
                Directory.CreateDirectory(pathToMods);
}

Time for a little breakdown of what’s happening. First, the code sets the value of pathToMods. This value is a file path, and the path in question is the Resources folder within the path of the game. Of course, none of that will matter if the folder doesn’t exist. The next two lines check to see if there is a Resources directory. If there isn’t, the folder will be created for you.

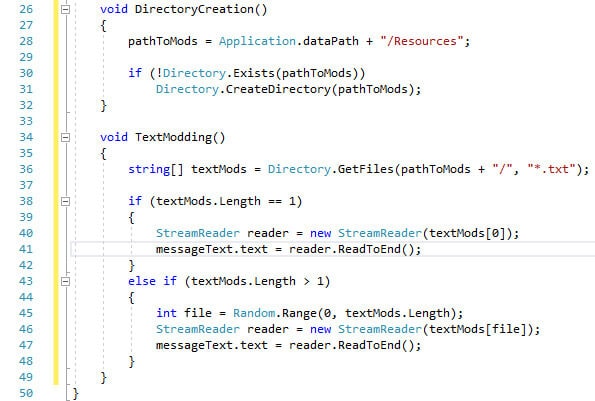
Up next is where the fun begins. TextModding is the function that will allow a user to modify the text in the game. The function goes like this:

void TextModding()
{
        string[] textMods = Directory.GetFiles(pathToMods + "/", "*.txt");
        if (textMods.Length == 1)
        {
                StreamReader reader = new StreamReader(textMods[0]);
                messageText.text = reader.ReadToEnd();
        }
        else if (textMods.Length > 1)
        {
                int file = Random.Range(0, textMods.Length);
                StreamReader reader = new StreamReader(textMods[file]);
                messageText.text = reader.ReadToEnd();
        }
}

First, you create an array of strings called textMods. What do you fill this array with? You gather a list of all files with the txt extension and get their paths. Next, a check is performed to see if there’s more than one text file. This is done in case the user has more than one txt file. If there’s only one txt file, then you simply take that file, read the text inside it, and then apply that text to the Text object in the game. If there’s more than one txt file to choose from, Unity will choose one at random.

So far, your two new functions, DirectoryCreation and TextModding, should look like Figure 10.

Figure 10: DirectoryCreation and TextModding

Next comes the ability to modify the current mesh on the Cube object using a function called MeshModding. Like before, it will find all files with the fbx extension. If there’s more than one file, the program will randomly select one to use. However, this is where the similarities between this function and TextModding end.

void MeshModding()
{
        string[] meshModPaths = Directory.GetFiles(pathToMods + "/", "*.fbx");
        string modToUse = "mod";
        string extensionToRemove = ".fbx";
        if (meshModPaths.Length == 1)
        {
                modToUse = Path.GetFileName(meshModPaths[0]);
                modToUse = modToUse.Replace(extensionToRemove, "");
                mf.mesh = Resources.Load<Mesh>(modToUse);
        }
        else if (meshModPaths.Length > 1)
        {
                int file = Random.Range(0, meshModPaths.Length);
                modToUse = Path.GetFileName(meshModPaths[file]);
                modToUse = modToUse.Replace(extensionToRemove, "");
                mf.mesh = Resources.Load<Mesh>(modToUse);
        }
}

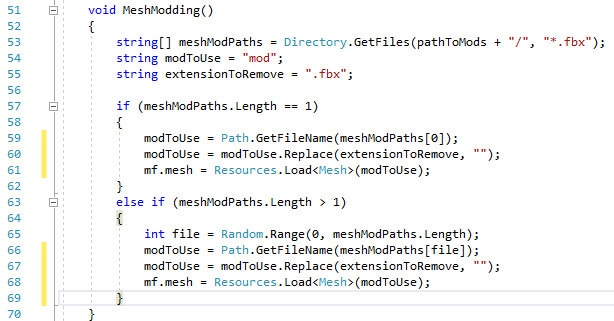
The basic idea is still intact, but the execution is somewhat different. Notice the two additional string variables declared alongside the string array. Your modToUse variable is simply the name of the mod to use, and you just give it a placeholder name. After this comes another string variable named extensionToRemove. As it turns out, a function you use later doesn’t like having extensions in the name of the file to search for. To get around this, you just specify which part of the text you wish to remove from the variable and use Replace to rid the variable of the extension.

At the last line, you call Resources.Load to load the fbx file into the game. Recall the Resources folder you had the program create thanks to DirectoryCreation. This function will specifically search the Resources folder in your game for whichever file you tell it to load. In this case, it’s whatever the name of the file stored in modToUse would be minus the extension. As expected, you also specify that it will be loaded as a mesh to make Unity happy. Figure 11 shows the function.

Figure 11: MeshModding function

This concludes the coding section of this project. To summarize, you have granted a user the ability to modify text by reading a txt file that they create. You also allowed them to change the mesh of the object in the scene by placing an fbx file in the Resources folder. Close Visual Studio and head back to the Unity project.

Finishing the Project

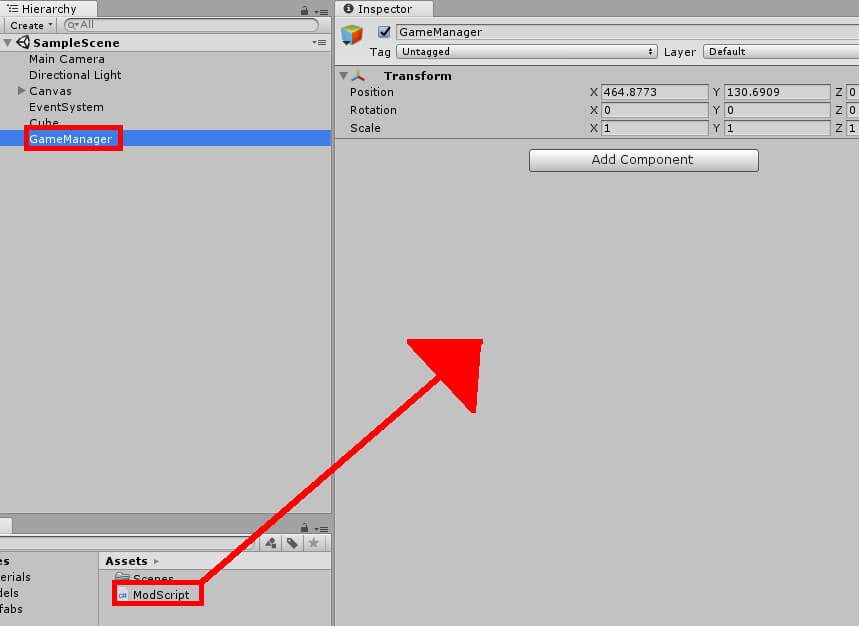
Select the GameManager object in the Hierarchy and drag ModScript from the Assets window into the Inspector, attaching the script to the object as shown in Figure 12.

Figure 12: Attaching ModScript to GameManager

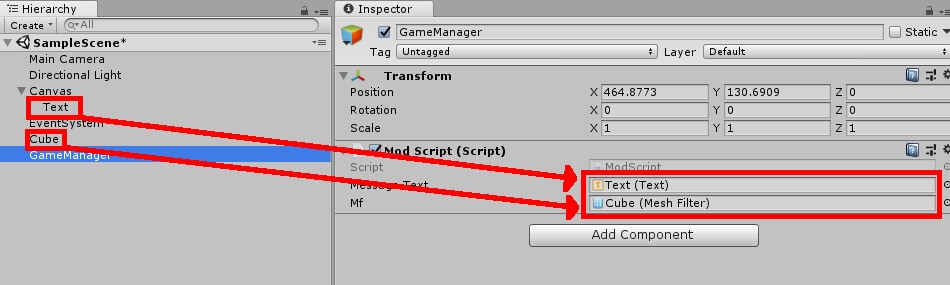
Next, comes the assignment of the Message Text and Mf variables. Find your Text object that you created earlier and drag that to the Message Text field in the newly created ModScript component. Then take the Cube object and drag it to the Mf field. Once you have these in place, the Inspector should look like Figure 13.

Figure 13: Applying Text and Cube to their corresponding variables

There’s nothing else that needs to be done now. Does this mean the project is finished? Well, yes and no. You can and should run the project in Unity to create the Resources folder, but the project itself won’t do anything you haven’t already set up. But that’s the point. The idea is you create your base game, and then somebody else can come in later and modify certain aspects of it. In this case, go ahead and pretend to be that somebody. But first be sure to run the program so the Resources folder is created as shown in Figure 14.

Figure 14: That folder wasn’t there before…

Begin by adding a mesh for the game to pull from. So long as the mesh is an fbx file, the program will work just fine. This example will use a model of a barrel found here. Once you’ve got your model, whether it be the barrel example or something else entirely, use Windows Explorer to navigate to the Resources folder of your project. Place that fbx file in this folder.

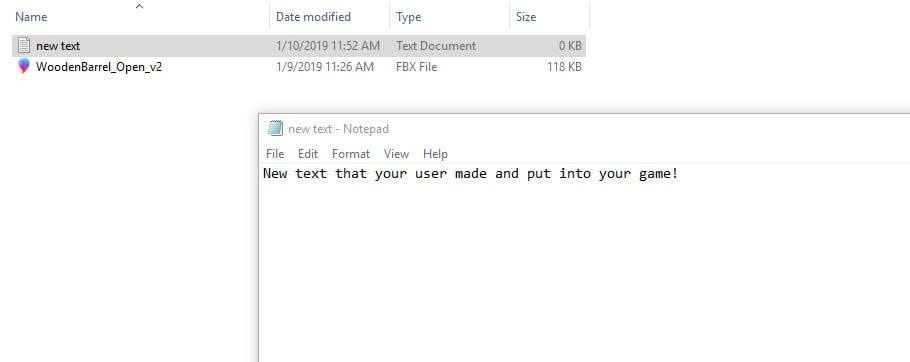
The text modding functionality is even simpler. Simply create a new txt file and place it somewhere in the folder. You may name the text file anything you like. Open the file and enter whatever text you wish as shown in Figure 15.

Figure 15: Adding files to the Resources directory and writing text to a txt file

Now enter Unity once again. Your users wouldn’t normally see this, but Unity will detect these files and update the Assets window. Now try running the game again. You should see the text change and the basic mesh of the Cube object replaced with whatever you placed as shown in Figure 16. Note: you may need to edit the scale value of the object to better see the modded mesh.

Figure 16: The (modified) game in action!

Conclusion

As pointed out in the introduction, this is only meant to be a simple intro to the absolute basics of modding. But feel free to pat yourself on the back, for this small project you created has more modding capabilities than many games get, officially or otherwise. This example introduced you to allow other users to change some of the game text and meshes your game might use. Furthermore, it was simple too. If you’ve ever tried to mod a game yourself, you might find that it can be somewhat difficult. Here, the process has been simplified so those who wish to mod the project can do so quickly.

Of course, how much further you would take this is up to you, and it all depends on if you even want to build your game with modding in mind. To do that you’ll need to create a system that works for you as well as other users. Perhaps you should have the game search for specific filenames? What about texturing a mesh? In this example, the mesh that you modded into your game used the texture the Cube object did. If you can change out a 3D object, it stands to reason you can also change the texture attached to that object. Experiment and see what you can discover, both for yourself and your users.


The post Basic Modding with Unity appeared first on Simple Talk.


from Simple Talk http://bit.ly/2E585yL
via

Sunday, February 10, 2019

6 SSMS features that deserve some attention

SSMS new versions are full of very interesting features. With SQL Server 2019 arriving, it’s normal that our focus is captured by the new features in the database engine, however, SSMS has also a lot to offer.

Let’s highlight some very interesting features this tool has to offer on its new versions.

Vulnerability Assessment

Sometimes the configuration of a server and database seems very complex, especially in relation to security.

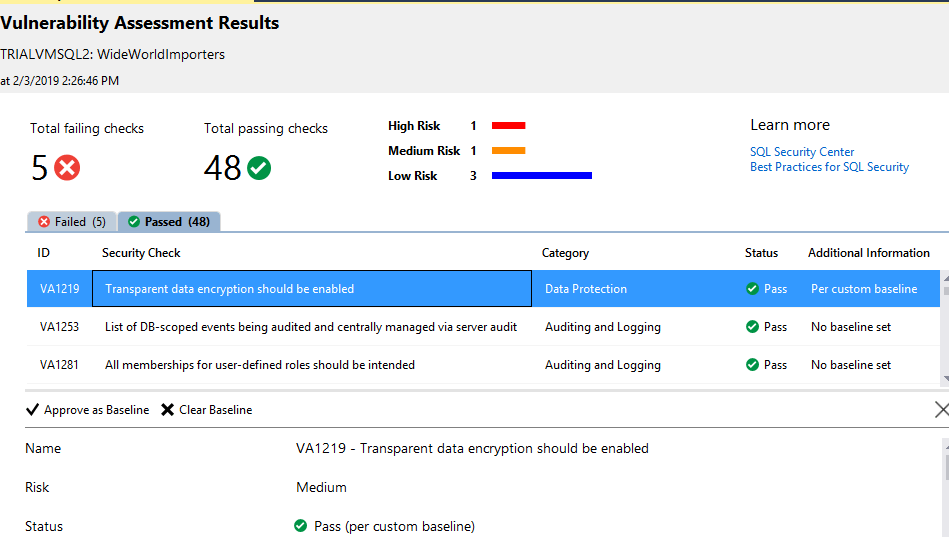
The vulnerability assessment feature analyses 53 potential problems, identify if the configuration is correct or not and if not, classifies the risk of the problem.

The evaluation can be made for each database and the reports can be saved in JSON format an open again later.

For each potential problem, the report explains the problem and provides the query used to check if the problem is present or not on the database.

The tool also allows us to record the result as a baseline for our environment. By doing so, we take our custom configuration and needs out of the way so they are not reported as vulnerability issues. However, this is the weaker point of the tool: the baselines are stored in a JSON file on the same folder of the vulnerability report. As a result, if you run the report from different client machines you may get different results, ignoring previous baselines that have been saved.

You can read more about this feature on this link 

Static Data Masking

GDPR brought a lot of restriction to the way we manage our data. We can’t use the production data to test new versions of our application, for example. The dynamic data masking was a beginning but sometimes we really need to hide the data, create a copy of the database replacing some fields with dummy data. That’s the static data masking.

This new feature allows us to choose which columns we would like to mask, choose a mask function and start the process, which will create a masked backup copy of the database, that we can deliver to a tester team, for example.

You can read more details on this link 

Data discovery and classification

In the era of GDPR and other similar laws around the world, it’s becoming more and more important to identify exactly what kind of data we have in our databases, if they are public, confidential, and so on.

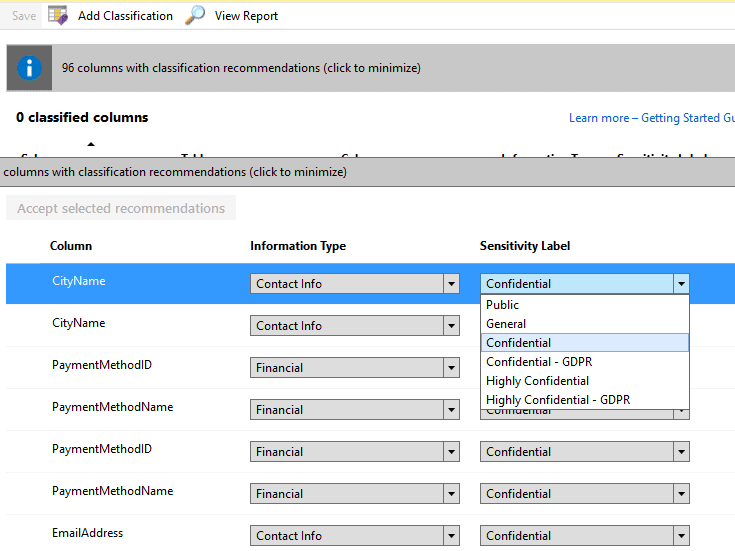
The data discovery and classification feature help us with this. First, it tries to automatically identify which fields are sensitive and recommend a classification for them. We can set classifications for the fields recommended and anyone else.

There are two labels we can set for each field: Information type and sensitive level, this last one includes GDPR levels.

Besides that, we can add both labels for any field in the model, even if it hasn’t initially being identified as sensitive.

All the classifications are stored in two system tables: sys_information_type_name and sys_sensitivity_label_name

It’s an interesting feature, the reports seem interesting, but it’s a modeling feature and SSMS lacks a lot of modeling features, even the database diagrams are being deprecated. I’m not sure about how useful a modeling feature will be inside SSMS.

What are your thoughts? Are you using this feature? Let me know what you think about.

You can learn more about this feature on this link.

Database Upgrade

In my humble opinion, this is the most powerful new feature in SSMS. Every SQL Server version brings many updates on the query optimizer, however, the query optimizer is so powerful that while most of the queries may be improved, some of them may have performance problems. Since SQL Server 2016, a procedure for these situations was established:

  • After migrating the database to a new version, keep it on the old compatibility level
  • Use query store during a while to create a baseline for query performance
  • Change the compatibility level to the new version
  • Wait to capture the query executions
  • Fix query regressions by forcing old query plans

This feature, also called Query Tunning Assistant, or QTA, help us to execute this process. Mind that this process may take many days or weeks to capture the workload twice, before and after the compatibility model change. This feature creates an upgrade session, recommend the best configuration for query store and follow the workload capture.

The best part is the end of the process: The QTA doesn’t stick only to forcing old query plans, in this case, we could make all the tasks using query store by ourselves. QTA is able to analyze regressed queries and identify many well-known regression problems and suggest the creation of plan guides to solve the problems.

This is way more detailed than we could do by ourselves using the server tools, turning this feature very useful.

Integrated with Azure Data Studio

Azure Data Studio is a new Microsoft tool that allows access not only to SQL Server but to many different data sources either on the cloud or on premises. It’s not clear yet what’s the future relation between SSMS and Azure Data Studio, but now SSMS has the option to open the same connection in Azure Data Studio, moving from one tool to another.

When working with SSMS you are just one click away from opening the same server on Azur Data Studio, right-clicking the connection.

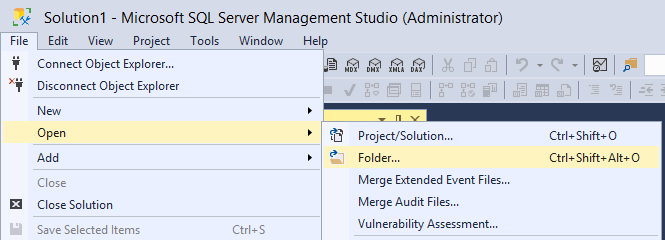
Open Folder

SSMS is a child of Visual Studio, it inherits many visual studio behaviours, including the pattern to work with solution files. Although it’s interesting, DBA’s are not used to solution files, they keep their scripts in .SQL files organized in different folders and that’s it.

Allowing DBA’s to open a folder as a solution makes our lives way easier and help us with the organization of our scripts.

The post 6 SSMS features that deserve some attention appeared first on Simple Talk.


from Simple Talk http://bit.ly/2tfGMvh
via

Friday, February 8, 2019

Using Temporary Procedures

I’ve often read in forums how people have special utility databases with all their stored procedures and functions for working on the databases on the server. It is great because you don’t want your utilities intruding into the actual databases that you are developing or testing.

The problem is that it doesn’t work. Let me demonstrate.

We’ll pretend that we have a database called ‘MyDevStuff’ with all our lovely tools. You’ll need to create this. Then we put in a dummy utility. In reality, it will be cunning routines for doing reports, checking for code smells, outputting the contents of tables, making metadata queries, creating documentation and so on.

Instead, we will create a single procedure that does nothing more than to report its database context, and we’ll run it on every database in the instance. At the same time, we’ll create an identical temporary procedure.

-- before running this, create a dev utils directory called MyDevStuff
USE MyDevStuff;
GO --now create a pretend utility that actually just reports its database context
CREATE OR ALTER PROCEDURE WhatDatabaseAmIin @CurrentDatabase sysname OUTPUT
AS
SELECT @CurrentDatabase = Db_Name();
GO
   --next create an identical temporary procedure
CREATE OR ALTER PROCEDURE #WhatDatabaseAmIin @CurrentDatabase sysname OUTPUT
AS
SELECT @CurrentDatabase = Db_Name();
GO
/* we will now test out what we've done on the current directory */
DECLARE @MyCurrentDatabase sysname;
DECLARE @MyCurrentDatabaseInTempVersion sysname;
EXECUTE MyDevStuff.dbo.WhatDatabaseAmIin @MyCurrentDatabase OUTPUT;
EXECUTE #WhatDatabaseAmIin @MyCurrentDatabaseInTempVersion OUTPUT;
SELECT @MyCurrentDatabase AS where_the_Procedure_Is,
  @MyCurrentDatabaseInTempVersion AS where_the_temp_Procedure_Is,
  Db_Name() AS where_I_really_am;
go
/*
Now we will prepare to test this out in every database. Firstly
we create a string with the SQL to execute that we just tested */
*/ 
DECLARE @command NVARCHAR(4000) =
  '
use ? 
DECLARE @MyCurrentDatabase Sysname
DECLARE @MyCurrentDatabaseInTempVersion Sysname
EXECUTE MyDevStuff.dbo.WhatDatabaseAmIin  @MyCurrentDatabase OUTPUT
EXECUTE #WhatDatabaseAmIin  @MyCurrentDatabaseInTempVersion OUTPUT
SELECT @MyCurrentDatabase AS where_the_Procedure_Is,@MyCurrentDatabaseInTempVersion AS where_the_temp_Procedure_Is,Db_Name() as where_I_really_am
';
/* we want to put our results in just one table */
DECLARE @MyResults TABLE
  (
  where_the_Procedure_is sysname,
  where_the_temp_Procedure_is sysname,
  where_l_really_am sysname
  );
/* now we insert into our table variable the results of executing the test SQL
in all databases. We don't really need to but it proves the point */ 
INSERT INTO @MyResults (where_the_Procedure_is, where_the_temp_Procedure_is,
where_l_really_am)
EXECUTE sp_MSforeachdb @command;
SELECT where_the_Procedure_is, where_the_temp_Procedure_is, where_l_really_am
  FROM @MyResults;

The result is

where_l_really_am           where_the_Procedure_is  where_the_temp_Procedure_is
--------------------------- ----------------------- -----------------------------
master                      MyDevStuff              master
tempdb                      MyDevStuff              tempdb
model                       MyDevStuff              model
msdb                        MyDevStuff              msdb
RedGateMonitor              MyDevStuff              RedGateMonitor
AdventureWorks2016          MyDevStuff              AdventureWorks2016
WideWorldImporters          MyDevStuff              WideWorldImporters
PhilFactor                  MyDevStuff              PhilFactor
Antipas                     MyDevStuff              Antipas
Phasael                     MyDevStuff              Phasael
Archaelus                   MyDevStuff              Archaelus
Northwind                   MyDevStuff              Northwind
Shadrach                    MyDevStuff              Shadrach
Abednego                    MyDevStuff              Abednego
Meshach                     MyDevStuff              Meshach
Daniel                      MyDevStuff              Daniel
pubs                        MyDevStuff              pubs
MyDevStuff                  MyDevStuff              MyDevStuff

Well, to look on the positive side, the procedure was correct when it was in its own database. but if a procedure is executed, it uses its own context. However, a temporary procedure uses whatever context it is executed in. This can be very useful. I recently saw a comment on StackOverflow from a user who said that temporary Procedures had no apparent use. I don’t agree.

This means that you can only use temporary procedures or registered routines. I must explain that it is perfectly possible to create system procedures , functions and views. The problem with these is in deploying them. They are also intrusive into the master database, and you really ought to leave the master database alone. A lot of us use them but it is definitely a code smell.

Can one create a temporary procedure within a procedure? Then you can call an initialization routine and avoid having to put all the actual code of your routine in a batch every time you want to use it.

USE MyDevStuff;
GO
--now create a pretend utility that creates a tewmporary procedure
CREATE OR ALTER PROCEDURE InitStuff
AS
IF Object_Id('tempdb..#ThisIsStrangeAndAlarming') IS NOT NULL
  DROP PROCEDURE #ThisIsStrangeAndAlarming;
EXECUTE sp_executesql N'
CREATE  procedure #ThisIsStrangeAndAlarming
 @CurrentDatabase sysname OUTPUT
AS
SELECT @CurrentDatabase = Db_Name();
';
GO

EXECUTE MyDevStuff.dbo.InitStuff;
USE MyDevStuff;
DECLARE @MyCurrentDatabaseInTempVersion sysname;
EXECUTE #ThisIsStrangeAndAlarming @MyCurrentDatabaseInTempVersion OUTPUT;
SELECT @MyCurrentDatabaseInTempVersion;
USE AdventureWorks2016;
EXECUTE #ThisIsStrangeAndAlarming @MyCurrentDatabaseInTempVersion OUTPUT;
SELECT @MyCurrentDatabaseInTempVersion;

Yes. Contrary to all expectations, a temporary procedure is treated differently to a temporary table. It is not disposed of at the end of the procedure. The temporary table must be cleared away at the end of a procedure and you can see it happening here.

CREATE OR ALTER PROCEDURE CreateATempTable
AS
IF Object_Id('tempdb..#ThisisMyTempTable') IS NOT NULL DROP TABLE #ThisisMyTempTable;
EXECUTE sp_executesql N'
CREATE  table #ThisisMyTempTable
  
 (MyID int identity primary key, MyJSON NVarchar(max))
';
GO
SELECT * FROM #ThisisMyTempTable;
/*
Msg 208, Level 16, State 0, Line 87
Invalid object name '#ThisisMyTempTable'.
*/

Because temporary procedures last for the entire session or connection, it means that you can use your initialization procedure to create the utilities you create at the start of your connection and they will continue to exist for the life of the connection. That procedure ‘InitStuff’ is permanent in your utilities database, and by calling it you either get your temporary procedures updated or created.

As always, there is a snag. You can’t create temporary functions or views. It is just procedures.

Aha! (I hear you say), all you need to do is to employ the USE command at the start of the function and specify the database context that you want the body of the routine to execute in.

Just try it!

USE MyDevStuff;
GO --now create a pretend utility that actually just reports its database context
CREATE OR ALTER PROCEDURE BetterWhatDatabaseAmIin @context sysname=DB_NAME(),@CurrentDatabase sysname OUTPUT
AS
USE @context
SELECT @CurrentDatabase = Db_Name();
GO
/*
Msg 154, Level 15, State 1, Procedure BetterWhatDatabaseAmIin, Line 3 [Batch Start Line 94]
a USE database statement is not allowed in a procedure, function or trigger.
*/

I’ve found myself using temporary procedures quite a lot for tasks that require scripting across databases. I do it because it is less intrusive and requires less tear-down. Temporary procedures vanish without trace when the connection or session is terminated. In code, It is possible to create them within a session, use them and then close the connection. It would be possible to use prepared statements but these would have to be referenced by a handle in a variable, and finally the handle would have to be disposed of: That is an unpleasant complication.

There is an irritating problem with any temporary routine: It means updating the scripts, applications and files whenever you change or improve the procedure. It isn’t a good idea to have more than one source. If you maintain these from an initialization procedure held anywhere on the instance, then this problem is contained: You just alter the initialization procedure in your utility database from a single source in source-control.

A slick way around all this is to create pretend system views, functions or procedures. This is too intrusive and is seldom allowed. Imagine wanting to do it on a production server!

The post Using Temporary Procedures appeared first on Simple Talk.


from Simple Talk http://bit.ly/2UQNgwB
via

Apache Cassandra Data Modeling and Query Best Practices

Apache Cassandra database is a distributed, fault tolerant, linearly scalable, column-oriented, NoSQL database. Apache Cassandra is great at handling massive amounts of structured (table has defined columns), and semi-structured (table row doesn’t need to populate all columns) data. Cassandra is a distributed storage system that is designed to scale linearly with the addition of commodity servers, with no single point of failure. Cassandra can be easily scaled across multiple data centers (and regions) to increase the resiliency of the system.

Features of Cassandra

  • Open Source – It is an open source project by Apache. Cassandra can be integrated with other source projects like Hadoop, Apache Pig, Apache Hive, etc.
  • Peer-to-Peer Architecture – All nodes in the Cassandra cluster communicate with each other. There is no master-slave paradigm in Cassandra.
  • No Single point of Failure – In a cluster, all nodes are created equal. Data is distributed across the nodes in the cluster and each node is capable of handling read and write requests.
  • Highly Available and Fault Tolerant – Because of data replication across the nodes in the cluster, Cassandra is highly available and fault tolerant.
  • Globally distributed – A Cassandra cluster may be deployed in multiple data centers, which may be globally distributed.
  • Flexible Data Model – The concepts from DynamoDB and BigTable are built into Cassandra to allow for complex data structures. The model works for a wide variety of data modeling use cases.
  • Linearly Scalable – When new nodes are added, the data is more evenly distributed across the nodes, which reduces the load each node handles.
  • Tunable Consistency – Consistency level is number of nodes needed to agree on the data for reads and writes. The consistency level controls both read and write behavior based on your replication factor. The Consistency level could be zero, one, quorum, local quorum or all.

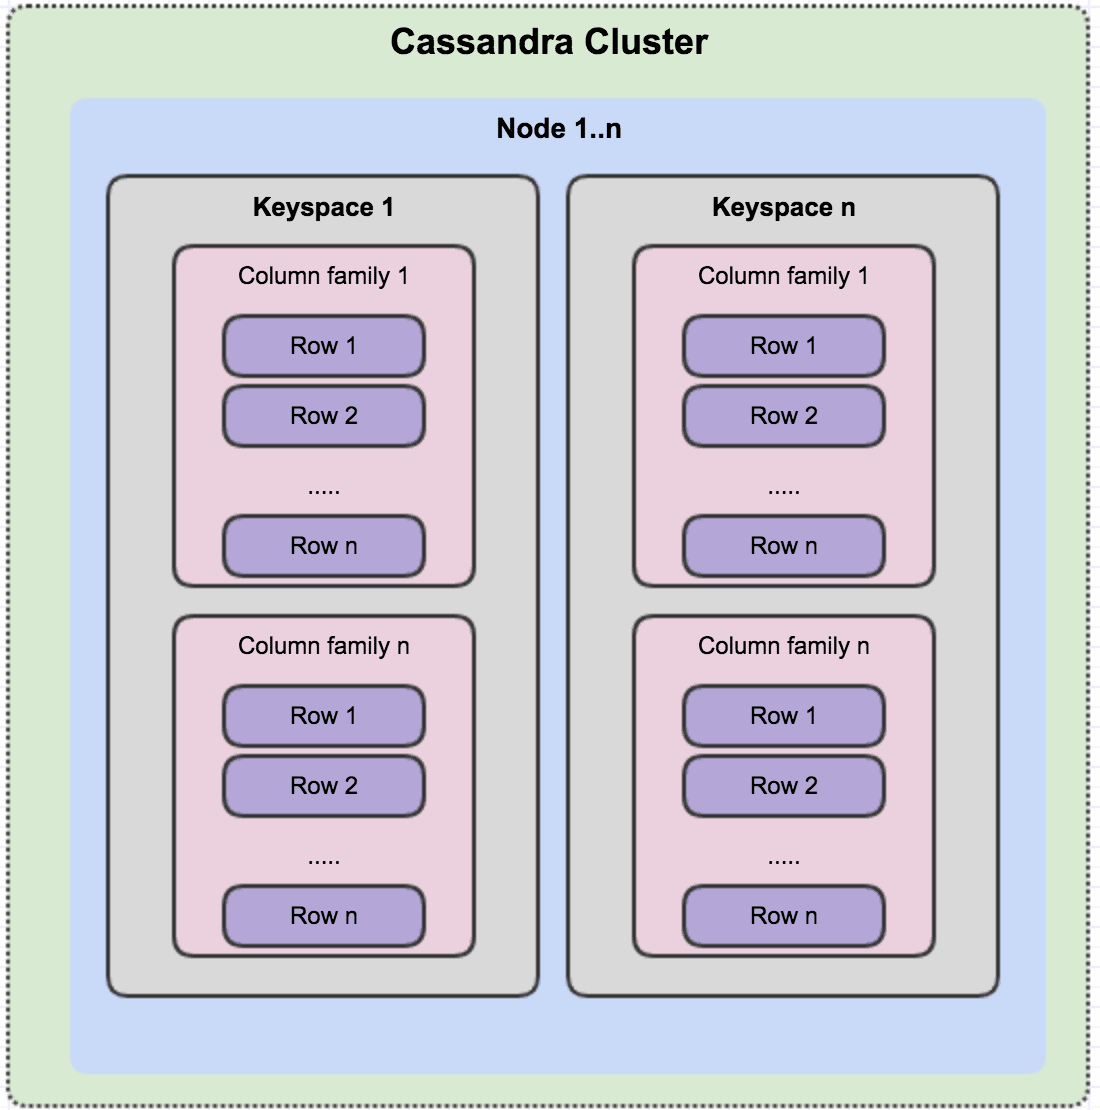
Layers of a Cassandra Cluster

  • Cluster – Cassandra Cluster is a collection of nodes in a ring format that work together. It can span multiple physical locations. Data is distributed across nodes in the cluster using consistent hashing-based function.
  • Node -Node is the basic infrastructure component of Cassandra and it’s where the data is stored. Each node contains a data replica.
  • Keyspace – Keyspace is a collection of column families and is equivalent to a database in RDBMS. The definition of keyspace contains Replication factor, Replication strategy (simple or network topology) and Column families.
  • Column Family – Column family is a container of a collection of rows. This is equivalent to a table in RDBMS.
  • Row – Each row in Cassandra is identified by a unique key and each row can have different columns. The row key is a unique string and there is no limit on its size.
  • Column– Each Column is a construct that has a name, a value and a user-defined timestamp with it. Each row can have a variable number of columns.


  Cassandra Cluster Node l..n Keyspace 1 Column family 1 Row 1 Row 2 Row n Column family n Row 1 Row 2 Row n Keyspace n Column family 1 Row 1 Row 2 Row n Column family n Row 1 Row 2 Row n

Layers of a Casandra Cluster

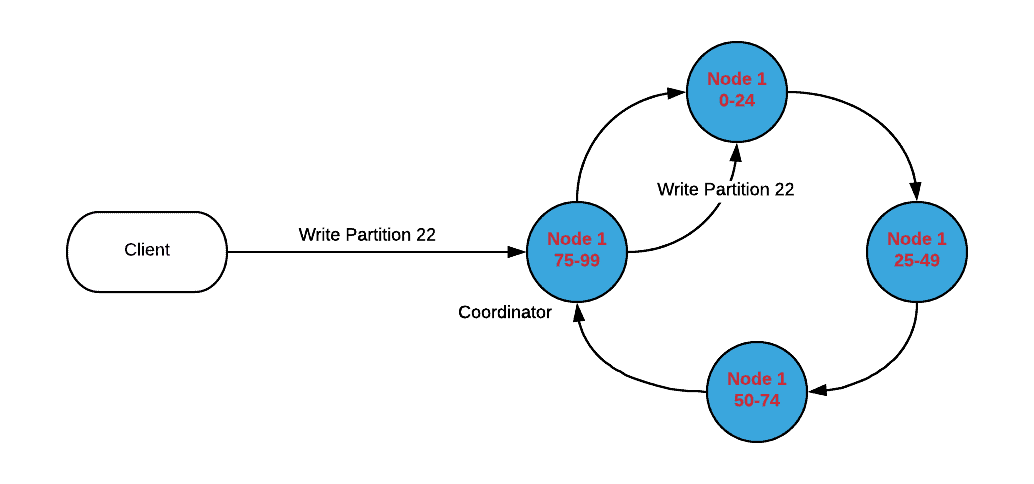
Cassandra Cluster in a Single DC

The client request is received by a coordinator node (any node in the cluster can be selected as a coordinator). The coordinator finds the node which has the matching token range and persists data in that node. The data is replicated to other nodes in the cluster based on the Replication Factor defined in the keyspace. If you choose the SimpleStrategy, it just selects consecutive nodes in the ring for replication.

Write Partition 22 Client Node 1 0-24 Write Partition 22 Node 1 75-99 Coordinator Node 1 50-74 Node 1 25-49

Single DC

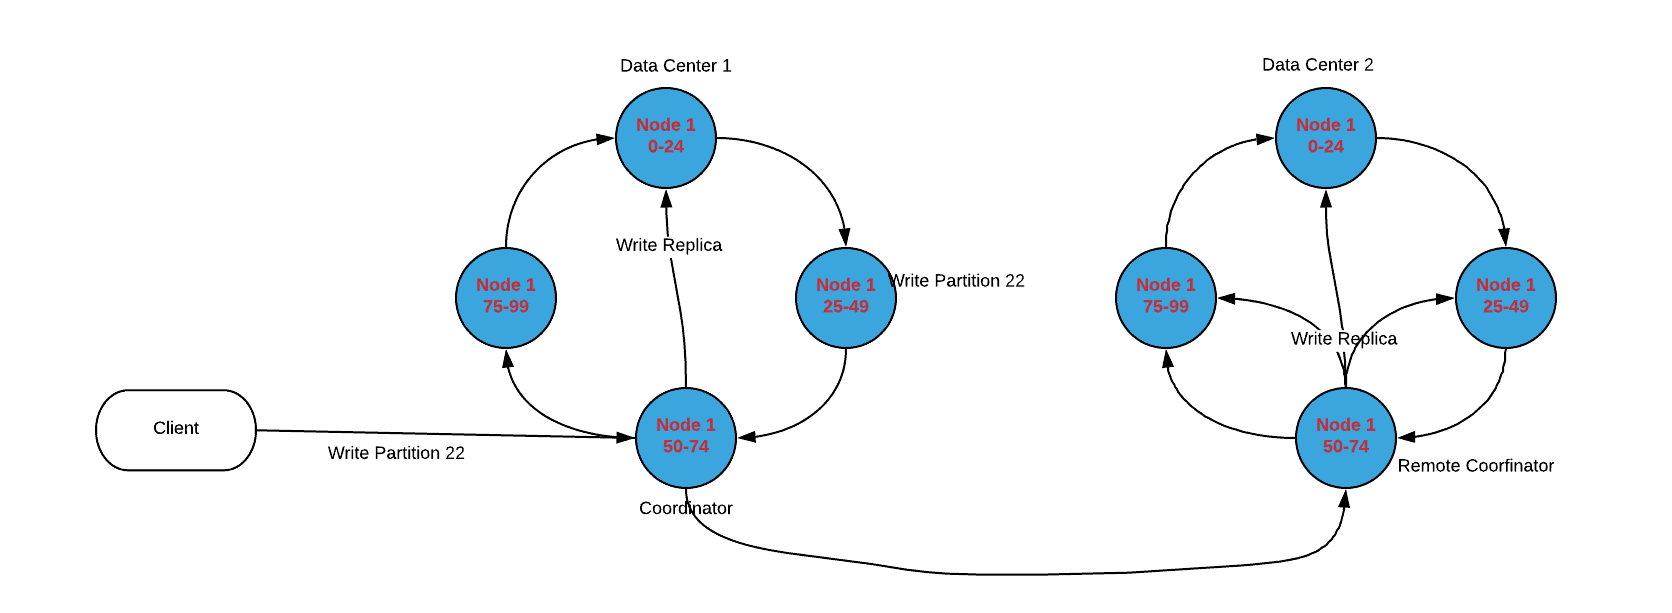
Cassandra Cluster in Multi-DC

In Multi-data center replication, you need to define the number of replications per DC and Cassandra will replicate accordingly. NetworkTopologyStrategy is used as replication strategy for multi-DC replication.

Data Center 2 Node 1 25-49 Client Node 1 75-99 Write Partition 22 Data Center 1 Node 1 0-24 Write Replica Node 1 50-74 rite Partition 22 Node 1 0-24 Node 1 75-99 Write R Node 1 25-49 lica Node 1 50-74 Remote Coorfinator Coor ator

Multi-data center


Is Cassandra the Right Choice for Your Application Workload?

Before using Cassandra as a database for your application, you may need to evaluate whether Cassandra database is the right choice for your application needs. Writes are very fast in Cassandra due to the log-structured design, and written data is persisted with a Commit Log and then relayed to Memtable and SSTables(Sorted String Tables).

  • Commit Log When data is written to the Cassandra node, the data is stored in in-memory cache, the Memtable, and also appends writes to commit log.
  • Memtable – Memtable is an in-memory cache that holds data rows before they are flushed to SSTable. For a given Column Family, usually there exists one Memtable.
  • SSTable – SSTable is a file that stores a set of immutable data rows (key-value) sorted by row key. When Memtable data is flushed, a new SSTable is created.

 Cassandra database is a good choice for the following use cases:

  • Very high write throughput and a smaller number of reads.
  • Ability to linearly scale the database by adding commodity servers.
  • Multi-region and multi-data center replication.
  • Ability to set Time-to-live time on each record row.

Cassandra isn’t a good choice for following use cases:

  • Application needs ACID properties from a database.
  • Application needs Joins (JOIN is not supported in Cassandra).
  • Application needs many secondary indexes. Secondary indexes degrade query performance.
  • Queue like designs: Writing and then deleting data at scale results in large number of tombstones, which degrades the performance. Instead use native queueing technologies such as ActiveMQ, RabbitMQ, Kafka, etc.
  • If your application needs very high read concurrency, then MongoDB may be a better choice

The Cassandra Data Model

The Cassandra data model and on disk storage are inspired by Google Big Table and the distributed cluster is inspired by Amazon’s Dynamo key-value store. Cassandra’s flexible data model makes it well suited for write-heavy applications.

Cassandra Data Modeling – Best Practices

Picking the right data model helps in enhancing the performance of the Cassandra cluster. In order to come up with a good data model, you need to identify all the queries your application will execute on Cassandra. You should model Cassandra data model around your queries, but not around objects or relations.

Choose the Proper Row Key

The critical part of Cassandra data modeling is to choose the right Row Key (Primary Key) for the column family. The first field in Primary Key is called the Partition Key and all other subsequent fields in primary key are called Clustering Keys.

The Partition Key is useful for locating the data in the node in a cluster, and the clustering key specifies the sorted order of the data within the selected partition. Selecting a proper partition key helps avoid overloading of any one node in a Cassandra cluster.

CREATE TABLE Employees (
    emp_id uuid,
    first_name text,
    last_name text,
    email text,
    phone_num text,
    age int
    PRIMARY KEY (emp_id, email, last_name)
)

Here the Primary Key has three fields: emp_id is the partition key, and email and last_name are clustering keys. Partitioning is done by emp_id and within that partition, rows are ordered by the email and last_name columns.

Determine queries first, then model it

In relational databases, the database schema is first created and then queries are created around the DB Schema. In Cassandra, schema design should be driven by the application queries.

Duplicate the data

In relational databases, data normalization is a best practice, but in Cassandra data duplication is encouraged to achieve read efficiency.

Garbage collector

Garbage collection (GC) is the process by which Java removes objects that don’t have any references in the heap memory. Garbage collection pauses (Stop-the-world events) can create latencies in read and write queries. There are two major types of garbage collection algorithms, G1 garbage collector and CMS (Concurrent Mark and Sweep) garbage collector. G1 GC gives better performance than CMS for large heap sizes but the tradeoff is longer GC times as better explained in this page. Choose right GC for your use case.

Keyspace replication strategy

Use SimpleStrategy for single data center replication. Use NetworkTopologyStrategy for multi-data center replication.

Payload

If your query response pay load size is over 20 MB, consider additional cache or change in query pattern. Cassandra is not great at handling larger payloads.

Cassandra Queries – Best Practices

There are several things to keep in mind when designing the queries:

Prepared statements

  • Prepared statements are highly recommended when interacting with Cassandra as they remove overhead compared to simple Statements.
  • Prepared statements get pre-compiled and cached. It is an optimization that allows parsing a query only once but execute it multiple times with different values.
  • Don’t bind “null” values on prepared statements and don’t insert “null” values into a column value as both of these cases create tombstones.

Batch statements

  • If you need atomicity, you may use batches. Make sure the statements in the batch have a minimal number of partitions. Ideally, use single partition batches from the same table and same partition key because they are executed faster than statements having multiple partition keys.
  • Batching statements with different partition keys force the coordinator to scan across multiple nodes to find data, and this impacts query performance.
  • Batch Size: Batching a large number of statements into a single batch will negatively impact the coordinator. Instead, split the statements into multiple batches. It is recommended to honor the batch size (batch_size_fail_threshold_in_kb) limit configured in the cassandra.yaml configuration file
  • Batching too many statements into a single batch, may result in a runtime exception InvalidQueryException (com.datastax.driver.core.exceptions.InvalidQueryException: Batch too large.)
  • Don’t use Batches for performance optimizations. Batches are never meant to improve performance.

ALLOW FILTERING in queries

  • If possible, avoid ALLOW FILTERING in Cassandra queries as latencies will be high and performance will be impacted.
  • When using Allow Filtering in queries, you may get warnings such as “xxx Statement have unpredictable performance.” When Allow Filtering is used, Cassandra skips over the data, rather than using an index to seek the data. Without Allow Filtering, the data read through scales linearly with the amount of data returned.
  • Using Allow Filtering in queries is fine if you are returning most of the data fetched from the Column Family, but if you are skipping over most of the data, this will be a performance hit.

Indexing

  • An index provides a means to access data in Cassandra using a non-partition key. You may reduce or avoid the usage of secondary indexes as they impact read and write performances.
  • Use materialized views with automatic updates to make reads faster.

Decide on proper TTL

  • In Cassandra, TTL (time-to-live) is set at a per column value but is not defined per row or column family. Once the TTL is set, it’s hard to change, and it’s also hard to update TTL for an existing row column(s). The only way you can change the TTL is to read the complete row and re-insert the row with a new TTL.
  • If you run an update query on existing row with only few column updates (on already TTL set row), the life of these columns is extended by TTL time while other columns expire sooner. When you query, it’s possible to receive only a few columns data as other columns data might have already expired. To avoid this inconsistency, make sure you read the full row before updating to have consistent TTL on all columns.

Miscellaneous considerations

  • Don’t range scan the Cassandra Column family. Scan the table only by a specific partition key for better performance.
  • Lower or Disable retry policies. Speculative Retry and read_repair_chance is being deprecated in later versions of Cassandra. If the initial request fails, further requests will highly likely fail and thus cascade into wider issues.
  • Use token aware in java driver.  With this, the client maintains the token range and location of data, so the coordinator node doesn’t have to do this work on select queries.
  • Querying too many tables at once can be expensive and increases the latency.

Summary

Strong understanding of Cassandra architecture and identification of all query patterns in advance help in creating an optimal data model in a Cassandra Cluster. This Article covered some of the use cases around when to use and when not to use Cassandra database. Also, several best practices and tips around how to create right Cassandra data model, and how to optimize queries to achieve better performance are covered.


The post Apache Cassandra Data Modeling and Query Best Practices appeared first on Simple Talk.


from Simple Talk http://bit.ly/2HX2UVG
via

Thursday, February 7, 2019

DevOps Without the Database: A Cautionary Tale

You hear often how DevOps doesn’t work with databases, or conversely that the people responsible for databases don’t work with DevOps. Neither should be true, but both frequently are.

When people say that “DevOps doesn’t work with databases,” what they tend to mean is that it’s difficult to automate many aspects of database development and deployment, due to the persistence of data and the size of the database. While, historically, there has been some justification for this side of the argument, there isn’t any for its flip-side. If DevOps means Developers and Ops sharing their skills for mutual benefit, then why shouldn’t that work when applied to databases? In my experience, unfortunately, developers and administrators have a poor track record of collaboration and open communication.

Start with difficult, mainly manual, database development processes, then vigorously stir up emotions by employing poor personal interaction skills, and suddenly bad judgement is everywhere and database projects either fail, or don’t work as advertised, take a lot longer than they should, and cost a lot more. You’ll often see all of that combined. I have just such a story.

Mea Culpa

Let me start by saying that a substantial part of this story is my fault. I don’t think I can take personal responsibility for everything that went wrong. However, I am responsible for a healthy chunk of it. So, before we get to the story, let me explain why I think I’m partly at fault.

I’m probably not the nicest person in the world now, but I used to be a stone-cold jerk. I didn’t see my job as a service. I didn’t realize that by being a servant-based leader, I could get a lot more done. Yeah, my nickname was The Scary DBA, but I mostly got that from just looking scary. I had another nickname, Rant. You know, a play off my name. However, it was really a play off my personality. I’d snap easily, and start wailing about how something was just plain wrong, stupid, whatever. Quite rightly, it turned a lot of people off.

To quote the greatest philosophers of our age, I got better. I began to see that by being nothing but an irritant, even when bad or dumb things really did happen to the database, I wasn’t helping myself, nor my team, nor my employer. Since I liked the team and liked my job, I had started to turn things around. However, for one project, it was too late.

The Project

I can’t go into details about this project. I can’t name names. I don’t know who made all the decisions that were made, and other than my own part in its downfall, owned to up front, I can’t tell you who was responsible. So, in order to protect the innocent, I’m going to protect the guilty as well.

This project had already launched and failed a few times. Frankly, it was a difficult project, supporting a fundamental, but very complex, business process. Let’s face it, if it was easy, it probably wouldn’t have a lengthy, and hopefully entertaining, as well as enlightening, story attached.

Development

An outside contractor was brought in who had a wild new idea: code first. Combine that with an Object Relational Mapping tool (ORM) and some special secret sauce that only he knew, and this difficult project would not only succeed, but he’d get it 100% complete within 18 months.

Cool!

“Oh, but no DBAs. No database developers. They’re really not needed, thanks to the magic of the ORM tool and, I’ve been told, they’re the main reason that previous attempts at this project failed.”

Now, upon hearing this, the old me would have freaked. The newer me looked at old me in the mirror and said,

“See. This is your fault.”

I requested to be involved in the project as an observer so that I could take the superior and successful (well, in theory, they will be eventually) processes to other projects. This was granted, so I really did get to learn how things were done under this new methodology.

I went to classes and learned about code first development. I also learned all about this new ORM tool that was going to revolutionize our database development. The code first approach made some sense to me, although there were aspects of skipping database design entirely that bothered me. The ORM tool also seemed to be a miracle. It would not only write the queries for the database, it would build the database entirely and deploy it, all automatically. Heck, I’d been working for years at that point trying to make database deployments easier and more automated. I was even a very early adopter of Data Dude, which became Visual Studio Database Tools. I’m not simply a believer in DevOps. I’d already implemented one aspect of DevOps, the automation, multiple times on multiple projects. I just wish I had been better at practicing the foundation of DevOps, communication.

One thing I had learned, and it still holds true: the devil is in the details. So, I sat down and read through the documentation on the ORM tool, wrote some code, did a bunch of research on the internet. It seems that most, but not all, of the claims were true. However, there was a fairly long list of caveats and cautions about how to implement the ORM tool. I started documenting best practices and things to avoid. I put it all together and called a meeting with the development team.

Sitting across from me at the meeting were several people who, let’s be honest, I had treated badly in the past. We went through my document. I presented what I thought was a very good case for a light database developer involvement, just to be there to catch any queries that went south and needed to be tuned or rewritten manually. Based then on my research and now on very long experience, anywhere from 2-5% of queries generated from an ORM tool are weak at best, and seriously problematic at worst. You will need to write a few queries by hand, but not very many.

However, I was completely dismissed out of hand. Oh, and, asked not to take part in the project any more, even as an observer. And so, things went ahead without me.

And so, I spied on them.

Yeah, they’re using our database servers and I have ‘sa’ privileges, and this was development, not a production system, so I set up SQL trace and watched the queries being generated. I also looked at the database design regularly. They were violating just about every single suggestion I had made. They were effectively using the “Hello World” example from the ORM tool as a set of best practices and developing from there.

Of course, spying on people is not a nice thing to do, proving that back then I was not a nice person. Remember, also, that this situation was one of my own creation. If I hadn’t been so difficult in the past, they’d have had no cause to dismiss my input now.

Testing

The new code first project was running long; and during testing they were hitting issues with the database. All sorts of issues. Performance, deployments, more. So, they contact me or my team, right? Nope. They called in a Microsoft consultant. Great guy. We knew each other. He called me to let me know he was going to be in our office. He asked me about the project. I was honest. I explained that because I was an ass previously, I had been kept out of the project. Yes, my pride was wounded, but I really didn’t blame them for this; it was on me.

Of course, I knew some of what was going on, so I explained it to him. He then did something that I’m not sure I should thank him for or not. He invited me to the meeting.

I show up at the meeting and I’m getting a lot of unkind stares from people. My consultant friend shows up and says, “I hope you don’t mind, I invited Grant to sit in.” I said, and boy, I’m so lucky I said this, “I’m just here to observe. I won’t take part or talk at all.” With that, I was allowed to stay, and the development team proceeded to explain the issues to the consultant, and show him problematic code, which I’d already seen.

Now, remember, the entire database had been built in a fully-automatic fashion from the ORM tool. Most tables had no clustered index. Many of the tables, maybe even most, had no primary key. This was SQL Server, and yet there was not a single foreign key in the database. They had basically turned the relational storage engine into an object storage engine, but SQL Server is not an object storage engine. It was not working. Not at all.

The queries were…well, if you’ve seen some of the 5% of queries generated by an ORM tool that are problematic, it looked just like those. There were IN statements with 500 items or more, different parameter types for the same column, and lots more. The consultant saw all this and then started to address it.

First words out of his mouth were, “Well, as Grant probably already told you….”

The room went quiet. He outlined the issues with the database and the queries, frequently repeating something along the lines of “I’m sure Grant already said this but…”

I was dead silent the whole time, and if you know me well, that’s a miracle. No one looked me in the eye. I was starting to feel stiff and sore, because I was trying so hard not to move, lest I get noticed. The atmosphere in there was that bad.

And, throughout the meeting and afterwards, I was beating myself up. I recognized that because I had been extremely difficult, if not downright impossible, to work with in the past, my organization was now suffering. I had screwed up horribly. What’s more, I recognized that many of the people in the room were leaders in the organization. I’d burned bridges in the past with all of them. I decided then to get a new job.

Delivery

The project kept going. It ran very long. It ran very over budget. Further, when it was finally delivered, the database as configured, worked, albeit slowly (they never did fix all those issues), but it was impossible to generate any reports.

The object storage model they’d imposed on SQL Server couldn’t be sliced across the tables in the way that was possible with a relational model. They could use the tool to pull data out, but that was all. For the reporting, they had to build a data mart database, designed fully as a relational database. It had primary keys, foreign keys and all the rest. They then had to build a special replication process, with more Microsoft consulting help (those guys rock by the way) in order to get the data from the barely functional database into the data mart.

Worse, deployments from the ORM tool worked wonderfully…for the first deployment. After that though, the tool didn’t protect the existing data. It treated the database like code. How do you deploy code? Drop the old stuff and put the new stuff in. Doing that in a database results in lots of pain. So, another process was built to capture the changes made in the database in one location and then create a safe script for getting the changes into production.

All this added time, cost, all sorts of overhead, and all of it was because I’d previously behaved as a big enough jerk that the development team, at every possible point, resisted having someone with database knowledge involved as they built a database.

Deliverance

So what lessons can we all learn?

First, don’t be a jerk. I hurt myself and negatively impacted my career in many ways because I was not acting like an adult, let alone a professional. More damagingly, my personal failings soured many the development staff on the whole database team. So, instead of just kicking me out, or heck, firing me, they decided to kick out anyone with database knowledge. That hurt the organization.

Next, databases are persnickety beasts. A successful database DevOps project will need someone on the team who has deeper knowledge of how the database behaves, whether or not they’re called a DBA. That person is going to help you develop the database, yes. They’re also going to help you safely deploy the database. Finally, and this is the most important part, they’re going to be around for ongoing support of both these processes, as well as deal with emergencies within the database system as they arise, as they will. All this is regardless of the type of database system you’re dealing with.

DevOps works, and works well with databases. However, DevOps really is about communication. If you’re not working hard to communicate across teams, if you’re actively isolating teams, then you will cause problems for yourself down the road. DevOps projects succeed all over the world, all the time. However, they succeed or fail on the culture of communication you build. So, as individuals, don’t be a jerk. As a team, be inclusive. As an organization, ensure that your jerks are kept in line and your teams are involving all the stakeholders in a project. Then, your DevOps implementation will also succeed.


Do you have a scary story to tell about leaving the database behind? Tell us your story for a chance to win an Echo Show or a $150 Amazon gift card.

The post DevOps Without the Database: A Cautionary Tale appeared first on Simple Talk.


from Simple Talk http://bit.ly/2GsTUFi
via