Monday, April 1, 2019

Security Considerations for ERP Applications

Did you know?

  • eBay suffered a serious security breach in 2014 that led all 145m customers to change passwords to secure their accounts.
  • According to research performed by the Ponemon Institute, the average cost for a breach of sensitive data in 2018 is US$148 per record.
  • The UK’s Information Commissioner Office (ICO), responsible for policing data protection in the UK, fines companies around £2m annually for failing to protect personal data.
  • Regulation directives such as the General Data Protection Regulation (GDPR, enforcement beginning May 2018), mandate organizations to comply with security practises that ensure that any personal data for all individuals within the European Union collected is adequately protected.

Information security breaches, including non-compliance to regulatory standards, can yield financial and reputational consequences that are better avoided by any organization, large or small. Information security has become an increasing concern for organisations resulting in growing security budgets intended to tighten processes and also to conform to new and changing security regulations. An organization’s security strategy is generally aimed at managing the risk of security breaches and staying compliant with regulatory standards. Operational procedures and business applications that support them need to be strategically managed and controlled to ensure the integrity, availability, and security of sensitive data that the organization owns.

A key aspect of any security strategy is the ability to achieve a level of security that appropriately demonstrates an organisation’s commitment to information security regulations and the safety of the data collected from its trading partners. Too little security increases the risk of breaches while too much security can result in unnecessary IT overheads, compromised system performance, and loss of agility in business processes. There is no ‘cure-all’ security solution; each organization needs to evaluate its risks and set objectives that are relevant for their environment and the type of information it handles.

This article is inspired by experience and lessons learnt as a solution designer extending an enterprise application to meet custom business requirements that are not met by the standard implementation. The primary focus of this article is the extension of security objectives to the maintenance of business applications. While this specific experience is on Oracle E-Business Suite, the core principles and lessons learnt are fundamentally applicable to a wide range of commercial application environments that process and manage sensitive data. The article seeks to emphasize the importance of enterprise resource planning systems to the operational efficiency of organisations, how the maintenance and usage of these systems increase data security risk, and what can be done from a development and maintenance perspective to mitigate this risk.

Without some form of computer automation, most businesses would not be able to achieve operational efficiency. Regardless of the size of an organization, operational complexities are a reality, and the need for accurate record keeping, resource allocations, analysis, planning, and reporting is necessary. Enterprise Resource Planning (ERP) systems have evolved over the years to meet these operational requirements efficiently.

An enterprise resource planning system integrates business processes and data from all the core business functions such as sales order processing, purchasing, financial management, and payroll. It allows for different operational functions to share common data and processes. For example, Oracle E-Business Suite uses a data model known as Trading Community Architecture (TCA) that provides a single, universal definition of trading partners’ data for all business functions. TCA enables the creation and maintenance of a single record of trading partners’ information to be utilised by any of the business operations. For instance, there can only be a single trading partner record created in the system that can be qualified to be used as a customer, a supplier or any required business entity and is available across all functions. This promotes data efficiency and integrity by having a centralised source of true information.

ERP applications are typically designed as large, complex, homogeneous mission-critical systems and are generally developed and marketed as commercial off-the-shelf software by large software vendors such as SAP, Oracle, and Microsoft. The development of ERP applications is theoretically based on industry best practices, and they are intended to meet broad business requirements covering a wide range of industries. For an ERP application such as Oracle E-Business Suite, the security architecture is presented as its cornerstone, established over time and can be configured to meet specific regional or organizational requirements.

The functionality provided by Commercial ERP systems is designed to be highly configurable to allow customers to incorporate their own business rules to match specific business or industrial requirements. However, even after the configuration is completed as intended, gaps often remain between standard delivered features and specific organization requirements. In an effort to improve user acceptance, most ERP customers end up developing extensions and customizations to make sure application better supports business processes.

Because ERP systems process and hold sensitive personal and commercial information relating to employees, customers, suppliers, prospects and projects, further developments outside of the original blueprint expose the application to increased risk of data security breaches and non-compliance to regulations. Custom developments generally make up a very small portion of the whole application but, because they access and process the same sensitive data as the main application, they pose a significant security risk that could potentially cost the organization in security breach damages. ERP system vendors, while they recommend best practice standards to be followed, generally do not support custom developments. It is, therefore, a customer’s responsibility to make sure that an organisation’s security objectives are enforced and effectively embedded in the development strategy for these extensions.

The extension and customization of ERP applications is a specialised technical effort that requires, over and above the necessary development skills, a good understanding of the architectural, functional, and security model of the application, including the vendor suggested best practice for product extension. Application development approaches used for ERP extensions need to ensure that the original application’s data security model is maintained and automatically enforced in all the possible states of data within the application. Otherwise, the cornerstone feature of the application becomes severely compromised. Development standards and practices should also meet security objectives defined in the organisation’s strategy and should aim to protect any sensitive data with the same attitude that is required of all business process. This calls for application developers to thoroughly understand the organization’s security strategy and how the application’s security model can be extended to custom developments.

Information security can only be adequately addressed in development if the security requirements for every solution to be implemented are explicitly identified and fulfilled at every stage of the development cycle; i.e., specific security requirements that are addressed in requirements analysis, design specification, and solution implementation. This facilitates validation and verification for conformance to security strategy. With this understanding, the following are some of the key security aspects for enterprise developers to consider when extending ERP applications.

Access Control

Access control in ERP applications is concerned with defining and managing authorized users, including granting them the relevant roles they need to access processes and data. Access control is critical to the goal of protecting data from unauthorized disclosure and modification, at the same time, maintaining appropriate levels of availability to authorized users for operational purposes.

Oracle E-Business Suite embeds the principle of least privilege in its security model. This principle is based on the practice of granting necessary privileges only – application users should not be given more privileges than necessary. This is implemented through a feature known as Role Based Access Control (RBAC). RBAC enables organizations to create roles based on specific job functions, and to assign these roles the appropriate permissions. User access is determined by assigning individual users the appropriate roles.

It is important for developers to understand how to extend the application’s security model to all custom developments in a similar way to standard functionality. Where parts of the security model are configurative, custom extensions should also similarly use the configured security features. Custom developments must be registered to the application in a manner that enables them to be appropriately assigned to the relevant users using role-based access control. This way their access is controlled, and they are only made available to users that need them for their specific job roles.

The level of data access accorded to custom processes should be relevant for intended purposes. For instance, a custom process to extract enterprise data should be given read-only access to specific database objects. A specific database user should be defined for such a process, which would be granted specific access to enforce the rule of not giving users more information than is required.

Custom processes such as interfaces or integrations that have back end access to the ERP application should have controlled access to enterprise data, giving them the right level of access to specific data. Each process needs to be associated with a user account that is granted access only to the functions and data necessary to meet the process requirements. Appropriate read and or write privileges should be defined for each interface according to its requirements. Data extracted out of the enterprise system should be nothing more than is required by the receiving system.

Access control for enterprise applications is best achieved by leveraging on existing models and technology. Software vendors employ security specialists to define, refine and rigorously validate security frameworks that meet industry standards and regulatory requirements. Commercial ERP platforms are also developed to incorporate the latest security technology, protocols, and algorithms. The custom solutions for extensions should be designed to fully utilise the established development framework. This not only provides consistency in the way security is applied across the system, but also enables a seamless environment that would be easier to manage and maintain when upgrades are delivered.

When implementing extensions, application developers need to analyse their usage and the data access that the process requires. Access to extensions should only be granted to users that are authorised to run the functionality, and this is achieved by making the new function available only to the necessary roles. Data access is controlled by associating the process with a database user that is granted only the read or write access to specific data objects as required by the process. Without this level of access control, the security of enterprise data would be at risk from both internal and external users who have the authority to log into the system.

Database Level Security

At the core of an ERP system is a relational database management system (RDBMS) that manages the data input/output and storage on the database server. The ability to logically customize data objects for a variety of users is key for any enterprise application and is fundamental to the security architecture for managing access to data. Different database platforms offer tools to create logical data objects that enable different users to view and handle common business objects in different ways.

Oracle meets this requirement with its Virtual Private Database (VPD) table feature. VPD is a concept that enables data restriction in large databases so that only a subset of the data appears to exist, without physically segregating the data into different data objects. It refers to the use of row-level security (RLS) and the use of application contexts. VPD’s row-level security allows access restriction by attaching a function that defines access rules to a table, view, or synonym. The function is known as the security policy, and it returns a predicate as an SQL filter. When a query is issued against the protected object, Oracle dynamically appends the predicate returned from the function to the original SQL statement, thereby filtering the data records by the values generated by the security policy.

A typical VPD implementation is where there is a requirement to restrict sites, departments or individuals to operate only on their own records. Ordinarily, multi-organizational enterprises would need to have multiple database instances, one for each entity or, at the very least, multiple schemas in order to maintain data security. The effort and cost to implement and maintain that would be mammoth. However, with Oracle VPD, one database does the job, and the security is proven. VPD enables different users to access the same table in a single schema yet each user gets a different view of the available data, that is, each one will see only what is appropriate for that user to see. This security feature has been proven to be airtight, given that the security policy is accurately implemented, it is logically invoked by the application, and the data is accessed securely.

To effectively implement VPD tables, the concept should be implemented from design. It requires an appropriate table structure with distinct partitioning (or labelling) column(s), proper configuration of user accounts, and implementing the security policy via a SQL function. Routines that populate the protected tables must be designed to enforce NOT NULL constraints on the partitioning columns and to validate the values in these columns as they are key to policy implementation. All routines that access data from these tables should always reference the appropriate object where the security policy is applied. In most cases, the security policy is applied to a view or a synonym for that table, and this has to be determined during design to assign object privileges appropriately

VPD is an Oracle database feature that can be utilised to implement data security at the database level. Custom tables handling sensitive data that needs to be securely accessed must be defined following the rules for virtual private databases. This enables the data to be logically partitioned and for security policies to be defined and applied for secure access. There are standard security policies delivered with Oracle E-Business Suite that can be extended to custom development. Application developers need to understand how this hangs together with user profiles in order to appropriately use it in custom developments. Application development standards should explicitly embed these security development rules so that they can be checked in quality reviews.

Data Encryption/Data Masking

In addition to controlling functional and data access, ERP data can be encrypted to reduce exposure risks. Encryption is an essential tool for securing sensitive information, more commonly used for in-transit data, to ensure the confidentiality and integrity of data are not compromised. For static data, data encryption is not necessary for all security scenarios, but for sensitive personal data such as credit card numbers or passwords, it is an essential tool.

The encryption process uses mathematical algorithms to change information into incomprehensible characters thus providing a fundamental form of defence on the data itself. This means that even in the event of an access control breach, compromised data is still only intelligible to authorized users who possess the right encryption keys.

Databases can be made quite secure, with proper configuration, but they can also be vulnerable to host break-ins if the host is compromised. In well-publicized break-ins, hackers have managed to obtain a large list of credit card numbers, or customer passwords, by breaking into a database. But if the data is encrypted, the stolen information would be useless. The encryption of stored data is, therefore, an important tool in limiting information loss even in the normally rare cases that access controls are bypassed.

Data masking is a technique that is used to protect further data where encryption is not necessary. This allows sensitive information to be transposed in a manner that will not hinder ordinary database operations, such as maintaining referential integrity and data type constraints. Data values are changed yet conform to schema requirements, allowing database extracts that ordinarily contain sensitive data to be used for development and testing purposes. Data masking can be done by scripting, but tools are also available such as Redgate’s Data Masker for Oracle.

Developers need to understand organizational policy concerning the handling of personal data and apply the necessary security tools appropriately. With the rise of e-commerce, if custom developments handle sensitive financial information such as credit card numbers, this ought to be handled with the utmost care. Sensitive information such as credit card numbers or account passwords should always be encrypted even in storage. Data masking should be used for development and testing environments to protect personal or commercial data from illegal disclosure and yet giving developers a more realistic domain on which to work. Business sensitive or personal data should also be encrypted when transporting across networks.

Conclusion

Data Security is becoming increasingly critical for organizations as the consequences of a security breach are becoming more and more significant. Hackers are getting more sophisticated, protection laws are getting tighter, and penalties are on the increase. ERP systems lie at the core of business processes, and they process and maintain most of the business data that is considered to be sensitive. ERP vendors play their part by investing in platforms and technologies that secure the data so much that the security model is often presented as the cornerstone of the application, but as long the application is extensible, any custom developments pose a risk of breaching security rules. It is important that the organisation’s security strategy is well understood by all personnel especially those who develop and maintain applications handling sensitive data. Security requirements for all developments need to be explicitly defined and specifically considered in the solution design and test strategy. There are many security tools available, but for commercial ERP systems, there is no need to re-invent the wheel. The security implementation that comes with the application should be extended as much as possible to all custom developments. Proper analysis of each requirement is also essential to determine the right level and tool to meet security requirements appropriately.

References:

https://www.esecurityplanet.com/network-security/ebay-data-breach-exposes-145-million-user-records.html – Ebay Data Breach

https://www.ibm.com/security/data-breach – Ponemone Institute Report

https://www.gov.uk/government/publications/data-protection-act-2018-overview – Data Protection Act

Oracle eBusiness Suite Security Guide – Part Number E22952-22

Oracle Database Security Guide 12c Release – Part Number E48135-19

The post Security Considerations for ERP Applications appeared first on Simple Talk.


from Simple Talk https://ift.tt/2CPUIkQ
via

Thursday, March 28, 2019

GDPR in the USA

The General Data Protection Regulation (GDPR) is a relatively new data privacy law that has been added to our compliance requirements. The GDPR joins Sarbanes-Oxley (SOX), the Payment Card Industry (PCI) compliance, the Health Insurance Portability and Accountability Act (HIPAA), and the Family Educational Rights and Privacy Act (FERPA) as one more piece of the data and compliance puzzle that we have to solve. The GDPR itself was written and made law by the European Union (EU). This immediately raises the question, what does the GDPR have to do with the United States of America? There are short, medium, and long answers to this question, and you need all three. To get started, here’s the short answer, not much. Since the application of the EU law is to people within the EU, it doesn’t have immediate application within the US. However, there are a couple of “buts” associated with that short answer. These “buts” constitute the medium and long answers.

But, What If You Collect EU Data?

The law is pretty clear and written in easy to understand language (unlike a lot of other laws). The application of the law is written in the first line of the first Article of the first Chapter:

This Regulation lays down rules relating to the protection of natural persons with regard to the processing of personal data and rules relating to the free movement of personal data.

What they’ve done is to define the law as applying only to “natural persons.” Why this particular term of art? Because they are intentionally creating a law that applies to human beings and not the legal construct of a person. In short, it eliminates the inclusion of corporations.

The next thing we need to define is, what data is included under the law. This is a little less clear. If we look at Chapter 1, Article 3, we get the answer:

This Regulation applies to the processing of personal data in the context of the activities of an establishment of a controller or a processor in the Union, regardless of whether the processing takes place in the Union or not.

Processing and collection are different. If the data is collected within the EU, as opposed to say, when someone from the EU is visiting the US, and they submit information to a non-EU based org, then it’s applicable. However, processing the data (cleansing, storage, aggregation, whatever) after it has been collected, applies regardless of where the processing occurs.

They go on to clarify and expand this further in the second part of Article 3:

This Regulation applies to the processing of personal data of data subjects who are in the Union by a controller or processor not established in the Union, where the processing activities are related to:

  1. the offering of goods or services, irrespective of whether a payment of the data subject is required, to such data subjects in the Union; or
  2. the monitoring of their behaviour as far as their behaviour takes place within the Union.

When we take these together, we can say that the law applies to the collection of personal information from people currently residing within the EU. This makes it applicable to US entities. If your organization is collecting information from any people within the EU, then that information falls under all the regulations and laws of the GDPR.

I know the very next comment is usually along the lines of “Yeah, but, we’re in the US. They can’t come after us here.” Which would be true if there weren’t these things called treaties that can be used to ensure that you are, in fact, held responsible if you break the law in another country. Combining this with the fact that the very first enforcement act of the GDPR was against a company in Canada, of all places. Subsequently, multiple actions, including the largest fine to date, have been against companies operating from the USA.

For my medium-sized answer then, the GDPR does apply to you and your organization, even if you’re within the USA, if you’re collecting information on people within the European Union.

Now, before you get all smug, let’s assume you’re only dealing with data from a person in California or Oregon. You’re safe right? Let’s talk about the longer answer now.

But, What If Laws Modeled on the GDPR Come to the USA?

Too late. They’re already here. Not only do we already have a GDPR-influenced law in effect, but not yet in enforcement right now in the United States, but we have several that are being actively worked and written up. Let’s start with the California Privacy and Protection law (CPP).

The CPP was passed last year and takes effect next year, January 1, 2020. Since the law was closely modeled on the GDPR, it mirrors a lot of the language. However, California being California, they’ve gone even farther. They have passed the standard definitions within the GDPR of such things as the right to be forgotten, a requirement to opt-in for communication and data collection, the requirement that you publish how the data is being processed and have a mechanism for accessing the data you collect on an individual. They’ve also expanded what constitutes personal information. They’ve added things to the definitions that many of us who follow the GDPR expect to become standard: IP address, geolocation, browsing history, search history and more. You also have to provide a straight-up “opt-out” option to the data you collect and to any data you share with third parties. What’s more, another piece of legislation is in the works within California that will make the CPP even stronger, including allowing individuals to bring suit against companies that violate the CPP in addition to anything the state itself does.

Do you have the data of people residing in the state of California? If so, are you changing what you do and how you do it in order to be compliant with this new law? You may need to get on that sooner rather than later since enforcement is less than nine months away as I write this.

Don’t start feeling smug again because you don’t have data on people residing in California. Washington state has passed its own GDPR style law, the Washington Privacy Act (WPA). The WPA offers the usual set of rights to individuals and requirements to organizations, including such things as the need to conduct risk assessment reporting in order to reach compliance with the law. They’ve also added their own wrinkle, addressing how facial recognition technology can be used. The application of the law is any company that conducts business within Washington, intentionally targets residents of Washington. But it limits the size of the organizations covered to those who have at least 100,000 consumers’ data or those that derive 50% of their revenue from data and process 25,000 consumers’ data. The enforcement of this law will start July 31, 2021, so you have some time to get ready for this one.

There are at least 10 other states that are currently working on some version of a new privacy compliance law; all of them are modeled on the GDPR. The ones I’ve read about so far include: New York, Hawaii, New Jersey, Maryland, Massachusetts, New Mexico, Rhode Island, Mississippi, and North Dakota.

If all that sounds like a bit of a nightmare, a hodge-podge of different laws with conflicting requirements, you’re right. The good news is that the US Congress is looking to try to put together a GDPR style law and pass it before the end of 2019. However, the bad news is, given the current political climate in the United States (and I’m not arguing for or against any party or individual, just stating a fact), it’s unlikely that anything will be passed prior to 2020, if not 2021. Adding to the limits on movement caused by the political climate, many of the major technology organizations within the US are also attempting to influence the law that will ultimately be passed. The tech companies agree that a federal law would be preferable to the painful collection of laws passed by the states, however, they can’t agree on what they would like to see. In the meantime, the states are moving forward.

For what it’s worth, all fifty states and the federal government already have breach reporting rules in place, many of them passed last year in response to the GDPR. You’ll need to ensure you are least ready on that topic if not all the others in and around the GDPR and all the related laws.

Finally, let’s assume that you manage to somehow dodge every possible state law as well as the EU law because you’re only dealing with data from some entity separate from these. That’s great, except that a whole bunch of other countries are now passing GDPR-style laws. If you deal with data from the following countries, you will need to understand how their GDPR-style compliance regime applies:

  • Argentina
  • Brazil
  • China
  • Iceland
  • Malaysia
  • Switzerland
  • Uruguay

So, my long answer to the question of whether or not the GDPR applies to you is as follows:

Of course, it does.

OK, maybe that wasn’t so long. But let’s face it, assuming no other changes (and that’s a very poor assumption), you’re looking at requireing GDPR-style management of your data if you have information from individuals in the 28 countries of the EU, at least 12 States in the US, and possibly the entire US if a law passes at the federal level, and another 7 countries. It’s highly unlikely that you can run any kind of business, charity or whatever, that’s not going to be directly affected by one, or a whole bunch, of these compliance regulations. Although, speaking of charities, many of the laws have varying requirements for things such as non-profits, schools, smaller companies and more. You’ll want to review the laws that are applicable to you to know best how to deal with them.

Allow me to reemphasize a point made earlier, the CPP takes effect in less than nine months. If you do business within California, or with California residents, you only have that much time left to get your data and data management into compliance. The GDPR is here in the US right now.

Conclusion

There’s no longer any valid reason left to argue that you don’t have to worry about the GDPR. One way or another, it is going to affect how you manage your data. It’s no longer an optional, “we’ll get around to it” issue either. With over 59,000 instances of breaches reported since May of 2018, a large number of those under investigation, and an equally large number of warnings and fines already levied, this is an immediate issue. Your next step should be within your organization to ensure that you are going through a risk assessment. The general outline of this is defined within the GDPR in Article 35. If a data protection impact assessment has not yet been done within your organization, get that going now.


The post GDPR in the USA appeared first on Simple Talk.


from Simple Talk https://ift.tt/2HZhnii
via
Wednesday, March 27, 2019

Introduction to SQL Server Security — Part 4

The series so far:

  1. Introduction to SQL Server Security — Part 1
  2. Introduction to SQL Server Security — Part 2
  3. Introduction to SQL Server Security — Part 3
  4. Introduction to SQL Server Security — Part 4

In the previous articles in this series, I introduced you to SQL Server security principals and the part they play in authentication and authorization. At their most basic, principals are server and database entities that can request access to SQL Server resources. The most common principals are server logins, server roles, database users, and database roles.

SQL Server provides a number of built-in principals that are added automatically when you install a SQL Server instance or create a database. In some cases, it’s not always clear when and how to use these principals. For example, SQL Server automatically adds the public server and database roles. Unlike other fixed roles, you can modify their permissions. However, this can impact common database operations, so you must proceed cautiously if changing the default configuration.

In this article, I dig into some of the more confusing built-in principals to help you better understand how they fit into the larger authentication picture. I created the examples for this article on an instance of SQL Server 2017, but much of the information applies to SQL Server editions going back to 2014 or earlier. Regardless of which edition you’re using, you should understand how these built-in principals work before enabling them or modifying them in your production environments.

The sa Login

The sa login, short for system administrator, is one of the riskiest server-level principals in SQL Server. It’s automatically added as a member of the sysadmin fixed server role and, as such, has all permissions on that instance and can perform any activity. If the login were hacked, the attacker could do unlimited damage.

You cannot drop the sa login, but you can disable it. If you select Windows Authentication when installing SQL Server, the database engine assigns a random password to the account and automatically disables it. If you then switch to SQL Server Authentication, the login remains disabled, and you must manually enable it.

If you select SQL Server Authentication during installation, the account will be enabled, but you must provide a password, so make sure it’s a strong one. Even if the login is enabled, you should avoid using it for your applications. In fact, unless a connecting system absolutely requires the sa login, it’s best that the account remains disabled.

You can verify whether the sa login is disabled by querying the sys.server_principals system view, using a SELECT statement similar to the following:

USE master;
GO
SELECT principal_id, type_desc, is_disabled
FROM sys.server_principals
WHERE name = 'sa';

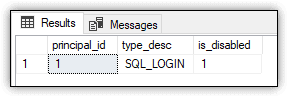
If the login is disabled, the is_disabled value will be 1, as shown in Figure 1.

Figure 1. The sa login on a SQL Server instance

You cannot remove the sa login from the sysadmin server role, but you can verify its membership:

SELECT member.name
FROM sys.server_role_members rm
JOIN sys.server_principals role  
  ON rm.role_principal_id = role.principal_id  
JOIN sys.server_principals member  
  ON rm.member_principal_id = member.principal_id
WHERE role.name = 'sysadmin';

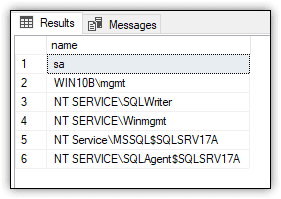
The statement uses the sys.server_role system view and sys.server_principals system view to return the members of the sysadmin role, as shown in Figure 2.

Figure 2. Principals assigned to the sysadmin server role

If you find yourself in a situation that requires the sa login, you must enable the account before it can be used. To do so, run an ALTER LOGIN statement that sets the ENABLE property and then run the statement again to assign a password to the login, as shown in the following example:

USE master;
GO
ALTER LOGIN sa ENABLE;  
GO  
ALTER LOGIN sa WITH PASSWORD = 'tempPW@56789';
GO

Of course, if you were to enable the login, you would need to assign a much stronger password than the one shown here. Moreover, if you’re just trying all this out, be sure to perform your modifications in a non-production environment.

You can test the sa login in SQL Server Management Studio (SSMS) by launching a new query and changing the connection. The following steps describe how to change that connection:

  1. In SSMS, launch a new query.
  2. On the new query tab, right-click a blank area in the query editor, point to Connection and click Change Connection.
  3. In the Connect to Database Engine dialog box, select SQL Server Connection from the Authentication drop-down list. The form will be updated to include login and password text boxes.
  4. Type sa for the login and the password you provided when you enabled the login, and then click Connect.

After you’ve logged in as sa, try running a query such as the following:

SELECT * FROM sys.server_principals;

The query should run with no problem because the sa login is permitted to do anything on the server. On my test system, the SELECT statement returns 32 rows.

After you’ve verified the login, run the following ALTER LOGIN statement to disable it:

ALTER LOGIN sa DISABLE; 
GO

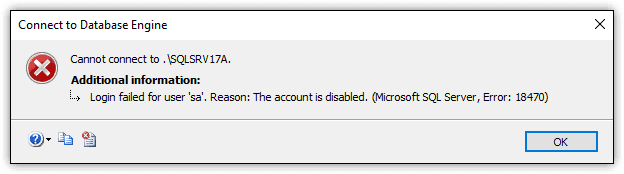
Next, launch a new query and again try connecting with the sa login, following the same steps outlined above. This time, you should receive an error similar to the one shown in Figure 3.

Figure 3. The error generated when trying to connect with the disabled sa login

Whenever possible, you should ensure that the sa login remains disabled. Also, consider renaming the login to provide another line of defense. Because the login is so well known, it’s a frequent target for cybercriminals who have lots of tools at their disposal for cracking passwords. Once they’ve gotten into your databases, you might not be able to stop them until it’s too late.

Certificate-Based Logins

When poking around SQL Server, you’re likely to notice a set of server logins whose names start and end with double hash marks, as in ##MS_PolicySigningCertificate##. The logins are certificate-mapped accounts used by the database engine for internal purposes. You should not delete these or mess with them in any way.

To retrieve a list of certificate-based logins, run the following query:

SELECT name, type_desc, is_disabled
FROM sys.server_principals
WHERE name LIKE '##%'
ORDER BY name;

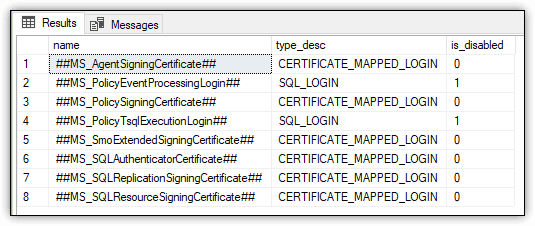
Figure 4 shows the results that the statement returns on my system.

Figure 4. Certificate-based logins on a SQL Server instance

Notice that two of the logins are marked as disabled and their type listed as SQL_LOGIN, rather than CERTIFICATE_MAPPED_LOGIN. Despite these differences, Microsoft documentation specifically states that these two are also considered to be certificate-mapped logins.

You can view the certificates associated with the enabled certificate-based logins by running the following SELECT statement:

SELECT name FROM sys.certificates
WHERE name LIKE '##%'
ORDER BY name;

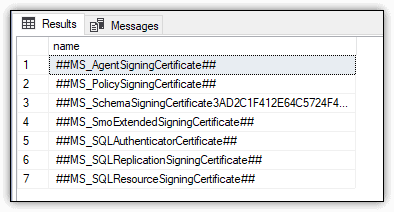
On my system, the statement returns the results shown in Figure 5, confirming that there’s a certificate for each enabled login.

Figure 5. Certificates associated with certificate-mapped logins

For the most part, you don’t have to worry about the logins, unless you’re involved in an audit or performing a security scan, in which case you might need to explain to the powers-that-be why these logins are showing up in your reports.

The public Server and Database Roles

Each SQL Server instance contains the public fixed server role, and each database (including system databases) contains the public fixed database role. All logins belong to the public server role, and all database users belong to the public database role. You cannot drop either role, and you cannot add members to or remove members from either role.

The database engine assigns a set of permissions to the roles by default. Logins inherit all permissions granted to the public server role unless a login has been specifically granted or denied those permissions. The same goes for the public database role. Users inherit all permissions unless they’ve been specifically granted or denied permissions.

To view the permissions assigned to the public server role, run the following SELECT statement:

SELECT pm.state_desc, 
  pm.permission_name,
  pm.class_desc,
  pm.major_id,
  ep.name
FROM sys.server_permissions pm
JOIN sys.server_principals pr 
  ON pm.grantee_principal_id = pr.principal_id
LEFT JOIN sys.endpoints ep
  ON pm.major_id = ep.endpoint_id
WHERE pr.name = 'public';

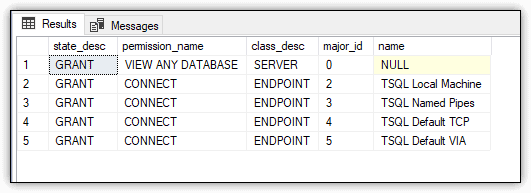
The statement joins the sys.server_permissions, sys.server_principals, and sys.endpoints system views to retrieve the relevant information. On my system, I retained the default permissions, which are shown in Figure 6

Figure 6. Default permissions assigned to the public server role

You can take a similar approach to retrieve the permissions assigned to the public database role:

USE ImportSales1;
GO
SELECT pm.state_desc, 
  pm.permission_name, 
  pm.class_desc,
  pm.major_id,
  OBJECT_NAME(pm.major_id) obj_name
FROM sys.database_permissions pm
JOIN sys.database_principals pr 
  ON pm.grantee_principal_id = pr.principal_id
WHERE pr.name = 'public';

In this case, the public database role is specific to the ImportSales1 database, which was created as part of the examples in the previous article in this series. The database is a simple, contained database that includes only the Sales schema and the Customers table. You can refer back to that article for details about the database, or you can run this statement against another database.

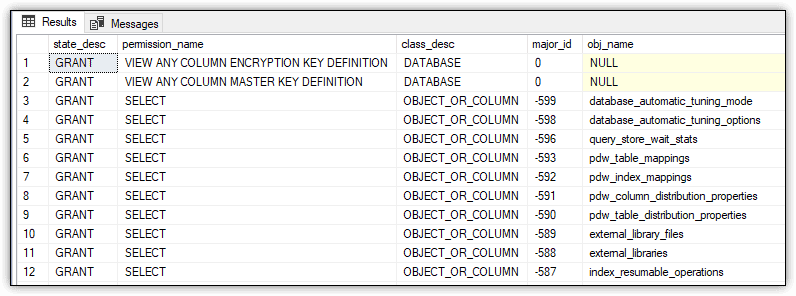
Figure 7 shows part of the results returned by the SELECT statement on my system. As with the public server role, I made no modifications to the public database role. By default, the role has been granted 176 permissions, the majority of which are the SELECT permission granted to system views.

Figure 7. Partial view of the default permissions assigned to the public database role

If you were to run the same query against the master database, it would return a much larger result set (2,254 rows on my system). In this case, the results would also include the EXECUTE permission, granted on system functions and stored procedures.

The public roles are different from other fixed server and database roles because you can grant, deny, and revoke permissions. Even so, you should avoid modifying the public roles and instead create one or more additional roles. However, if you work someplace that insists upon using the public roles, you should grant permissions to the roles only on securables that you want to make available to all users. In addition, you should avoid denying permissions because they can override the permissions granted to individual users or logins.

You can also revoke permissions on the public roles, but be careful when doing so. SQL Server assigns a number of permissions to these roles by default (as you saw in the preceding examples), and many of those permissions are used for routine database operations. Revoking permissions on these roles can impact all logins or users.

The dbo Database User and Schema

Every database contains a dbo user and dbo schema. Although the two are related, they serve very different purposes. (The term dbo stands for database owner.)

The dbo user is added as a member of the db_owner fixed database role. By default, the user is granted all permissions in a database and can perform all activities within the scope of that database. You cannot limit the dbo user or drop the user from the database.

SQL Server automatically maps the sa login, database owner, and members of the sysadmin server role to the dbo user account in each database. To verify this, connect to a SQL Server instance as one of these users and query the CURRENT_USER system function, as in the following example:

SELECT CURRENT_USER;

The SELECT statement should return dbo as the current user.

The dbo user also owns the dbo schema, which is the default schema for all newly created databases and users, unless a different schema is specified. As with the dbo user, you cannot drop the dbo schema.

To verify the login name and default database associated with the dbo user, run the following query against one of your databases:

USE ImportSales1;
GO
SELECT SUSER_SNAME(sid) login_name, default_schema_name
FROM sys.database_principals
WHERE name = 'dbo';

In this case, the query is specific to the ImportSales1 database created for the previous article, but you can use any database. It should return the login for your current connection, as well as the dbo schema.

You can also verify that the dbo user has been added to the db_owner database role:

SELECT member.name
FROM sys.database_role_members rm
JOIN sys.database_principals role  
  ON rm.role_principal_id = role.principal_id  
JOIN sys.database_principals member  
  ON rm.member_principal_id = member.principal_id
WHERE role.name = 'db_owner';

The statement should return dbo, along with any other role members. When I ran the query on my system, I was still working within the context of the ImportSales1 database, so the query returned only dbo, which is tied to my login.

However, look what happens with the WideWorldImporters database, which I attached to my SQL Server instance from the backup file I downloaded from GitHub:

USE WideWorldImporters;
GO
SELECT SUSER_SNAME(sid) login_name, default_schema_name
FROM sys.database_principals
WHERE name = 'dbo';

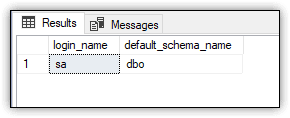
On my system, the results indicate that sa is the associated login, along with dbo as the default schema, as shown in Figure 8.

Figure 8. Login associated with the dbo user

In addition, when I retrieve the members of the db_owner database role, the results include both the dbo user and my login account:

SELECT member.name
FROM sys.database_role_members rm
JOIN sys.database_principals role  
  ON rm.role_principal_id = role.principal_id  
JOIN sys.database_principals member  
  ON rm.member_principal_id = member.principal_id
WHERE role.name = 'db_owner';

Because the dbo user is associated with the sa account, my login is added as a separate member to the db_owner database role. In this way, both my login and the sa login have full control over the database (assuming the sa login is enabled).

Be aware, however, you might not see the same results on your system as I see mine. It’s possible that only the dbo user will be added to the role. It will depend on how you’ve configured your system and added the WideWorldImporters database.

On my system, my login is considered the owner for both the ImportSales1 database and WideWorldImporters database, even though my login is associated only with the dbo user in the ImportSales1 database. To confirm the database owners, I ran the following query:

SELECT name, SUSER_SNAME(owner_sid) 
FROM sys.databases
WHERE name = 'ImportSales1' 
  OR name = 'WideWorldImporters';

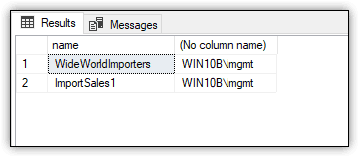
The query returned my login for both databases, as shown in Figure 9.

Figure 9. Login associated with WideWorldImporters and ImportSales1 databases

You should also be aware of the query engine’s behavior when it comes to the dbo schema. When you query a database object without specifying a schema, the query engine first looks in your default schema if it’s other than dbo. If the object is not there, the query engine looks in the dbo schema. If the object is not in that schema, an error is returned.

When you create a user, you can specify a default schema. If you do not, the dbo schema is assumed. Users with dbo as their default schema do not inherit the permissions granted to the dbo user.

In addition, if you specify a default schema other than dbo and the user is a member of the sysadmin server role, the specified schema is ignored and the dbo schema is used. The default schema for all members of sysadmin is dbo.

The guest Database User and Schema

As with dbo, every database contains a guest user and a guest schema. You can use the guest user to grant database access to logins that are not associated with user accounts in that database, a strategy that should not be implemented lightly.

Although the guest user cannot be dropped, it is disabled by default and assigned no permissions. Microsoft recommends that you keep it that way. If enabled, logins that should not be able to get into a database will have access. Do not enable the account unless you have a compelling reason to so.

The guest user owns the guest schema. Like the user, the schema cannot be dropped. However, it contains no objects and has been granted no permissions. In fact, the guest schema is seldom used, if at all.

To verify whether the guest user is enabled, run the following query:

USE ImportSales1;
GO
SELECT u.hasdbaccess, p.default_schema_name
FROM sys.database_principals p
JOIN sys.sysusers u
  ON p.principal_id = u.uid
WHERE p.name = 'guest';

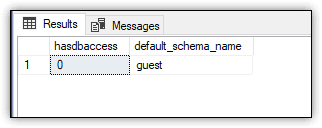
The query should return a hasdbaccess value of 0, indicating that the user account is disabled, as shown in Figure 10. The query should also return guest as the default schema.

Figure 10. Enabled status of the guest user account

If against all advice you decide to enable the guest account, you must grant the CONNECT permission to the user, as shown in the following example:

GRANT CONNECT TO guest;
GO

Granting the CONNECT permission is all it takes to enable the guest user. If you rerun the previous SELECT statement, the hasdbaccess value should now be 1.

At any time (the sooner, the better), you can disable the guest account by revoking the CONNECT permission:

REVOKE CONNECT FROM guest;
GO

To verify whether the guest schema contains any objects, run the following query, which will normally return zero rows:

SELECT o.name
FROM sys.all_objects o
JOIN sys.schemas s
  ON o.schema_id = s.schema_id
WHERE s.name = 'guest';

If you were to enable the guest user, you might want to add objects to the guest schema specifically for that user to access, but chances are, you won’t be touching either one.

The sys Database User and Schema

Every database includes the sys user and sys schema. The sys user owns the sys schema. The user serves no other purpose. It’s associated with no logins and is disabled by default. In all likelihood, you’ll never need to interact with this user account.

The sys schema is another story. The database engine requires the schema for internal use. You cannot modify or drop the schema. It contains a number of important system objects, such as system tables, catalog views, dynamic management views, and built-in functions. You’ve already seen several of the catalog views in action in the previous examples. The sys schema is particularly handy for accessing SQL Server metadata.

You can view the objects in the sys schema by running the following query:

USE ImportSales1;
GO
SELECT o.type_desc, o.name
FROM sys.all_objects o
JOIN sys.schemas s
  ON o.schema_id = s.schema_id
WHERE s.name = 'sys'
ORDER BY o.type_desc, o.name;

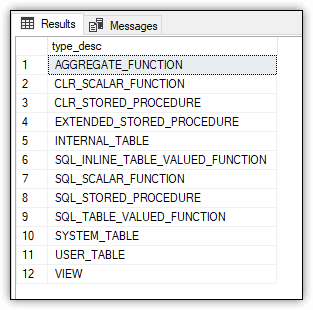
In this case, the SELECT statement is specific to the ImportSales1 database. On my system, the statement returns 2,273 rows, broken into 12 object types. To view a list of the object types, run the following query:

SELECT distinct o.type_desc
FROM sys.all_objects o
JOIN sys.schemas s
  ON o.schema_id = s.schema_id
WHERE s.name = 'sys'
ORDER BY o.type_desc

Figure 11 shows the results I received when I ran the SELECT statement.

Figure 11. The types of objects in the sys schema

You can also retrieve a list of objects based on type, as shown in the following example:

SELECT o.name
FROM sys.all_objects o
JOIN sys.schemas s
  ON o.schema_id = s.schema_id
WHERE s.name = 'sys' 
  AND o.type_desc = 'VIEW'
ORDER BY o.name;

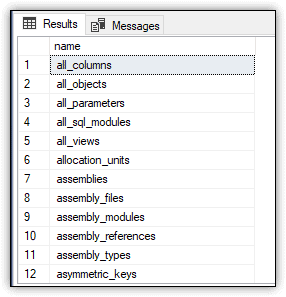
The statement returns only the objects of type VIEW. Figure 12 shows part of the results I received. There were 473 rows in all.

Figure 12. A partial list of the views in the sys schema

For more information about catalog views and dynamic management views, check out my Simple Talk article SQL Server System Views: The Basics.

The INFORMATION_SCHEMA Database User and Schema

Like sys, every database also includes the INFORMATION_SCHEMA user and INFORMATION_SCHEMA schema. Again, the user is there only to support the schema. You cannot drop the user, but it is disabled by default.

Unlike sys, the INFORMATION_SCHEMA schema contains only a small number of views and no other object types. You can confirm this by running the following SELECT statement:

SELECT o.name
FROM sys.all_objects o
JOIN sys.schemas s
  ON o.schema_id = s.schema_id
WHERE s.name = 'INFORMATION_SCHEMA'
ORDER BY o.name;

Figure 13 shows part of the results that I received. In all, there are 21 INFORMATION_SCHEMA views for the ImportSales1 database.

Figure 13. A partial list of the views in the INFORMATION_SCHEMA schema

For more information about INFORMATION_SCHEMA views, refer to the same Simple Talk article, SQL Server System Views: The Basics.

SQL Server’s Odd Collection of Predefined Principals

When working with SQL Server and its databases, it’s important that you understand how the built-in principals work, especially the ones I’ve covered here. For the most part, SQL Server attempts to configure these principals in a way that best protects your data, such as disabling the sa server login or guest database user, but this doesn’t prevent you from taking steps that can disrupt operations or, worse still, open your data up to security risks. The better you understand how to work with the server and database principals, the better you can protect your SQL Server instance and its databases.

The post Introduction to SQL Server Security — Part 4 appeared first on Simple Talk.


from Simple Talk https://ift.tt/2YnZDmd
via
Monday, March 25, 2019

Scripting Out a SQL Server instance (Agent jobs, XEvents, Triggers and the like)

In order for a database system to work, you often need to provide programmable server objects. I’ve written very few databases that didn’t include agent jobs and triggers, or that didn’t require XEvents for diagnostics.  These need to be scripted out in just the same way as database objects. . It can be done via SSMS, of course, but a script provides a safety-net even then. For a DBA, it is useful to script server objects. 
You may be wanting to save just the server objects that are associated with one or more databases. It is always a problem with server scripts that it isn’t always easy to associate agent job steps with a particular database. I don’t have an answer for this. I think the best approach is to filter jobs by name if you have a  job that has a one-to-one relationship with a database.

Here is an example of how to script out the main server programmable objects with the sqlserver module. I’ve included the empty databases in this script, since these are server objects, but you can experiment with the list according to your specific requirements. I’ve chosen to script out the server objects that aren’t system objects. You will get more informationabout settings and configurations if you remove that filter.

$Filepath = 'MyFilePath' # local directory to save build-scripts to
$ServerInstance  = 'MyServer' # server name and instance
$SQLUserName = 'MyLogin' #leave blank if Windows auth

$BadChars = '[\\\/\:\.]' #characters that we don't want in filenames


set-psdebug -strict # to catch subtle errors
$ErrorActionPreference = "stop" # you can opt to stagger on, bleeding, if an error occurs
# Load sqlserver module
$popVerbosity = $VerbosePreference #remember current verbosity setting
$VerbosePreference = "Silentlycontinue"
# the import process is very noisy if you are in verbose mode
Import-Module sqlserver -DisableNameChecking #load the SQLPS functionality
if ([System.Reflection.Assembly]::LoadWithPartialName("Microsoft.SqlServer.Management.XEvent") -eq $null)
{
  throw "Could not load library for Extended Events."
}
$VerbosePreference = $popVerbosity
#Does the directory specified actually exist? If not create it.
if (-not (Test-Path -PathType Container $Filepath))
{
  # we create the  directory if it doesn't already exist
  $null = New-Item -ItemType Directory -Force -Path $Filepath;
}

# get credentials if necessary
if ($SQLUserName -ne '') #then it is using SQL Server Credentials
{
  $SqlEncryptedPasswordFile = `
  "$env:USERPROFILE\$($SqlUserName)-$($SQLInstance).txt"
  # test to see if we know about the password in a secure string stored in the user area
  if (Test-Path -path $SqlEncryptedPasswordFile -PathType leaf)
  {
    #has already got this set for this login so fetch it
    $Sqlencrypted = Get-Content $SqlEncryptedPasswordFile | ConvertTo-SecureString
    $SqlCredentials = `
    New-Object System.Management.Automation.PsCredential($SqlUserName, $Sqlencrypted)
  }
  else #then we have to ask the user for it
  {
    #hasn't got this set for this login
    $SqlCredentials = get-credential -Credential $SqlUserName
    $SqlCredentials.Password | ConvertFrom-SecureString |
    Set-Content $SqlEncryptedPasswordFile
  }
}

$ms = 'Microsoft.SqlServer'
$My = "$ms.Management.Smo" #
if ($SQLUserName -eq '') #dead simple if using windows security
{ $s = new-object ("$My.Server") $ServerInstance  }
else # if using sql server security we do it via a connection object
{
  $ServerConnection = new-object "$ms.Management.Common.ServerConnection" (
    $ServerInstance , $SQLUsername, $SqlCredentials.Password)
  $s = new-object ("$My.Server") $ServerConnection
}

$ScriptOptions = new-object ("$My.ScriptingOptions")
$MyPreferences = @{
  #create the scripting options just the once
  'ExtendedProperties' = $true; #we want extended properties scripted
  'DRIAll' = $true; #Yes, all the constraints
  'ScriptDrops' = $false;
  'Indexes' = $true; # Yup, these would be nice
  'Triggers' = $true; # This should be included when scripting a database
  'ScriptBatchTerminator' = $true; # this only goes to the file
  'IncludeHeaders' = $true; # of course
  'ToFileOnly' = $true; #no need of string output as well
  'IncludeIfNotExists' = $true; # not necessary but the script can be more versatile
  'IncludeDatabaseContext' = $true;
  'Encoding' = [System.Text.Encoding]::UTF8;
}
$MyPreferences.GetEnumerator() |
Foreach{ $Name = $_.name; $ScriptOptions.$name = $_.Value }

#
if ($s.Version -eq $null) { Throw "Can't find the instance $ServerInstance " }
$Scriptdirectory = "$FilePath\$($s.DomainInstanceName -replace $BadChars, '-')"
<# and we can now establish the filename based on the server and maybe create the directories #>
if (-not (Test-Path -PathType Container $Scriptdirectory))
{
  # we create the  directory if it doesn't already exist
  $null = New-Item -ItemType Directory -Force -Path $Scriptdirectory;
}

$ScriptOptions.Filename = "$Scriptdirectory\Agent.sql";
$s.jobserver.script($ScriptOptions) #script out the agent creation (its properties, in fact!)
#properties, roles,
@('Databases', 'audits', 'AvailabilityGroups', 'CryptographicProviders', 'Endpoints', 'Settings',
  'Triggers', 'BackupDevices', 'LinkedServers', 'Logins', 'UserDefinedMessages') |
foreach { $s."$_" } | # we can get a description of each type from the URN and write each object out
  foreach {
    $currentCollection = $_.urn.Type;
    if ($_.IsSystemObject -eq 0)
    {
      $ScriptOptions.Filename = "$Scriptdirectory`\$currentCollection-$($_.Name -replace $BadChars, '-').sql";
      $ScriptOptions.ScriptDrops = $true; $ScriptOptions.AppendToFile = $false;
      try { $_.Script($ScriptOptions) }
      catch { write-warning "$currentCollection : $($_)" } #delete server object if it is there
      $ScriptOptions.ScriptDrops = $false; $ScriptOptions.AppendToFile = $true;
      try { $_.Script($ScriptOptions) }
     catch { write-warning "$currentCollection : $($_)" } #create server object if not there 
    }
  }
#iterate over the collections we want to script out...  
@('Alerts', 'Jobs', 'Operators',
  'SharedSchedules', 'ProxyAccounts', 'TargetServers') |
foreach { $s.JobServer."$_" } | # all the Agent objects we want to script out
  foreach {
  $currentJobserverCollection = $_.urn.Type;
  $ScriptOptions.Filename = "$Scriptdirectory`\$currentJobserverCollection-$($_.Name -replace $BadChars, '-').sql";
  $ScriptOptions.ScriptDrops = $true; $ScriptOptions.AppendToFile = $false;
  try { $_.Script($ScriptOptions) }
  catch { write-warning "$currentJobServerCollection : $($_)" } #script delete agent object if it is there
  $ScriptOptions.ScriptDrops = $false; $ScriptOptions.AppendToFile = $true;
  try { $_.Script($ScriptOptions) }
  catch { write-warning "$currentJobserverCollection : $($_)" } #create agent object 
}
#Now we script out the Extended events (xEvents)
#first we get our connection
$SqlConn = $s.ConnectionContext.SqlConnectionObject
#we use this to instantiate our Xtended Events store
$store = New-Object  Microsoft.SqlServer.Management.XEvent.XEStore $SqlConn
#we script out all the sessions.
$store.Sessions | foreach{
  $_.ScriptCreate().ToString() > "$Scriptdirectory`\Events-$($_.Name -replace $BadChars, '-').sql";
}

This should end up providing you with a directory with all your programmable server objects scripted out, each in its own file.


The post Scripting Out a SQL Server instance (Agent jobs, XEvents, Triggers and the like) appeared first on Simple Talk.


from Simple Talk https://ift.tt/2Fy7k0O
via

Wednesday, March 20, 2019

Scripting out several databases on a server

A while ago, I wrote an article Automated Script-generation with Powershell and SMO about using SMO to script out a SQL Server database. It has remained surprisingly but agreeably popular. SMO is still there, but now part of the sqlserver module that is included with SSMS and downloadable. Someone recently asked me whether it was possible to alter one of the scripts to allow several databases to be scripted out at one go. The answer of course, ‘Do bears deposit nitrogenous waste-products in the wood?’. I thought I ought to upgrade a script to current standards, and add support for those who have to use a SQL Server Login. I also initialize the scripting preferences in a different way that allows configuration to be read from disk or specified differently for each database. I haven’t implemented these configuration  options but merely made it possible by having the configuration data in a hash table, so it can be read in. 

Here is the code

$Filepath = 'PathToWhereToStoreThem' # local directory to save build-scripts to
$DataSource = 'MySQLServerInstance' # server name and instance
$Database = 'A*' # the database to copy from. wildcard comparison *, ? [a-d](range) and [and](set ofchars)
$SQLUserName = 'PhilFactor'#leave blank if Windows auth
# set "Option Explicit" to catch subtle errors
set-psdebug -strict
$ErrorActionPreference = "stop" # you can opt to stagger on, bleeding, if an error occurs
# Load SMO assembly, and if we're running SQL 2008 DLLs load the SMOExtended and SQLWMIManagement libraries
$popVerbosity = $VerbosePreference
$VerbosePreference = "Silentlycontinue"
# the import process is very noisy if you are in verbose mode
Import-Module sqlserver -DisableNameChecking #load the SQLPS functionality
$VerbosePreference = $popVerbosity
#Does the directory specified actually exist? If not create it.
if (-not (Test-Path -PathType Container $Filepath))
{
  # we create the  directory if it doesn't already exist
  New-Item -ItemType Directory -Force -Path $Filepath;
}

# get credentials if necessary
if ($SQLUserName -ne '') #then it is using SQL Server Credentials
{
  $SqlEncryptedPasswordFile = `
       "$env:USERPROFILE\$($SqlUserName)-$($SQLInstance).txt"
  # test to see if we know about the password in a secure string stored in the user area
  if (Test-Path -path $SqlEncryptedPasswordFile -PathType leaf)
  {
    #has already got this set for this login so fetch it
    $Sqlencrypted = Get-Content $SqlEncryptedPasswordFile | ConvertTo-SecureString
    $SqlCredentials = `
    New-Object System.Management.Automation.PsCredential($SqlUserName, $Sqlencrypted)
  }
  else #then we have to ask the user for it
  {
    #hasn't got this set for this login
    $SqlCredentials = get-credential -Credential $SqlUserName
    $SqlCredentials.Password | ConvertFrom-SecureString |
    Set-Content $SqlEncryptedPasswordFile
  }
}

$ms = 'Microsoft.SqlServer'
$My = "$ms.Management.Smo" #
if ($SQLUserName -eq '') #dead simple if using windows security
{ $s = new-object ("$My.Server") $DataSource }
else # if using sql server security we do it via a connection object
{
  $ServerConnection = new-object "$ms.Management.Common.ServerConnection" (
                                      $DataSource, $SQLUsername, $SqlCredentials.Password)
  $s = new-object ("$My.Server") $ServerConnection
}

if ($s.Version -eq $null) { Throw "Can't find the instance $Datasource" }
$CreationScriptOptions = new-object ("$My.ScriptingOptions")
$MyPreferences = @{
  'ExtendedProperties' = $true; #we want extended properties scripted
    'DRIAll' = $true; #Yes, all the constraints
  'Indexes' = $true; # Yup, these would be nice
  'Triggers' = $true; # This should be included when scripting a database
  'ScriptBatchTerminator' = $true; # this only goes to the file
  'IncludeHeaders' = $true; # of course
  'ToFileOnly' = $true; #no need of string output as well
  'IncludeIfNotExists' = $true; # not necessary but it means the script can be more versatile
}
$MyPreferences.GetEnumerator() |
Foreach{ $Name = $_.name; $CreationScriptOptions.$name = $_.Value }

$s.Databases | where name -like $Database |
foreach {
    write-verbose "now doing $($_.name)"
  $transfer = new-object ("$My.Transfer") $_
  $CreationScriptOptions.Filename = "$($FilePath)\$($_.Name)_Build.sql";
  $transfer.options = $CreationScriptOptions # tell the transfer object of our preferences
  $transfer.ScriptTransfer()
}
"All done, Master. "

SSMS uses the same library for scripting databases. By using code like this, you are just automating what would be a tedious and error-prone process. If you look at the original article, you’ll see that there are ways of doing an object-level script and so on, so you can match pretty-well everything you can do within SSMS.

The post Scripting out several databases on a server appeared first on Simple Talk.


from Simple Talk https://ift.tt/2JtvOxg
via

Wednesday, March 13, 2019

Converting a History Table into a System-Versioned Temporal Table

SQL Server has had many different methods to track changes to data. There has been old-fashioned trigger-based logging, Change Data Capture, and Change Tracking. All of these features allow you to see how data has changed with varying degrees of how far you can go back historically to see the changes. However, there has never been the ability to see how the entire table looked at any given point in time. That is what Temporal Tables do – they log every change that happens to the table. When you want to query it for any specific period of time, SQL Server will do the hard work of getting the snapshot of how the data in the entire table looked at that time.

A great introduction on how to set up temporal tables in different ways with various limitations can be found here. In this article, you will learn how to set up versioning when creating a new table and how to convert a table with an existing history to a system-versioned temporal table.

Creating a System-Versioned Temporal Table


Table versioning can be created on entirely new tables, or on existing tables. The history table, or the table where changes are logged, can be:

  • An entirely new, ‘anonymous’ table with no name specified in which case SQL Server creates a table and assigns a name,
  • A ‘default’ table with a name as desired by you,
  • An existing table with data that you now want to use as a history log.

To get started, create an entirely new table and version it first.

CREATE TABLE [dbo].[Region]
(RegionID INT IDENTITY(1,1) NOT NULL 
     CONSTRAINT PK_Region PRIMARY KEY CLUSTERED,
 RegionDescription VARCHAR(100) NULL,
 StartDateTime datetime2 generated always as row start NOT NULL,
 EndDateTime datetime2 generated always as row end NOT NULL,
 PERIOD FOR SYSTEM_TIME (StartDateTime, EndDateTime))
 WITH (SYSTEM_VERSIONING = ON (HISTORY_TABLE = dbo.Region_History));

 INSERT INTO [dbo].[Region]
 (RegionDescription)
 VALUES ('North USA')
INSERT INTO [dbo].[Region]
 (RegionDescription)
  VALUES
 ('South USA'),
 ('NorthEast USA')
SELECT * FROM [dbo].[Region]

It is easy to see that the column StartDateTime is populated with current date and time in UTC, and EndDateTime is the max value that can be specified for a datetime2 data type. These are not specified in the insert statements and do not have defaults defined, they get autopopulated. Notice the syntax in the CREATE TABLE statement, generated always as row start and generated always as row end.

Now take a look at what was logged in history table:

SELECT * FROM [dbo].[Region_History]

This returns nothing. This is because logging is limited to updates and deletes and does not log inserts.

Now, if you run an update and then look at the history table, you will see that the previous row has been logged. The StartDateTime and EndDateTime values specify exactly when this row was active.

UPDATE [dbo].[Region] SET RegionDescription = 'NorthEast US' 
WHERE RegionDescription = 'NorthEast USA'
SELECT * FROM [dbo].[Region_History]

If you look at the main table for the same row, you can see that it has a new start date that matches the date when previous version of the row was retired.

SELECT * FROM [dbo].[Region]

Deleting a row also works similarly. When the end date of the deleted row matches date when it was deleted and there is no matching row in the main table.

DELETE  FROM [dbo].[Region] WHERE RegionID = 3
SELECT * FROM [dbo].[Region_History] WHERE RegionID = 3

Adding Versioning an Existing Table

The next scenario is to transition an existing history table to versioning. Trigger-based change tracking is still a very common and easy-to-implement process used at many places. This example explores a simple way this was implemented and how to use the same table, without changing or deleting any data to implement versioning.

IF (EXISTS (SELECT * 
                 FROM INFORMATION_SCHEMA.TABLES 
                 WHERE TABLE_SCHEMA = 'dbo' 
                 AND  TABLE_NAME = 'Region'))
        BEGIN
        ALTER TABLE dbo.Region SET (system_versioning = off)
        DROP TABLE dbo.Region
        DROP TABLE dbo.Region_History
        END
go
CREATE TABLE  [dbo].[Region](
        [RegionID] [int] IDENTITY(1,1) NOT NULL,
        [RegionDescription] [varchar](100) NULL,
        [CreateUser] [nvarchar](100) NOT NULL default 
              (COALESCE(SUSER_NAME(SUSER_ID()),USER_NAME())),
        [CreateDate] DateTime NOT NULL default getdate(),
        [UpdateUser] [nvarchar](100) NOT NULL default 
              (COALESCE(SUSER_NAME(SUSER_ID()),USER_NAME())),
        [UpdateDate] DateTime NOT NULL default getdate()
 CONSTRAINT [PK_Region] PRIMARY KEY CLUSTERED 
(
        [RegionID] ASC
)WITH (PAD_INDEX = OFF, STATISTICS_NORECOMPUTE = OFF, 
     IGNORE_DUP_KEY = OFF, ALLOW_ROW_LOCKS = ON, 
     ALLOW_PAGE_LOCKS = ON) ) 
CREATE TABLE  [dbo].[Region_History](
        [RegionHistoryID] [int] IDENTITY(1,1) NOT NULL,
        [RegionID] [int] NOT NULL,
        [RegionDescription] [varchar](100) NULL,
        [CreateUser] [nvarchar](100) NOT NULL ,
        [CreateDate] DateTime NOT NULL ,
        [UpdateUser] [nvarchar](100) NOT NULL 
           default (COALESCE(SUSER_NAME(SUSER_ID()),USER_NAME())),
        [UpdateDate] DateTime NOT NULL default getdate()
) 
GO

There are two simple triggers, one for updates and one for deletes, to track changes to the table.

CREATE TRIGGER [dbo].[Region_Update] on [dbo].[Region]
AFTER UPDATE
AS
BEGIN
  INSERT INTO dbo.Region_History 
  (RegionId,RegionDescription,CreateUser,CreateDate,
      UpdateUser,UpdateDate)
  SELECT i.RegionId,i.RegionDescription,i.CreateUser,i.CreateDate,
     SUSER_SNAME(), getdate()
  from  dbo.Region r 
  inner join inserted i on r.RegionID=i.RegionID 
END
GO
CREATE TRIGGER [dbo].[Region_Delete]   
ON [dbo].[Region]   
AFTER DELETE   
AS   
  INSERT INTO [dbo].[Region_History]
([RegionID],[RegionDescription],[CreateUser],
     [CreateDate],UpdateUser,UpdateDate )
SELECT  [RegionID],[RegionDescription],[CreateUser],[CreateDate],
      SUSER_SNAME(), getdate()  FROM DELETED
GO
--Now insert data into the main table. 
INSERT INTO [dbo].[Region]
(RegionDescription)
values 
('Northeast')
,('Southwest')
,('West')
,('Southeast')
,('Midwest');
SELECT * FROM [dbo].[Region]

Intentionally change the same records several times so that the history table has a decent volume of data. This script will take about 10 minutes to run as you are recreating a history table with several updates with different timestamps on them.

DECLARE @counter INT
SELECT @COUNTER = 100
WHILE @counter > 0
BEGIN
UPDATE [dbo].[Region]
SET RegionDescription = 'NorthEast' 
WHERE RegionDescription = 'Northeast'
WAITFOR DELAY '00:00:01'
UPDATE [dbo].[Region]
SET RegionDescription = 'Southwest ' 
WHERE RegionDescription = 'Southwest'
WAITFOR DELAY '00:00:01'
UPDATE [dbo].[Region]
SET RegionDescription = 'Southeast ' 
WHERE RegionDescription = 'Southeast'
WAITFOR DELAY '00:00:01'
UPDATE [dbo].[Region]
SET RegionDescription = 'Midwest ' 
WHERE RegionDescription = 'Midwest'
WAITFOR DELAY '00:00:01'
UPDATE [dbo].[Region]
SET RegionDescription = 'MidWest' 
WHERE RegionDescription = 'Midwest '
WAITFOR DELAY '00:00:01'
UPDATE [dbo].[Region]
SET RegionDescription = 'SouthWest' 
WHERE RegionDescription = 'Southwest '
WAITFOR DELAY '00:00:01'
UPDATE [dbo].[Region]
SET RegionDescription = 'SouthEast' 
WHERE RegionDescription = 'Southeast '
SELECT @counter = @counter - 1
END

Also, delete a couple of records from the main table.

DELETE FROM [dbo].[Region] WHERE RegionDescription = 'West'
DELETE FROM [dbo].[Region] WHERE RegionDescription = 'MidWest'
SELECT * FROM dbo.Region

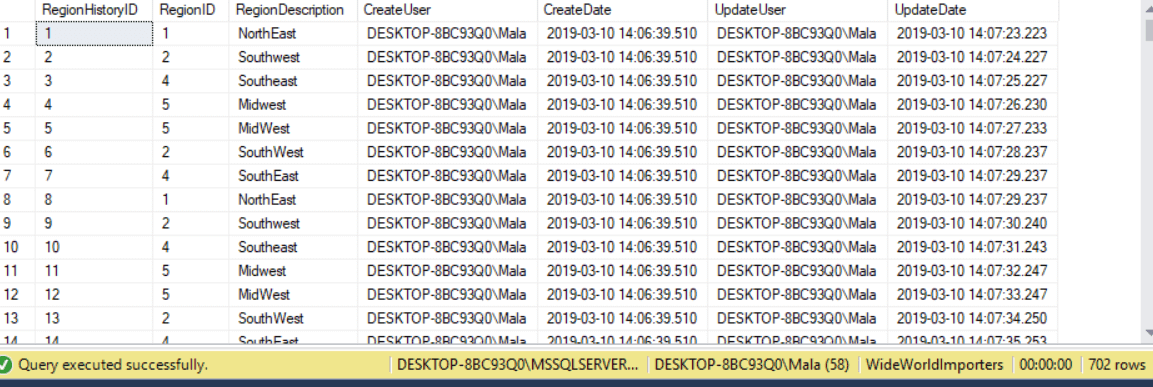
You’ll see 702 rows in the history table.

SELECT * FROM dbo.Region_History

The goal is to transition these two tables to temporal tables by keeping this data intact and allowing for traditional querying as well as querying using temporal table methodology.

As a first step, add start and end dates to both tables:

ALTER TABLE dbo.Region
ADD [StartDate] [datetime2] NOT NULL DEFAULT (getdate()),
[EndDate] [datetime2] NOT NULL 
    DEFAULT (convert(datetime2, '9999-12-31 23:59:59.9999999'))
ALTER TABLE dbo.Region_History
ADD [StartDate] [datetime2] NOT NULL DEFAULT (getdate()),
[EndDate] [datetime2] NOT NULL 
   DEFAULT (convert(datetime2, '9999-12-31 23:59:59.9999999'))

The structures of the history table and main table must be identical for turning versioning on. Since there is one column, regionhistoryid, in the history table that is not in the main table, you can either get rid of it in the history table or add it to the main table. Getting rid of it will mean the history table has no key per the older method. This is not ideal if you want to query older data with that method. Instead, add it to the main table. You won’t be using it, just add it to ensure conformance for this purpose.

ALTER TABLE [dbo].[Region] ADD RegionHistoryId int;

The next step is to add the period to connect two new fields in the main table and then attempt to enable versioning.

ALTER TABLE dbo.Region   
ADD PERIOD FOR SYSTEM_TIME ([StartDate], [EndDate]) 
ALTER TABLE dbo.Region  
   SET (SYSTEM_VERSIONING = ON (HISTORY_TABLE = dbo.Region_History, 
      DATA_CONSISTENCY_CHECK = ON))

This returns an error as shown below:

SQL Server will not allow identity columns in a history table. The identity property must be removed, but the data in this column is needed. To solve this, create another column, move data there, drop this column and rename the new column to the old name.

ALTER TABLE [dbo].[Region_History] ADD RegionHistId int;
GO
UPDATE [dbo].[region_history] SET regionhistid = regionhistoryid;
GO
ALTER TABLE [dbo].[region_history] DROP COLUMN regionhistoryid;
GO
EXEC sp_RENAME 'dbo.region_history.RegionHistid' 
     , 'RegionHistoryID', 'COLUMN';
GO

Now that the identity column is removed from the history table, try to turn versioning on again. This time you’ll get another error.

ALTER TABLE dbo.Region  
   SET (SYSTEM_VERSIONING = ON (HISTORY_TABLE = dbo.Region_History, 
      DATA_CONSISTENCY_CHECK = ON))

The data consistency check runs DBCC CHECKCONSTRAINT under the hood and comes up with issues if constraints do not validate. The default value of the new EndDate column is the maximum date of the system which, of course, is in the future.

There are several ways to resolve this problem. One way is to enable versioning but to skip the checks. Don’t run this code, but here it is for your reference:

ALTER TABLE dbo.Region  
   SET (SYSTEM_VERSIONING = ON (HISTORY_TABLE = dbo.Region_History, 
      DATA_CONSISTENCY_CHECK = OFF))

This essentially means the data that is currently in the history table cannot be queried on with methods used to query temporal tables. You may also run into issues with querying any new data because older data is bad and has time period overlaps. This method is not recommended since it carries a lot of risk.

Instead, it is better to fix the data for time periods to match what is expected when using temporal table methodologies. Each history record must have a start and end date in the past during which the row was valid. The start date of each history record must match the end date of the one before it and the end date should be the start date of the next one and so on. The start date of the main table record should equal the last end date of its history. Cleaning up the data in this way will ensure that there are no time gaps.

To perform the cleanup, follow these three steps:

Step 1: Find the first history record for each row in the main table and set start date to equal the create date and end date to equal update date.

UPDATE dbo.region_history SET startdate = createdate, 
  enddate = updatedate
--select a.regionid,a.regionhistoryid,b.slno
FROM dbo.region_history a INNER JOIN 
(SELECT regionid,regionhistoryid,
   RANK() OVER (PARTITION BY regionid ORDER BY regionhistoryid) AS slno 
 FROM dbo.region_history) b
ON a.regionid = b.regionid AND a.regionhistoryid = b.regionhistoryid 
  AND b.slno = 1

Step 2: Find the records that are dated after the first one, and update them in sequence, the start date of each record should be equal to end date of the previous one.

UPDATE dbo.region_history SET startdate = b.priorupdatedate,
  enddate = a.updatedate
--select a.*,b.priorupdatedate, b.slno
FROM dbo.region_history a INNER JOIN 
(SELECT regionid,regionhistoryid,updatedate,
  LAG(updatedate) OVER (PARTITION BY RegionId order by updatedate) 
    AS priorupdatedate,
  RANK() OVER (PARTITION BY regionid ORDER BY regionhistoryid) AS slno 
  FROM dbo.region_history) b
ON a.regionid = b.regionid AND a.regionhistoryid = b.regionhistoryid 
   AND b.slno > 1 and b.priorupdatedate IS NOT NULL

Step 3: The last date of the very last history record should equal the start date in main table of the same record. Remember that you have old triggers still enabled, so any changes you make to the main table will be logged again. So first, you have to drop those triggers. You also have to temporarily remove the period.

DROP TRIGGER [dbo].[Region_Delete]
DROP TRIGGER [dbo].[Region_Update]
ALTER TABLE dbo.region DROP PERIOD FOR system_time;

Then, run an update to bridge the history on the history table and main table.

WITH RegionCTE AS
(
    SELECT RegionID, maxupdatedate = MAX(updatedate) 
    FROM dbo.Region_History GROUP BY regionid
)
UPDATE dbo.region SET startdate = b.maxupdatedate,
   enddate = '9999-12-31 23:59:59.9999999'
--select a.*,b.priorstartdate
FROM dbo.region a INNER JOIN RegionCTE b  
ON a.regionid = b.regionid

You may, if you choose to, drop the columns createuser, createdate, updatedate, updateuser, and regionhistoryid from both tables at this point. If you have older queries using these columns, though, this might not be desirable to do.

Now, when you add the period back in and set versioning on, it works like a charm. You have also covered all time gaps involved so that querying using both the older method and the new method in versioning will work the same.

ALTER TABLE dbo.Region   
   ADD PERIOD FOR SYSTEM_TIME ([StartDate], [EndDate])
ALTER TABLE dbo.Region  
   SET (SYSTEM_VERSIONING = ON (HISTORY_TABLE = dbo.Region_History, 
   DATA_CONSISTENCY_CHECK = ON))
SELECT * FROM dbo.Region 
FOR SYSTEM_TIME AS OF '2019-03-10 14:07:29.2366667' ;

Gives results as below:

DECLARE @ADayAgo datetime2   
SET @ADayAgo = DATEADD (day, -2, getdate())   
/*Comparison between two points in time for subset of rows*/   
SELECT D_1_Ago.[RegionID], D.[RegionID],   
D_1_Ago.[RegionDescription], D. RegionDescription,
D_1_Ago.[StartDate], D.[StartDate],   
D_1_Ago.[EndDate], D.[EndDate]   
FROM [dbo].[Region] FOR SYSTEM_TIME AS OF @ADayAgo AS D_1_Ago   
JOIN [dbo].[Region] AS D ON  D_1_Ago.[RegionID] = [D].[RegionID]    
AND D_1_Ago.[RegionID] BETWEEN 1 and 4 ;

(The results returned may depend on when you run this query – in comparison to when the data was created, so use the right date for the variable @Adayago).

Converting Your Data

Cleaning up the data to make it conform to the system-version temporal tables can be quite tricky, and your scenario may be even more complex. Here are a few things to keep in mind:

  • The start date should always be less than the end date in both tables.
  • If you have multiple history records for a single parent record in main table, the start and end dates should also be sequential in ascending order with no period overlaps.
  • The end date for the last row in the history table should match the start date for the active record in the parent table.

Deleting data that does not obey these conditions is also a possible solution. Since this destroys the purpose of even having an existing table converted to history, this is not recommended. Instead you could keep that table as is and use a brand-new table to store versioning history.

It is also noteworthy that table versioning does not capture who made the change. That is something you may have to do manually, if you have a need to get this information. This trigger based workaround suggested by MVP Aaron Bertrand is a good way to incorporate this.

Removing Versioning

Eventually you may have e a scenario where you need to drop the tables or remove versioning entirely. Reasons might be that the table is gathering too much history or the footprint is not affordable.

To do this, you need set system versioning off and drop period for system_time. You can remove the date columns too since they are not of much relevance if the table is not using them but this optional.

There are a few steps to go through for this process and the following script can come in handy.

DECLARE @DefaultConstraint nvarchar(200)
DECLARE @Tablename nvarchar(200)
DECLARE @startdatecolumnname nvarchar(200)
DECLARE @enddatecolumnname nvarchar(200)
SELECT @Tablename = 'dbo.Region'
SELECT @startdatecolumnname = 'SysStartTime'
SELECT @enddatecolumnname = 'SysEndTime'
EXEC('ALTER TABLE ' + @Tablename + ' SET (system_versioning = off)')
EXEC('ALTER TABLE ' + @Tablename + ' DROP PERIOD FOR system_time;')
SELECT @DefaultConstraint = Name FROM SYS.DEFAULT_CONSTRAINTS 
WHERE PARENT_OBJECT_ID = OBJECT_ID(@Tablename) 
AND PARENT_COLUMN_ID = (SELECT column_id FROM sys.columns 
WHERE NAME = @startdatecolumnname 
AND object_id = OBJECT_ID(@Tablename))
IF @DefaultConstraint IS NOT NULL
EXEC('ALTER TABLE ' + @Tablename +  
   ' DROP CONSTRAINT ' + @DefaultConstraint)
EXEC('ALTER TABLE ' + @Tablename + 
   ' DROP COLUMN IF EXISTS ' + @startdatecolumnname)
SELECT @DefaultConstraint = Name FROM SYS.DEFAULT_CONSTRAINTS 
WHERE PARENT_OBJECT_ID = OBJECT_ID(@Tablename) 
AND PARENT_COLUMN_ID = (SELECT column_id FROM sys.columns 
WHERE NAME = @enddatecolumnname 
AND object_id = OBJECT_ID(@Tablename))
IF @DefaultConstraint IS NOT NULL
EXEC('ALTER TABLE ' + @Tablename + 
   ' DROP CONSTRAINT ' + @DefaultConstraint)
EXEC('ALTER TABLE ' + @Tablename + 
   ' DROP COLUMN IF EXISTS ' + @enddatecolumnname)

Summary

Data Versioning is complex and there are no two ways of versioning that work exactly the same. There are many situations you may run into if you are transitioning from an older method to temporal tables. Knowing what SQL Server expects would help this transition to happen smoothly. Below table has a summary of errors you can encounter. Temporal tables are a great feature and very easy to use, once we cross the hurdle of setting them up.


The post Converting a History Table into a System-Versioned Temporal Table appeared first on Simple Talk.


from Simple Talk https://ift.tt/2EZHuCx
via

Breaking the 4th Wall with Unity

Have you ever been around someone who thinks all the computers in the world will somehow gain awareness and wipe humanity off the planet? If you have not, then your social circle is far more pleasant than others. But pretend for a moment you have someone like that. Have you ever thought about pulling a prank to make them think a simple game they’re playing is actually aware of who they are and some of the things they’re doing? Now that would be funny, if a bit cruel. Usually, breaking the fourth wall in any medium is a matter of smart writing more than anything else. This isn’t to say the programmers can’t get involved. A well-known example of breaking the fourth wall comes from Metal Gear Solid where a certain boss character would comment on some of the games you’ve been playing based off what data was in your memory card.

Even now, it’s always fun seeing those things despite how creepy it admittedly is. While writers certainly do most of the legwork with this kind of thing, it was a team of programmers that ultimately made the above example possible. If it can be done back in the 1990s, it can certainly be done now. Here, the aim is to create a Unity project that will pull files from a user’s computer to change items like images on the screen or simple text. And of course, this will be done in such a way to trick the user into thinking the game knows more about them than they would probably like.

Setup

Every prank begins with a little preparation. Start by creating a new project in Unity as shown in Figure 1.

Figure 1: Creating a new project.

Of course, the project can be named whatever you wish. This example will name the project 4thWall. It will be a 3D project, though you can just as easily apply the same ideas in a 2D project. Decide on a location for your project then click the Create Project button, Figure 2, at the bottom right of the window.


Figure 2: Project settings.


Several objects will be needed to make this project function. In total, you will need a text object, an empty game object that will hold your script, an object that can play back a video from your computer, and four sprite objects that will be used to display images collected from your computer. Begin with what will be referred to as the GameManager. Create a new empty object by navigating to the Hierarchy window and selecting Create->Create Empty. You’ll find the menu item in Figure 3.

Figure 3: Creating an empty game object.

Next up are the sprite objects. These are as simple as clicking that same Create button in the Hierarchy and selecting 2D Object->Sprite. After creating the object you’ll want to give it a default image to use. Select the object in the Hierarchy, then navigate to the Inspector window. Under the Sprite Renderer component, press the button at the far right of the Sprite field as shown in Figure 4.

Figure 4: Setting a placeholder sprite.

In the window that appears, select any of the images you wish to use as a placeholder image. In Figure 5, the example is selecting UISprite as the placeholder. After this, you should be able to see your sprite object in the center of the screen. Be aware that the image is a small by default.

Figure 5: List of sprites you can use as placeholders.

You can duplicate this object by selecting it in the Hierarchy and pressing Ctrl + D. Make sure there are four sprite objects by the time you are finished. For the sake of knowing what each object is, go ahead and name these four sprite objects Pic1, Pic2, Pic3, and Pic4 as shown in Figure 6.

Figure 6: The Hierarchy so far.

Though small, it is advised to leave the Pic objects at their default scale. This is because the images being pulled from the computer will most likely be large in size, much larger than the sprite you’re currently using. Once loaded, the images appear at an appropriate size. However, they still need to be moved to different locations. Pulling multiple images from a user’s computer is less impressive when you can only see one of them at any given moment. By editing the Position values in each object’s Transform component, you can set exact locations for each object. The table below gives the recommended positions of each Pic object.

Object

Position X

Position Y

Pic1

-9

4

Pic2

9

-2

Pic3

-9

-2

Pic4

9

4

Table 1: Position of all Pic objects.

With the Pic objects set up, you now need a video player created. This object, as you might have guessed, will play whatever video file it’s given. During runtime, your upcoming script will select a video from the user’s computer to play automatically. Like with the GameManager object you’ll want to create an empty game object. Once again, a name will be assigned to this object. Simply naming it Video should do.

Once that’s been done, a new component will be attached to Video. In the Inspector window you’ll want to press the Add Component button as shown in Figure 7.

Figure 7: Adding a new component.

Search video to find the Video Player component. Once found, select the component to attach it to your new object. Figure 8 shows you where to do this.

Figure 8: Selecting the Video Player component.

Ordinarily, the Video Player component might be used to play a cutscene in a game. Here it will be used for the purpose of shattering the fourth wall. After attaching the component there’s a handful of items that need changing. For starters, set the Loop checkbox to true. Then, change the Render Mode to Camera Far Plane. This allows the video to be played wherever the camera is currently facing and will be placed behind other objects. Click and drag Main Camera into the Camera field, then set the alpha to 0.25. Finally, change the Aspect Ratio to No Scaling as scaling will most likely not be needed.

When you’ve done all this, the component should look like the one in Figure 9.

Figure 9: Video Player settings.

The final object to create is the Text object. Using the same Create button as before, navigate to UI->Text to create your Text object. You may leave the object with its default name if you wish. Be sure you also set the position of Text to ten for Position X and fifty for Position Y. Then adjust the width and height of the object to five hundred and three hundred respectively.

By default, the Text object will simply have New Text as the default text, but you can change that if you’d prefer it to be something else. However, you will want to set the Font Size to twenty-five to make the text more readable. You will also want to set the alignment to the center of the screen. Figure 10 shows the settings.

Figure 10: The complete Text object.

The stage is now set. Four sprite objects dot the world, some text is on the screen, and a video player is awaiting input. All you need to do now is gather a few files from your computer and load them into Unity. Typically, this is done by simply clicking and dragging assets into the Unity editor, but for your purposes, this is going to go a step further. A C# script will be used to randomly pull some files from a computer and feed them into Unity.

To create this script, navigate to your Assets window, right click, then navigate to Create->C# Script as shown in Figure 11.

Figure 11: Creating a new script.

Name this script NewScript, then double click it to open Visual Studio and begin coding.

The Code

Right off the bat, you’ll need to make sure you have the following using statements:

using UnityEngine;
using UnityEngine.UI;
using UnityEngine.Video;
using System;
using System.IO;
using System.Collections.Generic;

Of these statements, only UnityEngine.Video is new to this series. As you may have guessed, it allows you to perform video related tasks from within your code. These tasks can include assigning and playing a video clip. With these statements included, you’ll now want to declare two variables and an array.

public Text uiText;
public SpriteRenderer[] pictures;
public VideoPlayer vidPlayer;

Later on, you’ll assign many of the objects you created to these variables. In the case of pictures, you’ll write the code in a way that will allow you, the creator of this program, to pull more pictures if you desire. Of course, this would require placing more sprite objects within the world. The code should resemble Figure 12.

Figure 12: All using statements and variable declarations.

The Update function can be deleted or commented out, as it will not be needed in this example. Before moving on to the Start function, create a method that will be used later. This method will return a Sprite when called, which will be useful when assigning images to the Pic objects.

Sprite LoadImage(Vector2 size, string filepath)
{
        byte[] bytes = File.ReadAllBytes(filepath);
        Texture2D pic = new Texture2D((int)size.x, (int)size.y, 
                   TextureFormat.RGB24, false);
        pic.filterMode = FilterMode.Trilinear;
        pic.LoadImage(bytes);
        Sprite sp = Sprite.Create(pic, 
            new Rect(0, 0, pic.width, pic.height),
            new Vector2(0.5f, 0.5f));
        return sp;
}

First, the method reads all the bytes from a file. It gets this file based on a filepath that is provided. Then it creates a Texture2D variable named pic from that file. But of course, Texture2D is not the same as a Sprite. Fortunately, there’s a useful method that allows you create a new sprite from a Texture2D file. A new sprite, simply called sp, is created using pic. Then sp gets returned, which then results in a pic object receiving its assigned image. The new function should look like Figure 13.

Figure 13: The LoadImage method.

Now the Start method can be completed. One thing you’ll want the onscreen text to do is address the user by their name. Oftentimes a player will be asked to input their name in game, but this project is once again going a step further. Operating systems still require that a user be created in order to use the computer. You’re going to get the username associated with the account being used as the first thing you do.

string username = Environment.UserName;

Simply filling in some text isn’t the only thing this string variable will be useful for. It will also be used when navigating to certain directories to acquire files. The next several lines will gather files in certain directories and fill arrays with them. You’ll also be setting up the arrays that will be used to fill in images and some of the text that will appear on the screen.

string docPath = "C:\\Users\\" + username + "\\Documents\\";
List<string> documents = new 
        List<string>(Directory.GetFiles(docPath, "*.docx"));
string[] docFiles = new string[documents.Count];
string imagePath = "C:\\Users\\" + username + "\\Pictures\\";
List<string> images = 
       new List<string>(Directory.GetFiles(imagePath, "*.jpg"));
Sprite[] imageFiles = new Sprite[images.Count];
string vidPath = "C:\\Users\\" + username + "\\Videos\\";
string[] videos = Directory.GetFiles(vidPath, "*.mp4");
if (videos.Length != 0)
        vidPlayer.url = 
        videos[UnityEngine.Random.Range(0, videos.Length)];

All three blocks of code do essentially the same thing with some minor differences between each section. First, a string variable is created. This string contains a file path that corresponds with the type of files you wish to pull. Then the Directory.GetFiles method gathers all files within a path and of a certain type that you specify. For example, the first block of code relates to finding some docx files within the user’s Documents folder.

The one part of this code that mixes it up the most is the section involving the video player. It starts off the same, but the final two lines are completely different. First, it checks to see if a video was found at all. Assuming it does, then instead of creating a new array, it tells Unity to assign a video clip to vidPlayer. This is done by giving vidPlayer a url to get a file from. UnityEngine‘s Random method is called upon to select a url (or video clip, to put it simply), assuming there’s more than one to choose from. The Start function should look like Figure 14.

Figure 14: The Start function so far.

Now comes the time for the program to pick which files it wants to use. A combination of if statements and for loops will be used to accomplish this. Starting with the document reading, the code goes like this:

if (docFiles.Length == 0)
{
        docFiles = new string[3];
        docFiles[0] = "Hang on...";
        docFiles[1] = "Do you not create documents?";
        docFiles[2] = "It seems you don't.";
}
else if (docFiles.Length > 0 && docFiles.Length < 3)
{
        for (int i = 0; i < docFiles.Length; i++)
        {
                int file = UnityEngine.Random.Range(0, documents.Count);
                docFiles[i] = Path.GetFileName(documents[file]);
                documents.RemoveAt(file);
        }
}
else
{
        for (int i = 0; i < 3; i++)
        {
                int file = UnityEngine.Random.Range(0, documents.Count);
                docFiles[i] = Path.GetFileName(documents[file]);
                documents.RemoveAt(file);
        }
}

Depending on the situation, a different set of tasks is performed. If there were no documents found, then you simply fill the emptiness by asking the user if they’ve not created any documents. Next, a check is performed to see if more than zero but fewer than three files were found. So long as this condition is met, a for loop will be executed as many times as there are files. During this loop, an integer is assigned by picking a random number between zero and however many documents were located. You then assign an item in the docFiles array to the name of the document. At the end, the item selected is removed from the list of the documents to avoid duplicates. The code should look like Figure 15.

Figure 15: Document selection.

Finally, if there’s more than three documents to display, a for loop is executed. This for loop is much like the last except it only executes a maximum of three times. You can of course change this if you’d like, but you may need to change some other parts of the code to accommodate such a change. Now that the documents have been selected it’s time to pick out some photos from the computer.

if (imageFiles.Length < 4)
{
        int newPics = imageFiles.Length;
        for (int i = newPics; i < 4; i++)
                pictures[i].gameObject.SetActive(false);
        for (int i = 0; i < newPics; i++)
        {
                int file = UnityEngine.Random.Range(0, images.Count);
                imageFiles[i] = 
                     LoadImage(new Vector2(25, 25), images[file]);
                pictures[i].sprite = imageFiles[i];
                images.RemoveAt(file);
        }
}
else
{
        for (int i = 0; i < pictures.Length; i++)
        {
                int file = UnityEngine.Random.Range(0, images.Count);
                imageFiles[i] = 
                    LoadImage(new Vector2(25, 25), images[file]);
                pictures[i].sprite = imageFiles[i];
                images.RemoveAt(file);
        }
}

Much like with the document selection, the photo selection process begins by checking the length of imageFiles. If it’s less than four, then some of the pic objects will need to be disabled. Once this is done, a for loop is executed to fill in any remaining sprite objects with a picture. The for loop in question is much like the one used in the documents section but with one extra step involved. Your LoadImage method is put to use here. When using it, you specify the Vector2 size as well as the file path to pull the image from.

If there are four or more images to use, then the for loop simply executes without the need to disable any pic objects. Apart from the variable used to specify the number of loops to make, the for loop is exactly the same as the one before. At this point the only thing left to do now is to change the on screen text and begin the video playback. Of course, video playback only begins if a video file was found in the first place.

uiText.text = "You are " + username 
     + ". \n \n You have these documents: \n" + docFiles[0] 
     + "\n" + docFiles[1] + "\n" + docFiles[2] 
     + "\n \n I see who you are. I know you.";
if (videos.Length != 0)
        vidPlayer.Play();

NewScript is now finished as shown in Figure 16 and ready to test. Save your work and return to the Unity editor to complete the project.

Figure 16: Photo selection, changing text, and starting the video.

Finishing the Project

Find the GameManager object in the Hierarchy. Once found, click and drag NewScript into the Inspector window. Figure 17 shows how to do this.

Figure 17: Adding the NewScript script component.

Next, locate the Text, Video, and Pic objects in the Hierarchy. Click and drag those to the corresponding fields in the NewScript component. For the Pic objects, you can lock the Inspector window, select all four objects, and drag them to the Pictures text to set all four of those to the Pictures array with ease as shown in Figure 18.

Figure 18: Setting all the variables.

Now you’ll need to set up some files within the various folders to test out your program. A few docx files should be placed in your computers Documents folder, at least four jpg files in your Pictures folder, and an mp4 file in your Videos folder. Once you’ve prepared all this, you are ready to test the project. Note that you may need to adjust the scale of the Pic objects so they don’t bleed into each other. The example set forth in this article sets the scale to 0.3 for all four Pic objects. Figure 19 shows the screen on my machine.

Figure 19: The project in action.

Conclusion

Breaking the fourth wall is just one tool a game developer can use to pull the player into the world they have created. And there’s really no better way to convince the player that the game knows them than by pointing out little things on their device. In this case you allowed your Unity game to rummage through the user’s computer and pull out a few items to display to the user. How one would execute on this knowledge remains up to the developer. In this case, it was to destroy the fourth wall between player and program. But there could be other uses for pulling files from a computer. What might that be? That’s a question only you can answer.


The post Breaking the 4th Wall with Unity appeared first on Simple Talk.


from Simple Talk https://ift.tt/2u3m4PN
via