Monday, April 8, 2019

Reporting Services Basics: Overview and Installation

SQL Server Reporting Services (SSRS) is a server-based reporting platform that allows you to create and manage a wide variety of different types of reports and deliver them in a range of formats. You can create basic reports containing tables and graphs, or more complex data visualizations, using charts, maps and sparklines. You can even create dashboards that will run on your phone! Reports can draw their data from SQL Server databases, but also from other relational database such as Oracle or Azure SQL Database, and other types of data sources such as Analysis Services.

You can present your finished reports from the Reporting Services website typically running on premises, called the Web Portal, or users can view them within web- or Windows-based applications. Reports can also be viewed in SharePoint with a special webpart. (In earlier versions of SSRS, there was also a SharePoint integrated mode.) End users can run reports on demand or schedule them as subscriptions. This article is the first in a series that will provide in-depth coverage of the basics of report development with SSRS.

The report development examples in this series will work for SSRS 2017 and later. Many of the examples will also work for earlier versions. If you are still using SSRS 2005, please refer to Steve Joubert’s original SSRS series. If you are working with 2008 to 2012, look at the series I wrote a few years ago.

SSRS Through the Ages

SSRS has been around since 2004, first shipping as an “add-on” for SQL Server 2000, and then fully integrated into SQL Server 2005. I first saw it demonstrated at the 2003 PASS Summit and had the Beta version installed and running at work as soon as I could get my hands on the media. Back in 2003, the SQL Server community were very excited about SSRS as it made available, for the first time, built-in reporting capabilities for SQL Server. If you owned SQL Server, you owned SSRS.

Since its integration into SQL Server 2005, Microsoft has made a number of improvements over the years and gave it a complete overhaul in 2016. One big change in 2016 was the renaming of the website from Report Manager to Web Portal. In 2017, SharePoint integrated mode was discontinued, but a special version for hosting Power BI dashboards called Power BI Reporting Services became available.

SSRS Architecture

An SSRS deployment must be associated with a SQL Server instance. On the instance will be two databases, named by default:

ReportServer – contains the report definitions, configuration, history, security of deployed reports and more

ReportServerTempdb – much like tempdb, it is used as a workspace for building reports and doesn’t maintain any objects permanently.

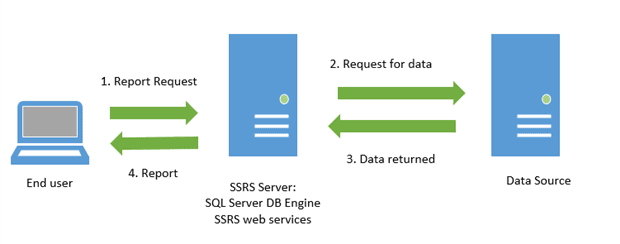
You will also need a location for the Report Server Web Service, which can be on the same server as the databases, as in the simple deployment architecture shown in Figure 1, or on a different server. On whichever server you choose, you will have access to the Web Portal that allows you to deploy and manage the reports. The data sources will typically be found on other servers throughout the network. End users can run reports from the Web Portal, create subscriptions, and publish their own reports if they have permission.
1979-1-1a32f2e5-7fce-4e3c-8c4d-7249004a6

Figure 1: A simple SSRS deployment

The end user sends an HTTP request for a report, providing any required parameters. The SSRS server finds the metadata of the report and sends a request for data to the data sources. The data returned by the data sources is merged with the report definition into a report. As the report is generated, it is returned to the client. There are two layers of security to get past before viewing the report.

SSRS Security

You have many options for securing the reports. The first layer of security is built into the Web Portal. You can control access to folders and individual reports based on network groups or user accounts. The second layer of security is to the database. You can either base the security on the individuals running the report or store an account within the data source that can be passed on to the database system. Security will be covered in more detail in a later article on deploying reports.

Tools for Building SSRS Reports

SSRS reports are XML files with the extension RDL. If you were a robot instead of a human, you might be able to just create the RDL files with a text editor. Instead, there are a number of tools from Microsoft for building reports that can be hosted in the SSRS Web Portal depending on the type of report and who is building the report.

Traditional SSRS reports, which also might be called paginated reports, can be build using SQL Server Data Tools (SSDT) or Report Builder. SSDT is an add-in for Visual Studio so developers will be more comfortable working in this environment. SSDT is based on a solution/project model and integrates with version control software such as Azure DevOps formerly known as Visual Studio Team Services. This is the tool you will use for this series of articles.

Report Builder is meant more for power users to create their own reports, but developers in some shops use this tool in place of SSDT. Instead of a project model, each report is independently created. One advantage of Report Builder is that it has an Office look and feel which makes it more comfortable for non-developers to use. It also has more wizards to help beginners get started. Users of Report Builder can take advantage of published report parts to make building a dashboard simple. Figure 2 shows what Report Builder looks like when it’s launched:
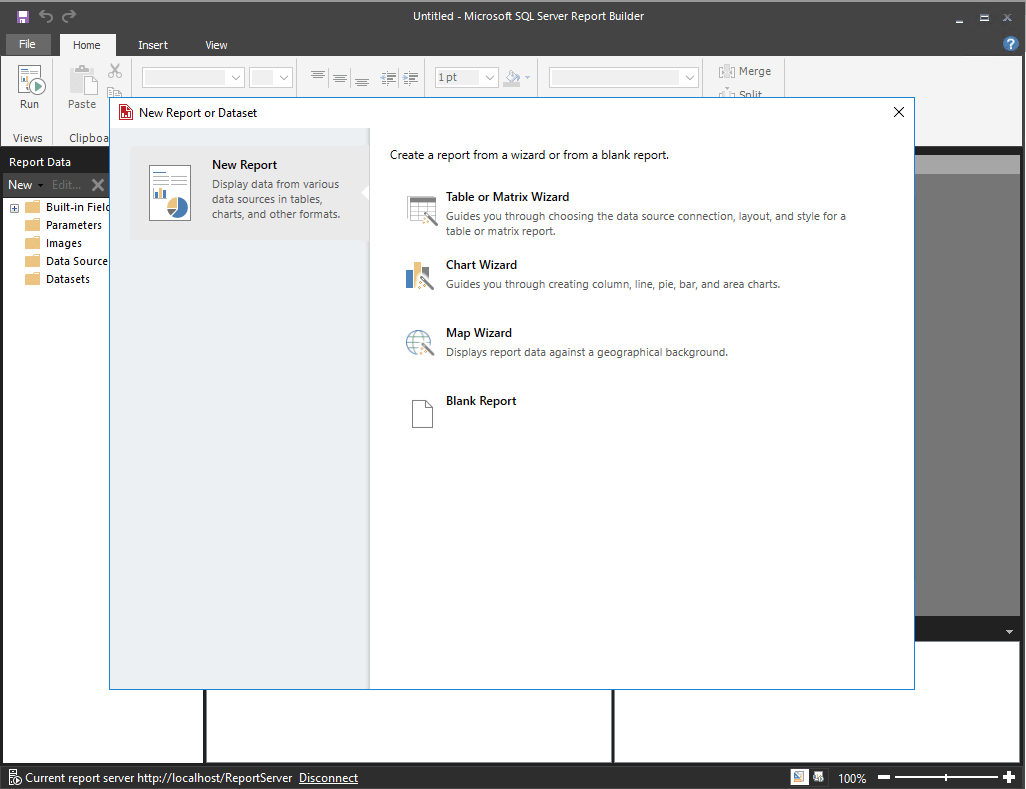
Figure 2: Report Builder

A new type of report available with SSRS 2016 is called Mobile Reports. Mobile Reports must be created with the Mobile Report Publisher which is launched from the Web Portal. These reports are dashboards which can run on phones and tablets as well as the Web Portal. (If you are a previous developer or user of Datazen reports, these will look familiar to you as Microsoft acquired the company and brought the technology into SSRS). Figure 3 shows what the Mobile Report Publisher looks like:
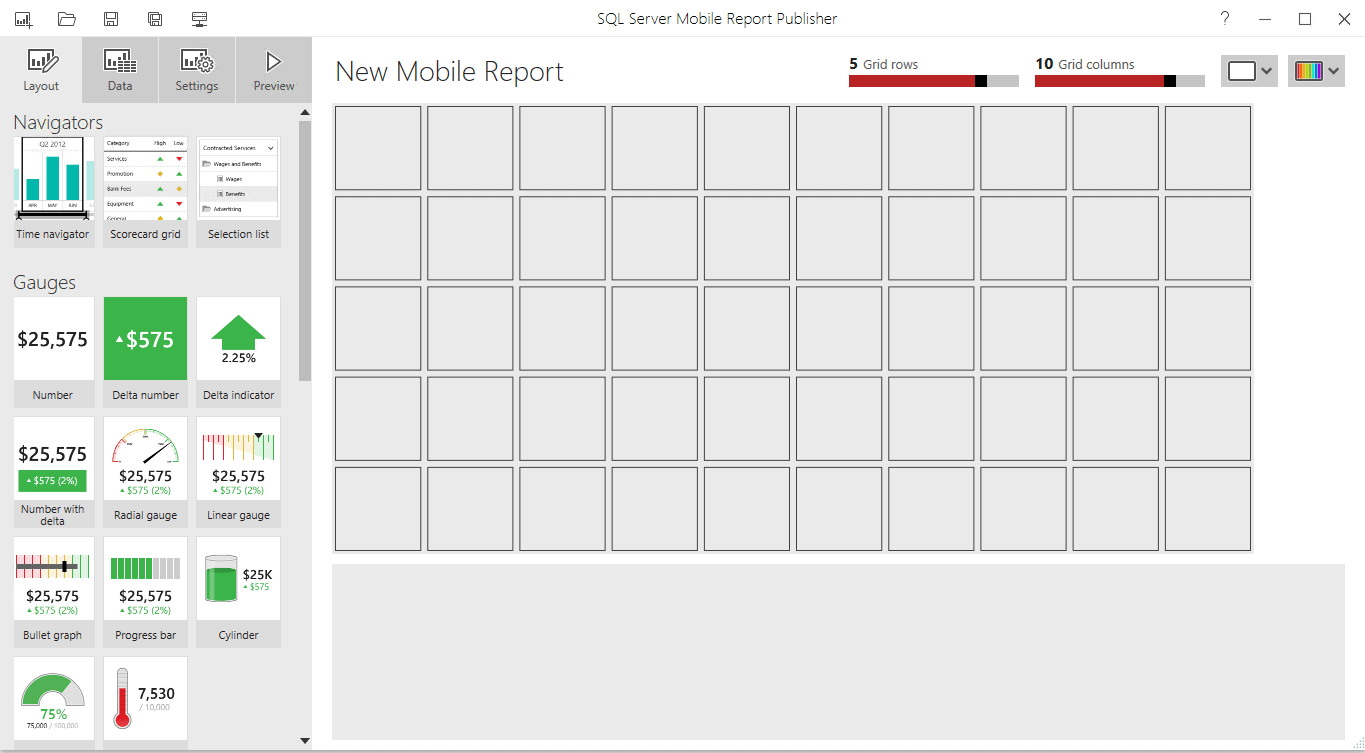
Figure 3: Mobile Report Publisher

Power BI dashboards can also run in a special type of SSRS Web Portal called Power BI Report Server. The tool for creating Power BI dashboards is called Power BI Desktop. Power BI is out of scope for this series, but if you would like to learn more about this topic, take a look at the article series written by Robert Sheldon.

Installing and Configuring SQL Server and Reporting Services

Since this series is focused on report development, it will cover just enough about installation and configuration to help you get things set up on your development computer. This section is not intended to provide information for installing SQL Server or SSRS in a production environment. 

To follow along with this series of articles, you will need to install the following:

  • A SQL Server instance
  • SQL Server Management Studio (SSMS)
  • Visual Studio with SSDT 2017
  • Report Server 2017 

You should be running a Windows 10 computer, making sure that there is at least 50 GB free on the hard drive. You will also need to restore the AdventureWorks sample database to follow along with the examples.

At the time of this writing, SQL Server 2019 is available as a Community Technology Preview (CTP), which is a fancy way of saying Beta version. The following instructions are based on SQL Server 2017, the latest generally available version. One big change made in the installation of SSRS in 2017 is that the SSRS media must be downloaded and installed separately.

SQL Server Instance Installation

If you already have a SQL Server instance in place, version 2008 or later, you can skip this section. The instance is used to host the two databases used by SSRS and the sample databases used in the examples.

To install the SQL Server instance, you will need to first download the media. I will not provide a link here, because invariably it will change, so just search for “SQL Server 2017 downloads.” The page that was current as of this writing had links for a free trial and for a Developer Edition shown in Figure 4. Choose the Developer edition and save the downloaded file.
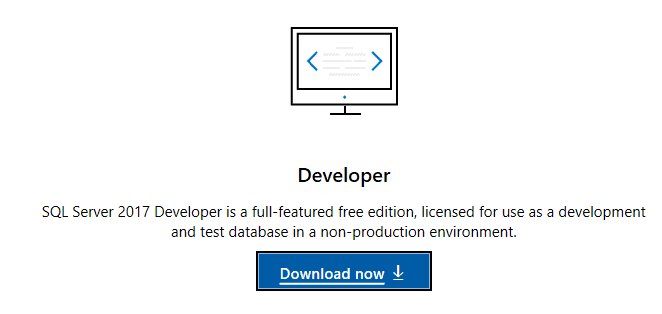
Figure 4: The SQL Server media download page

I’m not going to show you every step of installing SQL Server because that information can be found elsewhere. Here are the important things to note:

  1. The page mentioned above allows you to download the actual media. Do that first.
  2. Once you have downloaded the media, run setup.exe to launch the SQL Server Installation Center. You’ll need to click New SQL Server stand-alone installation on the Installation page shown on Figure 5.
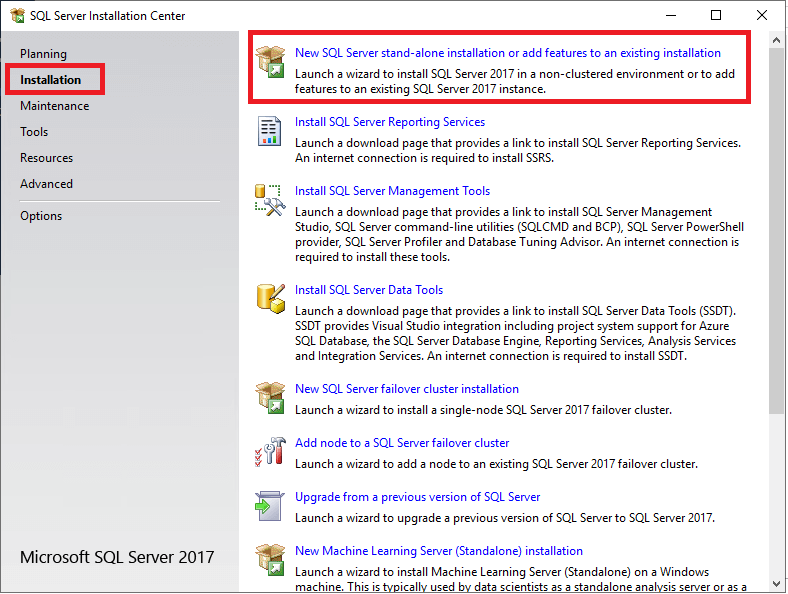
Figure 5: Launch the installation

  1. Make sure to choose the Developer Edition shown in Figure 6.
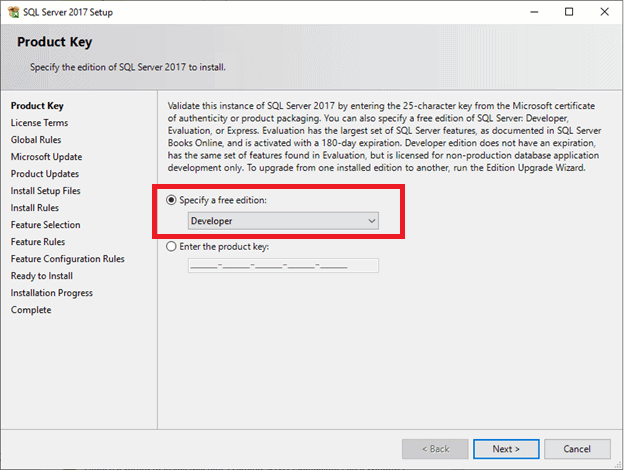
Figure 6: The Developer edition

  1. The only instance feature you will need for learning SSRS is the Database Engine Services shown in Figure 7.
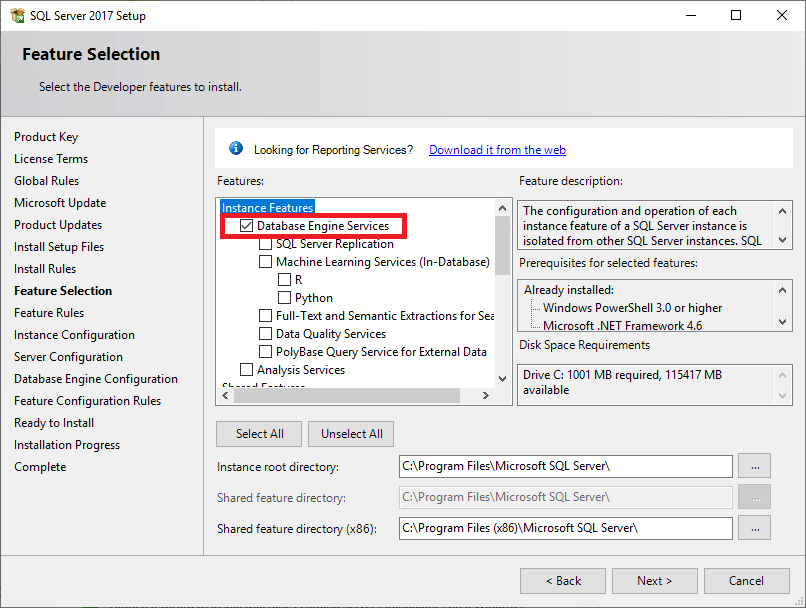
Figure 7: Features

  1. To make things simpler, just install the Default instance shown in Figure 8. If you have already installed an instance, you’ll see it listed. If that’s the case, you may want to just cancel out of the wizard at this point and use the previously installed instance.
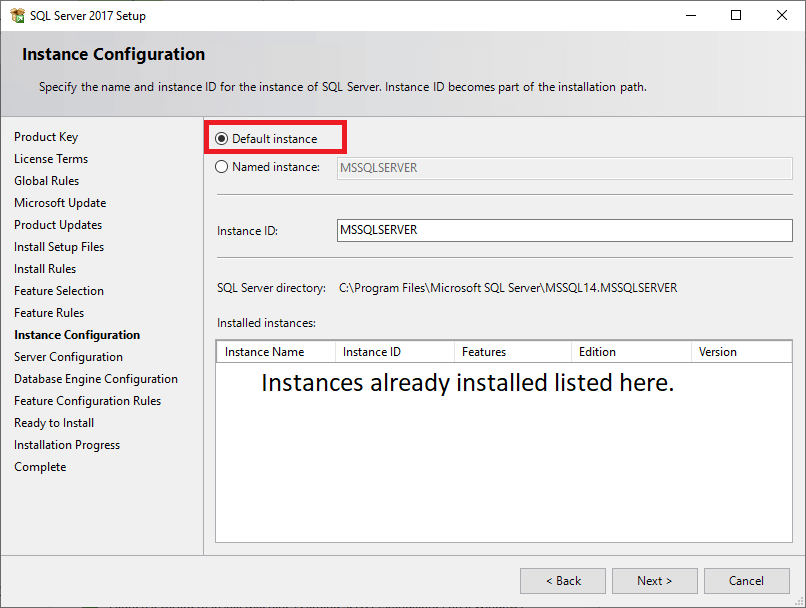
Figure 8: Install the Default instance

  1. Be sure to click Add current user to make your account an administrator. You may also want to set the security to Mixed mode. Figure 9 shows these options.
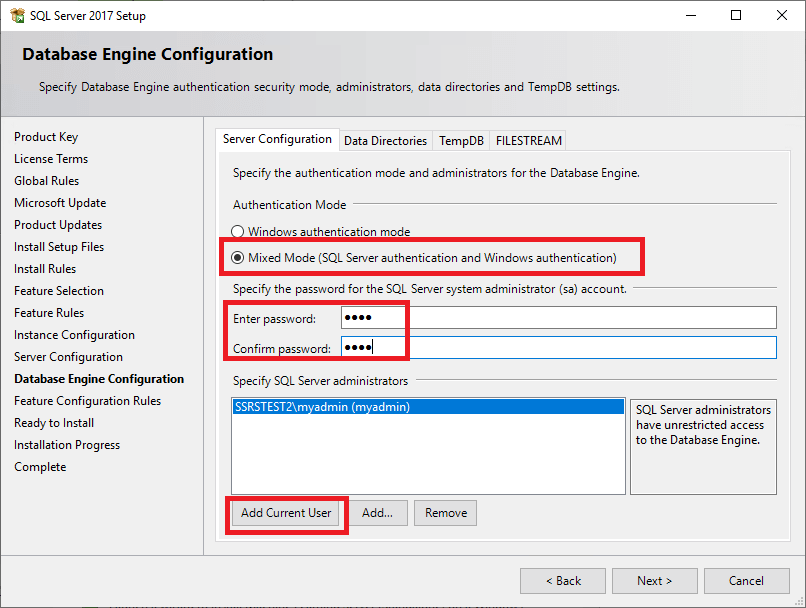
Figure 9: Security settings

  1. Review the summary shown in Figure 10 and go make yourself a cup or coffee or tea after clicking Install because it could take 10 or 20 minutes for the installation to run.
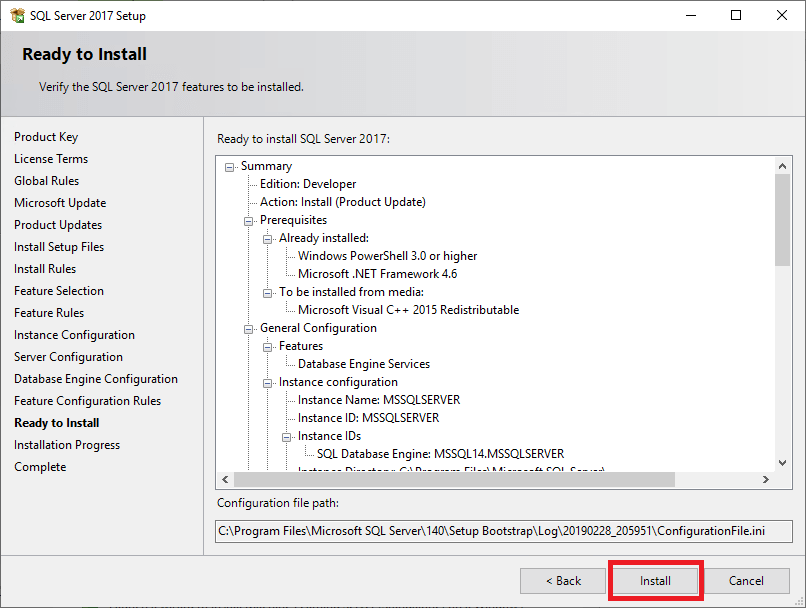
Figure 10: The Summary

  1. Figure 11 shows that the installation was a success!
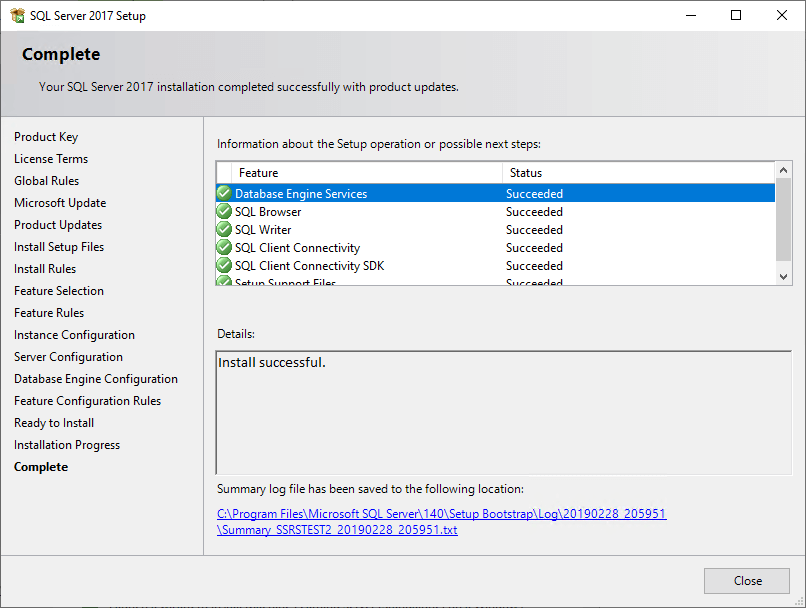
Figure 11: Success!

SSMS Installation

SQL Server Management Studio (SSMS) is the tool you will use to connect to the SQL Server instance to restore the sample databases and run queries. If you already have this tool in place, you can skip to the next section.

Microsoft is now releasing new versions of SSMS on a frequent basis, so it is no longer installed during the database engine installation. You can search for “SSMS download” to find the latest version. You can also find a link on the Installation page of the SQL Server 2017 Installation Center, if you used this to install your instance. You can launch it again from the Windows Start menu. Figure 12 shows where you can find the link.
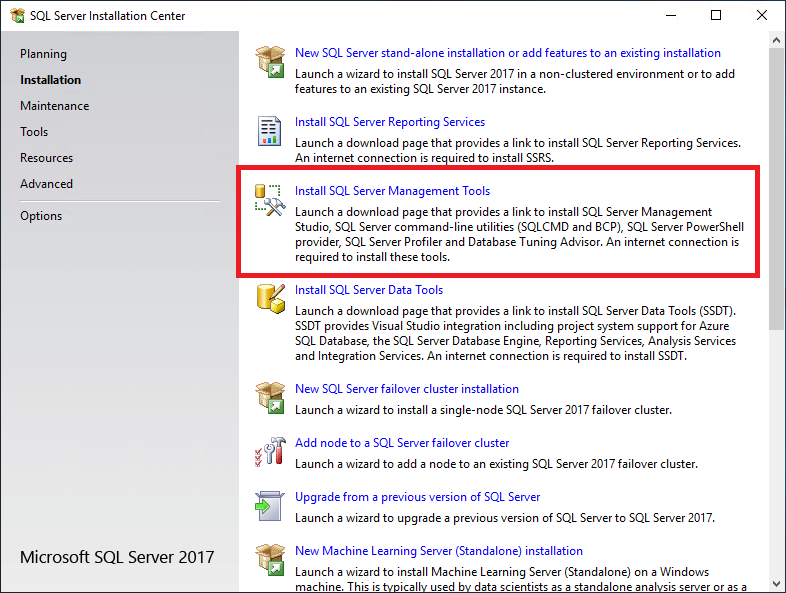
Figure 12: Launching the download page for SSMS

Once you have downloaded the media for SSMS, just run the installation wizard accepting the defaults.

SSRS Service Installation and Configuration

Previous versions of SQL Server allowed you to include SSRS during the installation of the database engine, but that is no longer the case beginning with 2017. Installing them together was quite convenient since the installation took care of the SSRS configuration for you automatically. Now, you must download the media separately and configure SSRS yourself. It’s not difficult, but I’ll walk you through the steps.

Begin by searching for “Download SSRS” or you can also find a link to the download page from the SQL Server 2017 Installation Center shown in Figure 13.
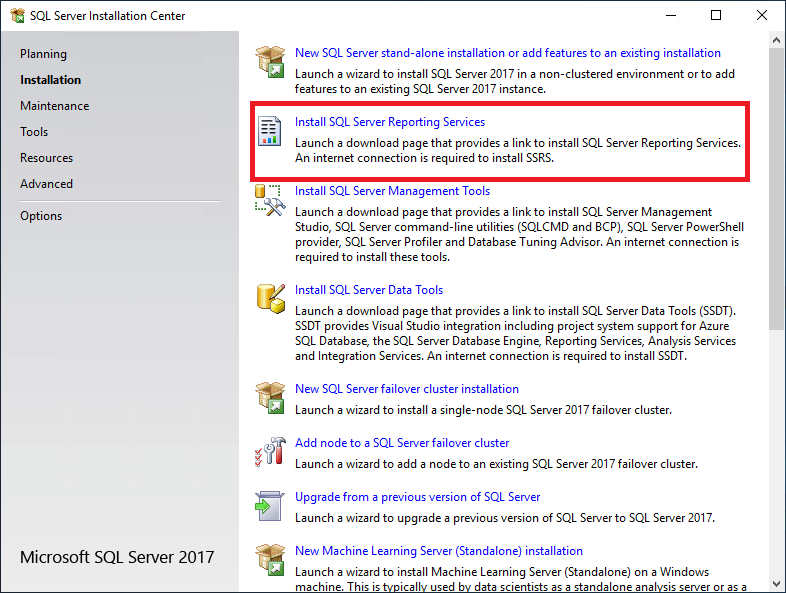
Figure 13: A link to the download page for SSRS

Save and run the downloaded file. To get the installation started, click Install Reporting Services shown in Figure 14.
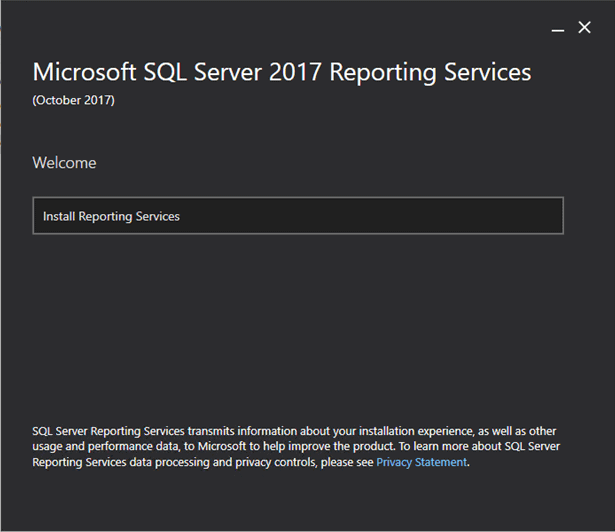
Figure 14: Install Reporting Services

Click through the installation wizard. The most important question for you to answer is to specify the edition. Make sure that you select the Developer edition.

Once the installation is complete, you’ll be asked to configure the report server. If you are required to restart, do that first. After you restart, you will need to launch the Report Server Configuration Manager. You can do this from the item found in the Windows Start menu or from the final page of the SSRS installation shown in Figure 15 if you didn’t have to restart.
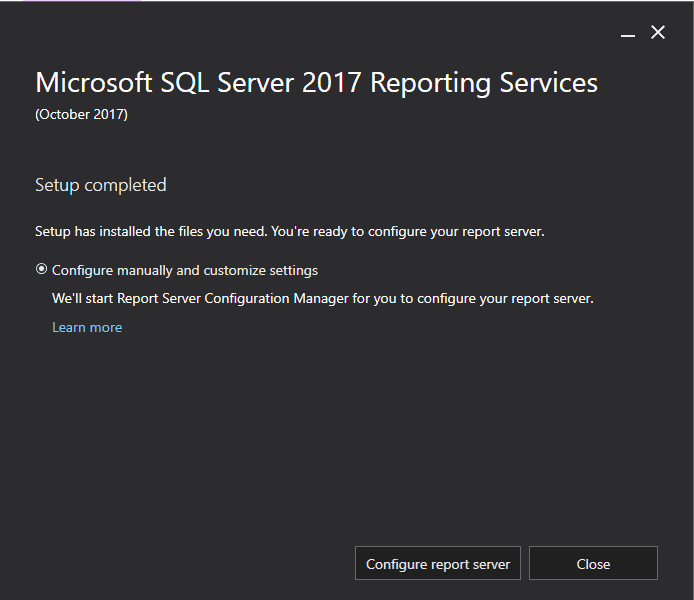
 

Figure 15: The final page of the SSRS installation wizard

Either way you launch Report Server Configuration Manager, you will need to connect as shown in Figure 16.
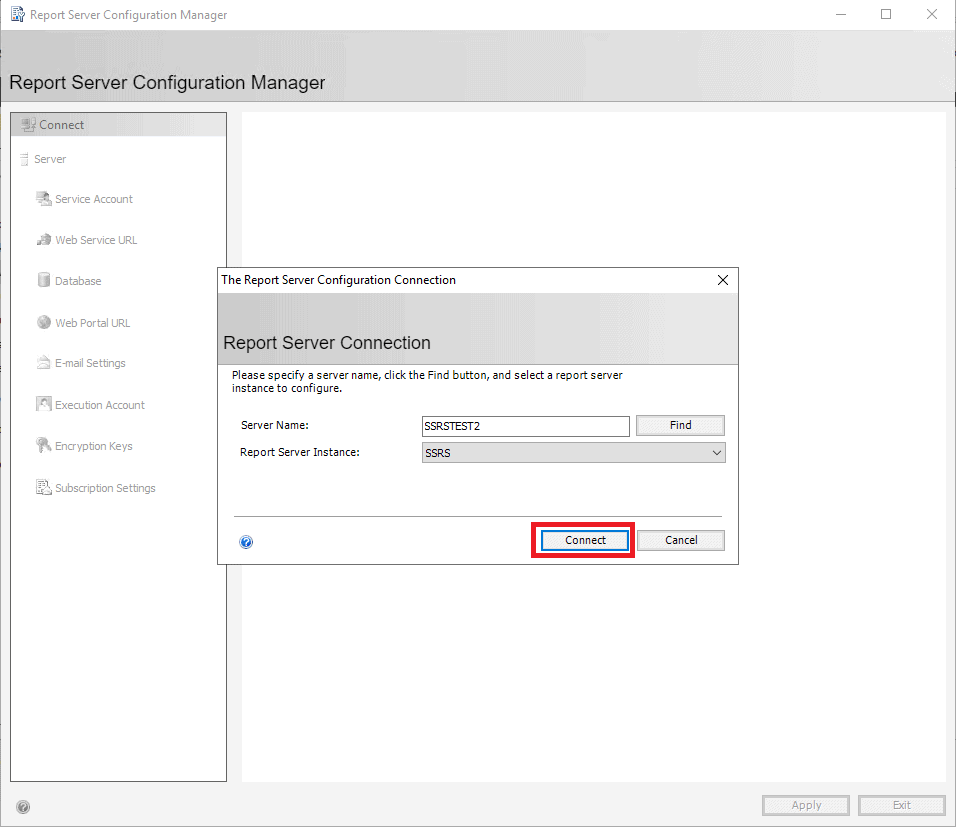
Figure 16: Connect to SSRS

There are three items that must be set up when configuring SSRS just to get it running:

  • Database
  • Web Service URL
  • Web Portal URL

Click Database on the left menu. Click Change Database shown in Figure 17.
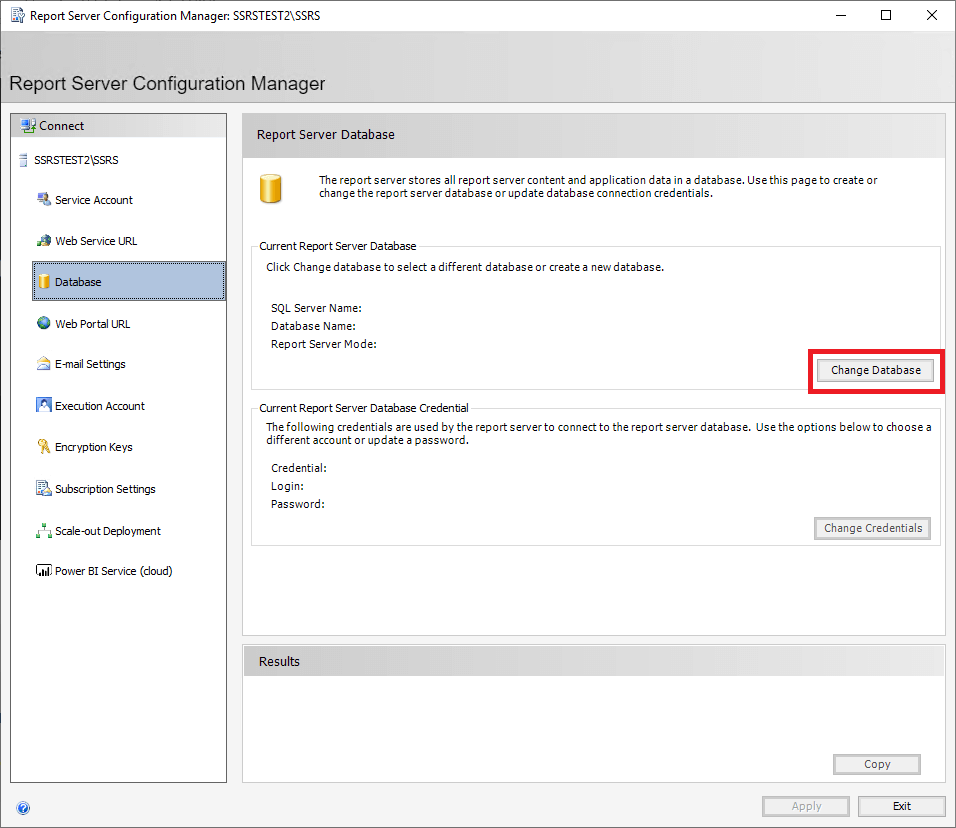
Figure 17: Click Change Database

This will launch the Report Server Database Configuration Wizard. Leave Create a new report server database selected and click Next as shown in Figure 18.
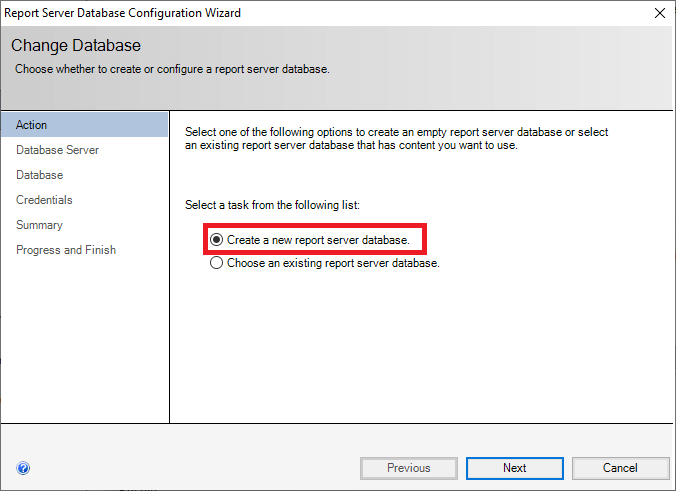
Figure 18: Create a new database

On the following screen, make sure that the local computer name is filled in. If you are using a named instance, then the Server Name will be computer\instance. If you’re not sure, take a look at the “Connecting to Your SQL Server Instance” section later in this article. Leave the Authentication type set at Current User – Integrated Security and click Next as shown in Figure 19.
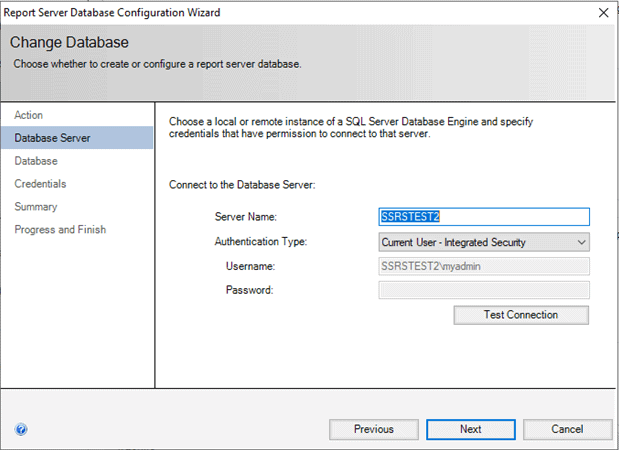
Figure 19: The server name

On the next page, you will specify the SSRS database name. The default database name is ReportServer. Figure 20 shows that you can leave it at the default and click Next.
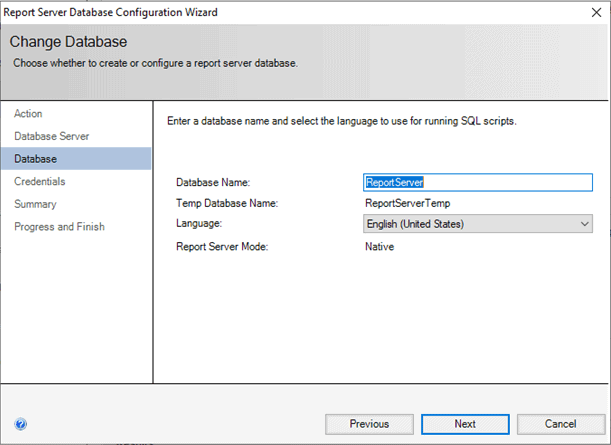
Figure 20: The database name

Leave the Authentication Type set at Service Credentials and click Next as shown in Figure 21.
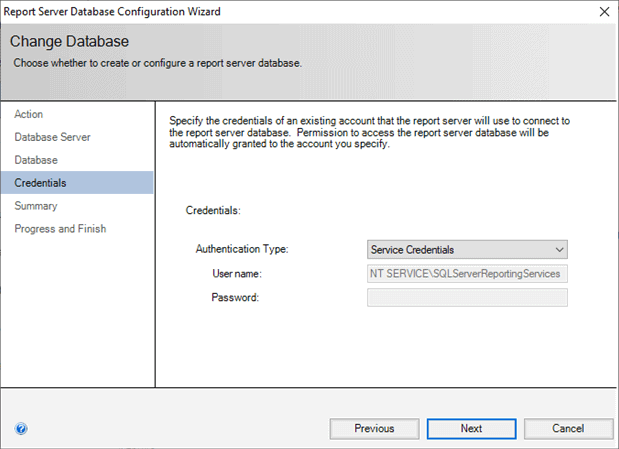
Figure 21: The authentication type

That’s the last question you’ll be asked about the database. Complete the wizard to create the database. Once the database is in place, click Web Service URL.

Leave the defaults in place and click Apply as shown in Figure 22.
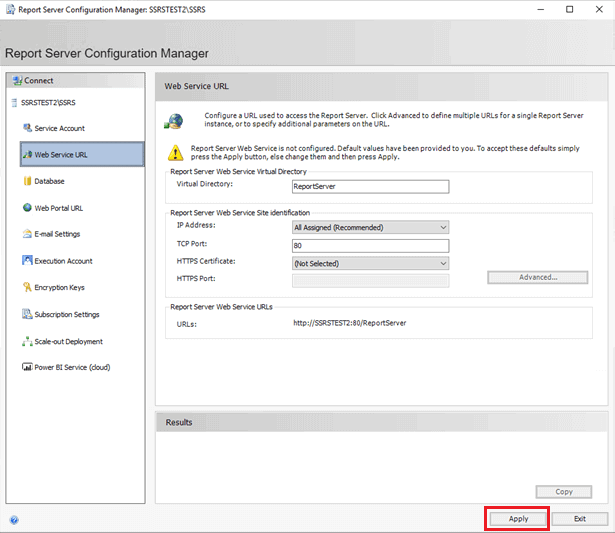
Figure 22: The Web Service URL

Click Web Portal URL. Again, leave the defaults in place and click Apply as shown in Figure 23.
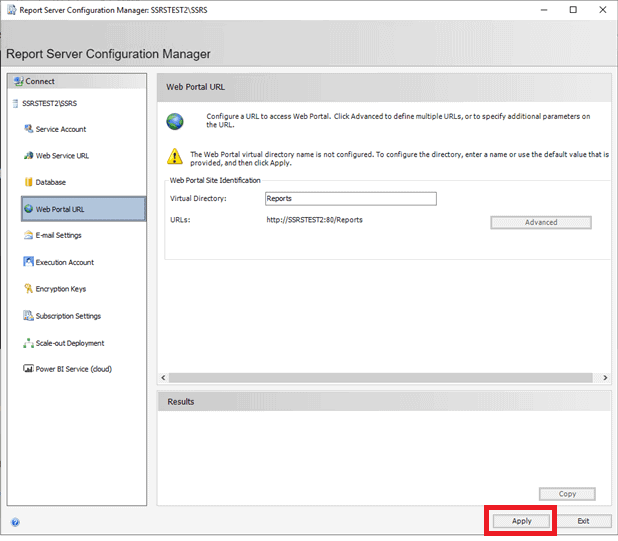
Figure 23: The Web Portal URL

Make a note of the URL. This is what you’ll use to connect to the Web Portal after deploying reports. Once done, exit out of the Report Server Configuration Manager. Now that the SSRS service is in place, the next step is installing the development tool.

Installing SSDT

You’ll use SSDT to develop reports, and this is the last item to install. You can search for “SSDT Download” or launch the page from the SQL Server 2017 Installation Center shown in Figure 24.
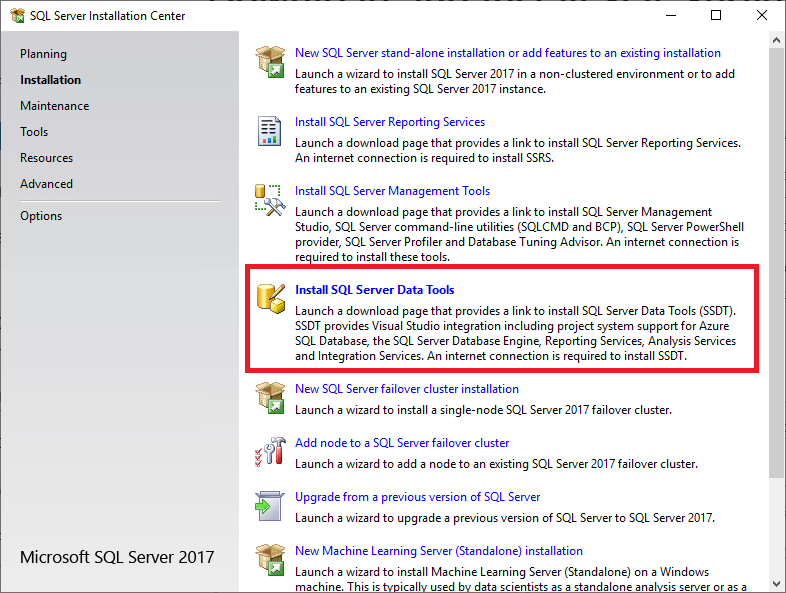
Figure 24: The link to the SSDT download

You will need to scroll down the web page to find the link for SSDT standalone installer as shown in Figure 25.
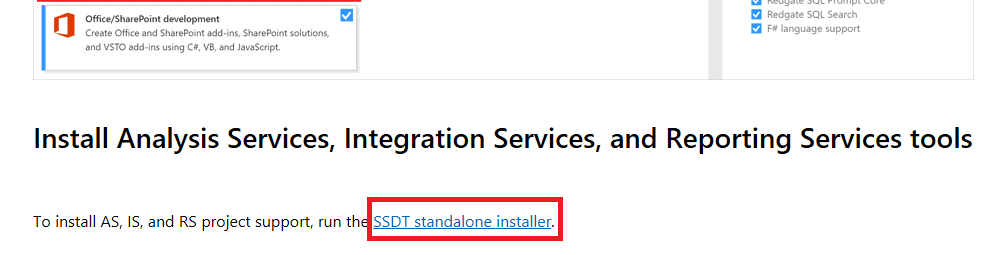
Figure 25: The SSDT installer

Once downloaded, run the file. Make sure that SQL Server Reporting Services is selected and click Install as shown in Figure 26.
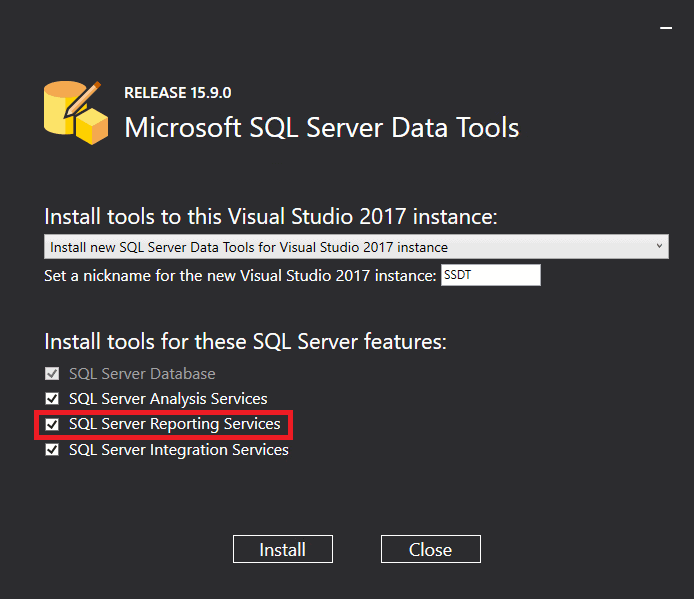
Figure 26: Install SSDT

Accept any other defaults and complete the installation.

Connecting to Your SQL Server Instance

You may have trouble connecting to your local SQL Server instance for a couple of reasons. First, you may not know the actual server name needed to connect to it, especially if you have installed a named instance. The other problem may be that it’s just not running. I’ve seen that happen quite often with laptops.

To solve both problems, launch SQL Server Configuration Manager. You may find it in the SQL Server programs section of the Windows Start menu. If not, take a look at this post for more information. With this tool, you can see the instance name as well as start up an instance that isn’t running. Click SQL Server Services and take a look at the items on the right as shown in Figure 27.
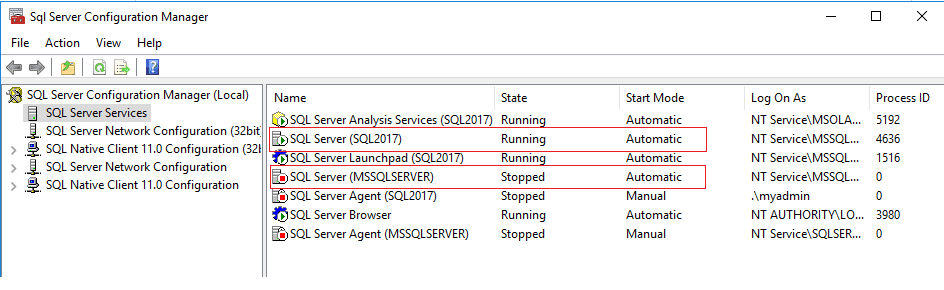
Figure 27: The SQL Server Configuration Manager

Default instances are called SQL Server (MSQLSERVER). When connecting to the default instance locally, you just need the computer name or an equivalent:

  • localhost
  • (local)
  • . (That’s just a period!)

If you see something else in parentheses after the words SQL Server, that’s a named instance. To connect to a named instance, you’ll need the computer name followed by a backslash and the instance name. Here are some examples assuming that my computer is called MyComputerName:

  • MyComputerName\SQL2017
  • Localhost\SQL2017
  • (local)\SQL2017
  • .\SQL2017

Notice in the previous image that the default instance is stopped. Just right-click the instance and choose Start to get it running.

Now that you know the name of your SQL Server and have ensured that it’s running, launch SSMS and connect to it as shown in Figure 28.
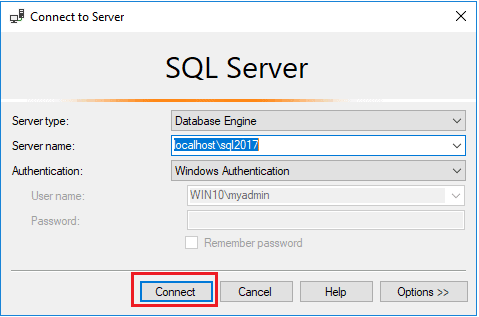
Figure 28: Connect to the SQL Server

You’ll see the SQL Server and several folders in the Object Explorer window shown in Figure 29.
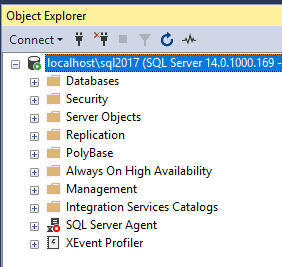
Figure 29: The Object Explorer

Restoring a Sample Database

To follow along with the examples in this series of articles, you’ll need to restore one or more sample databases. The main database that will be used for the examples is called AdventureWorks2017. At the time of this writing, Microsoft is hosting the sample databases on GitHub, a well-known software repository site. Search for the AdventureWork2017.bak file. A bak file is a backup file, and that’s what you need. Figure 30 shows the download page.
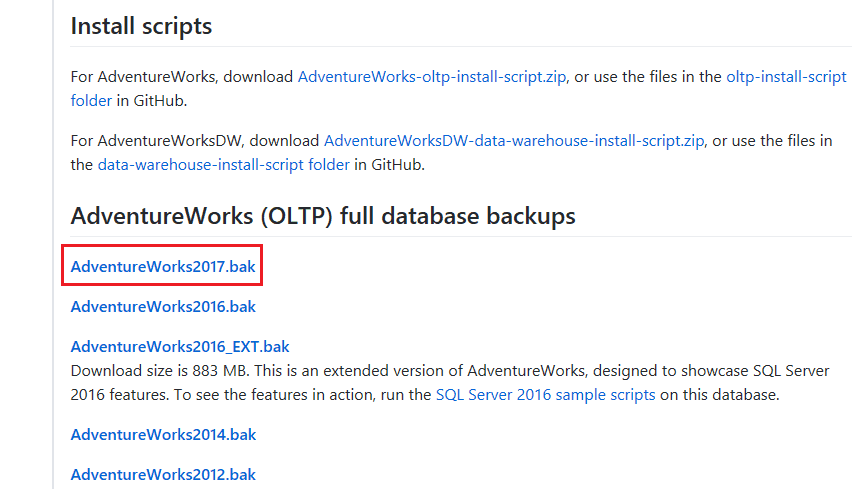
Figure 30: Download AdventureWorks

Do not download the file to your Desktop, Documents, or Downloads file. Since SQL Server is running under an identity that is not you, it can’t see files in those locations. I recommend just downloading to a file in your C:\ drive such as C:\Temp.

Follow these steps to restore the database:

  1. Connect to the SQL Server instance by launching SSMS and connecting to it. If you have trouble, review the “Connecting to Your SQL Server Instance” section.
  2. Right-click on the Databases folder and select Restore Database… as shown in Figure 31.
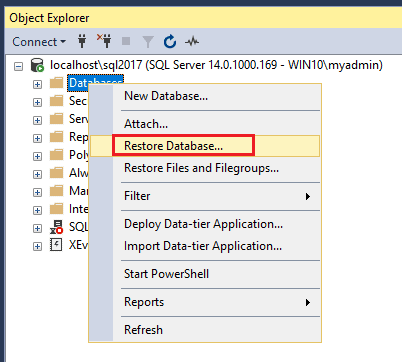
Figure 31: Choose Restore Database

  1. Select Device and click the ellipses as shown in Figure 32.
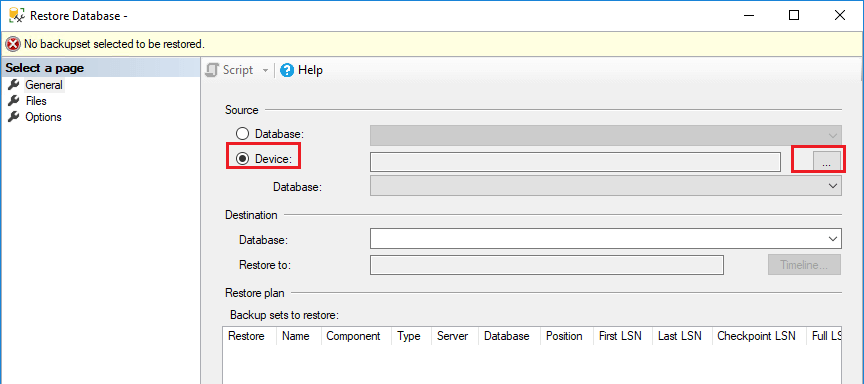
Figure 32: Click the elipses.

  1. This brings up the Select backup devices window. Click Add shown in Figure 33.
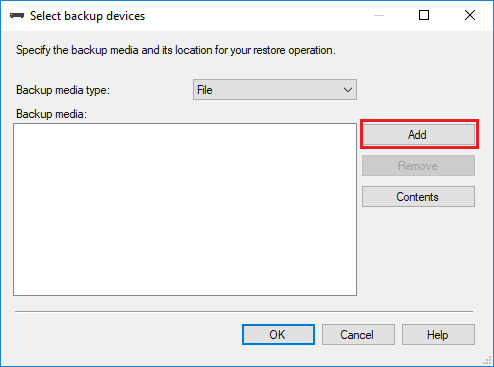
Figure 33. Click Add

  1. Navigate to the folder where the bak file is stored as shown in Figure 34.
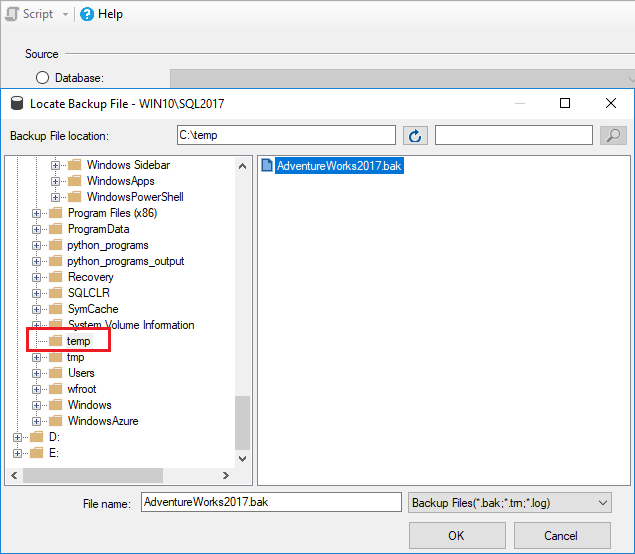
Figure 34: Navigate to the backup file

  1. Select the file and click OK. You’ll click OK two more times to fire off the restore.
  2. Once the database has been restored, you’ll see the message shown in Figure 35. Click OK two more times to dismiss the dialogs.
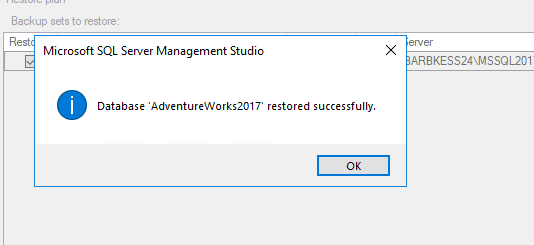
Figure 35: A successful restore

Conclusion

If you have followed the instructions in this article, you now have a development environment for SSRS set up on your workstation or laptop. In the next article, I’ll show you how to create some basic reports.


The post Reporting Services Basics: Overview and Installation appeared first on Simple Talk.


from Simple Talk http://bit.ly/2G85eGo
via

Friday, April 5, 2019

Checking on the Differences Between Two Versions of a Database Build

One of the common problems when you are developing databases is knowing what’s changed and when. You want to detect changes and to work out what has changed in a particular build. You’d have thought it would be an easy problem, when you consider that every database object in SQL Server’s system views has a date when the object was last modified. If you want to know what’s been changed since a particular date you would need to just list all those objects that have a ‘last-modified’ date greater than that date.

This actually works fine if you just want to be know whether objects have changed, but you are likely to want more than that. It is nice to know what’s been deleted too. While were about it, it is nice to see if something has been renamed or added.

This can all be achieved reasonably easy by querying the metadata, but unlike a database comparison tool, it can do little more than tell you what has changed rather than the way it has changed. It has a different objective. It gives you just the overview to track changes in a particular build. If you want to compare different builds, you can ‘t use it because the object_ids will be different. You’ll need to use a database comparison tool because the information you want to use is lost.

The problems with this technique come from the fact that some database components such as indexes, columns, parameters and distribution statistics aren’t considered to be objects, because they are parts of other objects, tables or routines in this case. When, for example, a column changes, the whole table changes and its last-modified date is changed to the time that the column was modified. However, some objects that are parts of other objects such as primary keys and constraints are considered to be objects in their own right. Sometimes they roll their updated modification date back to the parent object. Sometimes, rarely, they don’t. When a foreign key constraint is changed, both participating tables are flagged as being modified, which isn’t entirely intuitive.

Nowadays it is easier to use Extended Events to track database changes, but this requires a session to be running at the time to capture the event. If this isn’t possible, then the default trace may have the information. On the other hand, this may have been switched off, or the data may have got lost. This happens if the background noise of maintenance tasks drowns out the database modifications you want to track by pushing them out of the current default trace log. It is useless if you want to study the history of changes in a build.

In order to track database changes, you need to understand the thinking behind the way that the various database components are recorded in the system views. Objects that don’t have parents are typically views, table valued functions, stored procedures, service queues, inline table valued functions, tables and scalar functions. On the other hand, check constraints, default constraints, foreign key constraints, primary key constraints, sql triggers, and unique constraints have parents, and have no independent existence beyond their parent object. When the parent is deleted, so are the children. However Columns, parameters and indexes aren’t considered to be objects, just attributes of objects, so can only be tracked by their ids together with the object IDs of their associated objects.

Why bother with all this? If you maintain a single build, merely making changes to it for every internal release, then you can preserve just the values of the objects name, object_id, modify_date and parent_object_id in a database somewhere. If you do that for every integration, then you have the means to list out all the changes between any two releases. Hmm. I wonder what has changed since the beginning of May? (click click click.) Hmm. OK, it doesn’t tell you how it has changed, but it narrows it down! Another use: At the beginning of a day’s work, you save those four columns from the sys.objects table. At the end of the day, you run the query which identifies the changes. This allows you to script out all the changed objects into source control. With SMO (sqlserver), you can do it all automatically once you’ve devised a script to do it.

I started on this routine in order to monitor changes being made to clones, using SQL Clone. In this case, it is easy to save a json file with the required columns to disk when creating the image and use that to check on what has changed with each clone. One could even report on when the changes were made.

The table value you need in order to do comparisons is easily illustrated by using Adventureworks, but any database will do, obviously.

You can create a table to store these in, or maybe store them on disk. We’ll show the former method. Here is an example of such a table

CREATE TABLE DatabaseObjectReadings(
        Reading_id int IDENTITY,
        DatabaseName sysname NOT NULL,
        TheDateAndTime datetime NULL default GETDATE(),
        TheJSON NVARCHAR(MAX))

… then you can take an ‘insta-record’ of the state of a database (Adventureworks2016 in this case)

INSERT INTO DatabaseObjectReadings (DatabaseName, TheJSON)
SELECT 'Adventureworks2016' AS DatabaseName,
(SELECT --the data you need from the test database's system views
      Coalesce(--if it is a parent, then add the schema name
        CASE WHEN parent_object_id=0 
                THEN Object_Schema_Name(object_id,Db_Id('AdventureWorks2016'))+'.' 
                ELSE Object_Schema_Name(parent_object_id,Db_Id('AdventureWorks2016'))+'.'+
                    Object_Name(parent_Object_id,Db_Id('AdventureWorks2016'))+'.' END
                + name,'!'+name+'!' --otherwise add the parent object name
                ) AS [name], object_id, modify_date, parent_object_id
      FROM AdventureWorks2016.sys.objects
      WHERE is_ms_shipped = 0
          FOR JSON AUTO) AS TheJSON

… and reference them later. You could, if you want, just get a count of just the modifications

SELECT Count(*)
  FROM   AdventureWorkstest.sys.objects new
         LEFT OUTER JOIN OPENJSON((
                SELECT TOP 1 theJSON FROM DatabaseObjectReadings
                WHERE DatabaseName='AdventureWorks2016' ORDER BY TheDateAndTime desc
                ))
         WITH([object_id] int, modify_date datetime) AS original
             ON original.Object_ID = new.object_id
                 AND original.Modify_Date = new.modify_date
  WHERE  new.is_ms_shipped = 0
      AND original.Object_ID IS NULL;

This will tell you the number of database objects that have changed. However, I guess you’d want more than that. This involves several comparisons between the two table values of objects so you either need a CTE or some table variables.

I’ve given a CTE version of the code in an article I’ve written elsewhere that describes how I went about the chore of testing the development of the code for this. However, that is only capable of comparing two databases on the same server. It is more useful if could compare with a JSON string, or file-based data. The best performance and versatility comes from an inline table-valued function. Here we first create the table type and table-valued function before preparing the data and passing it to the function. OK, it may look slightly cumbersome, but it is quick.

I’ve taken the original from a version stored in a DatabaseObjectReadings table. I made a copy of AdventureWorks 2016, and ran a few deletions and modifications on it to test it out. Naturally, you can compare two versions of the same build of a database when you have neither of them, just a record of relevant columns in sys.objects.

IF Object_Id('dbo.DatabaseChanges') IS NOT NULL
   DROP FUNCTION [dbo].[DatabaseChanges]

IF EXISTS (SELECT * FROM sys.types WHERE name LIKE 'DatabaseUserObjects')
DROP TYPE [dbo].[DatabaseUserObjects]
CREATE TYPE [dbo].[DatabaseUserObjects] AS TABLE
(
   [name] sysname, object_id int, modify_date Datetime, parent_object_id int
)

go
CREATE FUNCTION [dbo].[DatabaseChanges]
(
    @Original DatabaseUserObjects READONLY ,
    @Comparison DatabaseUserObjects READONLY 
)
RETURNS TABLE AS RETURN
(
SELECT Cloned.name, 'Added' AS action --all added base objects
  FROM @Comparison AS Cloned  --get the modified
    LEFT OUTER JOIN @Original AS Original-- check if they are in the original
      ON Cloned.object_id = Original.object_id
  WHERE Original.object_id IS NULL AND cloned.parent_Object_id =0
  --if they are base objects and they aren't in the original
UNION ALL --OK but what if just child objects were added ...
SELECT Clonedchildren.name, 'Added' -- to existing objects?
  FROM @Original  AS Original-- check if they are in both the original
    INNER join @Comparison AS Cloned -- and also they are in the clone
      ON Cloned.name = Original.name --not renamed
            AND Cloned.object_id = Original.object_id
                --for ALL surviving objects
        inner JOIN @Comparison AS Clonedchildren--get all the chil objects
        ON Clonedchildren.parent_object_id =cloned.object_id
        LEFT OUTER JOIN -- and compare what child objects there were
    @Original OriginalChildren 
        ON Originalchildren.object_id=ClonedChildren.object_id
        WHERE OriginalChildren.object_id IS NULL 
UNION ALL
--all deleted objects but not their children
SELECT Original.name, 'deleted'
  FROM @Original AS Original --all the objects in the original
    LEFT OUTER JOIN @Comparison AS Cloned --all the objects in the clone
      ON Cloned.name = Original.name 
            AND Cloned.object_id = Original.object_id
  WHERE Cloned.object_id IS NULL AND original.parent_Object_id =0
  --the original base objects that aren't in the clone 
UNION ALL
--all child objects that were deleted where parents survive
SELECT children.name, 'deleted'
  FROM @Original AS Original
    INNER join @Comparison AS Cloned
      ON Cloned.name = Original.name 
            AND Cloned.object_id = Original.object_id
                --for ALL surviving objects
        inner JOIN @Original AS children
        ON children.parent_object_id =original.object_id
        LEFT OUTER JOIN
    @Comparison AS ClonedChildren ON children.object_id=ClonedChildren.object_id
        WHERE ClonedChildren.object_id IS NULL 
UNION ALL
SELECT Original.name,
  CASE WHEN Cloned.name <> Original.name THEN 'renamed'
    WHEN Cloned.modify_date <> Original.modify_date THEN 'modified' ELSE '' END
  FROM @Original AS Original
    INNER JOIN @Comparison AS Cloned
      ON Cloned.object_id = Original.object_id
  WHERE Cloned.modify_date <> Original.modify_date
     OR Cloned.name <> Original.name
  )
GO

Now we can use this function do check on the difference between any two saved versions of the database or the current state of the database.

DECLARE @original AS DatabaseUserObjects
DECLARE @Changed AS DatabaseUserObjects

INSERT INTO @Changed
SELECT --the data you need from the test database's system views
      Coalesce(--if it is a parent, then add the schema name
        CASE WHEN parent_object_id=0 
                THEN Object_Schema_Name(object_id,Db_Id('AdventureWorksTest'))+'.' 
                ELSE Object_Schema_Name(parent_object_id,Db_Id('AdventureWorksTest'))+'.'+
                    Object_Name(parent_Object_id,Db_Id('AdventureWorksTest'))+'.' END
                + name,'!'+name+'!' --otherwise add the parent object name
                ) AS [name], object_id, modify_date, parent_object_id
      FROM AdventureWorksTest.sys.objects
      WHERE is_ms_shipped = 0

INSERT INTO @Original
  SELECT [name], object_id, modify_date, parent_object_id
  --the data you need from the original database's system views
      FROM OpenJson((
                SELECT TOP 1 theJSON FROM DatabaseObjectReadings
                WHERE DatabaseName='AdventureWorks2016' ORDER BY TheDateAndTime desc
                ))
         WITH(name NVARCHAR(4000),[object_id] int, modify_date DATETIME, [parent_object_id] int) AS original

SELECT * FROM DatabaseChanges(@Original,@Changed) ORDER BY name

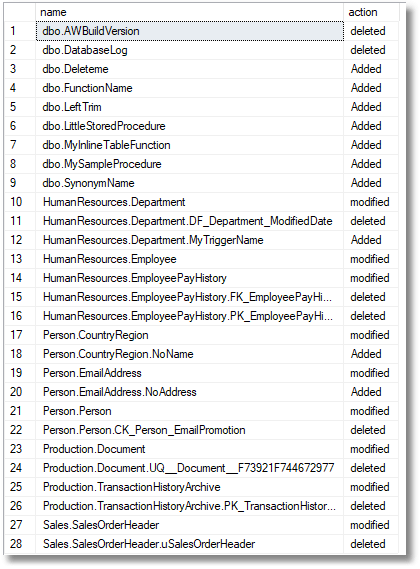
We can sort this another way, but this is the most obvious way because it groups the members of each schema together, and lists each object together with the child object that has changed, the parent first followed by the children.

You could, conceivably, do better by adding the details of the columns, indexes and so on that are related to these. However, that’s not the objective here because I just want to know what object is affected by the modification and I already know that. If you want all that stuff, you can buy a SQL Comparison tool!


The post Checking on the Differences Between Two Versions of a Database Build appeared first on Simple Talk.


from Simple Talk http://bit.ly/2UwTzsr
via

Finding a character in every character string by elimination

A few weeks ago, a coworker had a scenario where he was trying to import a large amount of data into some format (I think it was JSON, but I think it was a special limitation… that isn’t really important to the solution), and it didn’t allow certain characters. Narrowing down what the bad character was, was proving to be a hassle.

This reminded me of a solution that I had used back when I first had gotten into the whole numbers table thing. Using a number’s table, you can break down every value in a column into one character per row, and then do some analysis. In our case, I want to find a bad character, by eliminating known acceptable characters.

For an example, I am going to take a fresh version of the WideWorldImporters database, and look at their Application.People table. The Fullname column contains characters that are not in the US centric characters, and can cause some, poorly written, pieces of software to fail.

To start with, we will create a number table, with basically contains 1 row for every number from 0 up. We will load it up to 999999, not that our strings will be that long, but this is a typical good size for most uses of a number table, and you can increase that pretty simply by adjusting the query.

USE WideWorldImporters;
GO
CREATE SCHEMA Tools;
GO
CREATE TABLE Tools.Number
(
    I   int CONSTRAINT PKTools_Number PRIMARY KEY
);
GO
;WITH digits (I) AS (--set up a set of numbers from 0-9
        SELECT I
        FROM   (VALUES (0),(1),(2),(3),(4),(5),
                       (6),(7),(8),(9)) AS digits (I))
--builds a set of data from from 0 to 999999
,Integers (I) AS (
        SELECT D1.I + (10*D2.I) + (100*D3.I) + 
               (1000*D4.I) + (10000*D5.I) + (100000*D6.I)
        FROM digits AS D1 CROSS JOIN digits AS D2 
             CROSS JOIN digits AS D3
             CROSS JOIN digits AS D4 
             CROSS JOIN digits AS D5
             CROSS JOIN digits AS D6 )
--insert into table
INSERT INTO Tools.Number(I)
SELECT I
FROM   Integers;

Check out the data exists:

SELECT *
FROM   Tools.Number
ORDER  BY I;

If the output isn’t 1000000 rows, starting at 0 and ending at 999999, then something is incorrect in your configuration. Otherwise, let’s move on to the using this data.

Now, the idea is that we will join the Application.People table to the Numbers table for a number of rows. We will do this for all of the numbers that are from 1 to the length of the name. Then use that value to get the substring of the value for that 1 character. I also include the Unicode value in the output to allow for some case sensitive operations, since UNICODE(‘a’) <> UNICODE(‘A’).

SELECT People.FullName, Number.I AS position,
       SUBSTRING(People.FullName,Number.I,1) AS [char],
       UNICODE(SUBSTRING(People.FullName, Number.I,1)) 
                                                AS [Unicode],
       CASE WHEN i = LEN(People.FullName) 
            THEN 1 ELSE 0 END AS last_character_flag
FROM   Application.People AS People
         JOIN Tools.Number
               ON Number.I BETWEEN 1 AND LEN(People.FullName)
ORDER  BY FullName;

The output will have the full name repeated in the first column, then have the character position in the second, along with the character and Unicode output of the value (and an indicator if it is the last character of the string.) Now we can simply use a NOT LIKE expression against our single character, eliminating from contention the numbers (0-9) and letters (a-z), space, -, and a single quote (my database is case sensitive, adjust if you are dealing with case sensitive character sets):

SELECT People.FullName, Number.I AS position,
       SUBSTRING(People.FullName,Number.I,1) AS [char],
       UNICODE(SUBSTRING(People.FullName, Number.I,1)) 
                                                AS [Unicode],
          CASE WHEN i = LEN(People.FullName) 
                     THEN 1 ELSE 0 END AS last_character_flag
FROM   Application.People AS People
         JOIN Tools.Number
               ON Number.I BETWEEN 1 AND LEN(People.FullName)
WHERE  SUBSTRING(People.FullName,Number.I,1) 
        NOT LIKE '[- a-z0-9'']' --LIKE expr on the single char
ORDER  BY FullName;

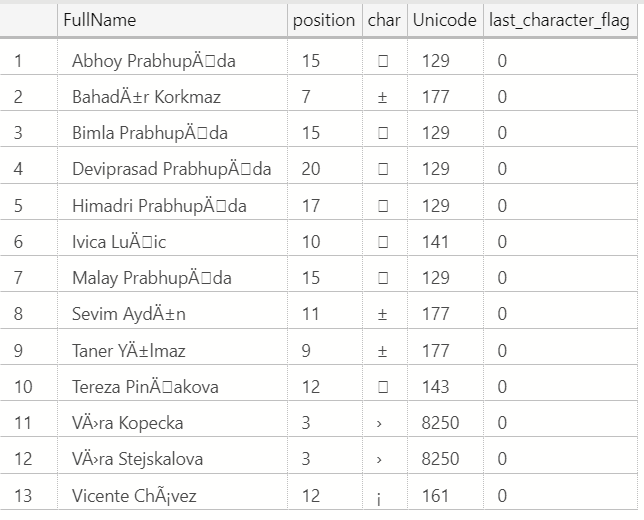
What you will see is a set of data that has the characters that are not our like (which may actully mean the fullname value is duplicated) This may look like the following (This being output from Azure Data Studio), depending of course on your client, and if this looks ok in your regional dialect, but unicode 129 appears to be a control character: https://www.compart.com/en/unicode/U+0081):

I believe these characters are there just to make it fun to use the WideWorldImporters database, but of course, this is a good thing when you are testing/demonstrating software.

Now, once you have this base set of data, with the characters now each on their own row to work with, you can use this query in a CTE and look at some “interesting” details about the characters in a set.

For example, if you want to know which characters (ignoring case, in a case sensitive db) are used the most (and least) in a column (for some reason):

WITH CharacterRows AS (
SELECT People.FullName, Number.I AS position,
       SUBSTRING(People.FullName,Number.I,1) AS [char],
       UNICODE(SUBSTRING(People.FullName, Number.I,1)) 
                                           AS [Unicode],
  CASE WHEN i = LEN(People.FullName) THEN 1 ELSE 0 END 
                                 AS last_character_flag
FROM   Application.People AS People
         JOIN Tools.Number
               ON Number.I BETWEEN 1 AND LEN(People.FullName)
)
SELECT char, COUNT(*)
FROM CharacterRows
GROUP BY char
ORDER BY COUNT(*) DESC;

Or, if you want to see it case sensitive, you can use the Unicode value of the character:

WITH CharacterRows AS (
SELECT People.FullName, Number.I AS position,
       SUBSTRING(People.FullName,Number.I,1) AS [char],
       UNICODE(SUBSTRING(People.FullName, Number.I,1)) AS [Unicode],
  CASE WHEN i = LEN(People.FullName) THEN 1 ELSE 0 END 
                                 AS last_character_flag
FROM   Application.People AS People
         JOIN Tools.Number
               ON Number.I BETWEEN 1 AND LEN(People.FullName)
)
SELECT Unicode, MAX(char), COUNT(*)
FROM CharacterRows
GROUP BY Unicode
ORDER BY COUNT(*) DESC;

What is the most used character in the English language? The Internet tells me that it is e, but in the People.FullName column, it is the lowercase letter a, by a large margin.

As for performance, I have use the version of this query to search through rows with millions of rows, with an average of 20 or so characters per value with very good performance. Aggregating the number of characters that were used in the strings was, on my Surface 4 laptop, notably laggy, taking around 10 seconds as opposed to sub second response to return the 13 rows using the characters that were not in the typical set of 26 letters, 10 numbers, – and space. Your mileage certainly may vary, so test, test, test.

The post Finding a character in every character string by elimination appeared first on Simple Talk.


from Simple Talk http://bit.ly/2VmMoAz
via

Thursday, April 4, 2019

How did we get to service meshes?

If you’ve been to a conference over the last few years, you’ve probably come across microservices. A microservice architecture consists of many highly decoupled services that are independently deployable and organized around business capabilities. This isn’t a new idea, SOA had similar ideas in the 90’s but the technology around it was clunky (it seemed to involve an awful lot of XML — never a good start!).

Individually microservices are simple — they are small and do one thing. However, imagine you’ve got a few hundred and now you need to start managing those messages, get some consistency and put some standard functionality in (think orchestration, transformation, routing, circuit breaking etc.). How do you do this consistently?

Solving the problems around service communication

The first option is a message queue. Instead of point-to-point communication use a central store (Enterprise Service Bus) and everything communicate through that broker. A broker service like RabbitMQ can support multiple protocols/transport and do all this out of the box. Message buses also help with scalability, but this comes at a cost. The centralised bus is a single point of failure (SPOF). To address this, message buses are typically clustered for reliability and resilience. This therefore has a high operational cost.

Another option for managing microservice communications is an API gateway. An API gateway can make client code (that consumes microservices) easier to write by effectively bundling APIs together to present a uniform interface for clients. Imagine a reverse proxy on steroids. API Gateways run on the edge (the boundary between services and clients) and give consistency through API management (versioning etc), security and SLA management. Examples of this include APIGee (acquired by Google) and Apiary (acquired by Oracle). One anti-pattern around API Gateways (as noted by Thoughtworks) is a tendency for the API gateway to grow in functionality to the point that’s it’s complexity outweighs the benefits. It’s still a SPOF and requires specialist skills to maintain.

Lately, and quickly, a new breed of technology has been developed that offers another choice. A service-mesh offers consistent discovery, security, tracing, monitoring and failure handling without the need for a shared asset like an API gateway or message bus.

Deriving a Mesh

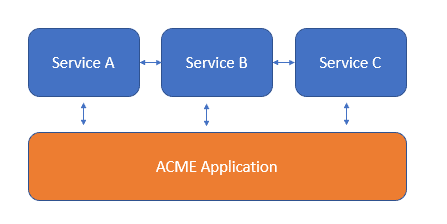
That sounds like a desirable solution, but how’d you achieve that? Let’s try and walk through a very simplified example. We’ve got three services A, B, C and they work together to build ACME’s first web based service (it probably sells Anvils on Demand). Here’s our “architecture”

https://cdn-images-1.medium.com/max/1200/1*7XMkSwQL0j7GDKd5Qf4c2w.png

ACME. Inc Architecture

We’ve got a few problems with this. Services A, B and C and the ACME application all have some common code to communicate with each other. This is starting to get complicated — how do the servers find each other? What does Service B do when Service C goes down? And how do we get the metrics in a sensible way?

One option would be to build a library that encapsulates all this functionality. That’s an option but then we get into the dreaded world of versioning. That library is going to either be very good at versioning (can anyone do semantic-versioning right?) or it’s going to be set in stone and never updated. Any bugs or crashes in this library are going to cause service outage and building it into the application will compromise the single purpose principle of services.

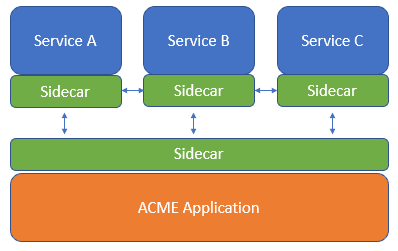
As David Wheeler says, “All problems can be solved with another layer of indirection”. The answer is to factor this logic out and run it as a separate process. Let’s look at our architecture now.

https://cdn-images-1.medium.com/max/1200/1*ZvQVATuuGNERAJTcUfF_lQ.png

Another layer of indirection!

This is known as the Sidecar pattern. This pattern allows us to deploy more of our components as separate process/containers and reduces the amount of business logic needed in each service.

This is still a complicated set up — what does this indirection really give us? We’ve still got to write the same amount of code we did before. But do we?

What if we didn’t have to write these sidecars? What if we developed a common sidecar at a higher-level of abstraction that provided this common functionality like service discovery, authentication and diagnostics. That’s exactly what a service mesh, such as Consul, LinkerD and Istio is!

https://cdn-images-1.medium.com/max/1200/0*IhP8Zf8ihFzSjizD.jpg

Meshes are resilient!

So, what is a service mesh?

A service mesh is logically split into two different types. The data plane mediates and controls network communication between services. The control plane is the meta level that manages and configures the sidecars themselves.

Typically the control plane is managed using a decentralised peer-to-peer approach (typically implemented by a distributed consensus protocol, such as Raft or the wickedly complicated Paxos algorithm). For the data plane, events are often distributed using a Gossip Protocol.

So in summary, you’d use the Service Mesh pattern when you’ve got cross-cutting concerns (configuration, service discovery, monitoring etc.) that you want to centralise. You solve these by using a service mesh that mediates all communication in and out of each service.

If you’ve noticed any errors in the description above, please let me know and I’ll update!

In the meantime, if you’ve read this far I should mention we are hiring for engineers in our Cambridge office. Feel free to reach out to me if you’d like to know more.

This post was first published on Redgate’s product development blog, Ingeniously Simple.

The post How did we get to service meshes? appeared first on Simple Talk.


from Simple Talk https://ift.tt/2UvLZhY
via

Wednesday, April 3, 2019

Scary Stories from the Trenches

If you have worked with databases long enough, you probably have many frightening stories to tell about things that have gone awry on the job or problems that were difficult to solve. Accidently dropping a table or trying to fix an issue with the CIO standing right in your cube, repeatedly asking if you’ve fixed it yet, are the two that immediately come to mind.

Grant Fritchey (@GFritchey) has quite a few war stories. In one of them, he was instructed to supply a backup of the production database to a developer. The developer was working on a process to send out automated email messages to customers. Since the data was not masked in any way, emails went out to real addresses during testing. That wasn’t the worst part of the story, however. Since the developer had quite a sense of humour, the messages contained, shall we say, some mature content. Luckily, Grant said he did not lose his job over this since he did exactly what he was told to do. I have a feeling that procedure changes were made quickly after that fiasco.

Kendra Little (@Kendra_little) has a story from many years ago when she was responsible for setting up a dev environment. Everything was scripted, but the process took two weeks due to all the database restores. One Friday evening a script had the wrong dev environment settings in it, and the dev environment ended up unusable. The dev team had to decide whether they would just not work for two weeks while the two-week process ran again or not be able to do end-to-end testing for the rest of the development cycle – a couple of months.

These are some scary stories, but, fortunately, there are tools that can you help avoid problems like these. Even though you can automate jobs and processes with scripts, tools can be very helpful. Take SQL Clone, for example. Kendra’s restores would have taken just seconds instead of two weeks had SQL Clone been available. And, if the private information, including email addresses, had been masked with Data Masker, Grant would have avoided this embarrassing mishap.

As humans, we are intelligent, but we also have the tendency to make mistakes. Computers are not smart (at least not yet!) but they do exactly what we tell them to do, and they can do it fast. They also don’t get bored doing repetitive tasks. That’s why DBAs like to automate as many of their tasks as possible. You’ve probably heard the term “lazy DBA,” but I call automation being smart and efficient. This is even more important as DBAs have more responsibilities due to new regulations and how IT is changing.  The more that can be automated, the less mistakes are made, and the more DBAs have time for other projects. Scripting can only take DBAs so far. That’s where the right tools for the job make all the difference.


The post Scary Stories from the Trenches appeared first on Simple Talk.


from Simple Talk https://ift.tt/2K3TDfn
via

SQL For Cosmos DB – Tips and Tricks

The series so far:

  1. Introduction to SQL for Cosmos DB
  2. SQL For Cosmos DB – Tips and Tricks

This article will help you extend your basic Cosmos DB SQL querying abilities. Here, you will learn a few of the tricks that you might need to overcome the limitations of the flavour of Cosmos DB SQL.

String Functions for Wildcard Searches

The Cosmos DB engine is not bad at searching through vast swathes of JSON data. If you need to use a wildcard search for a text inside a specific attribute, the CONTAINS() function is a good starting point. You use it rather like a T-SQL LIKE in a WHERE clause.

NOTE: Load the SimpleCars2 data into the Cosmos DB emulator. For help with this, see the first article in this series.

Run the examples in this article against SimpleCars2.

SELECT  s.CustomerName, s.InvoiceNumber
FROM    s
WHERE   CONTAINS(s.CustomerName, "Wheels")

This query finds the following documents in the source collection:

[
    {
        "CustomerName": "Wonderland Wheels",
        "InvoiceNumber": "GBPGB011"
    },
    {
        "CustomerName": "Wonderland Wheels",
        "InvoiceNumber": "GBPGB011"
    }
]

You need to be aware that the search text is case sensitive. What do you do to make a wildcard search case-insensitive? The answer is simply to force the attribute and the text that you are searching to be in the same case, much as you would do for case-sensitive collations in SQL Server:

SELECT  s.CustomerName
FROM    s
WHERE   CONTAINS(UPPER(s.CustomerName), "WHEELS")

Alternatively, if you need to set up a Wildcard search that applies to the start or the end of the contents of an attribute, similar to LIKE ‘%sometext’ in T-SQL, you can use this approach:

SELECT  s.CustomerName
FROM    s
WHERE   STARTSWITH(s.CustomerName, "Won")
        OR
        ENDSWITH(s.CustomerName, "Vehicles")

This more focused wildcard search gives the following result:

[
    {
        "CustomerName": "Wonderland Wheels"
    },
    {
        "CustomerName": "Wonderland Wheels"
    },
    {
        "CustomerName": "Birmingham Executive Prestige Vehicles"
    }
]

This query will still be case sensitive, but you can use the UPPER() or LOWER() functions to ensure that a case-insensitive search is applied.

Null Handling in Cosmos DB SQL

One reassuring shared feature between T-SQL and Cosmos DB SQL is that nulls, expressed as the unquoted lowercase word null in JSON, will ‘infect’ an entire calculation and return a null value if any single attribute is null. This is something that you will have to learn to handle in JSON documents.

However, one of the joys of a semi-structured format like JSON is that no attribute is compulsory. The potential consequence is that attributes may be missing in certain documents, and a missing attribute will also return a null in a calculation. In essence, you have to guard against two different types of nulls, missing elements, and actual null values.

To make this clearer, suppose that you have written some preventative code like this:

SELECT  s.InvoiceNumber
       ,s.Cost + s.RepairsCost 
       + s.PartsCost + s.TransportInCost 
       + (IS_NULL(s.LineItemDiscount) ? 0 : s.LineItemDiscount) 
           AS Costs
FROM   s

Assuming the query works (and there is no reason that it should not) the output should be:

[
    {
        "InvoiceNumber": "GBPGB011",
        "Costs": 7425
    },
    {
        "InvoiceNumber": "GBPGB011",
        "Costs": 66400
    },
    {
        "InvoiceNumber": "GBPGB001" ,
        "Costs": 56425
    },
    {
        "InvoiceNumber": "GBPGB002" ,
        "Costs": 185650
    },
    {
        "InvoiceNumber": "GBPGB003"
          
    },
    {
        "InvoiceNumber": "EURDE004"
    },
    {
        "InvoiceNumber": "EURFR005"
    }
]

Here you are combining the Cosmos DB SQL IS_NULL() function, which detects a missing attribute, with ternary logic to imitate the T-SQL ISNULL() function. What is more, you have enclosed the NULL detection ternary logic inside parentheses like this:

(IS_NULL(s.LineItemDiscount) ? 0 : s.LineItemDiscount)

This ensures that the output works as you expect. Indeed, forgetting to enclose the IS_NULL() logic inside parentheses will cause problems.

If you run this query against the SimpleCars2 collection, you will see that this technique works flawlessly for Invoice GBPGB002 where there is a LineItemDiscount attribute that is set to null in the source JSON document. Unfortunately, the total costs are missing for three invoices, numbers GBPGB003, GBPGB004, and GBPGB005. If you look at these documents, you can see that they are all missing the LineItemDiscount attribute.

Undeterred, you try and remedy the situation using the IS_DEFINED() function, like this (and please note that the ternary logic is reversed compared to the IS_NULL() function):

SELECT  s.InvoiceNumber
       ,s.Cost + s.RepairsCost 
       + s.PartsCost + s.TransportInCost 
       + (IS_DEFINED(s.LineItemDiscount) ? s.LineItemDiscount : 0) 
           AS Costs
FROM   s

This time, the output looks like this:

[
    {
        "InvoiceNumber": "GBPGB011",
        "Costs": 7475
    },
    {
        "InvoiceNumber": "GBPGB011",
        "Costs": 66900
    },
    {
        "InvoiceNumber": "GBPGB001 ,
        "Costs": 59125
    },
    {
        "InvoiceNumber": "GBPGB002"
    },
    {
        "InvoiceNumber": "GBPGB003",
        "Costs": 16410
    },
    {
        "InvoiceNumber": "EURDE004",
        "Costs": 10600
    },
    {
        "InvoiceNumber": "EURFR005",
        "Costs": 17970
    }
]

In this case, you will see costs for invoices GBPGB003, GBPGB004, and GBPGB005 where there is no attribute at all for line item discount but not for GBPGB002, the document with the actual null value.

This example shows that there are, in fact, two types of nulls in JSON, missing attributes and attributes that contain a null. One way to ensure that both of these potential traps are handled is code like this:

SELECT  s.InvoiceNumber
       ,s.Cost + s.PartsCost + s.TransportInCost 
       + (IS_DEFINED(s.LineItemDiscount) 
          AND NOT IS_NULL(s.LineItemDiscount) ? s.LineItemDiscount : 0)
           AS Costs
FROM   s

Finally, you obtain the result that you were looking for:

[
    {
        "InvoiceNumber": "GBPGB011",
        "Costs": 7225
    },
    {
        "InvoiceNumber": "GBPGB011",
        "Costs": 66400
    },
    {
        "InvoiceNumber": "GBPGB001",
        "Costs": 56950
    },
    {
        "InvoiceNumber": "GBPGB002",
        "Costs": 180150
    },
    {
        "InvoiceNumber": "GBPGB003",
        "Costs": 15750
    },
    {
        "InvoiceNumber": "EURDE004",
        "Costs": 10100
    },
    {
        "InvoiceNumber": "EURFR005",
        "Costs": 16610
    }
]

Here you are using simple logic to detect, firstly, if the attribute is defined and secondly to ensure that, if it is present, it does not contain a null. This kind of approach comes close to basic null handling in T-SQL. Once you reach a certain level of proficiency in Cosmos DB, you can write your own user-defined functions in JavaScript to handle these kinds of issues.

Given the clear limitations of Cosmos DB SQL, you will have to become inventive when writing SQL queries. You will have to write complex SQL using combinations of the available functions to achieve your goals.

Take a look at a handful of elementary workarounds to give you some ideas.

SUBSTRING() for LEFT()

Cosmos DB SQL currently does not have an equivalent to the SQL LEFT() function. Instead, you need to use a little ingenuity and apply the SUBSTRING() function like this:

SELECT  s.CustomerName ,s.SalePrice
FROM    simplecars AS s
WHERE   SUBSTRING(s.CustomerName, 0, 1) = "M"

You should obtain the following result:

[
    {
        "CustomerName": "Magic Motors",
        "SalePrice": 65000
    }
]

SUBSTRING() for RIGHT()

Just as there is no LEFT() function, there is no RIGHT() function. However, combining the SUBSTRING() and REVERSE() functions like this can solve certain challenges:

SELECT  s.CustomerName ,s.SalePrice
FROM    simplecars AS s
WHERE   SUBSTRING(REVERSE(s.CustomerName), 0, 1) = "r"

This time the result is:

[
    {
        "CustomerName": "WunderKar",
        "SalePrice": 11500
    }
]

Remember, that if you are looking for more than one character at the right of the string using this technique, then you will need to reverse the string that you are searching for. That is, instead of looking for ‘red’ you would have to enter ‘der.’

If entering a search text in reverse order causes you any discomfort, then you can always add a second REVERSE() like this:

SELECT  s.CustomerName ,s.SalePrice
FROM    saleselements AS s
WHERE   REVERSE(SUBSTRING(REVERSE(s.CustomerName), 0, 3)) = "Kar"

Once again, this is case-sensitive unless you extend the SQL to enforce case-insensitivity, like this:

SELECT  s.CustomerName ,s.SalePrice
FROM    saleselements AS s
WHERE   SUBSTRING(REVERSE(UPPER(s.CustomerName)), 0, 1) = "R"

Impersonate T-SQL YEAR(), MONTH(), and DAY()

There is no YEAR() function in Cosmos DB SQL. However, one simple alternative is to apply the SUBSTRING() function to the date string and isolate the relevant date element. To specify JSON documents for a specific year, you could write:

SELECT s.SaleDate
FROM   s
WHERE  SUBSTRING(s.SaleDate, 0, 4) = "2015"

The output from this query displays the sale date for six of the seven documents in the collection.

Extending this principle, you can isolate the month like this:

SELECT s.SaleDate
FROM   s
WHERE  SUBSTRING(s.SaleDate, 5, 2) = "02"

Only two objects are returned in this case. The day can be isolated in this way:

SELECT s.SaleDate
FROM   s
WHERE  SUBSTRING(s.SaleDate, 8, 2) = "25"

This filter only returns a single object.

Although they are probably self-evident, for the sake of completeness it is worth noting that you can use:

The operators >=, <=, <> or !=

IN for a set of years, etc.

Once you start creating more complex WHERE clauses that mix and match these elements, you will find that you can specify date and time ranges extremely easily.

Rounding up to nearest 1000

As a simple example of how to extend the Cosmos DB SQL functions, take a look at the following short code snippet that extends the TRUNC() function to round up to the nearest thousand:

SELECT  TRUNC(ROUND(s.TotalSalePrice / 1000)) * 1000 AS RoundedUp
FROM    s

Here, the output looks like this:

[
    {
        "RoundedUp": 89000
    },
    {
        "RoundedUp": 89000
    },
    {
        "RoundedUp": 65000
    },
    {
        "RoundedUp": 220000
    },
    {
        "RoundedUp": 20000
    },
    {
        "RoundedUp": 12000
    },
    {
        "RoundedUp": 20000
    }
]

Conclusion

There are many other workarounds that you can apply to overcome the limitations of the Cosmos DB implementation of SQL, and this short list could be extended to cover a range of options. However, this would be like a trip back to SQL Server circa 1994, and even this would not cover all the challenges that you are likely to face. Suffice it to say that you are likely to require some ingenuity and write extremely convoluted SQL to do something that would be simple in T-SQL or to consider other solutions.

Cosmos DB has a short answer to this, and that it to write your own user-defined functions in JavaScript. This is a rich and immensely powerful language, and it can be fairly easy to extend Cosmos DB SQL with a plethora of functions that answer your specific requirements. However, the purpose of this article is to look at the Cosmos DB flavor of SQL, and so learning how to add extensions in a language that you may not be familiar with will have to wait for another day.

The next article in the series will cover how to query more complex JSON documents.

The post SQL For Cosmos DB – Tips and Tricks appeared first on Simple Talk.


from Simple Talk https://ift.tt/2TUoWJl
via

Monday, April 1, 2019

Security Considerations for ERP Applications

Did you know?

  • eBay suffered a serious security breach in 2014 that led all 145m customers to change passwords to secure their accounts.
  • According to research performed by the Ponemon Institute, the average cost for a breach of sensitive data in 2018 is US$148 per record.
  • The UK’s Information Commissioner Office (ICO), responsible for policing data protection in the UK, fines companies around £2m annually for failing to protect personal data.
  • Regulation directives such as the General Data Protection Regulation (GDPR, enforcement beginning May 2018), mandate organizations to comply with security practises that ensure that any personal data for all individuals within the European Union collected is adequately protected.

Information security breaches, including non-compliance to regulatory standards, can yield financial and reputational consequences that are better avoided by any organization, large or small. Information security has become an increasing concern for organisations resulting in growing security budgets intended to tighten processes and also to conform to new and changing security regulations. An organization’s security strategy is generally aimed at managing the risk of security breaches and staying compliant with regulatory standards. Operational procedures and business applications that support them need to be strategically managed and controlled to ensure the integrity, availability, and security of sensitive data that the organization owns.

A key aspect of any security strategy is the ability to achieve a level of security that appropriately demonstrates an organisation’s commitment to information security regulations and the safety of the data collected from its trading partners. Too little security increases the risk of breaches while too much security can result in unnecessary IT overheads, compromised system performance, and loss of agility in business processes. There is no ‘cure-all’ security solution; each organization needs to evaluate its risks and set objectives that are relevant for their environment and the type of information it handles.

This article is inspired by experience and lessons learnt as a solution designer extending an enterprise application to meet custom business requirements that are not met by the standard implementation. The primary focus of this article is the extension of security objectives to the maintenance of business applications. While this specific experience is on Oracle E-Business Suite, the core principles and lessons learnt are fundamentally applicable to a wide range of commercial application environments that process and manage sensitive data. The article seeks to emphasize the importance of enterprise resource planning systems to the operational efficiency of organisations, how the maintenance and usage of these systems increase data security risk, and what can be done from a development and maintenance perspective to mitigate this risk.

Without some form of computer automation, most businesses would not be able to achieve operational efficiency. Regardless of the size of an organization, operational complexities are a reality, and the need for accurate record keeping, resource allocations, analysis, planning, and reporting is necessary. Enterprise Resource Planning (ERP) systems have evolved over the years to meet these operational requirements efficiently.

An enterprise resource planning system integrates business processes and data from all the core business functions such as sales order processing, purchasing, financial management, and payroll. It allows for different operational functions to share common data and processes. For example, Oracle E-Business Suite uses a data model known as Trading Community Architecture (TCA) that provides a single, universal definition of trading partners’ data for all business functions. TCA enables the creation and maintenance of a single record of trading partners’ information to be utilised by any of the business operations. For instance, there can only be a single trading partner record created in the system that can be qualified to be used as a customer, a supplier or any required business entity and is available across all functions. This promotes data efficiency and integrity by having a centralised source of true information.

ERP applications are typically designed as large, complex, homogeneous mission-critical systems and are generally developed and marketed as commercial off-the-shelf software by large software vendors such as SAP, Oracle, and Microsoft. The development of ERP applications is theoretically based on industry best practices, and they are intended to meet broad business requirements covering a wide range of industries. For an ERP application such as Oracle E-Business Suite, the security architecture is presented as its cornerstone, established over time and can be configured to meet specific regional or organizational requirements.

The functionality provided by Commercial ERP systems is designed to be highly configurable to allow customers to incorporate their own business rules to match specific business or industrial requirements. However, even after the configuration is completed as intended, gaps often remain between standard delivered features and specific organization requirements. In an effort to improve user acceptance, most ERP customers end up developing extensions and customizations to make sure application better supports business processes.

Because ERP systems process and hold sensitive personal and commercial information relating to employees, customers, suppliers, prospects and projects, further developments outside of the original blueprint expose the application to increased risk of data security breaches and non-compliance to regulations. Custom developments generally make up a very small portion of the whole application but, because they access and process the same sensitive data as the main application, they pose a significant security risk that could potentially cost the organization in security breach damages. ERP system vendors, while they recommend best practice standards to be followed, generally do not support custom developments. It is, therefore, a customer’s responsibility to make sure that an organisation’s security objectives are enforced and effectively embedded in the development strategy for these extensions.

The extension and customization of ERP applications is a specialised technical effort that requires, over and above the necessary development skills, a good understanding of the architectural, functional, and security model of the application, including the vendor suggested best practice for product extension. Application development approaches used for ERP extensions need to ensure that the original application’s data security model is maintained and automatically enforced in all the possible states of data within the application. Otherwise, the cornerstone feature of the application becomes severely compromised. Development standards and practices should also meet security objectives defined in the organisation’s strategy and should aim to protect any sensitive data with the same attitude that is required of all business process. This calls for application developers to thoroughly understand the organization’s security strategy and how the application’s security model can be extended to custom developments.

Information security can only be adequately addressed in development if the security requirements for every solution to be implemented are explicitly identified and fulfilled at every stage of the development cycle; i.e., specific security requirements that are addressed in requirements analysis, design specification, and solution implementation. This facilitates validation and verification for conformance to security strategy. With this understanding, the following are some of the key security aspects for enterprise developers to consider when extending ERP applications.

Access Control

Access control in ERP applications is concerned with defining and managing authorized users, including granting them the relevant roles they need to access processes and data. Access control is critical to the goal of protecting data from unauthorized disclosure and modification, at the same time, maintaining appropriate levels of availability to authorized users for operational purposes.

Oracle E-Business Suite embeds the principle of least privilege in its security model. This principle is based on the practice of granting necessary privileges only – application users should not be given more privileges than necessary. This is implemented through a feature known as Role Based Access Control (RBAC). RBAC enables organizations to create roles based on specific job functions, and to assign these roles the appropriate permissions. User access is determined by assigning individual users the appropriate roles.

It is important for developers to understand how to extend the application’s security model to all custom developments in a similar way to standard functionality. Where parts of the security model are configurative, custom extensions should also similarly use the configured security features. Custom developments must be registered to the application in a manner that enables them to be appropriately assigned to the relevant users using role-based access control. This way their access is controlled, and they are only made available to users that need them for their specific job roles.

The level of data access accorded to custom processes should be relevant for intended purposes. For instance, a custom process to extract enterprise data should be given read-only access to specific database objects. A specific database user should be defined for such a process, which would be granted specific access to enforce the rule of not giving users more information than is required.

Custom processes such as interfaces or integrations that have back end access to the ERP application should have controlled access to enterprise data, giving them the right level of access to specific data. Each process needs to be associated with a user account that is granted access only to the functions and data necessary to meet the process requirements. Appropriate read and or write privileges should be defined for each interface according to its requirements. Data extracted out of the enterprise system should be nothing more than is required by the receiving system.

Access control for enterprise applications is best achieved by leveraging on existing models and technology. Software vendors employ security specialists to define, refine and rigorously validate security frameworks that meet industry standards and regulatory requirements. Commercial ERP platforms are also developed to incorporate the latest security technology, protocols, and algorithms. The custom solutions for extensions should be designed to fully utilise the established development framework. This not only provides consistency in the way security is applied across the system, but also enables a seamless environment that would be easier to manage and maintain when upgrades are delivered.

When implementing extensions, application developers need to analyse their usage and the data access that the process requires. Access to extensions should only be granted to users that are authorised to run the functionality, and this is achieved by making the new function available only to the necessary roles. Data access is controlled by associating the process with a database user that is granted only the read or write access to specific data objects as required by the process. Without this level of access control, the security of enterprise data would be at risk from both internal and external users who have the authority to log into the system.

Database Level Security

At the core of an ERP system is a relational database management system (RDBMS) that manages the data input/output and storage on the database server. The ability to logically customize data objects for a variety of users is key for any enterprise application and is fundamental to the security architecture for managing access to data. Different database platforms offer tools to create logical data objects that enable different users to view and handle common business objects in different ways.

Oracle meets this requirement with its Virtual Private Database (VPD) table feature. VPD is a concept that enables data restriction in large databases so that only a subset of the data appears to exist, without physically segregating the data into different data objects. It refers to the use of row-level security (RLS) and the use of application contexts. VPD’s row-level security allows access restriction by attaching a function that defines access rules to a table, view, or synonym. The function is known as the security policy, and it returns a predicate as an SQL filter. When a query is issued against the protected object, Oracle dynamically appends the predicate returned from the function to the original SQL statement, thereby filtering the data records by the values generated by the security policy.

A typical VPD implementation is where there is a requirement to restrict sites, departments or individuals to operate only on their own records. Ordinarily, multi-organizational enterprises would need to have multiple database instances, one for each entity or, at the very least, multiple schemas in order to maintain data security. The effort and cost to implement and maintain that would be mammoth. However, with Oracle VPD, one database does the job, and the security is proven. VPD enables different users to access the same table in a single schema yet each user gets a different view of the available data, that is, each one will see only what is appropriate for that user to see. This security feature has been proven to be airtight, given that the security policy is accurately implemented, it is logically invoked by the application, and the data is accessed securely.

To effectively implement VPD tables, the concept should be implemented from design. It requires an appropriate table structure with distinct partitioning (or labelling) column(s), proper configuration of user accounts, and implementing the security policy via a SQL function. Routines that populate the protected tables must be designed to enforce NOT NULL constraints on the partitioning columns and to validate the values in these columns as they are key to policy implementation. All routines that access data from these tables should always reference the appropriate object where the security policy is applied. In most cases, the security policy is applied to a view or a synonym for that table, and this has to be determined during design to assign object privileges appropriately

VPD is an Oracle database feature that can be utilised to implement data security at the database level. Custom tables handling sensitive data that needs to be securely accessed must be defined following the rules for virtual private databases. This enables the data to be logically partitioned and for security policies to be defined and applied for secure access. There are standard security policies delivered with Oracle E-Business Suite that can be extended to custom development. Application developers need to understand how this hangs together with user profiles in order to appropriately use it in custom developments. Application development standards should explicitly embed these security development rules so that they can be checked in quality reviews.

Data Encryption/Data Masking

In addition to controlling functional and data access, ERP data can be encrypted to reduce exposure risks. Encryption is an essential tool for securing sensitive information, more commonly used for in-transit data, to ensure the confidentiality and integrity of data are not compromised. For static data, data encryption is not necessary for all security scenarios, but for sensitive personal data such as credit card numbers or passwords, it is an essential tool.

The encryption process uses mathematical algorithms to change information into incomprehensible characters thus providing a fundamental form of defence on the data itself. This means that even in the event of an access control breach, compromised data is still only intelligible to authorized users who possess the right encryption keys.

Databases can be made quite secure, with proper configuration, but they can also be vulnerable to host break-ins if the host is compromised. In well-publicized break-ins, hackers have managed to obtain a large list of credit card numbers, or customer passwords, by breaking into a database. But if the data is encrypted, the stolen information would be useless. The encryption of stored data is, therefore, an important tool in limiting information loss even in the normally rare cases that access controls are bypassed.

Data masking is a technique that is used to protect further data where encryption is not necessary. This allows sensitive information to be transposed in a manner that will not hinder ordinary database operations, such as maintaining referential integrity and data type constraints. Data values are changed yet conform to schema requirements, allowing database extracts that ordinarily contain sensitive data to be used for development and testing purposes. Data masking can be done by scripting, but tools are also available such as Redgate’s Data Masker for Oracle.

Developers need to understand organizational policy concerning the handling of personal data and apply the necessary security tools appropriately. With the rise of e-commerce, if custom developments handle sensitive financial information such as credit card numbers, this ought to be handled with the utmost care. Sensitive information such as credit card numbers or account passwords should always be encrypted even in storage. Data masking should be used for development and testing environments to protect personal or commercial data from illegal disclosure and yet giving developers a more realistic domain on which to work. Business sensitive or personal data should also be encrypted when transporting across networks.

Conclusion

Data Security is becoming increasingly critical for organizations as the consequences of a security breach are becoming more and more significant. Hackers are getting more sophisticated, protection laws are getting tighter, and penalties are on the increase. ERP systems lie at the core of business processes, and they process and maintain most of the business data that is considered to be sensitive. ERP vendors play their part by investing in platforms and technologies that secure the data so much that the security model is often presented as the cornerstone of the application, but as long the application is extensible, any custom developments pose a risk of breaching security rules. It is important that the organisation’s security strategy is well understood by all personnel especially those who develop and maintain applications handling sensitive data. Security requirements for all developments need to be explicitly defined and specifically considered in the solution design and test strategy. There are many security tools available, but for commercial ERP systems, there is no need to re-invent the wheel. The security implementation that comes with the application should be extended as much as possible to all custom developments. Proper analysis of each requirement is also essential to determine the right level and tool to meet security requirements appropriately.

References:

https://www.esecurityplanet.com/network-security/ebay-data-breach-exposes-145-million-user-records.html – Ebay Data Breach

https://www.ibm.com/security/data-breach – Ponemone Institute Report

https://www.gov.uk/government/publications/data-protection-act-2018-overview – Data Protection Act

Oracle eBusiness Suite Security Guide – Part Number E22952-22

Oracle Database Security Guide 12c Release – Part Number E48135-19

The post Security Considerations for ERP Applications appeared first on Simple Talk.


from Simple Talk https://ift.tt/2CPUIkQ
via