Monday, September 9, 2019

How to Use SQL Audit and Azure Log Analytics to Comply with Audit Rules

As a database professional, your most important duty is to protect the data under your care. This is something that I believe most any DBA would agree with; yet, in many cases, you may unknowingly neglect one of the core aspects of data protection, namely tracking who is viewing and modifying the data itself. Most any competent data professional would agree with the need for things like backups, integrity checks, etc., and those certainly are critical (it’s not really going to matter who modified data if you lose it all due to a failed disk). But in today’s world where regulations and risk of data breach abound, they are no longer sufficient to fulfil your duties.

All one needs to do is look at the data protection and regulatory rules affecting many businesses to see this. Here are two clear examples.

PCI-DSS

The Payment Card Industry Data Security Standard, or PCI-DSS, defines rules that companies who accept, store, and process credit card data must follow. While not an actual regulation, in that it is not enforced by any governmental organization, the penalties and potential for lost revenue if an entity is found to be non-compliant are no less substantial.

PCI-DSS is a set of twelve rules, ranging from securing physical access to systems (rule 9) to anti-virus (rule 5) and network security (rule 1). One of the rules I’ve found more complex is rule 10, which requires, among other things, implementing “automated audit trails for all system components” that are involved in the processing and storage of cardholder data[1]. For example, you must be able to show who accessed cardholder data, both from the perspective of viewing and modifying.

GDPR

The Global Data Protection Regulation, or GDPR, it a set of regulations passed by the European Union to protect personally identifiable information (or PII for short). Among its many provisions, several point to the need for robust auditing of access to relevant data. For example, Article 25, “Data protection by design and default”, states that “The controller shall implement appropriate technical and organizational measures for ensuring that, by default, only personal data which are necessary for each specific purpose of the processing are processed.”[2] Article 33, “Notification of a personal data breach to the supervisory authority”, requires that organizations holding personal data “shall without undue delay and, where feasible, not later than 72 hours after having become aware of it, notify the personal data breach to the supervisory authority”.[3] I would argue that, without an accurate record of who accessed your data, you will be very hard pressed to meet either of these requirements.

Having established a clear need for tracking access to data, there is one more item to discuss before getting into specifics, namely the question of where the audit data is kept. In the case of those subject to PCI-DSS, the rule is quite clear, in that rule 10.5.3 states “Promptly back up audit trail files to a centralized log server or media that is difficult to alter.” [4] This should surprise no one familiar with common-sense security, in that the systems holding the logs should be well segregated and secured from the systems generating them. The practical implication of this is that while you may generate the relevant audit records on the systems holding the data (for this purpose, an installation of SQL Server), you should not solely keep it there. In addition, you should ensure that no one component of the system can delete data already logged to the central location; otherwise, an attacker could remove their tracks before you had a chance to see them.

Having laid these foundations, it’s time to learn how you might implement a solution.

Overall Solution Design

To recap the stated requirements:

  1. Audit all access to relevant data, including viewing and modification.
  2. Audit any activity around the granting of access to the data itself.
  3. No automated component of the system should have access to delete the audit records in their eventual home (both short and long term).
  4. Finally, transmit these audit logs to a secure location outside the area where they are generated, such that compromise of the original system does not put the logs themselves at risk.

Before delving deeper, I want to note that the solution shown here is minimal, and certainly should not be considered adequate to meet the needs of all organizations. For example, it does not involve functionality such as automated analysis of logs or alerting based on defined criteria being met. For example, you may need to be notified when certain kinds of access occurs (such as someone being granted access to sensitive data), or when certain normal patterns of usage are violated (such as when data access occurs from a machine not normally accessing the data, or by a user from an unusual location). These are more complex issues to solve, and as a leader for a team facing them, I can state that they require complex and often expensive solutions. Take this solution only as a starting point, from which you may expand to better suit your particular circumstances. Also, for the sake of expediency, the article may take specific shortcuts that would not be acceptable in a live system.

The solution will combine two main components: SQL Server Audit and Azure Log Analytics.

SQL Server Audit

Available since SQL Server 2014, SQL Server Audit is a feature that allows you to track certain kinds of activity against an instance of SQL Server. These include data access (both view and modify), administrative setting changes, and privilege modifications to name several. This data is collected locally and can be sent to various destinations, such as physical files, Windows logs, and Azure blob storage. Initially, certain features were restricted to only Enterprise edition of SQL Server, such as database level auditing; thankfully, starting with SQL Server 2016 Service Pack 1, all features are available in Standard edition as well, making the feature accessible even to organizations who cannot afford an Enterprise license.

In this solution, SQL Server Audit will serve as the means to collect the necessary audit data. Previously, this likely would have involved either a third-party tool or the creation of a SQL Profiler trace, both of which carry cost and risk. With SQL Server Audit, the functionality is relatively easy to set up, once you understand some fundamental concepts. This article covers how to make use of SQL Audit’s ability to log events to the Windows Application event log, where they can be picked up for processing.

Azure Log Analytics

The Azure Log Analytics platform is designed to provide robust data analytics and visualization for bulk log data. In this case, it provides a place to view data while preventing the need for another piece of infrastructure to manage. You could easily substitute something fancier, such as Elasticsearch, Splunk, or any other platform of your choosing. If your organization already uses something else, I’d encourage you not to go outside the box.

In order to capture the audit events, you will make use of Log Analytic’s feature for collecting Windows event log data.

Time to get building!

Pre-Requisites

Before beginning this exercise, there are a few things you will need.

  • An instance of SQL Server 2016 SP1 or higher, minimum Standard Edition (Developer Edition will work fine as well).
  • An Azure subscription, with a configured Azure Log Analytics Workspace.
  • The Azure Monitor agent must be installed on the operating system hosting SQL Server.
  • A basic understanding of Azure Log Analytics query language.

The SQL Server need not be hosted in Azure, though that is ideal for lab purposes. (Note: For more information about using Azure Log Analytics to collect the audit logs on SQL Servers hosted outside of Azure VMs, see this documentation.)

Here are some guides for how to create a subscription, create a SQL Server virtual machine, and create an Azure Log Analytics Workspace.

TIP: When creating the Log Analytics workspace, choose the region closest to where your virtual machine will be (or if the virtual machine is in Azure, pick the same region if possible). Log Analytics is only available in certain regions, which you can see by browsing this link and scrolling down until you see “Log Analytics” in the list of services.

Auditing Setup

This section covers how to set up a basic server and database level audit in SQL Server and show how the events are logged to the local Windows event log.

SQL Audit configurations have three components: server audits, server audit specifications, and database audit specifications. I’ll discuss each in a little more detail.

Server Audits

A Server Audit object defines how audit data should be logged. For example, you can define outputs such as:

  • Files, both on the local file system or a remote share
  • Windows event logs, specifically the Application or (with some extra setup) the Security log
  • URLs, used mainly for storing audit data in Azure Blob Storage

In this case, you are going to log data to the Windows Application event log. See Microsoft’s documentation for more details.

Server Audit Specifications

A Server Audit Specification object defines what groups of events should be audited at the server level. This includes a great many options, some of which should be used with caution as they may generate a great deal of data.

In this case, you would like to audit the following kinds of server level events:

  • Changes to audit settings
  • Changes (DDL) to any database object
  • Ownership changes on any database object (which might allow a user to have different privileges)
  • Changes to permissions on any database level object
  • Changes to ownership at the database level (e.g. changing the principal that owns a database)
  • Changes to permissions at the overall database level (e.g. granting rights to a principal on an entire database)
  • Changes to database level role memberships
  • Changes to server level objects
  • Changes to ownership of server level objects
  • Changes to permissions on server level objects
  • Changes to server level permissions
  • Changes to server level role memberships

Refer to Microsoft’s documentation for more information about server audits.

Database Audit Specifications

A Database Audit Specification object defines what groups of events should be audited at the database level. Unlike Server Audit Specifications, these are defined on a database by database basis. Many of these are database level equivalents to the action groups available in the Server Audit Specification object. For example, the DATABASE_ROLE_MEMBER_CHANGE_GROUP action group is present in both Database and Server Audit Specifications; in the case of the former, it will only be applied in databases where the audit specification is present, whereas in the latter it will be applied across all databases in an instance.

A good rule of thumb is If you need to audit some kind of action across all databases on an instance, your best bet is likely to do so within a Server Audit Specification, not a Database Audit Specification. There are trade-offs to this, however, such as less granularity in terms of filtering. An excellent example of this is relevant to the scenario, specifically the need to audit access to and modification of data in specific tables, which will be the primary use case for this Database Audit Specification.

Say that you have one or more tables that you must audit access to, across many similar databases on a system. This being the case, you could do so in several ways.

  1. You could add the SCHEMA_OBJECT_ACCESS_GROUP action group to a Server Audit Specification. This will audit all access to any table across all databases on the instance. Certainly, very comprehensive, but likely also generating a large volume of data, some or most of which might not be necessary depending upon your needs.
  2. You could add the SCHEMA_OBJECT_ACCESS_GROUP action group to a Database Audit Specification in each of the databases that need to be audited. This will audit all access to any table in any database that has the audit specification defined. Depending on what percentage of databases on the instance you need to audit, and what percentage of tables within those databases must be audited, this may be a useful solution (but still very likely to generate a lot of data).
  3. You could add specific tables to a Database Audit Specification, using Database Level Audit Actions. This would let us very granularly define what tables require what kinds of access.

Microsoft’s documentation provides more details.

Constructing the audit

Reviewing the list of things to audit, and the various ways which might meet these requirements, you can now create the audit objects and see data being logged to the local Application event log.

First, create the Server Audit object, which will define how the data is logged.

CREATE SERVER AUDIT SQLAudit TO APPLICATION_LOG;

ALTER SERVER AUDIT SQLAudit WITH (STATE=ON);
Next, create the Server Audit Specification.
CREATE SERVER AUDIT SPECIFICATION SQLServerAuditSpec
  FOR SERVER AUDIT SQLAudit
    ADD (AUDIT_CHANGE_GROUP),
    ADD (DATABASE_OBJECT_CHANGE_GROUP),
    ADD (DATABASE_OBJECT_OWNERSHIP_CHANGE_GROUP),
    ADD (DATABASE_OBJECT_PERMISSION_CHANGE_GROUP),
    ADD (DATABASE_OWNERSHIP_CHANGE_GROUP),
    ADD (DATABASE_PERMISSION_CHANGE_GROUP),
    ADD (DATABASE_ROLE_MEMBER_CHANGE_GROUP),
    ADD (SERVER_OBJECT_CHANGE_GROUP),
    ADD (SERVER_OBJECT_OWNERSHIP_CHANGE_GROUP),
    ADD (SERVER_OBJECT_PERMISSION_CHANGE_GROUP),
    ADD (SERVER_OPERATION_GROUP),
    ADD (SERVER_PERMISSION_CHANGE_GROUP),
    ADD (SERVER_ROLE_MEMBER_CHANGE_GROUP)--,
    /*
    -- Uncomment this section to enable auditing of all object access
    -- across all databases on the server level instance. USE WITH 
    -- EXTREME CAUTION AS THIS MAY GENERATE A LOT OF DATA.
    ADD (DATABASE_OBJECT_ACCESS_GROUP),
    ADD (SCHEMA_OBJECT_ACCESS_GROUP)
        */
  WITH (STATE=ON);

TIP: You will see above that I have left a commented section that would enable the auditing of table/object access at the server level. As discussed above, this is likely only useful in certain cases and should be avoided unless absolutely necessary.

Once both of these objects have been created, run a few statements in order to generate some audit records.

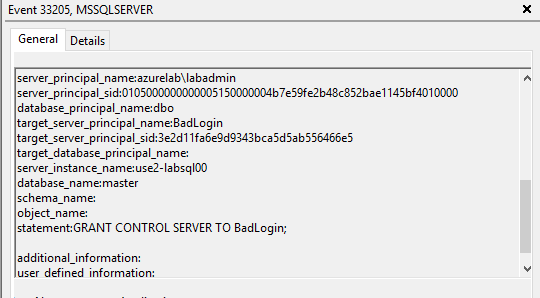
CREATE LOGIN BadLogin WITH PASSWORD = '!m$0B@d';
ALTER SERVER ROLE sysadmin ADD MEMBER BadLogin;
GRANT CONTROL SERVER TO BadLogin;
CREATE ENDPOINT BadEndpoint AS TCP (LISTENER_PORT=55001) FOR TSQL();
GRANT CONNECT ON ENDPOINT::BadEndpoint TO BadLogin;
GRANT CONNECT ON ENDPOINT::[TSQL Default TCP] to [public];

After running these commands, open Event Viewer and browse to the Application event log. You should see several log records that look similar to this one.
Next, use a Database Audit Specification to capture statements against a particular table.

CREATE DATABASE TestDB;
GO

USE [TestDB];
GO

CREATE TABLE MySensitiveTable (col1 int, col2 char(1));
GO
CREATE DATABASE AUDIT SPECIFICATION SqlDatabaseAudit
FOR SERVER AUDIT SqlAudit
ADD (SELECT, INSERT, DELETE, UPDATE ON dbo.MySensitiveTable BY Public)
WITH (STATE=ON);
GO
INSERT INTO dbo.MySensitiveTable
(
    col1,
    col2
)
VALUES
(
    1, -- col1 - int
    'A' -- col2 - char
);

SELECT * FROM dbo.MySensitiveTable mst;

DELETE FROM dbo.MySensitiveTable;

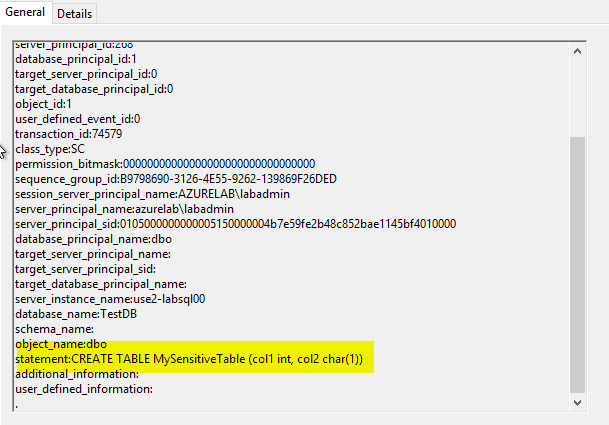
Looking in Event Viewer, you’ll now see these captured as well.
It’s now time to proceed to the next step, which is configuring the Azure Log Analytics agent to collect the necessary event logs.

Azure Log Analytics Agent

By default, the Log Analytics agent does not collect Windows Event Log data. Fortunately, this is easy to do in the central Log Analytics Workspace configuration in the Azure Portal.

To configure the Log Analytics agent residing on the computer(s) hosting SQL Server, you need to complete these steps.

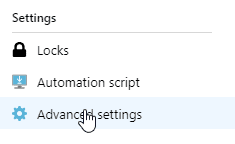
  1. Navigate to the “Advanced Settings” blade for the OMS Workspace you created.
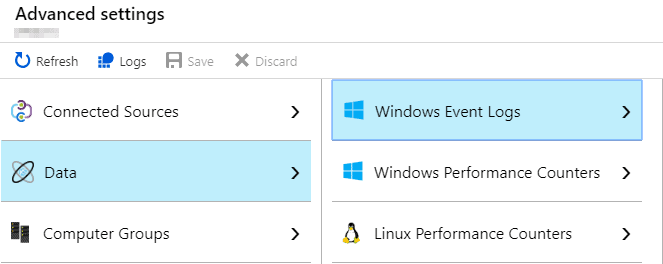
  2. Click “Data”, then “Windows Event Logs”.
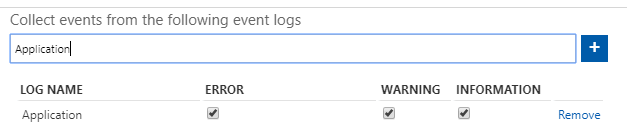
  3. Type in “Application” in the search box, select the same text in the resulting drop-down, then click the small “+” button.

  4. Ensure that all available checkboxes are selected.
  5. Click the “Save” button along the top of the screen to save the configuration.
Once you have completed this, go back to SQL and run some more commands, such as the following.

USE [master];
GO

ALTER SERVER ROLE sysadmin DROP MEMBER [BadLogin];

USE TestDB;
GO

INSERT INTO MySensitiveTable VALUES (2,'B');
SELECT * FROM MySensitiveTable;
DELETE FROM MySensitiveTable;

Now, navigate to the Logs blade in your OMS Workspace, and run a query such as the following:

Event
| where Source == 'MSSQLSERVER'
| top 100 by TimeGenerated desc

Note that it may take a few minutes for the audit to show up, so you may have to rerun it. Looking at the results, expand a few of the events and you should see something like the following.
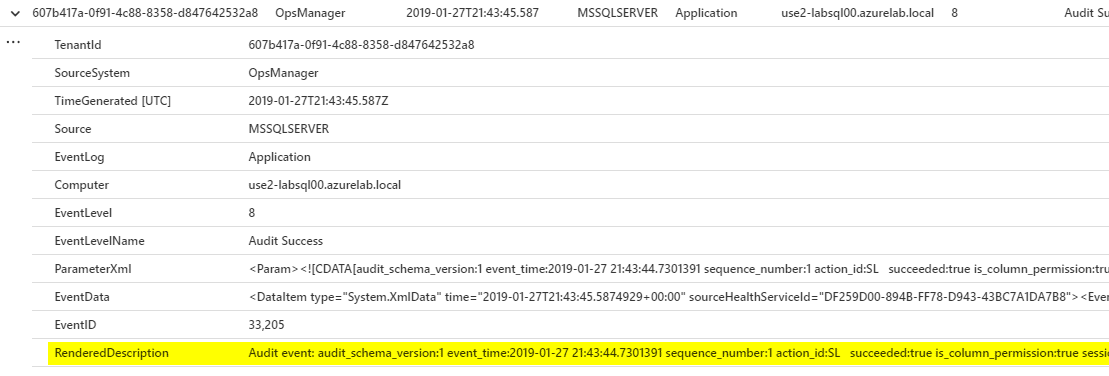
Note the highlighted field in particular. In this basic configuration, unfortunately, Log Analytics bunches a lot of the useful data together in one field, which does make it somewhat hard to read. In future explorations I hope to be able to get the data parsed in a more readable fashion, and perhaps also explore how one might set up alerts based on certain kinds of actions, such as additions to highly privileged groups or access to sensitive data.

Summary

In this article, I’ve shown how to configure a basic SQL Audit configuration, including the Server Audit (how data is logged), Server Audit Specification (what actions get audited at a server-wide level), and Database Audit Specification (what actions get audited on a database by database case) objects. I’ve also shown how easy it is to get this data out of the local system and into an Azure Log Analytics Workspace. While this certainly meets the stated requirements, there are some limitations to this model.

First, as shown previously, the data is not particularly readable, which also means it is hard to alert on or analyze further. Second, this configuration will result in all Information level Application Event Log entries being ingested into the Log Analytics Workspace. Depending on what applications are installed on the host computer, this could result in a lot of data that may or may not have used (though in general I’d say that aggregating log data as a whole is useful, especially in security conscious environments).

My eventual goal is to take this basic setup and address each of these issues. While this will necessitate some additional complexity, in the end, the added value will more than likely outweigh that. Stay tuned!

References

1. See section 10.2 of https://www.pcisecuritystandards.org/documents/PCI_DSS_v3-2-1.pdf

2. https://gdpr-info.eu/art-25-gdpr/

3. https://gdpr-info.eu/art-33-gdpr/

4. See section 10.5.3 of https://www.pcisecuritystandards.org/documents/PCI_DSS_v3-2-1.pdf

The post How to Use SQL Audit and Azure Log Analytics to Comply with Audit Rules appeared first on Simple Talk.


from Simple Talk https://ift.tt/2A4JTd2
via

Saturday, August 31, 2019

Creating ASP.NET Apps with React

Single Page Applications are the new wave of the moment. In the midst of several frameworks and libraries that arose during the last decade to tackle better ways to build web applications, React is now the most popular one. It’s a lightweight library (yes, React is not a framework, so it means it doesn’t come with all the rules, specifications and patterns that Angular, e.g., comes with), that is embraced and powered by the community, simple to use, flexible, and relies on a strong concept: components.

Components are not a concept created by React, you may say, and you would be correct. However, React made them far simpler for JavaScript developers. Now, with just the use of a single .js file, as well as the power of ECMAScript (especially from 6+) and some good old patterns, you can create complex web applications from scratch, reusing as many components you need. This makes the reuse of code a big plus for JavaScript apps: more testable, concise, understandable, etc.

Besides that, the community grew rapidly around the React world, creating tons of new related libraries that help to boost React’s power to a whole new level. From libs for centralized state management (Redux), stylizing your components (or add known libs like Bootstrap, Antd, etc.), to completely new ways of dealing with forms, remote calls, server-side rendering… The number of options is huge and continuously growing.

In this article, you’ll learn how to integrate a well-known back-end API (that’ll be served on top of ASP.NET) to a SPA totally made in React from scratch. React, in fact, can be integrated with whatever back-end services you want; however, this will be an excellent opportunity for you to analyze how both environments (front and back) work together in real-world scenarios.

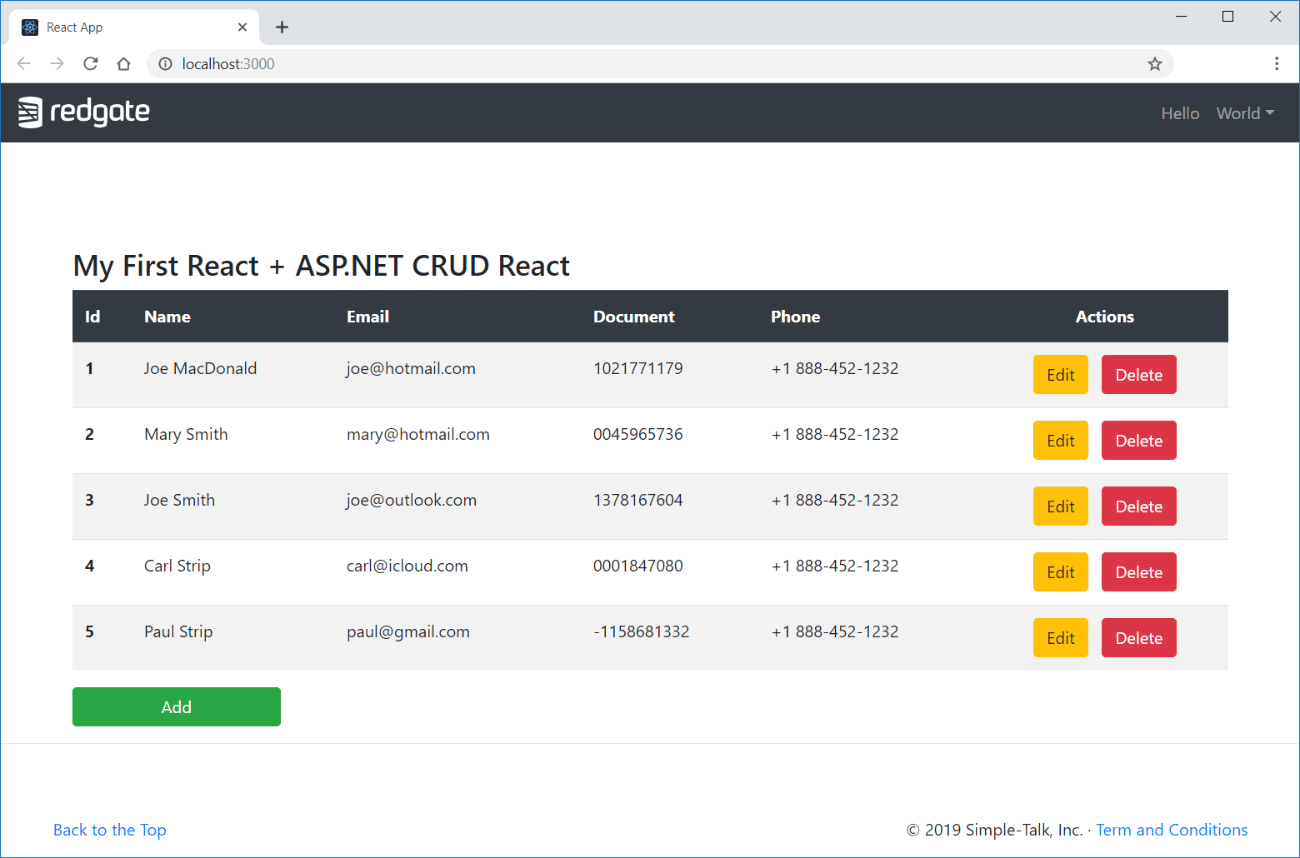
To do this, the article covers building a CRUD application of user data, exploring the construction of both back and front ends, from the installation and configuration to the implementation. It makes use of Bootstrap for the UI, in order to cut down on worry about CSS and styles. This is the final representation of the view, once done:

https://lh5.googleusercontent.com/wb9C4_vEk7vFfkC1kTt4qxQ_9H6i2_T-EsWdjwNO77J1QH6HEiwGkdcznWR13xKu6c6VKOAHz-JxIKV_KNQZMnCpdnqMzwaQPT6zCLwIW5bGgrZ6LiEyYg3bh6vE2z9dff28jKEr

Figure 1. The final application visualization.

Setup – Back-end

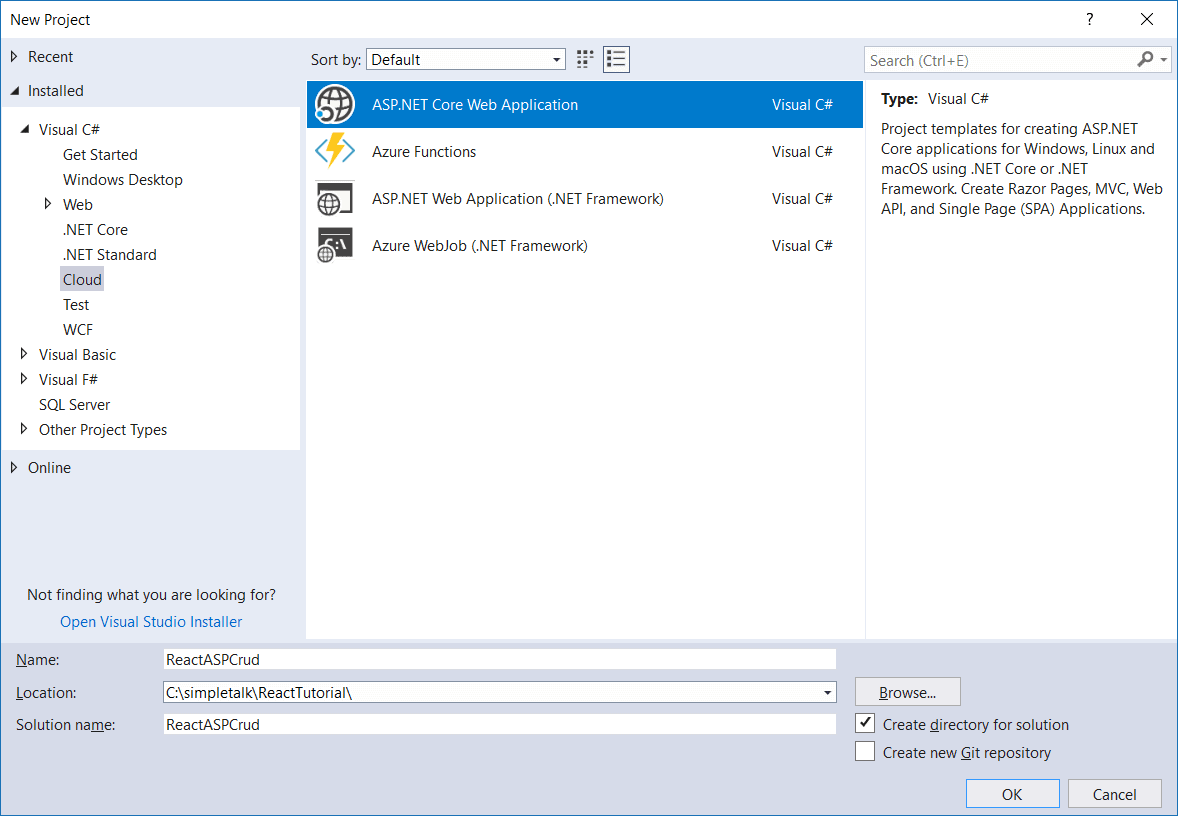
First, make sure you have a recent version of Visual Studio Community installed on your computer. Then, create an API project by going to the File –> New –> Project… menu and selecting the ASP.NET Core Web Application option, as shown in Figure 2.

Figure 2. Creating the new API project.

Give it a name and click OK. For the next wizard screen, you’re going to see that a React.js project template is already available along with the ASP.NET Core projects. It’s useful to have this, mainly for experienced developers who don’t want to spend much time on setting up and copy-pasting stuff. However, as beginners, I’d suggest starting from zero, with preset config. This will lead you a better understanding of the basics around how React works, as well as how you will connect the front to the back-end API.

Additionally, this example will not use the same structure VS sets up there. It consists of a project in which the front will be hosted the same place as the back-end code. Nevertheless, you will work in a side front project independent of the ASP.NET suite. This means that they’ll exist in two different worlds that still communicate with each other.

After completing this tutorial, I’d encourage you to go back and create another project, this time, with the project template. That way, you’ll have enough knowledge to understand what VS has magically created for you.

Once finished, move on to the ASP.NET API architecture. This is going to be simple: you’ll expose some /users endpoints to add, list, search, update and delete users in an in-memory static list in the back-end application. This way, you’ll maintain three main packages in the project:

  • Controllers: already created within the project, they’ll store the user’s controller;
  • Models: will store the data transfer objects, as plain and simple user data objects;
  • Services: will store the service classes that’ll handle the operations over the user’s list.

Make sure to create each folder in the root source folder. Start with the User.cs file. Listing 1 shows its content.

Listing 1. User.cs class

using System;
namespace ReactASPCrud.Models
{
    public class User
    {
        public int Id { get; set; }
        public string Name { get; set; }
        public string Email { get; set; }
        public string Document { get; set; }
        public string Phone { get; set; }
    }
}

It’s just simple code with a bunch of fields to represent each input shown in Figure 1.

Listing 2 shows how the UserService.cs will look:

Listing 2. UserService.cs class code.

using ReactASPCrud.Models;
using System;
using System.Collections.Generic;
using System.Linq;
namespace ReactASPCrud.Services
{
    public class UserService
    {
        private static List<User> users = new List<User>();
        private static int Count = 1;
        private static readonly string[] names = new string[] { "Jonathan", "Mary", "Susan", "Joe", "Paul", "Carl", "Amanda", "Neil" };
        private static readonly string[] surnames = new string[] { "Smith", "O'Neil", "MacDonald", "Gay", "Bailee", "Saigan", "Strip", "Spenser" };
        private static readonly string[] extensions = new string[] { "@gmail.com", "@hotmail.com", "@outlook.com", "@icloud.com", "@yahoo.com" };
        static UserService()
        {
            Random rnd = new Random();
            for (int i = 0; i < 5; i++)
            {
                string currName = names[rnd.Next(names.Length)];
                User user = new User
                {
                    Id = Count++,
                    Name = currName + " " + surnames[rnd.Next(surnames.Length)],
                    Email = currName.ToLower() + extensions[rnd.Next(extensions.Length)],
                    Document = (rnd.Next(0, 100000) * rnd.Next(0, 100000)).ToString().PadLeft(10, '0'),
                    Phone = "+1 888-452-1232"
                };
                users.Add(user);
            }
        }
        public List<User> GetAll()
        {
            return users;
        }
        public User GetById(int id)
        {
            return users.Where(user => user.Id == id).FirstOrDefault();
        }
        public User Create(User user)
        {
            user.Id = Count++;
            users.Add(user);
            return user;
        }
        public void Update(int id, User user)
        {
            User found = users.Where(n => n.Id == id).FirstOrDefault();
            found.Name = user.Name;
            found.Email = user.Email;
            found.Document = user.Document;
            found.Phone = user.Phone;
        }
        public void Delete(int id)
        {
            users.RemoveAll(n => n.Id == id);
        }
    }
}

There are a couple of new things going on. First, you need a static List to store the elements, simulating something like a database (feel free to implement whatever storage strategy you would like). The next three arrays represent some random names, surnames and mail extensions in order to facilitate the process of generating a prelist of users and randomize their field values as well.

The static block initializes this list, making sure to generate as many random values as possible. The rest of the methods are just performing usual operations over the list, with the help of Linq.

Simple, isn’t it? Time to move to the controller. Make sure to rename the default one already created to UsersController.cs (the plural is important here, once it’s used for ASP.NET to apply the URI path for all operations). Then, substitute its content with the code shown in Listing 3.

Listing 3. UsersController.cs class code.

using System.Collections.Generic;
using System.Threading.Tasks;
using Microsoft.AspNetCore.Cors;
using Microsoft.AspNetCore.Mvc;
using ReactASPCrud.Models;
using ReactASPCrud.Services;
namespace ReactASPCrud.Controllers
{
    [Produces("application/json")]
    [Route("api/[controller]")]
    [ApiController]
    [EnableCors("ReactPolicy")]
    public class UsersController : ControllerBase
    {
        private readonly UserService userService;
        public UsersController(UserService userService)
        {
            this.userService = userService;
        }
        // GET api/users
        [HttpGet]
        public IEnumerable<User> Get()
        {
            return userService.GetAll();
        }
        // GET api/users/5
        [HttpGet("{id}")]
        public async Task<IActionResult> Get(int id)
        {
            return Ok(userService.GetById(id));
        }
        // POST api/users
        [HttpPost]
        public async Task<IActionResult> Post([FromBody] User user)
        {
            return CreatedAtAction("Get", new { id = user.Id }, userService.Create(user));
        }
        // PUT api/users/5
        [HttpPut("{id}")]
        public async Task<IActionResult> Put(int id, [FromBody] User user)
        {
            userService.Update(id, user);
            return NoContent();
        }
        // DELETE api/users/5
        [HttpDelete("{id}")]
        public async Task<IActionResult> Delete(int id)
        {
            userService.Delete(id);
            return NoContent();
        }
        public override NoContentResult NoContent()
        {
            return base.NoContent();
        }
    }
}

Note that most operations perform the exact same calls through the UserService methods; they’re practically equal. However, some things are noticeable:

  • EnableCors annotation is an important point here, mainly because it sets the CORS policy this controller must use, the one to be configured soon. Without it, request calls from a different origin (the React application, in this case) won’t be allowed by the server;
  • The service is being injected via the controller’s constructor. This is only possible because you’ll also set it up soon in the Startup class;
  • The Post method makes use of CreatedAtAction() method to return a reference to the Get equivalent method of the then-created user. This allows the API to return a 201 HTTP status along with the header of where the created resource is located;
  • The rest of the endpoints return a 204 HTTP status representing a No Content action.

Finally, you need to make some important configurations to the Startup.cs class. Open it and add the following changes shown in Listing 4. These are the code you need to add to the ConfigureServices() method:

  • The registration of UserService as a singleton object that’ll be automatically available for injection throughout the project;
  • The Cors policy previously mentioned. Here, you’re just allowing any method, origin, header and credentials that arrive at the house (which wouldn’t be appropriate for production security reasons).

Listing 4. Code to add to ConfigureServices() method.

using ReactASPCrud.Services
…
services.AddSingleton<UserService>();
services.AddCors(o => o.AddPolicy("ReactPolicy", builder =>
{
     builder.AllowAnyOrigin()
            .AllowAnyMethod()
            .AllowAnyHeader()
            .AllowCredentials();
}));

Then, you need to make sure that the Cors is enabled by adding the following code snippet to the Configure() method:

app.UseCors("ReactPolicy");

Now you can run the application and the test the endpoints on your own. Make sure to pay attention to the port where your service will be run since this is going to be important when calling the endpoints from the React code.

Setup – Front-end

Now, it’s React time. The first thing you must install on your computer is Node.js. I’m not getting into details about Node.js and how it works or how to install it, but if you don’t have it yet, follow this link for instructions. It’s very straightforward. Please, remember that, for this article, you’ll need a Node.js at, at least, 8.16.0+. So, make sure to upgrade it if you’re under an older version.

For the IDE, use Visual Studio Code for the front-end, but feel free to use whichever tool you’re more used to.

Because of the complexities involving React, use create-react-app, a great shortcut to creating a preset React application that comes with default folders, initial config files, serviceWorker, a package.json file, some JavaScript/CSS files and more. It makes it very easy to create an application from nothing and run it with npm or yarn.

The first command you need to run is the following:

npx create-react-app react-ui-crud

npx is a tool that facilitates using packages from the npm registry. Npm is a better way to deal with dependencies on the registry, and so it is the same for npx for CLI tools/executables on the registry. You can read more about it here.

The first limitation is the name of the project. There are some restrictions like the use of capital letters or special characters. Once you enter the command, some basic React dependencies will be immediately installed:

  • react: the React lib itself. Main module;
  • react-dom: this package serves as the entry point to the DOM and server renderers for React. It is intended to be paired with the generic React package, which is shipped as react to npm.
  • react-scripts: this package includes scripts and configuration used by Create React App.

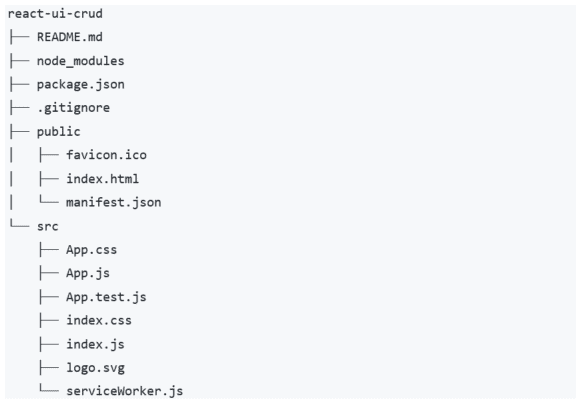
At the end, the script will have created your project with the following structure:

The node_modules is the directory where all your Node.js dependencies will be installed. They’re going to be read from the package.json file, which instructs npm to handle what packages retrieve from the registry (remote repo) every time you run the command npm start. That’s why this directory is usually ignored in your .gitignore file, once npm knows where to search for all of them in case you’re cloning the project for the first time or accidentally delete them.

The public folder is the place you’ll store the files that can be directly accessed from the client, like images, HTML or public scripts. Generally, the src folder, the one that stores your JavaScript dynamic files as well as CSS, is the folder where you spend most of the time working.

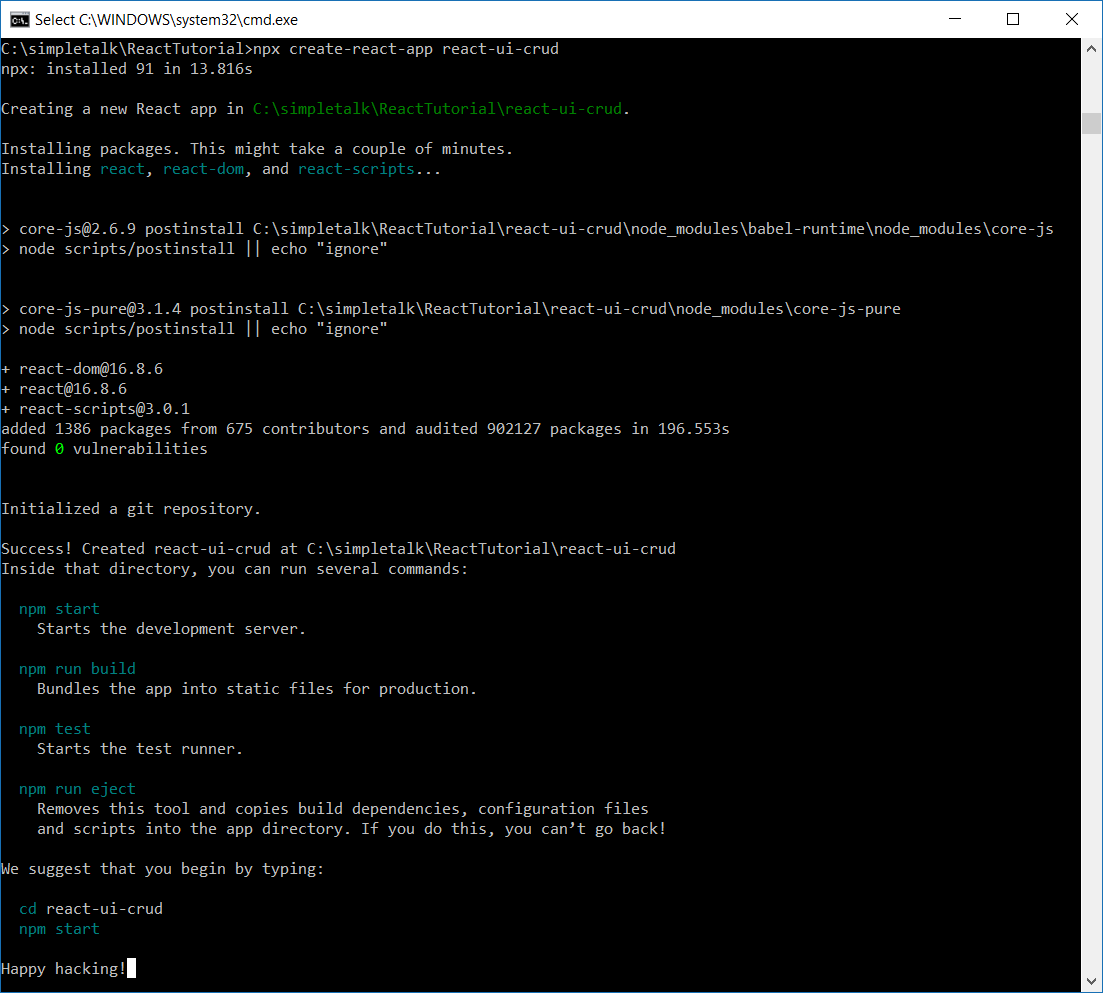
Figure 3 shows the output generated by the command.

Figure 3. create-react-app output.

You still need to add some more dependencies to the project. Since you won’t take too much time on the styling of the UI, you’ll make use of Bootstrap for that job. More specifically, you’ll use the reactstrap library, which is a great encapsulation of Bootstrap components as React ones.

For this, issue the following command in the root folder of the project:

npm install --save bootstrap reactstrap

That’s it. Before diving into the React code, analyze the contents of package.json file in Listing 5.

Listing 5. package.json code.

{
  "name": "react-ui-crud",
  "version": "0.1.0",
  "private": true,
  "dependencies": {
    "react": "^16.8.6",
    "react-dom": "^16.8.6",
    "react-scripts": "3.0.1",
    "reactstrap": "^8.0.1"
  },
  "scripts": {
    "start": "react-scripts start",
    "build": "react-scripts build",
    "test": "react-scripts test",
    "eject": "react-scripts eject"
  },
  "eslintConfig": {
    "extends": "react-app"
  },
  "browserslist": {
    "production": [
      ">0.2%",
      "not dead",
      "not op_mini all"
    ],
    "development": [
      "last 1 chrome version",
      "last 1 firefox version",
      "last 1 safari version"
    ]
  }
}

The main parts of the file are contained under dependencies and scripts properties. The first lists the exactly same dependencies previously installed (this is part of the way npm knows where to fetch again in case you delete them); the second configures the commands npm used when you run start, build, etc. along with npm in the command line.

Go and test it. Run npm start in the root folder, and npm will run the application, as well as open a browser window with a simple logo of React and some code as an example.

Let’s React

First take a look at the usual header and footer parts. It’s easier since you’ll have contact with the menu and footer links first and understand how you can connect Bootstrap with React. For this, create a new folder /components into /src folder, which is the place to store all the scripts regarding React components. Then, create two files AppHeader.js and AppFooter.js. Listing 6 shows the code of the first JavaScript file.

Listing 6. First React component: AppHeader.js

import React, { Component } from 'react'; // 1
import {
    Navbar,
    NavbarBrand,
    NavbarToggler,
    Collapse,
    Nav,
    NavItem,
    NavLink,
    UncontrolledDropdown,
    DropdownToggle,
    DropdownMenu,
    DropdownItem
} from 'reactstrap'; // 2
class AppHeader extends Component { // 3
    state = { // 4
        isOpen: false
    };
    toggle = this.toggle.bind(this); // 5
    toggle() { // 6
        this.setState({
            isOpen: !this.state.isOpen
        })
    }
    render() { // 7
        return <Navbar color="dark" dark expand="md">
            <NavbarBrand href="/">
                <img src="https://cdn.rd.gt/assets/images/global/redgate-logo--white.svg?v=1" width="128" className="d-inline-block align-top" alt="" />
            </NavbarBrand>
            <NavbarToggler onClick={this.toggle} />
            <Collapse isOpen={this.state.isOpen} navbar>
                <Nav className="ml-auto" navbar>
                    <NavItem>
                        <NavLink href="/">Hello</NavLink>
                    </NavItem>
                    <UncontrolledDropdown nav inNavbar>
                        <DropdownToggle nav caret>
                            World
                        </DropdownToggle>
                        <DropdownMenu right>
                            <DropdownItem href="/">For U</DropdownItem>
                            <DropdownItem>For Us</DropdownItem>
                        </DropdownMenu>
                    </UncontrolledDropdown>
                </Nav>
            </Collapse>
        </Navbar>;
    }
}
export default AppHeader; // 8

There are some numbers in the comments help explain what every part of the code represents:

  1. The first thing with React components is importing. Here, you import all the other components, functions, constants, etc., needed alongside the rest of the JS file. React is the main and default import; it’s necessary to inject React stuff into the current file. Component is one of the possible ways React allows you to represent a component: via class. This way, in point 3, you can extend from the React Component element to create a React component by class extension.
  2. Here, you import all the different Reactstrap components you’ll need: from navbar to dropdownmenu. Check their official list of possible components.
  3. Creating a new component called AppHeader.
  4. When using the class-based component model, React allows you to have a direct state variable, which can be defined right after the class declaration, and will store all the properties that are important for the functioning of the current component and just for it. Here, you’re creating a boolean prop called isOpen that’ll store the current state of the dropdownmenu (that’ll be created soon).
  5. Here, you merely bind the current component to the toggle() function below.
  6. The toggle() function: it’ll alter the state of the component every time is called, i.e., every time the Reactstrap component orchestrate a call to it to manage if the dropdown is open or not.
  7. The render() function: it’s the most important overwritten function of every React component because it is responsible for returning the JSX code (JSX is a syntax extension to JS, is similar to a template language, but with JavaScript) that visually and functionally represents the component itself. Take a closer look at the code. It’s like a mix of HTML with some tags that were imported earlier from Reactstrap. They are organized in such way that needs to be correctly nested and receive the proper properties. Like in the case of <NavbarToggler> and <Collapse> components which rely on both the toggle function and isOpen property respectively, and previously set. The first determines which function must be called for every click on the toggle icon of the navbar, and the second gets the boolean state value that it’ll use to apply the correct style for open/closed states. Normal HTML tags are also present, but they are also JSX-like components. For example, notice the declaration of the class name of the <img> component: className. This is JSX.
  8. Lastly, you must export the component. The name here doesn’t need to be the same as your class, but it’s the one you’ll use when importing your component outside of this class.

It’s also important to remember that React will make sure to recall the render() function every time the state is changed.

Listing 7 shows the footer component code.

Listing 7. Second React component: AppFooter.js

import React, { Fragment } from 'react';
class AppFooter extends React.Component {
    render() {
        return <Fragment>
            <hr className="featurette-divider" />
            <footer style= className="navbar fixed-bottom">
                <p className="float-right"><a href="/">Back to the Top</a></p>
                <p>© 2019 Simple-Talk, Inc. · <a href="/">Term and Conditions</a></p>
            </footer>
        </Fragment>;
    }
}
export default AppFooter;

This one is simpler. It doesn’t make use of any state manipulation nor JavaScript functions. It’s basically HTML and inline style via JSX syntax. However, notice that you’re importing a new React element: Fragment. This is an important shortcut for encapsulating coding in React. In other words, the render() function expects to receive a root element that encloses all the other inner elements; otherwise you’ll see a syntax error. In other times, you’d need to use a <div> boilerplate tag to do this, but not anymore. <Fragment> will do the job without having to insert useless HTML tags into the page.

Before running the example, you need to change the index.js and App.js files. For instance, every React application starts by a single index.js file placed at the root of the app that’ll make some initial configs and call the hierarchy of mounted components. Have a look at the final index.js content at Listing 8.

Listing 8. index.js file.

import React from 'react';
import ReactDOM from 'react-dom';
import './index.css';
import 'bootstrap/dist/css/bootstrap.min.css';
import App from './App';
import * as serviceWorker from './serviceWorker';
ReactDOM.render(<App />, document.getElementById('root'));
// If you want your app to work offline and load faster, you can change
// unregister() to register() below. Note this comes with some pitfalls.
// Learn more about service workers: https://bit.ly/CRA-PWA
serviceWorker.unregister();

Notice that React also makes a call to its render() function, passing the root element of the whole application, in this case, <App>. But who’s App? Precisely, the App.js that is also already preset into the src folder (its code is in Listing 9 below). Finally, observe the import of the bootstrap.mim.css to make sure the styling will be correctly applied.

Listing 9. App.js content.

import React, { Component, Fragment } from 'react';
import AppHeader from './components/AppHeader';
import AppFooter from './components/AppFooter';
class App extends Component {
  render() {
    return <Fragment>
      <AppHeader />
      <AppFooter />
    </Fragment>;
  }
}
export default App;

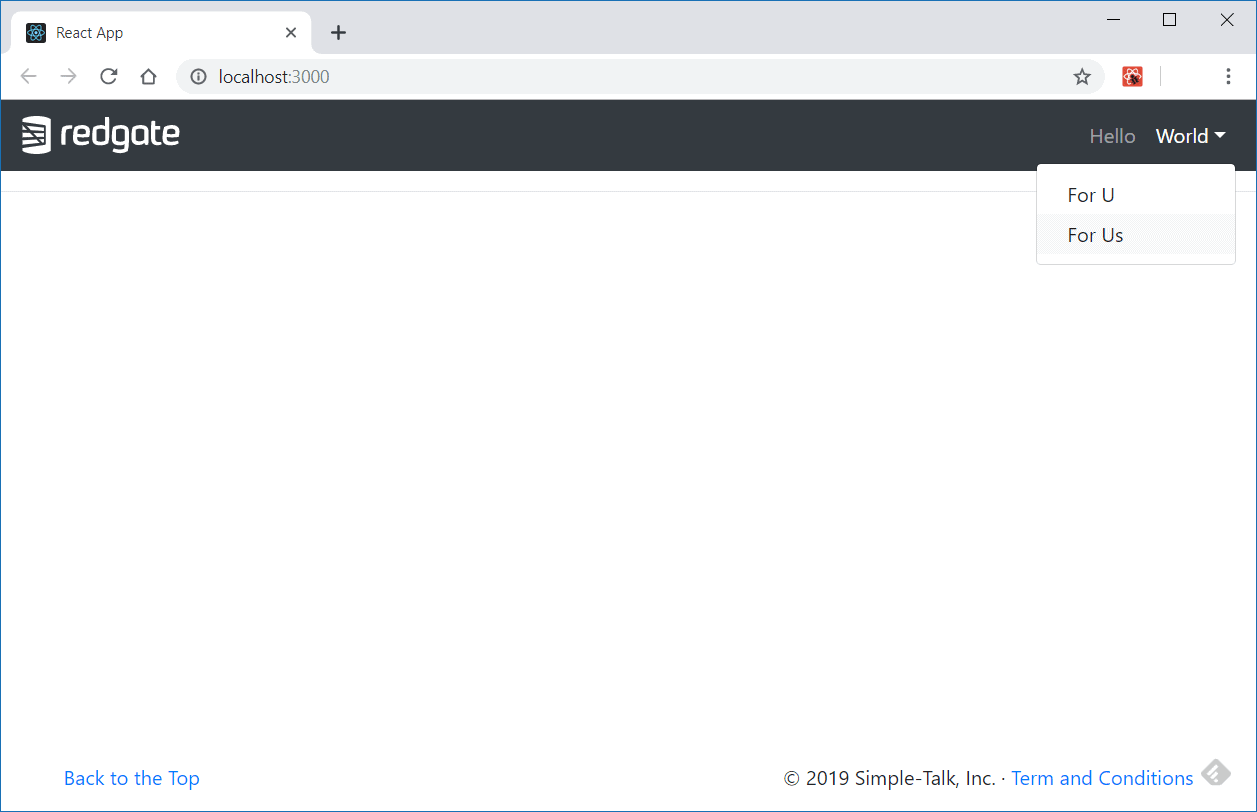
App components import the two previously implemented components and mount them into another Fragment. And that’s it. Issue the npm start command again and see what happens to your view (Figure 4).

Figure 4. Home page with Reactstrap header and footer.

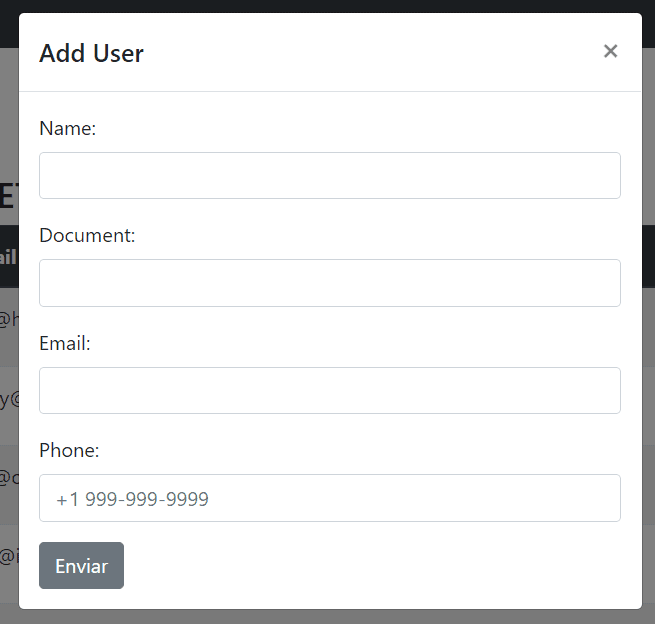
Now, it’s time to get started with the body page content. However, instead of going directly to the table implementation or the fetching the data from the back-end, you’ll begin with the modal component that’ll be responsible for getting the form data information from the user, just like shown in Figure 5.

Figure 5. Modal with form data.

Why this? This is a bottom-up strategy to help you understand the details from a more fine-grained perspective.

For instance, the same form will be used for both adding and editing information of a user. That’ll simplify the code and allow reuse of components. Before diving in, create a new folder /constants at the same level of /components folder. Inside of it, create an index.js file and place the following content into it:

export const USERS_API_URL = 'https://localhost:5001/api/users';

This will be the constant of the API address. Then, create a new folder into /components called /form, to store the components related to form manipulation. Inside, create two new files: RegistrationForm.js and RegistrationModal.js. Listing 10 shows the code for the first one.

Listing 10. Creating the RegistrationForm.js file.

import React from 'react';
import { Button, Form, FormGroup, Input, Label } from 'reactstrap';
import { USERS_API_URL } from '../../constants';
class RegistrationForm extends React.Component {
    state = {
        id: 0,
        name: '',
        document: '',
        email: '',
        phone: ''
    }
    componentDidMount() {
        if (this.props.user) {
            const { id, name, document, email, phone } = this.props.user
            this.setState({ id, name, document, email, phone});
        }
    }
    onChange = e => {
        this.setState({ [e.target.name]: e.target.value })
    }
    submitNew = e => {
        e.preventDefault();
        fetch(`${USERS_API_URL}`, {
            method: 'post',
            headers: {
                'Content-Type': 'application/json'
            },
            body: JSON.stringify({
                name: this.state.name,
                document: this.state.document,
                email: this.state.email,
                phone: this.state.phone
            })
        })
            .then(res => res.json())
            .then(user => {
                this.props.addUserToState(user);
                this.props.toggle();
            })
            .catch(err => console.log(err));
    }
    submitEdit = e => {
        e.preventDefault();
        fetch(`${USERS_API_URL}/${this.state.id}`, {
            method: 'put',
            headers: {
                'Content-Type': 'application/json'
            },
            body: JSON.stringify({
                name: this.state.name,
                document: this.state.document,
                email: this.state.email,
                phone: this.state.phone
            })
        })
            .then(() => {
                this.props.toggle();
                this.props.updateUserIntoState(this.state.id);
            })
            .catch(err => console.log(err));
    }
    render() {
        return <Form onSubmit={this.props.user ? this.submitEdit : this.submitNew}>
            <FormGroup>
                <Label for="name">Name:</Label>
                <Input type="text" name="name" onChange={this.onChange} value={this.state.name === '' ? '' : this.state.name} />
            </FormGroup>
            <FormGroup>
                <Label for="document">Document:</Label>
                <Input type="text" name="document" onChange={this.onChange} value={this.state.document === null ? '' : this.state.document} />
            </FormGroup>
            <FormGroup>
                <Label for="email">Email:</Label>
                <Input type="email" name="email" onChange={this.onChange} value={this.state.email === null ? '' : this.state.email} />
            </FormGroup>
            <FormGroup>
                <Label for="phone">Phone:</Label>
                <Input type="text" name="phone" onChange={this.onChange} value={this.state.phone === null ? '' : this.state.phone}
                    placeholder="+1 999-999-9999" />
            </FormGroup>
            <Button>Send</Button>
        </Form>;
    }
}
export default RegistrationForm;

First, consider the React imports. Here, you’re making use of Reactstrap form components. Then, comes the state definition: just single properties representing each one of the inputs in the user registration form.

The function componentDidMount() is new: it is invoked immediately after a component is mounted (inserted into the tree), which is good because the user props will be passed down to this component as a property (available through this.props snippet). The props are like params of a function in JavaScript, but in this case, as params from one component to another. The code is checking for its existence, which will mean that it’s an editing action; otherwise consider it just a new registration. If the user is present, extract its props and set them to the current state. You may already guess why. Yes, it’s because they need to fill the inputs before the modal opens.

The onChange() function is a simple function to receive an onChange event and change the component state accordingly.

The submitNew() function will handle the onSubmit event, specifically on calling the API to submit a new user. Notice the reliance on the Fetch API to make the HTTP calls, but feel free to use whichever library in which you feel comfortable. The function code is very intuitive by itself. Notice that at the end, it gets the json response data and sends it to the function addUserToState() (which is not implemented in this component, since this comes within the props object). The toggle() is another function implemented later, so don’t worry about it now.

The submitEdit() function will do practically the exact same things as submitNew(), except for the API endpoint and the response dealing function, this time updateUserIntoState().

Finally, the render function is prepared to identify whether the user comes within the props or not and places the correct submit function to the <Form> component. Based on this, if the state of the component was previously set with the user’s info, then the value of each input will be filled correspondently.

Great! Next stop is the RegistrationModal component which will import the form and hold the rules for its exhibition. Look at the Listing 11 for its code.

Listing 11. Creating the RegistrationModal.js file.

import React, { Component, Fragment } from 'react';
import { Button, Modal, ModalHeader, ModalBody } from 'reactstrap';
import RegistrationForm from './RegistrationForm';
class RegistrationModal extends Component {
    state = {
        modal: false
    }
    toggle = () => {
        this.setState(previous => ({
            modal: !previous.modal
        }));
    }
    render() {
        const isNew = this.props.isNew;
        let title = 'Edit User';
        let button = '';
        if (isNew) {
            title = 'Add User';
            button = <Button
                color="success"
                onClick={this.toggle}
                style=>Add</Button>;
        } else {
            button = <Button
                color="warning"
                onClick={this.toggle}>Edit</Button>;
        }
        return <Fragment>
            {button}
            <Modal isOpen={this.state.modal} toggle={this.toggle} className={this.props.className}>
                <ModalHeader toggle={this.toggle}>{title}</ModalHeader>
                <ModalBody>
                    <RegistrationForm
                        addUserToState={this.props.addUserToState}
                        updateUserIntoState={this.props.updateUserIntoState}
                        toggle={this.toggle}
                        user={this.props.user} />
                </ModalBody>
            </Modal>
        </Fragment>;
    }
}
export default RegistrationModal;

Way more straightforward than the form component, this one has its own toggle() function (the one called in the previous listing) to be passed as a props function. It simply toggles the state of the boolean modal state attribute every time an HTTP call is finished in order to close the modal automatically.

Here, you’re also receiving values via props from the outer components that call it. In this case, isNew will tell if the user is a new one or an existing one, which is essential information for determining which form state will be presented. Also, you can use this info to change the labels of the button, for example. It can be either an Add or Edit labeled button. Notice how you’re also applying the class of the modal based on another property passed via props. The rest of the code is just filling the blanks of each property needed by a RegistrationModal.

This is good until now, but you need to move forward to the next two components that’ll close the implementation: DataTable.js and Home.js. The DataTable component, as you may guess, is the one who’s going to store the table with the list of users fetched from the back-end.

Listing 12. Creating the DataTable.js file.

import React, { Component } from 'react';
import { Table, Button } from 'reactstrap';
import RegistrationModal from './form/RegistrationModal';
import { USERS_API_URL } from '../constants';
class DataTable extends Component {
  deleteItem = id => {
    let confirmDeletion = window.confirm('Do you really wish to delete it?');
    if (confirmDeletion) {
      fetch(`${USERS_API_URL}/${id}`, {
        method: 'delete',
        headers: {
          'Content-Type': 'application/json'
        }
      })
        .then(res => {
          this.props.deleteItemFromState(id);
        })
        .catch(err => console.log(err));
    }
  }
  render() {
    const items = this.props.items;
    return <Table striped>
      <thead className="thead-dark">
        <tr>
          <th>Id</th>
          <th>Name</th>
          <th>Email</th>
          <th>Document</th>
          <th>Phone</th>
          <th style=>Actions</th>
        </tr>
      </thead>
      <tbody>
        {!items || items.length <= 0 ?
          <tr>
            <td colSpan="6" align="center"><b>No Users yet</b></td>
          </tr>
          : items.map(item => (
            <tr key={item.id}>
              <th scope="row">
                {item.id}
              </th>
              <td>
                {item.name}
              </td>
              <td>
                {item.email}
              </td>
              <td>
                {item.document}
              </td>
              <td>
                {item.phone}
              </td>
              <td align="center">
                <div>
                  <RegistrationModal
                    isNew={false}
                    user={item}
                    updateUserIntoState={this.props.updateState} />
                  &nbsp;&nbsp;&nbsp;
                  <Button color="danger" onClick={() => this.deleteItem(item.id)}>Delete</Button>
                </div>
              </td>
            </tr>
          ))}
      </tbody>
    </Table>;
  }
}
export default DataTable;

The first function of the component is the deleteItem(), which will perform an HTTP call for deleting a user. The id is received as a param, and the function deleteItemFromState() (shown later) will be called as soon as the request completes.

Note that the render function is receiving a prop called items from the outer component with the list of users to iterate and show into the table. For the <tbody>, it first checks for the absence of any item into the list and then shows a corresponding message of “No Users yet”, otherwise, the list will be iterated and, at the Actions column, each item will have a <RegistrationModal> imported along with a button for items deletion.

Pay attention to how React makes use of its componentization style to make it simple to reuse components and reference them from the others.

Listing 13 shows the code of the Home.js component.

Listing 13. Creating the Home.js file.

import React, { Component } from 'react';
import { Col, Container, Row } from 'reactstrap';
import DataTable from './DataTable';
import RegistrationModal from './form/RegistrationModal';
import { USERS_API_URL } from '../constants';
class Home extends Component {
  state = {
    items: []
  }
  componentDidMount() {
    this.getItens();
  }
  getItens = () => {
    fetch(USERS_API_URL)
      .then(res => res.json())
      .then(res => this.setState({ items: res }))
      .catch(err => console.log(err));
  }
  addUserToState = user => {
    this.setState(previous => ({
      items: [...previous.items, user]
    }));
  }
  updateState = (id) => {
    this.getItens();
  }
  deleteItemFromState = id => {
    const updated = this.state.items.filter(item => item.id !== id);
    this.setState({ items: updated })
  }
  render() {
    return <Container style=>
      <Row>
        <Col>
          <h3>My First React + ASP.NET CRUD React</h3>
        </Col>
      </Row>
      <Row>
        <Col>
          <DataTable
            items={this.state.items}
            updateState={this.updateState}
            deleteItemFromState={this.deleteItemFromState} />
        </Col>
      </Row>
      <Row>
        <Col>
          <RegistrationModal isNew={true} addUserToState={this.addUserToState} />
        </Col>
      </Row>
    </Container>;
  }
}
export default Home;

Here are some assumptions to analyze:

  • The state will have an array of items (the users) to manipulate throughout the app use;
  • Once the component mounts, it fetches the list of users from the API (getItens function);
  • The getItens() function will make a GET request, convert the response to json, set it to the current state, or log any error if it happens;
  • The addUserToState() function (which you’ve seen called before) will receive a user and add it to the current state;
  • The updateState() function will also fetch the items from the server, but note that it’s receiving the id as a param, that you can use to update it just into the state list, if you want;
  • The deleteItemFromState() function will receive the id to perform the user’s corresponding deletion from the current state;
  • The render() function is just a summary of a simple JSX content for building the <DataTable> and <RegistrationModal> components into Bootstrap row/column structures.

You still need to add the <Home> component to the main one, <App>:

render() {
    return <Fragment>
      <AppHeader />
      <Home />
      <AppFooter />
    </Fragment>;
  }

Finally, don’t forget to import the new Home component at the top of the file:

import Home from './components/Home';

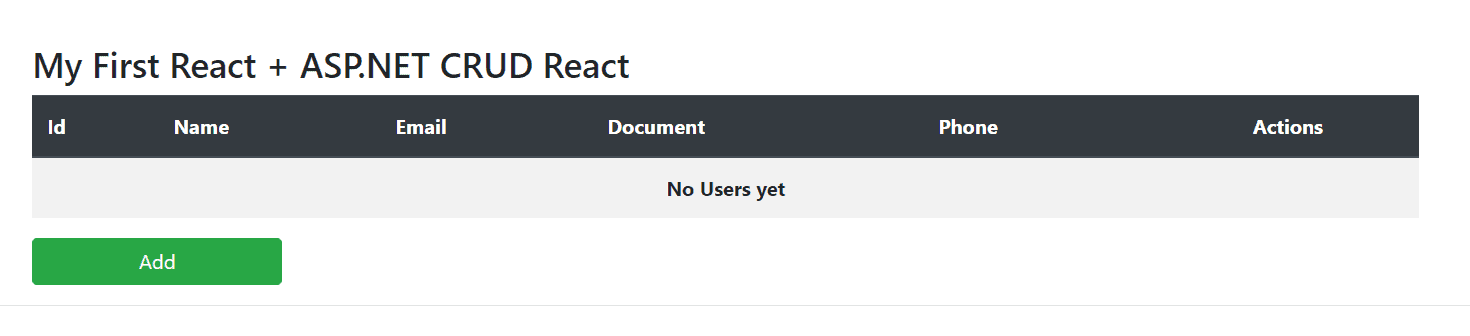
Once the application is refreshed in the browser, and if the API is not running, this is the screen you’ll see:

Figure 6. Table of users with no entries.

Conclusion

That’s it. Go ahead, run the API and test the interface it by yourself, making sure to verify if Reacstrap made it responsive for you as well.

This was just a brief intro around the universe of React and how you can connect it, not only with ASP.NET based APIs, but with any type of API. Some details, like the Cors configs, are essential to make sure they can communicate with each other.

You can also check the full source code here. Good studies!


The post Creating ASP.NET Apps with React appeared first on Simple Talk.


from Simple Talk https://ift.tt/34huJPF
via

Wednesday, August 28, 2019

SQL in the City Streamed next week!

I don’t know when I first heard about Redgate, but it might have been in 2005 when Steve Jones asked me to review their product, SQL Backup, for SQL Server Central. It was quite the coincidence when my manager asked me a few weeks later if I had heard of SQL Backup and would I like to switch to that backup solution. (We did begin using it!) Lots of other folks have been using SQL Compare or SQL Prompt for years, and they usually tell me about how they love these products when I talk to them at events.

Redgate software is turning 20 years old! To celebrate, we are hosting a special edition of SQL in the City Streamed on September 4th. There will be surprises and lots of fun, so be sure to register. I may be wearing the costume of one of my sci-fi heroes, and you don’t want to miss that!

The post SQL in the City Streamed next week! appeared first on Simple Talk.


from Simple Talk https://ift.tt/30E8iSo
via

New Feature: OPTIMIZER_FOR_SEQUENTIAL_KEY

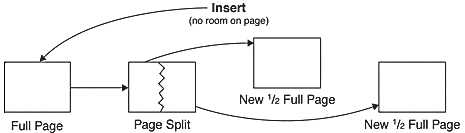
Once upon a time a SQL Server version that hadn’t row locks. The minimal level of lock was page lock, every time you want to lock a record, an entire page was locked.

page splitAt that time we were between the devil and the deep sea: if we choose a clustered index with an ascending key we would create what was called a Hot Spot, all the records would be inserted on the same page, creating a bottleneck. On the other hand, if we create a clustered index with a non-ascending key, we would suffer from index fragmentation and page splits, having huge admin trouble to find out the correct fill factor for each index in order to support the period between the re-index job without too many page splits.
When SQL Server 7 was launched (we haven’t arrived in the year 2000 yet, be patient, please), finally we got the row locks we so much dreamed about! With them, the hot spots were gone and creating a clustered index with ascending key became best practice to avoid index fragmentation, page splits and a lot of admin tasks.

page latch

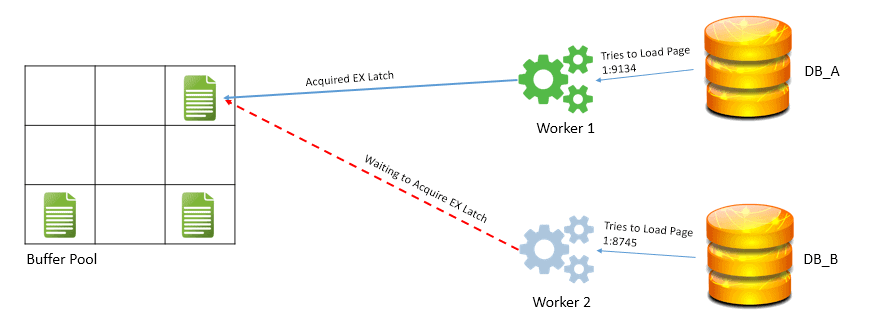
Underneath, the active pages were cached in memory, during a transaction the update was happening in memory (until the commit, which forces the log flush), and the concurrency started to be in the memory. A new server monster was released: PAGELATCH_EX . It’s not a lock, it’s internal SQL concurrency for the use of a resource, in this case, a page. Way lighter than the locks and hot spots we had before SQL Server 7. However, the bottleneck was still there. Lighter, impossible to notice in small workloads, but it was there.

Using our time machine, we can jump to SQL Server 2014. The internet and the increase in the amount of data were making the bottleneck visible again, so Microsoft created an alternative: In-Memory tables. The in-memory tables totally eliminated the latches, but the limitations were high, the first versions not even accepted a table with foreign keys. It was more a feature to be used for data ingestion than for the main tables.

Now, in 2019, Microsoft decides to teach us a bit more about this bottleneck while also improve some workloads that may be suffering from it. What in the past was called hot spot, today is called last page insert contention.

Microsoft is now addressing a problem called convey: sometimes the active thread takes more time to release the latch on the last page then it should. Threads doing some extra work, or the moment of the creation of a new page (which is also called page split), or other activities make a change on the throughput of the data.

For us, the technical solution is simple: if we suffer from this problem, we can apply the option OPTIMIZE_FOR_SEQUENTIAL_KEY on an index and that’s it, the magic is done.

Underneath what’s happening is an unfair thread distribution: SQL Server tries to identify if one thread will keep the page latch for more time than it should and if that’s the case, leave this thread for last, trying to keep a constant throughput on the data insertion.

Sometimes history teaches us. Hot Spot’s, PAGELATCH_EX, conveys, different levels of the same problem.

You can read a lot more about OPTIMIZE_FOR_SEQUENTIAL_KEY, conveys and all the details you can find here

The post New Feature: OPTIMIZER_FOR_SEQUENTIAL_KEY appeared first on Simple Talk.


from Simple Talk https://ift.tt/30FKHR5
via

Thursday, August 22, 2019

PowerShell and Secure Strings

One of the more common problems I’ve faced with a particular client is setting up data extractions from outside sources such as SFTP servers. Since this client deals with PII data, it’s essential that this is done in as a secure manner as possible. For example, all connections need to be encrypted using protocols such as SFTP instead of FTP.

Securely connecting is particularly easy to accomplish if one uses a 3rd party module such as Posh-SSH. However, you are still stuck with the problem of logging into the remote SFTP server securely.

For this article, I will be using snippets of code from Posh-SSH, but I will not be diving deep into the actual usage of Posh-SSH. I recommend you download the module from the above link and learn about it yourself. Perhaps in the future, I’ll write a complete article on using Posh-SSH, but the focus of this one will be on using Secure Strings.

A typical SFTP connection using Posh-SSH may look like:

New-SFTPSession -ComputerName "test.rebex.net"

If you run the above command, which includes a valid SFTP server name, you’ll get a dialog box that asks for a username and password. For this test site, you can use the username of demo and the password password. This works great if you want to do an interactive session with the SFTP server, but this doesn’t help with automation. In most cases, you need to automate this process and find a way to pass the username and password to the cmdlet.

Looking closely at the New-SFTPSession cmdlet syntax, you will see there is a parameter, Credential, that appears to be useful. The first trick is in creating a valid credential object. To get there, take a look at the cmdlet Get-Credential. By changing your code to the following, you get one step closer, but you are still prompted for the username and password.

$sftpServername = 'test.rebex.net'
$Credential =Get-Credential
$session = New-SFTPSession -ComputerName $sftpServername -Credential $Credential
# do some stuff here
Remove-SFTPSession -SessionId $session.Sessionid

You may want to add AcceptKey as a parameter to the New-SFTPSession Cmdlet to run this in non-interactive mode, or it will again hang waiting for a response to the dialog box asking if you want to accept the key from the remote server.

You’ll notice that I’ve added a $session object to capture information about the SFTP session being created. Part of the reason is so that you can properly close the session when you’re done with it as shown in the last line using the Remove-SFTPSession cmdlet.

You are now a step closer, as you can pass a valid credential object to the New-SFTPSession cmdlet, but you are still being prompted for it. Next, I’ll show you how to encode the password directly in the script.

$sftpUsername = 'demo'
$sftpPassword = ConvertTo-SecureString 'password' -AsPlainText -Force
$sftpServername = 'test.rebex.net'
$Credential = New-Object System.Management.Automation.PSCredential ($sftpUsername, $sftpPassword)
$session = New-SFTPSession -ComputerName $sftpServername -Credential $Credential
# do some stuff here
Remove-SFTPSession -SessionId $session.Sessionid

If you run the above script with the provided username, password and SFTP server, you’ll see it automatically creates the session without prompting you for any information. This is a huge leap forward.

There are two key parts to this. The first one is the New-Object System.Management.Automation.PSCredential. This cmdlet takes the username and password and creates a credential object. This credential object then can be used by the New-SFTPSession cmdlet.

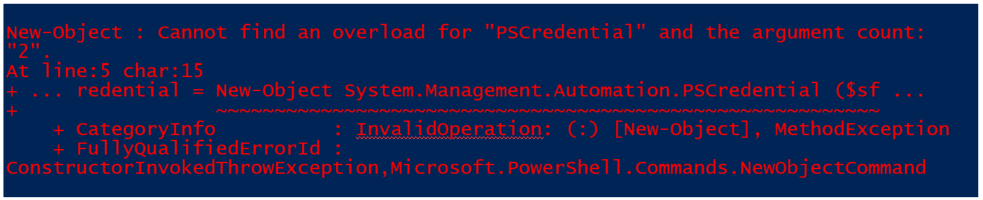
My first inclination was to pass in a normal string to both the username and password, and indeed, a standard string for the username actually works. However, if you try passing in a normal string as the password, you’ll get an error.

This message is not very helpful. Fortunately, the authors of PowerShell had security in mind and essentially force you to be secure. The trick is, PSCredential requires a secure string for the password.

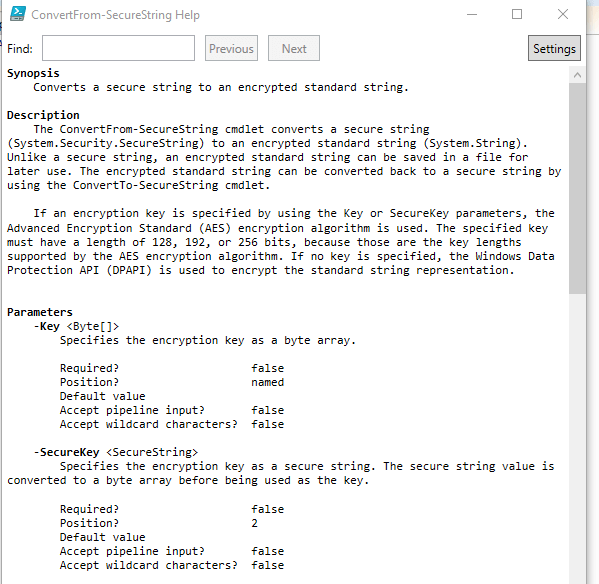
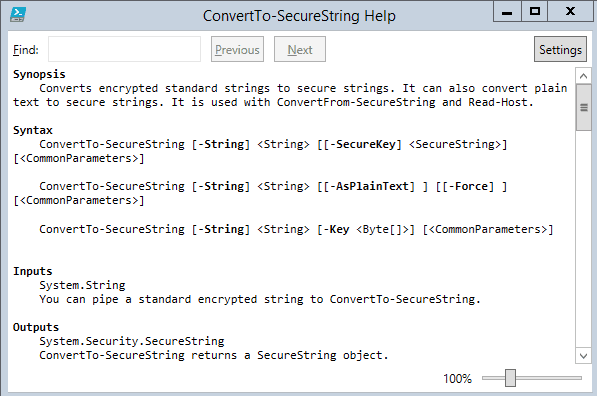
This is why you see the cmdlet ConvertTo-SecureString as the second line in the above script. To understand what this does, it is worth checking out the help on this cmdlet. The easiest way to do this, of course, is via the command

get-help -ShowWindow ConvertTo-SecureString

This command will pop up the following window

The key here is the second example in the syntax where it shows the parameters of –AsPlainText and –Force. You will need to use both. As the synopsis states, Converts encrypted standard strings to secure strings. It can also convert plain text to secure strings. Normally this cmdlet expects an encrypted string, which is not what you are passing to it, but it can be forced to take a plaintext string and convert it to a secure string. That’s what happens in the above script.

You’re now a step closer. You have a script you can save and run as needed. However, as you’re probably worried about, the secure password is now embedded as plaintext in your script. This means anyone with access to that script now has access to the password which is far from ideal.

The obvious next step then is to somehow create an encrypted password and to use that. To do this, I will assume that it’s ok to interactively enter the plain text password once.

$LocalFilePath='C:\temp'  
read-host -AsSecureString | ConvertFrom-SecureString | Out-File $LocalFilePath\cred_$env:UserName.txt

I will break this apart a bit. The setting of the $LocalFilePath is pretty simple. In production, I obviously would not use a temporary location. Where you chose to store the resulting file will depend on your specific needs.

The second line, however, is a bit more interesting. The read-host cmdlet waits for the user to input text. Note, if you run it without the AsSecureString it may appear to hang. In actuality, it will merely wait until you type some text and press enter. This text may be visible on the screen. When you use the AsSecureString it will give you a dialog box which will use dots to mask what you type in.

Once the cmdlet gets the string you’ve entered, it will pipe the output to ConvertFrom-SecureString. If you run just those two parts read-host -AsSecureString | ConvertFrom-SecureString you will get output similar to the following:

ConvertFrom-SecureString does the opposite of what ConvertTo-SecureString does. It will take a secure string and convert it to an encrypted string. Note that a secure string is simply a string that is masked so it can’t be read on the screen. It’s not actually encrypted. Don’t mistake secure for encrypted.

Finally, the script takes the output from ConvertFrom-SecureString and pipe it to Out-File $LocalFilePath\cred_$env:UserName.txt


You will note that the filename is based on my environment variable UserName. This is important for reasons I will explain in a moment. If you run the above, and look in the directory you set in the $LocalFilePath (which above is set to C:\temp), you will see a file name similar to cred_gregmoore.txt. If you try to read that file, you will see it contains the encrypted string created above.

Finally, you have the encrypted password stored in a file. This is a huge step because it means that you only need to enter the password once, in a secure fashion (i.e. no one looking over your shoulder will see the actual password; they will just see the dots in the dialog box prompting for it.)

The next step is to use that now encrypted password in the connection. That’s fairly simple to do:

$LocalFilePath='C:\temp'  
$password = get-content $LocalFilePath\cred_$env:UserName.txt | ConvertTo-SecureString
$Credential = New-Object System.Management.Automation.PSCredential ($sftpUSerName, $Password)

The second line retrieves the encrypted password you created and converts it to a Secure String. Even then, the string is still not readable by anyone. If you try to read the $password variable’s value, you will see:

The third line in the script above passes that Secure String to the cmdlet creating the credential. After this, you can run the following:

$session = New-SFTPSession -ComputerName $sftpServername -Credential $Credential
# do some stuff here
Remove-SFTPSession -SessionId $session.Sessionid

Congratulations, you now have a secure way of running a script to connect to your SFTP server. The above scripts can be used to pass credentials to other internet services, but that’s beyond the scope of this article, other than to say that the above technique will work for anything using a $Credential object.

I will admit, I was quite happy with the above solution until I tried to put it into production running as a scheduled task. Then it simply wouldn’t work. It took me a while to figure out a fundamentally simple reason that was obvious in hindsight.

First, I checked the help on ConvertTo-SecureString

get-help -ShowWindow ConvertTo-SecureString

The help information was not super helpful, though it was interesting to learn the various options. The reason the script failed in production was that I wanted to run the entire script as a scheduled task with a service account. After some experimentation, I realized that when the scheduled task was set up to log in as me, the script ran fine. However, when I ran it as the service account my customer uses for scheduled tasks, it would fail but in no obvious way.

To troubleshoot, I did what any decent programmer would do; I added some lines to print out debug information.

At the time, I was using a line more like:

$password = get-content $LocalFilePath\sftp_password.txt | ConvertTo-SecureString

The goal was to use the same file I had created when I ran the script manually. Even though I was using a service account, the password needed for the SFTP service is the same no matter which account is running the script.

Now at this point, an astute reader is probably guessing what the problem is. For those who haven’t quite figured it out, I will say my debugging showed that the script ran fine up to that point but failed on that particular line.

It took me a bit to realize that the PowerShell creators were smarter than me and that the ConvertTo-SecureString and ConvertFrom-SecureString cmdlets based their encryption key on the identity of the user logged in. In hindsight, this, of course, made perfect sense when I thought about it. It allows me to encrypt a string and save it to a file but prevents anyone else from reading the same file and decrypting the same string. A system wouldn’t be very secure if anyone could come along and decrypt files that others had encrypted.

My solution was to brute-force the password into a secure string and then into an encrypted string. This involves running a script to create an encrypted file. The key is a block of script like the following:

$LocalFilePath='C:\temp'  
if (-not (test-path $LocalFilePath\cred_$env:UserName.txt))
{
    read-host -AsSecureString | ConvertFrom-SecureString | Out-File $LocalFilePath\cred_$env:UserName.txt
    "Setting Password first time for $env:UserName" | out-file $LocalFilePath\app_log.txt -append
}

Note a couple of things in this block of code:

  • The filename has a prefix of cred_ (short for credential) and the name of the user setting the credential file. This convention helps administrators keep track of who has created credential files.
  • The credential file will be stored in the directory set by $LocalFilePath, in this case, C:\temp, but on production, it should be someplace else.
  • The snippet above is written to be run in an interactive mode, i.e., the user will be presented with a dialog box to type in the password. This will then create the appropriate credential file for them. This file then gets used later when I want to create my SFTP session.

For this to work for a service account, the admin, such as myself either has to log in as that service account and run the script and enter the appropriate password. If that is not possible, for example, you are not allowed to log in as the service account, but you can run the following script to create the file in a scheduled task running as that user:

# Set Service Account Password Script
# Remember to remove the plain-text password after running this under the service account 
$LocalFilePath='C:\temp'  
if (-not (test-path $LocalFilePath\cred_$env:UserName.txt ))
{
    "password" | ConvertTo-SecureString -AsPlainText -Force | ConvertFrom-SecureString | Out-File $LocalFilePath\cred_$env:Username.txt
    "Setting Password first time for $env:UserName" | out-file $LocalFilePath\app_log.txt -append
}
  • Once the script is run once as the service account in question, remove the script with the plain-text password or edit it to remove the plain-test password.
  • You’ll note as a good programmer, I’m logging this step.

Using a script like this is far from the only way to handle the issue. The important point to keep in mind is that when running as a scheduled task, as a service account, it is the service account that somehow has to create its own credential file. You can use alternative methods; this is just the one I happen to use.

So now that there is a secure way of storing the password on the disk, here’s a script with all the pieces together. A simple script might look something like this:

# To set the password for a Service Account, run the Set Service Account Password Script before running this one! Otherwise, this will hang since it expects user input.

# To set password interactively, run this script as is:
$LocalFilePath='C:\temp'  
if (-not (test-path $LocalFilePath\cred_$env:UserName.txt))
{
    read-host -AsSecureString | ConvertFrom-SecureString | Out-File $LocalFilePath\cred_$env:UserName.txt
    "Setting Password first time for $env:UserName" | out-file $LocalFilePath\app_log.txt -append
} 


$sftpUsername = 'demo'
$password = get-content $LocalFilePath\cred_$env:UserName.txt | ConvertTo-SecureString
$Credential = New-Object System.Management.Automation.PSCredential ($sftpUSerName, $Password) 
try
{ 
$sftpServername = 'test.rebex.net'
$session = New-SFTPSession -ComputerName $sftpServername -Credential $Credential
# do some stuff here
Remove-SFTPSession -SessionId $session.Sessionid 
}
catch
{
    $exception = $_.Exception.Message
    "Error in New-SFTPSession -ComputerName $sftpURL -Credential $Credential" | out-file $LocalFilePath\app_log.txt -append 
Remove-SFTPSession -SessionId $session.SessionId
    return
}

With that, you should have the framework to securely access your SFTP server without having to save a password in plaintext anywhere on the disk. And with a slight modification, you can also make this work for service accounts, albeit with briefly storing the password as plaintext before deleting it.

One final addendum, if the SFTP password ever changes, you need to delete the credential file you created and rerun the Service Account Password script under the service account credentials and with the new password embedded in the script. Just remember to delete the password itself from the script when done.


The post PowerShell and Secure Strings appeared first on Simple Talk.


from Simple Talk https://ift.tt/2Hm92E9
via

Wednesday, August 21, 2019

Goodbye to the Microsoft Professional Program

I’ve worked with Microsoft technologies for over 20 years and, during that time, earned a good income to support my family and have a comfortable life. Despite that, Microsoft manages to break my heart again and again. Take the sad saga of the Windows Phone. I was working for Microsoft when the first Windows Phones arrived in the US in 2010, and we were expected to buy one. This was my first modern-day smartphone, but even before that, I used Windows Mobile phones like the Moto Q. I had to give up my Windows Phone for an Android two years ago when the lack of apps continued to diminish the usefulness of the phone. This was about the same time that Microsoft announced that they had abandoned the platform. My new Android phone is great, but I still miss my old Window Phone.

I was also a big fan of the Microsoft Band 2, a smartwatch. I happened to be at a conference in Seattle when they arrived in stores in 2015 and quickly purchased one at the Microsoft Store in Bellevue. The functionality of the device was terrific, and Microsoft even provided an SDK for writing your own apps. Unfortunately, the Band 2 was made to last about six months before malfunctioning or disintegrating. (I managed to get mine replaced twice during the one-year warranty period.) I had hoped that Microsoft would figure out a way to get the devices to hold up longer, but, unfortunately, they decided to abandon the line.

Even though I know that technology (and everything else) is constantly changing, my heart was broken once again last week as Microsoft announced the retirement of the Microsoft Professional Program (MPP) at the end of this year. The MPP is a certificate program with nine separate tracks ranging from Data Science to Cybersecurity to Entry Level Software Development. The courses feature recordings, practice labs, exams, forums, and a capstone project.

I completed several of the courses in the Data Science track in 2017 and learned so much that I started presenting a session at SQL Saturdays and other events called Azure Machine Learning 101 based on one of the courses. I’ve been promoting the MPP at each presentation and pointing people to the program when they ask me where to get training to be a developer, for example.

The FAQ page for the retirement announcement states that they “decided to take the best of the Microsoft Professional Program and apply it to a program where you can earn a technical certification when you complete your coursework.” Instead of the MPP, they are directing people to Microsoft Learn. At the time of this writing, there are 648 modules that you can take for free on Microsoft Learn that can help you prepare for traditional (MSCE, for example) or new role-based certifications.

Since the announcement, I’ve completed several of the Data Science and DevOps modules in the new platform. The modules are short and closely mapped to the functionality found in Azure. Even if you are not looking to earn a certification, they might be an excellent way to learn about a feature or technology that you are trying to figure out.

Just like my Android phone, I like the new online training. I’ll even promote it during my machine leaning presentation, but maybe I won’t get so attached this time.


The post Goodbye to the Microsoft Professional Program appeared first on Simple Talk.


from Simple Talk https://ift.tt/2TPK2Kt
via

Tuesday, August 20, 2019

Customizable Characters in Unity

The ability to change the appearance of the player-controlled character is practically a staple of video games. Some will argue that the appearance of the character is more important than the statistics or personalities of the characters themselves. A player often wants to put themselves in the game’s world, and the outward appearance of the one they are controlling is often the first way to accomplish this task. Creating the art for the character is most of the work itself, but of course, programmers have to develop the tools for the user to take advantage of it. As it turns out, developing those tools is easier than you may think.

This project will demonstrate how a character creator is made as well as how the character can retain its attributes from one scene to the next. As you may have guessed, there are several parts to the character creator itself, so this article will focus on the code to save time. That said, an overview will still be done to give you an idea of how the project will look and function once it’s complete. If you wish to follow along, you can download a version of the project without code. Also, there is a code completed project you can refer to as well.

The Project

To open a pre-existing project, you will first open Unity and click Open.

Figure 1: Opening a project

After this, navigate to the folder containing the project. Select the folder with the Unity project within it, then click the Select Folder button that appears in the bottom right. Once this is done, the project will begin loading. Keep in mind that you may have to navigate lower into another folder before finding the correct directory that Unity can open.

Figure 2: Selecting the project to be opened.

Once loaded, you’ll be greeted with a project that looks like the figure below:

Figure 3: The character creator project

The screen won’t appear this way when testing the project in full-screen mode. This appearance is due to the way Unity is currently drawing the user interface (UI) in the game view. Right away, you’ll see a very menu-based project with several buttons and a scrollbar. The buttons, in particular, were created from a single button that was duplicated multiple times. Once all buttons are created in this manner, all that remains is adjusting their position, size, and image. There are an input field and a button saying “to next scene” on the right side of the screen. In the middle behind the UI objects is the user’s character, ready to be customized. The assets being used for the character come from the Custom Character 2D Vol. 1 asset from the Unity asset store. You can view these assets from its respective asset store page here.

Over in the Hierarchy, you can get a better idea of just how much is in the project. Expanding UI->CharacterCreatorBackground->OptionsContainer->Content reveals the different sections that the user will be able to change to their likings, such as the eyes and hairstyles. Expanding the different sections from there shows the individual buttons that make up each section. There’s a total of thirty-seven different buttons in the entire character creator menu!

Figure 4: List of objects.

The last items of note are the two different scenes given the precise names of SampleScene and New Scene. Currently, you’re looking at SampleScene. You can double-click New Scene found in the Scenes folder in the Assets window to check out what’s inside that area if you wish, but there isn’t much. A salmon pink color with some white text that appears unfinished is all that lies within this scene. When the project is complete, this scene will have the newly created character along with some new text to demonstrate persistence between scenes.

For now, it’s recommended to have SampleScene opened as that’s where most of the action will take place. Now that you’re familiar with all the pieces bringing the project together, it’s time to create the code that will make your character creator operate. In the Scripts folder, you’ll need to create three C# scripts. The names of these scripts are in the figure below:

Figure 5: All scripts

The CustomChar Script

CustomChar is an excellent place to begin as its purpose is to hold all the various pieces that make up the character. Update can be deleted or commented out as it will not be needed.

public SpriteRenderer hairBack;
public SpriteRenderer hairFront;
public SpriteRenderer ear;
public SpriteRenderer body;
public SpriteRenderer eyebrow;
public SpriteRenderer eye;
public SpriteRenderer mouth;
public SpriteRenderer effect;
public SpriteRenderer faceOption;
public string charName;
void Start()
{
        DontDestroyOnLoad(this);
}

Several SpriteRenderer variables are declared with a name that relates to what part of the customized character that’s being edited. For example, the ear variable will hold the character’s ear sprite. At the end of this list of variables is a string, called charName. This variable will contain the string the user inputs into the input field from earlier. In both of your scenes, some text will change to show the user’s name along with the remainder of a message. Finally, in the Start function, you have DontDestroyOnLoad called and given a target. When loading a new scene, all objects in the current scene would ordinarily get destroyed. If you wish for an object to persist throughout scenes, such as your custom character, then DontDestroyOnLoad will preserve this object and bring it into any new scene that is loaded.

The CustomChar script is now complete. UIManager is up next, and as you can imagine, it has a lot more going on, however, there are ways to simplify the coding process.

The UIManager Script

First, you’ll need to delete or comment out Start and Update. After that, you’ll also want to add using UnityEngine.UI and using UnityEngine.SceneManagement in order to perform certain tasks. Then you move on to the variable declaration:

[SerializeField]
private CustomChar cc;
public InputField nameInput;
public Text message;

You might think that some Sprite variables are missing for the different parts of the character, but what you’ll see later on is that the various button functions can take care of sprite assignment for you. While you can certainly create arrays to hold the different sprites, it would be far easier to give the function a parameter that you can fill in from the Unity Editor. What’s more, there’s no need to do one function for each button. You can instead create one function for each type of character part and let the parameter take care of the rest. The function will look like this:

public void HairBackAssign(Sprite selection)
{
        cc.hairBack.sprite = selection;
}

This particular function would be given to the buttons that deal with the character’s back hair. All it does is get the CustomChar script, get the correct SpriteRenderer from it, and assign that SpriteRenderer the selection Sprite. All the other buttons follow a similar pattern with some minor differences. Table 1 shows all the functions and the corresponding code for each function.

Table 1: All functions and their code

Function Name

Code

HairBackAssign(Sprite selection)

cc.hairBack.sprite = selection;

HairFrontAssign(Sprite selection)

cc.hairFront.sprite = selection;

BodyAssign(Sprite selection)

cc.body.sprite = selection;

EarAssign(Sprite selection)

cc.ear.sprite = selection;

EyeAssign(Sprite selection)

cc.eye.sprite = selection;

EyebrowAssign(Sprite selection)

cc.eyebrow.sprite = selection;

MouthAssign(Sprite selection)

cc.mouth.sprite = selection;

Not all the button functions are complete though. There’s an extras section in the character creator which allows you to put glasses on the character and have them create a fireball. Where are the functions for those? They operate a little differently as neither the glasses or fireball have additional images that they could be. Instead, the buttons for those extras will enable or disable the item.

public void EffectOn()
{
        if (cc.effect.enabled == true)
                cc.effect.enabled = false;
        else
                cc.effect.enabled = true;
}
public void FaceOptionOn()
{
        if (cc.faceOption.enabled == true)
                cc.faceOption.enabled = false;
        else
                cc.faceOption.enabled = true;
}

The functions check if the sprite renderer for the fireball and the glasses is enabled or not. Depending on the answer it will reenable or disable the extras as needed. To complete the script, some assignments will need to be given to the button saying “to next scene” and the input field.

public void UpdateText()
{
        cc.charName = nameInput.text;
        message.text = "Hello! My name is... " + cc.charName;
}
public void ToNextScene()
{
        SceneManager.LoadScene("New Scene");
}

UpdateText, unlike all the other functions in this script, will be called every time the value of the input field changes. This is being done so you can watch the text in the same scene update in real-time. It also will assign the text in the input field to the charName variable in CustomChar. The final function, ToNextScene, calls SceneManager to load New Scene. Speaking of New Scene, there’s one final script that needs coding for the code of this project to be complete.

The NewLevelText Script

Open the NewLevelText script, remove or comment out Update, add using UnityEngine.UI to the top, then enter the following:

private Text levelText;
void Start()
{
        string character = GameObject.Find("Character").GetComponent<CustomChar>().charName;
        levelText = GetComponent<Text>();
        levelText.text = "Greetings! I am " + character + ", and I hope you have a wonderful day!";
}

Used in New Scene, this script will find the character you create, get the CustomChar script and get charName. Then NewLevelText gets the Text component of the object to which it’s attached. Finally, it updates the level’s message to include the character’s name.

Save the code in Visual Studio and head back to Unity.

Completing the Project

Perhaps the most important script in the entire project goes to the Manager object. With the object selected, click and drag UIManager into the Inspector window to attach the script.

Figure 6: Attaching the UIManager component to the Manager object.

You should also do the same for the Character object and the CustomChar script.

Back at the Manager object, assign Character to cc, NameInput to UIManager’s NameInput, and MyNameIs to Message.

Figure 7: Assigning component fields

Next, you’ll need to tell Unity of all the different sprite renderers that make up the character. Expand the Character object in the Hierarchy, followed by expanding the Face child object to get all the different parts of the character. Then, with Character selected, click and drag all the different character parts into their respective fields in the CustomChar component.

Figure 8: Assigning the various character pieces to their respective fields.

Now comes the assignment of functions to UI elements. Starting with the NameInput field, find the On Value Changed event in the Input Field component within the Inspector window. Once located, click and drag the Manager object into the Object field. From there, select the button currently saying No Function. From the drop-down menu that appears, navigate to UIManager->UpdateText().

Figure 9: The function assigned to the input field’s On Value Changed event.

Similarly, you’ll need to give ToNextScene the ToNextScene function by finding the button’s Button component looking for the OnClick event. Once again, drag in Manager. This time look for the ToNextScene function.

All that remains after this is to assign all the character creator buttons to their respective functions as well as fill in the required parameter. Given the large number of buttons to work with a table will be provided showing the different buttons, the function to use, and which sprite to use for each button. But first, a quick example of how to handle these assignments as well as where to find the images in the first place.

First, you should navigate to the sprites to be used. In the Assets folder, navigate to Custom Character_Vol 1->png->character. From here, there are several folders corresponding to the various character pieces. Going into any of these folders will reveal the sprites you’ll need to fill parameters. Be aware that some of the files come as individual sprites while others are sprite sheets which are files with multiple images in a single file that get separated in Unity. Like with child objects in the Hierarchy, in these cases, you’ll need to expand the sheet to find the individual images.

Figure 10: Comparison of sprites with and without sprite sheet.

As for assigning functions to buttons, it’s the same as the ToNextScene button as before but with an additional step. Once again, you’ll set Manager as the object in the On Click event followed by selecting the correct function. After that, a field will appear below the function drop-down menu asking for a sprite. Click and drag an image from the Assets window into this field to complete the button. Look for the buttons in the Hierarchy at UI  CharacterCreatorBackground  OptionsContainer  Content.

Figure 11 uses the BodyOption1 button as an example.

Figure 11: BodyOption1 button being given a function and sprite.

Using the table below, assign the character creator buttons to the correct functions and make sure they use the correct sprite. The codeless version of the project may fill the sprites in automatically after assigning the button function. This is due to some changes I made to the project before uploading it to GitHub. Though convenient, it is recommended you at least check the correct sprite is being used. It is also worth noting that the below table will specify if the sprite is found within a sprite sheet. Note that the button objects found in Extras will not need a sprite. This will also be specified in the table.

Table 2: All character creator buttons, their functions, and sprites.

Button Object

Function

Sprite

BodyOption1

BodyAssign()

body1

BodyOption2

BodyAssign()

body2

BodyOption3

BodyAssign()

body3

BodyOption4

BodyAssign()

body4

BackHairOption1

HairBackAssign()

h_b_a1

BackHairOption2

HairBackAssign()

h_b_a2

BackHairOption3

HairBackAssign()

h_b_a3

BackHairOption4

HairBackAssign()

h_b_b1

BackHairOption5

HairBackAssign()

h_b_b2

BackHairOption6

HairBackAssign()

h_b_b3

FrontHairOption1

HairFrontAssign()

h_f_a1

FrontHairOption2

HairFrontAssign()

h_f_a2

FrontHairOption3

HairFrontAssign()

h_f_a3

FrontHairOption4

HairFrontAssign()

h_f_b1

FrontHairOption5

HairFrontAssign()

h_f_b2

FrontHairOption6

HairFrontAssign()

h_f_b3

EarOption1

EarAssign()

face_ear_00

EarOption2

EarAssign()

face_ear_01

EyeOption1

EyeAssign()

eye_4 (found in eye sprite sheet)

EyeOption2

EyeAssign()

eye_5 (found in eye sprite sheet)

EyeOption3

EyeAssign()

eye_6 (found in eye sprite sheet)

EyeOption4

EyeAssign()

eye_7 (found in eye sprite sheet)

EyeOption5

EyeAssign()

eye_8 (found in eye sprite sheet)

EyebrowOption1

EyebrowAssign()

eye_0 (found in eye sprite sheet)

EyebrowOption2

EyebrowAssign()

eye_1 (found in eye sprite sheet)

EyebrowOption3

EyebrowAssign()

eye_2 (found in eye sprite sheet)

EyebrowOption4

EyebrowAssign()

eye_3 (found in eye sprite sheet)

MouthOption1

MouthAssign()

mouth_0 (found in mouth sprite sheet)

MouthOption2

MouthAssign()

mouth_1 (found in mouth sprite sheet)

MouthOption3

MouthAssign()

mouth_2 (found in mouth sprite sheet)

MouthOption4

MouthAssign()

mouth_3 (found in mouth sprite sheet)

MouthOption5

MouthAssign()

mouth_4 (found in mouth sprite sheet)

MouthOption6

MouthAssign()

mouth_5 (found in mouth sprite sheet)

MouthOption7

MouthAssign()

mouth_6 (found in mouth sprite sheet)

MouthOption8

MouthAssign()

mouth_7 (found in mouth sprite sheet)

ExtraOption1

FaceOptionOn()

N/A

ExtraOption2

EffectOn()

N/A

Save your work. Go into New Scene by double-clicking the name in the Scene folder in the Assets. Find the Text object under Canvas. Once found, attach the NewLevelText component to it. After you finish that, save the scene and go back back to SampleScene and give the character creator a try.

Figure 12: Character created in the previous scene persists into the new scene with DontDestroyOnLoad.

Conclusion

The two main takeaways from this project come from the button functions and DontDestroyOnLoad. Both simple items but can make game development much easier, especially when it comes to the more complex tasks like a character creator. Using parameters helped lower the number of lines in the code and kept everything tidy. DontDestroyOnLoad demonstrated the simplest way to have an object persist between scenes, thus eliminating the need to rebuild complex objects each time it’s required. All of this was shown in the context of character creators, but it could be used in other places such as stat keeping and tracking decisions the user makes.

The post Customizable Characters in Unity appeared first on Simple Talk.


from Simple Talk https://ift.tt/2NhmDQG
via