Monday, June 22, 2020

Storage 101: Cloud Storage

The series so far:

  1. Storage 101: Welcome to the Wonderful World of Storage
  2. Storage 101: The Language of Storage
  3. Storage 101: Understanding the Hard-Disk Drive 
  4. Storage 101: Understanding the NAND Flash Solid State Drive
  5. Storage 101: Data Center Storage Configurations
  6. Storage 101: Modern Storage Technologies
  7. Storage 101: Convergence and Composability 
  8. Storage 101: Cloud Storage

Throughout this series, I’ve discussed a range of storage-related topics, some of which I mentioned only briefly. One of those is cloud storage, which now plays a vital role in today’s data management strategies. Organizations of all types and sizes now employ cloud storage to varying degrees, either to supplement their on-premises systems or to handle the bulk of their data. Because cloud storage has become so pervasive, this article focuses exclusively on that topic, describing what it is, how it works, and its benefits and challenges.

Cloud storage refers to a system in which data storage is offered as a service by a cloud provider, usually as part of other cloud-based services. The provider stores the data in its own data centers or leases space in third-party data centers. The data centers might be confined to one geographic area or spread out across multiple regions.

With cloud storage, the provider oversees all back-end operations that go with maintaining the storage infrastructure and delivering storage services. A team of experts manages the hosting environments, protects them and their data, and handles administrative tasks such as updating systems, implementing data protections, and ensuring availability.

For now, I’m restricting the context to public cloud storage; I cover private cloud later in this article. In the public model, customers typically pay a monthly rate based on the amount of storage space they use and on selected options such as storage type, data ingress/egress, or performance level. Customers can add or remove capacity on demand, providing them with an extremely flexible data solution.

Cloud Storage Architecture

Cloud storage is delivered through a virtualized infrastructure that logically pools physical storage resources and presents them as services that are accessible through a centralized portal for easy allocation. Customers can also interact with the storage pool through a public API that facilitates data access and management. The storage pool can span multiple servers or even multiple locations, with the data itself distributed across drives. The combination of distributed data and the operation’s inherent redundancy delivers a high degree of fault tolerance and reliability.

Figure 1 provides a conceptual overview of the cloud storage architecture. The exact implementation varies by service provider, with new technologies continuously emerging and existing ones evolving. Even so, the figure should give you a sense of how the physical storage resources are abstracted into logical storage pools that can then be consumed as part of a data management strategy.
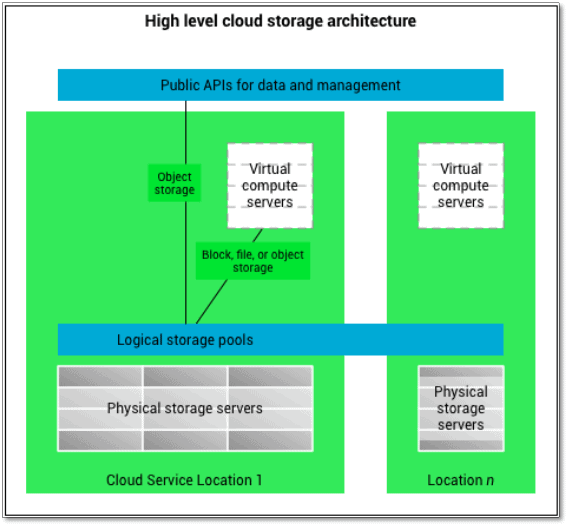
Figure 1. Cloud storage architecture (image by Leoinspace, licensed under Creative Commons Attribution-Share Alike 3.0 Unported)

Figure 1 also shows that a provider might support up to three storage types: object, block, and file. I explained each type in this first article in this series, but here’s a summary for your convenience:

  • Object storage has its origins in the cloud and was developed to address the growing influx of unstructured data. In object storage, data is broken into self-contained, modular units (objects) that include identifiers and customizable metadata, which simplifies access and supports advanced analytics. Object storage does not perform as well as block storage, especially when it comes to writing data, which is why it’s a good fit for workloads that are not latency-sensitive, such as backups and archiving.
  • Block storage breaks data into chunks (blocks) that include no metadata, unless you count the block’s unique identifier. Storage area networks (SANs) use block storage because it is fast and efficient, well-suited for workloads such as email servers, relational databases, and virtual desktop infrastructures. Block storage doesn’t scale as well as object storage, yet it’s still the go-to type for latency-sensitive workloads.
  • File storage has the familiar hierarchical structure you find in such applications as Windows Explorer or macOS Finder. It’s the type of storage used by your everyday applications. Both direct-attached storage (DAS) and network-attached storage (NAS) commonly use file storage. It’s easy to work with and understand; however, it has strict scalability limitations and supports little metadata.

Some cloud storage providers might offer only one or two storage types, but most of today’s major players now offer all three, with object and block storage supporting the bulk of enterprise workloads.

The Tempting World of Cloud Storage

Many organizations turn to cloud storage because of its pay-for-use, consumption-based payment structure, which enables them to move from a capital expense (CapEx) model to an operating expense (OpEx) model. Not only does this eliminate the steep up-front costs that come with on-premises storage solutions, but it also avoids having to over-provision storage resources to accommodate fluctuating workloads or anticipated increases in data volumes.

With cloud storage, customers pay only for the storage they need when they need it. There might be base fees attached to the service, but these may be trivial compared to purchasing, housing, and maintaining a system on-premises. That said, cloud services costs can quickly add up, as I’ll explain in a bit.

Related to cost is the inherent elasticity of cloud storage. Customers can scale capacity up and down as their business requirements change without having to negotiate the hurdles and expenses that come with scaling on-premises systems. This elasticity also eliminates the type of over-provisioning that comes with on-premises solutions. Capacity in the cloud is almost unlimited, as long as you can afford to pay for it.

Cloud storage also has the advantage of 24×7 global availability from just about anywhere connectivity can be established, making it possible for business users and applications with an internet connection to access the data whenever they need it. They can even use protocols such as Web Distributed Authoring and Versioning (WebDAV) to map local drives to cloud storage, providing even more flexibility.

Another reason many organizations use cloud storage is that it’s incredibly user-friendly, whether you’re an administrator, developer, tester, or end-user. The centralized portal and API facilitate quick and efficient operations that make it simple to provision new storage, change existing configurations, collaborate with other users, and work with the data. Cloud storage accelerates and streamlines most of the day-to-day operations that come with on-premises storage.

Cloud storage also includes built-in data protections that address both data loss and security. As already mentioned, the built-in redundancy and distributed data lead to a high degree of fault tolerance. Cloud providers also take steps to protect against data loss and lack of availability in the event of hardware failure, natural disaster, or human error.

In addition, providers implement safeguards to ensure the data is protected from both internal and external threats, implementing such protections as monitoring, firewalls, encryption, intrusion detection, multi-factor authentication, and physical security. Most vendors recognize that their reputations are at stake and will take whatever steps necessary to avoid risking a data breach, often exceeding the protections implemented by many organizations.

The Dark Side of Cloud Storage

Despite the protections that cloud storage providers have in place, security remains one of the top reasons that organizations are hesitant to put their data out on the cloud, in no small part because of the number of big-name breaches to make the headlines. Even under the best circumstances, storing data in the cloud increases the attack surface area, with data crossing more networks, distributed to more locations, and replicated more frequently. The larger the attack surface area, the higher the chance that the data can be compromised.

Cloud providers, especially the big players, have big bullseyes painted on them, with international cybercriminals using the most sophisticated weaponry available to try to penetrate infrastructure defenses. In addition, providers must guard against internal threats, which might come in the form of espionage, rogue employees, or careless in-house practices.

Providers must also take into account privacy concerns and applicable compliance regulations. Customers have a lot at stake when it comes to protecting personal data. Compromised data can result in lawsuits, stiff penalties, and tarnished reputations from which a company might never recover. Although cloud providers have taken steps to address privacy concerns and conform to applicable regulations, many organizations still believe the risks are too great to trust their sensitive data to the cloud.

Even if organizations are comfortable with the protections that a provider offers, they must still take into account the cost of storing data in the cloud. On the surface, the CapEx model might appear an affordable alternative to on-premises storage, but a long-range analysis that calculates the true total cost of ownership (TCO) often paints a much different picture, when taking into account ongoing subscription fees, additional charges for extra capacity and performance, data transfer fees, charges for high-speed network connections, and other factors. And unlike equipment you own, you have no assets to sell once you’re done with the service.

At the same time, cloud storage also means losing control over the data. Organizations can access, update, and move their data as necessary, but they don’t get to determine when security patches are applied or maintenance windows scheduled, nor can they control how systems are optimized or when newer technologies might be implemented. The provider regulates just about every aspect of every operation related to the platform.

In addition, organizations that access their data through the Internet are at the mercy of the ebbs and flows of the endless traffic streams. To improve connectivity, they might deploy dedicated private WANs (increasing costs). However, even if they bump up the bandwidth, applications running on-premises and getting their data from the cloud can still encounter significant latency issues. Customers might find that they need to move their applications to the same cloud platform, increasing costs and adding to the risks of vendor lock-in.

Another concern with cloud storage is whether an organization can depend on the provider to remain in the cloud storage business for the foreseeable future. The company might go bankrupt, get eaten up by a by another company, change its business strategy, experience a disaster, or disappear for any number of other reasons. Not only does this put your day-to-day operations at risk, but it might also prevent you from being able to access your data.

Private and Hybrid Cloud Storage

Although many organizations have concerns about cloud storage, they like the service-based delivery model that the cloud affords, which is why some deploy private or hybrid clouds. A private cloud is a dedicated platform that offers storage and compute resources as services, similar to a public cloud. The components that make up a private cloud infrastructure might be housed on-premises or in a colocation facility, and in either case, the organization has complete control over the components.

A private cloud offers some of the same flexibility, scalability, efficiency, and ease-of-use as a public cloud, although not nearly to the same degree, especially when it comes to flexibility and scalability. Even so, the private could be a useful solution for organizations that want more control over their storage or that have strict security and compliance requirements, which is often the case for organizations such as government agencies, financial institutions, or healthcare companies.

Despite the benefits of a private cloud, implementing and maintaining the infrastructure can be a complex and costly undertaking, and organizations must be well prepared to take on such a project. Not only does this require careful planning and budgeting, but it might also mean bringing on personnel with the necessary expertise. As an alternative, some companies go with consumption-based storage, which takes a pay-as-you-go approach to delivering managed, on-premises services.

In some cases, an organization will want to deploy a private cloud but still use public cloud services for some of its storage. One option is to maintain separate operations, with the public and private clouds treated as individual efforts. However, this can increase management complexities and contribute to data siloes.

Another approach is the hybrid cloud, in which private and public cloud storage are coordinated by an orchestration layer that integrates operations across multiple platforms. With an effective hybrid cloud solution in place, an organization can maintain strict control over its sensitive data, while maximizing the advantages of both private and public cloud platforms.

There is, of course, a lot more to private and hybrid cloud systems than what I’ve covered here, as is the case with most storage-related concepts, but this should give you a sense of some of the options available for implementing cloud storage.

Making the Most of Cloud Storage

Initially, cloud storage was seen as a vehicle for reducing CapEx for smaller organizations, allowing them to store their data on a public cloud platform, without the paying for storage they did not need. Now organizations of all sizes and types are leveraging cloud storage, taking advantage of the different deployment options to support a wide range of workloads, such as disaster recovery, file archiving, DevOps development processes, seasonal fluctuations, Internet of Things (IoT) analytics, or any number of other possible use cases.

But as I mentioned earlier, cloud storage also comes with several challenges. For example, there are security and privacy concerns as well as issues related to vendor lock-in and customer control. One concern I didn’t discuss is whether the cloud will be able to handle the anticipated increase in data volumes over the next few years. But that’s a discussion I’ll leave for another time.

The post Storage 101: Cloud Storage appeared first on Simple Talk.


from Simple Talk https://ift.tt/3esDVFe
via

Connecting to a SQL Server Docker Container Running in macOS

The series so far:

  1. Creating Your First SQL Server Docker Container in macOS
  2. Managing SQL Server Docker containers in macOS
  3. Connecting to a SQL Server Docker Container Running in macOS

In the second part of this article series, you learned about the container’s nature (ephemeral) and a few details about its life cycle. More importantly, I provided you with a detailed explanation on how to use the Docker client to list and delete container images, check the container’s state filtering by name, and specific status (started | stopped). To finally close, the article explained what happens inside a container when it is ended, started, and deleted.

In this third part, you will learn about the container’s network connectivity, starting from the creation of an interactive bash shell session to remotely connect within the container and ending with an understanding of how containers interact with your local network. And finally, connecting to your SQL Server instance running an in a Docker container by using your favorite database management tool.

Connecting within a container

Before providing examples on how to connect to SQL Server to execute queries and scripts, create database objects, or start any database development, I would like to show you how to connect within the actual (Linux) container through the macOS terminal.

Getting started with docker exec

The docker exec command allows you to execute any type of shell-based commands within a running container. This command is an excellent tool for debugging, monitoring, and also to perform administrative level tasks like the creation of directories, files, and more.

Here is the docker exec syntax:

docker exec [options] <container name> <command>

As you can see, this command is very straightforward. As the syntax above describes, you have to pass one or more options and then just provide the container name followed with the actual command to execute within the container.

You may wonder what options to use. That’s a very fair question, and let me tell you there a few of them. You can start by taking a look at the official definition from Docker docs here, in case you want to read further. However, I will make use of a couple of them in the next section.

Creating a Bash session

Based on the explanation from the previous section. You can leverage the docker exec command to perform any kind of Linux based command inside a container, like creating a remote terminal session.

In Ubuntu’s case, the default shell is bash. However, it won’t be just a matter of passing bash as the second parameter. Remember, you still have to provide one or more options for this command to work.

In the specific case to connect to your container using an interactive bash terminal, you have to use the -i with -t options before the bash command. I know this sounds a little bit complex, but trust me, this is the right way you want to do it.

The following table explains each one of the parameters I will use for this command:

Option

Description

-i

It means you want to connect using an interactive method

-t

It means tty as any devices that act like teletype in a terminal

bash

Starts a bash session inside the container

Putting all these options and parameters together, you will execute the following instruction. In this case, SimpleTalk is my SQL Server’s name:

docker exec -it SimpleTalk "bash"

The context of your macOS terminal will switch immediately, from your localhost to the container’s interactive bash session you just created. You can also confirm, you are within the container executing the hostname command as follows:

As you can see, SimpleTalk is the string value I defined as the container hostname at the time of its creation. In case you get an alpha-numeric combination returned, do not worry; that is fine. That happens to be the actual container ID (As described in the docker ps section in the second part of this article series).

Now that you confirmed the connection works within the container, it’s time to perform more interesting like exploring all SQL Server binaries and data files.

Exploring your SQL Server container

As it occurs on any Windows installation, SQL Server on Linux uses a default location to store all its binaries, libraries, dumps, and another for the actual database files (MDF, NDF, and LDF) and error logs. There are no changes in this regard when running SQL Server on Docker. In the end, SQL Server will use the same binaries and libraries when running in a Docker container on Linux.

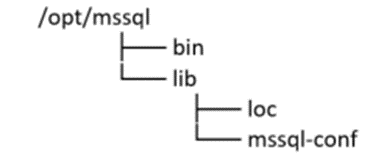
You can find the SQL Server binaries, libraries, and configuration files all in the /opt/mssql location, as any other regular SQL Server on Linux installation. Take a look at the folder structure for a moment:

All these directories and files within are pretty much the heart and soul of SQL Server on Linux. I recommend not making any changes to the existing files in this location as any mistake there can compromise your SQL Server instance availability and operationality.

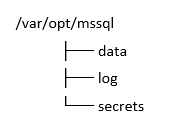
Now it is the time to get familiar with the datafile and logs location. First, get familiar with the folder structure:

As you can see, there is a folder called data. That is the location where you will find all the system and user database files (MDF, NDF, and LDF); of course, you can change this location to a customized path as you are used to doing in Windows. However, modifying the SQL Server default data path for a container is outside the scope of this article.

Do not get confused by the log folder; this is where the error log and dump files are stored. As described before, the data folder holds both MDF (data) and LDF (transaction log) files.

It is time to put what you have learned into practice, starting from listing the existing database files in your container. The first thing you want to do is to navigate towards /var/opt/mssql/data as follows:

cd /var/opt/mssql/data

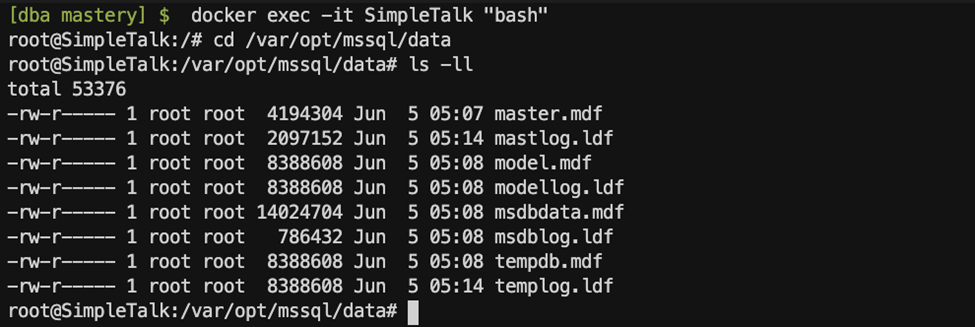
Now that you are positioned in the data file directory, it will be easy to list all files under this folder to identify which databases exist in this container. You can use the ls -ll command for that purpose; it will return the complete list of existing files under the current directory using the “long list format”.

Here you have the example, starting from the docker exec command:

As you can see above, the long list format that includes the file type (simple file | directory), owner, group, file size, creation date, and file name. This information is pretty good; moreover, it helps you to understand better who, when, and what kind of files was created under a specific directory.

Network connectivity

Docker desktop uses a bridge-type network by default. A network bridge is a communication device that provides a way to communicate two or more network segments allowing them to work as a single network.

You can use the docker network ls client command to list all existing networks in your Docker desktop implementation. Like the previous examples, all the Docker client commands should be executed using the macOS terminal. Once you execute the docker network ls command, you will see some information returned that will include the internal network ID, name, driver, and scope.

Here is an example of the information returned in my Docker desktop implementation:

As you can see from the output above, three networks were listed instead of the default bridge. According to Docker’s documentation, the host and none networks under the name column are not fully developed at this time. However, Docker uses them to manage the internal connectivity from a container when the same is started locally from the Docker daemon or when no network devices are required.

In my specific case, using a local docker daemon, there is no need to specify the container IP address to connect. Because all my containers are running on my laptop, Docker uses the network bridge device, allowing me to connect like it was running on my local machine.

This topic will become more evident in the next section when connecting to the SQL Server container using SQLCMD.

SQLCMD

SQLCMD is a command line-based utility you can use to connect to any SQL Server instance. One of the significant characteristics of this utility is that it works the same regardless of the platform (Windows, Linux, macOS, Azure Cloud shell). The installation process is quick and straightforward; you can follow the steps on how to install it for macOS here.

From now on, I will assume you already have SQLCMD installed. The following section will focus on the connectivity aspect; thus, it is crucial to have this command line-based utility for you to follow the steps.

Getting back to the main point, SQLCMD requires a few parameters to work. The information required to connect a SQL Server instance using this tool is just the hostname or IP address followed by the port number, user name, and password. Here you have the syntax of the SQLCMD to connect to a SQL Server instance:

sqlcmd -S <hostname | port number> -U <Login> -P <Password>

Of course, there are many more options like database name, query, input file, output file, etc. in case you are interested to learn more about this utility; you can check more details at Microsoft docs. My goal, for now, is just to get you started with SQLCMD.

What is essential to understand, though, is how to port redirection works for containers. Each container must have a unique port number, exposed at the creation time. That means you can have only one container listening to port 1433 or 1434, and so on. It’s pretty much the same concept of default and named instances on Windows that you are probably familiar with as a SQL Server Database administrator or developer.

Therefore, be mindful of the ports already in use in the macOS. You don’t want to end up using a port that is already used by other critical applications.

There are many ways to get the port exposed for a container; however, I will re-use one of the previous examples in this article. To be specific, I will use the docker ps -a -f command to get all the information related to my SimpleTalk container, including the exposed port:

docker ps -a -f "name=SimpleTalk" --format "table \t\t\t"

Looking at the output returned, I can conclude that the SimpleTalk container is listening through port 1433. At this point, I know two of the required parameter values to connect to the SQL Server instance using the SQCMD utility.

The next two parameters are the user name and password. You will probably realize that you already have this information. If you recall from the previous article, the docker container run command for SQL Server requires setting an environment variable as the SA password at creation time. Therefore, you can re-use all this information to connect your SQL Server container.

Here is the visual representation of the parameters and its values:

Parameter name

Value

Server name (-S)

localhost

Port

1433

User (-U)

SA

Password (-S)

MyP@ssw0rd#

Now it’s time to put all these parameters together using the SQLCMD utility. Here is how it looks in action:

sqlcmd -S localhost -U SA -P "MyP@ssw0rd#"
SELECT @@SERVERNAME;
GO

Note, I didn’t have to specify the port number. There is a simple explanation for this; remember, I’m connecting to a SQL Server instance listening thought the port 1433, which is the default for SQL Server. Thus, there is no need to specify that port number as part of the parameters in the SQCMD utility when using the default port.

As you can see from the output, the connection was successful, and I was even able to run a query to get the SQL Server instance name, which returned the container ID (hostname).

Here’s a second example using a SQL Server container listening through a non-default port —different than 1433. I will start by creating a second container (see this article) called DBA-Mastery. This time the container will listen through port 1401. Once again, I will make use of the docker ps -a -f command to get all the information for this other container, as I did previously for the SimpleTalk container:

docker ps -a -f "name=DBA-Mastery" --format "table \t\t\t"

As you can see from the returned output above, the PORTS column shows the mapping between the port 1401 and 1433. Being the first port (1401), the one from my local machine, and the second port (1433) belongs to the one within the container.

Based on the information for this new SQL Server container environment called DBA-Mastery, the connection parameters will be something like this:

Parameter name

Value

Server name (-S)

localhost

Port

1401

User (-U)

SA

Password (-S)

MyP@ssw0rd#

This is how you should connect using SQLCMD:

sqlcmd -S localhost,1401 -U SA -P "MyP@ssw0rd#"

Please note the server name (-S) parameter is a little bit different this time. It is using a combination of the localhost, followed by a comma, then specifying the 1401 port. This port parameter is required whenever you want to connect to a SQL Server instance mapped to the non-default port.

Azure Data Studio

As the title of this article states, I’m using macOS to host my SQL Server containers. In the previous section, I gave you an example of how to use SQLCMD, a command line-based utility used to manage databases or just simply to execute T-SQL queries.

However, sometimes we need a complete solution with a rich editor experience, let me tell you that Azure Data Studio is the perfect tool for the job. Azure Data Studio is a modern cross-platform tool focused on the coding experience that also provides you with a user-friendly solution to managing SQL Server databases regardless of its environment (on-premises, cloud, containers).

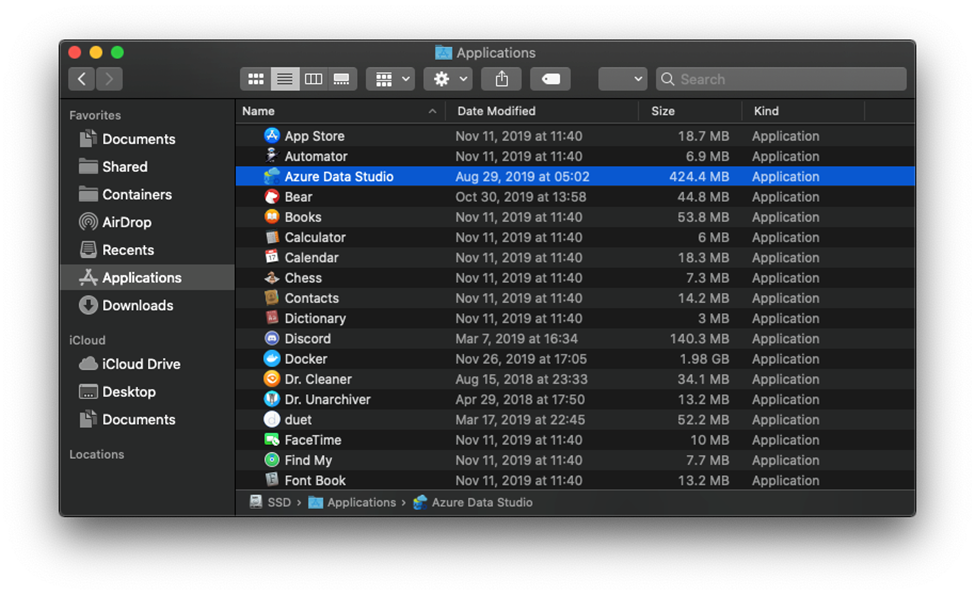
Installing Azure Data Studio in macOS is easy; just download the application file from here. You don’t need to extract or run anything, just grab the downloaded file to your applications folder:

For more information about this tool, you can always take a look at the Microsoft docs.

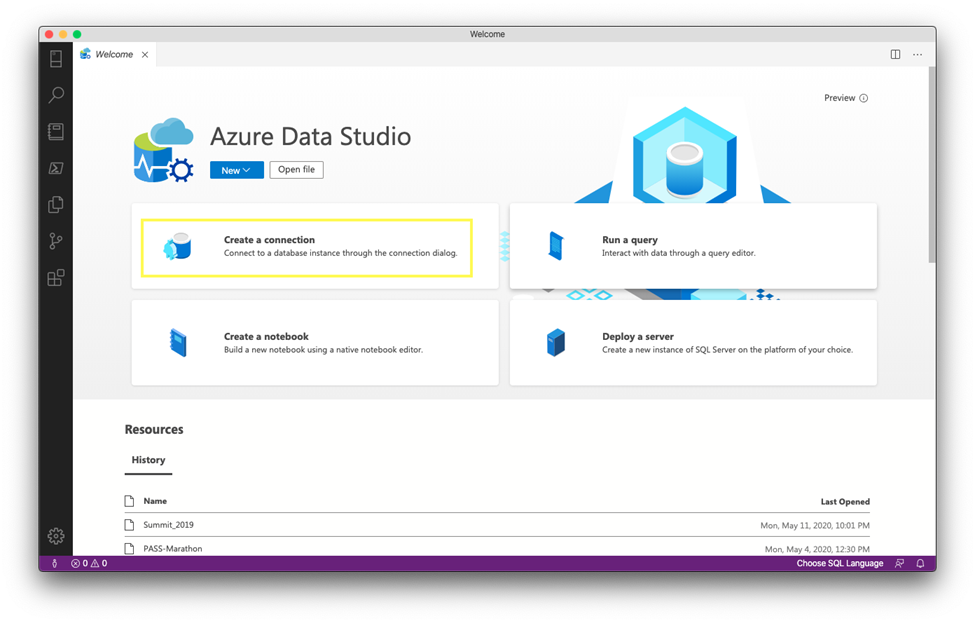
To get started, open Azure Data Studio, then go to your welcome page and click on Create a connection:

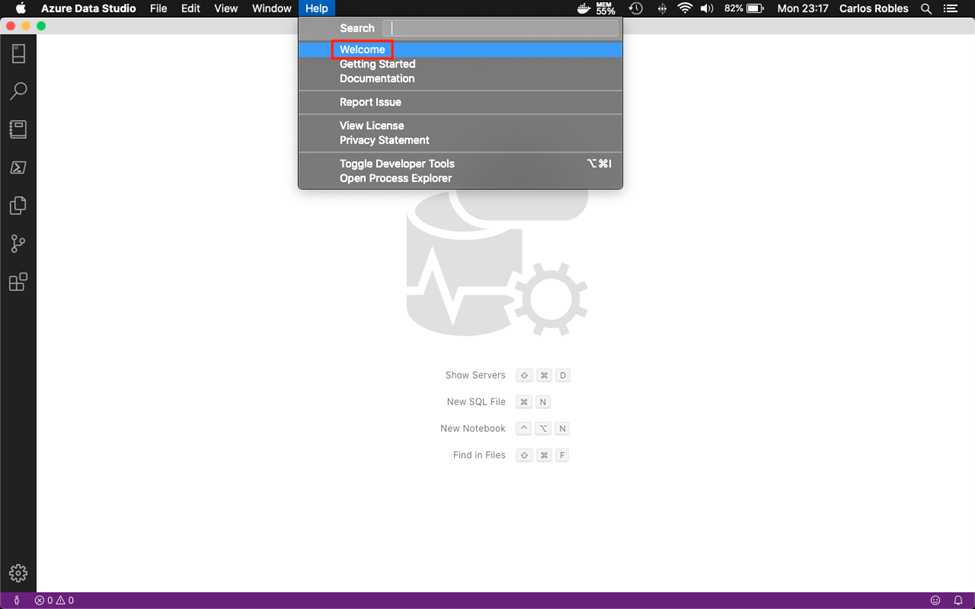
Do not worry if you don’t see the Welcome page, just navigate through the macOS top menu and click on Help. You can open the Welcome page from there:

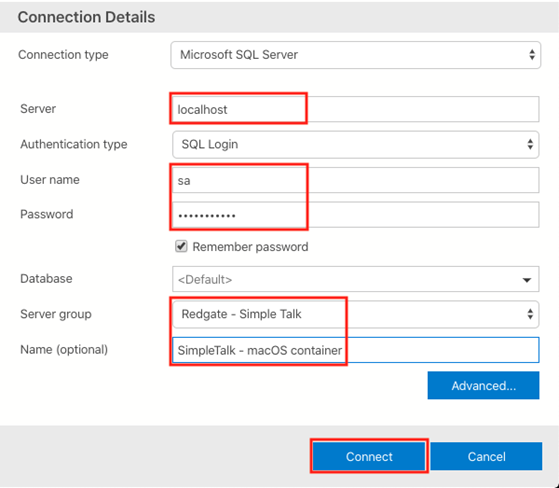
A new section called Connection Details will open on the right-hand side of Azure Data Studio. Here is where you must specify the connection details as follow:

I just went through all the fields completing the information I already know:

  • server name,
  • user name and
  • password

Please note the Server Group and Name fields are optional. I just decided to call this server group Redgate – Simple Talk, and of course, I want this SQL Server container to be part of this server group. Then the Name field simply refers to the SQL Server connection, kind of a label or alias. I will use SimpleTalk – macOS containers for demo purposes.

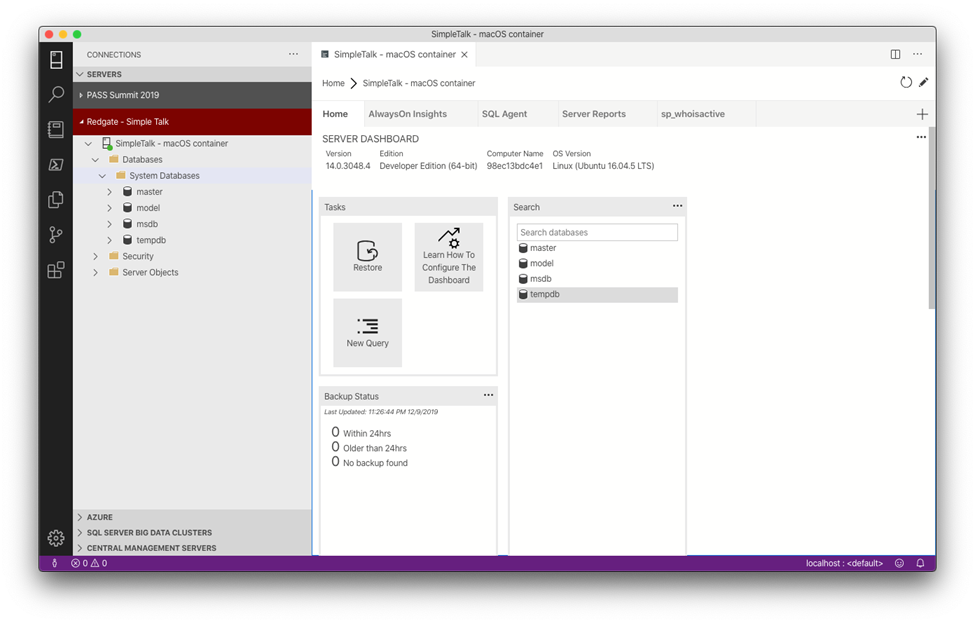
I am all set! I should be able to connect to my SQL Server container to start any new development or simply to manage my existing databases:

Conclusion

Understanding containers basic networking and connectivity terms is vital to get you started with any kind of development using a SQL Server instance running on Docker. Docker provides a very straightforward way to initialize a remote terminal session through the docker exec command.

Later, I explained the few options available when choosing a database management tool for macOS. You can leverage a command line-based tool like SQLCMD, to get you started executing queries fast and easy. Or either, choose a graphical user interface tool like Azure Data Studio, which provides a modern cross-platform rich editor experience to focus on your database development needs.

Please join me in this series of articles where I will be talking about the following topics related to Docker containers for SQL Server:

  • Persistent storage \ Docker volumes
  • Transferring files from the host machine to Docker and vice versa
  • Restoring databases from any source to a SQL Server instance running in a container
  • Upgrading a SQL Server instance running in a container
  • Creating a custom SQL Server container
  • Automating the deployment of custom SQL Server containers
  • Configuring an Availability group for a SQL Server instance running in a container
  • More …

Thanks for reading!

The post Connecting to a SQL Server Docker Container Running in macOS appeared first on Simple Talk.


from Simple Talk https://ift.tt/3ekm17H
via
Monday, June 15, 2020

Using a Public Web Service to Consume SQL Server Build Numbers

During my time as a professional DBA, I have been responsible for quite a few SQL Server instances, all with their own set of characteristics, including different versions and patching levels, the topic of this article.

One of the primary duties that DBAs have is making sure that the SQL Server instances are patched and up to date, as Microsoft makes available all the corresponding Service Packs and/or Cumulative Updates. This responsibility, of course, applies for the on-premises deployments of SQL Server. Microsoft manages most database services for you in Azure, however, you will still be responsible for keeping Azure Virtual Machines up to date.

With this said, how can you make sure that your set of SQL Server instances are patched up to the latest available release by Microsoft? One obvious way is to manually check the current releases of SQL Server and compare that list against what you currently have, making a note of the current status of your environment and pointing out any differences. However, doing this can consume a lot of time, especially if you have quite a handful of instances to check.

I found that I wanted to know if my instances were up to date, but, eventually, I didn’t have enough time on my hands to be constantly checking for the available updates. I previously created and tried a solution that consumed and parsed a website to gather the information about the SQL Server build numbers. However, I decided to put that solution to rest because I realized that I don’t want to depend on the availability of an external site to keep things working fine for me.

After failing at many attempts to find a solution to automate this effort, I decided to build a public service that can surely help any SQL Server DBA fulfil this important duty.

Choosing the technology to build the public service

After several hours of thinking, I chose Azure (a solid decision by the way) by combining two of their “serverless” offerings, to help me reduce the overall costs. This article in no way is a deep dive into the technologies picked, so with that out of the way, let me explain why I picked Azure Serverless Functions and Azure SQL Database Serverless.

One of my first options was to spin a Virtual Machine, install a web server, a database, point a custom domain to the public IP assigned to the Virtual machine, and develop the service. However, by going this route, even if there’s no activity going on in the server, you still have to pay a minimum amount for the storage and virtual network assigned to your Virtual Machine.

With the serverless options, you can get a cost-effective and very convenient solution simply by paying for it when your stuff is really used.

Azure SQL Database Serverless

Nowadays, there’s an offering from Microsoft, for your Database-as-a-Service solution, called serverless. A convenient feature from this option is that, if your database hasn’t been used for a continuous amount of time (1hr is the minimum you can pick, up to 7 days), then it will auto-pause itself and, you guessed it, you will only be charged for the storage assigned to your database. Under normal conditions, Microsoft charges for the storage and compute resources used by your Azure SQL Database.

There is one important detail that should be kept in mind, and it is the fact that if your database is in a paused state, and a request tries to hit the database, then it will require some time (usually it’s several seconds) for it to “wake up” and serve the request. Therefore, there might be times where it seems that your service is slow, but it is very likely that it is just the database “waking up”. You can find more information here.

Azure Serverless Functions

Azure functions are an excellent option for quickly developing microservices, without worrying about the underlying infrastructure that powers them to run; hence the addition of the term serverless. It doesn’t mean that it doesn’t require a server to run behind the scenes. There are different service plans and configurations for your functions, but the convenient part for me is that there are free grants covered by month, and so far, I haven’t spent a single dime in Azure functions.

You can find more information here.

Details and usage of the public service

Before detailing the structure and usage of the service, I would like to express one important fact, and it is that, as of the time of this writing, the usage of this public service is entirely free for the end-user. I am personally financing the resources described in Azure (even if it’s a tiny bit currently) and will continue to do so for the foreseeable future unless something prevents me from doing so.

To consume the service, you have to issue an HTTP request, either through a web browser or programmatically through a script, in order to get the json response with the data. As of this writing, there is no restriction upon who can consume this service; however, this can eventually change if any maliciousness is detected, such as trying to bring the service down.

NOTE: You have to be 100% sure that the machine from where you trigger the request has internet access. It might be an obvious thing, but I have seen cases where the service seems to be failing, and it is just that extremely simple detail.

Here is the structure of the URL:

http://www.sqlserverbuilds.info/api/builds/{version:regex(2019|2017|2016|2014|2012|2008R2|2008|all)}/{kind:regex(first|latest|all)}

As you can see, there are two sections of the URL within curly brackets {}. The first will tell the service about the information that the user is actually targeting:

{ version:regex(2019 | 2017 | 2016 | 2014 | 2012 | 2008R2 | 2008 | all) }

In here you specify, as a parameter, the particular SQL Server version for which you wish to know the released/available build numbers. If you specify all, then all the build numbers I have collected in the database are going to be returned. I have only populated the database with build numbers starting from SQL Server 2008. I know that there are many systems out there still running SQL Server 2005 and below, but I just thought that SQL Server 2008 would be a good starting point; perhaps in a future revision/release of this project, I might add even older versions.

The next part looks like this:

{ kind:regex(first | latest | all) }

In here you specify, as a parameter, how granular you want the information to be returned by the service.

First: tells the service to return only the very first build number for the specified SQL Server version.

Latest: tells the service to return only the latest build number for the specified SQL Server version.

All: tells the service to return all the build numbers found for the specified SQL Server version.

Output Examples:

Here are some examples of the call to the service and the results. Note, as I stated earlier, if you experience either a blank json object as a response or general slowness overall, it means that the database was in a paused state and it is “waking up”.

Retrieving the first build number for SQL Server 2019.

URL: http://www.sqlserverbuilds.info/api/builds/2019/first

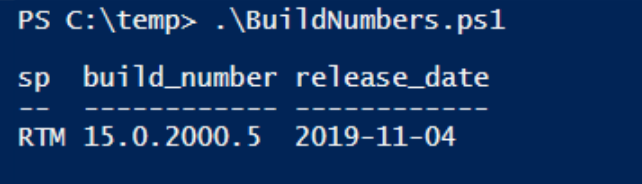
Result: [{ "sp" : "RTM", "build_number" : "15.0.2000.5", "release_date" : "2019-11-04" }]

Retrieving the latest build number for SQL Server 2019.

URL: http://www.sqlserverbuilds.info/api/builds/2019/latest

Result: [{ "sp" : "RTM","cu" : "CU4", "build_number" : "15.0.4033.1", "release_date" : "2020-03-31" }]

Retrieving all the build numbers for SQL Server 2019.

URL: http://www.sqlserverbuilds.info/api/builds/2019/all

Result: [
{ "sp" : "RTM", "cu" : "CU4", "build_number" : "15.0.4033.1", "release_date" : "2020-03-31" },
{ "sp" : "RTM", "cu" : "CU3", "build_number" : "15.0.4023.6", "release_date" : "2020-03-12" },
{ "sp" : "RTM", "cu":"CU2", "build_number" : "15.0.4013.40", "release_date" : "2020-02-13" },
{ "sp" : "RTM", "cu" : "CU1", "build_number" : "15.0.4003.23", "release_date" : "2020-01-07" },
{ "sp" : "RTM", "extra" : "GDR", "build_number" : "15.0.2070.41", "release_date" : "2019-11-04" },
{ "sp" : "RTM", "build_number" : "15.0.2000.5", "release_date" : "2019-11-04" }
]

Retrieving the first build number of all the SQL Server versions stored in the database.

URL: http://www.sqlserverbuilds.info/api/builds/all/first

Result: [
{ "sp" : "RTM", "build_number" : "15.0.2000.5", "release_date" : "2019-11-04" },
{ "sp" : "RTM", "build_number" : "14.0.1000.169", "release_date" : "2017-10-02" },
{ "sp" : "RTM", "build_number" : "13.0.1601.5", "release_date" : "2016-06-01" },
{ "sp" : "RTM", "build_number" : "12.0.2000.8", "release_date" : "2014-04-01" },
{ "sp" : "RTM", "build_number" : "11.0.2100.60", "release_date" : "2012-03-06" },
{ "sp" : "RTM", "build_number" : "10.50.1600.1", "release_date" : "2010-04-21" },
{ "sp" : "RTM", "build_number" : "10.0.1600.22", "release_date" : "2008-08-07" }
]

Retrieving the latest build number of all the SQL Server versions stored in the database.

URL: http://www.sqlserverbuilds.info/api/builds/all/first

Result: [
{ "sp" : "RTM", "cu" : "CU4", "build_number" : "15.0.4033.1", "release_date" : "2020-03-31" },
{ "sp" : "RTM", "cu" : "CU20", "build_number" : "14.0.3294.2", "release_date" : "2020-04-07" },
{ "sp" : "SP2", "cu" : "CU12", "build_number" : "13.0.5698.0", "release_date" : "2020-02-25" },
{ "sp" : "SP3", "cu" : "CU4", "extra" : "CVE", "build_number" : "12.0.6372.1", "release_date" : "2020-02-11" },
{ "sp" : "SP4", "extra" : "CVE", "build_number" : "11.0.7493.4", "release_date" : "2020-02-11" },
{ "sp" : "SP3", "extra" : "GDR", "build_number" : "10.50.6560.0", "release_date" : "2018-01-06" },
{ "sp" : "SP4", "extra" : "GDR", "build_number" : "10.0.6556.0", "release_date" : "2018-01-06" }
]

Structure of the JSON response

Once you get back the JSON response, you’ll need to interpret the information:

[
   {
      "sp" : "RTM",
      "cu" : "CU4",
      "build_number" : "15.0.4033.1",
      "release_date" : "2020-03-31"
   }
]

sp: The Service Pack level of the build number

  • From SQL Server 2017 and up, this will always have “RTM” as Microsoft shifted to Cumulative only releases.

cu: The Cumulative Update level of the build number.

  • When this field doesn’t come in a particular response, it means that the build number is in its base RTM/SP level without its first Cumulative Update.

build_number: The actual build number of the specific release.

release_date: The date when Microsoft release the specific build number to the public.

  • Sometimes, there are rare cases where Microsoft pulls a particular build number from public availability (due to bugs, errors reported). When I find cases like these, I usually pull them from the database as well.

extra: When this field appears in a particular response object, it means that the build number is a special case release, either a General Distribution Release, a Hotfix, or an On-Demand update.

Bonus script to interact with the public service

Since the spirit of this public service is to allow the fellow DBAs to programmatically consume the service, let me leave you a PowerShell script that you can use as a “stepping stone” for you own particular use case.

Something that has been very helpful to me (and it might be to you as well) is the use of this service to store the build numbers information in a central repository that I can keep up-to-date and use it to determine if my list of instances are up-to-date. Of course, you would have to craft that solution and apply some sort of automation to it.

Code

$response = Invoke-WebRequest -URI http://www.sqlserverbuilds.info/api/builds/2019/first -UseBasicParsing
$json = ConvertFrom-Json $([String]::new($response.Content))
#This means that an option that targets multiple build numbers was sent
if($json.length -gt 1){
    foreach($item in $json){
        $item
    }
}
else{
    $json
}

Output Examples

Fetching one build number for a particular SQL Server version.

A blue and white sign Description automatically generated

Fetching all the build numbers from a particular SQL Server version.

A blue and white text Description automatically generated

Fetching all the build numbers stored in the database.

A blue and white text Description automatically generated

Conclusion

I really hope that this personal initiative can be valuable to any SQL Server DBA out there facing the same situation that I once faced. Keep in mind that there is a chance that you might find errors while attempting to consume the service, and it wouldn’t be that surprising as the version I’m presenting within this article is v1.0.

I personally will be updating the database with every new release that Microsoft makes public, and any ideas, comments, suggestions, complaints will always be welcome in favor of improving this service in any possible way, so feel free to drop a comment and I will try my best to address it.

The post Using a Public Web Service to Consume SQL Server Build Numbers appeared first on Simple Talk.


from Simple Talk https://ift.tt/3e5ktOB
via

Tuesday, June 9, 2020

PASS Summit Goes Virtual

The PASS organization announced last week that the 2020 Summit, originally planned for Houston this November, will now be held virtually. This is bittersweet for me, since going to the Summit has been the highlight of almost every year since 2003. I had decided, however, that I would not attend in person this year unless I would somehow be immune from Covid-19 by then.

Each year, PASS Summit has hundreds of great sessions, and I must admit that I don’t attend a lot of them during Summit week. I typically spend my time networking and taking advantage of things like the Microsoft Data Clinic where you can ask questions of the people who build and support SQL Server and the rest of the Data Platform. Since Microsoft had announced that they were switching all events to virtual through July 2021, I suspected that the clinic would be absent this year had PASS decided to stay in-person. Hopefully, PASS will figure out how to do most of the things that make it a wonderful event each year while being virtual.

While I’m happy that the PASS Summit will be virtual in 2020, I also know how tough it is to pull off a great virtual event. One big problem is that it’s much harder to pay attention to virtual sessions than in-person sessions. For example, I attended the MVP Summit virtually in March from my desk, and even though I had full support from my manager to focus on the sessions, it was not easy to ignore my to-do list.

One big advantage of going virtual for PASS is that it will be easier for people who have never attended before, especially from around the world. This is also a great opportunity for people to submit a session (they also re-opened the call for speakers) who have only dreamed of speaking at Summit due to the cost of travel or getting the time away from work.

I also wonder what the attendance would have been like in November had it stayed in-person. At that time there could be even more travel restrictions in place or a surge in new infections. Probably just a fraction of those who normally attend would make it to an in-person event.

It’s up to PASS and the community to be creative so that this event will not only be educational but also be a way for people to connect as they do each year. I know it won’t be the same as the traditional Summit, but I hope it is still fun.

While holding PASS Summit virtually is disappointing for many people, I do think it was the right decision and I plan to make the best of it.


The post PASS Summit Goes Virtual appeared first on Simple Talk.


from Simple Talk https://ift.tt/3f2ojIo
via

Friday, June 5, 2020

Using Azure Data Studio with SQL Prompt

One of the coolest and most useful features of Azure Data Studio (ADS) is SQL Notebooks. If you haven’t seen them, notebooks allow you to combine text with markdown and runnable code in the same document, and they are shareable. Notebooks might be used for teaching, documentation, or runbooks among other uses.

I recently heard about a public preview for Redgate’s SQL Prompt for ADS, and I wondered if the features would work only in a query window or if the features would also work in a notebook. After testing, I found that yes, SQL Prompt features do work in notebooks. It doesn’t matter if you are working in a query window or a notebook, you can take advantage of SQL Prompt!

To try it out, I installed the most recent ADS version and the public preview for SQL Prompt for ADS. The first feature I tested was formatting.

Formatting

There is some built-in formatting in ADS, but there is just one style. SQL Prompt has several built-in styles, plus it imports styles from SSMS if you have it installed and allows you to create your own custom styles.

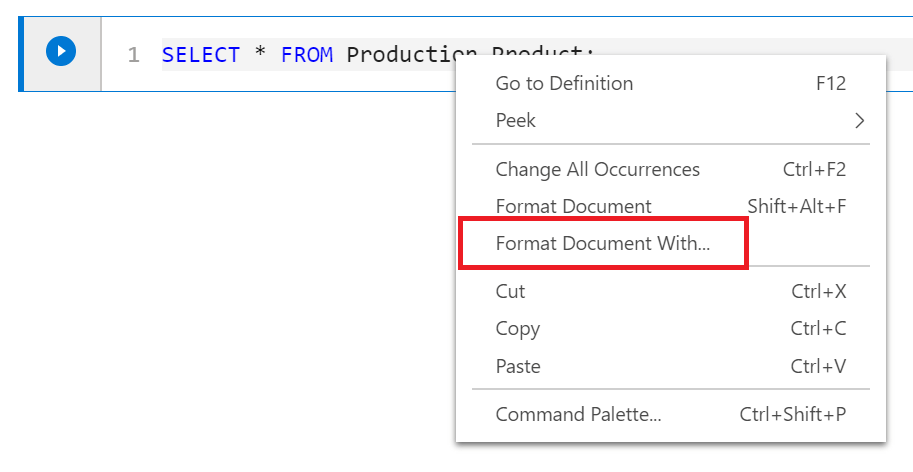
You must tell ADS that you want to use SQL Prompt for formatting either for the current operation or as a default. To set it up as the default, right-click in a notebook code cell or in the query window. Then select Format Document With as shown in Figure 1.

Figure 1: Choose a formatter

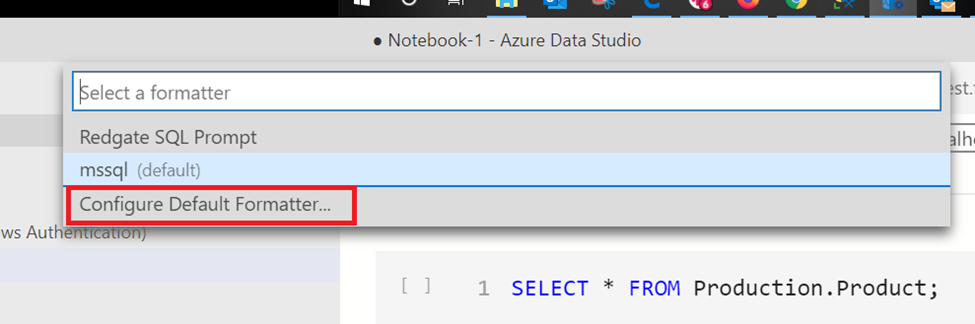
A dialog will pop up. Click Configure Default Formatter as shown in Figure 2.

Figure 2: Configure the default

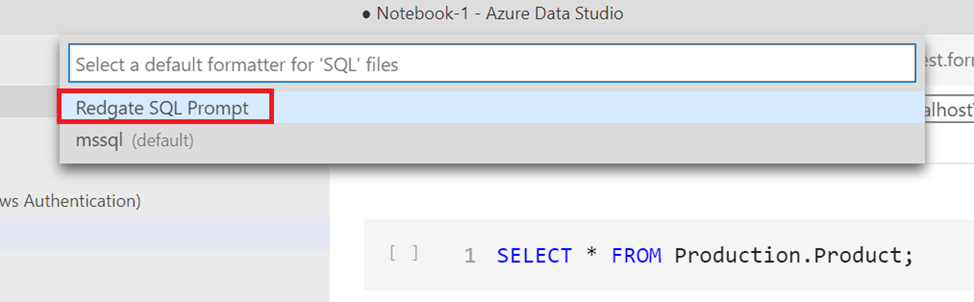
Then click Redgate SQL Prompt as shown in Figure 3.

Figure 3: Select SQL Prompt

From then on, SQL Prompt will be the default formatting tool for both the notebooks and query window.

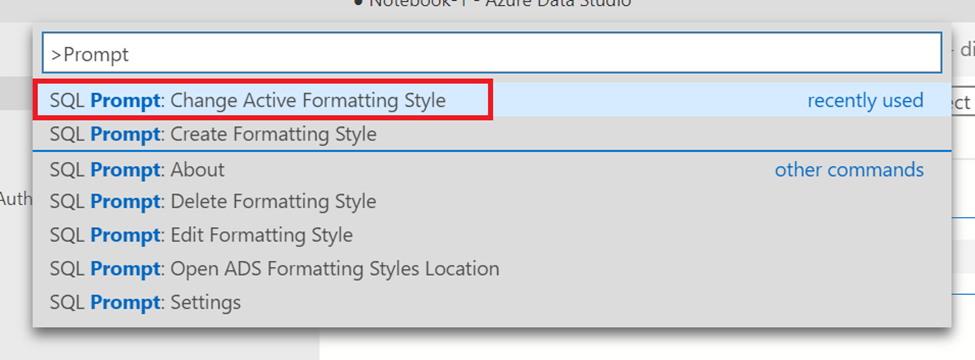
One advantage of SQL Prompt is that you have several formats from which to choose. There are five built-in formatting styles and any created in SSMS will automatically import. To see the styles, first bring up the command pallet by typing CTRL+SHIFT+P. You can search for everything related to Prompt as shown in Figure 4. Select SQL Prompt: Change Active Formatting Style.

Figure 4: Find Change Active Formatting Style

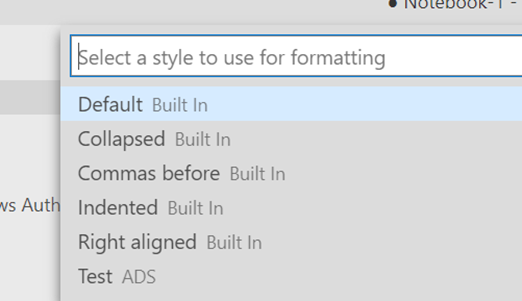
Here you’ll see a list of built-in styles plus any of your custom styles shown in Figure 5. You can select any of them to be your default style going forward.

Figure 5: Select a formatting style

Notice in Figure 4 that you can also delete, create, or edit formatting styles. Now, formatting the way you like it is just a right-click away in both notebooks and the query window.

Another feature available in this preview is the well-loved snippets. Learn about that next!

Snippets

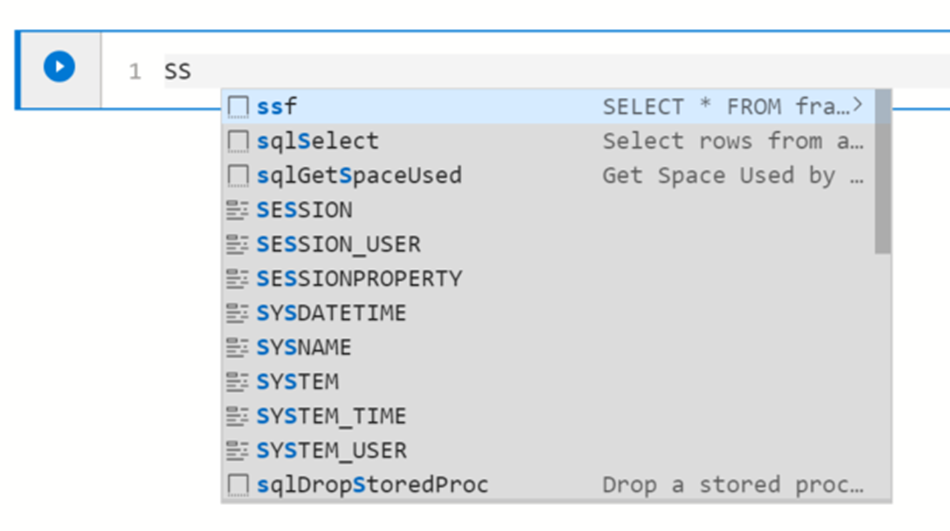
Snippets save SQL Prompt users tons of time. They are as simple as typing in three or four characters to get anything from a SELECT statement to a function definition. Just like formatting, this feature can be seen in the notebooks. Figure 6 shows the famous SSF (select star from) snippet.

Figure 6: Select star from

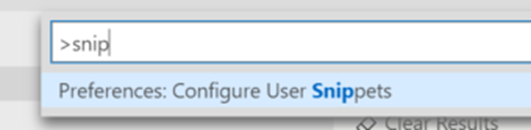
Snippets are great for things that you type often, like the team’s official comment section for procs. To see the available snippets, go to the command pallet and search for Preferences: Configure User Snippets as shown in Figure 7.

Figure 7: Configure user snippets

You’ll be able to see your custom snippet list and create your own.

Conclusion

SQL Prompt is a popular tool that has worked in SSMS and Visual Studio to save you time writing T-SQL code. Now, there is a preview of SQL Prompt that runs in Azure Data Studio, and you get these features in both query windows and notebooks!


The post Using Azure Data Studio with SQL Prompt appeared first on Simple Talk.


from Simple Talk https://ift.tt/2Mqwx0W
via

Wednesday, June 3, 2020

OAuth 2.0 with GitHub in ASP.NET Core

OAuth2 has been a buzz word for a long time. The protocol proves itself when authentication features are demystified, and a common implementation is simply provided for dozens of different languages, platforms, and frameworks.

It was born under the perspective that, just like everything else in the distributed world, authentication and authorization processes also need to be distributed. For OAuth2, specifically, you always get an OAuth client and a server. The server provides tokens and the other protocol mechanisms.

Within the .NET universe, there’s a bunch of libraries that you can use. Options are available out there, but regardless of your choice, it is important to understand first how OAuth 2.0 works.

Because it’s big, a deep understanding is not necessary (unless you work specifically with rough APIs that require a lot of standardization). However, it does not absolve you from the basics.

This tutorial will dive into the implementation of a simple integration between GitHub and ASP.NET Core. It will make use of Octokit (a GitHub API client library for .NET) to retrieve information from your personal GitHub account after authenticating and authorizing a GitHub application (to be created).

What about OAuth2?

OAuth2 is all about clients (also known as consumers) and servers (more specifically, service providers). The client application knows the server endpoints to call for tokens. These tokens that usually have an expiration time are essential to prove that the same client is whom it says it is when it tries to access other sensitive endpoints of the API.

Every time a new request arrives, the request must have the returned token with it; otherwise, the resource is going to be denied.

The service provider, as you may have understood, is the one who generates the tokens (based on other flows, even third-party or proprietary validation flows) as well as authorizes the users.

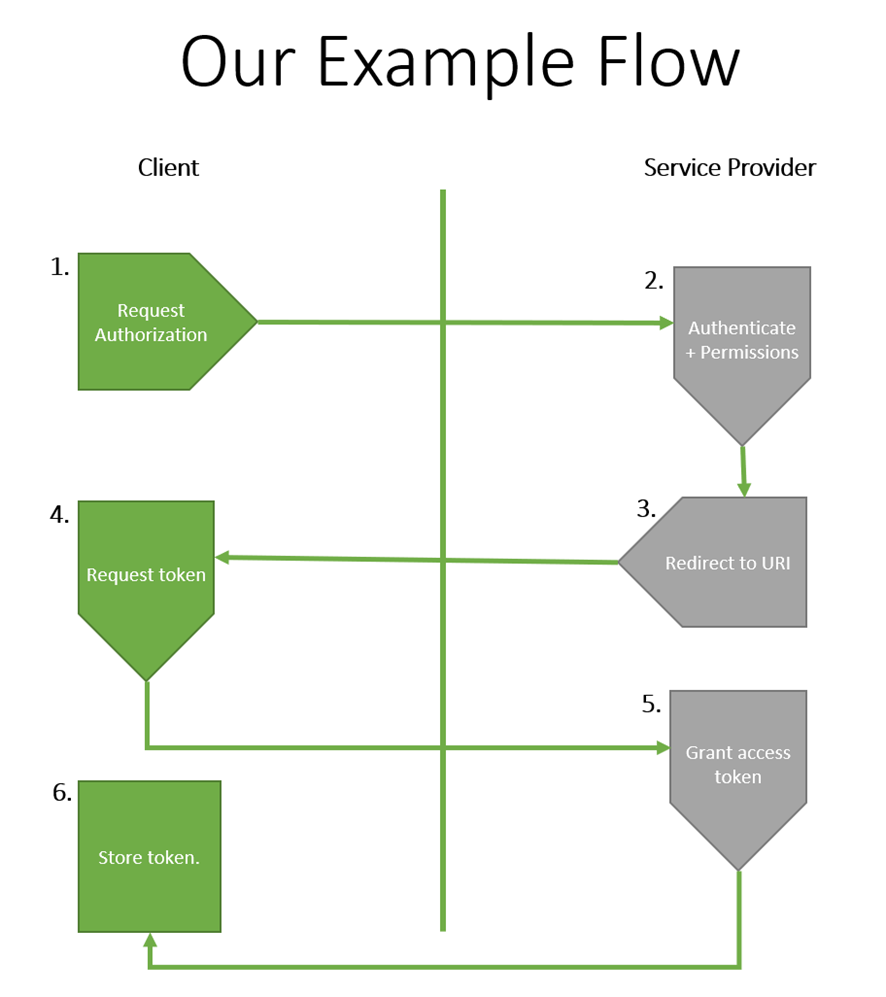
For this to work out, the service provider needs to port an application. The application is the mechanism that communicates with the user before to ensure that he/she has that proper access (through authentication, in this case, via login in your GitHub account). It usually needs only a name and a redirect URI that the provider will use to redirect after the authentication and authorization processes finish.

Figure 1. The OAuth2 flow of the GitHub example.

The flow divides into the following steps:

  1. First, after the GitHub application has been created, you make a request to GitHub service provider for the authorization. For this step to proceed, you’ll need to authenticate to your GitHub account.
  2. Once authenticated, you’ll be prompted to an authorization page in which you get to authorize the client to have access to your GitHub information through the application you’ve created.
  3. If authorized, the user will be redirected to the redirect URI informed previously in the moment of the GitHub application creation. GitHub will also place a temporary access token for more urgent operations.
  4. However, you still need the permanent token, so you’ll need to request it from the server in a subsequent call.
  5. Now that the permanent access token is granted, you can make the other calls to the GitHub API to get the data you want.
  6. In this example, you won’t save this token anywhere, just in the application session, because it’s a test. It’s crucial to have your own database structure for production applications, safely constructed to store sensitive information like these integration tokens.

You can read more about how GitHub authorizes OAuth apps here.

The example project

Now that you have a better understanding of how OAuth2 will play its role in GitHub integration, it’s time to move on to the implementation. (You can find the source code here.)

Please make sure you have the latest updated version of Visual Studio (the Community Edition is fine). No extra workloads are needed for this example, except for ASP.NET and web development. Check out this link if you don’t have it yet.

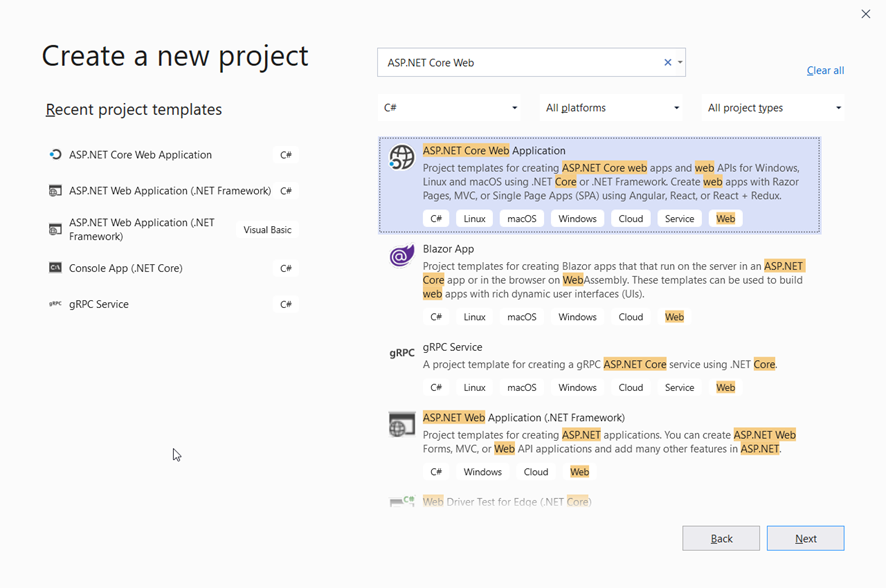
Now, open Visual Studio and go to the Create a new project option. Then, search for ASP.NET Core Web and select the C# implementation option (not Visual Basic), like in Figure 2.

Tela de computador com texto preto sobre fundo branco Descrição gerada automaticamente

Figure 2. Creating a new ASP.NET Core Web application.

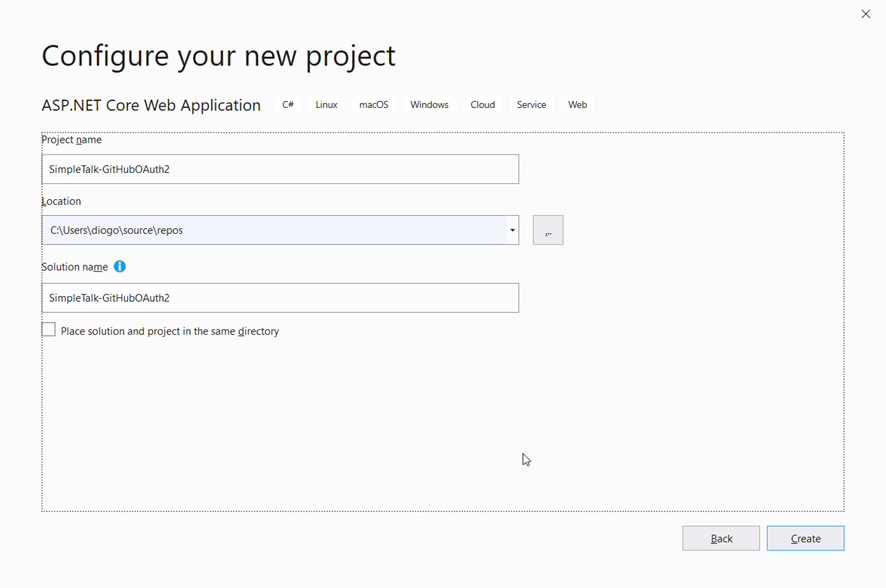
Click Next. Then, type the name of the project like in Figure 3. Select the folder of your preference and click Create.

Tela de celular com texto preto sobre fundo branco Descrição gerada automaticamente

Figure 3. Giving the project a name.

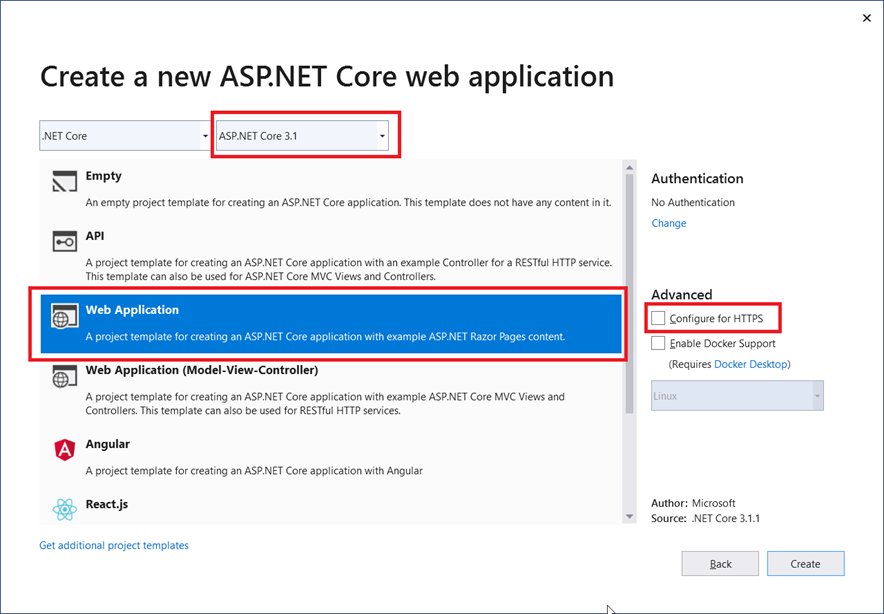
For the next screen, select the option Web Application since you’re going to create a simple web application with Bootstrap and Razor Pages for simplicity. Check that your ASP.NET Core version is 3.1 or higher. The example in this article won’t work in older versions. Make sure to deselect the Configure for HTTPS option too.

Figure 4. Selecting the project template.

Click Create. Go ahead and look at the generated files. If you’re not familiar with Razor, I suggest that you read this.

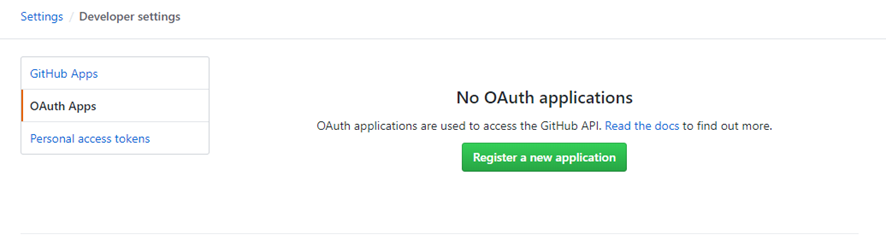
Before proceeding with the ASP.NET implementation, you must create the GitHub application. For this, login to your GitHub account and access the Developer Settings page.

Tela de celular com texto preto sobre fundo branco Descrição gerada automaticamente

Figure 5. GitHub Developer Settings page.

Then, with the OAuth Apps option selected, click the Register a new application button.

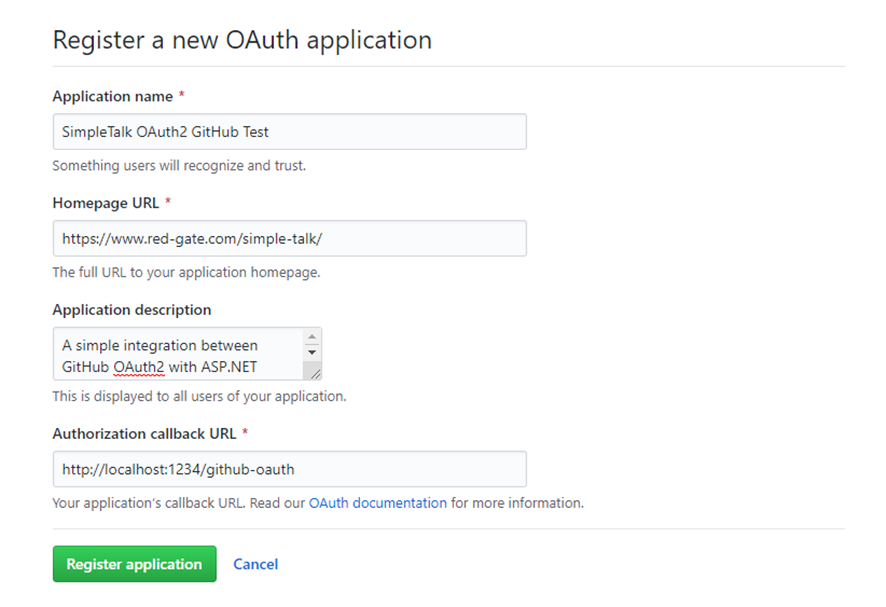
Fill in the fields with the same data shown in Figure 6 below and click Register application.

Tela de celular com texto preto sobre fundo branco Descrição gerada automaticamente

Figure 6. Creating a new GitHub application.

Note that you’re filling the authorization callback URL with the value http://localhost:1234/github-oauth because you’re anticipating the port the ASP application will run in as well as the endpoint you’ll set up in the redirect API to receive the temporary token.

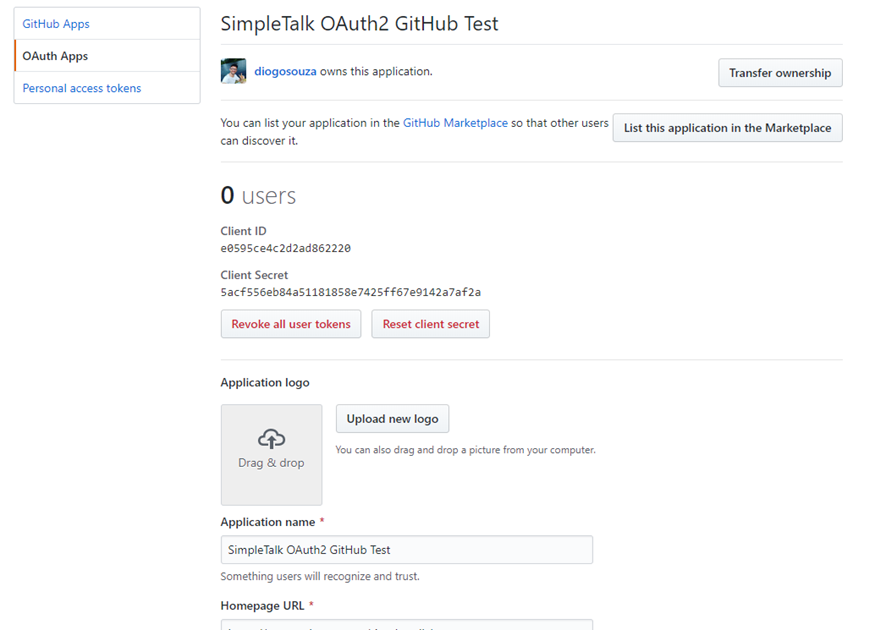
After that, you’ll be redirected to the following page:

Figure 7. GitHub test application in details.

Here, you have the client id and client secret that you’ll use to register the same application in the ASP.NET implementation. You can also customize the application logo, name, website URL and other relevant information at any time on this page.

Now to get back to the project. Before proceeding, you need to have the following NuGet dependencies installed:

Install-Package Newtonsoft.Json
Install-Package Octokit

For that, open the Package Manager Console (via Tools > NuGet Package Manager) and run the above commands.

The first necessary change is the port you’ve just defined in the GitHub application. For this, open the launchSettings.json file under the Properties folder and change the applicationUrl under the issSettings property to http://localhost:1234/.

Then, go to the appsettings.json file (in the root folder) and add the following:

"GitHub": {
    "ClientId": "e0595ce4c2d2ad862220",
    "ClientSecret": "5acf556eb84a51181858e7425ff67e9142a7af2a"
},

Make sure to change the values with yours. On to the code.

The most important part of the implementation will take place in the Startup class. Listing 1 shows how it should look like in its entirety.

Listing 1. Startup class code.

using System.Net.Http;
using System.Net.Http.Headers;
using System.Security.Claims;
using System.Text.Json;
using Microsoft.AspNetCore.Authentication;
using Microsoft.AspNetCore.Authentication.Cookies;
using Microsoft.AspNetCore.Authentication.OAuth;
using Microsoft.AspNetCore.Builder;
using Microsoft.AspNetCore.Hosting;
using Microsoft.AspNetCore.Http;
using Microsoft.Extensions.Configuration;
using Microsoft.Extensions.DependencyInjection;
using Microsoft.Extensions.Hosting;
using Newtonsoft.Json.Linq;
namespace SimpleTalk_GitHubOAuth2
{
    public class Startup
    {
        public Startup(IConfiguration configuration)
        {
            Configuration = configuration;
        }
        public IConfiguration Configuration { get; }
        // This method gets called by the runtime. Use this method to add services to the container.
        public void ConfigureServices(IServiceCollection services)
        {
            services.AddRazorPages();
            services.AddAuthentication(options =>
            {
                options.DefaultAuthenticateScheme = CookieAuthenticationDefaults.AuthenticationScheme;
                options.DefaultSignInScheme = CookieAuthenticationDefaults.AuthenticationScheme;
                options.DefaultChallengeScheme = "GitHub";
            })
               .AddCookie()
               .AddOAuth("GitHub", options =>
               {
                   options.ClientId = Configuration["GitHub:ClientId"];
                   options.ClientSecret = Configuration["GitHub:ClientSecret"];
                   options.CallbackPath = new PathString("/github-oauth");
                   options.AuthorizationEndpoint = "https://github.com/login/oauth/authorize";
                   options.TokenEndpoint = "https://github.com/login/oauth/access_token";
                   options.UserInformationEndpoint = "https://api.github.com/user";
                   options.SaveTokens = true;
                   options.ClaimActions.MapJsonKey(ClaimTypes.NameIdentifier, "id");
                   options.ClaimActions.MapJsonKey(ClaimTypes.Name, "name");
                   options.ClaimActions.MapJsonKey("urn:github:login", "login");
                   options.ClaimActions.MapJsonKey("urn:github:url", "html_url");
                   options.ClaimActions.MapJsonKey("urn:github:avatar", "avatar_url");
                   options.Events = new OAuthEvents
                   {
                       OnCreatingTicket = async context =>
                       {
                           var request = new HttpRequestMessage(HttpMethod.Get, context.Options.UserInformationEndpoint);
                           request.Headers.Accept.Add(new MediaTypeWithQualityHeaderValue("application/json"));
                           request.Headers.Authorization = new AuthenticationHeaderValue("Bearer", context.AccessToken);
                           var response = await context.Backchannel.SendAsync(request, HttpCompletionOption.ResponseHeadersRead, context.HttpContext.RequestAborted);
                           response.EnsureSuccessStatusCode();
                           var json = JsonDocument.Parse(await response.Content.ReadAsStringAsync());
                           context.RunClaimActions(json.RootElement);
                       }
                   };
               });
        }
        // This method gets called by the runtime. Use this method to configure the HTTP request pipeline.
        public void Configure(IApplicationBuilder app, IWebHostEnvironment env)
        {
            if (env.IsDevelopment())
            {
                app.UseDeveloperExceptionPage();
            }
            else
            {
                app.UseExceptionHandler("/Error");
            }
            app.UseStaticFiles();
            app.UseRouting();
            app.UseAuthentication();
            app.UseEndpoints(endpoints =>
            {
                endpoints.MapControllers();
                endpoints.MapRazorPages();
                endpoints.MapControllerRoute(
                    name: "default",
                    pattern: "{controller}/{action=Index}/{id?}");
            });
        }
    }
}

Because it is a bit long, it’s broken up in sections so you can understand it better. The implementation will make use of the paradigms and patterns adopted by David McCullough on his excellent article about the demystifying of ASP.NET Auth System. Please, give it a read before proceeding since it explains each part of the ASP.NET Auth system like Identities, claims, verbs, handlers and more in detail.

  • The method ConfigureServices() received most of the changes. Here, you’re setting up the AddAuthentication() method to override the defaults and make GitHub scheme the new default one.
  • The authentication handler will be cookies. When you open the index page for the first time, depending on the ASP.NET Core version you’re using, it’s common to see the message that the website is making use of cookies. In other words, every time the full authentication process with GitHub finishes, the result is going to be stored in a cookie (see the further call to AddCookie() method).
  • Then, you provide the implementation for the OAuth scheme GitHub. Note that it has the same name you gave to the default scheme before. They need to be the same. Regarding the implementation of this OAuth provider, you’ve seen already that the client id, secret and redirect path must be supplied. They come from the settings in the json file.
  • Next, provide the endpoints where the provider will search for the auth, token and user information.
  • The option SaveTokens is important because it guarantees that the tokens will be stored after each request finishes.
  • The auth handler also needs the claim actions to understand which information must be injected. Those claims are the only ones explored here, but feel free to test more.
  • Finally, in the Configure() method, you need to remove the use of authorization (not needed) and add the use of authentication, along with the UseEndpoints() to map controllers and Razor pages, as well as the routes.

As you can see, this example makes use of the famous pattern for controllers and actions: {controller}/{action=Index}/{id?}.

Now create the first controller so you can see more clearly how this pattern applies. For this, create a new folder called Controllers in the root of the project. Then, create a new controller by selecting the Add > Controller > MVC Controller – Empty option, giving it a name (AuthController) and clicking Add. Then, change its content to the following:

using Microsoft.AspNetCore.Authentication;
using Microsoft.AspNetCore.Mvc;
namespace SimpleTalk_GitHubOAuth2.Controllers
{
    [Route("[controller]/[action]")]
    public class AuthController : Controller
    {
        [HttpGet]
        public IActionResult Login(string returnUrl = "/")
        {
            return Challenge(new AuthenticationProperties() { RedirectUri = returnUrl });
        }
    }
}

The controller reads the exact metadata information about the class and HTTP method, respectively. That means the names here are important, otherwise the Razor pages won’t find the right route to it.

Next, change the Index.cshtml content, which is located under the Pages folder. Take a look at Listing 2 for the new HTML code to place there.

Listing 2. Index.cshtml code.

@page
@model IndexModel
@{
    ViewData["Title"] = "Home page";
}
    <div class="row">
        @if (!User.Identity.IsAuthenticated)
        {
            <a asp-action="Login" asp-controller="Auth" class="btn btn-outline-primary">Log In with GitHub</a>
        }
        else
        {
            <div id="accordion" class="container-fluid">
                <div class="card">
                    <div class="card-header" id="headingOne">
                        <h5 class="mb-0">
                            <button class="btn btn-link" data-toggle="collapse" data-target="#collapse-repos" aria-expanded="true" aria-controls="collapse-repos">
                                Repos
                            </button>
                        </h5>
                    </div>
                    <div id="collapse-repos" class="collapse show" aria-labelledby="headingOne" data-parent="#accordion">
                        <div class="card-body">
                            <ul>
                                @foreach (var repo in Model.Repositories)
                                {
                                    <li><a href="@repo.HtmlUrl">@repo.FullName</a></li>
                                }
                            </ul>
                        </div>
                    </div>
                </div>
                <div class="card">
                    <div class="card-header" id="headingTwo">
                        <h5 class="mb-0">
                            <button class="btn btn-link collapsed" data-toggle="collapse" data-target="#collapse-starred" aria-expanded="false" aria-controls="collapse-starred">
                                Starred Repositories
                            </button>
                        </h5>
                    </div>
                    <div id="collapse-starred" class="collapse" aria-labelledby="headingTwo" data-parent="#accordion">
                        <div class="card-body">
                            <ul>
                                @foreach (var repo in Model.StarredRepos)
                                {
                                    <li><a href="@repo.HtmlUrl">@repo.FullName</a></li>
                                }
                            </ul>
                        </div>
                    </div>
                </div>
                <div class="card">
                    <div class="card-header" id="headingThree">
                        <h5 class="mb-0">
                            <button class="btn btn-link collapsed" data-toggle="collapse" data-target="#collapse-followers" aria-expanded="false" aria-controls="collapse-followers">
                                Followers
                            </button>
                        </h5>
                    </div>
                    <div id="collapse-followers" class="collapse" aria-labelledby="headingThree" data-parent="#accordion">
                        <div class="card-body">
                            <ul>
                                @foreach (var follower in Model.Followers)
                                {
                                    <li><a href="@follower.HtmlUrl">@follower.Login</a></li>
                                }
                            </ul>
                        </div>
                    </div>
                </div>
                <div class="card">
                    <div class="card-header" id="headingFour">
                        <h5 class="mb-0">
                            <button class="btn btn-link collapsed" data-toggle="collapse" data-target="#collapse-following" aria-expanded="false" aria-controls="collapse-following">
                                Following
                            </button>
                        </h5>
                    </div>
                    <div id="collapse-following" class="collapse" aria-labelledby="headingFour" data-parent="#accordion">
                        <div class="card-body">
                            <ul>
                                @foreach (var follower in Model.Followers)
                                {
                                    <li><a href="@follower.HtmlUrl">@follower.Login</a></li>
                                }
                            </ul>
                        </div>
                    </div>
                </div>
            </div>
        }
    </div>

This example uses the index model because it’s already created, but feel free to add new models by your preference. Here, it’s using a Bootstrap accordion to display several data about the logged in GitHub account.

If the user is not authenticated, it shows the login button. Otherwise, it displays the listing.

You’ll basically list the repositories, the followers and following users and starred repositories. All of them in a <ul> HTML list as bullets. All the values, in turn, come from the model itself, i.e., from the Index.cshtml.cs class. Open it and replace its content with the code in Listing 3.

Listing 3. Index.cshtml.cs code.

using System.Collections.Generic;
using System.Security.Claims;
using System.Threading.Tasks;
using Microsoft.AspNetCore.Authentication;
using Microsoft.AspNetCore.Mvc.RazorPages;
using Octokit;
using Octokit.Internal;
namespace SimpleTalk_GitHubOAuth2.Pages
{
    public class IndexModel : PageModel
    {
        public IReadOnlyList<Repository> Repositories { get; set; }
        public IReadOnlyList<Repository> StarredRepos { get; set; }
        public IReadOnlyList<User> Followers { get; set; }
        public IReadOnlyList<User> Following { get; set; }
        public async Task OnGetAsync()
        {
            if (User.Identity.IsAuthenticated)
            {
                string accessToken = await HttpContext.GetTokenAsync("access_token");
                var github = new GitHubClient(new ProductHeaderValue("AspNetCoreGitHubAuth"), new InMemoryCredentialStore(new Credentials(accessToken)));
                Repositories = await github.Repository.GetAllForCurrent();
                StarredRepos = await github.Activity.Starring.GetAllForCurrent();
                Followers = await github.User.Followers.GetAllForCurrent();
                Following = await github.User.Followers.GetAllFollowingForCurrent();
            }
        }
    }
}

Here is the model data to display the information in the cshtml page. The GitHubClient class receives the generated access token as parameter to create the credential store and, in turn, returns the github object, which you’re using right below to access the GitHub account info.

All the operations are async; that’s why you need to await them to finish. Go ahead and check for the other objects and methods available. You’ll see that there are options for viewing your pull requests, comments and likes, and much more. This is the power of Octokit.

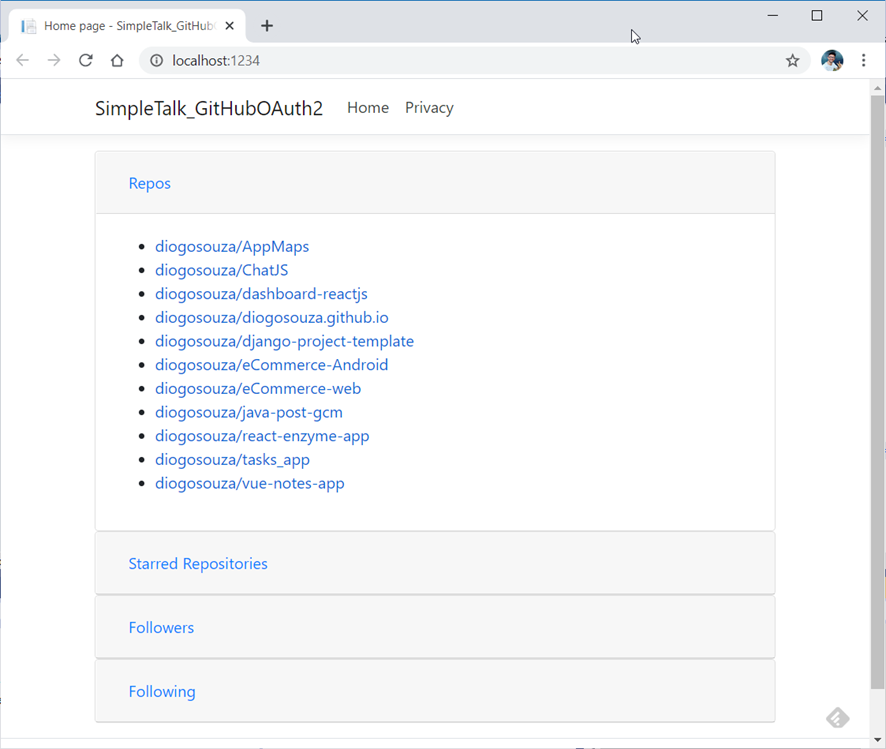
Now to test it. For this, run the application and, once it’s finished, it opens the following browser page:

Figure 8. Index page.

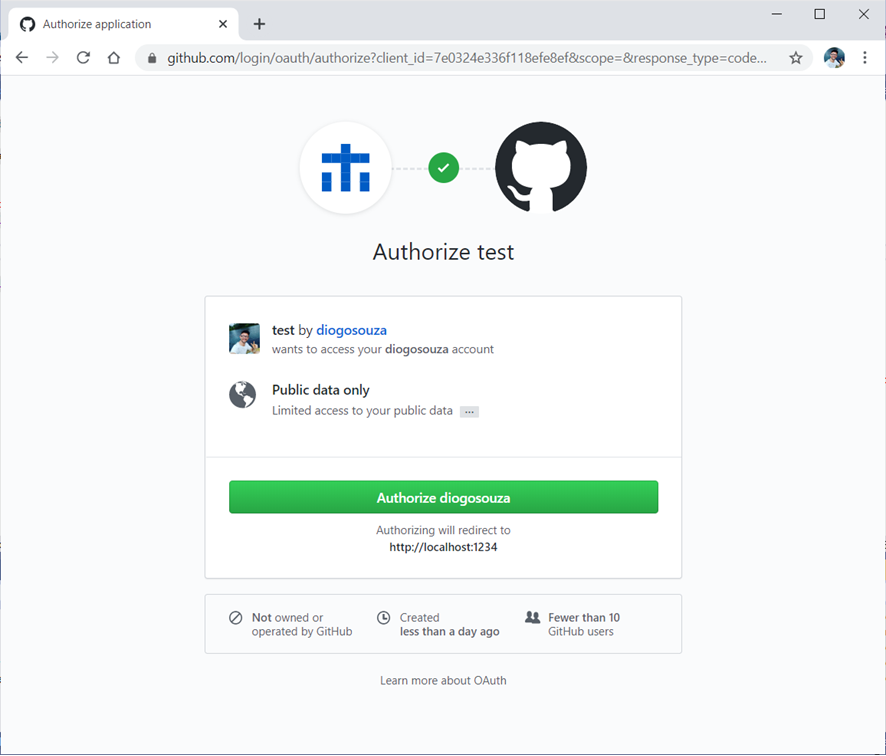
When you click the Login button, you’ll be redirected to the GitHub official authorization web page, like in Figure 9. Then, click the Authorize {user} button and you’ll be redirected to the application again.

Figure 9. Authorizing the user in GitHub.

Figure 10 shows how the redirected page will look. You can switch from one accordion tab to another to check the list of data along with the respective URL links to each one.

Figure 10. List of repositories, followers, following and starred repos

Conclusion

That’s it. Simple, isn’t it? Be aware that the configurations change a bit depending on the version of ASP.NET Core you’re using. This article uses version 3.1. For older versions of this integration, you’ll need different Razor config settings. When it comes to integrating it with ASP.NET MVC, you’ll need a different setup for the Startup class as well, so be careful when playing with them.

I’d strongly recommend that you read the official Octokit and GitHub OAuth documentation. Octokit, in particular , comes in many flavors: JavaScript, Ruby, Java, Python, etc. It’s a mature and well-supported library. It’s also very useful, especially if you’re connecting many applications (clients and servers) from different languages.


The post OAuth 2.0 with GitHub in ASP.NET Core appeared first on Simple Talk.


from Simple Talk https://ift.tt/2Aw9ZsP
via

Tuesday, June 2, 2020

Too Much Stuff

We’ve lived in our current home for 30 years and have managed to accumulate a lot of possessions. We have closets, drawers, cabinets and a storage shed filled with things, many of which we don’t remember buying or receiving in the first place.

I haven’t quite gotten into the Marie Kondo way of organizing yet, but I have made an effort to cut down on some of these items. For example, I have eliminated two-thirds of the physical books in my office, but I haven’t touched books stored in other areas. There you will find forty-year-old college textbooks and hundreds of sci-fi paper backs. OK, the sci-fi books are great and worth keeping.

We had a sewing machine sitting unused for over 20 years. I’m not sure if I ever used it, but my husband would not let me give it away. Finally, our daughter-in-law’s sewing machine broke, and he agreed to let her “borrow” it to make surgical masks. I’m hoping that she will need to “borrow” it for many years and maybe just keep it.

After speaking at so many events over the years, I now refuse to accept a speaker shirt. I have at least 20 nice ones in my closet after throwing away all the t-shirts. People always say, wear them while gardening – which I don’t do – but even then, there are only so many that I can use. In fact, I wear tech shirts almost every day since I work from home. These shirts are indestructible, and I could probably wear them for the rest of my life.

There is also swag from tech events. You know, that “stuff we all get.” I typically make it home from PASS Summit each year with less than I take with me since I will often have some books to give away. I won’t not pick up much from the vendor booths unless there is something extremely useful like a laptop camera cover or a toy my grandchildren might like. Even then, I seem to have a lot of this junk swag sitting around.

Recently, a drawer in my desk broke. This drawer contained small computing odds and ends like cords and hard drives. I realized that I should take a look at all the storage devices and see what is on them before destroying the drives. Or maybe I should just destroy them without looking. Do I really need Power Point slides from 2010 or old copies of the SQL Server media? On the other hand, there might be some family photos that I shouldn’t throw away. Probably the best idea is to start up a movie and then watch it while I go through these files just in case there is something worthwhile.

The bad thing is that I not only have files on old hard drives, I also have Drop Box, OneDrive, and Google Drive. And then there are those 1,500+ unread emails in my Outlook.com inbox. No matter where I look, there is clutter, both physical and virtual.


The post Too Much Stuff appeared first on Simple Talk.


from Simple Talk https://ift.tt/3eGamjk
via