Tuesday, December 14, 2021

Azure Policies and Management Groups

When I first started speaking about cloud technologies over a decade ago, the most common question I heard was around just how secure the platform was. Security was top of mind for people when all of their data resided in data centers that they owned and maintained up to that point. Almost everyone that had access to their data worked directly for the company. They controlled where the data lived, who had access to it, and even who was running the networking cables the data traveled across. As cloud technologies advanced and became more mainstream, fewer questions came up about security. That doesn’t mean that people aren’t still concerned about security; it just means that there are many more answers to the questions and a good deal of options on how to secure your data. This article explains how Azure Policies and Management Groups can simplify Azure SQL security.

Features like Always Encrypted, Transparent Data Encryption (TDE) with optional customer-managed keys, private endpoints, and auditing are just a few of the many options available to secure data stored in Azure SQL Database and Azure SQL Managed Instance. Having the options is one thing, but ensuring they are used is another, especially when many databases are scattered across multiple subscriptions. Each organization must decide which options they are going to implement and then not only put them in place but also ensure that they aren’t circumvented or modified later. This is where tools in Azure such as Azure Policy and Management Groups come in handy.

What is Azure Policy?

At its core, Azure Policies are defined rules that you create to enforce certain settings or configurations in your Azure deployed resources. You create a policy and then apply that policy to some scope, such as a subscription or resource group. The Azure Platform will enforce that policy against all resources within the assigned scope. Enforcement could mean that the Azure platform flags a resource that is not meeting the policy as non-compliant so that you can remediate the issue, or it could mean that the platform simply refuses to deploy a resource that doesn’t meet the policy. You have a lot of control over how the platform enforces your selected policies.

For Azure SQL Database and Azure SQL Managed Instance, there are a ton of scenarios where having policies to enforce your security approach will be extremely helpful. Some ideas are:

  • Restricting the physical locations that databases are stored in order to meet data sovereignty requirements or simply to limit where your databases are located. You can restrict your databases to only be created in specific Azure regions, for example.
  • Ensure that Private Endpoint connections are configured so that you don’t have a database accessible directly through the public endpoint.
  • Enforcing customer-managed keys for encrypting your data at rest if you choose to use that option.
  • Enforcing auditing to be turned on.
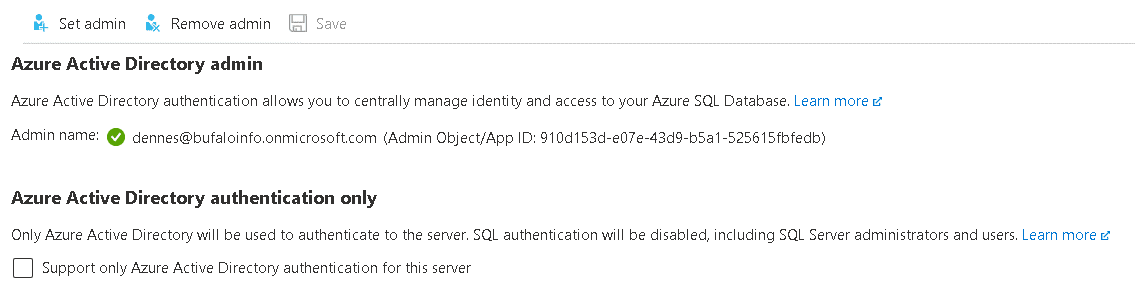
  • Enforcing that an Azure Active Directory administrator is assigned at the server level.

Essentially, almost anything that you can define as part of your deployment can be placed into a policy for the platform to enforce, or at least report when you have non-compliant databases.

Here is an example of a policy that ensures that an Azure Active Directory administrator is provisioned for Azure SQL Database servers. This particular policy is one that Microsoft provides as a built-in policy to choose from, which is why you see the policyType set to BuiltIn.

{
  "properties": {
    "displayName": "An Azure Active Directory administrator should be provisioned for SQL servers",
    "policyType": "BuiltIn",
    "mode": "Indexed",
    "description": "Audit provisioning of an Azure Active Directory administrator for your SQL server to enable Azure AD authentication. Azure AD authentication enables simplified permission management and centralized identity management of database users and other Microsoft services",
    "metadata": {
      "version": "1.0.0",
      "category": "SQL"
    },
    "parameters": {
      "effect": {
        "type": "String",
        "metadata": {
          "displayName": "Effect",
          "description": "Enable or disable the execution of the policy"
        },
        "allowedValues": [
          "AuditIfNotExists",
          "Disabled"
        ],
        "defaultValue": "AuditIfNotExists"
      }
    },
    "policyRule": {
      "if": {
        "field": "type",
        "equals": "Microsoft.Sql/servers"
      },
      "then": {
        "effect": "[parameters('effect')]",
        "details": {
          "type": "Microsoft.Sql/servers/administrators"
        }
      }
    }
  },
  "id": "/providers/Microsoft.Authorization/policyDefinitions/1f314764-cb73-4fc9-b863-8eca98ac36e9",
  "type": "Microsoft.Authorization/policyDefinitions",
  "name": "1f314764-cb73-4fc9-b863-8eca98ac36e9"
}

A policy is made up of some metadata, parameters, and then the actual rule. In this example, the rule is checking to see if the settings for Microsoft.Sql/servers/administrators are set on any resource that is of type Microsoft.Sql/servers. The policy provides a parameter named effect. When you apply the policy to a scope, you can supply a value for the parameter to indicate how the system should respond if the administrator settings are provided or not. The options for the parameter in this policy are constrained by allowedValues and are defined as either Disabled (which means no action is taken) or AuditIfNotExists (which means the resource will be flagged as non-compliant). By providing you the ability to set the parameter in this way, you can toggle the action of this policy to be enforced or not without having to remove the policy entirely from a scope if you need to turn it off for a short time.

Here is a screenshot from the Azure Portal showing a database that is non-compliant with the defined policy above. Note that the deployed system has two Azure SQL Servers, but only one of them has Azure Active Directory Administrators assigned, which is why you see a 50% compliance. The screen is currently filtered to only show you the non-compliant resources.
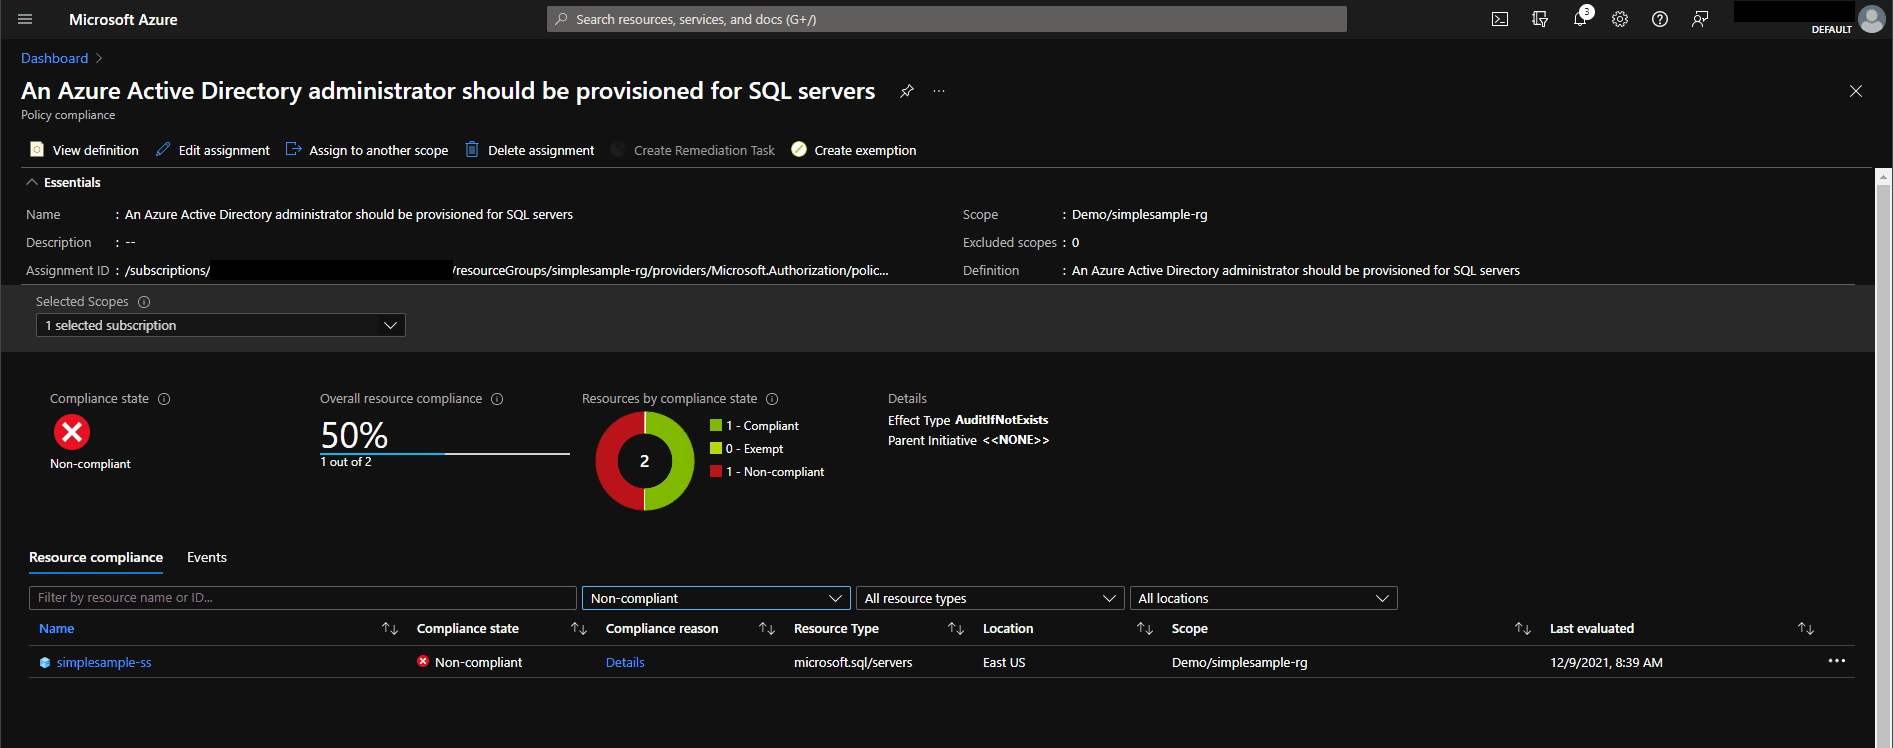
Image showing the results of an Azure policy. One database is violating the policy.
Image: Azure Portal showing non-compliant resources for defined policies

To learn more about Azure Policy, including how to create your own, check out the documentation provided by Microsoft. The documentation details how to create policies, deploy them, and monitor the compliance status.

You can end up with many different policies defined to create the rules you want to be enforced in your organization. To help organize these policies, you can create a collection of policies into what is known as an Initiative (also called a policySet). By grouping policies into an initiative, you can simplify the assignment and administration of your chosen rules. Like with a single policy, you can assign an initiative to a scope, and then all rules assigned to that initiative will be enforced across that scope.

What are Management Groups?

A management group is a mechanism for organizing your Azure subscriptions. Each management group can contain zero or more Azure Subscriptions, and the management groups can be hierarchical so that you can nest management groups within other management groups. Management Groups allow you to create a collection of subscriptions that can then be managed in a like manner without having to go to each subscription. For example, you can assign role-based access control permissions at a management group level, and all subscriptions beneath that group will inherit those permissions.

By default, there is an implicit root management group on all Azure Active Directory tenants. You can then add new management groups, including nesting them, under the root in order to organize your subscriptions in a manner that makes sense for your company. This capability lets you group subscriptions by deployment environment (like dev, test, or production), region, department, or something completely bespoke to meet your needs. A subscription can only belong to one management group at a time. However, remember that you can nest the management groups.

Management Groups can be a selected scope for Azure Policies and Initiatives which means you can assign a policy in one place, such as the root management group, and ensure that it is implemented across all your subscriptions. You can also have policies assigned at specific levels in your management group hierarchy so that the rules are only applied to subscriptions within that management group and down the hierarchy from there.

There is a lot of power in using management groups. If you are not familiar with them, you can read more in the Microsoft documentation. You can find tutorials and more in the docs, as well as some guidance on organizing your management groups effectively in the Cloud Adoption Framework articles.

Putting Azure Policy into action

Much like any project you work on, the first step in getting a handle on your security and governance is to gather requirements. If your organization does not currently have any rules around securing your data, then now is the time to sit down and get them defined. If you already have rules but are doing manual enforcement, now is the time to look at what you can automate using Azure Policy and Management Groups. Since you can have a policy around almost any aspect of a deployment, the possibilities are nearly endless, and it may take some time to determine what all makes sense for you to put into place.

In addition to defining the policies and initiatives you will enforce, you will also need to decide how they will be applied to your subscriptions. If you weren’t already using Management Groups, you’d want to spend some time thinking through the organization of your subscriptions. This task can potentially be trickier than it sounds and not always straightforward. You may find that some subscriptions are easily grouped while others are outliers that need special consideration.

As you are gathering your plans, here are some suggestions that you may wish to take into consideration:

  • Different environments, such as development, test, preview, or production, may have other policy requirements, so use subscriptions to help mitigate this. You could also use tags if you need to mix environments within a subscription; however, if you do this, you need to enforce the use of tags of specific values. It is also suggested to enforce the use of a default tag to have the most stringent policy for fail-safe so that any resources deployed without specific tags defined end up being locked down the hardest until someone makes a conscious decision on what should be applied to it.
  • Make sure to source control your policies and automate them as much as possible. Look at tools such as scripts using the PowerShell Az module, Azure CLI, terraform, or ARM.
  • Document your policies to detail why each one is required and at what scopes. Documentation is beneficial if you are a Software-as-a-Service (SaaS) provider to answer security questions from your customers who will want to know how their data is being handled.
  • While Azure Policy is powerful, not all things can be completely enforced via policy. For example, Azure SQL Firewall rules or SQL logins are defined within the databases themselves and not as metadata about the resources. Therefore, they can’t be monitored as part of a policy. For these scenarios, you may find that a script that does routine checks on these types of items will need to be put in place.
  • Define a procedure to perform periodic reviews on all non-compliant databases and remediate as necessary as part of your regular operations. Set aside time to do this routine so that it doesn’t get put off.
  • Management Groups can define a specific group as the default management group for new subscriptions. By default, it is the Root Management Group; however, that may not be the best place for new subscriptions depending on what policies you want in place at that level. Check out the documentation on how to set your default management group. When choosing where a new subscription will be placed, think about failing safe as it applies to what security you want on your databases automatically without additional effort.
  • Don’t wait until you have all possible policies you want to enforce defined before getting them applied. Once you have one or two policies that you know you’ll want to enforce, go ahead and get them implemented. This will allow you to work through your process of managing your policies and initiatives while the number of policies is small.
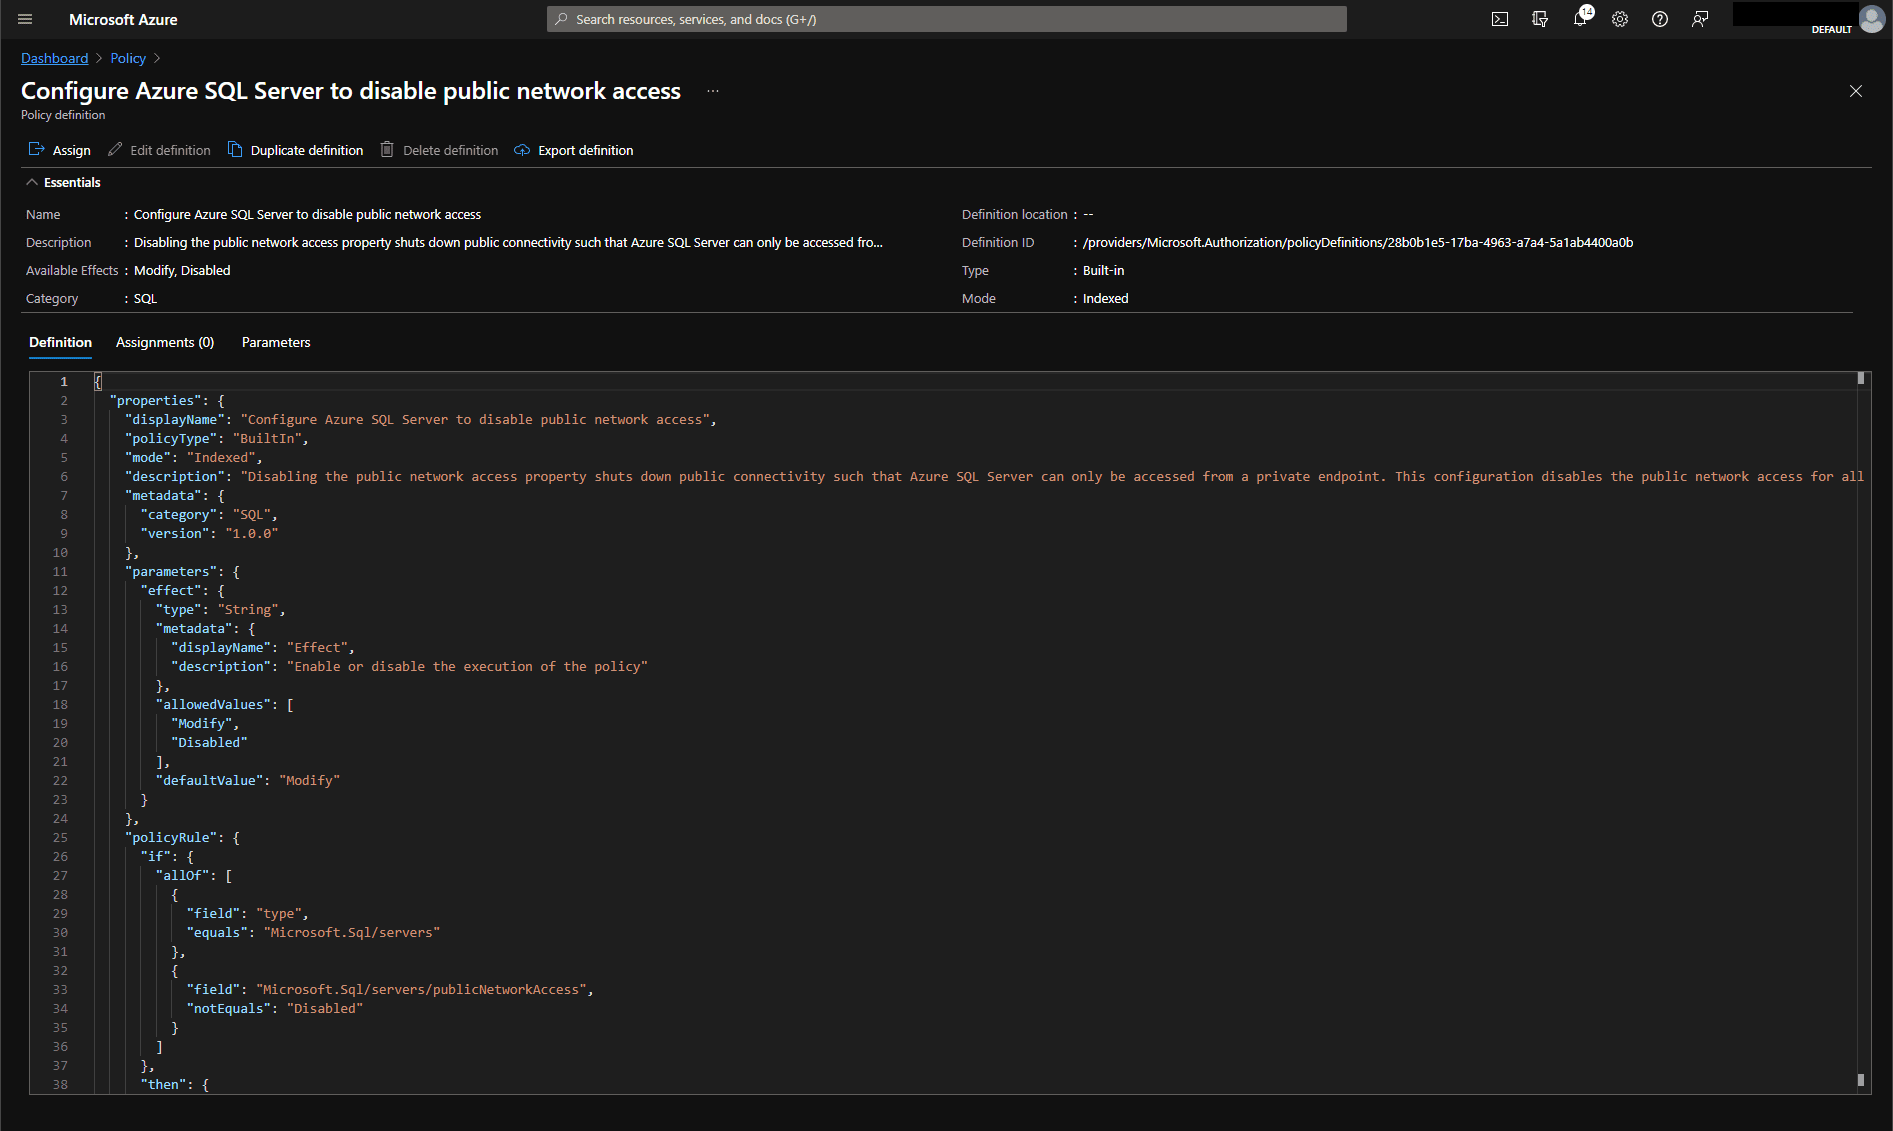
  • Microsoft has created a lot of Azure Policy definitions for specific compliance standards policies, which can easily be pulled into your own initiatives. You can find a list of specific compliance standards (such as FedRAMP, HIPAA, NIST, and more ) in their documentation, along with links to Azure Policies defined on GitHub to use. They also have an Azure Security Benchmark built-in initiative you can use as a baseline if you wish. These built-in initiatives would be a great place to start, especially if there is a specific compliance standard you need to follow and there is already a policy defined.
    Image showing the configuration page of an Azure policy. The JSON is available on the page.
    Image: Azure Portal showing the configuration for a built-in policy for ensuring Azure SQL Servers have disabled public access
Azure Policy and Management Groups

Using Azure Policies and Management Groups can help you get a good handle on the security of your data. You may still need to provide additional measures, but these tools will help you automate the enforcement of rules you define and provide a baseline level of security and compliance for all of your Azure SQL Databases and Azure SQL Managed Instances.

If you liked this article, you might also like Performance of querying blob storage with SQL – Simple Talk (red-gate.com).

The post Azure Policies and Management Groups appeared first on Simple Talk.


from Simple Talk https://ift.tt/3q0hJto
via

Monday, December 13, 2021

Linking a Virtual Machine with Azure Active Directory

Microsoft included in the provisioning process of a Virtual Machine the possibility to create a link between a virtual machine and the Azure Active Directory. This happened some time ago.

This was a great improvement in security and management. Instead of having an isolated user management for each virtual machine, the login on the virtual machines would be controlled by Azure Active Directory.

But what if, for some reason we miss the opportunity to join the virtual machine with active directory when it’s being provisioned? How could we join it to Azure AD after it’s already created?

There is a set of configurations needed to use Azure Ad login in a Virtual Machine:

  • Install the Azure Ad Login Extension
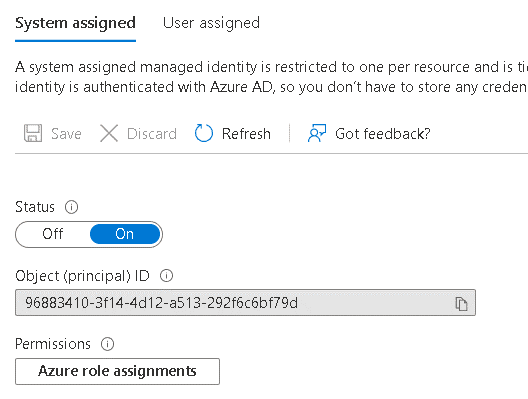
  • Enable a Managed Identity
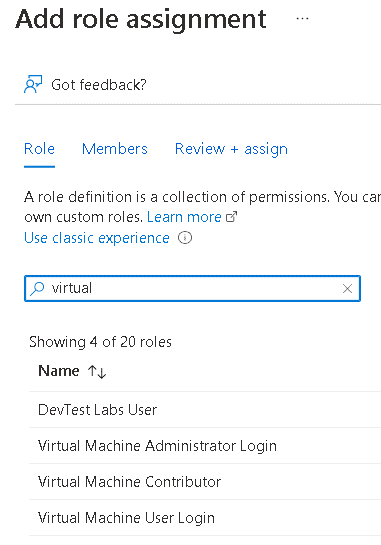
  • Define the RBAC permissions
  • Register the source machine with Azure Ad

Install the Azure Ad Login Extension

On the portal, you can use the Extensions left menu item to install this extension. It’s very straightforward, no special configuration needed during the installation.

  1. Open the virtual machine page in Azure Portal
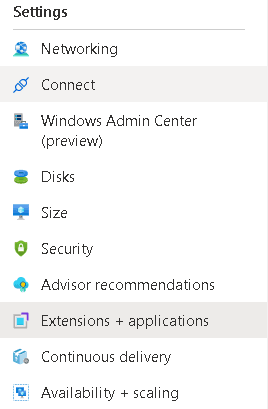
  2. Click Extensions + Applications on the left menu


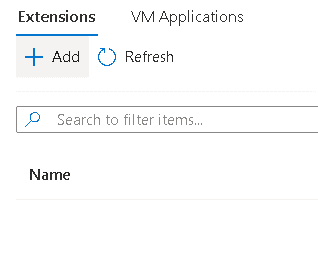
  1. Click the Add button

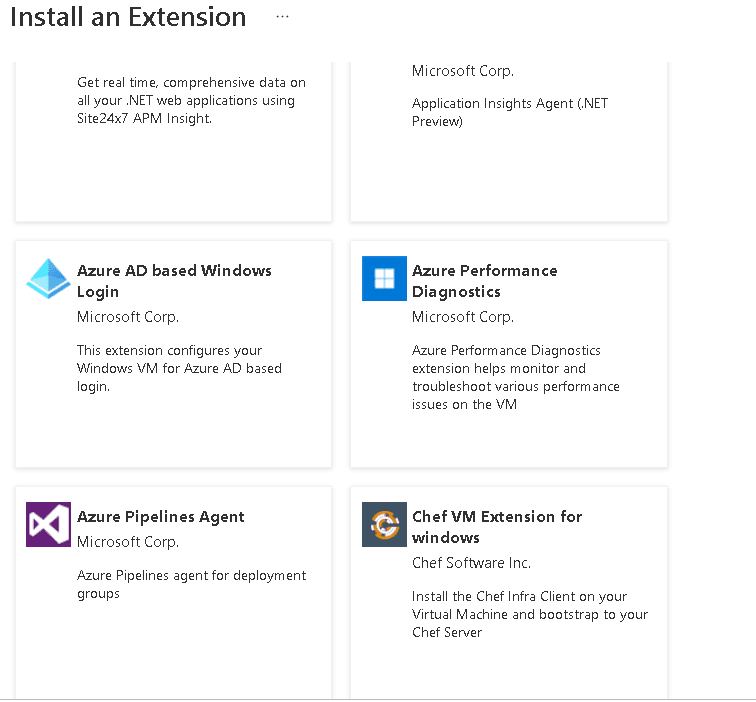
  1. Select Azure Ad based Windows Login

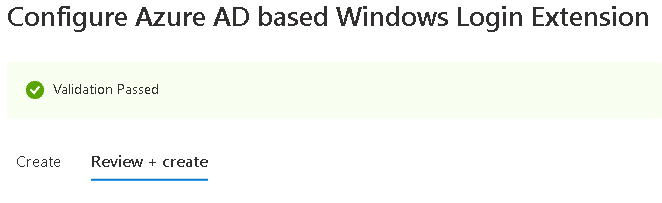
  1. Click the Review + Create button
  2. Click the Create button

Enable a Managed Identity

The Virtual Machine needs a Managed Identity. You need to enable it

  1. Open the virtual machine page in Azure Portal
  2. On the left menu, under Settings, select Identity
  3. Turn the System assigned identity On

Define RBAC permissions

The Virtual Machine has RBAC roles to define the administrators and regular users for it.

You need to add the users to these roles before trying the login. I recommend to use Azure Ad groups. Because we may be talking about many users and many VMs to manage.


Register the source machine with Azure Ad

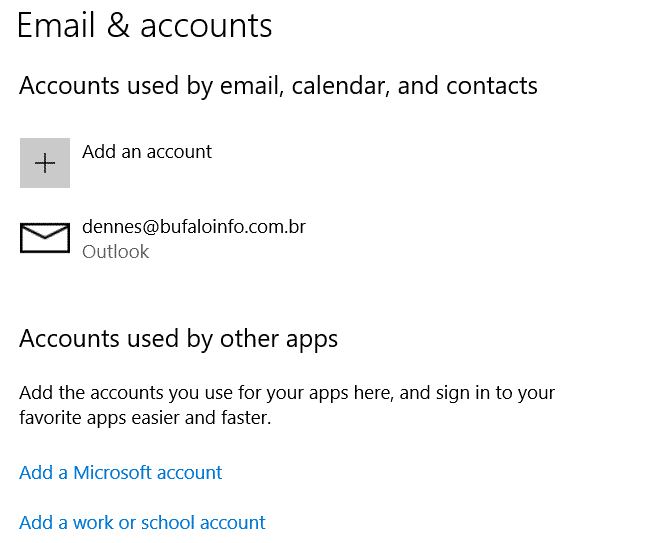
The login only works if the source machine is a registered device on Azure Ad.

You can register the source machine by using Accounts in the source machine. Once you add a work account from your Azure Ad, the machine will be registered in it.


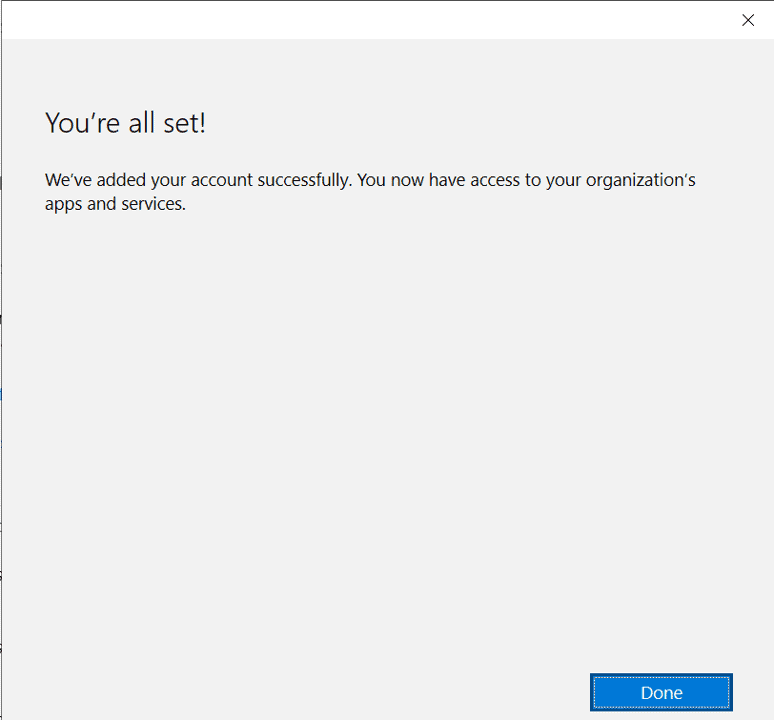
Once you made a login you will receive a successful registration message.


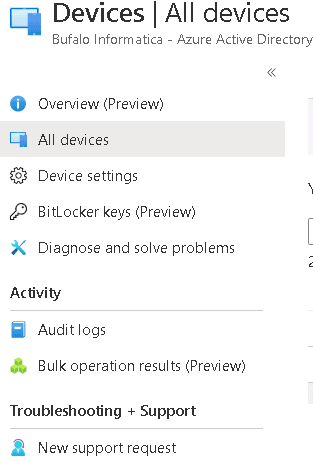
You can open Azure Active Directory in the portal and take a look on devices. Your machine should be there.


Login

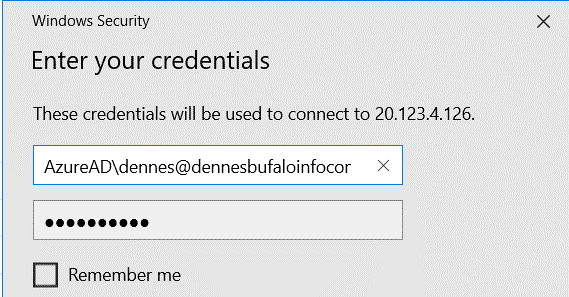
The login on the virtual machine requires a special syntax. You need to use AzureAD\<UserUPN> for the login. It will only work with native accounts from the Azure tenant. It will not work with external/guest accounts.


Summary

Integrating the Virtual Machines with Azure AD is a great way to manage virtual machine users in a large scale.

The post Linking a Virtual Machine with Azure Active Directory appeared first on Simple Talk.


from Simple Talk https://ift.tt/3IP4CUb
via
Monday, December 6, 2021

Azure SQL: Enforcing SQL Authentication type

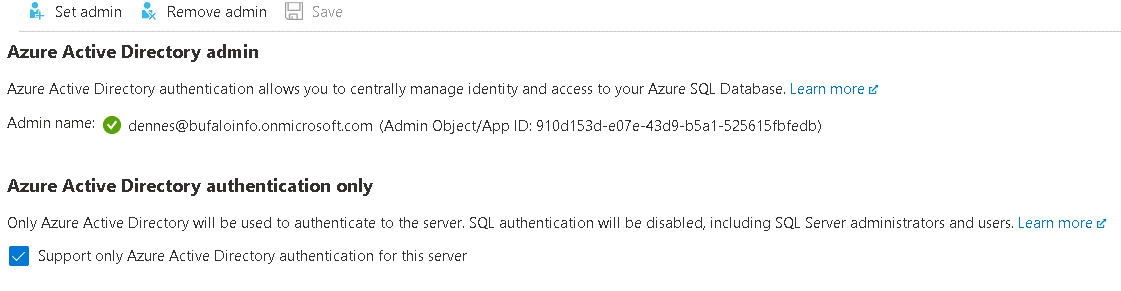
Some time ago I wrote a blog about the just released feature to allow only Azure Authentication in Azure SQL Databases.


On that blog, I explained not only about the feature, but how to use Azure Policies, a great feature for governance, to control which Azure SQL are correctly configured and which is not, even in a world-wide scenario.

From that time to today, a lot of things happened. The feature was in preview. The structure of the ARM template for this feature changed, making the policies I create not work anymore. After a while, Microsoft reverted the changes or something similar and the policies started work again. Now I can publish this new blog post.

The policy from the previous blog post can only to check if the Azure SQL is using Azure Authentication only or if it is accepting Azure SQL Authentication as well.

This time, let’s analyse a policy not only to check, but to change this configuration.

The policy is this one:

{
   "parameters":{
      
   },
   "policyRule":{
      "if":{
         "allOf":[
            {
               "field":"type",
               "equals":"Microsoft.Sql/servers"
            }
         ]
      },
      "then":{
         "effect":"deployIfNotExists",
         "details":{
            "type":"Microsoft.Sql/servers/azureADOnlyAuthentications",
            "roleDefinitionIds":[
               "/providers/Microsoft.Authorization/roleDefinitions/056cd41c-7e88-42e1-933e-88ba6a50c9c3",
               "/providers/Microsoft.Authorization/roleDefinitions/8e3af657-a8ff-443c-a75c-2fe8c4bcb635"
            ],
            "existenceCondition":{
               "allOf":[
                  {
                     "field":"Microsoft.Sql/servers/azureADOnlyAuthentications/azureADOnlyAuthentication",
                     "equals":true
                  }
               ]
            },
            "deployment":{
               "properties":{
                  "mode":"incremental",
                  "name":"Default",
                  "template":{
                     "$schema":"https://schema.management.azure.com/schemas/2015-01-01/deploymentTemplate.json#",
                     "contentVersion":"1.0.0.0",
                     "parameters":{
                        "fullServerName":{
                           "type":"string"
                        }
                     },
                     "resources":[
                        {
                           "name":"[concat(parameters('fullServerName'), '/Default')]",
                           "apiVersion":"2021-02-01-preview",
                           "type":"Microsoft.Sql/servers/azureADOnlyAuthentications",
                           "properties":{
                              "azureADOnlyAuthentication":true
                           }
                        }
                     ]
                  },
                  "parameters":{
                     "fullServerName":{
                        "value":"[field('name')]"
                     }
                  }
               }
            }
         }
      }
   }
}

There are some interesting points to analyse about this policy.

The Policy Effect: DeployIfNotExist

It’s using the effect called deployIfNotExist, it will generate a deployment in case the condition is not met

There is an existence criteria in the effect and it needs to be met. In this policy most of the checks are in the effect, not in the main If of the policy. The main If is only checking for the type of the object. The additional conditionals are under existenceCondition, a property of this effect.

The ExistenceCondition

The condition checks if Azure SQL Server accepts Azure AD Authentication only and if not, the effect executes a deployment.

Deployment

The deployment property,  another property of the deployIfNotExist effect, contains an ARM template. The deployment is incremental, this means the policy effect will only deploy the features or properties in the template, nothing else.

This policy is possible because the property to allow only Azure AD Authentication is in an isolated object, making it easy for a policy to deploy this object.

The object needs to be related to the server, that’s why the deployment has a parameter called fullServerName and we use this parameter as the name of the deployed object.

The parameter is filled with the expression [field(‘name’)] . This expression retrieves the name of the object the policy is evaluating, in this case, the Azure SQL Server.

Role Definitions

The policy will execute the deployment of the template. Any change in Azure objects, in our scenario, Azure SQL Servers, will trigger the policy check.

It’s not so simple. This triggers many questions.

  • Which identity will be used to make the deployment?
  • What permissions this identity has?
  • Will it be the same identity used everywhere?

We create and save the policy in an Azure hierarchy and we can assign it at any level below this hierarchy. Only the policy assignment can trigger the policy execution, if we have no assignment, we have no execution.

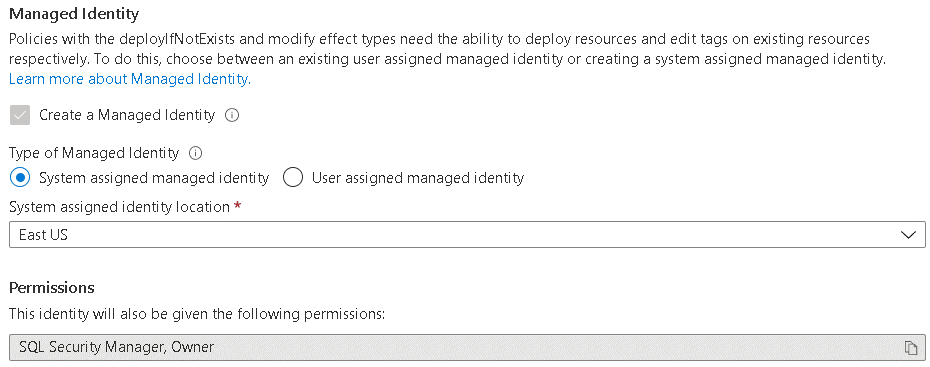
During the assignment, we create a link between the policy and one object, which can be a Resource Group, a Subscription or a Management Group. This assignment can, in some cases, also creates a managed identity. The created managed identity will need permission to execute the deployment required by the policy.

The permissions and the management identity creation are related: The management identity will be created when the permissions needed by the managed identity are included in the policy.


The roleDefinitionIds property has the permissions for the managed identity on the level of the object assigned to the policy (Resource Group, Subscription or Management Group).

Remediation Task

You can force the policy check at any moment using powershell. However, the fix of the problem will only be executed in two situations: Either when the object is created or if we create a Remediation Task.

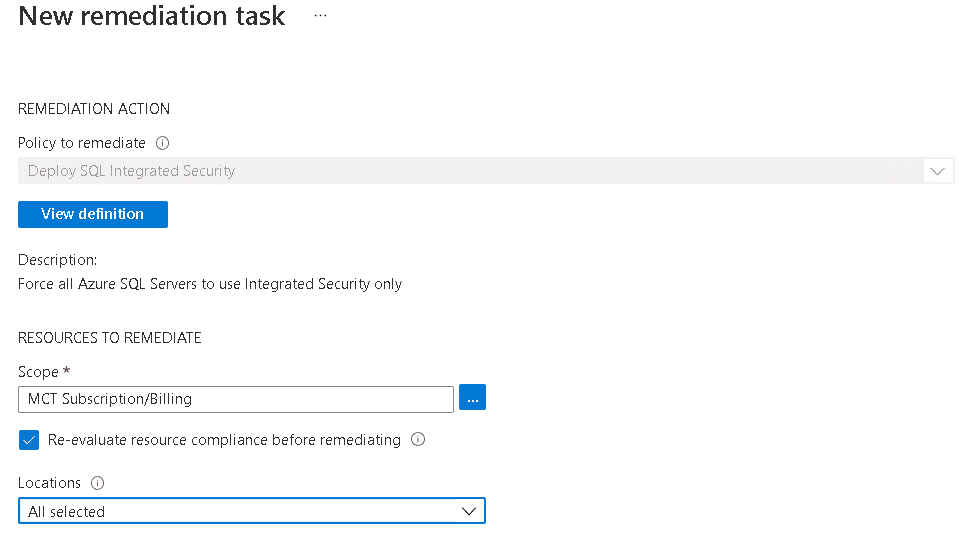
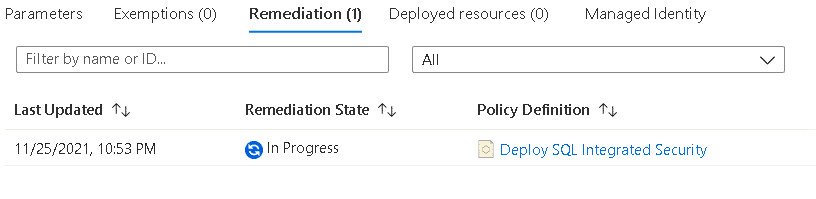
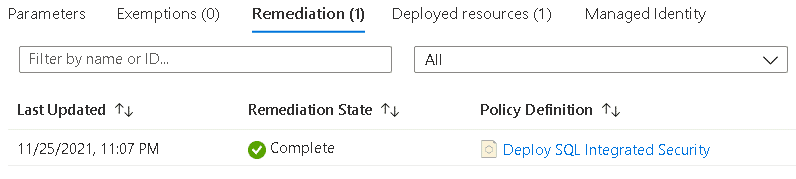
Using the policy assignment we can create and execute a remediation task to fix the existing problems, executing the remediation already defined in the policy.


Summary

The possibility to enable only Azure AD Authentication in Azure SQL Databases is already great. Adding to this  the possibility to enforce this rule in many different levels using the policies is even better.

This policy is not perfect. It will fail if the Azure SQL Server doesn’t have an administrator configured. But this blog gives you the overall idea about what’s possible to achieve.

The post Azure SQL: Enforcing SQL Authentication type appeared first on Simple Talk.


from Simple Talk https://ift.tt/3IsJfYD
via

Wednesday, December 1, 2021

How to return multiple sequence numbers with sp_sequence_get_range

The series so far:

  1. Introduction to SQL Server sequence objects
  2. Using SQL Server sequence objects
  3. How to return multiple sequence numbers with sp_sequence_get_range

Each time an application requests a sequence number using the NEXT VALUE FOR function, they get a new sequence number. The last used sequence number gets updated in the database metadata. If an application requires a sequence number series to be sequential, the NEXT VALUE FOR function cannot guarantee that all sequence numbers returned will be sequential. This behavior is caused because multiple sessions could be requesting sequence numbers at relatively the same time. If an application requires multiple sequence numbers, and all the sequence numbers need to be sequential, then the sp_sequence_get_range stored procedure should be used. This article will explore how an application can use this stored procedure to generate a range of sequential sequence numbers.

Sp_sequence_get_range stored procedure

The sp_sequence_get_range stored procedure is a system stored procedure that comes with SQL Server. It supports returning a range of sequence numbers for a sequence object. In reality, this stored procedure doesn’t really return a range of values but instead returns a series of output parameter values. The output parameters can then be used to generate a range of sequence number values programmatically. The stored procedure will also support cycling sequence numbers when the minimum or maximum values of the sequence object are reached. When this stored procedure is called, in addition to returning the output values, it also updates the last sequence number used in the Database metadata as if the entire range of sequence numbers was returned.

Below is syntax for the sp_sequence_get_range stored procedure, as found in the Microsoft documentation:

sp_sequence_get_range [ @sequence_name = ] N'<sequence>'   
     , [ @range_size = ] range_size  
     , [ @range_first_value = ] range_first_value OUTPUT   
    [, [ @range_last_value = ] range_last_value OUTPUT ]  
    [, [ @range_cycle_count = ] range_cycle_count OUTPUT ]  
    [, [ @sequence_increment = ] sequence_increment OUTPUT ]  
    [, [ @sequence_min_value = ] sequence_min_value OUTPUT ]  
    [, [ @sequence_max_value = ] sequence_max_value OUTPUT ]  
    [ ; ]

For a complete explanation of each of these parameters, please refer to the Microsoft documentation.

To understand how this store procedure can be used to generate a range of sequence numbers, take a look at a few examples.

Sequence object for examples

All the examples in this article will use a sequence object name CountTo7 that can be created by running the code in Listing 1.

Listing 1: Create CountTo7 sequence object

USE tempdb;
GO
CREATE SEQUENCE CountTo7
   AS int
   START WITH 1
   INCREMENT BY 1
   MINVALUE 1
   MAXVALUE 7
   NO CYCLE; 
GO

This sequence object is defined as an integer. It can be used to generate the following series of sequence numbers: 1, 2, 3, 4, 5, 6, and 7. When a sequence number value of 7 is reached, the sequence number will not cycle because the NO CYCLE option has been specified.

Generating a range of three values

For the first example, the sp_sequence_get_range stored procedure will be called to return a range of three values from the CountTo7 sequence object. This procedure will not return the range of sequence numbers. Instead, it returns only output variables that can be used to generate the range of three values programmatically. Additionally, when this stored procedure is called, it will update the last sequence number as if all three different sequence numbers have been generated.

The code in Listing 2 will call the sp_sequence_get_range stored procedure requesting three values from the CountTo7 sequence objects. It will then use the output from the stored procedures to print out the next three sequence numbers.

Listing 2: Return a range of three values

USE tempdb;
GO
-- declare variable 
DECLARE   
  @RangeSize int = 3,   
  @FirstSeqNum sql_variant,  
  @LastSeqNum sql_variant,
  @CycleCount sql_variant,
  @SequenceIncrement sql_variant,
  @MinValue sql_variant, 
  @MaxValue sql_variant, 
  @CurrentSeqNum int,
  @I int = 0; 
--Get sequence object values to support range
EXEC sys.sp_sequence_get_range  
  @sequence_name = N'CountTo7', 
  @range_size = @RangeSize,
  @range_first_value = @FirstSeqNum OUTPUT,
  @range_last_value = @LastSeqNum OUTPUT,
  @sequence_increment = @SequenceIncrement OUTPUT;
-- Cycle Through Range
SET @CurrentSeqNum = CAST(@FirstSeqNum AS int);
WHILE @CurrentSeqNum <= CAST(@LastSeqNum as int)
BEGIN
    PRINT @CurrentSeqNum  
    SET @CurrentSeqNum = @CurrentSeqNum + 
         CAST(@SequenceIncrement AS int);
END

When the code in Listing 2 is run the output in Report 1 is produced.

Report 1: Output of PRINT statement in Listing 2

An image showing 1, 2, 3 returned

The code in Listing 2 first declares some variables to capture the output of the sp_sequence_get_range stored procedure. The code then calls the sp_sequence_get_range stored procedure, which returns several output variables. The output variable @FirstSeqNum contains the first variable in the range, the @LastSeqNum contains the last sequence number in the range, and the @SequenceIncrement variable contains the increment value for the @CountTo7 sequence objects. These variables are then used to process through a WHILE loop until all values in the requested range are displayed using a PRINT statement.

When the sp_sequence_get_range stored procedure was called, it returned output values and updated the database metadata for the last value used by the CountTo7 sequence object. This can be verified by running the code in Listing 3.

Listing 3: What is the current sequence number value

USE tempdb;
GO
SELECT name, current_value FROM sys.sequences
WHERE name = 'CountTo7';

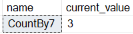
Report 2 shows the current sequence number value for the CountTo7 sequence object.

Report 2: Current value of CountTo7 sequence object

An image showing properties of the sequence object, CountBY7 and current value = 3

The last value stored in metadata will be used to determine the next sequence number to generate if the NEXT VALUE FOR function or when the sp_sequence_get_range stored procedure is called. If Listing 2 is run a second time, it will print sequence values 4, 5, and 6. However, if it is run a third time, the following error will occur:

An image showing the error number when the values requested passes the maxium

This message occurs because the CountTo7 sequence object is set up to not cycle, and there is only one more sequence number available before reaching the limit. To avoid this error, the code needs to be modified to reach the maximum for this non-cycling sequence object.

Dealing with maximum values for non-cycling sequence object

Some additional code will need to be written to programmatically retrieve the last range of sequence numbers for a non-cycling sequence object. In Listing 4, the code determines whether or not the maximum sequence value has been reached. If it has been reached, the message “No more values left” will be displayed. If not, the code adjusts the range size setting based on the number of values left.

Listing 4: Code to handle maximum values

USE tempdb;
GO
-- declare variable 
DECLARE   
  @RangeSize int = 3,   
  @FirstSeqNum sql_variant,  
  @LastSeqNum sql_variant,
  @CycleCount sql_variant,
  @SequenceIncrement sql_variant,
  @MinValue sql_variant, 
  @MaxValue sql_variant, 
  @CurrentSeqNum int,
  @I int = 0,
  @maximum_value int, 
  @increment int,
  @current_value int,
  @is_cycling bit; 
-- Get current values for sequence objecty
SELECT @maximum_value = CAST(maximum_value as int), 
       @increment = CAST(increment as int),
           @current_value = CAST(current_value as int),
           @is_cycling = Cast(is_cycling AS bit)
FROM sys.sequences WHERE name = 'CountTo7'
-- Are any values left
IF @current_value = @maximum_value 
BEGIN
   PRINT 'No more values left'
   RETURN
END
-- Adjust range if not enough values left
IF  (@current_value + (@increment * @RangeSize)) > @maximum_value
        AND @is_cycling = 0
   SET @RangeSize = @maximum_value - @current_value;
--Get range of sequence number
EXEC sys.sp_sequence_get_range  
  @sequence_name = N'CountTo7', 
  @range_size = @RangeSize,
  @range_first_value = @FirstSeqNum OUTPUT,
  @range_last_value = @LastSeqNum OUTPUT,
  @sequence_increment = @SequenceIncrement OUTPUT;
-- Cycle Through Range
SET @CurrentSeqNum = CAST(@FirstSeqNum AS int);
WHILE @CurrentSeqNum <= CAST(@LastSeqNum as int)
BEGIN
   PRINT @CurrentSeqNum  
   SET @CurrentSeqNum = @CurrentSeqNum + 
          CAST(@SequenceIncrement AS int);
END

I’ll leave it up to you to run the code in Listing 4. The first time you run it, it should adjust the range and return the last value left for this sequence object, which would be “7”. For every execution after the first one, the message “No more values left” will be displayed. It is worth noting that this code only works for sequence objects that have a positive increment value and don’t cycle. If you need to handle sequence objects that cycle or count down, different code will be needed.

Handling cycling of sequence numbers

When a sequence object supports cycling, the code to return ranges of sequence numbers gets a little more complicated. The output parameter @range_cycle_count can be used to determine if the range requested by the sp_sequence_get_range stored procedure has cycled. This output parameter indicates the number of times a range has cycled, where 0 indicates the range has not cycled through all the available values of a sequence object. A positive number tells the number of times a sequence object has cycled, based on its minimum or maximum value.

When a range of numbers is cycled, the first sequence number used after cycling depends on the increment value. If the increment value is positive, the minimum value is used as the first sequence number after cycling. If the increment value is negative, the maximum value is used as the first sequence number after cycling.

Run the code in Listing 5 to cycle through a range of numbers. This code was built by refactoring the code in Listing 4 and adding additional code to cycle up or down through the sequence numbers depending on whether the increment value is negative or positive.

Listing 5: Code to cycle through sequence numbers

USE tempdb;
GO
DECLARE   
-- Parameters for code
  @RangeSize int = 3,   
  @SequenceName varchar(100) = 'CountTo7', 
  -- Variables returned from sys.sp_sequence_get_range  
  @RangeFirstValue sql_variant,  
  @RangeLastValue sql_variant,
  @RangeCycleCount int,
  -- values returned from sys.sequences 
  @SequenceMinValue int, 
  @SequenceMaxValue int,
  @SequenceIncrement int,
  @SequenceCurrentValue int,
  @SequenceIsCycling bit,
  -- temp variables
  @I int = 0,
  @CurrentSeqNum INT;
  
-- Get current values for sequence settings
SELECT @SequenceMinValue = CAST(minimum_value as int), 
       @SequenceMaxValue = CAST(maximum_value as int), 
       @SequenceIncrement= CAST(increment as int),
           @SequenceCurrentValue = CAST(current_value as int),
           @SequenceIsCycling = Cast(is_cycling AS bit)
FROM sys.sequences where name = @SequenceName;
-- Adjust range to reflect number of values left if not cycling
IF @SequenceIsCycling = 0  AND (@SequenceMaxValue - 
           @SequenceCurrentValue) / @SequenceIncrement < @RangeSize
   AND @SequenceIncrement > 0
   SET @RangeSize = (@SequenceMaxValue - 
         @SequenceCurrentValue) / @SequenceIncrement
IF @SequenceIsCycling = 0  AND 
        (@SequenceMinValue - @SequenceCurrentValue) / 
           @SequenceIncrement < @RangeSize
   AND @SequenceIncrement < 0
   SET @RangeSize = (@SequenceMinValue - 
         @SequenceCurrentValue) / @SequenceIncrement
-- Are the more sequences available
IF @RangeSize > 0
   --Get range of values
   EXEC sys.sp_sequence_get_range  
     @sequence_name = @SequenceName, 
     @range_size = @RangeSize,
     @range_first_value = @RangeFirstValue OUTPUT,
     @range_last_value = @RangeLastValue OUTPUT, 
     @range_cycle_count = @RangeCycleCount OUTPUT;
ELSE
-- No more 
  PRINT 'No more sequence numbers to return';
SET @CurrentSeqNum = CAST(@RangeFirstValue AS INT);
-- Cycle Through Range
WHILE @RangeSize > 0  
BEGIN
    IF @CurrentSeqNum > @SequenceMaxValue
           SET @CurrentSeqNum =  @SequenceMinValue;
        IF @CurrentSeqNum < @SequenceMinValue
           SET @CurrentSeqNum = @SequenceMaxValue
        PRINT @CurrentSeqNum;
        SET @CurrentSeqNum = @CurrentSeqNum + @SequenceIncrement;
        SET @RangeSize = @RangeSize - 1
END

To verify the code in Listing 5 will cycle through the values of the CountTo7 sequence object, the object first needs to be altered, so it supports cycling by using the code in Listing 6.

Listing 6: Altering sequence object to support cycling

USE tempdb;
GO
ALTER Sequence CountTo7 
   RESTART WITH 7
   CYCLE;
GO

Listing 6, in addition to altering the object to cycle, also sets the sequence object to restart at 7. Setting this sequence object to restart at 7 updated the current_value in metadata to 7 and reset the last_used_value to NULL. This can be verified by running the code in Listing 7.

Listing 7: Reviewing metadata for CountTo7 sequence object

USE tempdb;
GO
SELECT name, current_value, last_used_value FROM sys.sequences
WHERE name = 'CountTo7';

When the code in Listing 7 is run the output in Report 3 is displayed.

Report 3: Output when Listing 7 is run

An image showing that the current value is 7 and the last used value is NULL

With the CountTo7 sequence object set up to cycle, the code in Listing 5 can be executed. The first time this code is run, it will generate the range shown in Report 4.

Report 4: Output from the first execution of Listing 5

Image showing 7, 1,2

The sequence started generating values starting at 7 and then cycled, creating values 1 and 2, as the last two values in the range. The second time the code in Listing 5 is executed, it will return 3, 4, and 5. Each time it is rerun, it will generate the next three sequence number values based on the information stored in the database metadata.

The @range_cycle_count variable in the Listing 5 code is used to determine if the range of numbers cycled past the maximum value. In Listing 5, the sp_sequence_get_range stored procedure will never cycle through the range of values more than one time. This behavior happens because a range of 3 values is too small to cycle through the complete list of 7 values associated with the @CountTo7 sequence object.

To test if the code in Listing 5 will cycle through the CountTo7 sequence values more than once, all that needs to be done is to pick a @RangeSize parameter setting greater than 7. I’ll leave it up to you to test out different @RangeSize values to verify that this code can cycle multiple times through a range of sequence numbers.

The code in Listing 5 not only supports cycling but also has been written to handle sequence objects with a negative increment value. Keep in mind the code shown here is only sample code and has not been thoroughly tested to cover all situations. Therefore, use it at your own risk and fully test it before using this sample code in your application.

Missing sequence number values

The sp_seqeunce_get_range has a few issues of which you should be aware. When this stored procedure is called to retrieve a range, it updates the last used sequence number for the sequence object in the database metadata. If all of the values in the range requested are not used, any unused values will be lost. Additionally, if the database engine crashes, the last used sequence number stored in metadata will not be rolled back. Therefore, any values not used before the crash will also be lost.

Return multiple sequence numbers with sp_sequence_get_range

The sequence object was introduced with SQL Server 2012. Sequence objects can be used to populate multiple columns in a single table, as well as to synchronize a series of generated numbers across multiple tables. Using the sequence object to generate a series of numbers has more flexibility than using an identity column. When multiple sessions request sequence numbers simultaneously, the numbers generated for a given session may not be continuous sequence numbers. When this is an issue, the sp_sequence_get_range stored procedure can be used. By using this stored procedure, application code can be written, so a range of sequential sequence numbers can be obtained for a session. The next time you need to ensure that sequence number values are contiguous, you should use the sp_sequence_get_range system stored procedure to guarantee your range of sequence numbers does not have missing values.

If you liked this article, you might also like 

The post How to return multiple sequence numbers with sp_sequence_get_range appeared first on Simple Talk.


from Simple Talk https://ift.tt/3rouVuf
via

Revisiting SQL Server certification

I first touched a SQL Server instance back in 1998 during a SQL Server 6.5 course. I hadn’t planned to take the class except that the small company I worked for had a remaining credit with one of the local training organizations. My manager thought it might be a good fit for me, but I had no idea that SQL Server would eventually become the focus of my career.

Not long after that, SQL Server 7 was released, and I was much more interested in taking a class to learn about it and get the certification called MCDBA. Over the following years, I kept up with the many iterations of the cert to learn about new features or help an employer with their Microsoft partner status. Maybe I am unusual, but I also enjoy taking the exams.

I am back trying to get my certs up to date. It had been six years since I had taken a Microsoft certification exam, so I was pretty surprised to see how much they have changed. Previously, four or five exams were required to get the premier certification, renamed to MCSE at some point. Now there is one exam to get the Azure Data Fundamentals credential and one to get the Azure Database Administrator Associate cert.

These new certs have Azure in the names for a reason. Experience with on-premises SQL Server will not be enough. You will need to understand the Azure database offerings, working in hybrid environments, migrating to Azure, and managing databases once they are in the cloud. Microsoft has also provided free online training courses for each exam to help you learn more listed right on the page. Training for the new certification is a fantastic opportunity for DBAs who have worked strictly with on-premises SQL Servers to upgrade their skills.

I took the fundamentals exam (DP-900) about a month ago. I found it easy, probably because of all the time I spent in Azure when tech reviewing articles and from years of experience working with SQL Server. I brushed up on Cosmos DB, the different Azure storage offerings, and Power BI to prepare. The exam covers much more, but I already knew most of the material well. Of course, your experience may be different, so be sure to review the topics covered.

Right now, I’m working on the associate exam (DP-300). This one is taking some study since I haven’t worked with several features like high availability and security in Azure. Again, there are training materials freely available. I suspect I’ll be ready to sit for the exam by the end of the year.

Microsoft certification is a controversial topic. It can be a great way to learn the latest technology, but good test takers can sometimes pass the exams without touching a server. Certifications look good on a resume, but they don’t necessarily prove expertise at the end of the day.

Commentary Competition

Enjoyed the topic? Have a relevant anecdote? Disagree with the author? Leave your two cents on this post in the comments below, and our favourite response will win a $50 Amazon gift card. The competition closes two weeks from the date of publication, and the winner will be announced in the next Simple Talk newsletter.

The post Revisiting SQL Server certification appeared first on Simple Talk.


from Simple Talk https://ift.tt/3D2WZFG
via

Monday, November 29, 2021

Query Store and hints: More Powerful than ever

I need to confess: I’m proud of the article Query Store and Parameterization Problems I wrote. Today it’s no news at all (although some people may not know the details about plan guides I included in the article) but I wrote it in 2017, based on SQL Server 2016, when the idea of identifying parameter sniffing with query store was very fresh.

Jump to today: Query Store got a new feature, Query Store Hints. This feature is already being the base for many performance improvements in SQL Server. The idea is the possibility to include query hints on the query store queries.

In my article about parameterization, I made use of plan guides exactly because it was the only way to include hints on the queries. Query Store Hints change that, and in my opinion, they make plan guides obsolete. What other reason would make you still use a plan guide today? I would love to hear about it on the comments.

Preparing the Environment

Let’s prepare an environment for some tests.

First Step: Provision a demonstration database

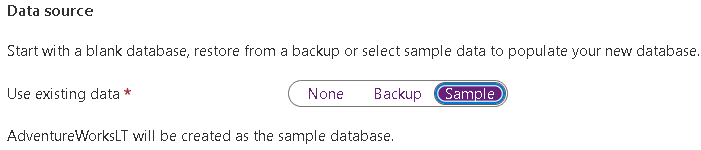
When you are provisioning an Azure SQL Database you can choose to provision a demo database, AdventureWorksLT. Let’s start with one.

Second Step: Creating a view to replate spt_values

We need to make the tables bigger for the example. Many years ago, Adam Machanic created a script called MakeBigAdventure.sql. The script create two tables inside the Adventureworks database, Bigproduct and BigTransactionHistory.

The script was made to work on AdventureWorks in a SQL Server on premises. It uses the table master..spt_values to randomize the records.

On Azure SQL, we don’t have access to the master..spt_values table, so we need to replace it with something else. We can create a view for this purpose. The code of the view will be the following:

CREATE VIEW dbo.spt_values
AS
  WITH int1(z)
       AS (SELECT 0
           UNION ALL
           SELECT 0),
       int2(z)
       AS (SELECT 0
           FROM   int1 a
                  CROSS JOIN int1 b),
       int4(z)
       AS (SELECT 0
           FROM   int2 a
                  CROSS JOIN int2 b),
       int8(z)
       AS (SELECT 0
           FROM   int4 a
                  CROSS JOIN int4 b),
       int16(z)
       AS (SELECT TOP 2048 0
           FROM   int8 a
                  CROSS JOIN int4 b)
  SELECT Cast (NULL AS NVARCHAR(35)) [name],
         Row_number()
           OVER (
             ORDER BY z)  1         AS [number],
         Cast (‘P’ AS NCHAR(3))      [type],
         Cast (NULL AS INT)          [low],
         Cast (NULL AS INT)          [high],
         0                           [status]
  FROM   int16 

Original link: https://devio.wordpress.com/2018/06/03/generating-a-range-of-numbers-and-dates-in-t-sql/

Third Step: Fix the script to work with AdventureWorksLT

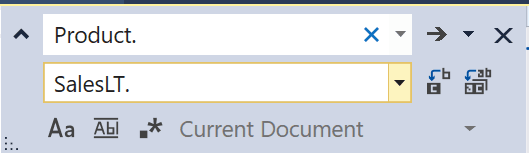
AdventureWorks has the schema Product, while AdventureWorksLT has the shema SalesLT. You need to replace the Product schema by SalesLT. A simple find/replace solves the problem.


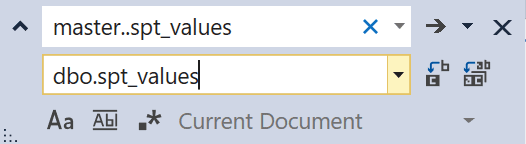
Fourth Step: Fix the name of spt_values in the script

A simple replace from master..spt_values to dbo.spt_values will do the work.

Fifth Step: Create an Index

Let’s create an index over a field that we know will have an uneven distribution and due to that will cause the parameter sniffing problem.

You can use the following statement:

CREATE NONCLUSTERED INDEX indprice
  ON [dbo].[BigProduct] ([listprice])

go 

Establishing the problem

This is the same problem describe on the article Query Store and Parameterization Problems, but we will use a different solution.

Let’s create a stored procedure which causes the parameterization problem. The procedure code is below:

CREATE PROCEDURE Filterprice @listprice NUMERIC(15, 2)
AS
    SELECT *
    FROM   dbo.bigproduct
    WHERE  listprice = @listprice 

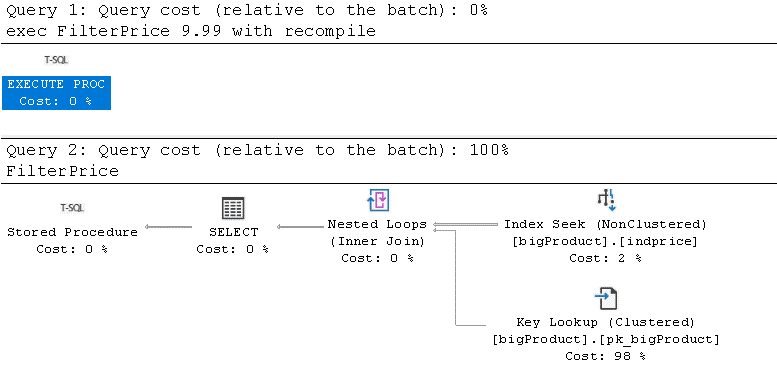
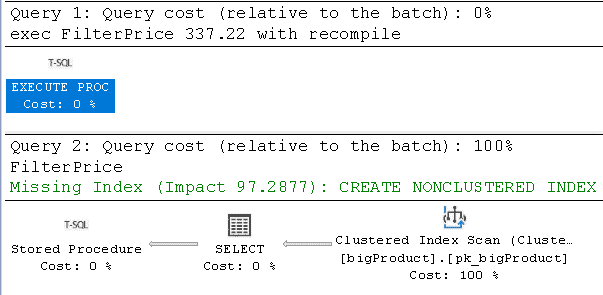
If you check the estimated execution plan of the code below, you will notice each procedure execution has a different query plan. This happens because the distribution of values in the field is not even. Some values appear way more frequently than others. The use of With Recompile will ensure the plans of these executions will not be stored in the cache


EXEC Filterprice
  9.99 WITH recompile
 

EXEC Filterprice
  337.22 WITH recompile 


Causing the problem


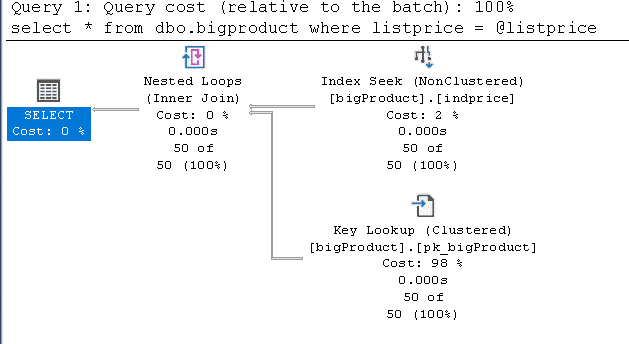
The result of the execution of the queries again, without using the With Recompile is both queries will be using the same plan, which will be wrong for one of them.


EXEC Filterprice
  9.99

EXEC Filterprice
  337.22 

When one of these procedures is executed without the recompile option, the plan will be included in the query plan cache. The next execution will use the same plan again, causing a problem, because the plan may not be the best choice to the value.

On the original article, we solved the problem using a plan guide to force the recompile of the query. Let’s solve the problem this time using Query Store Hints.

Using Query Store Hints to solve the problem

The Query Store hints are applied over the queries. We need to discover the id of this query inside query store. The following statement can do the work:

SELECT query_sql_text,
       q.query_id
FROM   sys.query_store_query_text qt
       INNER JOIN sys.query_store_query q
               ON qt.query_text_id = q.query_text_id
WHERE  query_sql_text LIKE N’%bigproduct%’
go 


Even the query being inside the stored procedure, it will be individually recorded in query store. Once we know the id of the query, we can make the application of the query hint using a stored procedure:

EXEC Sp_query_store_set_hints
  @query_id=1,
  @value = N’OPTION(RECOMPILE)’;

go 

 
Execute the queries again and now each one will have the best plan according the parameter. We also have an additional benefit in comparison to other solutions, such as setting the procedure as WITH RECOMPILE : Only a single query is being recompiled, not the entire procedure.

Monitoring

Once you decide to apply query store hints, there are some monitoring tasks you need to execute:

  • You need to monitor the hints. In case of a failure in a hint, you need to react to that.
  • You need to monitor query regressions. If a hint is not needed anymore, you can suffer from a query regression and this will appear as part of the monitoring.

The following query can be used to monitor the hints:

SELECT query_hint_id,
       query_id,
       query_hint_text,
       last_query_hint_failure_reason,
       last_query_hint_failure_reason_desc,
       query_hint_failure_count,
       source,
       source_desc
FROM   sys.query_store_query_hints;

go 

The Future

SQL Server 2022 is bringing many new optimization features. They are becoming more intelligent and being built over previous existing features. Some of the new optimization features will be automatically creating query store hints.

Conclusion

The SQL Server optimization features are becoming more intelligent on each version. Each new optimization feature, however, brings new and more advanced needs for monitoring.


The post Query Store and hints: More Powerful than ever appeared first on Simple Talk.


from Simple Talk https://ift.tt/2ZzeP5s
via

Unity state machine behaviours

An animation in a Unity project is an opportunity to perform many additional actions on top of the animation itself. These actions can be anything the developer desires, including allowing specific user actions or changing variables to your needs. Some time back, Unity’s animation events were demonstrated as a tool for accomplishing some of these goals. They’re great for performing functions at specific points in an animation but not as helpful if there’s something more general you want to do at any point in the animation. Enter Unity State Machine Behaviours, a class of script that works specifically with the Unity Animator system.

Working alongside the Animator, State Machine Behaviours lets you define actions for entering, exiting, and updating various animation states. This means you can have code that runs specifically during an object’s idle state and another script that only executes during the same object’s walking state. Not only does this allow you to perform specific actions during certain states, but it’s also a great way to keep your code organized too. Another great benefit is the ability to reuse these scripts on other state machines, so you don’t have to worry about a script being tied to a single object. As usual, the best way to see the benefits is to see it all in action. Follow along to see how to use these scripts in a project, and by the end, you’ll have a Unity project with a character that performs different actions based on whether it’s in an idle or walking state.

There are many unique assets in this project, so to focus on the code and how it works, a sample project has been created to give you a starting point if you choose to follow along. Additionally, there is a completed version with all the code included to view and modify as you see fit. Links for these projects are listed below. Open the Unity Hub app and click the Add button, find the folder containing the Unity project, and choose Select Folder.

Codeless project: https://github.com/prof-smash/SimpleTalk-StateMachines-Codeless

Complete project: https://github.com/prof-smash/SimpleTalk-StateMachines-Complete

Project overview

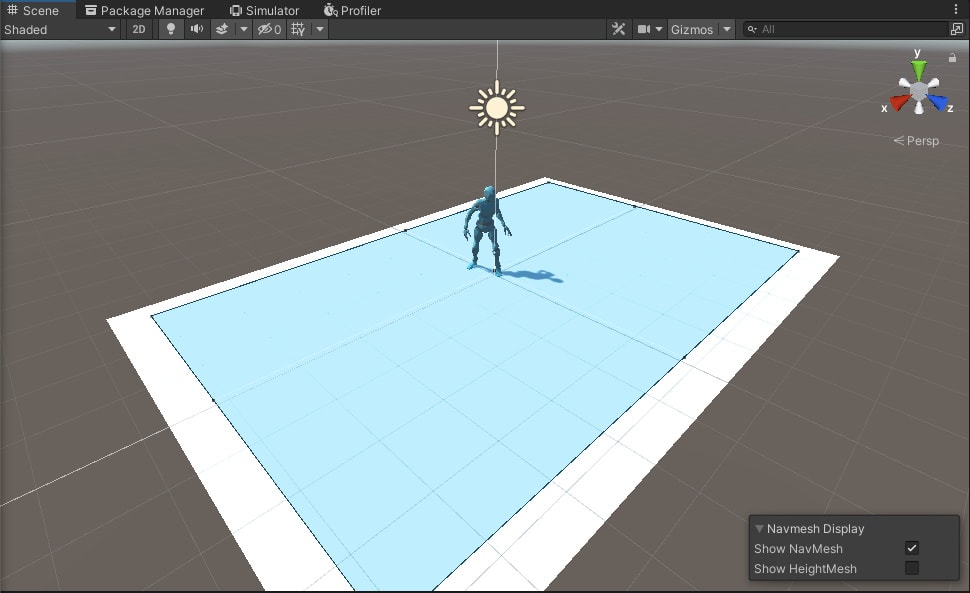
First, take a brief look at what’s included in the sample project. Upon opening the project, you should be greeted with a scene with a blue bot character standing on a plane. If you don’t see this, find the SampleScene asset in your Assets window and open it. This blue bot has an animator tied to it that allows playing idle and walking animations. As it walks, it will leave markers on the floor to indicate where it has been. The markers come from the prefab simply named Marker in the Prefabs folder.

Additionally, some text displaying the number of walks the bot has taken is in the upper left corner of the screen. The exact location and appearance of the text may vary depending on your display, so feel free to adjust its position, color, and other properties in the Inspector. Finally, though you can’t see it at the moment, a nav mesh has been set up, which defines the area the bot can walk. If you wish to see this nav mesh, click the Navigation tab in the Inspector area (if you don’t see this tab, go the top menu and choose Window->AI->Navigation), and you should see a blue area in the Scene window that defines the nav mesh. All other assets in the Assets window include the texture for the marker and animations for the bot.

Image showing the project scene with the nav mesh shown. Blue rectangle with a bot.

Figure 1: The project scene with the nav mesh shown

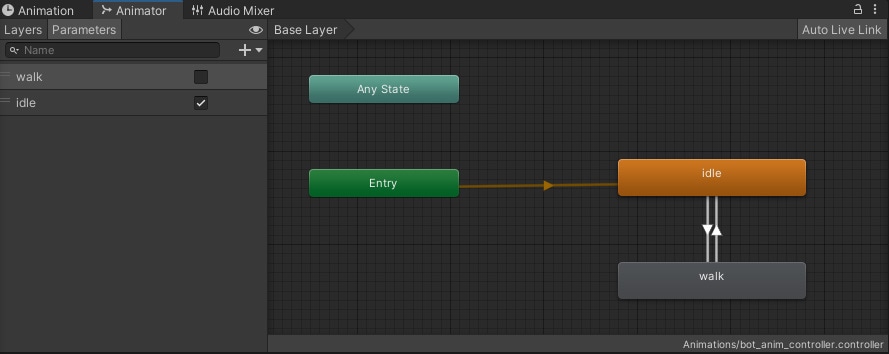
Those animations are brought together via the bot_anim_controller asset in the Animations folder. If you select this asset and open the Animator window (found by going to Window->Animation->Animator), you can see the animator immediately launches the bot into the idle state. If you can’t see this right away, you may need to navigate the Animator window using the Alt key plus mouse button to pan the view. The arrows pointing to and from the idle and walk states are transitions, with each given a condition that must be met for the transition to occur. In this case, two booleans named idle and walk are set to control when the bot is in the idle or walk state, respectively. These two states are where the scripts will be attached to give the bot unique behaviours based on the state.

Image showing bot_anim_controller, showing animation states, transitions, and booleans. Buttons for entry, idle, and walk

Figure 2: bot_anim_controller, showing animation states, transitions, and booleans

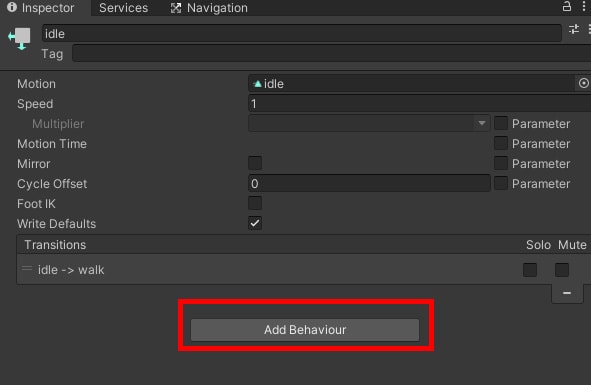
If you click on the idle state, you should see a button in the Inspector window that says Add Behaviour. Click this button, then click New Script, then give the script the name IdleStateBehaviour. The newly created script will be immediately added to the idle state, with the asset itself being placed in the Assets folder. Repeat this process for the walk state, this time calling the script WalkStateBehaviour.

Image showing the location of the Add Behaviour button

Figure 3: Adding a new state machine behaviour script

By using this specific button to create the script, Unity will know to make this a script that inherits from the StateMachineBehaviour class, so we won’t have to worry about changing that. It also sets up a template for the state machine behaviour script that gives you all the methods you’ll need to code state behaviours. Double click the IdleStateBehaviour script to open it in Visual Studio and set up the first state behaviour.

IdleStateBehaviour code

As promised, the IdleStateBehaviour script is inheriting from StateMachineBehaviour from the start. Additionally, there are five methods, each with brief documentation of how they work. For this project, the focus will be placed on OnStateEnter, OnStateUpdate, and OnStateExit. As the names imply, these methods perform code based on when the bot enters or exits its idle state and is currently in the idle state. But that’s not all! Like the traditional MonoBehaviour scripts Unity users are used to, you can define variables that can be edited in the Unity editor right here in this script. These variables are a good place to start with the coding process. So, just above OnStateEnter, enter the following:

[Range(2.0f, 10.0f)]
public float waitTime = 5f;
public GameObject marker;
private float timeTillMove = 5f;
private Vector3 stopPosition;

The first two variables will be for you to decide in the editor, with waitTime defining how much time there is between walks. Next is marker, which will be what the bot places down upon leaving its position. Finally, timeTillMove will be the actual timer that counts down between walks, with the time in question coming from waitTime, and stopPosition is the location the bot stops at, which will be used to place markers.

Moving on to OnStateEnter, you’ll notice that an Animator is set in the method’s parameters. In fact, this is true of all the methods in the script. This will be helpful as it allows you easy access to the bot’s animator and the methods and data associated with it. Let’s put it to use along with some additional code:

animator.SetBool("walk", false);
stopPosition = new Vector3(animator.transform.position.x, 
         0.01f, animator.transform.position.z);

Recall the booleans that control when transitions occur in the bot’s animator. When the bot is in its idle state, you wouldn’t want it to start walking in place. To prevent this, set the walk bool in the animator to false the moment the bot enters its idle state. You’ll also go ahead and get its current position for leaving a marker later on when exiting the idle state. The Y value of stopPosition will be set to 0.01 to allow the marker to be slightly above the floor so you can see it. Without this change, the marker will “blend” with the floor and stutter or even be impossible to see.

Let’s move on to OnStateUpdate, which will execute continuously so long as the bot is in its idle state. This method is perfect for counting down the seconds before moving again. To execute this, enter the following:

timeTillMove -= Time.deltaTime;
if (timeTillMove <= 0)
{
        timeTillMove = waitTime;
        animator.SetBool("walk", true);
}

This code is pretty straightforward. The timeTillMove variable is subtracted until it reaches zero, at which point the timer is reset using waitTime, and the walk bool in the animator is set to true. Notice that the timer will not count down until this state is active again, so there’s no need to worry about it counting down too early.

Finally, let’s implement the code for OnStateExit. It consists of a single line that spawns the marker object into the world at the position recorded in stopPosition.

Instantiate(marker, stopPosition, Quaternion.identity);

That’s all the code for IdleStateBehaviour. Now it’s time to move on to the code for the bot’s walk state.

WalkStateBehaviour code

Like the IdleStateBehaviour script, this script will keep its focus on OnStateEnter, OnStateUpdate, and OnStateExit. However, the script as a whole will be slightly more involved than IdleStateBehaviour as it will search for objects in the scene, find a random position for the bot, and update statistics. It will also utilize the UnityEngine.UI and UnityEngine.AI namespaces. With that in mind, let’s set up the using statements now.

using UnityEngine.UI;
using UnityEngine.AI;

Like before, there are also a few variables to declare before getting into the meat of the code, with one of them being a value you’ll set in the editor.

[Range(2.5f, 7f)]

public float maximumWalkingDistance = 4f;

private Text walkText;

private NavMeshAgent agent;

private int walks = 0;

Of particular note, here are the walkText and agent variables. The walkText variable will be given string data to display in the UI seen earlier in the scene. It will be updated with the values of walks whenever the bot has finished taking its short walk. Meanwhile, the agent variable will contain the Nav Mesh Agent component on the bot object. As you’ll see later on, we get the agent by using GetComponent whenever the bot enters the walk state. Why wouldn’t you just set agent in the editor? This is because scripts inheriting from StateMachineBehaviour do not allow you to pass in gameobject data into the script before runtime, including their components. Because the state machine behaviour lives within the animator asset, as opposed to within the scene, we cannot link objects within the scene to the script. Thus, we work around that by using methods like GameObject.Find or reference the gameobject (and thus its components) where the animator is attached.

Next, the code for OnStateEnter:

animator.SetBool(“idle”, false);

walkText = GameObject.Find("WalksText").GetComponent<Text>();
agent = animator.GetComponent<NavMeshAgent>();
agent.destination = RandomPosition(animator.transform.position, 
             maximumWalkingDistance, -1);

First, we make sure the bot cannot accidentally go back to its idle animation while walking. Then you find the WalksText object in the scene and tell the script to use that for walkText. You then set up the NavMeshAgent, including its destination. The destination is found using the RandomPosition, a custom method for finding a random point in the Nav Mesh to walk. Now would be an excellent time to create the RandomPosition method.

Vector3 RandomPosition(Vector3 origin, float distance, int layerMask)
{
        Vector3 randomDirection = Random.insideUnitSphere * distance;
        randomDirection += origin;
        NavMeshHit navHit;
        NavMesh.SamplePosition(randomDirection, out navHit, distance, 
               layerMask);
        return navHit.position;
}

Returning to the pre-generated methods, OnStateUpdate will be utilized to check how far away the bot is from its destination. If it has made it to its destination, then the bot will simply return to the idle state, and the process repeats.

float dist = agent.remainingDistance;
        if (dist != Mathf.Infinity && agent.pathStatus == 
              NavMeshPathStatus.PathComplete && 
               agent.remainingDistance <= 0.01f)
{
            animator.SetBool("idle", true);
}

After leaving this state and returning to the idle state, the number of walks taken is incremented by one. walkText is updated to reflect this change. That code will be going in OnStateExit.

walks++;
walkText.text = "Walks Taken: " + walks.ToString();

That ends all the code needed for this project. Be sure to save all scripts, then return to the Unity editor for some final tasks.

Finishing up

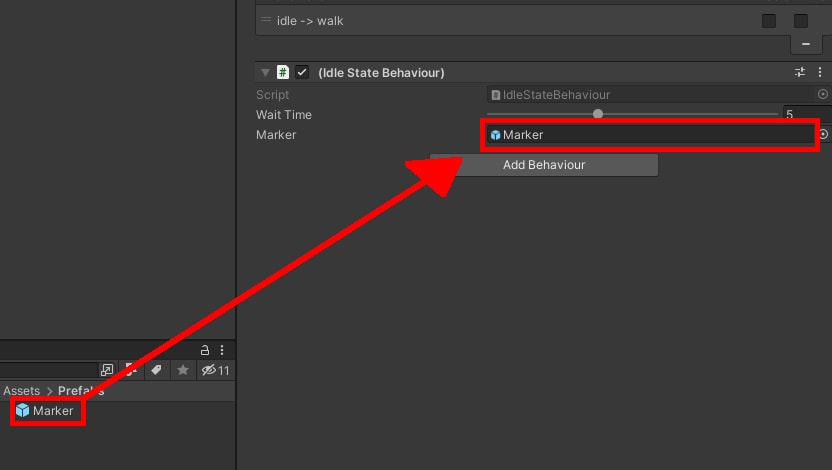
There’s not much else that needs to be done to complete the project. If it’s not open already, make sure the Animator window is open, and you have the bot_anim_controller asset selected. Start by clicking on the idle state. Set the time you want the bot to wait before starting its next walk and make sure the script knows where to find the Marker prefab.

Image showing how to drag the Marker to the Walk state

Figure 4: Assigning the marker

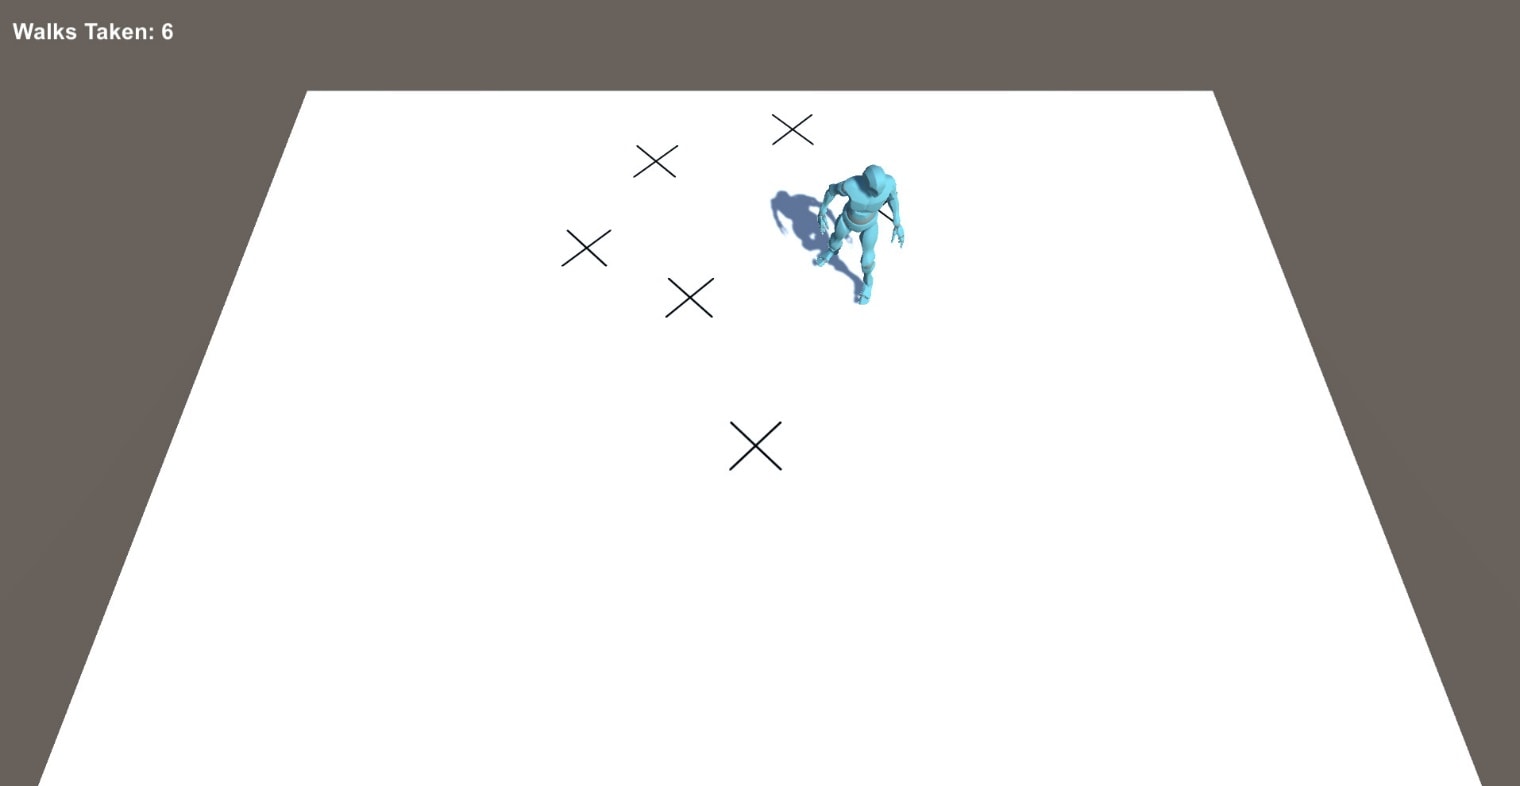
Likewise, select the walk state and set your maximum walking distance. If you only want the bot to take short walks, lower the walking distance. For the opposite, raise the Maximum Walking Distance. Once you’ve made your decision, test out the project using the play button at the top. The bot should start going to random spots on the floor, leaving markers along the way, and counting how many walks it has taken. It will continue to do this until you stop running the project.

Image showing the game in action. The bot is walking and leaving X where it stops.

Figure 5: The project in action

Conclusion

As stated before, the beauty of these scripts is that they can be assigned to any animation state. So you can have multiple objects use the code you’ve just written, even if they have different animators powering them. You just need to be mindful of items like animator booleans and any additional states within the animator. Additionally, these can also be used to give an object specific instructions in an organized, easy to access way. Whether it’s for a simple prototype or a large, complex project, state machine behaviours can be a valuable tool to help you achieve the goals of your Unity project.

As stated before, the beauty of these scripts is that they can be assigned to any animation state. So you can have multiple objects use the code you’ve just written, even if they have different animators powering them. You just need to be mindful of items like animator booleans and any additional states within the animator. Additionally, these can also be used to give an object specific instructions in an organized, easy to access way. Whether it’s for a simple prototype or a large, complex project, state machine behaviours can be a valuable tool to help you achieve the goals of your Unity project.


The post Unity state machine behaviours appeared first on Simple Talk.


from Simple Talk https://ift.tt/319lq7v
via