Friday, October 21, 2022

The Basics of Updating Data in a SQL Server Table

Entry in Greg Larsen's series on Learning T-SQL. The series so far:

  1. The basic T-SQL Select Statement
  2. Ordering a result set in SQL Server
  3. The ins and outs of joining tables in SQL Server
  4. Summarizing data using GROUP BY and HAVING
  5. The Basics of Inserting Data into a SQL Server Table
  6. The Basics of Updating Data in a SQL Server Table

Once data is inserted into a table, data typically needs to be maintained as time goes on. To make changes to an existing row or a number of rows, in a table, the UPDATE statement is used. This article shows how to use the UPDATE statement to modify data within a SQL Server table.

Syntax of the UPDATE Statement

There are many different options supported by the UPDATE statement. This article will only be showing how to use the basic and most common options of the UPDATE statement. The syntax for that basic UPDATE statement that this article will explore can be found in Figure 1.

UPDATE <object>
    SET <column_name> = {expression}[ ,…n]
    [ <OUTPUT Clause> ]
    [ FROM <table_source> [ ,…n] ]
    [ WHERE  <search_condition> ]

Figure 1: Basic syntax for the UPDATE statement

Where:

  • <object> – is a table or view name that is being updated.
  • <column_name> – is a column that will be updated.
  • {expression} – is a literal string, number, or value that will be used to update the associated <column_name>. This value can be any scalar expression, such as supplied from a variable or even another column in the same or different table.
  • <table_source> – is a table, view or derived table that will be updated.
  • <search_condition> – is a constraint that identifies which rows are the target of the UPDATE statement.

To understand the complete syntax of the UPDATE statement refer to the Microsoft Documentation.

Sample Data

To demonstrate how to update the values in a table, sample data will be needed. The code in Listing 1 will create and populate two different sample tables that will be used in this article.

The code two tables: dbo.Room and dbo.PriceChanges. These tables will be used in the examples found in this article. If you want to follow along and run the examples contained in this article, use this code in Listing 1, to create these sample tables in the tempdb database on your instance of SQL Server.

USE tempdb;
GO
CREATE TABLE dbo.Room (
   RoomNum INT,
   Beds INT,
   Sleeps INT,
   StandardRate MONEY,
   PriceChangeDateTime DATETIME2(0),
   RoomDesc VARCHAR(max));
GO
CREATE TABLE dbo.PriceChanges (
   RoomNum VARCHAR(100),
   NewStandardRate MONEY)
GO
-- INSERT Tables with Data
INSERT INTO dbo.Room 
VALUES (1,1,2,125.99,SYSDATETIME(),
        'This room has 1 king size bed, a TV with blue-ray DVD player, and private bathroom with tub'),  
       (2,2,4,175.99, SYSDATETIME(),
        'This room has two double beds, a TV with blue-ray DVD Player, and a private bathroom, with only a shower'),
       (3,2,4,250.99, SYSDATETIME(),
        'This room is a suite.  It has a private bedroom with king size bed, and private bathroom.  In the living space there is a sofa that pulls out to sleep two.  There is also a fireplace and a couple of easy chairs.  There are two TVs with blue-ray players. Has a kitchen with dishes.');
INSERT INTO dbo.PriceChanges    
VALUES (1,150.99),
       (2,198.99),
       (3,299.99);
GO

Listing 1: Sample Tables

Updating a Single Column Value on a Single Row

There are times when data in a single row of a table needs to be changed. It might need to be changed because it was entered incorrectly, or as time goes on the data needs to change to reflect the current situation. When a single column value, in a single row, needs to be changed the UPDATE statement can be used.

In Listing 2 is an example that will update the value of the StandardRate column to 179.99 for the row where the RoomNum column is equal to 2.

USE tempdb;
GO

UPDATE dbo.Room
   SET StandardRate = 179.99
WHERE RoomNum = 2;
GO

Listing 2: Updating a single column value on a single row

In Listing 2, the UPDATE statement updated the stored value of the StandardRate column in the Room table. The SET clause was used to provide the new rate value of 179.99 for StandardRate column. To identify that only the row with a RoomNum of 2 was to be updated the WHERE clause was used.

Care needs to be taken when issuing an UPDATE statement to ensure you don’t update more rows than intended. For instance, if the WHERE clause was not included in the statement, all the rows in the Room table would have had their StandardRate value set to 179.99. More on this later in the “Concerns with using the UPDATE statement” section below.

Updating Multiple Column Values on a Single Row

The prior example issued an UPDATE statement to modify a single column’s value on a single row. The UPDATE statement allows multiple column values on a single row to be updated at the same time. When multiple columns need to be updated, the additional columns and values can be added to the SET clause, as was done on Listing 3

USE tempdb;
GO
UPDATE dbo.Room
   SET StandardRate = 299.99,
          PriceChangeDateTime = SYSDATETIME()
WHERE RoomNum = 3;
GO

Listing 3: Updating two column values on a single row

This example updates the StandardRate and PriceChangeDateTime columns for only the rows where RoomNum is equal to 3. To provide different values for the two different columns (StandardRate and PriceChangeDateTime) two different values were provided on the SET clause. Each column name/value pair is separated by a comma. This example only updated two different columns. If more than 2 columns needed to have their values updated then more name/values pairs could be added, where each pair is separated by a comma.

Updating Multiple Rows

Each example so far has only updated a single row. There are times when an applications might need to make the same column value changes to more than a single row. For instance, suppose the sample table needed to have the PriceChangeDateTime column value changed to the current date and time, on the two different rows that were updated in the last two examples. This could be accomplished by running the code in Listing 4.

USE tempdb;
GO
UPDATE dbo.Room
   SET PriceChangeDateTime = SYSDATETIME()
WHERE RoomNum in (2, 3);
GO

Listing 4: Updating multiple rows with a single UPDATE statement

When the code in Listing 4 is executed the current date and time value will be set for room numbers 2 and 3. If the WHERE clause was excluded, like in Listing 5 below, all the PriceChangeDateTime values for all rows in the Room table would have been updated.

USE tempdb;
GO
UPDATE dbo.Room
   SET PriceChangeDateTime = SYSDATETIME();
GO

Listing 5: Updating all rows in Room table

Note: Make sure to review the concerns section below to better understand the pitfalls that can occur when using an UPDATE statement that excludes the WHERE clause.

Update a table with values from another table

In all the examples so far, the SET clause has used a literal value to provide the new value to update the columns in the Room table. Another way to provide the values for an UPDATE statement is to provide them from another table. When the sample data was generated, a table named dbo.PriceChanges was created. This table contains price changes for each of the different rooms. To use the PriceChange table to update rows in the Room table the code in Listing 6 is provided.

USE tempdb;
GO
UPDATE dbo.Room
   SET StandardRate = PriceChanges.NewStandardRate,
       PriceChangeDateTime = SYSDATETIME()
FROM Room JOIN PriceChanges
ON Room.RoomNum = PriceChanges.RoomNum;
GO

Listing 6: Using a table to provide values for UPDATE statement

The FROM clause joins the Room table and the PriceChanges table based on the RoomNum column in both tables. For every row that matches the join criteria SQL Server will take the NewStandardRate column value from the matching PriceChanges table and update the StandardRate column in the Room table. Additionally, the code in Listing 6 also updated the PriceChangeDateTime column with the current date and time, using the SYSDATETIME() function.

In Listing 6 every row in the Room table got a new rate. That is because there was a matching row in the PriceChanges table for every RoomNum. If only a specific RoomNum was required to get a rate update, then a WHERE constraint could be added to the code, as shown in Listing 7.

USE tempdb;
GO
UPDATE dbo.Room
   SET StandardRate = PriceChanges.NewStandardRate,
       PriceChangeDateTime = SYSDATETIME()
FROM Room JOIN PriceChanges
ON Room.RoomNum = PriceChanges.RoomNum
WHERE Room.RoomNum = 2;
GO

Listing 7: Update only RoomNum 2

In Listing 7 the WHERE constraint identified that only RoomNum 2 should be updated.

Partial Updates of Large Data Type Columns

Certain datatypes can hold a large amount of data and sometimes it is better to not try to download and update the entire value. With the introduction of SQL Server 2005, Microsoft introduced the WRITE clause to perform a partial or full updates of a large data type columns (varchar(max), nvarchar(max), and varbinary(max); each of which can hold up to 2GB of data in a single value). Here is the syntax for the WRITE clause:

.WRITE(expression, @Offsert, @Length)

The “expression” is the value that will be written to the large data time column, the @Offset identifies the starting position of where the partial update will begin, and the @Length identifies the number of characters that will be replaced.

The code in Listing 8 uses the WRITE clause to change the word “to” in the RoomDesc column to the value “which will” on only the row where the RoomNum is equal to 2.

USE tempdb;
GO
SELECT RoomDesc
FROM   dbo.Room
WHERE  RoomNum = 3;

UPDATE dbo.Room
   SET RoomDesc.WRITE --charindex finds first instance of a value
                  ('which will',charindex('to',RoomDesc)-1,2)
WHERE RoomNum = 3;

SELECT RoomDesc
FROM   dbo.Room
WHERE  RoomNum = 3;
GO

Listing 8: Using the WRITE calls to perform a Partial update

Compare the output and you will see the difference (this is just a portion of the RoomDesc column value before and after the update):

RoomDesc
----------------------------------------------
s out to sleep two. There is also a fireplace

RoomDesk
----------------------------------------------
s out which will sleep two. There is also a f

The WRITE clause cannot be used to update a large data type column to NULL value. This can be demonstrated by running the code in Listing 9.

UPDATE dbo.Room
   SET RoomDesc.WRITE (NULL,0, LEN(RoomDesc))
WHERE RoomNum = 3;
GO
SELECT * FROM dbo.Room WHERE RoomNum = 3;

Listing 9: Trying to set RoomDesc to null

When the code is Listing 9 is executed it runs without error. But by reviewing the output of the SELECT statement, which can be found Report 1, the RoomNum column was set to the empty string, not to a NULL value.

Table Description automatically generated with medium confidence

Report 1: Output of SELECT statement in Listing 9

If a large data type column needs it values set to NULL, then a standard SET clause can be used as in Listing 10.

UPDATE Room
   SET RoomDesc = NULL
WHERE RoomNum = 3;
GO
SELECT * FROM dbo.Room WHERE RoomNum = 3;

Listing 10: Setting a large data type column to null.

The output shown in Report 2 was created when the code in Listing 10 was executed.

Report 2: Output from Listing 10.

In Report 2 the column value for the RoomDesc column is now set to NULL.

Using the TOP Clause

The TOP clause can be used to limit the number of rows being updated. This can be demonstrated by using the code in Listing 11.

USE tempdb;
GO
UPDATE TOP (2) dbo.Room
   SET PriceChangeDateTime = SYSDATETIME();
SELECT * FROM Room;
GO

Listing 11: Using the TOP clause to limit the number of rows being updated

The table Room only has 3 rows of data. When the code is listing 9 is run only the first two rows will be update. This can be seen by revieing the PriceChangeDateTime column values on the three different rows in the output in Report 3.

Report 3: Output when Listing 11 was executed

In Report 3 only the first two rows have updated the PriceChangeDateTime column values. The “TOP (2)” clause in Listing 11 restricted the third row from getting a new datetime stamp value.

Concerns with using the UDPATE statement

Here is a list of a few concerns that might arise when issuing an UPDATE command:

  • Forgetting to add a WHERE constraint to an UPDATE statement when only a subset of rows needs to be updated. By leaving off the WHERE clause causes all rows in the target table will be updated. (This is a common database programmer error to think an entire statement is highlighted, but miss the WHERE clause. An all too common mistake.)
  • Having an incorrect WHERE clause. When a WHERE clause is not correct, either no rows will be updated, or the wrong rows will be updated.

There are a couple of different techniques that can be used to avoid these two issues.

The first one is to take a database/transaction log backup prior to running an untested UPDATE statement. By having a backup, you have a recovery point should a UPDATE statement update rows that should have been updated. Even though this method technically works, it might not be the most elegant solution to resolving a poorly coded UPDATE statement. It also is not ideal in a very active table where other writes are happening concurrently.

Another method is to first write a SELECT statement using the newly coded WHERE clause. By using a SELECT statement you can verify the correct rows are return. If the wrong rows are displayed, then no problem. Just modify the SELECT statement until the correct WHERE statement is coded, and the correct set of rows are displayed. Once the correct WHERE statement has been generated, change the SELECT statement to an UPDATE statement.

The last method (and one of the best methods when writing scripts to modify a production system) is to wrap the UPDATE statement inside a transaction. First issue a BEGIN TRANACTION, then make your changes. By doing this the UPDATE statement can be rolled back if it updated the rows or values incorrectly. Just be aware that uncommitted changes can block other users depending on how your server and databases are configured.

Updating data using a view

Updating data accessing a view can be a very useful tool. Using a view, you are able to enforce criteria on the user by embedding it in the view. Using the WITH CHECK OPTION, you can ensure that users can only modify (or insert) data that they can see based on any filtering of rows in the view. You can read more about view objects in the Microsoft documentation.

The important thing to understand for this article is that you can only modify one table object’s data at a time. For example, in listing 12 I will create a view that references dbo.Room and dbo.PriceChanges.

CREATE VIEW dbo.v_room
AS
SELECT Room.RoomNum,
       Room.Beds,
       Room.Sleeps,
       Room.StandardRate,
       Room.PriceChangeDateTime,
       Room.RoomDesc,
       PriceChanges.NewStandardRate
FROM   dbo.Room
                JOIN dbo.PriceChanges
                        ON Room.RoomNum = PriceChanges.RoomNum;

Listing 12: View that references multiple tables

One of the nice things about view objects is that they hide the implementation details from the user. However, if a user wrote the query as shown in Listing 13, they will get a confusing error message:

UPDATE dbo.v_room
   SET Beds = 100,
       NewStandardRate = 1000
WHERE  RoomNum = 1;

Listing 13: Update that references multiple tables in the same query

The error output is:

View or function 'dbo.v_room' is not updatable because the modification affects multiple base tables.

To use the view in this particular update scenario, you need to use the code from listing 14:

UPDATE dbo.v_room
  SET Beds = 100
WHERE  RoomNum = 1;

UPDATE dbo.v_room
   SET NewStandardRate = 1000
WHERE  RoomNum = 1;

This works fine.

Note: While it is beyond the scope of this article, you can make any view editable using an instead of trigger object. For more details, go to the documentation for CREATE TRIGGER.

Changing Data with the Basic UPDATE statement

The primary method to maintain existing data in a table as it changes over time is to use the UPDATE statement. An UPDATE statement can update a single column on a single row, or multiple columns on one or more rows. The values used to update a column value can be provided as a scalar expression or can come from column values in another table.

Care needs to be taken when writing UPDATE statements. A badly formed UPDATE statement might update all rows in an entire table, or an incorrect set of rows. Therefore, make sure all UPDATE statements are fully tested prior to running them against your production database. Understanding the basic UPDATE statement is critical in making sure accurate UPDATE statement are written and performed, to maintain database records, as their column values changed over time.

The post The Basics of Updating Data in a SQL Server Table appeared first on Simple Talk.


from Simple Talk https://ift.tt/vSKkfAc
via

Saturday, October 15, 2022

Going to the PASS Data Community Summit this year?

We are just one month away from the PASS Data Community Summit. One month. If you haven’t yet decided to go… let me try to sway you at least one more time to be there in mid- November.

If you work with any of the products that comprise the Microsoft Data Platform, you hopefully have heard of PASS, the PASS Summit, or the current PASS Data Community Summit. If you haven’t, follow this link and check it out. Suffice it to say that it has been one of the biggest conferences for the Microsoft Data Platform over the past 20 years and one I have gone to almost every one of them.

While the main focus of the summit is learning about SQL Server, Power BI, and the array of data platform tools, over time it has taken on a much more personal feel. It has grown to be almost like a family homecoming event where you see family you know as well as family you’ve never met before.

The past two years (for reasons you already know to well) have been virtual only. In the years before it was on site, mostly in Seattle, WA, but it has visited other sites as well. This year is a first… the conference is going to be hybrid, allowing you to be able to attend in Seattle, Washington, US, or anywhere in the planet where there is Internet connectivity.

 In Person

Not much needs to be said about going to the in-person event. The conference will be three main days of breakout sessions, and two days of full day sessions. The entire time you are there will be spent learning, eating, socializing and maybe a little sightseeing around Seattle. Pike Place Market.is just down a few blocks away as well as some amazing shops and museums. (You can sleep on the trip home.)

With a month to go, if you’ve been sitting on the fence of whether to travel to Seattle, it is time to choose a side of that fence. I can offer you one more incentive to fall towards attending: $200 off the price. Just use this code when registering: SIMPLETALKVIP, then before you know it, you will be amongst thousands of friends or soon to be friends and family.

Virtual

I obviously cannot, with clear conscious say that attending virtually will be as good as being there in person. It is not. Even the experience of walking down Pike Street on a chilly fall morning in Seattle is something that you cannot replicate virtually.

  A city street with a fire hydrant Description automatically generated with low confidence

What I will say, is that it is infinitely better than missing out completely and does have certain benefits over attending locally. So, if flying, travel costs, family needs, visas, mobility issues, etc. are a barrier for you making it to the Washington State Conference Center, attending virtually you can get just as much technical education (and still as much socializing as you want without even leaving the city you live in.)

This year will be my third PASS Summit that I will miss in-person for health issues (recovering from a broken foot), and it is immensely comforting that I will at least get to learn new topics, and interact with people, etc. even if it isn’t in person. I will be working as a session producer during all the break-out sessions, but will spend as much other time as I can hanging out in the virtual hangout areas. I will help host a few meetups, one for Simple Talk (for readers and creators alike) and another for the Friends of RedGate.

Beyond the obvious travel (or lack of) benefit, there is one major benefit to attending virtually. Seeing and hearing. After a day of sessions (and a previous night of socializing), the screen starts looking like this.

A group of people sitting in a room looking at a screen Description automatically generated with medium confidence

Sometimes because I am tired, sometimes because the room is large and some of the print is small; and sometimes because I accidentally brought the wrong glasses. Sitting here at my desk attending the session, it is clear as day even without my glasses. If I want to get a little bit of the feel of attending in person, I can cast sessions to my 65-inch TV and invite a friend or family member to occasionally climb past me during the best part of the session and then take pictures of the screen with the flash on! (Luckily I can go back and watch the part I missed later with the recordings!)

Just like I had a code for in-person event, I have, arguably, a better code for online. Use the code LDONLINE210 for 50% off. (That’s right, not $50, 50%. A great deal!).

 So go get registered

If you are able, click here on the registration link and register, attend, and watch as many of the presentations as you can during and after the summit. It will be well worth it!

See you online!


The post Going to the PASS Data Community Summit this year? appeared first on Simple Talk.


from Simple Talk https://ift.tt/ogv3iQ5
via

Friday, October 14, 2022

Backing up MySQL Part 1: mysqldump

mysqldump is one of the most popular database backup tools in the MySQL world.

The tool is prevalent partly because it’s very basic and quite powerful – mysqldump database backup tool is command line-based, very simple and very straightforward to use. As far as MySQL or its flavors (MariaDB and Percona Server) are concerned, this command line-based tool is one of the top choices for junior and senior database engineers across the world alike.

What is mysqldump and How Does It Work?

On a high level, mysqldump is a CLI-based database backup utility that is widely used to take logical backups. A logical backup creates a “logical copy” of the database by creating SQL statements that can be used to recreate the database structure, indexes, partitions, and data inside of tables within the database.

The utility can be invoked by typing mysqldump inside of the command line once we’re logged into MySQL and in most use cases, the usage of the tool looks something like this (all as one command on one line, separated for formatting purposes).

mysqldump -u[username] -p[password] 
    [one_or_more_of_the_available_options] 
    [database_name] [table_name] > output.sql

In this code block:

  • username - depicts your username that has access to do the backup.
  • password - is the password of that user.
  • one_or_more_of_the_available_options – lets us define the options needed for a specific dump of the data (we will get into that a little later.) You can also define a database_name from where they want their data to be dumped.

You can also elect to define a table_name inside of the database as well to only dump one table.

The mysqldump command is also usually finalized by specifying a file to write the output to – an arrow towards the right (“>”) with a file name after it will tell MySQL where to write the output of the command (the file can have any legal filename.) Without it, mysqldump will print all results to the screen. Users can also make the arrow face towards the left to import their data dumps into MySQL using the CLI like so:

mysql -uroot -p db_name < backup.sql

Bear in mind that, like most command line tools, it’s not advisable to use mysql or mysqldump by supplying a password in clear text. There are many reasons for this, but the main one is that might be possible for another person to log in and see the last issued commands, which include the provided username and password. It’s best to provide a username and password in the my.cnf file and avoid providing the password in the command line by doing something like this (also, choose a stronger password than the one provided here):

[mysqldump]
user=secret
password=useastrongpasswordhere

Then, our query would look the same, just without the -p[password] option due to the password already being provided in my.cnf: provide a username in the same fashion and you can get rid of the -u[username] option as well.

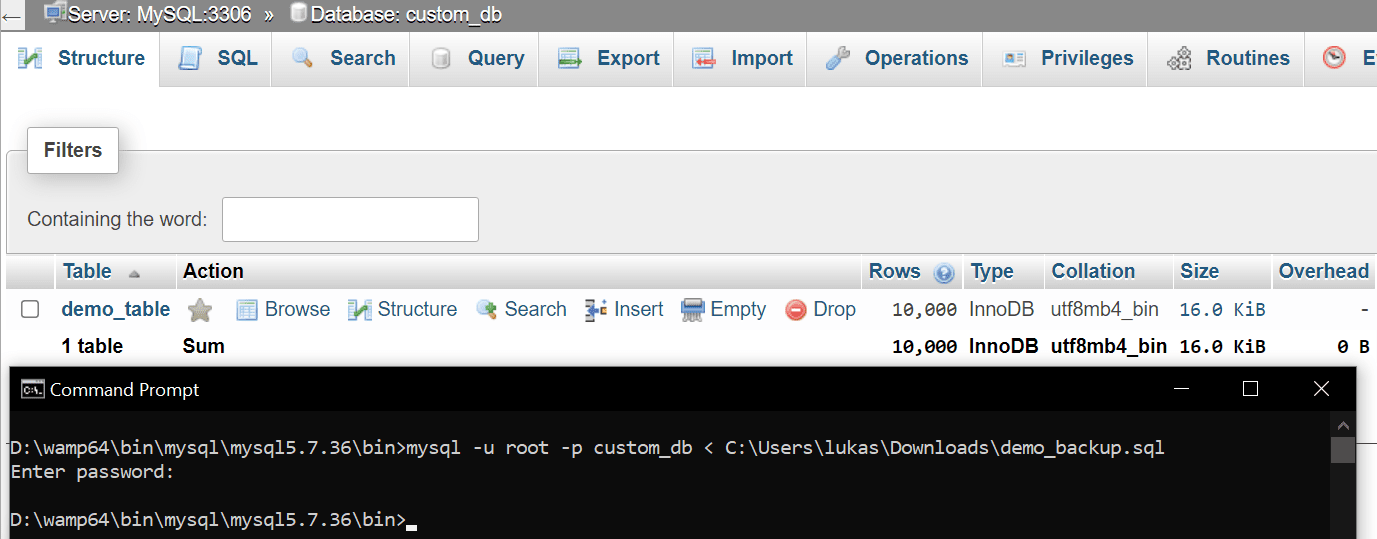
The output of mysqldump is usually a file with a .sql extension: if the name of the file is specified, MySQL creates the specified file, but if not, the name of the file will consist of the name of the database or the table that is being backed up (the following command would back up all tables inside of a demo_database into a file called demodb_backup.sql):

mysqldump -uroot -p demo_database > demodb_backup.sql

Options Provided by mysqldump

Now that we have covered the basics of how mysqldump works, let’s look at the options of mysqldump. Some of the commonly used options are as follows (all options should be provided after the username and the password, in the [one_or_more_of_the_available_options] position as indicated in the previous section.) All of the options can also be used in conjunction with other options as well:

Option

What Does it Do?


--all-databases

Can be used to take a backup of all databases in a database instance.

--add-drop-[table|database]

Adds a DROP [TABLE|DATABASE] statement before creating tables or databases. Useful if we’re migrating updated data back to the server where the old pieces of the data reside.

--fields-terminated-by

Adds a character at the end of one column and at the start of another (data will look like “column1|column2” if the “|” termination denominator is used, etc.) Very frequently used together with LOAD DATA INFILE | LOAD DATA INTO OUTFILE statements.

--force

Using this setting, the database dump continues even if any errors are encountered. Useful in a demo environment. Think of this setting as a brother to the --ignore command when loading a dump into the database – it essentially ignores all of the non-critical errors encountered by MySQL (such as duplicate value errors) letting the backup process continue until it’s finished no matter what.

--no–data

Tells MySQL to avoid dumping the data existing inside tables (i.e. MySQL will dump only the database and table structure, so the dumps will be considerably faster if we have a lot of data.)

--where

Only dumps data matching a specified WHERE clause.

--lock-tables

Allows us to lock all of the tables before taking a copy of them so that no operations could interfere with our backup – in such a case, data will not be inserted, updated, deleted, or otherwise modified. All locks last until the backup operation is finalized.

The table above should allow you to realize how powerful mysqldump can be if used properly; keep in mind that the table above doesn’t provide a complete list of the available options (you can find all options in the MySQL documentation); but it should be a decent starting point to gain a basic understanding of what mysqldump can do.

mysqldump Use Cases

Beyond simple backups, mysqldump can also be used to assist when we find ourselves dealing with “corner-case” usage cases as well: for example, the tool can provide tab-delimited output that can be exceptionally useful if we want to work with data in “big data” text viewers such as EmEditor or work with our data using Microsoft Excel: we simply specify the --tab option as part of the options and mysqldump will do all of the work for us. Should we want to test if the database object definitions are loaded into the database properly, all we have to do is dump our data by using a combination of four options provided one after another:

  • The --all-databases option would dump all databases.
  • The --no-data option would refrain from copying data.
  • The --routines option would dump procedures and functions inside of our database.
  • The --events option would dump the existing scheduled events.

When we use mysqldump in such a fashion, a dump (backup) file will be created, but it won’t have any data. However, loading the file back into a database server, though, will allow us to test for any weird, odd-looking warnings, or spot other noteworthy errors.

mysqldump can also be used together with other client-line programs such as mysql, mysqlimport or in a manual fashion using LOAD DATA INFILE: all we have to do is have the file taken by mysqldump at hand, then issue a statement like so (the following statement would import a file named demo.txt into a database named database_name):

mysqlimport --fields-terminated-by=: --lines-terminated-by=\n 
        database_name demo.txt

We can also use LOAD DATA INFILE in the same fashion: if our data is delimited by, say, the “,” sign, we could make use of a query like this and load our data existing in demo.txt into a table called demo_table:

LOAD DATA INFILE 'demo.txt' INTO TABLE demo_table FIELDS  
        TERMINATED BY ',';

Combining Options with mysqldump

Now let’s rewind a little. Throughout this article, we’ve kept mentioning that other options can be used together with mysqldump to do complex things with the tool. For some, here’s where the depths of mysqldump become a little complex but bear with us and we will explain everything you need to know.

First off, bear in mind that all components of MySQL (including, but not limited to mysqldump) usually have a couple of additional options can be specified and those options vary according to the component that we work with. Combining options is simple:

  1. Choose the component you need to work with (in our case, we’re looking at mysqldump.)
  2. Visit the documentation and familiarize yourself with the available options regarding that component (the complete list of options can be found in the documentation of the component you’ve chosen – the options for mysqldump can be found here.)
  3. Evaluate the issue that you’re having. How does the option you’re looking at help solve it? Will the results be satisfactory?
  4. Choose one or multiple options from those available.

Once you have chosen an option, remember that the output of any issued command is directly dependant on additional options. In other words, any option that is specified modifies the functionality of the command you’ve chosen. All options need to be specified by writing their name as part of a command after “–“, like so:

mysqldump --no-data

The above statement would make mysqldump work with a command named “no-data” (as explained above, the command wouldn’t dump any data, and it would only dump the structure of the database.) Combining --add-drop-table to tell MySQL to make sure the table of the same name doesn’t exist before creating any other tables. Some people may also want to specify an absolute path to the file in order to ensure that the file is going to be stored in a directory of their choice (doing so may be a necessity if the –secure-file-priv option is enabled: the option limits the ability for users to export or import data to or from the database – in that case, data could only be exported into a directory specified in the variable – learn more here.)

Coming back to mysqldump, though, one of the most frequent usage scenarios consist of dumping all databases and including a DROP TABLE statement before any table is created – doing so will ensure that even if the backup is loaded into a database that has the exact same table names, they will be dropped and created anew.:

mysqldump -uroot --all-databases --add-drop-table > backup.sql

As we have covered – mysqldump will dump the data inside of MySQL, but the specifics of what it will do are directly dependent on the options you specify when executing it. All options have a specific use, and once we choose what options we are going to combine the command with, we need to keep in mind the fact that it affects the output that we receive.

The complete list of available options exclusive to mysqldump can be found over at the documentation. When you’re done dumping, test the backup as well: load it into your MySQL database instance through phpMyAdmin or simply specify the name of the file through the CLI like so (note that the database must be created before importing the data into it):

mysql demo < backup.sql

The above command will import a backup into your database called “demo.” Do note this command assumes that you have your username and password specified in my.cnf in the same way you did for mysqlbackup (see example above) – if the username and password are not specified in your my.cnf file, you will still have to provide a username and a password like in the example below.

Then, inspect your database – does the data in it represent the data you expect to be in the instance?

With that being said, we will now leave the gates towards the depths of mysqldump open for you to explore; the advice contained in this blog post should be a decent starting point for those who are interested in how the CLI-based database dumping tool works and why does it work in the way that it does, and the MySQL documentation will act as a guide for people who are interested in the tool on a deeper level. Nothing beats your own experience though – do experiment with mysqldump on local servers, make sure to learn from the mistakes other developers made in the past as well, and until next time!


The post Backing up MySQL Part 1: mysqldump appeared first on Simple Talk.


from Simple Talk https://ift.tt/UFVfkPG
via

Friday, October 7, 2022

Introducing the MySQL INSERT statement

Entry in Robert Sheldon's series on Learning MySQL. The series so far:

  1. Getting started with MySQL
  2. Working with MySQL tables
  3. Working with MySQL views
  4. Working with MySQL stored procedures
  5. Working with MySQL stored functions
  6. Introducing the MySQL SELECT statement

In the previous article in this series, I introduced you to the SELECT statement, one of several SQL statements that fall into the category of data manipulation language (DML), a subset of statements used to query and modify data. Another DML statement is the INSERT statement, which lets you add data to MySQL tables, both permanent and temporary. This article covers the INSERT statement and the different ways you can use it to add data.

Earlier in this series, I introduced you to the INSERT statement, but most mentions were fairly brief because the statement was included only to support other concepts. This article focuses exclusively on the INSERT statement and the primary components that you should understand when getting started with this statement.

Preparing your MySQL environment

For the examples in this article, I used the same database, tables, and data that I used in the previous article. If you have not set up that database and want to try out the examples in this article, you can download the MySQL_06_setup.sql file and run the script against your MySQL instance. For your convenience, I’ve included the SQL for the manufacturers and airplanes tables here so you can reference their definitions when trying out the INSERT statements in the examples throughout this article:

CREATE TABLE manufacturers (
  manufacturer_id INT UNSIGNED NOT NULL AUTO_INCREMENT,
  manufacturer VARCHAR(50) NOT NULL,
  create_date TIMESTAMP NOT NULL DEFAULT CURRENT_TIMESTAMP,
  last_update TIMESTAMP NOT NULL 
    DEFAULT CURRENT_TIMESTAMP ON UPDATE CURRENT_TIMESTAMP,
  PRIMARY KEY (manufacturer_id) ) 
ENGINE=InnoDB AUTO_INCREMENT=1001;

CREATE TABLE airplanes (
  plane_id INT UNSIGNED NOT NULL AUTO_INCREMENT,
  plane VARCHAR(50) NOT NULL,
  manufacturer_id INT UNSIGNED NOT NULL,
  engine_type VARCHAR(50) NOT NULL,
  engine_count TINYINT NOT NULL,
  max_weight MEDIUMINT UNSIGNED NOT NULL,
  wingspan DECIMAL(5,2) NOT NULL,
  plane_length DECIMAL(5,2) NOT NULL,
  parking_area INT GENERATED ALWAYS AS ((wingspan * plane_length)) STORED,
  icao_code CHAR(4) NOT NULL,
  create_date TIMESTAMP NOT NULL DEFAULT CURRENT_TIMESTAMP,
  last_update TIMESTAMP NOT NULL 
    DEFAULT CURRENT_TIMESTAMP ON UPDATE CURRENT_TIMESTAMP,
  PRIMARY KEY (plane_id),
  CONSTRAINT fk_manufacturer_id FOREIGN KEY (manufacturer_id) 
    REFERENCES manufacturers (manufacturer_id) ) 
ENGINE=InnoDB AUTO_INCREMENT=101;

If you don’t want to mess with downloading and running the script, you can simply create these two tables without populating them. They include everything you need to test out the INSERT statements in the following examples.

The INSERT statement syntax

A MySQL INSERT statement is one of the fundamental DML statements in MySQL. You can use it to add one or more rows of data to a table. The following syntax shows that basic elements that go into an INSERT statement:

INSERT [IGNORE] [INTO] table_name
[(column_list)]
VALUES (value_list) [, (value_list)]...

The syntax does not include all the elements in an INSERT statement, but it does provide the ones that will be most useful to you when first learning how to use the statement:

  • The INSERT clause specifies the table in which the data will be inserted. The INTO keyword is optional, but it is used quite commonly with INSERT. Its use does not impact the statement one way or the other. The IGNORE keyword determines how certain exceptions are handled when running the INSERT statement, which will be covered later in the article.
  • The second line in the syntax specifies the columns into which the data will be inserted. The column list must be enclosed in parentheses, and if there is more than one column, they must be separated by commas. The column list is optional, but it is generally a good idea to include it in case there are underlying schema changes. If the column list is not included, a value must be provided for every column in the table, in the order the columns are listed in the table definition.
  • The VALUES clause specifies the values to be inserted into the target table. The values themselves must be enclosed in parentheses and, if there is more than one, separated with commas. The values must correspond to the columns in the column list, if one is present. If not, you must include a value for every column. You can specify multiple rows of data (value lists) in the VALUES clause. If you do, each value list must be enclosed in its own set of parentheses, and the value lists must be separated by commas.

The INSERT statement also supports the INSERT…SELECT format, which enables you to add data to a table using the results returned by SELECT statement, rather than including a VALUES clause. Although there’s more to the INSERT statement than the basic elements I’ve described here, this should be enough to get you started and, in fact, enable you to add a wide range of data to your MySQL tables. This will also provide you with a good foundation for when you’re ready to learn more advanced statement features.

Inserting a single row into a table

In most cases, adding a single row of data to table is a reasonably straightforward process. You define the INSERT clause and VALUES clause and usually specify the column list in between. The column list should include only those columns for which you provide values. The list can include the primary key column, generated columns, or columns defined with default constraints, but you must be careful how you handle them, as you’ll see later in the article.

When specifying the column values, be sure that they conform to the data types defined on the target column. To demonstrate what I mean, take a look at the following example:

INSERT INTO manufacturers (manufacturer)
VALUES ('Bombardier');

The INSERT statement adds a row to the manufactures table. In this case, the column list includes only the manufacturer column, which is defined with the VARCHAR(50) data type. Because only one column is specified, the VALUES clause contains only one value, Bombardier, which is passed into the clause as a string (as indicated by the single quotations). The string is treated as character data, which can be inserted into the VARCHAR column, as long as the string is within the 50-character limit.

You don’t need to pass values into the other columns in the table because MySQL assigns their values by default. The manufacturer_id column is automatically assigned a value through the AUTO_INCREMENT operator, and the create_date and last_update columns each include a DEFAULT constraint that uses the CURRENT_TIMESTAMP operator to automatically assign the current timestamp to the column.

After you run the INSERT statement, you can verify that the row has been added by running the following SELECT statement.

SELECT * FROM manufacturers WHERE manufacturer = 'Bombardier';

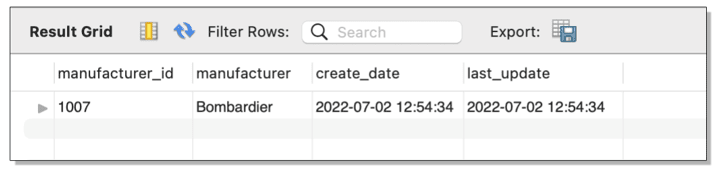
Figure 1 shows the statement’s results, which includes only one row because the SELECT statement includes a WHERE clause that specifies Bombardier as the manufacturer.

Figure 1. Adding a row to the manufacturers table

Notice that the manufacturer_id value is 1007. You will need to know this value when you add data to the airplanes table, if the data is related to the Bombardier manufacturer. This is because the airplanes table includes a foreign key that references the manufacturer_id column in the manufacturers table. For example, the following INSERT statement adds a row of data to the airplanes table, specifying 1007 as the value for the manufacturer_id column (note that if you are following along, your value may not be 1007 in the statements, depending on what you have done with the table, so you may need to alter the value as you work with the code):

INSERT INTO airplanes 
  (plane, manufacturer_id, engine_type, engine_count, 
    wingspan, plane_length, max_weight, icao_code)
VALUES ('Learjet 24',1007,'Jet',2,35.58,43.25,13000,'LJ24');

As you can see, the column list includes many more columns than the previous example. In fact, it includes all the table’s columns except the primary key column (plane_id), the generated column (parking_area), and the two columns defined with default constraints (create_date and last_update).

The VALUES clause contains a value for each specified column. The value list includes 1007 for the manufacturer_id value because the row data describes one of Bombardier’s planes. If you try to insert a row that includes a nonexistent manufacturer_id value, MySQL will throw an error.

After you run the INSERT statement, you can verify that the row has been added by running the following SELECT statement:

SELECT * FROM airplanes WHERE manufacturer_id = 1007;

Figure 2 shows the results returned by the SELECT statement. Because only one plane has so far been added for Bombardier, the results include only that row.

Figure 2. Adding a row to the airplanes table

The two examples in this section demonstrated the basic elements that go into an INSERT statement. The biggest issue to watch for is to ensure that you correctly match your column list and value list. If you don’t, your statement is likely to generate an error or, worse still, add incorrect data to your database.

Working with primary keys

Even if you define your primary key column with the AUTO_INCREMENT operator, you can still insert a specific value into that column, as long as the value doesn’t already exist and it conforms to the column’s data type. For example, the following INSERT statement adds another row to the airplanes table, only this time it specifies a plane_id value, rather than letting the operator automatically generate the value:

INSERT INTO airplanes 
  (plane_id, plane, manufacturer_id, engine_type, engine_count, 
    wingspan, plane_length, max_weight, icao_code)
VALUES (401,'Learjet 24A',1007,'Jet',2,35.58,43.25,12499,'LJ24');

In this case, the plane_id value is 401, but you could have specified any unsigned integer, as long as it’s not already being used. If you now run the preceding SELECT statement, you should get the results shown in Figure 3 .

Figure 3. Specifying the primary key value (outlined in red) when inserting data

If you just created the table, the plane_id value for the first row should be 101, but if you had created (and populated) the table in the previous article, the value should be 342.

When adding a value manually to an AUTO_INCREMENT column, be aware this will set a new starting point for the operator. You can see this in action in the following example, which adds another row to the table, but without specifying the plane_id value:

INSERT INTO airplanes 
  (plane, manufacturer_id, engine_type, engine_count, 
    wingspan, plane_length, max_weight, icao_code)
VALUES (‘Learjet 24E’,1007,’Jet’,2,35.58,43.25,12900,'LJ24');

If you were to query the airplanes table after running the INSERT statement, you would see that the plane_id value for the new row is 402, not 343, which would have been the old starting point for the AUTO_INCREMENT operator.

Figure 4. Viewing the primary key values (outlined in red) on the inserted data

In most cases, a new starting point will probably not be a big deal, but it could cause a bit of confusion for someone reviewing the data because it might appear as though rows are missing. You can’t go back, either. For instance, you can add a row that manually specifies 343 as the plane_id value, but the next auto-incremented value will still be 403, not 344.

Whatever value you add to a primary key column, you must ensure that you don’t specify a value that’s currently being used, as in the following example:

INSERT INTO airplanes 
  (plane_id, plane, manufacturer_id, engine_type, engine_count, 
    wingspan, plane_length, max_weight, icao_code)
VALUES (401,'Learjet 25',1007,’Jet’,2,35.58,47.58,15000,'LJ25');

Because the plane_id value 401 already exists, MySQL will stop execution and return the following error:

Error Code: 1062. Duplicate entry ‘401’ for key ‘airplanes.PRIMARY’

That said, if a primary key value has been deleted from the table or changed to another value, the original value can be reused.

At times, you might want to prevent a statement from generating an error even if there is a problem with a value. In these situations, you can add the IGNORE modifier to the INSERT statement to instruct MySQL to return a warning rather than generate an error and stop execution. To use the modifier, add the IGNORE keyword directly after INSERT, as in the following example:

INSERT IGNORE INTO airplanes 
  (plane_id, plane, manufacturer_id, engine_type, engine_count, 
    wingspan, plane_length, max_weight, icao_code)
VALUES (401,'Learjet 25',1007,’Jet’,2,35.58,47.58,15000,'LJ25');

The IGNORE modifier applies only to certain types of errors. Fortunately, a duplicate primary key is one of those. Now the INSERT statement will return the following warning, rather than stopping execution:

0 row(s) affected, 1 warning(s): 1062 Duplicate entry ‘401’ for key ‘airplanes.PRIMARY’

The data is still not inserted into the table, but statement execution can continue if necessary. This probably won’t have much of an impact when adding only one row to a table. However, if you were running an INSERT statement that adds multiple rows, the modifier makes it possible for the statement to still add the other rows even if one of them fails.

Overriding default values

There will likely be times when you’ll want to override a column’s default value with your own, in which case, you simply specify the value as you would any other column. For example, the following INSERT statement overrides the default value assigned to the create_date column:

INSERT INTO airplanes 
  (plane, manufacturer_id, engine_type, engine_count, 
    wingspan, plane_length, max_weight, icao_code, create_date)
VALUES ('Learjet 25',1007,'Jet',2,35.58,47.58,15000,
        'LJ25','2022-06-12 08:30:00');

As you can see, I’ve included create_date in the column list and the new value in the value list. If you query the airplanes table after running the INSERT statement, you’ll see that the specified value has been inserted into the create_date column, as shown in Figure 5.

Figure 5. Overriding a column’s default value (outlined in red)

The INSERT statement also supports the use of the DEFAULT keyword. This can be handy when including a column that automatically generates a value. For example, you can use the keyword in your value list for primary key columns, generated columns or columns defined with default constraints.

The main advantage of this approach is that you don’t have to specify the table’s columns after the INSERT clause. For example, the following INSERT statement achieves the same results as the preceding example, but without the column list:

INSERT INTO airplanes 
VALUES (DEFAULT,'Learjet 25',1007,'Jet',2,15000,35.58,47.58,
  DEFAULT,'LJ25','2022-06-12 08:30:00',DEFAULT);

That statement uses the DEFAULT keyword for the primary key column (plane_id), the generated column (parking_area), and the last_update column, which is defined with default constraint. However, the statement still specifies a value for the create_date column.

Although this approach might make it easier to write certain types of INSERT statements, you must ensure that you specify values for all columns and that you list them in the correct order (as they appear in the table definition), otherwise, your statement might generate an error or insert incorrect data. Be aware this approach does not protect against underlying schema changes. For example, if a column is added to the table, the INSERT statement would break. That’s why it’s usually better to specify the column list.

Getting the values right

An INSERT statement will fail if the number of specified values in the VALUES clause does not match the number of specified columns in the column list. For example, the following INSERT statement includes a value list that contains one more value than the column list:

INSERT INTO airplanes 
  (plane, manufacturer_id, engine_type, engine_count, 
    wingspan, plane_length, max_weight)
VALUES ('Learjet 25A',1007,'Jet',2,35.58,47.58,12499,'LJ25');

In this case, the missing column is icao_code, but it could have been any column. The statement will still return the following error:

Error Code: 1136. Column count doesn’t match value count at row 1

The reference to row 1 in the error message means that the first error to be encountered was the first row of values that you tried to add to the table. If you were trying to add five rows and the error occurred at the third row, the error message would reference row 3. However, if you try to insert multiple rows and more than one row contains incorrect values, the error message will reference only the first row that caused MySQL to stop execution and generate the error.

You’ll also receive this error if you specify more columns than values, as in the following INSERT statement:

INSERT INTO airplanes 
  (plane, manufacturer_id, engine_type, engine_count, 
    wingspan, plane_length, max_weight, icao_code, create_date)
VALUES ('Learjet 25A',1007,'Jet',2,35.58,47.58,12499,'LJ25');

This time, the column list includes the create_date column, but the value list does not include a value for the column. The number of columns must match the number of values. If they don’t, MySQL generates an error and stops statement execution. Unfortunately, the IGNORE keyword does not prevent this type of error from being generated.

In addition to getting the number of columns and values right, you must also ensure that your values are the correct data types. For example, the following INSERT statement attempts to insert the value multiple tons in the max_weight column:

INSERT INTO airplanes 
  (plane, manufacturer_id, engine_type, engine_count, 
    wingspan, plane_length, max_weight, icao_code)
VALUES ('Learjet 25A',1007,'Jet',2,35.58,47.58,'multiple tons','LJ25');

The statement generates the following error because it’s trying to insert a character string into a column configured with the MEDIUMINT data type:

Error Code: 1366. Incorrect integer value: 'multiple tons' for 
column 'max_weight' at row 1

Unlike the first two examples in this section, the IGNORE keyword will work in this situation, changing the error into a warning. However, rather than inserting multiple tons into the max_weight column, MySQL will insert 0.

Another issue to be aware of is the column order. You must ensure that your column list and value list are in the same order to avoid inserting the wrong data into the wrong column. For example, the airplanes table includes the wingspan and plane_length columns, both of which are defined with the DECIMAL(5,2) data type. In a situation such as this, it would be easy to invert the values when inserting them into the columns, without generating an error, resulting in the database storing the wrong wingspan and length.

Because the columns are configured with the same data type, this type of error can be difficult to catch. This is similar to what you might see when first names and last names get reversed in a database. You might be able to define check constraints on the table to help eliminate some risks (depending on the nature of the data), but it basically comes down to taking extra care to ensure that the values correctly match their respective columns.

Inserting multiple rows in a table

The INSERT statement lets you add multiple rows of data to a table, without having to define multiple statements. You need to include only one VALUES clause, but you must include a value list for each row, enclose each value list in parentheses, and separate those value lists with commas. For example, the following INSERT statement adds four rows to the airplanes table:

INSERT INTO airplanes 
  (plane, manufacturer_id, engine_type, engine_count, 
    wingspan, plane_length, max_weight, icao_code)
VALUES 
  ('Challenger (BD-100-1A10) 300',1007,'Jet',2,63.83,68.75,38850,'CL30'),
  ('Challenger (BD-100-1A10) 350',1007,'Jet',2,69,68.75,40600,'CL30'),
  ('Challenger (CL-600-1A11) 600',1007,'Jet',2,64.33,68.42,36000,'CL60'),
  ('Challenger (CL-600-2A12) 601',1007,'Jet',2,64.33,68.42,42100,'CL60');

As you can see, each row is enclosed in parentheses, and commas separate the rows. If you query the table after running the INSERT statement, you should see the newly added rows, as shown in Figure 6.

Figure 6. Adding multiple rows to a table

Adding multiple rows is a straightforward process, but you must ensure you take the same precautions as when adding a single row. Each value list must include the same number of values as the number of specified columns. The values must also be in the correct order and conform to the data types defined on the target columns. However, you can use the IGNORE keyword if you want the INSERT statement to continue to execute even if one row fails, although this depends on the nature of the error.

Inserting data into a temporary table

MySQL also lets you use the INSERT statement to add data to a temporary table. It works the same as adding data to a regular, permanent table, except that a temporary table exists only during the current session and is dropped as soon as the session ends. To create a temporary table, you can use the CREATE TABLE statement, but you must include the TEMPORARY keyword after CREATE, as shown in the following example:

CREATE TEMPORARY TABLE airplanes_temp (
  plane VARCHAR(50) NOT NULL,
  manufacturer_id INT UNSIGNED NOT NULL,
  engine_type VARCHAR(50) NOT NULL,
  engine_count TINYINT NOT NULL,
  wingspan DECIMAL(5,2) NOT NULL,
  plane_length DECIMAL(5,2) NOT NULL,
  max_weight MEDIUMINT UNSIGNED NOT NULL,
  icao_code CHAR(4) NOT NULL);

The statement creates the airplanes_temp table, which includes many of the same columns as the airplanes table. After you create the airplanes_temp table, you can use an INSERT statement to add data to that table, following the same format as you saw in earlier examples:

INSERT INTO airplanes_temp 
  (plane, manufacturer_id, engine_type, engine_count, 
    wingspan, plane_length, max_weight, icao_code)
VALUES 
  ('Challenger (CL-600-2B16) 601-3A and -3R',1007,'Jet',2,64.33,68.42,43100,'CL60'),
  ('Challenger (CL-600-2B16) 604',1007,'Jet',2,64.33,68.42,47600,'CL60'),
  ('Challenger 604-605',1007,'Jet',2,64.33,68.42,48200,'CL60'),
  ('Challenger 650',1007,'Jet',2,64.33,68.42,48200,'CL60');

The INSERT statement adds four rows, as indicated by the value lists in the VALUES clause. After running the statement, you can query the table to verify that the rows have been properly inserted:

SELECT * FROM airplanes_temp;

The SELECT statement should return the results shown in Figure 7.

Figure 7. Adding data to a temporary table
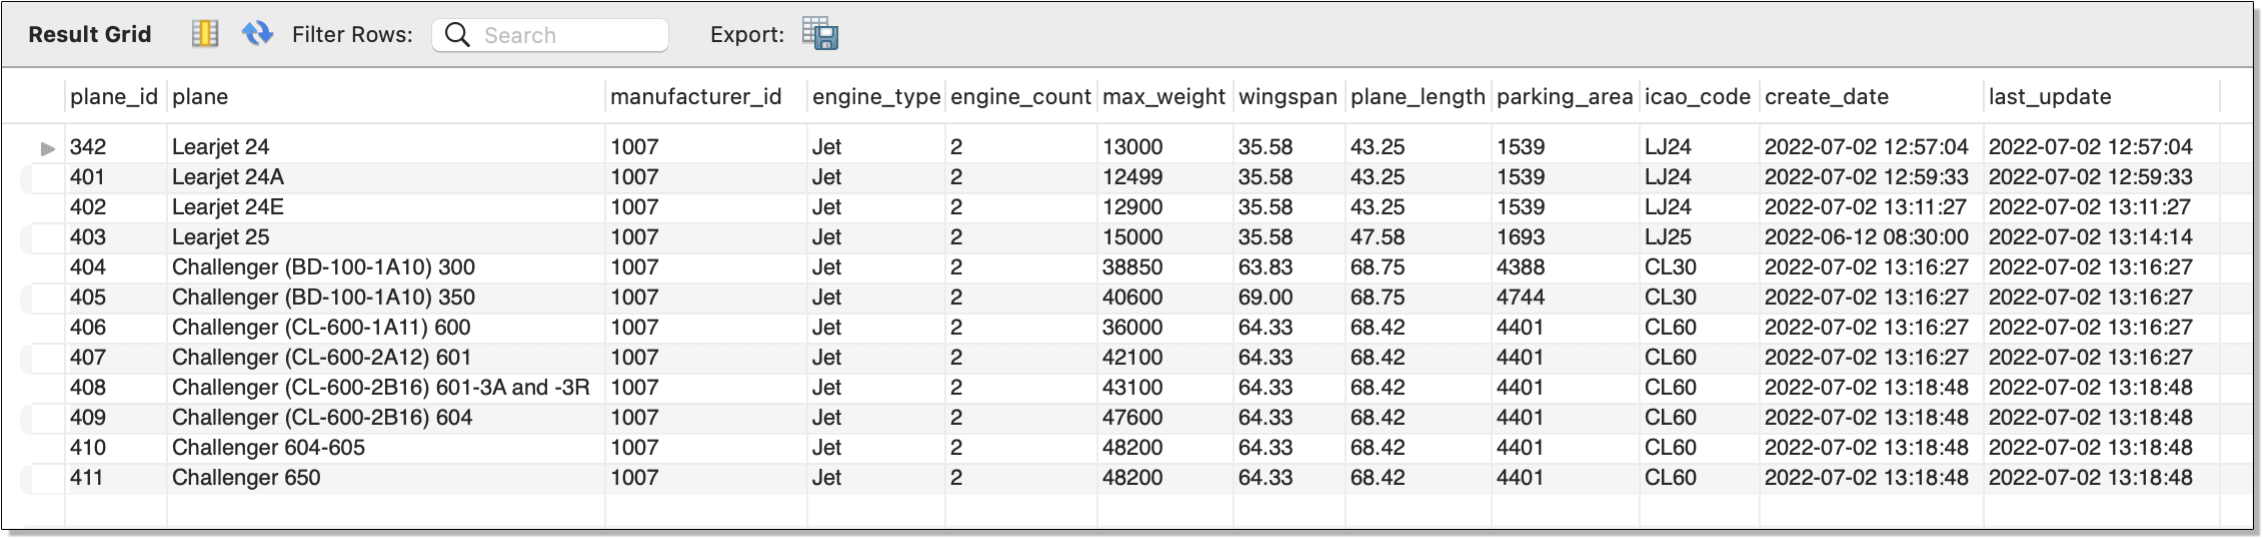
You can access the temporary table just like a regular table, as long as you’re still in the same session in which the table was created. The temporary table retains the data until you explicitly drop the table or end the session.

Inserting data from a SELECT statement

Another handy feature of the INSERT statement is its ability to use the results of a SELECT statement to add data to a table. For this, the INSERT statement takes a slightly different syntax:

INSERT [IGNORE] [INTO] table_name
[(column_list)]
select_statement

Many of the statement’s base elements are the same. The main difference is that you substitute the VALUES clause with a SELECT statement. For example, the following INSERT statement replaces the VALUES clause with a SELECT statement that retrieves data from the airplanes_temp temporary table:

INSERT INTO airplanes 
  (plane, manufacturer_id, engine_type, engine_count, 
    wingspan, plane_length, max_weight, icao_code)
SELECT plane, manufacturer_id, engine_type, engine_count, 
  wingspan, plane_length, max_weight, icao_code
FROM airplanes_temp
WHERE manufacturer_id = 1007;

The SELECT statement itself is just a standard query. The main thing to be aware of in this case is that it’s retrieving data from a temporary table, so you must run the INSERT statement in the same session that the temporary table was created. After you run the INSERT statement, you can then run the following SELECT statement (which is the same one we’ve been using) to verify that the data has been added:

SELECT * FROM airplanes WHERE manufacturer_id = 1007;

The SELECT statement returns the results shown in Figure 8. Notice that the four rows that were in the temporary table are now in the airplanes table.

Figure 8. Inserting data from a SELECT statement

You might have noticed that the SELECT statement embedded in the INSERT statement was retrieving all rows and columns from the airplanes_temp table. In situations such as this, you can use a TABLE statement instead of a SELECT statement:

INSERT INTO airplanes 
  (plane, manufacturer_id, engine_type, engine_count, 
    wingspan, plane_length, max_weight, icao_code)
TABLE airplanes_temp;

This INSERT statement achieves the same results as the preceding INSERT statement. The TABLE statement itself is comparable to the following query:

SELECT * FROM airplanes_temp;

Although the TABLE statement simplifies the INSERT statement, you must be sure that the columns in the column list are in the same order as those returned by the TABLE statement and that there are the same number of columns.

Working with the INSERT statement

For the most part, you should have little problem working with the INSERT statement, as long as you’re careful when specifying your column list and value list. Once you get comfortable with the basics, you can then incorporate the statement into other objects. For example, you might create a stored procedure that inserts data into a table.

You can also explore other aspects of the INSERT statement, such as adding data to a partitioned table or updating a row with a duplicate primary key. To learn more about the options available to the statement, check out the INSERT Statement topic in the MySQL reference manual. Just be sure you have a good handle on the basics before moving on to the more advanced features available to that statement.

The post Introducing the MySQL INSERT statement appeared first on Simple Talk.


from Simple Talk https://ift.tt/Hk8tvUG
via

Wednesday, October 5, 2022

The Basics of Inserting Data into a SQL Server Table

Entry in Greg Larsen series on Learning T-SQL. The series so far:

  1. The basic T-SQL Select Statement
  2. Ordering a result set in SQL Server
  3. The ins and outs of joining tables in SQL Server
  4. Summarizing data using GROUP BY and HAVING
  5. The Basics of Inserting Data into a SQL Server Table

Before data can be read from of a SQL Server database table, the table needs to contain rows of data. One of the most typical ways to get data into a table is to use the INSERT statement. One row or multiple rows can be inserted with a single execution of an INSERT statement. You can even use the output of a stored procedure to insert rows. In this article, I will explore the basics of inserting data into a SQL Server table using the INSERT statement.

Syntax of the basic INSERT statement

As with most SQL Server commands, there are multiple ways to use them. The INSERT statement is no different. For this article, let’s review the syntax of the basic INSERT statement found in Figure 1.

INSERT [INTO] <object >[ (<column_list>)] 
  VALUES (<value_list1>)[,(<value_list2>)…,(<value_list N>)];

Figure 1: Basic Insert statement

Figure 1 only contains the syntax for the basic INSERT statement. For the complete syntax of the INSERT statement, refer to the Microsoft Documentation. You will see that there is quite a bit more syntax available, but in this article, I will include only the basics.

The object is the name of the table or view in which a single row or multiple rows will be inserted. The column_list contains the comma delimited names of the columns that will be populated with values identified in the VALUES parameter. The column_list is only required if a subset of the object’s columns is populated with values, although it can also be included if all the columns in the table are being populated.

value_list1 will include the values used to populate the columns inserted in the first row. If multiple rows are inserted with a single INSERT statement, then value_list2 through value_listN will be used to identify the additional sets of values for any other rows to be inserted.

A few examples are provided to better understand how to use this basic syntax to insert data into a SQL Server table.

Creating table to insert rows of data

Before the examples in this article can be executed, a target table for insert rows needs to be created. The code in Listing 1 will create that table.

USE tempdb;
CREATE TABLE dbo.Cars 
(
   CarID tinyint NULL, 
   Manufacture varchar(30) NULL, 
   Model Varchar(30) NULL,
   ModelYear int NULL, 
   PurchaseDate date NULL
);

Listing 1: Code to create target table

The code in Listing 1 creates a table named dbo.Cars, that will be created in the tempdb database. If you want to follow along and run the example code in this article, then run the code in Listing 1 to create the dbo.Cars table on your SQL Server instance. Any database, even tempdb as included in the code, will suffice.

Populating each column in a table

An INSERT statement can be used to insert a value for every column in a table, or a subset of columns. In this section, two examples will be shown that populate values for all the columns in the dbo.Cars table. The code for the first example can be found in Listing 2.

INSERT INTO dbo.Cars (CarID, 
           Manufacture,
           Model, 
           ModelYear, 
           PurchaseDate)
VALUES (1, 'Ford', 'F250', 2017, '2021-11-25');

Listing 2: Populating each column using the column list parameter

The code in Listing 2 inserts a single row into the dbo.Cars table. This INSERT statement uses the optional column_list parameter, which in this case identifies every column in the table. Since every column in the dbo.Cars table is being populated, the column list is not required. But including the column_list parameter is a common practice for clarity and reducing breaking changes as it allows new columns with DEFAULT constraints to be added without affecting existing code.

The VALUES clause in Listing 2 contains only the value_list1 parameter since only one row is being inserted. The first value in column_list1 specifies the numeric value 1. This value will be used to populate the first column identified in the column_list, which in this case is CarID. The second column in the column list Manufacture is populated with the second value in column_list1 parameter, “Ford”. Each of the following values in value_list1 are used to populate each additional column listed in the column_list parameter.

The code in Listing 3 shows adding a second row to the dbo.Cars table, where every column is populated with a value. But this example doesn’t include the column_list parameter.

INSERT INTO dbo.Cars 
VALUES (2, 'Subaru', 'Outback', 2019, '2018-12-31');

Listing 3: Populating each column without using the column_list parameter

When no column_list parameter is specified, the values in the column list must be specified in a specific order to ensure the correct column gets populated with the correct value. The order to specify the values is based on the column’s ordinal position in the table. The first value specified places a value in the first column in the table, the second value goes in the second column, and so on.

Populating only a few columns with an INSERT statement

There are times when a row needs to be inserted, but there are no values available for every column in the table. For instance, suppose the dbo.Cars table tracks the inventory of cars on a car dealer’s parking lot. Typically, cars on a car lot have not yet been purchased. Because of this, the purchase date for a car will not be known until the car is bought by a customer. You can create a new row in the dbo.Cars table without including a value for the PurchaseDate column, the INSERT statement in Listing 4 can be run. The value will either be NULL or use a DEFAULT constraint value if one exists.

INSERT INTO dbo.Cars (Manufacture, Model, ModelYear, CarID)
VALUES ('Chevrolet', 'Suburban', 2005,3);

Listing 4: Inserting a row without populating the PurchaseDate column.

In Listing 4, a new Chevrolet Suburban was added to the dbo.Cars table, without a purchase date. The code in Listing 4 didn’t have the PurchaseDate column listing in the column list parameter or a matching purchase data value in the VALUES parameter. Therefore, this INSERT statement populated all columns but the PurchaseDate column.

One other thing worth mentioning about Listing 4 is the first column listed in the column_list and first value listed value_list1 parameters are not for populating the first column, ordinal position-wise in the dbo.Cars table. The first ordinal column in the dbo.Cars table is CarID, which is specified last in the column_list of this example. Therefore, this example demonstrates that the columns listed in the column_list parameter and value list don’t have to be specified in the ordinal position order relative to the other column/value pairs listed. If you’d like to know the ordinal positions of each column in the dbo.Cars table, then you can run the code in Listing 5.

SELECT column_id, name
FROM  sys.columns
WHERE OBJECT_ID = OBJECT_ID('dbo.Cars')
ORDER BY column_id;

Listing 5: Showing the original position for columns

To verify that each column was populated with the correct value and the PurchaseDate column didn’t get a value the code in Listing 6 can be run.

SELECT * FROM dbo.Cars where CarID = 3;

Listing 6: Reviewing the row inserted by the code in Listing 4

In Report 1 is the output when the code in Listing 6 is executed.

Report 1: Output produced when Listing 5 is executed

Report 1 shows the PurchaseDate column value was not populated with a value. Plus, all the other columns were correctly populated even though the columns in the column_list parameter were specified in a different order then their ordinal position in the dbo.Cars table.

Automatically generating an identity column value when inserting rows

A table definition might have at most one column identified as an identity column. When a column has been defined as an identity column, the values assigned for the column will typically be automatically generated when each new row is inserted. The values generated are based on the seed and increment value associated with the identity column. The seed value identifies the value of the identity column for the first row populated. Whereas the increment value identifies the value that will be added to the previous inserted identity value to obtain the next identity value.

When an identity column is defined on a table, the value for that column can’t be manually populated with an insert statement. In order to demonstrate this, the dbo.Cars table will need to be dropped and recreated by running the code in Listing 7.

USE tempdb;
GO
DROP TABLE dbo.Cars;
GO
CREATE TABLE dbo.Cars 
(
   CarID tinyint identity, 
   Manufacture varchar(30), 
   Model Varchar(30),
   ModelYear int, 
   PurchaseDate date
);

Listing 7: Dropping and recreating dbo.Cars table

In Listing 7, the new dbo.Cars table created specified that the CarID column is an identity column without specifying an seed and increment value. When the seed and increment values are not identified, the default values of 1 will be used for the seed and increment values. The seed value is the first value used, and the increment is how much will be added to the previous value for the next value.

If an INSERT statement tries to manually insert an identity column value, an error will occur. To demonstrate this, the code in Listing 2 can be executed again. This second execution produces the error shown in Report 2.

Report 2: Error received when inserting row

This error occurs because the code in Listing 2 tried to insert the value “1” into the identity column while the IDENTITY INSERT property for the dbo.Cars table is set to off. Before discussing this property first let’s show the correct way to automatically insert rows when a table contains an identity column.

The code in Listing 8 demonstrates how to automatically generate identity column values when using the basic INSERT statement without providing the value for the CarID column.

INSERT INTO dbo.Cars (Manufacture, Model, ModelYear, PurchaseDate)
VALUES ('Ford', 'F250', 2017, '2021-11-25');

INSERT INTO dbo.Cars 
VALUES ('Subaru', 'Outback', 2019, '2018-12-31');

SELECT * FROM dbo.Cars;

Listing 8: Automatically generating identity values when inserting a row

Report 3 shows the output from SELECT statement when Listing 8 is run.

Report 3: Output when Listing 8 is run

The code in Listing 8 has the INSERT statements that were included in Listing 2 and 3, but with one exception. It doesn’t contain the CarID column in the column list parameter. Report 3 shows how the identity value on the first row inserted was assigned the value 1 and the next row inserted got an identity value of 2.

IDENTITY_INSERT property and manually assigning identity values

Identity value can be assigned manually if needed. It is generally not a good practice to manually insert identity values. But there are times when you might need to assign an identify column manually, like if you need to recreate some missing data (for example an errantly deleted row).

To do this, the IDENTITY_INSERT option needs to be turned on for the table in which identity columns are going to be inserted. To demonstrate this, execute the code in Listing 9.

SET IDENTITY_INSERT dbo.Cars ON;

INSERT INTO dbo.Cars (CarID,Manufacture, Model, ModelYear)
VALUES (10,'Chevrolet', 'Suburban', 2005);

SET IDENTITY_INSERT dbo.Cars OFF;
SELECT * FROM dbo.Cars;

Listing 9: Manually inserting an identity value.

This code first turned on the IDENTITY_INSERT property on dbo.Cars table using a SET command. Turning on IDENTITY_INSERT tells the SQL Server database engine that an INSERT statement will supply the identity value in an INSERT statement. The INSERT statement in Listing 9, inserts a new dbo.Cars row, and supplies value of 10 for the CarID column. Lastly, the code uses another SET command to turn off the IDENTITY_INSERT property.

Note: The best practice is to turn on IDENTITY_INSERT just before inserting identity values and turning it off immediately following the last INSERT statement that assigns an identity value.

Report 4 shows the output produced when the SELECT statement is Listing 9 was executed. See how the third row has a value of 10 for the CarID column.

Report 4: Output when Listing 9 was executed

Care should be taken when manually setting identity values because it is possible to insert a row with an identity value that already exists.

When identity values are assigned manually, SQL Server keeps track of the highest identity value added. It then uses this highest value to generate the next identity value when a new row is inserted (this is demonstrated in the next section).

Add multiple rows to a table using a single INSERT statement

Prior to SQL Server 2008, only one row could be added to a table using the VALUES clause of an INSERT statement. With SQL Server 2008 or above, multiple rows can be inserted using a single INSERT statement when it contains multiple items in the VALUES clause. The code in Listing 10 shows how to insert 2 new rows into the dbo.Cars table with a single INSERT statement.

INSERT INTO dbo.Cars (Manufacture, Model, ModelYear,PurchaseDate)
VALUES ('Kia', 'Spectra', 2007,'2008-11-18'),
    ('Nissan','King Cab',1983,'1998-05-14');

SELECT * FROM dbo.Cars;

Listing 10: Inserting two rows with a single INSERT statement

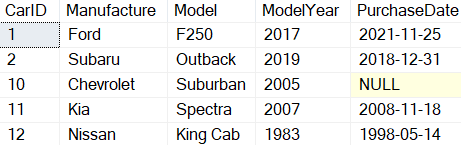
By reviewing Listing 10, you can see there are two different sets of values listed in the VALUES parameter. Each set of values is contained inside a set of parathesis, with a comma between them. When Listing 10 is executed, two rows will be inserted. The SELECT statement in Listing 9 produced the output in Report 5.

Report 5: Output when Listing 9 is run

The last two rows, with identity values 11 and 12, were the ones added with the single INSERT statement.

Using a SELECT statement to feed an INSERT statement

In all the examples so far, the values for each new row added were supplied by using the VALUES parameter. But that is not the only way to provide values. A SELECT statement can also provide new row values for an INSERT statement, as is shown in Listing 11.

INSERT INTO dbo.Cars(Manufacture, Model, ModelYear,PurchaseDate)
  SELECT Manufacture, Model, ModelYear, SYSDATETIME()
  FROM dbo.Cars 
  WHERE CarID = 1 OR CarID = 2;

SELECT * FROM dbo.Cars;

Listing 11: Using a SELECT statement to identify values for new rows

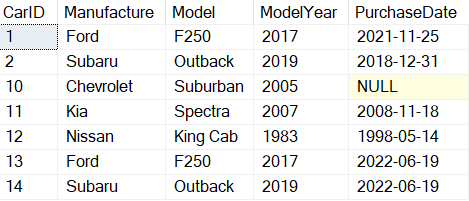
In Listing 11, a SELECT statement was used to select the column values for two rows from the dbo.Cars table that have CarID values 1 and 2. The two rows selected provided the values for the INSERT statement. The last two rows added can be seen in Report 6.

Report 6: Output when code in Listing 11 was executed

The rows with CarID values of 13 and14 are the rows that were added. These rows have the same Manufacture, Model, and ModelYear as the first two rows, except the PurchaseDate is different. The PurchaseDate values were set by using the SYSDATETIME() function in the VALUES clause.

Inserting data from the output of a stored procedure

There are times when more complicated logic is needed to prepare rows for insert. For example, an application might need to run a stored procedure that reviews a table or a series of tables to determine what rows need to be inserted into a table.

In this example code in Listing 12, a stored procedure is created that will determine what rows and values to insert. The stored procedure makes multiple passes through a WHILE loop. Each pass through the loop programmatically determines if information will be inserted into a temporary table or not. Once the WHILE loop completes, all the rows in the temporary table are displayed.

Instead of outputting the rows to the screen, the output from the stored procedure will then be used to feed values into an INSERT statement to create new rows in the dbo.Cars table. The code for the described stored procedure can be found in Listing 12.

CREATE PROC dbo.RecsToInsert
AS
DECLARE @I int = 0;
CREATE TABLE #T (
Manufacture varchar(30), 
MadeUpModel Varchar(30),
MadeupModelYear int, 
PurchaseYear date);
WHILE @I < 2 BEGIN
  SET @I = @I + 1;
  INSERT INTO #T 
   SELECT CASE WHEN @I = 1 THEN 'Ford'
         WHEN @I = 2 THEN 'Tesla' END AS Manufacture,
       CAST (@I as CHAR(1)) AS MadeUpModel,
       YEAR(SYSDATETIME()) AS MadeupModelYear,
       SYSDATETIME() AS PurchaseDate;
END 
SELECT * FROM #T;
DROP TABLE #T;

Listing 12: Sample Stored Procedure

The stored procedure created in Listing 11 will insert two rows into the temporary table #T. Those two rows will then be displayed using a SELECT statement. To execute this stored procedure and insert the two rows contained in the temporary table, execute the code in Listing 13.

INSERT INTO dbo.Cars 
EXEC RecsToInsert;

Listing 13: Inserting the output of a stored procedure into a table.

The stored procedure dbo.RecsToInsert was executed by specifying the “EXEC” statement in conjunction with the INSERT statement, similar to how the SELECT statement was executed in Listing 11. The output produced by this stored procedure provides the values for the different rows and their values for the INSERT statement. In this example, two rows output by the store procedure were inserted into the dbo.Cars table.

Note: While this method will not be available for other statements, it is very common to create a temporary table to receive the output of a stored procedure, then use that in an UPDATE, DELETE, MERGE, etc. statement.

Basic of Inserting Data into a SQL Server Table

If an application plans to capture data and store it in a SQL Server table, one of the primary ways to accomplish that task is with an INSERT statement. INSERT statements allow storing a single column value, multiple column values or all the column values into a table. It is also possible to insert multiple rows with a single INSERT statement or a stored procedure. Knowing the basics of inserting data into a SQL Server table using the INSERT statement is a key skill that every T-SQL programmer should have.

The post The Basics of Inserting Data into a SQL Server Table appeared first on Simple Talk.


from Simple Talk https://ift.tt/3auvHtR
via