Thursday, September 14, 2023

The Pains and Joys of Making a Conference Schedule

Over the past 10 years, I have been involved in scheduling speakers at several conferences, most notably the PASS Data Community Summit. Since starting at Red-Gate last September, I have been much less involved in planning the Summit. Still, I have been able to help with the schedule by looking it over and looking for any inconsistencies, holes, or missing topics. Doing that reminded me of just how much of a pain it is, but also just how much joy there is when the schedule is released.

The first phase of making a schedule is choosing speakers. There is a delicate balance of skills, experience, topics, and even demographics that needs to be taken into account as you choose which speakers to call, and what topics you want presented. Good speakers get turned away every year from every conference because there are far more speakers than slots for them to speak.

The really challenging part comes once you have the set of speakers and sessions chosen: Making the schedule. The more days, the more slots, the more difficult. One of my previous colleagues I worked with on PASS Selection Committees, Jay Robinson, always referred to it as “Scheduling Sudoku”, which is an apt, if a bit basic description of the process. You have N number of rooms M number of slots, and you build out the schedule.

The difference between scheduling speakers and sudoku is in the latter you only need to consider the magnitude of each slot. Building a schedule requires you to consider a lot of complicated factors. For example:

  • Speaker requests: Speakers make requests all the time. This is something I never considered doing when I submit to speak. (With a few exceptions for expensive conferences), if I submit to speak, I generally plan to attend the entire conference even if I am not chosen.
  • Topic: Trying to spread out every topic over a conference gets more complicated than it sounds. You might have major topics (Databases versus UI coding), but then subtopics (Indexing, Query Tuning) that you also want to separate because they share a common underlying bond.
  • Speaker utilization: The big rule that can’t be broken sounds easy: “Don’t schedule a speaker against themselves.” Yet it happens. Sometimes they are a member of a panel that is not as obvious when you are doing the schedule. Sometimes they are expected to be in a non-speaking location. Sometimes it just is a mistake.
  • Demographics: You want to spread everyone out based on many characteristics, not the least of which is their employer. Also, don’t give anyone preferential treatment (which has many more meanings than you would expect).
  • Preferential treatment: Yep, even though I just said not to do this, there are regularly reasons that you have to put one speaker in a particular slot.
  • Overall mix of speakers to start and finish the conference: This was always hard. No one wants to be stuck in the final speaker slot (or day for that matter!). Everyone wants to be in the first slot so you can be done and go learn something. But organizers want people to have a reason to show up on that last day. Hence, you schedule a few great people on the final day and hope they forgive you. And that you don’t have to give them preferential treatment.

These are just the primary, even obvious, difficulties of making a schedule. What is exceptionally exciting is that all of these could change at any time. You can be 100% complete, reviewed, run up the flag pole, tested against all of your measuring sticks, and … you get the word that Speaker X has dropped out.

If you have ever actually played sudoku, you no doubt have reached that delightful stage of the game where you think you have solved it. Just a few more numbers to go. And then, there is one number that just won’t fit. Then you have to unravel your solution to get back to where everything does fit. Frustrating right? It is, but once you get all those darned numbers lined up, boy, is that a great feeling.

Today, the people who worked so diligently on the PASS Data Community Summit schedule get to see their fully filled out Schedule Sudoku entry and take a breath. Celebrate the victory. The schedule is done and ready for people to start planning their schedules. So hop over to passdatacommunitysummit.com/sessions/ and check out the schedule.


The post The Pains and Joys of Making a Conference Schedule appeared first on Simple Talk.


from Simple Talk https://ift.tt/jvuNkb8
via

Wednesday, September 13, 2023

Microsoft Fabric: Using notebooks and table partitioning to convert files to tables

When Microsoft Fabric was born, the only method to convert files to tables was using notebooks. Nowadays we have an easy-to-use UI feature for the conversion.

As I explained on the article about lakehouse and ETL, there are some scenarios where we still need to use notebooks for the conversion. One of these scenarios is when we need table partitioning.

Let’s make a step-by-step on this blog about how to use notebooks and table partitioning.

The steps explained here are based on the same sample data from the lakehouse and ETL article. In that article you can find the steps to build a pipeline to import the data to the files area.

The Starting Point

The starting point for this example is a lakehouse called demolake with the files already imported to the Files area using a pipeline.

No table is created yet.

Loading a Notebook

We will use a notebook for the conversion. You can download the notebook here. We will use the notebook called “01 – Create Delta Tables.ipynb”

  1. Click the Experience button and select the Data Engineering Experience
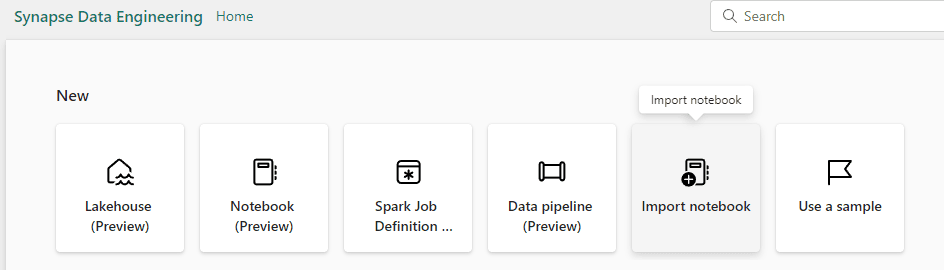
  2. Click the Import Notebook button.

Interface gráfica do usuário, Aplicativo, Word Descrição gerada automaticamente

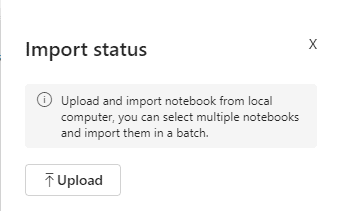
  1. Click the Upload button and select the notebook you just downloaded.

Interface gráfica do usuário, Texto, Aplicativo, Email Descrição gerada automaticamente

  1. Click the button lakehouse demo in the left button bar to return to the workspace.

Interface gráfica do usuário, Texto, Aplicativo Descrição gerada automaticamente

  1. Click on the notebook you imported.
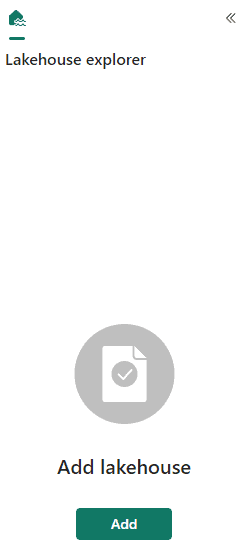
  2. On the Lakehouse explorer window, click the Add button to link the notebook to a lakehouse.

Interface gráfica do usuário, Aplicativo, Teams Descrição gerada automaticamente

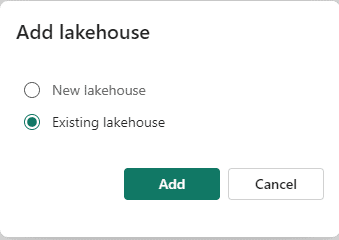
  1. On the Add Lakehouse window, select Existing Lakehouse and click the Add button.

Interface gráfica do usuário, Texto, Aplicativo, chat ou mensagem de texto Descrição gerada automaticamente

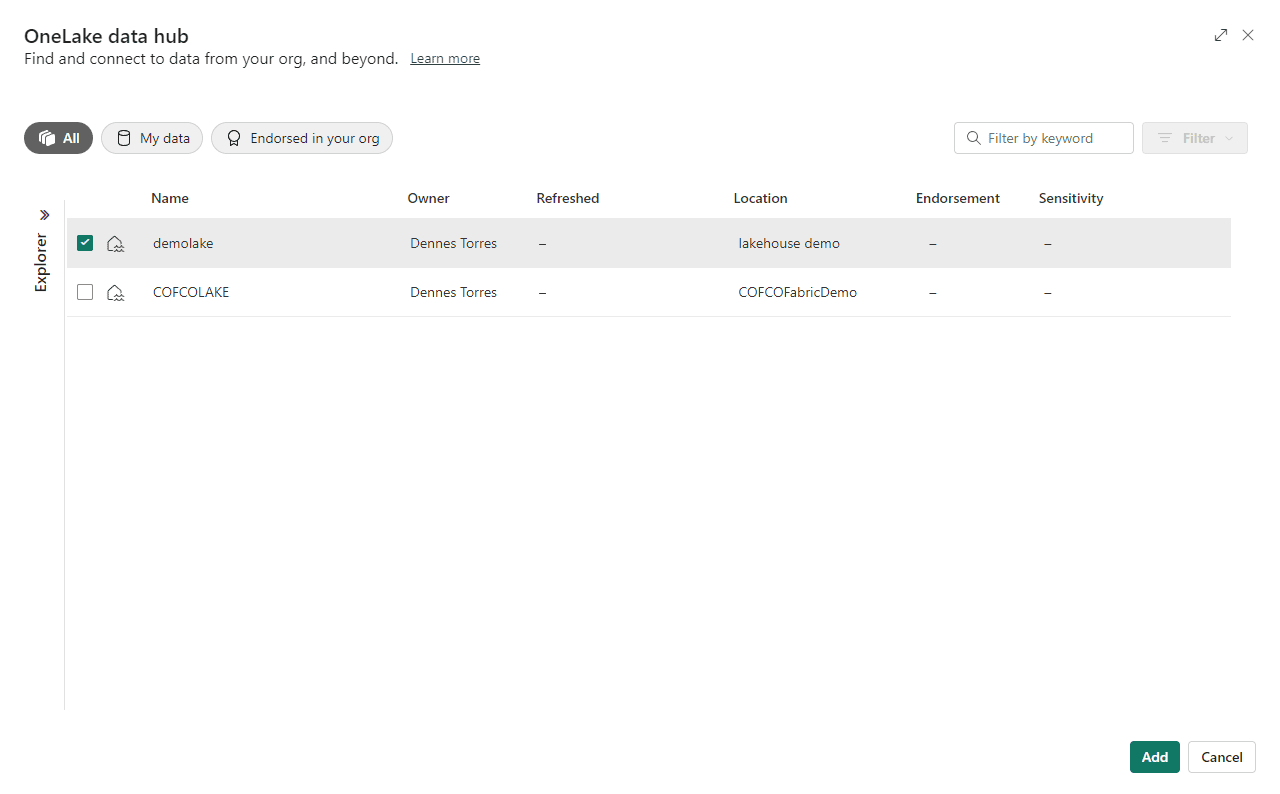
  1. Select the demolake and click the Add button.

Interface gráfica do usuário, Texto, Aplicativo, Email Descrição gerada automaticamente

The notebook code

Let’s analyse the code in the notebook we just imported.

First Code Block

# Copyright (c) Microsoft Corporation.
# Licensed under the MIT License.

spark.conf.set("sprk.sql.parquet.vorder.enabled", "true")

spark.conf.set("spark.microsoft.delta.optimizeWrite.enabled", "true")

spark.conf.set("spark.microsoft.delta.optimizeWrite.binSize", "1073741824")

This code block enables the V-Order optimization. This is a special optimization for delta tables. You can read more about the V-Order optimization on this link: https://learn.microsoft.com/en-us/fabric/data-engineering/delta-optimization-and-v-order?tabs=sparksql

The optimizeWrite option allow us to define what’s called binSize. This configuration defines the size for each parquet file used to store the data. Controlling the size of the files we can avoid too big files or too small files, either of these cases would cause a performance problem.

I would not be surprised if in the future some of these configurations may become a default.

Second Code Block

from pyspark.sql.functions import col, year, month, quarter

table_name = 'fact_sale'

df = spark.read.format("parquet").load('Files/fact_sale_1y_full')

df = df.withColumn('Year', year(col("InvoiceDateKey")))

df = df.withColumn('Quarter', quarter(col("InvoiceDateKey")))

df = df.withColumn('Month', month(col("InvoiceDateKey")))

df.write.mode("overwrite").format("delta").partitionBy("Year","Quarter").save("Tables/" + table_name)

This block executes the following tasks:

  • Read the fact_sale table from the Files folder.
  • Create a column called Year.
  • Create a column called Quarter.
  • Create a column called Month.
  • Save the data in the Tables area. The table is partitioned by Year and Quarter, and it will overwrite any existing table with the same name.

Third Code Block

from pyspark.sql.types import *
def loadFullDataFromSource(table_name):
    df = spark.read.format("parquet").load('Files/' + table_name)
    df.write.mode("overwrite").format("delta").save("Tables/" + table_name)

full_tables = [

'dimension_city',
'dimension_date',
'dimension_employee',
'dimension_stock_item'
 ]

for table in full_tables:
    loadFullDataFromSource(table)

This block has a function called loadFullDataFromSource. The function is defined in the beginning of the code, but it will only be executed when called.

The execution itself starts on the full_tables variable definition. This variable is an array with the name of the dimensions, which are also the name of the folders under the Files area in the lakehouse.

A FOR loop is executed over the table variable. For each dimension, the function loadFullDataFromSource is called receiving the name of the dimension as a parameter.

The function loads the data from the Files area and saves it to the Tables area using the table name as parameter. As a result, the function will load all the dimensions, one by one.

Executing the Notebook and checking the result

  1. Click the Run All button to execute all the code blocks in the notebook.

Microsoft Fabric uses a feature called Live Pool. We don’t need to configure a spark pool for the notebook execution. Every workspace linked with Fabric artifacts has the Live Pool enabled. Once we ask to execute a notebook or a single code block, the pool is enabled in very few seconds.

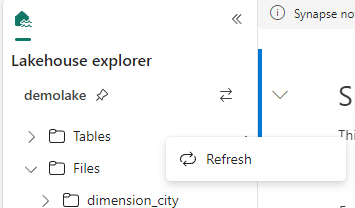
  1. On the lakehouse explorer, right click Tables and click Refresh.

Interface gráfica do usuário, Aplicativo Descrição gerada automaticamente

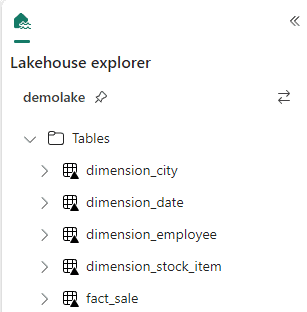
  1. The tables are now available in the Tables area.

Interface gráfica do usuário, Aplicativo Descrição gerada automaticamente

  1. On the left bar, click the demolake button.

Let’s look on the storage behind the tables in the lakehouse.

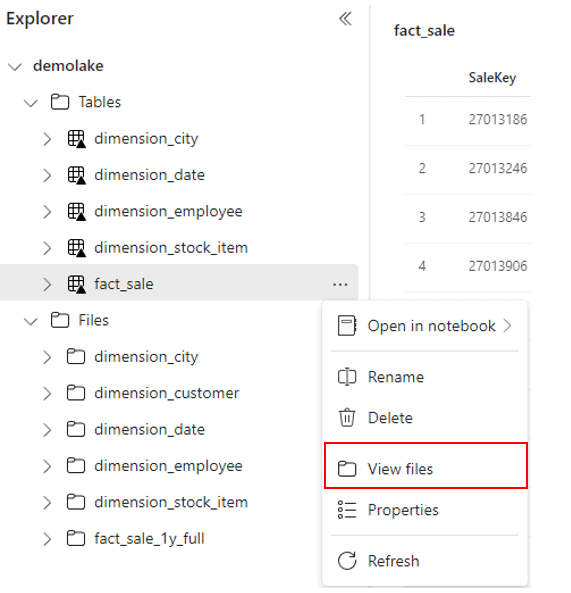
  1. Right click the fact_sale table
  2. On the context menu, click View files menu item.

Interface gráfica do usuário, Aplicativo Descrição gerada automaticamente

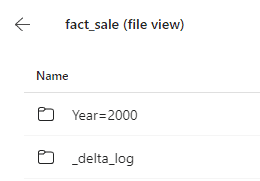
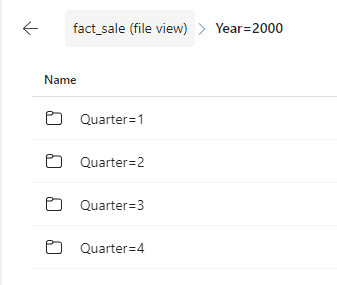
Mind how the files are stored in delta format and partitioned by Year and Quarter according to the configuration defined in the notebook.

Interface gráfica do usuário, Aplicativo Descrição gerada automaticamente

  1. Click the Year folder.

Interface gráfica do usuário, Aplicativo Descrição gerada automaticamente

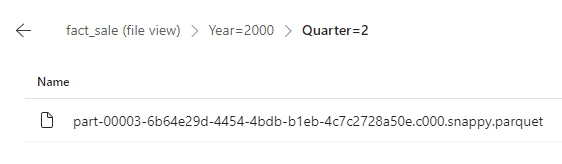
  1. Click one of the Quarters folder.

Interface gráfica do usuário, Texto, Aplicativo Descrição gerada automaticamente

Conclusion

On this blog you discovered how you can make the transformation from Files to Tables in a lakehouse using pyspark code and in this way be able to partition tables and schedule the code to make this movement.

The post Microsoft Fabric: Using notebooks and table partitioning to convert files to tables appeared first on Simple Talk.


from Simple Talk https://ift.tt/BM4Gzy6
via

Sunday, September 10, 2023

SQL Server Row Level Security Deep Dive. Part 3 – Performance and Troubleshooting

Previous sections gave a brief introduction to RLS, including some common use cases. They also showed how to implement RLS using a few different methods. This section focuses on performance and potential issues you may encounter.

There are two main areas where RLS can impact performance. The first is the user or authentication lookup. Some kind of lookup must be performed in the access predicate to determine either the user name, group membership, or specific values in the session context. Considering that RLS is non-prescriptive, the lookup isn’t confined to these methods, but they are very easy methods to use and implement and are standard based on implementations I’ve seen.

The second area is the authorization lookup. The authorization lookup, checking if a user has access to particular rows, can have a much bigger impact on performance. This is also in the access predicate. Following the basic rules for performance and keeping lookups simple goes a long way to minimizing the impact of RLS on performance. The goal is to keep performance levels as close as possible to a table without RLS. If indexes and predicates are correct, RLS can improve performance in some situations due to the automatic filtering that happens.

Authentication Performance

This section focuses on authentication performance. As you look at authentication performance, don’t forget about ease of implementation. Some of the methods below scale better than others, from a management perspective, since they are easier to add new users or add new RLS criteria. This will differ based on your environment and solution, but be sure to consider ease of management when you select a method.

Session context

Using session context is a relatively lightweight solution that works well if you have a good method to consistently set the SESSION_CONTEXT. The session context lookup is very fast and is similar to the role lookup solutions below.

I expected SESSION_CONTEXT to have the most potential for performance issues, but testing indicates no issues. In fact, it was the fastest method by far. Performance isn’t the only consideration for your architecture. Maintenance considerations are probably a higher priority, as long as non-functional requirements (NFRs) are met for performance. As long as you test your usage, and keep the implementation simple, SESSION_CONTEXT performs well.

Active Directory Group Membership

Active Directory or Azure Active Directory group membership has to perform a lookup outside of the SQL Server environment. Even with this lookup, it is a fast lookup process. This fits well for smaller implementations or specific security overrides in the access predicate, such as db_owner groups.

SELECT IS_MEMBER(‘Domain\Group’)

SQL Server User Role Assignment

User role assignment is similar to group membership lookups. This is part of the method used in the WideWorldImporters example database. It generally scales better than group lookups from an administrative standpoint. You don’t need to add multiple active directory groups and train teams on their usage. It might be more difficult to ensure a pattern exists for the group depending on enterprise standards.

SELECT IS_ROLEMEMBER(‘RoleName’)

User Name Lookup

Direct user name lookups aren’t scalable from a maintenance perspective but are useful when combined with other methods. This can be especially useful for administrators or service accounts in conjunction with other methods, such as SESSION_CONTEXT.

SELECT USER_NAME()
SELECT SUSER_NAME()

Performance Comparison

I did a quick test comparing the authentication methods listed above. It isn’t a definitive test, but I ran it many times and it was very consistent between runs. Once you get above 10,000 executions it levels out. There isn’t a huge difference between the fastest and slowest execution time for 1 million executions, under 300 milliseconds, but you can see the difference below. Your implementation may vary so be sure to performance test and tune as you implement. It was interesting to see that with 100 thousand executions, the SESSION_CONTEXT lookup had a run time of 0 milliseconds and is the reason I increased to 1 million executions.

SET STATISTICS TIME ON
SET STATISTICS IO ON
GO
--GRANT SELECT ON SCHEMA::RLS TO RLSLookupUser
DECLARE @AuthTime TABLE (
        AuthTimeID              int                             NOT NULL        PRIMARY KEY CLUSTERED           identity
        ,AuthType               varchar(25)             NOT NULL
        ,AuthStart              datetime                NOT NULL
        ,AuthEnd                datetime                NOT NULL
        ,AuthCount              int                             NOT NULL
)
DECLARE 
        @StartTime      datetime
        ,@EndTime       datetime
        ,@AuthCount     int
        ,@AuthType      varchar(25)
EXECUTE AS USER = 'RLSLookupUser'
SELECT
        @StartTime      = GETDATE()
        ,@AuthType      = 'User Name Lookup'
SELECT TOP 1000000 *
INTO #RLSLookupUser
FROM RLS.UsersSuppliers UP
        CROSS JOIN dbo.Numbers N
WHERE UP.UserId         = USER_NAME()
SELECT @EndTime = GETDATE()
        ,@AuthCount     = @@ROWCOUNT
REVERT
INSERT INTO @AuthTime (
        AuthType
        ,AuthStart
        ,AuthEnd
        ,AuthCount
)
VALUES (
        @AuthType
        ,@StartTime
        ,@EndTime
        ,@AuthCount
)
DECLARE @ROLES TABLE (
        RoleName        varchar(255)
)
INSERT INTO @ROLES (
        RoleName
)
VALUES
        ('db_datareader')
        ,('db_datawriter')
        ,('db_owner')
SELECT
        @StartTime      = GETDATE()
        ,@AuthType      = 'Role Lookup IS_MEMBER'
SELECT TOP 1000000 *
INTO #ISMEMBER
FROM @ROLES R
        CROSS JOIN dbo.Numbers N
wHERE IS_MEMBER(R.RoleName) = 1
SELECT @EndTime = GETDATE()
        ,@AuthCount     = @@ROWCOUNT
INSERT INTO @AuthTime (
        AuthType
        ,AuthStart
        ,AuthEnd
        ,AuthCount
)
VALUES (
        @AuthType
        ,@StartTime
        ,@EndTime
        ,@AuthCount
)
SELECT
        @StartTime      = GETDATE()
        ,@AuthType      = 'Role Lookup IS_ROLEMEMBER'
SELECT TOP 1000000 *
INTO #ISROLEMEMBER
FROM @ROLES R
        CROSS JOIN dbo.Numbers N
wHERE IS_ROLEMEMBER(R.RoleName) = 1
SELECT @EndTime = GETDATE()
        ,@AuthCount     = @@ROWCOUNT
INSERT INTO @AuthTime (
        AuthType
        ,AuthStart
        ,AuthEnd
        ,AuthCount
)
VALUES (
        @AuthType
        ,@StartTime
        ,@EndTime
        ,@AuthCount
)
BEGIN TRY
        EXEC sp_set_session_context N'RLSRegion', 'Central', 1
END TRY
BEGIN CATCH
        PRINT 'SESSION ALREADY SET'
END CATCH
SELECT
        @StartTime      = GETDATE()
        ,@AuthType      = 'Session Context'
SELECT TOP 1000000 *
INTO #SESSIONCONTEXT
FROM dbo.Numbers N
WHERE SESSION_CONTEXT(N'RLSRegion') = N'Central'
SELECT @EndTime = GETDATE()
        ,@AuthCount     = @@ROWCOUNT
INSERT INTO @AuthTime (
        AuthType
        ,AuthStart
        ,AuthEnd
        ,AuthCount
)
VALUES (
        @AuthType
        ,@StartTime
        ,@EndTime
        ,@AuthCount
)
SELECT *
        ,DATEDIFF(ms,AuthStart,AuthEnd)         TotalTimeMS
FROM @AuthTime
DROP TABLE #ISMEMBER
DROP TABLE #ISROLEMEMBER
DROP TABLE #RLSLookupUser
DROP TABLE #SESSIONCONTEXT

Authorization Performance

As with authentication, authorization can be implemented in multiple ways. Standard tuning techniques can be used to meet your NFRs. This includes proper indexing, table design, and hardware choices will impact system performance.

Denormalization

Denormalization is an important part of performance with RLS. Any additional joins in the access predicate have a tendency to decrease performance. Complex queries, such as joins with an OR clause can be performance killers. When possible, denormalize the data by including the lookup column in each table with RLS. The extra overhead in the ETL and disk IO is minimal and compensated for by the improved performance during queries. This is also a good reminder to think about your security architecture during the design phase so refactoring isn’t necessary. Performance testing and tuning is a key activity, especially when using RLS with transactional systems (or even warehouses). Adding extra columns and maintaining those columns is less tenable in systems with high numbers of transactions, so be sure RLS fits your usage patterns.

Single level security lookup tables

Avoid joins in lookups. A flattened, single level lookup table for security, performs much better than traversing multiple levels for access predicates to the key column. They often can’t be avoided completely, but they should be minimized. This would apply to scenarios such as geographical regions or any other hierarchical organizational unit. A specific example is region level access to data, with state level access (which includes all counties), country level access (which includes all states / provinces), and complete world level access (which includes all countries) at the top. It is possible to assign security at a country level and have the access predicate join to states and counties, which then joins to the correct rows using county in the final clause. Since the access predicate is executed for each row, even a small difference in performance can have a large overall impact. Maintaining a hierarchical structure for joins is possible, but much better performance is realized by flattening the hierarchy. This is done during pre-processing using ETL as an asynchronous process. In the county, state, country, world example, much better performance is realized if world access is saved to the security tables as all counties per user. This can result in a lookup table with many rows, but it performs much better than traversing four structures and including OR logic in the access predicate. If the data can’t be flattened, union statements are generally more efficient than using OR in the join.

Indexing and Performance Tuning

Access predicates should be tuned like any other function or query. Like all queries, join columns and where clauses are great starting points for tuning. Ensure both sides of the join clause are indexed correctly as well as the filter columns. Pay special attention to joins with OR logic. As mentioned above, queries with an OR in the join usually perform better as two separate statements with a UNION. Even with these general guidelines, changes to predicates for performance should be tested and validated.

Azure Synapse / Elastic Query / Linked Server

Azure Synapse is listed in the Microsoft documentation as a valid target for RLS access predicates and security policies. Tuning with external sources can be limited if you don’t maintain those external systems. The same general guidelines apply. Keep logic as simple as possible. Perform any operations on the source instead of over the network when feasible. This means, if joins or calculations must be done, perform them in the source using a view and include any filters via a WHERE clause in the view on the source also. If the teams that maintain source systems are different from the consumer’s system, it can help to show the performance difference if teams are reluctant to add the logic on the source system. It also helps if the view definition is provided to the source owners so they just need to review and check in / deploy the code.

Troubleshooting 

If users are unable to access rows which they should be authorized to access, it can be confusing to troubleshoot. This is especially true for support team members less familiar with the inner workings of RLS and how all of the authentication (who is the user and is their identity verified, i.e., the login process) and authorization (does the user have permission to access a resource) mechanisms fit together.

 The pattern for troubleshooting access to tables with RLS is identical to troubleshooting general access with a few additional steps added. The user should have a valid login or contained user, they should have database access, object access, should not be blocked, etc. RLS troubleshooting will be specific to the implementation. If the system is unfamiliar, scripts can be used to find the access predicate and the RLS logic.

Authentication

A brief review of SQL Server security mechanisms is useful for understanding how to troubleshoot RLS at an authorization level. This is the login process. The first step in authorization for SQL Server is determining and specifying the login method. The way this is done depends on the tool getting used and the methods configured on the server. It ranges from a SQL Server login, a contained database user with login, a Windows integrated account (trusted login) and various Azure authorization mechanisms. An end user must first be authorized before they can access a database.

 Authentication is relatively easy to troubleshoot. A login failed message is a clear indicator for this problem. It could still mean that the user typed in the wrong server name, the wrong user name, a bad password, or authorization is blocked at a network level, but it certainly narrows down the list of things to verify. The DBA or Active Directory team may need to get involved at this stage. Verify that the SQL Account, Active Directory account or Azure Active Directory account is enabled and not locked out. SQL Trace / Profiler or a SQL Audit can be very useful to show that the authentication attempt is hitting the server. If the authentication failure doesn’t show in the trace or audit, the request isn’t even hitting the server and more basic troubleshooting is indicated. From a client perspective, command line tools such as sqlcmd.exe can simplify this process. I find that sqlcmd.exe is easier for troubleshooting because the exact command can be shared with the user and they can paste it in their command line exactly. This eliminates some of the communication errors that can happen with non-technical users (or even technical users). If the login is a SQL login, the support team can also verify it themselves. None of these techniques are specific to RLS, but authentication is the first thing to check.

Server Authorization

If the account passes the authentication check, server authorization should be validated. This is essentially the same thing when considering a SQL login. For trusted authentication, a login exists on the server or a group the user is a member of is mapped to the server. That user also needs to be allowed access to the server which just means it is not disabled. If this has been done, the active users on the server can be verified. A trace can also be used to capture all logins. If the user is found in the trace, server authorization is not the problem. DMVs such as sys.processes also show current users, the network protocol used, authentication method and many more details that can be useful for troubleshooting.

SELECT * 
FROM sys.sysprocesses

Database Authorization

Database authorization is the process of a login being mapped to a database user and that user getting access to the database. In the case of an Azure database contained user, the server authentication or login is the same as the database authorization. If the login is mapped to a user, the other common item to check is that the user isn’t orphaned due to a recent database restore from a different server. This isn’t likely in a production environment but it should be checked if the user is present but the user isn’t able to access the database. Sys.sysusers shows the login SID associated with a user account. A NULL sid value is generally an indication of a problem for non-system user accounts. You can also use the GUI to look at users and their associated logins.

 SELECT * 
FROM sys.sysusers

Object / Table Authorization

SQL Server provides great flexibility in the methodology for assigning security to users. The most important aspect of assigning security is consistency. Simplicity of design is also important but consistency makes interpreting security faster and adding security for users easier. Some methods are better than others from an organizational perspective and a maintenance perspective, but are outside the scope of this article and when troubleshooting access, the design phase is already done. Each of the following methods for allowing authorization need to be checked.

Direct Access

Direct access, assigning SELECT, INSERT, UPDATE, DELETE, EXEC for a database object, for users and groups should be checked. Direct access is clear and easy to interpret at this level. It is generally not a best practice to assign security directly at a user level, but there are use cases for this and it happens frequently. Be sure to check for explicit deny permissions at this level too. Even if this is not the agreed upon pattern, this should be validated. Organization changes can result in confusion and standards not getting followed.

Database Role Membership

Role level access is usually where security will be granted. This includes the built-in roles and user defined roles. You may need to enumerate group membership to get a clear picture. As discussed in the design section, built-in roles are likely not optimal for RLS solutions and should be used with caution, if at all, with RLS.

Server Role Membership

Server level roles apply to all databases, so they need to be checked as well. This won’t, or shouldn’t, apply to regular user accounts, but a quick check of these roles is warranted. There should be a very small number of users in this category. This means checking for the sysadmin role since it impacts all databases and translates to dbo access in each of them.

RLS Authorization

If a user account is authenticated, is authorized at the server, database, and object level, the last thing to check is RLS authorization. As mentioned above, Row Level Security is not a prescriptive technology, it is dependent on each team to decide the specific method that best meets the requirements of the project. Documenting the particular method used for RLS in each application is highly recommended and will ease this portion of troubleshooting. Depending on the method used, check the database tables used by RLS, check Active Directory groups, validate the SESSION_CONTEXT() (hopefully not CONTEXT_INFO()), or any other method used. It can be helpful to have another user with the same permission set to check their access to data to help narrow down the issue. There is no single method to do this, but understanding the design and how authorization is granted will give you a starting point.

There are a few RLS use cases that aren’t as obvious during the planning phases but will quickly become obvious when it is moved to production. Be sure to include ETL service accounts in the RLS plans. They generally should have access to all data, but if that is not the case, ensure that all scenarios are tested. The same is true for admin accounts and other service accounts. Putting a user is in the db_owner or sys_admin role doesn’t automatically grant them access to all rows in an RLS protected table. If you need admins to run DML scripts for your team in production, be sure they have access. An override statement for admins in the access predicate is something to consider.

If you provide validation or setup scripts to a support team, be sure to include RLS in those scripts. You will also want to give developers and support teams a base level of training even if database development or support isn’t their primary area of responsibility. At the very least, the support team should understand that RLS is used in the database and how an issue with RLS access appears from a user’s perspective.

ETL and Admin Issues

As mentioned above, ETL packages are no exception to Row Level Security rules. The same general troubleshooting rules apply to service accounts used by ETL. If RLS uses tables for authorization, be sure the ETL account has access to that schema. This will differ from regular user account access but it is needed so the ETL account can maintain those tables. In any case, ensure that ETL accounts are setup to access all data.

Service Account Access and Admin Access

Any service account used to access the database, ETL or otherwise, must be setup with the correct RLS access in addition to standard authorization. If the account will be performing DML operations, it should have access to all rows or the ETL operations should be tested more thoroughly than usual. Administrators must also have full access if they perform any DML operations. The block filter can also help with the issues presented below.

False Duplicates

The ETL service account must have full access to the data or duplicate key errors are possible during INSERT or UPDATE. Key lookups and anti joins used to find missing records don’t work if the lookup table isn’t accessible via RLS. The query engine will interpret the inaccessible rows as non-existent in the table and try to insert them again. The error message will show a duplicate key error and may be difficult to interpret if you aren’t looking for it and if troubleshooting happens with an account having full access. A block modifier will prevent this operation but may hurt performance. In highly critical systems, the extra effort to populate RLS tables and the chance of an error may be worth the performance benefits. This is clearly dependent on the system needs and service level agreement (SLA).

Excess Deletes

It is also possible to delete excessive rows with an anti-join if the RLS is not allowed for the source table. ETL service accounts run with elevated privileges and RLS must be included in those privileges. Testing is recommended when implementing RLS and extra care should be taken when adding to a pre-existing database. These issues aren’t limited to ETL, they can happen with any account that is allowed direct CRUD access, but it is a scenario unique to RLS. Sanity checks before deleting (only deleting if the percentage of rows to be deleted is low enough) can help avoid these situations.

Ghost Records

Joins in the access predicate can cause issues beyond performance. The referenced table must be accessible to the account performing the lookup. Ghost records, records that are inaccessible to the user but block operations that should be allowed, can happen when JOINs are required in the access predicate. If the table containing the lookup column deletes rows before the target table, the target table will not return the expected rows and they can’t be deleted normally. This is much more likely in warehouses without foreign keys maintaining referential integrity. It happens when table keys are deleted in referenced tables without first deleting the rows referencing them, so in non-enforced or logical foreign keys.

Requirements to reproduce this scenario

  • A lookup table is used to apply RLS rules
  • The table with RLS applied to it must perform an additional lookup (JOIN) to retrieve the RLS column
    • In the scenario below, the PurchaseOrderLineID is used to get to PurchaseOrderID then the SupplierID
  • No foreign keys are protecting the referential integrity of the tables
    • Likely scenario in a warehouse or reporting database
  • The table containing the lookup column, in this case SupplierID, is deleted before the referencing table, in this example, Purchasing.PurchaseOrderLines.
  • The account performing ETL does not have an exclusion to RLS. You can see in the following example that db_owner would see all records and this would not happen.
    • You wouldn’t want to grant dbo rights to an ETL account
    • Consider adding the ETL account to your RLS exclusion list to bypass this issue

This can be prevented by deleting in the correct order, but in real-world scenarios, that doesn’t always happen. The easiest way to deal with these records, after they are corrupted, is to lock the target tables, drop RLS, fix the incorrect data, reapply RLS, and unlock the tables.

The following shows this scenario for Purchasing.PurchaseOrderLines. It needs access to the SupplierID maintained in the Puchasing.PurchaseOrders table. If the SupplierID records are deleted first, the PurchaseOrderLines records can’t be deleted with a normal user account.

--Setup accounts for this test
CREATE USER RLSGhostRecords WITHOUT LOGIN
ALTER ROLE db_datareader ADD MEMBER RLSGhostRecords
DENY SELECT ON SCHEMA::RLS TO RLSGhostRecords
INSERT INTO RLS.UsersSuppliers (
        UserID
        ,SupplierID
)
VALUES (
        'RLSGhostRecords'
        ,12
)
GO
CREATE USER RLSETLUser WITHOUT LOGIN
ALTER ROLE db_datareader ADD MEMBER RLSETLUser
ALTER ROLE db_datawriter ADD MEMBER RLSETLUser
--Note that this user also has access to the RLS schema
--Also note, this user does not have db_owner permissions, best practice for user accounts
--The following is needed for the user to change the state of the security policy
GRANT ALTER ANY SECURITY POLICY TO RLSETLUser
GRANT ALTER ON SCHEMA::RLS TO RLSETLUser
INSERT INTO RLS.UsersSuppliers (
        UserID
        ,SupplierID
)
SELECT
        'RLSETLUser'
        ,SupplierID
FROM Purchasing.Suppliers
ORDER BY SupplierID
GO

This grants all records to the ETL account and a single SupplierID to the new regular user account, RLSGhostRecords. The following shows the RLS access predicates and security policies.

--Simple access predicate
CREATE FUNCTION RLS.AccessPredicate_SupplierID_PurchasingPurchaseOrders(@SupplierID     int)
RETURNS TABLE
WITH SCHEMABINDING
AS
RETURN
        SELECT 1 AccessResult
        WHERE IS_MEMBER('db_owner') = 1 
        UNION
        SELECT 
                1 AccessResult
        FROM RLS.UsersSuppliers US
                INNER JOIN Purchasing.PurchaseOrders PO
                        ON US.SupplierID                        = PO.SupplierID
        WHERE US.SupplierID                                     = @SupplierID
                AND US.UserID                                   = USER_NAME()
GO
CREATE SECURITY POLICY RLS.SecurityPolicy_SupplierID_PurchasingPurchaseOrders
ADD FILTER PREDICATE RLS.AccessPredicate_SupplierID_PurchasingPurchaseOrders(SupplierID) ON Purchasing.PurchaseOrders
,ADD BLOCK PREDICATE RLS.AccessPredicate_SupplierID_PurchasingPurchaseOrders(SupplierID) ON Purchasing.PurchaseOrders AFTER UPDATE
WITH (STATE = ON, SCHEMABINDING = ON)
GO
--Simple access predicate with a lookup
CREATE FUNCTION RLS.AccessPredicate_PurchaseOrderLineID_PurchasingPurchaseOrderLines(@PurchaseOrderLineID       int)
RETURNS TABLE
WITH SCHEMABINDING
AS
RETURN
        SELECT 1 AccessResult
        WHERE IS_MEMBER('db_owner') = 1 
        UNION
        SELECT 
                1 AccessResult
        FROM RLS.UsersSuppliers US
                INNER JOIN Purchasing.PurchaseOrders PO
                        ON US.SupplierID                        = PO.SupplierID
                INNER JOIN Purchasing.PurchaseOrderLines POL
                        ON PO.PurchaseOrderID           = POL.PurchaseOrderID
        WHERE US.UserID                                         = USER_NAME()
                AND POL.PurchaseOrderLineID             = @PurchaseOrderLineID
GO
CREATE SECURITY POLICY RLS.SecurityPolicy_PurchaseOrderLineID_PurchasingPurchaseOrderLines
ADD FILTER PREDICATE RLS.AccessPredicate_PurchaseOrderLineID_PurchasingPurchaseOrderLines(PurchaseOrderLineID) ON Purchasing.PurchaseOrderLines
,ADD BLOCK PREDICATE RLS.AccessPredicate_PurchaseOrderLineID_PurchasingPurchaseOrderLines(PurchaseOrderLineID) ON Purchasing.PurchaseOrderLines AFTER UPDATE
WITH (STATE = ON, SCHEMABINDING = ON)
GO

To replicate a reporting database, I also removed the foreign keys. Remember that if the foreign keys are in place, this issue can’t happen.

ALTER TABLE [Purchasing].[PurchaseOrders] DROP CONSTRAINT FK_Purchasing_PurchaseOrders_SupplierID_Purchasing_Suppliers  
ALTER TABLE [Purchasing].[SupplierTransactions] DROP CONSTRAINT FK_Purchasing_SupplierTransactions_SupplierID_Purchasing_Suppliers  
ALTER TABLE [Warehouse].[StockItems] DROP CONSTRAINT FK_Warehouse_StockItems_SupplierID_Purchasing_Suppliers  
ALTER TABLE [Warehouse].[StockItemTransactions] DROP CONSTRAINT FK_Warehouse_StockItemTransactions_SupplierID_Purchasing_Suppliers  
ALTER TABLE Warehouse.stockItemTransactions DROP CONSTRAINT FK_Warehouse_StockItemTransactions_PurchaseOrderID_Purchasing_PurchaseOrders
ALTER TABLE Purchasing.SupplierTransactions DROP CONSTRAINT FK_Purchasing_SupplierTransactions_PurchaseOrderID_Purchasing_PurchaseOrders
ALTER TABLE [Purchasing].[PurchaseOrderLines] DROP CONSTRAINT

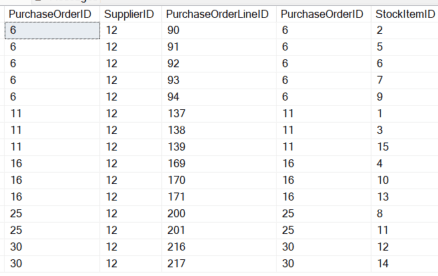
With the base configuration, and all records intact, the standard user is able to see all Purchasing.PurchaseOrderLines associated with the supplier they are assigned. This is the expected behavior.

EXECUTE AS USER = 'RLSGhostRecords'
GO
SELECT
        PO.PurchaseOrderID
        ,PO.SupplierID
        ,POL.PurchaseOrderLineID
        ,POL.PurchaseOrderID
        ,POL.StockItemID
FROM Purchasing.PurchaseOrders PO
        INNER JOIN Purchasing.PurchaseOrderLines POL
                ON PO.PurchaseOrderID           = POL.PurchaseOrderID
WHERE PO.SupplierID                                     = 12
REVERT

If this supplier is removed from the system and the corresponding Purchasing.PurchaseOrders are removed, it creates the ghost records in Purchasing.PurchaseOrderLines.

EXECUTE AS USER = 'RLSETLUser'
GO
DELETE Purchasing.PurchaseOrders
WHERE SupplierID        = 12
REVERT
GO

Re-running the SELECT statement as RLSGhostRecords shows no records. This is expected since it is an INNER JOIN, and those records were just deleted.

What can be difficult to troubleshoot is that even directly looking up the records associated with SupplierID 12, no records are returned. Note that an account with DBO access would see these records due to the exception in the access predicate for members of db_owner. If your access predicate does not have an exception in it for dbo, even those accounts won’t see the records.

EXECUTE AS USER = ‘RLSETLUser’
GO
SELECT 
        *
FROM Purchasing.PurchaseOrderLines POL
WHERE POL.PurchaseOrderLineID           IN (90
                                        ,91
                                        ,92
                                        ,93
                                        ,94
                                        ,137
                                        ,138
                                        ,139
                                        ,169
                                        ,170
                                        ,171
                                        ,200
                                        ,201
                                        ,216
                                        ,217
                                ) 
GO
REVERT
GO

This may not be a huge issue in a reporting system, but it will cause record counts to not match. It can cause other issues with ETL depending on the exact scenario. It can be very frustrating to troubleshoot.

After you have determined the cause, you have a couple of choices to fix the issue. The first is to delete the offending rows with an account that has an exception in the access predicate. If this happens on a regular basis or you don’t have an exception, I would use a process like the following.

EXECUTE AS USER = 'RLSETLUser'
GO
--Use serializable to ensure other users don’t access the table when RLS is disabled
SET TRANSACTION ISOLATION LEVEL SERIALIZABLE
GO
--Use an explicit transaction to further ensure other users can’t access the table 
BEGIN TRANSACTION
BEGIN TRY
--Disable the security policy
        ALTER SECURITY POLICY RLS.SecurityPolicy_PurchaseOrderLineID_PurchasingPurchaseOrderLines
        WITH (STATE=OFF)
--Delete the bad rows with an anti-join
        DELETE Purchasing.PurchaseOrderLines WITH(TABLOCK)
        FROM Purchasing.PurchaseOrderLines POL
                LEFT JOIN Purchasing.PurchaseOrders PO
                        ON POL.PurchaseOrderID  = PO.PurchaseOrderID
        WHERE PO.PurchaseOrderID                IS NULL
--Re-enable the security policy
        ALTER SECURITY POLICY RLS.SecurityPolicy_PurchaseOrderLineID_PurchasingPurchaseOrderLines
        WITH (STATE=ON)
        COMMIT TRANSACTION
END TRY
BEGIN CATCH
        IF @@TRANCOUNT > 0  ROLLBACK TRANSACTION
        ALTER SECURITY POLICY RLS.SecurityPolicy_PurchaseOrderLineID_PurchasingPurchaseOrderLines
        WITH (STATE=ON)
END CATCH
SET TRANSACTION ISOLATION LEVEL READ COMMITTED
GO
REVERT
GO

Summary

Implementing RLS incurs a certain amount of responsibility with performance considerations, administrative overhead, and training. Initial design decisions will have a large impact on overall system performance and will also impact ease of administration and support issues. Standard design patterns should be maintained when implementing RLS and performance tuning should be a part of the design process and may involve refactoring tables to include RLS columns. This is easier in warehouse solutions but tuning is arguably more important in transactional systems.

Next sections on RLS:

Part 4 – Integration, Antipatterns, and Alternatives to RLS

Part 5 – RLS Attacks

Part 6 – Mitigations to RLS Attacks


The post SQL Server Row Level Security Deep Dive. Part 3 – Performance and Troubleshooting appeared first on Simple Talk.


from Simple Talk https://ift.tt/Bdg9KqL
via

Thursday, September 7, 2023

Working with MySQL constraints

MySQL provides a set of constraints that you can include in your table definitions to help ensure the integrity of the data. The constraints let you better control the types of data that can be added to the database. For example, you can use constraints to set a column’s uniqueness or nullability, specify a default value for a column, or verify that the data falls within a certain range of acceptable values.

MySQL supports six basic types of constraints for ensuring data integrity: PRIMARY KEY, NOT NULL, DEFAULT, CHECK, UNIQUE, and FOREIGN KEY. In this article, I introduce you to each constraint type and provide examples for how they work. The examples include a series of CREATE TABLE statements that demonstrate different ways to incorporate constraints into your table definitions. If you’re not familiar with the CREATE TABLE statement or how to create tables in a MySQL database, refer to an earlier article in this series that introduces you to the statement.

Some resources also consider data types to be constraints because they limit the types of data that can be inserted into a table’s columns. For example, a column configured with an integer data type will take whole numbers but not decimals or string values. I do not cover data types in this article and instead focus only the six other constraint types. For information about data types, see the MySQL article Data Types.

Note: The examples in this article are based on a local instance of MySQL that hosts a very simple database. The last section of the article—“Appendix: Preparing your MySQL environment”—provides information about how I set up my environment and includes a SQL script for creating the database I used when building these examples.

PRIMARY KEY constraints

A PRIMARY KEY constraint provides a mechanism for uniquely identifying each row in a table. It is defined on one or more of a table’s columns (the key columns) to ensure the row’s uniqueness. When you add a PRIMARY KEY constraint to a table, MySQL also creates a unique index on the key columns to enforce their uniqueness.

A table can have only one primary key, and the key columns must be defined as NOT NULL. If they are not explicitly defined as NOT NULL, MySQL implicitly declares them as such to ensure that each row in the table has an associated primary key value. This is important because a unique index on its own can contain multiple NULL values, so NOT NULL is needed to guarantee that a unique identifier is associated with each row.

You can add a primary key to a table when you create the table. The easiest way to add a single-column primary key is to include it in the column definition, as in the following example:

DROP TABLE IF EXISTS airplanes; 

CREATE TABLE airplanes (
  plane_id INT UNSIGNED PRIMARY KEY,
  plane VARCHAR(50),
  engine_type VARCHAR(50),
  engine_count TINYINT);

The statement creates a primary key on the plane_id column. The column’s definition includes the PRIMARY KEY keywords, which tells MySQL to create a PRIMARY KEY constraint on that column when creating the airplanes table. MySQL creates the unique index at the same time.

That’s all you need to do to create a primary key. MySQL does the rest. If you want to create a primary key on multiple columns, you must define it separately from the column definition, which I’ll be discussing shortly.

Note: The CREATE TABLE statement in this example is preceded by a DROP TABLE statement that includes the IF EXISTS option. Because the examples in this article re-create the airplanes table, you should precede each example with the DROP TABLE statement if trying out the examples for yourself. Although I won’t be repeating the DROP TABLE statement going forward, this is the approach I used when I created and tested the examples for this article.

MySQL tracks all constraints defined on all the tables in a database. You can view the constraints by querying the TABLE_CONSTRAINTS table in the INFORMATION_SCHEMA, which tracks all database metadata. The following SELECT statement retrieves information about existing constraints in the travel database:

SELECT table_name, constraint_name, constraint_type
FROM information_schema.table_constraints
WHERE constraint_schema = 'travel';

The statement returns the results shown in the following figure. The results indicate that PRIMARY KEY constraints have been defined on the airplanes table and manufacturers table, which was created as part of the setup for this article.
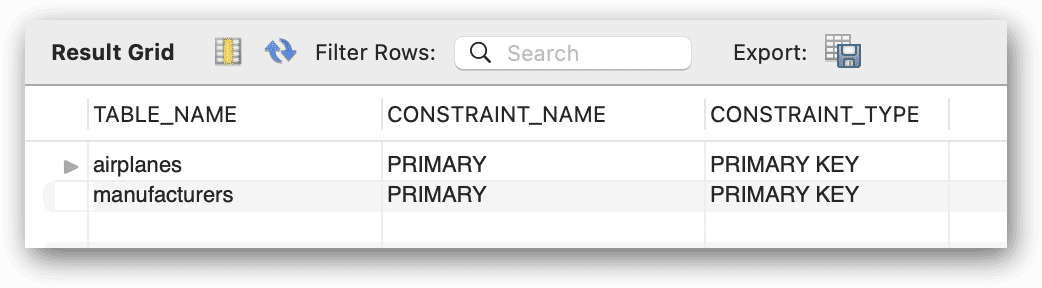
MySQL automatically assigns the name PRIMARY to each primary key constraint and to its associated unique index. Unlike other types of constraints, you cannot change these names. In addition, you should not use the name PRIMARY for any other indexes you create.

You can verify the PRIMARY KEY constraint in the airplanes table by running the following INSERT statement twice in a row:

INSERT INTO airplanes 
  (plane_id, plane, engine_type, engine_count)
VALUES (1001,'A340-600','Jet',4);

The first time you run the statement, MySQL inserts the data with no problem, but when you run the same statement a second time, MySQL returns the following error because you violated the PRIMARY KEY constraint:

Error Code: 1062. Duplicate entry '1001' for key 'airplanes.PRIMARY'

Another method you can use to define a PRIMARY KEY constraint is to add a separate constraint definition after the column definitions, as in the following example:

CREATE TABLE airplanes (
  plane_id INT UNSIGNED,
  plane VARCHAR(50),
  engine_type VARCHAR(50),
  engine_count TINYINT,
  PRIMARY KEY (plane_id));

This CREATE TABLE statement achieves the same results as the previous CREATE TABLE statement. In this case, however, you must specify the column on which the primary key will be created. MySQL will then create a PRIMARY KEY constraint on plane_id column, naming the constraint and index PRIMARY.

In some cases, you might want to create a PRIMARY KEY constraint on multiple columns. For example, you might have two columns in a table that do no uniquely identify each row individually, but together they do. In the following example, the CREATE TABLE statement defines a primary key on the plane_id and alt_id columns:

CREATE TABLE airplanes (
  plane_id INT UNSIGNED,
  alt_id INT UNSIGNED,
  plane VARCHAR(50),
  engine_type VARCHAR(50),
  engine_count TINYINT,
  PRIMARY KEY (plane_id, alt_id));

A primary key made up of multiple columns is sometimes referred to as a composite primary key. The need to use composite primary keys depends on the nature of your data. In this case, the plane_id and alt_id columns are used together to create a unique identifier for each row, making it possible for them to serve as the primary key. To test how this work, start by running the following INSERT statement:

INSERT INTO airplanes 
  (plane_id, alt_id, plane, engine_type, engine_count)
VALUES (1001,173,'A340-600','Jet',4);

The statement should insert the data with no problem because there are no conflicting primary key values. Now run the next INSERT statement, which specifies the same plane_id value but a different alt_id value:

INSERT INTO airplanes 
  (plane_id, alt_id, plane, engine_type, engine_count)
VALUES (1001,174,'A340-600','Jet',4);

Once again, the INSERT statement should run without problem because together the values in the two columns are still unique. You can verify that the airplanes table now contains the two rows of data by running the following SELECT statement:

SELECT * FROM airplanes;

The statement returns the results shown in the following figure, which indicates that the information in both rows is the same except for the alt_id values.
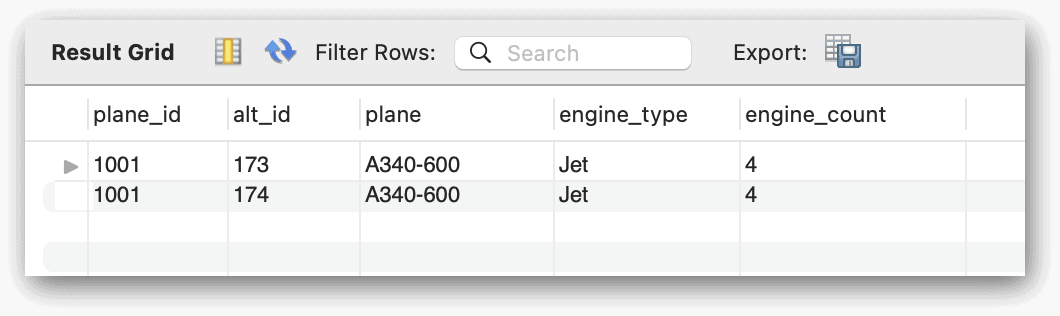
If you were to rerun the previous INSERT statement (or use the same plane_id and alt_id values in a different INSERT statement), MySQL would instead return the following error:

Error Code: 1062. Duplicate entry '1001-174' for key 'airplanes.PRIMARY'

When defining primary keys on InnoDB tables, try to keep the key columns as short as possible to minimize storage overhead, such as using integers rather than 20-character strings. Each secondary index defined on an InnoDB table contains a copy of the primary key column for the corresponding rows, and the extra data can add up. Shorter key columns can also result in better query performance, depending on the type of queries.

Note that you do not have to drop the entire table to change the constraint. Using the ALTER TABLE statement, you can drop the primary key constraint, and then recreate it.

--Remove the existing constraint
ALTER TABLE airplanes
   DROP PRIMARY KEY;

--Add the new PRIMARY KEY constraint
ALTER TABLE airplanes
   ADD PRIMARY KEY (plane_id, alt_id);

If you are new to MySQL, this syntax for altering a primary key may not be what you expect, but the PRIMARY KEY constraint has a set name, unlike in some other RDBMS types.

NOT NULL constraints

When defining a column in a CREATE TABLE statement, you can specify the column’s nullability, which determines whether the column accepts NULL values. A NULL value typically means that there is no data or that the column’s value is not known. This is different from a value of 0 or an empty string, although NULL is sometimes confused with these values. (A fair amount of confusion and debate continue to surround NULL, but this is a discussion well outside the scope of this article.)

You can specify a column’s nullability by including the keywords NULL or NOT NULL in the column definition. By default, MySQL permits NULL values, so if you don’t specify a nullability option, MySQL will assume NULL, unless the column is a primary key. If you do not want to permit NULL values, you must add the NOT NULL keywords to your column definitions, as in the following example:

CREATE TABLE airplanes (
  plane_id INT UNSIGNED NOT NULL,
  alt_id INT UNSIGNED NOT NULL,
  plane VARCHAR(50) NOT NULL,
  engine_type VARCHAR(50) NOT NULL,
  engine_count TINYINT NOT NULL,
  PRIMARY KEY (plane_id));

The CREATE TABLE statement is the same as in the previous example, only now each column definition includes NOT NULL. You can test a column’s nullability by running a few INSERT statements, starting with the following:

INSERT INTO airplanes 
  (plane_id, alt_id, plane, engine_type, engine_count)
VALUES (1001,173,'A340-600','Jet',4);

This statement should run with no problem because the statement provides a non-NULL value for all the columns, but now try to run the following INSERT statement, which specifies NULL as the engine_type value:

INSERT INTO airplanes 
  (plane_id, alt_id, plane, engine_type, engine_count)
VALUES (1002,174,'A350-800 XWB',NULL,2);

This time MySQL returns the following error, which states that the engine_type value cannot be NULL:

Error Code: 1048. Column 'engine_type' cannot be null

Instead of trying to insert a NULL value, you might try to insert the row without specifying an engine_type value:

INSERT INTO airplanes 
  (plane_id, alt_id, plane, engine_count)
VALUES (1002,174,'A350-800 XWB',2);

This time you’ll get a different error message because MySQL doesn’t know what to do with the engine_type column:

Error Code: 1364. Field 'engine_type' doesn't have a default value

If a default value is assigned to the column (a topic I’ll be discussing shortly), MySQL will insert that value into the column if no value is provided. Without a default value, MySQL returns an error.

However, this is true only if strict mode is enabled on your MySQL server, which is the default setting. If strict mode is disabled, MySQL will implicitly insert the data type’s default value, which in this case, is an empty string. This is because the data type for the engine_type column is VARCHAR, and MySQL uses an empty string as the implicit default value for all string types except ENUM.

Note: A discussion about strict mode and how to disable and enable it is beyond the scope of this article. For information about strict mode, see the MySQL topic Server SQL Modes.

At times, you might want to define a column to permit NULL values, in which case, you can specify NULL in the column definition, or you can omit the nullability option. (Many database teams prefer to include default settings in schema definitions as part of best practices.) The following CREATE TABLE statement sets the engine_type column to NULL:

CREATE TABLE airplanes (
  plane_id INT UNSIGNED NOT NULL,
  alt_id INT UNSIGNED NOT NULL,
  plane VARCHAR(50) NOT NULL,
  engine_type VARCHAR(50) NULL,
  engine_count TINYINT NOT NULL,
  PRIMARY KEY (plane_id));

Now try to insert a row into the table without specifying the engine_type value:

INSERT INTO airplanes 
  (plane_id, alt_id, plane, engine_count)
VALUES (1001,173,'A340-600',4);

This time, MySQL will insert NULL for the column’s value, which you can confirm by querying the airplanes table:

SELECT * FROM airplanes;

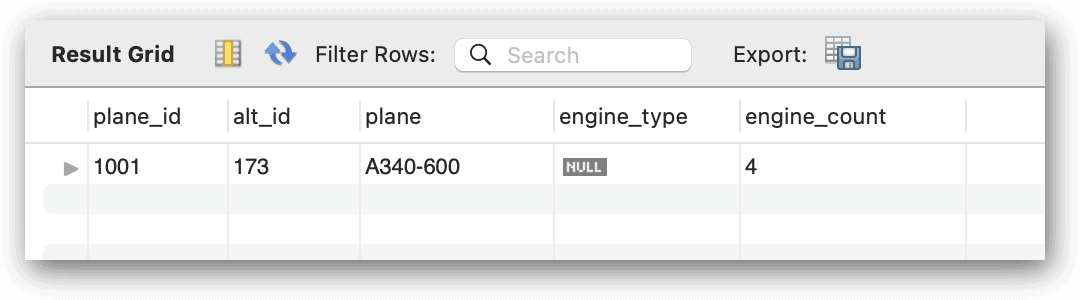
The following figure shows the results returned by the SELECT statement. As you can see, the engine_type value is set to NULL.
The debate over whether to support NULL values in a relational database has been going on for years (along with the debate about what NULL means). The extent to which you use NULL values will depend on the policies that your team has adopted. If you’re trying to limit the use of NULL, you can sometimes accommodate unknown values by adding DEFAULT constraints to your column definitions.

DEFAULT constraints

When creating or updating a table, you can add DEFAULT constraints to your column definitions. A DEFAULT constraint specifies the value to use for a column when an INSERT statement does not provide the value.

The default value can be a literal constant or a scalar expression. If you specify an expression, it must adhere to the following rules:

  • The expression must be enclosed in parentheses.
  • The expression can reference other columns, but it cannot depend on a column defined with AUTO_INCREMENT.
  • The expression cannot include subqueries, parameters, variables, stored functions, or loadable functions. However, it can include operators, literals, or built-in functions (both deterministic and nondeterministic).

To add a literal DEFAULT constraint to a column definition, you need only specify the DEFAULT keyword, followed by a default value that conforms to the column’s data type. For example, the following CREATE TABLE statement defines a DEFAULT constraint on the engine_type column:

CREATE TABLE airplanes (
  plane_id INT UNSIGNED NOT NULL,
  alt_id INT UNSIGNED NOT NULL,
  plane VARCHAR(50) NOT NULL,
  engine_type VARCHAR(50) NOT NULL DEFAULT 'unknown',
  engine_count TINYINT NOT NULL,
  PRIMARY KEY (plane_id));

In this case, the default value is the string unknown. You can test this out be running the following INSERT statement, which does not include a value for the engine_type column:

INSERT INTO airplanes 
  (plane_id, alt_id, plane, engine_count)
VALUES (1001,173,'A340-600',4);

To verify that the default value has been added, you can run the following SELECT statement:

SELECT * FROM airplanes;

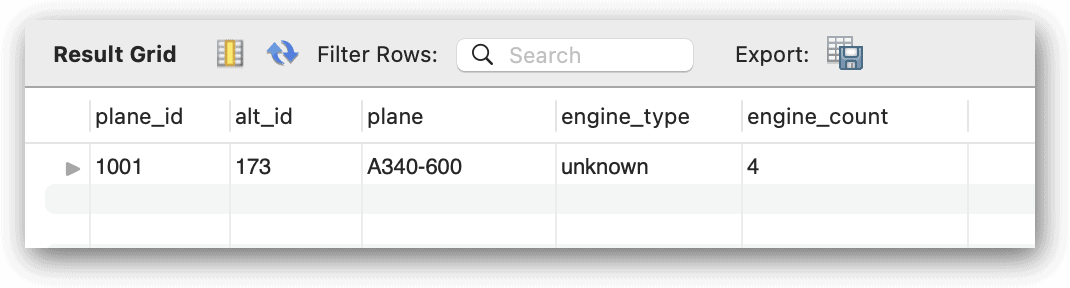
The statement returns the results shown in the following figure, which indicates the engine_type column has a value of unknown.
As noted above, you can specify an expression for the default value, rather than a literal. For example, the following CREATE TABLE statement includes the create_date and last_update columns, which are defined with default values:

CREATE TABLE airplanes (
  plane_id INT UNSIGNED NOT NULL,
  alt_id INT UNSIGNED NOT NULL,
  plane VARCHAR(50) NOT NULL,
  engine_type VARCHAR(50) NOT NULL DEFAULT 'unknown',
  engine_count TINYINT NOT NULL,
  create_date TIMESTAMP NOT NULL DEFAULT CURRENT_TIMESTAMP,
  last_update TIMESTAMP NOT NULL 
    DEFAULT CURRENT_TIMESTAMP ON UPDATE CURRENT_TIMESTAMP,
  PRIMARY KEY (plane_id));

Both new columns use the CURRENT_TIMESTAMP function for the default value. The last_update column also includes the ON UPDATE CURRENT_TIMESTAMP clause, which instructs MySQL to update the column’s value when the row has been updated. However, this clause is not part of the DEFAULT clause. In both column definitions, the default expression is only the CURRENT_TIMESTAMP function.

You might have noticed that the DEFAULT clauses in the two column definitions do not enclose their expressions in parentheses. It turns out that the parentheses are not required when you use the CURRENT_TIMESTAMP function as the default value in TIMESTAMP or DATETIME columns. You can confirm that it works by running the following INSERT and SELECT statements:

INSERT INTO airplanes 
  (plane_id, alt_id, plane, engine_type, engine_count)
VALUES (1001,173,'A340-600','Jet',4);

SELECT * FROM airplanes;

The INSERT statement runs with no problem, and the SELECT statement returns the expected results, which are shown in the following figure. MySQL automatically adds the timestamps to the create_date and last_update columns. If you had enclosed the default expression in parentheses, you would have received the same results.

If you update the row in any way, MySQL will automatically update the last_update column with the current timestamp, providing a record for when the row last changed.

CHECK constraints

Another type of constraint that MySQL supports is the CHECK constraint, which verifies that each data value inserted into a column meets the requirements specified by the constraint. A CHECK constraint defines an expression that must evaluate to TRUE or UNKNOWN (to accommodate NULL values) for a value to be added into the column. If the expression evaluates to FALSE, the insert or update fails, and MySQL issues a constraint violation.

A CHECK constraint can be specified within a column definition or after the column definitions. In either case, the constraint’s expression must adhere to the following rules:

  • The expression cannot reference a column defined with AUTO_INCREMENT or a column in another table.
  • The expression cannot include stored functions, loadable functions, procedure and function parameters, variables, or subqueries. However, the expression can include literals, operators, or deterministic built-in functions.

To create a CHECK constraint as part of a column definition, you need only specify the CHECK keyword, following by the expression. For example, the following CREATE TABLE statement defines a CHECK constraint on the wingspan column:

CREATE TABLE airplanes (
  plane_id INT UNSIGNED NOT NULL,
  alt_id INT UNSIGNED NOT NULL,
  plane VARCHAR(50) NOT NULL,
  engine_type VARCHAR(50) NOT NULL DEFAULT 'unknown',
  engine_count TINYINT NOT NULL,
  wingspan DECIMAL(5,2) NOT NULL
    CHECK (wingspan BETWEEN 10 AND 400),
  create_date TIMESTAMP NOT NULL DEFAULT CURRENT_TIMESTAMP,
  last_update TIMESTAMP NOT NULL 
    DEFAULT CURRENT_TIMESTAMP ON UPDATE CURRENT_TIMESTAMP,
  PRIMARY KEY (plane_id));

The CHECK constraint’s expression specifies that the wingspan value must be between 10 and 400. You can verify whether this works correctly by first running the following INSERT statement, which specifies a wingspan value of 208.17.

INSERT INTO airplanes 
  (plane_id, alt_id, plane, engine_type, 
    engine_count, wingspan)
VALUES (1001,173,'A340-600','Jet',4,208.17);

MySQL should insert the row without any issues because the wingspan value meets the criteria specified by the CHECK constraint, but now try to add a value that falls outside the acceptable range:

INSERT INTO airplanes
  (plane_id, alt_id, plane, engine_type, 
    engine_count, wingspan)
VALUES (1002,174,'A350-800 XWB','Jet',2,408.17);

In this case, the specified wingspan value is 408.17, which causes MySQL to baulk and return the following error:

Error Code: 3819. Check constraint 'airplanes_chk_1' is violated.

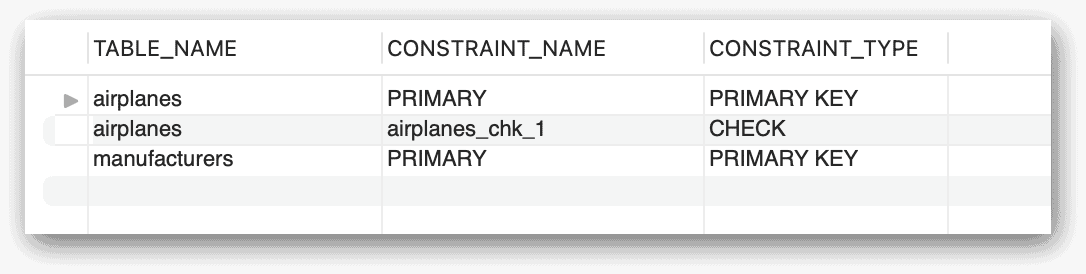
Notice that the error message refers to the constraint as airplanes_chk_1. This is the name that MySQL automatically assigned to the constraint when it was created. You can conform this by again querying the INFORMATION_SCHEMA, like you did after you added a primary key:

SELECT table_name, constraint_name, constraint_type
FROM information_schema.table_constraints
WHERE constraint_schema = 'travel';

The following figures shows the results returned by the SELECT statement, which include the newly added CHECK constraint:
MySQL follows a specific formula when naming a constraint. For CHECK constraints, it uses the table name, followed by _chk_, and then followed by an ordinal number that is automatically incremented with each new CHECK constraint. However, you can provide a custom name for a CHECK constraint, as in the following example:

CREATE TABLE airplanes (
  plane_id INT UNSIGNED NOT NULL,
  alt_id INT UNSIGNED NOT NULL,
  plane VARCHAR(50) NOT NULL,
  engine_type VARCHAR(50) NOT NULL DEFAULT 'unknown',
  engine_count TINYINT NOT NULL,
  wingspan DECIMAL(5,2) NOT NULL
    CONSTRAINT chk_wingspan 
      CHECK (wingspan BETWEEN 10 AND 400),
  create_date TIMESTAMP NOT NULL DEFAULT CURRENT_TIMESTAMP,
  last_update TIMESTAMP NOT NULL 
    DEFAULT CURRENT_TIMESTAMP ON UPDATE CURRENT_TIMESTAMP,
  PRIMARY KEY (plane_id));

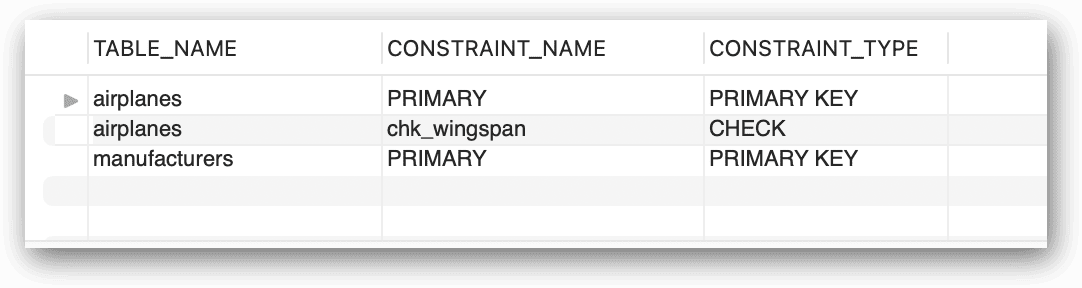
To name a CHECK constraint, you proceed the CHECK keyword with the CONSTRAINT keyword, followed by the constraint name, which in this case, chk_wingspan. Now when you query the INFORMATION_SCHEMA, the results should reflect the new name, as shown in the following figure.
When naming a CHECK constraint or certain types of constraints, the constraint name must be unique within the database and for the constraint type. This means you cannot create two CHECK constraints within the same database that are both named chk_wingspan, even if they’re defined on different tables. (When naming a constraint, be sure to follow your team’s naming conventions.)

You can also define a CHECK constraint after the column definitions, as you saw with PRIMARY KEY constraints:

CREATE TABLE airplanes (
  plane_id INT UNSIGNED NOT NULL,
  alt_id INT UNSIGNED NOT NULL,
  plane VARCHAR(50) NOT NULL,
  engine_type VARCHAR(50) NOT NULL DEFAULT 'unknown',
  engine_count TINYINT NOT NULL,
  wingspan DECIMAL(5,2) NOT NULL,
  create_date TIMESTAMP NOT NULL DEFAULT CURRENT_TIMESTAMP,
  last_update TIMESTAMP NOT NULL 
    DEFAULT CURRENT_TIMESTAMP ON UPDATE CURRENT_TIMESTAMP,
  PRIMARY KEY (plane_id),
  CONSTRAINT chk_wingspan
    CHECK (wingspan BETWEEN 10 AND 400));

This CREATE TABLE statement achieves the same results as the previous one, creating a CHECK constraint named chk_wingspan. One of the advantages of creating a CHECK constraint after the column definitions is that you’re not tied to a specific column, making it possible to reference multiple columns in your expression, as in the following example:

CREATE TABLE airplanes (
  plane_id INT UNSIGNED NOT NULL,
  alt_id INT UNSIGNED NOT NULL,
  plane VARCHAR(50) NOT NULL,
  engine_type VARCHAR(50) NOT NULL DEFAULT 'unknown',
  engine_count TINYINT NOT NULL,
  wingspan DECIMAL(5,2) NOT NULL,
  plane_length DECIMAL(5,2) NOT NULL,
  create_date TIMESTAMP NOT NULL DEFAULT CURRENT_TIMESTAMP,
  last_update TIMESTAMP NOT NULL 
    DEFAULT CURRENT_TIMESTAMP ON UPDATE CURRENT_TIMESTAMP,
  PRIMARY KEY (plane_id),
  CONSTRAINT chk_wingspan
    CHECK (wingspan BETWEEN 10 AND 400),
  CONSTRAINT chk_length 
    CHECK (plane_length < (wingspan * 2)));

The statement defines a CHECK constraint named chk_length. The constraint’s expression ensures that the plane_length value is always less than the wingspan value doubled. This is the sort of constraint you might create to avoid inserting anomalous data. You can test the constraint by running a couple INSERT statements, starting with the following statement:

INSERT INTO airplanes 
  (plane_id, alt_id, plane, engine_type, 
    engine_count, wingspan, plane_length)
VALUES (1001,173,'A340-600','Jet',4,208.17,247.24);

This INSERT statement should run with no problem because the plane_length value falls within the acceptable range, but suppose you now try to run the next statement, which specifies 498.58 as the plane_length value:

INSERT INTO airplanes 
  (plane_id, alt_id, plane, engine_type, 
    engine_count, wingspan, plane_length)
VALUES (1002,174,'A350-800 XWB','Jet',2,212.42,498.58);

Because the plane_length value exceeds the amount specified by the CHECK expression, MySQL returns the following error:

Error Code: 3819. Check constraint 'chk_length' is violated.

MySQL CHECK constraints can be useful when you need to apply business rules that govern what is considered acceptable types of data. For this reason, CHECK constraints are often specific to the circumstances in which they’re implemented.

Constraints can be added and removed from a table using the ALTER TABLE statement, this time using the name of the constraint:

ALTER TABLE airplanes    
     DROP CONSTRAINT chk_wingspan; 
ALTER TABLE airplanes  
   ADD CONSTRAINT chk_wingspan        
      CHECK (wingspan BETWEEN 10 AND 400);

UNIQUE constraints

A UNIQUE constraint creates a unique index on one or more key columns. The index ensures the uniqueness of the data inserted into the columns. The only exception to this is the NULL value. Unlike some database management systems, MySQL permits its unique indexes to contain multiple NULL values. However, you can avoid the multiple values by configuring the column as NOT NULL.

The simplest way to define a UNIQUE constraint on a single column is to add it to the column definition. For example, the following CREATE TABLE statement defines a UNIQUE constraint on the alt_id column:

DROP TABLE IF EXISTS airplanes; 
CREATE TABLE airplanes (
  plane_id INT UNSIGNED NOT NULL,
  alt_id INT UNSIGNED NOT NULL UNIQUE,
  plane VARCHAR(50) NOT NULL,
  engine_type VARCHAR(50) NOT NULL DEFAULT 'unknown',
  engine_count TINYINT NOT NULL,
  wingspan DECIMAL(5,2) NOT NULL,
  plane_length DECIMAL(5,2) NOT NULL,
  create_date TIMESTAMP NOT NULL DEFAULT CURRENT_TIMESTAMP,
  last_update TIMESTAMP NOT NULL 
    DEFAULT CURRENT_TIMESTAMP ON UPDATE CURRENT_TIMESTAMP,
  PRIMARY KEY (plane_id),
  CONSTRAINT chk_wingspan
    CHECK (wingspan BETWEEN 10 AND 400),
  CONSTRAINT chk_length 
    CHECK (plane_length < (wingspan * 2)));

As with the other examples, you can test the constraint by running a couple INSERT statements, starting with the following one:

INSERT INTO airplanes 
  (plane_id, alt_id, plane, engine_type, 
    engine_count, wingspan, plane_length)
VALUES (1001,173,'A340-600','Jet',4,208.17,247.24);

The statement should run with no problem, but the next one will not because the alt_id value violates the UNIQUE constraint because the statement is trying to again insert 173:

INSERT INTO airplanes 
  (plane_id, alt_id, plane, engine_type, 
    engine_count, wingspan, plane_length)
VALUES (1002,173,'A350-800 XWB','Jet',2,212.42,198.58);

Not surprisingly, the statement returns the following error:

Error Code: 1062. Duplicate entry '173' for key 'airplanes.alt_id'

As with other constraint types, you can also define a UNIQUE constraint after the column definitions, although you must also specify the column name:

CREATE TABLE airplanes (
  plane_id INT UNSIGNED NOT NULL,
  alt_id INT UNSIGNED NOT NULL,
  plane VARCHAR(50) NOT NULL,
  engine_type VARCHAR(50) NOT NULL DEFAULT 'unknown',
  engine_count TINYINT NOT NULL,
  wingspan DECIMAL(5,2) NOT NULL,
  plane_length DECIMAL(5,2) NOT NULL,
  create_date TIMESTAMP NOT NULL DEFAULT CURRENT_TIMESTAMP,
  last_update TIMESTAMP NOT NULL 
    DEFAULT CURRENT_TIMESTAMP ON UPDATE CURRENT_TIMESTAMP,
  PRIMARY KEY (plane_id),
  CONSTRAINT chk_wingspan
    CHECK (wingspan BETWEEN 10 AND 400),
  CONSTRAINT chk_length 
    CHECK (plane_length < (wingspan * 2)),
  UNIQUE (alt_id));

After you add a UNIQUE constraint to a table definition, you can again query the INFORMATION_SCHEMA, which should give you the results shown in the following figure.
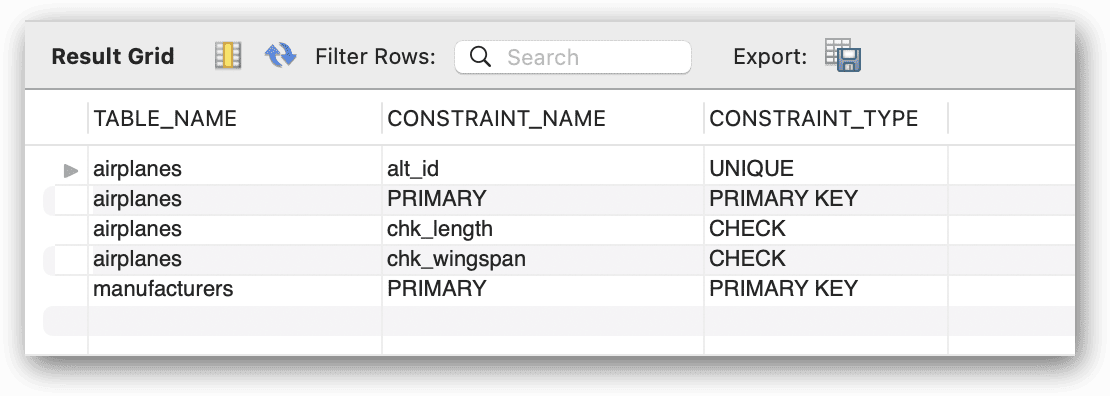
MySQL named the UNIQUE constraint alt_id, after the column on which the constraint is defined. MySQL also assigned this name to the associated index. However, you can provide a name for the constraint (and index), just like you can with CHECK constraints:

CREATE TABLE airplanes (
  plane_id INT UNSIGNED NOT NULL,
  alt_id INT UNSIGNED NOT NULL,
  plane VARCHAR(50) NOT NULL,
  engine_type VARCHAR(50) NOT NULL DEFAULT 'unknown',
  engine_count TINYINT NOT NULL,
  wingspan DECIMAL(5,2) NOT NULL,
  plane_length DECIMAL(5,2) NOT NULL,
  create_date TIMESTAMP NOT NULL DEFAULT CURRENT_TIMESTAMP,
  last_update TIMESTAMP NOT NULL 
    DEFAULT CURRENT_TIMESTAMP ON UPDATE CURRENT_TIMESTAMP,
  PRIMARY KEY (plane_id),
  CONSTRAINT chk_wingspan
    CHECK (wingspan BETWEEN 10 AND 400),
  CONSTRAINT chk_length 
    CHECK (plane_length < (wingspan * 2)),
  CONSTRAINT uc_alt_id UNIQUE (alt_id));

In this case, the name of the constraint is uc_alt_id, which you can again confirm by querying the INFORMATION_SCHEMA. You can also define a UNIQUE constraint on multiple columns, just like a primary key. In the following example, I define a composite UNIQUE constraint on the alt_id1 and alt_id2 columns.

CREATE TABLE airplanes (
  plane_id INT UNSIGNED NOT NULL,
  alt_id1 INT UNSIGNED NOT NULL,
  alt_id2 INT UNSIGNED NOT NULL,
  plane VARCHAR(50) NOT NULL,
  engine_type VARCHAR(50) NOT NULL DEFAULT 'unknown',
  engine_count TINYINT NOT NULL,
  wingspan DECIMAL(5,2) NOT NULL,
  plane_length DECIMAL(5,2) NOT NULL,
  create_date TIMESTAMP NOT NULL DEFAULT CURRENT_TIMESTAMP,
  last_update TIMESTAMP NOT NULL 
    DEFAULT CURRENT_TIMESTAMP ON UPDATE CURRENT_TIMESTAMP,
  PRIMARY KEY (plane_id),
  CONSTRAINT chk_wingspan
    CHECK (wingspan BETWEEN 10 AND 400),
  CONSTRAINT chk_length 
    CHECK (plane_length < (wingspan * 2)),
  CONSTRAINT uc_alt_id UNIQUE (alt_id1, alt_id2));

A composite UNIQUE constraint works just like a composite PRIMARY KEY constraint, when it comes to inserting data. For example, the following two INSERT statements run with no problem, even though they specify the same alt_id1 value:

INSERT INTO airplanes 
  (plane_id, alt_id1, alt_id2, plane, engine_type, 
    engine_count, wingspan, plane_length)
VALUES (1001,173,297,'A340-600','Jet',4,208.17,247.24);

INSERT INTO airplanes 
  (plane_id, alt_id1, alt_id2, plane, engine_type, 
    engine_count, wingspan, plane_length)
VALUES (1002,173,298,'A350-800 XWB','Jet',2,212.42,198.58);

However, the next INSERT statement tries to add a pair of alt_id1 and alt_id2 values that already exist:

INSERT INTO airplanes 
  (plane_id, alt_id1, alt_id2, plane, engine_type, 
    engine_count, wingspan, plane_length)
VALUES (1003,173,298,'A350-900','Jet',2,212.42,198.58);

As expected, MySQL returns the following error:

Error Code: 1062. Duplicate entry '173-298' for key 'airplanes.uc_alt_id'

Adding a UNIQUE constraint to a table definition is a fairly straightforward process. Keep in mind however, that MySQL uses the same name for both the constraint and the unique index, so don’t try to create another index with the same name.

Note: just as before, you can drop and alter a UNIQUE constraint using the ALTER TABLE statement.

FOREIGN KEY constraints

Another type of constraint that MySQL supports is the FOREIGN KEY constraint. This one is different from the other constraints in that it enables you to enforce referential integrity across tables. A foreign key establishes a relationship between a parent table and child table. The parent table holds the referenced column values, and the child table holds the referencing values.

Note: The topic of foreign keys is much more involved than what I can cover in this article in depth. This article aims to give you a big picture of all the MySQL constraints. For more specific information about foreign keys, I recommend that you review the MySQL article FOREIGN KEY constraints.

Although you can set up a FOREIGN KEY constraint that references a column in the same table (as you might do when working with hierarchical data), most foreign key relationships reference one or more columns in a different table. For example, the following CREATE TABLE statement defines a foreign key that references the manufacturer_id column in the manufacturers table:

CREATE TABLE airplanes (
  plane_id INT UNSIGNED NOT NULL,
  alt_id INT UNSIGNED NOT NULL,
  plane VARCHAR(50) NOT NULL,
  manufacturer_id INT UNSIGNED NOT NULL,
  engine_type VARCHAR(50) NOT NULL DEFAULT 'unknown',
  engine_count TINYINT NOT NULL,
  wingspan DECIMAL(5,2) NOT NULL,
  plane_length DECIMAL(5,2) NOT NULL,
  create_date TIMESTAMP NOT NULL DEFAULT CURRENT_TIMESTAMP,
  last_update TIMESTAMP NOT NULL 
    DEFAULT CURRENT_TIMESTAMP ON UPDATE CURRENT_TIMESTAMP,
  PRIMARY KEY (plane_id),
  CONSTRAINT chk_wingspan
    CHECK (wingspan BETWEEN 10 AND 400),
  CONSTRAINT chk_length 
    CHECK (plane_length < (wingspan * 2)),
  CONSTRAINT uc_ids UNIQUE (plane_id, alt_id),
  FOREIGN KEY (manufacturer_id) 
    REFERENCES manufacturers (manufacturer_id));

When defining a foreign key, you must specify the FOREIGN KEY clause, followed the name of the column on which you’re creating the foreign key. You must also include a REFERENCES clause that specifies the parent table and the target column within that table. In this case, the manufacturer_id column in the airplanes table is referencing the manufacturer_id column in the manufacturers table.

To test the foreign key, you can run the following INSERT statement, which uses 101 for the manufacturer_id value:

INSERT INTO airplanes 
  (plane_id, alt_id, plane, manufacturer_id, engine_type, 
    engine_count, wingspan, plane_length)
VALUES (1001,173,'A340-600',101,'Jet',4,208.17,247.24);

For the INSERT statement to run successfully, the manufacturers table must include a row with a manufacturer_id value of 101, which it does (assuming you created and populated the manufacturers table). But suppose you were to now run the following INSERT statement, which uses a manufacturer_id value that does not exist in the manufacturers table:

INSERT INTO airplanes 
  (plane_id, alt_id, plane, manufacturer_id, engine_type, 
    engine_count, wingspan, plane_length)
VALUES (1002,175,'A350-800 XWB',121,'Jet',2,212.42,198.58);

When you try to execute the statement, MySQL returns the following error:

Error Code: 1452. Cannot add or update a child row: a foreign key constraint 
fails (`travel`.`airplanes`, CONSTRAINT `ibfk_1` FOREIGN KEY (`manufacturer_id`) 
REFERENCES `manufacturers` (`manufacturer_id`))

As you can see in the message, MySQL has named the constraint airplanes_ibfk_1. What you don’t see is that MySQL also created a non-unique index on the manufacturer_id column in the airplanes table and named the index manufacturer_id.

As with other constraint types, you can assign a custom name to a foreign key. For this, you must precede the FOREIGN KEY clause with the CONSTRAINT keyword, followed the constraint name, as in the following example:

CREATE TABLE airplanes (
  plane_id INT UNSIGNED NOT NULL,
  alt_id INT UNSIGNED NOT NULL,
  plane VARCHAR(50) NOT NULL,
  manufacturer_id INT UNSIGNED NOT NULL,
  engine_type VARCHAR(50) NOT NULL DEFAULT 'unknown',
  engine_count TINYINT NOT NULL,
  wingspan DECIMAL(5,2) NOT NULL,
  plane_length DECIMAL(5,2) NOT NULL,
  create_date TIMESTAMP NOT NULL DEFAULT CURRENT_TIMESTAMP,
  last_update TIMESTAMP NOT NULL 
    DEFAULT CURRENT_TIMESTAMP ON UPDATE CURRENT_TIMESTAMP,
  PRIMARY KEY (plane_id),
  CONSTRAINT chk_wingspan
    CHECK (wingspan BETWEEN 10 AND 400),
  CONSTRAINT chk_length 
    -- CHECK (wingspan < (plane_length / 2)));
    CHECK (plane_length < (wingspan * 2)),
  CONSTRAINT uc_ids UNIQUE (plane_id, alt_id),
  CONSTRAINT fk_manufacturer 
    FOREIGN KEY (manufacturer_id) 
    REFERENCES manufacturers (manufacturer_id));

Now both the constraint and associated index will be named fk_manufacturer, rather than the names assigned by MySQL. Again, be aware that the name must be unique within the data for the particular constraint type, so don’t try to create another foreign key with the same name, just like you should not try to create an index with the same name.

Getting started with MySQL constraints

MySQL constraints are one of the most important tools you have for ensuring the integrity of your data. But you need to understand how they work and how to implement them to realize their full potential. In this article, I’ve introduced you to the various types of constraints and the ways you can add them to your tables. I recommend that you learn more about each constraint type so you fully understand the ways in which it works and its limitations. A good place to start is with the MySQL topic CREATE TABLE statement. There you’ll find descriptions of each constraint type and links to additional information.

Appendix: Preparing your MySQL environment

For the examples for this article, I used a Mac computer that was set up with a local instance of MySQL 8.0.29 (Community Server edition) and MySQL Workbench. I also created the travel database and the manufacturers table. If you want to try out the examples, you should first run the following script against your MySQL instance:

--NOTE: if you have been working through the examples,
--you may need to drop the existing database first (or use
--a different database name.)
CREATE DATABASE IF NOT EXISTS travel;
USE travel;
CREATE TABLE manufacturers (
  manufacturer_id INT UNSIGNED NOT NULL,
  manufacturer VARCHAR(50) NOT NULL,
  create_date TIMESTAMP NOT NULL DEFAULT CURRENT_TIMESTAMP,
  last_update TIMESTAMP NOT NULL 
    DEFAULT CURRENT_TIMESTAMP ON UPDATE CURRENT_TIMESTAMP,
  PRIMARY KEY (manufacturer_id) );
INSERT INTO manufacturers (manufacturer_id, manufacturer)
VALUES (101,'Airbus'), (102,'Beagle Aircraft Limited'), 
  (103,'Beechcraft'), (104,'Boeing');

The script creates the travel database, adds the manufacturers table, and inserts several rows into the table. Be aware, however that most of the examples in this article do not reference the manufacturers table. They simply use a CREATE TABLE statement to define different versions of the airplanes table to demonstrate various types of constraints. The manufacturers table is used only when explaining how to define a FOREIGN KEY constraint.


The post Working with MySQL constraints appeared first on Simple Talk.


from Simple Talk https://ift.tt/VlkjUgu
via