Tuesday, October 24, 2023

Exporting and Importing Data into SQL Server Using Files

There are plenty of applications and tools available that allow for the movement of data in and out of SQL Server. Some tools are built by Microsoft, such as SSIS or Azure Data Factory. Others are created by third parties, such as Databricks or Snowflake. Still other available options make use of SQL Server features and rely on our own ability to write efficient code to get data from point A to point B.

Before diving into the specific solution presented in this article, there is value in recognizing that different data movement methods are better for different situations and data profiles. The following is a (brief) overview of when different types of tools might be most useful:

  • Azure Data Factory, Azure Synapse Link: Ideal for data sources already in Azure, where these tools are conveniently available and file system/3rd party app access may be limited or inconvenient.
  • SSIS: Convenient for on-premises SQL Server workloads or scenarios where SSIS is already used and an organization has existing expertise using it.
  • Third Party Tools: There are many out there and their use is ideal when an organization is already invested in their applications or architecture. Mixing and matching ecosystems can be challenging, expensive, and require more overhead to spec-out security and data flows.
  • Linked Servers: This is insanely convenient when moving data between two SQL Servers, but does require a secure connection between those servers. Linked servers are not ideal for large data sets and trying to efficiently run complex queries cross-server can yield unexpected results.

For the purposes of this article, we will focus solely on the task of moving a data set from one server to another. Topics such as ETL, ELT, data warehousing, data lakes, etc…are important and relevant to data movement, but out of scope for a focused discussion such as this.

Why (and Why Not to) Use Files?

The primary benefits of exporting data to files are:

  • File portability. Once written, a file may be compressed, moved, copied, backed up, or otherwise manipulated freely without any impact on SQL Server.
  • Bulk Loading. When reading a file into SQL Server, it can be bulk-loaded, which uses a minimally-logged process to import data faster while reducing the impact on the transaction log.
  • Security. The only security need is a storage location to write the file to from the source server and a storage location to read the file from on the target server. There is no need for connections to other servers, services, or apps.
  • Economy. In general, file storage and movement is inexpensive, whereas IO within SQL Server or other cloud services can be more costly. This varies from service-to-service, but for large data sets, data movement can quickly become a non-trivial cost.

The benefits above are also reasons to not use files. If you have no easy way to move the source file to the target destination, then portability provides no value. Similarly, if data loads need to be fully-logged for posterity or detailed, recovery (such as restoring to a point-in-time), then bulk-loading cannot be used. Lastly, if the resources needed to write/read a file from storage are not available for either the source or target server, then those would also be nonstarters.

If unsure of what method is best, consider testing the most feasible ones available to determine which are the fastest and most cost-effective. Scalability is also important. If you believe that the five servers you move files from may one day become one hundred servers, then consider if processes built now will scale up over time.

A Note on the Methods I will Use

Because there are many ways to import and export data, you may be quick to ask why I chose these specific methods. The choice of methods and code was based on two important factors:

  1. Security
  2. Speed

In terms of security, it was important to avoid xp_cmdshell or any other extended stored procedure that could provide security weak points by unnecessarily linking SQL Server to the file system. Enabling a feature like that creates a permanent security hole that is best left avoided. In this article I will use PowerShell to export data, which can read data from a table into a file and do so without needing any changes to SQL Server security. Similarly, to import data into SQL Server, I will useOPENROWSET to read a file, and then insert that data into a table without any other special security considerations. 

Speed is also quite important here. Presumably, loading files like this will often be associated with analytics, logging, or other processes that tend to move large volumes of data. Ideally, these processes should be minimally logged and not consume excessive system resources. Writing data out to a file requires only reading the source table. There is no need for any SQL Server logging or writes, and once the data has been written to the CSV, our work on the source database server is complete without any cleanup or additional actions needed. Reading the file via OPENROWSET can take advantage of a minimally-logged bulk insert, which is key to performance here. Not needing to log the details of every row inserted into the target table will greatly improve the speed of this process. As a bonus, there will be no transaction log bloat, which will also avoid log file growth and potentially large transaction log backups.

Generating CSV Files from SQL Server Queries

Consider a query that needs to capture sales details for a given month. The results need to be imported automatically into another server. Here, we will walk through one way to automate this using the query, some PowerShell, and a SQL Server Agent job to execute the code.

The following is a query that pulls nine columns from a handful of tables in WideWorldImportersDW (which can be downloaded here from learn.microsof.com):

SELECT
     Sale.[Sale Key],
     [Stock Item].[Stock Item],
     Customer.Customer,
     Sale.[Invoice Date Key],
     Sale.[Delivery Date Key],
     Sale.Quantity,
     Sale.[Unit Price],
     Sale.[Total Excluding Tax],
     Sale.Profit
FROM Fact.Sale
 INNER JOIN Dimension.[Stock Item]
  ON [Stock Item].[Stock Item Key] = Sale.[Stock Item Key]
 INNER JOIN Dimension.Customer
  ON Customer.[Customer Key] = Sale.[Customer Key]
WHERE Sale.[Invoice Date Key] >= '2/1/2016'
AND Sale.[Invoice Date Key] < '3/1/2016';

The month bounded by the WHERE clause may vary over time, but the general shape of the data will remain static. The results show us what this data looks like:
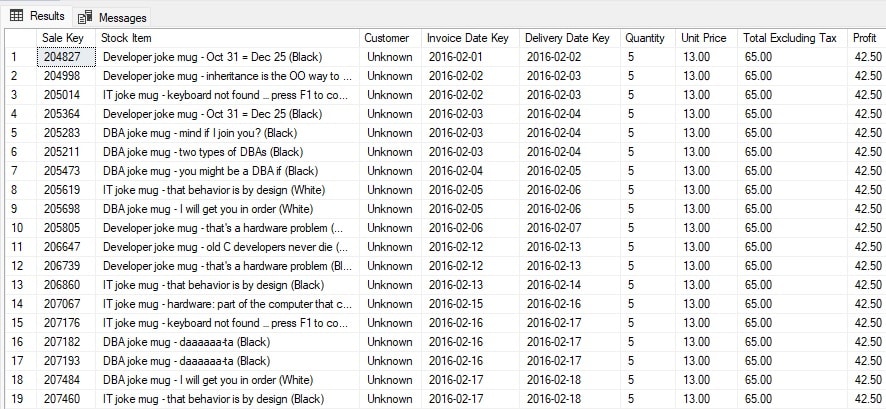
This is relatively straightforward data: Some dates, integers, decimals, and strings. Nothing unusual that might require special consideration. Note that file encoding may become relevant if the data source contains Unicode characters.

Create a New SQL Server Agent Job

To start, let’s create a new SQL Server Agent Job:
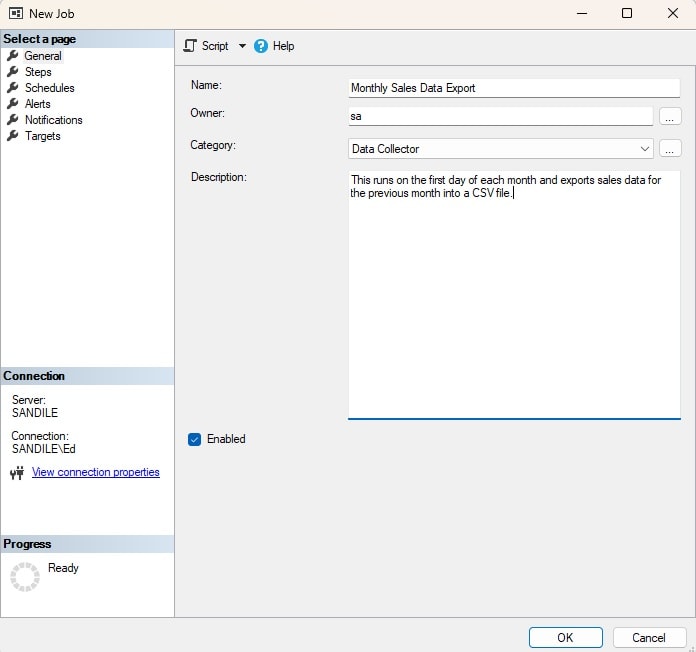
The details are entirely up to you and the conventions your database environment follows for names, categories, etc…For the moment, no schedule will be created as we can test this manually. Note that sa is used for the job Owner. Feel free to substitute it with any other job owner. (For more information, check out this blog post from Brent Ozar.)

The SQL Server Agent login will still be the one that is used to execute the job, regardless of its owner.

Next, go to the General pane, and click on the “New” button. Then choose PowerShell as the job type:
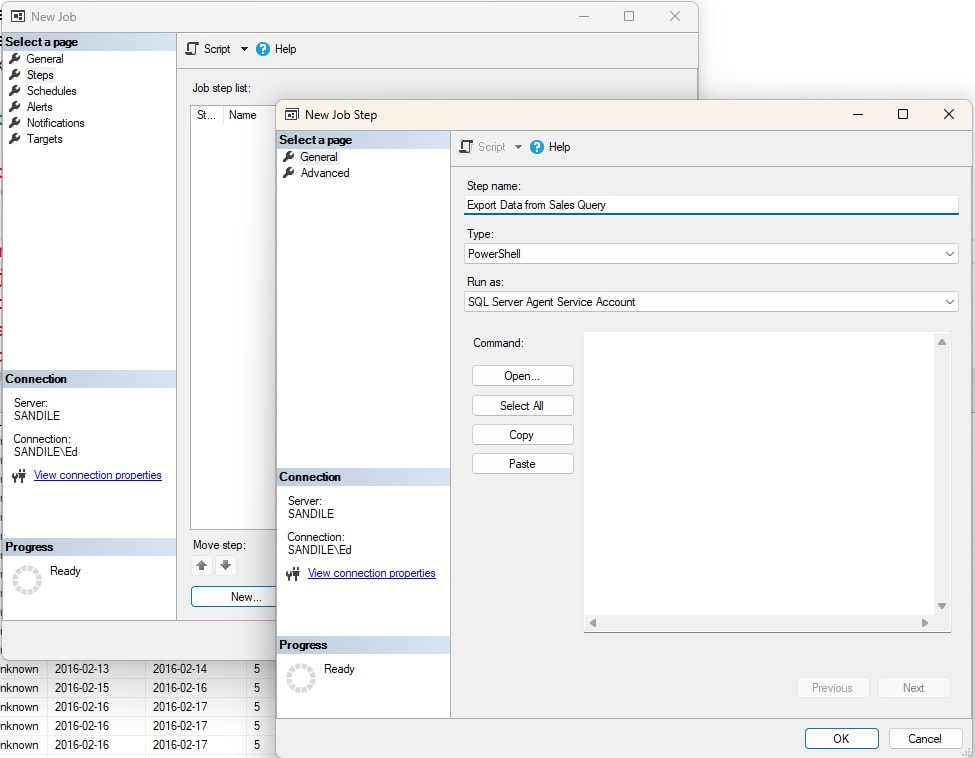
This is where the job creation pauses so that a PowerShell script can be written and tested. The steps that need to be accomplished are:

  1. Define the SQL Server connection and file destination.
  2. Define the query.
  3. Define the file name and format.
  4. Execute code to export the contents of the query to the file based on the specifications defined above.

Note that it is possible to export data using xp_cmdshell or some other SQL Server extended stored procedure, but those options are avoided due to the security concerns they raise. PowerShell can be executed from a SQL Server Agent job, a Windows task, or via a similar process.

To begin, the following code will outline the query source and destination:

$SQLServer = get-content env:computername
$SQLDBName = "WideWorldImportersDW" 
$delimiter = ","
$Today = Get-Date -uformat "%m_%d_%Y"
$SqlConnection = New-Object System.Data.SqlClient.SqlConnection
$SqlConnection.ConnectionString = 
     "Server = $SQLServer; Database = $SQLDBName; Integrated Security = True;"
$SqlCmd = New-Object System.Data.SqlClient.SqlCommand
$SqlCmd.Connection = $SqlConnection
$SqlAdapter = New-Object System.Data.SqlClient.SqlDataAdapter
$FilePath = "C:\SQLData\DataExport\"

The value for $SQLServer may need to be adjusted if a named instance is being accessed or if the SQL Server is not local to this machine. While the comma is used as the delimiter, other characters may be chosen. The date format is arbitrary and is used later when naming the file. Feel free to adjust it as needed or remove it if a timestamp is unneeded. Lastly, $FilePath is a local folder on my machine that the file can be exported to. This can also be adjusted to whatever location makes the most sense to export the CSV file to.

With the parameters for this process defined, the query to be executed can be added:

$SqlQuery = "
     SELECT
          Sale.[Sale Key],
          [Stock Item].[Stock Item],
          Customer.Customer,
          Sale.[Invoice Date Key],
          Sale.[Delivery Date Key],
          Sale.Quantity,
          Sale.[Unit Price],
          Sale.[Total Excluding Tax],
          Sale.Profit
     FROM Fact.Sale
      INNER JOIN Dimension.[Stock Item]
       ON [Stock Item].[Stock Item Key] = Sale.[Stock Item Key]
      INNER JOIN Dimension.Customer
       ON Customer.[Customer Key] = Sale.[Customer Key]
     WHERE Sale.[Invoice Date Key] >= '2/1/2016'
       AND Sale.[Invoice Date Key] < '3/1/2016';
"

Note that there is no need to double the apostrophes as the T-SQL is entered in double-quotes (and it is PowerShell, not dynamic T-SQL). Next, the file destination needs to be defined and the query prepared for execution:

$SqlCmd.CommandText = $SqlQuery
$SqlAdapter.SelectCommand = $SqlCmd
$DataSet = New-Object System.Data.DataSet
$SqlAdapter.Fill($DataSet)
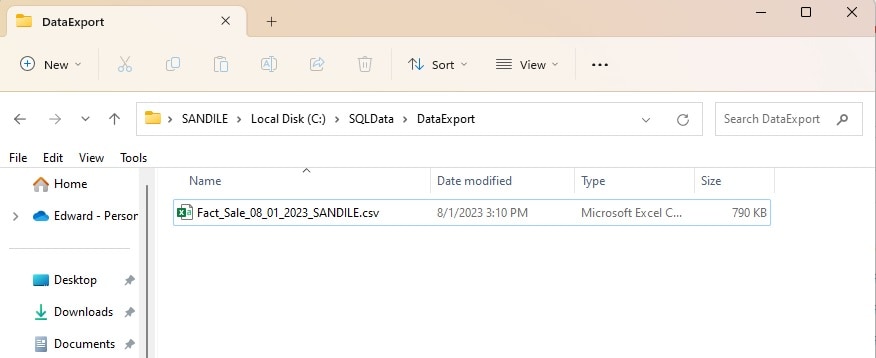
$FileName = "Fact_Sale_" + $Today + "_" + $SQLServer + ".csv"
$FullPathWithFileName = $FilePath + $FileName

As with the prior code, there is latitude here for customization. The file name and extension may be adjusted as needed to make your version of this process as easy to manage as possible. Ideally, files should be easy to identify via automated processes so it is simple to move/read them. In addition, regular cleanup of old files may be a helpful step as well. Lastly, the data set can be exported to a CSV:

$DataSet.Tables[0] | export-csv -Delimiter $delimiter -Path $FullPathWithFileName -NoTypeInformation

The code above can be pasted into the SQL Server Agent job step from above. (You can download the code from the Simple-Talk website here).
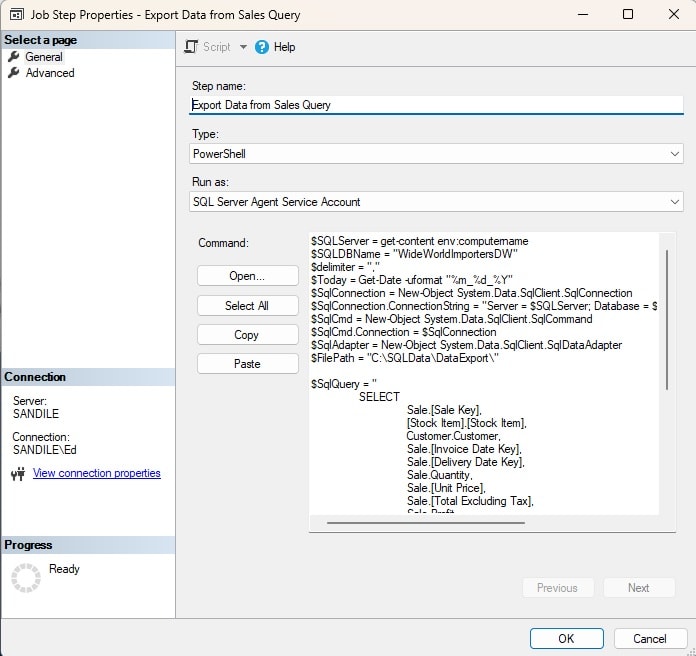
The job step and job can be saved. To test the newly created job, it will be run manually (if it does not work for any reason, editing the code in a tool like Visual Studio Code can be very helpful to find the issue. Common issues are security related, like the service account not having direct access to the directory you are exporting to.):
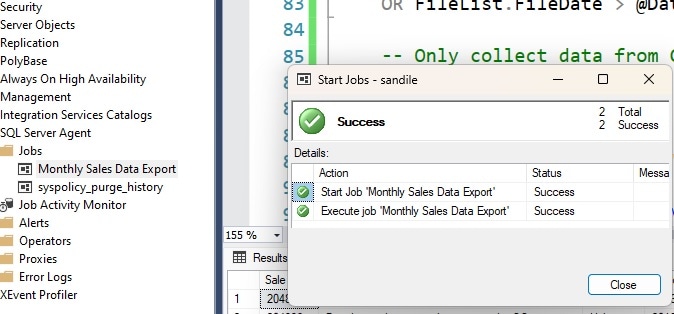
After the job succeeds, the target directory can be checked to confirm that the file was generated:
PowerShell may also be configured to run using the Windows Task Scheduler, which would allow it to run independently of SQL Server, without the need for a SQL Server Agent job. This may or may not be convenient but is an option that is available. This can be especially useful if you are working with an Express Edition server.

Note that there are many other ways to generate files from SQL Server that vary in process, simplicity, and need for operator intervention. You are welcome to use another method if it meets the needs of your database environment more effectively.

File Cleanup

If automatic cleanup is desired for CSV files, there are a couple of scenarios that can be handled here. First, if there is a need to remove empty CSVs, the following code can do that:

$path = "C:\SQLData\DataExport\";
Get-ChildItem -Path $FilePath -Recurse -Force | Where-Object { $_.PSIsContainer -eq $false -and $_.Length -eq 0 -and $_.Name -like '*.csv'} | remove-item

This is useful if it is possible for empty files to be created and it is preferable to delete them than to move them around between file systems or servers and try to process them anyway.

Similarly, if there is no need to keep CSV files past a given retention period, a command like this can remove files older than a set number of days:

$limit = (Get-Date).AddDays(-7)
$path = "C:\SQLData\DataExport\"
 
# Delete files older than the $limit.
Get-ChildItem -Path $path -Force | Where-Object { $_.Name -like '*.csv' -and !$_.PSIsContainer -and $_.LastWriteTime -lt $limit } | Remove-Item -Force

This removes all CSV files older than 7 days and can be adjusted to whatever retention period is needed.

Automatic file cleanup of some sort is a good idea. Because forever is a long time to retain files! PowerShell can handle any retention scenario that can be dreamed up, whether similar to the examples provided here or not.

There are many ways to implement cleanup, such as a step added onto this SQL Server Agent job, a new job, or a Windows scheduled task. The method you choose should be based on your standards and what is easiest to maintain over time. Adding a step to this job is likely the simplest way to add cleanup, but not the only valid way.

Importing Data from CSV Files into SQL Server

Once created, data files can be compressed and moved to a target location, wherever that happens to be. PowerShell is an ideal tool for command-line operations, though you may have your own tools to accomplish common file manipulation tasks.

When complete, a file or set of files will now reside on a new server and be ready for import into a database. There are many ways to accomplish this task, each with strengths and weaknesses. The primary challenge when importing data into SQL Server using any method is aligning the data types in the source data set (the CSV files) with the data types in the target table. Anyone that has experience using the Data Import/Export Wizard in SQL Server Management Studio has undoubtedly felt the pain of mismatched data types, unexpected NULLs, and data truncation errors.

The first step to getting data imported into SQL Server is to have a table available that the data can be loaded into. It is critical that the data types in this table match the data types used earlier exactly. Mismatched data types can lead to data truncation, errors, bad data, and perhaps worst of all, a very difficult task of figuring out exactly where such errors are coming from in your source data!

This is a step that is worth double and triple-checking for accuracy! The following is the table structure that will be used for our staging table:

CREATE TABLE dbo.Fact_Sale_Staging
(    [Sale Key] BIGINT NOT NULL 
        CONSTRAINT PK_Fact_Sale_Staging PRIMARY KEY CLUSTERED,
    [Stock Item] NVARCHAR(100) NOT NULL,
    [Customer] NVARCHAR(100) NOT NULL,
    [Invoice Date Key] DATE NOT NULL,
    [Delivery Date Key] DATE NULL,
    [Quantity] INT NOT NULL,
    [Unit Price] DECIMAL(18,2) NOT NULL,
     [Total Excluding Tax] DECIMAL(18,2) NOT NULL,
    [Profit] DECIMAL(18,2) NOT NULL
);

Note that while the column names match those used earlier, they do not have to match. A mapping can be created between source and target data if there is a need for differing naming conventions. That being said, there is value in consistency, and I recommend that column names are kept in sync between source data set, CSV file, and target table.

For our data import process, we will create an XML format file template up-front that will be used by OPENROWSET when data is read from the file. A prefabricated template provides some significant benefits, as well as a few drawbacks, including:

Pros:

  • Guaranteed data type matching from source to target.
  • Easy mapping of columns within the source data to target table.
  • Flexibility to customize data type/length/terminator details extensively.

Cons:

  • Schema changes in the source data must be reconciled with the format file prior to importing data.
  • Mistakes in the format file will lead to errors

Note that that while format file mistakes will lead to errors when importing data, this is not completely a bad thing. Many operators would prefer an error to bad data or silent conversion problems.

Creating a Format File Template

We will create a format file template using XML. The file will be broken into three sections:

  1. Header
  2. Column size/terminator definitions
  3. Column names/data types

The header contains basic XML definition information and is universal to this format file, regardless of the tables/columns imported:

<?xml version="1.0"?>
<BCPFORMAT xmlns=http://schemas.microsoft.com/sqlserver/2004/bulkload/format 
           xmlns:xsi="http://www.w3.org/2001/XMLSchema-instance">

The next block of XML contains a row per column that describes field terminators, lengths, and collation:

<RECORD>
  <FIELD ID="1" xsi:type="CharTerm" TERMINATOR="," MAX_LENGTH="100"/>
  <FIELD ID="2" xsi:type="CharTerm" TERMINATOR="," MAX_LENGTH="100" 
COLLATION="SQL_Latin1_General_CP1_CI_AS"/>
  <FIELD ID="3" xsi:type="CharTerm" TERMINATOR="," MAX_LENGTH="100" 
COLLATION="SQL_Latin1_General_CP1_CI_AS"/>
  <FIELD ID="4" xsi:type="CharTerm" TERMINATOR="," MAX_LENGTH="100"/>
  <FIELD ID="5" xsi:type="CharTerm" TERMINATOR="," MAX_LENGTH="100"/>
  <FIELD ID="6" xsi:type="CharTerm" TERMINATOR="," MAX_LENGTH="100"/>
  <FIELD ID="7" xsi:type="CharTerm" TERMINATOR="," MAX_LENGTH="100"/>
  <FIELD ID="8" xsi:type="CharTerm" TERMINATOR="," MAX_LENGTH="100"/>
  <FIELD ID="9" xsi:type="CharTerm" TERMINATOR="\r\n" 
                                                 MAX_LENGTH="100"/>
</RECORD>

The numbers provided for FIELD ID should match the column order from the source table and CSV file. While it is possible to move these around, the resulting confusion is not worth the effort. The parts of this code that need to be modified with each different CSV file are the TERMINATOR, MAX_LENGTH, and COLLATION.

TERMINATOR will typically be a comma (for a CSV file), though it may be adjusted to another separator if the file was generated using another process.

MAX_LENGTH defines the maximum length that the column can be. If the column is a string, then the maximum length is whatever the column length is as defined in the source data set. For other data types, this maximum length should the most characters a column could consume. There is no need to be completely precise here on field length. A date may consume 10 characters exactly (MM/DD/YYYY), but if 20 or 50 or 100 is used, the performance difference will be negligible. Feel free to estimate, so long as the numbers used are greater than or equal to the actual column maximum length.

COLLATION is only used for columns that have a collation associated with them, which means only string/character columns. This includes CHAR, NCHAR, VARCHAR, NVARCHAR, TEXT, and NTEXT data types. If you work in an environment with many different collations, then there may be a need to add some additional code into the T-SQL code presented in the next section to handle that and ensure there are no collation conflicts when the file is read into SQL Server. Using an explicit or dynamic column list with COLLATE DATABASE_DEFAULT or something similar would accomplish the task effectively, if needed.

The final section of XML includes a row per column and additional details of the target table:

<ROW>
  <COLUMN SOURCE="1" NAME="Sale Key" xsi:type="SQLBIGINT"/>
  <COLUMN SOURCE="2" NAME="Stock Item" xsi:type="SQLNVARCHAR"/>
  <COLUMN SOURCE="3" NAME="Customer" xsi:type="SQLNVARCHAR"/>
  <COLUMN SOURCE="4" NAME="Invoice Date Key" xsi:type="SQLDATE"/>
  <COLUMN SOURCE="5" NAME="Delivery Date Key" xsi:type="SQLDATE"/>
  <COLUMN SOURCE="6" NAME="Quantity" xsi:type="SQLINT"/>
  <COLUMN SOURCE="7" NAME="Unit Price" xsi:type="SQLDECIMAL"/>
  <COLUMN SOURCE="8" NAME="Total Excluding Tax" xsi:type="SQLDECIMAL"/>
  <COLUMN SOURCE="9" NAME="Profit" xsi:type="SQLDECIMAL"/>
</ROW>

The data types may be a bit unfamiliar to those exposed to data types exclusively within databases. The following documentation assists in mapping SQL Server data types to the CLR data types used here:

https://learn.microsoft.com/en-us/sql/relational-databases/clr-integration-database-objects-types-net-framework/mapping-clr-parameter-data?view=sql-server-ver16

While not wholly intuitive, the leap between these data types is not complicated.

As with the prior section of XML, ensure that the COLUMN SOURCE values match up with the FIELD ID values defined previously. NAME is the exact column name for the target table where this data will be imported to. Lastly, the type is the CLR data type discussed above.

Finally, the file should be concluded with a closing tag:

</BCPFORMAT>

While creating a format file for the first time may be challenging, mistakes are relatively easy to resolve. For example, if the Quantity column were defined as a SQLDATETIME, instead of a SQLINT, the following error would be returned when importing the data:

Msg 257, Level 16, State 3, Line 40
Implicit conversion from data type datetime to int is not allowed. Use the CONVERT function to run this query.

The error immediately implies that we should check DATETIME values and determine where a DATETIME is being mapped to an INT. In the example above, there are no other DATETIME columns, so locating the mistake is relatively painless.

Note: the XML file in its complete version is located in the downloads from the Simple-Talk website here).

A Note on Compression

If the CSV file that was generated earlier in this article is to be moved from server-to-server, then there is value in compressing it prior to moving it. Many popular utilities exist that can compress files, such as Gzip or 7Zip, or Windows’ built-in compression.

Regardless of whether the source table was compressed in SQL Server, the CSV file that is generated will not be. The larger the file gets, the more space that will be saved, reducing the bandwidth needed to move the file, and ultimately reducing the time needed to move it.

Importing Data to SQL Server

With the building blocks of a target table, CSV file, and format file complete, T-SQL may be written to import the CSV file. The script is relatively short and simple and leans heavily on the work that we have already done. Note that some parameters are defined at the beginning of the script and spliced into a dynamic SQL statement. If your file name/location never changes, you may use static T-SQL instead, and reduce the size of this code to 7 lines:

-- Adjust this to the local path where the file will be
DECLARE @FileLocation VARCHAR(MAX) = 'C:\SQLData\DataExport\'; 
-- This can be determined dynamically, if needed.
DECLARE @FileName VARCHAR(MAX) 
                          = 'Fact_Sale_08_01_2023_SANDILE.csv';
-- This is the schema name for the target table
DECLARE @SchemaName VARCHAR(MAX) = 'dbo'; 
-- This is the target table name
DECLARE @TableName VARCHAR(MAX) = 'Fact_Sale_Staging'; 

DECLARE @SqlCommand NVARCHAR(MAX);

SELECT @SqlCommand = '
     INSERT INTO [' + @SchemaName + '].[' + @TableName + ']
     SELECT *
     FROM OPENROWSET(BULK N''' + @FileLocation + @FileName + ''',
     FIRSTROW = 2, FORMATFILE = ''' +
     @FileLocation + @TableName + '.xml'',
     FORMAT = ''CSV'') AS CSVDATA;'

EXEC sp_executesql @SqlCommand;

Note, you can download the .CSV file on the Simple-Talk website here, if you only want to work on the importing code).

Some details about this code that can be customized:

  • The file location, file name, schema name, and table name can all be adjusted to match the file that will be imported. If the table name, date, and server are all known, then those 3 strings can be concatenated into the CSV name with a bit of additional work.
  • FIRSTROW depends on whether header data exists in the CSV file. Our file contains a single row at the start of the file with column names, therefore the first data row is 2.
  • FORMATFILE is the location/name of the format file. Here, I chose to match the format file name and target table name. You may adjust this if convenient to be something else.
  • FORMAT will be CSV, if CSV is the source file format.

Using BULK with OPENROWSET allows for a minimally logged bulk import of data into the target table. This is ideal for large analytic data loads, where full logging can be time-consuming and resource intensive. There are prerequisites for minimal logging, which can be reviewed here: https://learn.microsoft.com/en-us/sql/relational-databases/import-export/prerequisites-for-minimal-logging-in-bulk-import?view=sql-server-ver16.

When executed, the result is a speedy import of 5,196 rows and a success message:

Lastly, we can review the data that was imported into SQL Server:
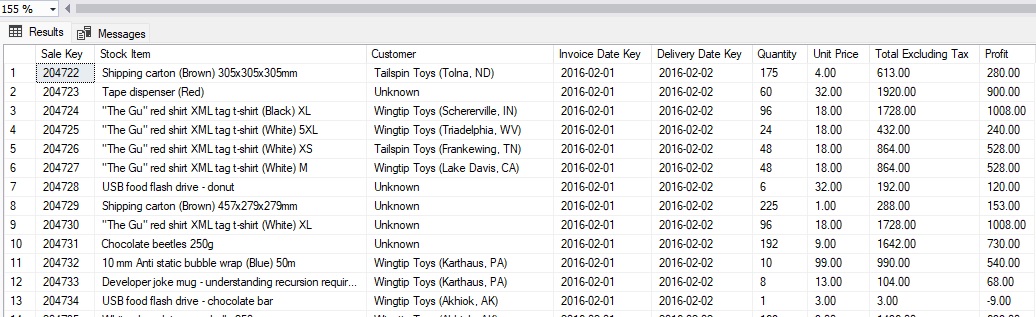
The first time that data is imported from files, there is value in manually examining some of the data to ensure that it looks correct. Special attention should be paid to:

  • Data Types
  • NULL values
  • Truncation/data length

The data set used in this article intentionally had no NULL values in any of the columns. If the source data set can be formatted effectively to remove NULL values and clean up abnormalities, then the import of data later on will be smoother and easier to manage.

It is far easier to debug data issues in the source data than those that occur downstream after data has been exported, compressed, moved, and imported.

If NULL is not removed from the source data (or somehow managed), then it will appear as the string “NULL” in the CSV. If that NULL string is mixed into an INT, DATE, or other non-string column, then it may result in unexpected errors or unusual data when imported.

To summarize: Agree on a way to manage data types, sizes, and NULL prior to exporting data.

Conclusion

The importing and exporting of data is likely one of the greatest administrative hassles to face data professionals. The number of ways in which things can go wrong is innumerable. Having a well-architected, tested, and reliable process to manage these processes can save immense time as well as greatly improve data quality.

Many of the manual GUI tools for moving data around are time-intensive, error-prone, and can lead to invisible bad data that is not detected until it is too late. When these processes can be automated, then the removal of the human factor can further speed up data generation/movement.

This article walked through a step-by-step approach for exporting data from SQL Server and then importing it into another SQL Server. There are many ways to accomplish this task. Feel free to experiment and customize to determine which methods and details are most effective for the tasks that challenge you.

All files and code used in these demos are provided for you to review and learn from. If you have any questions or ideas for future improvements, feel free to share with me anytime!


The post Exporting and Importing Data into SQL Server Using Files appeared first on Simple Talk.


from Simple Talk https://ift.tt/YUj5sL3
via

Monday, October 23, 2023

What Counts for a DBA: Preparation

While preparing for this career as an editor, my mind went to the joys of sitting at a computer editing documents. I expected this to include checking articles for technical accuracy, and proper English, formatting documents to meet the website standard, and posting the documents. I just knew that many of the firefighting skills I needed when doing administration and deployment duties would be gone. 

However, there is still an ever-present need to be prepared when things go awry (like when a one-week vacation turns into much longer due to the germs that roam this earth looking for a short-term residence. One of the most significant differences between my prep now and then is just how important it is. 

You probably don’t realize just how important you are as a DBA. The data you manage is the lifeblood of one or more business processes. If that data disappears completely, some parts of your employer’s procedures would need to be completely rebooted. For example, say all the data in your product sales database was deleted. Some sales would be lost, and the history of the sales that had been made would be lost. Which is a bit more critical than if a post goes missing for a day or two from the website. (Unless you were the author who expected the post to happen!) 

Your importance is primarily tied to how prepared you are for the fires that may or may not ever occur. Whether by luck or providence, some organizations never have a significant failure of a system. But if you ask their DBA (and system administrators), most of those organizations would tell you that they never had a failure because as they prepared for a future catastrophic event, their systems became more and more safe for the everyday things that typically happen. (And thankfully, their, or their cloud host’s, data centers had never been destroyed by the hurricane that they practiced for year after year.) 

All of this pertains to you whether, as Monica Rathbun used to speak about a lot (and wrote about here on Simple-Talk in 2018), you are the sole DBA for an organization or part of a team. As part of a team, you may have a lot of support in place, but in larger groups, the dynamics of being prepared differ (especially in that sometimes one person thinks the other is handling something but is not. 

Either way, as a DBA, being prepared is more than taking backups and making sure they restore. It is about being ready for anything and everything. Really, it is your entire job, other than all the other tasks you have to do. 

The post What Counts for a DBA: Preparation appeared first on Simple Talk.


from Simple Talk https://ift.tt/rfGm6v5
via

Thursday, October 19, 2023

Protecting your Cloud Assets

Organizations of all types and sizes are turning to the cloud for their application and data storage requirements. The cloud makes it possible for them to deploy their workloads more quickly and to scale them up and down as requirements change. Not only does this increase the organization’s flexibility, but it also frees up IT personnel to focus on other initiatives, while avoiding the overhead that comes with on-premises infrastructure.

Deploying to the cloud can also increase security risks, however, and add to the complexities of complying with applicable regulations and standards. Cloud platforms are processing and storing more data than ever—much of which transmitted over the internet—and this can leave it susceptible to a wide range of vulnerabilities. More than ever, organizations need to implement a cloud security strategy that minimizes the risks that come with the cloud and ensures that their sensitive data remains safe and available.

Cloud security refers to the practices, policies, and controls that an organization employs to protect the data, applications, and infrastructure it deploys to cloud environments. A comprehensive strategy is essential for the organization to fully protect its cloud assets and prevent unauthorized access to the data, while safeguarding sensitive information such as credit card numbers or personal identifiable information (PII).

By implementing a cloud security strategy, IT teams can minimize the risks that come with cloud deployments and better meet compliance requirements. That said, implementing an effective strategy is no small undertaking. There are numerous types of cloud services, environments, and applications, and they can be mixed-and-matched in a variety of ways, adding to the challenges that already come with protecting data in today’s increasingly connected world.

The many faces of the cloud

One of the challenges that comes with protecting cloud assets is that an organization can use cloud services in a variety of ways. For example, cloud service providers (CSPs) generally support one or more of the following service types:

  • Infrastructure as a service (IaaS). The CSP supplies the compute, network and storage resources, along with virtualization capabilities. The customer is responsible for the data, applications, middleware, operating system, and virtual machines.
  • Platform as a service (PaaS). The CSP supplies a complete platform that enables customers to develop and deploy their own applications to the cloud. Customers write, build, and maintain those applications and provide the necessary data.
  • Software as a service (SaaS). The CSP supplies a complete, fully managed application that customers typically access through a supported web browser or downloadable app. Customers are responsible only for configuring certain settings and providing the necessary data.

An organization might use all these types of services or only one or two of them. Some vendors also offer other variations. For example, they might provide containers as a service (CaaS), which lets the organization run its apps within a containerized environment, or they might offer function-as-a-service (FaaS), which enables an organization to run its applications as functions, without having to maintain infrastructure.

In addition to different service types, organizations can also deploy to different cloud types. The four most common cloud types are public, private, hybrid, and multicloud:

  • Public. The cloud environment is hosted by a CSP in an off-site data center. The CSP is responsible for maintaining and securing the environment. Customers have only limited access to the backend systems and infrastructure, depending on the service type.
  • Private. The cloud environment is maintained for an organization’s exclusive use. The infrastructure might be hosted and managed on-site by the organization itself or deployed off-site and maintained by a third-party provider. In either case, the customer has far more control over the environment than with the public cloud.
  • Hybrid. This configuration is a combination of both public and private clouds, with workloads often spanning both types of environments. Ideally, a hybrid cloud operates a single cloud platform that seamlessly spans environments. This approach provides organizations with more flexibility when implementing their workloads, but it adds to the complexity of managing and securing workloads and data.
  • Multicloud. This configuration is a combination of two or more public cloud services, often from different CSPs. The multicloud approach does not assume the type of seamless operations promised by the hybrid cloud, although a multicloud scenario still complicates the process of managing and securing data.

Organizations might also support hybrid multicloud environments, in which a private cloud is combined with multiple public cloud services, adding even more complexity to their cloud security strategies.

The importance of cloud security

Cloud service providers take security seriously and use a variety of methods to protect their systems and their customers’ data. However, these safeguards might not be enough to fully protect an organization’s resources, especially with the steady adoption of hybrid and multicloud environments.

Cloud architectures are, by their nature, highly interconnected, giving would-be cybercriminals many entry points for carrying out their attacks. All it takes is one breach at a single weak point, such as a compromised identity or stolen device, for a hacker to enter and traverse a large network of connected resources.

Rather than treating security and compliance as an afterthought, organizations moving into the cloud must be proactive in protecting their cloud assets. They need a strategy that can help minimize the risk of a successful cyberattack, while mitigating the impact of an attack should a hacker succeed. But achieving this level of protection is no small matter, with organizations facing a wide range of threats:

  • Identify theft
  • Insider threats
  • Social engineering attacks
  • Malware and ransomware
  • Intellectual property threats
  • Data leakage and corruption
  • Insecure APIs and applications
  • Distributed denial-of-service (DDoS) attacks

This is by no means an exhaustive list of the various ways that data can be put at risk. According to CrowdStrike’s 2023 Global Threat Report, cloud exploitation grew by 95% in 2022, and 71% of those attacks were malware-free. At the same time, the number of “cloud-conscious” threat actors nearly tripled, and the number of access broker ads on the dark web increased by 112%. Access broker ads are placed by threat actors who acquire credentials through illicit means and then try to sell them to anyone who will pay.

Many of the attacks that are carried out against cloud environments are the result of the following four factors, which are common to many organizations deploying workloads to the cloud:

  • Lack of visibility. Public cloud environments are owned and managed by third-party CSPs. Those environments are tightly controlled and often provide customers with limited visibility into critical processes. At the same time, cloud environments provide a great deal of flexibility, making it easy to deploy dynamic workloads and scale to meet fluctuating demand. In such an environment, IT teams can have a difficult time tracking who is accessing which resources and how those resources are being used.
  • Inadequate identity and access management. Cloud deployments can increase management overhead, making it difficult to track the various ways that user and application accounts have been granted access to various cloud resources. Accounts are often granted greater access than needed, or access is not rolled back after it’s no longer needed. Hybrid cloud and multicloud environments only add to the complexity of managing access. Without a proper identity and access management (IAM) strategy in place, organizations are at an increased risk of introducing vulnerabilities that can lead to compromised data.
  • Misconfigured system settings. The more cloud services that an organization uses, the more settings there are to configure and the more ways there are to misconfigure those settings. For example, administrators might not remove default passwords, fail to enable encryption on storage resources, or implement inadequate logging on backend services. Any of these misconfigurations can introduce vulnerabilities into the environment and result in compromised data.
  • Failure to secure workloads. Today’s cloud workloads often require multiple resources and span multiple environments. Application components are frequently provisioned dynamically, with resources scaled up and down as required. Data might be inputted from multiple sources and outputted to multiple sources. Failure to properly secure such a workload at any one layer can make it susceptible to an assortment of security risks.

Another challenge that many organizations face is in trying to accommodate the various regulations that govern how the data must be treated. Expanding into the cloud adds additional layers of complexity when it comes to ensuring that data is being properly handled and protected according to governing regulations and standards. IT teams must be able to demonstrate that they are continuously in compliance no matter where the data resides—made all the more difficult by the lack of control that comes with cloud environments.

Only by implementing a comprehensive cloud security strategy can an organization hope to meet these challenges head on. An effective strategy offers a number of important benefits to the organization:

  • Greater visibility. By implementing a comprehensive cloud security strategy, IT teams gain greater visibility into their cloud assets through the use of tools and processes designed specifically for cloud environments.
  • Greater data protection. An effective strategy incorporates data security by default (security by design). Cloud security ensures that data is secure wherever it resides, while relying on comprehensive data governance and the careful implementation of identity access and management. Along with greater data protection comes greater customer trust.
  • Improved compliance. The tools and processes used to implement a cloud security strategy go hand-in-hand with achieving the necessary level of compliance. Cloud security provides IT with visibility into its cloud assets and protects those assets, which in turn helps the organization to comply with the legal and industry standards that govern their operations and data requirements.
  • Streamlined management. For an organization to effectively secure their cloud environments, they will often consolidate and centralize their monitoring and management operations, which can also help streamline the security process. In this way, administrators can more easily implement security policies, manage software updates, view distributed resources, manage workflows, and analyze pertinent information, all of which makes it easier to ensure the data remains secure.
  • Increased flexibility. A comprehensive cloud security strategy makes it easier to support cloud-native solutions because cloud security tools and techniques are already designed to accommodate these types of workloads. In this way, IT teams don’t need to reinvent the wheel with each new application type they deploy to the cloud. An effective strategy also makes it easier to support a remote workforce because the protections are already geared toward resource distribution.
  • Reduced costs. The more effective the cloud security strategy, the greater the savings. Because of the increased visibility and streamlined management, IT teams can use resources more efficiently and reduce their overall management costs. Greater data protection also helps to minimize the risk of a data breech, which can be an extremely costly prospect.

Today’s organizations face an uphill battle when it comes to protecting their cloud assets. The need for a robust cloud security strategy has never been greater. An organization that fails to protect its cloud assets could face steeps fines, a loss in revenue, and a tarnished reputation that takes years to restore.

Managing data in the cloud

Cloud security follows a shared responsibility model, in which the CSP is responsible for certain aspects of security, and the customer is responsible for the rest. The exact split usually depends on the type of cloud service.

For example, in an IaaS scenario, the vendor is responsible for the server, network, and storage infrastructure—along with the virtualization capabilities—and the customer is responsible for securing the operating system, middleware, applications, and data. In an SaaS scenario, however, the CSP is responsible for all these components, and the customer need only ensure that the application settings and access permissions are handled properly.

Not surprisingly, a cloud security strategy must take into account these factors and a number of other considerations, which can be broken down into four broad categories: data management, risk management, infrastructure and application security, and business continuity.

Data management

Data management refers to the steps that an IT team can take to ensure that the data itself is properly protected at all times, in all locations, and under all circumstances. To this end, the team should apply basic data security, implement a data governance plan, and put into place the necessary access controls.

Data security is concerned with protecting sensitive data at rest and in motion. This is especially important because users often access cloud resources over the internet and from a variety of locations. For this reason, all sensitive data should be encrypted, using advanced encryption algorithms. An organization might also want to implement a public key infrastructure (PKI) that uses digital certificates to secure digital communications.

An effective cloud security strategy also requires a system of data governance, which ensures that data is properly managed throughout its entire lifecycle. Data governance takes a wholistic approach to keeping data secure, private, accurate, and available. This can be achieved only if an IT team has visibility into all its data and can identify where it resides and what controls have been placed on the data.

An important component of data governance is to ensure that the data is handled in a way that complies with applicable regulations and standards, whether the data is processed or stored on-premises or with a third-party CSP. Where possible, an IT team should automate compliance policies and controls, using tools designed specifically for a cloud environment.

Data management should also include a comprehensive system of access controls that incorporate techniques such as security policies, multifactor authentication (MFA), principles of least privilege, zero-trust access controls, and virtual private networks (VPNs), along with extensive and robust logging.

As part of this process, an IT team should implement a robust IAM solution that provides a security framework for controlling who can access specific cloud-based and on-premises resources and what level of access they should have to those resources, based on their individual identities. The IAM solution should control access to all systems, networks, and assets, while providing protection down to a granular level.

In addition, the IT team should consider implementing a data loss prevention (DLP) solution that reduces the risks of data loss, leakage, and misuse. The team might also benefit from a cloud access security broker (CASB), which establishes a gateway between the CSPs and their customers to enforce an organization’s security policies.

Risk management

In today’s complex cloud environments, an IT team must be proactive when it comes to securing sensitive data, and that means taking steps to detect threats and respond to security incidents as soon as they arise. To this end, the team must be able to anticipate potential threats and know what actions to take to address them if and when they arise.

The team needs as much visibility into its workloads and data as possible, across all its cloud environments, and that means continuously monitoring the applicable systems to stay on top of what’s happening and to look for vulnerabilities and threats, which are often indicated by anomalous behavior somewhere in the network or application stack.

An IT team must be able to monitor, log, and analyze events across all their cloud environments. To do so, they require solutions that provide insights into their cloud resources so they know what’s happening in those environments at all time. These insights can also help them better understand their own attack surfaces and where vulnerabilities might lie.

The team should also regularly scan for vulnerabilities and properly configure a system of alerts so threats can be immediately addressed. Advanced threat protection is essential in safeguarding cloud resources and sensitive data and preventing potential data breaches; however, this protection can be achieved only if the team has complete visibility into its network, endpoints, workloads and data.

The team must also be prepared to respond immediately to any threat incidents that might occur. This starts with careful incident planning, along with regular, comprehensive auditing and risk assessments. Such auditing can be an effective strategy for minimizing risks. It might also be required by applicable regulations or standards.

Because of the steady migration to the cloud, many tools are now available to help organizations be more proactive in their risk management. The following tools provide a variety of examples of techniques that can help protect cloud assets:

  • Security information and event management (SIEM). Combines security information management (SIM) with security event management (SEM) to identify and respond to potential security threats.
  • Cloud infrastructure entitlement management (CIEM). Automatically monitors cloud resources to help mitigate the risks associated with granting excessive permissions on those resources.
  • Cloud security posture management (CSPM). Automatically identifies and responds to security and compliance issues across SaaS, PaaS, and IaaS environments.
  • Extended detection and response (XDR). Collects and correlates security threat data from siloed security tools to provide extended visibility across cloud and on-premises endpoints.
  • SaaS security posture management (SSPM). Automatically detects and responds to misconfigured settings discovered in target SaaS environments that can represent security or compliance risks.

In addition to tools such as these, many organizations also use penetration testing to verify the security of their cloud systems. Penetration testing makes it possible to simulate an attack to help identify and address vulnerabilities. When penetration testing is performed in conjunction with regular audits, an IT team can more effectively verify the security measures they’ve put into place and where gaps in security might exist.

Infrastructure and application security

IT teams require consolidated solutions that give them centralized visibility and control over the various infrastructure and applications across their cloud environments. Only then can they properly monitor and analyze what is happening on their systems and track workflows as they move between endpoints. A centralized security system enables them to effectively enforce policies and carry out operations such as managing software updates.

To protect their infrastructure and applications, IT teams might employ a wide range of technologies, including firewalls, antimalware, AI-drive analytics, Internet Protocol Security (IPsec), network detection and response (NDR) systems, and many others. In addition, they might segment their networks and workloads to isolate them, which can help minimize damage in the event of a breach. For example, they might partition workloads into subnets or use micro-segmentation to isolate applications and their operating environments.

Cloud security should also take into account endpoint security. Endpoints can connect to cloud environments in multiple ways. For example, a user might access cloud resources through a browser, an application might incorporate a connector provided by the cloud service, and management software might use an API to access and control cloud resources. IT teams must be vigilant in monitoring these connections and their users’ behavior.

Application security goes hand-in-hand with cloud security, especially with the growing reliance on cloud-native architectures. Development and deployment operations are becoming more fluid and dynamic, requiring careful consideration in how to protect them. IT teams are also faced with development trends such as infrastructure as code (IaC) and continuous integration/continuous delivery (CI/CD), which blur the lines between application and cloud security even more.

In today’s cloud environments, IT teams often must take additional steps to protect their resources, such as scanning container images or application code before the application is deployed to production or creating micro-perimeters around application components to reduce their attack surfaces.

Like IT administrators, developers are under greater pressure to ensure the security of their applications, especially if they dynamically provision infrastructure, as in the case of IaC. Developers and security teams must also be careful about using open-source components in their applications, which typically require additional scanning that takes into account component dependencies.

Organizations now have a number of tools to help protect their infrastructure and applications. For example, they might turn to one or more of the following types of solutions:

  • Secure access service edge (SASE). Provides a cloud-based framework for converging wide area networking and network security functions—such as secure web gateways and firewall as-a-service—into a unified platform that connects users, systems and endpoints.
  • Zero-trust network access (ZTNA). Enables remote users to access internal applications and services—as defined by access control policies—while adopting a zero-trust security model.
  • Cloud-native application protection platform (CNAPP). Consolidates multiple security and compliance functions into a unified, cloud-based platform that detects and responds to threats throughout an application’s entire lifecycle.
  • Cloud workload protection platform (CWPP). Detects and responds to threats in workloads running on different types of clouds, such as private and public clouds, and different types of application environments, such as containers, physical servers, and virtual machines.

One emerging trend that can help organizations address infrastructure and application security is DevSecOps (short for development, security, and operations). DevSecOps is an approach to DevOps that integrates security into every stage of the software development lifecycle. It breaks down the barriers between the security team and the development and operations teams, just like DevOps aims to break down the barriers between development and operations. With DevSecOps, organizations are more likely to catch security-related issues because the code can be scanned and tested for misconfigurations, compliance issues and other security concerns.

Business continuity

No matter how diligent an organization might be about security, the possibility of a breach still exists, and IT teams need to be prepared for the potential loss of data that comes with it. This means having in place a system that can recover from disaster and ensure business continuity with the least impact on operations. To achieve this, IT teams must build redundancy into their systems so they can seamlessly recover them if and when the need arises.

An organization’s disaster recovery strategy should strive for uninterrupted operations in the event of disaster—or at least achieve minimal disruptions. The systems necessary to support the organization’s workloads should be up and running as quickly as possible, and the data that supports those workloads should made available just as fast. A disaster recovery strategy is not only important in the event of a security breach, but also for any other type of event that might disrupt operations, such as an earthquake or hurricane.

The exact nature of system recovery will depend on the cloud platform and type of service being implemented. For example, an organization that runs its own private cloud to provide PaaS services will take a different approach to disaster recovery than the organization relying on SaaS applications hosted in a public cloud platform.

Regardless of the environment, however, IT teams should implement robust backup solutions that ensure the availability of data no matter what type of event should occur. A backup solution can help protect against accidental data deletion or corruption as well as against malicious threats such as malware, ransomware, insider sabotage, or other types of attacks that could lead to data loss.

IT teams should also take the steps necessary to protect their backups and ensure they can be easily restored. For example, they should encrypt their backups, test the data-recovery process, and ensure that at least one copy of each backup is isolated to prevent infection from malware. At the same time, the backup strategy should take into account retention policies, applicable compliance laws, and any other constraints on the data.

Protecting your cloud assets

Although cloud services promise to simplify IT operations, organizations must still use due diligence to protect their cloud assets. As part of this effort, they should ensure that their workers receive the training they need to understand and apply security best practices. For example, they should know how to identify suspicious emails and avoid using unsanctioned services (shadow IT).

An organization might also bring on Certified Cloud Security Professionals (CCSPs) to help ensure cloud security or consider a managed detection and response (MDR) service, which provides a team of security experts to monitor an organization’s systems 24×7 to detect and respond to cybersecurity threats

When it comes to cloud security, there is no one-size-fits-all solution. Organizations must tailor their strategies to meet their own specific needs, taking into account the service type (e.g., IaaS or SaaS), cloud structure (e.g., public cloud or hybrid cloud), type of applications (e.g., containerized or virtualized), applicable regulations (e.g., GDPR or CCPA), and the many other factors that must be considered when deploying to the cloud.

Threats against data come in many forms and continue to grow more sophisticated and aggressive each day. The more proactive an organization can be in protecting its cloud assets, the less likely it will suffer a data breach and the more quickly it can recover if it does.


The post Protecting your Cloud Assets appeared first on Simple Talk.


from Simple Talk https://ift.tt/yCO3RPb
via

Monday, October 16, 2023

SQL Server Security Primer

SQL Server security structure, mechanisms and methods are very thoroughly documented in the Microsoft documentation, but it is quite daunting if you don’t already know about the functionality. I recently had a request to explain some security features of SQL Server so that internal audits could be completed. While thinking about the request and preparing for the meeting, I realized how many security features are available in SQL Server. The purpose of this post is not to thoroughly explain how all of these items work but to give an introduction to these features and a few recommendations. Given how many security-centered features are available, I’m sure I missed a few, and new features are added all the time, but these are the main features at the time of this writing.

I’ve tried to organize the features into logical groupings, but some certainly cross boundaries. And you could argue that some belong in different categories, but the descriptions and recommendations remain the same.

Since I don’t dig into how to configure these items, but when and why I would use them, the audience for this is less technical. But I also found this to be a useful reminder about some functionality, so architects and developers may also find utility in that aspect. Each of the topics below could have their own post or even series of post, so this just touches on each item with basic descriptions and use cases.

Security requires multiple layers to be effective since there are so many possible ways for a system to be compromised. Physical server security, network security, including wireless, user training, application security, external vendor security and many other areas can impact the overall well-being of your SQL system. Work with your infrastructure and security teams to understand all areas as they impact your SQL system. It’s difficult to prepare for a risk if you aren’t aware of that potential risk.

Physical / Network Security

One of the main questions that come up around SQL is how the data files are physically secured, how data is transferred over the wire and other protections outside of the data engine. This section covers those areas, which is primarily concerned with encryption at various levels.

Transparent Data Encryption (TDE)

Transparent data encryption (TDE), at rest database encryption, encrypts the database files when the data engine is not using the files. This would be when the service is manually stopped, the files are detached, or the database is set to auto close and it has been inactive. TDE very similar to encrypting your local drive. The engine has access to the decryption key and decrypts / encrypts automatically, but if you tried to read the data file with a hex editor you would only see the encrypted data. If you don’t have the encryption key you also can’t attach the database to a different server. Starting in 2017, TDE is on by default in Azure SQL Database. This is also an option for on-prem and managed instances, but you do have to go through the configuration process.

The attack window for accessing the raw data files is very narrow in an Azure environment. In general, the engine would need to be off and the attacker would need to have access to the file location in Azure. If someone has that level of access, they probably don’t need to grab the raw data files. But it is on by default and it makes everyone feel better about security in Azure. I tried to see if it can be turned off in the Azure dashboard without luck, but it may be accessible via deployment templates. There really is no good reason to disable TDE in Azure.

In an on-prem environment, you need to make sure certificates are configured and enable TDE manually. The attack window is bigger for on-prem environments, but you still need elevated access to grab the raw data files. If you have ever used sp_detach_db / sp_attach_db, you understand how these files could be used. Without the encryption key, you won’t be able to access the data in another instance of SQL Server, but that’s the point of using TDE. For sensitive data, it makes sense to enable TDE in on-prem servers.

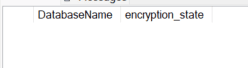
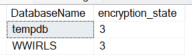
Status of TDE can be queried via sys.dm_database_encryption_keys. Refer to the documentation for a full list of encryption_state values, but a value of 3 indicates an encrypted database. If there are no values returned by the query, or a 0 is returned, no keys are created and databases are not encrypted.

/*
0 = No database encryption key present, no encryption
1 = Unencrypted
2 = Encryption in progress
3 = Encrypted
4 = Key change in progress
5 = Decryption in progress
6 = Protection change in progress (The certificate or asymmetric key that is encrypting the database encryption key is being changed.)
*/
SELECT
        DB_NAME(DEK.database_id)        DatabaseName
        ,encryption_state
FROM sys.dm_database_encryption_keys DEK
ORDER BY DEK.database_id

Default On-prem state

Default Azure SQL Database state

Recommendation

Leave TDE enabled in Azure SQL and consider using TDE for on-prem servers, especially with sensitive data.

Transport Layer Security (TLS/SSL)

Transport layer security (TLS) is on-the-wire encryption. It is still commonly referred to as SSL encryption and this is how website data is secured during transmission and SQL data can be secured in the same way. TLS encrypts data as it travels over the network, whether that is your internal network or it is going to a client outside your network on the internet or a partner site. TLS uses public key encryption and requires a certificate be installed on the server and a secure line of intermediate certificates verifying that the certificate is trusted.

As with TDE, TLS is on by default with Azure SQL databases and must be configured for other instances. I have mixed feelings about the on-prem configuration of TLS. It increases the administrative overhead and requires certificates to be managed on a regular basis. It may be worth it depending on your security requirements, but it isn’t a point and click operation. And I have seen multiple instances where certificates have to be installed by typing in the certificate hash (fingerprint) manually in the registry. Things have improved greatly with the Azure database implementation and it is fairly seamless. If you decide to use TLS for on-prem instances, usage can be optional, forced for all connections, or forced for a subset of connections.

Encryption status can be validated with the DMV sys.dm_exec_connections. The following shows my local server with a default configuration and the second shows a default Azure database.

SELECT
        SP.spid
        ,SP.program_name
        ,SP.cpu
        ,SP.physical_io
        ,SP.open_tran
        ,SP.net_library
        ,DC.net_transport
        ,DC.auth_scheme
        ,DC.encrypt_option
FROM sys.sysprocesses SP
        INNER JOIN sys.dm_exec_connections DC
                ON SP.spid                      = DC.session_id

ORDER BY SP.spid

On-Prem Default

Azure Database Default

Note

Even if TLS is not enabled for a server, all login packets are encrypted. Data packets are only encrypted if TLS is enabled and enforced or used by the client.

Recommendation

TLS is configured by default in Azure SQL and it makes sense considering that you can access the database over the internet, depending on your Azure environment. Consider using TLS for on-prem servers, especially with sensitive data. It may not be worth the effort on-prem if the data is not especially sensitive or if network connections are already encrypted using a different technology such as IPsec.

Backup file encryption

Backup file encryption is easy to understand, easy to implement, and recommended. Since backup files can be moved, and in fact should be moved if on-prem (for disaster recovery scenarios), they are a viable attack target. This is done by default in Azure and is an option for on-prem backups.

Recommendation

Encrypt your backups. Very small downside with greatly enhanced security.

Network Security Groups (NSG)

Network security groups (NSG) are used to isolate and secure assets within an Azure environment and between Azure environments and on-prem environments. I have seen them used to ensure only specific services are able to access specific servers on-prem, but they are very flexible. They are analogous to firewall or router rules in a traditional network environment and can be used to limit traffic to and from SQL databases or servers. This functionality isn’t specific to SQL but it is part of the Azure ecosphere. Microsoft recommends using a Zero Trust approach. This makes it harder for an attacker that gains access to a single resource to expand their access.

Recommendation

NSGs are very powerful and offer great flexibility in configuration. Subnets and virtual networks can be used to segment traffic with NSGs helping to secure these groupings. Work with your cloud engineering team and security team to align security expectations and protect your Azure SQL environment.

Firewall policy in Azure SQL

Azure SQL includes a firewall policy that limits the IP address(es) that can access the database by default. This can be configured automatically using Azure templates and can also be updated manually using the GUI and the system stored procedure, sp_set_database_firewall_rule (at a database level) and sp_set_firewall_rule (at a server level). Use the system view sys.database_firewall_rules (at a database level) and sys.firewall_rules (at a server level) to review the existing policies on a database. Firewall rules can also be reviewed and set in the Azure dashboard or with PowerShell. This isn’t a foolproof method to stop outside attacks, but it is highly recommended and a good starting point for security.

Firewall rules in the enterprise

Outside of the SQL ecosphere, firewall rules and security appliances can be used to limit traffic to SQL servers and databases. Network border security is standard and highly sensitive data can be placed into more secure subnets (DMZs). Work with your DBAs and security teams on the right solution for your environment, but be sure your SQL environment is not accessible to all IPs on the internet.

Recommendation

NSGs, firewall policies, firewall rules and appliances should all be used to protect SQL environments. Work with your network and security teams to determine the enterprise standard and follow that. This helps ensure something isn’t missed and also helps troubleshooting if everything is done using the same methodology. Severely limit the clients allowed to access Azure SQL environments. This will typically be clients in your Azure infrastructure and on-prem clients in your control. It also should be mentioned to limit physical access to local servers and network equipment. Everything should be behind locked doors with very limited access.

Authentication Options

Authentication is the process of proving that the user trying to access a resource is in fact, the user they claim to be. They are authentic and verified. I have seen some documentation recently that conflates authentication and authorization. This is tempting in a world with contained user accounts that essentially act as the authentication and the authorization mechanism. I think the concepts are useful separately and will treat them as such here. They work together, but they are separate items.

Logins

Several methods for authenticating to a SQL server or database are available. They are all generally referred to as logins. The basic types of logins follow.

SQL Logins

SQL logins are contained entirely in the SQL server or database, in the case of Azure or a contained database. Names and passwords are stored by SQL, but enterprise standards can be enforced for both password complexity and frequency of password updates.

This is the standard SQL username and password. It is very easy to setup and easy to maintain for small environments. It becomes more difficult to maintain as the environment grows and the number of users increase. It is not the best method for authentication but it is simple and works well within its’ bounds.

Reminder

SQL logins are specific to the container they are created in. That means, if you have a SQL login on your production server and another SQL login on your dev server with the same name, they are not the same login. They have a different SID in the system tables, passwords are not synchronized automatically, and they only are similar in the actual name. Any synchronization of passwords or security is managed manually by the teams.

Integrated Authentication

Integrated authentication is the process of using the local Windows or the Active Directory (AD) logins for authentication to SQL. This requires maintenance of these accounts at an enterprise level, but it is much more secure for several reasons. The first is that you will usually assign security at a group level rather than individual user level. Changes are managed via standard enterprise approvals and security in SQL is modified much less using this method (after initial setup). The second reason is that password complexity and changes are managed via standard methods in the enterprise. The third reason is that if an account is locked out or disabled in AD, it applies to everything, including SQL. Lastly, unlike SQL logins, integrated authentication means that an AD user on one server is identical to an AD user on another server. There are no passwords to synchronize between servers. In fact, you can’t manage the passwords at a SQL level, it is all done in AD.

Azure Options

Azure SQL offers some new methods for authentication. Azure Active Directory – Universal with MFA, Azure Active Directory – Password, and Azure Active Directory – Integrated. Which method you use will depend on enterprise decisions, but they are all more secure than SQL logins for the same reasons mentioned in the Integrated Authentication section.

Note

Microsoft has recently changed the name of Azure Active Directory to Microsoft Entra ID. This is starting to get reflected in the documentation but it has not changed in SSMS yet.

Managed identities

Managed identities are a newer method for authenticating in an Azure environment. It connects a resource group to a SQL instance. From the perspective of SQL, it looks like a regular user and security is assigned in the same manner.

This is the method of choice for connecting to SQL from an Azure resource group. This connection would have previously been done with a service account of some type, but managed identities involve even less setup than an AD or Azure AD (AAD) account and require less overall management and no password management.

Server logins of all types can be queried with the following.

SELECT *
FROM sys.server_principals

Users

A user is the authentication method within a database. It previously had to be connected to a server login. With Azure, the line between logins and users has blurred. It is possible to create a contained user that serves as the previous login and is effectively a combination of the login and user. Current documentation lists 13 types of users. At a database level, this is how security is assigned and can even be the authentication level.

Recommendation

Integrated authentication, Azure authentication, and managed identities (for service access) are considered best practices. Use these methods, when possible, rather than SQL logins. Contained users are recommended for portability and using AD or AAD facilitates administration.

Setup Reminder

During the setup process, SQL Server now forces security by default. It is always possible to make bad decisions, use bad passwords, change the configuration later or do other things generally considered poor security design. The defaults are secure by design, but be sure you understand the security implications of your setup options, especially authentication choices.

Users can be viewed with the following.

SELECT *
FROM sys.database_principals

Authorization Options

Authorization is the process of checking that a user has access to specific resources in SQL. Typical users won’t have server level permissions, but they are available to administrators and it is useful to know how they work. Most authorization happens in the database and usually objects are secured at an even lower level such as at a schema level.

Built-in server roles

Server roles in SQL Server are equivalent to security groups in active directory with pre-defined security assigned to them. Normal users won’t be assigned server roles, it is typically reserved for administrators of some type. Server roles, as the name implies, are also only available on server systems, not on SQL database. I wouldn’t expect server roles to be part of a regular security architecture other than for administrators.

Server level permissions

Permissions can also be assigned directly at the server level to users in server systems. There is a case for this outside of administrators when you have power users / developers that are able to perform some troubleshooting and understand the care needed on a production system. These users are typically architects or leads on an application team. I will typically ask for server state, create trace, view any definition, and showplan permissions when I am on a team so I can run DMVs, examine queries and troubleshoot using trace.

Built-in database roles

Database roles are similar to server roles, but are specific to each database. Granting db_datareader in one database does not grant that role in any other database. The typical database roles granted in a database are db_datareader and db_datawriter. As their name implies, they allow a user to respectively SELECT, and INSERT / UPDATE / DELETE from any object in the database.

The built-in roles fit small teams and projects but generally don’t adhere to the rule of least privilege in larger projects. Granting access to all objects in a database is excessive and may be a security gap, especially in warehouse projects. Consider your usage patterns before you rely too heavily on these roles.

User defined roles

User defined roles are like built-in roles, but they have no assigned security when they are created. This allows them to be tied to any schema or set of objects as needed to fit the project and any security can be tied to these roles. This fits well for a more complicated project and projects with more users. A pattern I typically follow is to create a schema for different groups of tables and assign access to these schemas via user defined roles. In addition to limiting security, it also makes it easier to track down security.

Database level permissions

SQL also allows permissions to be assigned at a database level. This is similar to the server level permissions described above. They typically are also permissions that would be reserved for an administrator or power user. These are permissions beyond typical DDL (data definition language) and DML (data manipulation language). These include things like ALTER ANY ROLE, ALTER ANY DATABASE SCOPED CONFIGURATION, ALTER ANY MASK, and many others. Refer to the SQL Server documentation for a full list.

Directly assigned permissions

I have described using roles to assign permissions to users. Permissions can also be assigned directly to users. I highly discourage this pattern as it makes consistency difficult and discourages the use of roles and group-based permissions. I also discourage assigning permissions directly to security groups and prefer to assign them to roles, then assign groups to those roles. This keeps the pattern consistent and allows the same permission sets to be used for any authentication method.

Schema based security

Security can also be assigned at a schema level rather than at a database or object level. This means that any new objects created in the schema have the same security assignments. It’s a great pattern when combined with user role security.

Row level security (RLS)

Row level security (RLS) was described extensively in my blog series. It is a good supplement to standard security and another possible layer when it meets business requirements. RLS returns different results for queries based on the user accessing the data. This can be a powerful combination, especially with a reporting solution. Remember that RLS is an additional layer of security and does not replace standard security mechanisms.

RLS access predicates and security policies can be reviewed with the following.

SET NOCOUNT ON
;
WITH ACCESS_PREDICATES AS (
        SELECT DISTINCT
                SP.object_id
                ,SP.target_object_id
                ,SS.value                               AccessPredicateName
        FROM sys.security_predicates SP
                CROSS APPLY string_split(SP.predicate_definition,N'(') SS
        WHERE SS.value <> ''
                AND SS.value NOT LIKE '%))'
)
SELECT
        SS.name                                                         SchemaName
        ,SO.name                                                        TableName
        ,SSSP.name                                      SecurityPolicySchema
        ,SSP.name                                                       SecurityPolicyName
        ,SSP.type_desc                          SecurityPolicyDescription
        ,SSP.is_enabled                         SecurityPolicyIsEnabled
        ,AP.AccessPredicateName
        ,SP.predicate_definition                AccessPredicateDefinition
        ,SP.operation_desc
        ,SP.predicate_type_desc
FROM sys.schemas SS
        INNER JOIN sys.objects SO
                ON SS.schema_id                 = SO.schema_id
        INNER JOIN sys.security_predicates SP
                ON SO.object_id                 = SP.target_object_id
        INNER JOIN sys.security_policies SSP
                ON SP.object_id                 = SSP.object_id
        INNER JOIN sys.schemas SSSP
                ON SSP.schema_id                = SSSP.schema_id
        LEFT JOIN ACCESS_PREDICATES AP
                ON SP.object_id                 = AP.object_id
                AND SP.target_object_id = AP.target_object_id
ORDER BY
        SS.name
        ,SO.name
        ,SSP.name
GO

Recommendation

Authentication can become very complicated and difficult to track down, especially if consistent methods aren’t used when designing security. Define a standard for your organization and use it. When you need to deviate, make sure the developers understand the need and can justify the change to standards. Deviations should also only happen when supporting business functionality. Built-in user roles are often sufficient for transactional applications and service accounts, but they are applied very broadly, at a database level. User-defined roles allow finer grained, and consistent controls and are more useful for warehouses and even transactional databases. Remember the rule of least privilege and only grant the necessary level of security. The db_owner role should be extremely restricted and never allowed for application or service accounts. The server role sysadmin should be even more restricted.

Additional Data Security Structures

Dynamic data masking

Dynamic data masking is a method to hide or obfuscate sensitive data for groups of users while allowing other users to see that sensitive data. There are many options for hiding the data, including options for what the mask looks like and how many characters in a field to mask. Refer to my series on dynamic data masking for additional details, but this is another addition to standard security. It does not limit the rows returned or how the data can be used. It just limits what certain columns look like to end users.

Masked column details can be reviewed via the system objects, in addition to the Azure dashboard and SSMS.

SELECT
        SS.name                 SchemaName
        ,SO.name                TableName
        ,SC.name                ColumnName
        ,SC.is_masked   ColumnIsMasked
        ,ST.name                ColumnDataType
        ,CASE 
                WHEN st.max_length = -1 THEN 0
                WHEN st.name IN ('nchar','nvarchar') THEN SC.max_length / 2
                WHEN st2.name IN ('nchar','nvarchar') THEN SC.max_length / 2
                ELSE SC.max_length
        END     MaxLength
        ,st.precision
        ,st.scale
        ,M.masking_function
FROM sys.objects SO
        INNER JOIN sys.columns SC
                ON so.object_id = sc.object_id
        INNER JOIN sys.schemas SS
                ON so.schema_id = ss.schema_id
        INNER JOIN sys.types ST
                ON SC.system_type_id    = ST.system_type_id
                AND SC.user_type_id             = ST.user_type_id
        LEFT JOIN sys.types st2
                ON st.system_type_id            = st2.system_type_id 
                AND st2.system_type_id          = st2.user_type_id
                AND st.is_user_defined          = 1
        LEFT JOIN sys.masked_columns M
                ON SC.object_id                         = M.object_id
                AND SC.column_id                        = M.column_id
WHERE SC.is_masked                              = 1
ORDER BY
        SS.name
        ,SO.name
        ,SC.name
GO

Recommendation

Consider dynamic data masking when it fits your business scenario. It can add complexity and has some vulnerabilities so take these into account. Refer to my series on dynamic data masking for specifics.

Cross database queries

In on-prem and managed instances, a user can access other databases by using the syntax of database.schema.object. They must also have authorization to these objects and have an account in those databases, but it is worth knowing that the functionality is available.

Recommendation

Cross database queries can be very tempting since they allow data to be accessed from any database on a server. They are not supported in Azure databases, so if you are planning the move to Azure, I would avoid them. Similar functionality exists in Azure, Elastic Queries, but they are configured differently.

Ownership chaining in views / stored procedures / objects

Ownership chaining can be used in views and stored procedures to allow a user to access data they wouldn’t normally be able to access. If they have EXEC permissions on a stored procedure, and the owner of the objects in the stored procedure are the same as the stored procedure, the execution will be allowed and data returned. They don’t need permission on the object referenced by the stored procedure. The key is that the owner is the same. This isn’t something you need to configure, but it is something you can take advantage of in your design.

EXECUTE AS

The command EXECUTE AS allows a user to run statements and commands under the context of a different user, in other words it is impersonation. When running as that user, they have the permissions of the user specified. Standard users are not able to use the EXECUTE AS command by default and must be granted permission for it. The user must have IMPERSONATE permissions for the user specified in the EXECUTE AS statement.

Recommendation

When using impersonation, be sure to specify or create a user with the minimum viable security. This is consistent with the other security mechanisms and patterns discussed. Impersonation can also be combined with stored procedures and views to temporarily allow additional permissions that the user wouldn’t normally have, making the system more secure overall. Users created without a login can be impersonated allowing for very precise control and can be useful for test scenarios.

Views as a layer

Views can be used as a security layer by limiting the data returned to users. They can limit both the columns returned and the rows. Data can also be obfuscated at this level by replacing sensitive values. This has been a common practice in database systems for a long time. Putting views into different schemas allows security to be assigned easily and automatically after initial setup.

Recommendation

Views are an effective part of a security plan. Views can be used to limit the data returned, as a layer to simplify and decouple tables from queries, and as a method for assigning security. Use caution nesting views as it can get complicated to troubleshoot and can inhibit performance tuning due to that complexity.

Linked Servers

Linked servers provide a method to run queries between one or more servers. The query is initiated on the first server and it executes on the remote server under the defined security context. Performance considerations aside, they need to be configured carefully to ensure security. Multiple methods are available to configure security but generally executing as the current user will be most predictable and secure. Note that this functionality is only available on server instances of SQL.

Linked servers can be viewed in SSMS in the “Server Objects”

Recommendation

Linked servers are not supported in Azure SQL databases. Like cross database queries, this functionality can be simulated with Elastic Queries. Linked servers and Elastic Queries are easy to misconfigure, so use caution when implementing these solutions and be sure they are the best fit. Other virtualization technologies such as PolyBase may be more secure and perform better.

Additional Data Encryption

There are multiple ways to encrypt and protect data when using SQL. Built-in methods are recommended over custom-coded solutions due to the amount of testing, rigor and patching available. Several options are available in SQL to encrypt data at different levels.

Always Encrypted

Always Encrypted is a method to encrypt specific columns in the database without exposing the encryption keys to the database engine. This makes it extremely secure and suitable for the most sensitive data. It is also possible to perform comparisons and lookups on these columns if it is configured with deterministic encryption. Deterministic encryption has specific requirements and requires additional configuration. A secure enclave can be used to enhance Always Encrypted implementations by improving comparison operations available but this option has more environment and configuration requirements. The secure enclave sets aside memory space where operations are secure but performed with the data in an unencrypted state.

Recommendation

Always Encrypted is a great option for extremely sensitive data and creates a true separation between the administrators and the owners of the data. It requires some configuration but is recommended for highly privileged data when even administrators shouldn’t be able to see the data. Be sure you understand the limitations and possible performance hit if you don’t use deterministic encryption.

Column level encryption

Column level encryption (symmetric key encryption) can be achieved using database keys and a certificate created in the database. It is a secure option and easy to configure but the certificate and key can be controlled by SQL administrators. This data is encrypted at rest and only decrypted when requested by authorized users.

Recommendation

Column level encryption is easy to implement and protects data at rest and in backups, but it is vulnerable to internal bad actors. If the data absolutely can’t be exposed to administrators, consider Always Encrypted instead.

Custom encryption

Outside the scope of SQL, any encryption managed by a security appliance or an application can be saved inside SQL. This will generally be stored in binary columns and offers benefits if you already have the encryption infrastructure in place. Key management is always an issue with encryption. If that problem is already solved at an enterprise level it may make sense to use your existing processes rather than configuring encryption at a SQL level.

Monitoring Options

Part of every security plan should include monitoring. There are several methods to check for security issues with your SQL environment. Some of the methods below are more automated than others but each has a potential use case.

SQL Trace / Profiler

SQL trace, or the GUI wrapper, Profiler, has been part of the SQL ecosphere for the longest compared to the other monitoring options listed in this section. It allows administrators and others with trace permissions to view all queries coming into SQL or a subset based on filters. This tool has traditionally been very useful for troubleshooting specific issues as they happen. It can also be used to capture SQL query information over time for later analysis.

Recommendation

Trace / profiler is extremely easy to use but will be deprecated in future versions. Start getting familiar with alternatives such as extended events and audits. This has been one of the hardest transitions for me due to the ease of use and utility of SQL trace, but luckily new methods are available that provide nearly the same functionality.

Extended Events

Extended events were introduced with SQL Server 2005 and have similar functionality to trace. They continue to be available in Azure SQL. Security functions have been moved to audits, but they can be used to capture server activity.

Extended events running in a server environment can be seen with the following.

SELECT *
FROM sys.dm_xe_sessions

Azure database event sessions can be seen with a different system view.

SELECT *
FROM sys.database_event_sessions

Recommendation

Extended events are the new utility of choice to capture submitted queries and performance related items in near-real time. As mentioned in trace, start getting familiar with extended events if you haven’t already.

Server and Database Audits

Server and database audits, or just database audits on Azure SQL, allow you to set up rules to capture specific events, including many that are also covered in extended events and trace. Results can be stored in several different types of targets, including binary files, and event logs. Events to be audited must be specified but a base set of audit events are a standard part of the configuration.

Recommendation

Audits are lightweight, capture events, and can be used to meet regulatory requirements. They fit well in highly regulated environments.

SQL Advanced Threat Protection

Advanced Threat Protection covers all instances of SQL in Azure, including Azure on VMs and managed instances. It alerts users to suspicious database activities and can provide alerts for administrators. This feature requires additional configuration and incurs additional fees. It requires a Log Analytics Workspace for storage as well as the service, so review pricing.

Recommendation

Threat protection can provide warnings about potential SQL injection attacks, including the query sent to the data engine. It is very easy to configure and should improve over time as Microsoft is able to find new attack patterns, so it is worth considering.

DDL Triggers

Data definition language (DDL) triggers can be created at a database level to track changes to objects, including the user that made the change. If you are using other monitoring tools this may be redundant, but it is reliable and available.

The following will show database DDL triggers.

SELECT
        TR.name
        ,TR.is_disabled
FROM sys.triggers TR
WHERE parent_class_desc         = 'DATABASE'
ORDER BY TR.name

C2 Audit Mode / Common Criteria Compliance

C2 audit mode imposes a set of auditing standards and security behaviour on SQL server systems. It is available on server systems and records trace information for many events and Microsoft documentation warns that it stores a large amount of information.

Common criteria compliance is based on EU security standards and covers three items. First is that memory must be overwritten with a known pattern before it is reallocated. Second is the ability to view login statistics. The third is that a GRANT statement never supersedes a DENY statement. Without this, GRANT at a column level will override DENY at a table level.

Recommendation

If you are using c2 audit mode, consider moving to common criteria compliance as c2 audits will be deprecated in a future version.

DMVs

Many data management views (DMVs) are available to monitor your environment and most are available in all versions of SQL. They allow you to get a quick view into the workings of the system and also can provide recommendations for performance tuning, show blocking processes, configuration items and most of the inner workings of the system.

Recommendation

Even if you use an external monitoring tool it is worth your time to learn some basic DMVs. They are a lightweight method to view system status at a glance. I find them to be more convenient than the Azure GUI, especially if you need to manage multiple servers.

Monitoring data changes

SQL offers multiple methods to monitor and determine who made changes to data, what was changed and when. In most systems it isn’t necessary to capture data changes, but it has become much easier in recent versions.

System-versioned temporal tables (history tables)

System-versioned temporal tables (temporal tables / history tables), automatically capture all data changes to a table. When a base table is configured as a temporal table, another table is linked to capture all changes. This includes all INSERT, UPDATE, and DELETE operations. Queries against the base table won’t include history information by default, but special syntax will return the modified rows. This can be used to capture who made the changes if that information is included in the data modification statements.

Temporal tables and their associated history tables can be viewed using system views. The following example uses the WideWorldImporters sample database.

SELECT
        SS.name                 ParentTableSchema
        ,ST.name                ParentTableName
        ,SSA.name               HistoryTableSchema
        ,STA.name               HistoryTableName
FROM sys.schemas SS
        INNER JOIN sys.tables ST
                ON SS.schema_id                         = ST.schema_id
        INNER JOIN sys.tables STA
                ON ST.history_table_id          = STA.object_id
        INNER JOIN sys.schemas SSA
                ON STA.schema_id                        = SSA.schema_id
ORDER BY
        SS.name
        ,ST.name

Change data capture

Change data capture (CDC) is similar to temporal tables, but it doesn’t store data in a directly accessible table. Data is made available through table-valued functions. They also use SQL Agent jobs, or a scheduler in Azure, to capture and maintain changes. CDC is easier to initially implement since it requires no changes to the base table, but it does have more long-term management costs.

CDC status can be verified with the following.

SELECT
        SS.name         CDCSchemaName
        ,ST.name        CDCTableName
FROM sys.schemas SS
        INNER JOIN sys.tables ST
                ON SS.schema_id         = ST.schema_id
WHERE is_tracked_by_cdc = 1
ORDER BY
        SS.name
        ,ST.name

Triggers

Triggers can be created to capture data modification operations to tables. This was a common method before temporal tables and CDC was available. The exact storage method and columns captured is entirely dependent on your implementation.

The following provides a comma separated list of triggers on each table in a database.

;
WITH TRIGGERS_CTE AS (
        SELECT
                SS.name                                 SchemaName
                ,SO.name                                ObjectName
                ,SO.type_desc                   ParentObjectType
                ,STUFF(
                        (SELECT ',' + SOTI.name
                                FROM sys.objects SOTI
                                WHERE SOTI.parent_object_id = SO.object_id
                                        AND SOTI.type = 'TR'
                                FOR XML PATH('')),1,1,'')                       TriggersOnObject
        FROM sys.schemas SS
                INNER JOIN sys.objects SO
                        ON SS.schema_id         = SO.schema_id
)
SELECT
        SchemaName
        ,ObjectName
        ,ParentObjectType
        ,TriggersOnObject
FROM TRIGGERS_CTE
WHERE TriggersOnObject IS NOT NULL

Recommendation

Triggers are not the preferred option for monitoring data changes due to the programming requirements. When system features are available for something, it usually makes sense to use that functionality instead of coding your own version. Temporal tables are easy to implement and query but do require table changes. CDC is easier to implement but has a much higher maintenance cost. I generally prefer using temporal tables since changes are managed via automated deployments and they are easy to query and report against. CDC may fit your need better but consider both options if you need to monitor data changes.

Recommendation Summary

SQL configuration and options generally guide you to good security decisions during setup operations. Make sure you understand any options that you change from the default. Each version of SQL is more secure than the previous version, from the database engine implementation to default features. This is a direct product of the 2002 Trustworthy Computing initiative by Microsoft. It put a strong focus on security at all levels of design and that focus continues. But having a secure product is the framework for your architectural decisions and design patterns. It is up to you and your team to make good decisions and follow best practices.

When it comes to security, consistency is critical. There are many ways to design security within SQL, but consistency is extremely important. This makes administration predictable and improves the chances that new security requirements are applied consistently. This applies to all aspects of the SQL ecosystem, from physical security, to database security, and application security.

Another key objective of configuring user security in SQL is using minimum viable security. This should sound familiar and be the core tenant of all security decisions. Some things are automatically secure with SQL, but user configuration and security rely on a foundation of good enterprise architecture and sound decisions when structuring security in SQL. It can be tempting to use a broad database role for security, but be sure that is the best fit. It is very easy to create a custom role that limits access. This will make your life easier in the long run.

Basic recommendations

  • In Azure, TDE is the default. Consider implementing it on-prem for sensitive data
  • Encrypt your backups. This is the default behaviour in Azure and optional for on-prem SQL
  • Be sure your connection is secure. This is another default in Azure, TLS is on for databases. In a secure building with no potential for leaks, you may not need to use TLS, but be sure you understand the risks.
  • SQL should be behind a firewall of some type and not exposed directly to an open internet connection.
  • Use a consistent authentication and authorization pattern. Utilize your existing security structures and use Active Directory when possible. Try to use groups and user roles rather than applying security directly to users.
  • Don’t allow users to hit transactional systems directly. They should go through some kind of an additional security layer such as an application using APIs.
  • Consider additional security structures if they fit the business need. This can include dynamic data masking, row level security, additional encryption, views and stored procedures as a security layer, and data change monitoring.
  • Employ a method to monitor security and system activity. Third party tools are available and there are many mechanisms included in the SQL ecosphere.
  • Stay on top of patches for your systems. Microsoft and third parties provide alerts for vulnerabilities and patches.
  • Work with your security team to understand outside risks. Discuss and understand physical security, user training, data extracts, application interfaces, external vendors and anything else accessing your system. You likely don’t own the data on the system but it is your responsibility to be sure it is secure.
  • Keep your system updated. This includes both patches and engine versions for SQL Server. This is easier in Azure database since you are always on the latest version.
  • If you really want to protect your data / intellectual property (IP), limit the number of exports allowed. This can be difficult in a culture of self-service data reporting, but extracts are challenging to control once they are created.

References

Physical / Network Security References

https://learn.microsoft.com/en-us/sql/relational-databases/security/encryption/transparent-data-encryption?view=sql-server-ver16

https://learn.microsoft.com/en-us/sql/relational-databases/system-dynamic-management-views/sys-dm-database-encryption-keys-transact-sql?view=sql-server-ver16

https://learn.microsoft.com/en-us/sql/database-engine/configure-windows/configure-sql-server-encryption?view=sql-server-ver16

https://learn.microsoft.com/en-us/sql/database-engine/configure-windows/certificate-overview?view=sql-server-ver16

https://learn.microsoft.com/en-us/sql/relational-databases/backup-restore/backup-encryption?view=sql-server-ver16

https://learn.microsoft.com/en-us/azure/virtual-network/network-security-groups-overview

https://learn.microsoft.com/en-us/sql/sql-server/install/configure-the-windows-firewall-to-allow-sql-server-access?view=sql-server-ver16

https://learn.microsoft.com/en-us/azure/azure-sql/database/firewall-create-server-level-portal-quickstart?view=azuresql

https://learn.microsoft.com/en-us/azure/azure-sql/database/firewall-configure?view=azuresql-db

https://learn.microsoft.com/en-us/azure/azure-sql/database/firewall-configure?view=azuresql

Authentication References

https://learn.microsoft.com/en-us/sql/relational-databases/security/choose-an-authentication-mode?view=sql-server-ver16

https://learn.microsoft.com/en-us/azure/active-directory/managed-identities-azure-resources/tutorial-windows-vm-access-sql

Authorization References

https://learn.microsoft.com/en-us/sql/t-sql/statements/create-user-transact-sql?view=sql-server-ver16

https://learn.microsoft.com/en-us/sql/relational-databases/security/permissions-database-engine?view=sql-server-ver16

https://learn.microsoft.com/en-us/azure/azure-sql/database/threat-detection-configure?view=azuresql

https://learn.microsoft.com/en-us/sql/t-sql/statements/grant-transact-sql?view=sql-server-ver16

https://www.red-gate.com/simple-talk/databases/sql-server/database-administration-sql-server/sql-server-security-fixed-server-and-database-roles/

https://learn.microsoft.com/en-us/sql/relational-databases/security/authentication-access/server-level-roles?view=sql-server-ver16

https://learn.microsoft.com/en-us/sql/relational-databases/security/authentication-access/database-level-roles?view=sql-server-ver16

https://learn.microsoft.com/en-us/sql/relational-databases/security/row-level-security?view=sql-server-ver16

Additional Data Security References

https://learn.microsoft.com/en-us/sql/relational-databases/security/dynamic-data-masking?view=sql-server-ver16

https://www.red-gate.com/simple-talk/blogs/unmasking-sql-server-dynamic-data-masking/

https://learn.microsoft.com/en-us/sql/relational-databases/in-memory-oltp/cross-database-queries?view=sql-server-ver16

https://learn.microsoft.com/en-us/sql/relational-databases/tutorial-ownership-chains-and-context-switching?view=sql-server-ver16

https://learn.microsoft.com/en-us/sql/t-sql/statements/execute-as-transact-sql?view=sql-server-ver16

https://learn.microsoft.com/en-us/sql/relational-databases/linked-servers/create-linked-servers-sql-server-database-engine?view=sql-server-ver16

Additional Data Encryption References

https://learn.microsoft.com/en-us/sql/relational-databases/security/encryption/always-encrypted-database-engine?view=sql-server-ver16

https://learn.microsoft.com/en-us/sql/relational-databases/security/encryption/encrypt-a-column-of-data?view=sql-server-ver16

Monitoring References

https://learn.microsoft.com/en-us/sql/relational-databases/sql-trace/create-a-trace-transact-sql?view=sql-server-ver16

https://learn.microsoft.com/en-us/sql/relational-databases/extended-events/quick-start-extended-events-in-sql-server?view=sql-server-ver16

https://learn.microsoft.com/en-us/sql/relational-databases/extended-events/view-the-extended-events-equivalents-to-sql-trace-event-classes?view=sql-server-ver16

https://learn.microsoft.com/en-us/sql/t-sql/statements/create-server-audit-transact-sql?view=sql-server-ver16

https://learn.microsoft.com/en-us/azure/azure-sql/database/threat-detection-overview?view=azuresql-mi

https://learn.microsoft.com/en-us/sql/relational-databases/triggers/ddl-triggers?view=sql-server-ver16

https://learn.microsoft.com/en-us/sql/relational-databases/system-dynamic-management-views/system-dynamic-management-views?view=sql-server-ver16

Monitoring Data Change References

https://learn.microsoft.com/en-us/sql/relational-databases/tables/temporal-tables?view=sql-server-ver16

https://learn.microsoft.com/en-us/sql/relational-databases/track-changes/about-change-data-capture-sql-server?view=sql-server-ver16

https://ift.tt/nDezR3A

Other References

https://www.microsoft.com/en-us/security/blog/2022/01/21/celebrating-20-years-of-trustworthy-computing/

https://www.cisa.gov/news-events/cybersecurity-advisories

The post SQL Server Security Primer appeared first on Simple Talk.


from Simple Talk https://ift.tt/BzMcjtF
via