Thursday, November 2, 2023

Move Disks or Virtual Machines between Tenants on Azure

Move objects on Azure is not simple. Move between Tenants is extremely difficult or not possible. I faced the challenge to move a virtual machine and disks between tenants recently and found the solution.

Some Years ago, I wrote an article about the Azure Resource Mover when it was still being created. Today the resource mover is integrated with the entire azure portal, although there are already many limitations in relation to moving resources. Anyway, this will not affect us on this blog post.

Moving Process

The process is based on moving the disks and creating the VM again on the other tenant.

These steps are for a Virtual Machine with managed disks:

  1. Create a snapshot from each disk
  2. From each snapshot, export it to VHD in a storage account.
  3. Use AZCOPY to copy the VHDs to a storage on the different tenant
  4. On the marketplace, create a new managed disk and select the option to create it from the VHD
  5. Repeat the step 4 for each VHD
  6. Open the managed disk which contains the operating system
  7. Use the option to create a virtual machine from the disk
  8. Attach the additional managed disks

It may appear to be something simple, but this process hides some details which most people don’t know:

  • A snapshot is managed. Copy a snapshot as a VHD requires a special command
  • It would be trivial if we could download the VHD and upload on the correct place. But we are talking about disks of 1Tb or more. These disks don’t fit our local environment, we need to transfer directly from one storage to another. AZCOPY has the capability to use a Server-to-Server API to make the transfer, the data doesn’t pass by your local machine.
  • We can create a Virtual Machine from an existing OS disk if we start the creating from the managed OS disk.

Let’s follow the steps and discover the hidden tricks in the way

Create a snapshot from the disk

  1. Open the managed disk.
  2. Using the top menu on the managed disk window, click Create Snapshot button
  3. On the Name textbox, provide a name to the disk snapshot.

You also can choose the resource group for the disk snapshot. Besides that, the additional properties are only important if you are following some standard from your company, such as security standards.

I will not get into the security details on this blog.

Export the snapshot to a VHD

The copy process needs to be done by script. Either Azure CLI or Powershell. I have a personal choice for Powershell.

The script needs to execute three steps:

  1. Use the Grant-AzSnapshotAccess cmdlet to get access to the snapshot, allowing the copy to happen
  2. Use the New-AzStorageContext cmdlet to get a context to the destination storage
  3. Use Start-AzStorageBlobCopy with the result from the two previous commands to execute the copy

Let’s consider the following information to start:

  • Resource Group name: devMaltaStation_group
  • Snapshot Name: disksnapshotbackup
  • Destination Storage account name: devmaltasnapshotexport
  • Destination container name: snapshots

Step-by-Step Process

We need to retrieve a key to the destination storage to complete the copy process.

  1. Access the storage account
  2. Click the menu item Access Keys on the left side of the window
  3. Click the Show button besides the textbox Key. It can either be for Key 1 or Key 2
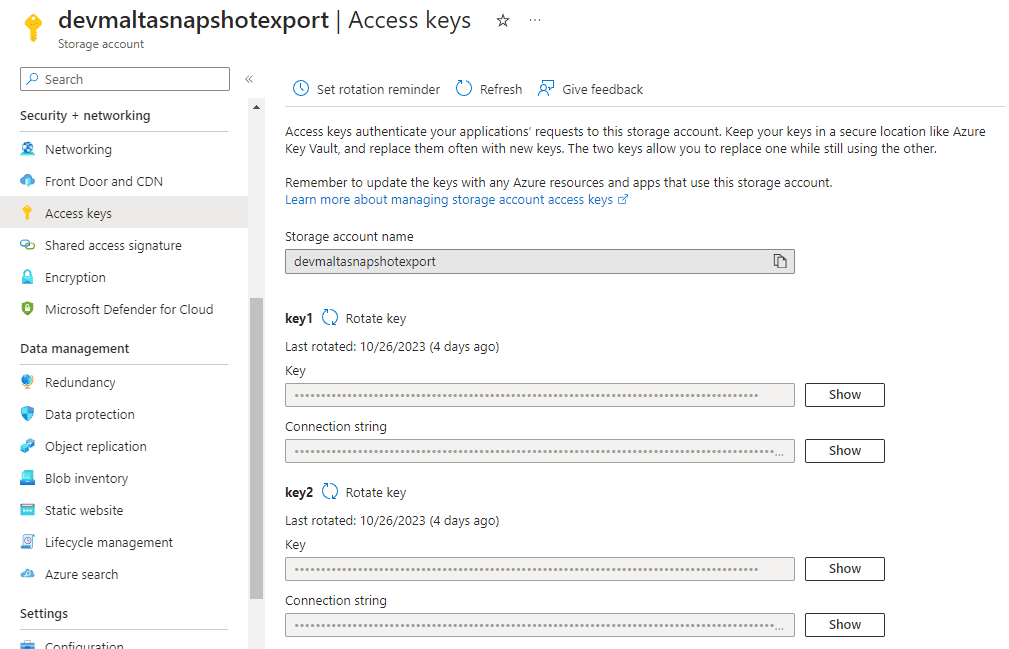
  1. Click the Copy button besides the key which will be displayed. Save this key, you will need it later.
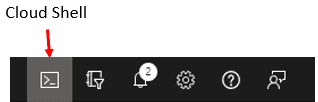
  2. Open the cloud shell using the button on the top of the window. I provided additional details about the cloud shell in a previous blog (https://www.red-gate.com/simple-talk/blogs/start-stopping-virtual-machines-resource-group/ )
A black and white screen with icons Description automatically generated

  1. Execute the code below to retrieve an object to access the snapshot

$sas=Grant-AzSnapshotAccess -ResourceGroupname 'devMaltaStation_group' -SnapshotName 'disksnapshotbackup' -DurationInSecond 600 -Access Read

You need to be careful with the DurationInSecond parameter. This is the amount of time the access will be allowed. The copy of the file needs to be completed before this amount of time.

  1. Execute the following statement to retrieve a context for the target storage:

$destinationContext= New-AzStorageContext -StorageAccountName 'devmaltasnapshotexport' -StorageAccountKey '<< the key you saved >>'

On this example, we are using a storage key retrieved on the steps 4 to 7. This could be in different ways, using a SAS key or using a connection string. You can check different options on (https://learn.microsoft.com/en-us/powershell/module/az.storage/new-azstoragecontext?view=azps-10.4.1 ). Different options would change the steps from 4 to 7.

  1. Execute the statement below to make the copy of the snapshot to the storage account:

Start-AzStorageBlobCopy -AbsoluteUri $sas.AccessSAS -DestContainer 'snapshots' -DestContext $destinationContext -DestBlob 'Disk01.vhd'
  1. Repeat the steps 6 to 8 for each snapshot you have, changing the name of the destination file on the step 8.

Use AZCOPY to transfer the snapshot

AZCOPY uses storage account SAS keys to access the source and destination storage. Because that, it doesn’t matter if the storage accounts are in the same tenant or not.

The best of it is the fact it uses server API’s for the transfer. In this way the data goes from server to server, without involving your client machine and avoiding a bottleneck.

Retrieving the address and key from the source:

  1. Access the source storage account
  2. Access the container and locate the file
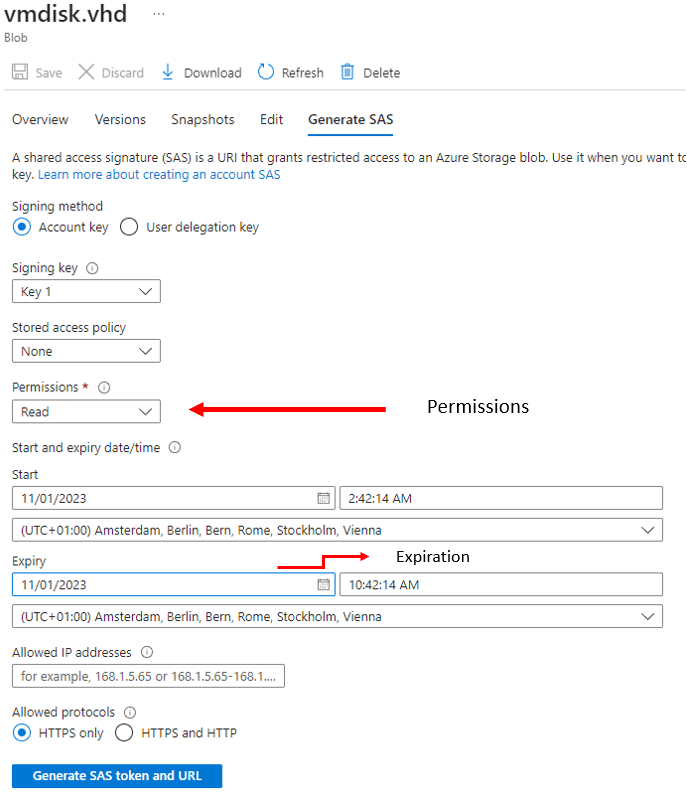
  3. Besides the file, open the expand menu (…) and click Generate SAS menu option

On the new window, the permission and the expiration are the two most important properties you need to handle. The source only needs Read permission, but the expiration needs to be enough for the copy
A screenshot of a computer Description automatically generated

  1. Click the Generate SAS token and URL button
  2. On the box Blob SAS URL, click the Copy button

This will copy the URL and SAS key together and you will need to use them to build the AZCOPY statement

A close-up of a computer screen Description automatically generated

Retrieving the URL from the target is basically repeating the steps from 13 to 17, with only a few differences:

  • You will point to a container or folder where the file will be saved
  • The permission will need to be more than Read.
  1. Build the AZCOPY statement as the format below:

azcopy cp "https://[srcaccount].blob.core.windows.net/[container]/[path/to/blob]?[SAS]" https://[destaccount].blob.core.windows.net/[container]/[path/to/blob]?[SAS]

Use the URLs you retrieved from the source and destination to build this statements

  1. Execute the AZCOPY on the cloud shell

Create a new Managed Disk

  1. Access the target resource group
  2. Click the Create button to access the marketplace

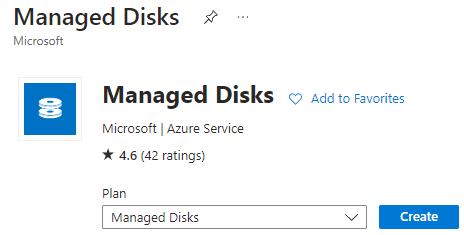
  1. On the marketplace, search for Managed Disk
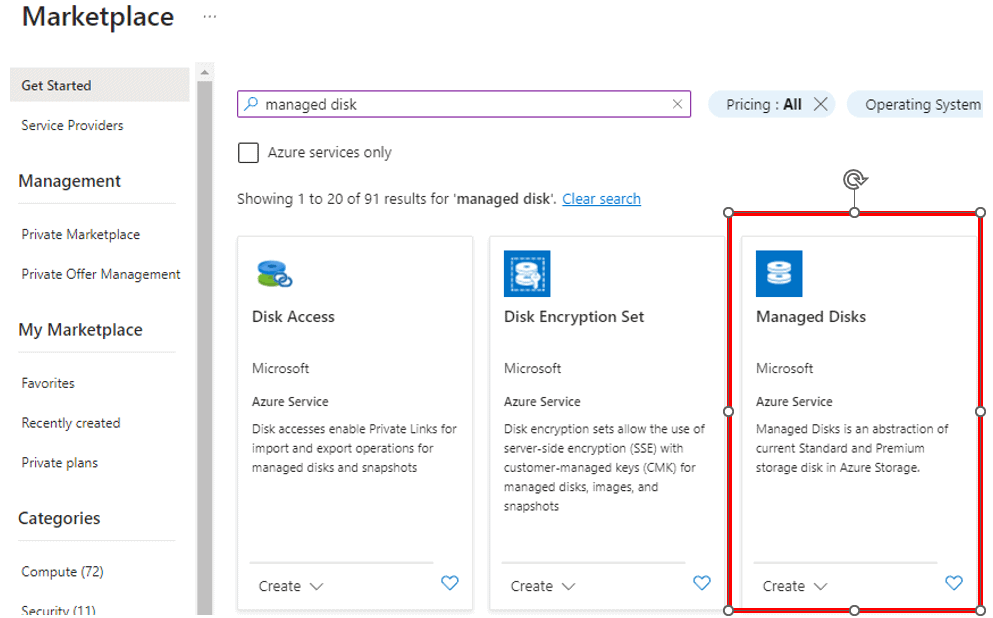
A screenshot of a computer Description automatically generated

  1. Click the Create button

A screenshot of a computer Description automatically generated

  1. On the box Source Type, select Storage Blob
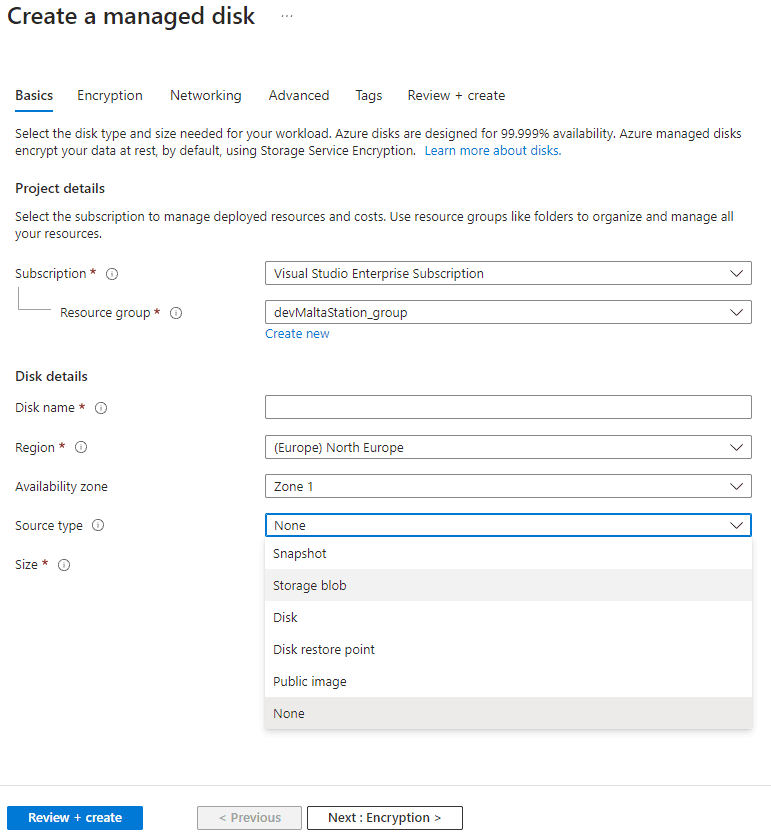
A screenshot of a computer Description automatically generated

  1. On the box Source Blob, click Browse to locate the VHD file

  1. On the following windows, point to the storage account, container and file
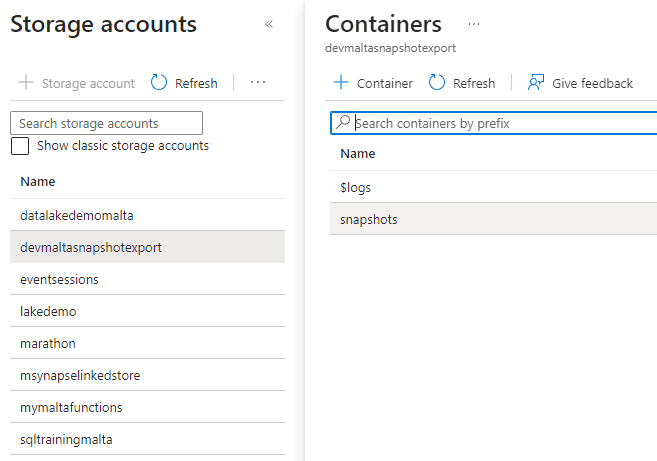
A screenshot of a computer Description automatically generated

  1. On the OS Type options, select the operating system the disk contains. Otherwise, you can only use it as a data disk.
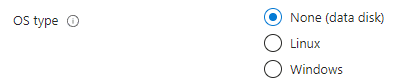
A white background with black dots Description automatically generated

  1. Select the VM architecture and disk size. This needs to be according to the original disk, otherwise the process will fail.
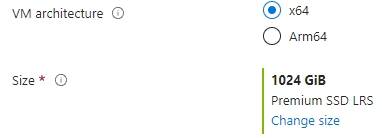
A white background with a black and white sign Description automatically generated with medium confidence

  1. Select the disk name, region and availability zone according to how you would like to create the new disk

A screenshot of a computer Description automatically generated

Create a new Virtual Machine

Once the disks are created, it’s time to create the Virtual Machine. The start of the process is simple: You open the OS disk and click the button to create a virtual machine.

A screenshot of a computer Description automatically generated

From this point, it’s almost a regular process of VM creation, but with the OS disk already selected. You can attach additional data disks as needed.

Summary

This process was very useful for me recently, avoiding making a completely new installation of a virtual machine. It may seem simple, but it’s full of tricks.


The post Move Disks or Virtual Machines between Tenants on Azure appeared first on Simple Talk.


from Simple Talk https://ift.tt/qNI8XbU
via

Monday, October 30, 2023

SQL Endpoints and Lakehouse UI Differences and Access Secrets

There are some differences and secrets between the UI of a SQL Endpoint and the UI of a Lakehouse.

I believe the lakehouse UI was changed recently, otherwise you can blame me for being distracted to this level. Let’s analyze the differences and pending points between these UI’s.

SQL Endpoints

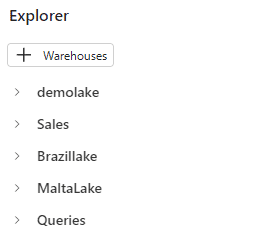
When using a SQL Endpoint, we can add multiple lakehouses to the explorer. They are included in the vertical, one above another. This is one of the differences between a SQL Endpoint and the lakehouse.

A screenshot of a computer Description automatically generated

On the top of Explorer, the button is called “+ Warehouses”. This may be a bit confusing because we are working with a lakehouse. The fact is we can add either a lakehouse or data warehouses to the explorer.

Domains and Workspaces

The Microsoft Fabric portal has the domain feature in preview. Domains are a concept from the Data Mesh architecture, but this is a subject for a different and longer article.

What’s important to understand is that domains allow us to create a set of workspaces and make some limited management tasks to the entire set.

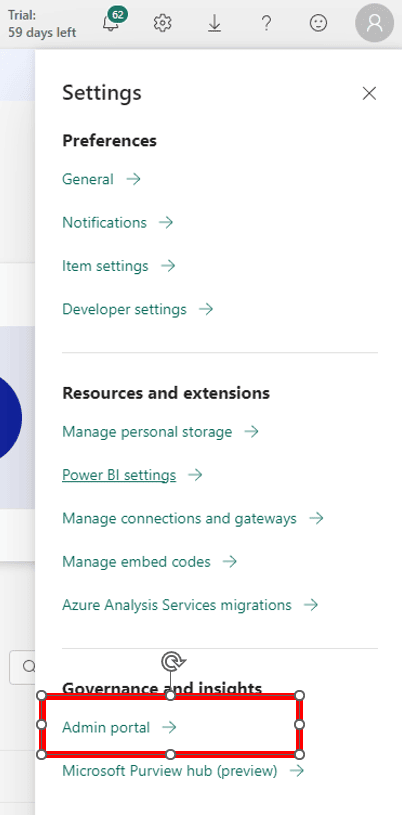
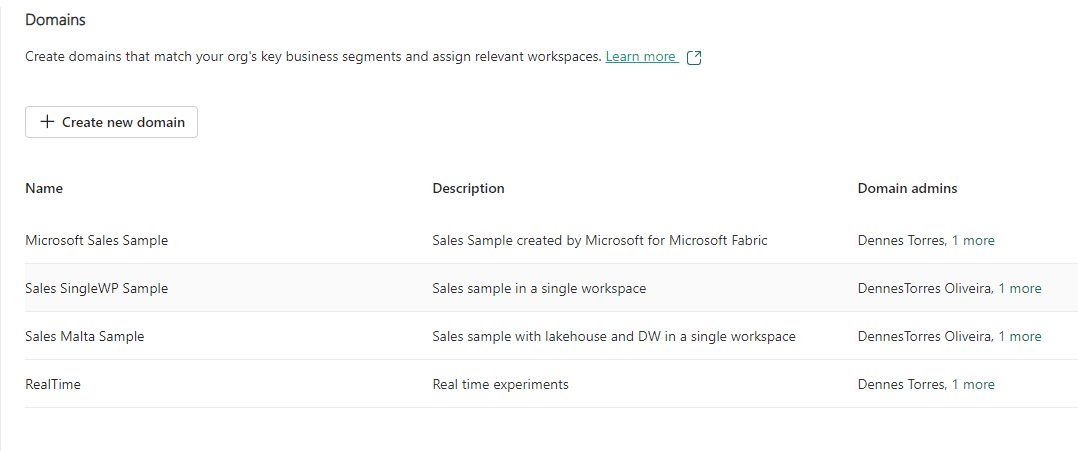
The access to the domains management is done through the Power BI Admin portal.

A screenshot of a computer Description automatically generated

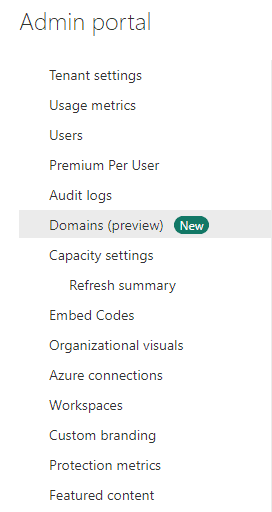
On the left side of the window, we click on Domains.

A screenshot of a computer screen Description automatically generated

In my environment, I already have many domains created.

A screenshot of a computer Description automatically generated

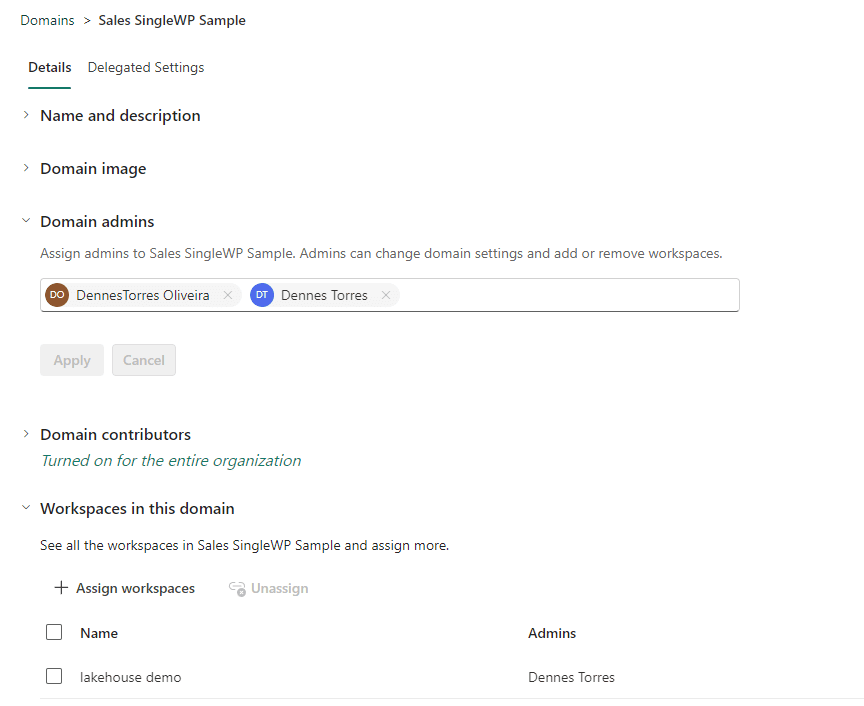
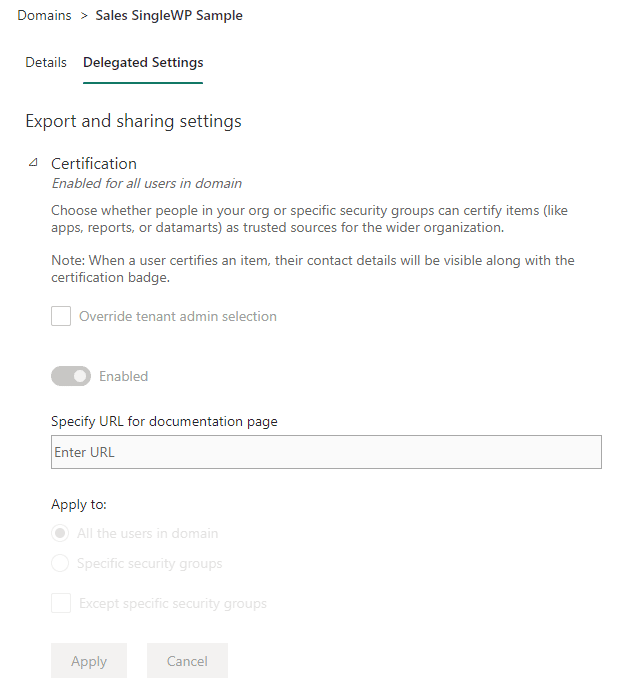
During the preview stage, there are very few configurations we can manage:

  • The Domain Admins
  • The Domain Contributors
  • Workspaces belonging to the domain
  • Data certification rules for the domain

A screenshot of a computer Description automatically generated

A screenshot of a computer Description automatically generated

The fact of whether a workspace is linked to a domain or not affects how the SQL Endpoint and Lakehouse window works.

Adding a Storage to the SQL Endpoint

There are some curious behaviors in relation to the SQL Endpoint and the domain management.

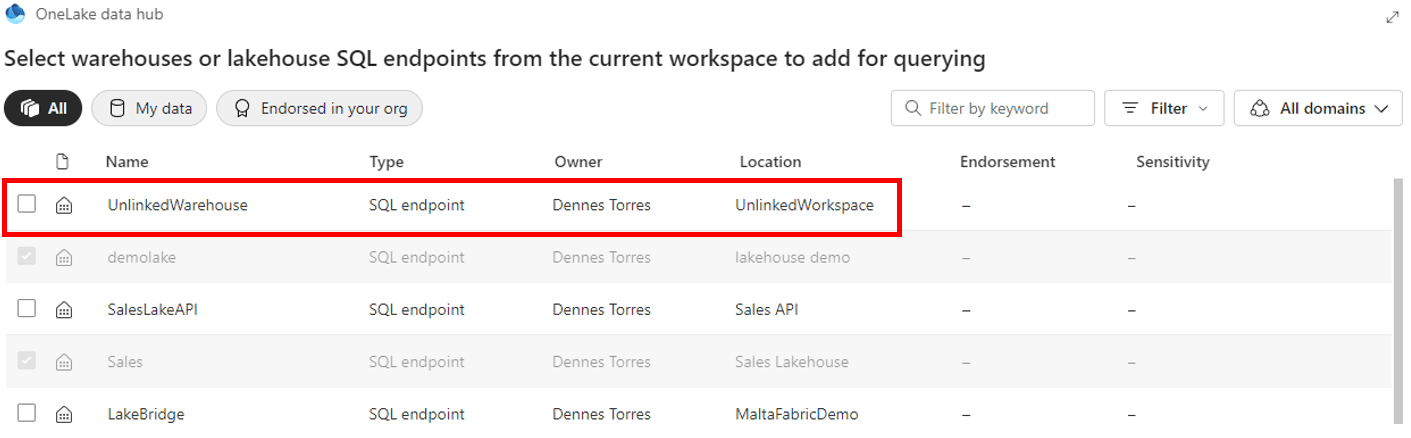
If the workspace doesn’t belong to a domain, on the top right of the window we only see a “Filter” dropdown. Using this limited option, we can only add objects, either data warehouse or lakehouses, which are present in the same workspace.

A screenshot of a computer Description automatically generated


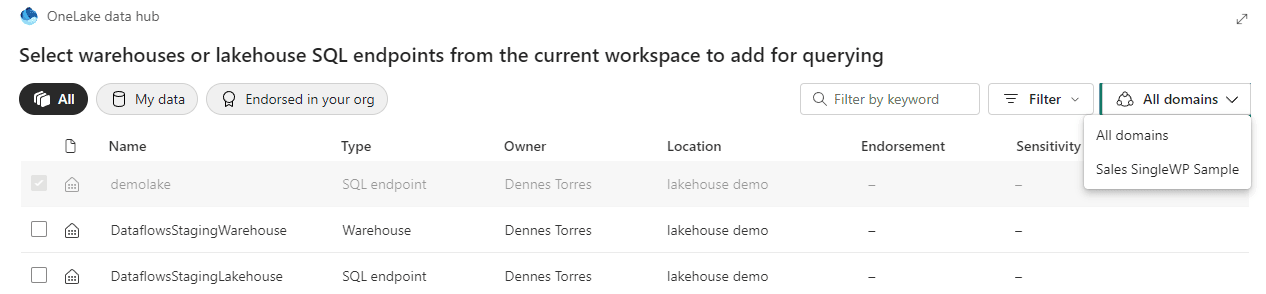
On the other hand, if the workspace belongs to a domain, we can see an additional dropdown intended to include a list of domains.

A screenshot of a computer Description automatically generated


However, this dropdown has some very singular behaviors:

  • Only the domain of the current workspace is listed, we can’t see a list of other existing domains.
  • The “All Domains” is the default option, but we don’t see objects from all domains by default. We need to change the dropdown to one domain and change back to “All Domains” in order to see all the objects.
  • The “All Domains” option includes objects not linked to any domain. The objects not linked to any domain can’t see the other ones, but the other ones can see them.


A screenshot of a computer Description automatically generated

Queries on the SQL Endpoint

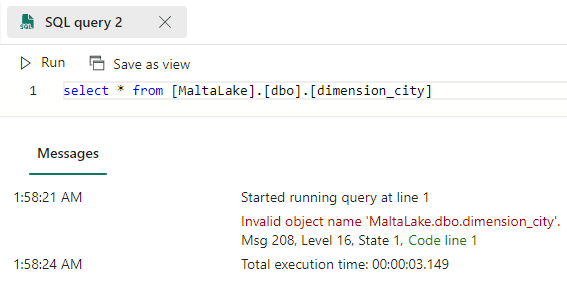
Although we can add objects from different workspaces in the Explorer, we can’t query them. Any attempt to make a cross workspace query will result in an error.

A screenshot of a computer Description automatically generated

Cross lakehouse work is a long subject for another article. But we can make a conclusion: Either there is some missing feature being produced, or the possibility to add lakehouses to the explorer but not being able to query them is a small method to make cross lakehouse queries easier (but not much).

The lakehouse explorer

We can consider there are two lakehouse explorers:

  • One is accessible directly from the lakehouse. On this one, only the lakehouse can be accessible.
  • The second one is accessible when we open a notebook. In this one we can add multiple lakehouses.

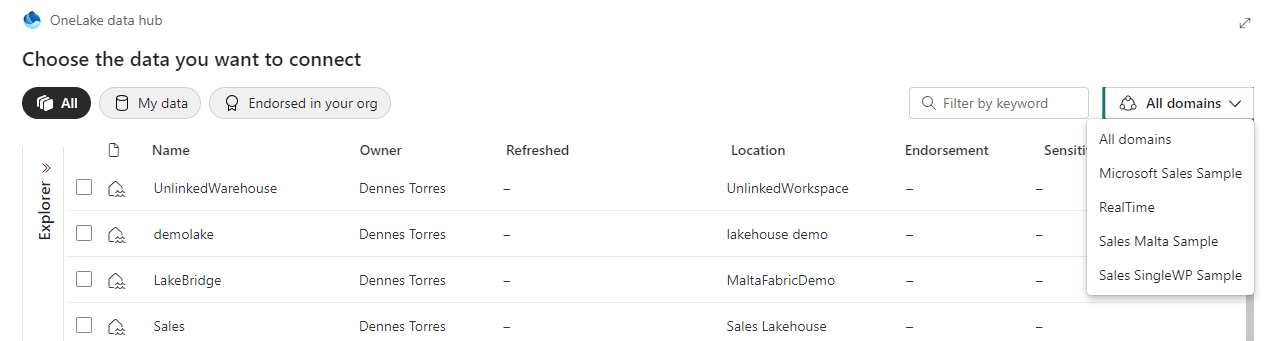
The window to add a lakehouse to this explorer is very similar to the one explained in relation to the SQL Endpoints but some behaviors are different:

  • All the domains are visible in this window, while on the SQL Endpoint only the workspace domain is visible.
  • The domain dropdown is available independently if the workspace is linked to a domain or not.

A screenshot of a computer Description automatically generated


My developer mind keeps wondering why a window which should be the same has different behaviors depending on where it’s called from one place or another, without a clear reason for this. I would love to read your thoughts on the comments.

The default lakehouse

The first lakehouse included becomes the default one for the notebook.

The notebook uses a feature called Live Pool. This means when we run the notebook the spark pool is created automatically for us.

The spark pool creation process includes mounting the default lakehouse as a folder on file system. The path for the default lakehouse will be /lakehouse/default, with the option to access files on /lakehouse/default/files or access tables on /lakehouse/default/tables.

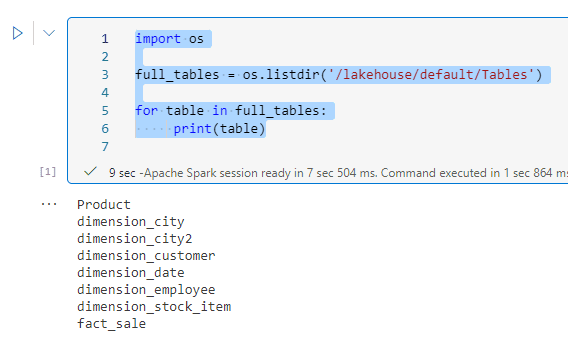
We can use the following code to list the tables from the default lakehouse:

import os

full_tables = os.listdir('/lakehouse/default/Tables')

for table in full_tables:
     print(table)

A screenshot of a computer program Description automatically generated

Multiple Lakehouses on the Explorer

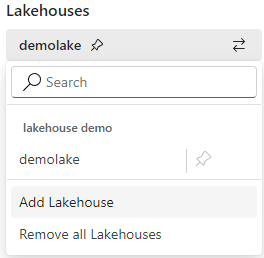
When we click on the two arrows icon, we can add new lakehouses to the explorer.

A screenshot of a search box Description automatically generated

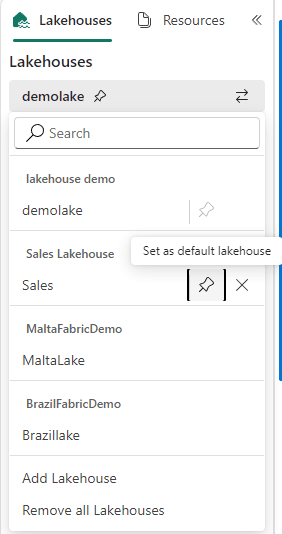
The lakehouses are not included vertically, like on the SQL Endpoint explorer. They are only visible when we click again on the two arrows icon.

A screenshot of a search engine Description automatically generated

The menu shows which one is the default lakehouse and allows us to change it. Changing the default lakehouse changes the content mounted on the folder on /lakehouse/default.

The Notebook Access to the lakehouse

The notebook has two different ways to access the lakehouse:

  • Access the mounted lakehouse using the OS path
  • Use Spark.SQL to access the lakehouses contained in the same workspace as the default one

There is no method for the notebook to iterate through the lakehouses added to the explorer. The presence of the lakehouses on the explorer only helps us choose the default lakehouse, nothing else.

This makes me wonder if this is only the starting stage of new features about to be released until the Microsoft Fabric GA version.

Spark.SQL on the notebook

Spark SQL can access different lakehouses, but the ones available to Spark SQL are totally independent of the lakehouses included in the lakehouse explorer.

In summary, Spark.SQL can access all the lakehouses contained in the same workspace as the default lakehouse. It doesn’t matter if they are included in the lakehouse explorer or not.

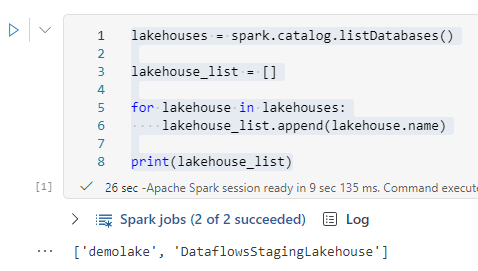
We can use the following code to list the available lakehouses to spark.sql:

lakehouses = spark.catalog.listDatabases()

lakehouse_list = []

for lakehouse in lakehouses:
     lakehouse_list.append(lakehouse.name)

print(lakehouse_list)

A screenshot of a computer program Description automatically generated

As you may notice in this example, the lakehouses listed are the ones in the same workspace as the default. This includes a lakehouse not in the Explorer and ignores others in it.

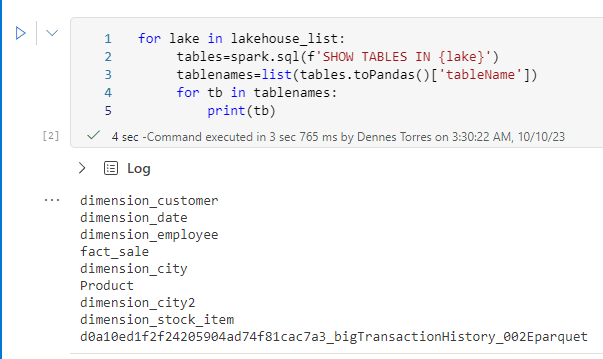
We can go further and use spark sql to list the tables in the lakehouses using the following code:

for lake in lakehouse_list:
    tables=spark.sql(f'SHOW TABLES IN {lake}')
    tablenames=list(tables.toPandas()['tableName'])
    for tb in tablenames:
        print(tb)

A screenshot of a computer program Description automatically generated

Summary

The UI is full of small tricks and unexpected differences which make us wonder which new features are coming on the GA version to justify these inconsistencies without a clear reason.

Meanwhile, we need to navigate these very small inconsistencies. The better we understand the relation between the lakehouse explorers, OS path and spark SQL, the better we will be able to make a great use of the environment.


The post SQL Endpoints and Lakehouse UI Differences and Access Secrets appeared first on Simple Talk.


from Simple Talk https://ift.tt/GU8tFN1
via
Saturday, October 28, 2023

Editing tip…Read Your Writing Aloud

Move your lips (and shake your hips if you want to, that is not required) and hear your words before you hit “post”. If you have someone you can read it to, that helps too. I commonly read my own articles to my spouse who will freely tell me when I am not making any sense!

Doing this will have amazing benefits to your writing quality. It is also the third hardest task you will encounter in the publishing process. (The first being choosing a topic, and the second, writing the first draft.) Why? Because no matter if I am editing or writing something, it will likely be the third to tenth time I have read those words. Being as honest as possible “I don’t want to read it again”. Even if the writer is as eloquent as William Shakespeare with the wit of Tim Conway… it starts to be a physically painful process to look at those words again.

The pain is worth it as it does wonders for my output. This is because it forces me to experience every word and every phrase as they are going to sound to the reader. The material sounds alive, and I get to know how it will feel to read the article (for the better or worse!)

You may be thinking, if you are going over the article multiple times, how do you miss glaring issues. On each pass, it is natural to start targeting the place where you think there are major issues. If I missed something once, I probably will miss it in other editing passes too, because each pass starts to just narrow in on the things you recently have changed. If I didn’t change it last pass, it is fine. Realistically, I could make changes every single pass, many many many times over, but every article only has so much time allotted to it.

When I don’t do this step, I more frequently than I like to admit, I get an email from and author that says, “It looks like you missed something.” Usually, it is something that I thought I did, often halfway finished. (Admittedly an example of this prompted this blog. I really thought I had done the final read through for that blog… but I was clearly wrong!)

The values of reading the article aloud

The kinds of things I typically find by reading my (and my author’s) articles aloud are:

  • Awkward phrasing: You often write a phrase in a way that seems interesting, but then read out loud and think “ugh.” I do this a lot when I am trying to sound cool or smart and saying it out loud ends in me reading it multiple times. I often try too hard to be funny, cool, witty, etc, when it isn’t as useful as I hoped in earlier edits.
  • Incorrect facts: When I read an article in its entirety out loud, incorrect statements seem to be more obvious. A common example is improper negation. For example, if the writer said: “In this article, I have mentioned how you should read your articles multiple times. Doing this will often hurt the quality of your article.” Reading it aloud makes the two sentences connect and the error often stands out. One sentence may have been edited to match something else, and the writer missed the first one.
  • Spelling errors: Subtle ones stand out when you are reading an article in a way that you don’t feel when you are scanning a document over and over. Sadly, spelling errors feel worse than major editing issues because once you see one, it just stands out.
  • Plagiarism: Big variances in tone are often a major giveaway that you copied something and didn’t put it in your own words. Ideally this is found early, but sometimes… And let me note this: nothing is worse than finding out a large part of a document is plagiarized. On rare occasion though, early in the editing process it doesn’t stand out as much because it is easy to get bogged down in fixing stuff that isn’t right.

    Note that some duplication is allowed, but only if it is a reasonable amount and attributed. The next editor’s post will be all about the subject of plagiarism!

The negatives

Are there negatives? Two that I can think of.

  • Punctuation: You don’t punctuate like you speak.

    For example, when I said that previous sentence I said out loud, “You don’t punctuate [pause for drama] like you speak.”


    Naturally I want to put a comma after the word “punctuate”, but that is not how it works. So, it becomes a struggle not to add a lot of commas to tell the reader where to pause like I want them to read it. Sometimes I will put an ellipsis (…), but best to not go overboard with that either.
  • It can lead to more major edits: Now, this is probably an overall positive, but this is supposed to be the final step. Just read it over, change a phrase or two, and move on so you can post it and move on.

    But then you realize something big. That section… would be better somewhere else. (And if you make major changes, you must do the whole reading aloud thing again, which can lead to more big changes, or even worse, undoing the previous changes!)

Yes, there are negatives, but the really only feel like negatives because you are ready to move on.

In Conclusion

The writing process is a lot of fun, overall. Researching, writing code, writing the text, editing other people’s writing, etc. It is something that I have loved to do for many years and now it is what I do many hours a week.

The only hard part of it is making sure you keep the quality up. Typos, missing paragraphs and images, confusing or incorrect statements, etc. can take something this is a wonderful tool to help others and turn it into a negative experience. It is a common suggestion to do one last read of your work before putting it out there.

My suggestion changes that in only one way. Read it aloud so you hear it, and you don’t start scanning it and miss something important. It is well worth the effort.


The post Editing tip…Read Your Writing Aloud appeared first on Simple Talk.


from Simple Talk https://ift.tt/bjkNJX8
via

Friday, October 27, 2023

Pike’s Market to Pikes Peak: The PASS Summit is Worth the Journey

Recently I spoke at SQL Saturday Denver. The day after the conference we went to visit Pikes Peak Mountain. You have a couple of choices of how you can get to the top of Pikes Peak Summit: hike, drive, or take the Cog railway. Each method has its own advantages and disadvantages. If you take the railway, you pay more and your time at the top is limited. Hiking up would take more time but you would get physical activity and the satisfaction that you made it to the top. We opted for the train ride up the mountain.

Regardless of what method we chose, being at the top of the Summit was worth it. The view from the top was amazing and you are surrounded by people who are there for the same shared experience.

Every year that I attend the PASS Data Community Summit, I feel the same way. Although PASS Summit is not held at 14,000 feet (although the trip up the escalators can feel like it), I look forward to the view from the skybridge towards Pike’s Market every year. And while the view of Seattle is beautiful, the view you get walking into the welcome session is just a little more awesome.

How to get to the Summit

Much like the choice of how to get to the top of Pikes Peak each person has to explore their options of getting to the PASS Summit. You could just take a week off work, buy a ticket and get a hotel (and many people do this). It is a great investment in your skill set. It is also a good investment in your skill set that you employer may want to make as well.

The Summit website has a template of a letter to help you convince your employer including details on what you will get and a place to make a reasonable budget as well. Determining how much it will cost to attend the Summit is easy, but it is hard to put an exact return on investment amount. The experience is more than just attending training sessions, it is making connections that may someday be of value to your employer (and you as well, but that may not be something to stress too much!).

I think the reason my employer has continued to support me attending the PASS Summit is because they see the fruit of the Summit when I return. If I look back to each year after I attended the conference, I can distinctly pick out what I did that year which was influenced by what I had learned. The opportunities for networking is invaluable, I have regularly reached out to connections I made at Summit when I had questions regarding something I was working on.

The Sessions

The number of knowledgeable speakers at the Summit is astounding. The sessions are taught by people who like to teach and pass on their knowledge. It is easy to get a little star-struck because your session may be taught by the people who wrote the book on one of the programming languages you use. Or perhaps by two people who have a YouTube channel you have learned a lot from.

Every year I come back with a notebook filled with notes and action items. Sometimes, I can’t wait to try things I learned about that day and must try them out at night (although this time may be better spent on some of the networking options while you are there).

Usually, there are multiple sessions that I want to attend at the same time. But it’s not a problem as the 3-day registration level gets on-demand access to recordings for a few months after the event. (and even the 1-day access can purchase access to all the sessions. More details here.)

What is incredible about being there live is that you get a lot of access to the presenters. There was one year when I was trying to decide if I should focus more on the Business Intelligence side of things instead of the DBA role. I waited after the session to talk to the speaker who had presented on a business intelligence topic and not only did the speaker talk to me but he sat down to show that I had his undivided attention. To this day that still sticks in my mind as a remarkable showing of caring.

Networking

Before I attended my first Summit a wise person said to not discount the conversations that may occur post-session or in the hallway. Sometimes you may just miss a session altogether. If you end up in a conversation with someone who is giving you great advice, then you can just watch the session later.

One of the easiest events to attend are the lunch-time sessions. For example, in year’s past there has been a Birds of a Feather luncheon where you pick your lunch table based on a topic that you are passionate about or one you want to learn more about. You are already going to eat lunch so why not network and learn something at the same time?

There are planned community events such as running (#SQLRun) at 6 a.m. (Stairs, stairs…so many stairs), playing board games, ping pong, Karaoke, or dinner at the Crab Pot. There is usually something for everyone going on each night. Attending these events and meeting new people is a great chance to make lasting friendships. For more details on what is currently planned, check out the Summit Community site). And if you don’t get involved with any of these events, you may end up having dinner with a group of people you have learned from (or taught) for many years before.

Goals

There is a feeling when you are in the middle of Summit that I can’t describe. During the Keynotes you are surrounded by other attendees who are excited to see what is announced. Between the keynotes and sessions, you can take in so much over the week!

Taking all of this information in mind, the Summit is where I set goals for the next year. For example, I have attended Summit for a number of years but this past year I finally set the goal of speaking. I know people who from their very first visit made it their goal to start speaking as soon as possible. Some have left Summit to go back to their hometown and start a user group. (and many people just go to learn and apply that new knowledge!)

If you are looking for inspiration, Summit is a great place to find it. Not only can you set goals, but Summit is the place to find people who can give you advice on things such as speaking and setting up a user group in your community. It is full of people who have been in the same position and can offer sound advice. Last year at Summit, I made the decision that this year I was going to start submitting to speak at the SQL Saturdays around the country. If I had not attended the Summit last year and been inspired, I would not be speaking at conferences this year. Next year I hope to reach one of my other goals: speaking at the Summit.

Note: If you will be at the Summit this year and are looking to start writing or speaking, there are a couple of special sessions being held in the community zone Just for you. Tony Davis, Louis Davidson and Tonie Huizer will be doing a Professional Power Hour about technical writing; and Ben Weissman will be doing a Ask Me Anything session for new speakers.

The Location

While you almost certainly will want to be completely engaged at the conference, there is almost always some downtime before or after. Seattle is a beautiful city surrounded by beautiful landscapes.

Hopefully, you will be able to take a day trip before or after the conference to do something like going out to Bainbridge Island (where Pickleball was invented). Or during the conference, you visit the Space Needle at night. And if nothing else suits your fancy, there is so much good food in Seattle, a lot of it within walking distance of the conference center

It is not hard to find a group of people to dine at one of the many restaurants surrounding the conference center or at Pike’s Place Market.

Conclusion

The PASS Data Community Summit is always a great experience and for a lot of people I know, it leads to more great experiences. For example, this year SQL Saturday Denver. felt more special as two of the members of the user group were people I met at my very first PASS Summit.

During that first Summit, I went to a board game night, I did not know anyone but ended up meeting various people including those two people. It was the last night of the conference, and they were going to Bainbridge Island the next day. They invited me to accompany them, and I am glad I accepted, the views were amazing a

. It is an experience I’ll never forget and now I try to visit every time I attend Summit.

While at Summit talk to people so you can hear stories of how after attending Summit it inspired them to start speaking, blogging, teaching people at their company, or transitioning to a different career path. (Just don’t lead with that last one when trying to convince your boss to send you to the Summit!)


The post Pike’s Market to Pikes Peak: The PASS Summit is Worth the Journey appeared first on Simple Talk.


from Simple Talk https://ift.tt/r1JBmnT
via

Wednesday, October 25, 2023

Database Projects for Microsoft Fabric Data Warehouse

Database Projects for Fabric Data Warehouse is one of the most recent news of Fabric for SDLC (Software Development Life Cycle). Microsoft released the Database Projects around 2010 and have they evolved since that year. The original name was a tool called SSDT, released as part of SQL Server, but running inside a Visual Studio Shell.

If you had Visual Studio already installed, it would run inside it, otherwise it would install a shell to run.

What is a Database Project

A database project provides more than way of use it, so we need to define it carefully:

  • From an existing database, we can generate the scripts of the existing database
  • On a new database project, we can create the schema of the database and deploy

The main point is the possibility to keep the script of the database under source control, including the database project in the SDLC (Software Development Lifecycle).

Two methods of Database Source Control

We can consider in the market there are two methods of database source control:

  • Incremental Scripts
  • Differential Scripts

Incremental Scripts

Using this method, we keep incremental scripts of every change made in the database. The scripts have a sequential order. The execution is always done in this order.

This method requires a reverse. We need a script to reverse the change as well, so we can advance or reverse in time.

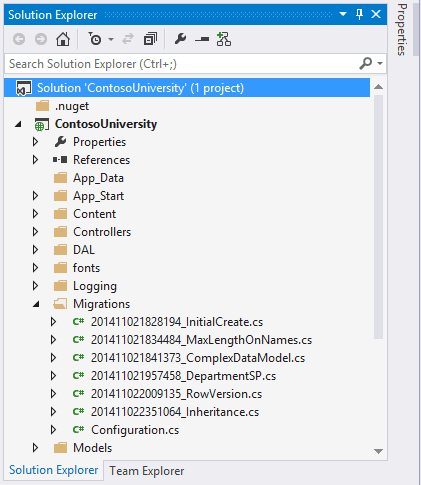
The image below shows an example of Migration scripts created by Entity Framework. Each file contains two methods, one for implement the changes and another to reverse them.

Bringing Control Back to Database Deployment with ReadyRoll and Entity Framework Code First Migrations - CodeProject

Using this method we extract the differential scripts and store them. We can use tools for this purpose or create the scripts manually (but I wouldn’t like to be the guy who does it manually).

If the scripts get mixed, lost, or anything similar, the updates will not work.

Example: Most ORM’s (Object Relational Mappings), such as Entity Framework or NHibernate, work in this way.

Differential Scripts – The Database Projects

This is the method used by Database Projects.

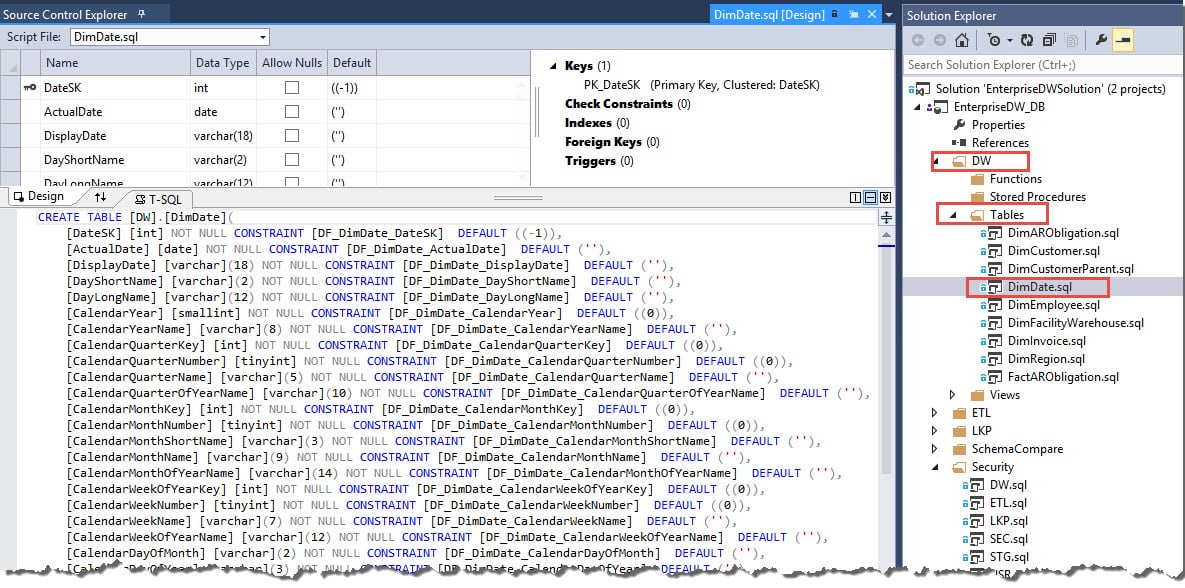
Why You Should Use a SSDT Database Project For Your Data Warehouse — SQL Chick

Using this method, we keep the database schema scripts. The scripts to create the objects.

This method requires a process call schema compare: The database project can be compared with the online version. The tool creates a differential script during the compare process, executes it and the script is discarded.

There are many configuration rules in relational about how the tool will proceed in relation to the differential script, the most important are:

  • The scripts need to be transactional. In complex DDL scripts, this may not be so simple to build, but the tool manages it. The point is: Or the entire update happens, or nothing happens.
  • Data movement may be needed. Some changes of structure may require an object to be dropped and created again and the differential script needs to manage the data movement required for this.
  • Data loss could happen. For example, you could reduce the size of a field or remove it. All tools I know have by default an option to stop in case of data loss and let the DBA analyze and order to proceed or not on a case-by-case basis.

What database projects can do

Using Schema Compare instead of incremental scripts makes it easier to identify the changes from one version to another, comparing the script of the objects instead of analyzing what the incremental scripts are doing.

The schema compare feature brings the following possibilities:

  • Compare two different versions of a project to find the differences and apply the differences from one to another
  • Compare two different live versions of a database to find the differences and apply the differences from one to another
  • Compare a project with a live version. The update can happen from the project to the live version or from the live version to the project. Of course, the last one is not good SDLC practice, but it can happen.

Which one to choose

In my personal experience, the Incremental scripts are the preferred choice by developers, because it’s close to their ORM work.

However, it leaves the database structure tied with development code. Because of that, the Differential Scripts are usually the preferred choice from DBAs.

Considering developers work mostly in production systems while the analytics is left for data specialists, it’s natural the first option for Microsoft Fabric Data Warehouse appears in the form of a Differential Script – The database projects

Database Projects for Fabric Data Warehouse and Synapse Serverless

The focus is so much on Fabric the fact the database projects are supporting Synapse Serverless as well will not be noticed. This is a considerable improvement on the SDLC (Software Development Lifecycle) for Synapse Serverless environments.

Over the years, extensions were created for Visual Studio Code and Azure Data Studio to support the database projects on them as well.

Using a difficult to understand strategy, Microsoft teams often release features on the extensions for these tools – Visual Studio Code and Azure Data Studio – and much later the feature is extended to Visual Studio itself.

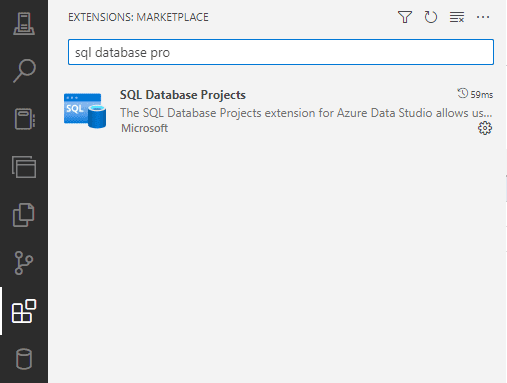
These extensions are called SQL Database Project and are still in preview.

A screenshot of a computer Description automatically generated

Each software has an insider version. The Insider version is like a version released directly from GitHub to you. I found less bugs on these extensions when testing the insider’s version, although, in my opinion, they are still a promise.

You cand download Azure Data Studio Insiders Version from this link

Creating the Database Project for Microsoft Fabric Data Warehouse

My tests were done with Azure Data Studio insiders’ version. The extension is available on the regular version, but I faced strange error messages which are pointed by links on the web to be related to compatibility level.

It doesn’t make much sense, because although we can see, we have no control over the compatibility level in Microsoft Fabric Data Warehouse.

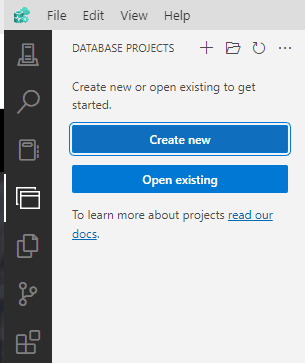
Once the extension is installed, we get a new left bar icon for the database projects.

A screenshot of a computer Description automatically generated

A screenshot of a computer Description automatically generated

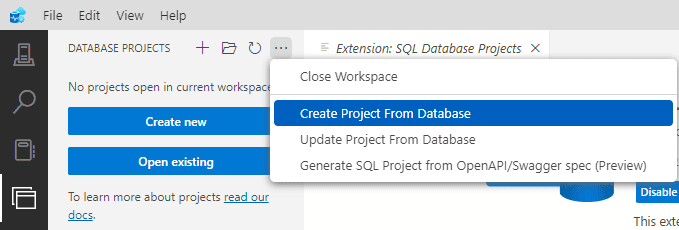
The main options are:

Create a Project : This will be an empty project

Open a Project : What the name implies

Create a Project from Database: Create the project and import the schema from the database

Update a project from the database: This should have the effect of a schema compared with the project as a target. It doesn’t seem a needed option.

Create a SQL Project from an OPENAPI/Swagger spec: This one surprises me. For someone my age, it seems like doing things in reverse order. On what scenarios would you use this option?

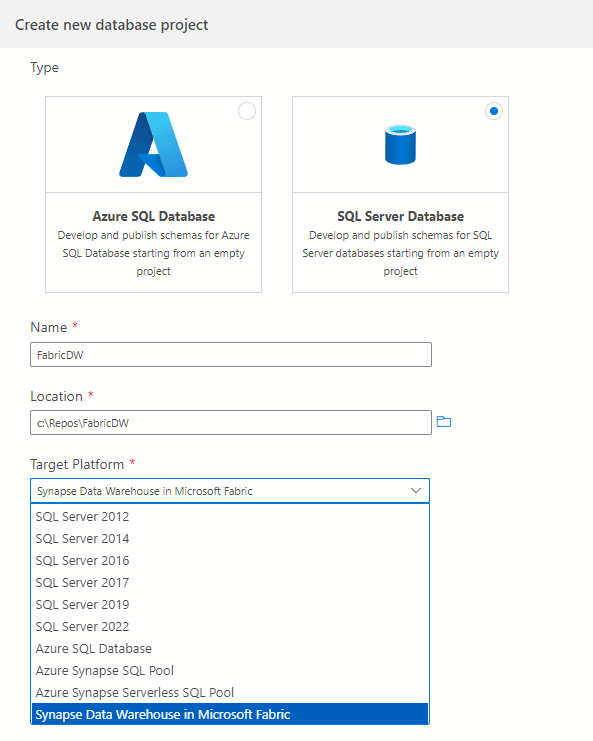
When we choose the option to create a project, we can choose what kind of project we would like to create and here are the new features. Under SQL Server project, we can find a Azure Synapse Data Warehouse in Fabric project and a Synapse Serverless SQL Pool, two new types.

A screenshot of a computer Description automatically generated

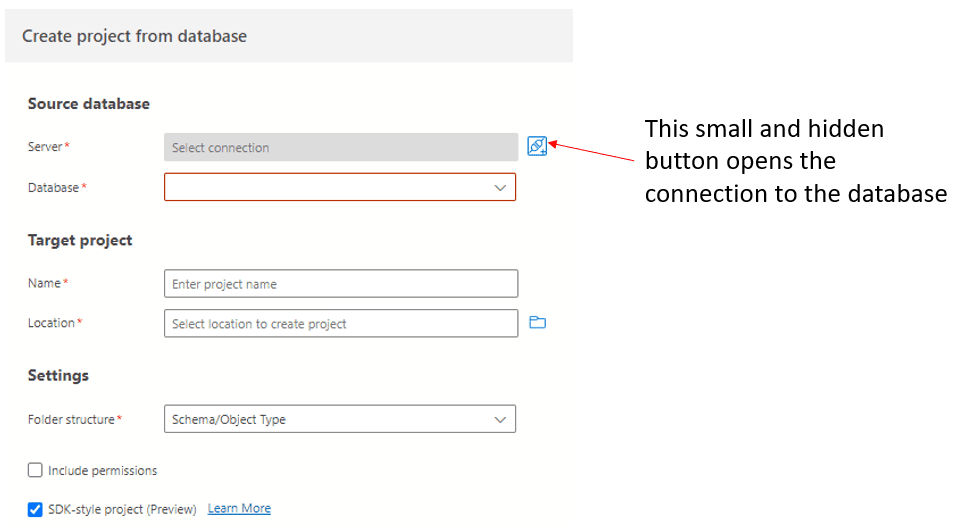
However, when you use the option Create a Project from Database, it asks immediately for the connection, not offering a list of types of projects.

A screenshot of a computer Description automatically generated


Default Option when No Project Type Selected

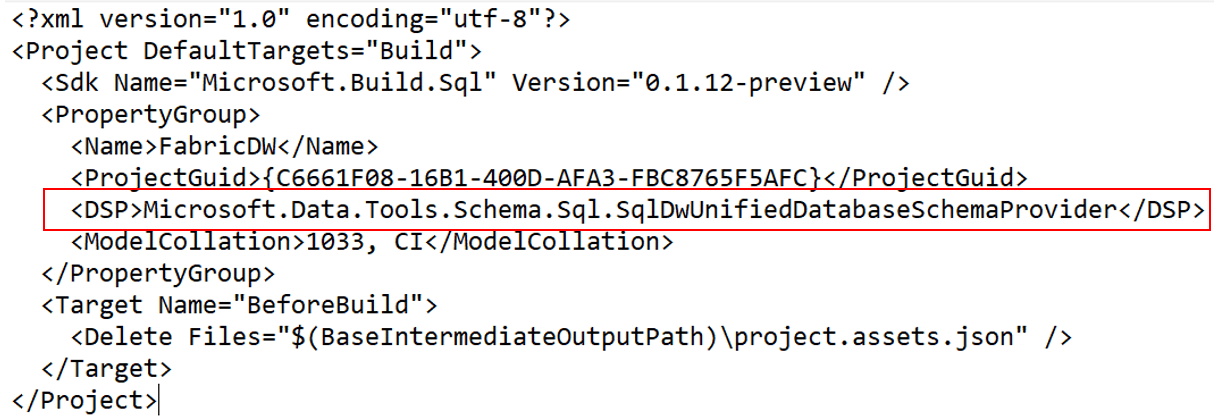
During my tests, sometimes it creates an Azure Synapse Serverless SQL Project by default. This made me edit the “.sqlproj” file on the notepad and discover the codename used for both type of projects, so I can change from one to the other one needed to solve bugs:

Microsoft.Data.Tools.Schema.Sql.SqlDwUnifiedDatabaseSchemaProvider : Fabric Data Warehouse

Microsoft.Data.Tools.Schema.Sql.SqlServerlessDatabaseSchemaProvider : Synapse Serverless Project

A screenshot of a computer code Description automatically generated

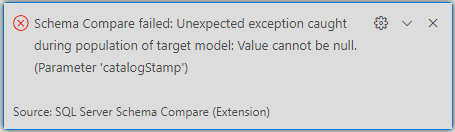
On the final version of Azure Data Studio, I faced some instable bugs. After some tests, only one persisted, during the schema compare:

A white background with black text Description automatically generated

A google research mentions this with some relation with compatibility level, but although we can see compatibility level on Fabric, we can’t change it.

After all the instability, I gave up and went directly to the Insiders version.

Managing Connection with Fabric Data Warehouse

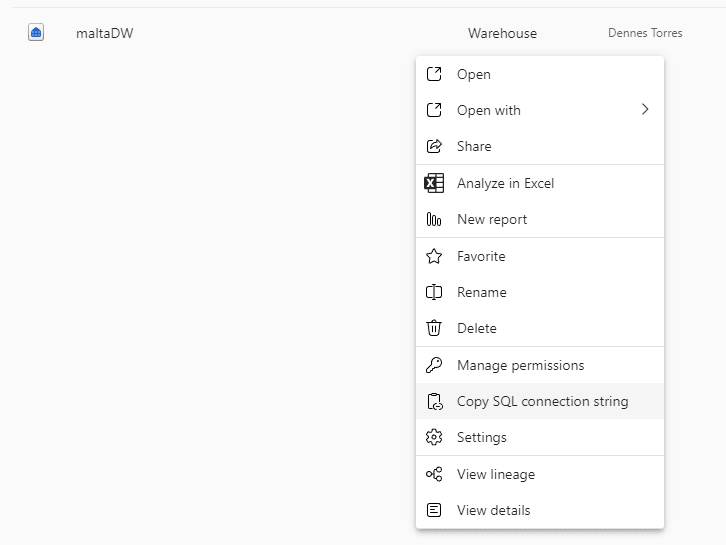
We need to go to Power BI and use the option Copy Connection String on the Data Warehouse.

A screenshot of a computer Description automatically generated

Every developer will recognize this is not a good choice of names. Connection String has a different meaning for developers, while in Power BI it contains only the server’s name, not the entire connection string.

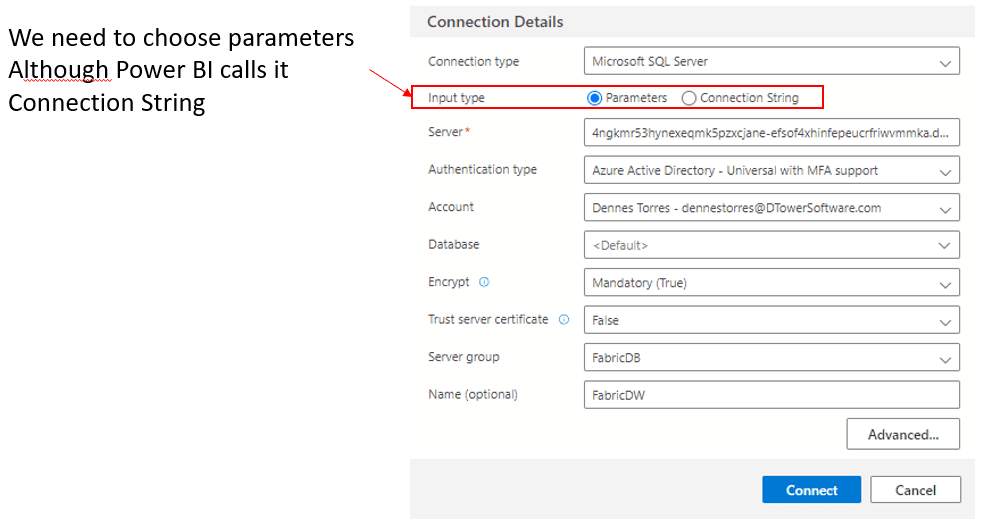
The mismatch starts on Azure Data Studio by itself. When creating the connection, we can choose to input parameters one by one or the entire connection string. We need to choose one by one, because the connection string copied from Power BI is not a connection string, but only the server’s name, captche?

A screenshot of a computer Description automatically generated

Active Directory was very recently renamed to Microsoft Entra. I found some inconsistency between the usage of Active Directory and Entra ID on the dropdown Authentication Type. Both options mean the same thing.

If I’m not mistaken, Synapse Serverless projects are using Entra ID, while Fabric Data Warehouse is using Active Directory. Or something similar.

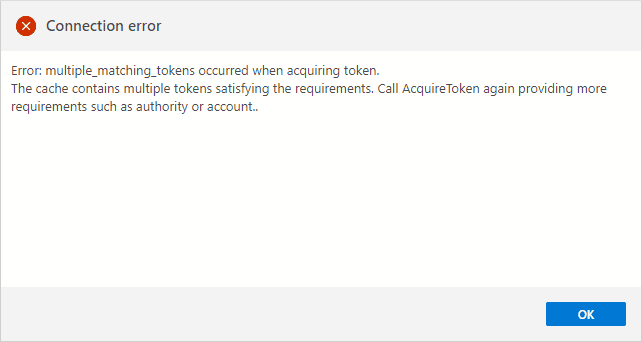
When you make a login in active directory (I will take a long time to get used to Entra. Does this have a meaning in English? Did anyone research in other languages?) you get a token. Azure Data Studio is making a reasonable service storing this token for you. Sometimes it complains you have duplicated tokens, and if it happens, you need to close it and open it again. But it could be worse, way worse.

A screenshot of a computer error Description automatically generated

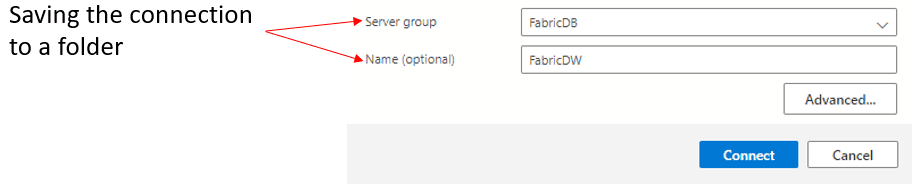
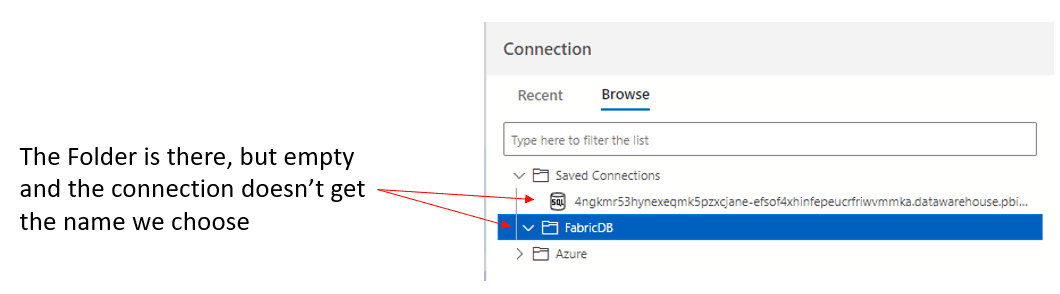
Azure Data Studio gives us the option to save the connection in a folder. This is a good way to organize our server connections.

A screenshot of a computer Description automatically generated

I don’t understand why it ignores the name we chose for the connection and saves it outside the folder we request, leaving the folder empty.

A screen shot of a computer Description automatically generated


Importing the Database Schema

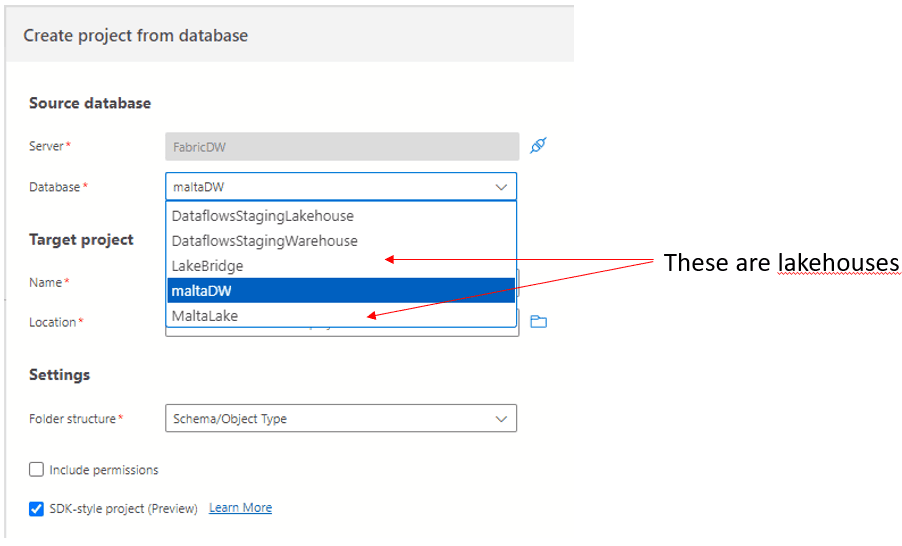
The connection is made to the server, it doesn’t contain a database name. Once the connection is established, the database names on the same server are retrieved and listed for us.

Some surprises appeared at this point:

  • A list of several databases was displayed
  • They are all databases in the same workspace
  • There are lakehouses and Data warehouses mixed

We can easily conclude there is a different server for each workspace.

A screenshot of a computer Description automatically generated

The last one was the biggest surprise. Is there a plan to make Database Projects work with lakehouses SQL Endpoints?

Warehouse Importing Result

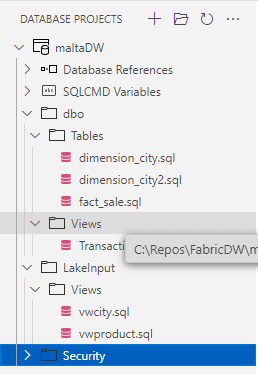
Each object from the database is created in a different .SQL file using a folder structure. The files contain the simple .SQL script to create the file, nothing incremental or more complex. This makes it easy to make version comparisons in source control, identify exactly which objects were changed.

A screenshot of a computer Description automatically generated

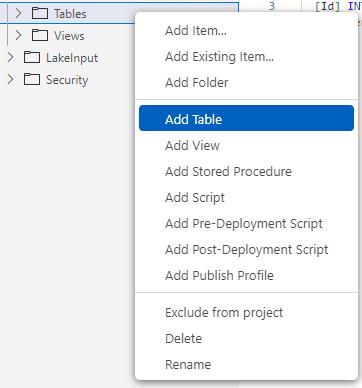
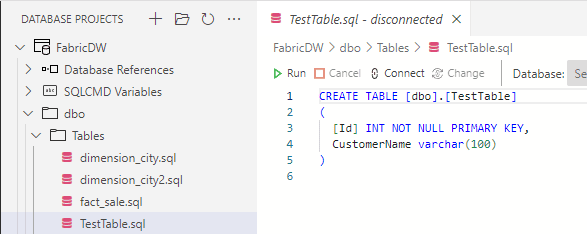
We can make changes to the structure offline. For example, we can create a new table. In the example below, I’m creating a new table called TestTable.

A screenshot of a computer Description automatically generated

A screenshot of a computer Description automatically generated

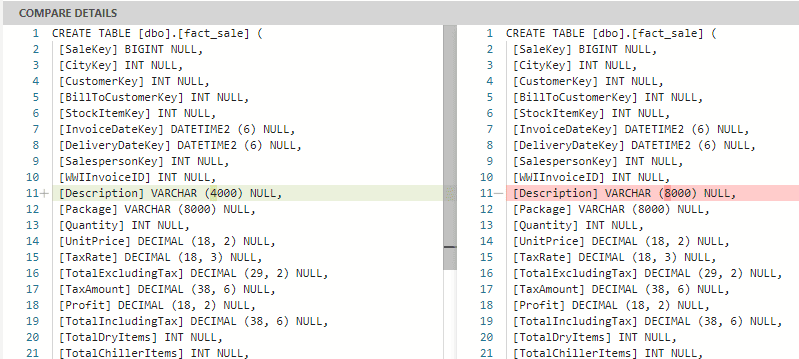
I will also change the size of one of the fact_sale table fields

Comparison and Comparison results

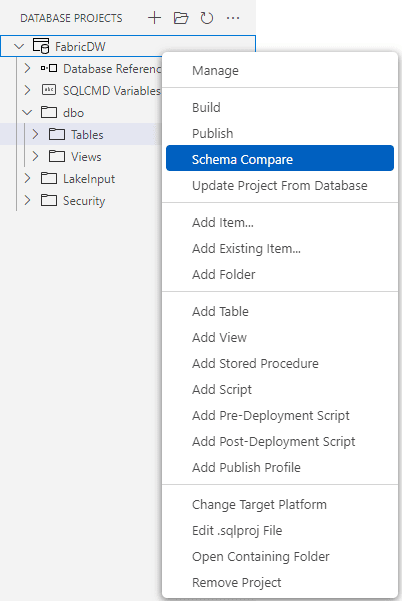
We start the schema compare using a right-click over the project and choosing Schema Compare menu item.

A screenshot of a computer Description automatically generated

The project will already be filled as source, and the target will be empty.

The choice of the target connection for the schema compare use similar windows as when we created the project from the database, no news at this point.

The most common scenario is the source being the project and target being the server. However, on the top button bar you have an option to reverse the order, what will invert the comparison and application of changes.

The comparison is also triggered by a button on the top bar.

It takes some minutes to be completed and it will point out the differences on each file. The column Action tell us if the file was changed or if it’s a new file.

A screenshot of a checklist Description automatically generated

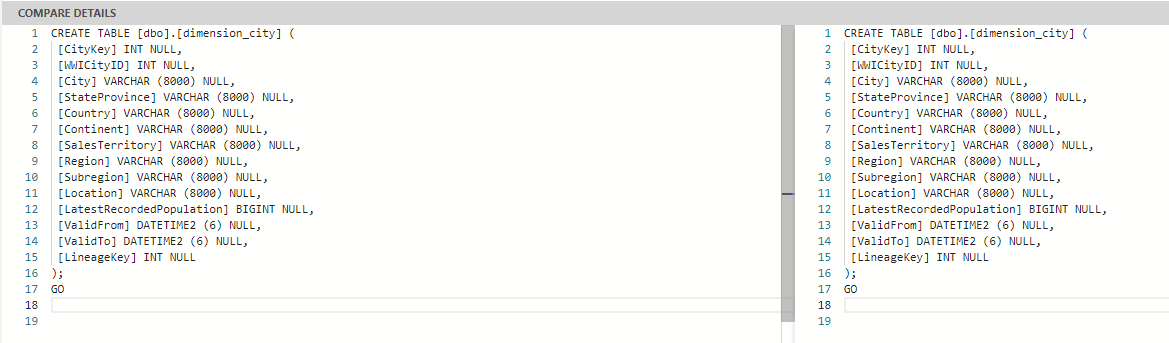
A small bug is causing all tables to be made as difference. During the import, some special character is included in the end of the files, and this is pointed out as a difference. The image below shows the difference pointed in empty rows when there is not a real difference.

A white rectangular object with a black border Description automatically generated

We can also see the difference of the fact_sale table highlighted for us:

A screenshot of a computer Description automatically generated

But the real differences will be pointed out as well, making it easy to decide what to update or not. The update application can be selective, you can decide what to update on the target side by checking or unchecking the column Include

Applying the Results

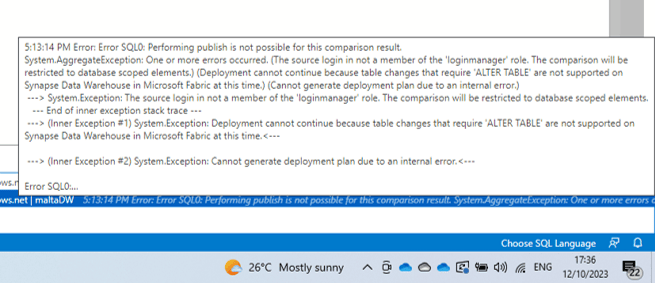
Unfortunately, when applying changes, we receive a mix of two messages: “Not supported” and an error about the roles of the user. It’s not clear if there is already a work around or if we will need to way a future version. The message also includes a mention to “Alter Table”, but when we are only adding tables the message continues to be the same.

Summary

This is a very promising feature. It seems we will have it available for us in a bunch of weeks, and this will make the SDLC with Microsoft Fabric easier.


The post Database Projects for Microsoft Fabric Data Warehouse appeared first on Simple Talk.


from Simple Talk https://ift.tt/vPrig8o
via