Thursday, November 9, 2023

Fabric Data Warehouse News you need to know

Microsoft Fabric, including the Data Warehouse, evolves faster than we can analyze and write about it. Here I’m summarizing the most recent news I looked at.

Clone Table

We have a specific statement to clone a table. But what exactly does it mean?

The Clone Table feature promises to create an image of the table on a specific point in time or with the current information. The documentation is not precise, because at some points it says it’s only a clone of the structure, but we can see the data on the table.

What’s the advantage of this over a simple SELECT INTO statement?

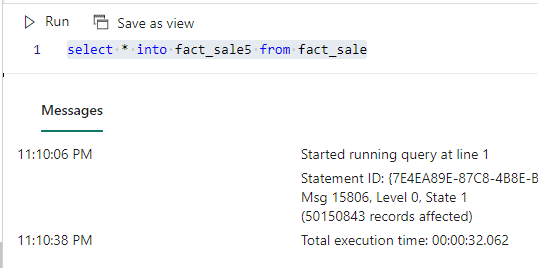
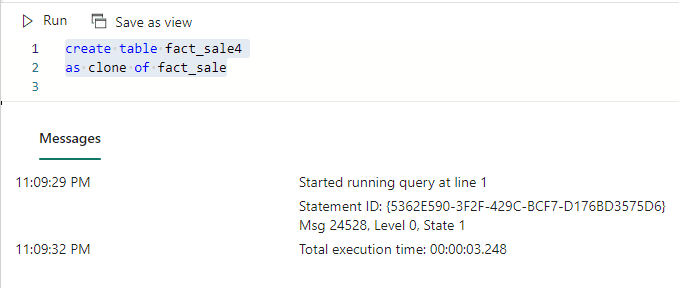
I tested both to discover. The images below illustrate how the clone table executes in only 3 seconds and the SELECT INTO takes 32 seconds for the same task.

A screenshot of a computer Description automatically generated

A screenshot of a computer Description automatically generated

However, this feature is in a very early stage. As a result, it shows some strange behaviours:

  • The cloned table doesn’t appear in the one lake explorer
  • A UI feature is promised and documented but not available yet
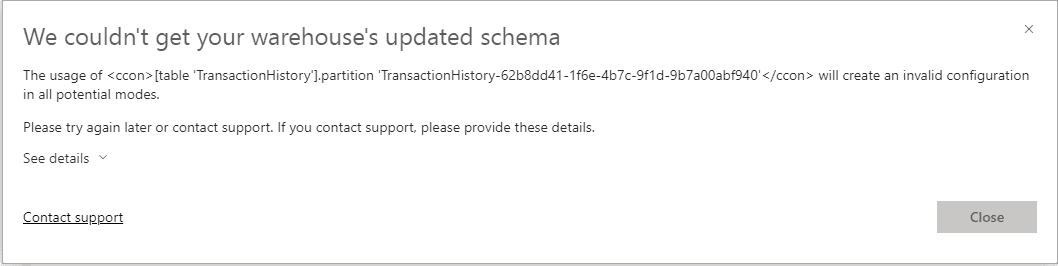
  • The cloned table doesn’t appear in the list of tables. A refresh results in an error. We can only access it from a query.

A screenshot of a computer program Description automatically generated

How does the clone happen in only 3 seconds?

Without the access to the files in the onelake, it’s difficult to say. My bet would be something related to the difference between copy files or copy records.

References:

https://learn.microsoft.com/en-us/fabric/data-warehouse/tutorial-clone-table-portal

https://learn.microsoft.com/en-us/sql/t-sql/statements/create-table-as-clone-of-transact-sql?view=fabric&preserve-view=true

sp_rename for tables

This is an inheritance from Azure Synapse, which never supported sp_rename. Problem solved. A small step for the technology, a big step for the data engineer.

Reference:

https://blog.fabric.microsoft.com/en-GB/blog/announcing-fabric-warehouse-support-for-sp_rename/

Data Warehouse Dynamic Data Mask

Another important addition is starting to appear on Synapse Data Warehouse, but it’s still missing some details.

Dynamic Data Mask is a very interesting feature to help protect sensitive data. However, in Synapse there are still some features missing:

Dynamic Data Mask with Alter Table is not working very well

We need to provide the Unmask permission to users and roles. I wrote an article when this feature was finally made available in SQL Server and Azure SQL. However, it’s not available in Synapse yet.

Reference:

https://learn.microsoft.com/en-us/fabric/data-warehouse/dynamic-data-masking

New CSV Parser for the Data Warehouse

I wrote before about the differences between the CSV Parser 1.0 and 2.0 in Synapse Analytics.

Checking the information from the old article, you may notice this is not a small advance, it’s a big deal.

Reference:

https://blog.fabric.microsoft.com/en-GB/blog/announcing-improvements-to-csv-data-ingestion-in-fabric-warehouse/

Save As View/Table available for Visual Queries

The queries feature, either SQL or Visual, are a great data exploration tool. It allows our users to explore the data before building any report, to discover exactly what’s hidden in the data before building reports.

The possibility to create tables and views also on the Visual Queries, as we already had on SQL ones, completes the data exploration scenario.

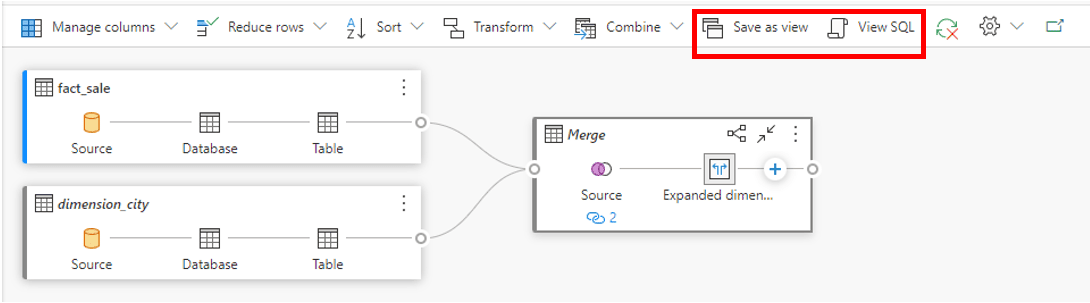
A screenshot of a computer Description automatically generated

The bad news:

An old bug on Visual Query continues to be alive and kicking, making this feature not so useful. On the image above, there is a join between fact_sale table and dimension_city table. However, either the View SQL button or the Save as view button only show the SQL from fact_table, not the entire query with the join.

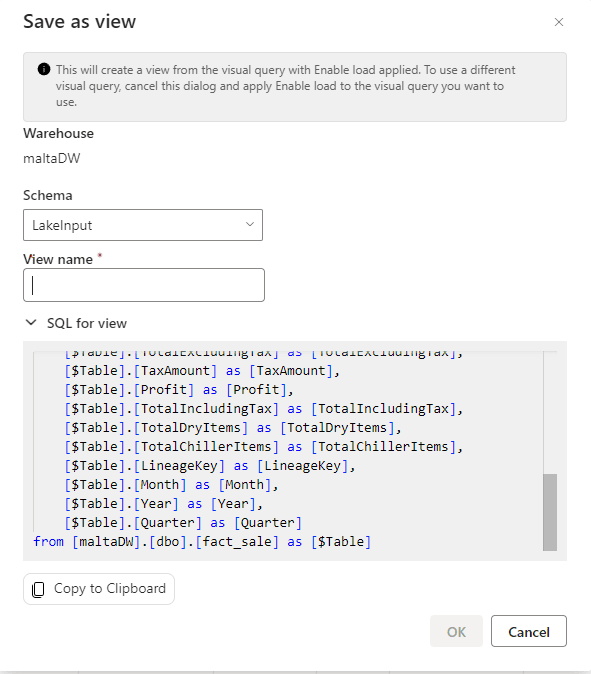
The image below shows the Save as view option, unfortunately without the JOIN it should have.

A screenshot of a computer Description automatically generated

Reference:

https://learn.microsoft.com/en-us/fabric/data-warehouse/visual-query-editor#save-as-view

Row Level Security

Row Level Security is one of the biggest differences between Data Warehouse and Lakehouse. Only a Data Warehouse has this feature, making the Data Warehouse a great candidate to be the gold layer in a medallion architecture, for example.

This feature has the same working method as in SQL Server: We create a function to filter the security by user and create a security policy to link the function to a table.

The example on the first reference below uses the USER_NAME() function. However, when an application connects to a database, we may be using an application identity, instead of a user identity. This could break the row level security.

The application has the capability to set a session context value with the name of the real user accessing the data. The security function would check the session context and ensure the row level security.

This architecture comes from SQL Server and it’s completely available in Microsoft Fabric Data Warehouse. It’s explained on the 2nd reference below.

Reference:

https://learn.microsoft.com/en-us/fabric/data-warehouse/row-level-security

https://learn.microsoft.com/en-us/azure/data-api-builder/azure-sql-session-context-rls

Summary

Microsoft Fabric has not been released yet. Documentations and announcements appear before all the feature details are available. However, this information shows us the direction things are evolving and what we should be looking for.


The post Fabric Data Warehouse News you need to know appeared first on Simple Talk.


from Simple Talk https://ift.tt/5J0YrTP
via

Monday, November 6, 2023

Moving SQL Server To The Cloud: Modernizing Stack Overflow for Teams

Earlier this year, we migrated the entire Stack Overflow for Teams platform to Azure. This was a lengthy endeavour and Wouter de Kort, one of our core engineers, wrote about multiple technical aspects of the project in these posts:

In this post, I’ll share a little more detail about the SQL Server portions of the migration, what we’ve done since, and how we’ve approached modernizing our environment while migrating to Azure. I’ll talk about a few key choices we made and trade-offs between simplicity and risk in case they are helpful as you face similar decisions.

Background

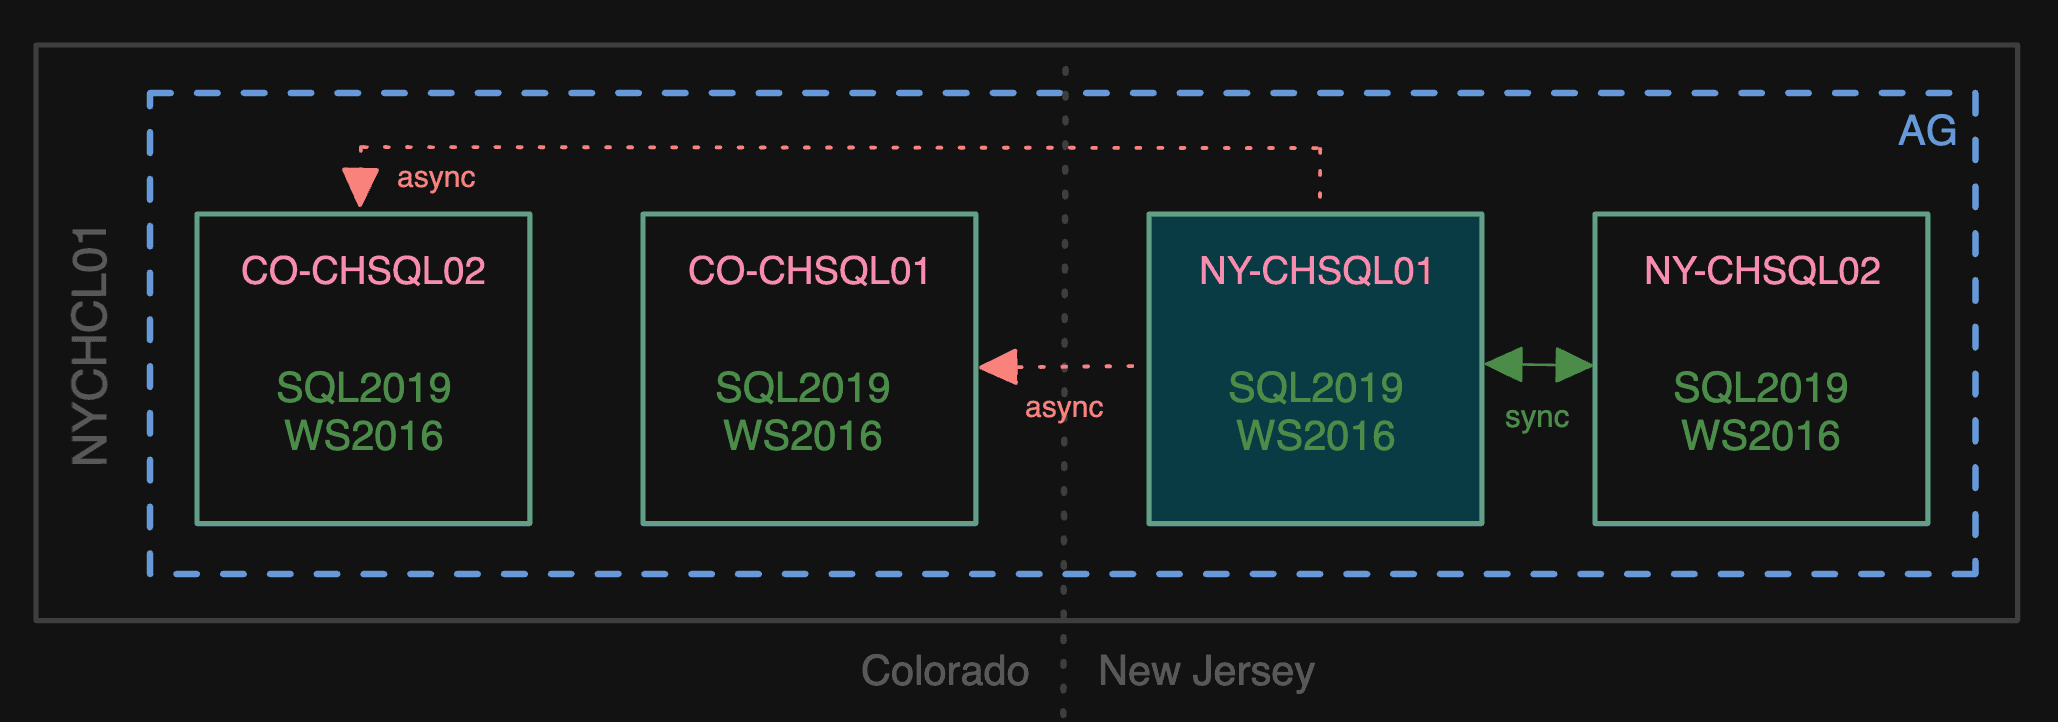
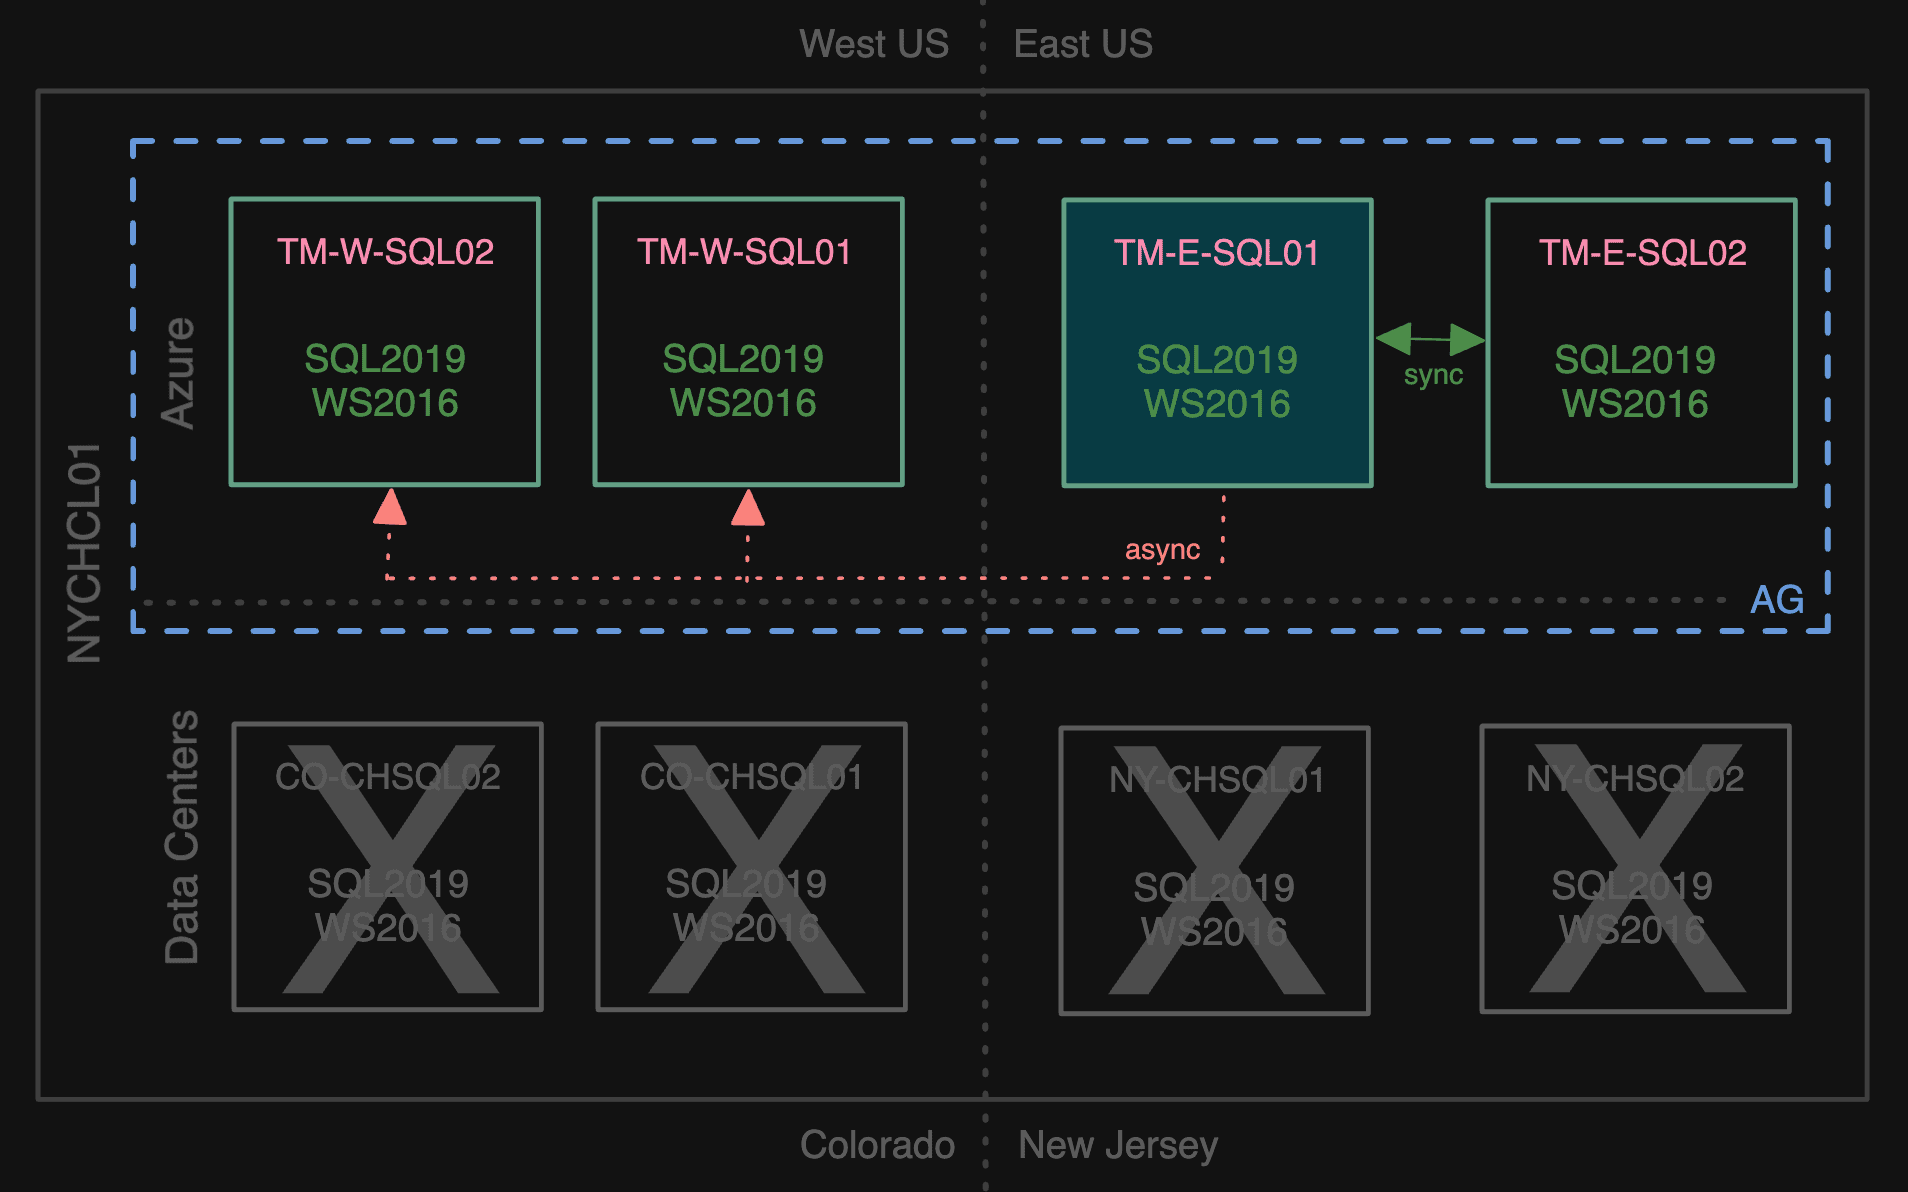
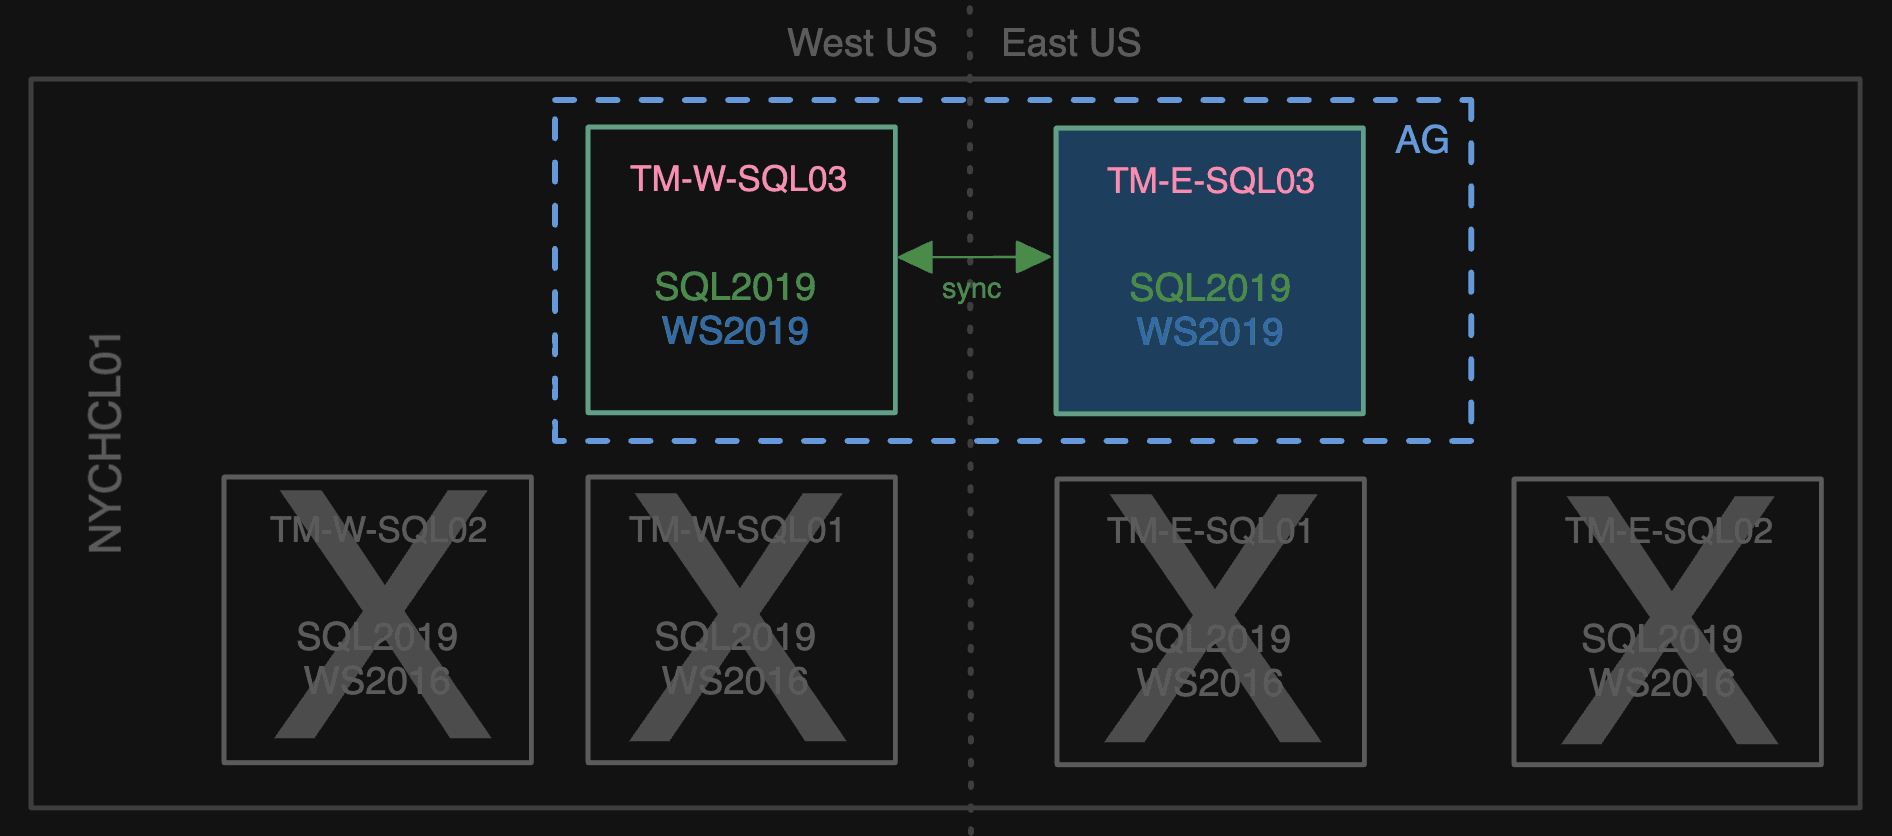
In our New York (actually, New Jersey) and Colorado data centers, the databases supporting Teams ran on four physical servers, two in each data center. The infra consisted of a Windows Server Failover Cluster (we’ll call it NYCHCL01), and four servers (NY-CHSQL01/02 and CO-CHSQL01/02), hosting 103 databases in a single availability group. Primary was always on one of the NY nodes, with a sync secondary on the other NY node and two async secondaries in Colorado:

What Teams looked like in the data center

But we wanted out of the data center

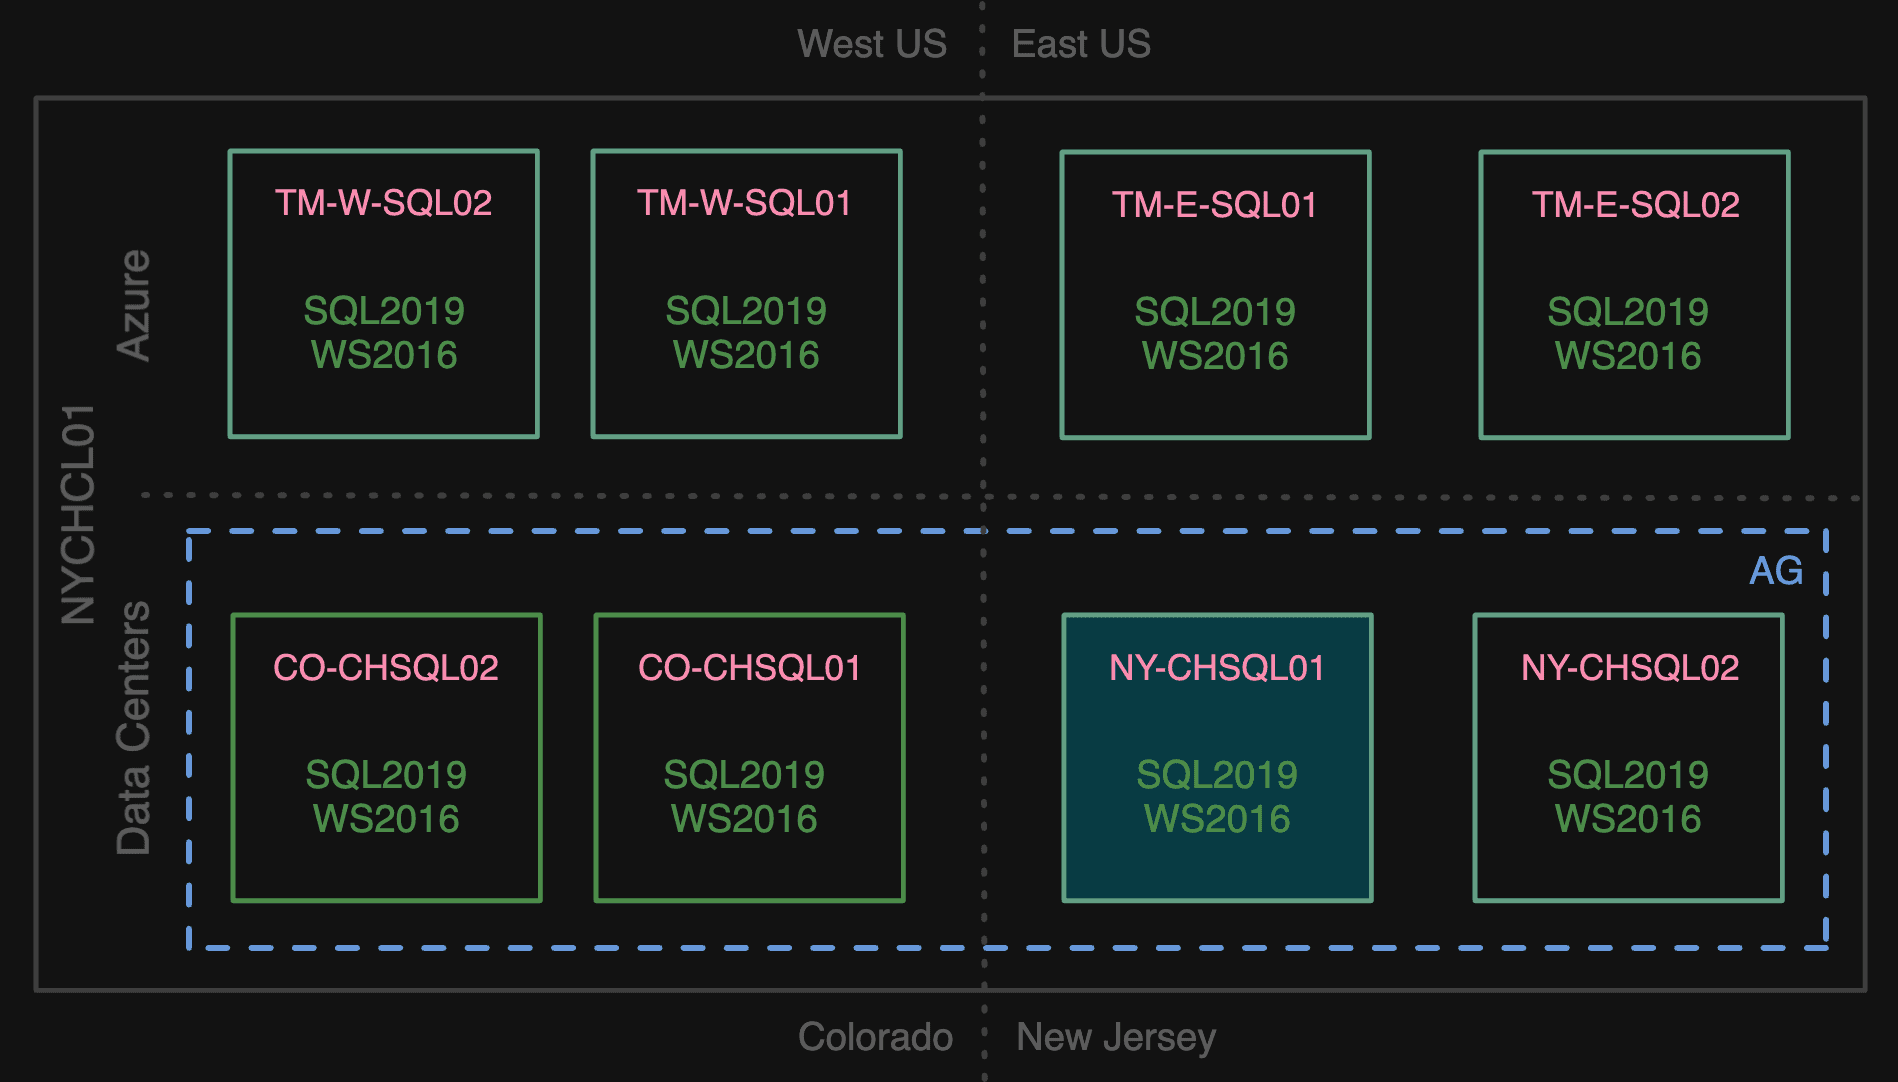
In order to migrate to the cloud, we built a mirrored environment in Azure: two Azure VMs in East US and two Azure VMs in West US. These servers joined the same cluster in the data center, and ran the same version of the operating system (Windows Server 2016) and SQL Server (2019).

A new mirrored environment in Azure

We went with Azure VMs running “on-prem” SQL Server, over PaaS offerings like Azure SQL Managed Instance (MI), for a few reasons:

  • A rule I tend to strictly follow is to change as few things as possible. In this case, we felt that sticking with the exact same engine and version would make for a more stable experience.
  • When possible, we want to make sure a migration is reversible. Since the source systems were still running SQL Server 2019, and we didn’t want to upgrade them before the migration, we couldn’t take advantage of newer features that would allow failing over and back between MI and SQL Server 2022.
  • We already exceeded MI’s hard limit of 100 databases. Fitting into a managed instance would mean breaking it up so not all databases were on the same instance – not insurmountable, but not something we’ve ever done with this system, and we didn’t want to disrupt the timeline trying it out.
  • When analyzing and forecasting costs, we just couldn’t find a sweet spot in the price/performance ratio that made sense – for the same power, a VM running SQL Server is currently the most economical choice for us. Even if it means we still have to manage some of the maintenance (e.g., OS patching and cumulative updates). We’ll continue to watch MI pricing over time and see if it comes down into an orbit that makes it attractive.

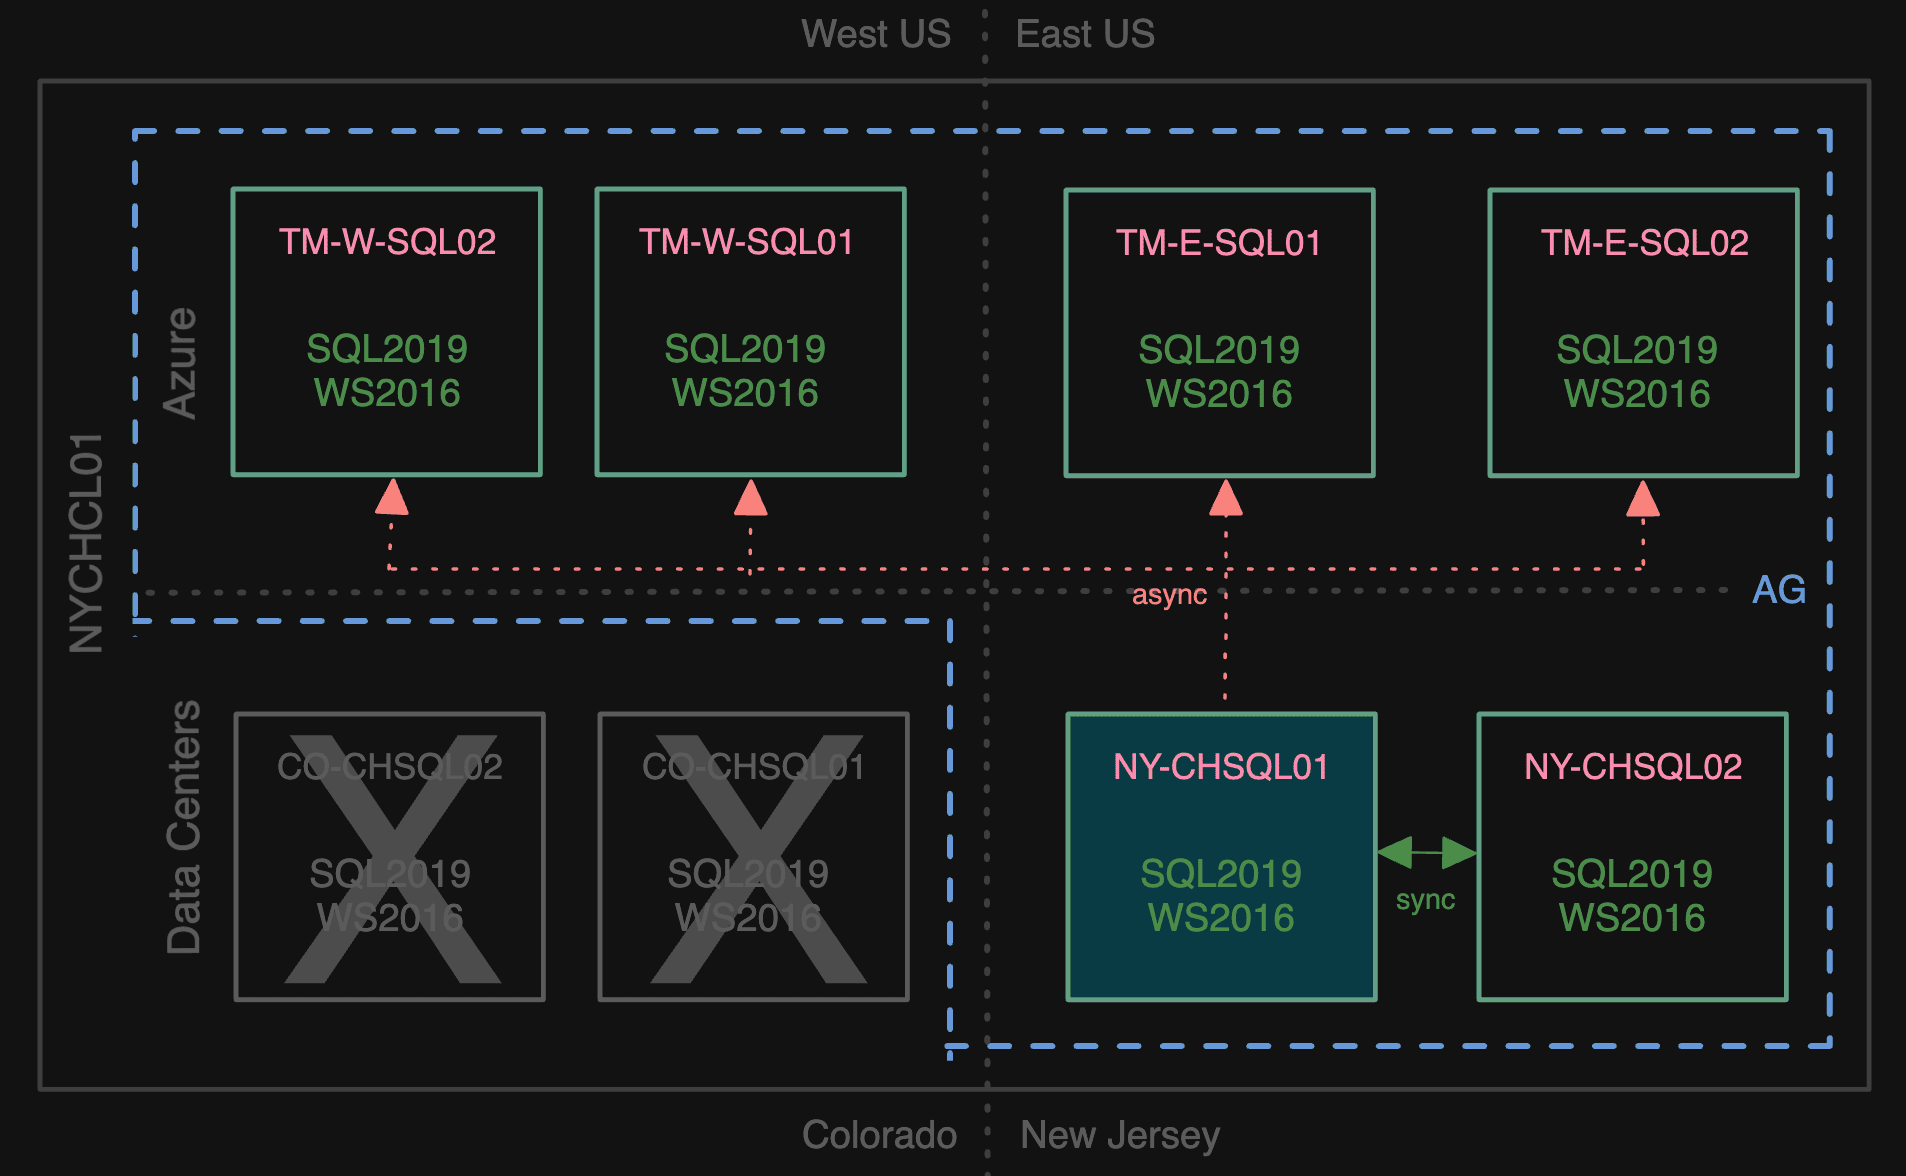
Once built and configured, we joined these new nodes to the AG, making them all async secondaries, and removed the Colorado nodes from the AG:

Getting Colorado out of the picture

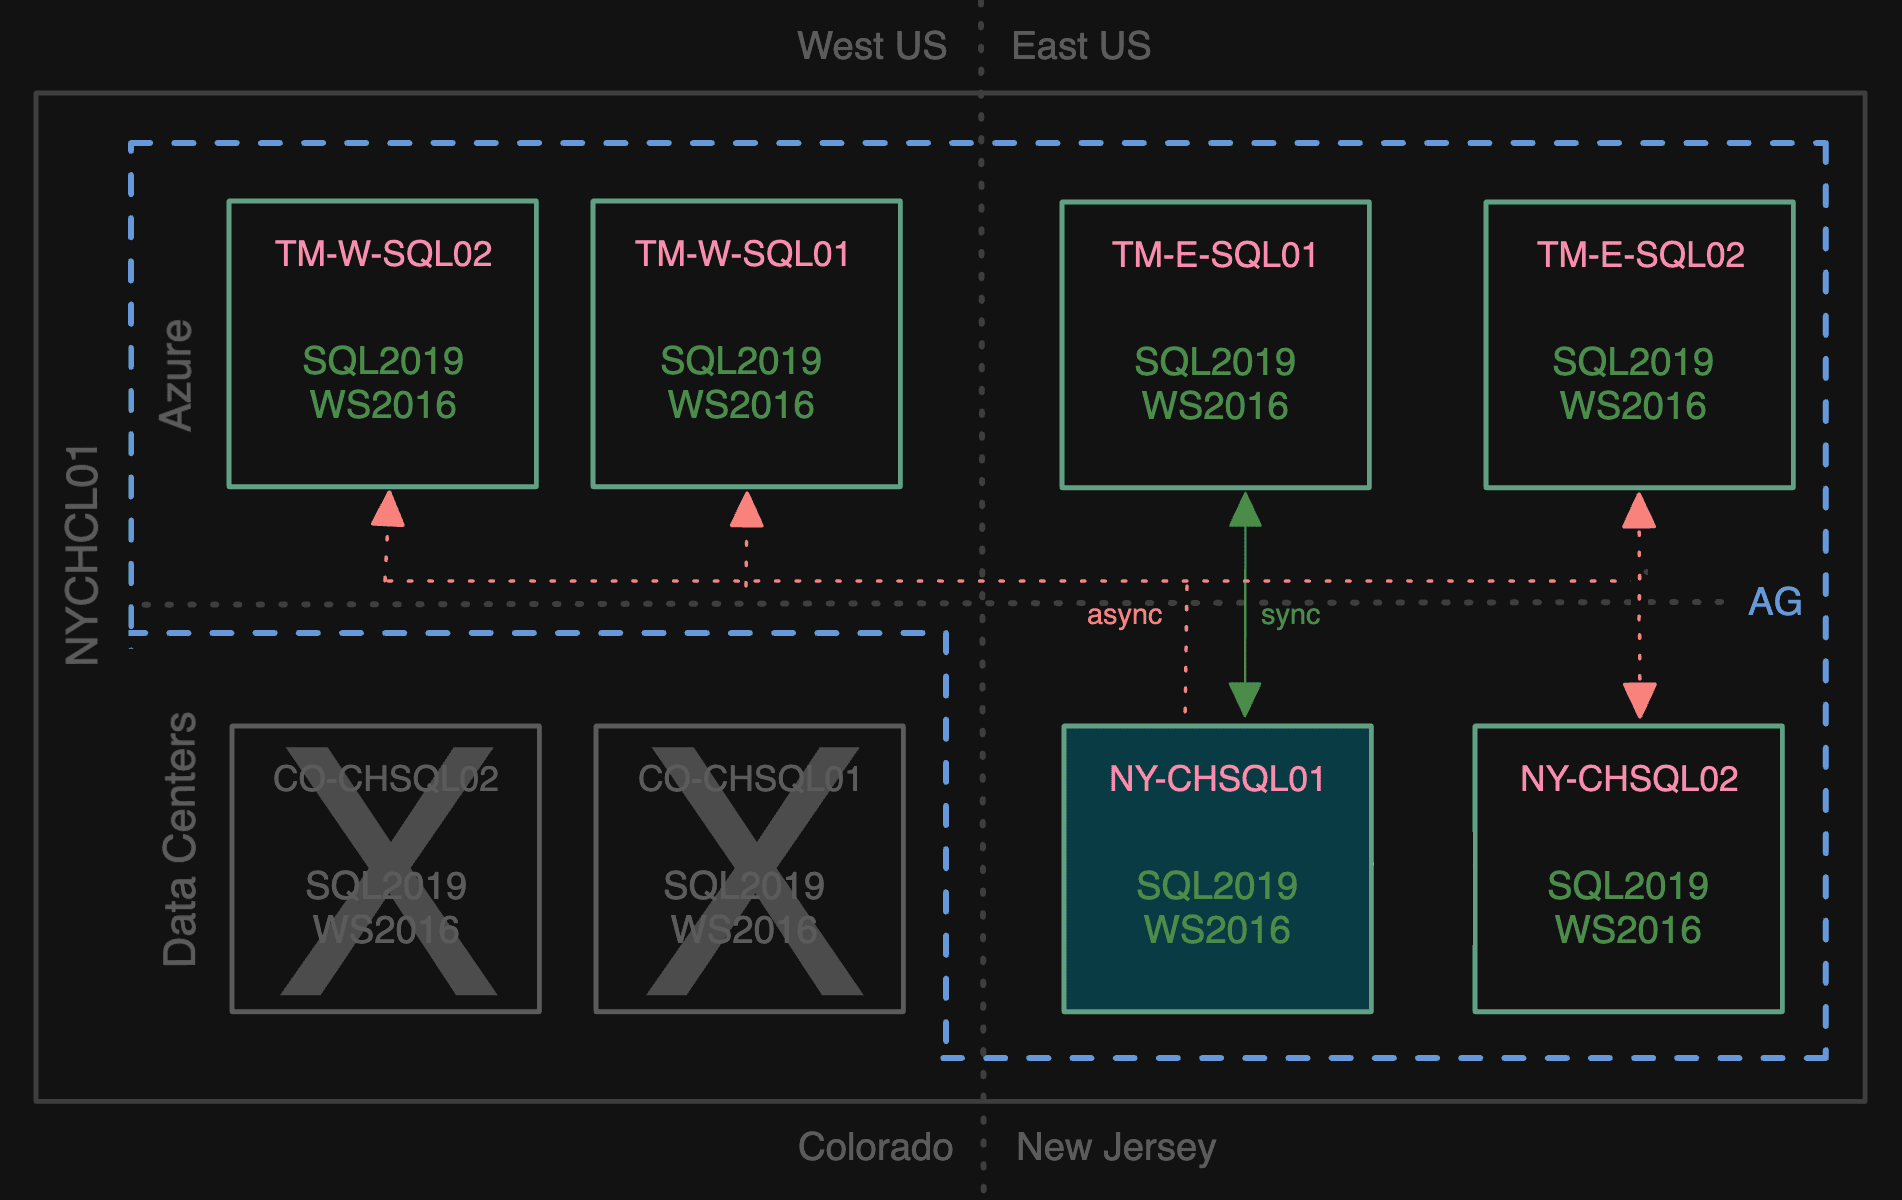
We didn’t want to stay in this mode for long since that is a lot of secondaries to maintain. We quickly made TM-E-SQL01 synchronous and the other NY secondary async.

Briefly using sync mode to Azure

Making TM-E-SQL01 synchronous and the other NY secondary async let us fail over to Azure (during a maintenance window), making TM-E-SQL01 primary and TM-E-SQL02 a sync secondary. This was not a point of no return, since we could fail back to the data center if we needed to, but we gradually cut remaining ties with the data center by removing the NY secondaries:

Saying goodbye to the data center

Now we had the AG fully in Azure, with zero customer impact other than the announced maintenance window.

Some notes

  • I’ve intentionally left a lot of the complexity out, as this was more than a simple AG failover. The operation required coordinating moving the application to Azure at the same time, since we didn’t want to have the app running in the data center talking to databases in Azure or vice-versa.
  • The failover itself should have been a tiny blip, measured in seconds, which wouldn’t even require a maintenance window. I’m glad we did plan for a window because the migration wasn’t as smooth as it should have been (the failover due to network constraints, and other pieces due to various application-side issues). Wouter talked about some of that in the second part of his blog series.

We thought we were done

During and after that migration, we came across some sporadic and not-so-well-documented issues with cross-region network performance. We’re talking about transfer speeds that were 60X slower at times – observed while backing up, restoring, or copying files between east and west nodes. While we could mitigate some of this by using Azure storage exclusively, this would cause double effort for some operations. In addition, there was valid concern that this unreliable network could cause broader latency for log transport and could even jeopardize successful failovers between regions. We also theorize that it contributed to some of the struggles we faced on migration day.

Several colleagues ran boatloads of tests using iPerf and other tools. We discovered that newer generation VM images running Windows Server 2019, while not completely immune to the issue, were much less likely to experience drastic fluctuations in transfer performance than our older gen images running Windows Server 2016. We also believed (but couldn’t explicitly prove) that the old cluster’s ties to the data center might contribute to the issue, since we could reproduce sluggishness or failures on those servers when performing operations that involve domain controllers (e.g., creating server-level logins or creating computer objects) – issues that never occur on identically configured servers that aren’t part of that cluster.

The new plan

We made a plan to ditch the old cluster and get off of Windows Server 2016 completely. This puts us in a much better position to have reliable cross-region failovers, helps us clean up some tech debt, and paves the way for upgrading to SQL Server 2022. Since we can’t just take new maintenance windows on the fly, we would have to do this with minimal downtime. For me, this means no data movement (e.g. manual backup / restore of all 103 databases). We also wanted to do this in a simple way, which for me means no distributed availability groups. So how would we move an AG to a new cluster with minimal downtime, no data movement, and without using a distributed AG?

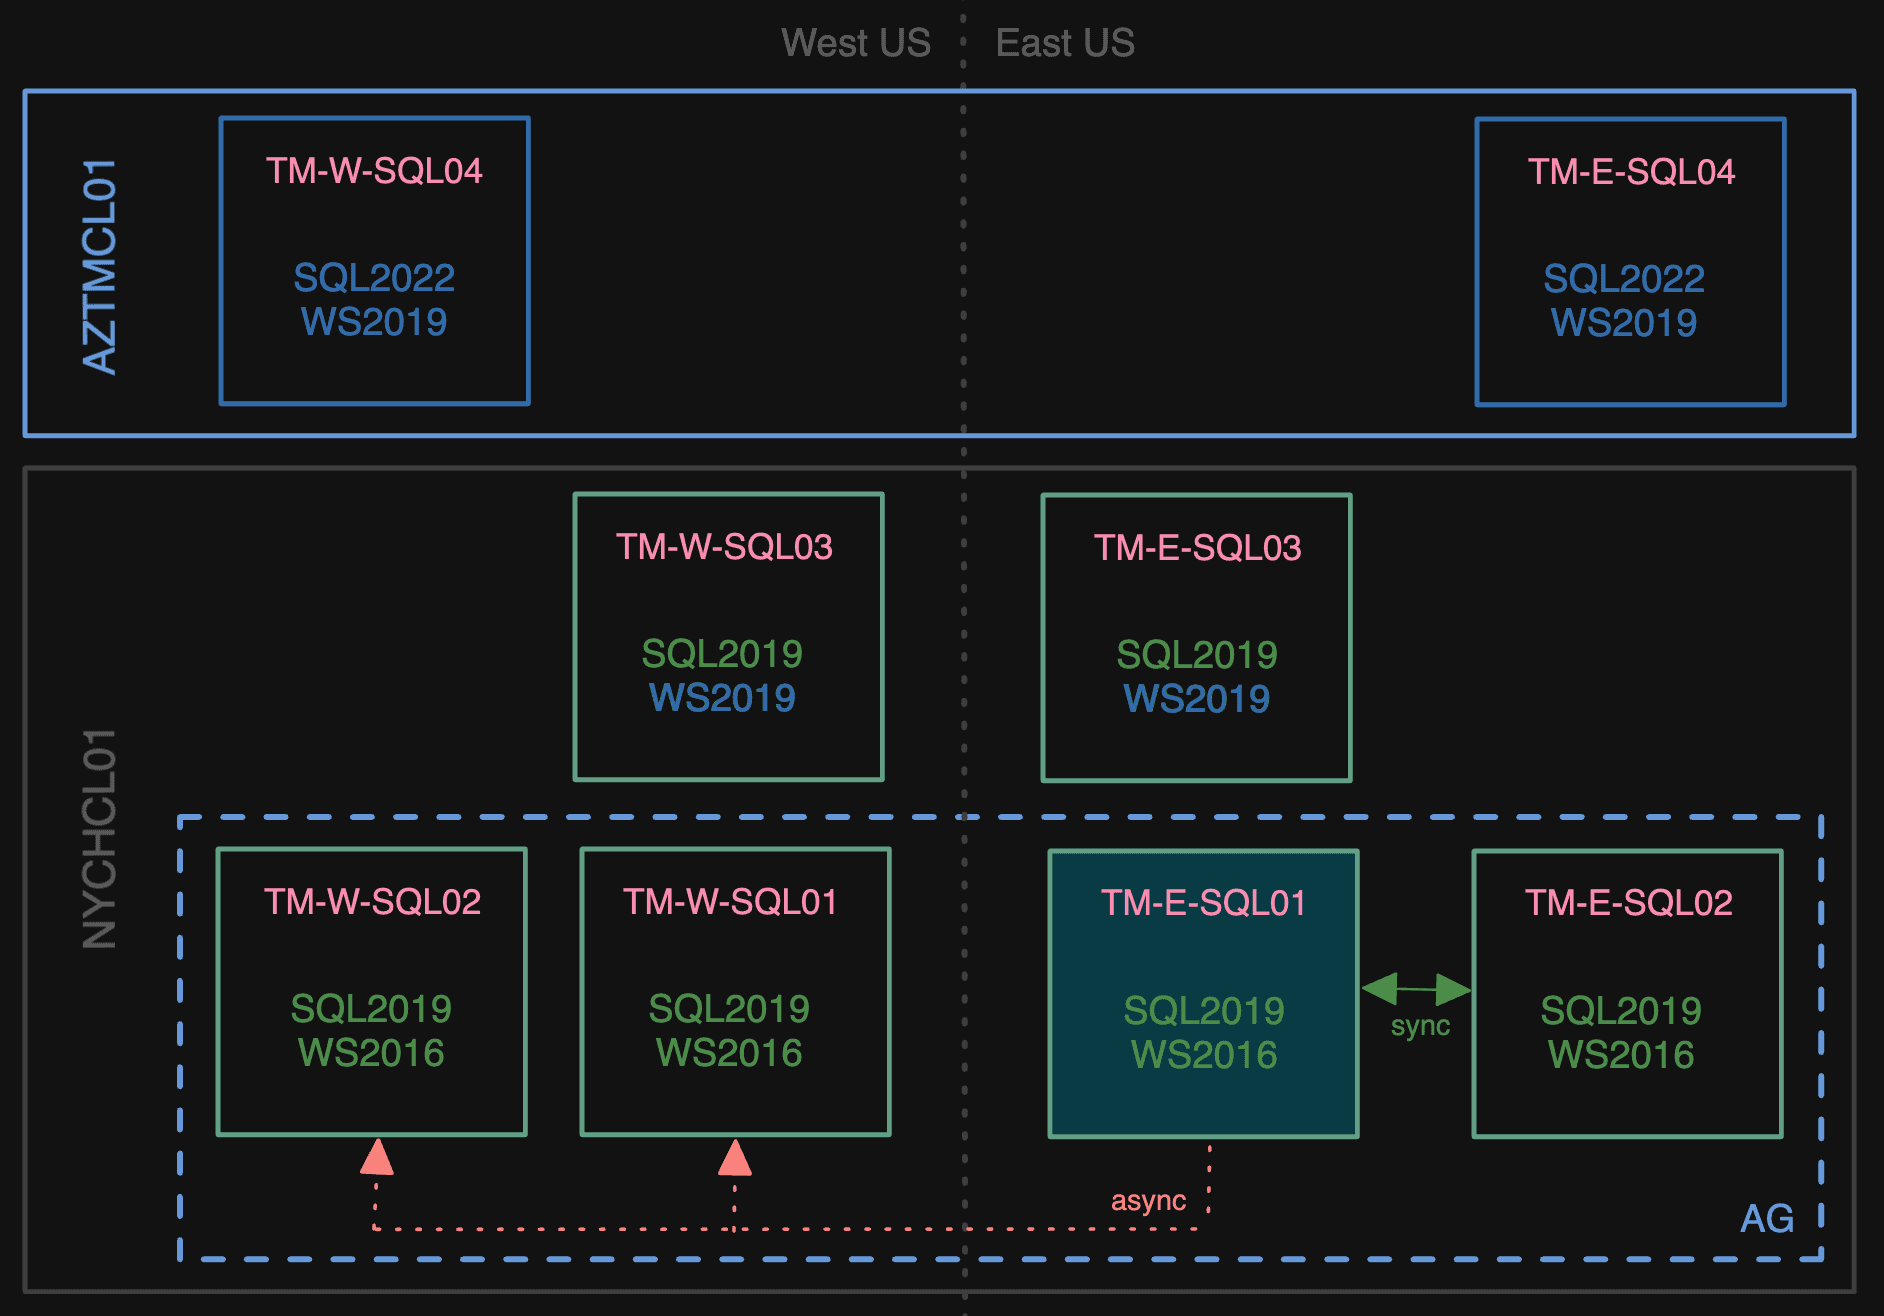
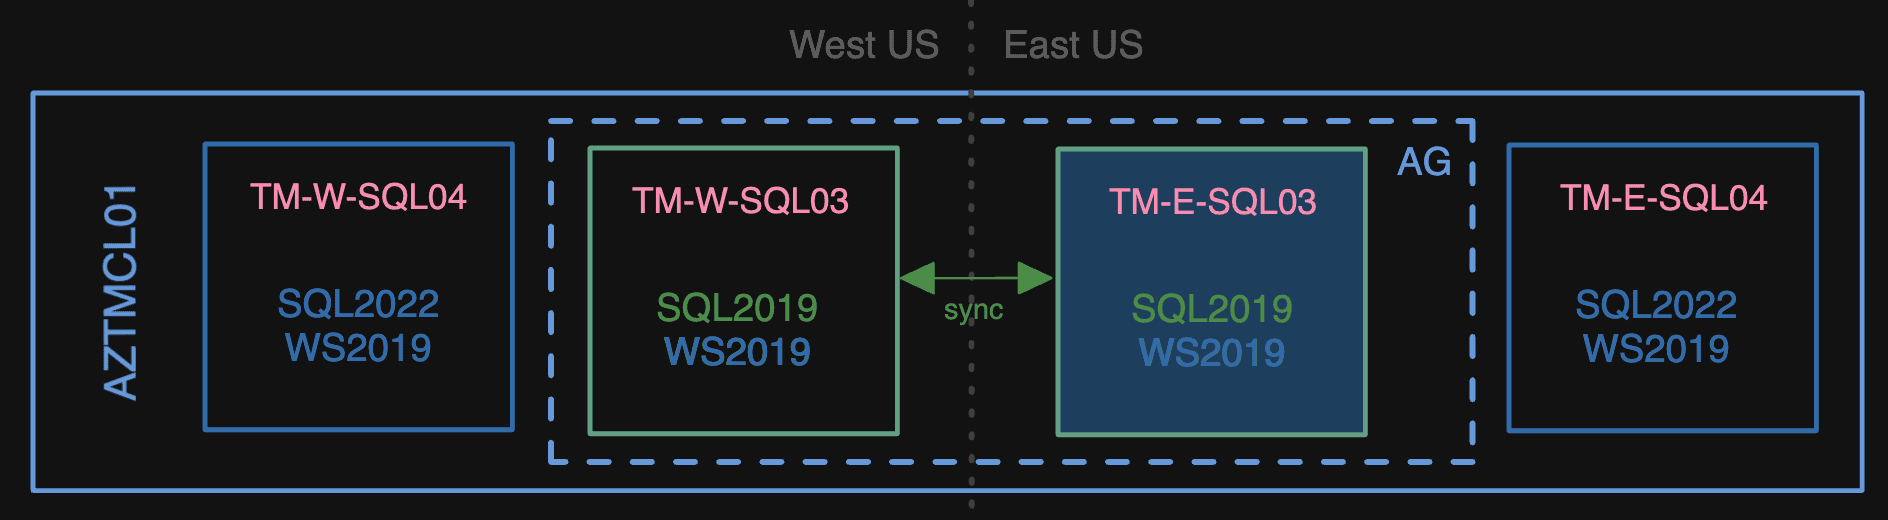
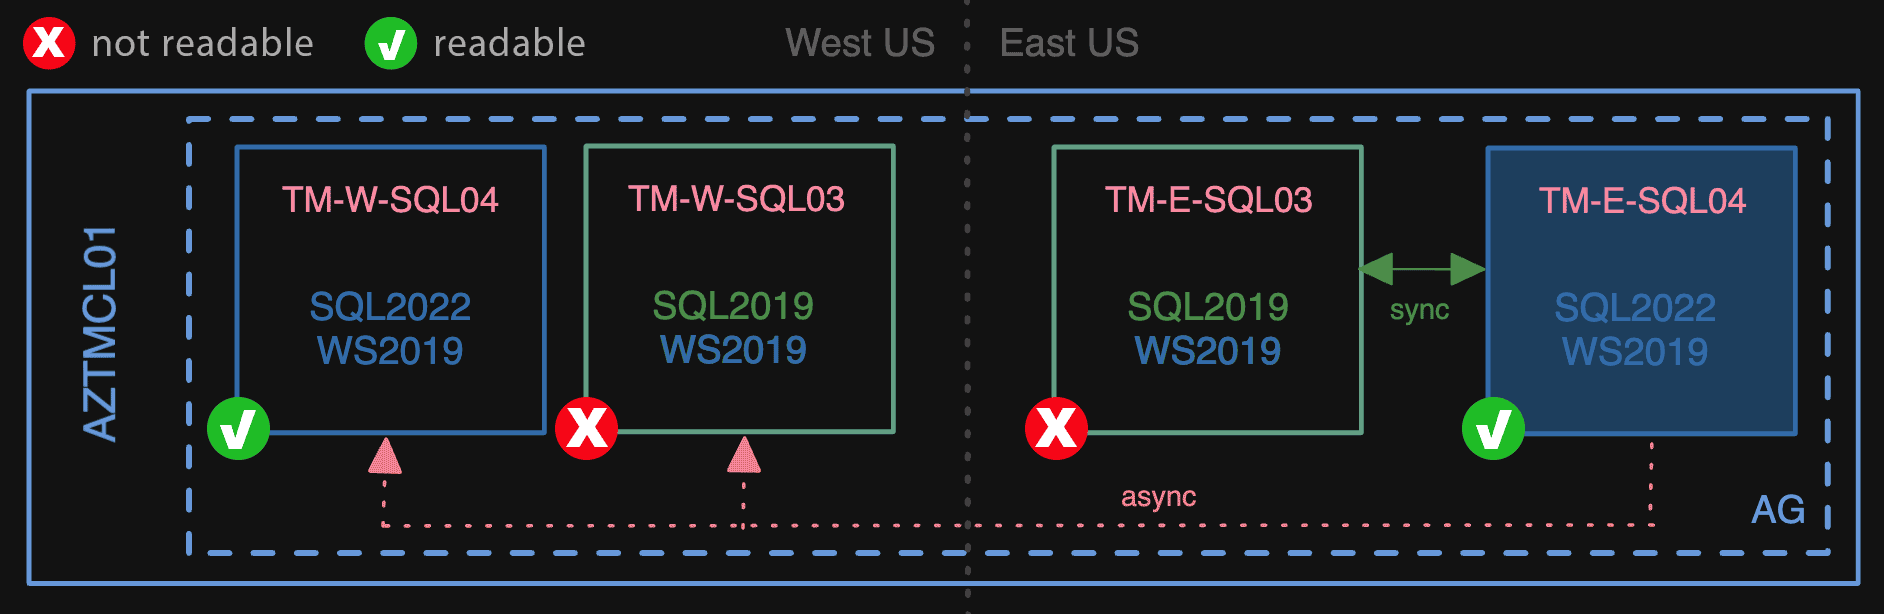
We started by evicting the NY and CO nodes from the old cluster. Then we created a new cluster in Azure (let’s call it AZTMCL01), and four new VMs all running Windows Server 2019 (we’ll call them TM-E-SQL03/04 and TM-W-SQL03/04). The two 03 nodes ran SQL Server 2019, and were added as nodes to the existing cluster. The two 04 nodes ran SQL Server 2022, and were added as nodes to the new cluster.

A new cluster has entered the chat

Next, we removed the west 01/02 nodes from the AG, and joined the new 03 nodes as async secondaries.

Losing the west 01/02 secondaries

Then we made TM-E-SQL03 a sync secondary, and kicked TM-E-SQL02 out of the AG.

Losing one more Windows Server 2016 node

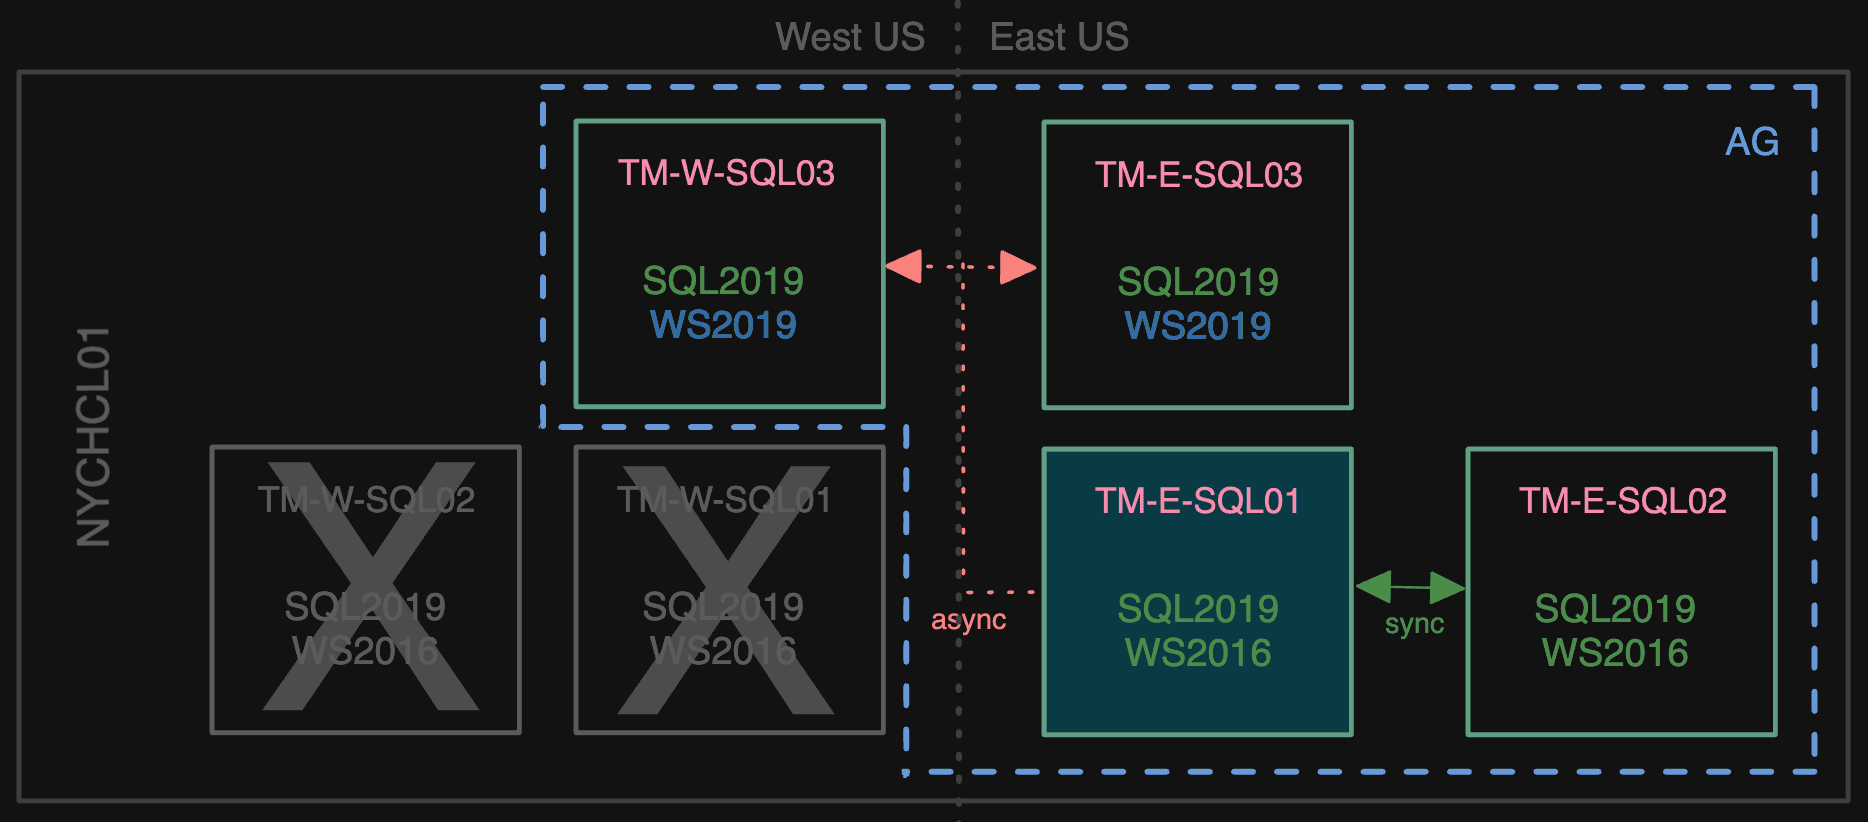
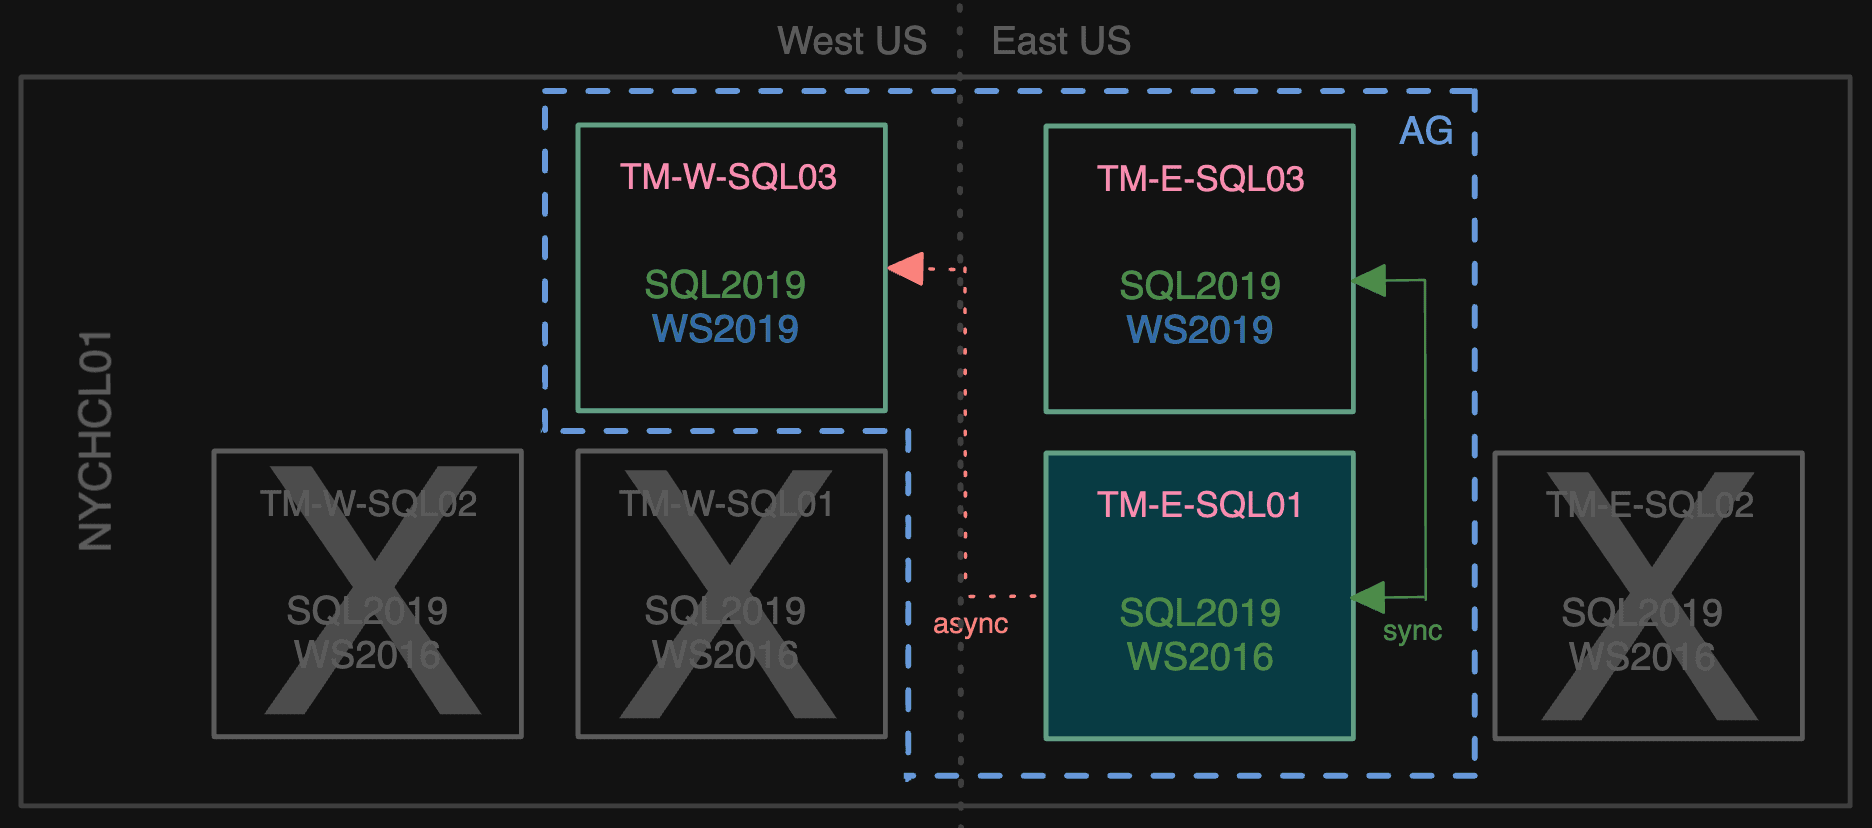
After that, we failed over to TM-E-SQL03, made TM-W-SQL03 a sync secondary temporarily, and removed TM-E-SQL01 from the AG.

And then there were two

The trickiest part

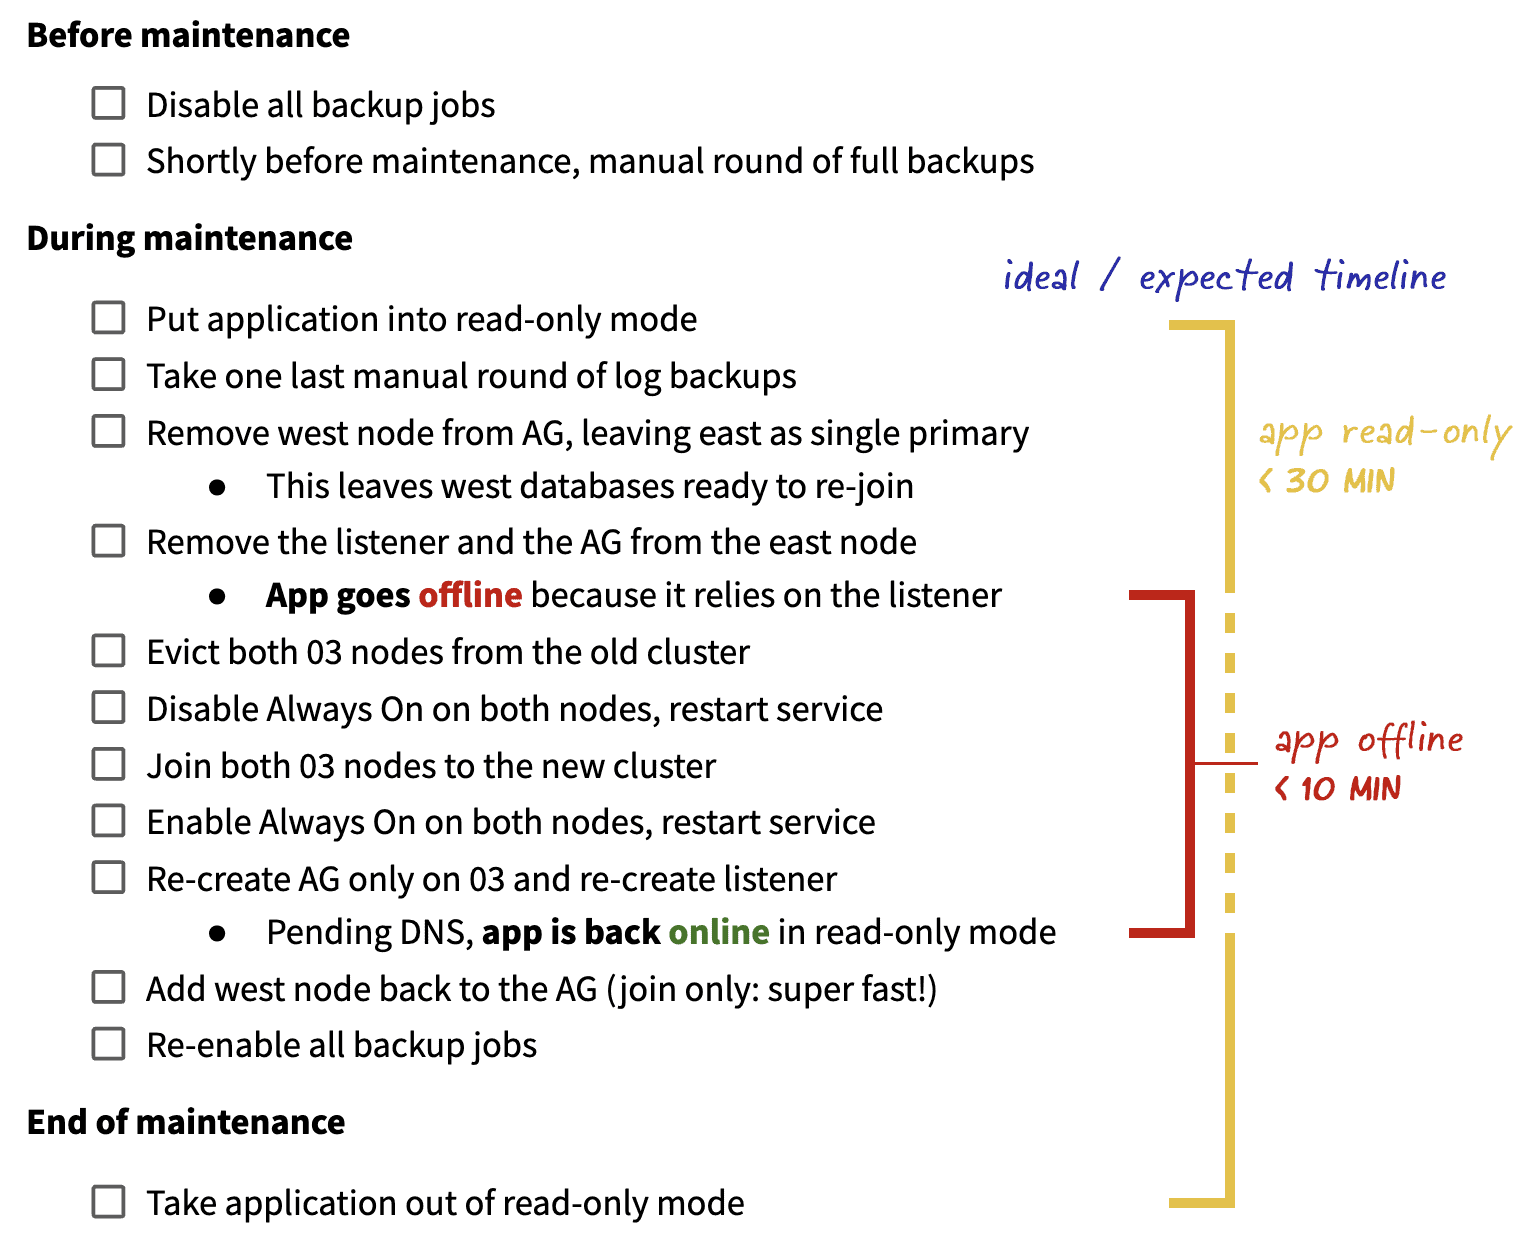
Next up, how would we actually move the 03 nodes to the new cluster? As mentioned before, we didn’t want to use distributed AGs to additional nodes already in the new cluster, though this would probably be a common and logical suggestion. Instead, we developed a plan to use a short maintenance window and simply move the existing nodes out of the old cluster and into the new cluster. Now, that sounds simple, but there are a lot of steps, and we can’t get there while the AG is up and running, so we’d have to perform the following before and during the maintenance window:

Checklist with guesstimates for duration

There is some risk there, of course, and a few points of no (or at least cumbersome) return. If anything went wrong while the AG was offline or while the primary was the single point of failure, we’d have to resort to the west node (or a full restore). And if the west node couldn’t join successfully, we’d have to seed the AG there from scratch, and would have a single point of failure until that finished. This is why we take a round of backups before the window and a round of log backups immediately after putting the app into read-only mode.

Spoiler: nothing went wrong. The transition was smooth, and the app was in read-only mode for a grand total of 25 minutes, with the offline portion lasting just 9 minutes (most of this time waiting for AD/DNS). Could we have avoided those 9 minutes of downtime? Sure. We could have deployed connection string changes to point to an explicit node instead of the listener then deployed another change to set it back. Then the only downtime would have been two brief service restarts. But this is a lot of additional work and pipeline orchestration to elevate the end-user experience – during an announced maintenance window – from 9 minutes of “offline for maintenance” to 2 minutes of “offline for maintenance” and 7-8 minutes of “you can read, but you can’t write.”

Once we were in a happy state, we could end the maintenance window and turn the app back on:

All Windows Server 2019 now

Now, on to SQL Server 2022

With the migration to the new cluster out of the way, we turned our attention to upgrading the environment to SQL Server 2022. This time, we could perform a rolling upgrade without a maintenance window and with just a minor failover blip, similar to when we perform patching. We disabled read-only routing for the duration of these operations, knowing that would mean increased workload on the primary.

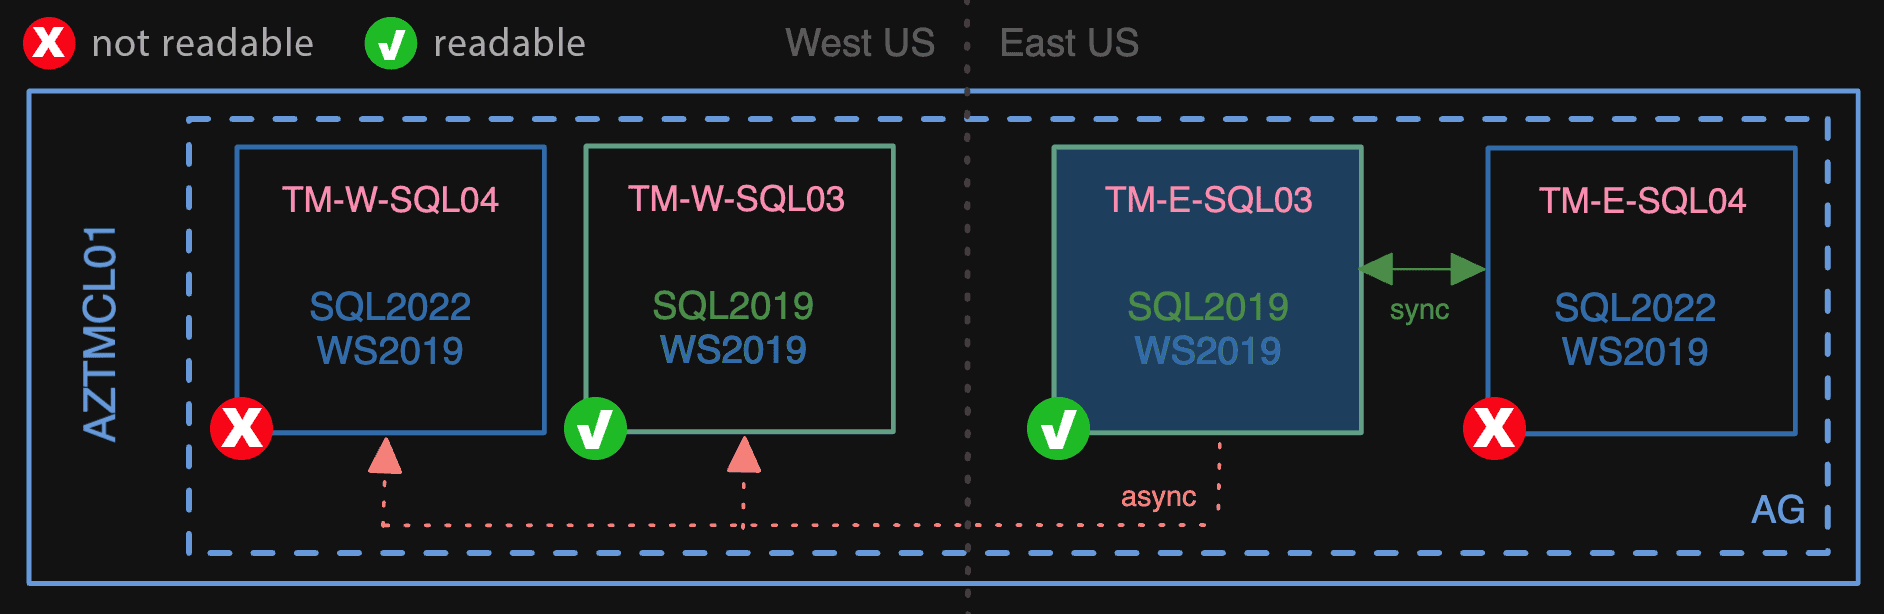
First, we added the 04 nodes as secondaries, but – being a newer version of SQL Server – they were not readable.

First, we made the 2022 nodes secondaries

Next, we failed over to TM-E-SQL04 as primary, which made the 03 nodes unreadable. This transition was the only downtime for customers, and the only point of no return. The most any customer might have been affected was 42 seconds – this was the longest any database took to come fully online, however this was not even a wholly user-facing database, more of a background scheduler type of deal.

Then, we failed over to a 2022 node

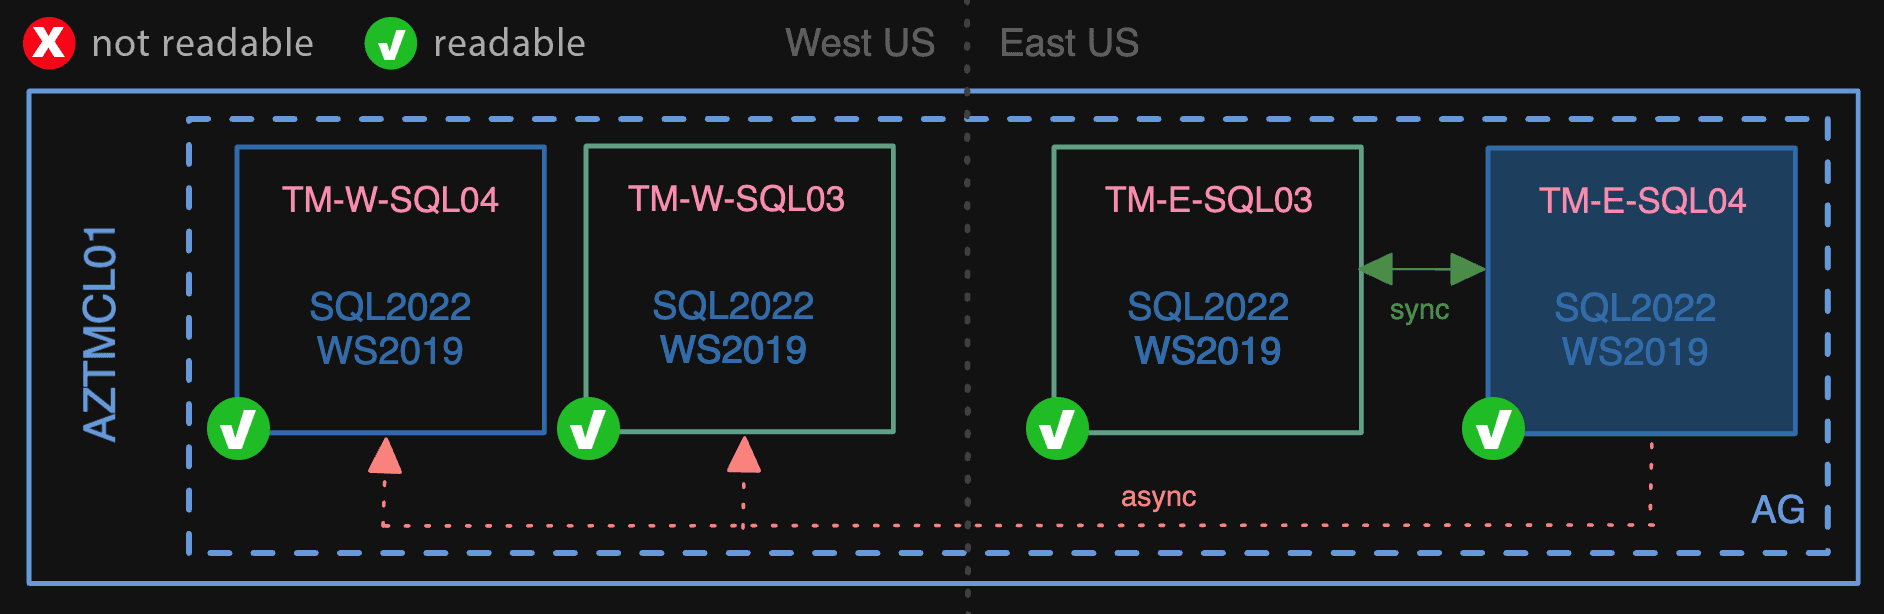
This is another state we didn’t want to be in for long. Not only were the lower version nodes unreadable but, also, the AG could no longer sync to those nodes. This means the primary couldn’t flush logs until the secondaries were all brought up to the same version (or removed from the AG). For expediency, we upgraded the 03 nodes to SQL Server 2022 in place; this isn’t my favorite approach, but it sure is simpler than building yet more VMs and working those into the mix:

Finally, we upgraded the 2019 nodes

If we needed to take a longer time to perform those upgrades, then in order to avoid undue duress on the primary, we would have just removed those nodes from the AG, and added them back when they (or their replacements) were ready.

At this point, all four nodes are running on Windows Server 2019 and SQL Server 2022, and everything has been smooth so far. Hopefully there is some valuable information here that can help you in your next migration or upgrade.

Next on the list: taking advantage of some of those SQL Server 2022 features, and following similar steps to modernize the public Q & A platform.

The post Moving SQL Server To The Cloud: Modernizing Stack Overflow for Teams appeared first on Simple Talk.


from Simple Talk https://ift.tt/0XeWw5q
via

Sunday, November 5, 2023

Creating an Azure PostgreSQL cluster and connecting to it

One of the technologies that my new job brought with it was learning about all the various database platforms that are not Microsoft SQL Server. Not that I don’t still spend time learning about SQL Server, as it will happily remain one of our largest topics, but rather that I need to learn about other platforms too.

As I have dealt with other platforms, PostgreSQL has stood out to me as the platform I am most interested in because it feels like the one that is most competitive with SQL Server’s platform (Oracle is out there too, as is MySQL, and many others, but PostgreSQL feels like the balance of affordability and features that it has a similar feel enough to get started.)

There are a few high-level differences that can be confusing. A cluster is really just a server (or in SQL Server, an instance). Second, the way you execute a batch of code is very different, and sometimes this is based on the tool you are using. As you dig into how PostgreSQL works, some things will feel really normal, and some stuff will be very different from the other servers you have used.

To start this series, I am going to provide a brief tutorial on how to get set up and connected. The process hasn’t changed much since I first started this tutorial six months ago, so hopefully it won’t be different for you. The only thing that changed was that they changed the name of this to include “Flexible Server” but everything basically works the same as it did then. The flexible part of the name is basically concerning pricing, from what I understand.

Note that my goal is to get an instance created that is used by one person (multiple connections and perhaps user principals eventually, but one human, on one keyboard at one IP address). This is not a tutorial about how you might set up a production cluster.

What follows is a step by step sequence to set up your cluster and start querying it in 30 minutes or less. 10 minutes or so once you have done it a few times.

Step 1. Connection and Account

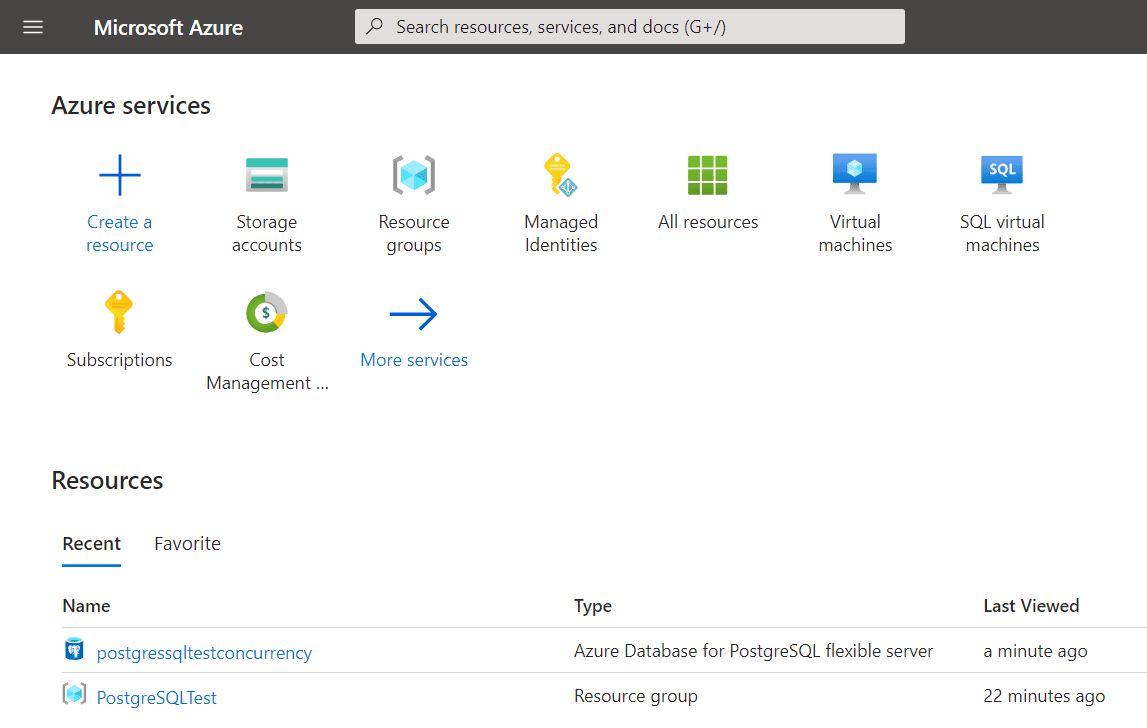
Go to portal.azure.com and login to your account. Using PostgreSQL on Azure is not free, but it is not expensive either. Later in the article I will show you where to get estimated costs.

Step 2. Create your resource

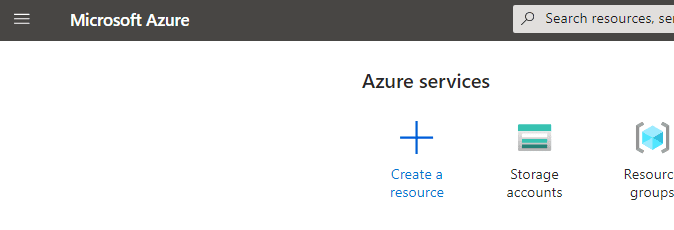
Choose to create a resource. This will be on the home page for the portal:

A screenshot of a computer Description automatically generated

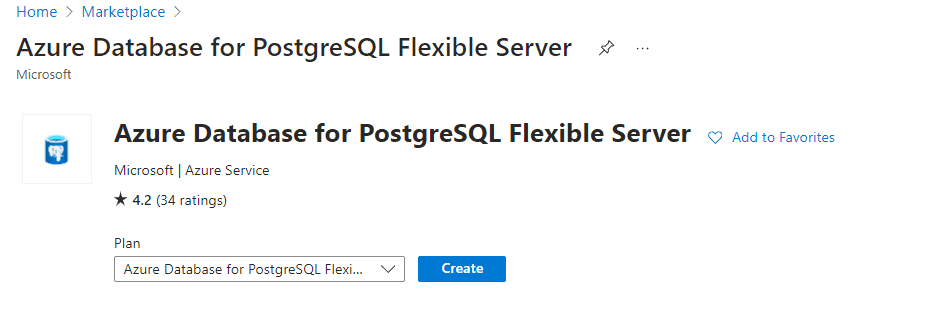
Search for “Azure Database For PostgreSQL Flexible Server” and choose that version. There are a few other options you will likely see, including one that is not suffixed with “Flexible server”, but that version will not support anything other than PostgreSQL 11.

A screenshot of a computer Description automatically generated

After you press create, you will be presented with a dialog to enter the server’s details. Here are the setings that I chose:

Basic configuration

  • Resource group (I set up a new one): PostgreSQLTest
  • Servername: postgressqltestconcurrency
  • PostgreSQL version: 15 (can also upgrade later if you want to use something different.)
  • Workload: Development. (Note, you will see the estimated costs to the right of the screen, the dev server is far far cheaper than the production version!)
  • Enable High Availability: Off (you can’t turn it on in the Development Workload anyhow)
  • Authentication method: PostgreSQL authentication only (Use Microsoft Entra if you can, but this is my own personal Azure account.)
  • Admin username: louis (It is my name!)
  • Password: Use something good, even in your dev instances!

When you have entered these details, check Next : Networking.

Networking

I will be configuring this with the easiest method possible. It is secure enough for dev work, especially if your password is really complex. But it is certainly not what I would consider safe enough to put any real, especially personal, data.

  • Connectivity Method: Public access (allowed IP addresses)
  • Add current IP address (One troubleshooting note, my IP address seems to change more frequently than I expect on my current service provider, so remember this is the first place to go to troubleshoot connection issues! A couple of times I forget then when using a VPN and I spend too much time trying to figure that out.)

Then click on Next: Security.

Security

This is mostly about the security of your data at rest and on the server. I chose Service Managed Key, as I really never plan to restore this database and I don’t care if Microsoft has access to the key either.

If you feel like you might need to do more with this server than to set this up, test with it, then throw the data away, read this section carefully. Then click “Next : Tags”, read that page to see if it pertains to you (for my needs, it doesn’t); and then finally click “Next : Review + Create”.

Final Review

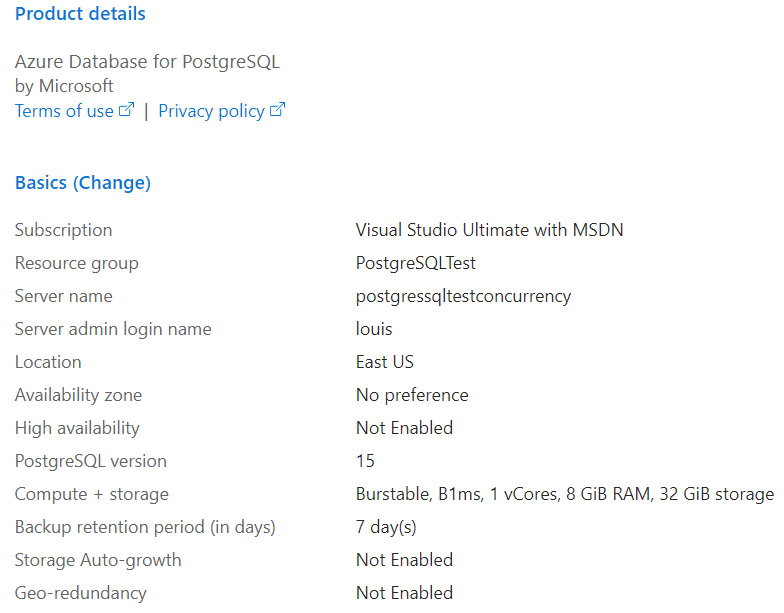
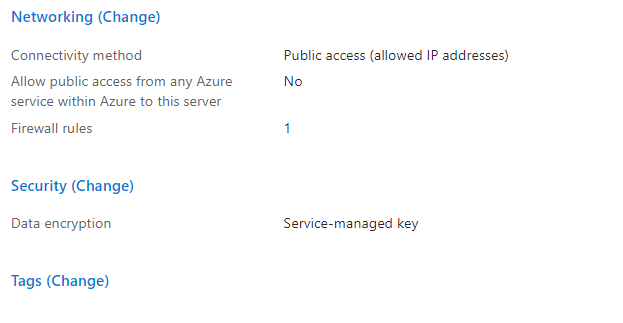
The final page should show you something like the following.

A screenshot of a computer Description automatically generated

A screenshot of a computer Description automatically generated

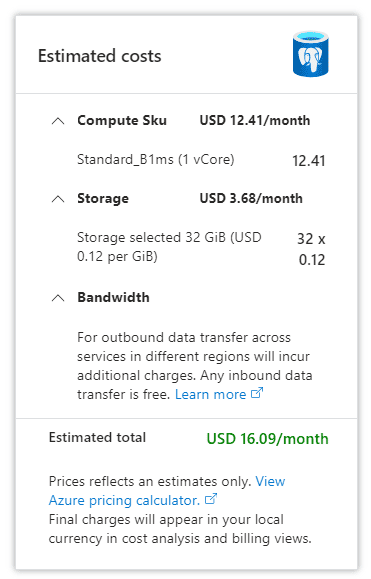
It will also include a set of estimated costs:

A screenshot of a phone Description automatically generated

Clearly, if you are not going to be using this much, that price is very reasonable if you don’t have a machine or VM you want to install PostgreSQL on.

After you click “Create” you will get a message that it is being deployed and it will take some amount of time between a few seconds and a bit longer than that. It was a few seconds for me!

Step 3: Connecting to your new server with Azure Data Studio

If you haven’t installed Azure Data Studio, you can do that by going to the download site. It is from Microsoft, it is cross platform and there are installers for Windows, MacOS, and Linux. There are plenty of other tools you can use, and Ryan Booz just published an article on Simple-Talk about this very subject and more. I commonly use DBeaver or PGAdmin to connect to instances when I am testing someone’s code as well. I just wanted to do this with Azure Data Studio!

Next, you are going to need to set up Azure Data Studio to use PostgreSQL. It only comes with Microsoft SQL Server access installed, but the setup to connect to PostgreSQL is quite easy. I will go through the basic steps, but you can also use the following tutorial on learn.microsoft.com.

After you open Azure Data Studios, find the extensions icon on the left toolbar:

A close-up of a button Description automatically generated

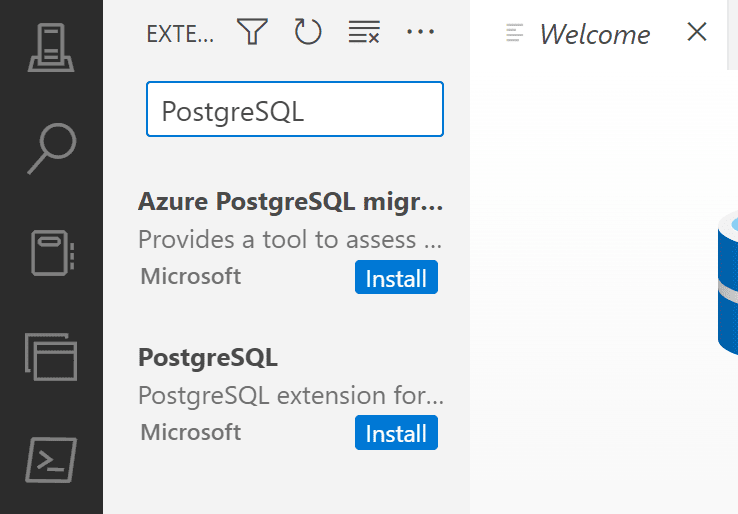
Choose that and type (or paste!) “PostgreSQL”. Choose the PostgreSQL extension:

A screenshot of a computer Description automatically generated

After you click install, you will see something like the following in the output window:

You are ready to connect!

Step 4: Connect to your server

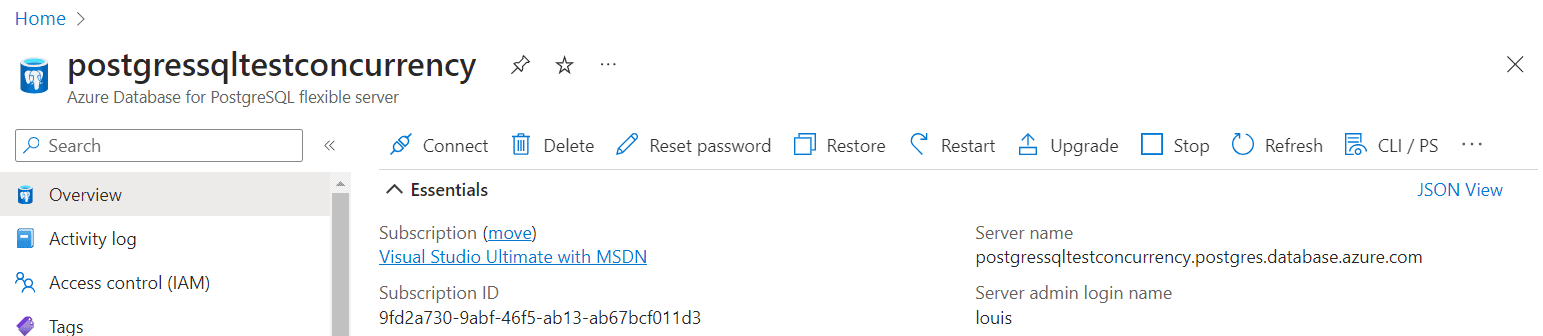
One piece of information that you probably won’t have already is the server name. You will need the entire address which (in my case) will be postgressqltestconcurrency + some address. To find it, go back to your Azure portal and click on that resource.

A screenshot of a computer Description automatically generated

Then, once you click the resource, you will see a list of attributes. The full server name is in there.

A screenshot of a computer Description automatically generated

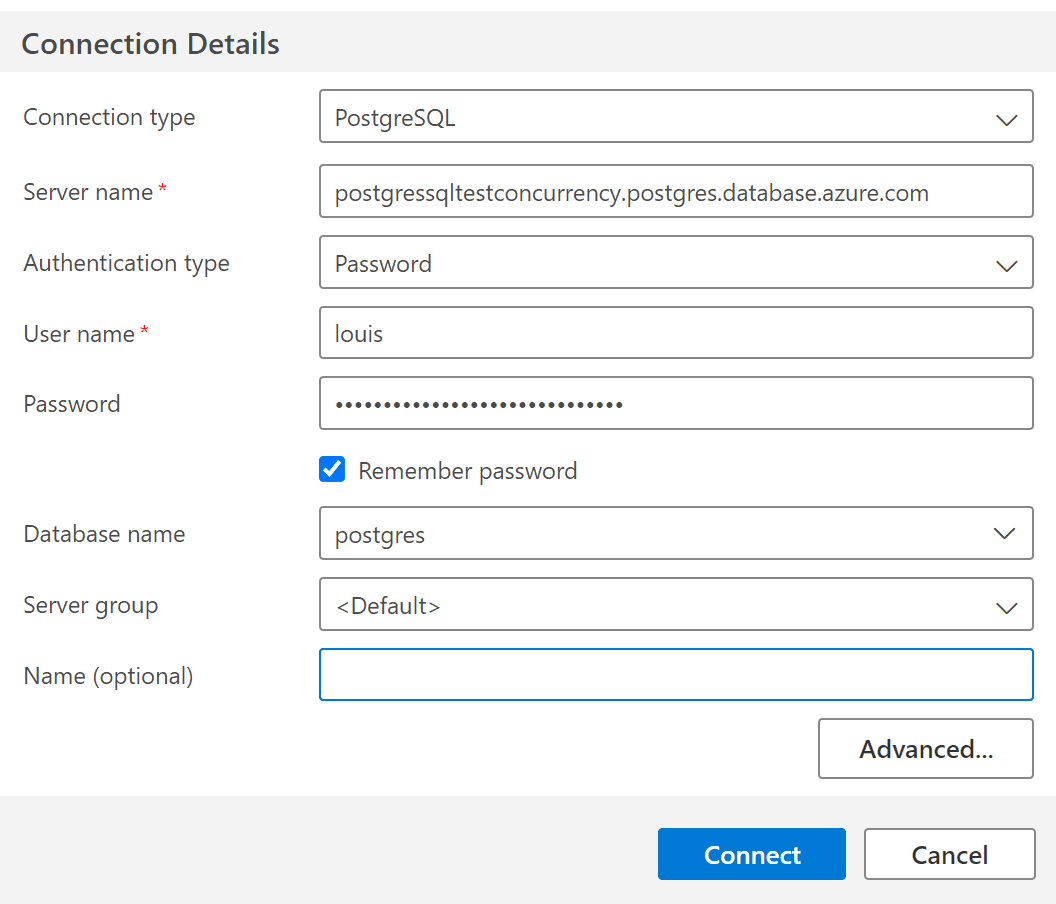
Now you have everything you need to connect from Azure Data Studio. Enter the servername, user name, password. Then choose the postgres database (we are going to create a database as the final step in this blog).

A screenshot of a computer Description automatically generated

If all goes well, (and it doesn’t always!), you should be connected to your instance when you press Connect. Choose “New Query” and now you are ready to execute statements. The first should likely be creating your own database for working in.

In my case, I will create a database named TestingConcurrency using the following statement:

CREATE DATABASE TestingSecurity;

And now you have a database to work with. You will probably need to reconnect (and most likely change your saved connection to now use TestingSecurity) to use the new database. There is no statement in PostgreSQL like SQL Server’s USE statement to change database contexts, but Azure Data Studio does have a drop down list of databases on the server.

Conclusion

Getting your Azure PostgreSQL Flexible Server installed, and running is not as hard as you might think, and definitely not super expensive either. If you don’t plan to use it all that much (and especially if this is being charged to a credit card!) you can stop the server when not using it and pay a very nominal fee for using the service .

The post Creating an Azure PostgreSQL cluster and connecting to it appeared first on Simple Talk.


from Simple Talk https://ift.tt/fvM0e7b
via

Friday, November 3, 2023

Beyond Limitations, Redefining Abilities with Assistive Technology

Assistive Technology (AT) refers to a broad range of tools, devices, and software designed to enhance and/or maintain the functional capabilities and independence of individuals with disabilities. These technologies are designed to address and cater to the unique needs and challenges faced by people with physical, sensory, cognitive, or communication impairments. Assistive technology refers to technology designed solely to help persons with disabilities perform specific tasks (PEATworks, 2018). There are so many examples of assistive technology that surround us, which are spread over varying levels of technological complexities. From simple assistive technologies such as floor-painted directions to very sophisticated and technologically advanced assistive technologies like eye gaze activated speech generating devices (“Types of AT / Guide to assistive technology,” n.d.).

AT can be categorized into two main types:

  • Low-Tech AT: These are simpler, non-electronic aids, such as walking canes, magnifying glasses, or pencil grips, which assist individuals in performing everyday tasks.
  • High-Tech AT: These are more complex, often electronic, devices and software, such as voice recognition software, motorized wheelchairs, and braille displays, which offer advanced functionality and customization based on the needs of the users.

Historical Overview of Assistive Technology

The presence of assistive technology (AT) in human life spans over a millennium, with its roots deeply embedded in the human desire to overcome physical limitations. Notable examples, such as eyeglasses and wheelchairs, provide a glimpse into the rich historical tapestry of AT. The history of AT can be traced back to the 11th century when the earliest forms of eyeglasses emerged.

These simple yet revolutionary optical devices, designed to correct vision impairments, were a key milestone in assisting individuals with visual deficiencies. Their invention opened up a new world of clarity and precision for those who had previously struggled with blurred or distorted vision. Wheelchairs, another remarkable AT innovation, find their origins dating as far back as the 5th century. These early wheelchairs served as rudimentary mobility aids for individuals with mobility impairments. Though considerably different from their modern counterparts, they symbolized humanity’s early efforts to provide mobility and independence to those who required assistance.

Over the centuries, the evolution of AT has been marked by other various significant milestones that have expanded its scope such as the Johannes Gutenberg’s invention of the printing press in the 15th century which revolutionized access to information for individuals with visual impairments. Through the mass production of books, people who were blind or had difficulty reading gained access to a wealth of knowledge through Braille and large-print materials. Furthermore, the 19th century saw the development of Morse code – a communication system based on dots and dashes. This invention not only radically change long-distance communication, but also provided a means of written communication for individuals with hearing impairments. It laid the foundation for later technologies like text messaging and telecommunication devices for the deaf (TDDs).

Legislation and Policy Changes

The profound impact of Assistive Technology (AT) on society has not been just a journey of technological advancement in isolation. AT’s impact has been reinforced by a series of strategic legislative and policy changes. These measures have been instrumental in advancing the development and accessibility of AT. They have played a pivotal role in forging pathways to inclusion and equity. Below are some of these legislations and policy changes that have been indispensable in propelling the transformative capabilities of assistive technology to the forefront of modern societal growth and progress.

The Americans with Disabilities Act (ADA) (1990)

The passage of the Americans with Disabilities Act in 1990 marked a momentous occasion in the history of AT. It mandated accessibility in public spaces and workplaces, spurring the development of a wide range of assistive technologies, from accessible building designs to communication devices.

The Individuals with Disabilities Education Act (IDEA) (1975)

The Individuals with Disabilities Education Act, enacted in 1975, mandated that children with disabilities have access to a free and appropriate public education. This legislation led to the widespread adoption of AT in educational settings, ensuring that students with disabilities could fully participate in the learning process.

The Assistive Technology Act (1988) – USA

The Assistive Technology Act of 1988, with refinements in 2004, played a vital role in the United States by establishing State Assistive Technology Programs in every state and territory. These programs provide crucial services such as device loans, training, and public awareness efforts, ensuring access to assistive technology (AT) for individuals with disabilities.

Every Student Succeeds Act (ESSA)

Every Student Succeeds Act (ESSA) has been essential in advancing the integration of assistive and instructional technology into the educational landscape. The Center on Technology and Disability has been at the forefront of disseminating valuable resources that elucidate how ESSA champions the effective use of these technologies to elevate the quality of teaching and learning experiences.

The Assistive Technology Act (2010) – UK

The Assistive Technology Act of 2010 in the United Kingdom represents a significant step forward in advancing the utilization and availability of assistive technology (AT) to improve the lives of individuals with disabilities. Often referred to as the UK AT Act, it encompasses a range of provisions designed to enhance the access and use of AT. It serves as a legislative foundation for the promotion of assistive technologies.

The Impact of AT in Modern Society

The significance of Assistive Technology in contemporary society cannot be overstated. AT has been pivotal in transforming the lives of millions of individuals with disabilities. Below are some examples of the impact of AT:

  • Independence: AT allows people with disabilities to perform tasks and activities that might otherwise pose a challenge. This fosters a sense of self-reliance and autonomy.
  • Improving the Quality of Life: AT plays a significant role in improving the overall quality of life for individuals with disabilities. AT breaks down the barriers to communication, mobility, and education by providing a level footing in access. Thus encouraging social inclusion and active participation in everyday life experiences.
  • Facilitating Education and Employment: AT contributes to reducing disparities in access and participation, creating more equitable opportunities in education and employment. AT does this by enabling individuals with disabilities to acquire knowledge and equip themselves with relevant skills to join the workforce.
  • Promoting Inclusivity: It promotes a more inclusive and equitable society by ensuring that individuals with disabilities can access and participate in various aspects of life.

Prerequisite:

Before you dive into this article, it’s important to understand who the intended readers are. This article caters to a diverse group of individuals with varying interests and backgrounds. Here are the prerequisites for the audience:

  • All Stakeholders in Design and Development: This article welcomes professionals involved in design and development processes, including designers, developers, project managers, and User Experience/User Interface (UX/UI) specialists.
  • Accessibility Enthusiasts: Accessibility enthusiasts who are passionate about creating inclusive digital experiences, will find valuable insights here. Prior knowledge of accessibility standards (e.g., WCAG) and assistive technologies will enhance your understanding.
  • Everyday Avid Readers: If you’re an avid reader who enjoys engaging with literary content and the acquisition of knowledge, you’re in the right place.

Whether you’re a professional in the world of design and development, an accessibility advocate, or simply someone who enjoys reading and knowledge acquisition, this article has something to offer.

Categories of Assistive Technology

Let us delve into some categories of assistive technology. This will provide us with a structured understanding of how these tools assist individuals with disabilities and help us appreciate the different functions that assistive technologies fulfill. Functions such as enhancing mobility and communication to support sensory and cognitive needs. These technologies, however simple or complicated, empower individuals with disabilities, promoting independence and inclusivity.

Understanding some of these categories and examples should ignite in us the passion and creativity to design, bearing in mind that assistive technology will often be woven into our design to assist our users when needed. As such we should create accessible friendly designs. Below are some categories and a few examples of many of the assistive technologies that have been in use for many years, and some new ones.

Augmentative and Alternative Communication (AAC) Systems:

These are communication aids. They are assistive devices or tools designed to support individuals with speech or communication impairments. They play a crucial role in bridging communication gaps for people who may have difficulty speaking or expressing themselves verbally. They also empower users to express their thoughts, needs, and emotions, thus promoting independence and improvement in the quality of life for users.

Augmentative and Alternative Communication (AAC) Systems encompass a range of communication solutions, including mobile apps that offer support through text or symbols. These systems employ symbols, aids, strategies, and techniques to facilitate communication and can be further categorized into three distinct types:

Unaided Communication Systems

These systems rely on the body rather than technology for communication. Examples include gestures, body language, and sign language, offering non-verbal individuals a means to convey their thoughts and emotions.

Low Tech AAC

This category includes communication tools that are not electronically dependent. Examples comprise picture boards, letter-based communication, or drawings, providing simple yet effective ways for individuals with communication challenges to express themselves.

High-tech AAC

In contrast, high-tech AAC devices depend on electricity or batteries and encompass advanced solutions like electronic communication boards, smartphone applications, and specialized devices. These technologies offer users a range of communication options, making it easier for them to interact with others and participate in daily life (LibGuides: Speech disorders: Common assistive technologies, 2022). Let’s take a look at some of them.

  • Communication Boards: Communication boards are visual aids used to facilitate communication for individuals with speech or language difficulties. These boards typically feature a grid of symbols, pictures, or words representing common phrases, objects, or actions. Users can point to or indicate the symbols on the board to convey their messages and thoughts. Communication boards come in various formats, from simple paper-based versions to more complex electronic variations. They are valuable tools for people with conditions such as autism, aphasia, or motor impairments, helping them express themselves and engage in conversations, enhancing their ability to interact with others and participate in daily life.
  • Speech-Generating Devices (SGDs): Speech-generating devices represent a significant advancement beyond communication boards, as they empower non-verbal individuals to communicate by transforming user input into speech. Both device groups cater to the same population and offer vital support to those with speech or language difficulties.

Furthermore, speech-generating devices extend their utility to individuals who stutter, contributing to enhanced fluency. There are two primary types of these devices:

  • Delayed Auditory Feedback Devices: These devices introduce a slight delay in the playback of the user’s voice, aiding individuals who stutter in achieving smoother speech.
  • Frequency-Altered Feedback Devices: These devices modify the pitch of the user’s voice during playback, providing another valuable tool for improving fluency and communication (LibGuides: Speech disorders: Common assistive technologies, 2022).

Mobility Aids

These address the diverse needs of individuals with mobility impairments, ranging from mild to severe. Their primary goal is to empower individuals with disabilities with the ability to move and navigate their surroundings independently. Mobility can be further subdivided into two essential subcategories:

Motion:

These assistive technologies facilitate physical movement and locomotion. Examples include:

  • Manual Wheelchairs: Designed for self-propulsion by the user, particularly suitable for those with upper body strength.
  • Power Wheelchairs: Electrically powered wheelchairs that offer user control and often come with customizable features.
  • Mobility Scooters: Three or four-wheeled scooters designed for outdoor mobility, providing a versatile mode of transportation.
  • Prosthetic Limbs: Artificial limbs that replace missing or amputated body parts, enabling individuals to regain mobility and engage in various activities.

Positioning:

These focus on ensuring precise placement and stability during stationary moments. Examples include:

  • Cushions: These aids provide comfort and support, enhancing positioning and reducing pressure sores for individuals who need to remain seated for extended periods or are bedridden.
  • Braces: Designed to support and stabilize specific joints or body parts, braces are valuable for maintaining proper alignment and mobility.
  • Splints: These devices immobilize or partially immobilize a limb to promote healing, prevent contractures, or address musculoskeletal conditions.

Vision Enhancement Technologies

1. Screen readers and magnifiers

Screen readers are software applications that provide auditory output of text displayed on screens. They are invaluable to individuals with visual impairments, as they audibly read aloud the content of computer screens, smartphones, and tablets.

Screen magnifiers, on the other hand, enlarge on-screen content, making it easier for individuals with low vision to read and interact with digital information. These technologies enable access to a wide range of digital resources, from websites and emails to documents and applications.

2. Electronic Braille notetakers

Braille is a tactile code that allows the visually impaired to read and write in multiple languages (Assistive Technology – Disability Support | Enabling Guide, n.d.). Electronic Braille notetakers are portable devices equipped with Braille displays and integrated software for creating and storing text. These devices allow individuals with visual impairments to take notes, read books, and access electronic documents in Braille. Some models also include internet connectivity and additional functions like calendar management, making them versatile tools for daily life.

Hearing Aids and Cochlear Implants

Hearing aids and cochlear implants are transformative technologies for individuals with hearing impairments. Hearing aids amplify sounds to improve hearing for those with mild to moderate hearing loss. They come in various styles, including behind-the-ear (BTE), in-the-ear (ITE), and completely-in-the-canal (CIC) models.

Cochlear implants, in contrast, are surgically implanted devices that directly stimulate the auditory nerve, making them suitable for individuals with severe to profound hearing loss. These technologies significantly enhance communication and overall quality of life for individuals with hearing impairments.

Cognitive and Learning Support

Cognitive skills are the skills people use to process things like reading things, reading things, remembering, etc. Which in turn goes hand in hand with learning.

Text-to-speech software

Text-to-speech (TTS) software is a tool used by individuals with reading difficulties, dyslexia, or cognitive impairments. It converts written text into spoken words, allowing users to listen to written content. TTS software can be integrated into various applications, including e-readers and word processors, making educational materials and digital information more accessible.

Note-taking apps

Note-taking apps equipped with accessibility features cater to individuals with cognitive or memory impairments. These apps offer digital note-taking solutions, often including audio recording capabilities and organization features. Users can create, review, and retrieve notes easily, thereby supporting learning, organization, and retention of important information.

Home and Daily Living Aids

These include simple and complex devices that promote independence in the completion of daily tasks. Examples of some common ones are dressing aids (buttons and hooks, zip pulls), cupholders, book stands, vacuum robots, automatic soap, and sanitizer dispensers.

More advanced options are:

Smart home devices: Smart home devices are a growing category of AT. These enhance the independence and convenience of individuals with disabilities. These devices can control lighting, thermostats, appliances, and security systems through voice commands or smartphone apps. They are particularly valuable for people with mobility impairments or those who may have difficulty with manual tasks.

Adaptive kitchen tools: Adaptive kitchen tools are specially designed utensils and equipment tailored to the needs of individuals with physical impairments or limited mobility. These aids include items such as ergonomic utensils with modified handles for easier gripping, one-handed cutting boards, and devices for safe stove and oven operation. Adaptive kitchen tools enable individuals to maintain independence in meal preparation and cooking.

Challenges and Barriers

Of course, with any technology that can be used to assist people with various tasks, there are going to be various challenges and barriers to their use. The following list explains a few such challenges.

  • Accessibility: Despite advancements in Assistive Technology, not all individuals with disabilities have equal access to these essential tools. Physical and digital environments may lack the necessary accommodations, hindering the effective use of AT. This includes issues like the absence of ramps or elevators in public places or websites and apps that are not designed with accessibility in mind.
  • Affordability: Cost is a significant barrier to the adoption of AT. Many advanced AT devices and software solutions are expensive, making them inaccessible to those with limited financial resources. Insurance coverage and government support for AT, although present, are sometimes inconsistent and inadequate to purchase such advanced AT.
  • Awareness: Lack of awareness regarding available AT solutions is a pervasive challenge. Individuals with disabilities, their families, and even some healthcare professionals may not be fully informed about the range of AT options. This has resulted in the underutilization of AT.
  • Stigma: Stigma and misconceptions surrounding AT, despite the growth in accommodation and support in recent times, still exist. Some people view the use of AT as a sign of dependence or weakness rather than as a means of empowerment. Addressing these stigmas is essential to creating a more inclusive society.
  • Compatibility: Integrating AT into existing systems and environments can be problematic. Devices and software may not always be compatible with one another, leading to interoperability issues that hinder the seamless use of AT. Some software lacks backward compatibility for older models of AT.
  • Integration: Incorporating AT into mainstream technologies, such as smartphones, can be challenging as it requires a united front with the collaboration of various stakeholders, including developers, manufacturers, and regulatory bodies. Usually, not all parties are concerned with AT integration. However, looking at the future we are trying to build, we should all strive to ensure that AT is seamlessly integrated into everyday devices and applications.
  • Data Privacy: As AT becomes more connected and reliant on data, concerns about the privacy and security of personal information are paramount as the AT experience is a personalized one for each user. Ensuring that sensitive data from AT devices and apps is protected from breaches and misuse is a pressing challenge.
  • Ethical Use: Ethical considerations surrounding AT, especially in the context of AI and machine learning, are essential. Ensuring that AT technologies are developed and used in ways that respect the autonomy and dignity of individuals with disabilities is an ongoing concern.

Recent Innovations in Assistive Technology

Recent innovations in wearable technology have greatly expanded the capabilities of AT. Wearable devices, such as smart glasses and exoskeletons, offer new levels of mobility and independence to individuals with disabilities. These technologies often incorporate sensors, GPS, and AI to enhance functionality and adapt to users’ needs.

Artificial Intelligence (AI) and machine learning have revolutionized AT by providing access to quick and adaptable real-time assistance based on recognition of the users’ preferences and needs. AI-powered speech recognition, predictive text, and image recognition are examples of how AI is enhancing the functionality of AT devices.

Advancements in 3D printing and digital manufacturing have provided the ability to create highly customized AT solutions. Prosthetic limbs, orthopaedic devices, and communication aids can now be precisely tailored to an individual’s unique anatomy and requirements, resulting in better comfort and functionality.

Telehealth and remote support have become increasingly important in the AT landscape, especially in the wake of the COVID-19 pandemic. Virtual consultations and remote monitoring allow individuals with disabilities to access expert advice and support from the comfort of their homes, reducing barriers related to distance and mobility.

The Future of Assistive Technology

The future of AT hinges on efforts to make it more accessible and affordable. Advocacy for policy changes, insurance coverage, and subsidies for AT devices will play a crucial role in ensuring that individuals with disabilities have equitable access to these technologies.

In addition, the continuous and rapid evolution of human-computer interfaces also plays a crucial role in the future of AT. Brain-computer interfaces (BCIs), haptic feedback systems, and gesture recognition technologies will enable simpler, faster, and more efficient interactions with AT devices, reducing the physical and cognitive burden on users.

Furthermore, advancements in medical and rehabilitative technologies that synergize with AT, are important to the future of AT. Innovations in neurorehabilitation, regenerative medicine, and assistive robotics hold promise for improving the functional abilities of individuals with disabilities. These will also reduce their reliance on AT.

Lastly, advocacy for AT will remain essential in shaping the future landscape. Governments, non-profit organizations, and disability rights groups who fight for the rights of people with disabilities will continue to play a pivotal role in this by advocating for policies that promote AT research, development, and equitable access. Pushing for the strengthening of ethical guidelines and regulations related to AT will also be crucial to ensure that these technologies serve the best interests of individuals with disabilities.

Conclusion

In conclusion, Assistive Technology (AT) is a remarkable field that has significantly improved the lives of individuals with disabilities and will continue to do so.

From communication aids like speech-generating devices to mobility solutions like powered wheelchairs, AT empowers individuals to overcome barriers and achieve greater independence. It promotes inclusivity by ensuring access to education, employment, and recreational activities, and it enhances the overall quality of life for people with disabilities.

To harness the full potential of AT, we must continue to raise awareness about its benefits and dispel misconceptions and stigmas. Encouraging inclusivity means not only making AT devices and services more accessible but also creating a culture of acceptance and support for individuals who rely on these technologies.

As we look to the future, it is evident that AT will play an increasingly vital role in our society. Advances in wearable technology, AI integration, and personalized solutions will continue to expand the possibilities for individuals with disabilities. Embracing this future means advocating for policies that promote research, development, and equitable access to AT, as well as supporting organizations and initiatives working toward a more inclusive and accessible world for all.

We must recognize that the power of AT goes beyond technology; it lies in its ability to empower individuals and bridge the gap between disability and opportunity. It is a testament to human innovation and the enduring spirit of resilience in the face of challenges. As we continue to advance in the field of Assistive Technology, we are moving closer to a world where every individual, regardless of their abilities, can fully participate and thrive in all aspects of life.

References

Assistive Technology – Disability Support | Enabling Guide. (n.d.). SGEnable_SF11. https://www.enablingguide.sg/im-looking-for-disability-support/assistive-technology/at-visual-impairment

LibGuides: Speech disorders: Common assistive technologies. (2022, December 13). https://guides.library.illinois.edu/c.php?g=613892&p=4265891

PEATworks. (2018, November 16). Accessible Technology vs. Assistive Technology [Video]. YouTube. https://www.youtube.com/watch?v=uBqzuSs9SCs

Types of AT / Guide to assistive technology. (n.d.). State of Minnesota. https://mn.gov/admin/at/getting-started/understanding-at/types/


The post Beyond Limitations, Redefining Abilities with Assistive Technology appeared first on Simple Talk.


from Simple Talk https://ift.tt/gsBQ2VR
via
Getting connected to PostgreSQL for the first time

PostgreSQL continues to be all the rage in 2023, whether in “vanilla” form of the fully open-source distribution or a variant like Amazon RDS, Neon, Yugabyte, and others. If you’re interested in trying PostgreSQL but only have experience with another database like SQL Server, it can feel a bit daunting to get started.

In this small series, we’ll walk you through the process of connecting to a version of PostgreSQL locally or in the cloud. Next, we’ll discuss some options for sample databases and show you how to restore them. And finally, we’ll finish by demonstrating a few ways to connect to and query the database.

So, let’s get right to it.

Getting Access to PostgreSQL

PostgreSQL is available in nearly every possible way. Local install, Docker, IaaS options, and fully supported DBaaS providers that you’re probably already using for at least one project. However, for most of this article we’ll focus on ways you can start to easily use PostgreSQL for free, either locally or online.

Local Installation

PostgreSQL has installation options on every major operating system. That said, Linux-based operating systems have more rigorous support and testing. Windows supports an installation package created and maintained by Enterprise DB (EDB) and can be useful for testing PostgreSQL on a local windows machine. As a rule of thumb, however, you’d be hard pressed to find a production workload running on the Windows installation.

Below, we’ll start by demonstrating how to start working with a version of PostgreSQL on your local computer using the supported methods. We won’t specifically show you how to connect to the server here.

Instead, you can follow our tutorial on using psql or wait for the third part of this series where we discuss a handful of currently supported and popular tools for connection to and managing PostgreSQL.

Docker Containers (all platforms)

For anyone that’s seriously considering having one or more local installations of PostgreSQL, Docker continues to be the easiest path forward. The official containers are maintained regularly and quickly updated as new releases are made. Also, when the release cycle begins each year for PostgreSQL, beta versions are made available as Docker images for convenient testing and exploration. The official PostgreSQL images are located on the Docker Hub.

You must have Docker installed and available to use the PostgreSQL Docker images.

The simplest way to create a PostgreSQL container is to run the following Docker command, which will make the server available on the default port 5432 from your local computer so that you can use graphical IDEs or terminal applications like psql without having to connect into the container itself.

$ docker run --name postgres-demo -e POSTGRES_PASSWORD=password 
-d postgres -p 5432:5432

The big part here is that if you don’t add the port parameter, then PostgreSQL won’t be accessible from outside of the container and you’d have to enter the shell of the container to connect.

Postgres.app (MacOS)

This is a community-maintained project that provides easy installation and access to stable releases of PostgreSQL on MacOS. You can select from numerous installers which provide different sets of PostgreSQL versions from the Postgres.app downloads page. Once installed and running, Postgres.app gives you the ability to start different supported versions of PostgreSQL (the most recent five releases). All packages also include all of the standard PostgreSQL command-line tools (psql, pg_dump, pg_restore, etc.) which can be mapped for easy use with the terminal.

The real value for MacOS users is that it’s a self-contained, native application that you can install and uninstall with simple drag-and-drop. And, because the project is actively maintained, there are even packages with recent Beta versions of the upcoming release of PostgreSQL that you can try.

Linux Package Installers

Most major Linux distributions have recent packages available in their packaging system. For the last number of years, Devrim Gunduz has spearheaded the maintenance of these packages and works hard to keep core PostgreSQL versions and numerous extensions ready and available for installation on your Linux distribution.

Follow your normal installation steps if you’re comfortable running native packages on Linux. Otherwise, Docker is a great choice on Linux.

Windows Installer

I want to briefly mention that there is a Windows installer that is maintained by EDB and available for installation. Over the years, Windows specific support has improved and there should be little difference running PostgreSQL on Windows vs. Linux.

That said, Windows installations are not widely used in the larger PostgreSQL community. While this generally shouldn’t be an issue with recent releases, just recognize that there are very few production installations of PostgreSQL running on Windows. If that is your only option, I’d strongly consider Docker or a good database hosting provider, some of which we mention in the next section.

Easy Database-as-a-Service (DBaaS) Providers

Another option for getting easy, quick access to PostgreSQL is to sign-up for a hosting provider with a plan and feature set that can meet your needs. Obviously, if you go this route, you will only be able to access the PostgreSQL instance when connected to the Internet. However, all of the mundane tasks of maintaining the server are taken care of by someone else.

All the options mentioned below are current as of August 2023. Because PostgreSQL is being heavily developed for all kinds of use cases, new database service providers are coming online often. We’ll try to keep this list updated if something changes, but realize that within a year, there will probably be more options. Your mileage may vary, and you should do some additional research.

None of the offerings below are specifically recommended or supported by Redgate or Simple Talk.

The Big Three

All major cloud providers have some kind of PostgreSQL offering. But, Amazon Web Services, Microsoft Azure, and Google Cloud Platform all have quick and easy options. Chances are you already use one of these platforms in your business and can quickly spin up a PostgreSQL cluster, often free or very low cost for hobbyist-like workloads.

AWS RDS

RDS PostgreSQL has been the leading DBaaS for over a decade now. Because so many companies have invested a lot within the AWS cloud, RDS and RDS Aurora are very easy to add onto a project to begin using PostgreSQL.

Generally speaking, regular RDS PostgreSQL is very close to standard PostgreSQL, the main limitations being that you do not get superuser access and you can’t install and use whatever extensions you want to.

Aurora PostgreSQL, on the other hand, has a lot more modifications to it under the covers which allows AWS to provide a serverless environment that doesn’t require as much daily tuning as something more standard.

Either option will allow you to start using PostgreSQL with minimal effort, so choose the one that makes sense for you already use AWS services.

Microsoft Azure

Similar to the AWS offerings above, Azure has a more traditional PostgreSQL offering, and a powerful multi-node database backed by the Citus extension. Microsoft has invested a lot of time and money into helping the PostgreSQL project grow and the Citus team within the Microsoft database group is very active and helpful to the community.

Azure Database for PostgreSQL is similar to RDS, while Azure Cosmos DB for PostgreSQL is more akin to Aurora, from a serverless, scalability perspective.

Google Cloud Platform

Last but not least, Google Cloud Platform (GCP) has two of their offerings as well. AlloyDB, the newest entry into the serverless PostgreSQL space has some compelling performance features that might help certain workloads.

Other PostgreSQL DBaaS Platforms

This grouping of cloud providers focusses solely on providing easy, scalable PostgreSQL instances in the cloud. Each of them has a specific focus or niche, and with a little research, you can find other similar platforms.

Crunchy Bridge – A product of the larger PostgreSQL focused company called Crunchy Data; Crunchy Bridge is a fully native PostgreSQL offering. They provide enterprise-grade hosting for large projects but have a long history of contributing to PostgreSQL and supporting smaller workloads too.

This past year, Crunchy Data introduced a “hobby” tier that will be free if you manage the instance and spend $5 or less a month.

Neon.techNeon is a newer player on the scene, originally opening for private beta in 2022. Neon is labelled as an open-source alternative to AWS Aurora with a lot of interesting features around database branching, bottomless object-level storage, and more. They have a free tier, and the sign-up process is quick and easy, getting you to a PostgreSQL database within a minute or two.

Recently, Neon has been spending effort on adding vector-based features and extensions to their offering, leaning heavily into using PostgreSQL as a part of AI applications.

aivenaiven is an infrastructure platform provider that also provides a hobby tier for trying PostgreSQL. Their offering is very similar to Crunchy Bridge, meaning that it’s not PostgreSQL plus some additional changes. They’re offering a traditional install of PostgreSQL with different options to match your workload requirements.

PostgreSQL Playground by Crunchy Data – This isn’t a hosted database, specifically, but a neat way to try and learn more about PostgreSQL without spending any money. The playground is an in-browser version of PostgreSQL, and they provide loadable datasets that can help you learn different aspects of PostgreSQL. This is definitely worth a look, keeping an eye out for future development of this tool. You can access the PostgreSQL Playground here.

Connecting to PostgreSQL

Regardless of what method you chose to use for your initial access to PostgreSQL, the next thing you’ll need to do is use a tool to get connected for the first time. If you’re coming from another database like SQL Server, there are often commonly supported IDEs that allow you to easily connect to the database for querying and management tasks.

With PostgreSQL, there is no official graphical tool. While pgAdmin is listed on the PostgreSQL.org website, it’s maintained by EDB, a major contributor to the PostgreSQL project. But there are a multitude of other options, both graphical and terminal in nature, that are actively used throughout the community.

The goal for you is to determine the level of graphical support you need to feel a sense of success and security. Below we’ll briefly discuss a few options for you to explore based on our experience, and in some cases, community recommendations.

psql

The psql command line tool has been a part of the PostgreSQL project for nearly 30 years. It has hundreds of built-in meta commands and connecting to a PostgreSQL database is quick. I always tell folks that eventually it’s going to be helpful to learn a little bit about psql. Read our two-part series (part 1, part 2) on installing and using this powerful query and management tool.

DBeaver

DBeaver is an open-source graphical IDE that allows you to connect to PostgreSQL, and tens of other databases. In my experience over the last few years, this tool is the closet I’ve come to SSMS, although it lacks many of the powerful SQL Server-like features because it’s a general database IDE.

For most people that don’t have another tool in mind, I often tell folks to start with DBeaver and then move on if you find it doesn’t meet your needs.

pgAdmin

This is another popular, open-source IDE that is maintained by EDB. pgAdmin does have some unique features, like a visual query plan explorer. At its core, pgAdmin is a web application being served in a desktop format, and so some of the design decisions and lack of intuitive key commands can feel cumbersome to some users.

Lots of people do use pgAdmin, so it’s worth a look if you have no other options.

Azure Data Studio

Microsoft released Azure Data Studio in 2017 for SQL Server. In 2019, they released an extension that allows you to connect to PostgreSQL for querying and some maintenance tasks. If you already use ADS and are used to the various key commands and extensions that can be used with PostgreSQL, you should at least give it a try. Azure Data Studio supports Windows, MacOs, and Linux.

Datagrip

Finally, Datagrip is a paid product from Jetbrains. If your company already owns licenses from Jetbrains, it’s definitely worth doing a trial of the IDE, but for most day-to-day work, any of the other open-source tools you can find will probably serve your needs.

Selecting and Restoring a Sample Database

Within the PostgreSQL community there are many sources to find sample databases. However, there are a few databases that are commonly used in demos and blog posts.

Pagila

The Pagila database is a has a simple schema that could be used to run a simple video rental store. It feels somewhat dated in concept, but it continues to be updated in the various forks that people keep of it. This is the simplest database to restore in many cases because it is provided as a set of SQL scripts, both for schema generation and data insertion. You can run the SQL scripts in an IDE, or you can do it with the psql application as shown on the GitHub repo.

To get started with Pagila, create a database on your PostgreSQL cluster and then execute the schema and data scripts on that newly created database.

psql -h localhost -p 5432 -U postgres -c 'CREATE DATABASE pagila;'
psql -h localhost -p 5432 -U postgres -d pagila 
-f pagila-schema.sql -f pagila-data.sql

Postgres Air

The Postgres Air database was created by Henrietta Dombrovskya to accompany her book, PostgreSQL Query Optimization. The database contains fake data for an airline company, including ticketing and routes. Henrietta and her team regularly update the database with new features, improved processes for creating more realistic data, and modifying the timestamps to stay closer to the current year.

The Postgres Air database is provided in both SQL script format and as a backup file from pg_dump. The backup files will be slightly smaller, but they do require a little more knowledge of using pg_restore. If you decide to use the SQL files, follow a similar workflow shown above with the Pagila database.

To restore the backup file instead, try the following with your locally installed pg_restore tooling. Many IDEs also contain interfaces for restoring a backup using a version of pg_restore that’s included into the application.

psql -h localhost -U postgres -p 5432 -c 'CREATE DATABASE postgres_air;'
pg_restore -h localhost -p 5432 -U postgres -W -v -Fc 
-d posgres_air < postgres_air_2023.backup

Wide World Importers

For years, the standard SQL Server sample database was Adventure Works. Over the years, Microsoft decided to create a new database to try and showcase the advanced features that had been added to the application in modern versions of the software. They called the database Wide World Importers. There are a lot of similarities to Adventure Works, but it also contains examples of new datatypes and features like temporal tables.

In 2017, a team at Microsoft converted the SQL Server schema to PostgreSQL and provided an updated workload generator application to fill it with data. If you’ve played with Wide World Importers before and are looking for something similar, this might be a good option to start with.

Be aware, however, that the sample data is very outdated, and you can’t fill it with data unless you use the workload generator because the necessary stored procedures don’t exist in the backup. Instead, they are created, if necessary, when the workload generator application starts.

This database is also provided as a pg_dump backup file, so the same pg_restore command will restore the database into your newly created database.

psql -h localhost -U postgres -p 5432 
-c 'CREATE DATABASE wide_word_importers_pg;'

pg_restore -h localhost -p 5432 -U postgres -W -v -Fc 
-d wide_word_importers_pg < wide_world_importers_pg.dump

Summary

One of the great things about PostgreSQL is that it can be used with many operating systems in many ways. Of course, that also can make it daunting to figure out how to get started. In this article, I have pointed out the many ways you can install and access a PostgreSQL database, along with setting up some sample data to work with.


The post Getting connected to PostgreSQL for the first time appeared first on Simple Talk.


from Simple Talk https://ift.tt/2Edcx4m
via

Thursday, November 2, 2023

Move Disks or Virtual Machines between Tenants on Azure

Move objects on Azure is not simple. Move between Tenants is extremely difficult or not possible. I faced the challenge to move a virtual machine and disks between tenants recently and found the solution.
Some Years ago, I wrote an article about the Azure Resource Mover when it was still being created. Today the resource mover is integrated with the entire azure portal, although there are already many limitations in relation to moving resources. Anyway, this will not affect us on this blog post.

Moving Process

The process is based on moving the disks and creating the VM again on the other tenant.

These steps are for a Virtual Machine with managed disks:

  1. Create a snapshot from each disk
  2. From each snapshot, export it to VHD in a storage account.
  3. Use AZCOPY to copy the VHDs to a storage on the different tenant
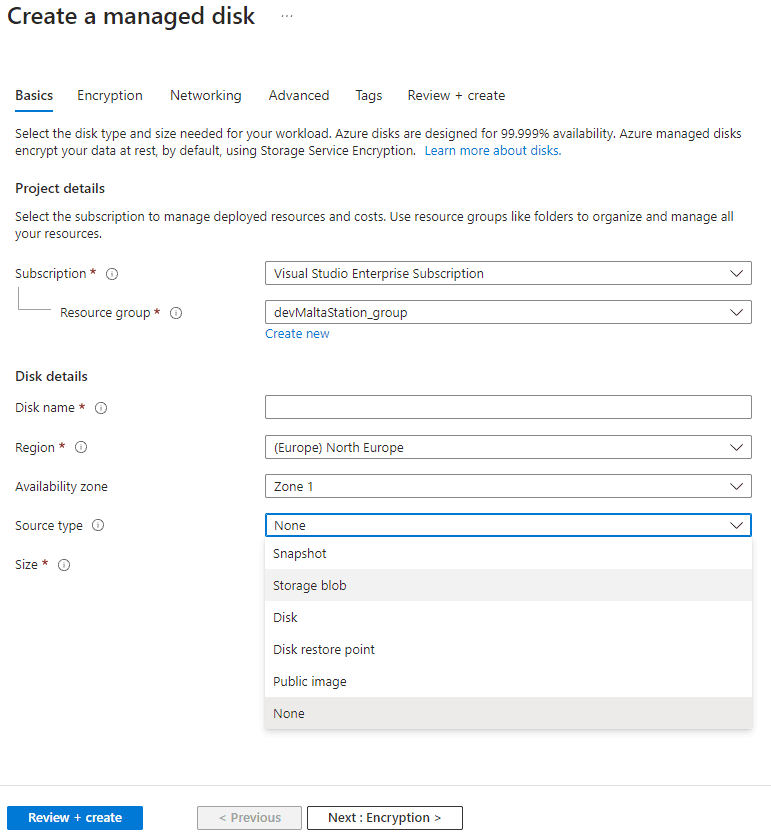
  4. On the marketplace, create a new managed disk and select the option to create it from the VHD
  5. Repeat the step 4 for each VHD
  6. Open the managed disk which contains the operating system
  7. Use the option to create a virtual machine from the disk
  8. Attach the additional managed disks

It may appear to be something simple, but this process hides some details which most people don’t know:

  • A snapshot is managed. Copy a snapshot as a VHD requires a special command
  • It would be trivial if we could download the VHD and upload on the correct place. But we are talking about disks of 1Tb or more. These disks don’t fit our local environment, we need to transfer directly from one storage to another. AZCOPY has the capability to use a Server-to-Server API to make the transfer, the data doesn’t pass by your local machine.
  • We can create a Virtual Machine from an existing OS disk if we start the creating from the managed OS disk.

Let’s follow the steps and discover the hidden tricks in the way

Create a snapshot from the disk

  1. Open the managed disk.
  2. Using the top menu on the managed disk window, click Create Snapshot button
  3. On the Name textbox, provide a name to the disk snapshot.

You also can choose the resource group for the disk snapshot. Besides that, the additional properties are only important if you are following some standard from your company, such as security standards.

I will not get into the security details on this blog.

Export the snapshot to a VHD

The copy process needs to be done by script. Either Azure CLI or Powershell. I have a personal choice for Powershell.

The script needs to execute three steps:

  1. Use the Grant-AzSnapshotAccess cmdlet to get access to the snapshot, allowing the copy to happen
  2. Use the New-AzStorageContext cmdlet to get a context to the destination storage
  3. Use Start-AzStorageBlobCopy with the result from the two previous commands to execute the copy

Let’s consider the following information to start:

  • Resource Group name: devMaltaStation_group
  • Snapshot Name: disksnapshotbackup
  • Destination Storage account name: devmaltasnapshotexport
  • Destination container name: snapshots

Step-by-Step Process

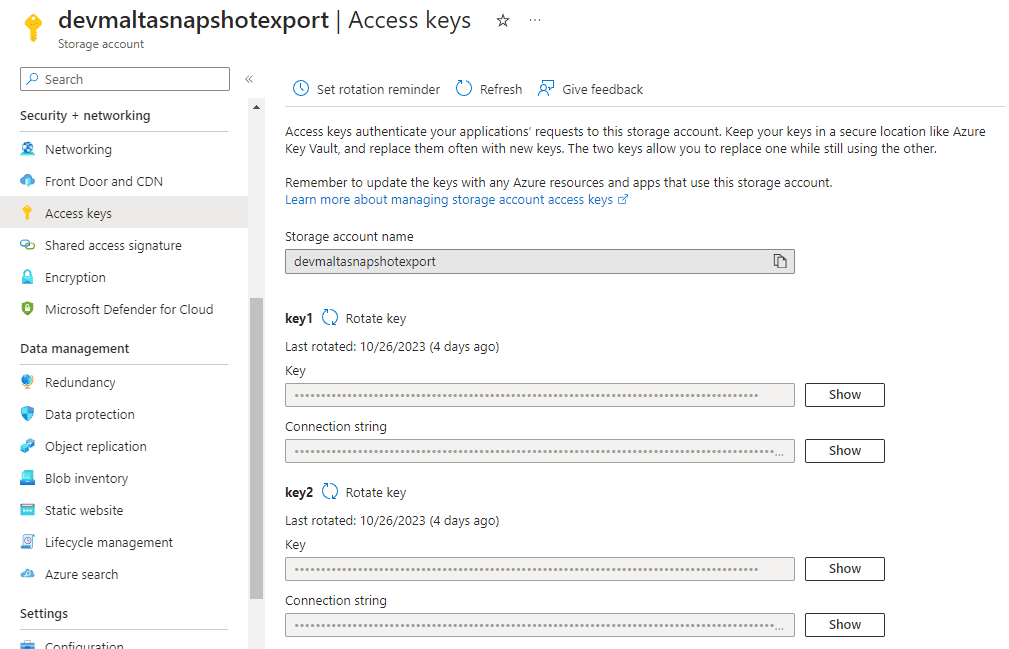
We need to retrieve a key to the destination storage to complete the copy process.

  1. Access the storage account
  2. Click the menu item Access Keys on the left side of the window
  3. Click the Show button besides the textbox Key. It can either be for Key 1 or Key 2

  1. Click the Copy button besides the key which will be displayed. Save this key, you will need it later.
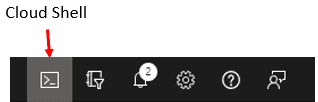
  2. Open the cloud shell using the button on the top of the window. I provided additional details about the cloud shell in a previous blog (https://www.red-gate.com/simple-talk/blogs/start-stopping-virtual-machines-resource-group/ )

A black and white screen with icons Description automatically generated

  1. Execute the code below to retrieve an object to access the snapshot

$sas=Grant-AzSnapshotAccess -ResourceGroupname 'devMaltaStation_group' -SnapshotName 'disksnapshotbackup' -DurationInSecond 600 -Access Read

You need to be careful with the DurationInSecond parameter. This is the amount of time the access will be allowed. The copy of the file needs to be completed before this amount of time.

  1. Execute the following statement to retrieve a context for the target storage:

$destinationContext= New-AzStorageContext -StorageAccountName 'devmaltasnapshotexport' -StorageAccountKey '<< the key you saved >>'

On this example, we are using a storage key retrieved on the steps 4 to 7. This could be in different ways, using a SAS key or using a connection string. You can check different options on (https://learn.microsoft.com/en-us/powershell/module/az.storage/new-azstoragecontext?view=azps-10.4.1 ). Different options would change the steps from 4 to 7.

  1. Execute the statement below to make the copy of the snapshot to the storage account:

Start-AzStorageBlobCopy -AbsoluteUri $sas.AccessSAS -DestContainer 'snapshots' -DestContext $destinationContext -DestBlob 'Disk01.vhd'
  1. Repeat the steps 6 to 8 for each snapshot you have, changing the name of the destination file on the step 8.

Use AZCOPY to transfer the snapshot

AZCOPY uses storage account SAS keys to access the source and destination storage. Because that, it doesn’t matter if the storage accounts are in the same tenant or not.

The best of it is the fact it uses server API’s for the transfer. In this way the data goes from server to server, without involving your client machine and avoiding a bottleneck.

Retrieving the address and key from the source:

  1. Access the source storage account
  2. Access the container and locate the file
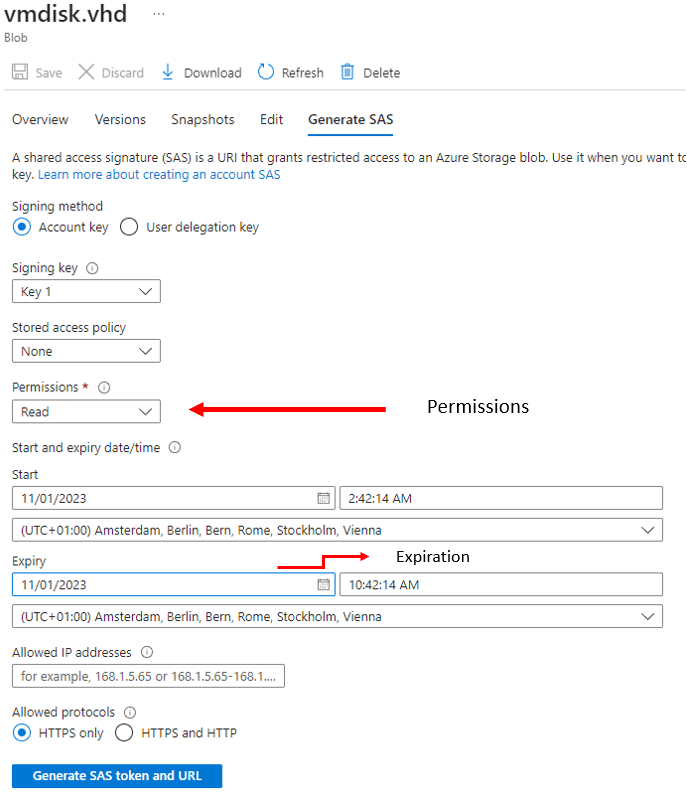
  3. Besides the file, open the expand menu (…) and click Generate SAS menu option

On the new window, the permission and the expiration are the two most important properties you need to handle. The source only needs Read permission, but the expiration needs to be enough for the copy

A screenshot of a computer Description automatically generated

  1. Click the Generate SAS token and URL button
  2. On the box Blob SAS URL, click the Copy button

This will copy the URL and SAS key together and you will need to use them to build the AZCOPY statement

A close-up of a computer screen Description automatically generated

Retrieving the URL from the target is basically repeating the steps from 13 to 17, with only a few differences:

  • You will point to a container or folder where the file will be saved
  • The permission will need to be more than Read.
  1. Build the AZCOPY statement as the format below:

azcopy cp "https://[srcaccount].blob.core.windows.net/[container]/[path/to/blob]?[SAS]" https://[destaccount].blob.core.windows.net/[container]/[path/to/blob]?[SAS]

Use the URLs you retrieved from the source and destination to build this statements

  1. Execute the AZCOPY on the cloud shell

Create a new Managed Disk

  1. Access the target resource group
  2. Click the Create button to access the marketplace

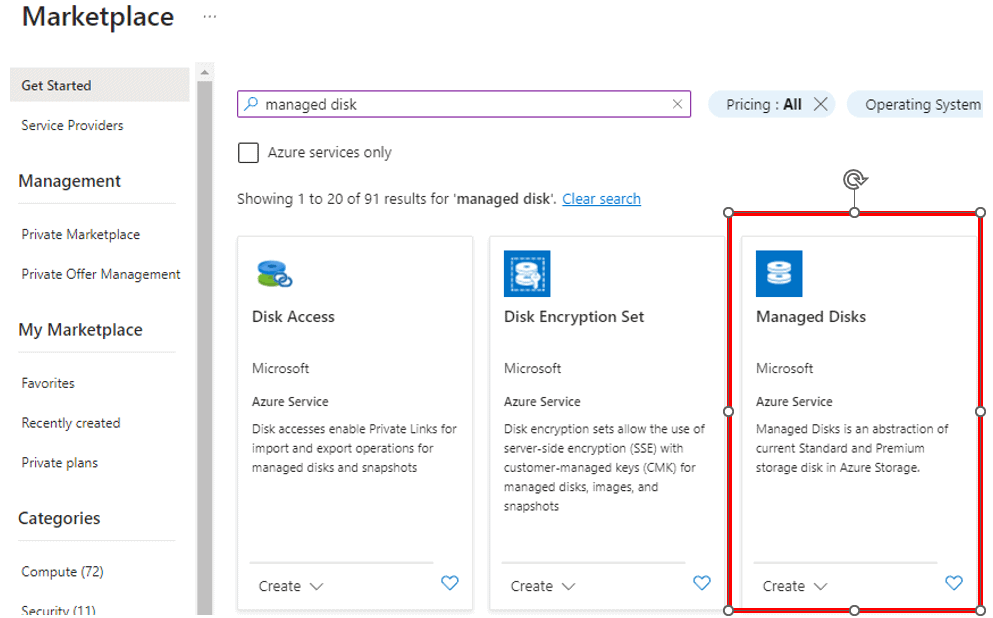
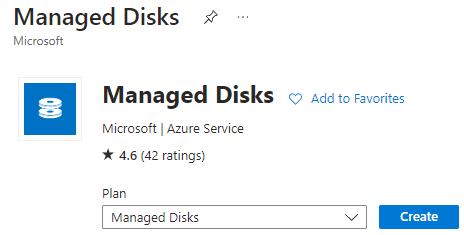
  1. On the marketplace, search for Managed Disk

A screenshot of a computer Description automatically generated

  1. Click the Create button

A screenshot of a computer Description automatically generated

  1. On the box Source Type, select Storage Blob

A screenshot of a computer Description automatically generated

  1. On the box Source Blob, click Browse to locate the VHD file

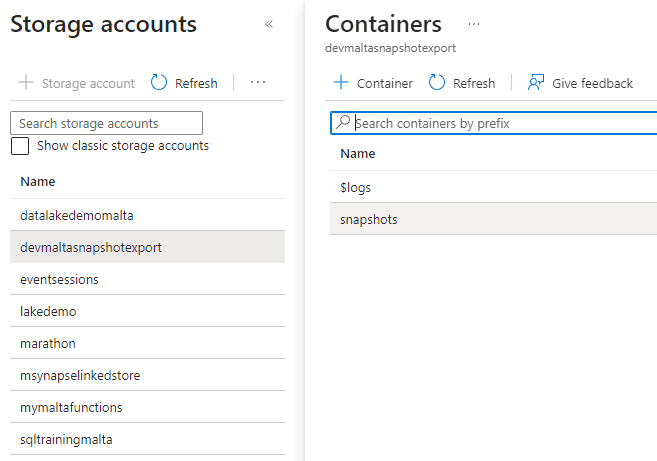
  1. On the following windows, point to the storage account, container and file

A screenshot of a computer Description automatically generated

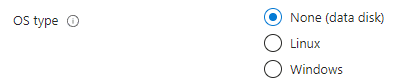
  1. On the OS Type options, select the operating system the disk contains. Otherwise, you can only use it as a data disk.

A white background with black dots Description automatically generated

  1. Select the VM architecture and disk size. This needs to be according to the original disk, otherwise the process will fail.

A white background with a black and white sign Description automatically generated with medium confidence

  1. Select the disk name, region and availability zone according to how you would like to create the new disk

A screenshot of a computer Description automatically generated

Create a new Virtual Machine

Once the disks are created, it’s time to create the Virtual Machine. The start of the process is simple: You open the OS disk and click the button to create a virtual machine.

A screenshot of a computer Description automatically generated

From this point, it’s almost a regular process of VM creation, but with the OS disk already selected. You can attach additional data disks as needed.

Summary

This process was very useful for me recently, avoiding making a completely new installation of a virtual machine. It may seem simple, but it’s full of tricks.


The post Move Disks or Virtual Machines between Tenants on Azure appeared first on Simple Talk.


from Simple Talk https://ift.tt/qNI8XbU
via