Monday, November 26, 2018

Transferring Data with JSON in SQL Server

JSON has two distinct uses, to transmit data and to store it. They are best considered separately. When you use JSON to store data, you are generally forced down the route of using a special-purpose database, though SQL Server is happy to accommodate JSON as an NVARCHAR(MAX). For transmitting and transferring data, JSON should be part of your toolkit because it is so widely used and supported. SQL server has at last provided enough functionality to allow us to use JSON to transmit data within applications and between applications and receive data from web services and network sources. There is a rich infrastructure of both standards, resources, and components that make this easy.

Why do we stick to ODBC and TDS to send and receive tables? Well, it is for three reasons; the conventions within ODBC quietly send the metadata, or ‘data about the data,’ along with the data itself. Secondly, TDS (Tabular Data Stream) is a very efficient application-layer protocol; finally, it is bullet-proof in its reliability. Now that JSON is acquiring a standard for JSON Schema which is being adopted widely, is it time to reconsider? With network speeds a thousand times faster than when SQL Server was first created, are we still bound to the traditional ways of transferring data? Should we consider other ways?

I have long had a dream of transferring data in such a way that the recipient has enough information to create a table automatically to receive the information. In other words, it transfers the metadata as well as the data. It makes it possible to transfer tables between different systems. Sure, ODBC actually does this, but it is not a file-based transfer.

I will be showing how to save SQL Server tables as JSON files that include the metadata and import them into SQL Server. We’ll test it out by attempting this on AdventureWorks.

If you are interested in checking out JSON to see if it works for you, I’ll be showing you how you can transfer both the data and the metadata or schema, using JSON with JSON Schema, with standard conventions, and avoid the quirks in the SQL Server implementation.

Why Bother with JSON Schema?

JSON Schema allows you to validate the contents of a JSON file and to specify constraints. It also provides a standard way of providing metadata for other purposes beyond JSON-based storage. MongoDB, for example, can use JSON Schema to validate a collection. NewtonSoft provides an excellent version of JSON that has full JSON Schema support and an online JSON Validator. You can even generate JSON Schemas from NET types. For me, the attraction is that I can avoid having to invent a way of transferring the metadata of file-based JSON Data. Data is always better with its metadata.

Why Use JSON at All When We Have Good Old CSV?

JSON wasn’t originally intended for relational data which is constrained by a schema or where the order of data within a row is invariant, as it is in CSV. However, raw JSON is good-natured enough not to object if you want to use it that way. No matter how you choose to use it, you’ll notice something useful if you are accustomed to CSV: JSON supports null values as well as the bit values true and false. At last, you can distinguish between a blank string and a null one.

If one can send the metadata in a way that is useful enough to allow creating a table successfully with it, then it is worth the effort. However, there are other benefits, because nowadays the front-end developers understand, and are happy with, JSON. They are content just to send and receive data in this format. This suits me, because they lose interest in accessing the base tables.

The CSV standard allows the first ‘header’ line to display the name of the column rather than the first line of data. The header line is in the same format as normal record lines. This goes some small way towards portability, but with JSON, we have the opportunity to associate far more of the metadata or a schema with the data. CSV can only be used effectively if both ends of the conversation know what every column means based on the name of the file and the header row, but with JSON, we don’t have to be so restrictive, because we can send a schema with the data.

I’ll explain more about this later, but first, we need to be confident that we are able to use JSON to reliably copy a table from one server to another. We will, for this article, stick to the most common way of rendering tabular data, as an array of objects. It is probably the simplest because it represents the way used by FOR JSON queries.

Transferring data as an array of objects.

We need to consider both the Data and the Schema. For this article, we’ll just stick to tables, rather than the broader topic of results of queries of maybe several tables. We need to provide a way of reading and writing these files.

There are some interesting things we have to take into account in reading data into a table.

  • OPENJson function can’t have certain deprecated datatypes in its ‘explicit schema’ syntax. We have to specify them as NVARCHAR(x)
  • FOR JSON cannot use some of Microsoft’s own CLR datatypes.
  • We have to cope properly with identity fields.
  • If importing data into a group of related tables, we need to temporarily disable all constraints before we start and turn them back on when we finish, and we need to wrap the operation in a transaction.
  • JSON files are, by convention, written in UTF-8 file format.

This makes the process a bit more complicated than you’d imagine and makes the requirement for a schema more important. We’ll look at what is required in small bites rather than the grand overview.

Writing the File Out

Here is what we’d like to achieve first: it is a JSON rendering of the AdventureWorks PhoneNumberType table, stored in a file. It contains both the data and the schema. You can keep data and schema separate if you prefer or have the two together in the one file. The schema has extra fields beyond the reserved JSON Schema fields just to make life convenient for us. It tells us where the table came from and what the columns consisted of. It also tells us if the columns are nullable. As we can add fields, we can even transfer column-level or table-level check constraints if we want to. The schema should have a unique identifier, the $id. Eventually, this should resolve to a reference to a file, but this is not currently a requirement. It is intended to enable the reuse of JSON schemas. It should also have a $schema keyword to identify the JSON object as a JSON schema. However, the schema can be blank, which means that all the JSON data with correct syntax that is validated against it passes validation. Here is an example:

{
   "schema":{
      "$id":"https://mml.uk/jsonSchema/Person-PhoneNumberType.json",
      "$schema":"http://json-schema.org/draft-07/schema#",
      "title":"PhoneNumberType",
      "SQLtablename":"[Person].[PhoneNumberType]",
      "SQLschema":"Person",
      "type":"array",
      "items":{
         "type":"object",
         "required":[
            "PhoneNumberTypeID",
            "Name",
            "ModifiedDate"
         ],
         "maxProperties":4,
         "minProperties":3,
         "properties":{
            "PhoneNumberTypeID":{
               "type":[
                  "number"
               ],
               "sqltype":"int",
               "columnNo":1,
               "nullable":0,
               "Description":""
            },
            "Name":{
               "type":[
                  "string"
               ],
               "sqltype":"nvarchar(50)",
               "columnNo":2,
               "nullable":0,
               "Description":""
            },
            "ModifiedDate":{
               "type":[
                  "string"
               ],
               "sqltype":"datetime",
               "columnNo":3,
               "nullable":0,
               "Description":""
            }
         }
      }
   },
   "data":[
      {
         "PhoneNumberTypeID":1,
         "Name":"Cell",
         "ModifiedDate":"2017-12-13T13:19:22.273"
      },
      {
         "PhoneNumberTypeID":2,
         "Name":"Home",
         "ModifiedDate":"2017-12-13T13:19:22.273"
      },
      {
         "PhoneNumberTypeID":3,
         "Name":"Work",
         "ModifiedDate":"2017-12-13T13:19:22.273"
      }
   ]
}

The schema object contains a valid JSON Schema for our result, tested to the json-schema.org standard (4 upwards). It enforces the object-within-array structure of the JSON and the order and general data type of each column. You’ll see that I’ve added some fields that we need for SQL Server to SQL Server transfer.
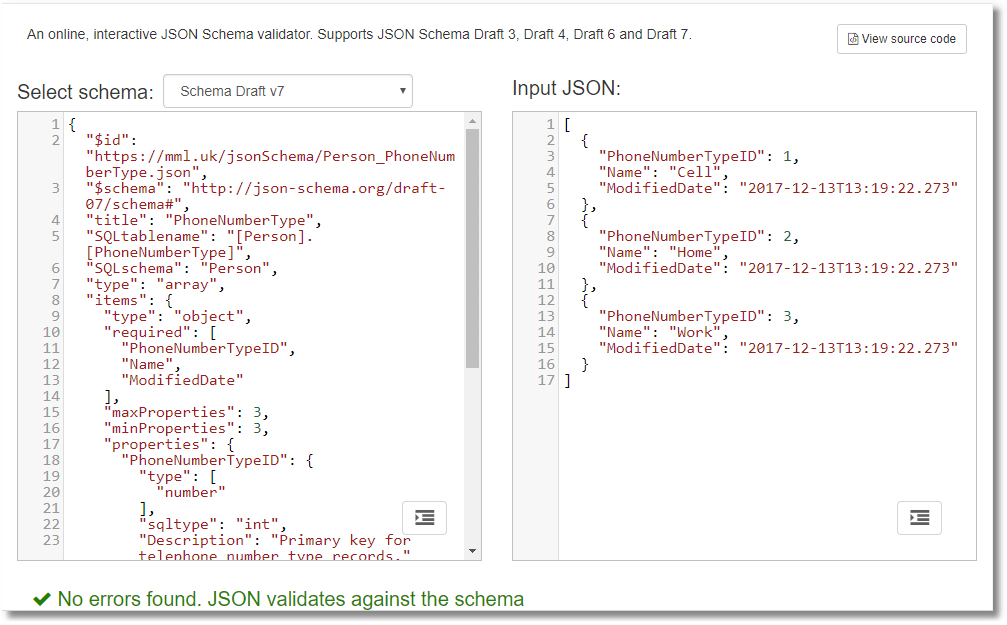
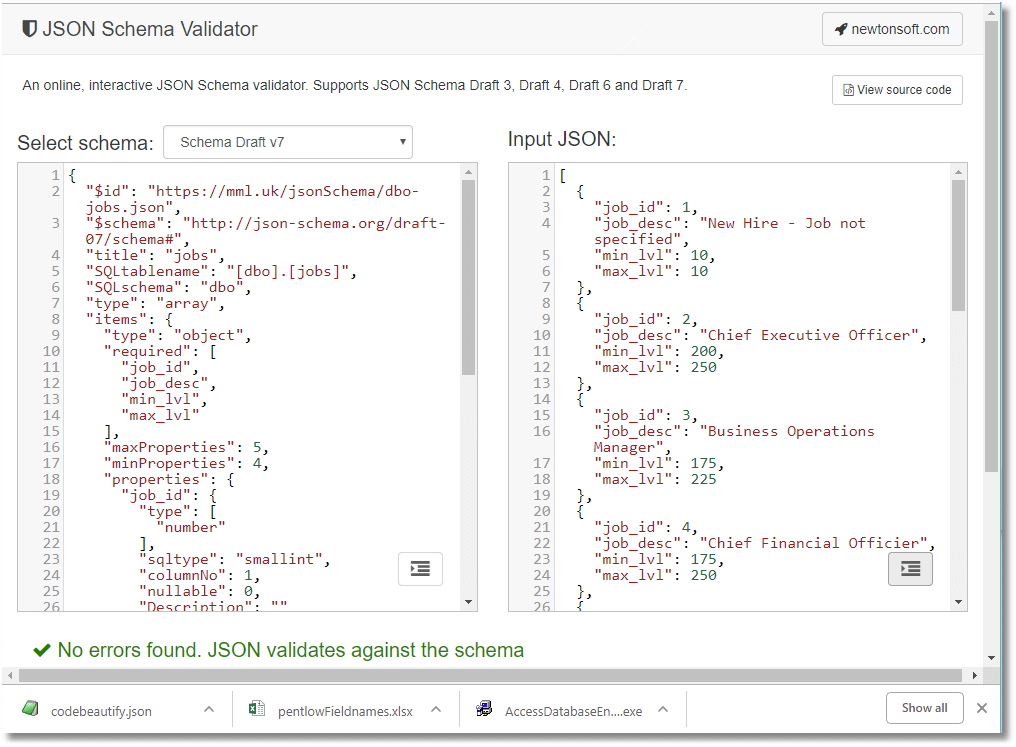
It is worth trying this out with the NewtonSoft validator seen above, manipulating the data and seeing when it notices! I haven’t added a regex to check the date format because our JSON is generated automatically, but there are a lot of useful checks you can add. This can be done in PowerShell and is a useful routine way of checking JSON data before you import it.

This schema is for the JSON version of the data as an array of objects. Fortunately, it is easy to generate the data because this is the natural way of FOR JSON AUTO.

declare @Thedata nvarchar(max)=
   (SELECT  * FROM adventureworks2016.person.PhoneNumbertype FOR JSON auto, INCLUDE_NULL_VALUES)
Print @TheData;

…which gives the result …

[
   {
      "PhoneNumberTypeID":1,
      "Name":"Cell",
      "ModifiedDate":"2017-12-13T13:19:22.273"
   },
   {
      "PhoneNumberTypeID":2,
      "Name":"Home",
      "ModifiedDate":"2017-12-13T13:19:22.273"
   },
   {
      "PhoneNumberTypeID":3,
      "Name":"Work",
      "ModifiedDate":"2017-12-13T13:19:22.273"
   }
]

The only complication is the fact that we need to include null values. Otherwise, the path specifications we need to use in OpenJSON to create a SQL result don’t always work, and the error it gives doesn’t tell you why. It is a good idea to provide a list of columns rather than a Select *, because we can then coerce tricky data types or do data conversions explicitly. If everything we have to do is as easy as that, it will be a short article.

We soon find out that it isn’t that easy.

SELECT * FROM Adventureworks2016.person.address FOR JSON auto, INCLUDE_NULL_VALUES

Gives the error

Alas, the JSON implementation has not yet come to grips with the geography datatype. Even to reliably export a table, we must spell out the columns if the table has CLR user types other than hierarchyid. This works.

SELECT AddressID, AddressLine1, AddressLine2,
       City, Address.StateProvinceID, PostalCode,
      Convert(VARBINARY(80),SpatialLocation) AS SpatialLocation, rowguid, ModifiedDate
            FROM Adventureworks2016.person.address FOR JSON auto, INCLUDE_NULL_VALUES

Although it provides the JSON, you need to carry the information about the SQL Server data type that the spatialLocation represents. As you can appreciate, to make it easy to consume a JSON document in SQL Server, you also need a schema.

Now we need to create the JSON.Schema of that JSON we just produced. There is a draft standard for this that is understood by the best .NET JSON package (NewtonSoft) as well as MongoDB 3.6 onwards. At the moment, it can do basic constraints and datatype checks, but it can also allow us to create a SQL table if we add sufficient information. Our extra information doesn’t interfere with JSON schema validation as long as we don’t use reserved words.

SQL Server doesn’t support any type of JSON schema information other than the one used in OpenJSON WITH. It is optimistically called ‘explicit schema.’ Although this is very useful, it can’t be transferred with the data or referenced from a URL. Sadly, it cannot be passed to the OpenJSON function as a string or as JSON. Ideally, one would want to use JSON Schema, which is now also used increasingly in MongoDB.

The application that is using the database will probably know about JSON Schema because the NewtonSoft JSON library is so popular and can pass it to you. Unfortunately, the datatypes in SQL Server are a rich superset of the basic JSON number, string, and Boolean. You won’t even get a datetime. JSON Schema, however, allows you to extend the basics with other fields, so we’ll do just that.

If you aren’t interested in JSON Schemas, you can still use them, just using { } or true as your schema, which means ‘anything goes’ or ‘live free and die, earlier than you think.’

We need to enforce nullability from the JSON perspective. This is done by defining the number type as an array. A nullable number allows both numbers and nulls, whereas a nullable string allows both nulls and strings. Because the sensible database developer adds descriptions to columns via the ms_description extended property, we can include that. We have added fields that aren’t part of the standard just to help us: SQLtype, column_ordinal, is_nullable, for example. This is allowed by the standard.

We use the handy sys.dm_exec_describe_first_result_set table function that gives us even more information than we want. I’m writing this for SQL Server 2017. SQL Server 2016 is usable, but the STRING_AGG() function is much neater for demonstration purposes than the XML concatenation trick.

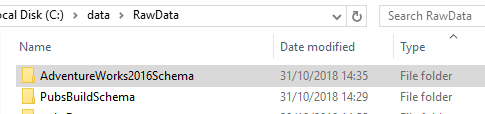
I will demonstrate, in this article, how to create a batch to save all the JSON Schemas for all the tables in the current database. But first, you’ll need two procedures. They are temporary so there is no mopping up to be done afterward, but you can easily make them permanent in a ‘utility’ database if they are useful to you later. The schemas are saved into a directory within C:\data\RawData\ on your server. (Obviously, you alter this to suit) The files will be stored in a subdirectory based on the name of the database, followed by Schema. Be sure to create the directory before running the code.
CREATE OR ALTER PROCEDURE  #CreateJSONSchemaFromTable
/**
Summary: >
  This creates a JSON schema from a table that
  matches the JSON you will get from doing a 
  classic FOR JSON select * statement on the entire table
Author: Phil factor
Date: 26/10/2018
Examples: >
  DECLARE @Json NVARCHAR(MAX)
  EXECUTE #CreateJSONSchemaFromTable @database='pubs', @Schema ='dbo', @table= 'authors',@JSONSchema=@json OUTPUT
  PRINT @Json
  SELECT @json=''
  EXECUTE #CreateJSONSchemaFromTable @TableSpec='pubs.dbo.authors',@JSONSchema=@json OUTPUT
  PRINT @Json
Returns: >
  nothing
**/
    (@database sysname=null, @Schema sysname=NULL, @table sysname=null, @Tablespec sysname=NULL,@jsonSchema NVARCHAR(MAX) output)
--WITH ENCRYPTION|SCHEMABINDING, ...
AS
DECLARE @required NVARCHAR(max), @NoColumns INT, @properties NVARCHAR(max);
                        
   IF Coalesce(@table,@Tablespec) IS NULL
                         OR Coalesce(@schema,@Tablespec) IS NULL
                           RAISERROR ('{"error":"must have the table details"}',16,1)
                        
                   IF @table is NULL SELECT @table=ParseName(@Tablespec,1)
                   IF @Schema is NULL SELECT @schema=ParseName(@Tablespec,2)
                   IF @Database is NULL SELECT @Database=ParseName(@Tablespec,3)
                   IF @table IS NULL OR @schema IS NULL OR @database IS NULL
                      RAISERROR  ('{"error":"must have the table details"}',16,1)
           
           DECLARE @SourceCode NVARCHAR(255)=
           (SELECT 'SELECT * FROM '+QuoteName(@database)+ '.'+ QuoteName(@Schema)+'.'+QuoteName(@table))
           SELECT 
             @properties= String_Agg('
               "'+f.name+'": {"type":["'+Replace(type,' ','","')+'"],"sqltype":"'+sqltype+'", "columnNo":'+ Convert(VARCHAR(3), f.column_ordinal)
                +', "nullable":'+Convert(CHAR(1),f.is_nullable)+', "Description":"'
               +String_Escape(Coalesce(Convert(NvARCHAR(875),EP.value),''),'json')+'"}',','),
             @NoColumns=Max(f.column_ordinal),
             @required=String_Agg('"'+f.Name+'"',',') 
             FROM
               ( --the basic columns we need. (the type is used more than once in the outer query) 
               SELECT 
                  r.name, 
                 r.system_type_name  AS sqltype, 
                 r.source_column,
                 r.is_nullable,r.column_ordinal,
                 CASE WHEN r.system_type_id IN (48, 52, 56, 58, 59, 60, 62, 106, 108, 122, 127)  
                    THEN 'number'
                   WHEN system_type_id = 104 THEN 'boolean' ELSE 'string' END
                 + CASE WHEN r.is_nullable = 1 THEN ' null' ELSE '' END AS type,
                 Object_Id(r.source_database + '.' + r.source_schema + '.' + r.source_table) AS table_id
                 FROM sys.dm_exec_describe_first_result_set
                    (@sourcecode, NULL, 1) AS r
               ) AS f
               LEFT OUTER JOIN sys.extended_properties AS EP -- to get the extended properties
                 ON EP.major_id = f.table_id
                AND EP.minor_id = ColumnProperty(f.table_id, f.source_column, 'ColumnId')
                AND EP.name = 'MS_Description'
                AND EP.class = 1
           
           SELECT @JSONschema =
             Replace(
               Replace(
                Replace(
                 Replace(
                   Replace('{
  "$id": "https://mml.uk/jsonSchema/<-schema->-<-table->.json",
  "$schema": "http://json-schema.org/draft-07/schema#",
  "title": "<-table->",
  "SQLtablename":"'+quotename(@schema)+'.'+quotename(@table)+'",
  "SQLschema":"<-schema->",
    "type": "array",
    "items": {
       "type": "object",
           "required": [<-Required->],
       "maxProperties": <-MaxColumns->,
       "minProperties": <-MinColumns->,
       "properties":{'+@properties+'}
        }
   }', '<-minColumns->', Convert(VARCHAR(5),@NoColumns) COLLATE DATABASE_DEFAULT
                         ) , '<-maxColumns->',Convert(VARCHAR(5),@NoColumns +1) COLLATE DATABASE_DEFAULT
                         ) , '<-Required->',@required COLLATE DATABASE_DEFAULT
                           ) ,'<-schema->',@Schema COLLATE DATABASE_DEFAULT
                     ) ,'<-table->', @table COLLATE DATABASE_DEFAULT
                  );
           
           
           IF(IsJson(@jsonschema)=0) 
                    RAISERROR ('invalid schema "%s"',16,1,@jsonSchema)
           IF @jsonschema IS NULL RAISERROR ('Null schema',16,1)
GO
go
CREATE OR ALTER PROCEDURE #SaveJSONToFile
  @TheString NVARCHAR(MAX),
  @Filename NVARCHAR(255),
  @Unicode INT=8 --0 for not unicode, 8 for utf8 and 16 for utf16
AS
  SET NOCOUNT ON
  DECLARE @MySpecialTempTable sysname
  DECLARE @Command NVARCHAR(4000)
  DECLARE @RESULT INT
 
--firstly we create a global temp table with a unique name
  SELECT  @MySpecialTempTable = '##temp'
       + CONVERT(VARCHAR(12), CONVERT(INT, RAND() * 1000000))
--then we create it using dynamic SQL, & insert a single row
--in it with the MAX Varchar stocked with the string we want
  SELECT  @Command = 'create table ['
       + @MySpecialTempTable
       + '] (MyID int identity(1,1), Bulkcol nvarchar(MAX))
insert into ['
       + @MySpecialTempTable
       + '](BulkCol) select @TheString'
  EXECUTE sp_ExecuteSQL @command, N'@TheString nvarchar(MAX)',
           @TheString
 SELECT @command 
--then we execute the BCP to save the file
  SELECT  @Command = 'bcp "select BulkCol from ['
          + @MySpecialTempTable + ']'
          + '" queryout '
          + @Filename + ' '
         + CASE @Unicode 
                     WHEN 0 THEN '-c' 
                     WHEN 8 THEN '-c -C 65001' 
                         ELSE '-w' END
          + ' -T -S' + @@ServerName
 SELECT @command 
     
  EXECUTE @RESULT= MASTER..xp_cmdshell @command
  EXECUTE ( 'Drop table ' + @MySpecialTempTable )
  RETURN @result
go

To create a valid JSON.Schema file in that #CreateJSONSchemaFromTable stored procedure, I’ve had to create it as a string because SQL Server’s FOR JSON couldn’t do all the work. That is the joy of JSON: it is so simple that you have the option of creating it as a string if the automatic version doesn’t quite do what you want. It is doing a few quite tricky things such as the array of JSON types that are necessary to check for nullability in JSON. You can verify it, too, with ISJSON() to be doubly certain it’s proper JSON, as I’ve done.

Once these procedures are in place, you can work considerable magic. To start fairly simply, here is how you can create the JSON for a specific table, both schema and data, and save it to disk on the server

DECLARE @TheJSONSchema NVARCHAR(MAX);
EXECUTE #CreateJSONSchemaFromTable @Tablespec = 'adventureworks2016.HumanResources.Employee',
  @jsonSchema = @TheJSONSchema OUTPUT;
DECLARE @TheJSONdata NVARCHAR(MAX) =
          (
          SELECT *
            FROM AdventureWorks2016.HumanResources.Employee
          FOR JSON AUTO, INCLUDE_NULL_VALUES
          );
DECLARE @TheJSON NVARCHAR(MAX) =
          (
          SELECT *
            FROM (VALUES (Json_Query(@TheJSONSchema), Json_Query(@TheJSONdata))) AS f (
            [schema], data
)
          FOR JSON AUTO, WITHOUT_ARRAY_WRAPPER
          );
EXECUTE #SaveJSONToFile @TheJSON,
'C:\data\RawData\HumanResources-Employee.json', 8;

You can, of course, save the JSON Schema file of all the tables in your database:

DECLARE @TheCommand NVARCHAR(4000)
SELECT @TheCommand='DECLARE @ourJSONSchema NVARCHAR(MAX) --our JSON Schema
EXECUTE #CreateJSONSchemaFromTable @TableSpec='''+Db_Name()+'.?'',@JSONSchema=@ourJSONSchema OUTPUT
DECLARE @destination NVARCHAR(MAX) = (Select ''C:\data\RawData\'+Db_Name()+'Schema\''+Replace(Replace(Replace(''?'',''.'',''-''),'']'',''''),''['','''')+''.json'')
Execute #SaveJSONToFile @theString=@ourJSONSchema, @filename=@destination'
EXECUTE sp_MSforeachtable @command1=@TheCommand

You can run the script to create the schema for all the tables of any database just by running it within the context of that database or add the USE directive.

Just to show that we have the power, here is how you can save all the JSON files, containing both the schema and data for all your tables all in one go. We still have some way to go because the CLR datatypes aren’t yet handled. We’ll deal with that soon.

DECLARE @TheCommand NVARCHAR(4000)
SELECT @TheCommand='
DECLARE @TheJSONSchema NVARCHAR(MAX) --our JSON Schema
EXECUTE #CreateJSONSchemaFromTable @TableSpec='''+Db_Name()+'.?'',@JSONSchema=@TheJSONSchema OUTPUT
DECLARE @destination NVARCHAR(MAX) = (Select ''C:\data\RawData\'+Db_Name()+'SchemaData\''+Replace(Replace(Replace(''?'',''.'',''-''),'']'',''''),''['','''')+''.json'')
DECLARE @TheJSONdata nvarchar(max)=
   (SELECT  * FROM '+Db_Name()+'.? FOR JSON auto, 
        INCLUDE_NULL_VALUES);
DECLARE @TheJSON NVARCHAR(MAX)=
(SELECT * 
 FROM (VALUES(Json_Query(@Thejsonschema), Json_Query(@TheJSONData)))f([schema],[data])
 FOR JSON AUTO, WITHOUT_ARRAY_WRAPPER);
 Execute #SaveJSONToFile @theString=@TheJSON, @filename=@destination'
 
EXECUTE sp_MSforeachtable @command1=@TheCommand

If you attempted this on AdventureWorks, you’ll appreciate that it will be a difficult article after all. This is because we have still to tackle the task of getting the JSON data when we have difficult datatypes such as CLR. Here is the procedure that will do that:

CREATE OR ALTER PROCEDURE #SaveJsonDataFromTable
  /**
Summary: >
  This gets the JSON data from a table 
Author: phil factor
Date: 26/10/2018
Examples: >
  USE pubs
  DECLARE @Json NVARCHAR(MAX)
  EXECUTE #SaveJsonDataFromTable 
     @database='pubs', 
         @Schema ='dbo', 
         @table= 'authors',
         @JSONData=@json OUTPUT
  PRINT @Json
Returns: >
  The JSON data
**/
  (@database sysname = NULL, @Schema sysname = NULL, @table sysname = NULL,
  @Tablespec sysname = NULL, @jsonData NVARCHAR(MAX) OUTPUT
  )
AS
  BEGIN
    DECLARE @Data NVARCHAR(MAX);
    IF Coalesce(@table, @Tablespec) IS NULL
    OR Coalesce(@Schema, @Tablespec) IS NULL
      RAISERROR('{"error":"must have the table details"}', 16, 1);
    IF @table IS NULL SELECT @table = ParseName(@Tablespec, 1);
    IF @Schema IS NULL SELECT @Schema = ParseName(@Tablespec, 2);
    IF @database IS NULL SELECT @database = ParseName(@Tablespec, 3);
    IF @table IS NULL OR @Schema IS NULL OR @database IS NULL
      RAISERROR('{"error":"must have the table details"}', 16, 1);
    DECLARE @SourceCode NVARCHAR(255) =
              (
              SELECT 'SELECT * FROM ' + QuoteName(@database) + '.'
                     + QuoteName(@Schema) + '.' + QuoteName(@table)
              );
    DECLARE @params NVARCHAR(MAX) =
              (
              SELECT 
                            String_Agg(
                  CASE WHEN user_type_id IN (128, 129, 130) THEN
                    'convert(nvarchar(max),' + name
                    + ') as "' + name + '"'
                  --hierarchyid (128) geometry (130) and geography types (129) can be coerced. 
                  WHEN user_type_id IN (35) THEN
                    'convert(varchar(max),' + name + ') as "'
                    + name + '"'
                  WHEN user_type_id IN (99) THEN
                    'convert(nvarchar(max),' + name + ') as "'
                    + name + '"'
                  WHEN user_type_id IN (34) THEN
                    'convert(varbinary(max),' + name
                    + ') as "' + name + '"' ELSE
                                            QuoteName(name) END, ', ' )
                FROM sys.dm_exec_describe_first_result_set(@SourceCode, NULL, 1)
              );
    DECLARE @expression NVARCHAR(800) =
      '
USE ' + @database + '
SELECT @TheData=(SELECT ' + @params + ' FROM ' + QuoteName(@database) + '.'
      + QuoteName(@Schema) + '.' + QuoteName(@table)
      + ' FOR JSON auto, INCLUDE_NULL_VALUES)';
    EXECUTE sp_executesql @expression, N'@TheData nvarchar(max) output',
            @TheData = @jsonData OUTPUT;
  END;
GO

You’d use it like this to get the data (make sure you create the directory first!):

USE WideWorldImporters
DECLARE @TheCommand NVARCHAR(4000)
SELECT @TheCommand='
Declare @Path sysname =''C:\data\RawData\'+Db_Name()+'Data\''
DECLARE @destination NVARCHAR(MAX) = 
(Select @path+Replace(Replace(Replace(''?'',''.'',''-''),'']'',''''),''['','''')+''.json'')
DECLARE @Json NVARCHAR(MAX)
  EXECUTE #SaveJsonDataFromTable 
     @database='''+Db_Name()+''',
         @tablespec= ''?'',
         @JSONData=@json OUTPUT
 Execute #SaveJSONToFile @theString=@Json, @filename=@destination'
 EXECUTE sp_MSforeachtable @command1=@TheCommand

To create files with the data and schema together, you’d do this

DECLARE @TheCommand NVARCHAR(4000)
SELECT @TheCommand='
DECLARE @TheJSONSchema NVARCHAR(MAX) --our JSON Schema
EXECUTE #CreateJSONSchemaFromTable @TableSpec='''+Db_Name()+'.?'',@JSONSchema=@TheJSONSchema OUTPUT
DECLARE @destination NVARCHAR(MAX) = (Select ''C:\data\RawData\'+Db_Name()+'SchemaData\''+Replace(Replace(Replace(''?'',''.'',''-''),'']'',''''),''['','''')+''.json'')
DECLARE @TheJsonData NVARCHAR(MAX)
  EXECUTE #SaveJsonDataFromTable 
     @database='''+Db_Name()+''', @tablespec= ''?'', @JSONData=@TheJsonData OUTPUT
DECLARE @TheJSON NVARCHAR(MAX)=
(SELECT * 
 FROM (VALUES(Json_Query(@Thejsonschema), Json_Query(@TheJSONData)))f([schema],[data])
 FOR JSON AUTO, WITHOUT_ARRAY_WRAPPER);
 Execute #SaveJSONToFile @theString=@TheJSON, @filename=@destination' 
EXECUTE sp_MSforeachtable @command1=@TheCommand

We can read out AdventureWorks into files, one per table, in around forty seconds. Sure, it takes a bit longer than BCP, but the data is easier to edit!

Reading the file back in

Now on another computer, we can pick the file up and easily shred it back into a table. We might want to complete one of two common tasks. If we are creating a table from the imported data, then we have to get the data from the schema and SELECT INTO the table. If we want to stock an existing table, then we want to INSERT INTO. In the second case, we can get the metadata from the table instead of the JSON file in order to do this.

Reading the JSON Data into an NVARCHAR(MAX) variable

This should work to read in the data from a file that is local to the server, but it doesn’t seem to import utf-8 data properly. However, for this test harness, it is OK.

DECLARE @JSONImport NVARCHAR(MAX) =
(SELECT  BulkColumn
FROM OPENROWSET (BULK 'C:\data\RawData\AdventureWorks2016SchemaData\HumanResources-Employee.json', SINGLE_CLOB, CODEPAGE='65001') AS json )

Shredding JSON into a table source manually

Now, assuming we have a JSON file that has both the schema and the data, we can do this to get a result when either doing a SELECT INTO or an INSERT INTO.

SELECT * FROM OpenJson(@JSONImport,'strict $.data') 
WITH
    (
        BusinessEntityID int '$.BusinessEntityID',
        NationalIDNumber nvarchar(15) '$.NationalIDNumber',
        LoginID nvarchar(256) '$.LoginID',
        --OrganizationNode hierarchyid '$.OrganizationNode',
        OrganizationLevel smallint '$.OrganizationLevel',
        JobTitle nvarchar(50) '$.JobTitle',
        BirthDate date '$.BirthDate',
        MaritalStatus nchar(1) '$.MaritalStatus',
        Gender nchar(1) '$.Gender',
        HireDate date '$.HireDate',
        SalariedFlag bit '$.SalariedFlag',
        VacationHours smallint '$.VacationHours',
        SickLeaveHours smallint '$.SickLeaveHours',
        CurrentFlag bit '$.CurrentFlag',
        rowguid uniqueidentifier '$.rowguid',
        ModifiedDate datetime '$.ModifiedDate'
    );

If you have made it to this point without reading the first part of the article, you might have thought that I’d typed all that SQL code out. No. I could have done it, but it’s a bit boring to do so, and I make mistakes.

You will notice that I had to comment out the organisationNode field. This is because CLR datatypes aren’t yet supported with the Explicit Schema (WITH (…)) syntax.

You need to do this instead

SELECT BusinessEntityID, NationalIDNumber, LoginID, Convert(HIERARCHYID,OrganizationNode) AS OrganizationNode,
      OrganizationLevel, JobTitle, BirthDate, MaritalStatus, Gender, HireDate,
      SalariedFlag, VacationHours, SickLeaveHours, CurrentFlag, rowguid,
      ModifiedDate
FROM OpenJson(@JSONImport,'strict $.data') 
WITH
    (
        BusinessEntityID int '$.BusinessEntityID',
        NationalIDNumber nvarchar(15) '$.NationalIDNumber',
        LoginID nvarchar(256) '$.LoginID',
        OrganizationNode NVARCHAR(100) '$.OrganizationNode',
        OrganizationLevel smallint '$.OrganizationLevel',
        JobTitle nvarchar(50) '$.JobTitle',
        BirthDate date '$.BirthDate',
        MaritalStatus nchar(1) '$.MaritalStatus',
        Gender nchar(1) '$.Gender',
        HireDate date '$.HireDate',
        SalariedFlag bit '$.SalariedFlag',
        VacationHours smallint '$.VacationHours',
        SickLeaveHours smallint '$.SickLeaveHours',
        CurrentFlag bit '$.CurrentFlag',
        rowguid uniqueidentifier '$.rowguid',
        ModifiedDate datetime '$.ModifiedDate'
    );

You’ll also find that you can’t use legacy types such a text, image and image either. In this case, you need to specify the equivalent MAX type instead.

Automating the Shredding of the JSON with the Help of JSON Schema

This means. that to import JSON reliably into a lot of tables, you will need to resort to assembling and executing code as a string using sp_executesql. This allows you to generate both the rather tedious column list and that rather daunting list of column specifications called the OpenJSON explicit schema automatically from the JSON Schema, or even an existing table if you wish. This now means that we can take any data from a file and read it straight into a suitable table.

We’ll start with a little test harness with a sample JSON schema and show how you can generate these two strings, the column specification, and the explicit schema. We need to do it in a way that will get around the restrictions of the OpenJSON implementation.

Declare @jsonSchema NVARCHAR(max)= '{
  "$id": "https://mml.uk/jsonSchema/Person-Address.json",
  "$schema": "http://json-schema.org/draft-07/schema#",
  "title": "Address",
  "SQLtablename":"Person.Address",
  "SQLschema":"Person",
  "type": "array",
  "items": {
    "type": "object",
        "required": ["AddressID","AddressLine1","AddressLine2","City","StateProvinceID","PostalCode","SpatialLocation","rowguid","ModifiedDate"],
    "maxProperties": 9,
    "minProperties": 9,
    "properties":{
    "AddressID": {"type":["number"],"sqltype":"int", "columnNo":1, "nullable":0, "Description":"Primary key for Address records."},
    "AddressLine1": {"type":["string"],"sqltype":"nvarchar(60)", "columnNo":2, "nullable":0, "Description":"First street address line."},
    "AddressLine2": {"type":["string","null"],"sqltype":"nvarchar(60)", "columnNo":3, "nullable":1, "Description":"Second street address line."},
    "City": {"type":["string"],"sqltype":"nvarchar(30)", "columnNo":4, "nullable":0, "Description":"Name of the city."},
    "StateProvinceID": {"type":["number"],"sqltype":"int", "columnNo":5, "nullable":0, "Description":"Unique identification number for the state or province. Foreign key to StateProvince table."},
    "PostalCode": {"type":["string"],"sqltype":"nvarchar(15)", "columnNo":6, "nullable":0, "Description":"Postal code for the street address."},
    "SpatialLocation": {"type":["string","null"],"sqltype":"geography", "columnNo":7, "nullable":1, "Description":"Latitude and longitude of this address."},
    "rowguid": {"type":["string"],"sqltype":"uniqueidentifier", "columnNo":8, "nullable":0, "Description":"ROWGUIDCOL number uniquely identifying the record. Used to support a merge replication sample."},
    "ModifiedDate": {"type":["string"],"sqltype":"datetime", "columnNo":9, "nullable":0, "Description":"Date and time the record was last updated."}}
        }
} '
/* the 'explicit schema'*/
SELECT String_Agg(quotename(property.[key])+' '+
  CASE sqltype 
    WHEN 'hierarchyid' THEN 'nvarchar(30)' 
    WHEN 'geometry'THEN 'nvarchar(100)'
    WHEN 'geography' THEN 'nvarchar(100)'
    WHEN 'image' THEN 'Varbinary(max)'
    WHEN 'text' THEN 'Varchar(max)' 
    WHEN 'ntext' THEN 'Nvarchar(max)'
    ELSE sqltype end+ ' ''$."'+property.[key]+'"''',',')
 FROM OpenJson(@jsonSchema,'strict $.items.properties') property
OUTER APPLY OpenJson(property.value) 
  WITH (sqltype VARCHAR(20)  'strict $.sqltype');
/* the parameter list */
  SELECT String_Agg(
  CASE WHEN sqltype IN ( 'hierarchyid', 'geometry', 'geography')
         THEN 'Convert('+sqlType+','+QuoteName(property.[key])+') AS "'+property.[key]+'"' 
    ELSE property.[key] end,', ')
 FROM OpenJson(@jsonSchema,'strict $.items.properties') property
OUTER APPLY OpenJson(property.value) 
  WITH (sqltype VARCHAR(20)  'strict $.sqltype');

In this case, what we get is this ‘explicit schema’ to place in OpenJSON’s WITH clause,

[AddressID] int '$."AddressID"',[AddressLine1] nvarchar(60) '$."AddressLine1"',[AddressLine2] nvarchar(60) '$."AddressLine2"',[City] nvarchar(30) '$."City"',[StateProvinceID] int '$."StateProvinceID"',[PostalCode] nvarchar(15) '$."PostalCode"',[SpatialLocation] nvarchar(100) '$."SpatialLocation"',[rowguid] uniqueidentifier '$."rowguid"',[ModifiedDate] datetime '$."ModifiedDate"'

…and a list of parameters for the SQL Expression …

AddressID, AddressLine1, AddressLine2, City, StateProvinceID, PostalCode, Convert(geography,[SpatialLocation]) AS "SpatialLocation", rowguid, ModifiedDate

Now we just need to put this all together in a way that is convenient! Note that you’ll need to add scripting logic to ensure that the schema is created first in the destination database.

CREATE OR ALTER PROCEDURE #SelectJsonIntoTable
  (@database sysname,  @JSONSchemaAndData NVARCHAR(MAX) 
  )
AS
DECLARE @ExplicitSchema NVARCHAR(MAX);
DECLARE @columnlist NVARCHAR(4000);
DECLARE @tableSpec sysname;
IF @JSONSchemaAndData IS NULL
OR @Database IS NULL
  RAISERROR('{"error":"must have the database and JSON details"}', 16, 1);
SELECT @ExplicitSchema =
 String_Agg(quotename(property.[key])+' '+
  CASE sqltype 
    WHEN 'hierarchyid' THEN 'nvarchar(30)' 
    WHEN 'geometry'THEN 'nvarchar(100)'
    WHEN 'geography' THEN 'nvarchar(100)'
    WHEN 'image' THEN 'Varbinary(max)'
    WHEN 'text' THEN 'Varchar(max)' 
    WHEN 'ntext' THEN 'Nvarchar(max)'
    ELSE sqltype end+ ' ''$."'+property.[key]+'"''',',')
 FROM OpenJson(@JSONSchemaAndData,'strict $.schema.items.properties') property
OUTER APPLY OpenJson(property.value) 
  WITH (sqltype VARCHAR(20)  'strict $.sqltype');
 SELECT  @columnlist = String_Agg(
  CASE WHEN sqltype IN ( 'hierarchyid', 'geometry', 'geography')
         THEN 'Convert('+sqlType+','+QuoteName(property.[key])+') AS "'+property.[key]+'"' 
    ELSE property.[key] end,', ')
 FROM OpenJson(@JSONSchemaAndData,'strict $.schema.items.properties') property
OUTER APPLY OpenJson(property.value) 
  WITH (sqltype VARCHAR(20)  'strict $.sqltype');
IF @ExplicitSchema  IS NULL RAISERROR('Cannot locate the schema', 16, 1);
SELECT @Tablespec=Json_Value(@JSONSchemaAndData,'strict $.schema.SQLtablename') 
DECLARE @command NVARCHAR(MAX) =
          (
          SELECT '
use ' + @database + '
   DROP TABLE IF EXISTS '+@TableSpec+'
   SELECT '+@columnlist+' into '+@TableSpec+' FROM OpenJson(@jsonData,''strict $.data'') 
   WITH
    (
    '+@explicitSchema+'
    );
')
     
EXECUTE sp_executesql @command, N'@jsonData nvarchar(max)', @jsonData = @JSONSchemaAndData;
GO

Inserting data into a new table

You can read in a file with the schema and data, importing into a new database, in this case called Demos:

DECLARE @JSONImport NVARCHAR(MAX) =
(SELECT  BulkColumn
FROM OPENROWSET (BULK 'C:\data\RawData\AdventureWorks2016SchemaData\HumanResources-Employee.json', SINGLE_CLOB, CODEPAGE='65001') AS json )
EXEC  #SelectJsonIntoTable @Database = 'Demos', @JSONSchemaAndData = @JSONImport;

Inserting into an Existing Table

In order to insert into an existing table, we need to use the principles we’ve shown. We can adopt several approaches to this. I prefer to use PowerShell with SMO, iterating through the tables, but the whole process can be done in SQL if need be. Whichever approach you take, the essential procedure is this which takes a file with just the data and inserts it into an existing table:

CREATE OR ALTER PROCEDURE #SaveJsonValueToTable
  (@database sysname = NULL, @Schema sysname = NULL, @table sysname = NULL,
  @Tablespec sysname = NULL, @jsonData NVARCHAR(MAX) 
  )
AS
DECLARE @parameters NVARCHAR(MAX);
DECLARE @hasIdentityColumn INT;
DECLARE @columnlist NVARCHAR(4000);
IF Coalesce(@table, @Tablespec) IS NULL
OR Coalesce(@Schema, @Tablespec) IS NULL
  RAISERROR('{"error":"must have the table details"}', 16, 1);
IF @table IS NULL SELECT @table = ParseName(@Tablespec, 1);
IF @Schema IS NULL SELECT @Schema = ParseName(@Tablespec, 2);
IF @database IS NULL SELECT @database = ParseName(@Tablespec, 3);
IF @table IS NULL OR @Schema IS NULL OR @database IS NULL
  RAISERROR('{"error":"must have the table details"}', 16, 1);
DECLARE @SelectStatement NVARCHAR(200) =
  (SELECT 'SELECT * FROM '+QuoteName(@database)+ '.'+ QuoteName(@Schema)+'.'+QuoteName(@table))
SELECT @parameters =
  String_Agg(
              QuoteName(name) + ' '
              + CASE f.system_type_name WHEN 'hierarchyid' THEN 'nvarchar(30)'
                  WHEN 'geometry' THEN 'nvarchar(100)'
                  WHEN 'geography' THEN 'nvarchar(100)'
                  WHEN 'image' THEN 'Varbinary(max)'
                  WHEN 'text' THEN 'Varchar(max)'
                  WHEN 'ntext' THEN 'Nvarchar(max)' ELSE f.system_type_name END
              + ' ''$."' + name + '"''',
              ', '
            ), @hasIdentityColumn = Max(Convert(INT, is_identity_column)),
  @columnlist = String_Agg(name, ', ')
  FROM sys.dm_exec_describe_first_result_set(@SelectStatement, NULL, 1) AS f;
IF @parameters IS NULL RAISERROR('cannot execute %s', 16, 1, @SelectStatement);
DECLARE @command NVARCHAR(MAX) =
          (
          SELECT '
use ' +     @database + '
Delete from ' + QuoteName(@database)+ '.'+ QuoteName(@Schema)+'.'+QuoteName(@table)
                 + CASE WHEN @hasIdentityColumn > 0 THEN
                          '
SET IDENTITY_INSERT ' + QuoteName(@database)+ '.'+ QuoteName(@Schema)+'.'+QuoteName(@table) + ' ON ' ELSE '' END + '
   INSERT INTO ' + QuoteName(@database)+ '.'+ QuoteName(@Schema)+'.'+QuoteName(@table) + ' (' + @columnlist + ')
   SELECT ' + @columnlist + ' FROM OpenJson(@jsonData) 
   WITH
    (
  ' +       @parameters + ' );
' +         CASE WHEN @hasIdentityColumn > 0 THEN '
SET IDENTITY_INSERT ' + QuoteName(@database)+ '.'+ QuoteName(@Schema)+'.'+QuoteName(@table) + ' OFF ' ELSE '' END
          );
EXECUTE sp_executesql @command, N'@jsonData nvarchar(max)', @jsonData = @jsonData;
GO

We didn’t have to use the schema because we can get everything we need from the table. Note that if you opt to have a single JSON document that holds both the data and the schema, you need to alter the OpenJson(@jsonData) to OpenJson(@jsonData, 'strict $.data')in the procedure.

Conclusion

If you want to copy data between SQL Server databases, nothing matches the performance of native mode BCP. If, on the other hand, you are sharing data with a range of heterogeneous data stores, services or applications, then you need to use JSON, I reckon. Nowadays, it is best to pass the schema with the data and the rise of the JSON Schema standard means that now we can do it reliably with checks for data integrity. Sure, we can stick to CSV, and it is great for legacy systems if you can find a reliable way of doing it for SQL Server, but CSV has no standard schema yet, and the application developers understand JSON better.

I get a certain pleasure in being able to write data straight into a database without the preliminaries of puzzling out the schema that would be required from a CSV file. It is so fast that I weep for all those lost hours doing it the hard way.

I also look forward to being able to check and validate data before I allow it anywhere near the database. Somehow JSON schema has opened up new possibilities.

The post Transferring Data with JSON in SQL Server appeared first on Simple Talk.


from Simple Talk https://ift.tt/2Qhjdzy
via

Friday, November 16, 2018

How to validate JSON Data before you import it into a database.

If you are, as you should be, checking JSON data in a whole lot of files before you import them into your database, you would do well to use JSON Schema, because you can run a number of checks such as regex checks that can’t be done any other way, and it is usually possible to detect bad data

Obviously, the most immediate value that the relational database person gets from doing this chore is to check that all the required (not null) columns are there for every row, and that they have the right sort of data. This can be done in very general terms if you use the ‘type’ field, but far more precisely if you are handy with PCRE regex.

In a nutshell, JSON Schema defines the way that you’ve structured your JSON document, the data types and constraints upon that data. It is extensible in that you can add your own special-purpose fields. It is ideal for tabular data because it can define how you represent columns, and what their names are. It can also enforce the structure so that tables and grids are safe within a JSON document.

If you have a very small amount of data, you can do the validation in an online JSON Validator such as the NewtonSoft JSON Schema Validator at https://www.jsonschemavalidator.net/.

This is currently the best way of building up a JSON Schema, and trying out the features of the validator, because you can build and test the rules you create against a subset of the table data.

Validation runs are a different problem Obviously, doing this in an online app will soon become tiresome, even with the smallest database. Imagine having to do this with a regular data feed or REST webservice! It is, however, possible to automate this.

There are many different ways of automating the validation process, using a range of platforms and frameworks. As I’m mostly using PowerShell for database scripting, I do it that way. I use NewtonSoft’s JSON.NET validator.

Imagine that you need to validate the aging classic database ‘Pubs’.

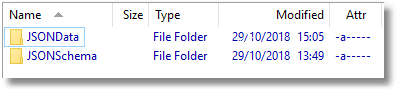
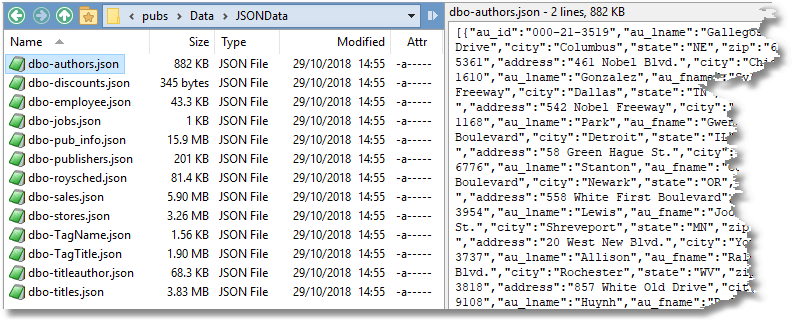
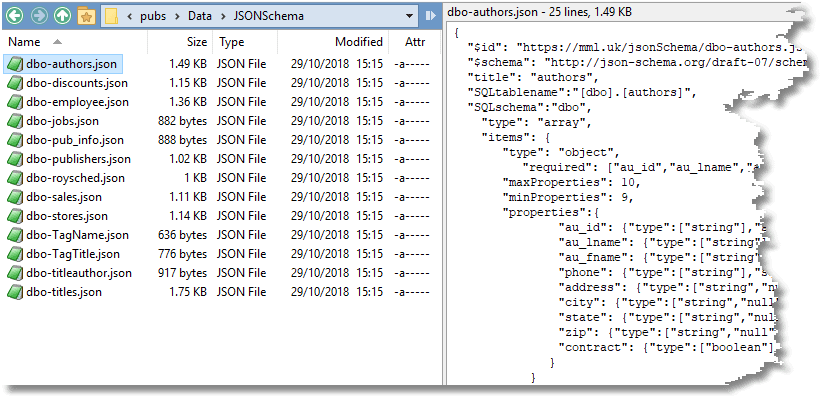
You have a data directory

You have a directory with the JSON data, one file per table, named after the table.

You also have a sibling directory with the schemas. (I’ve shown elsewhere how to generate the basic schemas from a SQL Server database, ready for your refinements.

I’m not suggesting that this is ideal, merely the way that I’ve set up the demo.

Now we can validate the two.

This is done here as a separate script, but it is likely to be part of an ingestion process. Your schemas will probably stay there, saved in source control for each data feed.

$ErrorActionPreference = "Stop"
# enter the base directory 
$Path = 'S:\work\programs\SQL\ScriptsDirectory\PentlowMillServ\pubs\Data'
# ...and the names of the subdirectories
$SchemaDirectory = 'JSONSchema\'
$DataDirectory = 'JSONData\'
# all this following section thanks to James Newton-King
$NewtonsoftJsonPath = Resolve-Path -Path "lib\Newtonsoft.Json.dll"
$NewtonsoftJsonSchemaPath = Resolve-Path -Path "lib\Newtonsoft.Json.Schema.dll"

Add-Type -Path $NewtonsoftJsonPath
Add-Type -Path $NewtonsoftJsonSchemaPath


# define the validator type
$source = @'
    public class Validator
    {
        public static System.Collections.Generic.IList<string> Validate(Newtonsoft.Json.Linq.JToken token, Newtonsoft.Json.Schema.JSchema schema)
        {
            System.Collections.Generic.IList<string> messages;
            Newtonsoft.Json.Schema.SchemaExtensions.IsValid(token, schema, out messages);
            return messages;
        }
    }
'@
Add-Type -TypeDefinition $source -ReferencedAssemblies $NewtonsoftJsonPath, $NewtonsoftJsonSchemaPath
# end of James Newton-King's code. Thanks, James.

Get-ChildItem "$($Path)\$($DataDirectory)" -Filter *.json | select Name | Foreach{
# do every file in the directory        
        $JSON = [IO.File]::ReadAllText("$($Path)\$($DataDirectory)$($_.Name)")
        $Schema = [IO.File]::ReadAllText("$($Path)\$($SchemaDirectory)$($_.Name)")
# parse the JSON files documents into a tokenised form
        $Token = [Newtonsoft.Json.Linq.JToken]::Parse($JSON)
        $Schema = [Newtonsoft.Json.Schema.JSchema]::Parse($Schema)
# do the validation, using the parsed documents 
        $ErrorMessages = [Validator]::Validate($Token, $Schema)
        if ($ErrorMessages.Count -eq 0)
        { write-host "Schema is valid" } #just for the test. I don't approve of write-host!
        else #I've selected just the first five because usually a whole column is wrong!
        { $ErrorMessages | Select-Object -First 5 | foreach{ write-warning $_ } }

This isn’t the only way of doing this. There are plenty of validators, but the JSON.NET validator is a good place to start if you are already heavily into PowerShell. For more details of JSON Schema, see http://json-schema.org/

The post How to validate JSON Data before you import it into a database. appeared first on Simple Talk.


from Simple Talk https://ift.tt/2QI78QU
via
Thursday, November 15, 2018

Are Tech Conferences Worth It?

In September, thousands of IT professionals, developers, and trainers descended on Orlando, FL, for Microsoft’s Ignite conference. This was Microsoft’s chance to make big announcements about artificial intelligence, Azure, SQL Server 2019, DevOps, and much more. The keynotes were live-streamed, and all the sessions are available for streaming on demand. From a distance, there was a palpable excitement seen from tweets and blog posts about the event.

I didn’t go to Ignite, but I did attend PASS Summit in early November. This is the premier Microsoft Data Platform conference, and it is typically held in Seattle. This was the 20th PASS Summit and the 15th for me. I had quite a few responsibilities at the event including speaking, the Women in Tech luncheon, and other Redgate related commitments. I did manage to attend four sessions. I do wish now that I had attended more, but I know that I can always watch the recordings later. It was a hectic week and it took me a couple of days to recover once home.

Conferences are expensive to attend. Travel costs, conference fees, and time away from the office are often difficult to justify. Some shops allow only one or two team members to go per year so that everyone eventually gets a chance. I think it is a good idea to send multiple people from a team so that they can attend different sessions and bring back what they learned.

For some people in tech, attending their favourite conference each year is an important benefit that may cause them to consider other employment if the benefit is taken away. For a few people, it is so worthwhile that they spend their personal time and own funds to attend if the option is not available from their employer. I had to do that for a couple of years when my former employer cut back on training. I felt it was worth it, and I was happy not to miss the conference.

Even though there is a high cost, there are many reasons to attend. Not only do these conferences have outstanding educational sessions, they are a chance to chat with industry experts from the community and engineers from Microsoft and other vendors. It’s also beneficial to meet peers (eventually they become friends) to share war stories and ideas. There are an overwhelming number of options for learning and networking at every conference. It’s a great way to find someone you can ask for advice or, possibly, find your next employer or employee.

Conferences are a great way for companies like Microsoft to showcase their latest technology. I think the biggest benefit for organisations from conferences is employee satisfaction and morale. Employees come back from conferences energized, enthused, and recharged. They will have new ideas about how to solve old problems and learn what’s happening next in their field. Some may be inspired to boost their careers by becoming speakers at future conferences.

Even in this digital age where just about anything can be done remotely, nothing beats attending a conference in person.

Commentary Competition

Enjoyed the topic? Have a relevant anecdote? Disagree with the author? Leave your two cents on this post in the comments below, and our favourite response will win a $50 Amazon gift card. The competition closes two weeks from the date of publication, and the winner will be announced in the next Simple Talk newsletter.

The post Are Tech Conferences Worth It? appeared first on Simple Talk.


from Simple Talk https://ift.tt/2PuoKCZ
via
Wednesday, November 14, 2018

Getting Excel Data as JSON: Rainfall and Sheep-Counting

You might think that it is easy to get JSON data from a spreadsheet, and there are plenty of utilities around that are based on the idea that it is trivial. If such data was strictly tabular, then it might be.  The problem is that any conversion tool makes assumptions about the way that data is structured, whether it is row- or column-oriented, whether it has headers, or row labels, and so on. The whole joy of excel is that it allows you a great deal of leeway in the way that you lay out your data. You might use headers, labels or ranges. There seems to be no end to the human ingenuity in finding creative ways of structuring data. The safest way I’ve ever found to automate the harvesting of data from a spreadsheet is to automate the process in PowerShell.

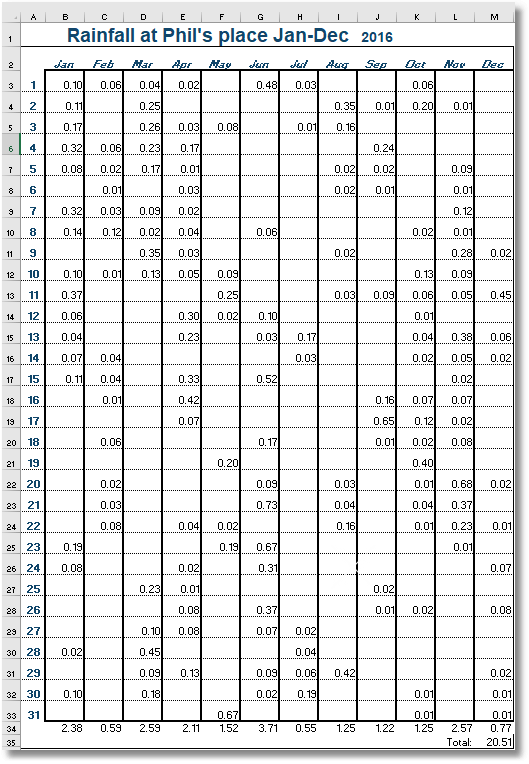
Sometimes, the requirement is just too trivial for an automated task. Let’s take a couple of simple tasks. Both these are based on what amounts to a form. As a developer, I occasionally have to deal with JSON-based files that amount to configuration information. For my first example, I will take a simple calendar form that allows someone to record a daily measurement such as the hours worked, the profit, the output, or whatever. We’ll do it for rainfall in inches.

A data person will groan slightly. This is a pivot that is friendlier to humans than machines. It has added totals. It has places where there is no data. What we need is a json file, object-within-array, that deals with all this. You won’t get very far just turning the format to JSON. Here is a sample spreadsheet. I’ll add a version to this article.

I’ve taken an existing format and added very few tweaks. The year in the top title is actually an integer value that is in a separate call to the merged-right-aligned cell containing the rest of the title. This makes it easy for us to detect what year the data applies to.

We then add a cell underneath the form. This is going to grow to the same number of cells in the same shape as the cells with the data in it.

In the cell formula, we add an expression

=IF(LEN(TRIM(E3))>0,CONCAT("{""date"":""",TEXT(DATE($J$1,COLUMN()-1,$A3),"yyyy-mm-dd"),""",""rainfall"":",E3,"},"),"")

What this means is ‘if the length of the trimmed string in the rainfall cell is greater than zero, then create a string that consists of the date label followed by a string value in ISO format that consists of the year column we added at the top, the column number -1 to tell us the month number, and the day taken from the column at the beginning of the row. Then we add the ‘rainfall’ label and the value in the cell. If no data in the call then we don’t record anything. ’

For this first cell we get the string ‘{“date”:”2016-01-01″,”rainfall”:0.1},’ displayed. It looks suspiciously like a fragment of JSON. Those liberally-sprinkled $ signs are absolute references to either columns and rows. The cell reference with both column and rows specified as absolute references is to get the year.

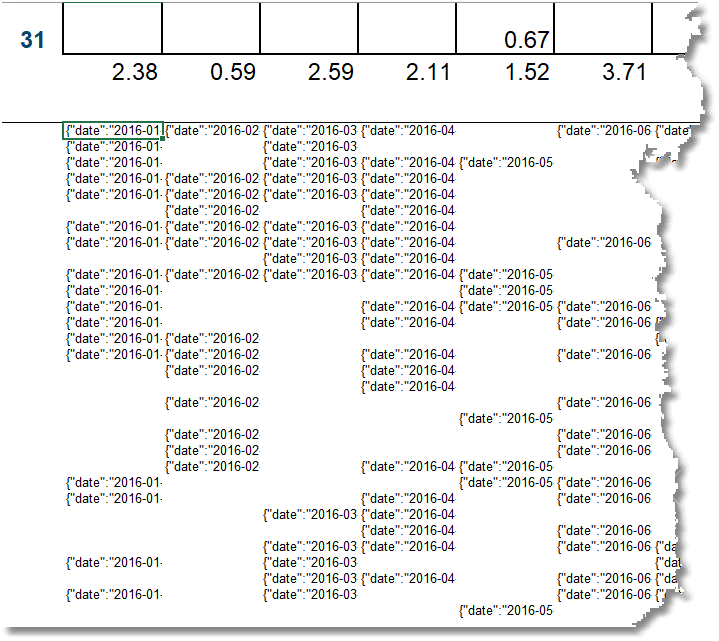
Now we use the ‘fill down’ and ‘fill right’ features to copy this expression to a block of cells of the same size and shape as the data(twelve across by thirty-one down), below this new cell. We now get a sort of doppelganger matrix with the fragment of JSON rather than the data.

You can’t see the full JSON equivalent of each cell as the display is truncated. You can see that it is a sparse matrix because if there is no rainfall then there is nothing to record (this is a philosophical argument I’ll grant you)

We have one last duty to perform. We need to concatenate all these together and lop off the final comma before wrapping it up into the array square-brackets.

In the cell below the block we’ve just created, we add this expression as a formula

=CONCAT("[",LEFT(CONCAT(B36:M66),LEN(CONCAT(B36:M66))-1),"]")

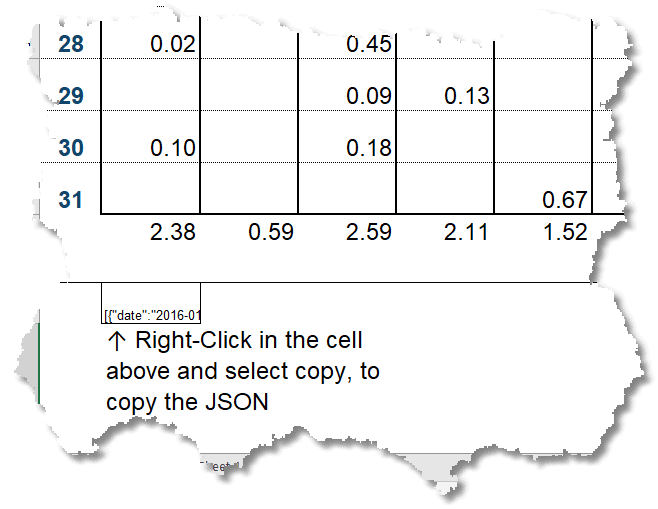
This cell will contain the legal JSON array of objects.

We then hide the rows containing the calculation calls, leaving the form and the final call containing the final JSON.

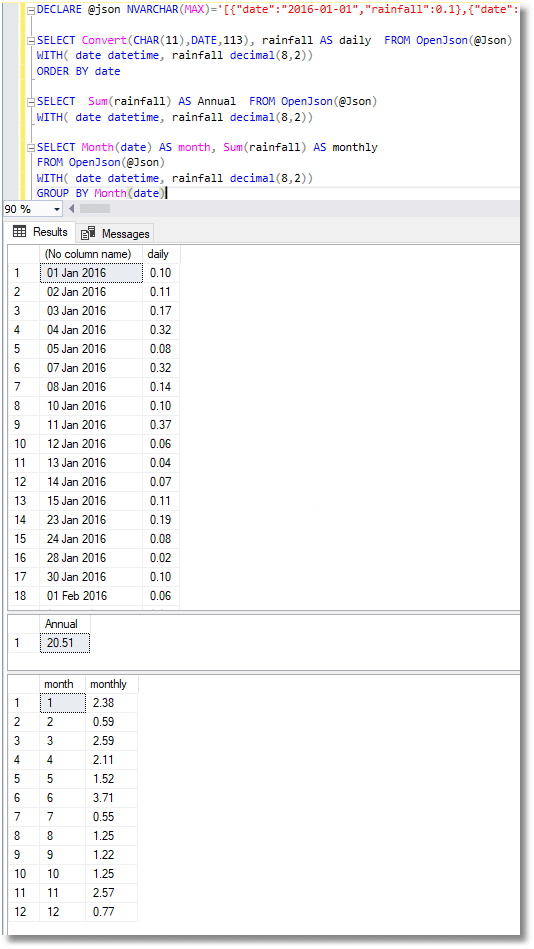
So we do that, and save it to file or whatever we need to do. We paste it into SSMS and check that it has faithfully recorded the data. With a relief, we find that our totals have tallied and we can go on to add the data to our database.

Now that we have a template that allows easy entry and checking of the data, we also have no fear of getting the data into a database.

What if the data is a wee bit more complex?

A while back, I was writing a blog here and needed a sample of JSON that wasn’t distracting and had no compromising information. I knocked together a database in Excel, using tables from the Wikipedia. I used Excel. I quite often gather information like this because of Excel’s easy way with HTML tables.

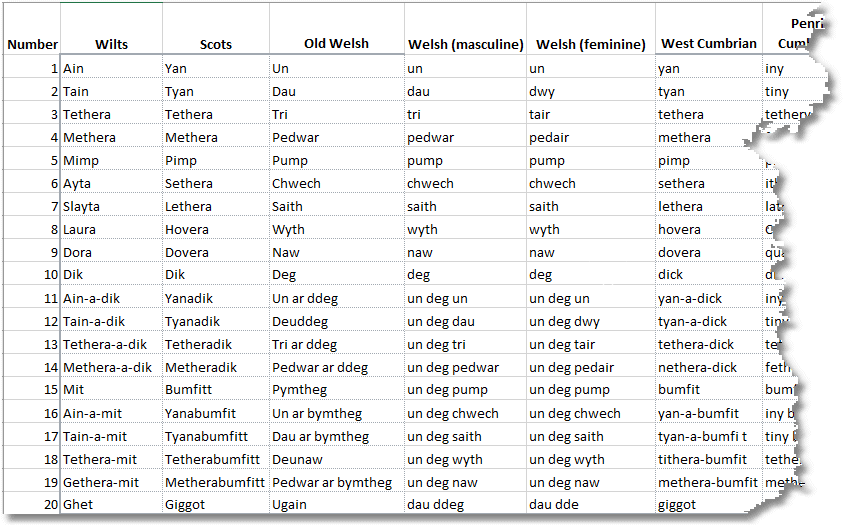
I have to confess that I got rather interested in the information I gathered, which was the dialect words for counting in twenties, which was once used throughout Britain for simple counting tasks. It is interesting because it is a survival of the old Brythonic language used before Roman imperialism. There was a craze amongst folklorists in the 1850s for collecting instances of it being used. It was lucky for modern linguists that they did as it was, even then, dying out.

Please imagine that it is your valuable business data and that what we have is the output of all our manufacturing plants month by month: something like that.

Here is a section of the spreadsheet

I added the cells in a similar way to that I’ve just described for the yearly calendar data. As I kept finding more and more strings, going back into books published in the 1860s, I had to keep adding columns for each new region was found. It had to be extensible.

This is an array of ‘region’ objects, each of which has an array of word objects.To illustrate the fact that this data was rather more complex, I’ve just reduced it to two numbers in the sequence array rather than the original twenty. Each JSON document in our collection has an embedded array.

  [{
     "region": "Wilts",
     "sequence": [{
        "number": 1,
        "word": "Ain"
     }, {
        "number": 2,
        "word": "Tain"
     }]
  }, {
     "region": "Scots",
     "sequence": [{
        "number": 1,
        "word": "Yan"
     }, {
        "number": 2,
        "word": "Tyan"
     }]
  }]

 Excel can cope perfectly easily with this.

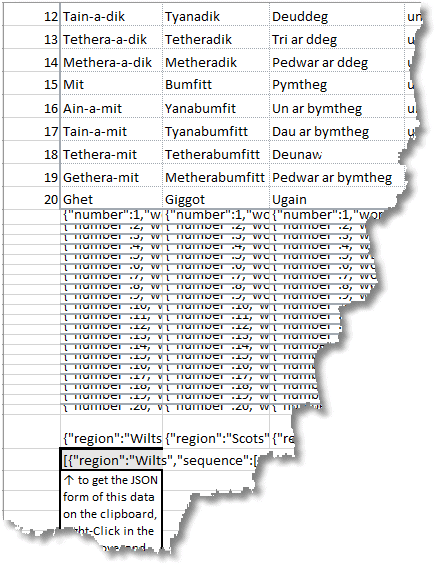
Below the form in which we entered our sheep-counting words for each region of the British isles, we create a block of calls of the same size and shape. Into the first cell we add a formula:

=IF(LEN(TRIM(B2))>0,CONCAT("{""number"":",$A2,",""word"":""",B2,"""},"),"")

This means ‘ if the value exists, join together the string ‘number’ in parentheses, followed by the data in the corresponding first row that tells us what number we are counting, and then provide the value within the column for this particular region. Add a comma. Otherwise leave a blank string’.

What we get is

{"number":1,"word":"Ain"},

We then copy this down and across by filling down and then right. It will be twenty rows and the same number of columns as there are regions.

Now we can assemble the region objects in the row below. The first call will have this expression

=CONCAT("{""region"":""",B1,""",""sequence"":[",LEFT(CONCAT(B22:B41),LEN(CONCAT(B22:B41))-1),"]},")

This means ‘join together or concatenate a string consisting of the key “region”: followed by name of the region (B1). Then we have the key “sequence” followed by an array open-square-brackets. Then we join together all twenty of the values of the cells above into an array.

This will, in the first column, give us the value …..

{
  "region": "Wilts",
  "sequence": [{
    "number": 1,
    "word": "Ain"
  }, {
    "number": 2,
    "word": "Tain"
  }, {
    "number": 3,
    "word": "Tethera"
  }, {
    "number": 4,
    "word": "Methera"
  }, {
    "number": 5,
    "word": "Mimp"
  }, {
    "number": 6,
    "word": "Ayta"
  }, {
    "number": 7,
    "word": "Slayta"
  }, {
    "number": 8,
    "word": "Laura"
  }, {
    "number": 9,
    "word": "Dora"
  }, {
    "number": 10,
    "word": "Dik"
  }, {
    "number": 11,
    "word": "Ain-a-dik"
  }, {
    "number": 12,
    "word": "Tain-a-dik"
  }, {
    "number": 13,
    "word": "Tethera-a-dik"
  }, {
    "number": 14,
    "word": "Methera-a-dik"
  }, {
    "number": 15,
    "word": "Mit"
  }, {
    "number": 16,
    "word": "Ain-a-mit"
  }, {
    "number": 17,
    "word": "Tain-a-mit"
  }, {
    "number": 18,
    "word": "Tethera-mit"
  }, {
    "number": 19,
    "word": "Gethera-mit"
  }, {
    "number": 20,
    "word": "Ghet"
  }]
}

This needs to be provided to every column with a regional variation in it by filling right to the row across all the columns representing a region.

Now we need to join all the regions together to give us the document, and to give it the array enclosing-brackets and nick out the final comma

This is done by a final expression in the first data column

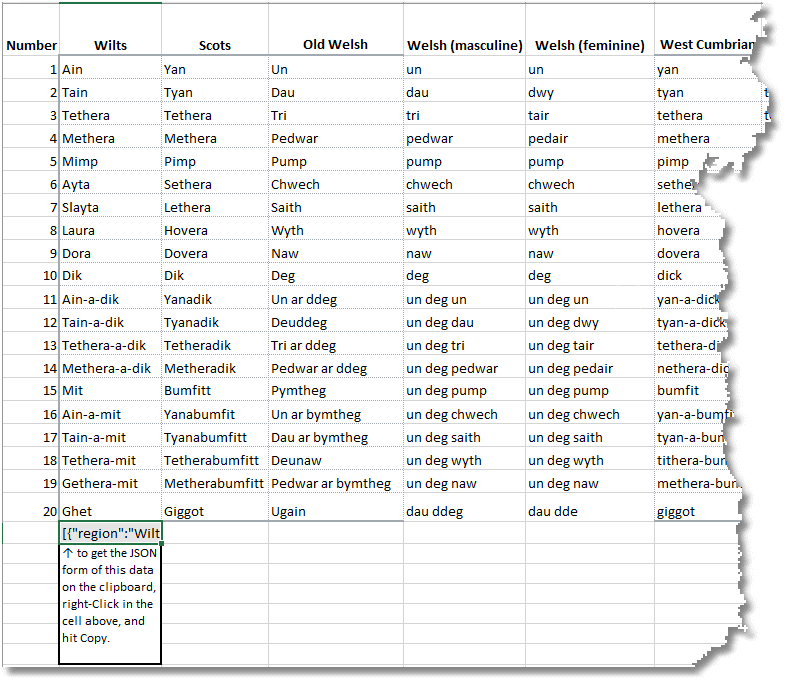
=CONCAT("[",LEFT(CONCAT(B42:AU42),LEN(CONCAT(B42:AU42))-1),"]")

Here is the spreadsheet with the rows un-hidden

And the final version

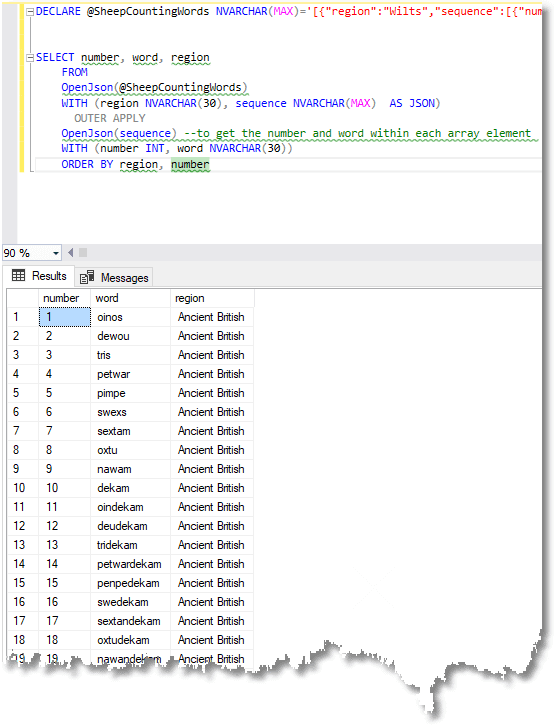
And we check out the JSON in SSMS

We can, (and have done), added many regional variations, merely by selecting a column, copying it, and inserting the copied column. This copies all the relevant formulas. I thin merely changed the data in the copied data-cells.

Conclusion

This technique works and saves a lot of time in transferring data. It saves time in gathering data due to excel’s wonderful promiscuity on collecting data. It saves time in importing the data into SQL Server because one can be so flexible in the way we arrange the JSON schema. We can even cope with data that goes across multiple worksheets. You may need to ‘escape’ the data if it contains banned characters such as the double-quote marks used as string delimiters or the control characters.

I’ve found that this technique works best where excel data is structured into forms in a reasonably disciplined ways, so it is worth taking time to create handy templates. I’ve noticed that a lot of business people relate very quickly to weekly or monthly charts of data and will be grateful for an accommodation towards the way that they naturally think about data.

The collection of the data can be done by ODBC or by automation of Excel rather than cut’ n paste. See Getting Data between Excel and SQL Server using ODBC for the details.

Sample Spreadsheets

SampleRainfall

YanTanTethera

The post Getting Excel Data as JSON: Rainfall and Sheep-Counting appeared first on Simple Talk.


from Simple Talk https://ift.tt/2RShpu0
via

SQL Server Auditing for HIPAA and SOX – Part 4

The series so far:

  1. Introduction to HIPAA and SOX — Part 1
  2. HIPAA and Database Administration — Part 2
  3. SOX and Database Administration — Part 3
  4. SQL Server Auditing for HIPAA and SOX — Part 4

Your organization might be storing data in a SQL Server database that’s subject to regulations such as the Health Insurance Portability and Accountability Act of 1996 (HIPAA) or the Sarbanes-Oxley Act of 2002 (SOX). If you’re a DBA managing such a database, one of the most important steps you can take is to implement an auditing strategy that monitors user activity for behavior that could lead to noncompliance.

Auditing provides a record of activities that can be used for performing forensic analysis in order to determine whether an incident has occurred and, if so, its full impact. Not only can this help to discover malicious activities but also to curb unintentional behavior that might put an organization at risk. For example, auditing can show which user ran an UPDATE statement against sensitive data in a specific table as well as who modified database objects or altered the permissions granted to a login.

Because of the important role that auditing plays in protecting data, Microsoft began incorporating auditing capabilities within the database engine starting in SQL Server 2008, with the introduction of SQL Server Audit. Since then, Microsoft has made several improvements to the service, although the core functionality remains the same.

SQL Server Audit is free in all SQL Server editions. When first introduced in SQL Server 2008, the Standard edition did not support some of the more granular auditing capabilities. Since SQL Server 2016 SP1, however, all editions include all SQL Server Audit features, making it a valuable tool for any sized organization.

Implementing SQL Server Audit

You can use SQL Server Audit to monitor user activity at the instance (server) level, at the database level, or both. To monitor activity, SQL Server Audit uses Extended Events, a configurable event framework built into the database engine. Extended Events is considered a replacement for SQL Trace because of its lower performance overhead.

SQL Server Audit is made up of several components. The top-level component is the audit object, a container for organizing the server and database audit settings and for delivering the final audit logs. You create an audit object at the instance level before configuring any other audit components. Each instance can support multiple audits.

When defining an audit, you must specify a destination, or target, for the audited data. The data can be saved to files on the local machine or to a network share. The files are automatically generated with the .sqlaudit extension.

You can also save audit data to the Windows Application event log or Windows Security event log. The Security log provides greater protection, but you must ensure that the appropriate permissions have been granted before you can save data to this log.

For each audit object, you can add a single server audit specification, which determines what type of events will be audited at the server level. Like the audit object, the specification is created at the instance level.

When you configure a server audit specification, you will need to add one or more action groups. An action group is a collection of actions that determine what events are monitored. An action is essentially a single event. For example, the action group DATABASE_CHANGE_GROUP raises an event when a database is created, altered, or dropped. The event is the execution of the CREATE, ALTER, or DROP statement. The action groups configured on a server audit specification monitor events across the entire SQL Server instance.

An audit object can also contain one or more database audit specifications, which are created at the database level. Each audit can include only one database audit specification per database. However, you can add either action groups or individual actions to a database audit specification.

The events raised by the action groups or actions in a database audit specification are specific to the database where the specification is defined. For example, you can add the DATABASE_OBJECT_CHANGE_GROUP action group in order to raise an event when a CREATE, ALTER, or DROP statement is executed against the database. However, you can also add individual actions. For instance, you can add a SELECT action to raise an event if a SELECT statement is executed or add an UPDATE action to raise an event if an UPDATE statement is executed.

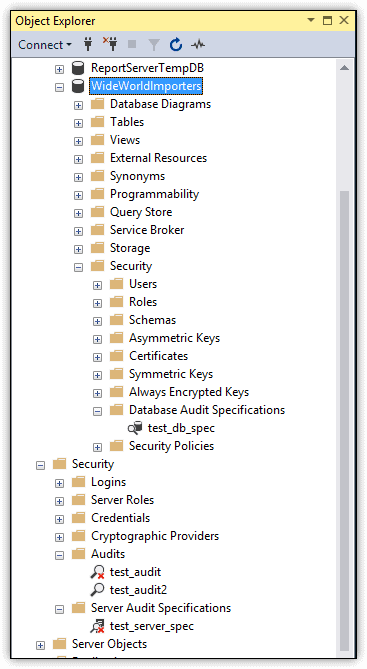
You can use T-SQL to define the SQL Server Audit components, or you can use the SQL Server Management Studio (SSMS) interface. Once created, the components appear in Object Explorer, either at the database level or server level. For example, Figure 1 shows Object Explorer with the Security node expanded for both the WideWorldImporters database and for the server instance. The database includes one database audit specification, and the instance includes one server audit specification and two audit objects. The test_db_spec database audit specification and the test_audit2 audit object are both enabled. The other components are disabled, as indicated by the red X.

Figure 1. SQL Server Audit components in Object Explorer

You can define audit objects on an instance based on your specific requirements and management preferences. For example, you can set up an audit that contains only a server audit specification and then set up a second audit that contains a database audit specification for each user database that stores sensitive data. In this way, you can enable or disable server-level or database-level audits independently of each other.

Setting up an audit in SQL Server is a fairly straightforward process. You define an audit object, configure the necessary audit specifications, and then enable each component. Feodor Georgiev provides an excellent overview of this process in his Simple Talk article SQL Server Security Audit Basics.

What to Audit in SQL Server

What is perhaps the biggest challenge in setting up SQL Server Audit is to determine exactly what data to audit to ensure compliance with HIPAA, SOX, or both. It might be tempting to simply audit everything, but this approach adds overhead, produces a vast amount of unnecessary data, and makes analyzing that data increasingly difficult. The more precise you can be when setting up auditing, the more effective the overall process.

Before you implement auditing, you need to understand what you are legally obligated to audit. Your organization might have additional requirements that go beyond the regulations, but you should still know what is required. In addition, you should capture a snapshot of your instance’s security context before you start auditing so you understand who has what permissions in the event that something gets change that should not have been changed. Again, refer to Feodor Georgiev’s article.

Be aware, however, that auditing can produce massive amounts of data, so you must be prepared to handle all that information. This means, in part, that you’ll likely need to set up a system for archiving the data. More importantly, you must ensure that the audit data is secure throughout every phase of the audit and review processes, using encryption, permissions, VPNs, and other mechanisms as appropriate. Another important step is to audit the auditing process itself. For example, you can use the AUDIT_CHANGE_GROUP server-level action group to raise an alert whenever an audit object is created, modified, or deleted.

When determining which actions to audit, you should carefully review the HIPAA and SOX regulations to determine which ones are applicable to your organization. For example, Section 164.312 of the HIPAA Security Rule states that the covered entity must protect electronic protected health information from “improper alteration or destruction.” And Section 401 of the SOX regulations states that all financial information included in the SEC reports or in “any public disclosure or press or other release” shall not contain untrue statements or omit the facts necessary to understanding the corporation’s financial condition.

From both of these sections, you can deduce that data must be protected against wrongful deletions or modifications, whether done intentionally or accidently. As a result, when configuring your audit, you’ll need to add actions or action groups that help you track data modifications and deletions to ensure no questionable actions have taken place.

To this end, you’ll likely include database-level audit actions such as INSERT, UPDATE and DELETE when setting up database audit specifications. But these actions alone might not be enough to ensure that all the necessary objects are being monitored. As a result, you might also want to add such components as the action group DATABASE_OBJECT_CHANGE_GROUP, which raises alerts when a CREATE, ALTER, or DROP statement is executed against any database object.

You can refer to the previous articles in this series for more specifics about the HIPAA and SOX regulations that could apply to SQL Server data, but keep in mind that these articles are no substitute for a thorough review of the regulations themselves when it comes to ensuring that you’re addressing all potential issues. You should also consider bringing in outside expertise if you’re uncertain how to comply with any of the regulations and what actions or action groups to monitor.

How to View the Audit Data

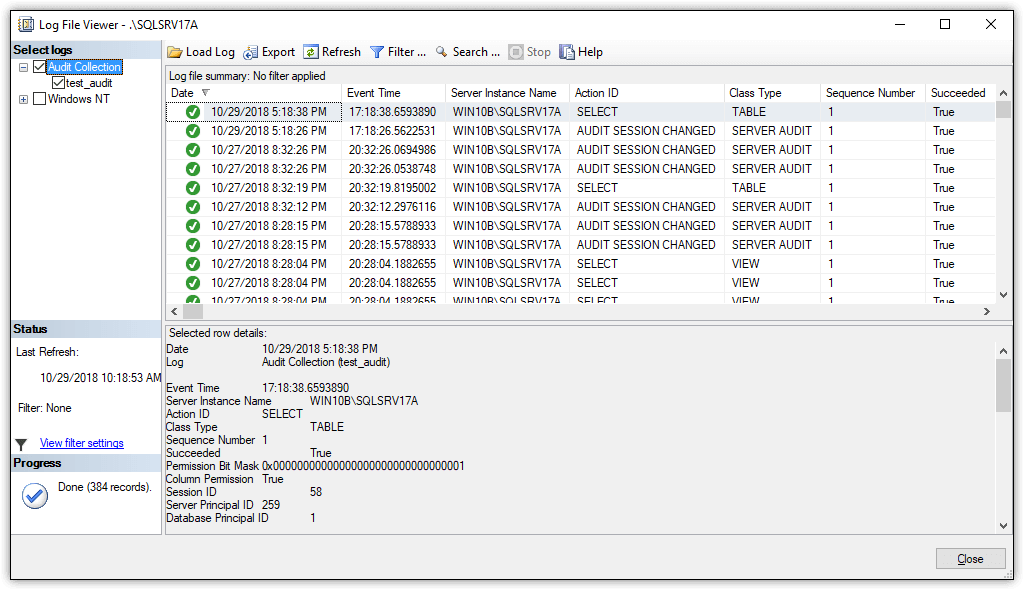
The way in which you access the audit data depends on your target. If you saved the data to files, you can use the Log File Viewer in SSMS to view the data, as shown in Figure 2. To access the Log File Viewer, right-click the audit in Object Explorer and then click View Audit Logs.

Figure 2. Viewing audit data in the Log File Viewer

In this case, the first item listed in the Log File Viewer is based on an alert generated when running the following query against the WideWorldImporters database:

SELECT TOP(10) * FROM Sales.Invoices;

The event is listed in the log file here because a database audit specification had been set up with the SELECT action included.

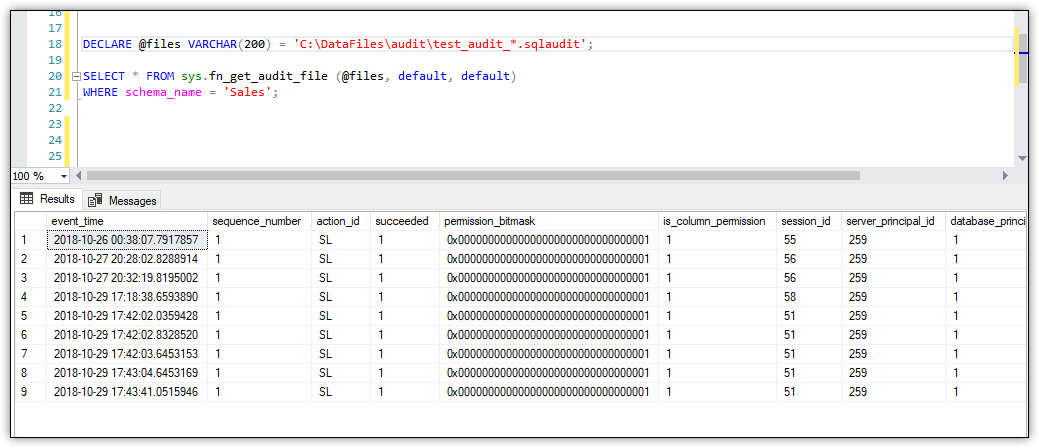
You can also view the audit data by using the sys.fn_get_audit_file table-valued function. For example, the following SELECT statement uses the function to access the audit logs for the test_audit audit object:

DECLARE @files VARCHAR(200) = 'C:\DataFiles\audit\test_audit_*.sqlaudit';
SELECT * FROM sys.fn_get_audit_file (@files, default, default)
WHERE schema_name = 'Sales';

Notice that the WHERE clause limits the results to the alerts generated on the Sales schema in the WideWorldImporters database, returning the events shown in Figure 3. In this case, the query returns only nine rows, one for each raised event, but in a production environment, you might see hundreds or thousands of rows, if not more.

Figure 3. Using the sys.fn_get_audit_file function to view audit data

Microsoft generally recommends that you use the Log File Viewer over the sys.fn_get_audit_file function because the viewer provides the data in a more user-friendly format. The viewer also includes filtering capabilities to better refine the information. That said, a little creative T-SQL will also get you the data you need when using the function. Plus, this approach is useful if you want to read the logs outside of SSMS, such as through an automated monitoring solution.

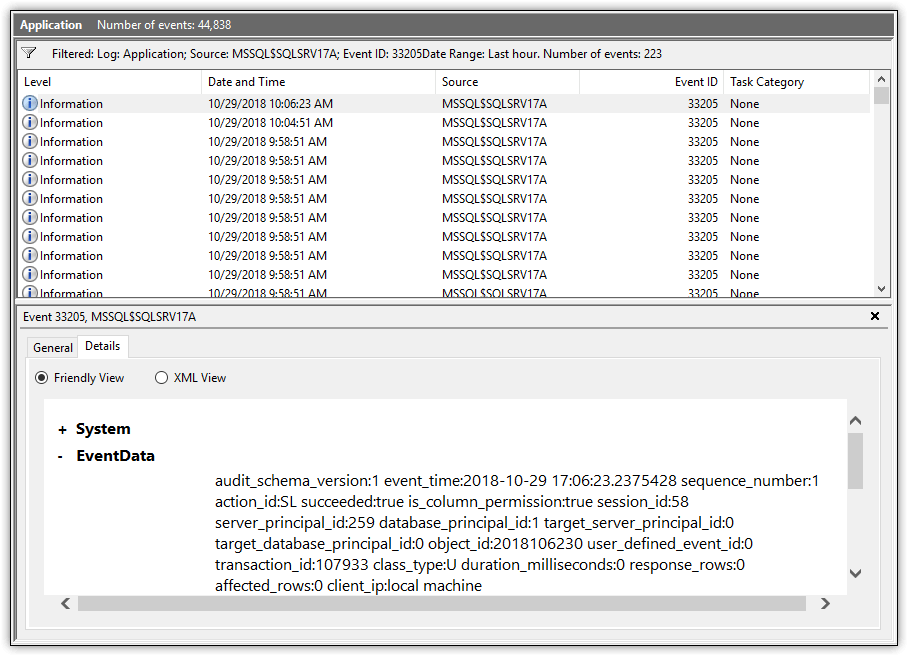
If you instead save the audit data to the Application or Security logs, you can use the Windows Event Viewer to access the data, as shown in Figure 4. Event Viewer lets you filter the data and view details about each event. You can also view the data as XML or export it to a file, using one of several of the available formats.

Figure 4. Viewing audit data in Windows Event Viewer

When audit data is saved to a Windows log, you can also use a tool such as PowerShell to retrieve the data directly. In this way, you can write scripts that pull the data you need from the logs when you need them, just like you can when using the sys.fn_get_audit_file function.

Regardless of how you save or view the audit data, you’ll find that the information is essentially the same. For example, an event might include the event time, database, schema, table, and T-SQL statement, if applicable. Each event also includes a category, or column, named action_id, which indicates the action that occurred to trigger the event. In figure 4, for example, the action_id value is SL, which is the abbreviation used to indicate that the action was a SELECT statement.

When you view the audit data through the Log File Viewer in SSMS, the action_id value is listed as the action’s full name. For example, if the action that triggered the event was a SELECT statement, the action_id value is SELECT. However, when you use any of the other tools to view the event data, you get only the abbreviations, which is why the value is listed as SL in Figure 4.

If you’re unsure what an abbreviation means, you can use the sys.dm_audit_actions dynamic management view to retrieve a list of the abbreviations and their meanings.

No matter how the audit data is saved or accessed, the bigger challenge lies in the fact that there can be massive amounts of information to monitor. Unfortunately, SQL Server does not include any useful solutions for working with the data once it’s been collected, other than to review it manually. As a result, you’ll need to set up your own system for monitoring the data or turn to a third-party solution such as EventTracker, which provides a tool for consolidating, managing and monitoring SQL Server Audit data (either through the Application log or Security log). Other options include the Splunk Add-on for SQL Server or LOGbinder for SQL Server.

Making the Most of SQL Server

For DBAs managing sensitive data stored in SQL Server databases, SQL Server Audit provides a powerful option for helping to ensure that their organizations remain in compliance with the HIPAA or SOX regulations.

In most cases, however, auditing will not be enough. For example, audit data might show who ran an UPDATE statement against a table, but it won’t tell you what the data was before it was modified. For that, you need to turn to such tools as triggers, Change Data Capture, or temporal tables. Temporal tables are a feature introduced in SQL Server 2016 that make it possible to track a table’s history of data changes.

No matter what tools you use, auditing will remain a pivotal component in any SQL Server compliance strategy. Fortunately, implementing auditing is a relatively straightforward process. The bigger challenges come when trying to decide what actions to audit and how to handle all the collected data. The better you understand the HIPAA and SOX regulations and the more thoroughly you plan your auditing strategy, the more effective your results and the better your chances of remaining in compliance.

The post SQL Server Auditing for HIPAA and SOX – Part 4 appeared first on Simple Talk.


from Simple Talk https://ift.tt/2Tb7qkU
via

Voice Commands in Unity

You don’t see it very often, but voice commands are no stranger to the world of video games. Games that could be played using your voice have existed since the late 90s with games like Hey You, Pikachu and Seaman being two notable examples from that time. Even now, with a little searching, you can easily find a game online that requires a microphone and your voice to play. What if you were told that you can make your own voice-controlled experience? As long as you have Unity and a microphone to test the project, you can!

In a moment you’ll be creating a project that will be controlled using nothing but your voice. You will, of course, need a mic to be able to run the project. A single cube will be created, and you will be able to command the cube to change colors, spin in a certain direction, make a sound, and print a message to Unity’s Debug Log. Accomplishing this will require Unity to look for certain phrases, which you will define. If what you say matches the phrase you define in code, then a user-defined function will be performed.

Setting Up

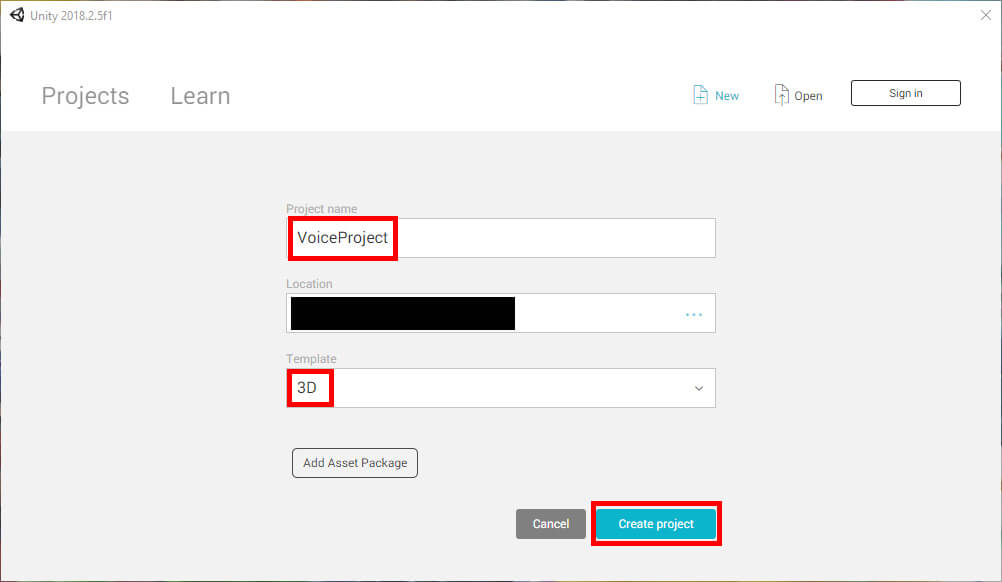
Upon starting Unity, you will need to create a new project.

Figure 1: Creating a new project.

Give the project the name VoiceProject, then specify the project location. This example images will be of a 3D project, but you can apply the same concepts in a 2D project as well. Once everything is set up, click Create Project.

Figure 2: Naming the project.

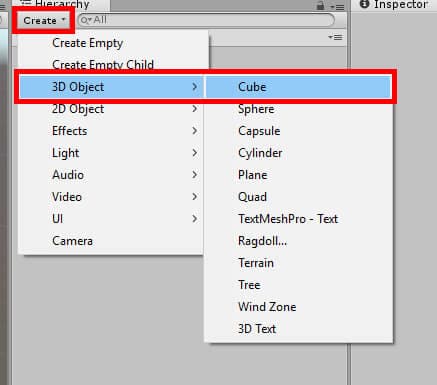
The first thing you’ll be doing is creating the Cube object needed for the project. In the Hierarchy window click Create->3D Object->Cube. For this project, you can leave the object to the default Cube name.

Figure 3: Creating a cube object.

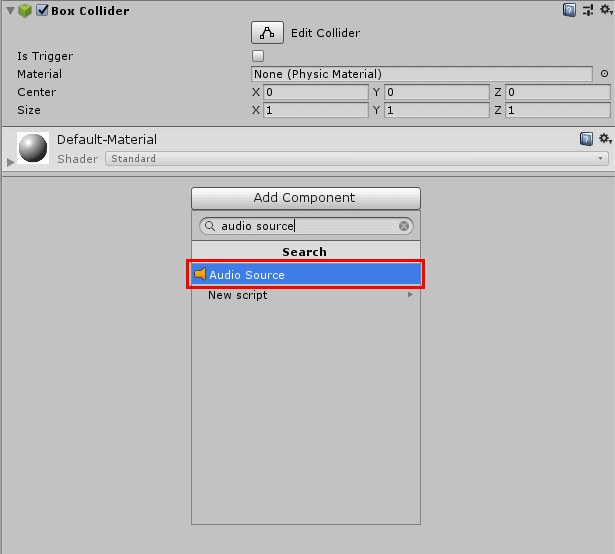
Once the object has been created, you’ll need to add an Audio Source component to it. In the Inspector window, click the Add Component button. Search for Audio Source then select the component at the top of the list.

Figure 4: Adding a new component.

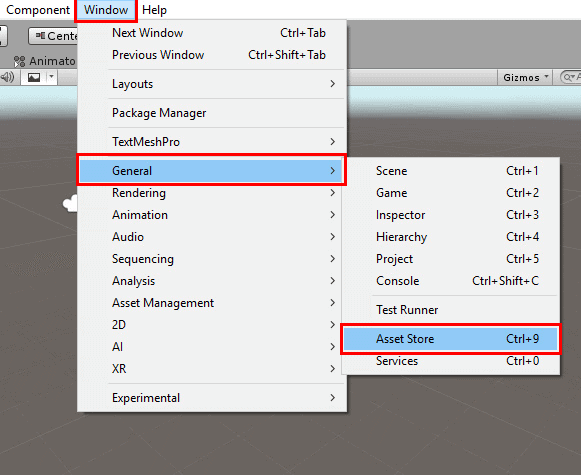
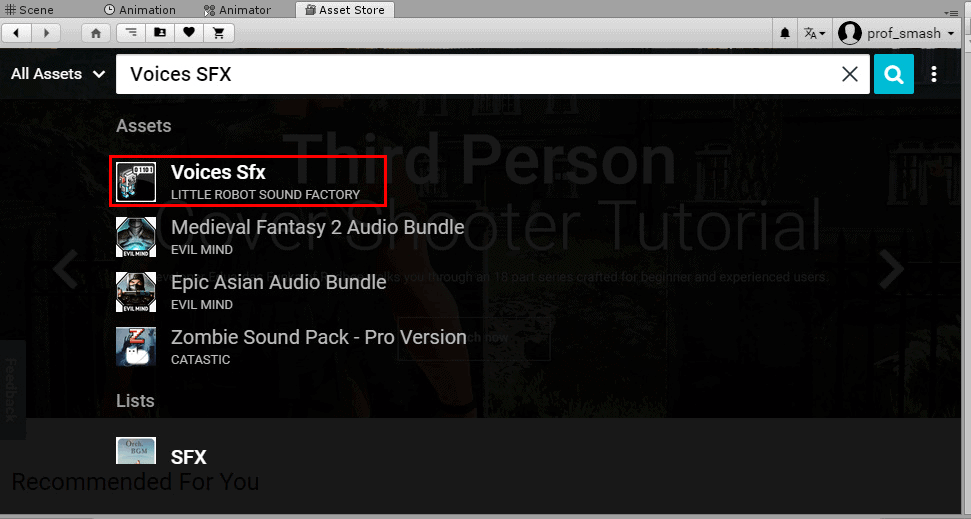
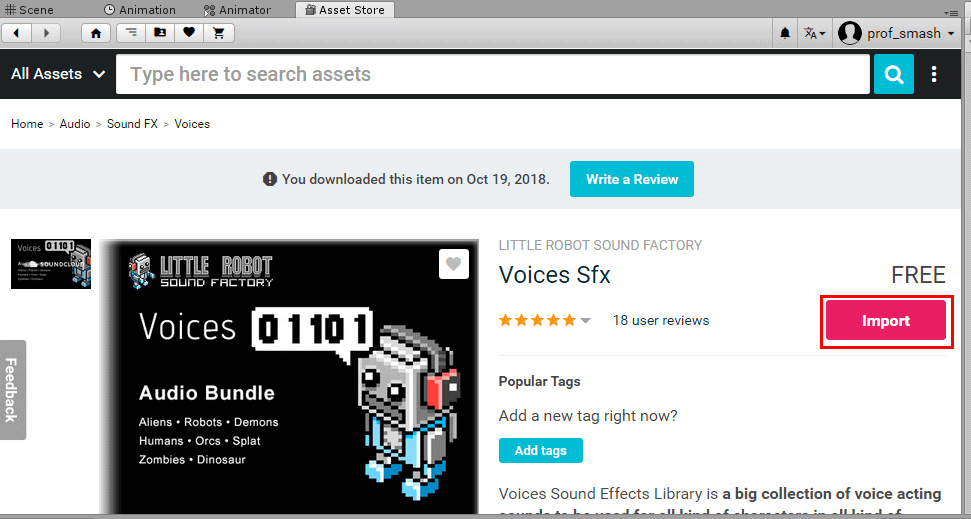
Of course, an Audio Source component would be rather useless without sounds. You can import sounds from your computer if you wish, but in this example, the Asset Store will be used to acquire some free sounds. At the top of the Unity window select Window->General->Asset Store.

Figure 5: Opening the Asset Store.

In the window that appears, search for Voices SFX and select the corresponding item by Little Robot Sound Factory in the drop-down menu that appears.

Figure 6: Selecting Voices SFX.

On the next screen, you’ll need to select the Download button to download the assets. After the download has been completed, you’ll need to press the same button to import the assets. The button should say Import after the download has completed.

Figure 7: Beginning the import process.

After pressing Import, the Import Unity Package window will appear. You can deselect all the sounds you don’t desire if you wish, but to keep things simple, this example import all the sounds in the package.

Figure 8: Importing the assets.

Once the sound assets have finished importing, you can either remove the Asset Store window you opened or simply switch over to the Scene window. Next, it will be time to make the script needed to implement voice commands. In the Assets window, right-click and choose Create->C# Script.

Figure 9: Creating a new C# script

Name this script VoiceControl. When finished, the Assets window will look like the below figure.

Figure 10: The current Assets window.

Finally, attach the VoiceControl script to the Cube object. Select Cube in the Hierarchy, then click and drag the VoiceControl script into the Inspector window underneath the Add Component button.

Figure 11: Adding the VoiceControl script component.

Now that the script is attached to the object, it’s time to make the code. Open the script in Visual Studio by double-clicking it in the Assets window.

The Code

Before creating any voice commands, you will need the following using statements at the top of the script.

using System.Collections.Generic;
using System.Linq;
using System;
using System.Collections;
using UnityEngine;
using UnityEngine.Windows.Speech;

The key statement is using UnityEngine.Windows.Speech. As you may have guessed, this is what will allow Unity to take voice commands and perform certain actions from there. With that completed, declare the following variables inside the class.

// Voice command vars
private Dictionary<string, Action> keyActs = new Dictionary<string, Action>();
private KeywordRecognizer recognizer;
// Var needed for color manipulation
private MeshRenderer cubeRend;
//Var needed for spin manipulation
private bool spinningRight;
//Vars needed for sound playback.
private AudioSource soundSource;
public AudioClip[] sounds;

First, you’ll need to define the Dictionary that will store the voice commands and what action they perform. Next, you declare a KeywordRecognizer to, well, recognize your words. Next, a MeshRenderer variable is declared. This will get the MeshRenderer component from the Cube object. This is needed because it’s the MeshRenderer that will allow you to change the color of the Cube object. After that, you have a boolean named spinningRight. You’ll use this boolean to tell the program whether the Cube object is to be spinning left or right depending on if spinningRight is true or false. Next, you will create a private AudioSource variable and a public array of AudioClip. SoundSource will be used to play sounds after hearing certain voice commands, and sounds will simply be a list of sounds that can be played. You will define what goes into the sounds array after entering the code. When you’ve entered all this, your script should look similar to the figure below.

Figure 12: Using statements and variable declaration.

From here, you’ll move on to the Start function. The Update function will not be needed for this project, so you can either comment it out or delete it. In the Start function, input the following code:

cubeRend = GetComponent<MeshRenderer>();
soundSource = GetComponent<AudioSource>();
//Voice commands for changing color
keyActs.Add("red", Red);
keyActs.Add("green", Green);
keyActs.Add("blue", Blue);
keyActs.Add("white", White);
//Voice commands for spinning
keyActs.Add("spin right", SpinRight);
keyActs.Add("spin left", SpinLeft);
//Voice commands for playing sound
keyActs.Add("please say something", Talk);
//Voice command to show how complex it can get.
keyActs.Add("pizza is a wonderful food that makes the world better", FactAcknowledgement);
recognizer = new KeywordRecognizer(keyActs.Keys.ToArray());
recognizer.OnPhraseRecognized += OnKeywordsRecognized;
recognizer.Start();

The Start function can be split into three parts. First, you begin by getting the Cube object’s MeshRenderer and AudioSource components using GetComponent. After that, you will define the various voice commands and corresponding functions that will be in your keyActs dictionary. You’ll be working on the functions in a moment. Notice how complex the voice commands can get. Near the end of your dictionary definitions, there’s an especially long voice command that is declared. As you’ll find out later, Unity will still be able to recognize this long series of words and perform the function that correlates to that command.

Next, recognizer gets its list of words to look out for by looking at the keys, or voice commands, in the keyActs dictionary. Then, whenever a phrase is recognized, the OnKeywordsRecognized function will be called, which will also be defined momentarily. Finally, the KeywordRecognizer will be initialized and will continue to run for as long as the program is operational.

When finished, the Start function should appear similar to this:

Figure 13: The completed Start function.

Now would be a good time to declare the different functions this script will need. OnKeywordsRecognized will be a good place to begin. Add the following function:

void OnKeywordsRecognized(PhraseRecognizedEventArgs args)
{
        Debug.Log("Command: " + args.text);
        keyActs[args.text].Invoke();
}

First, Unity’s console log will show what command was said once the user says any of the voice commands you’ve defined. Then the actual function that changes the object’s color will be called using Invoke. After this, enter the code that will change the cube’s color.

void Red()
{
        cubeRend.material.SetColor("_Color", Color.red);
}
void Green()
{
        cubeRend.material.SetColor("_Color", Color.green);
}
void Blue()
{
        cubeRend.material.SetColor("_Color", Color.blue);
}
void White()
{
        cubeRend.material.SetColor("_Color", Color.white);
}

All of these functions perform the same basic task. They change the color of the cube object. The color the cube is changed to is dependent on the function. In each function, you first get the cubeRend's material and call SetColor. You then specify that you want to change the main color the material, and then specify the color in question. With that completed, your color changing functions and keyword recognizer function will look like Figure #.

Figure 14: Color changing functions.

Now you’ll work on the functions that spin the cube either left or right.

void SpinRight()
{
        spinningRight = true;
        StartCoroutine(RotateObject(1f));
}
void SpinLeft()
{
        spinningRight = false;
        StartCoroutine(RotateObject(1f));
}

These functions get a little more complex. First, you define whether spinningRight is true or false, depending on which direction the Cube object will be spinning. Then a Coroutine is started that will rotate the object for one second. A Coroutine is similar to a function, but it has the ability to pause execution and return control to Unity and then continue where it left off on the next frame. They’re very useful for actions such as spinning an object around. Coroutines are declared with a return type of Ienumerator and must contain a yield return statement somewhere in the body. The Coroutine you’ll need is as follows:

private IEnumerator RotateObject(float duration)
{
        float startRot = transform.eulerAngles.x;
        float endRot;
        if (spinningRight)
                endRot = startRot - 360f;
        else
                endRot = startRot + 360f;
        float t = 0f;
        float yRot;
        while (t < duration)
        {
                t += Time.deltaTime;
                yRot = Mathf.Lerp(startRot, endRot, t / duration) % 360.0f;
                transform.eulerAngles = new Vector3(transform.eulerAngles.x, yRot, transform.eulerAngles.z);
                yield return null;
        }
}

As mentioned earlier, it’s given a parameter that controls how long to spin the object for. In this case, it’s a float variable named duration. You then declare a few variables to be used within the Coroutine along with their declarations. In the case of endRot, it will change its starting value based on if spinningRight is true or false. The while loop will run for as long as t is less than duration. During this time, the object will be spun around by setting a new Vector3 to the object’s transform.eulerAngles, or rotation. Mathf.Lerp exists to help make the rotation look nice and smooth instead of jagged and ugly looking.

The finished functions and Coroutine should look like the figure below.

Figure 15: Spinning functions and Coroutine.

Now you will make the program respond to your request to speak! Unfortunately, this program won’t allow you to have a complete conversation with the computer, but it could certainly be used as a starting point. Beneath the Coroutine, you will enter the following code.

void Talk()
{
        soundSource.clip = sounds[UnityEngine.Random.Range(0, sounds.Length)];
        soundSource.Play();
}

After responding to the command “please say something,” the program will respond by playing a random sound. You get the sound clip from the sounds array and then immediately play the sound afterward. Finally, create one last function to work with the last voice command you created.

void FactAcknowledgement()
{
        Debug.Log("How right you are.");
}

There’s not much going on in this function. After registering the voice command, Unity simply prints a message to the Debug Log agreeing with your statement. With those two functions out of the way, the script is now complete. Save your work and return to the Unity editor to finish the project.

Figure 16: The Talk and FactAcknowledgement functions.

Completing the Project

One task must be completed before you can test out your project. You need to assign some sound effects to the sounds array. To do this, select the Cube, go to the Inspector window and into the VoiceControl script component. Then, click the arrow next to the sounds array.

Figure 17: Opening the sounds array.

A field named Size appears when you click this arrow. Decide on how many individual sound effects you’d like to use. The example figure below sets the value of Size to five.

Figure 18: Defining the number of elements.

The moment you give Size a number, a list of empty elements appears. At this point, you need to drag some sound assets into these fields to populate the array. Remember those sound effects you downloaded early on? They’re going to be put to use here. In the Assets window, navigate to Voices SFX->Mp3. From there you must select one of the folders that contain the sounds you want. Any of the sound effects will do, but this example will use the sounds in the Robot folder.

At this point, you’ll need to select the Cube object from the Hierarchy and lock the inspector so you can more easily set the sounds to be used in your sounds array. With the Cube object selected, click the lock icon in the top right of the Inspector window.

Figure 19: Locking the Inspector.

All you need to do now is click and drag whatever sounds you wish to use into the empty fields in the sounds array.

Figure 20: Setting sound effects for sounds array.

After selecting your sounds of choice, the project will be complete! Give the project a test run by pressing the play button at the top of the Unity window. While playing, say any of the voice commands and watch your object change and react based on those commands. Don’t forget to have your microphone ready! Below is a list of the voice commands you’ve made:

  • “Red”
  • “Blue”
  • “Green”
  • “Spin Left”
  • “Spin Right”
  • “Please say something”
  • “Pizza is a wonderful food that makes the world better”

Figure 21: The project in action.

Conclusion

Voice commands don’t have to be relegated to mere gimmicks. The examples mentioned at the beginning are two examples of games using the voice to play. Though they aren’t very common, there are plenty of other cases of voice commands in video games. You can certainly take that functionality outside of gaming as well. Most smartphones have voice input functionality allowing you to create text messages or check the weather. Here, you made an object change its color, spin around, play a sound, and print a message to the console using Debug Log. This is all being done with your voice. No hands required!

At the end of the day, the microphone can be used as another input device just like a mouse or keyboard if you know how to utilize it. Perhaps it can be used for accessibility, or to assist in multi-tasking. Voice commands are often relegated to mere gimmicks, but with the right idea and ability to do it, the power of the voice can be much better realized in games and other applications. Perhaps you have that idea. You can make it a reality!

The post Voice Commands in Unity appeared first on Simple Talk.


from Simple Talk https://ift.tt/2zONWcV
via