Monday, February 18, 2019

How To, and Not To, Escape a String In TSQL

You are never too old to learn an important lesson. Like most programmers, I read programming language documentation for one of two reasons. 1. You have just found out about something new 2. You find out that you were wrong about something you thought you had read the first time, probably 10 years ago. Today’s blog came from an idea that arose from a mistake I made where I made a faulty assumption, and kinda exploded from there into multiple possibilities. This mistake was followed up by reading the documentation for the statement I used incorrectly.

One of my favorite SQL commands has been QUOTENAME. A common programming need when generating code is the need to surround a string value with quotes, and escape any characters that are the same as you are surrounding the string with, with doubles (and if you need doubles of the character in the string, you then need four of the characters.) For example, to surround the following string with single quotes (‘):

Mr. O’Malley

Possibly to use in a dynamic statement or variable declaration, you need to double up on the single quotes in the string, as in:

‘Mr. O”Malley’

Or if you are Rob Volk (@sql_r on Twitter), and you want to create an annoying database on your best frenemy’s SQL Server that includes brackets in the name, like:

This [database] Is Awesome

You will need to do:

CREATE DATABASE [This [database]] Is Awesome];

Doubling up the closing brackets, but not the leading ones. A way to do this is to use QUOTENAME, which has parameters of: string, and separator, by default it works with double brackets like most of SQL Server’s names, but you can give it any character to double up for you. So for our string:

DECLARE @Value nvarchar(15) = 'Mr. O''Malley';
SELECT @Value, QUOTENAME(@value) AS objectName, 
       QUOTENAME(@value,'''') AS string;

This returns:

objectName          string
--------------- ------------------- --------------------
Mr. O'Malley    [Mr. O'Malley]      'Mr. O''Malley'

I cut back on the size of the two items to the right in the output, which were both quite long characters in the textual output (* more details later). This seems to work great, so you feel like if you needed to generate some code, that you might want to do this:

DECLARE @Value nvarchar(200) = 'Mr. O''Malley';
SELECT  CONCAT('SELECT ',QUOTENAME(@Value,''''));

The output is

SELECT ‘Mr. O”Malley’

Paste this in a query execution window and execute. You will see the output is the string we started with. Problem is, QUOTENAME (,bum bum buummmmm, sung with dramatic effect), is there to quote a SQL Server Name value, and since names are not longer than 128 characters in SQL Server…the input you are quoting must be 128 characters or less (*the output, as I demonstrate later can be greater). So:

SELECT QUOTENAME(REPLICATE('a',200));

Where the input is greater than 128 characters, returns NULL, and it does it quite silently. Which is generally not what you will want. In my case, I was designing an extended property script generator, which will take the sql_variant and cast the value to an nvarchar(max). I didn’t test with 129 and greater character inputs, but a coworker had graciously provided me with a string that was like 8000 characters. Luckily this wasn’t in production where my on-call phone was ringing, but still annoying enough/

So, I would suggest to only use QUOTENAME for code destined for production use when actually quoting name values for a SQL Statement, and use the more awkward to code method of:

DECLARE @Value nvarchar(15) = 'Mr. O''Malley'
SELECT @Value, 
       '''' + REPLACE(@value,'''','''''') + '''' AS              
                                      AwkwardButRightWay, 
       QUOTENAME(@Value,'''') AS QUOTENAME;

Which, if you execute it, will have the same output for both of the second columns.

One thing to note is that this (and really any simple repetitive scalar function) looks ripe for a user defined function. In versions prior to 2019, the advice had always been clearly to avoid them because they were, to say the least…performance limiting. In some cases, they caused a small slowdown. In others, massive performance holes. In SQL Server 2019, Microsoft has changed how some scalar functions can be used, and will “inline” the code of the function into the query plan that is using it. The net effect is that the performance is on par with re-coding the statement over and over instead of using a reusable function (even for some complex functions!).

For example, let’s build the function as such, in the WideWorldImporters database:

1234567890123456789012345678901234567890123456789012345678901234567890123
USE WideWorldImporters
GO
CREATE SCHEMA Utility
GO
--always doing single quote for my function
CREATE OR ALTER FUNCTION Utility.EscapeString ( @string nvarchar(max) ) 
RETURNS nvarchar(max)
WITH RETURNS NULL ON NULL INPUT
AS
  BEGIN
     --uncommenting this makes it not inlineable 
        --DECLARE @datevalue date = GETDATE();    
     RETURN '''' + REPLACE(@string,'''','''''') + '''';
  END;

You can execute it as such:

SELECT Utility.EscapeString(CityName)
FROM   Application.Cities;

And you can check if it can be inlined using:

SELECT is_inlineable
FROM   sys.sql_modules
WHERE OBJECT_ID = OBJECT_ID('Utility.EscapeString');

Which for our new function, returns 1.

Inlineable or not, you won’t see any change in this simple usage, I just wanted to point this out as a more viable possibility in the future. For more details on inlining functions, check out Brent Ozar’s post here:https://www.brentozar.com/archive/2018/11/sql-server-2019-faster-functions/.


* Finally, the next bit will look a bit like a stupid code trick, but entirely useful for determining how large a quoted string could be. I wondered what the largest output could be of the QUOTENAME function. If you have the following statement:

SELECT QUOTENAME(']')

It returns: []]] And:

SELECT QUOTENAME(']]')

Returns: []]]]], which is 2 characters longer than the original string. If we have 128 ] characters, we should get SELECT 127 * 2 + 4 or 258 characters, which the following statement will bear out…

SELECT LEN(QUOTENAME(REPLICATE(']',128)))

As would have simply reading the documentation for QUOTENAME, where it says the output if nvarchar(258)! Hence, for handling what size variable/column you need to accommodate from the EscapeString function is basically:

((Max length of your input) – 1) * 2 + 4

Where the max length isn’t two billion like varchar(max) will accommodate, but the max length that your source data can be.  Note of course that when you use this value with all of the escaped strings, that it will look larger than the target value, but just because we need space for 258 characters to hold the name, it does not mean we need 258 characters when you use the name.  Just one more of the complexities you will run into when building a bulletproof code generation tool.


The post How To, and Not To, Escape a String In TSQL appeared first on Simple Talk.


from Simple Talk http://bit.ly/2X7uxie
via

Friday, February 15, 2019

We’re Putting the SQL Band Back Together In Chattanooga

Wow, it has been a while since I last posted, with the holidays, and way too many other projects that I haven’t blogged about just yet because I haven’t found the time.

Last June, the SQL Saturday in Chattanooga and SQL Server User Group lost their venue, as well as the leader of the group. The leader of the group (our great friend Larry Ortega), decided when this happened that he was going to retire from running the event and group (something is sad for us, but hey, everyone gets there some day, and retirement doesn’t sound awful some days!). I really missed us having a group, so I prodded around a little bit, and found there were a set of people who were of the same mind.

The core group will be made up of Heather Durham, Srinivasan Kommini, Branden Schwartz and myself, (in no particular order other than myself last, though Branden has a lot more connections in this area than I ever have, and they all have more energy that I probably ever will!)

My personal goal was simply to get a regular monthly SQL Server meeting going, because I really like the format, other than the fact that you get one single topic that may not pertain to everyone. This single topic format has been great for me over the years, as I have learned a lot of stuff that I would not otherwise not have sought out, which was part of my impetus when I started prodding around for more work to do.

And, wow, our first meeting will be in just over a week, on Friday, February 22 at 12:00 Noon, in downtown Chattanooga at the The Edney Innovation Center (full details in Eventbrite) led by my good friend Ed Watson, who will be teaching us about Power BI:


Introduction to PowerBI

Are you new to Power BI? Do you want to learn what all the buzz is about and how to use it from a purely novice standpoint? Do you need to ramp up quickly to be able to build some great visualizations? This session is the session that you need! We will walk you through the basic architecture and nuances of Power BI all the while taking a fun adventure to building your first Power BI report. The attendee will leave the class ready to start using Power BI in the real world.

Speaker Bio:

Ed Watson is a Business Intelligence consultant for Improving Enterprises, a full-stack Microsoft consulting firm in Atlanta. Ed is also a Microsoft Data Platform MVP since 2014 and like most children, Ed was born at an early age. Although he started as a programmer, he later saw the light and began working in data as a DBA before finally making the jump to the Business Intelligence paradigm. He currently lives in Atlanta and is active with the Atlanta MDF and BI user groups.


Use this link to register/get more information if you are interested:
https://www.eventbrite.com/e/february-spoc-meeting-introduction-to-power-bi-tickets-54939076256

And here is your reward for reading this far into the message: At this meeting, we will not only have Ed teach us a great lesson, but we will be doing two other things:

1. Trying to get a feel for when meetings would be best. Will lunchtime work? Nighttime, etc.
2. Announcing something pretty awesome that I am going to save for another post!

Be seeing you!

The post We’re Putting the SQL Band Back Together In Chattanooga appeared first on Simple Talk.


from Simple Talk http://bit.ly/2DCwLxc
via

Tuesday, February 12, 2019

Using Batch Scripts, and SQLCMD to Write Out a Database’s Data.

This article is about using the DOS Batch script facility of the Windows command line, together with SQLCMD to write the contents of each table in a database to the local filesystem. It shows how to use temporary stored procedures to advantage.

Just to make it a bit harder, I’m doing it in extended JSON (MongoDB format), but I’ve included access to files with procedures for doing it in ordinary JSON or array-in-array JSON. It will also out put JSON Schema files. With tweaking, it will do XML or tab-delimited output as well.

I originally did this because I had to write a utility for copying a SQL Server database to MongoDB. The MongoImport utility didn’t want to play nicely with PowerShell, which is any Windows developer’s preferred way of scripting. I therefore went back to my roots and did it as an old-fashioned batch file, command file, call it what you will. Sadly, I have considerable ‘previous’ with writing DOS and Windows Batch files, as it was, and still is,  the equivalent to Duct Tape, Cable-ties and superglue for working with Windows servers. In looking around to find out if anyone had done a similar job, I was surprised to find very little, and even read some  comments on forums that it couldn’t be done: So I wrote this article.

In this script, I’m combining three slightly unconventional techniques. Dos Batch Scripts, SQLCMD scripting and the use of Temporary Procedures in SQL Server.

Dos Batch scripts

Batch files are written in the scripting language for Microsoft command line shell. It has evolved from the batch script language of MS-DOS, COMMAND.EXE, and CMD.EXE. They typically have either the .BAT or .CMD extension. Batch files were supposed to be superseded by PowerShell. The problem with Batch Files is that the format has been evolved over time by MSDOS/Windows developers who have little in the way of an overall vision of how a scripting language should work, so now it is a mess of switches, cryptic punctuation, strange conventions and hacks. If you have any sense that I’m exaggerating, just read the excellent documentation built into the command shell. If you don’t break into a sweat, you’re not reading it properly. To read the full story, type, in the command shell the names of all the commands followed by /?

Against all expectations, DOS scripting has thrived. On the Rosetta Code site, DOS Batch File Scripts compete with other languages for solving computer tasks and problems. The old MSDOS Batch news groups are still active. There are plenty of DOS script archives, and a package manager for Windows Batch scripts written, of course, as a batch file. Plenty of grey-muzzle ops people have built up expertise with DOS shell batches and see no reason to change, or to convert their myriad scripts. Stack Overflow is full of helpful Q&A pieces. Someone has even written Adventure games, RPGs and 3-D modelling in DOS Batch scripts: not because it is wise, but because it is challenging and invigorating to do so

SQLCMD

The SQLCMD command-line executable is a wonderful tool, but you really need to use it frequently in order to remember all the important switches, Command-line Options, scripting variables and sqlcmd commands. The most important advice that MSDN gives is to do as much as possible in a single SQLCMD session, and make full use of the sqlcmd commands, many of which work in SSMSs SQLCMD mode. You will need the MSDN instructions on SQLCMD with you as you work.

Temporary procedures

I’ve mentioned these in a previous article. I use the technique by loading all or any of the procedures I need at the start of the sqlcmd script and the procedures remain throughout the script because everything is run in the same connection. No teardown is needed because the temporary procedures are deleted along with temporary tables when the connection is closed.

The Script.

The script stores the credentials in plain text in the user area, relying on NTFS security to prevent them being disclosed. This is not that good, but a lot better that embedding UserIds or passwords in a script.

The script contacts the database to get a list of tables in the database you wish to use, and gets a list of the schemas and tablenames as a tablespec. With this list, it creates a SQLCMD script that writes out the results for each table to a different file in the directory you designate. It then executes this script.

The script writes  a few preliminaries to the SQL File that will eventually be executed. The source for this procedure is here 

--specify the name of the error file
:Error "C:\Users\andre\RunBatch\error.log"
--Execute preliminary script to add the temp procedure(s)
:r MyPath\JSONSQLServerRoutines\SaveExtendedJsonDataFromTable.sql
USE AdventureWorks2016
:XML on
set nocount on


then, for each table it does this ( Person.PhoneNumberType in this case) which writes out to the SQL File which is then executed, the instructions in SQL and SQLCMD commands to write  the JSON representation of the tables contents to a file

GO
:Out MyDirectoryPath\AdventureWorks2016\Person.PhoneNumberType.json
DECLARE @Json NVARCHAR(MAX)
EXECUTE #SaveExtendedJsonDataFromTable @TableSpec='Person.PhoneNumberType',@JSONData=@json OUTPUT
Select @json

The procedure #SaveExtendedJSONDataFromTable does most of the work. It creates a JSON document containing the data from the table, written in the MongoDB dialect of JSON called Extended JSON. if you want to export ordinary JSON, use SaveJsonDataFromTable.sql instead. When this script is executed by SQLCMD as the final part of the DOS batch script, it ends up with all the files written out into the directory you have chosen.

Here is the script. Firstly, you need to change the parameters at the start of the script to specify your work directory, the name you want for your SQLCMD file, the name of your error file, the path to your preliminary SQL file (with procedures or initialization stuff) and the name of the database you want to execute the script against. Then you need to create your credentials file along with the name of your server. You do this by executing the commented-out section at the beginning, filling in the credentials and executing just that batch


echo -S Bluebottle/Fly -U Queen -P NotAPassword9>%userProfile%\MyServerSqlCmd.txt 
REM Test out that it was properly saved

Set /p TheServer=<%userProfile%\MyServerSqlCmd.txt 
echo %TheServer%

Now we are ready to try it out. Such is the slight perversity of DOS batch files that it may not entirely run first time. Fortunately, your error log will tell you quite a bit, and if you read the attempt made at the SQLCMD file, this should indicate where things have broken. To debug, first delete the @echo off line so you can see how the batch ran. There are more hints here.

@echo off
REM before you start, you need to write out your SQLCMD credentials to a file in your user
rem area using code like this, if you use SQL Server Credentials ...
Rem echo -S MyServer -U MyUserName -h -1 -P MyPassword>%userProfile%\MyServerSqlCmd.txt
REM ... or like this if you use windows security
REM echo -S MyServer -h -1 -W  -f 65001 >%userProfile%\MyServerSqlCmd.txt
REM
REM read in your SQLCMD command and credentials
Set /p TheServer=<%userProfile%\MyServerSqlCmd.txt
REM Specify your work directory. I chose 'RunBatch' in my user area
Set workpath=%userProfile%\RunBatch
REM specify the name of your SQLCMD file
Set TheSQLCMDFileToExecute=%workpath%\SQLCMDFile.sql
REM Specify what preliminary file you need to set up 
Set PreliminarySQL=MyCode\Github\JSONSQLServerRoutines\SaveExtendedJsonDataFromTable.sql
REM choose the name of your error file
Set Errorfile=%workpath%\error.log
REM and specify the name of your database that you want to use
Set Database=AdventureWorks2016
REM check whether the workpath directory exists
if not exist "%workpath%\" (md %workpath%) 
if ERRORLEVEL 1 (
  echo An error creating "%workpath%" directory occurred 
  goto bombsite)
REM check whether the database directory within the workpath directory exists
if not exist "%workpath%\%Database%\" (md %workpath%\%Database%) 
if ERRORLEVEL 1 (
        echo An error creating "%workpath%\%Database%" occurred 
goto bombsite)
rem Write out the header to the SQLCMD file to execute
(
echo --specify the name of the error file
echo :Error "%Errorfile%"
echo --Execute prelimiary
echo :r %PreliminarySQL%
echo USE %Database%
echo :XML on
echo set nocount on
) >%TheSQLCMDFileToExecute%
Rem Create the query that brings you the list of tables
Set QUERY="SET NOCOUNT ON; SELECT Object_Schema_Name(object_id)+'.'+name AS The_Tables FROM sys.tables WHERE is_ms_shipped=0;"
REM Execute the query and create the entire SQL Command file that will be executed
for /F usebackq %%i in (`sqlcmd %TheServer% -d %Database%  -Q %QUERY%`) do (
rem for every tablespec in the list append the following text ....
        if ERRORLEVEL 1 (
          echo An error accessing  %Database%  to get the list of tables occurred 
          goto bombsite)
        (
        echo :Out %workpath%\%Database%\%%i.json
        echo DECLARE @Json NVARCHAR^(MAX^)
        echo EXECUTE #SaveExtendedJsonDataFromTable @TableSpec=^'%%i^',@JSONData=@json OUTPUT
        echo Select @json
        echo GO
        ) >>%TheSQLCMDFileToExecute%              
     ) 
Rem Now that is done, we just execute the file
sqlcmd %TheServer% -d %Database% -y 0 -i %TheSQLCMDFileToExecute%
if ERRORLEVEL 1 (
  echo An error running the script %TheSQLCMDFileToExecute% on %Database% occurred 
  goto bombsite)
goto end 
:bombsite
Echo We bombed!
Exit /b 1
:end
Echo Yes! We got here at last!!
Exit /b 0


Once a script like this is bedded down, it seems to run consistently. It runs fast, and the amount of code seems less than in PowerShell. However, for most purposes, I think I’ll stick with PowerShell. Note that the Invoke-SQLCMD cmdlet doesn’t implement the :OUT SQLCMD command so you would be stuck with executing the SQLCMD.exe command. I was spurred into writing this code because I had to use a batch for other things that didn’t work in PowerShell so my time wasn’t wasted!

The post Using Batch Scripts, and SQLCMD to Write Out a Database’s Data. appeared first on Simple Talk.


from Simple Talk http://bit.ly/2E8lXbD
via

The Performance of Window Aggregates Revisited with SQL Server 2019

In 2005 and 2012, Microsoft introduced a number of windowing functions in SQL Server, like my favourite function LAG. These functions perform well, but, in my opinion, the main benefit is making complicated queries easier to write. I’ve been fascinated by these functions for years, but there is one thing about them that has bothered me, and that is the performance of window aggregate functions. Luckily, that is changing with SQL Server 2019.

What are Window Aggregate Functions?

Window aggregate functions let you add your favourite aggregate functions, like SUM, AVG and MIN, to non-aggregate queries. This lets you return the details in the results while adding in grand totals or sub-totals or any other aggregate you need. Here’s an example:

USE AdventureWorks2017;
GO
SET STATISTICS IO ON;
GO
SELECT CustomerID, SalesOrderID, OrderDate, TotalDue 
FROM Sales.SalesOrderHeader
ORDER BY CustomerID;

SELECT CustomerID, SalesOrderID, OrderDate, TotalDue, 
        SUM(TotalDue) OVER(PARTITION BY CustomerID) AS SubTotal 
FROM Sales.SalesOrderHeader
ORDER BY CustomerID;

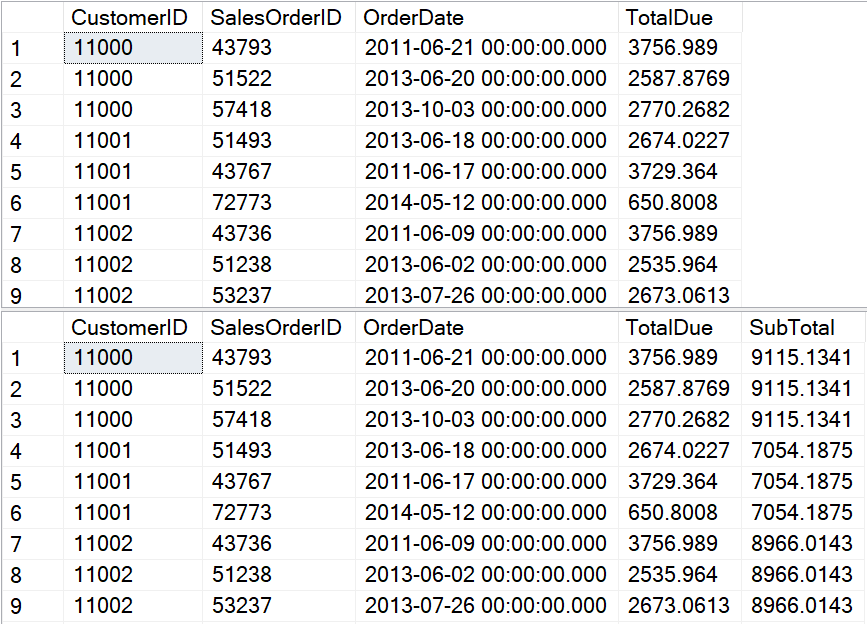
I’m running SQL Server 2019 CTP 2.2, and the database is in 2016 compatibility mode. The first query lists the sales orders, and the second query also has a sub total for each customer. The results should look like Figure 1.

Figure 1: The partial results of the sales orders queries

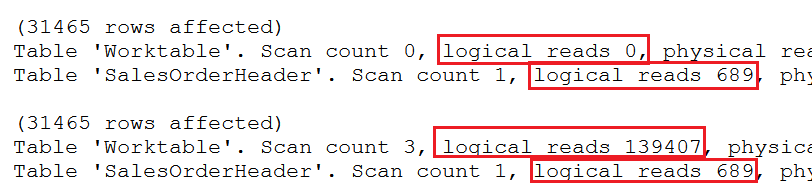
I think you would have to agree that calculating the subtotal was easy to do. You just have to add the OVER clause. In this case, I wanted the subtotals for each customer, so I included PARTITION BY CustomerID. The problem with this technique is that the performance has been disappointing. In fact, I’ve been recommending that window aggregates be avoided when they must operate on a large number of rows. To show what I mean, take a look at the STATISTICS IO results in Figure 2.

Figure 2: The logical reads for the sales orders queries

The first query has 0 logical reads for a worktable and 689 logical reads for scanning the entire table since there is no WHERE clause. The second query also takes 689 logical reads for scanning the table, and 139,407 logical reads for a worktable. That’s a big difference, but do the logical reads for a worktable affect query run times? These AdventureWorks tables are too small to see the performance impact, but it does make a difference as you’ll see in the next section.

Is the Performance Really That Bad?

To show how much the window aggregate impacts performance, the following queries use bigger tables created from Adam Mechanic’s script Thinking Big Adventure. To make sure that populating SSMS (SQL Server Management Studio) does not affect the run times, the results are saved in temp tables. Here are two queries calculating the subtotal for each product in this table of 31 million rows.

SET STATISTICS IO ON;
SET STATISTICS TIME ON;
CREATE TABLE #Products(ProductID INT, TransactionDate DATETIME, 
        Total MONEY, SubTotal MONEY);

WITH SubTotalByProduct AS (
        SELECT ProductID, SUM(Quantity * ActualCost) AS SubTotal
        FROM bigTransactionHistory 
        GROUP BY ProductID)
INSERT INTO #Products (ProductID, TransactionDate, Total, SubTotal)
SELECT STP.ProductID, TransactionDate, Quantity * ActualCost AS Total, 
     SubTotal 
FROM bigTransactionHistory AS BT 
JOIN SubTotalByProduct AS STP ON BT.ProductID = STP.ProductID; 

TRUNCATE TABLE #Products;

INSERT INTO #Products (ProductID, TransactionDate, Total, SubTotal)
SELECT ProductID, TransactionDate, Quantity * ActualCost AS Total, 
        SUM(Quantity * ActualCost) 
        OVER(PARTITION BY ProductID) AS SubTotal 
FROM dbo.bigTransactionHistory;

DROP TABLE #Products;

Since the results are stored in temp tables, the only output is the STATISTICS IO and STATISTICS TIME. The first query in this example demonstrates one of the traditional methods to get subtotals, using a CTE (common table expression) that joins to the original table. The second query creates the same results, but with a window aggregate function.

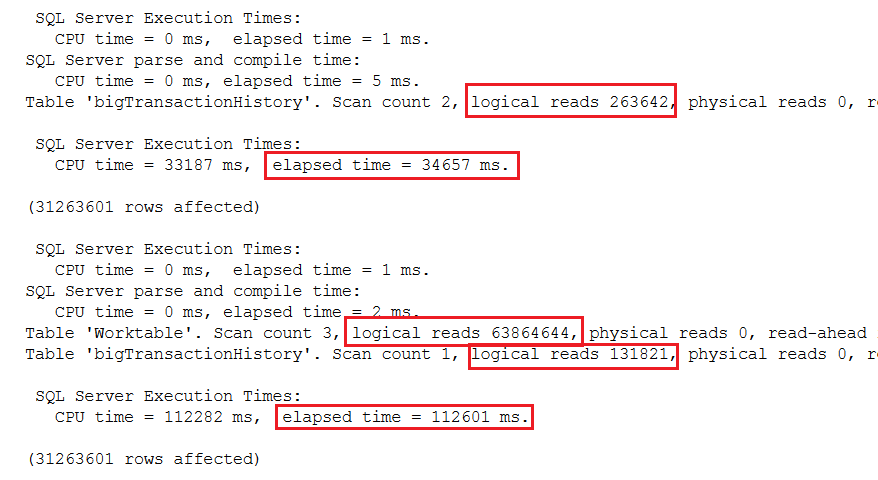
To make sure that caching didn’t affect the run time, I ran the queries twice. The statistics results of the second run can be seen in Figure 3.

Figure 3: The results of running the test on bigTransactionHistory

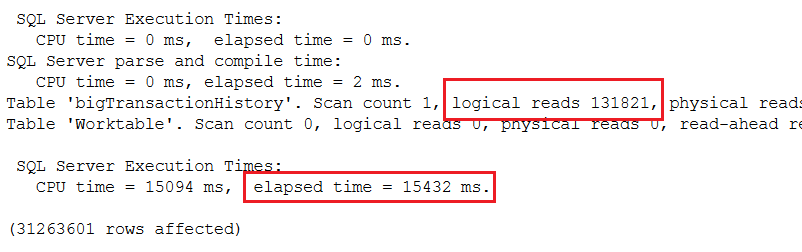
The first thing to notice is that the traditional method took 35 seconds. The window aggregate function method took 156 seconds or about 2.2 minutes. You can also see a big difference in the logical reads. The traditional method took twice as many logical reads when scanning the table. That’s because the table was accessed once inside the CTE and again in the outer query. The table was scanned just once when using the window aggregate, but again, the logical reads required is much higher than just reading the table due to the worktable. As you can see, there is a big performance hit with window aggregates over traditional methods.

Batch Mode to the Rescue

In 2016, Microsoft announced an advancement in the columnstore index feature called batch mode processing. This feature also improves the performance of window aggregate queries as long as a table with a columnstore index is part of the query. If that happens naturally, wonderful! Otherwise, artificially adding a columnstore index seems like more trouble than just using the traditional query method.

To show the difference in performance, this example creates an empty temp table with a columnstore index and adds it to the query.

USE master;
GO
ALTER DATABASE AdventureWorks2017
     --Make sure it’s 2016 compat
     SET COMPATIBILITY_LEVEL = 130 WITH NO_WAIT
GO
USE AdventureWorks2017;
GO
CREATE TABLE #Products(ProductID INT, TransactionDate DATETIME, 
        Total MONEY, SubTotal MONEY);
CREATE TABLE #CS(KeyCol INT NOT NULL PRIMARY KEY, 
        Col1 NVARCHAR(25));
CREATE COLUMNSTORE INDEX CSI_CS ON #CS(KeyCol, Col1);

INSERT INTO #Products (ProductID, TransactionDate, Total, SubTotal)
SELECT ProductID, TransactionDate, Quantity * ActualCost AS Total, 
        SUM(Quantity * ActualCost) 
        OVER(PARTITION BY ProductID) AS SubTotal 
FROM dbo.bigTransactionHistory
OUTER APPLY #CS;

DROP TABLE #Products;
DROP TABLE #CS;

To see the benefits of the 2016 change, the database compatibility level was changed to 2016. The empty table #CS was created along with a columnstore index. It’s added to the query with an OUTER APPLY and doesn’t affect the results.

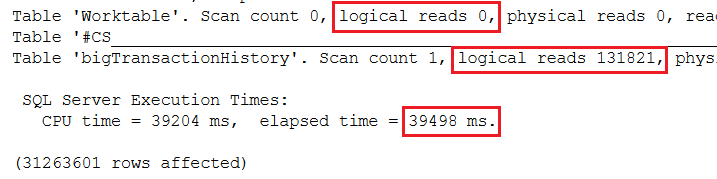
The performance results can be found in Figure 4:

Figure 4: Including a columnstore index to improve performance

In this test, the performance was similar to the traditional CTE query. That’s great, but in my opinion the main reason to use the window aggregate is to make the query simple to write. I don’t want to add the complexity of adding an artificial columnstore index. Luckily, in 2019, batch row processing applies to some queries that could benefit from it without a columnstore index, including window aggregates! This feature is called Batch Mode on Rowstore. Here is another test, this time with 2019 compatibility level.

USE master;
GO
ALTER DATABASE AdventureWorks2017
     --Set to 2019 compat
     SET COMPATIBILITY_LEVEL = 150 WITH NO_WAIT
GO
USE AdventureWorks2017;
GO
CREATE TABLE #Products(ProductID INT, TransactionDate DATETIME, 
        Total MONEY, SubTotal MONEY);

INSERT INTO #Products (ProductID, TransactionDate, Total, SubTotal)
SELECT ProductID, TransactionDate, Quantity * ActualCost AS Total, 
        SUM(Quantity * ActualCost) 
        OVER(PARTITION BY ProductID) AS SubTotal 
FROM dbo.bigTransactionHistory;

DROP TABLE #Products;

This time, the query took just 15 seconds to run! The performance results are shown in Figure 5.

Figure 5: Using the 2019 batch mode feature

Accumulating Aggregates

To get running totals, all you have to do is add ORDER BY to the OVER clause to the window aggregate. This is easy to do and will give you the results you expect as long as the columns in the ORDER BY option of the OVER clause are unique. To drastically improve performance, you need to add the frame (ROWS BETWEEN UNBOUND PROCEEDING AND CURRENT ROW) to the OVER clause. This is intuitive and is probably left out more often than it’s included. To see the difference, this test compares using the frame to not using the frame in 2016 compatibility mode.

USE master;
GO
ALTER DATABASE AdventureWorks2017
        SET COMPATIBILITY_LEVEL = 130 WITH NO_WAIT
GO
USE AdventureWorks2017;
GO
CREATE TABLE #Products(TransactionID INT, ProductID INT, 
        TransactionDate DATETIME, 
        Total MONEY, RunningTotal MONEY);
INSERT INTO #Products (TransactionID, ProductID, TransactionDate, 
        Total, RunningTotal) 
SELECT TransactionID, ProductID, TransactionDate, 
        Quantity * ActualCost, 
        SUM(Quantity * ActualCost) 
        OVER(PARTITION BY ProductID ORDER BY TransactionID)
FROM bigTransactionHistory;

TRUNCATE TABLE #Products;

INSERT INTO #Products (TransactionID, ProductID, TransactionDate, 
       Total, RunningTotal) 
SELECT TransactionID, ProductID, TransactionDate, 
        Quantity * ActualCost, 
        SUM(Quantity * ActualCost) 
        OVER(PARTITION BY ProductID ORDER BY TransactionID
        ROWS BETWEEN UNBOUNDED PRECEDING AND CURRENT ROW)
FROM bigTransactionHistory;

DROP TABLE #PRODUCTS

The results when using 2016 compatibility mode can be seen in Figure 6.

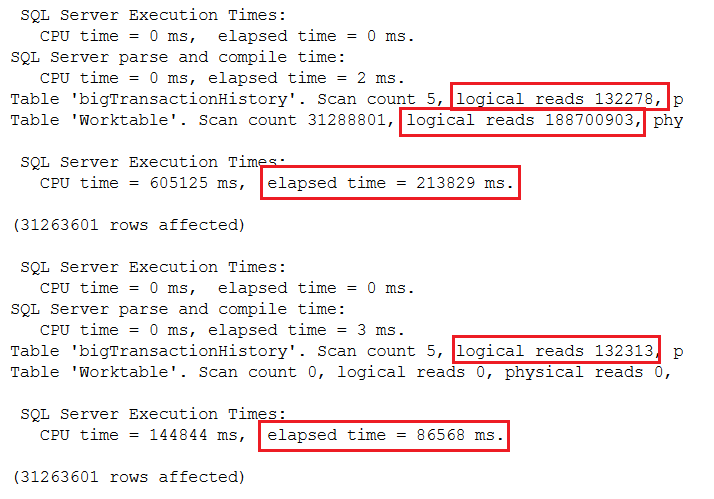
Figure 6: The results comparing using a frame with 2016 compatibility

By using the frame, the query went from almost 4 minutes to 1.4 minutes. Here’s the same test except for 2019 compatibility to take advantage of batch mode processing.

USE master;
GO
ALTER DATABASE AdventureWorks2017
        SET COMPATIBILITY_LEVEL = 150 WITH NO_WAIT
GO
USE AdventureWorks2017;
GO
CREATE TABLE #Products(TransactionID INT, ProductID INT, 
        TransactionDate DATETIME, 
        Total MONEY, RunningTotal MONEY);
INSERT INTO #Products (TransactionID, ProductID, TransactionDate, 
        Total, RunningTotal) 
SELECT TransactionID, ProductID, TransactionDate, 
        Quantity * ActualCost, 
        SUM(Quantity * ActualCost) 
        OVER(PARTITION BY ProductID ORDER BY TransactionID)
FROM bigTransactionHistory;

TRUNCATE TABLE #Products;

INSERT INTO #Products (TransactionID, ProductID, TransactionDate, 
        Total, RunningTotal) 
SELECT TransactionID, ProductID, TransactionDate, 
        Quantity * ActualCost, 
        SUM(Quantity * ActualCost) 
        OVER(PARTITION BY ProductID ORDER BY TransactionID
        ROWS BETWEEN UNBOUNDED PRECEDING AND CURRENT ROW)
FROM bigTransactionHistory;

DROP TABLE #Products;

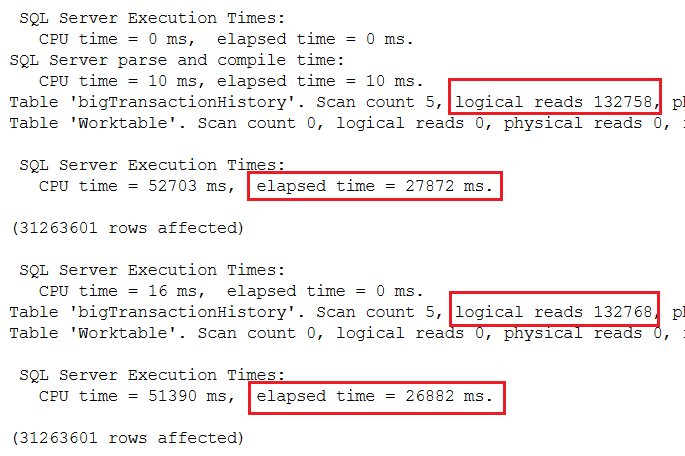
With batch mode, there is no performance penalty due to leaving out the frame. In each case, it took less than 30 seconds to run, even faster than using the frame in 2016. Of course, you will need to include the frame if you need one that is different than the default. (See my article Introduction to T-SQL Window Functions to learn more.) Figure 7 has the performance results.

Figure 7: The results of using 2019 compatibility mode with running totals

Batch Mode on Rowstore Processing

As you can see, this new batch mode on rowstore feature dramatically improved the performance of these two window function queries. My queries ran about 7 times faster, but your results will vary. How does batch mode work? It breaks the processing down into chunks of 900 values. SQL Server reserves this for queries with aggregation and sorts when scanning a large number of rows. It’s one of several query processing improvements available with 2019 which together are called Intelligent Query Processing.

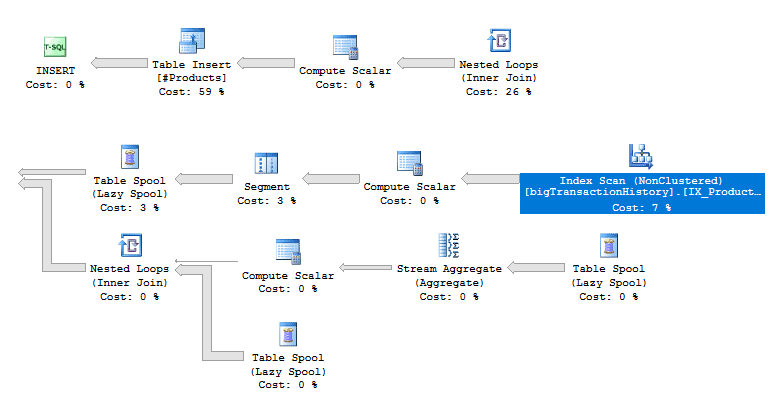
You may be wondering how to know if batch processing is used for a query. If you take a look at the execution plan, you can see the difference. Figure 8 is the execution plan for the subtotal query while in 2016 compatibility mode. To make this easier to see, I’ve split the image into two. The top shows the left side of the plan, and the bottom is the right side of the plan.

Figure 8: The execution plan for the subtotals with 2016 compatibility mode

The first interesting thing to note is that parallelism is not used even though it seems like it would be useful in a query of 31 million rows. It might be possible to rewrite the query to persuade the optimizer to parallelize the query, but that’s an article for another day.

Also notice the Table Spool operators. These are the worktables that you saw in the STATISTICS IO output. These are joined to the results using Nested Loops.

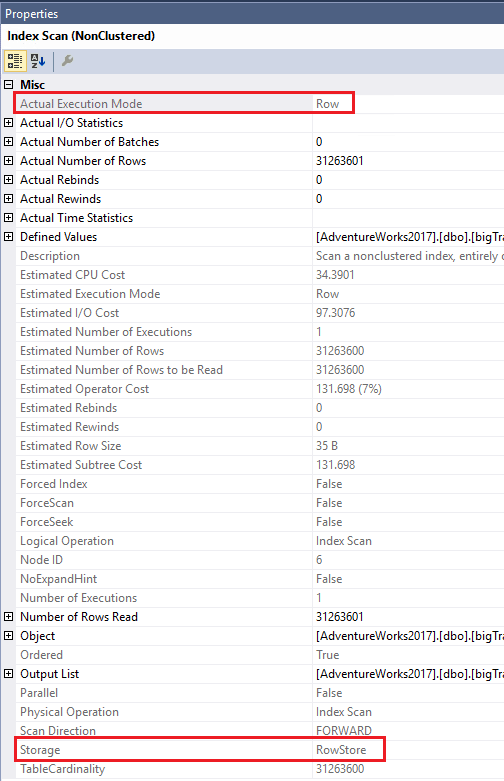
If you open the properties of the Index Scan operator (Figure 9), you’ll see that the storage is Rowstore, and the Actual Execution Mode is Row.

Figure 9: The properties showing Row mode

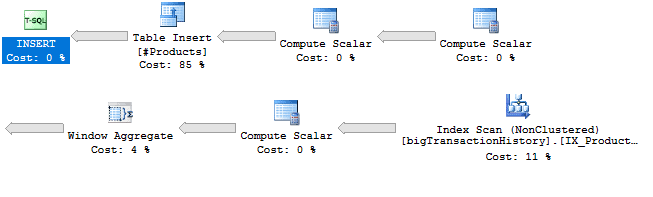
Now take a look at the execution plan in Figure 10 for the same query when in 2019 compatibility mode. Again, I have split it up to make it easier to read.

Figure 10: The plan used in 2019 compatibility mode

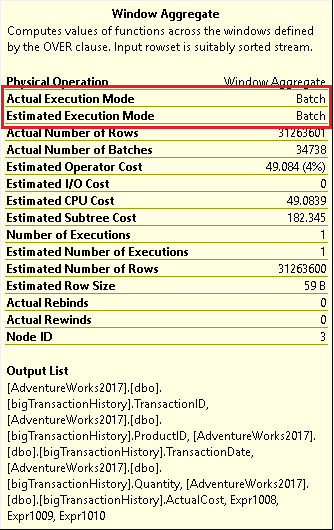
First, you will probably notice that this plan looks much simpler. There are no more worktables (Table Spools) and no need for the Nested Loops. There is also the new Window Aggregate operator. Hovering over the operator brings up the information shown in Figure 11.

Figure 11: The Window Aggregate operator popup

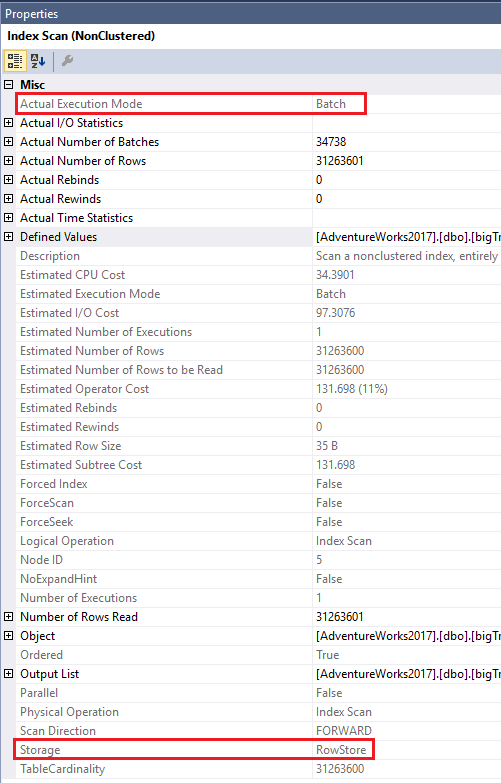
You can see that batch mode was used. By looking at the properties of the Index Scan in Figure 12, you will see that batch mode was used even though the index is stored in rowstore and not in columnstore.

Figure 12: The Index Scan properties

As mentioned earlier, batch mode on rowstore is reserved for queries of a large size that include certain aspects such as sorting or aggregates. I wondered where the tipping point was for this query, so I decide to create a copy of the bigTransactionHistory with the same indexes, just a smaller number of random rows. I found that the tipping point was 131,072 rows for this query on this instance running in an Azure VM. It could be something entirely different for another situation.

If you are using a monitoring tool, such as Redgate’s SQL Monitor, you can see the performance history of your queries and whenever the execution plans change. Wouldn’t it be a nice surprise if a query suddenly started running 5 or 10 times more quickly as the data grew?

Conclusion

Many organizations are not going to upgrade every time there is a new version of SQL Server available. When they do upgrade, they often skip versions. The Big Data Clusters feature is getting a lot of publicity, but not every shop will need it. I think everyone is going to appreciate the new query optimizations. Batch mode on rowstore is just one of many great features that will improve performance by just upgrading to 2019 when it’s generally available.


The post The Performance of Window Aggregates Revisited with SQL Server 2019 appeared first on Simple Talk.


from Simple Talk http://bit.ly/2SO7Q3q
via

Monday, February 11, 2019

Using Auth Cookies in ASP.NET Core

Cookie-based authentication is the popular choice to secure customer facing web apps. For .NET programmers, ASP.NET Core has a good approach that is worth looking into. In this take, I will delve deep into the auth cookie using ASP.NET Core 2.1. Version 2.1 is the latest LTS version as of the time of this writing. So, feel free to follow along, I’ll assume you’re on Visual Studio or have enough C# chops to use a text editor. I will omit namespaces and using statements to keep code samples focused. If you get stuck, download the sample code found at the end.

With ASP.NET 2.1, you can use cookie-based authentication out of the box. There is no need for additional NuGet packages. New projects include a metapackage that has everything, which is Microsoft.AspNetCore.App. To follow along, type dotnet new mvc in a CLI or do File > New Project in Visual Studio.

For those of you who come from classic .NET, you may be aware of the OWIN auth cookie. You will be happy to know those same skills transfer over to ASP.NET Core quite well. The two implementations remain somewhat similar. With ASP.NET Core, you still configure the auth cookie, set up middleware, and set identity claims.

Setup

To begin, I’ll assume you know enough about the ASP.NET MVC framework to gut the scaffolding into a skeleton web app. You need a HomeController with an Index, Login, Logout, and Revoke action methods. Login will redirect to Index after it signs you in, so it doesn’t need a view. I’ll omit showing view sample code since views are not the focus here. If you get lost, be sure to download the entire demo to play with it.

I’ll use debug logs to show critical events inside the cookie authentication. Be sure to enable debug logs in appsettings.json and disable Microsoft and system logs.

My log setup looks like this:

"LogLevel": {
  "Default": "Debug",
  "System": "Warning",
  "Microsoft": "Warning"
}

Now you’re ready to build a basic app with cookie authentication. I’ll forgo HTML forms with a user name and password input fields. These front-end concerns only add clutter to what is more important which is the auth cookie. Starting with a skeleton app shows how effective it is to add an auth cookie from scratch. The app will sign you in automatically and land on an Index page with an auth cookie. Then, you can log out or revoke user access. I want you to pay attention to what happens to the auth cookie as I put authentication in place.

Cookie Options

Begin by configuring auth cookie options through middleware inside the Startup class. Cookie options tell the authentication middleware how the cookie behaves in the browser. There are many options, but I will only focus on those that affect cookie security the most.

  • HttpOnly: A flag that says the cookie is only available to servers. The browser only sends the cookie but cannot access it through JavaScript.
  • SecurePolicy: This limits the cookie to HTTPS. I recommend setting this to Always in prod. Leave it set to None in local.
  • SameSite: Indicates whether the browser can use the cookie with cross-site requests. For OAuth authentication, set this to Lax. I am setting this to Strict because the auth cookie is only for a single site. Setting this to None does not set a cookie header value.

There are cookie options for both the auth cookie and a global cookie policy. Stay alert since the cookie policy can override auth cookie options and vice versa. Setting HttpOnly to false in the auth cookie will override cookie policy options. While setting SameSite in the cookie policy overrides auth cookie options. In my demo, I’ll illustrate both scenarios, so it is crystal clear how this works.

In the Startup class, find the ConfigureServices method and type:

services.AddAuthentication(CookieAuthenticationDefaults.AuthenticationScheme)
  .AddCookie(options =>
  {
    options.Cookie.HttpOnly = true;
    options.Cookie.SecurePolicy = _environment.IsDevelopment()
      ? CookieSecurePolicy.None : CookieSecurePolicy.Always;
      options.Cookie.SameSite = SameSiteMode.Lax;
  });

This creates the middleware service with the AddAuthentication and AddCookie methods. AuthenticationScheme is useful when there is more than one auth cookie. Many instances of cookie authentication let you protect endpoints with many schemes. You supply any string value; the default is set to Cookies. Note that the options object is an instance of the CookieAuthenticationOptions class.

The SecurePolicy is set through a ternary operator that comes from _environment. This is a private property that gets set in the Startup constructor. Add IHostingEnvironment as a parameter and let dependency injection do the rest.

In this same ConfigureServices method, add the global cookie policy through middleware:

services.Configure<CookiePolicyOptions>(options =>
{
  options.MinimumSameSitePolicy = SameSiteMode.Strict;
  options.HttpOnly = HttpOnlyPolicy.None;
  options.Secure = _environment.IsDevelopment()
    ? CookieSecurePolicy.None : CookieSecurePolicy.Always;
});

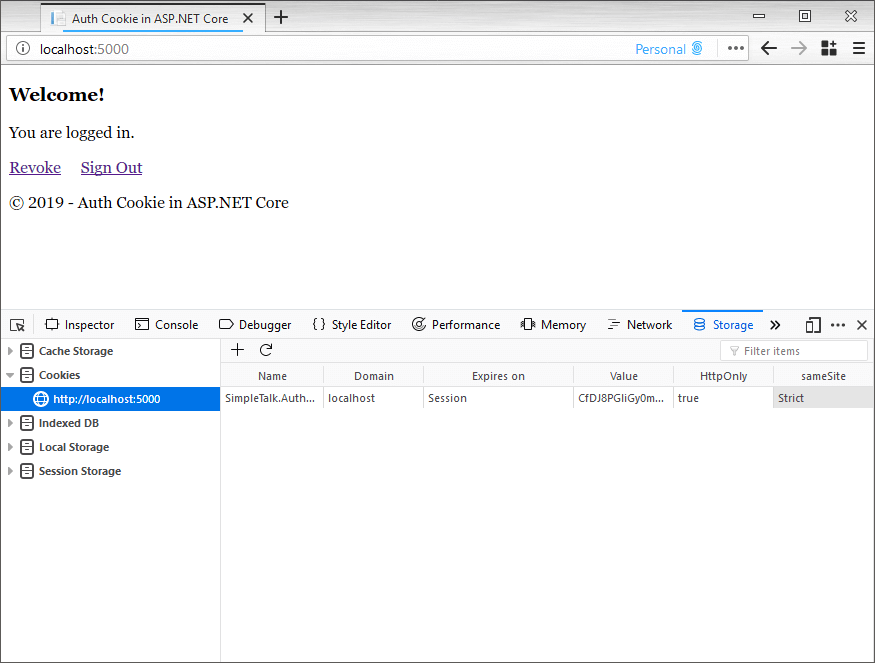
Take a good look at SameSite and HttpOnly settings for both cookie options. When I set the auth cookie, you will see this set to HttpOnly and Strict. This illustrates how both options override each other.

Invoke this middleware inside the request pipeline in the Configure method:

app.UseCookiePolicy();
app.UseAuthentication();

The cookie policy middleware is order sensitive. This means it only affects components after invocation. By invoking the authentication middleware, you will get a HttpContext.User property. Be sure to call this UseAuthentication method before calling UseMvc.

Login

In the HomeController add an AllowAnonymous filter to the Login and Logout methods. There are only two action methods available without an auth cookie.

Inside the Startup class, look for the AddMvc extension method and add a global auth filter:

services.AddMvc(options => options.Filters.Add(new AuthorizeFilter()))

With the app secure, configure the cookie name and login / logout paths. Find where the rest of the CookieAuthenticationOptions are and do:

options.Cookie.Name = "SimpleTalk.AuthCookieAspNetCore";
options.LoginPath = "/Home/Login";
options.LogoutPath = "/Home/Logout";

This will cause the app to redirect to the login endpoint to sign in. However, before you can take this for a spin, you’ll need to create the auth cookie.

Do this inside the Login action method in the HomeController:

var claims = new List<Claim>
{
  new Claim(ClaimTypes.Name, Guid.NewGuid().ToString())
};

var claimsIdentity = new ClaimsIdentity(
  claims, CookieAuthenticationDefaults.AuthenticationScheme);
var authProperties = new AuthenticationProperties();

await HttpContext.SignInAsync(
  CookieAuthenticationDefaults.AuthenticationScheme,
  new ClaimsPrincipal(claimsIdentity),
  authProperties);

AuthenticationProperties drive further auth cookie behavior in the browser. For example, the IsPersistent property persists the cookie across browser sessions. Be sure to get explicit user consent when you enable this property. ExpiresUtc sets an absolute expiration, be sure to enable IsPersistent and set it to true. The default values will give you a session cookie that goes away when you close the tab or browser window. I find the default values in this object enough for most use cases.

To take this for a spin load up the browser by going to the home or Index page. Note it redirects to Login which redirects back to Index with an auth cookie.

Once this loads it looks something like this. Be sure to take a good look at how the auth cookie is set:
JWT Identity Claim

Often, an auth cookie isn’t enough to secure API endpoints or microservices. For the web app to call a service, it can use a JWT bearer token to authenticate. To make the access token accessible, place it inside the identity claims.

In the Login action method within HomeController, expand the list of claims with a JWT:

var userId = Guid.NewGuid().ToString();
var claims = new List<Claim>
{
  new Claim(ClaimTypes.Name, userId),
  new Claim("access_token", GetAccessToken(userId))
};

private static string GetAccessToken(string userId)
{
  const string issuer = "localhost";
  const string audience = "localhost";

  var identity = new ClaimsIdentity(new List<Claim>
  {
    new Claim("sub", userId)
  });

  var bytes = Encoding.UTF8.GetBytes(userId);
  var key = new SymmetricSecurityKey(bytes);
  var signingCredentials = new SigningCredentials(
    key, SecurityAlgorithms.HmacSha256);

  var now = DateTime.UtcNow;
  var handler = new JwtSecurityTokenHandler();

  var token = handler.CreateJwtSecurityToken(
    issuer, audience, identity,
    now, now.Add(TimeSpan.FromHours(1)),
    now, signingCredentials);

  return handler.WriteToken(token);
}

I must caution, don’t ever do this is in production. Here, I use the user id as the signing key which is symmetric to keep it simple. In a prod environment use an asymmetric signing key with public and private keys. Client apps will then use a well-known configuration endpoint to validate the JWT.

Placing the JWT in ClaimsIdentity makes it accessible through the HttpContex.User property. For this app, say you want to put the JWT in a debug log to show off this fancy access token.

In the Startup class, create this middleware inside the Configure method:

app.Use(async (context, next) =>
{
  var principal = context.User as ClaimsPrincipal;
  var accessToken = principal?.Claims
    .FirstOrDefault(c => c.Type == "access_token");

  if (accessToken != null)
  {
    _logger.LogDebug(accessToken.Value);
  }

  await next();
});

The _logger is another private property you set through the constructor. Add ILogger<Startup> as a parameter and let dependency injection do the rest. Note the ClaimsPrincipal has a list of Claims you can iterate through. What I find useful is to look for a Type of claim like an access_token and get a Value. Because this is middleware always call next() so it doesn’t block the request pipeline.

Logout

To log out of the web app and clear the auth cookie do:

await HttpContext.SignOutAsync(
  CookieAuthenticationDefaults.AuthenticationScheme);

This belongs inside the Logout action method in the HomeController. Note that you specify the authentication scheme. This tells the sign-out method which auth cookie it needs to blot out. Inspecting HTTP response headers reveals Cache-Control and Pragma headers set to no-cache. This shows the auth cookie disables browser caching when it wants to update the cookie. The Login action method responds with the same HTTP headers.

Revocation

There are use cases where the app needs to react to back-end user access changes. The auth cookie will secure the application, but, remains valid for the lifetime of the cookie. With a valid cookie, the end-user will not see any changes until they log out or the cookie expires. In ASP.NET Core 2.1, one way to validate changes is through cookie authentication events. The validation event can do back-end lookups from identity claims in the auth cookie. Create the event by extending CookieAuthenticationEvents. Override the ValidatePrincipal method and set the event in the auth cookie options.

For example:

public class RevokeAuthenticationEvents : CookieAuthenticationEvents
{
  private readonly IMemoryCache _cache;
  private readonly ILogger _logger;

  public RevokeAuthenticationEvents(
    IMemoryCache cache,
    ILogger<RevokeAuthenticationEvents> logger)
  {
    _cache = cache;
    _logger = logger;
  }

  public override Task ValidatePrincipal(
    CookieValidatePrincipalContext context)
  {
    var userId = context.Principal.Claims
      .First(c => c.Type == ClaimTypes.Name);

    if (_cache.Get<bool>("revoke-" + userId.Value))
    {
      context.RejectPrincipal();

      _cache.Remove("revoke-" + userId.Value);
      _logger.LogDebug("Access has been revoked for: "
        + userId.Value + ".");
    }

    return Task.CompletedTask;
  }
}

To have IMemoryCache set by dependency injection, put AddMemoryCache inside the ConfigureSerices method in the Startup class. Calling RejectPrincipal has an immediate effect and kicks you back out to Login to get a new auth cookie. Note this relies on in-memory persistence which gets set in the Revoke action method. Keep in mind that this event runs once per every request, so you want to use an efficient caching strategy. Doing an expensive lookup at every request will affect performance.

Revoke access by setting the cache inside the Revoke method in the HomeController:

var principal = HttpContext.User as ClaimsPrincipal;
var userId = principal?.Claims
  .First(c => c.Type == ClaimTypes.Name);

_cache.Set("revoke-" + userId.Value, true);
return View();

After visiting the Revoke endpoint, the change does not have an immediate effect. After revocation, navigating home will show the debug log and redirect to Login. Note that landing in the Index page again will have a brand new auth cookie.

To register this event, be sure to set the EventsType in the CookieAuthenticationOptions. You will need to provide a scoped service to register this RevokeAuthenticationEvents. Both are set inside the ConfigureServices method in the Startup class.

For example:

options.EventsType = typeof(RevokeAuthenticationEvents);
services.AddScoped<RevokeAuthenticationEvents>();

The CookieValidatePrincipalContext in ValidatePrincipal can do more than revocation if necessary. This context has ReplacePrincipal to update the principal, then renew the cookie by setting ShouldRenew to true.

Session Store

Setting a JWT in the claims to have a convenient way to access identity data works well. However, every identity claim you put in the principal ends up in the auth cookie. If you inspect the cookie, you will notice it doubles in size with an access token. As you add more claims in the principal the auth cookie gets bigger. You may hit HTTP header limits in a prod environment with many auth cookies. In IIS, the default max limit is set to 8KB-16KB depending on the version. You can increase the limit, but this means bigger payloads per request because of the cookies.

There are many ways to quell this problem, like a user session to keep all JWTs out of the auth cookie. If you have current code that accesses the identity through the principal, then this is not ideal. Moving identity data out of the principal is risky because it may lead to a complete rewrite.

One alternative is to use the SessionStore found in CookieAuthenticationOptions. OWIN, for example, has a similar property. Implement the ITicketStore interface and find a way to persist data in the back-end. Setting the SessionStore property defines a container to store the identity across requests. Only a session identifier gets sent to the browser in the auth cookie.

Say you want to use in-memory persistence instead of the auth cookie:

public class InMemoryTicketStore : ITicketStore
{
  private readonly IMemoryCache _cache;

  public InMemoryTicketStore(IMemoryCache cache)
  {
    _cache = cache;
  }

  public Task RemoveAsync(string key)
  {
    _cache.Remove(key);

    return Task.CompletedTask;
  }

  public Task<AuthenticationTicket> RetrieveAsync(string key)
  {
    var ticket = _cache.Get<AuthenticationTicket>(key);

    return Task.FromResult(ticket);
  }

  public Task RenewAsync(string key, AuthenticationTicket ticket)
  {
    _cache.Set(key, ticket);

    return Task.CompletedTask;
  }

  public Task<string> StoreAsync(AuthenticationTicket ticket)
  {
    var key = ticket.Principal.Claims
      .First(c => c.Type == ClaimTypes.Name).Value;

    _cache.Set(key, ticket);

    return Task.FromResult(key);
  }
}

Set an instance of this class in SessionStore inside CookieAuthenticationOptions, these options are set in the ConfigureServices method in the Startup class. One caveat is getting an instance since it needs a provider from BuildServiceProvider. A temporary IoC container here feels hacky and pines after a better solution.

A better approach is to use the options pattern in ASP.NET Core. Post-configuration scenarios set or change options at startup. With this solution, you leverage dependency injection without reinventing the wheel.

To put in place this options pattern, implement

IPostConfigureOptions<CookieAuthenticationOptions>:

public class ConfigureCookieAuthenticationOptions
  : IPostConfigureOptions<CookieAuthenticationOptions>
{
  private readonly ITicketStore _ticketStore;

  public ConfigureCookieAuthenticationOptions(ITicketStore ticketStore)
  {
    _ticketStore = ticketStore;
  }

  public void PostConfigure(string name, 
           CookieAuthenticationOptions options)
  {
    options.SessionStore = _ticketStore;
  }
}

To register both InMemoryTicketStore and ConfigureCookieAuthenticationOptions, place this in ConfigureServices:

services.AddTransient<ITicketStore, InMemoryTicketStore>();
services.AddSingleton<IPostConfigureOptions<CookieAuthenticationOptions>,
  ConfigureCookieAuthenticationOptions>();

Make sure you make this change in the Startup class. If you peek inside Configure<CookiePolicyOptions>, for example, and crack open the code. Note the pattern; configuration runs through a singleton object and a lambda expression. ASP.NET Core uses this same options pattern under the hood. Now, firing this up in the browser and inspecting the auth cookie will have a much smaller footprint.

Conclusion

Implementing an auth cookie is seamless in ASP.NET Core 2.1. You configure cookie options, invoke middleware, and set identity claims. Sign in and sign out methods work based on an authentication scheme. Auth cookie options allow the app to react to back-end events and set a session store. The auth cookie is flexible enough to work well with any enterprise solution.


The post Using Auth Cookies in ASP.NET Core appeared first on Simple Talk.


from Simple Talk http://bit.ly/2SotRGu
via

Basic Modding with Unity

You might occasionally hear about a game that can be ‘modded.’ But what does that mean? For starters, a mod is simply a short version of the word ‘modification.’ In the context of video games, this means someone has taken time to modify a certain aspect of the game they are playing. This modification can occur by changing the model a character normally uses, editing text in the game, or changing out a music track. Some mods take it a step further by completely overhauling entire systems in the game such as the user interface or the character’s leveling mechanics.

The power of a community and the ability to mod a game cannot be overstated. Mods allow players to tweak a game to their liking, add more things to do in the game, or just provide a laugh by replacing the dragon with a cartoon pony. However, it should also be noted that allowing mods is a difficult task. There’s a reason so few games allow mods. In this article, you won’t learn how to make your game moddable to the level of a game like Skyrim, but you can learn some of the basics of implementing modding capabilities. Within Unity, you’ll be shown simple methods of allowing users to change the text in your game as well as changing the current mesh an object is using.

Setup

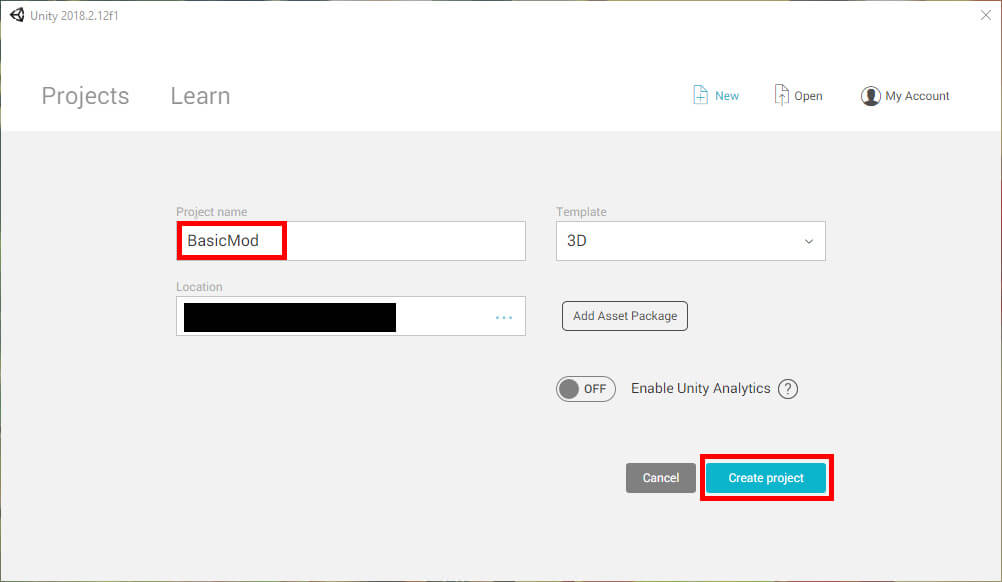
There’s nothing you need to do ahead of project creation, so just open Unity and make a new project as shown in Figure 1.

Figure 1: Creating a new project.

Name your project BasicMod, specify a file path, and make sure it’s a 3D project. Once you’ve done all that, create the project. The form should resemble Figure 2.

Figure 2: Naming the project.

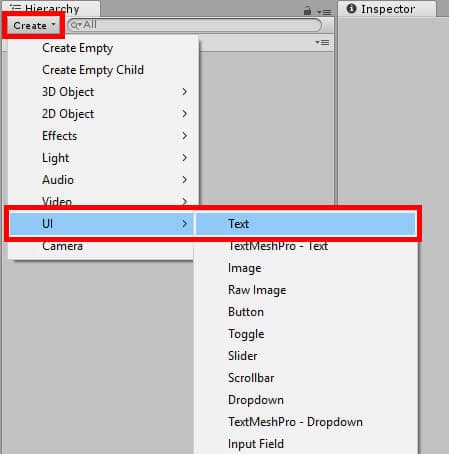
Of course, without any objects to modify there’s no game to mod at all. Start by creating some text on the screen. Go to the Hierarchy window and click the Create button. Choose UI->Text to make a text object like Figure 3.

Figure 3: Creating some text

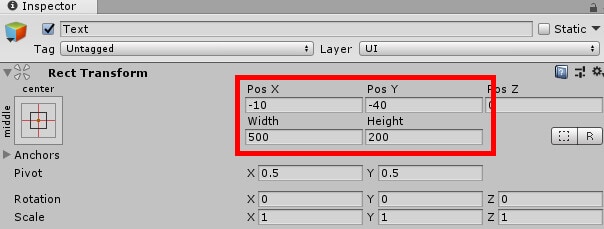
Next, you’ll need to position the text in a position where it can be easily seen. The location can be wherever you choose, but Figure 4 shows how to place the text in the upper-middle of the screen. In the Inspector window set Pos X to -10 and Pos Y to 125. Then set the Width variable to 500 and Height to 150, this way there’s plenty of space for whatever text you wish to enter.

Figure 4: Setting Text to the correct position and size

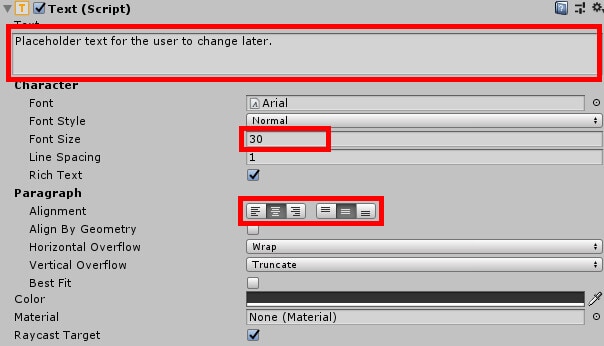
After this, create some placeholder text in the Text field. It can be whatever you wish. Finally, change any of the text properties you wish to make it easier to read. The below example in Figure 5 places the font size variable at 30 and sets the alignment to the center.

Figure 5: Setting up the text

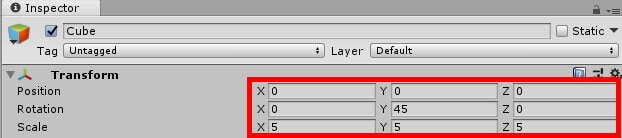
This will do for the game’s text object. Next, you’ll need a 3D object. The user may wish to change the object from a simple cube to something else. Start by clicking the Create button again in the Hierarchy. Navigate to 3D Object-Cube to create a cube object in the world. Set both its Position X and Position Y fields to 0. Change its Rotation Y field to 45 and set the scale to 5 for all three axes as shown in Figure 6.

Figure 6: The Cube object’s Transform component

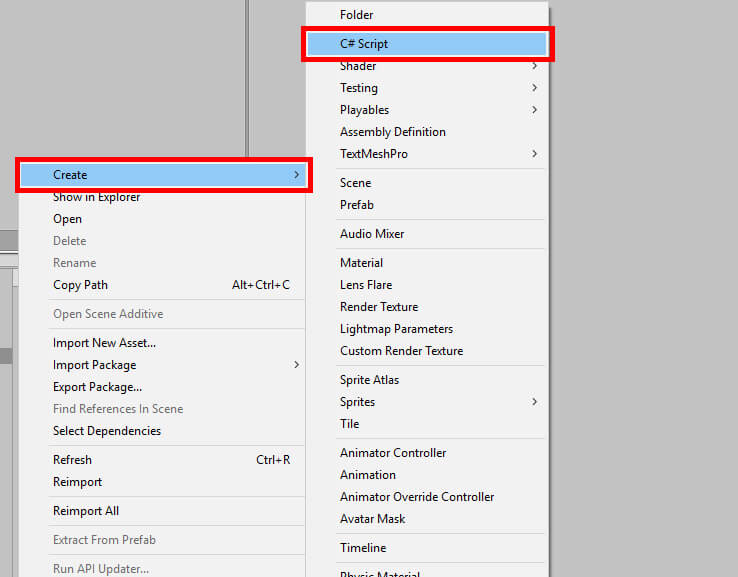
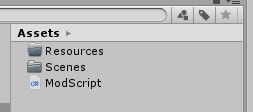
Finally, create an empty object by selecting the Create button then navigating to Create Empty. Name this new object GameManager. This is the object that will hold the script that makes this project run. There’s nothing more to do here in the Unity editor. Navigate to your Assets window and create a new C# Script as shown in Figure 7. Name this script ModScript.

Figure 7: Making a new C# script

Once created, double click ModScript to open Visual Studio and begin the coding process.

The Code

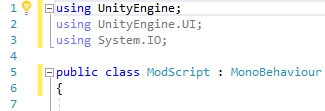
To get started, add using UnityEngine.UI; and using System.IO; to the top of the script as shown in Figure 8. System.IO is going to be very important for this project. You’ll use it to create a folder named Resources as well as employ StreamReader to read data from a file that the user creates. It will also be responsible for gathering file names, so the rest of the program knows which file to use. UnityEngine.UI also has an important job but just has less going on. This will allow you to edit the text on the Text object you created earlier.

Figure 8: All require using statements.

Only a few global variables will need to be declared for this project. Those variables are:

public Text messageText;
public MeshFilter mf;
private string pathToMods;

Finally, for the sake of cleanliness, you’ll have three function calls that make up the Start function. Write the following:

DirectoryCreation();
TextModding();
MeshModding();

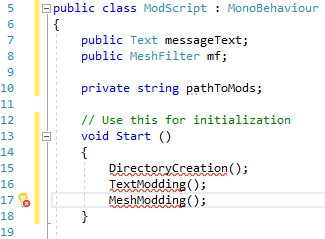
The Update function will not see any use in this project, so you may delete it or comment it out. Once finished, the variable declarations and the Start function should look like Figure 9.

Figure 9: The code so far…

Of course, the compiler doesn’t like the fact that those three functions don’t exist. Fortunately for Visual Studio, it won’t stay that way. Start with the DirectoryCreation function.

void DirectoryCreation()
{
        pathToMods = Application.dataPath + "/Resources";
        if (!Directory.Exists(pathToMods))
                Directory.CreateDirectory(pathToMods);
}

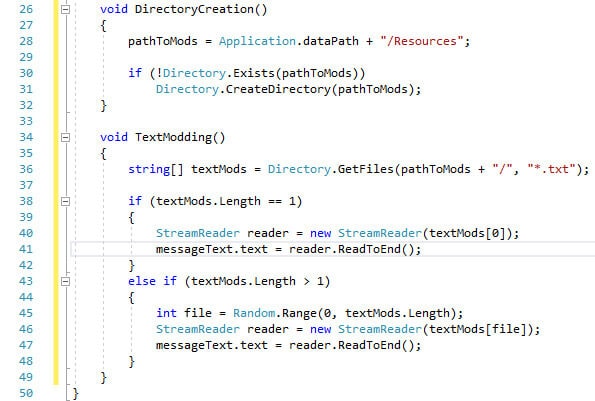
Time for a little breakdown of what’s happening. First, the code sets the value of pathToMods. This value is a file path, and the path in question is the Resources folder within the path of the game. Of course, none of that will matter if the folder doesn’t exist. The next two lines check to see if there is a Resources directory. If there isn’t, the folder will be created for you.

Up next is where the fun begins. TextModding is the function that will allow a user to modify the text in the game. The function goes like this:

void TextModding()
{
        string[] textMods = Directory.GetFiles(pathToMods + "/", "*.txt");
        if (textMods.Length == 1)
        {
                StreamReader reader = new StreamReader(textMods[0]);
                messageText.text = reader.ReadToEnd();
        }
        else if (textMods.Length > 1)
        {
                int file = Random.Range(0, textMods.Length);
                StreamReader reader = new StreamReader(textMods[file]);
                messageText.text = reader.ReadToEnd();
        }
}

First, you create an array of strings called textMods. What do you fill this array with? You gather a list of all files with the txt extension and get their paths. Next, a check is performed to see if there’s more than one text file. This is done in case the user has more than one txt file. If there’s only one txt file, then you simply take that file, read the text inside it, and then apply that text to the Text object in the game. If there’s more than one txt file to choose from, Unity will choose one at random.

So far, your two new functions, DirectoryCreation and TextModding, should look like Figure 10.

Figure 10: DirectoryCreation and TextModding

Next comes the ability to modify the current mesh on the Cube object using a function called MeshModding. Like before, it will find all files with the fbx extension. If there’s more than one file, the program will randomly select one to use. However, this is where the similarities between this function and TextModding end.

void MeshModding()
{
        string[] meshModPaths = Directory.GetFiles(pathToMods + "/", "*.fbx");
        string modToUse = "mod";
        string extensionToRemove = ".fbx";
        if (meshModPaths.Length == 1)
        {
                modToUse = Path.GetFileName(meshModPaths[0]);
                modToUse = modToUse.Replace(extensionToRemove, "");
                mf.mesh = Resources.Load<Mesh>(modToUse);
        }
        else if (meshModPaths.Length > 1)
        {
                int file = Random.Range(0, meshModPaths.Length);
                modToUse = Path.GetFileName(meshModPaths[file]);
                modToUse = modToUse.Replace(extensionToRemove, "");
                mf.mesh = Resources.Load<Mesh>(modToUse);
        }
}

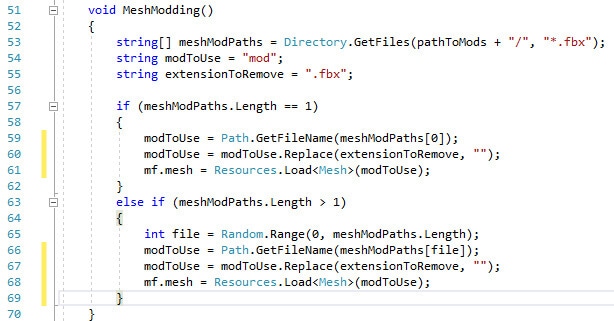
The basic idea is still intact, but the execution is somewhat different. Notice the two additional string variables declared alongside the string array. Your modToUse variable is simply the name of the mod to use, and you just give it a placeholder name. After this comes another string variable named extensionToRemove. As it turns out, a function you use later doesn’t like having extensions in the name of the file to search for. To get around this, you just specify which part of the text you wish to remove from the variable and use Replace to rid the variable of the extension.

At the last line, you call Resources.Load to load the fbx file into the game. Recall the Resources folder you had the program create thanks to DirectoryCreation. This function will specifically search the Resources folder in your game for whichever file you tell it to load. In this case, it’s whatever the name of the file stored in modToUse would be minus the extension. As expected, you also specify that it will be loaded as a mesh to make Unity happy. Figure 11 shows the function.

Figure 11: MeshModding function

This concludes the coding section of this project. To summarize, you have granted a user the ability to modify text by reading a txt file that they create. You also allowed them to change the mesh of the object in the scene by placing an fbx file in the Resources folder. Close Visual Studio and head back to the Unity project.

Finishing the Project

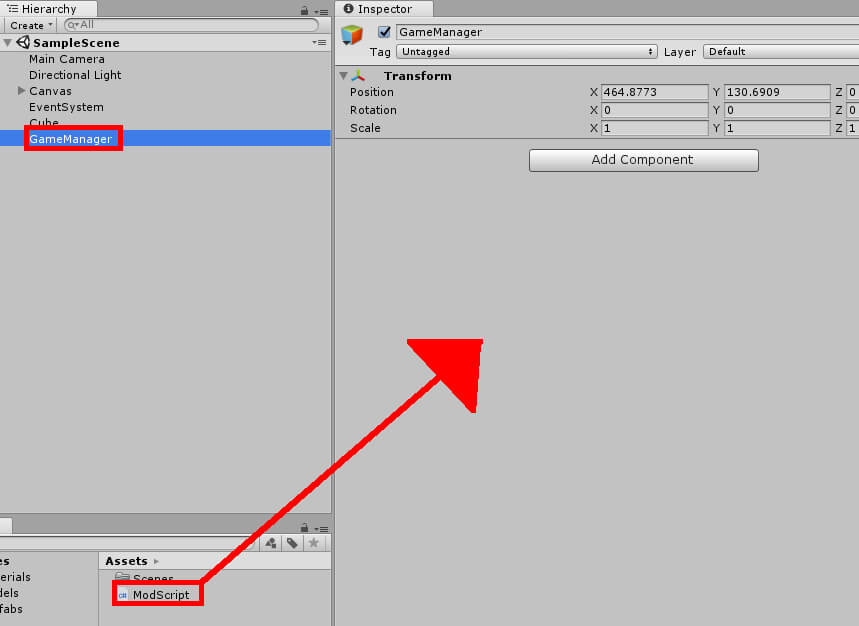
Select the GameManager object in the Hierarchy and drag ModScript from the Assets window into the Inspector, attaching the script to the object as shown in Figure 12.

Figure 12: Attaching ModScript to GameManager

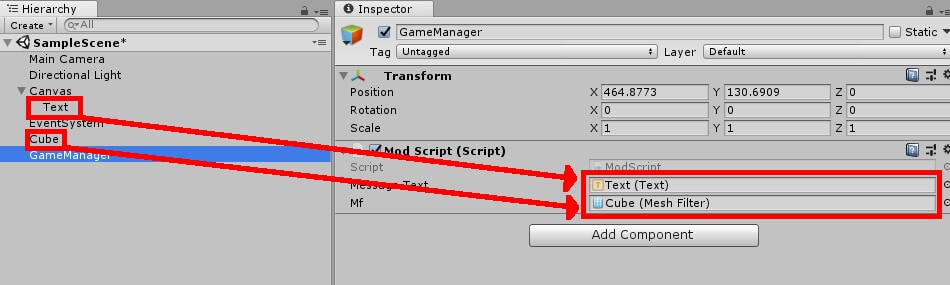
Next, comes the assignment of the Message Text and Mf variables. Find your Text object that you created earlier and drag that to the Message Text field in the newly created ModScript component. Then take the Cube object and drag it to the Mf field. Once you have these in place, the Inspector should look like Figure 13.

Figure 13: Applying Text and Cube to their corresponding variables

There’s nothing else that needs to be done now. Does this mean the project is finished? Well, yes and no. You can and should run the project in Unity to create the Resources folder, but the project itself won’t do anything you haven’t already set up. But that’s the point. The idea is you create your base game, and then somebody else can come in later and modify certain aspects of it. In this case, go ahead and pretend to be that somebody. But first be sure to run the program so the Resources folder is created as shown in Figure 14.

Figure 14: That folder wasn’t there before…

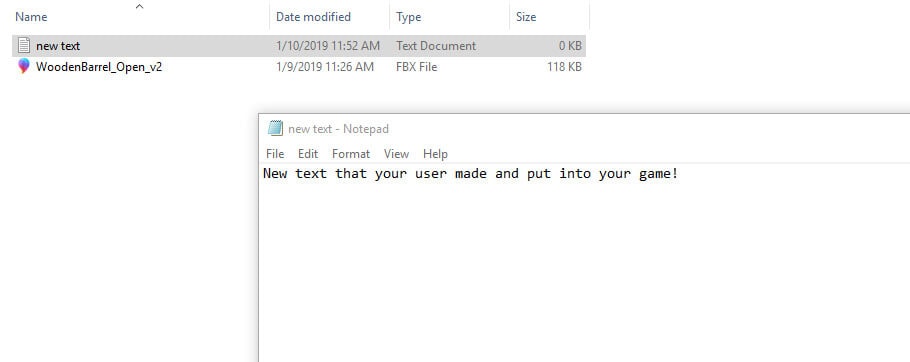
Begin by adding a mesh for the game to pull from. So long as the mesh is an fbx file, the program will work just fine. This example will use a model of a barrel found here. Once you’ve got your model, whether it be the barrel example or something else entirely, use Windows Explorer to navigate to the Resources folder of your project. Place that fbx file in this folder.

The text modding functionality is even simpler. Simply create a new txt file and place it somewhere in the folder. You may name the text file anything you like. Open the file and enter whatever text you wish as shown in Figure 15.

Figure 15: Adding files to the Resources directory and writing text to a txt file

Now enter Unity once again. Your users wouldn’t normally see this, but Unity will detect these files and update the Assets window. Now try running the game again. You should see the text change and the basic mesh of the Cube object replaced with whatever you placed as shown in Figure 16. Note: you may need to edit the scale value of the object to better see the modded mesh.

Figure 16: The (modified) game in action!

Conclusion

As pointed out in the introduction, this is only meant to be a simple intro to the absolute basics of modding. But feel free to pat yourself on the back, for this small project you created has more modding capabilities than many games get, officially or otherwise. This example introduced you to allow other users to change some of the game text and meshes your game might use. Furthermore, it was simple too. If you’ve ever tried to mod a game yourself, you might find that it can be somewhat difficult. Here, the process has been simplified so those who wish to mod the project can do so quickly.

Of course, how much further you would take this is up to you, and it all depends on if you even want to build your game with modding in mind. To do that you’ll need to create a system that works for you as well as other users. Perhaps you should have the game search for specific filenames? What about texturing a mesh? In this example, the mesh that you modded into your game used the texture the Cube object did. If you can change out a 3D object, it stands to reason you can also change the texture attached to that object. Experiment and see what you can discover, both for yourself and your users.


The post Basic Modding with Unity appeared first on Simple Talk.


from Simple Talk http://bit.ly/2E585yL
via

Sunday, February 10, 2019

6 SSMS features that deserve some attention

SSMS new versions are full of very interesting features. With SQL Server 2019 arriving, it’s normal that our focus is captured by the new features in the database engine, however, SSMS has also a lot to offer.

Let’s highlight some very interesting features this tool has to offer on its new versions.

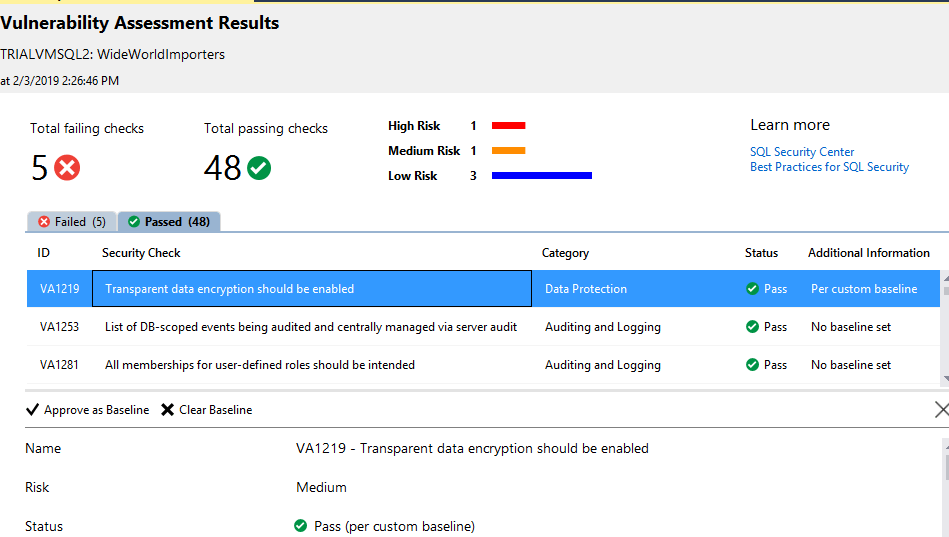
Vulnerability Assessment

Sometimes the configuration of a server and database seems very complex, especially in relation to security.

The vulnerability assessment feature analyses 53 potential problems, identify if the configuration is correct or not and if not, classifies the risk of the problem.

The evaluation can be made for each database and the reports can be saved in JSON format an open again later.

For each potential problem, the report explains the problem and provides the query used to check if the problem is present or not on the database.

The tool also allows us to record the result as a baseline for our environment. By doing so, we take our custom configuration and needs out of the way so they are not reported as vulnerability issues. However, this is the weaker point of the tool: the baselines are stored in a JSON file on the same folder of the vulnerability report. As a result, if you run the report from different client machines you may get different results, ignoring previous baselines that have been saved.

You can read more about this feature on this link 

Static Data Masking

GDPR brought a lot of restriction to the way we manage our data. We can’t use the production data to test new versions of our application, for example. The dynamic data masking was a beginning but sometimes we really need to hide the data, create a copy of the database replacing some fields with dummy data. That’s the static data masking.

This new feature allows us to choose which columns we would like to mask, choose a mask function and start the process, which will create a masked backup copy of the database, that we can deliver to a tester team, for example.

You can read more details on this link 

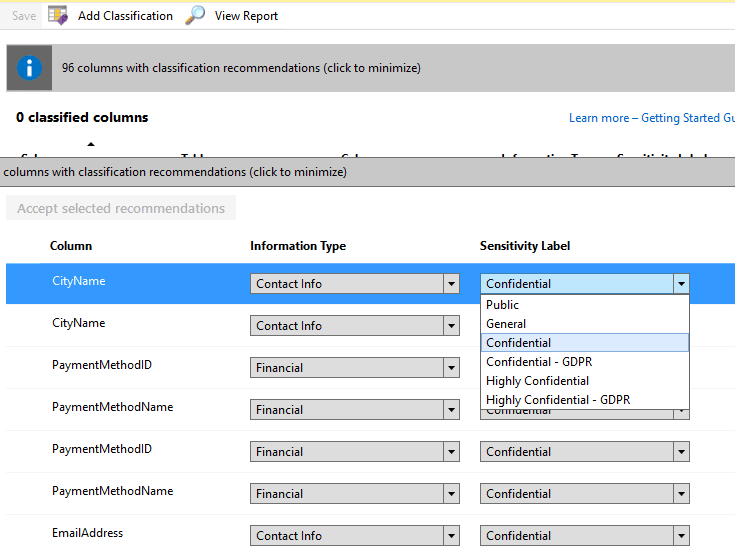
Data discovery and classification

In the era of GDPR and other similar laws around the world, it’s becoming more and more important to identify exactly what kind of data we have in our databases, if they are public, confidential, and so on.

The data discovery and classification feature help us with this. First, it tries to automatically identify which fields are sensitive and recommend a classification for them. We can set classifications for the fields recommended and anyone else.

There are two labels we can set for each field: Information type and sensitive level, this last one includes GDPR levels.

Besides that, we can add both labels for any field in the model, even if it hasn’t initially being identified as sensitive.

All the classifications are stored in two system tables: sys_information_type_name and sys_sensitivity_label_name

It’s an interesting feature, the reports seem interesting, but it’s a modeling feature and SSMS lacks a lot of modeling features, even the database diagrams are being deprecated. I’m not sure about how useful a modeling feature will be inside SSMS.

What are your thoughts? Are you using this feature? Let me know what you think about.

You can learn more about this feature on this link.

Database Upgrade

In my humble opinion, this is the most powerful new feature in SSMS. Every SQL Server version brings many updates on the query optimizer, however, the query optimizer is so powerful that while most of the queries may be improved, some of them may have performance problems. Since SQL Server 2016, a procedure for these situations was established:

  • After migrating the database to a new version, keep it on the old compatibility level
  • Use query store during a while to create a baseline for query performance
  • Change the compatibility level to the new version
  • Wait to capture the query executions
  • Fix query regressions by forcing old query plans

This feature, also called Query Tunning Assistant, or QTA, help us to execute this process. Mind that this process may take many days or weeks to capture the workload twice, before and after the compatibility model change. This feature creates an upgrade session, recommend the best configuration for query store and follow the workload capture.

The best part is the end of the process: The QTA doesn’t stick only to forcing old query plans, in this case, we could make all the tasks using query store by ourselves. QTA is able to analyze regressed queries and identify many well-known regression problems and suggest the creation of plan guides to solve the problems.

This is way more detailed than we could do by ourselves using the server tools, turning this feature very useful.

Integrated with Azure Data Studio

Azure Data Studio is a new Microsoft tool that allows access not only to SQL Server but to many different data sources either on the cloud or on premises. It’s not clear yet what’s the future relation between SSMS and Azure Data Studio, but now SSMS has the option to open the same connection in Azure Data Studio, moving from one tool to another.

When working with SSMS you are just one click away from opening the same server on Azur Data Studio, right-clicking the connection.

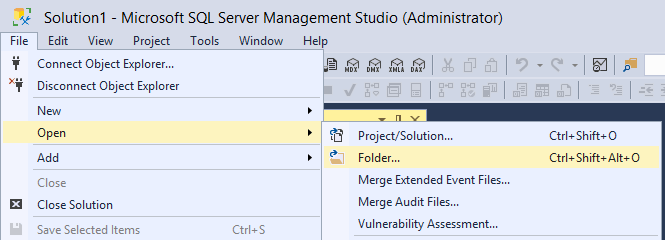
Open Folder

SSMS is a child of Visual Studio, it inherits many visual studio behaviours, including the pattern to work with solution files. Although it’s interesting, DBA’s are not used to solution files, they keep their scripts in .SQL files organized in different folders and that’s it.

Allowing DBA’s to open a folder as a solution makes our lives way easier and help us with the organization of our scripts.

The post 6 SSMS features that deserve some attention appeared first on Simple Talk.


from Simple Talk http://bit.ly/2tfGMvh
via