Monday, November 4, 2019

What’s in that database? Getting information about routines

There is a lot of information held in SQL Server metadata about your SQL Server procedures, triggers, views and functions. Some of it is valuable, other nuggets are useful and a few are rather dull but worthy. It really all needs to be tied together to tell the full story, especially if you are not able to, or do not want to, query the metadata directly. Until JSON arrived, this information could be viewed but it was all a bit tedious to get and display because it was hierarchical in nature. Now we can do a lot better in getting all this information about our database’s routines. (Routines, including triggers, views, procedures, Replication filter procedures, rules, defaults and functions, are also referred to as modules). Once we have the information, there are plenty of ways of inspecting it or getting reports from it.

We know from the metadata the identity of the other routines that use our routine, the objects that it references, its settings, parameters, return value, the table source it produces, any documentation in the extended properties. It is great to know all this when you are developing or maintaining SQL Server code. Over the years, I’ve used various approaches to getting all this information. Nowadays, I generally get a JSON document that has all the routines I’m interested in.

Here is an example, using AdventureWorks2016, where I’ve got the details of just one of each type of module contained there. The descriptions of the routines and the inline comments on the columns, and parameters come from the MS_Description extended property

[ 
   { 
      "Name":"dbo.uspPrintError",
      "Type":"sql stored procedure (P)",
      "Description":"Prints error information about the error that caused execution to jump to the CATCH block of a TRY...CATCH construct. Should be executed from within the scope of a CATCH block otherwise it will return without printing any error information.",
      "Dates":{ 
         "Created":"2017-10-16T15:52:22.977",
         "Last_Modified":"2017-10-16T15:52:22.977"
      },
      "Config":{ 
         "Ansi nulls":"true",
         "Quoted identifier":"true"
      },
      "ReferencedBy":[ 
         "Sales.uSalesOrderHeader",
         "Purchasing.dVendor",
         "Production.iWorkOrder",
         "Production.uWorkOrder",
         "dbo.uspLogError",
         "Purchasing.iPurchaseOrderDetail",
         "Purchasing.uPurchaseOrderDetail",
         "Purchasing.uPurchaseOrderHeader",
         "Sales.iduSalesOrderDetail"
      ]
   },
   { 
      "Name":"dbo.ufnLeadingZeros",
      "Type":"sql scalar function (FN)",
      "Description":"Scalar function used by the Sales.Customer table to help set the account number.",
      "Dates":{ 
         "Created":"2017-10-16T15:52:23",
         "Last_Modified":"2017-10-16T15:52:23"
      },
      "Properties":[ 
         "IsDeterministic",
         "IsPrecise",
         "IsSystemVerified"
      ],
      "Config":{ 
         "Ansi nulls":"true",
         "Quoted identifier":"true",
         "Schema-bound,":"true",
         "Database collation":"true"
      },
      "Parameters":[ 
         "@Value int -- Input parameter for the scalar function ufnLeadingZeros. Enter a valid integer."
      ],
      "Returned":[ 
         " varchar (8)"
      ],
      "ReferencedBy":[ 
         "Sales.Customer.AccountNumber"
      ]
   },
   { 
      "Name":"Person.iuPerson",
      "Type":"sql trigger (TR)",
      "Parent":"Person.Person",
      "Description":"AFTER INSERT, UPDATE trigger inserting Individual only if the Customer does not exist in the Store table and setting the ModifiedDate column in the Person table to the current date.",
      "Dates":{ 
         "Created":"2017-10-16T15:52:35.017",
         "Last_Modified":"2017-10-16T15:52:35.017"
      },
      "Config":{ 
         "Ansi nulls":"true",
         "Quoted identifier":"true"
      },
      "Referencing":[ 
         "inserted.Demographics.exist",
         "inserted",
         "Person.Person"
      ]
   },
   { 
      "Name":"Person.vAdditionalContactInfo",
      "Type":"view (V)",
      "Description":"Displays the contact name and content from each element in the xml column AdditionalContactInfo for that person.",
      "Dates":{ 
         "Created":"2017-10-16T15:52:35.060",
         "Last_Modified":"2017-10-16T15:52:35.060"
      },
      "Properties":[ 
         "SystemDataAccess",
         "UserDataAccess"
      ],
      "Config":{ 
         "Ansi nulls":"true",
         "Quoted identifier":"true"
      },
      "Columns":[ 
         "BusinessEntityID int ",
         "FirstName Name ",
         "MiddleName Name ",
         "LastName Name ",
         "TelephoneNumber nvarchar (50)",
         "TelephoneSpecialInstructions nvarchar (MAX)",
         "Street nvarchar (50)",
         "City nvarchar (50)",
         "StateProvince nvarchar (50)",
         "PostalCode nvarchar (50)",
         "CountryRegion nvarchar (50)",
         "HomeAddressSpecialInstructions nvarchar (MAX)",
         "EMailAddress nvarchar (128)",
         "EMailSpecialInstructions nvarchar (MAX)",
         "EMailTelephoneNumber nvarchar (50)",
         "rowguid uniqueidentifier ",
         "ModifiedDate datetime "
      ],
      "Referencing":[ 
         "Person.Person",
         "ContactInfo.ref.value"
      ]
   },
   { 
      "Name":"dbo.ufnGetContactInformation",
      "Type":"sql table valued function (TF)",
      "Description":"Table value function returning the first name, last name, job title and contact type for a given contact.",
      "Dates":{ 
         "Created":"2017-10-16T15:52:35.217",
         "Last_Modified":"2017-10-16T15:52:35.217"
      },
      "Properties":[ 
         "SystemDataAccess",
         "UserDataAccess"
      ],
      "Config":{ 
         "Ansi nulls":"true",
         "Quoted identifier":"true",
         "Database collation":"true"
      },
      "Columns":[ 
         "PersonID int ",
         "FirstName nvarchar (50)",
         "LastName nvarchar (50)",
         "JobTitle nvarchar (50)",
         "BusinessEntityType nvarchar (50)"
      ],
      "Parameters":[ 
         "@PersonID int -- Input parameter for the table value function ufnGetContactInformation. Enter a valid PersonID from the Person.Contact table."
      ],
      "Referencing":[ 
         "Person.BusinessEntityContact",
         "Person.ContactType",
         "Sales.Customer",
         "HumanResources.Employee",
         "Person.Person",
         "Sales.Store",
         "Purchasing.Vendor"
      ]
   }


This is very useful for documentation purposes, of course and would normally be added to the header of the source code. To do this, it is often better for visibility to convert it to YAML which doesn’t have to be ‘beautified’ to make it readable and indented. It is also easy to pop it into a JSON-oriented database such as MongoDB to get reports on your code.

This code is a single, rather large, query. I usually break it into manageable Table-valued functions that can be ‘inlined’. The problem with this is that they aren’t really designed for this sort of work because they have to be created in the database you are documenting and deleted after use. They therefore have to be eliminated from the set of modules being documented. You can use temporary stored procedures but not functions. I generally gloop all the code into a rather terrifying query, because I’ll be doing it as a repeatable script in PowerShell. It leaves no trace in the database being documented, of course. It also allows me to do the conversion to YAML more easily, allows me to update headers and so on.

For the purposes of this article, I’ll use the TVF approach, because one can explain it incrementally. To use this, you have to remember to delete it once you’ve finished. Some developers use a schema especially for such utilities that is not put into source control. I generally use temporary stored procedures for this sort of work but you can’t have temporary functions and this code relies heavily on Table-valued functions.

We’ll work through some of the routines that are required to give us a report on a database that we wish to document.

Getting a list of the names of objects referenced by this routine

We start by collecting the names of the objects, If any, that are referenced by the routine

CREATE OR ALTER   FUNCTION dbo.JsonReferencedObjects
/**
Summary: >
  This lists all the all the objects that are referenced by the object, as a json array
Author: PhilFactor
FirstCreated: 23/11/2018
Examples:
   - Select referenced from dbo.JsonReferencedObjects(Object_Id('Sales.SalesOrderHeader'))
 Name: 'dbo.JsonReferencedObjects' 
 Type: 'sql inline table valued function (IF)' 
 Columns: 
    - 'referenced nvarchar (4000)' 
 Parameters: 
    - '@Object_id int '
 Returns: >
  single column with list of referenced objects
**/
(
    @Object_id INT
)
RETURNS TABLE AS RETURN
SELECT '["'+
  String_Agg(
  Coalesce(referenced_server_name + '.', '')
  + --possible server name if cross-server
  Coalesce(referenced_database_name + '.', '')
  + --possible database name if cross-database
  Coalesce(referenced_schema_name + '.', '')
  + --likely schema name
  Coalesce(referenced_entity_name, '')
  + --very likely entity name
  Coalesce('.' + Col_Name(referenced_id, referenced_minor_id), '') 
    ,'", "') +'"]' AS referenced
  FROM sys.sql_expression_dependencies
  WHERE referencing_id = @object_id
Go


This only returns a string as a single row containing a single column. It must access a table, the sys.sql_expression_dependencies system view. It is capable of improvement, I reckon: this is easy with a modular construction. Should these lists actually be lists of both names and object descriptions? When scanning them it isn’t always obvious, with many databases, what type of object it is. Be my guest and do it!

This function isn’t a huge step forward by itself but here is how you could use it to get a JSON report on all the modules in the database that make references to other objects such as tables. For these, it provides a References key that has as its value a list of the names of all the objects it references.

SELECT Object_Schema_Name(module.object_id) + '.'
       + Object_Name(module.object_id) AS "Name",
  Json_Query([References]) AS "References"
  FROM sys.sql_modules AS module
    OUTER APPLY dbo.JsonReferencedObjects(module.object_id)
  WHERE Json_Query("References") IS NOT NULL
FOR JSON AUTO;

Getting a list of the names of objects that reference the routine

This routine is even simpler. It simply gets the names of all the objects that reference the routine.

CREATE OR alter FUNCTION dbo.JsonObjectReferences
/**
Summary: >
  This lists all the all the objects that reference the object
Author: philfactor
Date: 23/11/2018
Examples:
   - Select * from dbo.JsonObjectReferences(Object_Id('Sales.SalesOrderHeader'))
 Config: 
     Ansi nulls: 'true' 
     Quoted identifier: 'true' 
 Columns: 
    - 'referencing nvarchar (4000)' 
 Parameters: 
    - '@Object_id int '
 Returns: >
  single column with list of referencing objects
**/
(
    @Object_id INT
)
RETURNS TABLE AS RETURN
SELECT '["'+
  String_Agg(--likely schema name
   Coalesce(Object_Schema_Name(referencing_id) + '.', '') 
   + Object_Name(referencing_id)
  + --definite entity name
  Coalesce('.' + Col_Name(referencing_id, referencing_minor_id), '') 
           ,'", "') +'"]' AS referencing
  FROM sys.sql_expression_dependencies
  WHERE referenced_id = @object_id
  Go

You can easily use this in a query to list out those routines that are referenced by other objects and with them the names of the referencing objects. As a variation, we’ll use it to get a document and then convert it back into a relational table just to illustrate the flexibility of JSON.

CREATE table #JsonRoutines (document VARCHAR(20), TheJSON nvarchar(MAX));
--insert the JSON document into it
INSERT INTO #JsonRoutines (document, TheJSON) 
   SELECT 'Referencing', (SELECT Object_Schema_Name(module.object_id) + '.'
           + Object_Name(module.object_id) AS "Name",
             Json_Query([Referencing]) AS "ReferencedBy"
          FROM sys.sql_modules AS module
          OUTER APPLY dbo.JsonObjectReferences(module.object_id)
          WHERE Json_Query("Referencing") IS NOT NULL
          FOR JSON AUTO
                 );
SELECT Name, Value AS Referencing  
FROM OpenJson(
     (SELECT TheJson FROM #JsonRoutines WHERE document='Referencing')) 
       WITH (Name NVARCHAR(80) '$.Name',
             ReferencedBy  nvarchar(max) '$.ReferencedBy' AS json)
  OUTER APPLY OpenJson(ReferencedBy)
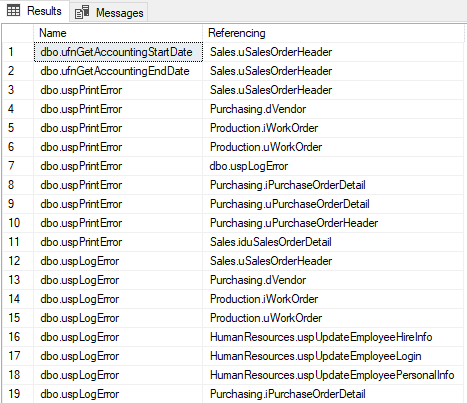
Of course, it is much easier to get this result from sys.sql_expression_dependencies directly but by storing the json an querying it, this would allow you to make queries even when the live database isn’t available.

Our next task is to render the declaration of our parameter, return value, or the component columns of a returned table. As this is repeated several times it is worth taking the performance hit and abstracting the logic as a function.

We really want all the information about values in routines to be in a form that is easy to inspect, so as to be able to take it in at a glance. They ought, therefore to be the same as they were in their declaration. This complicates the code more than somewhat, but this justifies having it in a function. Another complication is that we may have documented these values with an extended property. We’d need to pick this information up in an inline comment.

CREATE OR ALTER FUNCTION [dbo].[DataDeclaration]
(
@ValueTypemaxlength int,
@ValueTypePrecision int,
@ValueTypeScale int,
@tname sysname,
@XMLcollectionID int,
@isXMLDocument bit,
@Schemaename sysname,
@SchemaCollectionName sysname,
@Value sql_variant
)
RETURNS nvarchar(1000)
AS
BEGIN
RETURN  
   @tname + ' '  + 
      CASE
      -- we may have to put in the length
        WHEN @tname IN ('char', 'varchar', 'nchar', 'nvarchar')
        THEN '(' +
                  CASE WHEN @ValueTypemaxlength = -1 THEN 'MAX'
            ELSE CONVERT(VARCHAR(4),
              CASE WHEN @tname IN ('nchar', 'nvarchar')
              THEN @ValueTypemaxlength / 2 ELSE @ValueTypemaxlength
              END)
            END + ')'
        WHEN @tname IN ('decimal', 'numeric')
        THEN '(' + CONVERT(VARCHAR(4), @ValueTypePrecision)
              + ',' + CONVERT(VARCHAR(4), @ValueTypeScale) + ')'
        ELSE ''--we’ve done with putting in the length
      END+ --when an XML document
      CASE WHEN @XMLcollectionID <> 0
        THEN --deal with object schema names
          '(' +
          CASE WHEN @isXMLDocument = 1 THEN 'DOCUMENT ' ELSE 'CONTENT ' END
          + COALESCE(
           QUOTENAME(@Schemaename) + '.' + QUOTENAME(@SchemaCollectionname)
            ,'NULL') + ')'
          ELSE ''
      END + --when an XML document      
          CASE WHEN @value IS NOT NULL --the comment from the extended value
            THEN COALESCE('-- '+CONVERT(VARCHAR(2000),@value),'') ELSE '--'
                
      END
End
go

Getting a list of the parameters and their data type for the routine

We now use the function that we just now created, so as to extract all the parameters of the routine whose object_id we pass to it. We need to create this list in the right order.

CREATE OR alter FUNCTION dbo.JsonObjectParameters
/**
Summary: >
  This provides a JSON list of parameters together with their data type
  and any MS_Description they might have
Author: philfactor
Date: 23/11/2018
Examples:
   - Select * from dbo.JsonObjectParameters(object_id('dbo.DataDeclaration'))
 Config: 
     Ansi nulls: 'true' 
     Quoted identifier: 'true' 
 Columns: 
    - 'parameters nvarchar (4000)' 
 Parameters: 
    - '@Object_id int '
 Returns: >
  single column with list of parameters
**/
(
    @Object_id INT
)
RETURNS TABLE AS RETURN
SELECT (
SELECT '["'+
    String_Agg(parameter.name +' '+ 
    dbo.DataDeclaration(parameter.max_length,
      parameter.precision,parameter.scale,
      t.name, SchemaCollection.XML_collection_ID,
      is_XML_Document , Schemae.name, SchemaCollection.name,
      Value)
     + CASE WHEN is_Output=1 THEN 'return value'
        WHEN has_default_value=1 THEN ' default '+Convert(VARCHAR(20),default_value) 
        WHEN is_readonly=1 THEN ' readonly' ELSE '' END  
     ,'", "') WITHIN GROUP ( ORDER BY parameter_id asc )
           +'"]' AS parameter
    FROM sys.parameters parameter
     INNER JOIN sys.types t 
       ON parameter.user_Type_ID = t.user_Type_ID
     LEFT outer JOIN sys.xml_schema_collections SchemaCollection
       ON SchemaCollection.xml_collection_ID = parameter.XML_collection_ID
     LEFT OUTER JOIN Sys.Schemas Schemae 
       ON SchemaCollection.schema_ID = Schemae.schema_ID
     LEFT OUTER JOIN sys.extended_properties
       ON major_id=parameter.object_id AND minor_id=parameter_id
       AND class=2 --parameter
        AND sys.extended_properties.name='MS_Description'
    WHERE parameter_id >0 
    AND parameter.object_id=@Object_id
    ) AS "parameters"
GO

Getting a list of return values and their data type for the routine

CREATE OR alter FUNCTION dbo.JsonObjectReturn
/**
Summary: >
  This provides a return data type
Author: philfactor
Date: 23/11/2019
Examples:
   - Select * from dbo.JsonObjectReturn(object_id('dbo.DataDeclaration'))
Columns: 
    - 'returned nvarchar (4000)' 
 Parameters: 
    - '@Object_id int '
Returns: >
  single column “returned” with list
**/
(
    @Object_id INT
)
RETURNS TABLE AS RETURN
SELECT (
SELECT '["'+
    String_Agg(parameter.name +' '+ 
        dbo.DataDeclaration(parameter.max_length,
      parameter.precision,parameter.scale,
      t.name, SchemaCollection.XML_collection_ID,
      is_XML_Document , Schemae.name, SchemaCollection.name,
      null)
         + CASE WHEN is_Output=1 THEN 'return value'
                WHEN has_default_value=1 THEN ' default '+Convert(VARCHAR(20),default_value) 
                WHEN is_readonly=1 THEN ' readonly' ELSE '' END  
         ,'", "') +'"]' AS ReturnValue 
    FROM sys.parameters parameter
     INNER JOIN sys.types t 
           ON parameter.user_Type_ID = t.user_Type_ID
         LEFT outer JOIN sys.xml_schema_collections SchemaCollection
           ON SchemaCollection.xml_collection_ID = parameter.XML_collection_ID
         LEFT OUTER JOIN Sys.Schemas Schemae 
           ON SchemaCollection.schema_ID = Schemae.schema_ID
     WHERE parameter_id = 0 AND parameter.object_id=@object_id
  ) AS "Returned"
go

Getting a list of the Columns and their data type for the routine

Several types of routines, such as views and table functions, produce a table source. It is useful to know the columns and their correct order when using them, and it is particularly useful to be able to provide temporary tables with the correct datatypes in order to save data from them

CREATE OR ALTER  FUNCTION dbo.JsonObjectColumns
/**
Summary: >
  This provides a list of prarameters together with their data type
Author: philfactor
Date: 23/11/2018
Database: master
Examples:
   - Select * from dbo.JSONObjectColumns(object_id('dbo.ufnGetContactInformation'))
Returns: >
  single column with list
**/
(
    @Object_ID int
)
RETURNS TABLE AS RETURN
(
SELECT (
SELECT TOP 100 percent  '["'+
    String_Agg(c.name +' '+ 
    dbo.DataDeclaration(c.max_length,
      c.precision,c.scale,
      t.name, SchemaCollection.XML_collection_ID,
      is_XML_Document , Schemae.name, SchemaCollection.name,
      null),'", "' )
          WITHIN GROUP ( ORDER BY column_id asc )   +'"]'
     FROM sys.columns c
     INNER JOIN sys.types t ON c.user_Type_ID = t.user_Type_ID
     LEFT outer JOIN sys.xml_schema_collections SchemaCollection
     ON SchemaCollection.xml_collection_ID = c.XML_collection_ID
     LEFT OUTER JOIN Sys.Schemas Schemae ON SchemaCollection.schema_ID = Schemae.schema_ID
     LEFT OUTER JOIN sys.extended_properties
       ON major_id = c.object_id AND minor_id=column_id
       AND class= 1 -- Object or column
        AND sys.extended_properties.name='MS_Description'
                where c.object_id = @object_id
     
  ) AS "columns" 
)

Putting it all together

Now we can put all this together. This can be executed as is, or turned into a stored procedure

DECLARE @json NVARCHAR(MAX)=
(SELECT Object_Schema_Name(object.object_id) +'.'+object.name AS "Name",
     Lower(Replace(object.type_desc,'_',' '))+' ('+RTrim(object.type)+')' AS "Type", 
     Object_Schema_Name(object.parent_object_id) +'.'+Object_Name(object.parent_object_id) AS "Parent",
         Convert(NVARCHAR(2000),Value) AS "Description",
     json_query( (select      
                  Convert(VARCHAR(33),object.create_date,126) AS "Created",
          Convert(VarCHAR(33),object.modify_date,126)  AS "Last_Modified"
          for json path, WITHOUT_ARRAY_WRAPPER)
         ) as "Dates",
     --module.definition AS definition,
           Json_Query
            ((Select  '['+ String_Agg ('"'+f.attribute+'"',' ,')+']'
            from (values ('IsDeterministic'),('IsEncrypted'),('IsPrecise'),
                                     ('IsSystemVerified'),
                                                 ('SystemDataAccess'),('UserDataAccess'))f(attribute)
          where  OBJECTPROPERTYEX(object.object_id, f.attribute) =1)) as "Properties",
     Json_Query('{'+
         (SELECT String_Agg ('"'+attribute+'":'+CASE WHEN value=1 THEN '"true"' ELSE '"false"' END, ',
         ') from (VALUES 
                ( 'MS-shipped', object.is_ms_shipped),          
                ( 'Published', object.is_published),              
                ( 'Schema-published',object.is_schema_published),       
                ( 'Ansi nulls', module.uses_ansi_nulls),           
                ( 'Quoted identifier' , module.uses_quoted_identifier),    
                ( 'Schema-bound,',module.is_schema_bound),           
                ( 'Database collation', module.uses_database_collation),   
                ( 'Recompiled', module.is_recompiled),    
        --      ( 'Is Inlineable', module.is_inlineable), --2019 only           
                ( 'Null on null input', module.null_on_null_input),        
                ( 'Native compilation',module.uses_native_compilation))
                  f("Attribute","value") WHERE value=1)+'}')
      AS Config,
         Json_Query(columns) AS "Columns", Json_Query(parameters) AS "Parameters",
          Json_Query(returned) AS "Returned",Json_Query(referencing) AS ReferencedBy,
          Json_Query([references]) AS Referencing
     FROM
  sys.objects object
  INNER JOIN sys.sql_modules module
  ON module.object_id = object.object_id
     outer APPLY dbo.JsonObjectColumns(module.object_id)
         OUTER APPLY dbo.JsonObjectParameters(module.object_id)
         OUTER APPLY dbo.JsonObjectReturn(module.object_id) 
         OUTER APPLY dbo.JsonReferencedObjects(module.object_id)
         OUTER APPLY dbo.JsonObjectReferences(module.object_id)
     LEFT OUTER JOIN sys.extended_properties
       ON major_id = module.object_id AND minor_id=0
           AND class= 1 -- Object or column
        AND sys.extended_properties.name='MS_Description'
  WHERE OBJECT_SCHEMA_NAME(object.object_ID) <> 'sys'
  and object.is_ms_shipped=0
  order by modify_date asc
  FOR JSON auto)
  SELECT @json


Conclusions

Now we’ve got this far, it should give you some ideas for improvement. This rather depends on your team standards for documentation. You can, for example, document the structured headers that you put into your code. This means updating whatever structured header there is with the current version whenever the code is updated. It is quite easy to do this.

It should be possible to edit a JSON document like this to add a description of each routine, column and parameter. This could then be processed by a routine that saved it to the database as extended properties. As you know, these are surprisingly difficult to code by hand.

I hope this gets you thinking about ideas for improving database documentation to assist teamwork. I’m as bad as anyone in documenting my code and for some reason, every fibre of my body tends to resist adding explanation for code. For this reason, I cherish every device for making the documentation chore easier. This is one of them!


The post What’s in that database? Getting information about routines appeared first on Simple Talk.


from Simple Talk https://ift.tt/2PHUzY5
via

Tuesday, October 29, 2019

Associating Data Directly with SQL Server Database Objects.

It is easy to attach details and documentation to a SQL Server database using extended properties. In fact, you can add a number of items of information to any database objects such as tables, views, procedures or users. If you use JSON to store the information, then you can, in addition, even monitor trends by storing previous information as a back history of changes. This could include such information as the date of changes, or variables such as the size of the database or table at a particular date, with the object.

I’ll use as an example the applying of version numbers to a database. We’ll end up storing old version numbers and the date when they were applied. We’d want to do this to build up a history of when changes were made to a database. This allows us to find out various items of information as well as the current version: We can, for example, find out when, and how long, a database was at a version number.

Storing a version number for a database in JSON.

Let’s take things in easy steps.

Without a history

Imagine that you have a database called ‘AdventureWorks’ that you need to document. You might have several different facts that you need to store: a description maybe, more likely a version number. There are likely to be other facts you need to document. You might decide to store it a JSON so that you can access just part of the data.

DECLARE @DatabaseInfo NVARCHAR(3750)
SELECT @DatabaseInfo =
  (
  SELECT 'AdventureWorks' AS "Name", '2.45.7' AS "Version",
  'The AdventureWorks Database supports a fictitious, multinational manufacturing company called Adventure Works Cycles.' AS "Description",
    GetDate() AS "Modified",
        SUser_Name() AS "by"
  FOR JSON PATH
  );

IF not EXISTS
  (SELECT name, value  FROM fn_listextendedproperty(
     N'Database_Info',default, default, default, default, default, default) )
    EXEC sys.sp_addextendedproperty @name=N'Database_Info', @value=@DatabaseInfo
ELSE
  EXEC sys.sp_Updateextendedproperty  @name=N'Database_Info', @value=@DatabaseInfo

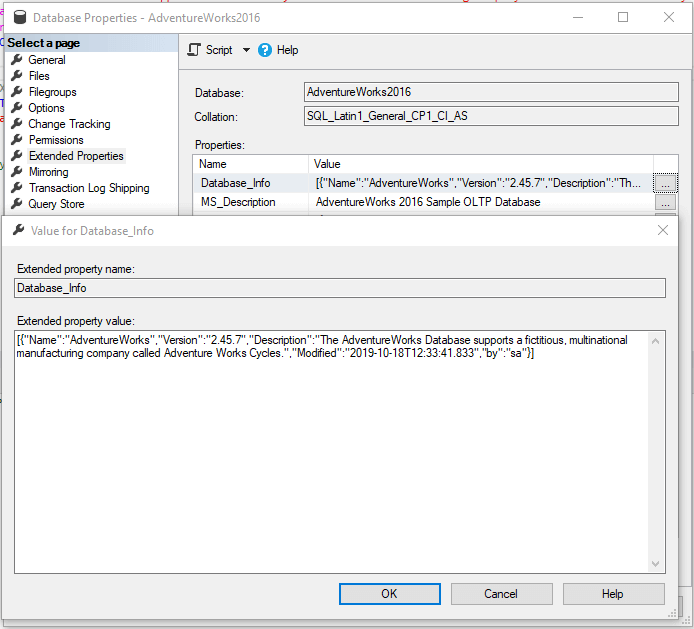
You can now view this in SSMS, of course

You can access it in SQL via various different techniques depending on your preferences.

You can just access the current version information, or any other value, using JSON_VALUE()

SELECT Json_Value((SELECT Convert(NVARCHAR(3760), value)
  FROM sys.extended_properties AS EP
  WHERE major_id = 0 AND minor_id = 0 
    AND name = 'Database_Info'),'$.Version') AS Version

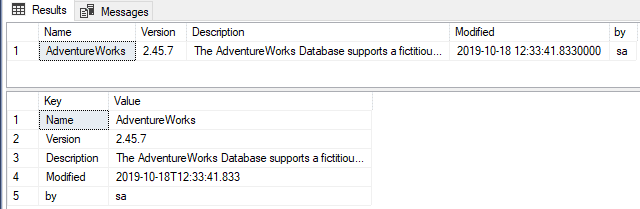
You can get the data as a result in various forms, including a single row or one row per key. Let’s first get the JSON value from the extended property …

DECLARE @DatabaseInfo NVARCHAR(3750);
SELECT @DatabaseInfo = Convert(NVARCHAR(3760), value)
  FROM sys.extended_properties AS EP
  WHERE major_id = 0 AND minor_id = 0 AND name = 'Database_Info';

.. then you can get the data as a result with a single row …

SELECT *
  FROM
  OpenJson(@DatabaseInfo)
  WITH (Name sysname, Version NVARCHAR(30), Description NVARCHAR(3000), Modified DATETIME2,
[by] NVARCHAR(30)
);

…or you can get the result with one row per key.

SELECT TheProperties.[Key], TheProperties.Value
  FROM OpenJson(@DatabaseInfo) AS TheJson
    OUTER APPLY OpenJson(TheJson.Value) AS TheProperties;

This data isn’t entirely secure. You need CONTROL or ALTER permissions on the object to alter it, but it can be accessed by anyone who has VIEW DEFINITION permission. We can demonstrate this now by creating a ‘headless’ user without a login and assigning just that permission. You can try this out with various permissions to see what works!

USE AdventureWorks2016;
-- create a user
CREATE USER EricBloodaxe WITHOUT LOGIN;
GRANT VIEW DEFINITION ON DATABASE::"AdventureWorks2016" TO EricBloodaxe;
EXECUTE AS USER = 'EricBloodaxe';
PRINT CURRENT_USER;
SELECT Convert(NVARCHAR(3760), value)
  FROM sys.extended_properties AS EP
  WHERE major_id = 0 AND minor_id = 0 AND name = 'Database_Info';
REVERT;
DROP USER EricBloodaxe;
PRINT CURRENT_USER;

Storing a history as well

At this point, you probably decide that you really want more than this. What you really need is to be able to keep track of versions and when they happened, something like this ….

{ 
   "Name":"MyCDCollection",
   "Version":"3.4.05",
   "Description":"Every book on databases for developers used to include one as an example",
   "Modified":"2019-10-21T11:44:53.810",
   "by":"EricBloodaxe",
   "History":[ 
      { 
         "Modified":"2019-10-21T11:44:03.703",
         "by":"dbo",
         "Version":"3.4.00"
      },
      { 
         "Modified":"2019-10-21T11:44:13.717",
         "by":"GenghisKahn",
         "Version":"3.4.01"
      },
      { 
         "Modified":"2019-10-21T11:44:23.733",
         "by":"AtillaTheHun",
         "Version":"3.4.02"
      },
      { 
         "Modified":"2019-10-21T11:44:33.763",
         "by":"VladTheImpaler",
         "Version":"3.4.03"
      },
      { 
         "Modified":"2019-10-21T11:44:43.790",
         "by":"KaiserBull",
         "Version":"3.4.04"
      }
   ]
}

(Taken from one of the test-harnesses. You’ll notice that we are doing very rapid CI!). Here, we have a database that we are continually updating but we have kept a record of our old versions, when they happened and who did the alterations.

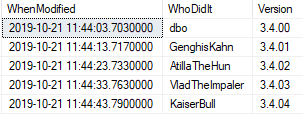
We can access the history like this

SELECT * FROM OpenJson(
  (SELECT Json_Query((SELECT Convert(NVARCHAR(3760), value)
    FROM sys.extended_properties AS EP
    WHERE major_id = 0 AND minor_id = 0 
      AND name = 'Database_Info'),'strict $.History')))
  WITH (WhenModified DATETIME2 '$.Modified',
            WhoDidIt sysname '$.by',
                [Version] NVARCHAR(30) '$.Version' )

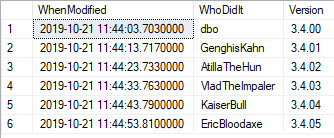
..but it would be better to add in the current version like this

DECLARE @Info nvarchar(3760)=(SELECT Convert(NVARCHAR(3760), value)
    FROM sys.extended_properties AS EP
    WHERE major_id = 0 AND minor_id = 0 
      AND name = 'Database_Info')
SELECT * FROM OpenJson(
  (SELECT Json_Query(@Info,'strict $.History')))
  WITH (WhenModified DATETIME2 '$.Modified',
            WhoDidIt sysname '$.by',
                [Version] NVARCHAR(30) '$.Version' )
UNION ALL 
SELECT Json_Value(@Info,'strict $.Modified'),
       Json_Value(@Info,'strict $.by'),
           Json_Value(@Info,'strict $.Version')

We maintain the current record where it is easy to get to and simply add an array to hold the history information. Our only headache is that we can only hold an NVARCHAR of 3750 characters (7500 of varchar characters) because extended properties are held as SQL_Variants. They need careful handling! This means that if our JSON data is larger, we have to trim off array elements that make the JSON exceed that number.

There is an error in the JSON_MODIFY() function that means that it doesn’t actually delete an array element, but merely assigns it to NULL. This can only be rectified by removing the NULL because one generally removes the oldest members of an array that you just append to by deleting element[0]. If it is NULL it still exists. Doh!

Once we have this up and running, there is a way of storing all sorts of ring-buffer information for reporting purposes that is in sorted order. Yes, you’re right, you now have a way of estimating database or table growth and performing a host of other monitoring tasks.

Because the code is rather more complicated, we’ll use a stored procedure. I’m making this a temporary procedure because I like to keep ‘utility’ code away from database code.

CREATE OR ALTER  PROCEDURE #ApplyVersionNumberToDatabase
@Version NVARCHAR(30) =  '2.45.7', 
@Name sysname = 'AdventureWorks', --only needed the first time around
@Description NVARCHAR(3000) =     --only needed the first time around
  'The AdventureWorks Database supports a fictitious, multinational 
  manufacturing company called Adventure Works Cycles.'
as

DECLARE 
  @CurrentContents NVARCHAR(4000);
--get the current values if any
SELECT @CurrentContents = Convert(NVARCHAR(3750), value)
  FROM fn_listextendedproperty(
N'Database_Info', DEFAULT, DEFAULT, DEFAULT, DEFAULT, DEFAULT, DEFAULT
);
--if there is nothing there yet ...
IF @CurrentContents IS NULL
  BEGIN --just simply write it in
    DECLARE @DatabaseInfo NVARCHAR(3750);
    SELECT @DatabaseInfo =
      N'{"Name":"' + String_Escape(@Name, 'json') + N'","Version":"'
      + String_Escape(@Version, 'json') + N'","Description":"'
      + String_Escape(@Description, 'json') + +N'","Modified":"'
      + Convert(NVARCHAR(28), GetDate(), 126) + N'","by":"'
      + String_Escape(current_user, 'json') + N'","History":[]}'; -- empty history array
    EXEC sys.sp_addextendedproperty @name = N'Database_Info',
@value = @DatabaseInfo;
  END;
ELSE
  BEGIN --place the current values in the history array
-- SQL Prompt formatting off
        SELECT @CurrentContents=
          Json_Modify(@CurrentContents, 'append $.History',Json_query(
           '{"Modified":"'
            +Json_Value(@CurrentContents,'strict $.Modified')
          +'","by":"'
            +Json_Value(@CurrentContents,'strict $.by')
          +'","Version":"'
            +Json_Value(@CurrentContents,'strict $.Version')
        +'"}'))
        --now just overwrite the current values
        SELECT @CurrentContents=Json_Modify(@CurrentContents, 'strict $.Version',@version)
        SELECT @CurrentContents=Json_Modify(@CurrentContents, 'strict $.Modified',
                                              Convert(NVARCHAR(28), GetDate(), 126))
        SELECT @CurrentContents=Json_Modify(@CurrentContents, 'strict $.by',current_user)
-- SQL Prompt formatting on
    --if the json won't fit the space (unlikely) then take out the oldest records
    DECLARE @bug INT = 10; --limit every loop to a sane value just in case...
    WHILE Len(@CurrentContents) > 3750 AND @bug > 0
      BEGIN
        SELECT @CurrentContents =
          Json_Modify(@CurrentContents, 'strict $.History[1]', NULL),
          @bug = @bug - 1;
                  --SQL Server JSON can't delete array elements, it just replaces them
                  --with a null, so we have to remove them manually. 
                  SELECT @CurrentContents=Replace(@CurrentContents,'null,' COLLATE DATABASE_DEFAULT,'') 
      END;
    EXEC sys.sp_updateextendedproperty @name = N'Database_Info',
@value = @CurrentContents;
    PRINT 'updated';
  END;

The way that this works is that you only need to put in the name of the database and the description first time around, or after you’ve deleted it.

Here is how you delete it.

EXEC sys.sp_dropextendedproperty @name = N'Database_Info';

The following code be necessary the first time around, especially if you’ve used different defaults for your temporary stored procedure.

EXECUTE #ApplyVersionNumberToDatabase @Version='3.4.00',@Name='MyCDCollection',
@Description='Every book on databases for developers used to include one as an example'

From then on, it is just a matter of providing the version number

EXECUTE #ApplyVersionNumberToDatabase @Version='3.5.02'

Testing it out

Here is one of the test routines that I used for the stored procedure, but without the checks on the version number, as that would be repetition.

EXEC sys.sp_dropextendedproperty @name = N'Database_Info';
EXECUTE #ApplyVersionNumberToDatabase @Version='3.4.00'
WAITFOR DELAY '00:00:10'
CREATE USER GenghisKahn WITHOUT LOGIN
GRANT alter ON database::"AdventureWorks2016" TO GenghisKahn 
EXECUTE AS USER = 'GenghisKahn' 
EXECUTE #ApplyVersionNumberToDatabase @Version='3.4.01'
REVERT
DROP USER GenghisKahn
WAITFOR DELAY '00:00:10'
-- create a user
CREATE USER AtillaTheHun WITHOUT LOGIN
GRANT alter ON database::"AdventureWorks2016" TO AtillaTheHun 
EXECUTE AS USER = 'AtillaTheHun' 
EXECUTE #ApplyVersionNumberToDatabase @Version='3.4.02'
REVERT
DROP USER AtillaTheHun
WAITFOR DELAY '00:00:10'
-- create a user
CREATE USER VladTheImpaler WITHOUT LOGIN
GRANT alter ON database::"AdventureWorks2016" TO VladTheImpaler 
EXECUTE AS USER = 'VladTheImpaler' 
EXECUTE #ApplyVersionNumberToDatabase @Version='3.4.03'
REVERT
DROP USER VladTheImpaler
WAITFOR DELAY '00:00:10'
-- create a user
CREATE USER KaiserBull WITHOUT LOGIN
GRANT alter ON database::"AdventureWorks2016" TO KaiserBull 
EXECUTE AS USER = 'KaiserBull' 
EXECUTE #ApplyVersionNumberToDatabase @Version='3.4.04'
REVERT
DROP USER KaiserBull
WAITFOR DELAY '00:00:10'
-- create a user
CREATE USER EricBloodaxe WITHOUT LOGIN
GRANT alter ON database::"AdventureWorks2016" TO EricBloodaxe 
EXECUTE AS USER = 'EricBloodaxe' 
EXECUTE #ApplyVersionNumberToDatabase @Version='3.4.05'
REVERT
DROP USER EricBloodaxe

Conclusion

Extended properties are useful for development work but wonderful for reporting on a database or monitoring a trend. If you use JSON to store the data, they can act as miniature tables, or more correctly ring buffers. They have a variety of uses and are easy to create and remove without making any changes to the database whatsoever. This is because Extended properties and their values are either ignored as changes by humans and deployment/comparison tools, or you can easily configure them to be ignored: They do not affect the version)


The post Associating Data Directly with SQL Server Database Objects. appeared first on Simple Talk.


from Simple Talk https://ift.tt/34mhnkn
via

The Good and Bad of Responsive Web Design

Two decades ago, the rapid adoption of the web interface brought to the proliferation of different versions and types of browsers, each of which built on the ashes of another one. In short, the source code of web pages became a messy tangle of lines trying to generate the same output regardless of the various behaviors of different browsers. It was a nightmare for developers to detect the user agent signature of the browser and route the workflow accordingly. Worse yet, the list of detected browsers had to be checked and updated regularly and more and more often.

About a decade ago, Responsive Web Design (RWD) emerged as a set of techniques that could reduce to nearly zero the effort necessary to produce a useful and nice-looking view on any known browsers. The key factor of RWD was the use of a rendering technique based on a virtual grid built on top of the physical screen view. In this way, the size of the screen became the determining factor driving the layout of elements. According to most developers, RWD freed the community from the chains of depending on detection of user-agent strings.

The present article looks at RWD in retrospective. Devised with the best intentions, RWD simplified a number of common and repetitive frontend development tasks but, in the end, failed at providing a new web development platform that was agnostic of the nature (mobile or desktop) and the form factor (smartphone, tablet, PC) of the underlying device.

Myths and Facts

I’ve never been a fan of RWD, but I had to surrender, accept and use it in production. Ineluctable is the adjective that better describes my feelings about it. In the end, like many, I survived it, but it NEVER managed to grow to be what a group of loudly speaking gurus envisioned a decade ago.

RWD heralds a fascinating idea that for its internal chemical composition has a stronghold on developers. The idea is: write your web views once and host it on any possible device. It’s the timeless and catchy myth of reusability, no more, no less.

RWD, however, has a few technical issues that have simply been ignored or worked around but never completely solved to date. RWD is based on CSS media queries, but CSS media queries (even in the latest version) don’t consider the actual signature of the underlying agent (the device).

  • All you can do is applying different CSS styles based on a query that can only filter by screen width (and/or height).
  • RWD assumes that a 480px wide screen is always the same, whether it’s a resized desktop browser window or a full-screen smartphone.
  • On a smaller screen, fonts should be scaled down automatically, but this won’t happen so nicely, and anyway no RWD-enabler library (e.g., Bootstrap) takes care of data effectively probably, because it’s tough. Yet, it’s a big pain in the proverbial neck for web developers.
  • Images should be media-queried too, and the PICTURE tag has been supported and popularized on purpose. Unfortunately, the PICTURE tag solves the problem in a highly impractical way.
  • The PICTURE element forces you to maintain multiple copies of the same image—one per breakpoint, at most. This amplifies the burden beyond imagination. It also drastically slows down the page rendering. Google reports that 60% of page load is due to images, and most visitors feel irritated if a page takes more than 2 seconds to fully render.
  • User agents are demonized, and devices are ignored by design. Hence, images can hardly be optimized for devices and dedicated, OS-specific features can’t be implemented. For example, you end up using the same Bootstrap-style date picker instead of intelligently switching to native Android/iOS date pickers on devices.

RWD was popularized around the silly idea of mobile-first as if it were realistic to have the same frontend codebase adapting (and without code!) to tiny mobile screens and also fitting very large smart TV displays. Sure, you can achieve that via CSS. At which cost? The cost of just hiding things as that’s all you can do with CSS. All the resources are downloaded regardless of the device and then just hid from view on smartphones—precisely the scenario where the download of unused resources is more costly! Amazing, isn’t it?

From Mobile-first to Mobile-last

Mobile-first design means just starting your design from the things you absolutely need and add those you need only on a larger screen. It’s a wonderful idea which in theory rules out device detection. In practice, though, it can only be implemented with device detection. This is what happens when developers follow the crowd of technology pundits instead of doing their job.

As a result, RWD today is only a good way to build a desktop web site and, at the cost of dealing with Bootstrap and media queries, making it render acceptably well on small mobile devices. The problems of adapting font and images and adding OS-specific or form-factor-specific features remains unsolved and abandoned on the table of tech-quackery.

As a result, RWD today is desktop-only and only an acceptable fallback on mobile devices.

Realistically Responsive Web Design

The painful point is found with smartphones and, to some extent, mini-tablets. Realistically, a large tablet form-factor (e.g., an iPad) can be treated the same as a desktop site from the font and image perspective. Are there any solutions?

  • First and foremost, you should wonder if you need a smartphone version of the site. If you want to provide a genuinely native (simulated) experience over the web, then make it a different project and use completely different views, libraries and technologies.
  • If not, then add a device detection engine. An effective (and freemium) library you might want to seriously consider is WURFL. At the very minimum, WURFL will inject—for free and without the need of subscriptions—a JavaScript object in the DOM with name and form factor of the device and a Boolean statement about whether it is a desktop or mobile device. That’s the starting point as it allows you to figure out at your coding expense the underlying OS. If you need more information on the detected device, then you create a paid account and get a dedicated service with an associated SLA.
  • If you only need the Boolean answer of whether the device is a mobile one or not, then one option is using some regular expression (StackOverflow is full of examples) that checks for one of the substrings that most commonly identify a mobile device. It’s a naïve solution, it but works if you don’t have strict requirements and a coarse level of tolerance.
  • CSS supports various metrics to define scalable fonts such as binding the font size to the screen or height of the display. You can try that, but my personal experience (for what it matters) is not positive as the factor to use to scale fonts up and down is hardly linear. With this approach a lot of trial-and-error is necessary to even find good candidate factors. In the end, properly sized fonts can be defined to a good extent via classic measurements switching to different CSS classes via media queries.
  • For images, you have to resort to a dedicated Content Delivery Network (CDN) that provides device detection and image compression on the fly. The ImageEngine library is not precisely a CDN but works like a CDN dedicated to images (it doesn’t work with other resources).It guarantees—I personally confirm it—at least 60% payload reduction for images and subsequently a faster page load and reduces latency.
  • Using ImageEngine (or similar frameworks) over changing your HTML code to use the PICTURE element (instead of IMG) is beneficial for two reasons. It works with the IMG element, and it doesn’t require you to manage multiple copies of the same image. You just point any IMG elements of your web pages to the absolute path of the image on the server. More precisely, each IMG element path will be prefixed by the URL of your ImageEngine account followed by the absolute image path on the query string. Under the hood, the ImageEngine endpoint will download the image from the server and start proxying access to it from various devices. Devices are recognized and classified by their user agent.
  • The effect is that images are resized in a device-specific way so that each device is intelligently served the same image just of the proper size. This is cost-free for you. A scenario in which a framework like ImageEngine may not work and PICTURE is preferable is when there is some strict art direction on a specific image and when you want an image to be cropped rather than just bluntly resized. While ImageEngine does support some parameters (cropping is one of those), it might not be sufficient to meet your needs and expectations.

Responsive Web Design is a great half solution. If you stop at the surface of what words mean then it’s no question that it honors the name it has. In this perspective, RWD just allows designing web views in a way that is responsive when the display size changes. The devil is in the details, though. Fonts and especially images are out of the media query syntax, and this is a huge problem for those writing web views every day. Finally, knowing the main characteristics but not necessarily the capabilities of the device is important as it enables small optimizations that are otherwise impossible. Those optimizations are not for highly trafficked sites, but just any decent web site.

Summary

If I look back at the message from device detection a decade ago, when RWD appeared, I note that the emphasis was more on the capabilities of a given device (what a device is able to do) whereas today it is more on the characteristics (what a device is and looks like).

Finally, it is worth noting that the ASP.NET platform for years, and since version 1.0, had an internal framework specifically designed for capturing device information and injecting it in the request lifecycle. Once mobile devices started becoming ubiquitous and numerous, a dedicated team constantly gathered and classified user agent strings. The project, however, was dismissed in 2011 because of prospected rapid and general adoption of Responsive Web Design.

Ten years later, it turns out to be a shortsighted decision that leaves developers in trouble when it comes to building web sites that not just render well on mobile devices but also perform and function nicely. The overall idea of “Design once, View anywhere” is gone. At a minimum, you must distinguish smartphones and the rest of the web.


The post The Good and Bad of Responsive Web Design appeared first on Simple Talk.


from Simple Talk https://ift.tt/36gRmV6
via

Understanding Auctions

In spite of the fact that they don’t get much attention in basic economics classes, we live in a world where we are subject to auctions almost constantly. It’s not just getting something on eBay or other auction sites, but it’s how many things are distributed in the public sphere. You can sell Google articles on bandwidth auctions, as one example in the real world. The ads you see on Google are the result of a constant stream of small auctions. Likewise, the automatic price changes for books on Amazon resulted in a computer-driven price of $2,198,177.95 for one book as two robots tried to outbid each other.

Basic Concepts

An auction depends on bids and a market:

  1. Not everyone values things the same. A lobster dinner looks good to me, but deadly to someone with a shellfish allergy. That final copy of The Flash #123 will complete my comic book collection, so despite being valuable in itself, that comic book has special value to me as a collector.
  2. Personal valuations change over time. I might eat a second lobster dinner immediately after the first one, but a third lobster is too much to eat right now. Call me next week, please.
  3. People do not trade unless they feel what they gain is more valuable than what they lose. I want that lobster dinner more than I want the $25 in my pocket. But I want $50 in my pocket more than a lobster in my belly. If I find out I bought crayfish and not lobster, I feel cheated and regret my purchase. This is called buyer’s remorse.
  4. Auction Theory 101 disallows something that happens in the real world: collusion. Groups of buyers can get together and agree to restrict their bids in some way that’s advantageous to them. The versions of auctions that are taught in economics classes start with the assumption that everyone is making a bid based on their accurate evaluation. Your Auction Theory 102 class will go into game theory and how to collude properly.

Bids have to stop at some point in time, so there is usually a deadline. There can be sealed-bids, where each bidder has a fixed number of bids (usually one) that they traditionally submit in an envelope. Open bid auctions are more lively; the bidders call out their offers until the auctioneer closes the bidding. You can enter and leave the auction at will.

These days, bidders do it online with bid snatcher software that automatically submits a bid that is under a pre-set limit. The usual strategy is to wait until the last possible minute (one second? micro-second? nano-second?) to get in a bid in so short a time slot that no human can type fast enough to beat you.

Types of Auctions

Auctions come in all kinds of flavors, but the basic parts are an offering of something (“I have here a mint-condition first edition of CAPTAIN BILLY’S WHIZBANG, 1919! I start the bidding at $500!”) and bids (“I’ll offer $750 for it. But I would pay up to $1000 for it; maybe I will get lucky!”). The bid can be accepted or rejected. If the bid is accepted, the item changes ownership. Now I get in some strategy here. Should I start with a very low bid and see if I get lucky? Should I start with a medium bid to discourage other bidders? Should I say to heck with it and just throw out my best offer first?

The least interactive auction is the first price sealed bid. The bidders submit sealed bids to the auctioneer, and then the auctioneer opens the bids and picks the winner. This form of auction is used for construction contracting, some military procurement, private-firm procurement, refinancing credit, foreign exchange, and many other goods. The bids are usually complicated things in which the bidder offers to fulfill a contract of some sort in detail. If you’re a Star Trek fan, then this “take it or leave it” approach is how Klingons do business. If you are making a deal with a Klingon, you either drink blood-wine together or shoot it out!

Broadly speaking, there are two styles of processing bids; ascending price (English) and descending price (Dutch).

English Auctions are also known as increasing or ascending price auctions. The auctioneer asks for a starting price, and the bidders increase the price until the item sells or the price offered is not high enough to meet a minimum bid, and the auction fails. This is the form that most of us know. It is how eBay works. Sort of. eBay is more complicated.

Dutch Auctions are also known as descending price auctions. The auctioneer asks for a high starting price, then drops the price lower and lower in steps until the item clears or the auction fails. This form of auction was popular with small retail stores in small American towns in the early 1900s. The items would be placed in the store window with a flip-chart price tag and an announcement that the price would decrease a certain predictable amount, say $1.00, per day until sold. Today, the Dutch auction is hidden in online clearance sales. Instead of looking at the store window on Main street, you get a series of email advertisements at lower and lower prices.

There are various forms of both categories. The Japanese auction is an ascending price auction with levels or tiers. Once you drop out, you cannot re-enter the bidding. For example, if the starting bid is $10, every interested bidder agrees to meet it. They may be required to show that they have at least that much money available, should they win. The auctioneer will then go up a level, say $15; anyone who fails to meet the new level is out and cannot re-enter the bidding, even if they are willing to pay a higher price later. You have a lot of information – the number of other bidders at every level and their exit prices. The auction continues until only one bidder remains.

Obviously, a winner can have buyer’s remorse – the feeling that they paid too much for the item. If you have seen bidding wars on eBay or in real life, you understand how emotions can get mixed up in the heat of the moment.

The solution is Vickrey or second-price auctions. The highest bidder wins, but the price paid is either the second-highest bid or a price between the highest and second-highest bids. The winner cannot be unhappy; he paid less than his bid and won. The losers cannot be unhappy; they all bid less than the winner.

The eBay proxy bid system is a form of second-price auction. A variant of a Vickrey auction, named generalized second-price auction is used in Google’s and Yahoo!’s online advertisement programs. The computer runs hundreds or thousands of auctions for the on-line adverting slots they sell. The auctioneer will probably like the idea of a bid between the highest and second-highest bids since it results in a little more profit.

Auction Database Schema

What should the skeleton of a database schema for a general auction look like? Let’s start with the bidders and a simple skeleton.

CREATE TABLE Bidders
(bidder_id INTEGER NOT NULL PRIMARY KEY,
...)


When logging in an item for an auction, you need to identify the item and get a starting bid amount. The minimum bid is also called the reserve amount. If there is no bid, equal to or greater than that amount, the auction is void.

CREATE TABLE Items
(item_id CHAR(15) NOT NULL PRIMARY KEY,
 item_name VARCHAR(25) NOT NULL,
 initial_bid_amt DECIMAL (12,2) NOT NULL
 CHECK(initial_bid_amt >= 0.00),
 minimum_bid_amt DECIMAL (12,2) NOT NULL
 CHECK(minimum_bid_amt >= 0.00));


A bid must be timestamped, and the bid amounts have to increase over time.


CREATE TABLE Bids
(item_id CHAR(15) NOT NULL
 REFERENCES Items (item_id)
 ON DELETE CASCADE,bidder_id INTEGER NOT NULL
 REFERENCES Bidders (bidder_id),
 bid_timestamp TIMESTAMP(0) DEFAULT CURRENT_TIMESTAMP NOT NULL,
 bid_amt DECIMAL (12,2) NOT NULL
 CHECK(bid_amt >= 0.00),
 PRIMARY KEY (item_id, bidder_id, bid_timestamp)
);

An item can be pulled from the auction, so the DDL should cascade and remove the bids when that happens. A bid can be pulled from the Bids table, but you have an auction as long as there’s at least one bid left the system.

Auctions are good for everyone because:

1) the seller gets compensation for something he might have otherwise discarded.

2) the buyer receives something he wants for the price that he’s agreed upon.

3) the item is assigned to the buyer who objectively wants it the most, and therefore you can assume this is the optimal use of the item.

Another allocation method would be by a raffle among the bidders. This might work if the sale of raffle tickets gives the seller a return equal to or in excess of the item’s value. However, for the economy as a whole, there’s no guarantee the item will wind up with the person who wants it the most. Everyone who has failed to win the lottery resents the winners and is dissatisfied with the fact that they didn’t get the prize. I’ve never quite figured out why anyone would think the universe owes them a winning lottery ticket, but a lot of people do.

Fair Division by Auction

So far, I’ve talked about using an auction to get a buyer and a seller together with one item. However, this technique is much more general. Imagine that Uncle Scrooge McDuck has died and left his estate to his heirs. Some of his estate is in the form of money, which is pretty easy to divide up, and several goods which cannot be split up. Unfortunately, one solution is to sell everything and then make sure that the entire estate is expressed in money. This is unfortunate because the heirs might actually want to keep something without having to monetize it. We need a different procedure.

The Knaster Inheritance Procedure (KIP) is named after Bronislaw Knaster. This is an auction scheme designed for an estate with many heirs, assuming that each heir has a large amount of cash at their disposal. The basic idea is that you auction all of the indivisible property in the estate to the heirs (bidders) and then adjust what the heirs think is a fair value.

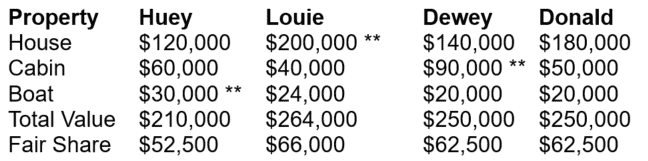
This is easier to see with an actual example. Suppose that Huey, Louie, Dewey and Donald are splitting up a house, a cabin, and a boat. You get bonus points if you know the actual names of Donald Duck’s nephews (spoiler: Dewey is actually “Deuteronomy”). They then give bids for each item, as shown below.

To divide up more than one item using the Knaster Inheritance procedure, you include two more rows: Total Value and Fair Share. The total value is the sum of that person’s bids, and the fair share is the percentage multiple of the total value.

In this example, Huey’s total value = $210,000. His fair share is $210,000 × 0.25 = $52,500.

Each item is given to the person with the highest bid, shown by ** in the chart. Louie gets the house, Dewey gets the cabin, and Huey gets the boat. Poor old Uncle Donald gets nothing. Here’s where the fair share comes into play. Remember that each person expects to get their fair share. Consider them one by one.

  • Huey gets the boat, which he valued at $30,000. Since his fair share is $52,500, he then expects the difference in cash: $22,500.
  • Louie gets the house, which he valued at $200,000. Notice that his fair share is lower than what he valued the house for. Thus, he expects to pay back the difference, which is $134,000.
  • Dewey gets the cabin, which he valued at $90,000. Again, this is higher than His fair share, so he expects to pay back the difference: $27,500.
  • Donald receives no property because he didn’t win any of the bids. Thus, he expects to get his fair share in cash: $62,500.

At this point, all four participants are getting what they believe is their fair share.

Notice that Louie and Dewey contribute to the kitty, while Huey and Donald are awarded money from it. Thus, our surplus is $134,000 + $27,500 − $22,500 − $62,500 = $76,500. This will then be divided among the four. Therefore, each duck gets an additional $76,500 × 0.25 = $19,125.

Thus, the final outcomes are:

  • Huey gets the boat, $22,500 for the fair share adjustment, and $19,125 from the surplus.
  • Louie gets the house and $19,125 from the surplus. He also has to pay $134,000 for the fair share adjustment.
  • Dewey gets the cabin and $19,125 from the surplus. He also has to pay $27,500 for the fair share adjustment.
  • Donald receives his fair share of $62,500 and $19,125 from the surplus.

In fairness, these calculations are probably better done with the spreadsheet than in a database. There are trade-offs with this procedure. On the good side, it can be extended to any number of items among any number of participants. Bids are done in secret and only once. The downside is that the amount of money involved can get pretty big. It’s also possible that one bidder who is willing to pay enough to beat everybody else, he can inherit everything. This might not be a downside if only one of the heirs to the estate really cares about the property and everybody else is just in it for the money.

Cheating

The seller wants to get the highest price for his goods, obviously. The fact or illusion of competition works in his favor, so the seller has an incentive to have shills bid up the price. At English auctions, the auctioneer himself pretends to hear bids (his incentive is that he gets paid by a percentage of sales); this is sometimes referred to as chandelier or rafter bids.

Then there is the outright shill bid. You get your fellow co-conspirator to bid on the item, even though they have no intention of buying it. One way to discourage shill bidding is to set a reserve price, so the seller is guaranteed a guaranteed minimum return. Another way is to detect shills is through the bid patterns. Typically, the shill increments the price by only small amounts, so as not to discourage a genuinely interested bidder from staying in the auction. The auction rules can require a minimum bid increment to discourage this behavior.

Another way to cheat is just outright collusion. The bidders get together before the auction and decide what the price will be. This has been done in several high-profile government auctions and was part of the storyline in John Steinbeck’s “The Pearl” short story.

The Bottom Line

Honesty seems to be the best general strategy. Do not overbid what you think the item is worth to you. If you pay your evaluation of the item, then you just made a routine purchase. If you pay less than your assessment, then you got a bonus. If you lose, then you still have your money.

The post Understanding Auctions appeared first on Simple Talk.


from Simple Talk https://ift.tt/31Q2dCd
via

Friday, October 25, 2019

How to Configure CI/CD in AzureDevOps

One of the goals of DevOps is to provide faster and reliable releases. In this regard, the terms Continuous Integration and Continuous Deployment have become very popular. Continuous Integration (CI) is a software development practice that requires developers working on the project to integrate code into a shared repository. For the CI process to be a success, the build, unit tests, integration tests, acceptance tests should be successful.

Continuous Delivery (CD) is an extension of CI that enables you to ship software faster, continuously. Continuous Delivery is achieved through Continuous Testing. Automated testing is integrated with the CI/CD pipeline. This ensures that all changes flowing through the pipeline are validated. Here’s the entire CI/CD workflow in a step by step manner.

  1. The developer checks in the source code to the code repository
  2. The build process is triggered
  3. All automated tests (unit tests, acceptance tests) are run
  4. If any of the tests fail, the build process terminates abruptly
  5. The release process is only triggered if the build process is successful
  6. If a release is successful, the application is deployed

This article presents a discussion on how CI/CD can be configured in Azure DevOps.

The Goals

In this post, I will show you how to:

  1. Create an Azure DevOps Project
    1. Edit a build pipeline (this pipeline will be created automatically)
    2. Edit a release pipeline (this pipeline will be created automatically)
  2. Clone the Code Repository
  3. Explore the CI/CD pipelines
  4. Trigger the CI/CD process

The Prerequisites

In this article, you’ll be using Visual Studio 2019 and .NET Core.

If you don’t have Visual Studio 2019 installed in your system, you can get a copy from here. If you don’t have .NET Core installed in your system, you can download a copy from here. You should also have an Azure account. You can create an Azure account for free. If you don’t have an Azure account, you can create one from here.

Creating an Azure DevOps Project

Azure DevOps Project facilitates an easy setup of the continuous integration (CI) and continuous delivery (CD) pipeline in Azure. You can use your existing code or use the example code from the sample application that is created by default when you create a new Azure DevOps Project in Azure.

To create a new Azure DevOps project, follow the steps outlined below:

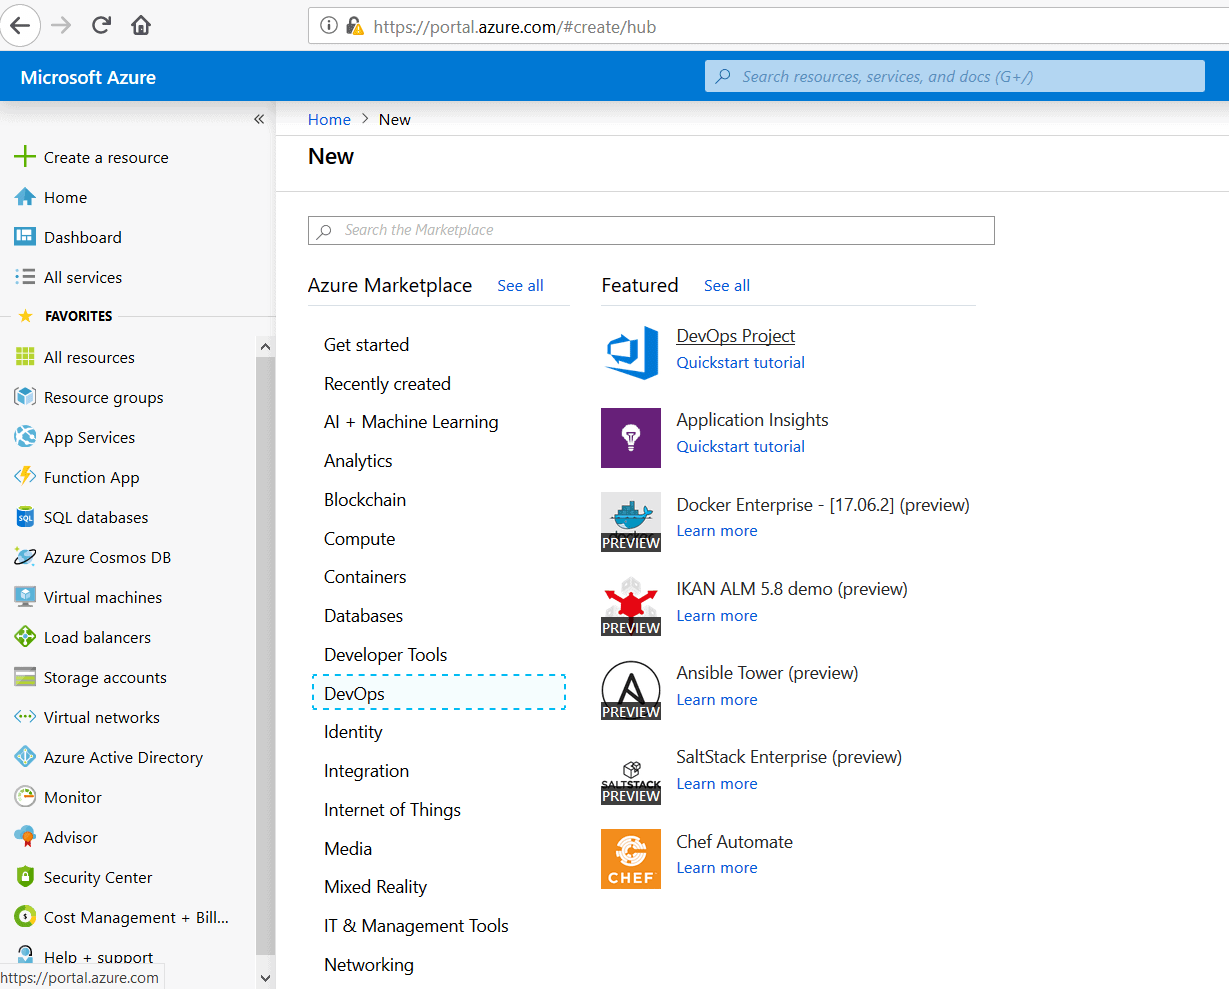
  1. Select the + Create Resource icon in the left navigation bar (refer to Figure 1)
  2. Select DevOps from the Azure Marketplace
  3. Click on DevOps Project in the list

Figure 1: The Azure DevOps Marketplace

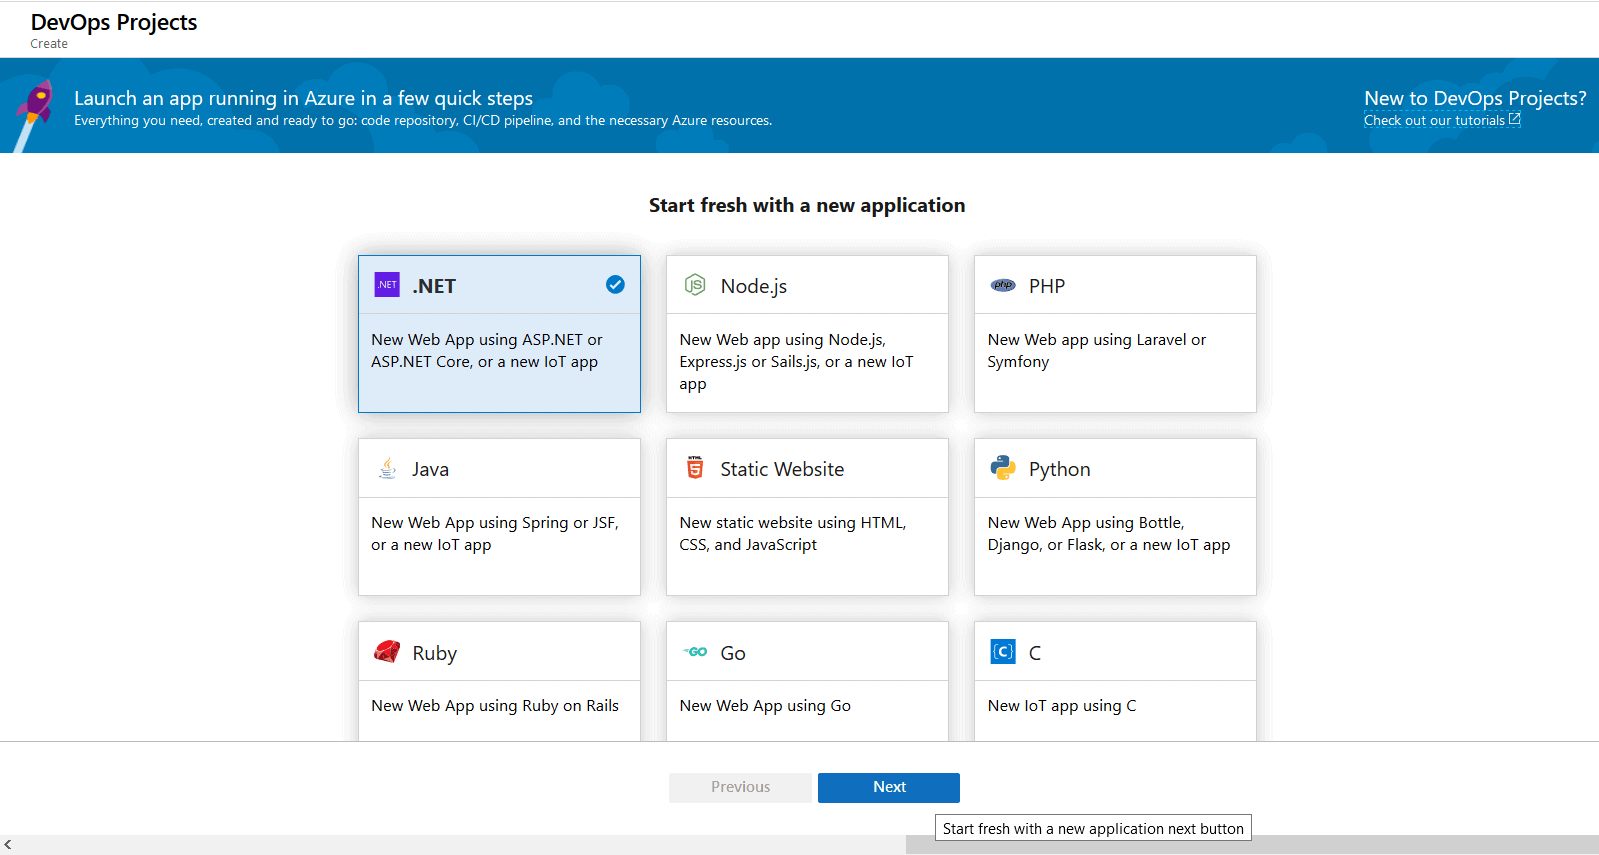
  1. In the next screen, select .NET shown in Figure 2 and click Next.

Figure 2: Choose the technology to be used

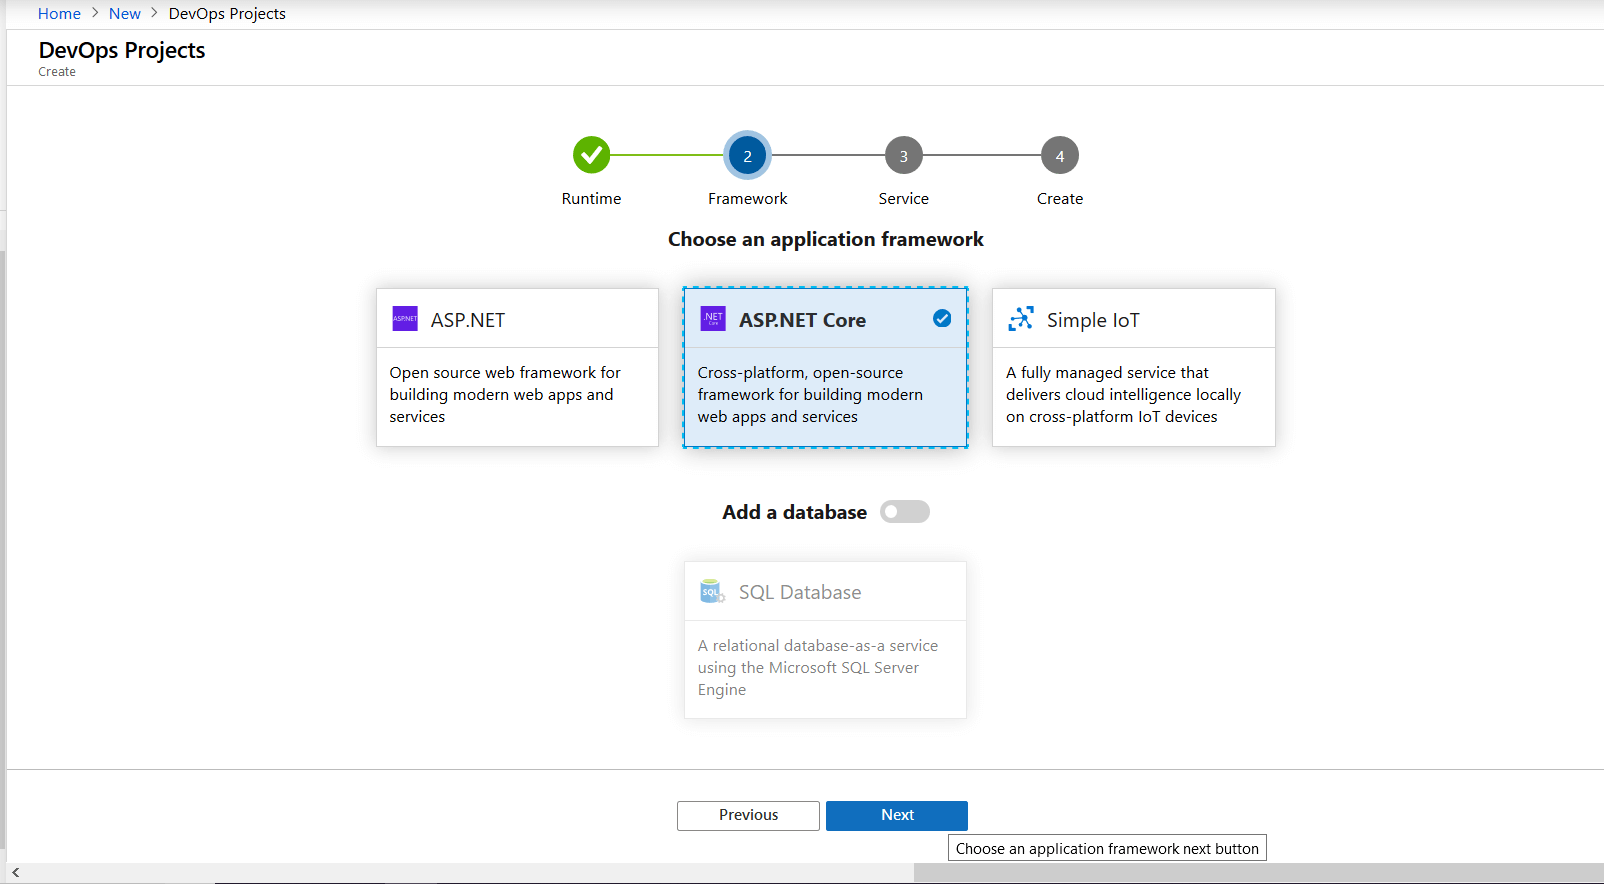
  1. In the next screen, select ASP.NET Core as the application framework, as shown in Figure 3. Since this example does not use a database, you can ignore the Add a database option for now.

Figure 3: Choose the application framework to be used

  1. Click Next

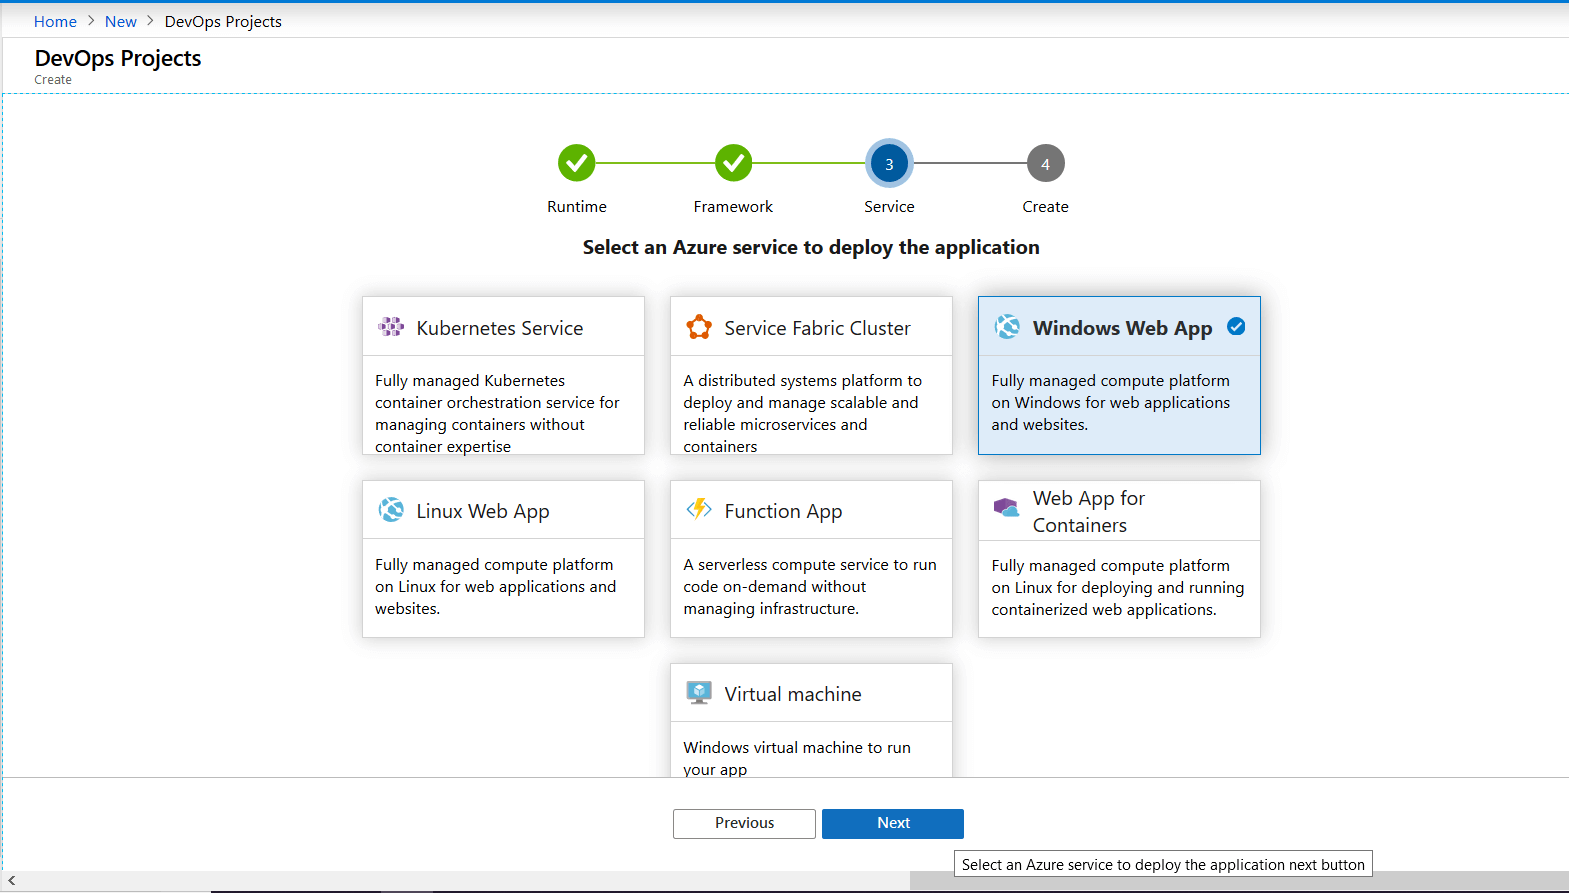
You can deploy your application to Virtual Machines, Windows App Service, Azure Kubernetes Services (AKS), Azure SQL Database, and Azure Service Fabric. In this example, you’ll deploy the sample application to Windows App Service.

  1. Specify Windows Web App as the type of the Azure service to be used, as shown in Figure 4.

Figure 4: Select the Azure service to deploy the application

  1. Click Next
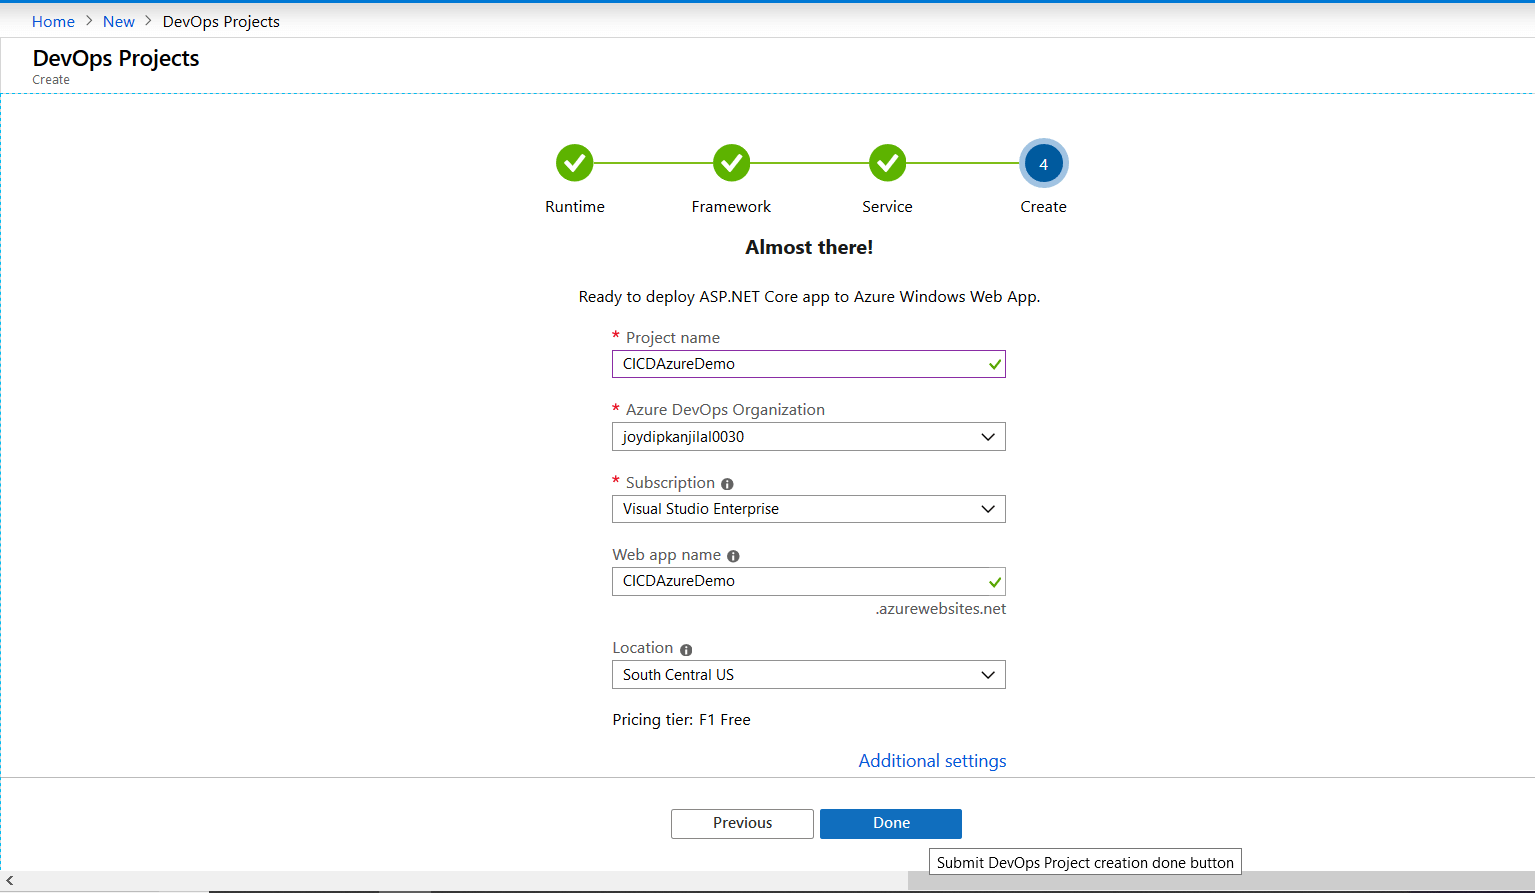
  2. In the next screen, specify the project name and the name of the Azure DevOps organization, as shown in Figure 5.
  3. Select the Subscription you would like to use
  4. Fill in a Web app name. Note that the name must be unique across Azure.
  5. Select your Location.

Note that you can change the default pricing tier being used by clicking on Additional settings and selecting the Pricing Tier from the drop-down control. The screen should look similar to Figure 5.

Figure 5: Specify the basic details

  1. Click Done to complete the process
  2. Once the deployment is complete, click Go to resource to view it.

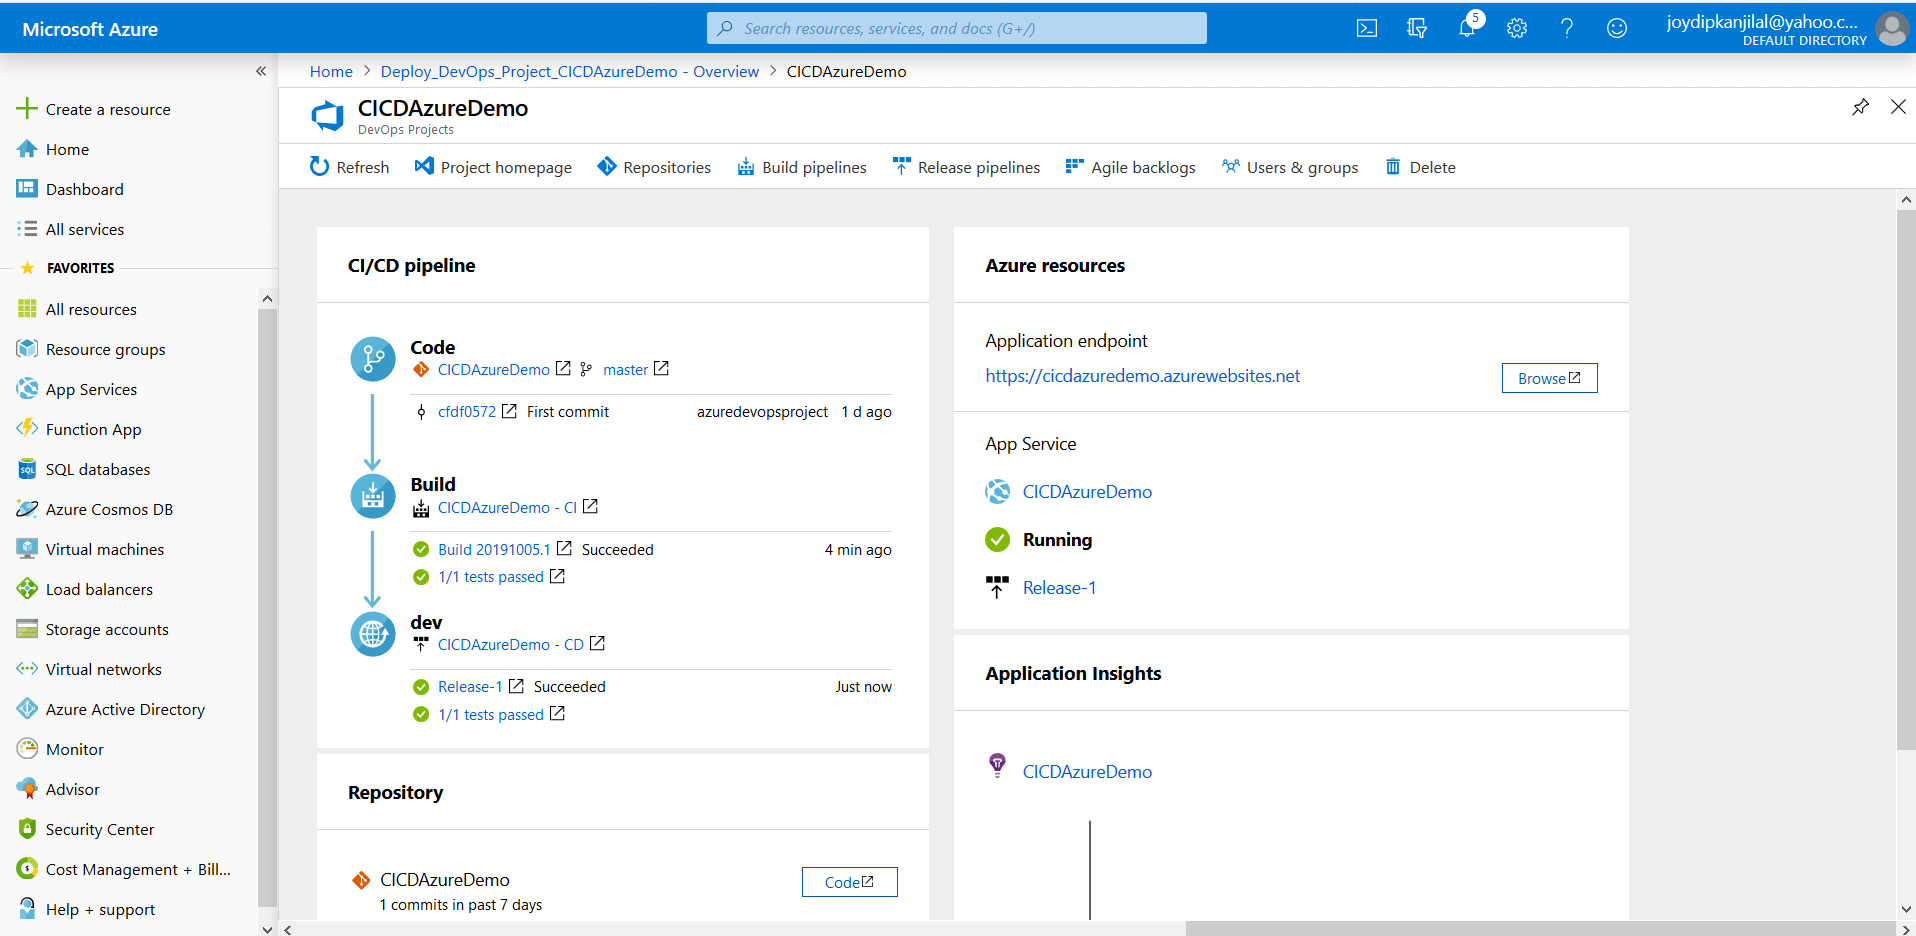
A new DevOps project will be created. Figure 6 shows how the Azure DevOps project dashboard looks. Note that you will have to wait several minutes for the Build process to complete, and until then the Azure resources details will not be filled in.

Figure 6: The Azure DevOps Dashboard

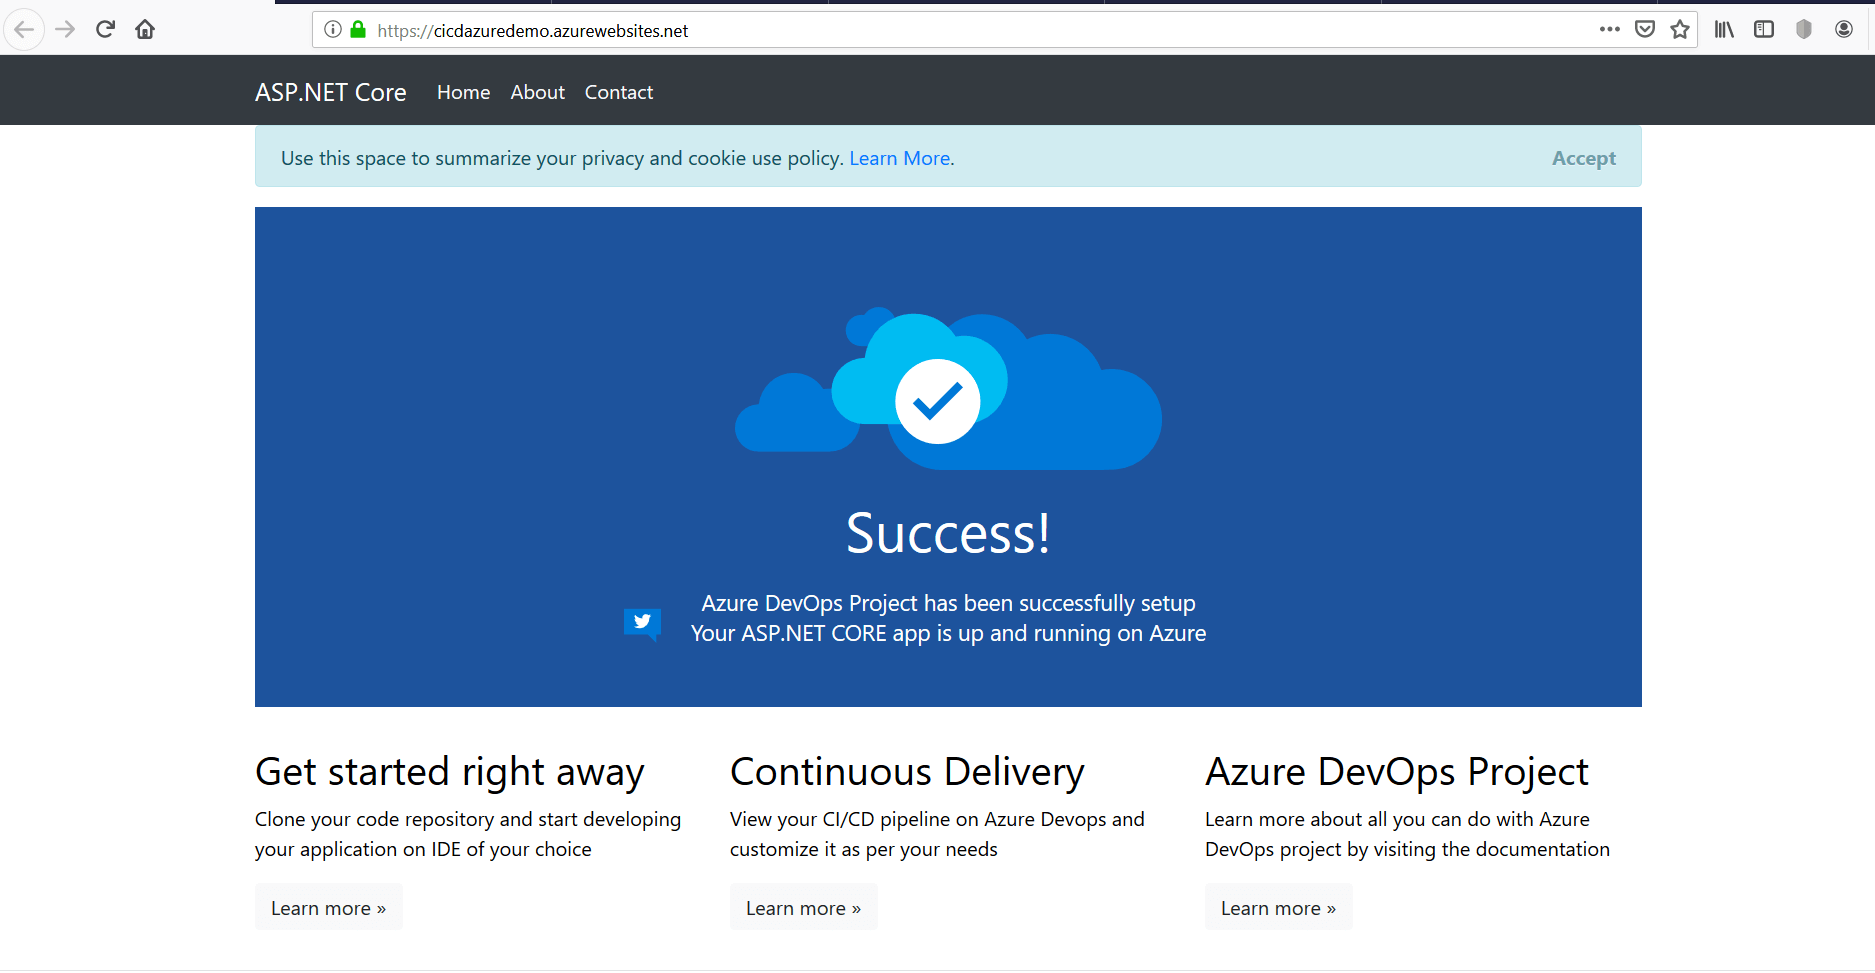
Click Browse (refer to Figure 6) to view your application in the web browser. Figure 7 below shows how your application should look in the web browser.

Figure 7: The Web Application in execution!

Cloning the Code Repository

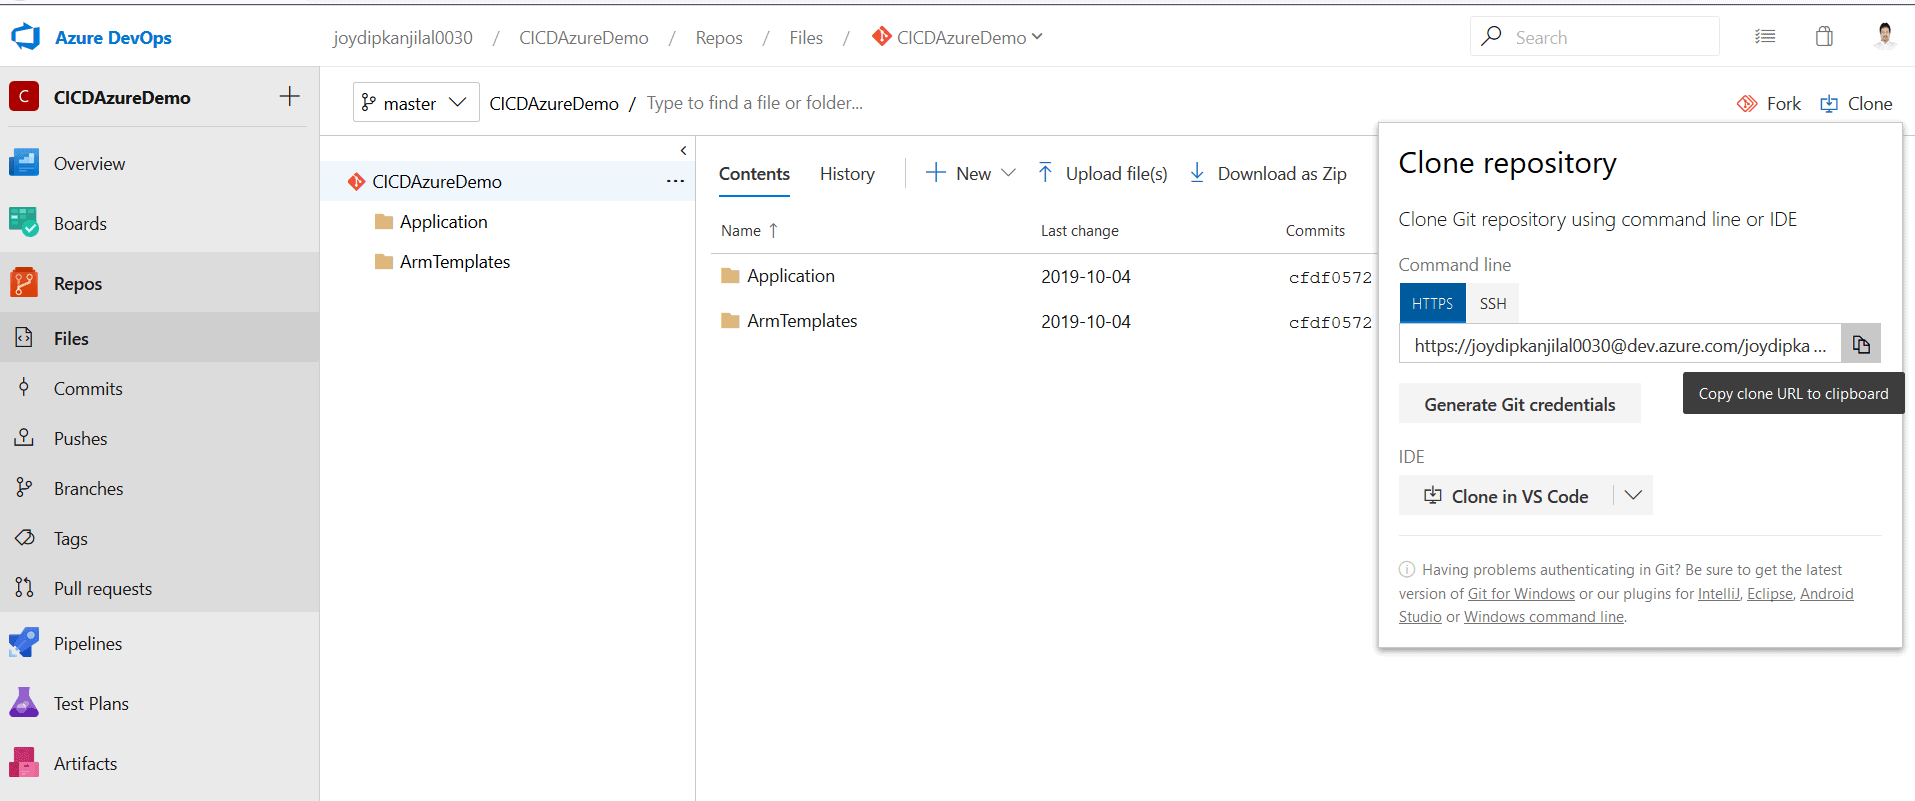
In the Azure DevOps project dashboard (refer to Figure 6), click on the name of your application under Code. Figure 8 shows the code repository in the web browser. Click Clone and then copy the Clone URL as shown in Figure 8 and proceed to the next step.

Figure 8: Clone the repository

Now follow the steps given below to clone the repository in Visual Studio 2019.

  1. Open the Visual Studio 2019 IDE
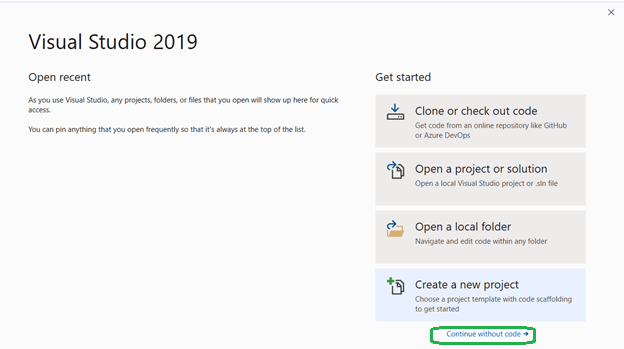
  2. Click Continue without code as shown in Figure 9 below

Figure 9: Continue without code

  1. In the Visual Studio 2019 IDE, click on View Team Explorer from the menu.
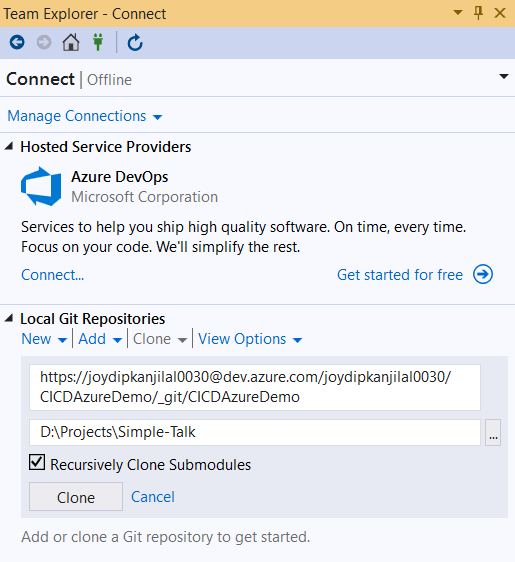
  2. Click Clone in the Team Explorer window.
  3. Specify the Clone URL and the path to the local folder where the repository will be cloned like Figure 10.

Figure 10: The Team Explorer

  1. Click Clone to start the process

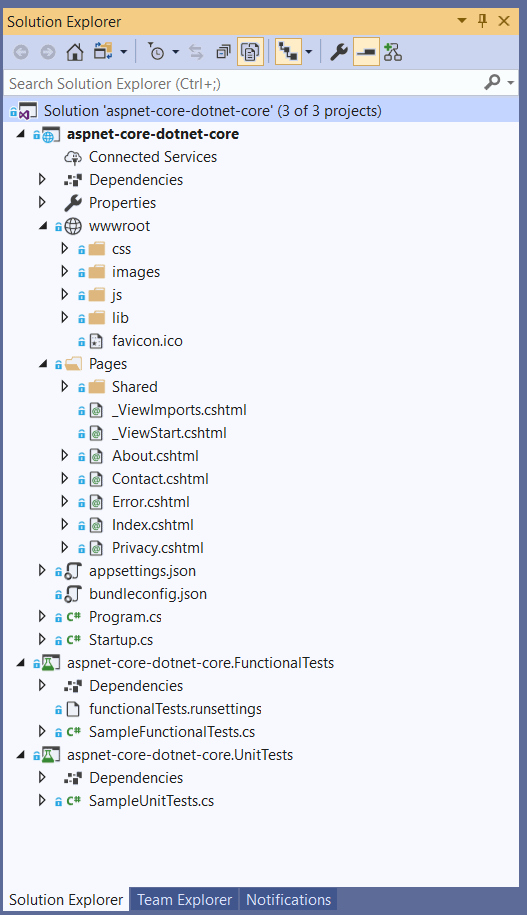
Once the repository has been successfully cloned, you can view the source code in the Solution Explorer. You can even make changes to the code if needed. Note that once you commit these changes to the code repository, the build process will be automatically triggered. After switching to the Solution view, the project should look similar to Figure 11.

Figure 11: Solution Explorer

Examining the CI/CD Pipelines

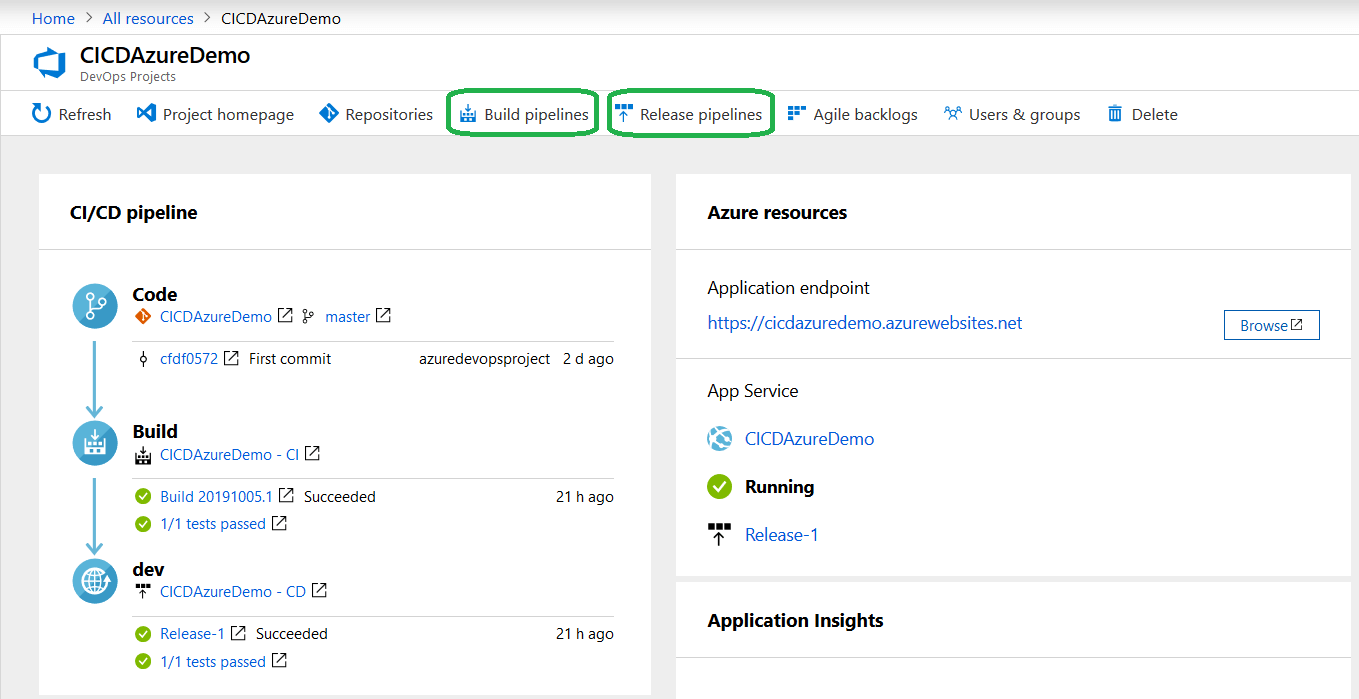
A full CI/CD pipeline will be automatically configured for you. You can explore the pipeline and even customize it if need be. At the top of the Azure DevOps project dashboard, you’ll see menu options for both Build pipelines and Release pipelines as shown in Figure 12.

Figure 12: The build and release pipelines

Build Pipelines

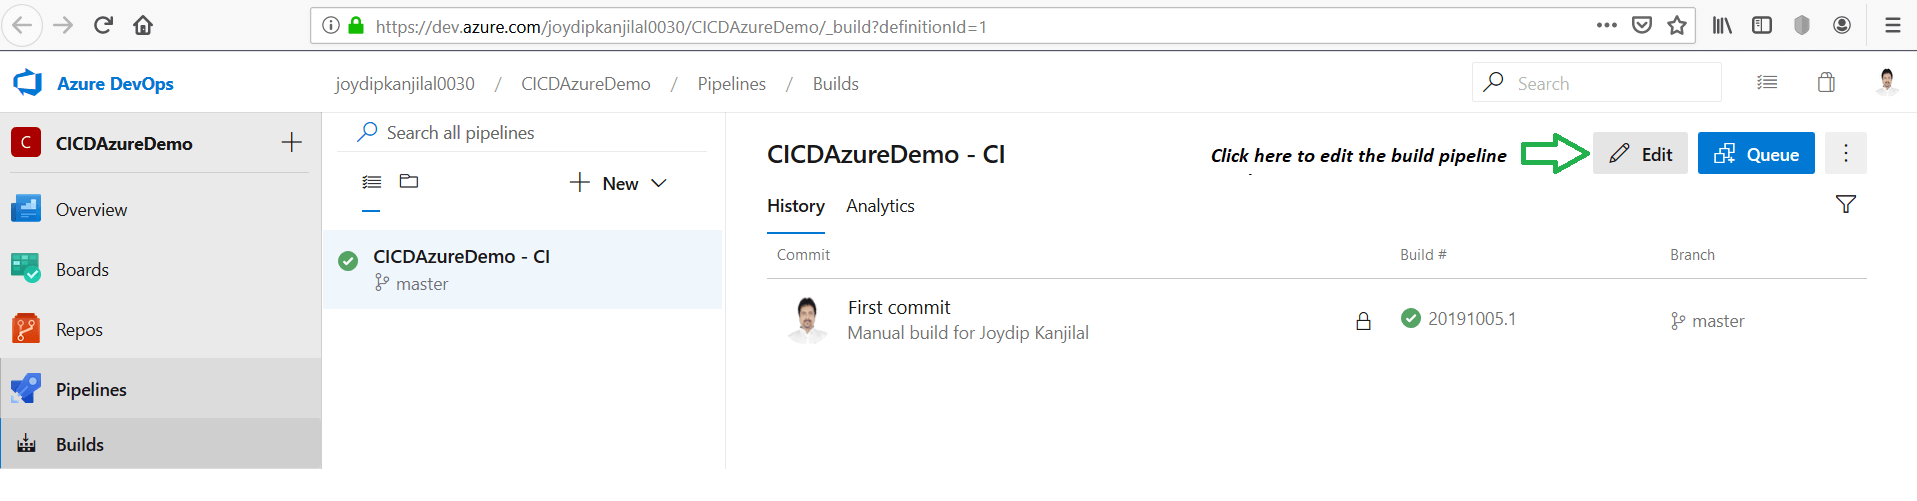
Click Build pipelines to load the build pipeline(s) for your application in the web browser, as shown in Figure 13 and then click Edit.

Figure 13: Edit the build pipeline

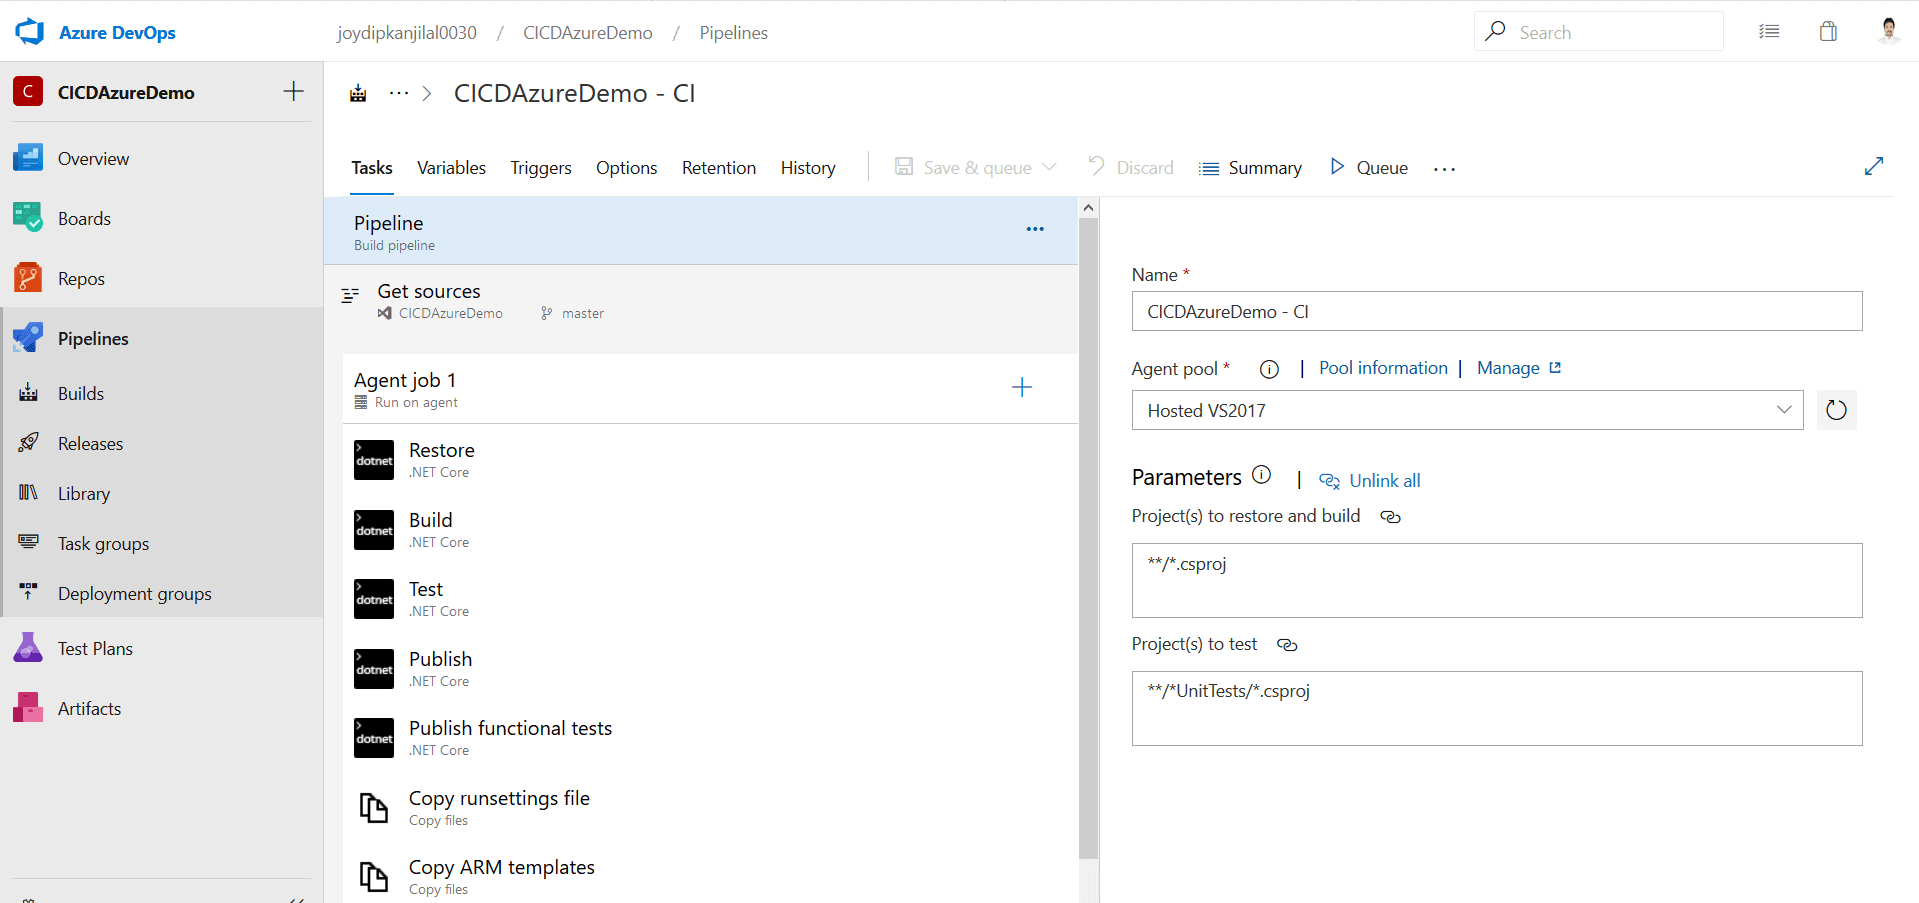
The build pipeline performs the following tasks.

  • Retrieves source code from the code repository
  • Restores the project’s dependencies
  • Builds the application
  • Runs all the automated tests
  • Publishes the outputs

Figure 14 illustrates the various tasks performed by your build pipeline.

Figure 14: Tasks performed by the build pipeline

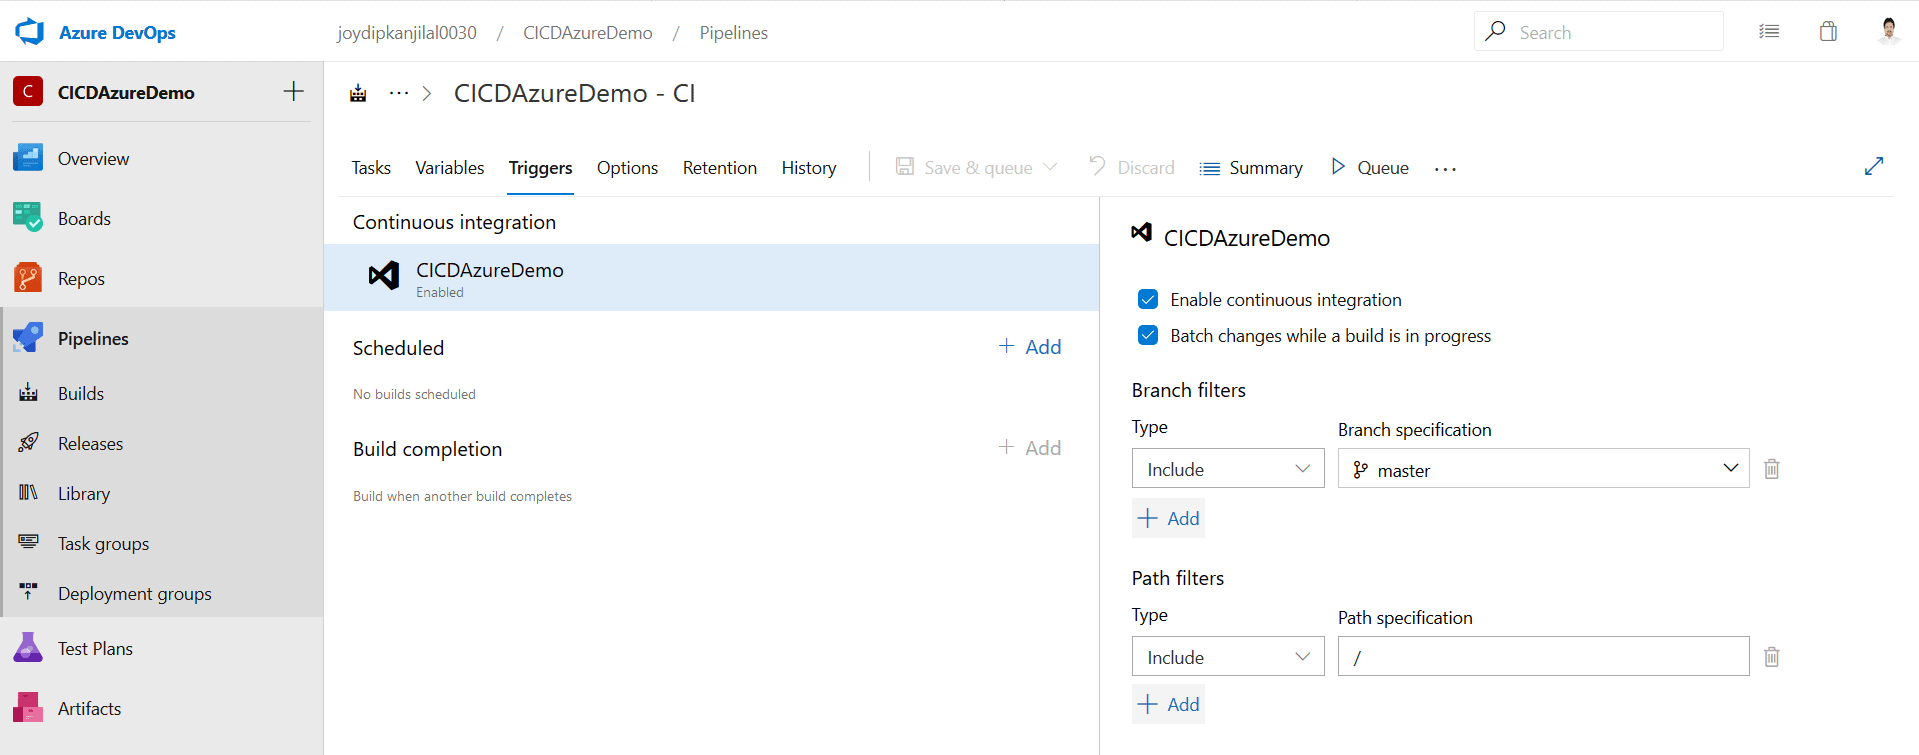
If you click on the History tab, you’ll be able to see a history of the changes for the build. When you click on the Triggers tab, you’ll be able to see the triggers that have been configured for the build as shown in Figure 15. The Azure DevOps project created CI triggers by default when you created the project.

Figure 15: CI Triggers

Optionally, include or exclude branches from the build pipeline. Note that the Enable continuous integration checkbox is checked. This would ensure that for every commit to the repository, a new build will be initiated.

Release Pipelines

Click Release pipelines in the Azure DevOps project dashboard to load the release pipelines for your application in the web browser, as shown in Figure 16 below.

Figure 16: Edit the release pipeline

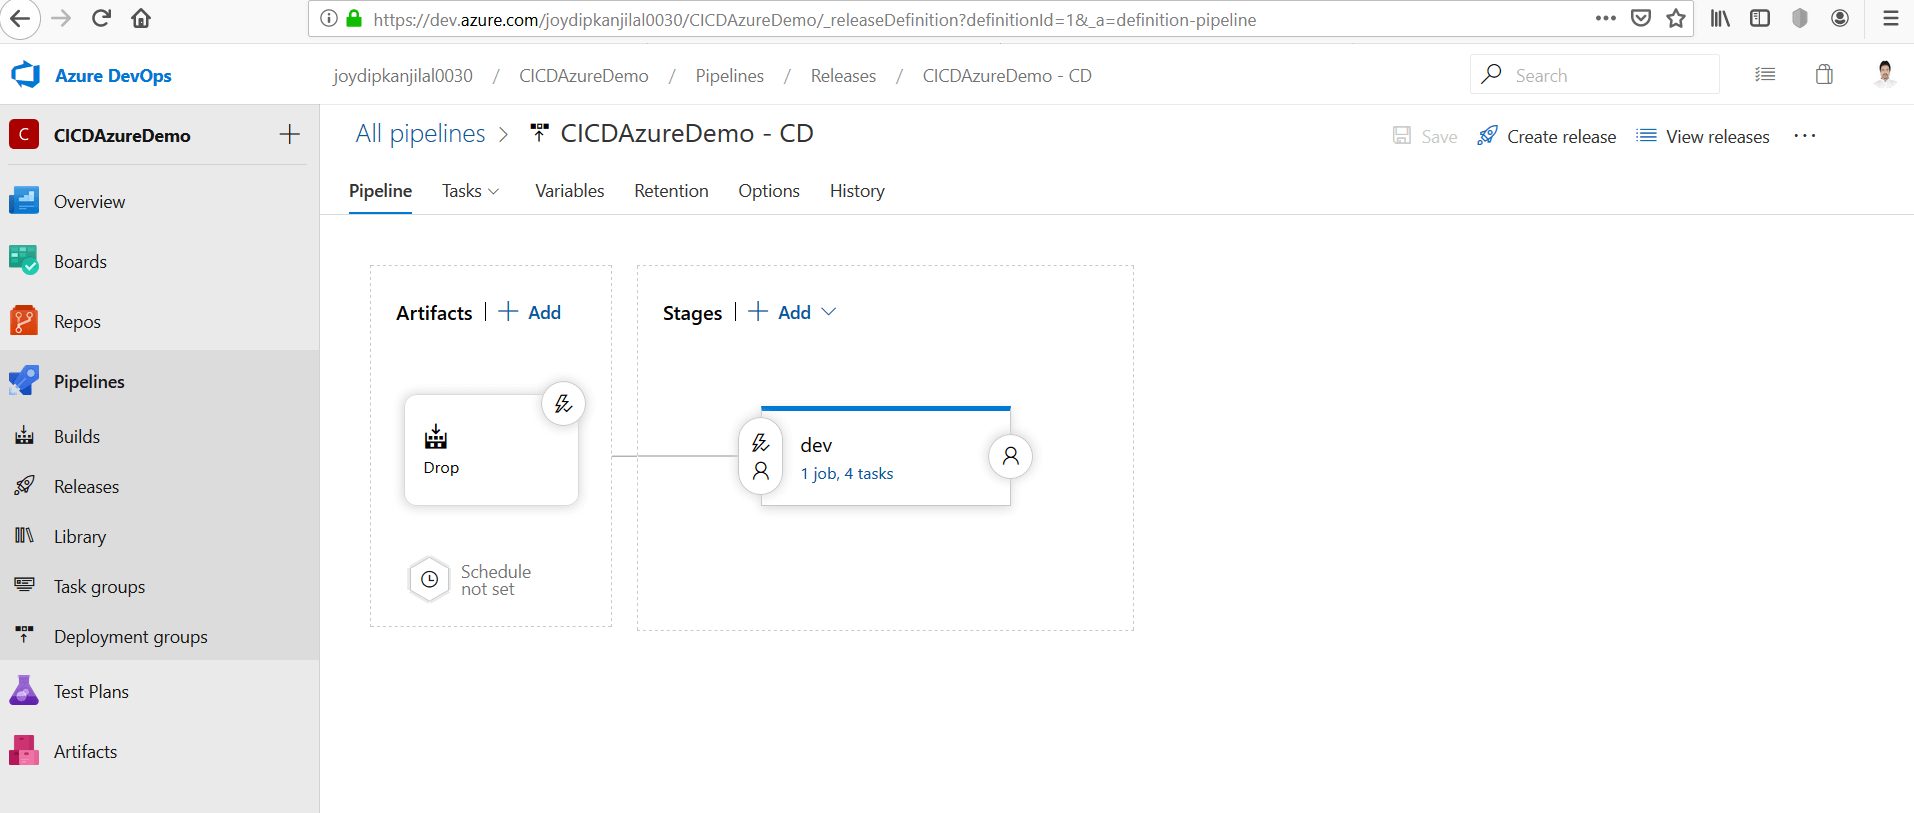
Click Edit to edit the release pipeline. Figure 17 illustrates the release pipeline in edit mode.

Figure 17: Release pipeline in edit mode

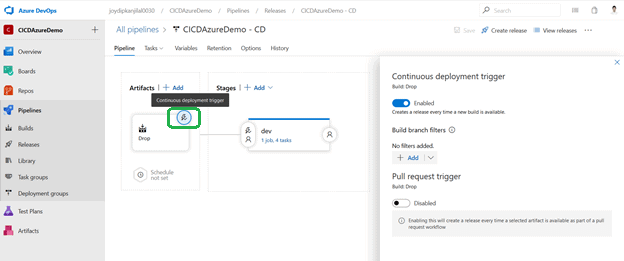
Select Drop from the Artifacts option. Click on the icon to the top-right corner of the Drop icon to view the continuous deployment trigger shown in Figure 18 that has been configured for the application.

Figure 18: View continuous deployment trigger

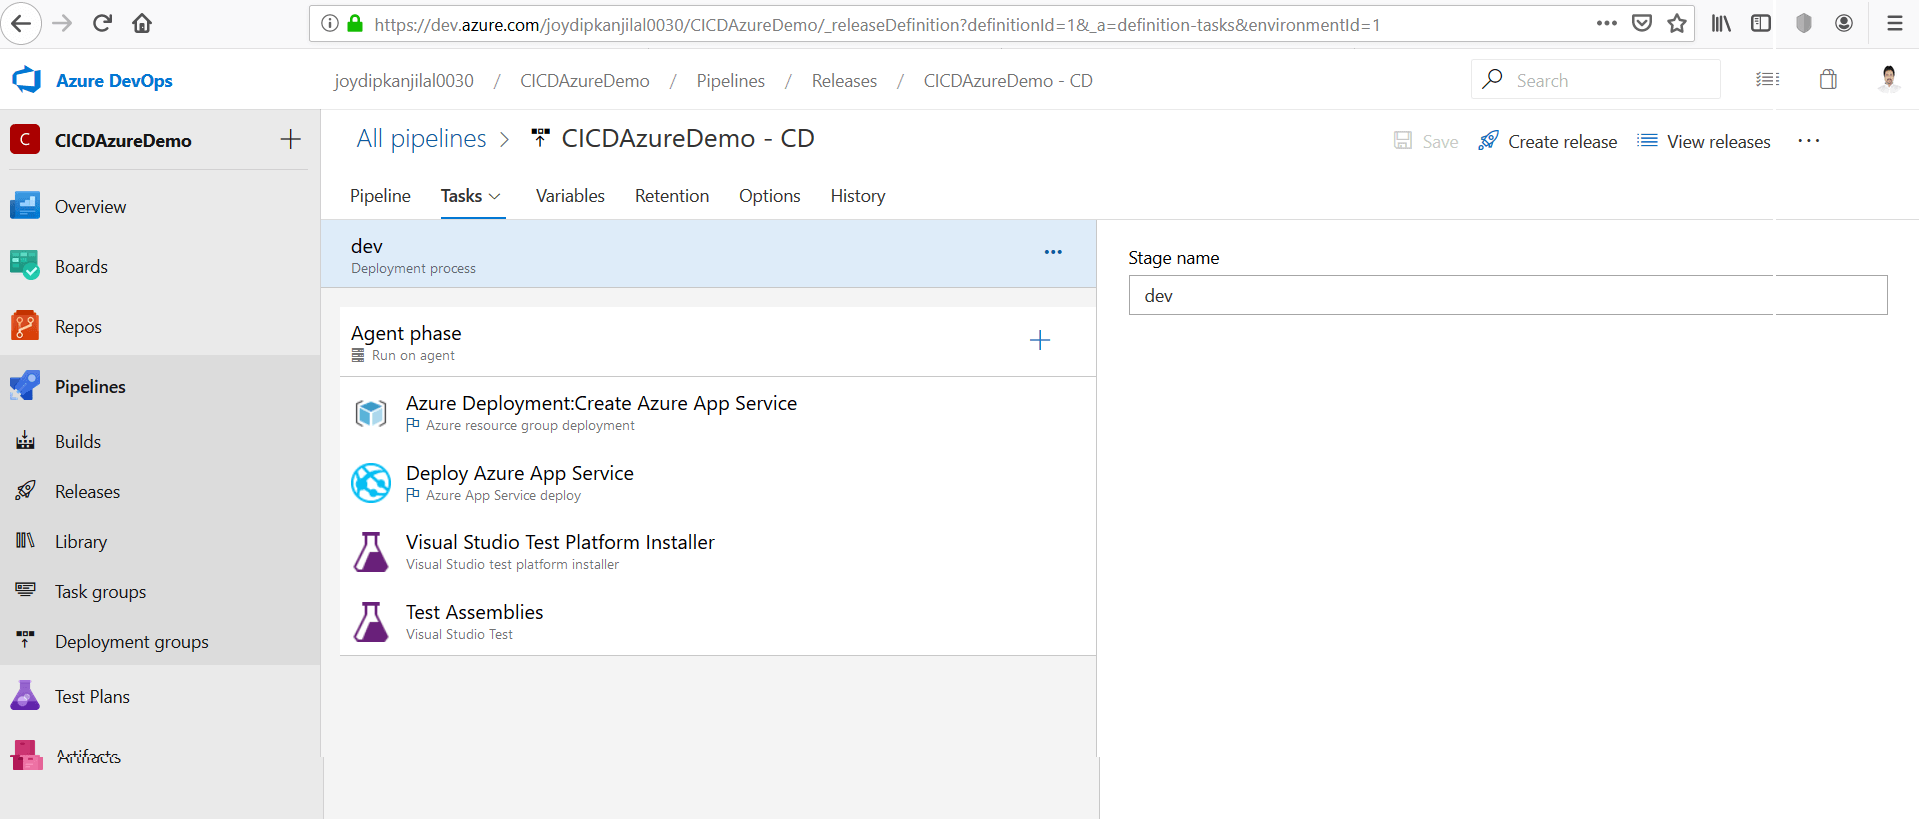
Note that the continuous deployment trigger creates a release whenever a new build is available. When you click on Tasks, you’ll be able to see all the tasks and activities that your release pipeline executes, as shown in Figure 19.

Figure 19: Tasks and activities

To see a list of all the releases, you can click on View releases as shown in Figure 19.

Triggering the CI/CD Process

There are two ways (automatic and manual) in which the CI/CD process can be triggered. The build process will be triggered automatically once you make changes in the source code and commit those changes to the code repository. It is during this phase that the tests are run automatically. If any of the tests fail or the compilation process is not successful, the build fails. If the build is not successful, the release process is not triggered.

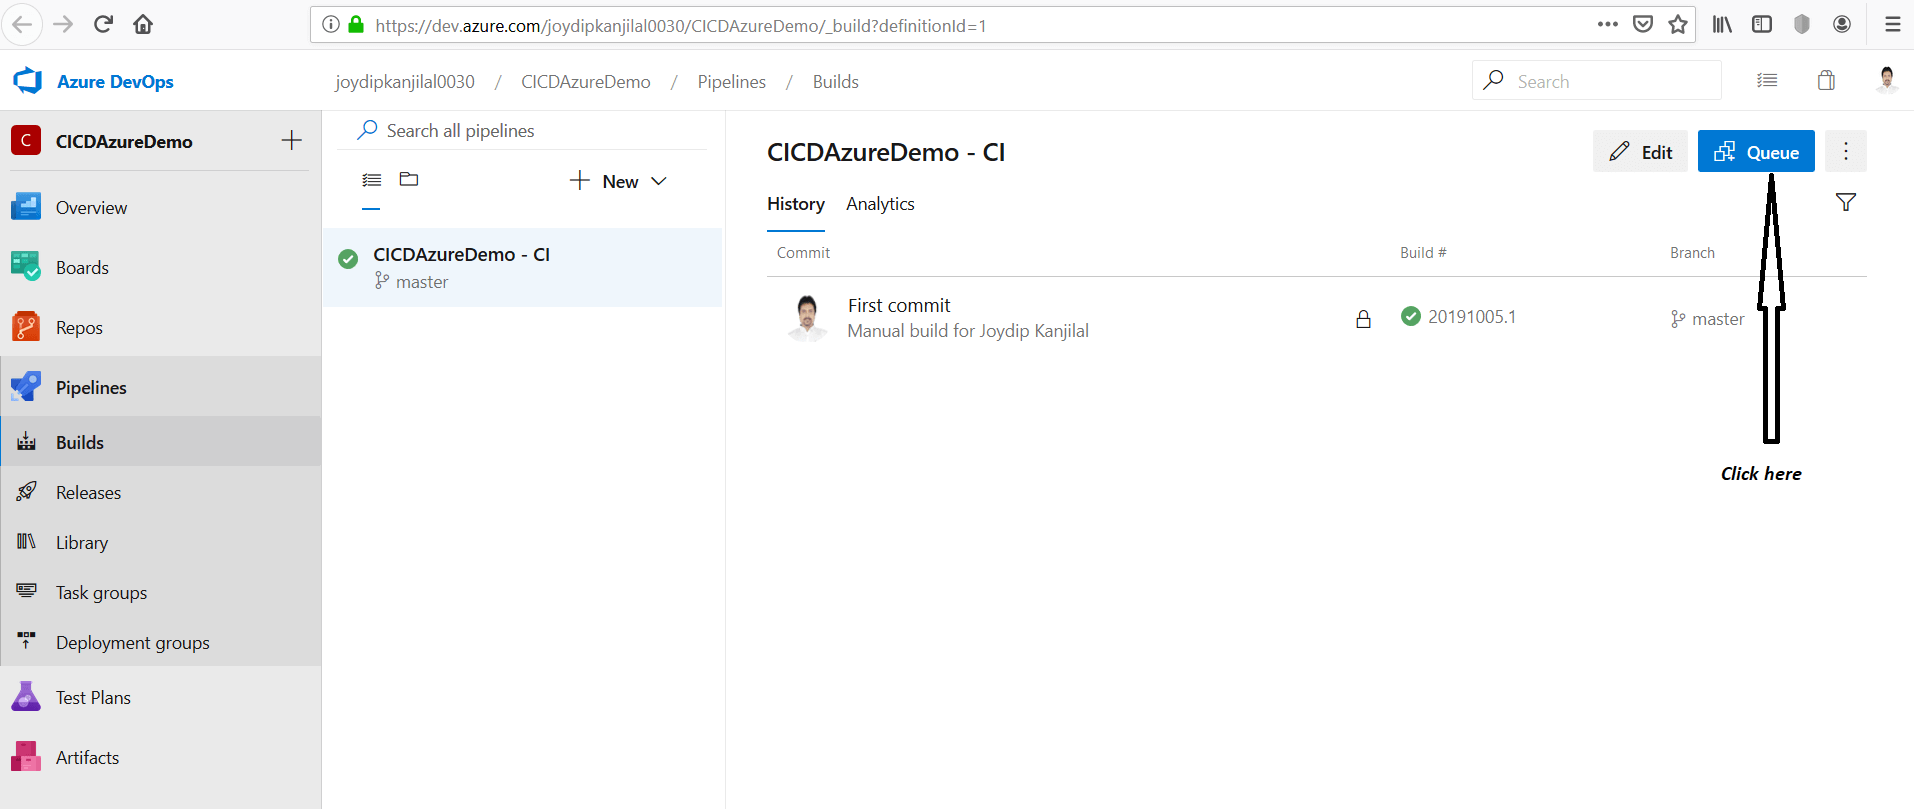
An alternative to this is by triggering the build process manually. To do this, first, select the Builds section and click on the Queue button, as shown in Figure 20. When you do this, a new build will be queued up.

Figure 20: Queue the build

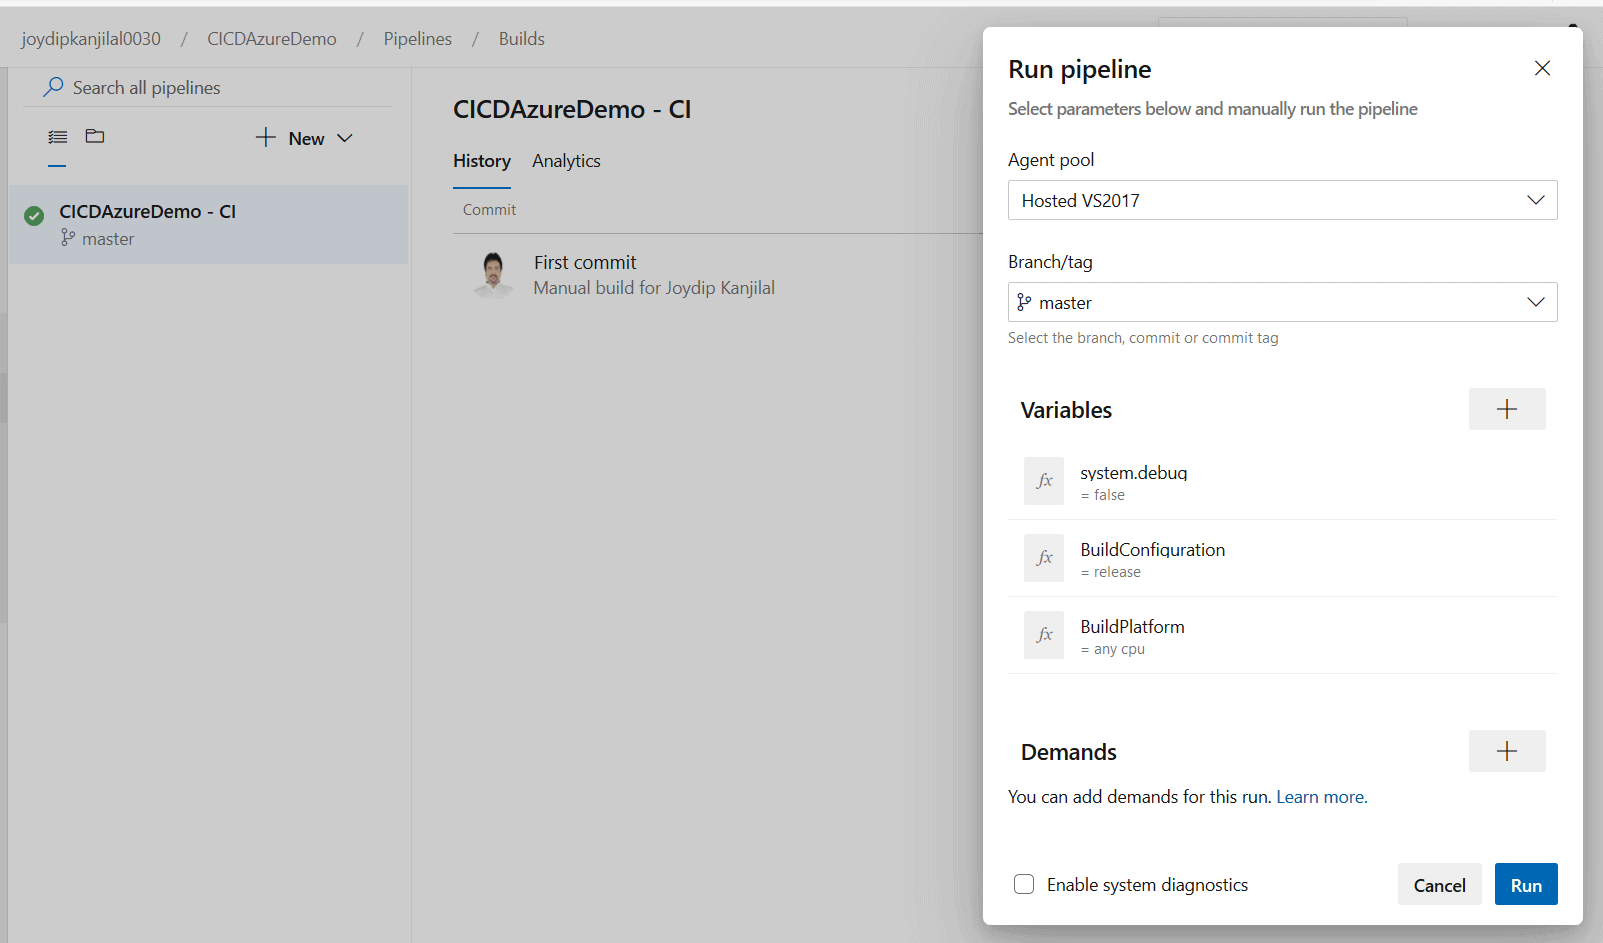
In the next screen, click on Run (see Figure 21) to trigger the build process manually.

Figure 21: Run the build pipeline

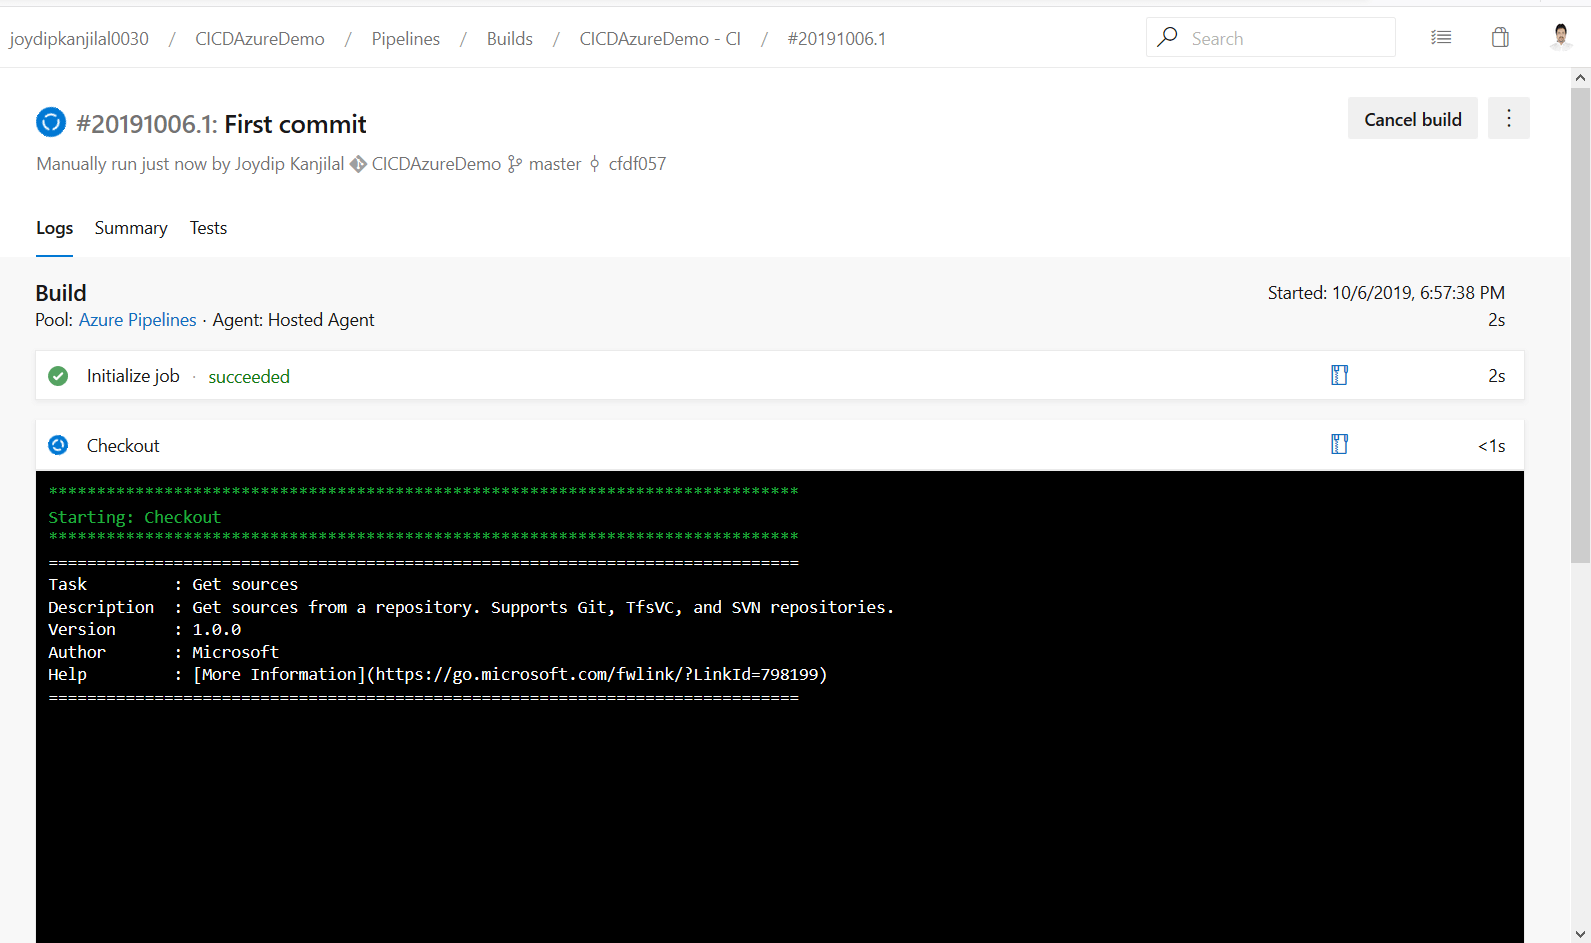
This will trigger the build process, as shown in Figure 22.

Figure 22: Build process started

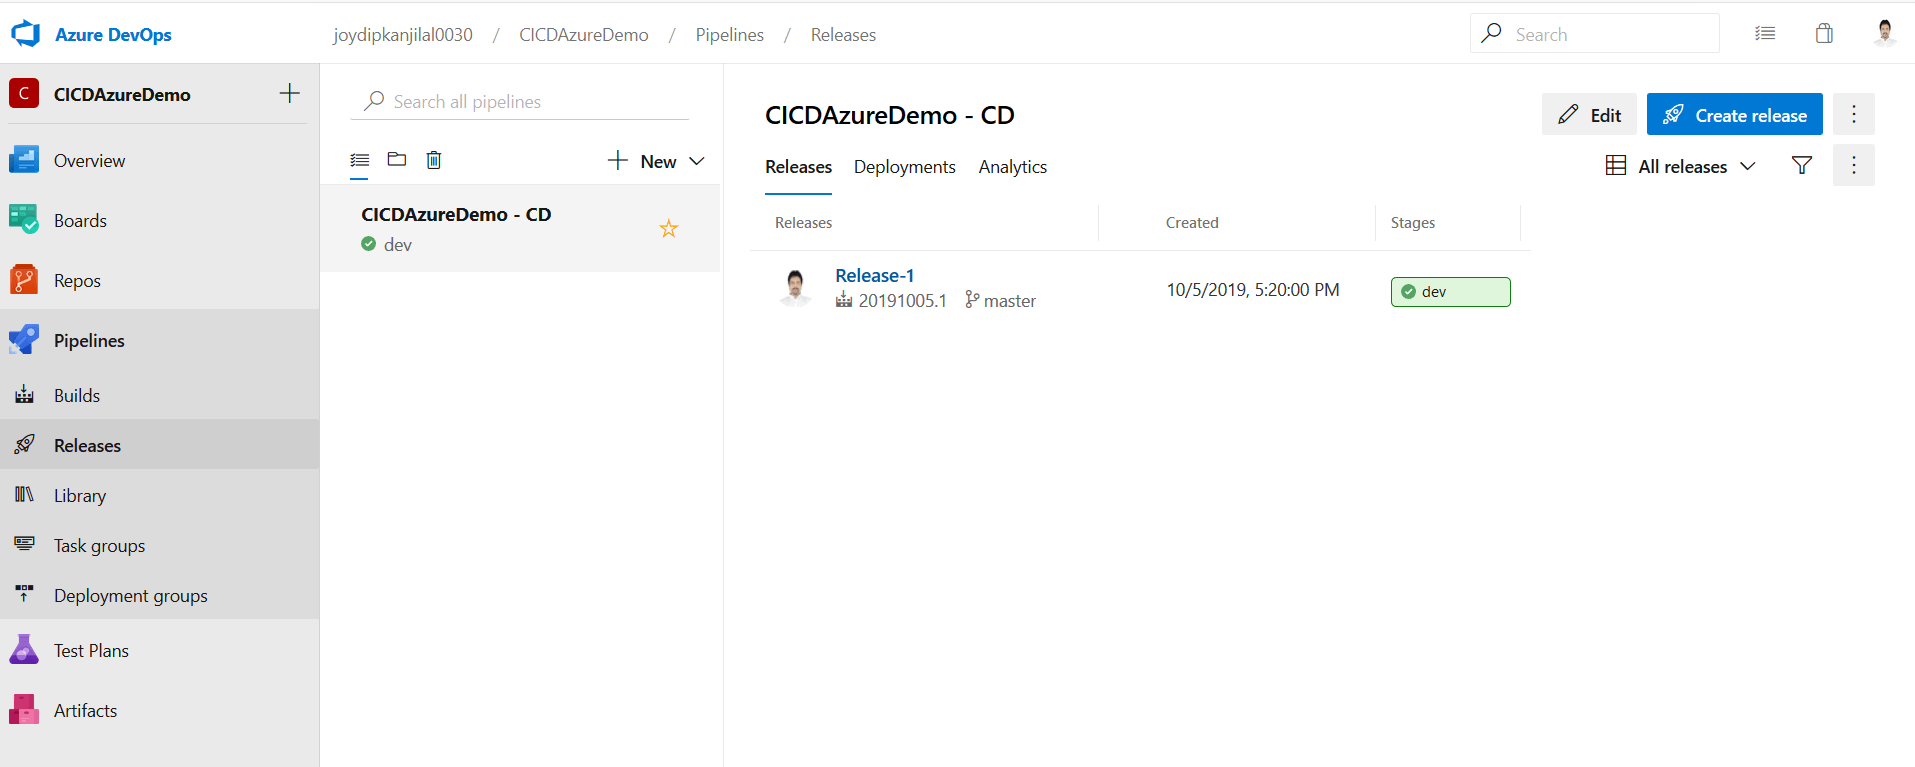
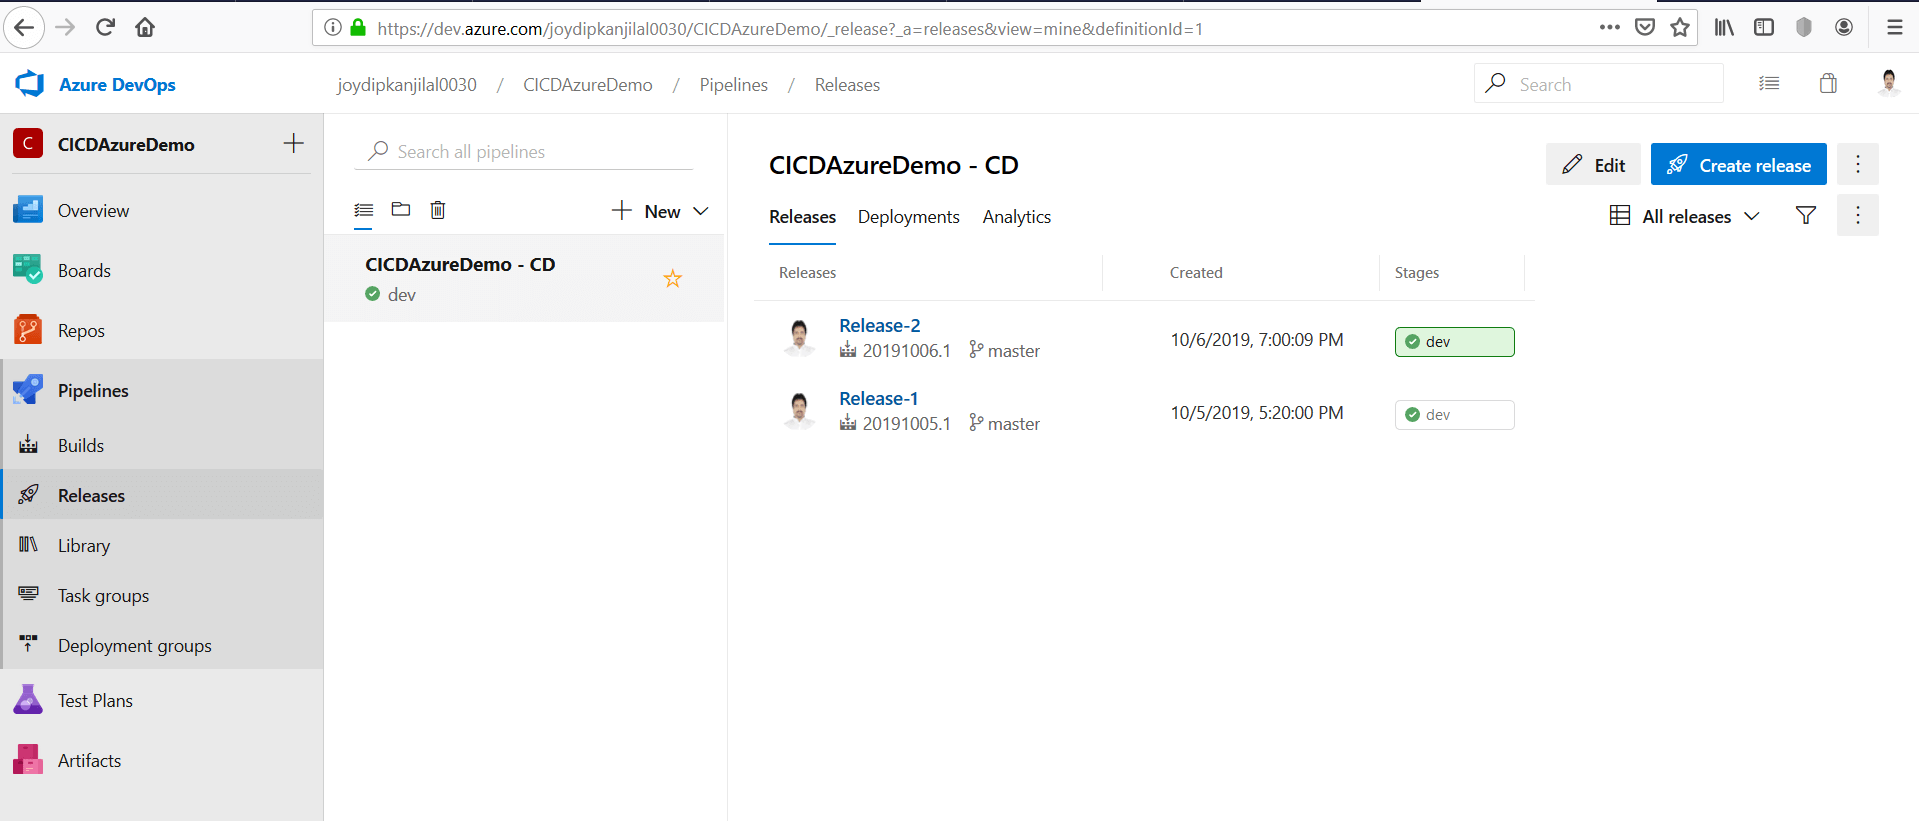
Like the build, you can also trigger a release process manually. To do this, switch to Releases and click on Create release, as shown in Figure 23.

Figure 23: Trigger the release process

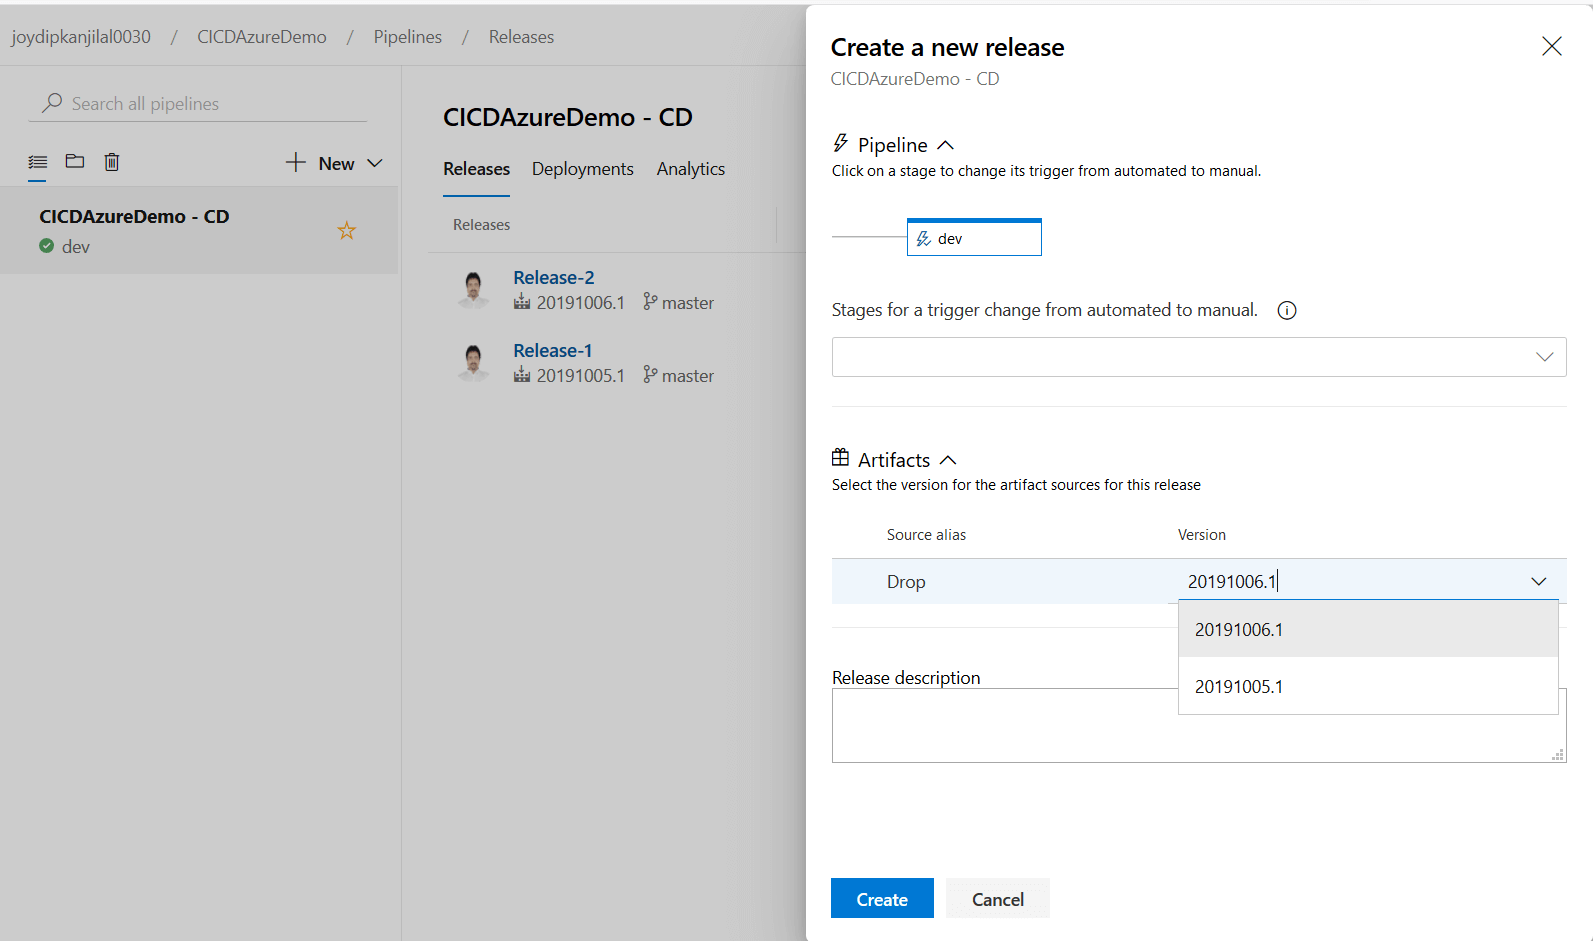
In the Create a new release screen shown in Figure 24, specify the build definition you would use to generate the release.

Figure 24: Specify the build

Click Create to start the release process.

Re-triggering the CI/CD Process

Now it’s time to change the source code and see how this change flows through the pipeline. To do this, follow the steps outlined below.

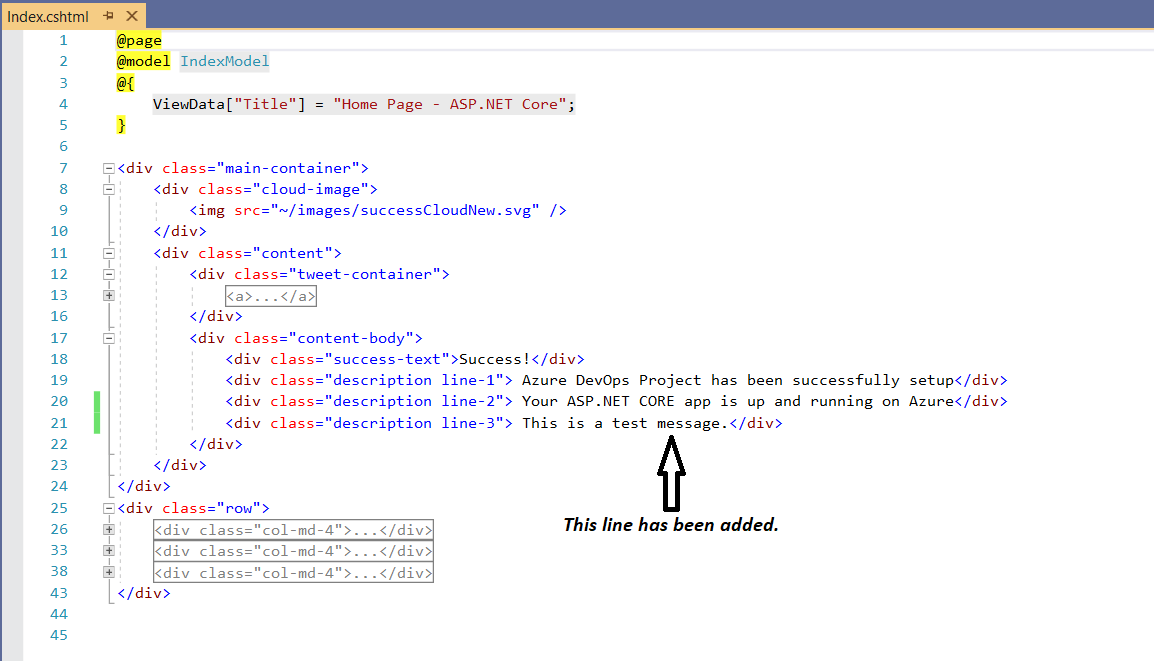
  1. Double-click the Index.cshtml file to open it. Add a line of text, as shown in Figure 25 below.

Figure 25: Adding a line of code

  1. Right-click on the solution in the Solution Explorer window and click Commit… to check-in the code.
  2. Specify a comment as a reason for the commit and click on Commit All.
  3. Click Sync to synchronize the changes with the server.
  4. Finally, click Push to send the changes from the local repository to the remote repository
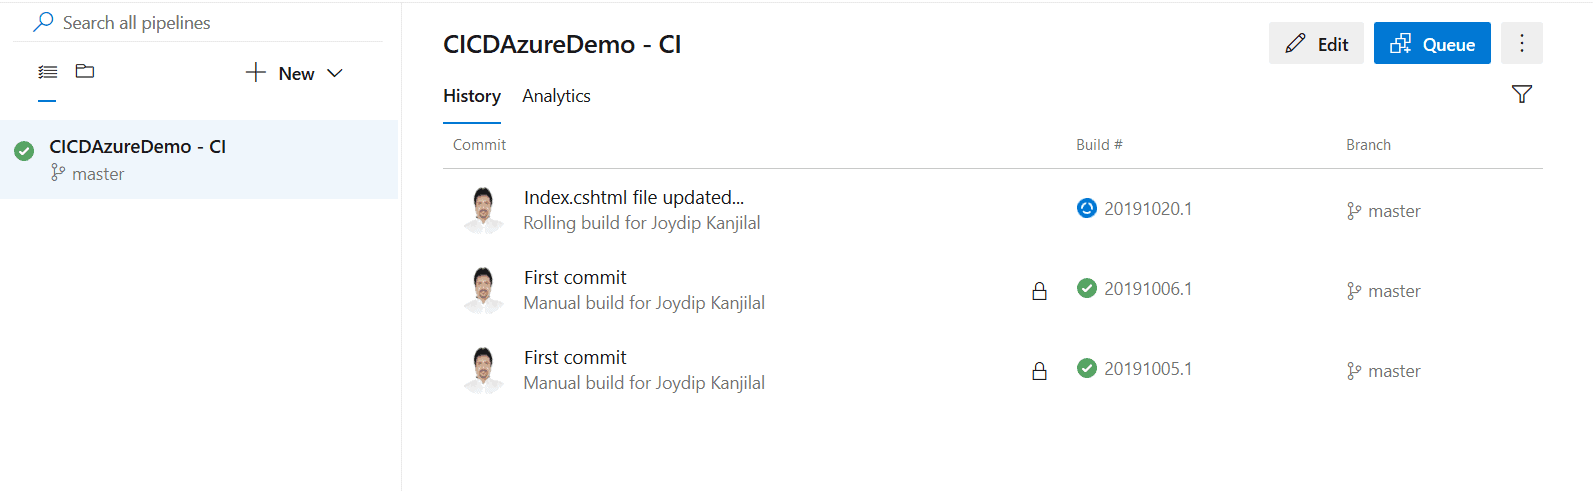
  5. The build process starts automatically, as shown in Figure 26.

Figure 26: The build process starts

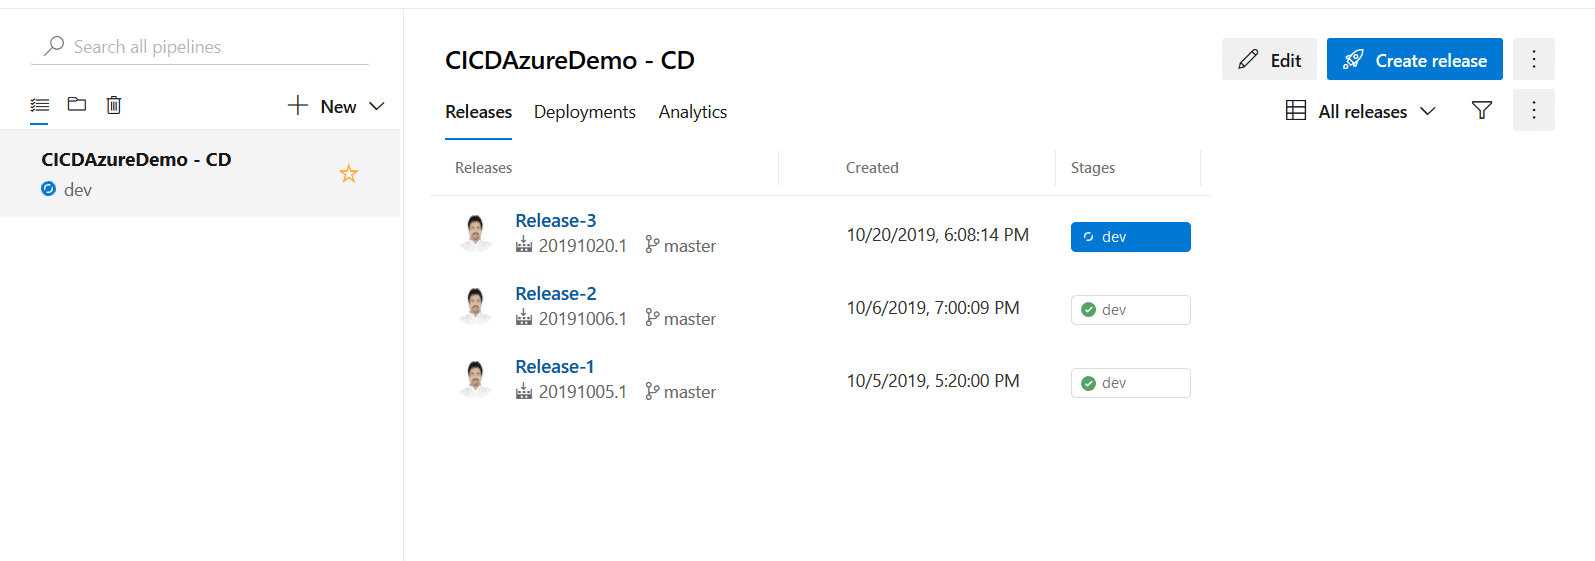
Once the build process is successfully completed, the release process starts automatically as shown in Figure 27 below.

Figure 27: The release process

After successful completion of the release process, the application is re-deployed to the same application endpoint, i.e., https://cicdazuredemo.azurewebsites.net. (Your URL will be different since the application names must be unique across Azure.)

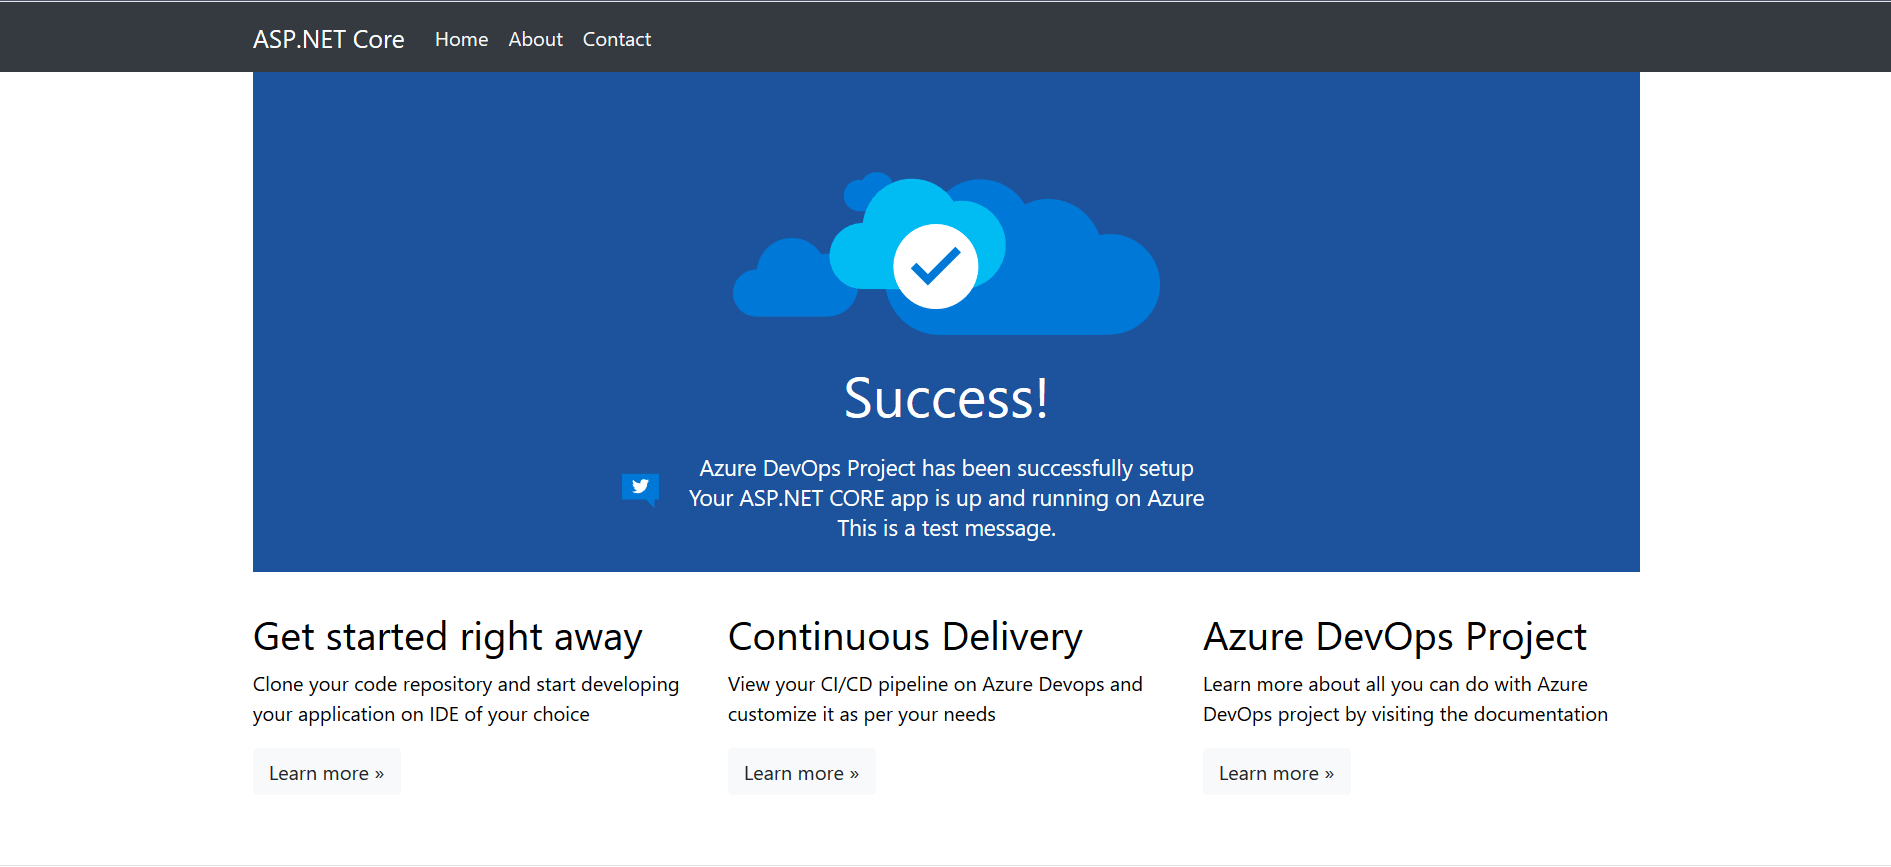
When you browse this endpoint in the web browser, here’s how the output will look. Note the text This is a test message as shown in Figure 28.

Figure 28: The output with the change

Summary

Continuous Integration and Continuous Delivery together can help your organization build great software with faster time to market releases. You can take advantage of CI/CD to automate your builds and deployments and be more productive. Both CI and CD help in automating the software delivery process. It should be noted that CI can happen several times a day – it all depends on the number of times the source code is committed.


The post How to Configure CI/CD in AzureDevOps appeared first on Simple Talk.


from Simple Talk https://ift.tt/2qHWKjX
via

Thursday, October 24, 2019

Moving on from Volunteer Projects

I can’t remember a time when I was not involved in side-projects, usually as a volunteer but also writing books or creating courses. New projects are like bright, shiny objects, and it’s easy to get involved in too many of them. Earlier this year, I found myself working on three books at the same time. One was contributing a chapter, another was as a tech reviewer, and the third was as the lead author. I also teach at a non-profit, present at tech events, and co-lead a PASS virtual group.

I currently teach T-SQL and SQL Server Reporting Services to a new group every six months at the non-profit. The specific program is dedicated to helping women gain skills to move into tech careers. My students come from diverse backgrounds, and many of these women are from underserved communities. It is wonderful to watch how thrilled they are to write their first queries and build their first reports. Once the class is complete, most of them go on to paid apprenticeships which usually lead to fulltime jobs in technology. My students have become DBAs, project managers, and developers at organisations like Boeing, Master Card, and Anheuser Busch as well as smaller companies in the St. Louis area. The program is changing hundreds of lives each year as well as helping to fill the tech talent pipeline.

While teaching at the non-profit has been the most rewarding experience of my life, I’m also a bit burnt out. I’ve been a volunteer at the organisation for about five years and have been teaching almost every Wednesday night during that time. It’s also an hour-long commute each way. (I work from home to avoid driving so much but still find myself driving to St. Louis a couple times each week.) At the beginning of this year, I decided to step back a bit by becoming an assistant instead of the lead instructor. One of my former students who is now a DBA has become the lead instructor, and I couldn’t be prouder. Two other wonderful volunteers also step in as well.

I recently decided to leave the six-month program at the end of the current term partly due to the burn-out but also due to the amount of travel that my fulltime job requires. I’m not completely leaving the nonprofit organisation, and I would like to try some other things like teaching weekend workshops instead of six-month classes. Stepping down from my class has not been an easy decision, but I’ve thought about it for months and know that it’s time.

It’s not easy to leave a volunteer position or even a job when one is so dedicated. Even though it is difficult in these situations, giving others responsibility – and trusting those people to make decisions – is how to be a good leader and the way to prepare to leave, even if that is years away. I know that the team will make changes to the class that are different than the ones I would make, and that’s OK because they are wonderful teachers and also just as dedicated to the students as I have been.  

Commentary Competition

Enjoyed the topic? Have a relevant anecdote? Disagree with the author? Leave your two cents on this post in the comments below, and our favourite response will win a $50 Amazon gift card. The competition closes two weeks from the date of publication, and the winner will be announced in the next Simple Talk newsletter.

The post Moving on from Volunteer Projects appeared first on Simple Talk.


from Simple Talk https://ift.tt/2Jft57W
via

Friday, October 18, 2019

Hosting a Machine Learning Model in ASP.NET Core 3.0

The romantic days of machine learning being the science of a few geeks are over. To be effective and ubiquitous as top managers claim they want it to be in the enterprise, machine learning must move into a more integrated and agile environment and, more than everything else, be effectively hosted in line-of-business applications. In this article, I’ll try to explain why this particular point is problematic today that most solutions, including shallow learning solutions, are primarily coded in Python. The essence of the article can be summarized in: a tighter integration between machine learning solutions and host application environments is, at the very minimum, worth exploring. This means looking beyond Python; and machine learning is now available (and fast-growing) right in the .NET platform, natively with existing .NET Framework applications and newer .NET Core applications. After a short introduction on the motivation for machine learning in .NET, I’ll discuss how to load an existing machine learning model into an ASP.NET Core 3.0 application and the practical issues you may face in production.

Why Python When Doing Machine Learning?

Python and C++ are the most commonly used languages in machine learning, but the actual reasons for their popularity are probably hard to investigate. At first sight, one may think it’s a matter of performance. The argument is valid for C++, but not for Python, which is an interpreted language with some support for multithreading, but only if you write that part of the code in C! The reason for the popularity of Python in machine learning is another: pure development convenience. When it comes to implementing machine learning, Python is on the forefront because of its impressive ecosystem of dedicated tools and libraries.

Once the same ecosystem grows in other programming platforms, then Python itself could be replaced with other languages that are easier to use than C++ and more powerful and better integrated with popular enterprise software platforms than Python. In particular, C# (and F#) and Java (and Scala and Kotlin).

Most models today are built with Python libraries (e.g., scikit-learn) and most neural networks are built with PyTorch or TensorFlow. Note, though, that TensorFlow is not an exclusive part of the Python ecosystem as it offers native bindings to other languages including C, C++ and Java and C# via dedicated proxies (e.g., TensorFlow.NET).

How would you use a trained model in production?

A model is only a binary file that must be loaded into some client application to be consumed. The model is not made of directly executable code but contains the analytical description of a computation graph in much the same way an IQueryable tree contains the graph of data query to execute. The machine learning model is inert if not embedded in some client application. There are three main ways to consume a Python model from outside any Python environment, such as a .NET or Java application.

  • Hosting the model in a remote (web) service
  • Hosting the model in-process and consuming it via bindings (if available) for the language in which the client application is written
  • Loading the model via the universal ONNX format

Needless to say, all known ways to host a trained model for consumption work, but none is perfect.

Hosting Core Issues

The most common way to expose a trained model is via a web wrapper. Both scikit-learn and TensorFlow have their favorite web infrastructures to expose the model via a dedicated web API. TensorFlow has the TensorFlow Serving infrastructure and scikit-learn relies on the Flask framework to quickly loading the model and return a URL for clients to call it over HTTP.

It should be noted, though, that an HTTP service has an impact on the overall application architecture because it forces to rely on external dependencies, thus adding latency in the system. The challenge is having a trained model that could be integrated within the same process of the application or the same process of the microservice that needs to invoke the model. This is what the second option refers to: importing the trained model as a serialized file and interact with it natively. This is only possible if the founding infrastructure—the library the model is built on—provides bindings for the language in which the client application is written. For example, a TensorFlow model can be natively used in C, C++ or Python and even in .NET through the intermediation of the TensorFlow.NET library. The same, however, can’t be said for model built with scikit-learn. It’s worth noting here that with TensorFlow, you build deep learning neural networks whereas with scikit-learn you mostly work out models based on simpler, shallow learning algorithms whose computation graph is sometimes as simple as calculating a mathematical function.

The third option refers to exporting the trained model in the universal ONNX format that enables multiple application environments, in multiple languages, to load the model. All the client application needs to do is incorporate a wrapper for consuming ONNX binaries, and all comes easy then. Note, though, that ONNX is a sort of common denominator of many libraries, and an ONNX importer is still not so common. Furthermore, at the moment, ONNX lacks support for certain areas of each original framework. ONNX, though, is a promising area for standardization of the serialized models.

Towards Machine Learning in .NET

More and more applications in need of consuming machine learning models are written in the context of enterprise solutions based on Java or .NET. Therefore, a native machine learning framework in any of those platforms is (or will be soon) a strict necessity. Generally available since the spring of 2019, ML.NET is a free, cross-platform and open-source framework designed to build and train learning models and host them within .NET Core and .NET Framework applications as well as .NET standard libraries. You can learn more about ML.NET at https://dotnet.microsoft.com/apps/machinelearning-ai/ml-dotnet.

Currently available as version 1.4, ML.NET aims at democratizing machine learning for developers, therefore, trying to simplify it to levels that are easy enough for developers. ML.NET doesn’t specifically target data scientists meaning there might be some data science approaches (and algorithms) that ML.NET doesn’t cover yet. On the other tip of the scale, though, ML.NET puts the ability to host models in-process in .NET applications and to develop them without gaining or buying Python skills. Compared to the pillars of the Python ecosystem, ML.NET can be seen primarily as the counterpart of the scikit-learn library. The framework, however, also includes some basic facilities for data preparation and analysis that you can find in Python helper libraries such as Pandas or NumPy.

To start with the ML.NET framework, you need to install ML.NET package and start creating models with plain C# using any editor on Windows, Mac or Linux. A specific extension–the Model Builder–is available for Visual Studio 2019. Providing a primer on ML.NET, or even machine learning as a whole, is beyond the purposes of this article. (It would anyway be good to hear from you on how such articles would be received!) In the rest of the article, we’ll assume to have an existing model trained with an ML.NET-based algorithm and proceed to see what it takes to host it effectively in an ASP.NET Core application.

Hosting a Model in ASP.NET

The output of ML.NET training is a ZIP file that contains, serialized in some proprietary way, the computation graph of the model. If you’re curious about the format, have a look at the source code of ML.NET. The code below shows how to load a previously trained model in a C# class invoked via an HTTP request.

var mlContext = new MLContext();
var model = mlContext
      .Model
      .Load(modelFilePath, out var inputSchema);

As the first thing, the code creates a required instance of the MLContext class—the root object of the ML.NET library. Next, a model is located by file path and loaded in memory. At this point, the MLContext instance is ready to use to model to perform the computation stored in the bits of the model. In the ML.NET lingo, this requires getting ahold of a prediction engine.

// Create prediction engine for the trained model
var predEngine = mlContext
       .Model
       .CreatePredictionEngine<InputData, OutputData>(model);

In the code snippet above, InputData and OutputData refer to two .NET types respectively describing the data being passed to the model and the data being returned by the model at the end of the hardcoded computation. The model describes a calculation to take place, and InputData and OutputData describe what the model receives and what the model returns. Those two types are used in two distinct phases: training and production. Training is the phase that generates the model and is commonly organized around an ML.NET-based console application. The console application refers to those types via a shared class library. The prediction engine returned by the call to CreatePredictionEngine is the actual instance that runs the computation stored in the model and returns the actual response.

var output = predEngine.Predict(input);

As an example, imagine you developed a model to predict the cost of a taxi ride. In this case, the input variable will be a C# object containing the parameters that will guide the model towards a prediction. The output variable is the C# description of the prediction—possibly just a numeric value denoting the expected amount of money to pay for the ride.

Scalability Concerns

It all seems easy, doesn’t it? Well, there are a few aspects to consider. First and foremost, the code presented works well, but it is not optimized for any multithreaded host scenarios, such as web applications, web API or even Azure Functions. The code presented is acceptable if used within a desktop or mobile application. Specifically, the code above has two main issues. One is that the model is being loaded on every HTTP request that causes it to execute. It’s just a matter of poor performance that becomes patent when the model is significantly large. At the very minimum, the trained model should be coded as a singleton and shared across the application. Technically, a model in ML.NET is an instance of the ITransformer type which is known to be thread-safe and then sharing it as a singleton is acceptable. In ASP.NET Core, the easiest is loading it at startup and sharing via dependency injection. Also, a global variable, however, works fine.

The other problem is more serious and relates to the PredictionEngine type. As mentioned, the type wraps up the trained model and invokes it. Getting an instance of the type is time-consuming, so it is not recommended to create a fresh instance every time a specific request comes in. Unfortunately, though, this type is also not thread-safe, meaning that the singleton workaround discussed for the model can’t be applied and a more sophisticated solution is recommended such as using object pooling. The good news is that you don’t have to work out an object pool yourself. The ML.NET team has an ASP.NET Core integration package in the works that provides a prediction engine pool out of the box, perfectly integrated with the dependency injection layer of ASP.NET Core. Here’s the code you need to have, based on the current preview package.

public void ConfigureServices(IServiceCollection services)
{
    // Other startup.cs code here
    // ...

    services.AddPredictionEnginePool<InputData, OutputData>()
            .FromFile(modelName: "MyModel", 
                      filePath:"MyModel.zip);
}

The startup.cs file adds a call to AddPredictionEnginePool specifying the name and the path to the trained model. Any controller that needs the services of the prediction engine has only to inject it.

The controller takes the following form:

public class SomeController : Controller
{
    private readonly SomePredictionService _service;

    public SomeController(
        PredictionEnginePool<InputData, OutputData> engine)
    {
        _service = new SomePredictionService(engine);
    }
   // More code here
    :
}

My favorite approach is injecting the external dependency in the controller and from the controller into an intermediate worker service that will do the job. An instance of a prediction engine is picked up from the pool and served to the ongoing request. The instance will then be returned to the pool when the request completes. The worker service—the class SomePredictionService—receives and uses the reference to the ML.NET prediction engine in a way that doesn’t affect threads and subsequently scalability of the host.

var output = engine
      .GetPredictionEngine("MyModel")
      .Predict(input);

The prediction engine pool is contained in the Microsoft.Extensions.ML Nuget package.

Summary

As machine learning transitions towards some sort of general availability and ubiquity, it becomes crucial to integrate it in the development cycle. This means agility between data science and development teams and also technical solutions that let the model being hosted in process when this makes technical and business sense. This article discusses the problems you face when hosting a trained model into an ASP.NET applications.


The post Hosting a Machine Learning Model in ASP.NET Core 3.0 appeared first on Simple Talk.


from Simple Talk https://ift.tt/2J1bel4
via