Wednesday, January 20, 2021

Google Firebase for serverless front-end applications

Firebase is a PaaS (Platform-as-a-Service) offering from Google used for application development that supports various setups such as iOS, Android, Web, Unity, C++, or REST for everything else. Google Firebase can be used for a gamut of use-cases. Whether you are building a modest mobile app with relatively simple storage needs or an enterprise application with non-trivial scaling, security and high-availability requirements, Firebase handles it well. Firebase provides comprehensive cross-platform modules for building, releasing and monitoring applications.

Serverless Architecture – Firebase services can be accessed directly from any client application (mobile device or web app), eliminating the need for dedicated servers. The upside here comes in the form of significant savings of time and resources. This article explores some of the key Firebase modules that enable quick and efficient development of Serverless Applications. For the purpose of this article, I have created an example Firebase web application, which I will use to demonstrate the usage of the Firebase SDKs. 

Realtime Database vs Cloud Firestore

Google Firebase has two NoSQL cloud-hosted database offerings that you can choose from – Realtime Database and Cloud Firestore. In both the offerings –

  • Data is synchronized in real-time across all connected clients and across all geo-locations through real-time listeners 
  • Client first SDK (no need for dedicated servers)
  • Offline support for mobile and web 
  • Free tier and then pay for what you use

Advantages of Cloud Firestore over Realtime database 

Structured data Cloud Firestore is a document-model DB, i.e. everything is stored as documents that contain key-value pairs. The values could be anything – strings, integers, floats, lists, binary bits, JSON maps, etc.  These documents are, in turn, grouped into collections. 
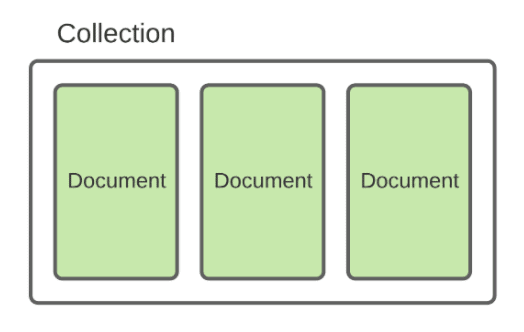
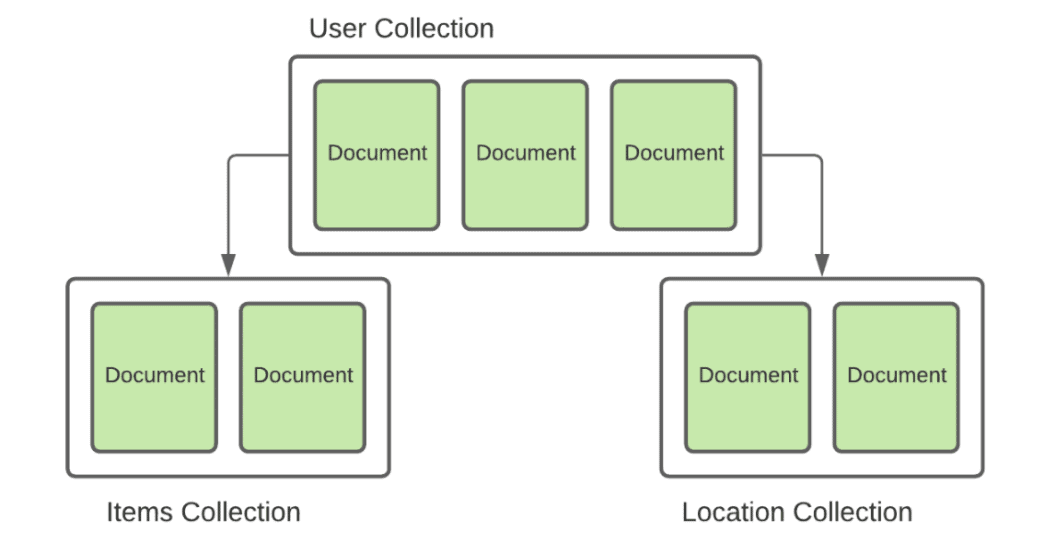
In most cases, an application needs several collections that contain documents which point to subcollections. These subcollections contain documents that in turn point to other nested subcollections and so on. This structure of organizing data in collections of documents is very performant since it allows for shallow queries, i.e. ability to query for a document without having to fetch all the linked subcollections. 
   

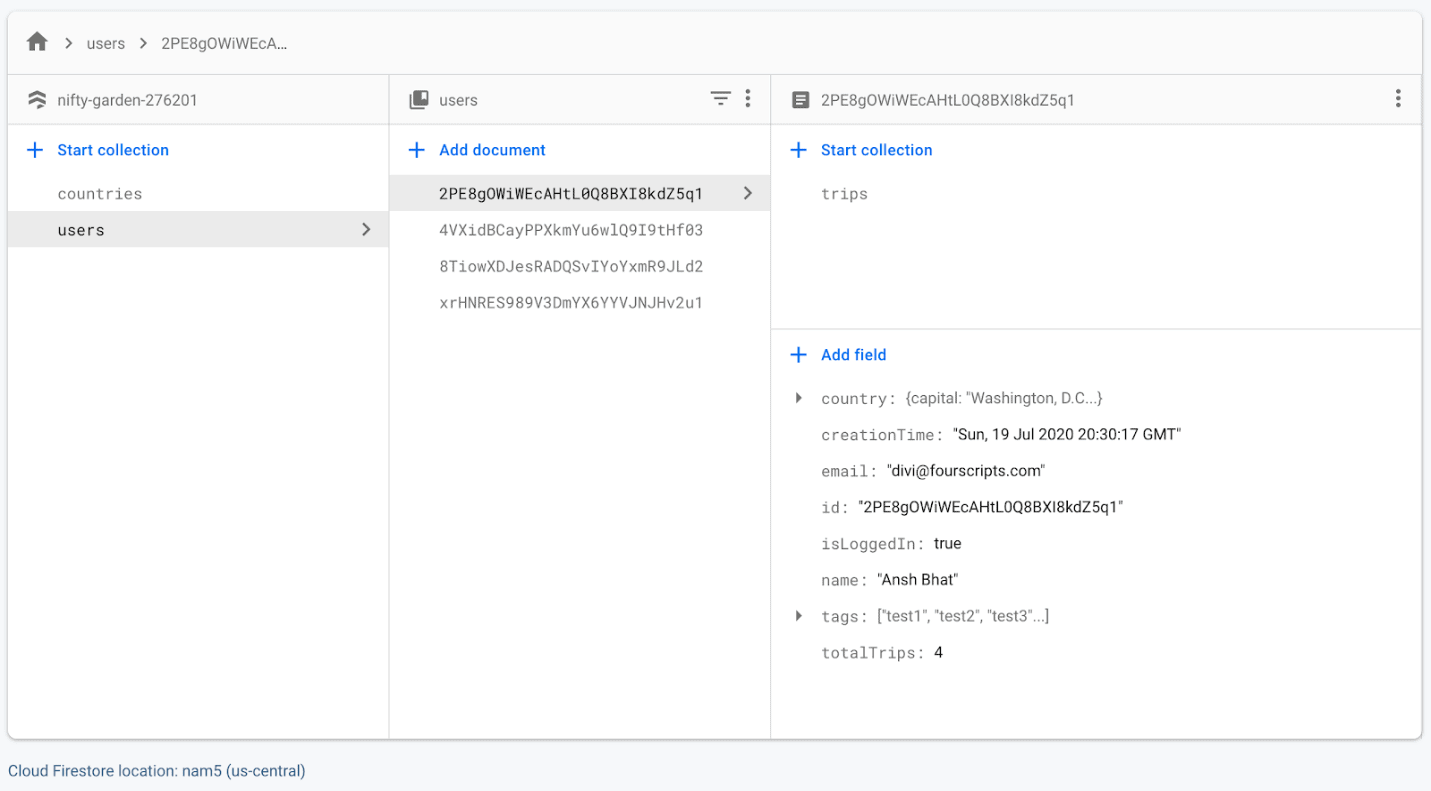
The image below is a Cloud Firestore DB with a users collection with some user documents. Each user document holds a trips collection.
In comparison, Realtime Database is an unstructured giant JSON tree where there are no formal hierarchy structures. If not designed properly, this can result in unnecessary fetching of nested data that may be not needed on the client.  

Better querying – Cloud Firestore also has better querying capabilities than the Realtime Database. Querying across multiple fields is harder to do in the Realtime Database, which usually involves denormalizing your data. With Firestore, querying multiple fields is natively supported without denormalizing your data. 

Built for scale Cloud Firestore is also a better option for applications with high scaling needs. Realtime Database caps at about 200,000 simultaneous client connections, whereas Cloud Firestore will accept up to 1,000,000 concurrent client connections per database. In addition, it has a better SLA of 99.999% uptime in multi-region instances and 99.99% uptime in regional instances vs Realtime Database, which offers 99.95% uptime.

Multi-region support Cloud Firestore supports multi-region locations. Data is replicated and available for use from multiple geo-locations across the world. In comparison, Realtime Database is available in a single region only with extreme low-latency for apps that need to sync their state frequently.

Offline support – Cloud Firestore offers offline support for iOS, Android and web clients, whereas Realtime DB offers offline support for iOS and Android clients only.

Security – In Cloud Firestore rules are non-cascading, and you can combine authorization and validation vs in Realtime DB rules are cascading with separate authorization and validation.
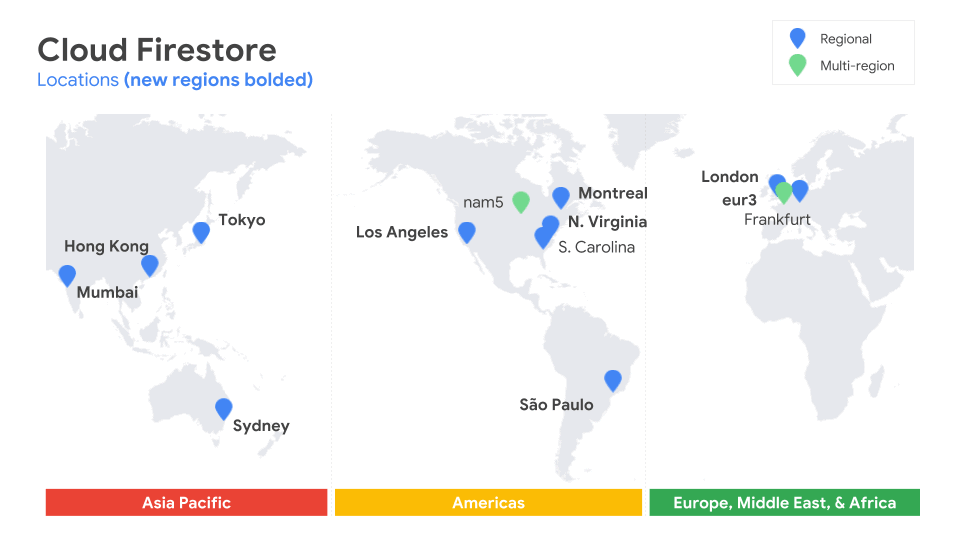
Google Firestore locations

(Source)

These Firebase database offerings are similar to other industry options such as Microsoft Azure Cosmos Database and AWS DynamoDB.

Why you may still want to use Realtime DB 

While Firestore is better in many ways over Realtime DB, there are a few use cases where Realtime DB might be the right option for you –

  • Realtime Database natively supports presence – telling when a user has come online or gone offline. This is also solved in Cloud Firestore, but the solution is not quite as elegant.
  • Based on the pricing models for Firestore and Realtime DB, applications that perform very large numbers of small reads and writes per second per client are better served on Realtime DB.
  • Realtime DB is also marginally better in latency if you have a particular need around low-latency operations (only in NA).

Cloud functions 

While a lot of processing and database CRUD operations can be performed on the frontend, there are some things that should never be done on the client-side. Firebase extends the Serverless paradigm with Cloud Functions which falls under Functions-as-a-Service (FAAS). Cloud functions allow you to perform secure compute operations abstracted from the client app, directly on Google’s cloud infrastructure. They are similar to AWS Lambdas or Azure Functions.

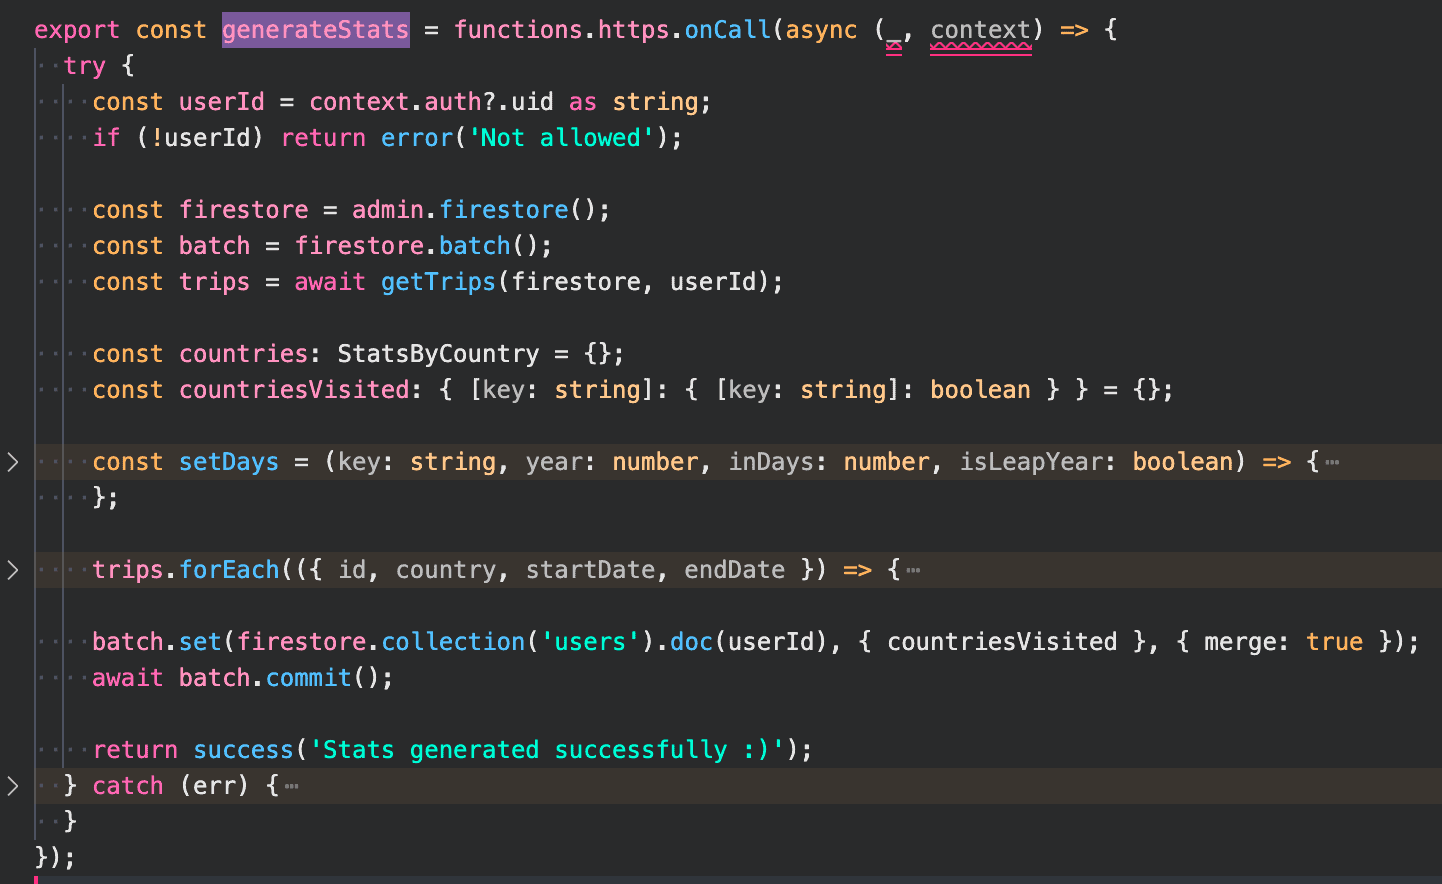
The image below is a cloud function (for this example web application) called generateStats that contains the business logic for my web application. This business logic is compute-heavy and deals with sensitive data which is not suited for the client. Cloud functions come in handy for such use-cases.

Here is the function definition in the codebase.
 

AuthenticationFirebase Authentication provides the following auth methods: 

  • Email/password
  • Phone
  • OAuth 2
    • Google
    • Facebook
    • Twitter
    • Github
  • Anonymous
  • Custom auth

It leverages industry-standard security protocols such as OAuth 2.0 and OpenID connect, making it easy to connect with custom backends. The fastest and easiest way to add authentication to an app is to use FirebaseUI Auth, a drop-in UI library. FirebaseUI implements complete user flows for all of Firebase Authentication’s supported sign-in methods. 

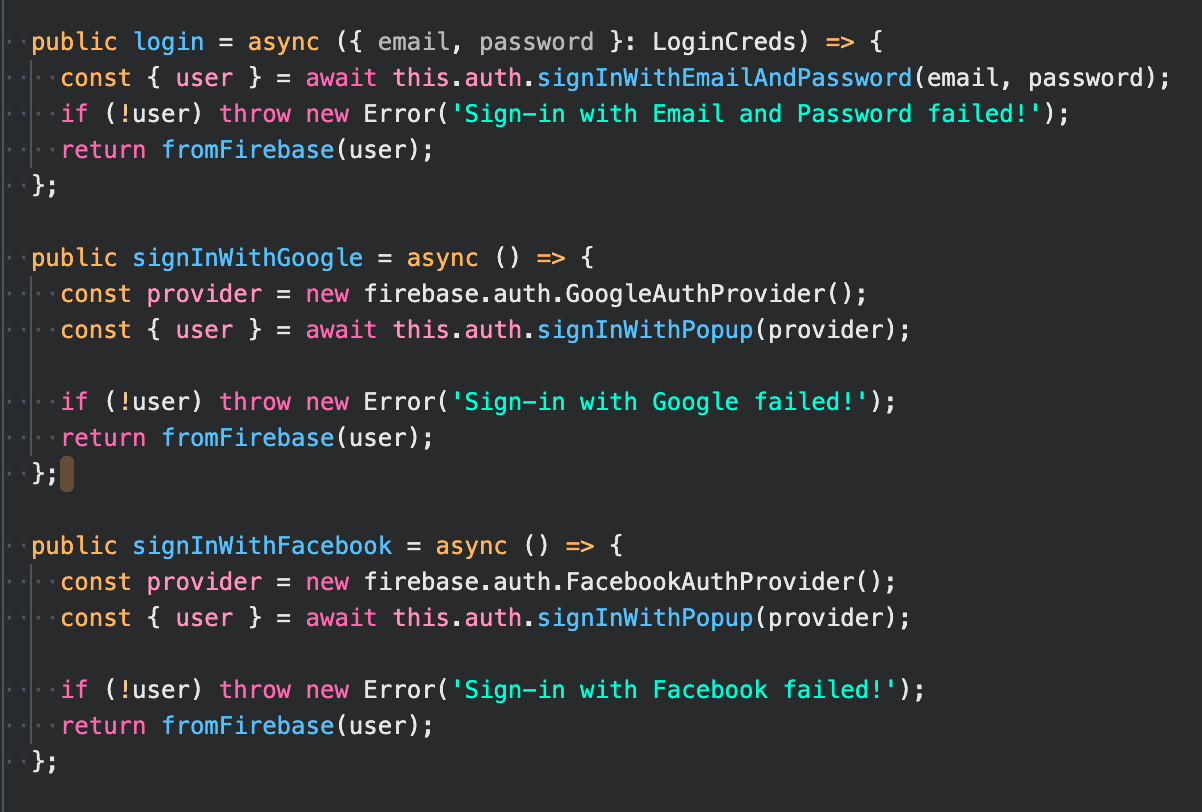
For my example web application, I have chosen Email/password, Google and Facebook as authentication methods. Here’s what the authentication code looks like with Firebase Auth provider SDKs 
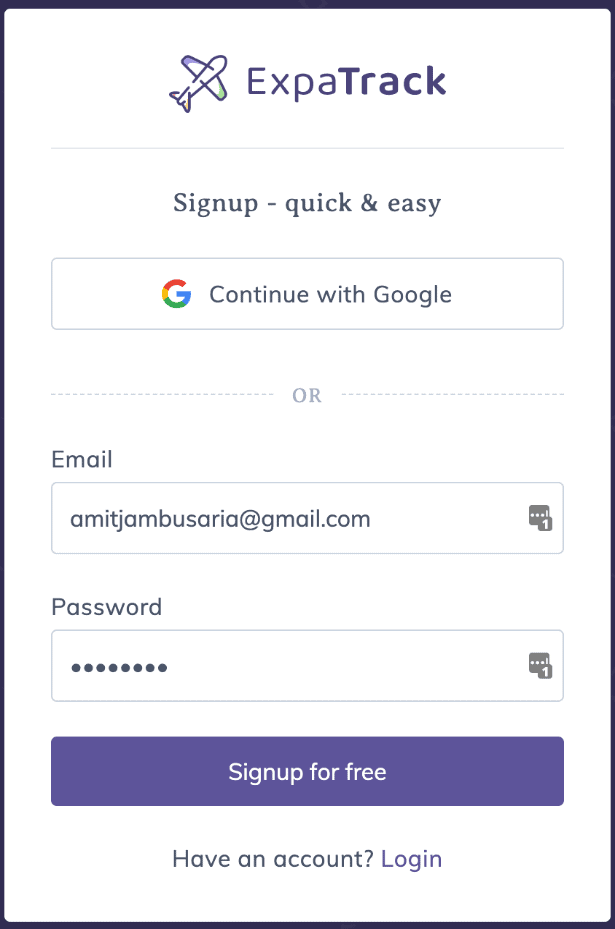
Here is the signup page with Firebase Auth 
Cloud Storage – Most applications have file storage requirements. Firebase provides Cloud Storage SDKs to manage uploads and downloads for user-generated content such as documents, images, audio, video, etc. Cloud Storage is one of the best options for file storage, considering it provides robust operations regardless of network quality, a simple, intuitive authentication model and is built of exponential scaling needs.

Key capabilities of Cloud Storage are as follows – 

  • Cloud Storage integrates seamlessly with Firebase Authentication to provide an easy to use, seamless authentication engine. The SDK provides a declarative security language to control access based on the file name, size, content-type or other metadata
  • Cloud Storage stores the files on Google Cloud Storage bucket which makes it accessible to Firebase SDKs for file upload / download from mobile clients; as well as access to Google Cloud for server-side processing
  • Firebase SDKs for Cloud Storage operations are very robust and can perform I/O operations regardless of network quality. 
  • It is also built for scale with up to an exabyte of storage if your app goes viral.

Here is an example usage of Cloud Storage. 
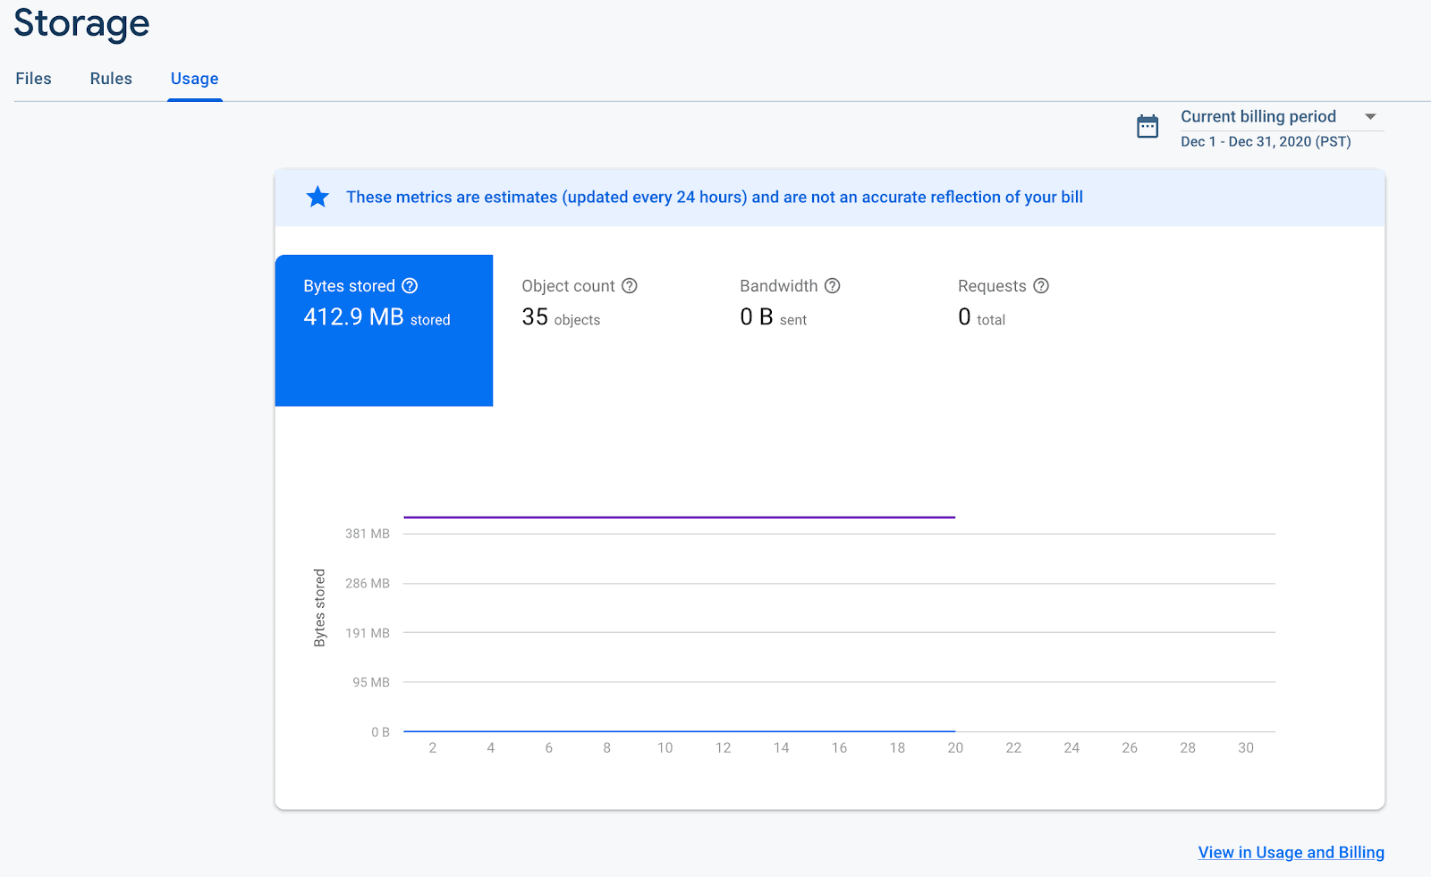
To incorporate Cloud Storage in web application

  1. Go to Firebase console → Storage dashboard  
  2. Click the Files tab → header of the file viewer.
  3. Copy the URL to your clipboard
  4. To your firebaseConfig object in your app, add the storageBucket attribute with your bucket URL:
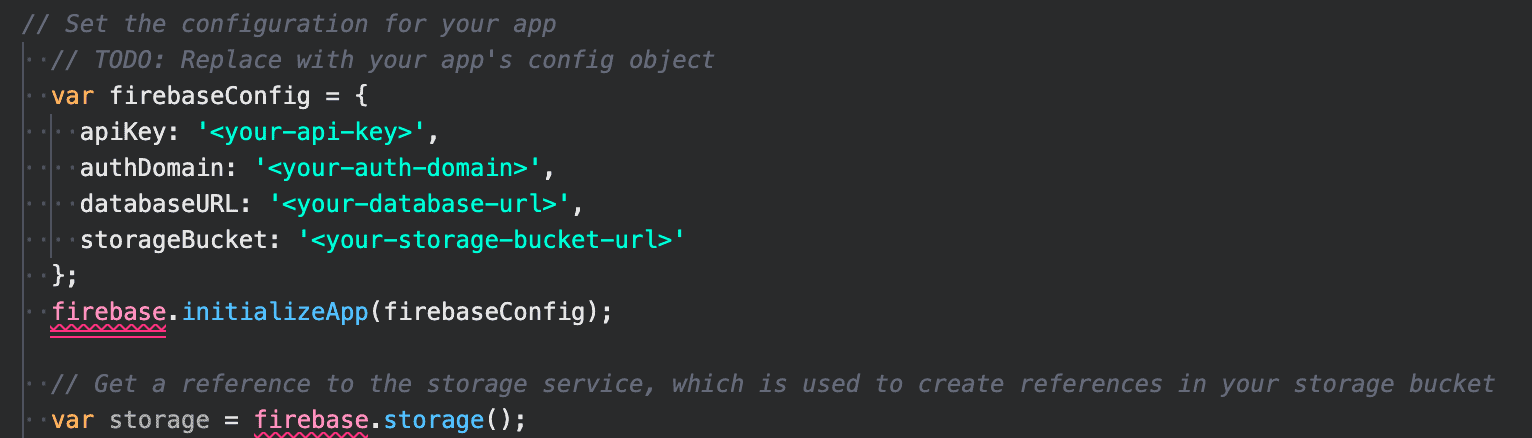
Hosting – Static and dynamic content hosting needs can be met with Firebase Hosting. Whether it’s HTML markup, CSS or Microservices in JS, all kinds of content hosting can be deployed to global CDN (represented below). Zero-config SSL and SSD caches and efficient compression techniques ensure that content is delivered swiftly and securely.

(Source)

Advantages of Firebase Hosting

  • Fast delivery of content – Each file (whether HTML, css or js) is cached on SSDs at CDN edges around the globe, served as compressed gzip or Brotli.
  • Built-in secure connections – SSL comes out of the box with Firebase hosting with zero configuration overhead for the application developer. 
  • Preview changes before deployment – Firebase hosting also allows you to view and test your changes on a locally hosted URL and interact with an emulated backend.
  • Faster deploys with one command – With the Firebase CLI, you can get the app deployed and running within seconds. One-click rollbacks are also supported.
  • View changes in an emulator before they go live. You can also set up a temporary preview URL along with GitHub integration for easier CI/CD development.
  • Firebase Hosting can also serve Dynamic content and host microservices (through Cloud Run) as well as Cloud Functions. All content served over HTTPS.

Hosting has a maximum limit of 2Gb for individual files, and Storage is free up to 10Gb. Larger files should be stored on Google Cloud Storage where the individual file limit is up to a terabyte. To control your usage, you can even set limits for your releases and delete targeted releases.

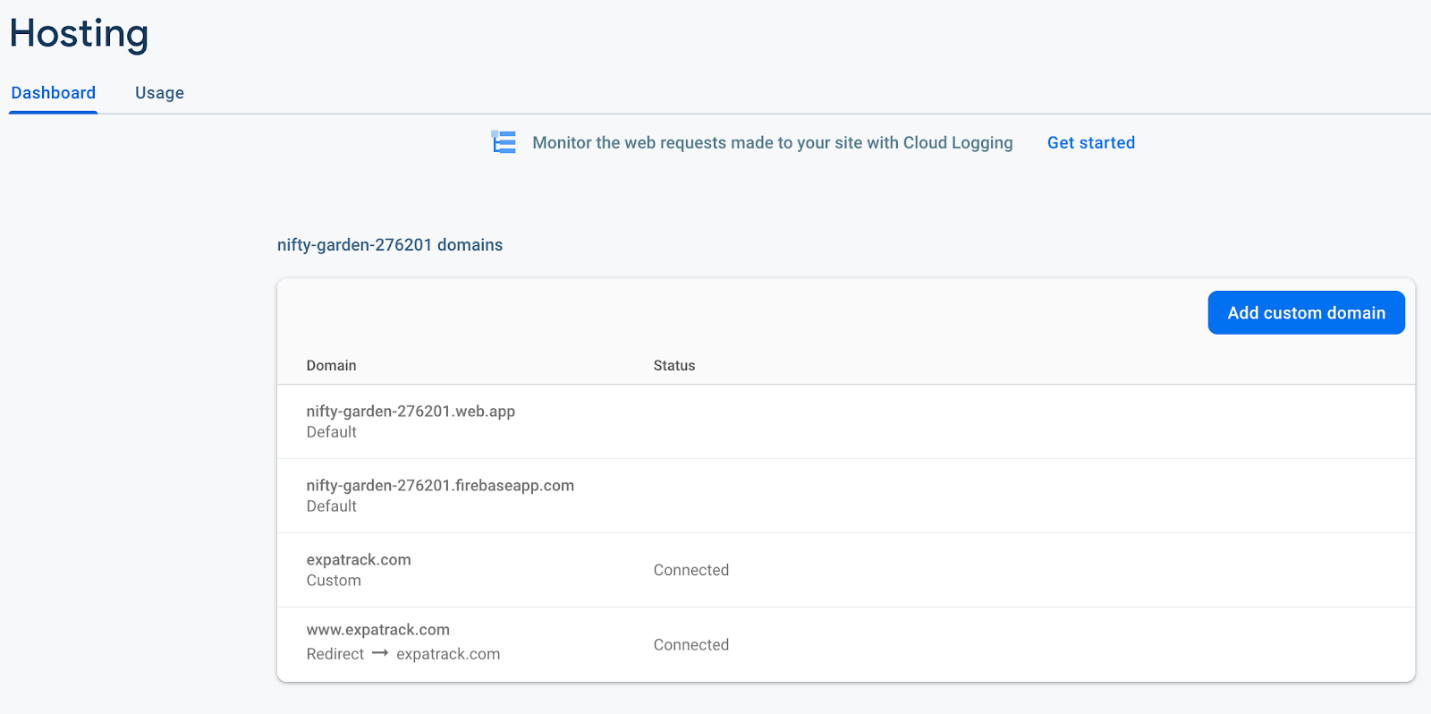
The image below is the example web application being served from Firebase hosting.
Cloud messaging 

Firebase Cloud messaging (previously known as Google Cloud Messaging) is used for iOS and Android notifications and notifications that show up in the corner of your browser. These notifications are really useful when it comes to improving and retaining user engagement. Cloud Messaging can also be used for IM use-cases, where it can transfer up to 4kb of payload to the client app.

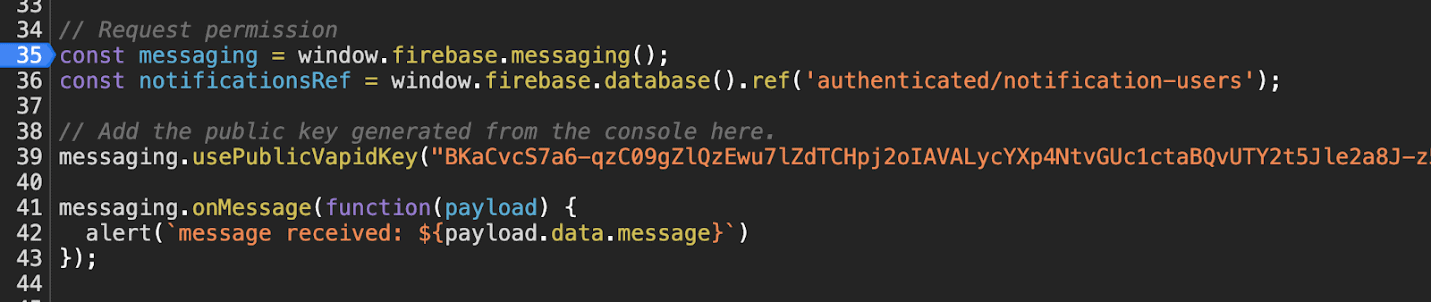
An FCM module consists of two primary components for sending and receiving: Send messages via Cloud Functions or from your own server application; and Receive messages via a service worker on web iOS or Android client app using the platforms transport service. The FCM SDK is only supported over HTTPS due to its use of service workers. The image below is the boilerplate for Cloud Messaging on the example application-
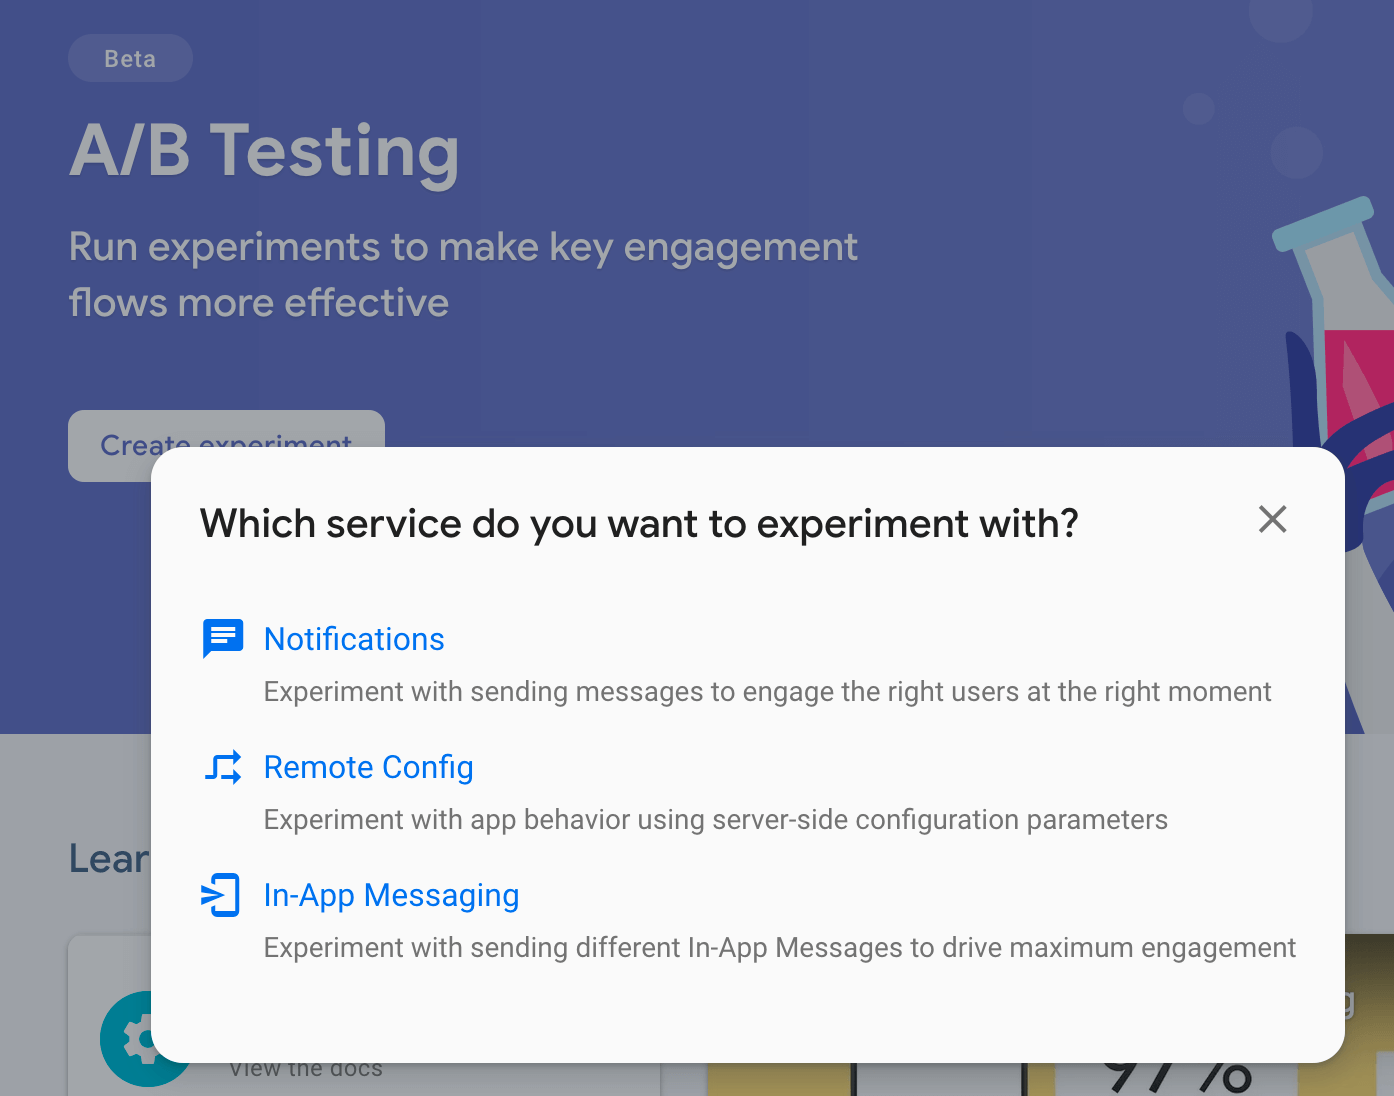
A/B testing – A/B testing refers to an experiment where two or more variants of a page, feature or workflow are served to end-users at random. Statistical analysis is used to determine which variation performs better towards a given objective such as conversion rate, page views or user engagement. Firebase A/B testing module allows you to test your application’s UI and provides a data-driven approach to discover a “winner” between control and one or more variations. It even lets you perform multivariate and multi-page testing towards improving overall KPIs.

Types of A/B tests supported by Firebase
Analytics – Using the Firebase SDK, you can get unlimited reporting for 500 distinct events on Google Analytics, which lets you make informed decisions for your product. This dataset can easily be linked to Google BigQuery, which lets you perform further analysis and provides comprehensive reporting tools via Google Data Studio. There is also an out of the box dashboard on the Firebase console that provides a high-level summary of data points such as active users, demographics, geo-locations, etc.
Google Firebase for Serverless Front-end Applications

I discussed some of the key Firebase modules in this article. The entire Firebase offering is divided into three categories as follows – 


  • Build – Get to market and deliver value to your users, faster
    • Authentication
    • Cloud Firestore DB
    • Realtime DB
    • Cloud Storage
    • Hosting
    • Cloud Functions
    • Machine Learning
  • Release and Monitor To improve app quality in less time with less effort
    • Google Analytics
    • Performance Monitoring
    • Test Lab
    • App Distribution
    • Crashlytics
  • Engage – For optimizing your app experience and keep users happy
    • A/B Testing
    • Cloud Messaging
    • Crashlytics
    • Dynamic Links
    • In-app Messaging
    • Predictions
    • AdMob
    • Remote Config

These products together make for a powerful suite of app dev tools that can significantly improve your speed to market and reduce overall operating costs while enabling critical insights towards improving your customers’ online experiences.


The post Google Firebase for serverless front-end applications appeared first on Simple Talk.


from Simple Talk https://ift.tt/3p3xTjG
via

Search SQL Server error log files

Each instance of SQL Server logs information about its processing to a file known as the error log. Depending on how long an instance has been up and what is being logged, the log files might be small or large. When the log files are small, they are fairly easy to browse using SQL Server Management Studio (SSMS). But when they are large, it is cumbersome to browse through them to find individual error log messages using SSMS. There are even times when the error log file is so large it can’t even be opened up using SSMS. This article will show you a few different ways to browse and search SQL Server error log files.

Using SSMS to search and filter large SQL Server error log files

When browsing a large error log file with SSMS, it can take a long time just to scroll through the file to find the portion of the log that you might be interested in reviewing. I find it easier to use the search and filter options to find the information in large error log files. I’ll demonstrate how to use these options to find information in large error log files.

Using the search option

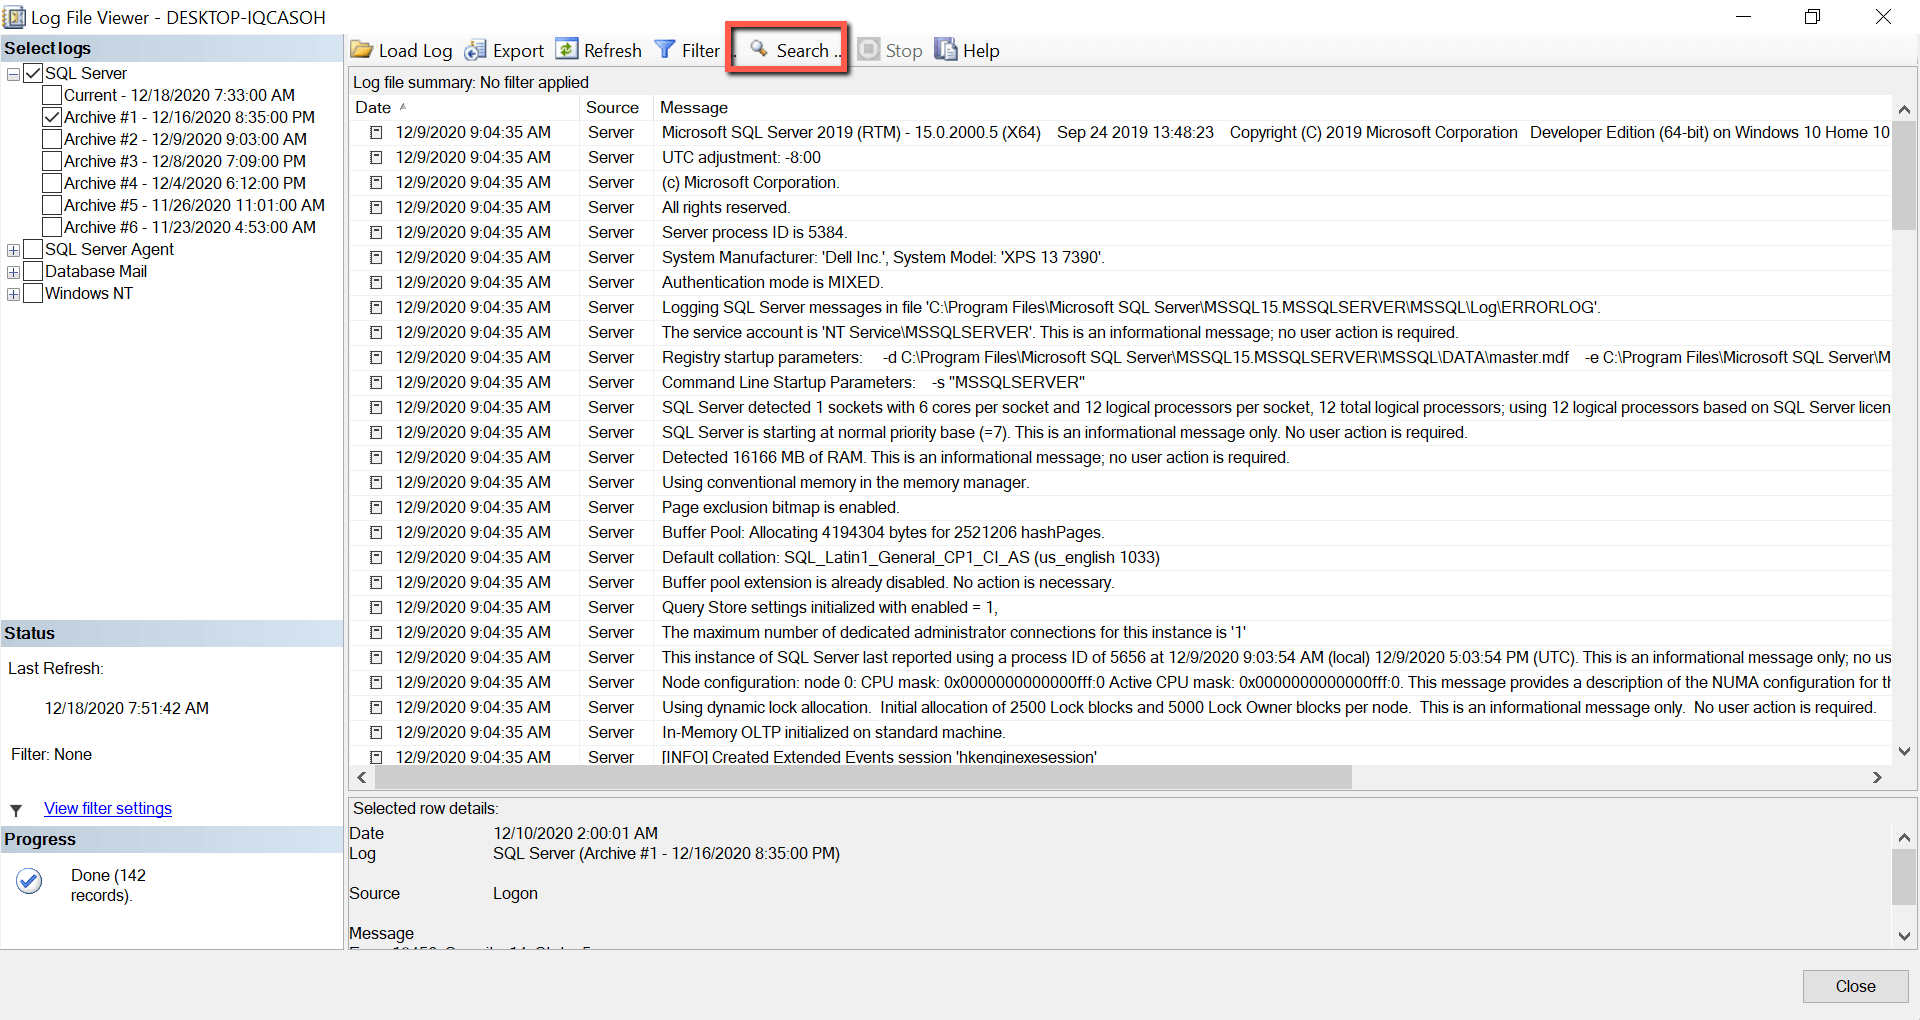
The search option is useful for finding the next occurrence of a string of characters in the log. To search, you can just browse through one of the archived log files, as shown in Figure 1.

Browsing my error log file to search SQL Server error log files

Figure 1: Browsing my error log file

Figure 1 shows the beginning of the error log file, and the entries are sorted by the date/time from the oldest to the newest. You can see the Search function outlined by a red box at the top of the screenshot. To use the search function, just click on this search icon, which brings up the search dialog shown in Figure 2.

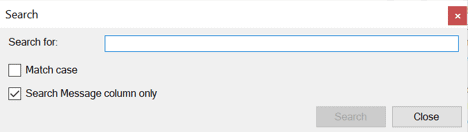
Search selection dialog

Figure 2: Search selection dialog

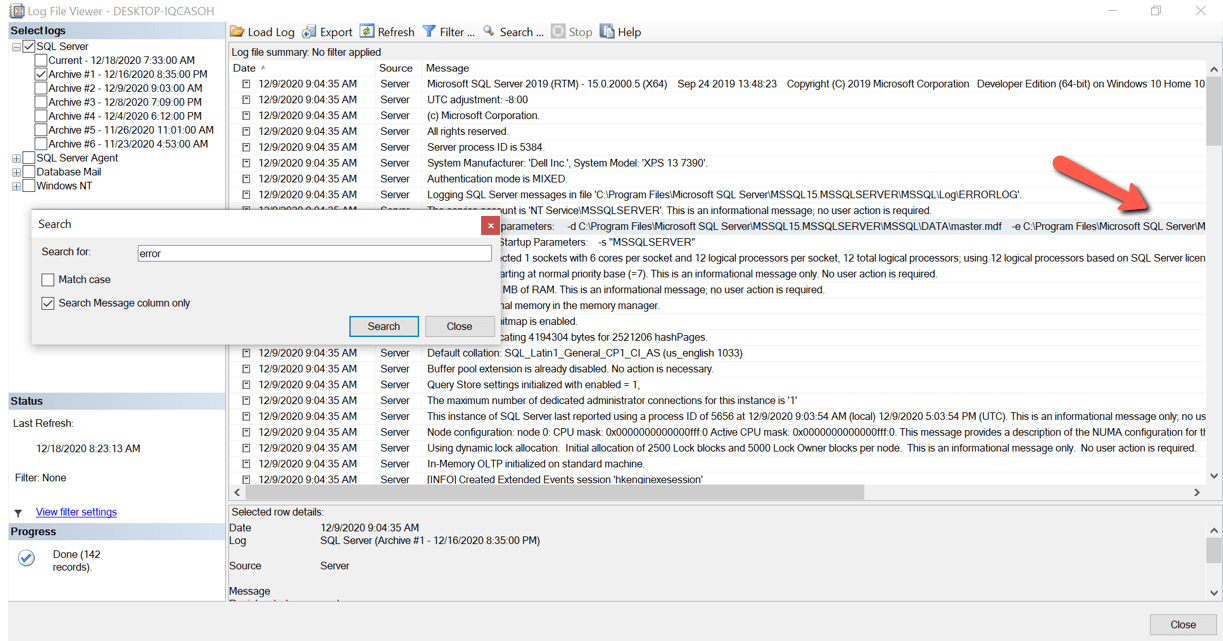
To search, just enter the string of characters you want to find in the Search for: field. The characters can be case-insensitive or case-sensitive based on whether the Match case check box is checked. You can also search just the Message column or all the columns depending on if the Search Message column only box is checked. When an error log file spans many days, you could uncheck this checkbox to search for a particular date/time string in the log. By doing this, the error log can be reposition to display a specific day in the log in a log file that contains multiple days.

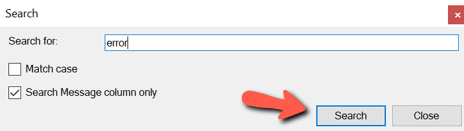
For this demonstration, enter the string error in the Search for: criteria. Once the search criteria are filled in, the Search button is enabled, as shown in Figure 3.

Enabling search button search SQL Server error log files

Figure 3: Enabling Search Button

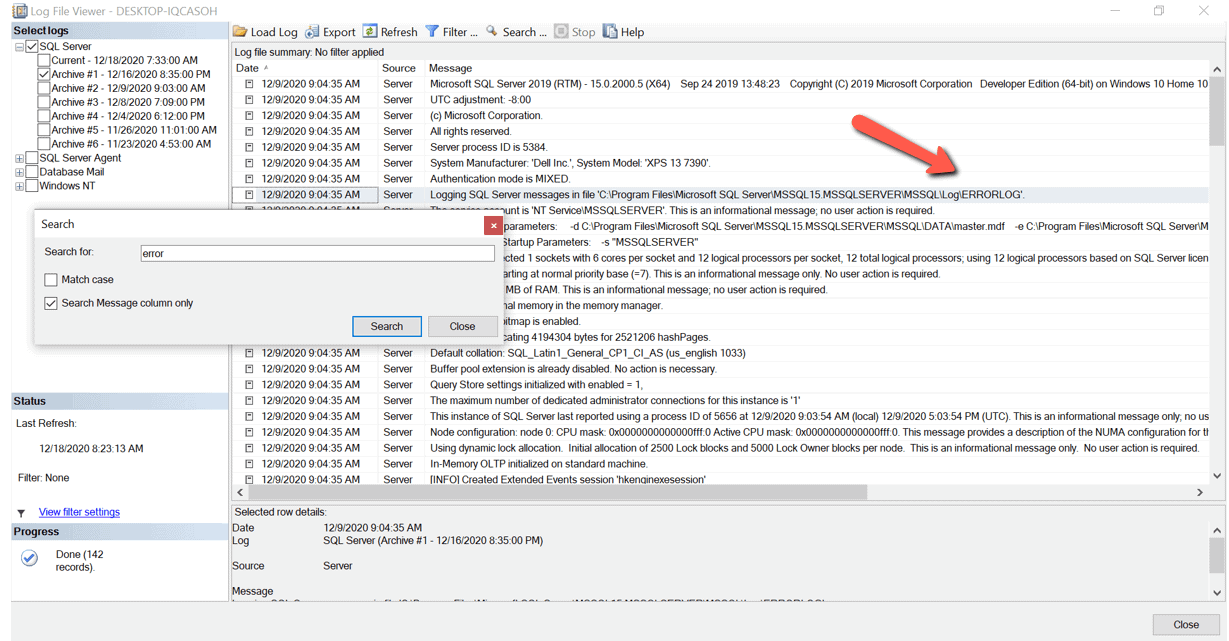
When clicking the Search button, the error log position is relocated to the first occurrence of the string error, as shown in Figure 4.

Repositioned to first occurrence of the string

Figure 4: Repositioned to first occurrence of the string

Click the Search button again to move to the next message text that contains the string error, as shown in Figure 5.

Next occurrence of the string error

Figure 5: Next occurrence of the string “error”

By reviewing Figure 5, you can see the search function found the string error just a few lines down further in the log (the actual string error is located out of view to the right). By clicking the search button repeatedly, you can progressively work through the large error log file finding all the messages that contain the string error. Once the last message is found, the search will start over from the top if you click the button again.

Using the search button repeatedly could be a little tedious, especially if the log file contains many messages with string error. Another way to find all the messages without clicking and scrolling is to use the filter option.

Using the Filter Option

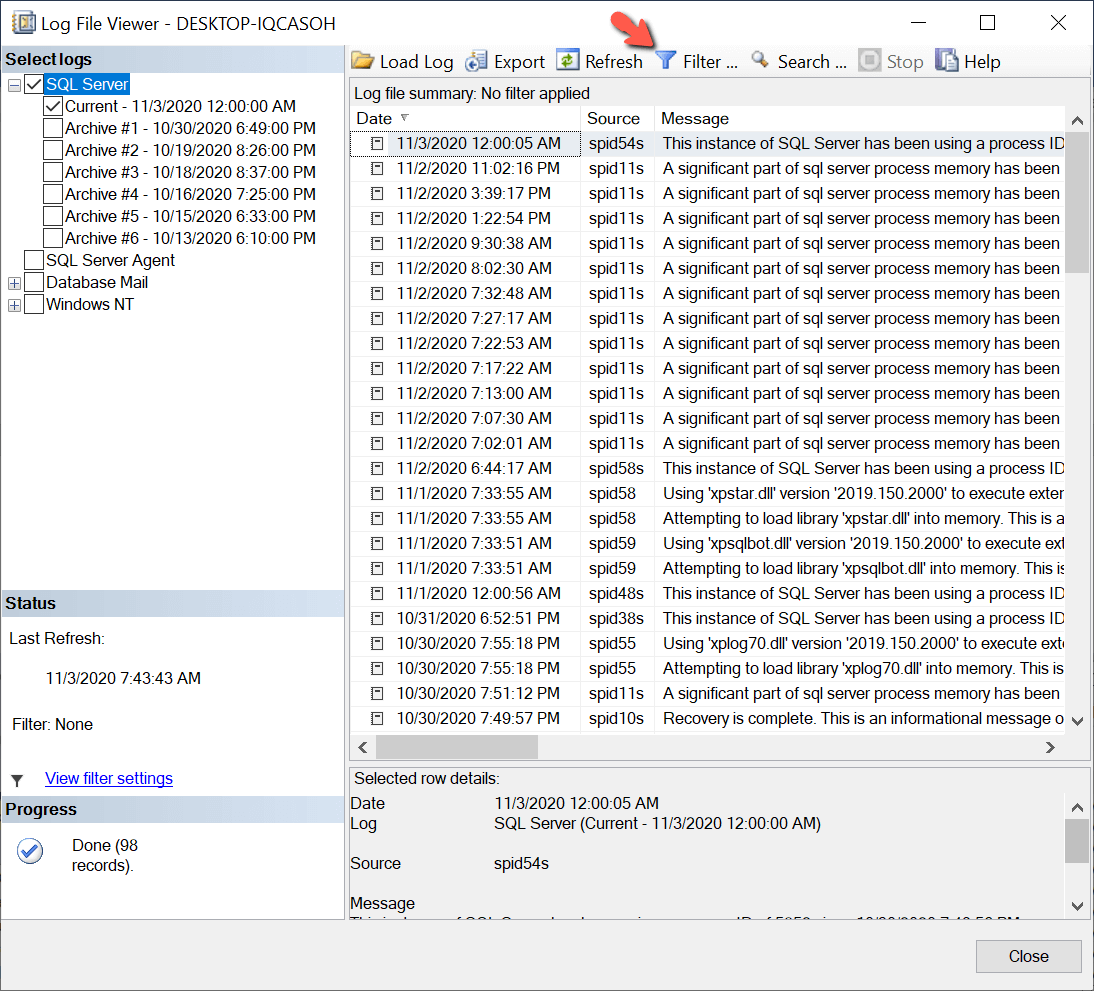
The filter option makes it a little easier to find all the occurrences of a string in the error log file. It does this by sifting through a large error log file and only displaying those rows that meet the filter criteria. Filtering is handy when you want to view specific log entries in a very large log file. To bring up the filter criteria, you need to click on the Filter options in the Log File Viewer window, as shown in Figure 6.

Selecting the filter option

Figure 6: Selecting the Filter Option

When the filter option is clicked, the dialog box in Figure 7 is shown.

Filter options

Figure 7: Filter Options

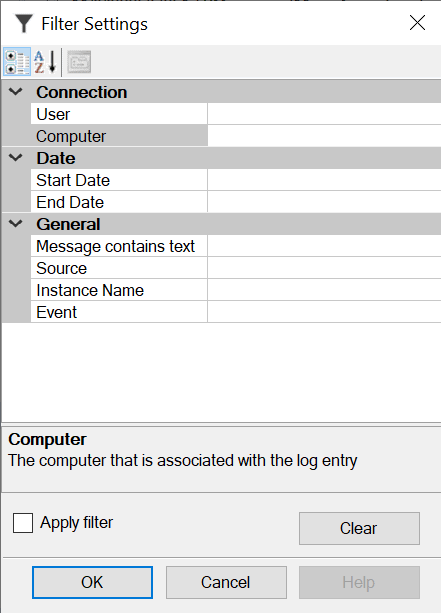
As you can see from Figure 7, there are several different filter selection options from which to choose. You can use one, or more of these filter options to identify those error log records you want to display. Table 1 lists the descriptions for each of these different filter options.

Table 1: Descriptions for each filter option

Filter Name

Description

User

The user name that is associated with the log entry

Computer

The computer that is associated with the log entry

Start Date

Log entry must be created on or after this date

End Date

Log entry must be created on or before this date

Message contains text

Log entry message must contain this text (case-insensitive)

Source

The source of the log entry

Instance Name

The instance Name that is associated with the log entry

Event

The event id that is associated with the windows log entry

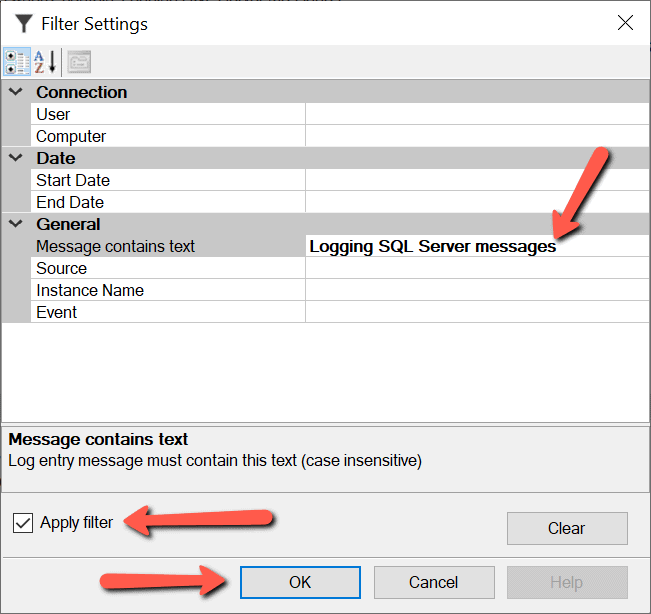
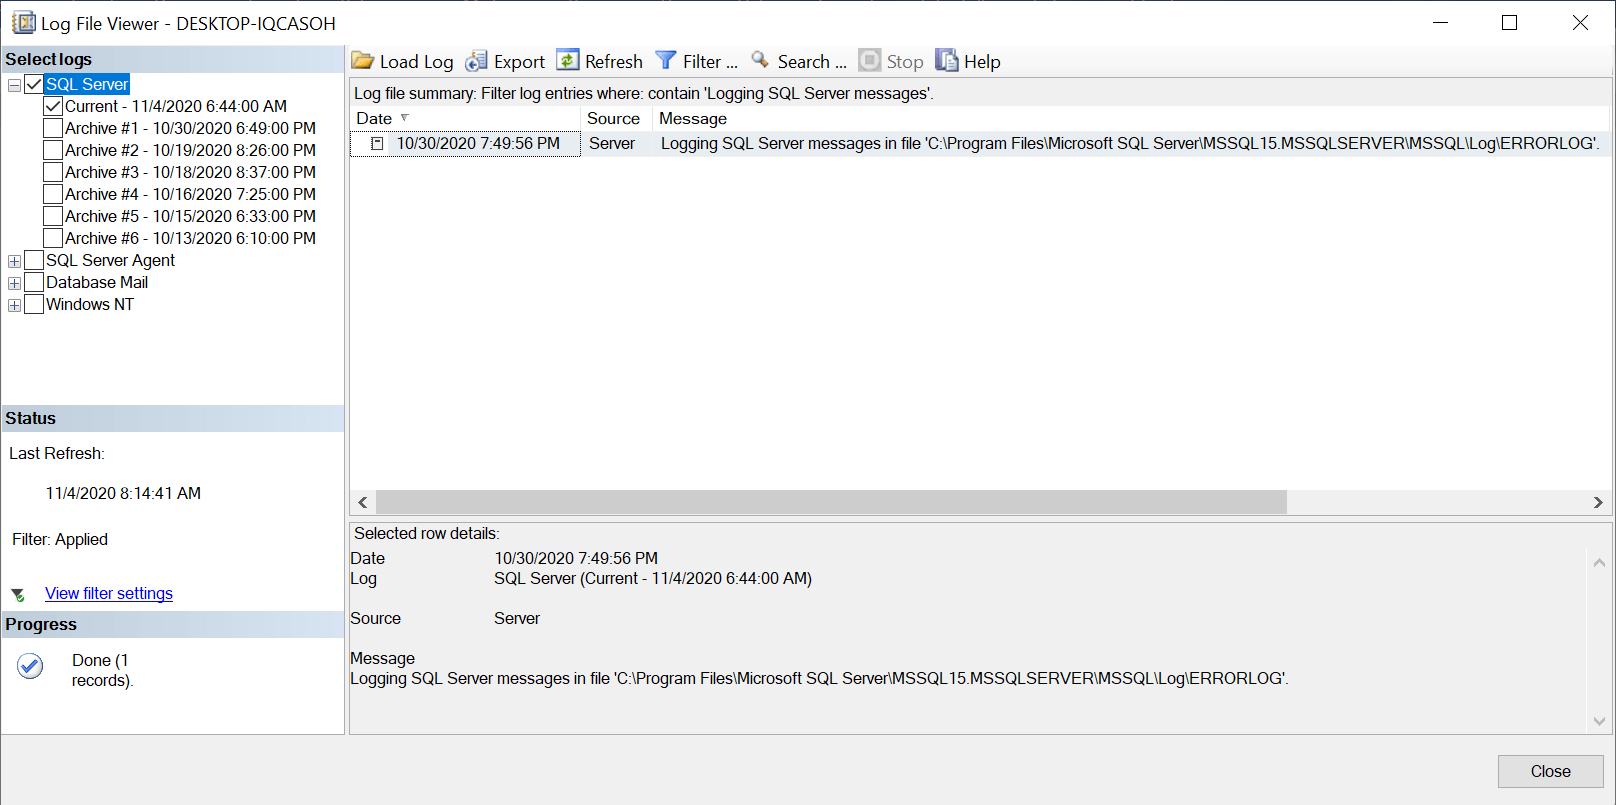
To demonstrate how to use the filter dialog to find specific error logs, first try to find the ERRORLOG file directory name using the Message contains text filter item. The error log directory name is displayed on an error log line item that contains the string Logging SQL Server messages in the message text. Therefore, all you need to do is enter this string in the Message contains text filter item, check the Apply filter checkbox, and then click on the OK button, as shown in Figure 8.

Applying filter

Figure 8: Applying Filter

After clicking the OK button, only the error log lines that contain the text are displayed, as shown in Figure 9. If the Apply Filter checkbox is not checked, before clicking on the OK button, the filter won’t be applied.

Figure 9: Results of message text filter

Using the filter item is especially useful for finding those messages that are hidden amongst all the messages you are not interested in. I also find using the Start Date and End Date filters extremely useful to find log entries for a specific date range. The date range filter is handy when the error log file is very large and contains multiple days of error log records.

Out of memory errors when viewing large logs

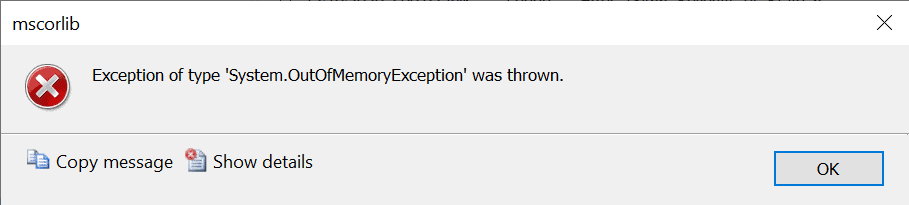
If SQL Server has been up for a while and the error log has not been cycled, or a lot of messages have been written to the log file over a short time, then the error log might be very large — possibly in the gigabyte size range. If you try to open one of these gigabyte log files using SSMS, a memory exception will occur. Figure 10 shows the out of memory exception that can occur when opening one of the large error log files.

Figure 10: Out of memory exception when trying to view a large error log file

I got this error when I tried to open one of my large, archived log files that was over 8 GB in size. When this error occurred, some of my log records were loaded into the viewer. I could still use the search option, but I got another memory exception when I tried to use the filter option.

If you are trying to use the SSMS to view large log files and having memory issues, this doesn’t mean you are out of luck. There are other options to view, search and filter these large log files.

Using a text editor to view a large log file

One option to view a large log file is to use a text editor. But it can’t just be any text editor; it needs to be a text editor that can read a large file. I have downloaded and used UltraEdit in the past to open large error log files. I’m not endorsing UltraEdit; I only mention it here because it is one of the editors I have used in the past to look at large log files. Keep in mind that UltraEdit is not free software; you need to have a license to use this product long-term. Before you consider downloading any text editor off the internet, make sure you understand the software’s uses and license requirements being downloaded.

Programmatically searching the error log file

Another option for searching those larger log files is to do it programmatically. SQL Server provides an undocumented extended stored procedure named xp_readerrorlog that can be used to search the error log and the SQL Agent log files.

Listing 1 is an example of how I used this undocumented stored procedure to search the active error log file on one of my instances of SQL Server.

Listing 1: Using xp_readerrorlog to find the location of error log file

exec xp_readerrorlog 0,1,N'Logging SQL Server messages in file';

This example searches for the string Logging SQL Server messages in file in the active log file. The output shown in Figure 11 is returned when running the command.

Figure 11: Output from running code in Listing 1

The log record that identified the file location where the error log messages are being written can be found by searching for this particular string in the active log file.

Even though this stored procedure is undocumented, there are many resources out there that explain how to use it. This stored procedure supports seven parameters. Those parameters are described in Table 2.

Table 2: Parameters for xp_readerrorlog

Parameter

Description

1

Identifies the error log file that you would like to read.  Set this parm to 0 if you’d like to read the current error log.  Or you can set it to either 1, 2, 3, etc. to read one of the historical error log files.

2

Identifies which error log to search.  1, or null for ERRORLOG, or 2 for the SQL Agent log

3

The first string you want to search for in the error log file.

4

The second string you want to search for in the error log file.

5

The start time constraint on searching.

6

The end time constraint on searching. 

7

Sort order of the output (ascending, descending)

Finding all the records in a large log file that contained the word error can easily be done by just changing the search string in parameter 3 of the code in Listing 1. You can write a short T-SQL script to find all the log records from the active SQL Server log file for yesterday and then place them in a temporary table for further analysis using the code in Listing 2.

-- Declare Variables needed
DECLARE @StartDate date,
        @EndDate   date;
-- Create temporary table to how error log records
CREATE TABLE #ErrorLogForYesterday (
  LogDate datetime, 
  ProcessInfo varchar(max), 
  Text varchar(max));
SET @StartDate = dateadd(dd,-1,getdate()); -- Yesterdays Date
Set @EndDate = getdate(); -- Todays Date
-- Extract error log records for yesterday in to temporary table 
INSERT INTO #ErrorLogForYesterday EXEC xp_readerrorlog 
            0,1,N'',N'',@StartDate,@EndDate;
-- Display error log records extracted
SELECT * FROM #ErrorLogForYesterday;
-- Cleanup
DROP TABLE #ErrorLogForYesterday;

Listing 2: Code to extract yesterday’s error log records

Programmatically finding error log records makes it easy to build processes to analyze the error log file. Using the method in Listing 2, a DBA could create a series of scripts that could programmatically run the xp_readerrorlog stored procedure to quickly analyze the different error log files.

Reading and Searching SQL Server Error Log Files

When SQL Server creates large error log files, it presents challenges for DBAs to read them. Large log files are cumbersome to scroll through to find errors. Luckily, the log view functionality of SSMS has the Filter and Search features built-in to allow a DBA to find strings within these large log files quickly. Additionally, using TSQL code to call the undocumented xp_readerrorlog stored procedure, allows a DBA to build scripts to read those large log files. Using these different methods to find errors in large SQL Server log files is critical for managing and maintaining SQL Server.

If you like this article, you might also like SQL Server Error Log Configuration – Simple Talk (red-gate.com)

The post Search SQL Server error log files appeared first on Simple Talk.


from Simple Talk https://ift.tt/3irgPBG
via

Tuesday, January 19, 2021

How to use Unity’s Remote Config

Imagine you’ve spent much time, possibly years, into crafting your Unity app. The app then gets published, the launch is smooth, everything’s good. However, then some time passes, and you want to modify some small item in your app. Maybe it’s a game, and you want to change the base health of an enemy type, or it’s a business app, and you want to notify users of a handy new feature. One might expect the developer to open up their Unity project, whether at home or at a work PC, make the necessary tweaks, and push these changes to their app. However, suppose instead you’re out of town, away from your work PC, and the changes required need to happen as soon as possible. What do you do? One option available is Unity’s Remote Config, a feature that lets you make changes to an app from anywhere in the world so long as you have a web browser and can open your Unity Dashboard.

Unity’s Remote Config lets you change your app remotely and in real-time. It’s especially useful for fine-tuning your software attributes without needing to redeploy it with every change. You can also use Remote Config for live events by enabling holiday themed content or to unlock a previously created feature. Note that Remote Config is not meant to be used for creating entirely new content for your app, but rather modifying or unlocking what is already in the app. While actively developing the application, Remote Config can be used to iterate on the program without needing to modify the code itself. To demonstrate this feature, a simple project will be put together that allows you to change a bool, string, int, and even JSON data from within the Unity Dashboard. Changes made in the dashboard will then be reflected within the app itself.

Project Setup

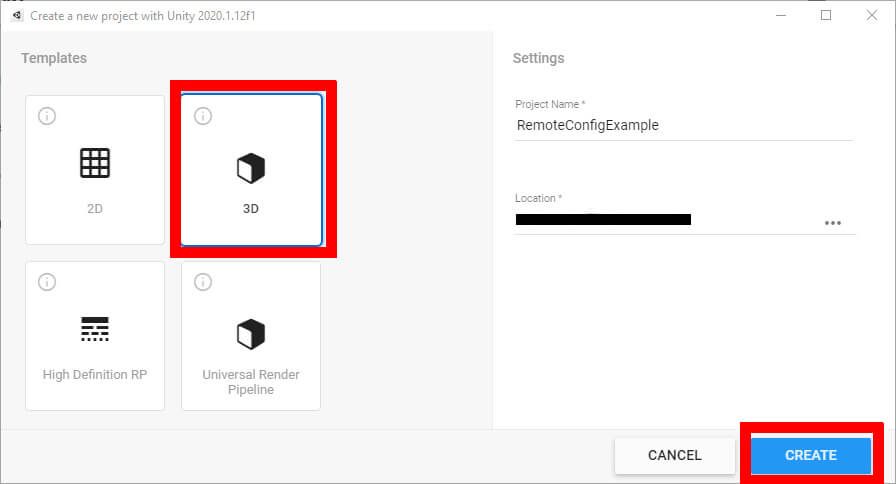
This example assumes that Unity 2020 will be used for the project. However, the 2019 version will work just as well. Select the default 3D template, give your project a name, and set its location. Then click the Create button.

Creating a new project.Figure 1: Creating a new project

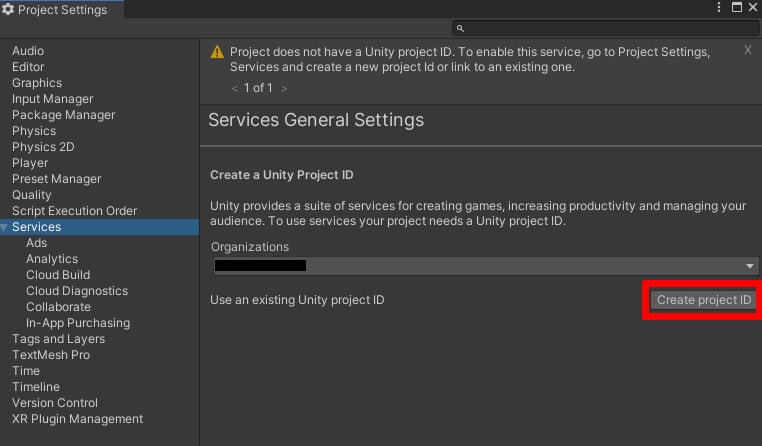
To utilize Unity’s Remote Config, you must set up Unity services and acquire a project ID. To do this, navigate to the Edit top menu and select Project Settings. From there, select the Services option. Please note that you may need to create a Unity account and log into it at this point. You’ll then be asked to select an organization. Once you do, you may then click the Create project ID button. Unity will then automatically assign your project an ID.

Setting up Unity Services

Figure 2: Setting up Unity Services

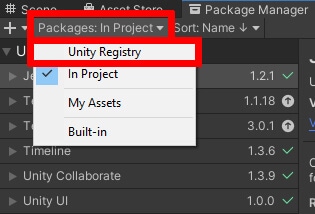
Next, you need to install the Remote Config package from Unity. Doing this requires navigating to the Package Manager, which is found in the top menu under Window->Package Manager. At first, the Package Manager will only show the packages currently installed in your project. To view all available packages, select the dropdown that currently shows Packages: In Project and choose Unity Registry.

Accessing packages in the Unity Registry

Figure 3: Accessing packages in the Unity Registry

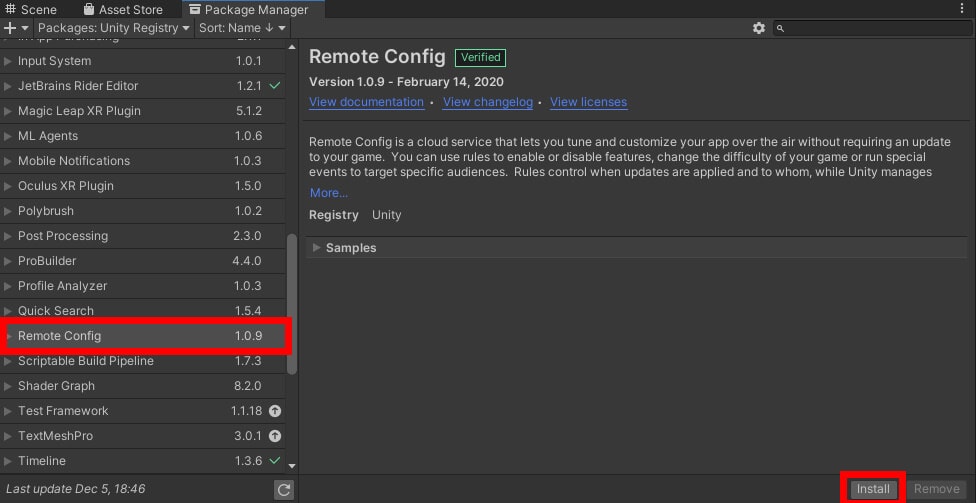
Scroll down until you find Remote Config, then click the Install button to add Remote Config to your project.

Installing the Remote Config packageFigure 4: Installing the Remote Config package
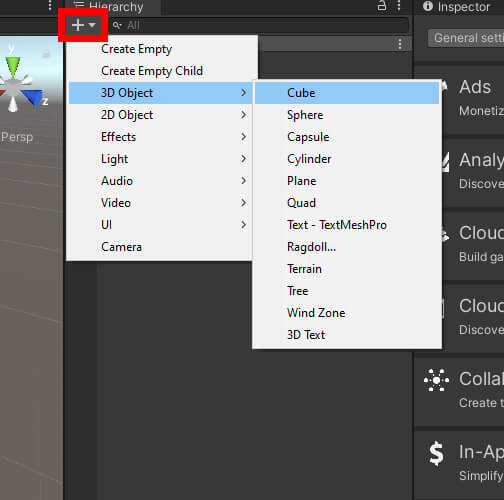
To better see the effects of Remote Config, you’ll need a small handful of objects to change within your app. Start by creating a simple cube by going to the Hierarchy window and selecting the + button, then choosing 3D Object->Cube.

Creating a new object

Figure 5: Creating a new object

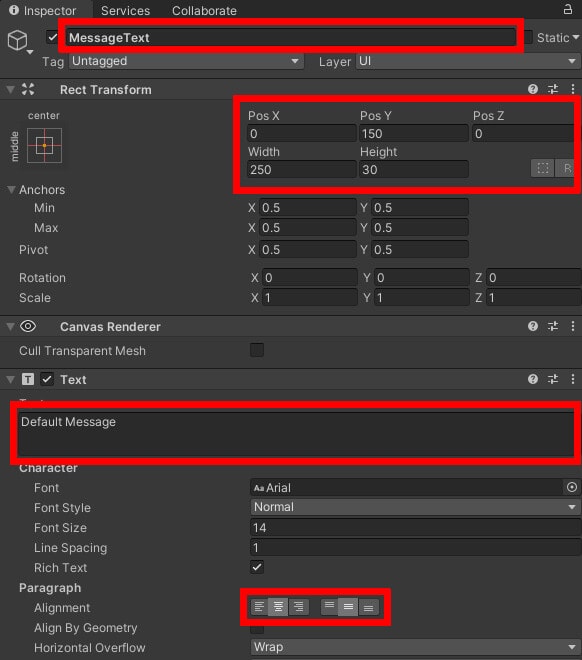
By default, the object should be placed with location coordinates of 0, 0, 0 with no rotation and a scale of one. You can leave this object as is, but if you want or need to change it, go into the Inspector window and change the values seen in the Transform component. Right after that, using the same object creation menu, create a UI with text. Set its position to be 0, 150 and give it a width of 250. It also looks nice to give the text center alignment and some default text. Finally, give it a unique name to help identify it easier.

Giving object a name, setting position and size, creating default text, and alignment

Figure 6: Giving object a name, setting position and size, creating default text, and alignment

Duplicate this text with Ctrl + D and move the copy a little lower down (this example changed the Y position to 100). This text will display a lucky number, which it will get from the Remote Config server. Change the object’s name and default text accordingly.

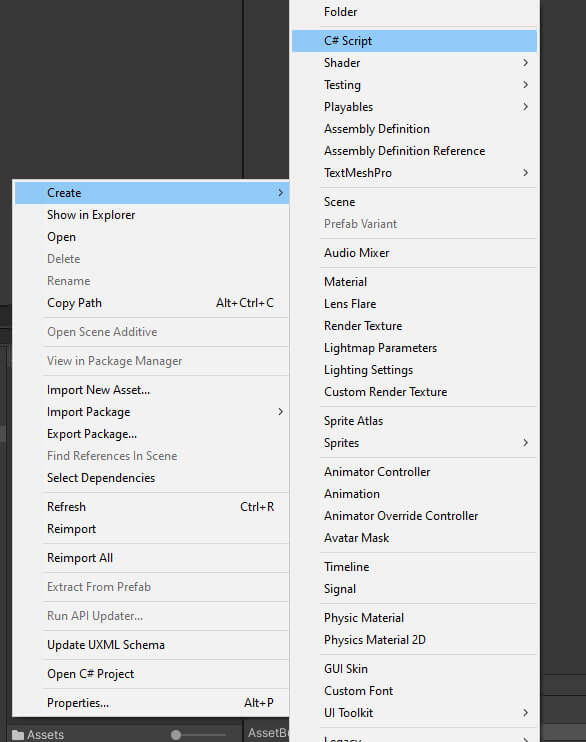
Finally, create the script needed to get the project running. Inside your Assets window, right-click and select Create->C# Script. The script in the example will be called GetConfig. With this, all the assets are in place, but Remote Config itself still needs a little more setup before you begin the coding process.

Creating a new C# script

Figure 7: Creating a new C# script

Preparing Remote Config

From the top menu, select Window->Remote Config. Once you do so, you’ll be greeted with a window where you can create settings and push settings from Unity to the Remote Config server and vice versa. First, you’ll need some environments to work in. You should be able to pull in the two default environments currently sitting in the server. Doing this is as simple as clicking the Pull button in the top right. If these environments don’t appear, wait a few minutes for Unity to automatically create these in the server, then try pulling again. There’s also the option of creating your own environment if you are having trouble pulling the default environments. The Create button at the top of the window will allow you to do this. If you aren’t able to create an environment within the Remote Config window or can’t find the Create button, try updating to a preview version of Remote Config. Directions on how to do this are listed in the JSON portion of this article. . . As far as what environment to use, , it’s recommended to use or create the Development environment while actively developing the app.

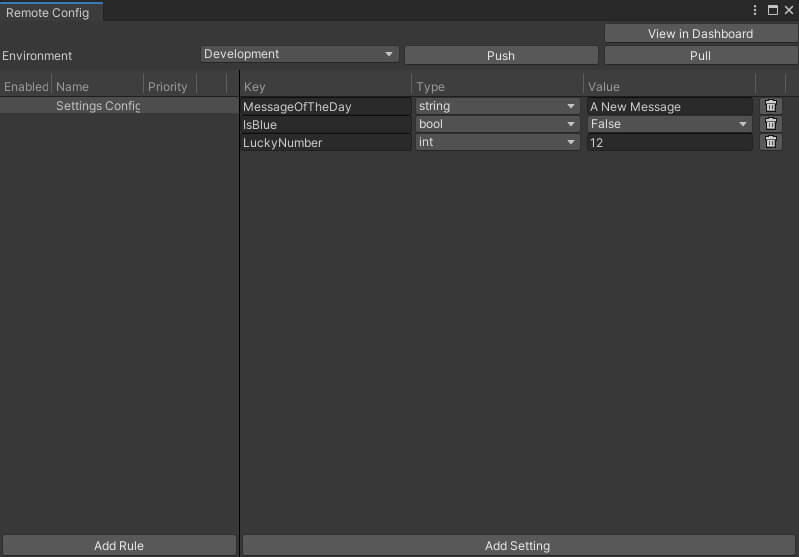
Now is the time to create some settings that will be used in the project and can change from within your Unity Dashboard. Click the Add Settings button located at the bottom. A new setting is created with the option to give it a name and choose a type. This project will focus on editing a bool, string, and int value. After choosing a type, you’ll then be asked for a value. Give the setting a value of your choosing.

The Remote Config window with settings

Figure 8: The Remote Config window with settings

In order to properly utilize Remote Config, you’ll need to push these settings out to the server. Click the Push button to achieve this. Once you’ve done so, you’ll have successfully stored these values in the Remote Config server to be used in your project. In the future, if you ever needed to get any new or updated settings made in the Unity Dashboard, you would click the Pull button. So, Push any settings you make in the editor, Pull any made in the dashboard.

Since this app wants to use settings in the Development environment within the Remote Config server, you’ll need to go to your project’s Build Settings in the File menu and check the box that says Development Build. This change can be made by first going to the top menu, choosing File, then Build Settings, then ticking Development Build. Now, whenever you run a .exe build of the app, it will get the settings seen in the Development environment. When releasing an app, you would want to uncheck Development Build and have your settings created and ready within the Release environment.

GetConfig Code

With everything set up, open the GetConfig script by double-clicking it in the Assets window. Once Visual Studio opens, the first thing to do is add using Unity.RemoteConfig and using UnityEngine.UI to the top of the script. Once that’s done, add the following to the class:

public struct userAttributes { }
public struct appAttributes { }
private bool isBlue;
private string message;
private int number;
[SerializeField] private Renderer rend;
[SerializeField] private Text messageText;
[SerializeField] private Text numberText;

For now, these two structs are not going to do anything. They will simply be passed into a method later to tell Unity to just use the default Remote Config settings. If you wanted to add custom attributes like a player name or skill level, this is where you would set that up. From there, your custom attributes can be used to only apply settings to users with certain attributes. However, for this project, the code will be kept simpler and focus on important aspects of Unity’s Remote Config.

Three private variables isBlue, message, and number will all be changed based on the values stored within your Remote Config settings. These values will be displayed using the cube object and the UI. All remaining variables are for changing properties of object components and the UI text created earlier. The SerializeField tag makes these otherwise private variables visible to the editor for editing.

The first thing to do is to let Unity know to call the SetValues function once Remote Config has finished retrieving data. SetValues will be created in a moment. After that, it then works on retrieving your currently stored configuration. Notice that the userAttributes and appAttributes types are passed into the FetchConfigs method, followed by creating new instances of those structs. All this is saying is that the project will use the default settings currently stored in Remote Config. This will all happen within the Awake function which replaces the Start function. Unity’s Awake function grants a little more safety when using Remote Config.

private void Awake()
{
        ConfigManager.FetchCompleted += SetValues;
        ConfigManager.FetchConfigs<userAttributes, appAttributes>
             (new userAttributes(), new appAttributes());
}

Next comes the Update function, which will have been created automatically when creating the script. Very little Remote Config work is being done here. This function will let you fetch configurations again whenever the left mouse button is clicked and give the app a way to close itself using the escape key. The code will be especially useful in demonstrating how you can make changes to your app from the Unity dashboard seamlessly while it is running.

private void Update()
{
        if (Input.GetMouseButtonDown(0))
                ConfigManager.FetchConfigs<userAttributes, appAttributes>(
                      new userAttributes(), new appAttributes());
        if (Input.GetKeyDown(KeyCode.Escape))
                Application.Quit();
}

Now is where the SetValues method comes in and is where the magic happens. Using Remote Config, you’ll change the values of isBlue, message, and number then use those values to change different parts of the app. The cube object will change color based on the value of isBlue, and the values of message and number will be shown in the app’s UI.

void SetValues(ConfigResponse response)
{
        isBlue = ConfigManager.appConfig.GetBool("IsBlue");
     message = ConfigManager.appConfig.GetString("MessageOfTheDay");
     number = ConfigManager.appConfig.GetInt("LuckyNumber");
        // apply values pulled from config
        if (isBlue)
                rend.material.color = new Color(0, 0, 1);
        else
                rend.material.color = new Color(1, 0, 0);
        messageText.text = message;
        numberText.text = "Lucky Number is: " + number.ToString();
}

The last job to be done is to make sure SetValues won’t be called when the object is destroyed. Earlier in the Awake function the script tells Unity to call SetValues anytime Remote Config has finished gathering configurations. However, if the object using Remote Config’s data is destroyed, you wouldn’t want that function being called. So, as a precaution, OnDestroy is used to remove the callback function, assuring that SetValues is not called when it is not needed.

private void OnDestroy()
{
        ConfigManager.FetchCompleted -= SetValues;
}

With all the code in place, save the script and return to the Unity editor to perform some finishing touches and run the project.

Testing the App

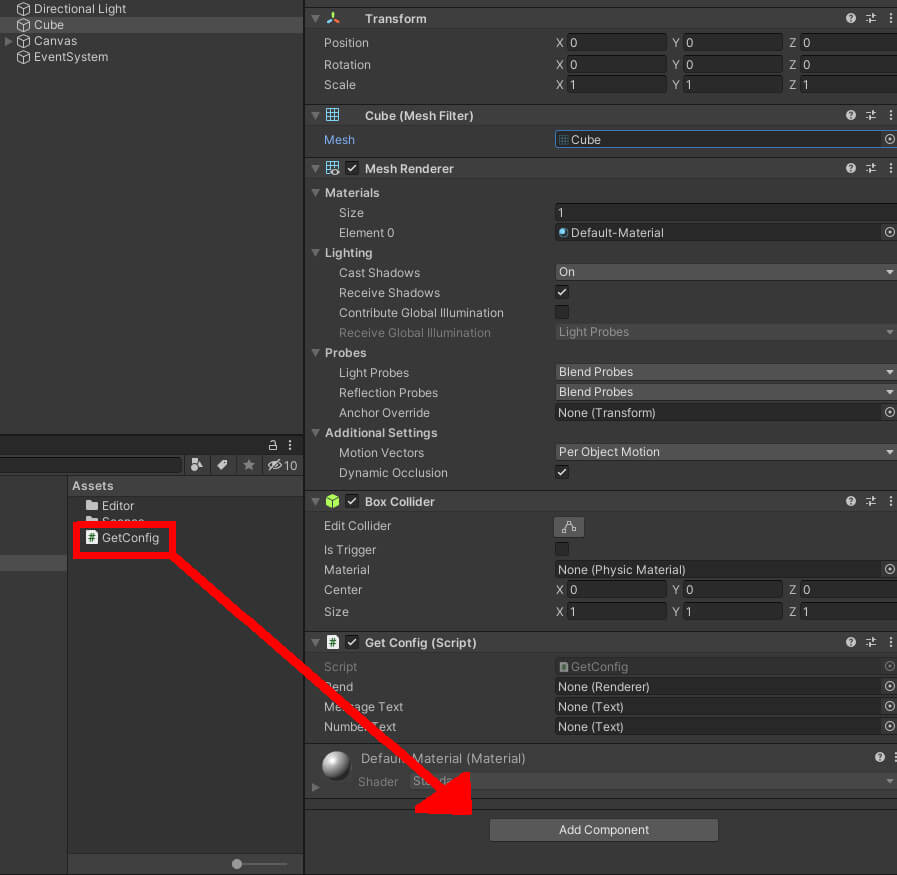
The first thing to do is attach the GetConfig script to the Cube object. Select the object in the Hierarchy window and then click and drag the script into the Inspector window.

Adding the GetConfig script componentFigure 9: Adding the GetConfig script component
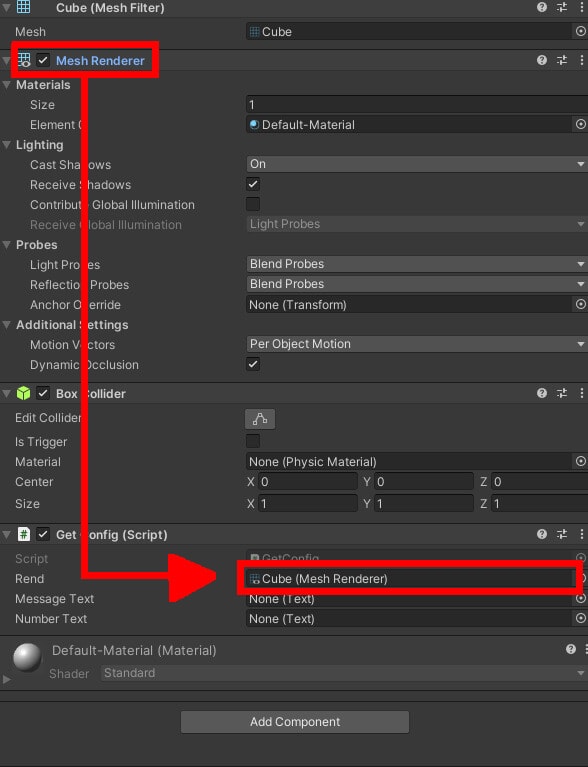
Now drag the object’s Mesh Renderer component into the Rend field, thereby allowing the program to change the cube’s color.

Setting Rend to be the object's Mesh Renderer component

Figure 10: Setting Rend to be the object’s Mesh Renderer component

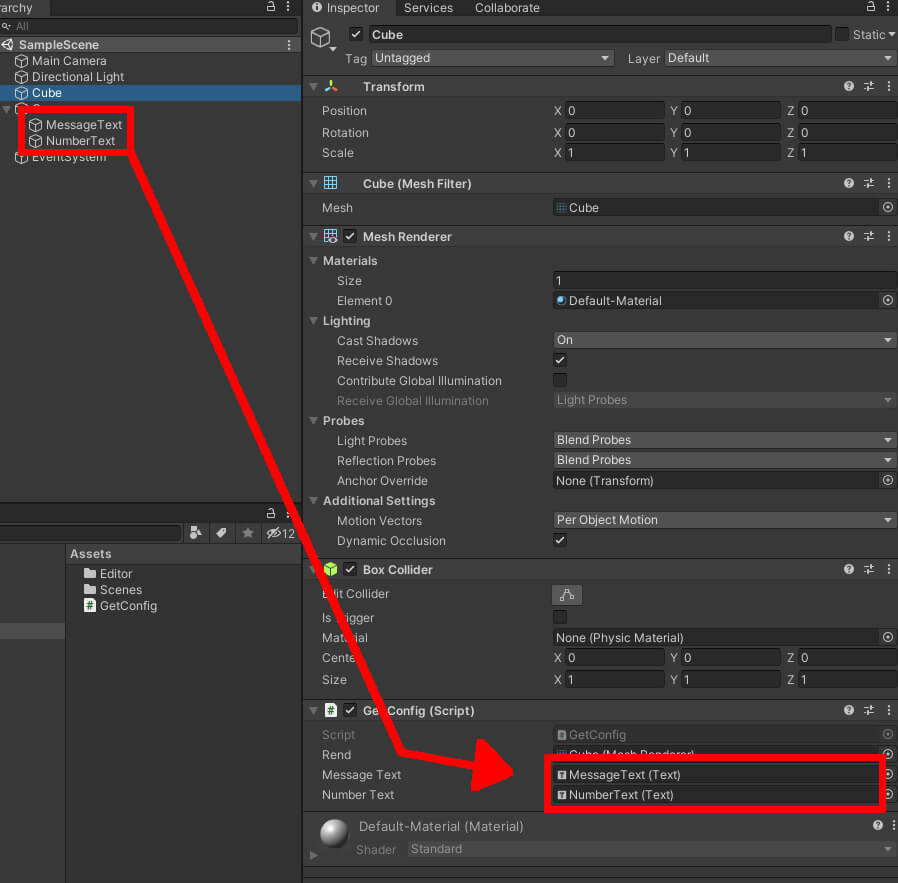
Finally, expand the Canvas object to find your two text objects. Drag them into the corresponding fields in the GetConfig component. Before selecting the two text objects, you may need to lock the inspector by clicking the padlock icon at the top.

Setting Rend to be the object's Mesh Renderer componentFigure 11: Setting the text fields

You’re all set! Run the program in the editor using the play button at the top and notice how the text and cube color changes to reflect what’s currently in Remote Config. If you’re having trouble seeing the changes, then here’s a few things you can try:

  • Make sure you’re using the correct names of your settings in the GetConfig script.
  • Make sure each text object is assigned to the correct field in the object’s GetConfig component.
  • Close and reopen Unity.
  • Push and/or pull your Remote Config settings in the Remote Config window.
  • Change the default environment in the Unity dashboard and pull again. Read on for more information on using the dashboard for Remote Config.
  • Create a brand new environment and set it as the default.

First run of the appFigure 12: First run of the app

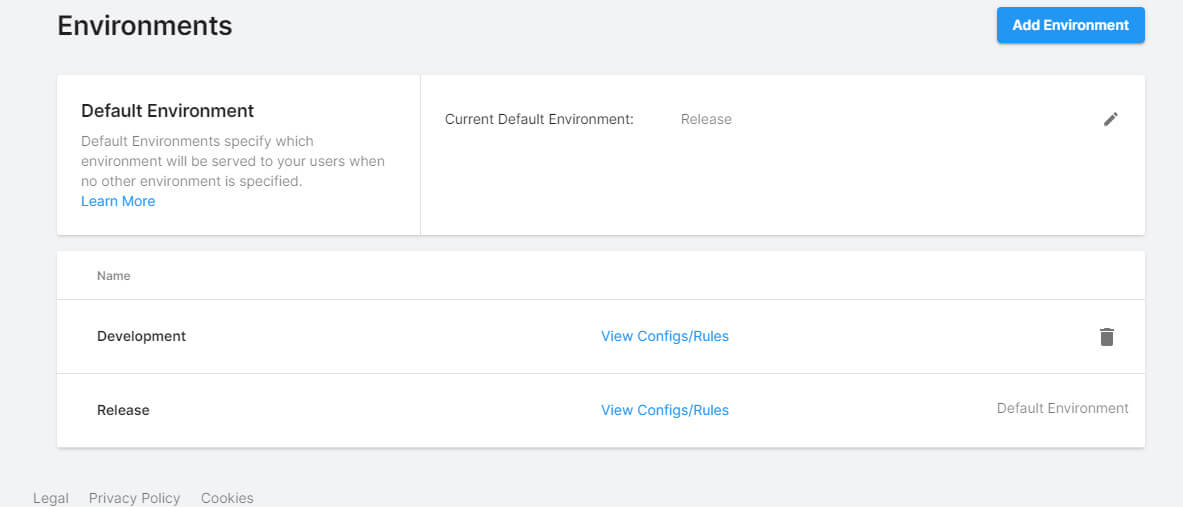
Now, let’s change these objects from the Unity dashboard. To open the dashboard, locate the Services window under Window -> General and click on the link to the dashboard. You will likely need to log in to your Unity account at this stage. Once logged in, you should be inside the dashboard for the project you have open. From there, open the menu (from the top left corner of the browser) and find Remote Config, located towards the bottom. From within Remote Config’s sub menu, choose Environments.

Remote Config screen, seen in browserFigure 13: Remote Config screen, seen in browser
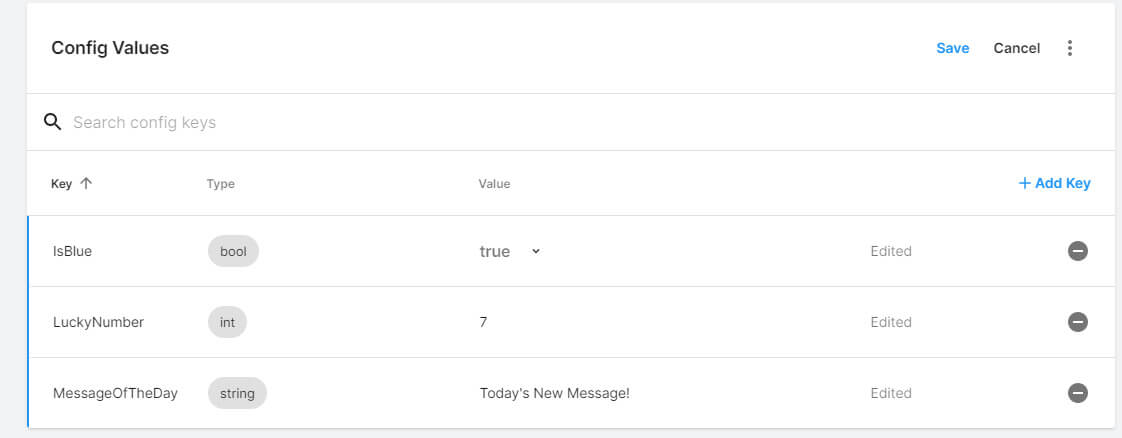
Here, you can change the default environment (make sure it’s set to Development), edit other environments, and create new ones. Click View Configs/Rules for the Development environment, then choose Default Config. Your settings will all appear, and you can change them as you wish, add new settings, and delete any you don’t want anymore. Try setting IsBlue to true and changing the LuckyNumber and MessageOfTheDay values.

Editing settingsFigure 14: Editing settings

When you’re finished, click Save then run your app again. Your changes should be made apparent in the app.

App reflects changes made in Remote Config environmentFigure 15: App reflects changes made in Remote Config environment
What’s more, you can see these changes occur in real-time too. With the app running, make another change in the dashboard, save it, then go back to the app and click anywhere on the screen. You should see the changes update after the mouse click. If you ever wanted to test this out on other people’s devices, you would need to build an exe using the Build Settings window, ensuring that Development Build is checked if the app is currently in development. If it’s not, leave it unchecked and make sure the appropriate Remote Config environment is set as the default one.

JSON Functionality

The project demonstrates the ability to modify variables without needing to open the Unity editor, and the variable types chosen are likely the most common ones you’ll use. For all intents and purposes, the project is complete. But when looking at the Unity Dashboard, you’ll notice that, along with floats and longs, another data type can be utilized. One of the more exciting options is the ability to utilize JSON within the app and changing that JSON as needed using Remote Config. However, as of this writing, it must be noted that Remote Config’s JSON functionality is still currently in active development and is not complete. That said, developers can still use JSON in their Remote Config projects if they install a preview version of the Remote Config package.

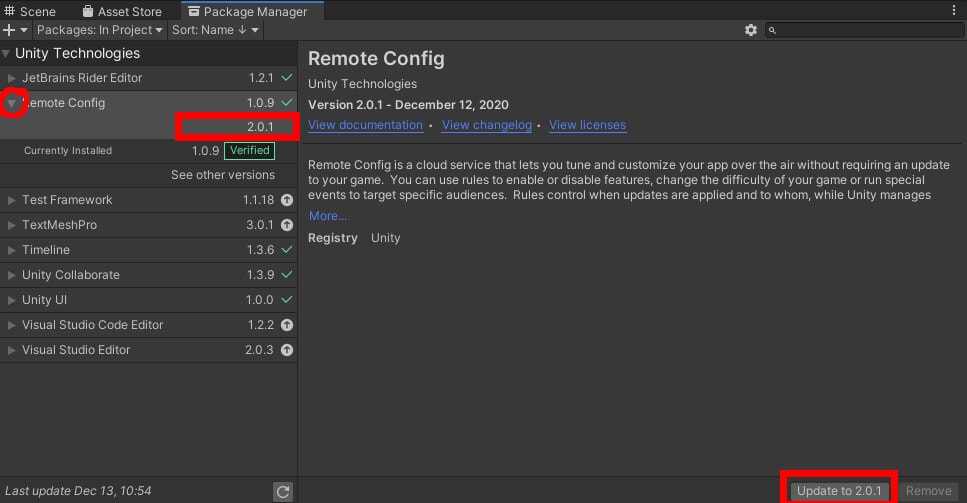
To start, return to the Package Manager window and find the Remote Config package. Click the arrow next to it to expand the version options available to you. Find version 2.0.1, then click the Update button.

Updating Remote Config to preview versionFigure 16: Updating Remote Config to preview version
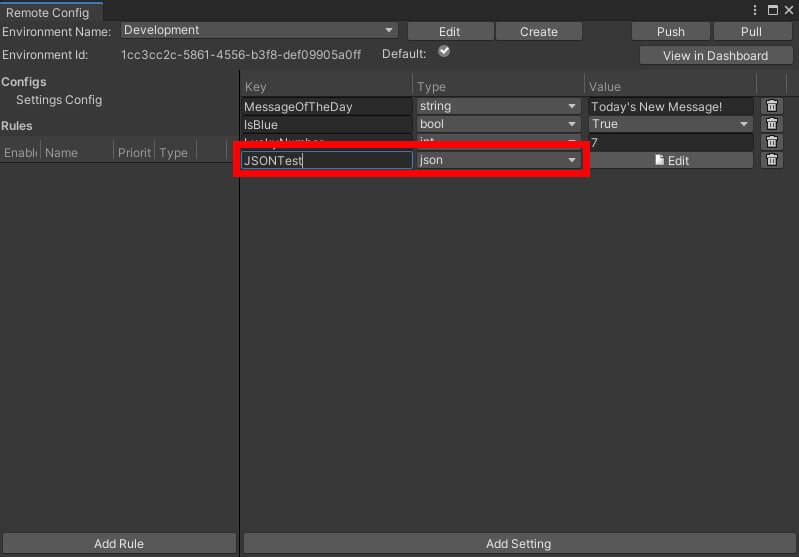

Next, reopen the Remote Config window. You may need to pull your settings again if the window is empty. Once it’s filled, change the environment to Development and create a new setting, giving it a name and the JSON type.

Creating a JSON setting

Figure 17: Creating a JSON setting

To change the JSON code, click on the edit button. A JSON editor will appear, allowing you to enter any of the JSON you wish. For this example, the following code will be used:

{
  "rotate_X": 10,
  "rotate_Y": 35,
  "rotate_Z": 10
}

Make sure to push this to the Remote Config server, then reopen the GetConfig script to utilize the newly created JSON.

Using JSON in Code

In order to use your newly created JSON, you’ll need to create a serializable class that can hold the data. The intent of the code is to modify the rotation of the cube object, which would be a property found within its Transform component. So, you’ll need to set up the class accordingly and get that component too. After that, a little code is added to SetValues and the JSON functionality is all set.

The serializable class is a good place to start. It can be placed anywhere so long as it’s outside the main class. As for the code, it consists of the following:

[System.Serializable]
public class TransformInfo
{
        public float rotate_X = 0f;
        public float rotate_Y = 0f;
        public float rotate_Z = 0f;
}

Two very important things to note about this. First, it’s integral that the class has the System.Serializable tag attached to it. Else, the JSON code won’t be able to write to the class at all. Second, make sure the names of the variables match what’s inside your JSON code, capitalization and all. This is generally true of programming in general, but it’s worth reiterating here to be safe.

Returning to the original GetConfig class, the project needs to be able to change the cube’s Transform component, and more specifically the rotation data. To allow this, create a new variable:

[SerializeField] private Transform tf;

The final step has you adding to the SetValues method. Like the other settings in Remote Config, you need to instruct Unity on how to use the newly retrieved JSON.

TransformInfo tInfo = new TransformInfo();
var jsonString = ConfigManager.appConfig.GetJson("JSONTest");
JsonUtility.FromJsonOverwrite(jsonString, tInfo);
tf.rotation = Quaternion.Euler(tInfo.rotate_X, 
      tInfo.rotate_Y, tInfo.rotate_Z);

First, a new TransformInfo object named tInfo will be created, followed by collecting the JSON code currently stored in the Remote Config server. Then we use the JsonUtility Unity class to, as the method name implies, rewrite the values of tInfo's variables according to what is in your JSON. After that, this object’s Transform component’s rotation is changed to whatever is now being held inside the tInfo object.

Be sure to save the script again, then return to the Unity editor to test the project.

Testing the JSON

Just before running the program, make sure the GetConfig component on the Cube object has the tf field filled. Similar to the Mesh Renderer component from earlier, all this takes is dragging the Transform component in the Inspector window into the field. Once that’s ready, run the project again. The cube should rotate itself according to what’s inside your JSON code. Be sure to go back to the dashboard, edit the rotation values, then left-click back in the Unity app to see an immediate change in the object’s rotation.

App utilizing JSON stored within Remote Config settingFigure 18: App utilizing JSON stored within Remote Config setting
Using Unity’s Remote Config

The ability to change your app from anywhere cannot be overstated. Even if you’re not the type who often travels, having this option to make quick and easy changes to your app brings the benefit of updating an app without having to go through the process of rebuilding it and sending out a traditional patch. Alongside making small, individual changes to an app, Remote Config also allows you to create rules, which are perfect for limited-time events. Set your dates and what settings will be affected, and your app will adjust itself per your Remote Config rule. For more information on Remote Config, check out Unity’s official documentation, found here.

If you liked this article, you might also like How to Create a Settings Menu in Unity – Simple Talk (red-gate.com)

The post How to use Unity’s Remote Config appeared first on Simple Talk.


from Simple Talk https://ift.tt/3o0I9bf
via

Power BI reading Parquet from a Data Lake

Data Lakes are becoming more usual every day and the need for tools to query them also increases.

While writing about querying a data lake using Synapse, I stumbled upon a Power BI feature I didn’t know was there.

When reading from a data lake, each folder is like a table. We store in the folder many files with the same structure, each file containing a piece of the data.

Data Lake tools are prepared to deal with the data on this way and read the files transparently for the user, but Power BI required us to read one specific file, not the folder. That’s until last November. If we google (verb: To google) about Power BI and Parquet files we can find many work arounds to read Parquet files in Power BI, but no mention to the new Parquet connector released on last November (https://powerbi.microsoft.com/en-us/blog/whats-new-in-power-query-dataflows-november-2020/), so I had to write about it.

The feature I’m illustrating on this article is in fact a combination of two features:

  • The feature to combine multiple files from Azure Data Lake Gen 2 storage. This was in preview in October 2019 in is available for a while, but I was surprised I couldn’t find any article really explaining the M code used to combine the files and how to customize the code.
  • The Parquet connector is the responsible to read Parquet files and adds this feature to the Azure Data Lake Gen 2. This connector was released in November 2020.

In order to illustrate how it works, I provided some files to be used in an Azure Storage. You can download the files here. You will also need to provision a new storage account and it will need to be an Azure Data Lake Storage Gen 2.

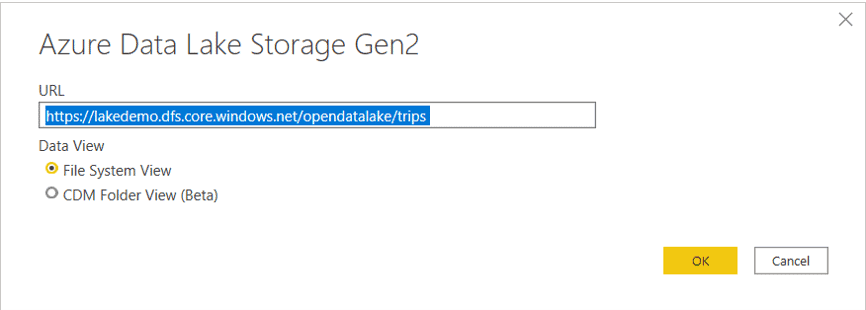
On the examples, I will use the address https://lakedemo.dfs.core.windows.net/opendatalake/trips for the storage, but you need to replace it with the DFS endpoint of your own storage.

Let’s make a step-by step:

  1. Open Power BI
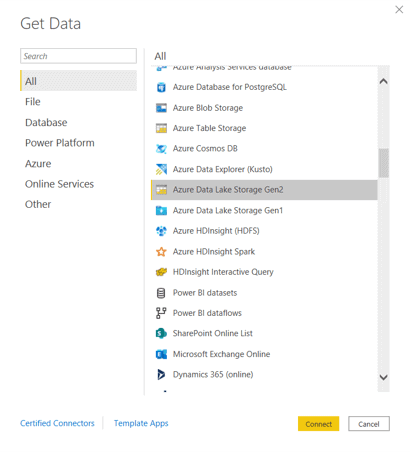
  2. Select Get Data option on the main screen
  3. Select Azure Data Lake Storage Gen2. We will test directly with one of the most efficient options

There are 3 storage options:

  • Azure Blob Storage
  • Data Lake Storage Gen 1
  • Azure Data Lake Storage Gen 2

It’s important to choose the correct option according your storage type, this affects the performance.

  1. On the URL box, type this URL: https://lakedemo.dfs.core.windows.net/opendatalake/trips

Graphical user interface, text, application Description automatically generated

  1. Click Ok button
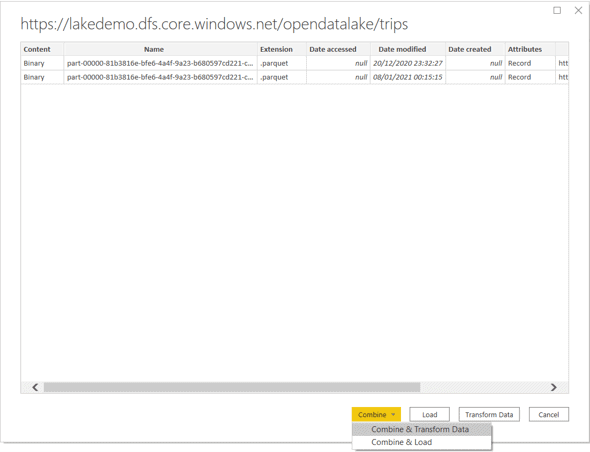
  2. Click the Combine button

Graphical user interface, text, application Description automatically generated

This screen has the traditional Transform and Load buttons but also has the Combine button, which has both options, Transform and Load, below it.

The traditional Transform and Load will be dealing with the list of files inside the Azure Storage folder. From this point, it will be our decision what to do with each file.

The Combine button, on the other hand, will bring to us a pre-built M script to combine all the files in the folder. It’s easy to mistake this feature believing Power BI will read only the current files, but in fact the script is flexible in such a way to read all the files in the folder, even future files included there.

  1. Select the option Combine & Transform
  2. Click Transform Data button

The M Code – How it Works

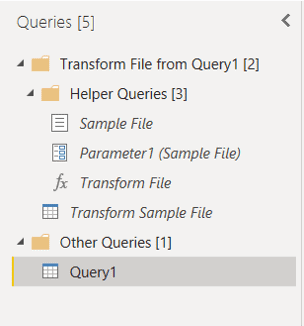
On Power Query window, you may notice the pre-built steps in the Applied Steps window. It’s also very interesting the way the queries were built: The final query is in a folder called Other Queries while you also have a folder called Helper Function containing a parameterized function.

Graphical user interface, application, Word Description automatically generated

Let’s analyze the M code to better understand how it works. Using the menu View-> Advanced Editor you can access the M code.

This is how our M code looks like:

let
  Source = AzureStorage.DataLake(“https://ift.tt/38T4pQ3;),
  #”Filtered Hidden Files1″ = Table.SelectRows(Source, each [Attributes]?[Hidden]? <> true),
  #”Invoke Custom Function1″ = Table.AddColumn(
    #”Filtered Hidden Files1″,
    “Transform File”,
    each #”Transform File”([Content])
  )
,
  #”Renamed Columns1″ = Table.RenameColumns(#”Invoke Custom Function1″, {“Name”, “Source.Name”}),
  #”Removed Other Columns1″ = Table.SelectColumns(
    #”Renamed Columns1″,
    {“Source.Name”, “Transform File”}
  )
,
  #”Expanded Table Column1″ = Table.ExpandTableColumn(
    #”Removed Other Columns1″,
    “Transform File”,
    Table.ColumnNames(#”Transform File”(#”Sample File”))
  )
,
  #”Removed Columns” = Table.RemoveColumns(#”Expanded Table Column1″, {“Source.Name”}),
  #”Grouped Rows” = Table.Group(
    #”Removed Columns”,
    {“Month”},
    {{“Trips”, each List.Sum([Trips]), type number}}
  )

in

  #”Grouped Rows”

These are the steps this code is executing:

  • Filter all files, making sure to not include hidden files
  • Use the AddColumn method to call the function “Transform File” for each row
  • Remove additional columns, leaving only the file name and result of the function
  • Expands the column containing the result of the function

This main script calls the Transform File function for each file in the folder. There is no fixed file name, all the files will be transformed and returned. This means that at any time new files are included in this data lake folder, a simple refresh will bring the data to the dashboard, leaving the solution flexible as a client solution for a data lake needs to be.

The M code for the Transform File function is this:

let
    Source = Parquet.Document(Parameter1),
    #”Changed Type” = Table.TransformColumnTypes(Source,{{“DateID”, type text}}),
    #”Added Custom” = Table.AddColumn(#”Changed Type”, “Month”, each Text.Middle([DateID],4,2)),
    #”Grouped Rows” = Table.Group(#”Added Custom”, {“Month”}, {{“Trips”, each Table.RowCount(_), Int64.Type}}),
    #”Changed Type1″ = Table.TransformColumnTypes(#”Grouped Rows”,{{“Month”, Int64.Type}})
in

    #”Changed Type1″

The function is using the Parquet connector released in November to process the file.

Additional Transformations

Probably we would like to make additional transformations to the data. For that, we have a choice to make: If we make the transformations on the main query, all the files will be combined first and only after the combine our transformations will be executed.

On the other hand, we have the option to make the transformations inside the function. If we do so, the transformations will be applied for each file before combining them. When they are combined, they will already be with the transformed result set.

For each transformation, we will need to identify if it will perform better when executed for each file or when executed over the combined result.

Let’s compare both options.

Transformations on the Combined Result

  1. Select the main query, Query1
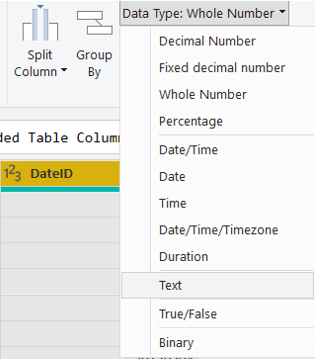
  2. Select the DateID column
  3. On the top bar, change Data Type to Text

Graphical user interface, application Description automatically generated

  1. Click the Add Column menu
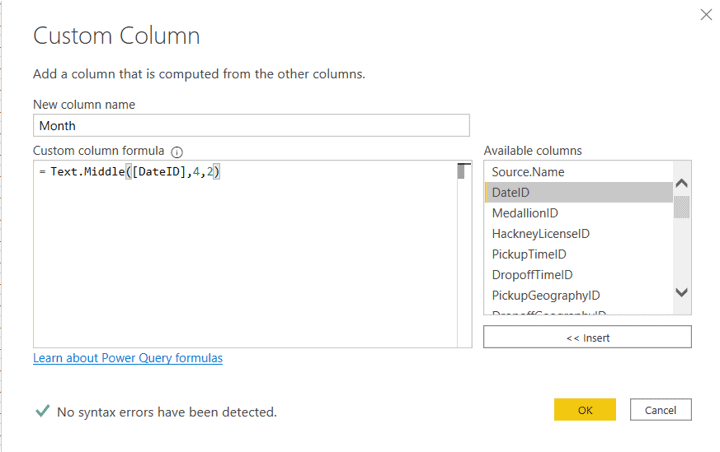
  2. Click Custom Column button
  3. On New Column Name box, set the name as Month
  4. On Custom Column Formula box, set the expression as =Text.Middle([DateID],4,2)

Graphical user interface, text, application Description automatically generated

  1. Click Ok
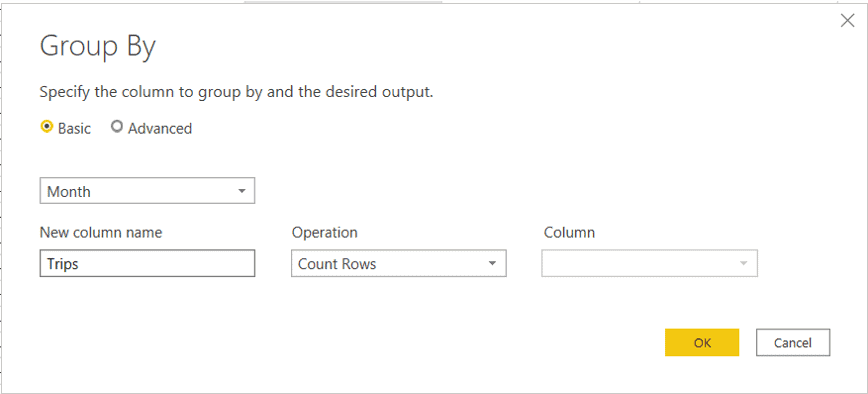
  2. Click the Group By button
  3. Select the Month column
  4. On New Column Name box type Trips
  5. Keep the default Operation, Count Rows

Graphical user interface, application Description automatically generated

  1. Click Ok
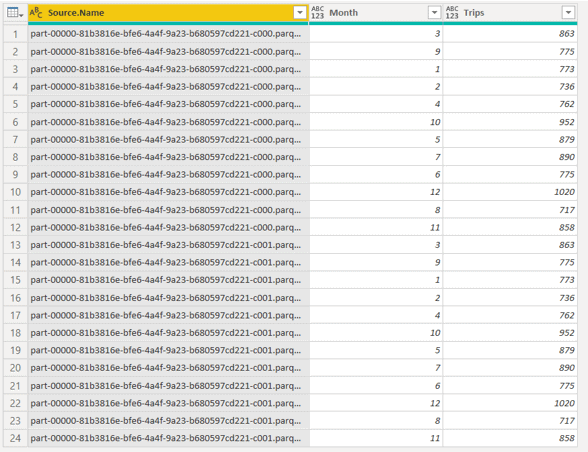
  2. Select the Month column
  3. On the top bar, change Data Type to Whole Number

Table Description automatically generated

That’s it, our ETL is ready to be used on the dashboards. Let’s check the execution time of the ETLs

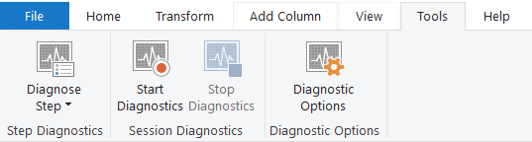
  1. Click Tools menu

Graphical user interface, application, Word Description automatically generated

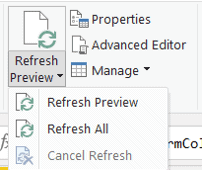
  1. Click the Start Diagnostics button
  2. Click Home menu
  3. Open the Refresh Preview drop down
  4. Click Refresh All menu item

Graphical user interface, application, Word Description automatically generated

  1. Click Tools menu
  2. Click Stop Diagnostics button

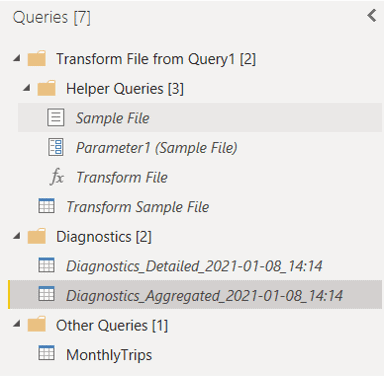
On the left side of the screen, in the query window, you will find a new folder called Diagnostics with two queries inside the folder, holding the results of the diagnostics.

  1. Click the Diagnostics_Aggregate query

Graphical user interface, application Description automatically generated

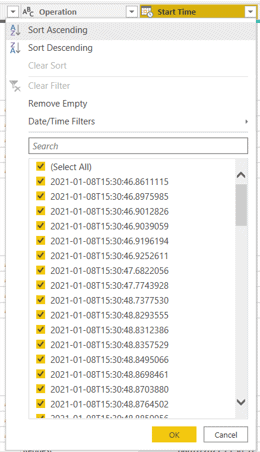
  1. On the StartTime column header, open the drop down
  2. Click the Sort Ascending menu item

Graphical user interface, text, application Description automatically generated

  1. Take note of the time on the first record
  2. On the StartTime column header, open the drop down
  3. Click Clear Sort menu item
  4. On the EndTime column header, open the drop down menu
  5. Click the Sort Descending menu item
  6. Take note of the time on the first record
  7. Calculate the time difference between the first time and the 2nd time you took note

In my example, the total time was 7 seconds. You may find slight differences.

Transformations on Each File

Let’s build the example again, this time building the transformations inside the function, so they would be applied for each file instead of the final result.

  1. Repeat the steps 1-7 from previous steps again
  2. Select the Transform Sample File query
  3. With the Transform Sample File query selected, repeat the steps 9-23
  4. Select the main query, Query1
  5. Remove the last step in Applied Steps window, the Change Type step
  6. Select the first column, Source.Name

Table Description automatically generated

  1. Click the Remove Column button
  2. Click Group By button
  3. Select the Month column
  4. In the New Column Name box, type Month
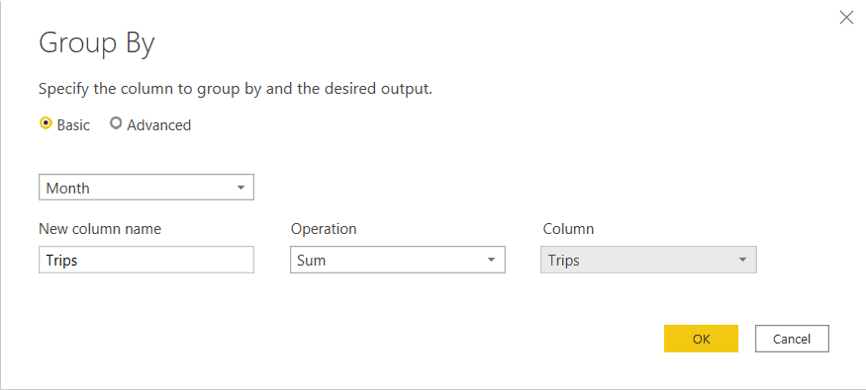
  5. On Operation drop down, select Sum
  6. On Column drop down, select Trips

Graphical user interface, application Description automatically generated

  1. Click Ok
  2. Repeat Steps 24-39

On my example, the execution time results in 4 seconds.

Conclusion

As you may notice, on this example the transformations made on each file performed better than the transformations made after the final combination. This illustrates how important it is to understand this structure and test the performance, deciding which one will perform better for your transformations.

This new feature may not be so obvious, hidden in a Combine button and a complex M code structure, but it’s still much better than possible work arounds for the problem.


The post Power BI reading Parquet from a Data Lake appeared first on Simple Talk.


from Simple Talk https://ift.tt/3bNbT97
via