In part 1 of this series, Introduction to Testing Your PowerShell Code with Pester, I covered the basics of using the Pester module to test your PowerShell code. The types of testing, unit, integration, and acceptance were discussed. In addition, the importance of having good requirements was stressed. We rolled up our sleeves next, learning how to install Pester, invoke a Pester test, and how to construct a test using the Describe, Context, and It functions.
In this article, we’ll continue our journey with Pester. I had mentioned the concept of mocks in the previous article, in this one you’ll see what a mock is and how to use it. I’ll also introduce a new concept, TestPath. Next, I’ll cover the way to distinguish the different types of test within Pester, and how to code your tests appropriately.
The Demos
The demos are in the same location on the author’s GitHub repository as the previous article. Locally, I continue to use the same C:\PowerShell\Pester-Demo folder as the previous article. However, you are not locked into this structure. To make it easy at or near the beginning of each script is a variable, $dir, which points to the demo folder. Just update this to point to the folder you want to place the demos in.
$dir = 'C:\PowerShell\Pester-Demo'
Pretend to Do Something!
Before you can run a test, you need something to test. For this section on mocks, a function called PretendToDoSomething has been created. The basic requirements for this function are:
- Accept the name of the file you need to create.
- Check to see if the file already exists. If it does, give a warning and have the function return false.
- Read data from a database, do some calculations, then write the results to the output file name provided in the parameter.
- Return true to indicate everything went well.
To explain mocks, you don’t really need to create a function that does everything, so step 3 will be simulated using Write-Verbose statements. Let’s look at the code; you’ll find this code in the file Mocks-PretendToDoSomething.ps1 in the demo downloads folder.
# Function to test Mocks with
function PretendToDoSomething ()
{
  [CmdletBinding()]
  param
  (
    [parameter (Mandatory = $true) ]
    $OutputFile
  )
  # For demo purposes, we're going to pretend to read
  # from a database, do some calculations, and create a file.

  # First though, we're going to check to see if the target file
  # exists and if so warn the user and exit the function
  Write-Verbose "Checking to see if $OutputFile exists"
  $exists = Test-Path $OutputFile
  if ($exists)
  {
    Write-Warning "Output file $OutputFile already exists!"
    return $false
  }

  # We're going to pretend, for this demo, that the Write-Verbose
  # statements are really a long series of complex code we've written.
  # In a non-demo situation this area is the code we really care about
  # testing.
  Write-Verbose 'Pretending to read data from a database'
  Write-Verbose 'Pretending to do some calculations'
  Write-Verbose "Pretending to write our results to the file $OutputFile"
  return $true
}
For the first test, you must create a unit test. If you recall, unit tests are done in isolation. They only run the code that is part of the module, not external code. For the function above, there is one line of code that must be addressed.
$exists = Test-Path $OutputFile
Test-Path is a PowerShell cmdlet. In order to keep to the isolation principle, you need to replace it with your own call, and you can do so using a mock.
NOTE: Some might also argue cmdlets such as Write-Verbose or Write-Host would also violate isolation rules. And while they might be correct, at some point you must use cmdlets so foundational, that you just need to accept them. Many of the Write-* cmdlets would fall into this category. As stated earlier, when using Test-Path, there are numerous things that may go wrong such as missing drives or folders. By mocking it, you remove the need to spend time debugging for those types of environmental conditions.
Ultimately, you’ll need to decide which cmdlets are foundational and can safely skip testing / mocking, and which ones may, through potential bugs or being vulnerable to external conditions such as missing internet, drives, etc., need to be tested and / or mocked in your code.
Unit Tests with The Mock
It’s time to create the test. If you want to follow along you can always download the complete file from the GitHub site as Mocks-PretendToDoSomething.Tests.ps1. At the top of the test, you’ll find this code:
$dir = 'C:\PowerShell\Pester-Demo'
Set-Location $dir
. "$dir\Mocks-PretendToDoSomething.ps1"
Every time the test executes, it will set the location then execute the code to load the function in memory. This is important! Let’s say your previous test found an error. You make changes to respond to the error, when you rerun the test you want to be sure your latest code is what is in memory. Hence it is important to execute your scripts in order to load, or reload, the items you are testing into memory.
Next, call Pester’s Describe function, and provide a name. Since these will be the unit tests, the name provided to the describe function reflects this. The next line creates a file name that doesn’t exist and places it in memory. As you will see in a moment, the file name is irrelevant as, thanks to mocks, you will never be using it for this set of tests.
Describe 'Unit Tests' {
  # Create a file name which doesn't exist
  $aFileThatDoesntExist = 'C:\blah\blah\blah\fooey.txt'
Now it’s time to employ Pester’s mock function. When the PretendToDoSomething function runs, you don’t want it to actually call Test-Path, as calling functions outside of what the developer has coded violates the rule of isolation. Therefore, you need to provide a replacement function for PowerShell to call. Here is the mock to do that.
# Test 1, make sure function returns false if file exists
  # Make test-path indicate the file already exists
 Mock Test-Path { return $true }
You employ the Pester function Mock, then provide a replacement function with the same name as the cmdlet (or function from another script or module) you are substituting. When the test runs, instead of executing the real PowerShell Test-Path cmdlet, it will instead execute the code block you provide to the mock. In this case, the code simply returns the value of true which essentially lies to PowerShell and indicates the file already exists, even though it doesn’t.
While the code in the script block passed to the mock is very simple, just a single line of code, you can in fact make these as long and complex as you need them to be. For this test, simply returning true meets the requirements in the first test, listed below, because it tests to ensure the PretendToDoSomething function exits with a value of false if the file exists.
$aTestResult = PretendToDoSomething $aFileThatDoesntExist -Verbose
  It 'Returns False if file already exists' {
    $aTestResult | Should -BeFalse
  }
The PretendToDoSomething function is called and the result is placed in the $aTestResult variable. Within the PretendToDoSomething function, if Test-Path finds the file, it provides a warning and returns a value of false. With the test done by the It function, it ensures the function correctly returns false if the file is already present. You’ll also note the use of the -Verbose switch to display additional information. When running tests manually this can be a useful tool for uncovering any errors. If you are running this in an automated fashion, for example as part of your source code management, then the verbose switch should be removed.
By using a mock, you can easily test that the code correctly handles the condition of a file existing without actually needing to create a file, nor exposing any bugs that may be lurking in the Test-Path cmdlet. You are only testing the code within the PretendToDoSomething function.
Run the Tests
In the downloads you’ll find a script Invoke-MocksTests.ps1. The code in it is straightforward.
# Set tests location
$dir = 'C:\PowerShell\Pester-Demo'
Set-Location $dir
# Invoke all the tests in the file
Invoke-Pester "$dir\Mocks-PretendToDoSomething.Tests.ps1"
Here is the output when just the first test is added to the Mocks-PretendToDoSomething.Tests.ps1file:
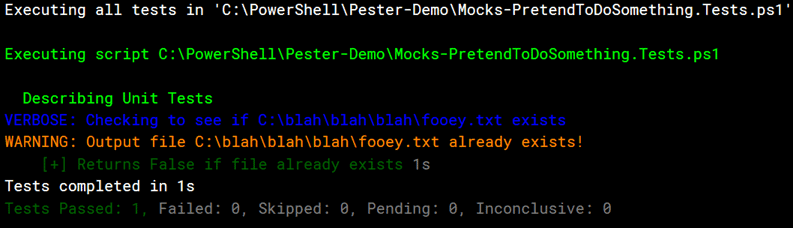
The script provided the Warning from the PretendToDoSomething function, then returned false because, through the use of the mocked Test-Path, the code thought the file already existed.
Testing for the Other Condition
The first test made sure the PretendToDoSomething function correctly returned a warning and exited returning a value of false when the file name passed in the functions parameter already existed. But when writing tests, you need to test for all conditions. In this case there are only two, the file exists, which was tested for, or the file doesn’t exist. For the ‘file doesn’t exist test’ we’ll use mock again and create a second version of Test-Path, only this time it will return false so the PretendToDoSomething function will think the file doesn’t exist. You can then check the results with another It test.
# Test 2, make sure function returns true if file doesn't exist
   # Make test-path indicate the file doesn't exist
  Mock Test-Path { return $false }

  # Calling with verbose can aid in testing
  $aTestResult = PretendToDoSomething $aFileThatDoesntExist -Verbose
  It 'Returns True if file didnt exist and processed OK' {
    $aTestResult | Should -BeTrue
  }
Running the Invoke-MockTests.ps1 now returns following results.
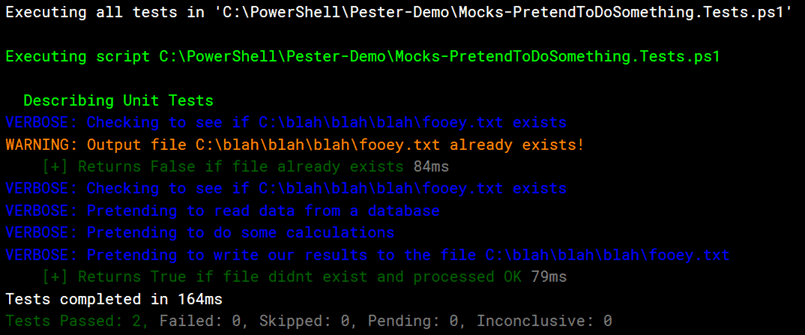
You can now see the two tests pass, the first testing for the file already existing, the second for when the file didn’t exist. The unit test now tests for both possibilities.
Obviously, this is a very simplified example; a real test would test many things beyond just the file existence, and likely include other mocks. There might be one mock for reading from the database, and another mock for writing out the file results, for example.
Integration Tests with $TestDrive
In the previous section, you saw how to construct tests that run in isolation, using the mock function to avoid executing code that was not part of the developers code base, such as code from PowerShell itself or modules such as AzureRM or SQLServer. The next step in testing is Integration Testing. With integration tests, you want to execute all code, both yours and that written by others. However, you want to eliminate any permanent effects, in other words not leaving any evidence your tests ran such as stray files, records in a database, and the like.
With databases you might start with a database located on a test server that is in a known state. In other words, you know exactly what records are in it prior to the start of the test, what the tables look like, etc. This known state is often referred to as the gold copy. After the test, you can examine the state of the database, comparing it to the gold copy, to ensure it is as desired. Validate which rows were updated, table structures, and the like. At the end of the test your script would have code to drop the database and restore it from the gold copy, ready to begin the tests again, or alternatively as the first thing in all tests drop and restore from the gold copy.
When it comes to eliminating effects to the file system, Pester makes this very easy. Rather than having to ‘clean up,’ Pester has a built-in variable called $TestDrive. When Pester runs a test, it generates a temporary area on your hard drive for this test execution, and places that location in the $TestDrive variable. Within your tests, you can reference the $TestDrive variable, much like the $dir variable is used in the downloaded samples. Before learning how to use this, first you need to update the PretendToDoSomething function. At the end of the function comment out the last Write-Verbose which pretends to write code to a file, and replace it with code that pushes a text string into a file using the Out-File cmdlet.
# Write-Verbose "Pretending to write our results to the file $OutputFile"
  Write-Verbose "Really writing our results to the file $OutputFile"
  "Some text was written at $(Get-Date)" | Out-File $OutputFile
Again, this simple snippet is just for illustration purposes, in your real-world code you’d actually put something meaningful here. Now you’re almost ready to write the integration tests. Unfortunately, the script for the unit tests is now broken. The use of Out-File will now violate the isolation testing rules, so you need to add it to the list of mocks within the original unit tests. You don’t want it to actually do anything, so you can just have it be an empty function. Here is the revised Test 2 from the Unit Test describe block:
# Test 2, make sure function returns true if file doesn't exist
  # Make test-path indicate the file doesn't exist
  Mock Test-Path { return $false }
  Mock Out-File { }
  # Calling with verbose can aid in testing
  $aTestResult = PretendToDoSomething $aFileThatDoesntExist -Verbose
  It 'Returns True if file didnt exist and processed OK' {
    $aTestResult | Should -BeTrue
  }
As you can see, the only thing you had to do was mock the Out-File cmdlet. Now that the unit tests are running in isolation again, they will pass. This illustrates a good point, namely that changes to the code you are testing will often require changes to all of your tests, unit, integration, and acceptance.
Now look at the code for the integration test. Add this code to the Mocks-PretendToDoSomething.Tests.ps1 file.
Describe 'Integration Tests' {
  # Create a file name
  $myTestData = "$($TestDrive)\MyTestData.txt"
  # Test using a file name that won't exist
  $aTestResult = PretendToDoSomething $myTestData
  It 'Returns True if file didnt exist and processed OK' {
    $aTestResult | Should -BeTrue
  }
  It "See if the output file $myTestData now exists" {
    $myTestData | Should -Exist
  }
}
The Describe block appropriately uses the name Integration Tests. The next line is the key, here it references the Pester built in variable $TestDrive and appends a file name to use. Now you’re going to call two tests. Note you do not use mocks here, you want the Test-Path and Out-File cmdlets in the PretendToDoSomething function to actually execute.
In the first test, you are passing in a file name that shouldn’t exist. And it won’t; the $TestDrive location is created on your hard drive the first time it is called from within a Describe script block. It will remain until the end of the script block. You can be assured the file name contained in the $myTestData variable will not exist. This variable is passed into the PretendToDoSomething function. It should successfully get past the Test-Path, write to the file using Out-File, and then return true. The second test employs the Should -Exist function and switches to validate that the file was created. Execute the test by once again running the code in the Invoke-MocksTests.ps1 script.
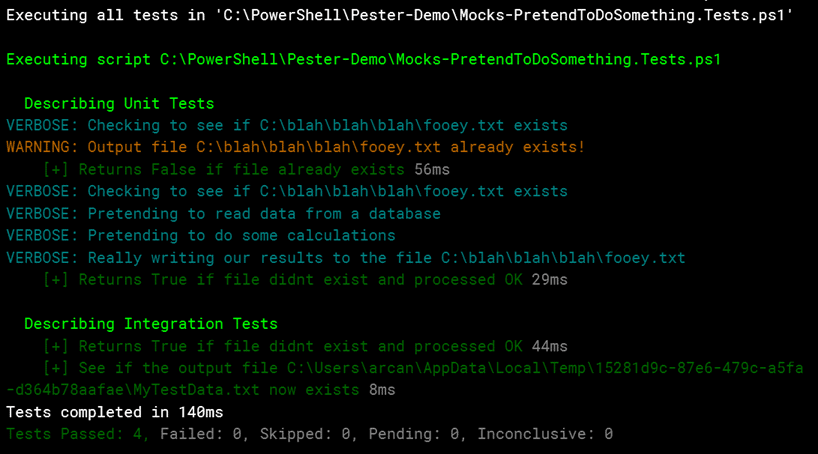
In the Integration Tests area, you’ll see both tests passed. In addition, you’ll see the long path which includes a GUID in the name in the second test. If you go hunting for this file on your hard drive, you won’t find it. The moment PowerShell found the closing squiggly brace in the Describe script block, Pester deleted that TestDrive folder. In this example, the full path and file name were included so you could see the type of path that is created by TestDrive. In normal test results though you would not want to include this information as it is meaningless, so the next example will fix that as well as add a second test for when the file already exists.
Describe 'Integration Tests' {
  # Create a file name
  # $myTestData = "$($TestDrive)\MyTestData.txt"
  # Create a file name (revised)
  $myTestDataFile = 'MyTestData.txt'
  $myTestData = "$($TestDrive)\$($myTestDataFile)"

  # Test using a file name that won't exist
  $aTestResult = PretendToDoSomething $myTestData
  It 'Returns True if file didnt exist and processed OK' {
    $aTestResult | Should -BeTrue
  }
  # It "See if the output file $myTestData now exists" {
  #   $myTestData | Should -Exist
  # }
  # Exist test revised to show just the file name
  It "See if the output file $myTestDataFile now exists" {
    $myTestData | Should -Exist
  }
  # Added test to see if file exists
  $aTestResult = PretendToDoSomething $myTestData
  It "Returns False if $myTestDataFile existed" {
    $aTestResult | Should -BeFalse
  }
}
First, there is a variable declared to hold just the file name ($myTestDataFile). Then the $myTestData variable assignment was revised to use $TestDrive and the new $myTestDataFile variable. The second test was revised to show just the file name, not the full path and file.
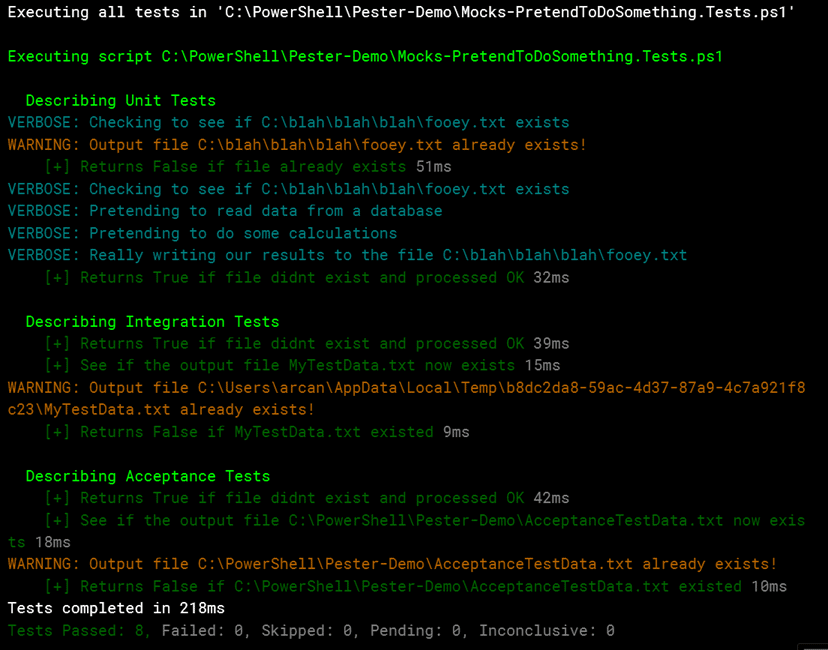
Finally, another was added test for when the file already exists. The file was created with the first test, so you can just reuse it with the second test where it checks for its existence. Alternatively, you could have also chosen to create the file yourself and used that file name as a parameter to the function being tested. Take a look at the output.
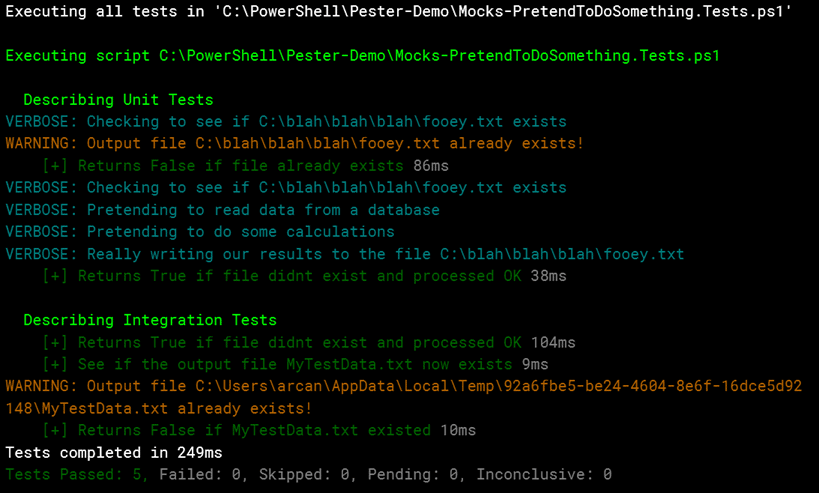
All three integration tests passed successfully. Also, for this test the Verbose switch was left off, just to show what a test looks like without using it.
Acceptance Tests
Thus far you’ve seen two of the three types of tests, so now you’ll address acceptance tests. With these types of tests, it is not only acceptable but desired to let the results of tests remain behind. Therefore, any files created should remain at the end of the test, unlike integration tests where nothing should remain behind when the tests are done. Here is the code for the acceptance tests.
Describe 'Acceptance Tests' {
  # Setup a location and file name for testing
  $dir = "C:\PowerShell\Pester-Demo"
  $testFile = 'AcceptanceTestData.txt'
  $testFilePath = "$dir\$testFile"
  # Ensure the file wasn't left over from a previous test
  if ($(Test-Path $testFilePath))
  {
    # Delete it, don't ask for confirmation
    Remove-Item $testFilePath -Force -ErrorAction SilentlyContinue
  }
  # Test using a file name that won't exist
  $aTestResult = PretendToDoSomething $testFilePath
  It 'Returns True if file didnt exist and processed OK' {
    $aTestResult | Should -BeTrue
  }
  # Test for the existence of the output file
  It "See if the output file $testFilePath now exists" {
    $testFilePath | Should -Exist
  }
  # Added test to see if file exists
  $aTestResult = PretendToDoSomething $testFilePath
  It "Returns False if $testFilePath existed" {
    $aTestResult | Should -BeFalse
  }
}
The test starts by designating a folder which already exists on the drive, and a file name. Note this does not use the $TestDrive folder, this is a real folder. This example uses the C:\PowerShell\Pester-Demo folder where the scripts reside.
Next, it checks to see if the file exists, having been leftover from a previous test, and if so delete it. It then runs three tests. These three are identical to the ones used in the integration tests, with the exception of the variable names. Here is the output from running the tests:
As you can see everything passed! Even better, if you look at the contents of the C:\PowerShell\Pester-Demo directory, you will see the AcceptanceTestData.txt file is still there.
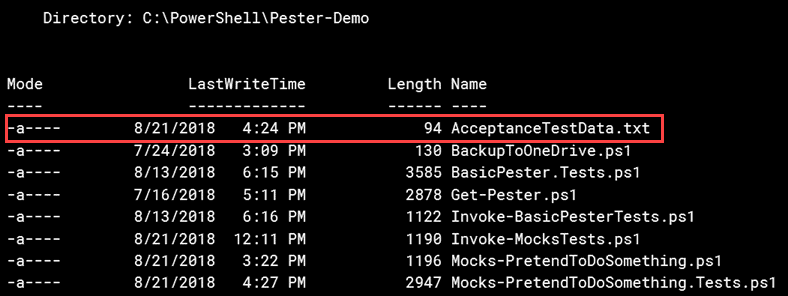
Thanks to the inclusion of the Test-Path / Remove-Item code, you can run the test as many times as you wish; the code will clean up leftover files from any previous tests before it executes the test again.
Getting Selective with Tests
As you can see from the output, every time you run the tests, you are running all three types of tests: unit, integration, and acceptance. Most often though, you’ll only want to run one, or maybe two of these types of tests. How then do you solve this dilemma?
Well, you could of course break the tests into three separate files. You would then be forced to explicitly declare each file you wish to run. This is OK when you only have a few, but what if you had tens, or even hundreds of tests? It quickly becomes unmanageable. In addition, you have multiple tests files you have to update. Pester provides a better option, through the use of the Tag parameter on the Describe function. Return to the tests you created and update the Describe block declarations like so:
Describe 'Unit Tests' -Tag 'Unit' {

Describe 'Integration Tests' -Tag 'Integration' {

Describe 'Acceptance Tests' -Tag 'Acceptance' {
As you can see, a Tag parameter was added, followed by a string for the tag. Typically, you use a tag that described the type of test. However, this isn’t a set rule. The Tag is just a string, you could have used any text you wished such as ‘Arcane’, ‘Code’, and ‘Red Gate’. It is generally best though to stick with something obvious as done here. Once you pick something, make it a standard, and use that across all your tests in your enterprise.
Now you can return to the script where you invoke the tests. In the demos, this is the Invoke-MocksTests.ps1. Add the following line to it:
Invoke-Pester "$dir\Mocks-PretendToDoSomething.Tests.ps1" -Tag 'Unit'
Now highlight the line in the ISE and either press F8, use File, Run Selection in the menu, or use the  button in the toolbar. When you do, in the output you’ll see only the unit tests were executed.
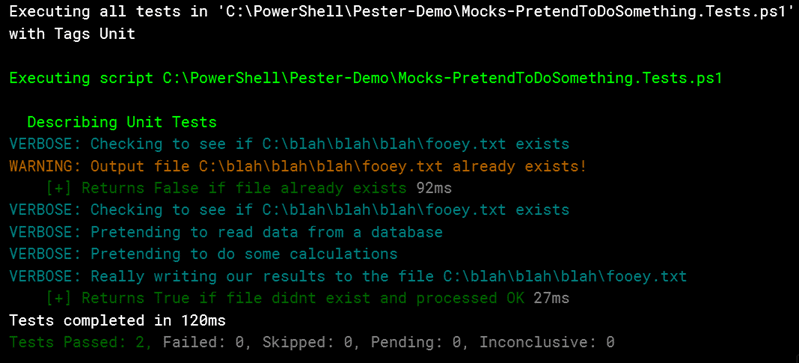
As you can see, only the describe block for unit tests was executed. Additionally, in the very first line of the output we see Pester outputs with the Tag Unit to show that it’s only executing tests with Describe blocks having the Tag of Unit. You can repeat this for integration and acceptance tests.
Invoke-Pester "$dir\Mocks-PretendToDoSomething.Tests.ps1" -Tag 'Integration'
Invoke-Pester "$dir\Mocks-PretendToDoSomething.Tests.ps1" -Tag 'Acceptance'
You can also include multiple tags on the Invoke-Pester call.
Invoke-Pester "$dir\Mocks-PretendToDoSomething.Tests.ps1" -Tag 'Unit', 'Integration'
I’ll leave it to you to execute and see the output.
Summary
This article began with a review of mocks, and how important they are to creating your unit tests. It then covered examples of unit, integration, and acceptance tests, and how Pester’s TestDrive can assist you with creating integration tests. Finally, I wrapped this article up by showing how to Tag each of your test groups, and to invoke Pester so that it only executes tests with the specified tag or tags.
In the next article, you’ll see how to write Pester tests for your modules. It’s not quite as straightforward as you might think, but once you learn the secret you’ll be able to construct good tests for all your modules.
The post Advanced Testing of Your PowerShell Code with Pester appeared first on Simple Talk.
from Simple Talk https://ift.tt/2LGWO8f
via
No comments:
Post a Comment