Tuesday, April 30, 2019

Oracle for Absolute Beginners: Problem-Solving as a New Developer

Hi.  My name is David. If you’ve heard of me, there’s a good chance it’s from my Oracle for Absolute Beginners series which I write for Simple Talk. (Either that, or you got here from googling the famous NFL sportsman who has the same name as me.  Poor guy, I bet journalists get us mixed up and ask him Oracle questions after every touchdown! “You played well today … but can you explain Oracle’s implementation of JSON?”)

I have been mentoring some new developers recently, and it has made me realise that I need to revisit my series. Yes, it does a good job of teaching new Oracle developers the basics of the language, but is that enough?  That’s like teaching someone the alphabet and expecting them to turn into Shakespeare!

If you are an absolute beginner, you do not just need to learn the what; you also need someone to teach you how to become a developer. What tools do you need?  How do you use them? Also, when you are assigned a task, how do you go about attacking it?

Most importantly, what do you do when you run into your first hiccup? Because no matter how well you’ve learned your lessons, once you start writing, running, and maintaining code, you will run into problems; you will fail.

The boxer Mike Tyson once said that everyone has a plan … until they get punched in the face.

I need to train you on what to do when Oracle punches you in the face.

I spend more time looking at error messages than I do looking at my wife. Every developer does.  I used to hate them; they used to scare me. I used to see them as a judgment on me, on my skills as a developer. I used to think that the fact that my code was erroring meant that I had failed, that I was inadequate.  Trust me; you will feel that way too.

However, I don’t feel that way now, and you don’t have to either. That’s because I’ve learned the simple steps to follow when my Oracle code breaks down and begins to pelt me with errors.

It is time, dear absolute beginner, that you do, too.

Debugging

Switch on debugging; the messages you receive will walk you through your code. In other words, you’ll get the first debug message first, the second one second, and the third will show up third. Find the juncture where this deviates, and you’ve found the line of code that is erroring. Still not sure what I mean? Don’t worry too much about it now; I’ll give you an example a little later.

One thing that you should bear in mind is that debug messages contained within a loop will be printed once for each iteration of the loop. What that means is that, if your code goes around your loop ten times, your debug message will be output ten times.

On the other hand, messages within a conditional statement will only be output if the code wanders down that branch of the statement.  Look at the following, for example:

IF 1 = 2 THEN
   <output debug message>
ELSE
    <output other debug message>
END IF;

The first debug message will never be output since 1 will never be equal to 2. (Despite whatever the old Spice Girls song said.)

If your code was not written with instrumentation already baked in, there’s no need to panic. (And in case you were wondering what instrumentation means, in this instance, it’s just a long-winded way of saying debugging.)  As long as you’re working in a development or test environment, you can probably add some debugging now, even if only temporarily.

Do you know about dbms_output.put_line? No? It’s a godsend. It’s a standard procedure that enables you to send messages from within PL/SQL. It’s great for debugging.

Here’s how you’d use it. (This is that example that I promised you a few paragraphs ago.)

BEGIN
   dbms_output.put_line('start of the procedure');
   dbms_output.put_line('before insert statement');

   INSERT INTO table…

   dbms_output.put_line('after insert statement');
END;


When you run your procedure, your messages will be printed to the screen. If, for example, you receive the start of procedure message, and the before insert statement one, but not the after insert statement message, then you know that the error is in your insert statement.

It’s really that simple.

Obviously, there’s a lot more you can do with debugging. If your procedure accepts parameters, output their values in debug messages. Also, if you run a cursor or call a function to populate variables, you should output the new values of those variables in debug messages. So yes, there’s a lot you can do with debug messages (as a matter of fact, I’ve written a whole article on the subject), but at the very heart of it is a simple truth. When you find the spot where your debug messages either terminate abruptly or deviate from the expected path, then you have found the cause of the error.

Oh, one last thing. If you’re running your code using SQL Plus, and you want to use dbms_output.put_line, you’ll need to call the following statement before executing your code:


SET SERVEROUTPUT ON;

This command instructs SQL Plus to print all debug messages to the screen. Throughout your career you will forget SET SERVEROUT ON; a number of times (everyone does!). On those days, you’ll sit there for five minutes wondering why you’re not getting any debug messages, and then you’ll realise what you’ve done. You’ll feel like a fool. We’ve all been there.

If your dbms_output.put_line messages were meant to be temporary, do remember to remove them when you’re done.

Excellent debugging should take the guesswork out of error hunting. When I use dbms_output.put_line, I use it liberally – the way an 8-year-old puts ketchup on his French fries. Everywhere.

Exceptions

If your code is not working as expected, but you don’t have errors screaming at you, there’s a chance you have  When Others  exception-handling in place that is holding a pillow over your errors’ mouths and shutting them up. You do not need When Others exception handling, but if you must have it, then re-raise your errors.  Alternatively, you can use our friend dbms_output.put_line and print out one of the following: SQLERRM or SQLCODE.  SQLERRM will give you the error message; SQLCODE will strip out the verbiage and just give you the error number.


BEGIN 

  …
EXCEPTION
  WHEN OTHERS THEN
       dbms_output.put_line('The error is '||SQLERRM);
       dbms_output.put_line('The error code is '||SQLCODE);
END;

Take a break

If you still can’t figure out where your error is coming from, take a break. Come back to it in five minutes with fresh eyes. Go make a coffee.  If you smoke, go and have a cigarette. I don’t smoke, so I hide in an empty meeting room and spend five minutes scrolling through Twitter. Now that I think of it, that’s probably worse for me than smoking!

Look at your code with fresh eyes

Several simple tricks will help you achieve this. The very best one is to speak to someone. I’ve found that often the simple act of explaining my problem to another developer is all it takes for the solution to come to me. Talking about a problem brings it into clearer focus.

There are other ways of doing this.  Sometimes I skip the code and read the comments instead.  Sometimes I get a notepad and write it all out as pseudocode.

I try to force myself to eliminate assumptions.  It is always that line of code that you think will never fail that is the source of the error.

Google

There is nothing new under the sun; no matter how obscure your problem is, someone else has encountered it before – and they’ve probably blogged about it too!

If you’re looking for quick answers, there are a number of reliable sites.

  • Asktom.oracle.com is excellent. It’s run by a guy named Tom Kyte, and he’s been answering Oracle questions on his site for 20 years, if not longer. Sometimes he gets grumpy when he’s asked what he thinks is a silly question, but you don’t have to ask questions, you can just search the archives for the problems that match yours.
  • Stack Overflow is this massive resource of questions and answers that cover every aspect of development. The quality of the answers can, sometimes, be variable.
  • Oracle Community is a site where Oracle developers ask and answer questions.  Some of the best Oracle developers in the world are active members of the community.
  • Burleson Consulting is a weird-looking site that is styled like it just stepped out of the 1990s. However, it does often contain useful, clearly-presented information.  Even if it looks like it’s out of the 1990s, its SEO must be cutting edge because it always comes near the top of every Google search.

Build your knowledge

Copying and pasting fixes from Stack Overflow might help you at the moment, but the only way to get better at problem-solving is to build your knowledge. There are several great resources for that: Simple Talk is excellent (and it’s not just because I’m on it!).  Also, Google a guy named Steven Feuerstein. He’s one of the best PL/SQL writers out there.

Learn from your mistakes

This is often the hardest thing.  The number of times I’ve thought “if only I’d put a bit more debugging in this package” or “why on earth didn’t I comment this code?” And then I’d go straight ahead and NOT put in additional debugging or commenting. Don’t be like me.  Don’t be like me at all.

Conclusion

It doesn’t matter what platform you use when you code, errors will happen. They don’t mean you are a failure; you need to learn how to use the tools to troubleshoot, debug, and fix the problems. Here, I’ve tried to show you a few techniques that have helped me over the years.

The post Oracle for Absolute Beginners: Problem-Solving as a New Developer appeared first on Simple Talk.


from Simple Talk http://bit.ly/2GULKFu
via

What is Automation?

Today I got a bit closer to a meaningful definition of automation as it applies to the software development process. I’ve been turning this concept over in my head for a while, which is partly related to the dreaded question of licensing.

Why should licensing an automation product be related to the number of users?

A few weeks ago, I was chatting a bit in the SQL Server Community Slack Channel. One community member was frustrated with per-user licensing for monitoring and automation products.

This isn’t the first time I’ve heard grumbling about per-user licensing, of course — with any licensing model, you’re going to hear grumbling about it; that’s just how licensing goes.

However, I think per-user licensing can make a lot of sense when it comes to automation products, because of the nature of automation. I work for Redgate, which does per-user licensing. I also often do demos of how our tools integrate with Microsoft’s Azure DevOps Services (formerly VSTS / or TFS-in-the-cloud), which licenses based on user numbers.

But not everyone thinks this makes sense.

That’s because they see automation as:

  • Something that one person sets up on a server, which that person may occasionally tweak; and…
  • A script or orchestrated set of scripts and products that replace the work that people (maybe more people than the person who set it up) would do manually

This definition isn’t dumb or naive at all. This is what automation has been in IT for many years: I’ve got a problem; I create a script. The script helps save me or my team some time, and I only ever look at it again if it stops working.

Based on that definition, the most natural way to charge for automation tools would be based on something like the number of times the tools run, the number of servers/cores they are run on, etc. (I don’t mean to make this post about how much software should cost. I don’t think that’s related to licensing model choice at all — no matter how you charge, whether it be people, cores, tentacles, or whatnot, you can find a way to make it cheaper or more expensive.)

The nature of automation has changed dramatically in recent years

As I said, I’ve been having a hard time putting a definition of what automation means now into words. Then I saw a link to this job description for a Sr. Resilience Engineering Advocate at Netflix.

There are a lot of interesting things about the job description, but one sentence that leapt off the page to me was that the team values:

Automation as a team player versus automation as a replacement for humans

–Netflix Cloud and Platform Engineering SRE Team

This is a huge part of the evolving definition of automation. Automation is now:

  • Something that a team configures, interacts with, and improves on a daily basis
  • A script or orchestrated set of scripts and products that are an integral part of the productivity of the team

The big reason that per-user licensing makes logical sense to me when it comes to tools that are designed to be a key part of the software development life cycle is that the tools are meant to be experimented with freely. The tools will work best if they’re able to be tinkered with and adapted over time, to suit the needs of the team at that point. Licensing based on cores or CPU cycles or usage naturally reduces experimentation if it is going to drive up the cost.

Also, the tools are meant to be team players: they are meant to be available to have every team member interact with them. Automation in the SDLC for database changes doesn’t mean that every time a change is committed, the change rockets toward production without a human being ever needing to think about it again. Instead, automation is a player in a process that can absolutely include rigorous review (both automated and human-powered), testing, and even approval gates when needed.

Automation looks different to different teams

Team size matters. If you’re one person in a small shop and you’re setting up automation to reduce the amount of manual work that you have to do, this highfalutin definition of automation as a “team player” probably isn’t going to resonate with you. You’re much more likely to continue to see automation in the classically defined sense.

However, on the other hand, you don’t have to have a team nearly as large as Netflix to start seeing the advantages of thinking about automation differently. It just takes a few people working together collaboratively and thinking about how to more consistently and reliably deliver values to customers to start changing the way automation exists in the workplace.


NOTE: This post first appeared on littlekendra.com.

Commentary Competition

Enjoyed the topic? Have a relevant anecdote? Disagree with the author? Leave your two cents on this post in the comments below, and our favourite response will win a $50 Amazon gift card. The competition closes two weeks from the date of publication, and the winner will be announced in the next Simple Talk newsletter.

The post What is Automation? appeared first on Simple Talk.


from Simple Talk http://bit.ly/2vvcTIw
via

Speaking at SQL Saturday Jacksonville on May the Fourth

SQL Saturday Jacksonville this weekend!

Coming up this weekend, on the least holiest, but still very awesome holiday (May the Fourth), I will be in Jacksonville, Florida delivering a couple of sessions. Now, you might say: “Louis, why would you be travelling on May 4?” Check out the logo for Jacksonville’s event:

https://i.imgur.com/pmuX1Sh.png

That’s right, since this is Star Wars day, Jacksonville will be doing a Star Wars themed SQL Saturday. I will be giving the following sessions, both in the Hoth Room, which I anticipate being a bit colder than I am going to like at 9:00 AM, so we may just have to pull out my light saber (yes, I have a few actually) Tauntaun to keep warm.

Database Design Fundamentals

Data should be easy to work with in SQL Server if the database has been organized as close as possible to the standards of normalization that have been proven for many years, but are often thought of as old-fashioned. Many common T-SQL programming “difficulties” are the result of struggling against these standards and can be avoided by understanding the requirements, applying normalization, as well as a healthy dose of simple common sense. In this session I will give an overview of how to design a relational database, allowing you to work with the data structures instead of against them. This will let you use SQL naturally, enabling the query engine internals to optimize your output needs without you needing to spend a lot of time thinking about it. This will mean less time trying to figure out why SUBSTRING(column,3,1) = ‘A’ is killing your performance, and more time for solving the next customer problem.

Relational Design Critique

The process of designing a relational database is not overly complex, and may be done by almost anyone on the development team. The process requires one to take the time to understand the requirements, when they exist, and apply a straightforward set of transforms to produce table structures that meets the needs. The tough part is that the process requires time and experience, neither of which anyone has enough of. In this session, to help the attendee differentiate right-enough designs from overly simple or overly complex designs, we will look at a variety of database snippets, each inspired from a real life design. We will discuss the pros and cons of the approach taken, and consider possible remediations to learn from a failure that was made by someone else.

Also, during the lunch hour, between sessions, I will be hanging out in the SQL Jedi Clinic, which is described as:

“We will have a room setup for you to ask our SQL Jedi Master’s for assistance with any current challenges you might be having. Look for this image posted at the door.

https://i.imgur.com/GJWnegF.png

I will be wearing my speaker shirt for this one for sure… Jedi robe. May the fourth be with you always.


The post Speaking at SQL Saturday Jacksonville on May the Fourth appeared first on Simple Talk.


from Simple Talk http://bit.ly/2WgLG8q
via

Thursday, April 25, 2019

Building an AngularJS Application with ASP.NET Core

Many applications today have similarities when it comes to separating the front- and back-ends. It means that the back-end can be hosted anywhere: in the cloud or on a dedicated server. There can be many serverless functions. It can be created in any programming language, using any stack tools of your choice. The same can happen to the front-end: you can go from a Single Page Application (SPA) loading everything through Ajax or use any framework to render your data from the server synchronously.

For SPAs, AngularJS has always appeared as an excellent choice because of its asynchronous nature, modularization via components, and the templating system which allows easy reuse of pieces of screens and logic. For the back-end, ASP.NET services have proven their value and effectiveness when it comes to speed, security, and even asynchronicity of the endpoints.

In this article, you’ll learn how to match both worlds in a concise and fully working application for the management of notes built on top of AngularJS in the front and an ASP.NET API in the back.

Setting Up

First, you’ll need to have Visual Studio Community Edition properly installed. Also, make sure to have installed the latest versions of .NET Core and ASP.NET Core frameworks as well. Then, select the option File –> New Project, then ASP.NET Core Web Application. Fill in the blank spaces as shown in Figure 1.

Figure 1. Creating a new ASP.NET Core application project.

Once you’ve finished, click OK. You’ll be requested to select the project template. Note here that you also have an option for an Angular template which you won’t select since the focus is on learning how Angular works separately from the .NET project itself. It’ll help you to understand both worlds working independently and see how a front-end application usually communicates with the back-end, specifically with Angular projects.

Select the API option (Figure 2), which will create several files, including a ready-to-use API with the four main HTTP methods for CRUD operations: GET, POST, PUT and DELETE. That’ll be useful for testing purposes.

Remember not to select anything else: you won’t use any authentication mechanism nor Docker support to keep this example simple.

Figure 2. Selecting the project template for ASP.NET Core application.

Now, set up the configurations for the Angular side. Since you did not install the Angular template in the wizard process, you’ll have to do that manually via command line. Before that, you need to install the latest version of Node.js and npm (Node package manager). It will be helpful to install and configure the proper packages directly from the official CDN sources.

Navigate to the Node.js website and download the proper installer for your OS. Pay attention to the version of your OS, whether it is 32-bit or 64-bit. Conclude the installation just like shown on the Node website instructions. Once you’re done, check the version in your command line:

node -v
npm -v

Great. Now, install Angular CLI. Angular CLI is a command line interface to scaffold apps for AngularJS based on its official packages, making the whole process of building an Angular app more productive and concise. For that, run the following command:

npm install -g @angular/cli

The -g flag will make sure to install it globally, that is, for everyone in your machine. Wait until it’s finished and, then, run the second following command:

ng new angular-simpletalk --skip-install

Note: If you don’t have Git installed, a warning message could appear at the end of the command, but don’t worry, it won’t prevent the project from being created.

Notice that the command ng will only be available once you’ve installed the Angular CLI tool. It is the official command for Angular operations in the command line. The command new, in turn, is responsible for creating the whole structure of the project, initializing it and creating the necessary files (HTML, CSS, and JavaScript) with preset configs that’ll be important during development. Figure 3 shows the questions the installer will ask you, such as if you’d like to enable Angular routing to the application (which you’ll say yes, since you’ll need this to navigate through pages in the app), and which stylesheet format you’d like to use (plain CSS, in case).

Figure 3. Creating a new Angular project via Angular CLI.

This will generate a bunch of folders and files inside the /angular-simpletalk directory. After it’s finished, go to the Visual Studio project, spot these assets and move them to the root directory, the same as the ASP.NET Core files. This is because the files need to be placed at the same level as the ASP.NET project.

Run these last commands to have the Angular HTTP dependency added as a dependency to the project:

npm install @angular/core@latest
npm install @angular/http@latest
npm install

You’ll need the HTTP package of Angular to make requests to the API.

Making the First Call to the API

To make HTTP requests in Angular, you first need to import the proper modules from the dependency packages imported earlier. Navigate to the /src/app/app.module.ts file and modify it as follows:

import { BrowserModule } from '@angular/platform-browser';
import { NgModule } from '@angular/core';
import { AppRoutingModule } from './app-routing.module';
import { AppComponent } from './app.component';
import { FormsModule } from '@angular/forms';
import { HttpModule } from '@angular/http';
@NgModule({
  declarations: [
    AppComponent
  ],
  imports: [
    BrowserModule,
    AppRoutingModule,
    FormsModule,
    HttpModule
  ],
  providers: [],
  bootstrap: [AppComponent]
})
export class AppModule { }

Notice that you’ve added two new imports: the HTTP and Forms modules. These are required because the application will not only send requests but also send them from web forms in later examples. The rest of the file remains the default.

Next, comes the component (specifically the file app.component.ts) that is responsible for making the request call itself. Change its content to the following:

import { Component, OnInit } from '@angular/core';
import { Http } from '@angular/http'
@Component({
  selector: 'app-root',
  templateUrl: './app.component.html',
  styleUrls: ['./app.component.css']
})
export class AppComponent implements OnInit {
  constructor(private _httpService: Http) { }
  accessPointUrl: string = 'https://localhost:44324/api/values';
  apiValues: string[] = [];
  ngOnInit() {
    this._httpService.get(this.accessPointUrl).subscribe(values => {
      this.apiValues = values.json() as string[];
    });
  }
}

Apart from the component imports Angular usually makes use of when it comes to this type of file, you also include the import of HTTP previously set. The constructor of this component receives the httpService as an injected parameter and calls the API inside the ngOnInit method, through the get()method. Note that the URL of the API is stored in a variable and passed to this method. The subscribe method, in turn, guarantees that the result will be stored asynchronously into the variable apiValues, once everything’s done.

Finally, adapt the app.component.html to read the retrieved data. Open it and change its contents to the following:

<!--The content below is only a placeholder and can be replaced.-->
<div>
  <h1>Application says what?</h1>
  <ul>
    <li *ngFor="let value of apiValues"></li>
  </ul>
</div>
<router-outlet></router-outlet>

An Angular directive inside of the <li> element iterates over the list of values the API returned and was stored into apiValues public variable. For now, you’ll keep using the autogenerated API endpoints, that is, those which return hardcoded values just as a matter of testing.

It happens that the application still won`t work because of a CORS problem. You must enable it to allow the Angular application to call an API hosted in a different address. For this, you`ll have to add the following content to the ConfigureServices method in Startup class:

services.AddCors(options =>
      {
        options.AddPolicy("CorsPolicy",
            builder => builder.AllowAnyOrigin()
            .AllowAnyMethod()
            .AllowAnyHeader()
            .AllowCredentials());
      });

As well as this one to the Configure method:

app.UseCors("CorsPolicy");

To run the application, make sure to first run the API application in the back-end. Then, in the command line, run the following command:

ng serve

It’ll both start your Angular application and watch for file changes. Access the address http://localhost:4200/ with your browser and you’ll see something like:

Figure 4. Showing values from the API with Angular.

Creating a Notes App CRUD

Now, you’ll create a complete application that manages notes from scratch. It’s helpful for you to understand how CRUD operations work in Angular-based apps. Figure 5 shows how the app will look when it’s complete:

Figure 5. The final screen of the Angular app.

Within the same application, create a new folder called Models. It’ll host the POCOs (Plain Old C# Objects). Then create a new class naming it Note.cs. Add the following content to it:

using System.ComponentModel.DataAnnotations;
namespace AngularFirstSteps.Models
{
  public class Note
  {
    public int Id { get; set; }
    [Required]
    public string Title { get; set; }
    [Required]
    public string Description { get; set; }
  }
}

It is made of simple attributes and getters and setters. Next, create a new controller class that will store the REST operations for each of the CRUD ones. Give it the name of NotesController.cs and add the following content:

using System;
using System.Collections.Generic;
using System.Linq;
using System.Threading.Tasks;
using AngularFirstSteps.Models;
using Microsoft.AspNetCore.Mvc;
namespace AngularFirstSteps.Controllers
{
  [Produces("application/json")]
  [Route("api/[controller]")]
  [ApiController]
  public class NotesController : ControllerBase
  {
    private static List<Note> notes = new List<Note>();
    private static int count = 0;
    static NotesController()
    {
      Note note1 = new Note
      {
        Id = count++,
        Title = "30 min run",
        Description = "It's important to your health"
      };
      Note note2 = new Note
      {
        Id = count++,
        Title = "Call the plumber",
        Description = "To fix the plumbing"
      };
      notes.Add(note1);
      notes.Add(note2);
    }
    // GET api/notes
    [HttpGet]
    public IEnumerable<Note> Get()
    {
      return notes;
    }
    // GET api/notes/5
    [HttpGet("{id}")]
    public async Task<IActionResult> Get(int id)
    {
      return Ok(notes.Where(note => note.Id == id).FirstOrDefault());
    }
    // POST api/notes
    [HttpPost]
    public async Task<IActionResult> Post([FromBody] Note note)
    {
      note.Id = count++;
      notes.Add(note);
      return CreatedAtAction("Get", new { id = note.Id }, note);
    }
    // PUT api/notes/5
    [HttpPut("{id}")]
    public async Task<IActionResult> Put(int id, [FromBody] Note note)
    {
      Note found = notes.Where(n => n.Id == id).FirstOrDefault();
      found.Title = note.Title;
      found.Description = note.Description;
      return NoContent();
    }
    // DELETE api/notes/5
    [HttpDelete("{id}")]
    public async Task<IActionResult> Delete(int id)
    {
      notes.RemoveAll(n => n.Id == id);
      return NoContent();
    }
  }
}

It’s basically the same thing as the previous Controller class, with the slight difference that each of our endpoints are now async, i.e., the client (Angular application) can make calls to the back-end REST endpoints and wait for them to respond asynchronously via callback functions.

The connection to a database, or anything like that, will not be covered as not to lose the focus of the article. Here, the operations will be stored in a static list, which will simulate a database, at least while the ASP.NET application is up in the server.

Now it’s time to set up our new components. There are three components to this app:

  1. app.component: it was already created within the application setup. It will call the next two templates;
  2. notes-listing.component: it will handle the operations of listing in a table the notes were added;
  3. add-update-notes.component: it will store the form and the other CRUD operation links.

For that, run the following commands at the command line (inside the “\AngularFirstSteps\angular-first-steps\src\app” folder):

ng generate component NotesListing 
ng generate component AddUpdateNotes

Run, in sequence, another command for the creation of an Angular service; this one is responsible for the REST service orchestration:

ng generate service NotesService

This will generate the following new folder structures:

Figure 6. New components folders.

The new components must be included in the app.module.ts file, which registers all the components, modules and new services of an Angular app. The final content of the file must be exactly as

import { BrowserModule } from '@angular/platform-browser';
import { NgModule } from '@angular/core';
import { AppRoutingModule } from './app-routing.module';
import { AppComponent } from './app.component';
import { RouterModule, Routes } from '@angular/router';
import { FormsModule } from '@angular/forms';
import { HttpModule } from '@angular/http';
import { HttpClientModule } from '@angular/common/http';
import { NotesListingComponent } from './notes-listing/notes-listing.component';
import { AddUpdateNotesComponent } from './add-update-notes/add-update-notes.component';
import { NotesService } from './notes-service.service';
const appRoutes: Routes = [
  { path: '', component: AppComponent }
];
@NgModule({
  declarations: [
    AppComponent,
    NotesListingComponent,
    AddUpdateNotesComponent
  ],
  imports: [
    BrowserModule,
    RouterModule.forRoot(appRoutes),
    AppRoutingModule,
    FormsModule,
    HttpModule,
    HttpClientModule
  ],
  providers: [NotesService],
  bootstrap: [AppComponent]
})
export class AppModule { }

Some basic actions:

  • Add the proper imports of the needed modules, components and services at the beginning of the file. Here, the modules will be:
    • Routers: enables navigation from one view to the next as users perform application tasks. We’ll only use to state that the root address of the application will always redirect to our home view;
    • Forms: implements a set of directives and providers to communicate with native DOM elements when building forms to capture user input;
    • Http: offers a simplified client HTTP API for Angular applications that rests on the XMLHttpRequest interface exposed by browsers. We’ll need to communicate with our REST endpoints;
    • HttpClient: implements an HTTP client API for Angular apps that relies on the XMLHttpRequest interface exposed by browsers;
  • Add the name of the components to each respective NgModule declarations tag; each of the imported modules to the imports tag, and the service to the providers one.

All set to be used. Start by coding notes-service.service.ts, which will be responsible for calling the back-end API. That’s its code:

import { Injectable } from '@angular/core';
import { HttpClient, HttpHeaders } from '@angular/common/http';
@Injectable()
export class NotesService {
  private headers: HttpHeaders;
  private url: string = 'https://localhost:44324/api/notes';
  constructor(private http: HttpClient) {
    this.headers = new HttpHeaders({ 'Content-Type': 'application/json' });
  }
  public get() {
    return this.http.get(this.url, { headers: this.headers });
  }
  public add(payload) {
    return this.http.post(this.url, payload, { headers: this.headers });
  }
  public remove(payload) {
    return this.http.delete(this.url + '/' + payload.id, { headers: this.headers });
  }
  public update(payload) {
    return this.http.put(this.url + '/' + payload.id, payload, { headers: this.headers });
  }
}

Please, don’t forget to pay attention to the right port your ASP.NET application was started with. Change it properly in the accessPoint variable. Nothing too exceptional here, just a function for each of the corresponding endpoints of the API receiving a payload and returning the same result our API returns. The pure logic will be spread out over the other components.

Take a look at the add-update-notes.component.ts file:

import { Component, EventEmitter, Input, Output, OnInit } from '@angular/core';
@Component({
  selector: 'app-add-update-notes',
  templateUrl: './add-update-notes.component.html',
  styleUrls: ['./add-update-notes.component.css']
})
export class AddUpdateNotesComponent implements OnInit {
  @Output() noteCreated = new EventEmitter<any>();
  @Input() note: any;
  constructor() {
    this.clearNotes();
  }
  ngOnInit() {
  }
  // Create an empty note object
  private clearNotes = function () {
    this.note = {
      id: undefined,
      title: '',
      description: ''
    };
  };
  public addUpdateNote = function(event) {
    this.noteCreated.emit(this.note);
    this.clearNotes();
  };
}

In Angular, a component can emit an event using @Output that’ll be, in turn, attached to an EventEmitter. The same will happen to @Input for an Angular model object that has its attribute bindings mapped in the HTML page. Both must be imported from the @angular/core default module.

There are two functions: one for handling the cleanup stuff, that is, recreating the note object with default values, and another one for dealing with the event emitting when a note is created. Since the same button will be used for both operations of saving and updating, its function will be responsible for emitting the respective note object.

The following is the HTML code for the respective add-update-notes.component.html:

<div>
  <h2 *ngIf="!note || note.id === undefined">Add note</h2>
  <h2 *ngIf="note && note.id !== undefined">Update note</h2>
  <form>
    <div class="form-group">
      <label for="title-input">Title:</label>
      <input name="title" type="text" id="title" [(ngModel)]="note.title" class="form-control" />
    </div>
    <div class="form-group">
      <label for="desc-input">Description:</label>
      <textarea name="description" type="text" id="desc-input" [(ngModel)]="note.description" class="form-control" ></textarea>
    </div>
    <button type="button" class="btn btn-primary" (click)="addUpdateNote($event);">Save</button>
  </form>
</div>

Here, it’s just mapping the right <h2> title based on which type of operation you’re doing. In other words, both register and update of a note will be handled by this page. The ngModel attribute maps each of the note object property that will receive the input value. The (click) attribute will map the corresponding function in the component js for receiving the event and pass it on.

The next component covered is the notes-listing.component.ts:

import { Component, EventEmitter, Input, Output, OnInit } from '@angular/core';
@Component({
  selector: 'app-notes-listing',
  templateUrl: './notes-listing.component.html',
  styleUrls: ['./notes-listing.component.css']
})
export class NotesListingComponent implements OnInit {
  @Input() notes: Array<any>;
  @Output() recordDeleted = new EventEmitter<any>();
  @Output() newClicked = new EventEmitter<any>();
  @Output() editClicked = new EventEmitter<any>();
  public delete(data) {
    this.recordDeleted.emit(data);
  }
  public edit(data) {
    this.editClicked.emit(Object.assign({}, data));
  }
  public new() {
    this.newClicked.emit();
  }
  ngOnInit() {
  }
}

For the notes listing, you’ll need an input that is also an array. It’ll receive its values from the service that, in turn, will catch them from the server endpoint. Each output event emitter will be attached to the corresponding function for editing, removing or creating a new (blank) note. Note that for the edit operation, you’re passing a copy of the data, instead of the original, in order to evict it to be modified.

That’s the content of the notes-listing.component.html:

<table class="table mt-5">
  <thead>
    <tr>
      <th scope="col">Title</th>
      <th scope="col">Description</th>
      <th scope="col">Actions</th>
    </tr>
  </thead>
  <tbody>
    <tr *ngIf="notes?.length == 0"><td>No data</td></tr>
    <tr *ngFor="let note of notes">
      <td></td>
      <td></td>
      <td>
        <a href="#" class="m-1" (click)="edit(note)">Edit</a>
        <a href="#" class="m-2" (click)="delete(note)">Delete</a>
      </td>
    </tr>
  </tbody>
</table>
<button type="button" class="btn btn-primary mb-2" (click)="new()">New</button>

This HTML basically exposes the table that will store the list of notes. Note that it’s using a ngIf directive to check if the list of notes is empty in order to show a proper message instead of the listing. Otherwise, the table will be iterated over the notes object as well as set each corresponding value to the columns. The rest of the code deals with the three links that’ll call the edit, delete and new functions.

Finally, analyze the code for the app.component.ts:

import { Component, OnInit } from '@angular/core';
import { NotesService } from './notes-service.service';
import * as _ from 'lodash';
@Component({
  selector: 'app-root',
  templateUrl: './app.component.html',
  styleUrls: ['./app.component.css']
})
export class AppComponent implements OnInit {
  public notes: Array<any>;
  public currentNote: any;
  constructor(private notesService: NotesService) {
    notesService.get().subscribe((data: any) => this.notes = data);
    this.currentNote = this.getDefaultNote();
  }
  private getDefaultNote() {
    return {
      id: undefined,
      title: '',
      description: ''
    }
  }
  public createUpdateNote = function (note: any) {
    let noteWithId = _.find(this.notes, (el => el.id === note.id));
    if (noteWithId) {
      const updateIndex = _.findIndex(this.notes, { id: noteWithId.id });
      this.notesService.update(note).subscribe(
        this.notes.splice(updateIndex, 1, note)
      );
    } else {
      this.notesService.add(note).subscribe(
        noteRecord => {
          note.id = noteRecord.id;
          this.notes.push(note)
        }
      );
    }
    this.currentNote = this.getDefaultNote();
  };
  public editNote = function(record: any) {
    this.currentNote = record;
  };
  public newNote = function () {
    this.currentNote = this.getDefaultNote();
  };
  public deleteNote(record) {
    const deleteIndex = _.findIndex(this.notes, { id: record.id });
    this.notesService.remove(record).subscribe(
      result => this.notes.splice(deleteIndex, 1)
    );
  }
  ngOnInit() {
  }
}

The first important thing about this code is that it’s injecting the NotesService in the constructor of the component since it is when the component is initiated that it will retrieve all the notes from the API and store them in the notes array. The function createUpdateNote() is the engine to decide whether to call the POST or PUT in the API. It’ll be called from the HTML page, specifically from the subcomponent tags. If the note id is passed in as an argument is into the current list of notes, it means it is an update. Otherwise, register a new one.

Note that it’s using an underscore _ operator to perform the search in the array. This is because you’ve imported Lodash at the beginning of the file. Lodash makes JavaScript easier by taking the hassle out of working with arrays, numbers, objects, strings, etc.

The rest of the functions will take care of placing the current note object to the currentNote variable or removing it from the notes array. Here is the content of the app.component.html file:

<section class="jumbotron">
  <div class="container">
    <div class="row">
      <div class="col-md-12">
        <app-add-update-notes (noteCreated)="createUpdateNote($event)" [note]="currentNote"></app-add-update-notes>
      </div>
    </div>
    <div class="row">
      <div class="col-md-12">
        <app-notes-listing [notes]="notes" (editClicked)="editNote($event)" (newClicked)="newNote()" (recordDeleted)="deleteNote($event)"></app-notes-listing>
      </div>
    </div>
  </div>
</section>

Here, the code is invoking the two components created for add/update and listing of the notes. Note that they must have the exact same name as the ones put into the selector attribute of the @Component annotation. Pay attention, as well, to the bindings made from each subcomponent’s functions to this component’s functions.

The reader may have noticed that a lot of CSS classes common to Bootstrap are used. This is because you’re composing the views using it, and now you need to install its npm package via the following command:

npm install bootstrap –save

Then, go to the styles.css file and add the following content:

@import '~bootstrap/dist/css/bootstrap.min.css';

This will provide the style of Bootstrap to the HTML. That’s it.

In order to run the application, start your ASP.NET application and go to the command line and run:

ng serve

Then, access the URL http://localhost:4200 and test your application.

Conclusion

You can access the source code for this project here. There’s a lot more to explore on Angular, and the official docs can help you. No matter what subject, ASP.NET will follow the path and give excellent solutions for API calls and more.

Take your time to explore it and make your own changes. Add more fields, validations, and interactions to the screen. Have fun!


The post Building an AngularJS Application with ASP.NET Core appeared first on Simple Talk.


from Simple Talk http://bit.ly/2UCaohD
via

Implementing a phone number based login/signup

In today’s world, a user interacts with various apps/websites which require them to login or sign up via using their email address. There are a high chances of a person forgetting the username and the associated password to login or just completely giving up the sign up process as it asks a lot of information. Furthermore, from the app developer point of view, they will need to perform extra steps to verify the user’s email address.

One can implement a social login mechanism like github, facebook, google etc. However, users sometimes want to limit the data that gets shared with the app developers.

This leads to another solution of using phone number as a way to login to the service. It is easy to remember the phone number and we can implement a mechanism to verify that the user is in possession of this number via text messages. This article explain a simple idea of how to implement phone number based login / signup mechanism.

How it works?

We can separate the sign up process into two parts.

  1. Login Flow : In this phase, user submits the phone number to app backend and receives a token.
  2. Verify Flow : In this phase, user submits the received token in the previous phase and sends to backend. On validation, user is logged in and a session cookie is issued.

Login Flow

Figure 1: Login Flow

In order to authenticate the user account, user submits the phone number to the App Backend (an example end point can be /login). On submission, user is shown a screen where a token can be submitted. App backend validates the input parameter and enrichies/ hydrates the request with extra information like (IP address, geo information, device information etc). All this information can be used to generate a fingerprint of a user request which can be used for later security measures.

This enriched and validated request is submitted to user service which generates a token and associate with these request. Token generation is an important process here.

Token Generation

The aim of the token is to make sure we can

  • expire the token so that same token cannot be used multiple times.
  • Invalidate a token so that if a user enters the phone number multiple times then we can invalidate the previously generated token issue a new one.

We can use a sql or a no-sql datastore for this scenario. For this example, we can take use memcache as a key value datastore. We can use the inputted phone number as the key and a randomly generated 6 digit token as the value which expires in 5 minutes.

{“Key” : “+1206-123-1234”, “Value”:”123456”}

Send SMS

User service then calls a telephony API to send this token to the user’s phone number. There are various companies which provides this service (ex: Twilio, Plivo etc).


Verify Flow

Figure 2: Verify Phone Number Flow

On reception of the token from login flow step, users enters the token on the form. This form consists of a hidden phone number field which is submitted to an endpoint (for ex: /verify_phone) with the the token. Once again the app backend hydrates the request and validates the input parameters. The user service does a look up with the phone number as the key from the memcache data store. A session cookie is issued If the token exists and matches with the input token. This session cookie is sent as response header to the client which can persist it for later requests.

Sign up vs Login

On successful token match, user service should do a look up in the user database to see if there is an already existing account with the same phone number, if that phone number is present then the user should be logged into that account.

In case, there is not account present, then the user account should be created first and then the user should be logged into newly created account.

Few notes about security and data store selection

While implementing this approach, we should be careful about abuse scenarios. The /login endpoint can be attacked by a script which keeps on sending a request with same phone numbers. This can be handled by implementing a check of number of attempts made before sending a text out with the token in login flow.

Another issue is to consider what happens if a user changes the phone number. This involves implementing a similar mechanism of verifying the new phone number and updating the user account if that is successful.

Also, we need to consider the backend data store for this approach. In our example, we considered memcache as a key value data store which if goes down can bring this mechanism down. We can use Redis instead, as it is a persistent key value store which provides key expiration mechanism. If we want to handle key expiration logic ourselves using another mechanism (like cron) then mysql / mongodb can also be used as a datastore.

Conclusion

In this article, we talked about a simple approach towards implementing a phone number based authentication mechanism. This definitely removes the mental load on the user to remember the email and passwords across various services. Various popular companies (Uber, WhatsApp, Lyft, Telegram etc) are utilizing this approach to drive the signup and login growth metric which is a strong validation for this approach. Finally, as with any approach towards building a software functionality, one should consider the pros and cons of this approach along with the security and data store issues that we talked about.

The post Implementing a phone number based login/signup appeared first on Simple Talk.


from Simple Talk http://bit.ly/2GEIhdZ
via

Wednesday, April 24, 2019

ASP.NET Core 3.0 Configuration Factsheet

In classic ASP.NET and ASP.NET MVC, application settings and configuration were much easier. There was a global configuration file—web.config—and, within it, there was a section named appSettings that could receive flat name/value pairs of string data. Once read, an application setting had to be converted to the most appropriate type, whether numeric, Boolean or date. Any change to any sections of the web.config file, including the appSettings section, caused the application to restart, and restarting the application would reload up-to-date settings.

It was not perhaps super-optimized—any change caused a restart—but it was super-simple. To be precise, one could also offload the entire subtree of application settings to an external configuration file. In this case, any changes to the configuration would not cause a restart but, on the other hand, leave unsolved the problem of reloading the updated configuration tree!

What about ASP.NET Core?

If you check out the Microsoft documentation, you might be frightened by the number of possible ways you can manage configuration data, whether in reading, writing, reloading, composing, filtering, injecting and the like.

The main purpose of this article is to clarify things by illustrating the most common application scenarios rather than just going through the full list of available options.

Understanding the Configuration DOM

The configuration of an ASP.NET Core application is based on a list of name-value pairs collected at runtime from a variety of data sources—primarily, but not necessarily, one or more JSON files.

All loaded values are composed into a single container. The container is not necessarily a flat dictionary of attributes and related values. Collected data can have any level of nesting and can be hierarchical as well. The root container is an object that implements the IConfigurationRoot interface. Configuration data is commonly built in the constructor of the startup class.

public class Startup
{
    public IConfigurationRoot Configuration { get; }
    public Startup(IHostingEnvironment env)
    {
        var dom = new ConfigurationBuilder()
            .SetBasePath(env.ContentRootPath)
            .AddJsonFile("appsettings.json")
            .Build();

        // Save the configuration DOM
        Configuration = dom;

        // Next tasks:
        //   - Load the config data into a POCO class
        //   - Share the POCO class with the rest of the app
    }
}

The constructor needs to be injected into the IHostingEnvironment reference to set the base path to locate all the JSON file(s) used to populate the configuration Document Object Model (DOM).

The ConfigurationBuilder class is responsible for aggregating configuration values together and building the DOM. The aggregated data should be saved within the startup class to be used later during the initialization of the pipeline. As mentioned, the DOM results from the combination of values that can possibly come from multiple data sources. Here’s an example:

var dom = new ConfigurationBuilder()
    .SetBasePath(env.ContentRootPath)
    .AddJsonFile("appsettings.json")
    .AddJsonFile("appcredentials.json")
    .AddJsonFile("appui.json")
    .AddEnvironmentVariables()
    .AddInMemoryCollection(
        new Dictionary<string, string> {
            {"Timezone", "+1"}
        })
    .Build();

The DOM is populated progressively, meaning that data providers are called in the same sequence in which they are concatenated to the configuration builder, and each is given a chance to override entries previously set. If the same entry, say Timezone, is contributed by multiple providers, then the last wins.

You can import settings from any number of JSON files, and each JSON file can have its own structure. Note that JSON files support a special naming convention:

file-name.[Environment].json

The [Environment] placeholder refers to the current environment name. For example, if the application is running in Development mode, then a file linked to the configuration tree with the following name is loaded.

appsettings.development.json

The same file, instead, would be ignored if the application is running in Staging or Production mode. Note also that the overriding rule holds, and the development settings file loaded later has still the chance to override any existing settings.

What if a JSON file is missing? The actual effect depends on the exact syntax used to invoke the method AddJsonFile. As in the code snippet above—no additional parameter but the file name—an exception would be thrown as the file is considered mandatory. The following syntax, instead, makes it optional.

var dom = new ConfigurationBuilder()
        .SetBasePath(env.ContentRootPath)
        .AddJsonFile("appsettings.json", optional: true);

The AddEnvironmentVariables methods add all known environment variables to the DOM and AddInMemoryCollection adds the specified dictionary.

Direct Access to the Configuration DOM

To read configuration data programmatically, you can use an indexer syntax and specify a case-insensitive path string that points to the information you want to read. To delimit properties in a hierarchical schema, you use the colon (:) symbol. For example, consider the following JSON file:

{
   "print" : {
       "pageFormat" : "A4",
       "color": "true"
   },
   "grid" : {
       "sorting" : "false",
       "search" : "false"
   }
}

The simplest way to read the pageFormat setting is the following.

var pageFormat = Configuration["print:pageformat"];

It is important to note that, by default, the setting is returned as a plain string and must be programmatically converted to its actual concrete type before further use. There’s also a strongly-typed API, however.

var fmt = Configuration.GetValue<int>("print:pageformat");

The GetSection method also lets you select an entire configuration subtree where you can act on using both the indexer and the strongly-typed API.

var fmt = Configuration.GetSection("print")
                       .GetValue<int>("pageformat");

Note that all the methods for direct access work on the DOM as a whole, regardless of the actual source of the data, whether JSON, memory, command line or whatever.

Loading the Configuration in a POCO Class

Aside for different syntax and the support for multiple data providers (including those you can write yourself for reading from your own data sources, such as database tables), the ASP.NET Core configuration API is so far functionally equivalent to that of the old ASP.NET. However, here’s a first relevant difference—loading settings into a C# class.

In classic ASP.NET, it was possible, but it was entirely up to you. In ASP.NET Core, instead, you can use the Bind method on the configuration root object.

var appSettings = new GlobalAppSettings();
Configuration.Bind(appSettings);

The net effect is that the freshly created instance of the POCO class of your choice (GlobalAppSettings in the code snippet) is automatically populated with all entries in the configuration DOM that match—by name—the public interface of the class. The binding rules are the same as in the controller’s model binding layer.

Once the custom POCO configuration class has been populated, you can run your own validation code to make sure that only valid settings are flowing into the application. Note that the POCO class is your class, meaning that you can give it all the helper methods you think you need.

Sharing the Configuration Settings Across the Application

The final step to conclude the first round of application settings in ASP.NET Core 3.0 is sharing the configuration POCO class with the rest of the application. In ASP.NET Core, the recommended approach is using the native Dependency Injection layer. All you need to do is adding the freshly created (and validated) instance of the GlobalAppSettings class as a singleton.

var appSettings = new GlobalAppSettings();
Configuration.Bind(appSettings);
services.AddSingleton(appSettings);

Next up, a controller class that needs to process configuration data will only have to import via Dependency Injection the global singleton instance of the GlobalAppSettings class.

public DemoController(GlobalAppSettings settings)            
{
   ...
}

Another equally valid option consists of creating your own singleton.

public class GlobalAppSettings
{
    public static GlobalAppSettings Instance = 
                 new GlobalAppSettings();
 
    public GlobalAppSettings()
    {
        :
        Instance = this;
    }
}

In this latter case, you don’t need to inject and import any reference to GlobalAppSettings.

var settings = GlobalAppSettings.Instance;

After leaving the boundaries of the startup class, the singleton will be up and running and fully initialized. A plain reference to the Instance property will be enough to read it. Being a configuration object, there should be no need to update it during the course of the program. If not, well, that could become an issue as updates may occur simultaneously.

Note that if you don’t like loading the configuration DOM into an aptly created POCO class, you can still share the configuration DOM with the rest of the application by simply passing the IConfigurationRoot object via the ASP.NET Dependency Injection system.

Moving One Step Further

So far so good. What’s been achieved is exactly the same as in old ASP.NET—just done better and with less effort. In other words, at this stage, the ASP.NET Core application can load all of its configuration settings from a variety of data sources, compose all entries in a single DOM, load it into C# POCO class and share either via a singleton in the DI system or as a handmade singleton object.

The ASP.NET Core documentation presents a slightly different way to deal with the application configuration data. It achieves the same purpose, of course, but does that through an additional layer of abstraction—the IOptions<T> wrapper. Say you have just built your configuration DOM and are ready to load it into a POCO class. Here’s the alternative code you can use. Needless to say, the code below belongs to the ConfigureServices method of the startup class.

services.AddOptions();
services.Configure<GlobalAppSettings>(Configuration);

The net effect of this code is double. First, it maps the configuration DOM to a freshly created instance of the GlobalAppSettings class and, second, it shares the settings object through the Dependency Injection system wrapped up in an IOptions<GlobalAppSettings> container. As a result, to access the settings object from within a controller class, you now need some slightly different code:

public DemoController(
             IOptions<GlobalAppSettings> options)            
{
   Settings = options.Value;
   ...
}

The controller class receives an IOptions<T> object and must dereference it to the actual configuration class via a call to the Value property.

Should you use IOptions<T>? And, if yes, why?

Frankly, there’s no clear reason for using IOptions<T> except that it is the most commonly discussed scenario. A couple of (minor) differences with the plain singleton scenario discussed earlier are:

  • It implements a sort of lazy loading of the configuration model. The actual mapping of the configuration data onto the embedded object occurs upon the first ever call to the property Value.
  • It provides a built-in mechanism to validate the configuration class.

Both points can be read as good points or bad points. It’s all about your perspective of things. For sure, by using IOptions<T> or the direct settings class, you won’t lose any of your programming power and going through IOptions<T> makes it slightly longer.

My personal idea is that the ASP.NET Core team first devised a more abstract approach to the whole topic of configuration data based on IOptions<T> and later realized that at least the most basic scenario—shared and immutable singleton—could have been implemented more simply, and they added the Bind method on the configuration root object.

What If You Want to Reload Settings?

As mentioned at the beginning of the article, in old ASP.NET, very occasionally someone cared about reloading settings on the fly without restarting the application. It is technically possible though. It only requires that you expose some dedicated endpoint that can be invoked (maybe even from the address bar with no dedicated admin UI) which will re-read the configuration sources and refreshes the current memory status. The application will use updated settings starting with the next request.

In ASP.NET Core, there’s also some built-in support for this scenario, and it passes through a couple of interfaces conceptually analogous to IOptions<T>. They are IOptionsSnapshot<T> and IOptionsMonitor<T>.

The former works like IOptions<T> except for one aspect. It doesn’t cache the configuration as an immutable singleton loaded at the application startup but reloads it for every single request. Put another way, the instance of the T type is shared as a singleton if you use IOptions<T> and is shared as a scoped object—singleton for the lifetime of the current request—if you use IOptionsSnapshot<T>.

A solution based on IOptionsSnapshot<T> has the power of getting up-to-date settings the first request after someone modifies the JSON file from which settings are loaded or one of the in-memory values or one of the environment variables.

What about IOptionsMonitor<T> instead?

If used instead of IOptions<T>, it still maintains an immutable singleton but adds some additional capabilities. In particular, if the JSON file(s) from which configuration is loaded have a file watcher mechanism attached, the options monitor will be notified and will react reloading the content from the JSON file(s) upon changes. To enable file watching, you need to proceed as follows:

var dom = new ConfigurationBuilder()
        .SetBasePath(env.ContentRootPath)
        .AddJsonFile("appsettings.json", 
                         optional: true, 
                         reloadOnChange: true);

In the end, if you wish that the ASP.NET Core application silently and automatically starts using updated settings as soon as possible, then use IOptionsMonitor<T> and make sure you add JSON files to the configuration DOM with the reloadOnChange flag turned on. Finally, notice that the configuration root object still has a Reload method that can be programmatically invoked to force a DOM to reload and refresh.

Summary

Overall, the configuration API in ASP.NET Core (including the latest 3.0 version) is richer than in the past. However, the basic things you might want to do are easy to accomplish and don’t take more than just a few lines of code. At the same time, the richness of the new API results in a long list of features that may or may not be used commonly and may even generate confusion when a developer visits the official ASP.NET Core web site. The ideal approach is to learn the absolute minimum you need to know (which means how to load the configuration as an immutable singleton in a C# POCO class) and then look around in case more is required or would be good to have. Chances are that all you need is already there!


The post ASP.NET Core 3.0 Configuration Factsheet appeared first on Simple Talk.


from Simple Talk http://bit.ly/2GzB0L8
via

Introduction to SQL Server Security — Part 5

The series so far:

  1. Introduction to SQL Server Security — Part 1
  2. Introduction to SQL Server Security — Part 2
  3. Introduction to SQL Server Security — Part 3
  4. Introduction to SQL Server Security — Part 4
  5. Introduction to SQL Server Security — Part 5
  6.  

SQL Server provides a number of tools for helping you ensure that your environment and data remain secure. Some of the most important of these come in the form of catalog views, dynamic management views (DMVs), and built-in system functions. By incorporating them into your T-SQL statements, you can retrieve important security-related information about your SQL Server environment, such as which principals are enabled, what permissions are assigned to those principals, or how auditing is implemented on database objects.

In this article, I cover a number of these views and functions and provide examples of how you can use them to retrieve details about your system’s security. I created the statements in SQL Server Management Studio (SSMS), using SQL Server 2017, although most of the information I cover can apply to SQL Server editions going back to 2014 or earlier.

Microsoft divides security-related catalog views into server-level views, database-level views, encryption-related views, and auditing-related views. I’ve taken the same approach here, providing a section for each type. Because there are fewer security-related DMVs and system functions, I’ve provided only a single section for each of them.

In all cases, I cover only a portion of the available views and functions, but enough to give you a sense of how you can use them when administering a SQL Server instance. Just be aware that Microsoft provides plenty of others, so be sure to refer to SQL Server documentation as necessary to learn about those views and functions I haven’t covered here.

Server-Level Catalog Views

SQL Server offers numerous security-related catalog views that operate at the server level. Two of the most useful are sys.server_principals and sys.server_permissions. The sys.server_principals view returns a row for each existing server principal, and the sys.server_permissions view returns a row for each assigned server permission.

You can join these views together to see the permissions granted on specific principals. For example, the following SELECT statement returns the permissions assigned to SQL logins that have been enabled:

SELECT pr.principal_id, pr.name, pe.state_desc, pe.permission_name
FROM sys.server_principals pr INNER JOIN sys.server_permissions pe 
  ON pr.principal_id = pe.grantee_principal_id
WHERE pr.type_desc = 'SQL_LOGIN' AND pr.is_disabled = 0;

The sys.server_principals view includes the type_desc column, which indicates the principal type. SQL Server supports six types of server principals, including SQL_LOGIN, WINDOWS_LOGIN and SERVER_ROLE. The view also returns the is_disabled column, which indicates whether a principal is enabled (0) or disabled (1). Both columns are specified in the WHERE clause to filter out all but enabled SQL logins. Figure 1 shows the results returned by the SELECT statement on my system, which includes only a few test logins.

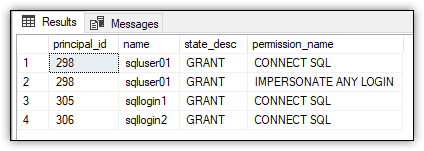
Figure 1. Permissions granted on SQL logins

You can also use the sys.server_principals view in conjunction with the sys.server_role_members view, which returns a row for each member of a fixed or user-defined server role. Because the sys.server_principals view includes all principals, including roles and logins, you can join the view to itself and to the sys.server_role_members view to retrieve the members of a specific role, as shown in the following example:

SELECT member.principal_id, member.name
FROM sys.server_role_members rm
JOIN sys.server_principals role  
  ON rm.role_principal_id = role.principal_id  
JOIN sys.server_principals member  
  ON rm.member_principal_id = member.principal_id
WHERE role.name = 'sysadmin' AND member.type_desc = 'SQL_LOGIN';

The statement limits the results to the sysadmin role and to SQL logins. Self-joining the sys.server_principals view makes it possible to retrieve both the role and login names. Figure 2 shows the results I received on my system, which indicate that the only two SQL logins are members of the sysadmin role, one of which is the sa account.

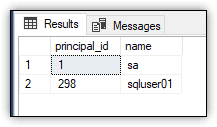
Figure 2. SQL logins in the sysadmin role

Another interesting catalog view is sys.system_components_surface_area_configuration, which returns a row for each executable object that can be enabled or disabled through SQL Server’s surface area configuration features. For example, the following statement uses the view to return a list of stored procedures included in the SMO and DMO XPs component:

SELECT database_name, schema_name, object_name
FROM sys.system_components_surface_area_configuration
WHERE state = 1 AND component_name = 'SMO and DMO XPs'
  AND type_desc = 'SQL_STORED_PROCEDURE';

The type_desc column in the WHERE clause specifies the object type (SQL_STORED_PROCEDURE), and the state column indicates that the object should be enabled (1), rather than disabled (0). Figure 3 shows the results returned on my system.

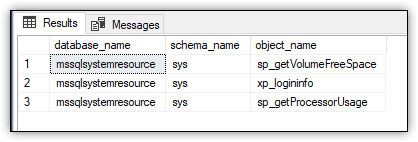
Figure 3. Stored procedures in the surface area configuration

The database_name value indicates which database contains the object. The possible values include master, msdb, and mssqlsystemresource (a read-only database that contains all the system objects).


Database-Level Catalog Views

Many of the database-level catalog views work much like their server-level counterparts, except that they’re specific to the current database. To try out some of these views, first create the Test1 database and then add the Sales schema (which will be used in later examples):

USE master;
GO
CREATE DATABASE Test1; 
GO
USE Test1;
GO
CREATE SCHEMA Sales; 
GO

After you create the database, you can run the catalog views within the context of that database. For example, you can use the sys.database_principals view to retrieve details about the existing database principals, and you can use the sys.database_permissions view to retrieve details about assigned database permissions. Similar to what you saw at the server level, you can join these views to see the permissions assigned to specific database principals. For example, the following SELECT statement returns certain types of permissions granted to the public role:

SELECT pm.state_desc, 
  pm.permission_name
FROM sys.database_permissions pm INNER JOIN sys.database_principals pr 
  ON pm.grantee_principal_id = pr.principal_id
WHERE pr.name = 'public' AND pm.class_desc = 'DATABASE';

The statement limits the results to permissions in the DATABASE class. However, the view can also return permissions for such classes as OBJECT_OR_COLUMN, SCHEMA, or DATABASE_PRINCIPAL, depending on what permissions have been assigned at the database level. Figure 4 shows the results that the SELECT statement returned on my system.

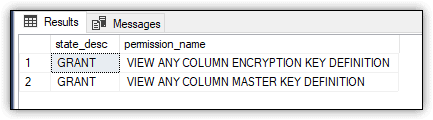
Figure 4. Database permissions granted to the public role

One way to check effective permissions without writing scripts yourself is to use Redgate’s SQL Census. It creates a report of who has access to what on your SQL Servers and makes best practice recommendations, like disabling SA accounts. It’s still in development but it’s a good starting point to check on your SQL Server permissions and undertake any necessary cleaning tasks.

SQL Server also provides database-level catalog views that do not have a server counterpart (and vice versa). For example, you can use the sys.master_key_passwords view to retrieve information about the database master key password, if the password was added by using the sp_control_dbmasterkey_password stored procedure.

To see how this works, start by creating a database master key in the Test1 database, as shown in the following example (using a stronger password than the one I’ve included here):

CREATE MASTER KEY 
ENCRYPTION BY PASSWORD = 'tempPW@56789';
GO

After you’ve created the master key, use the sp_control_dbmasterkey_password stored procedure to add a credential that specifies the same password as the one used when creating the database master key:

EXEC sp_control_dbmasterkey_password 
  @db_name = N'Test1',   
  @password = N'tempPW@56789', 
  @action = N'add';  
GO

When SQL Server tries to decrypt the database master key, it first attempts to use the service master key. If this doesn’t work, SQL Server searches the credential store for a master key credential, using that if it exists.

After you’ve created the master key credential, you can use the sys.master_key_passwords view to retrieve information about that credential:

SELECT * FROM sys.master_key_passwords;

The statement returns only the credential_id and family_guid values, as shown in Figure 5. The family_guid column displays the unique ID assigned to the database when it was originally created.

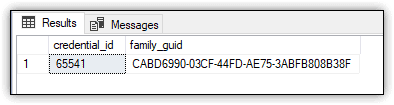
Figure 5. Configured database master key password

You can also use the sys.credentials view to retrieve credential information, as shown in the following example:

SELECT credential_id, name, credential_identity
FROM sys.credentials;

Although the sys.credentials view is a server-level catalog view, you can use it to see credentials created for database master keys. On my system, the SELECT statement returns the results shown in Figure 6.

Figure 6. Credential associated with the Test1 database master key

The results indicate that I have only one credential created on my SQL Server instance, the one for the Test1 database master key. Notice that the credential_id value shown here is the same value shown in Figure 5.

SQL Server also provides the sys.database_scoped_credentials view, which returns a row for each database-scoped credential in the database. The following SELECT statement uses the view within the context of the Test1 database:

SELECT * FROM sys.database_scoped_credentials;

The SELECT statement returns no rows for Test1. This is because the credential created for the database master key exists at the server level, not the database level.

Encryption-Related Catalog Views

The security-related catalog views also include about a dozen specific to SQL Server’s encryption features. One of these views is sys.certificates, which you can use to retrieve details about the certificates that exist in a database. To see the view in action, first create a certificate named Cert1 in the Test1 database, using the subject customer credit cards (or whatever subject you want to use):

USE Test1;
GO
CREATE CERTIFICATE Cert1
WITH SUBJECT = 'customer credit cards';

When you create a certificate without specifying a password, SQL Server uses the database master key to encrypt the certificate, which means that a master key must already exist. (You created the key in the previous section.) You can now use the sys.certificates view to retrieve information about the certificate:

SELECT name CertName,
  certificate_id cert_id,
  pvt_key_encryption_type_desc encrypt_type,
  issuer_name
FROM sys.certificates;

Figure 7 shows the results returned on my system. Notice that the encryption type is ENCRYPTED_BY_MASTER_KEY.

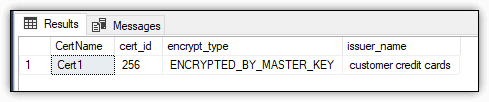
Figure 7. Cert1 certificate in the Test1 database

SQL Server also lets you add asymmetric and symmetric keys to your database. If you’ve added either type of key, you can use the sys.asymmetric_keys or sys.symmetric_keys view to return details about them. For example, suppose you create the following asymmetric key in the Test1 database:

CREATE ASYMMETRIC KEY Akey1
  WITH ALGORITHM = RSA_2048   
  ENCRYPTION BY PASSWORD = 'tempPW@56789';   
GO

The statement adds an asymmetric key named Akey1, using RSA encryption and password protection. You can now use the sys.asymmetric_keys view to retrieve information about the new key:

SELECT name key_name,
  pvt_key_encryption_type_desc encrypt_type,
  algorithm_desc,
  key_length
FROM sys.asymmetric_keys;

Figure 8 shows the results returned by the SELECT statement.

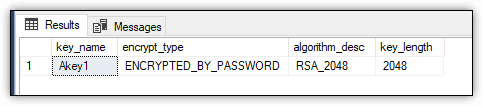
Figure 8. Akey1 asymmetric key in the Test1 database

The SELECT statement returns the key name, encryption type, algorithm, and key length, all of which were specified when creating the asymmetric key.

Auditing-Related Catalog Views

The final category of security-related catalog views includes those specific to SQL Server’s auditing features. If you’ve implemented auditing, these views can be particularly handy, especially the sys.server_audits and sys.database_audit_specifications views. The sys.server_audits view returns information about server audit objects, and the sys.database_audit_specifications view returns information about database audit specifications.

To see both views in action, start by creating and enabling the SrvAudit1 audit and the DbSpec1 database specification in the Test1 database:

USE master;  
GO  
CREATE SERVER AUDIT SrvAudit1  
TO FILE (FILEPATH = 'C:\DataFiles\audit\');  
GO  
ALTER SERVER AUDIT SrvAudit1  
WITH (STATE = ON);  
GO  
USE Test1;
GO  
CREATE DATABASE AUDIT SPECIFICATION DbSpec1 
FOR SERVER AUDIT SrvAudit1
ADD (SCHEMA_OBJECT_CHANGE_GROUP),
ADD (SELECT, INSERT, UPDATE, DELETE 
  ON Schema::Sales BY public)  
WITH (STATE = ON);  
GO

After you’ve created your server audit object, you can use the sys.server_audits view to view that object, specifying the audit name in your WHERE clause, as shown in the following example:

SELECT audit_id,
  name audit_name,
  create_date,
  type_desc,
  is_state_enabled is_enabled
FROM sys.server_audits
WHERE name = 'SrvAudit1';

The statement returns the results shown in Figure 9. Notice that the type_desc value is FILE, indicating that the audit log is saved to the file system rather than to the Security or Application log. The figure also indicates that the audit is enabled. (The is_enabled value is 1.)

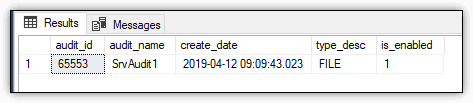
Figure 9. SrvAudit1 audit created on the server

You can then use the sys.database_audit_specifications view to view information about the database audit specification:

SELECT database_specification_id dbspec_id,
  name spec_name,
  create_date,
  is_state_enabled is_enabled
FROM sys.database_audit_specifications;

The statement returns the results shown in Figure 10.

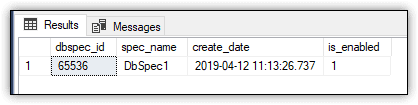
Figure 10. DbSpec1 database audit specification

SQL Server also provides several other catalog views specific to auditing, but their use depends on how you’ve configured auditing on your SQL Server instance. For example, if you create server audit specifications, you can use the sys.server_audit_specifications view to retrieve information about those specifications.

Dynamic Management Views

As with catalog views, SQL Server offers DMVs specific to auditing. One of these views is sys.dm_audit_actions, which lets you retrieve event-related information about audit actions and audit groups. For example, the following SELECT statement uses the view to return the IDs and names of the actions or groups with a class_desc value of LOGIN and a covering_parent_action_name value of LOGIN_CHANGE_PASSWORD_GROUP:

SELECT action_id,
  name action_name
FROM sys.dm_audit_actions
WHERE class_desc = 'LOGIN' AND
  covering_parent_action_name = 'LOGIN_CHANGE_PASSWORD_GROUP';

The class_desc column refers to the object class that the audit action applies to. The covering_parent_action_name column is the audit action or group that contains the row’s audit action. On my system, the SELECT statement returned the results shown in Figure 11.

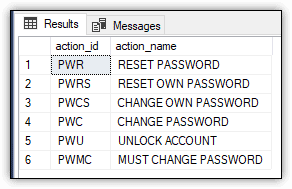
Figure 11. Audit actions in the audit log

Another DMV specific to auditing is sys.dm_server_audit_status view, which returns information about server audit objects. In the following example, the SELECT statement uses the view to retrieve the ID, name, status, and file size of each defined audit:

SELECT audit_id,
  name audit_name,
  status_desc,
  audit_file_size
FROM sys.dm_server_audit_status;

The only audit I had defined on my system when I ran this statement was the one created in the previous section, giving me the results shown in Figure 12.

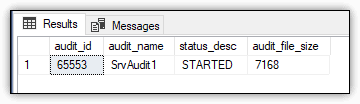
Figure 12. SrvAudit1 audit status

Security-related DMVs are not limited to auditing. SQL Server also provides several views specific to encryption, such as the sys.dm_database_encryption_keys view, which returns details about a database’s encryption state and its encryption keys.

You can see how the view works by setting up Transparent Data Encryption (TDE) on the Test1 database. For this, you need to take the following steps:

  1. Create a database master key in the master database, if the key doesn’t already exist.
  2. Create a certificate in the master database for securing the master key.
  3. Create a database encryption key in the Test1 database.

Normally, there would be an additional step to enable TDE on the Test1 database, but that’s not necessary to demonstrate how the sys.dm_database_encryption_keys view works.

To create a database master key in the master database, run the following CREATE MASTER KEY statement, providing a much more robust password, of course:

USE master;
GO
CREATE MASTER KEY 
ENCRYPTION BY PASSWORD = 'tempPW@56789';
GO

You can then use the sys.symmetric_keys catalog view to view information about the master database key:

SELECT name mkey_name,
  symmetric_key_id mkey_id,
  key_length,
  algorithm_desc
FROM sys.symmetric_keys;

Figure 13 shows the results returned by the SELECT statement on my system. When you create a database master key in the master database, SQL Server also adds a service master key.

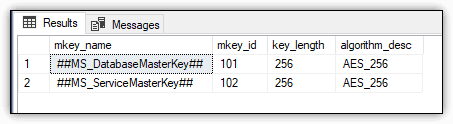
Figure 13. Database and service master keys

The next step is to create a certificate in the master database for securing the master key. You can do this easily enough by running the following CREATE CERTIFICATE statement:

CREATE CERTIFICATE TdeCert
WITH SUBJECT = 'TDE certificate';
GO

To verify that the certificate has been created, you can use the sys.certificates view, as shown in the following example:

SELECT name cert_name,
  certificate_id,
  pvt_key_encryption_type_desc encrypt_type,
  issuer_name
FROM sys.certificates
WHERE issuer_name = 'TDE certificate';

Because the master database on my system includes only one certificate, the SELECT statement returns only one row, which is shown in Figure 14.

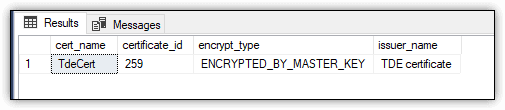
Figure 14. TdeCert certificate in the master database

The final step is to create a database encryption key in the Test1 statement. For this, you can use the following CREATE DATABASE ENCRYPTION KEY statement, specifying the TdeCert certificate you created in the master database:

USE Test1;
GO
CREATE DATABASE ENCRYPTION KEY
WITH ALGORITHM = AES_256
ENCRYPTION BY SERVER CERTIFICATE TdeCert;

When you run this statement, you should receive the following warning about backing up the certificate:

Warning: The certificate used for encrypting the database encryption key 
has not been backed up. You should immediately back up the certificate 
and the private key associated with the certificate. If the certificate
ever becomes unavailable or if you must restore or attach the database
on another server, you must have backups of both the certificate and 
the private key or you will not be able to open the database.

This completes the steps you need to take to prepare your database to try out the sys.dm_database_encryption_keys view. The following SELECT statement uses the view to retrieve the encryption state, key algorithm, key length and encryption type of the database encryption key:

SELECT encryption_state,
  key_algorithm,
  key_length,
  encryptor_type
FROM sys.dm_database_encryption_keys
WHERE DB_NAME(database_id) = 'Test1';

If you’ve been following along, the statement should return the results shown in Figure 15.

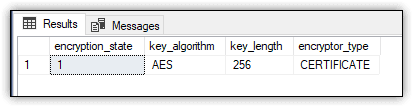
Figure 15. Database encryption key for the Test1 database

I realize that this is a long way to go about testing the sys.dm_database_encryption_keys view, but SQL Server supports only a handful of security-related DMVs, and I wanted to be sure you got to see some of them in action. That said, the TDE example I used here is actually based on one I created for the Simple Talk article Encrypting SQL Server: Transparent Data Encryption (TDE), which provides more specific information about enabling TDE on a SQL Server database.

Security-Related Functions

In addition to the catalog views and DMVs, SQL Server provides a number of security-related system functions. For example, you can use the sys.fn_builtin_permissions table-valued function to return details about the server’s built-in permission hierarchy or a subset of that hierarchy, as shown in the following SELECT statement:

SELECT class_desc,
  covering_permission_name,
  parent_class_desc
FROM sys.fn_builtin_permissions(DEFAULT)
WHERE permission_name = 'DELETE';

In this case, the sys.fn_builtin_permissions function takes DEFAULT as an argument, which means the function will return a complete list of built-in permissions. However, the WHERE clause limits those results to the DELETE permission. Figure 16 shows the results that were returned on my system.

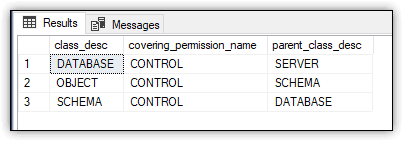
Figure 16. Built-in DELETE permissions on the SQL Server instance

SQL Server also provides a number of system functions for working with user and login accounts. To demonstrate how some of these work, first create the sqllogin1 login and then create the sqluser1 user in the Test1 database, based on the sqllogin1 login:

USE Test1;
GO
CREATE LOGIN sqllogin1 
WITH PASSWORD = 'tempPW@56789';
GO
CREATE USER sqluser1 FOR LOGIN sqllogin1;
GRANT SELECT, INSERT, DELETE
ON SCHEMA::Sales TO sqluser1;  
GO

The script also includes a GRANT statement that assigns the SELECT, INSERT, and DELETE permissions to sqluser1 on the Sales schema. You can verify these permissions by running the fn_my_permissions table-valued function within the security context of sqluser1:

EXECUTE AS USER = 'sqluser1'; 
SELECT permission_name 
FROM fn_my_permissions ('Sales', 'SCHEMA');  
REVERT;  
GO

The EXECUTE AS USER statement changes the security context to sqluser1, and the REVERT statement changes the security context back to the original user. Because the SELECT statement runs under the context of sqluser1, it returns the results shown in Figure 17, which verify the permissions assigned to that user.

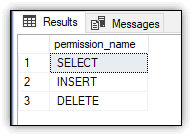
Figure 17. Permissions granted to sqluser1

SQL Server also provides a number of scaler functions for verifying a user’s identity, including the following:

  • The SUSER_NAME function returns the user’s login identification name.
  • The SUSER_ID function returns the user’s login identification number.
  • The SUSER_SID function returns the user’s login security identification number (SID).
  • The USER_NAME function returns the user’s database user account name.
  • The USER_ID function returns the user’s database user identification number.

For each of these functions, you can provide a parameter value or you can provide no value, in which case the function uses the current user or login account. You can test this out by calling the functions within the security context of sqluser1:

EXECUTE AS USER = 'sqluser1'; 
SELECT SUSER_NAME() login_name,
  SUSER_ID() login_id,
  SUSER_SID() login_sid,
  USER_NAME() dbuser_name,
  USER_ID() dbuser_id;
REVERT;  
GO

Figure 18 shows the results I received on my system. Notice that the results list the correct user name and the login name associated with that user.

Figure 18. User and login names and IDs for sqluser1

SQL Server also provides the IS_MEMBER scalar function for verifying whether the current user is the member of a specified group or role. For example, the following SELECT statement uses the function to determine whether sqluser1 is a member of the db_owner role:

EXECUTE AS USER = 'sqluser1'; 
SELECT USER_NAME() dbuser_name,
  CASE
    WHEN IS_MEMBER('db_owner') = 1 THEN 'member'
    WHEN IS_MEMBER('db_owner') = 0 THEN 'not member'
    WHEN IS_MEMBER('db_owner') = NULL THEN 'not valid'
  END AS is_member;
REVERT;  
GO

The IS_MEMBER function can return only one of three values:

  • If 0 is returned, the user is not a member of the specified group or role.
  • If 1 is returned, the user is a member of the specified group or role.
  • If NULL is returned, the group or role is not valid.

Figure 19 shows the results returned by the SELECT statement. As expected, the user is not a member of the db_owner role (unless you added the user to the role).

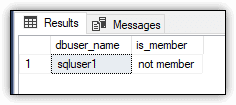
Figure 19. Verifying sqluser1 membership

Another fun built-in function is PWDCOMPARE, which lets you compare an existing password to a specified password. In this way, you can test for blank passwords or inadequate or common passwords, such as pa$$word.

To try out the function, first create the sqllogin2 login with a blank password (not in a production environment):

CREATE LOGIN sqllogin2 
WITH PASSWORD = '' , CHECK_POLICY = OFF;
GO

Next, run the following SELECT statement, using the PWDCOMPARE function in the WHERE clause to return any logins with a blank password:

SELECT principal_id, 
  name login_name
FROM sys.sql_logins
WHERE PWDCOMPARE('', password_hash) = 1;

The first argument passed into the PWDCOMPARE function is the unencrypted password, which in this case is an empty string. The second argument tells the function to use the password encryption hash. The function returns a 1 if the specified password matches the user’s actual password. Otherwise, the function returns 0. In this case, the WHERE clause specifies that the function must return 1 for the row to be returned. Figure 20 shows the results I received on my system.

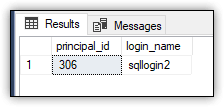
Figure 20. Comparing login passwords

The SELECT statement should return only the sqllogin2 login. If your results include other logins, you might want to reevaluate your current security strategy.

SQL Server Security Views and Functions

SQL Server provides a number of security-related catalog views, DMVs, and system functions in addition to what I covered here, and you certainly should take the time to learn about what’s out there. These views and functions can be very useful when trying to understand and troubleshoot security on a SQL Server instance. The more familiar you are with what’s available, the easier it will be for you to do your job and the more effectively you can ensure the security of your data.


The post Introduction to SQL Server Security — Part 5 appeared first on Simple Talk.


from Simple Talk http://bit.ly/2Iz5osA
via