The series so far:
- ASP.NET Core with GitOps: Dockerizing an API on AWS EC2
- ASP.NET Core with GitOps: Deploying Infrastructure as Code
- ASP.NET Core with GitOps: Orchestrating Your Containers with Kubernetes
In the previous tutorial, you learned how to write and deploy your Infrastructure as Code using AWS CloudFormation. This allowed you to launch several EC2 instances that run your Docker image.
The next step towards automatization is to have an orchestration system for your containers for deploying, scaling and managing them. For this series, you will be using AWS EKS (Elastic Kubernetes Service), but there are alternatives – even inside AWS- which will be presented during this article.
Understanding Kubernetes and EKS
Kubernetes is an open-source system designed by Google; as stated on their website, it is a “portable, extensible, open-source platform for managing containerized workloads and services.” This means that you can use Kubernetes to deploy and handle your containers (in this case, Docker containers) automatically.
Kubernetes works by having multiple nodes – basically, machines, whether they are virtual or physical – which handle running the pods – a container, or perhaps a group of containers. In this series, a node will be represented by an EC2 instance, while each pod will be a Docker container.
While bringing a lot of benefits to your infrastructure, running a Kubernetes cluster proves to be quite difficult. One of the services that can ease your work is Amazon’s Elastic Kubernetes Service. It has alternatives on the other big cloud providers – Google Kubernetes Engine (GKE) and Azure Kubernetes Service (AKS). Choosing between them can depend on multiple factors, such as the current knowledge of your team, costs, and where your infrastructure is currently deployed. If you are already running a large number of servers, databases, and VMs on Azure, for example, switching to Google Cloud Platform just because of Kubernetes would not make much sense.
The biggest drawback of EKS is probably its cost – as opposed to its competitors, which provide free services. It requires $0.2/hour/cluster, in addition to the costs of running the rest of your infrastructure, such as your EC2 instances and your databases.
What About Elastic Container Service (ECS)?
As mentioned earlier, there are alternatives to Kubernetes even inside AWS. ECS is an orchestration service that is native to AWS, provides better integration with other services from the platform, and is free of charge. You still pay for your instances and other services, but the orchestration capabilities are provided for free.
You can find many comparisons between ECS and EKS, and the choice should be made based on your organization’s needs; you will find ECS to be easier to learn, and you might find that it solves your problems, so you don’t have to dive into Kubernetes. One of the GitHub Actions most popular pipelines is deploying your application to ECS, so you can have your container orchestration ready faster than you think.
However, since this series is aiming to teach GitOps principles and practices, rather than platform-native solutions, the rest of the tutorial will focus on EKS.
Installing kubectl
Kubectl is a command-line interface (CLI) used for working with Kubernetes clusters. Even though you are using EKS, you need Kubectl to configure the cluster, set the image that is going to be deployed, and debug the process.
To install kubectl on your system, you can check out the guide on the Kubernetes website. After you finish the installation, verify the major and minor versions by running kubectl version. These are important when creating the EKS cluster, as the cluster and kubectl version must be within one minor version of each other.
You might also get the following message after checking the version: “The connection to the server localhost:8080 was refused – did you specify the right host or port?”. This happens because kubectl defaults the connection to localhost:8080; you will get to change this later when connecting to the EKS cluster.
Creating an EKS Cluster
The first step towards having Kubernetes deploy and manage your containers is to create an EKS cluster in your Infrastructure as Code. Most of the other resources will remain unchanged: you still need an Auto Scaling Group, a Launch Configuration and their underlying infrastructure. The main change will happen in the Launch Configuration, where instead of running your Docker container manually, you will ask the EKS cluster to handle that for you.
The EKS cluster requires an IAM role to be able to manage the resources. You can choose to add the role in your IaC file, but since it’s more of a “static” resource, creating it manually from the AWS console is not wrong. To do this, search for IAM in the Find services box:
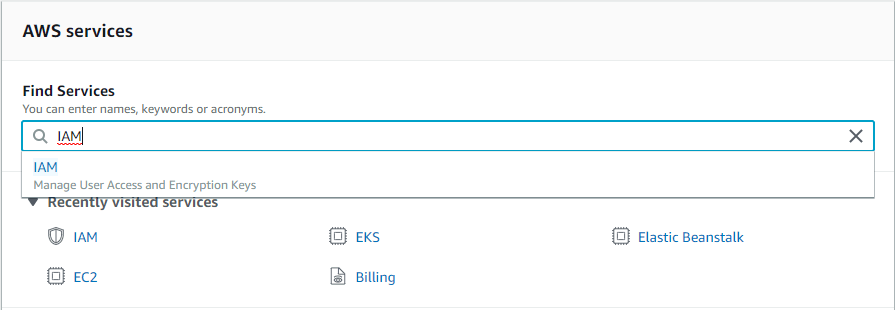
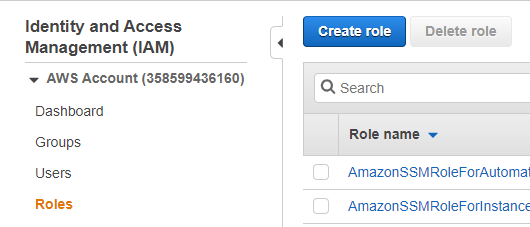
Select IAM, likely the first option. Then, from the left side of the screen, choose Roles and click the Create role button:
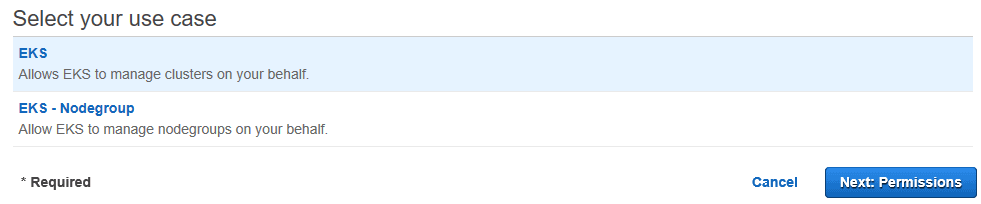
From the list of services that appears, search for EKS and click it, then click the Next: Permissions button.
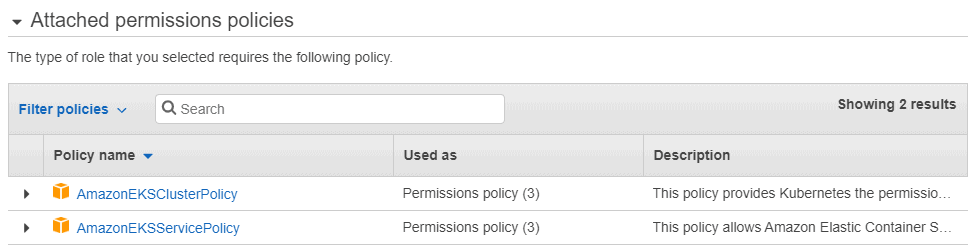
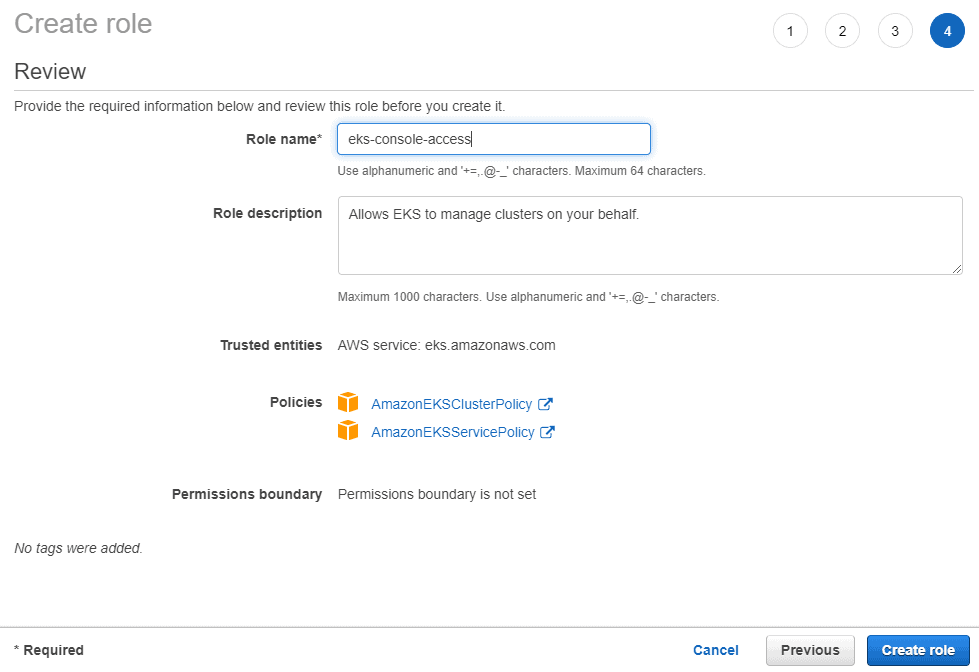
You should see the policies that are attached to the role:
Continue to click the Next buttons until you are asked to choose a role name. Pick something that will be intuitive, such as eks-console-access, and click the Create role button.
You can then search for the role in the table that opens up by using the name you just picked, and you should see a page with the details of your role:
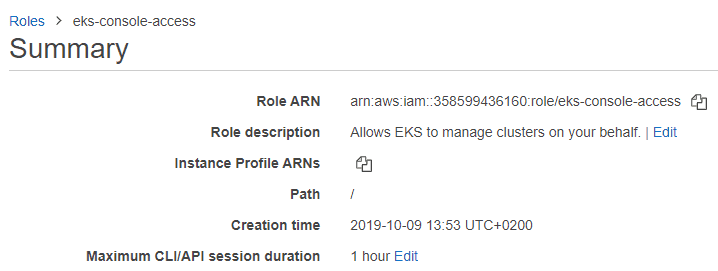
Copy the Role ARN value for later use. It will be needed when creating the EKS cluster.
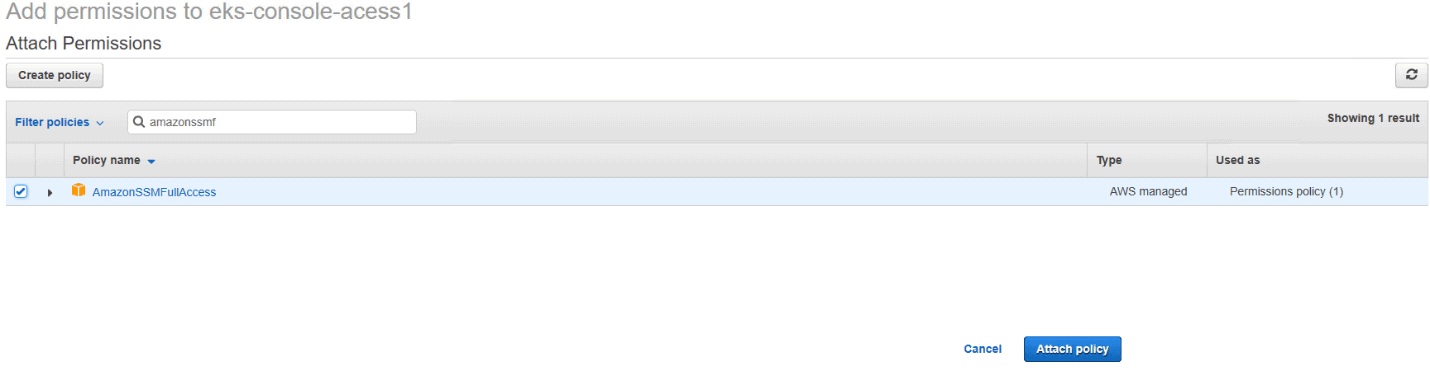
One more policy should be attached to the role. Click Attach policies and search for the AmazonSSMFullAccess policy. It will be needed for pulling the image ID later. Select the policy and click Attach policy.
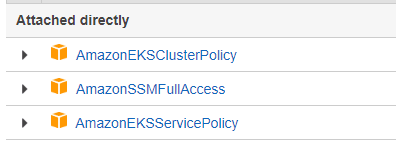
Now the three policies should be attached to the role.
It is now time to open your infrastructure.yaml file (from the previous article) and make the necessary modifications. You will create the EKS and get the nodes to attach to it. As in the previous tutorial, this can be a process of trial and error, but a good starting point is AWS’s template. It is very generic, but it is the best way to learn precisely what is needed, and you can adapt it to your own needs.
To understand the changes that are going to be made to the infrastructure file, you need to understand resource tagging. Generally, tags allow you to manage and search for your resources more efficiently. In the case of EKS, however, tags are necessary for your nodes to attach to the cluster.
Because you are creating an EKS cluster, change the Description in the top of the file:
Description: Creating an EKS cluster with multiple EC2 instances.
Next, a new security group needs to be created for the EKS. This is done to be able to manage the cluster independently from the nodes, as well as to avoid future circular dependencies in the infrastructure:
EksSecurityGroup:
    Type: AWS::EC2::SecurityGroup
    Properties:
      VpcId: !Ref VPC
      GroupDescription: Default security group for EKS.
      SecurityGroupIngress:
        - IpProtocol: tcp
          FromPort: 1025
          ToPort: 65535
          CidrIp: 0.0.0.0/0
        - IpProtocol: tcp
          FromPort: 443
          ToPort: 443
          CidrIp: 0.0.0.0/0
      SecurityGroupEgress:
        - IpProtocol: tcp
          FromPort: 1025
          ToPort: 65535
          CidrIp: 0.0.0.0/0
This security group allows communication on port 443, as well as any port between 1025 and 65535. You can find more information about which ports are necessary and recommended for your cluster in the AWS documentation.
Next, you can create the EKS cluster. This requires the ARN of the role you created earlier, the security group, as well as a list of subnets where your worker nodes will be hosted. The latest version supported on AWS right now is 1.14, but you can use any of the other supported versions.
EKS:
    Type: AWS::EKS::Cluster
    Properties:
      Version: '1.14'
      RoleArn: arn:aws:iam::358599436160:role/eks-console-access
      ResourcesVpcConfig:
        SecurityGroupIds:
          - !Ref EksSecurityGroup
        SubnetIds:
          - !Ref Subnet1
          - !Ref Subnet2
Now that you have the cluster ready, you can tag the related resources so that the nodes can attach to the cluster. The security group used by the nodes (MainSecurityGroup, in this case), as well as the Auto Scaling Group and the instances inside it, need a tag with the key kubernetes.io/cluster/{eks-id} and the value owned. Replace the MainSecurityGroup from your file with this code:
MainSecurityGroup:
    Type: AWS::EC2::SecurityGroup
    Properties:
      GroupDescription: Security group for the API instances.
      VpcId: !Ref VPC
      SecurityGroupIngress:
        - IpProtocol: "-1"
          FromPort: 0
          ToPort: 65535
          CidrIp: 0.0.0.0/0
      SecurityGroupEgress:
        - IpProtocol: "-1"
          FromPort: 0
          ToPort: 65535
          CidrIp: 0.0.0.0/0
      Tags:
        - Key:
              !Sub
                  - "kubernetes.io/cluster/${EksId}"
                  - EksId: !Ref EKS
          Value: 'owned'
Replace the AutoScalingGroup in your file with this code:
AutoScalingGroup:
    DependsOn: EKS
    Type: AWS::AutoScaling::AutoScalingGroup
    Properties:
      VPCZoneIdentifier:
       - !Ref Subnet1
       - !Ref Subnet2
      LaunchConfigurationName:
        Ref: LaunchConfiguration
      DesiredCapacity: 3
      MinSize: 2
      MaxSize: 4
      Tags:
        - Key:
              !Sub
                  - "kubernetes.io/cluster/${EksId}"
                  - EksId: !Ref EKS
          Value: 'owned'
          PropagateAtLaunch: 'true'
For the Auto Scaling Group, you can also see the PropagateAtLaunch property being set to the tag. This will ensure that the tag will also be applied to any instance inside the group.
Although you already have an IAM role for the cluster, creating another one for the launch configuration and for accessing the cluster through the console can be a good idea. This role would need other policies than the one you created earlier:
InstanceRole:
    Type: AWS::IAM::Role
    Properties:
      AssumeRolePolicyDocument:
        Version: '2012-10-17'
        Statement:
        - Effect: Allow
          Principal:
            Service:
            - ec2.amazonaws.com
          Action:
          - sts:AssumeRole
      Path: "/"
      ManagedPolicyArns:
        - arn:aws:iam::aws:policy/AmazonEKSWorkerNodePolicy
        - arn:aws:iam::aws:policy/AmazonEKS_CNI_Policy
        - arn:aws:iam::aws:policy/AmazonEC2ContainerRegistryReadOnly
  InstanceProfile:
    Type: AWS::IAM::InstanceProfile
    Properties:
      Path: "/"
      Roles:
        - !Ref InstanceRole
The image ID is also changed, as AWS provides a list of image IDs that are required to be used when working with EKS. You can find the list here. You should use it to find the right ID for your situation, as they are divided by Kubernetes versions, as well as AWS regions. Be sure to match the version of kubectl that you installed and the version specified in the EKS section of the file. After finding the right image for you, it is possible to pull the latest version from AWS automatically. To do this, create a parameter (add to the Parameter section) in the file with the image ID name as the default value:
AmiId:
    Description: The AMI to use for the EKS nodes.
    Type: 'AWS::SSM::Parameter::Value<AWS::EC2::Image::Id>'
    Default: '/aws/service/eks/optimized-ami/1.14/amazon-linux-2/recommended/image_id'
The final step is to link the cluster to the Launch Configuration; you need to specify the AMI and execute a Shell script instead of running the Docker container. Replace the LaunchConfigration section with this code:
LaunchConfiguration:
    DependsOn: EKS
    Type: AWS::AutoScaling::LaunchConfiguration
    Properties:
      IamInstanceProfile: !Ref InstanceProfile
      UserData:
        Fn::Base64:
          !Sub
            - |
                #!/bin/bash
                set -o xtrace
                /etc/eks/bootstrap.sh ${EksId}
                /opt/aws/bin/cfn-signal --exit-code $? \
                        --stack  ${AWS::StackName} \
                        --resource AutoScalingGroup  \
                        --region ${AWS::Region}
            - EksId: !Ref EKS
       ImageId: !Ref AmiId
      BlockDeviceMappings:
        - DeviceName: /dev/xvda
          Ebs:
            VolumeSize: 8
            VolumeType: gp2
            DeleteOnTermination: true
      SecurityGroups:
      - Ref: MainSecurityGroup
      InstanceType: t2.micro
The bootstrap.sh script is used to add the instances into the cluster; the next script, /opt/aws/bin/cfn-signal will signal when the instances are created and ready to be used.
Once you finish this, you can delete the LoadBalancer, Listener, ListenerRule and TargetGroup sections from your file. They no longer provide any value: the EKS cluster will take the role of a load balancer. You can find the final version of the file here.
Because of the IAM role that you added to the stack, you need to let CloudFormation know that it is allowed to create such resources. To do this, add the --capabilities flag to your update or create command from the previous article to create the stack. Run this in the command or terminal window replacing the Docker <username> and <password>:
aws cloudformation create-stack --stack-name dotnet-docker --template-body file://infrastructure/infrastructure.yaml --parameters ParameterKey=DockerUsername,ParameterValue=<username> ParameterKey=DockerPassword,ParameterValue=<password> --capabilities CAPABILITY_IAM
Updating or recreating the stack will take some time at this point, because of the EKS. Once it is finished, you should see the three instances being created in your EC2 dashboard. However, none of them is running any application at this point, as you have not told the cluster what image to run.
Managing the Containers
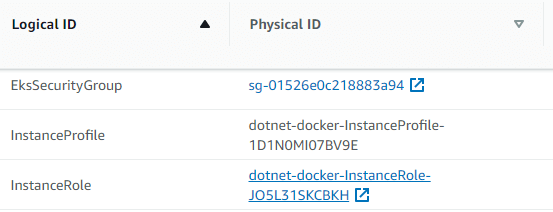
In your AWS Console, go to the CloudFormation dashboard, select your stack and go to the Resources tab. You need two values from here – the ARN of the role that was created from the file, and the ID of the cluster.
For the ARN, search for the InstanceRole resource and click the link in the Physical ID column:
The summary page for the role will open, and you can copy the ARN from there:

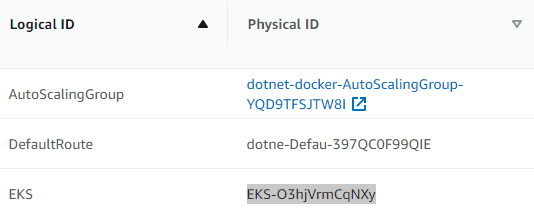
For the cluster, just search for the EKS resource and copy the Physical ID column:
Before being able to interact with the cluster from EKS, you need to create a file that will tell AWS you are allowed to do so. Create a file called aws-auth-cm.yaml and paste the following content into it. Replace <ARN> with the value copied earlier.
apiVersion: v1
kind: ConfigMap
metadata:
  name: aws-auth
  namespace: kube-system
data:
  mapRoles: |
    - rolearn: <ARN>
      username: system:node:
      groups:
        - system:bootstrappers
        - system:nodes
The first step for interacting with the cluster via CLI is to run the following command, to tell AWS which cluster you are going to work with. Replace <region> with the AWS region you are working in, such as eu-central-1, and <eks-id> with the physical ID of your cluster.
aws eks --region <region> update-kubeconfig --name <eks-id>
You should receive an output similar to this:

If you receive an error like “Invalid choice: ‘eks’”, it is because your awscli version is outdated. Update your package and make sure your version is at least 1.15.32.
Next, you will need to apply the AWS authentication file to the cluster, so you have access to its resources:
kubectl apply -f aws-auth-cm.yaml
This should output:

Note that the path to the aws executable must be in your PATH variable for this command to work if you are running Windows.
From this point, you can start managing your cluster. A good start is to check if the nodes were created correctly. If you followed the tutorial, you should see three nodes after running the command:
kubectl get nodes
It should output something similar to this:

If you cannot see any nodes, several things could have gone wrong:
- Run
sudo kubectl versionand make sure the client and server versions are the same (or one minor version apart); - Make sure you are pulling the correct AMI for the version you are using;
- Check the aws-auth-cm.yaml file and make sure you have the correct role ARN; also check the indentation of the file, because you will not receive any errors;
The next step is to create a deployment file. The deployment file tells the cluster what image to deploy, how many containers it should create, and what method to use when updating them. The file creates a rolling update, meaning that new pods are added gradually, as old ones are destroyed, allowing your application to continue serving requests. You can read more about all the options here.
The file looks like the code below. Be sure to replace <username> with your own Docker username:
apiVersion: apps/v1
kind: Deployment
metadata:
  name: dotnet-api
  labels:
    app: dotnet-api
  namespace: default
spec:
  replicas: 3
  selector:
    matchLabels:
      app: dotnet-api
  strategy:
    rollingUpdate:
      maxSurge: 25%
      maxUnavailable: 25%
    type: RollingUpdate
  template:
    metadata:
      labels:
        app: dotnet-api
    spec:
      containers:
      - image: docker.io/<username>/dotnet-api
        imagePullPolicy: Always
        name: dotnet-api
        ports:
        - containerPort: 80
          protocol: TCP
If you wish to deploy another image, you will change the -image line. Make sure the containerPort is also the one on which you expect your application to use.
Save this to a file called cluster-deployment.yaml and apply it to the cluster:
kubectl apply -f cluster-deployment.yaml
This command will create three pods, one running on each node. You can check this by running either one of the following commands:e
kubectl get deployments
kubectl get pods
You are now ready to expose your application through a cluster load balancer:
kubectl expose deployment dotnet-api --type=LoadBalancer --port=80 --target-port=80
To get the load balancer’s IP, run:
kubectl get svc
Copy the External-IP value from the output:

It might take a couple of minutes for the application to deploy, but you can append the standard/api/test to the external IP to test that everything is working as intended. If the app is running, you’ll see this message:

If at any point, you need to update the application served by the cluster, you can update the Docker image and then run the following command replacing your Docker <username>:
kubectl set image deployment/dotnet-api dotnet-api=docker.io/<username>/dotnet-api:latest
Debugging the Cluster
Working with Kubernetes can be a tedious process, with many things going wrong along the way.
One of the most common problems is the nodes not attaching to the cluster. This is most likely due to the wrong configuration in the infrastructure: check the launch configuration’s AMI, the Kubernetes version from EKS, and make sure the resources are correctly tagged.
If the nodes and pods are created, but the application is not running, the describe command can reveal a lot of information. You can run it on the pods, as well as the svc, to discover any issues, such as scheduling, or the image not being pulled:
kubectl describe pods
kubectl describe svc
Cleaning Up
Before deleting the stack, you need to delete the deployment and the svc. Since the deployment creates a load balancer, it will prevent you from deleting the stack as long as it exists. The command order is:
kubectl delete deployment dotnet-api
kubectl delete svc dotnet-api
aws cloudformation delete-stack --stack-name dotnet-docker
What is Next?
With Kubernetes, you are now able to easily manage a large number of containers with just a few commands. You can scale up or down, update the application that is being served, and diagnose any problems that appear along the way.
The next and final tutorial will teach you how to automate this process by using a CI/CD pipeline: any new commit to the master branch will result in the Docker image being pushed to the remote hub, and then updated in your cluster.
The post ASP.NET Core with GitOps: Orchestrating Your Containers with Kubernetes appeared first on Simple Talk.
from Simple Talk https://ift.tt/38xKBzv
via
No comments:
Post a Comment