Monday, September 28, 2020

Why choose Oracle?

As an applications development professional, my career objectives are to do work that is fulfilling in the sense that it challenges my capabilities, keeps me on the cutting edge of technology, and pays me decently. I have established my career as an Oracle Applications developer over the last two decades, and I couldn’t see myself doing anything else. Having worked with a few other technologies over the years, I can confidently say Oracle is a cut above most, as far as fulfilling my career goals is concerned. The purpose of this paper was to inspire a rising generation of IT professionals by highlighting some of the application development roles that I enjoy and how they are supported by Oracle technologies.

As it is with any vocation, the tools available to get the job done are as essential as the knowledge and the experience one needs to get it done efficiently and effectively. Fundamentally, it is crucial to have a solid foundational knowledge of software and how the specific tools help in implementing a software solution. At the core of the Oracle application is a relational database where data is logically organised into tables, and the tables are interlinked via primary and foreign key relationships to create a system. There are various development roles that one can do in the world of Oracle ranging from; database development, user interface development, application interface development, cloud applications, and business intelligence development.

One of Oracle’s greatest strengths is that it comes complete with an integrated set of development tools that support any development approach, any technology platform, and any operating system. Oracle development tools range from the traditional database management tools, Java-based mid-tier development tools, to the contemporary frameworks and platforms that are driving sophisticated cloud applications and architecture. These tools are being used to build and deliver intelligent, cutting edge solutions that manage applications data hosted by Oracle databases.

Over my last two decades in the industry, I have seen the evolvement of Oracle technologies together with the tools available for applications development, and I have understood how crucial it is for one to keep one’s skills updated, to stay relevant in the industry. What has been important for me is the fact that once I got the core technical development skills, it then became easier to upgrade as long as I understood the trending technologies and how Oracle incorporates them into their products.

As an Oracle applications developer, my job involves developing and maintaining routines that create and maintain the data in the database, and to present the data in such a way that it is operational for its intended purposes. I have developed extensions to Oracle’s out of the box applications functionality, bespoke applications, and interfaces that link Oracle applications to other external applications. Oracle also provides technologies and tools such as SOA that make interconnections with applications based on any technology seamless. Different skills and technologies are required to create and maintain a real-life application end to end and the beauty of Oracle is that it comes integrated with proprietary tools relevant for each stage of an application’s life cycle.

The diagram below is a simple illustration of the architecture of Oracle-based system applications. It represents the database tier, mid-tier and the interface tier where information flows between an Oracle database and the end users, other applications, or other databases.


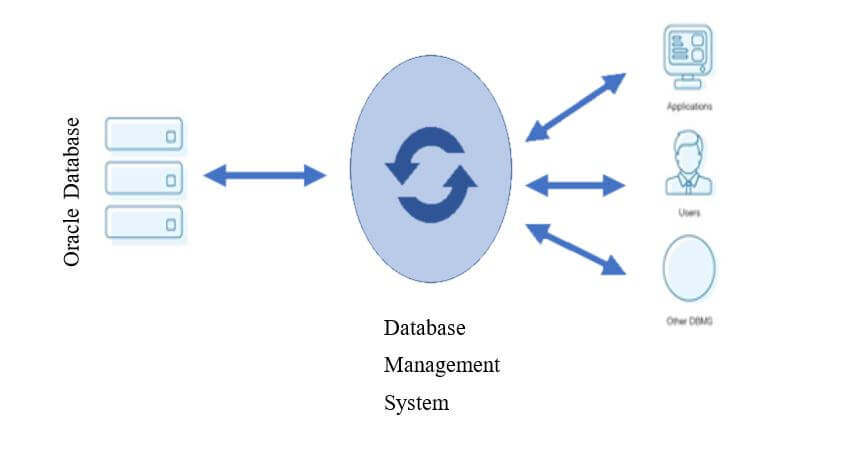
There is development work to be done at each tier of the application architecture represented above, and Oracle provides the necessary tools and technologies to develop a complete system. One may not necessarily need to be an expert in all the technologies, but it would be essential to understand how they interact with each other to build a seamless system. Oracle tools even cater for non-technical tasks which are equally essential in software development or in maintaining production systems. The following are some of the roles that I get involved in and how Oracle tools support meeting the task objectives.

Data Modelling

Requirements analysis and solution design are crucial steps for any software solution as these ensure that the product to be developed meets its functional or non-functional requirements. Data modelling is a technique that is used in database applications to specify the business requirements that would be later translated into software requirements for coding purposes. Data modelling can start during the business analysis phase as a communication tool in the exploration of system requirements with stakeholders. At this phase, the data model is done at a high level as appropriate to visualise requirements and explore domain concepts.

For purposes of system design, a data model represents the data structures that hold application data and how they are interrelated to create a system. Data modelling at this stage is especially important for purposes of making sure the data requirements of a system are accurately interpreted, and the attributes of each data entity are entirely specified. A developer’s data model is a refinement of the business analysis data model, with details of the actual data to be captured by the system which is later translated into a database.

Oracle SQL Developer, comes integrated with Data Modeler, a graphical tool for creating data models that enhances productivity and simplifies database creation. Data Modeler also generates the SQL code that is required to create the database tables represented by the data model. Database developers can use this tool to contextualise application data requirement and design the required database. More importantly, Data Modeler can import from, and export to a variety of sources and targets, provides a variety of formatting options, and validates models through a predefined set of design rules.

Database Development and Management

All operations on the data in an Oracle database application are performed using Structured Query Language (SQL) statements. From the creation of the database objects, you use data definition language (DDL) code, to data management using data manipulation language (DML) queries. SQL is the ANSI standard language for any relational database. Where DDL statements enable you to build and change the structure of the database, DML statements enable you to query and change the contents.

Oracle has its own version of SQL, Oracle SQL, which is an implementation of the ANSI standard that extends beyond the standard SQL features. Oracle SQL has evolved with the development of Oracle database technology, providing features to make use of cutting-edge database technology. It also incorporates the use of functions that would only be possible with a procedural language, for example, the decode construct simulates IF THEN ELSE logic. It goes without saying that to take full advantage of Oracle SQL features, one needs to know the features that are available for their database version and this information is generally available with the database version release note.

Oracle cursors is another powerful feature of Oracle SQL that allows users to manipulate multiple rows in a row by row manner. With cursors, Oracle creates a memory area, known as the context area, for processing SQL statements. A cursor can be explicitly named and defined for DML queries that return multiple rows or implicitly defined for single-row queries. The context area contains all the information needed for processing the statement; for example, the number of rows retrieved, etc.

In real life operations, it is common that the details of the SQL statement to be executed are not known until run time, for example where the exact details are driven by user input or the processing being done by a program. Oracle SQL supports the construction and execution of dynamic queries. This feature allows developers to develop flexible queries and cursors whose full context is determined dynamically at run time.

Virtual private database (VPD) is a powerful Oracle database security feature that enforces data security at the table row and column level. VPD is useful when security protections such as privileges and roles are not sufficiently fine-tuned. For example, you can allow all users to access the same employee’s table but create a security policy to restrict access to employees in the same department as the user. Essentially, the database adds a dynamic WHERE clause to a SQL statement issued against the table, view or synonym to which an Oracle VPD security policy was applied. The WHERE clause allows only users whose credentials pass the security policy to access the protected data.

Query Optimizer is another feature of Oracle SQL that is really useful, especially for performance management. All Oracle SQL statements use the optimizer to determine the most efficient means for accessing the specified data. The optimizer uses database statistics gathered for the system and the available access paths to determine the most cost-efficient execution plan. Oracle SQL developers can influence the default execution plan generated by the optimizer via the use of hints, changing the optimizer goal, or refreshing database statistics.

Application Development

SQL is a non-procedural language, which specifies what data to be operated on but cannot handle logical operations or how the operations are to be carried out. This leaves SQL as inadequate when it comes to developing applications that implement real-life business logic. This calls for the need for procedural program languages that implement control structures, such as loops or conditional branches, that are not available in SQL and are used to create procedures and functions.

With Oracle, procedures and functions can be developed and stored within the database. This is known as server-side programming, and the principal advantage of this approach is that the stored procedures, functions, and triggers can be invoked from anywhere. Also, server-side subprograms increase scalability by centralising application processing on the server; this enables clients to reuse code. In addition, as subprograms already reside within the database, there is reduced context switching and network traffic; therefore, calls are quick and efficient.

Oracle comes with its own proprietary procedural language, PL/SQL, to create server-side programs that are stored on the database in compiled form, making them more readily available to execute at run time. PL/SQL is the procedural extension to SQL which comes integrated with the database, supporting all Oracle SQL statements, functions, and data types. Oracle Database also provides support for developing, compiling, storing, and deploying Java programs. Java stored programs run on the database and are independent of programs that run in the middle tier. They interface with SQL using a similar execution model to PL/SQL. This integration with such powerful application development tools gives Oracle a competitive edge over other relational databases.

Applications Maintenance

Most of my work as an applications developer is maintaining Oracle applications that are already in use. Maintenance work varies from creating extensions to existing functionality, modifying existing functionality to meet changing business requirements, fixing bugs, and performance tuning of slow running programs. Performance tuning is always challenging as performance problems can be a result of several issues from poor program design to insufficient system resources. Even with the use of the most sophisticated development tools, if system resources are exhausted or poorly managed, system performance deteriorates. In such scenarios, the problem can only be rectified by increasing the required resources. Otherwise, performance tuning the underlying programs and queries would be required.

Oracle SQL developer comes with session and SQL monitoring tools that can help identify system performance, culprits, to be targeted for fixing. The execution plan that shows the path that is chosen by the Optimiser also helps to identify areas of concern within an SQL query. This information can be used to tune the SQL for better performance and can also inform whether database constructs such as indexes are required to speed up execution.

Conclusion

It is one thing knowing what needs to be done in applications development, but having the tools to get the job done more efficiently is very satisfying. Working with Oracle technologies is a continuous learning and development journey. There is a lot to learn, with each task accomplished. Inarguably, in order to succeed as an IT professional one needs to have good foundational knowledge, and to develop a systematic approach to problem-solving, which comes with experience. It is also equally important to know the tools available and to make the most use of the features presented by the tools. Oracle has developed a set of development tools that are geared to make applications development more efficient. Oracle technologies have also matured such that there are a mature knowledge base and online user communities where answers to most technical questions can be found. There is a lot that one can do as a technical career within the Oracle sphere. As an Oracle Applications technical professional, I can confidently say that I am satisfied with my career choice.


The post Why choose Oracle? appeared first on Simple Talk.


from Simple Talk https://ift.tt/3kYNBdp
via

Friday, September 25, 2020

Static hosting with Azure Blob Storage and Azure CDN

One of the most significant advantages of developing SPAs (Single-page applications) is the simplicity of deploying them to the cloud. Whether it is Angular, Vue, or React-based, you simply need to load an initial index.html file and point your hosting solution to it. All the rest of the work is automatically performed by the SPA framework along with the power of JavaScript.

However, for many developers out there, the chances are that once in a while they’d want to host a single application that is entirely static, i.e., doesn’t perform any HTTP call to a back-end API; like with a business website, or a portfolio page, for example.

If this is your case, then Microsoft is equipped with the right solution: Azure Blob Storage along with Azure CDN (Azure Content Delivery Network).

They’re all about static hosting. While Azure CDN is a global CDN solution for delivering high-bandwidth content, it also uses cached static objects loaded from Azure Blob storage, which, in turn, allows users to store large amounts of data on Microsoft’s storage solution.

This tutorial explores these two great tools by creating an Angular SPA application and deploying it statically to Azure in just a few steps. Come with me!

Setup

For this piece, you’ll be making use of a fully working example provided by the official Angular docs. It is an SPA app that loads an in-memory list of heroes, allowing the users to perform CRUD operations over it as shown in Figure 1.

Figure 1. Official Angular example app

Please, feel free to use any other Angular (or another SPA framework as well) app you desire. Go to this link and find the Download example link within it. Download the app, unzip it, and access its root folder via command line.

You’ll also need to have the latest version of Node.js installed on your machine. Then, open a command window and navigate to the app folder. Run the following commands:

npm install
npm start

They will download the required Node dependencies and start the app right after. Feel free to play around with it. The focus, however, is with the dist folder; so, run the following command:

npm run build

This command will generate a bunch of files under the dist/ folder that, together, represent the SPA as a whole. Save them for later.

Azure Configs

Now, on to the Azure configurations. First, log in to your Azure account here. If you don’t have one already, please go ahead and make sure to complete the checkout until the end. For this example, you need a subscription. Azure subscriptions are paid, but you can make use of the free initial trial to test it out.

You can access the Subscriptions option through the home page of your Azure account. Please, make sure to complete the subscription setup until the end before proceeding to the next steps. It’s a straightforward process, so don’t worry.

Once you’ve logged in, go to the home page and search for Storage account in the top search bar. Click it, and you’ll be redirected to the listing of storage accounts.

You may not have any yet, so click the Add button in the top bar and once redirected to the form page, fill in the fields according to the Figure 2 shown below.

Figure 2. Filling in storage account details

Note that you’ve got to inform a Resource group name. If you don’t have any, click the Create new link and give it a name like shown in Figure 3:

Figure 3. Creating a new resource group

These groups are responsible for integrating all the common resources under the same subscription, which is good for organizational means. If you dedicate a resource group for one purpose, it’s easy just to delete the resource group when you are done to clean up everything.

Your storage account name is also important. It defines how your blob account will be called through all the other Azure services and services of users across the globe. It has to be unique.

After you finish, click the button Review + create at the bottom of the page as shown in Figure 4. Then, you’ll be redirected to the review page with a summary of the configs.

Figure 4. Click Review + create button

Finally, click the Create button. This is it, for now, you have your first storage account!

Whenever you go back to the home page, your newly created Storage account will be exhibited there:

Figure 5. Recently created resources

When you click it, the Overview dashboard will display summarized and important information about this resource, like its location (datacenter), the subscription details, as well as some graphs with usage data.

Now, at the left-side panel, click the Static website menu option (under the Settings section) and enable it by clicking the Enabled toggle button. This is the option to allow the deploy of static websites to your Azure account.

Once you enable it, you must provide two main endpoints: the index file (where the app starts) and the error path, just as shown in Figure 6.

Figure 6. Providing document paths data

Once you’ve filled in the values, click the Save button. Then, the same page will be automatically updated with the public endpoints you may use to access them as shown in Figure 7.

Figure 7. Static website endpoints

However, this is still not enough to host the Angular files within Azure. You need a Blob container for that. Go back to the Storage account and click the Containers menu option (on the left-side panel), under the Blob service section as shown in Figure 8.

Figure 8. Click the Containers menu option

There you’ll get to see the list of containers among which there are two available ones: the $logs and $web containers. The second one is just what we need since it is well-suited for website content.

You can create as many containers as you want to organize your applications.

Click the $web container, and you’ll be redirected to the Overview page in which you get to upload your app files. That’s an effortless task to do. Click the Upload button at the top bar, and the right-sided panel shown in Figure 9 will appear.

Figure 9. Uploading files to your blob

Click the browse button and search for the dist folder that you built before in your local Angular app. Select all the files under the folder and click Ok. Then, click the Upload button. Wait until all the files are uploaded and watch each of them appear in the same Overview page.

That’s it! How do you access the application? Remember the Primary endpoint that was autogenerated under the Static website page? This is the final endpoint you may access to see your Angular app up and running. Enter it directly to your browser and have fun!

Azure CDN

Like all other CDNs, Azure CDN offers a faster way to cache your static website contents hosted in your Azure storage to enhance the speed and provide a better experience to the users. For this, you need to access your storage account once more and click the menu option Azure CDN (under the Blob service section of the left-side panel).

The screen shown in Figure 10 will appear. Make sure to fill in the New endpoint form fields accordingly. Note that the CDN endpoint name must be unique across Azure, so try again with a new name if there is a failure when creating the resource.

Figure 10. Creating a new CDN endpoint

Notice also that it’s targeting to cache the static website, not the blob, so be sure to select the proper option in the Origin hostname combo box. The CDN endpoint name is the prefix you want your hostname to have simplified at the end of the process.

When you’re done, click the Create button. This will take some time, so you’ll get to see a loading section at the notifications menu (Figure 11).

Figure 11. Processing the CDN creation

Once it’s done, you’ll remain on the same page and the Endpoints section is going to be refreshed to receive the newly created endpoint:

Figure 12. List of created endpoints

When you click it, Azure will redirect you to the details page. There, you may see more information about the CDN like its location, the supported protocols, and the Endpoint hostname (the one we must use to access the referred CDN).

Figure 13. Detailed information about the created CDN

If you try to access the created CDN through the provided Endpoint hostname, chances are that you may see the error screen shown in Figure 14. This happens because Azure takes some time to process the creation and propagate the new CDN through the web.

Figure 14. Page not found

Once you wait a bit more, you get to see the fully working app in action shown in Figure 15.

Figure 15. Angular app running under Azure CDN hostname

Conclusion

The solution explored over this article is also focused on the cost-benefit. On Azure, you pay only for what you use; that means that it’s a very cheap solution to host static websites that may be accessed rarely over time. Rather than paying for a fixed-priced solution, Azure CDN along with Azure Blob Containers offers a flexible and easy-to-use way to approach your needs.

And you can go beyond that. With an Azure Storage account in hand, you can store files, queues, disks, and many types of data, in a fast and straightforward manner. Best of luck!


The post Static hosting with Azure Blob Storage and Azure CDN appeared first on Simple Talk.


from Simple Talk https://ift.tt/368VkkX
via

Thursday, September 24, 2020

Let’s move: Azure Resource Mover

Many different situations may create the need to move Azure resources or objects from one region to another:

  • A company may move to a different country
  • New regulations may create the need to move data
  • A company may need to transfer one server to another branch
  • Or there is a need to move to a region with AZs for added resiliency

If you include the need to copy a resource or set of resources, instead of only moving, the list expands a lot.

Azure already offers the resources to do this: ARM templates, automated deployments, Data Sync, Recovery Services Vault, VM replication and so on. The problem is that sometimes, to move a set of objects together, you may need to use many of these services and understand how to use them.

The solution is a new free service, still in preview, called Azure Resource Mover. This service reduces the complexity of moving resources, minimizing the number of decisions needed on how the resources will be moved. More than that, the last step, deleting the source of the move, is optional, as you will see in detail later. You can use this feature, not only to move resources, but also to copy and distribute them across many regions. During the move process, only one side (source or destination) will be active, but once you finish the move, if you decide not to delete the source, you have in fact a new deployment of the solution.

Set up the VMs

This article demonstrates two step-by-step moves to explain how the new Azure Resource Mover works displaying a complete test of the features. I start with two virtual machines, in two different regions, and both will move to North Europe.

I created two resource groups as a starting point: MoverDemo and MoverDemo2, in different regions, UK South and East US.

A screenshot of a cell phone Description automatically generated

In each resource group, I created a virtual machine and the objects that follow it, shown in the image below.

Finding Azure Resource Mover

On the Azure Portal, you can use features still in preview, such as Resource Mover. Sometimes the Resource Mover may appear visible as an icon in the middle of the Azure services, but this usually happens when it was already used.

Another option is to use the search box on the site to find Azure Resource Mover, then click on it.

A third option is to use the Move button on top of the resource group screen. Open the resource group and click the Move button. Before Azure Resource Mover preview, there were only two options, move to another resource group and move to another subscription. Resource Mover included a new option: Move to another location.

A screenshot of a cell phone Description automatically generated

There is a small difference between opening Resource Mover directly or using the move to another location button. When you use the move button, you will directly open the wizard to add new objects to move. However, if you open the Resource Mover by clicking the button on the Home page of the portal, you will see the initial screen shown in the next section.

Starting the Azure Resource Mover wizard

Azure Resource Mover is not a simple Azure object; it is an environment for a wizard execution. The first thing you’ll see, when Overview is selected on the left side, is this guidance. This reflects, almost exactly, the sequence of steps of a move process:

  • Select the objects to move
  • Validate the objects dependencies
  • Make the move

These are the three main steps, but this is not the complete process, as you will discover on further steps.

  • Click the Across Regions item on the left side of the screen

On the middle-top screen, you will notice the information about source and target regions of the move. It may seem a bit strange at first glance, but this is not only information about the move, but a context control. Each set of source and target is a context for the move. You add objects in the context and start the steps for the move operation, being able to do it for each context.

  • Click the Change link and change the context a few times to better understand how the different contexts work.


While testing the context, you may have noticed that, once you change to an empty context, you will only be able to return to the previous one if you know the combination of source-destination.

If one employee starts a move in a context, changes the context and does not touch it anymore, no one will know about the existence of that move. In this situation, you may need to use CLI to find the existing contexts/move collections objects. You can open cloud shell from the top of the Azure Portal window and execute the following statement:

az resource list --resource-type Microsoft.Migrate/moveCollections

A screenshot of a cell phone Description automatically generated

The main properties you may notice are the type (moveCollection), id, and resourceGroup . These properties identify the existence of the moveCollection and the source and target of the move. Mind that you will only see this result after adding objects to a context because this will generate the moveCollection object. The product group is working on the creation of an overview section to list all the existing Move Collections, solving the problem above.

  • Click the Add Resources button to include resources in the move context. Start with the move from UK South to North Europe.

A screenshot of a cell phone Description automatically generated

  • When you click Add resources, a wizard will appear asking the source and destination of the move as shown in the figure below.

  • Click Next

  • Click the Select resources link
  • Locate the resources you would like to move. In this example, I will move the resource group MoverDemo.

One good way to do this is filtering by resource group. You may notice the selection windows only show the resource groups that have at least one resource in the source region.

  • After selecting the resources, click the Done button

A screen will appear explaining the steps of the wizard. This screen also advises you that a new resource group will be created to keep metadata information and about the creation of a system managed identity which will receive permission to make the move. You need to mark the checkbox, agreeing with these steps, before clicking the button and moving forward.

  • Change the context to East US-North Europe and repeat the steps in this section for the resource group MoverDemo2.
  • Change the context back to UK South-North Europe. You will see the objects included as the following image:

A screenshot of a cell phone Description automatically generated

The Status column shows in which step each object is. The Issues column alerts about any pending problem. At this point, you can already identify all the steps in the move process, although the sequence may not always be so clear:

Add Objects: Add in the context the objects to be moved. This step is completed.

Validate Dependencies: The objects included may depend on other objects. You need to execute a dependency validation for all of them.

Prepare: All the objects need preparation, and these preparations can be different for each object. It may involve cache, for example, additional metadata in the metadata resource group, and so on.

Initiate Move: The move task itself. This step creates the object in the destination region

Commit Move: This step works as a confirmation that we would like to keep the objects on the destination region.

Delete Source: This last step is optional. You can choose to delete the source objects or not. This makes Resource Mover way more powerful since it can be used to duplicate objects.

How do the steps work?

These steps, such as prepare, move, and commit, may appear as a black box for anyone who is using them. Here is a more in-depth explanation.

The service was made to work for many objects, and more and more objects will be included. These steps may have different meanings depending on the object. The main difference is related to stateless and stateful objects.

Stateless: Objects which don’t contain data, only definition and metadata, such as IP addresses and virtual networks.

Stateful: Objects which contain data, such as virtual machines and SQL databases.

The steps apply differently depending on the object:

Prepare: For stateless objects, the prepare step creates the arm template for the object deployment. Stateful objects are more complex. The action may be different for each kind of object, such as replication for VMs, for example, but the prepare step will be just a preparation for the action.

Move: This step will implement the preparation. It can be a simple deployment of the ARM template created or the establishment of a replication, but for stateful objects, the actions may vary.

Commit: This is the confirmation to proceed to the destination object. For stateless objects, this doesn’t mean too much, but for stateful objects, this may mean the replication being broken, for example.

Resolving dependencies

Follow these steps

  • Click the button Validate Dependencies
  • Change the context to East US-North Europe and Validate Dependencies
  • Return the context to UKSouth-North Europe

Having the dependency validation finished, a new button will appear on top of the screen, Add dependencies, as in the image below.

  • Click the Add dependencies button

  • On the Add Dependencies screen, select the resource group

The resource group also needs to be moved together with the virtual machine. More than that: It needs to be moved first.

  • Click the Add dependencies button

At this point, you will get back to the same screen listing the resources to move, the only difference is the presence of the resource group.

  • Click Validate Dependencies button

After including the missing dependencies, you need to validate again to ensure there is no additional dependency missing. After the 2nd round of validation, the screen will look like the image below: No issues pending, no blue alerts, but the Status column telling what the next step is.

  • Change the context to East US-North Europe and repeat the steps in this section.

Modifying the destination configuration

At this point, when the Status column shows the next step is the Prepare, you can customize the destination configuration for each object.

The column Destination Configuration has the destination name of the object as a link. If you click the link, you will reach a page to customize the object. Each object has different customization options.

Below you can see the configuration options of a virtual machine and a network interface

A screenshot of a cell phone Description automatically generated

A screenshot of a cell phone Description automatically generated

Moving the resources

After including the objects into the context, you don’t need to execute the steps for all the objects together. In fact, it’s exactly the opposite: In some situations, the objects will require that a dependency is moved first before even the prepare step, while in other situations you will have stateless and stateful objects mixed.

One stateful object can even take days to be moved (databases or virtual machines). You will want to ensure all stateless are moved first and only after that move the stateful objects within an acceptable window in the production environment.

During the following steps, you will move each context using different sequences, just as an example that this can be done. However, for virtual machines, both contexts have a requirement: The resource group needs to be moved first

  • Change the context back to UkSouth-North Europe
  • Select the resource group, marking the checkbox
  • Having the resource group selected, click the Prepare button

A screenshot of a social media post Description automatically generated

  • Click the button to go forward with the preparation process

As you may notice, the Status column changes only for the resource group, displaying the next step

  • Select the resource group again and click the Initiate Move button on the top of the screen.

A screenshot of a cell phone Description automatically generated

  • On the following screen, click the Initiate Move button

A screenshot of a social media post Description automatically generated

A screenshot of a cell phone Description automatically generated

  • Change the context to East US-North Europe
  • Repeat the steps in this section
  • Change the context back to UKSouth-North Europe
  • Select all the objects, except the resource group
  • Click the Prepare button

A screenshot of a social media post Description automatically generated

  • Click the button to go forward with the preparation process
  • Change the context to East US-North Europe
  • Select all the stateless objects, all objects except the resource group (already prepared) and the virtual machine (stateful)
  • Click the Prepare button

A screenshot of a social media post Description automatically generated

  • Click the button to go forward with the preparation process
  • After the preparation process, select the virtual machine

A screenshot of a cell phone Description automatically generated

At this point, you may notice how the objects are advancing in different steps. The resource group was already moved, the stateless objects are already prepared, and the virtual machine will be prepared now.

  • After selecting the virtual machine, click the Prepare button

A screenshot of a social media post Description automatically generated

  • Click the button to go forward with the preparation process
  • Change the context to UKSouth-North Europe
  • Select all stateless objects, all objects but the resource group (already moved) and the virtual machine (stateful)

A screenshot of a computer Description automatically generated

  • Click the top Initiate Move button

A screenshot of a social media post Description automatically generated

  • Click the Initiate Move button

A screenshot of a cell phone Description automatically generated

  • Change the context to East US-North Europe

Once the preparation of the virtual machine has completed, you will see the status of the objects like the image below:

A screenshot of a cell phone Description automatically generated

  • Select all the objects with status ‘Initiate move’ pending

A screenshot of a computer Description automatically generated

  • Click the top button Initiate Move

A screenshot of a computer Description automatically generated

  • Click the button Initiate Move
  • Wait for the move to be completed
  • Click the Home button to return to the start page of the Azure Portal
  • Locate the Resource Groups option to list all resource groups
  • Filter the resource groups typing “mover” on the filter box

A screenshot of a cell phone Description automatically generated

At this point of the execution, these are the resource groups we can find:

  • Two sources, you started with these
  • Two destinations, same name as the source but with the destination region concatenated
  • Two metadata resources, identifying the source and target of the move
  • Change the context to UkSouth-North Europe
  • Select the virtual machine, the only object still not moved

A screenshot of a cell phone Description automatically generated

  • Click the top button Initiate Move
  • Click the button Initiate Move
  • Wait the move to be completed

At this stage, you have two move contexts with all the objects on the ‘Commit move’ pending status. Our example will be more complete by committing only one of the contexts and deleting the other.

  • Select all the objects in the context

A screenshot of a cell phone Description automatically generated

  • Click the Commit move top button

A screenshot of a cell phone Description automatically generated

  • Click the Commit button at the bottom of the screen

A screenshot of a cell phone Description automatically generated

It’s still possible to identify further dependencies not included until this point. On this example, the network interface of the virtual machine is included in the context.

A screenshot of a cell phone Description automatically generated

  • Click the Commit button on the bottom of the screen again

A screenshot of a cell phone Description automatically generated

The commit breaks the relationship between the source and the destination. The last pending step is to delete the source, but this is an optional step, you can choose to delete the source or not, so you would complete a move or have a copy of the objects.

The metadata resource group

This is an excellent moment to look again at the metadata resource group. The content of the resource group Resourcemoverrg-eastus-northeurope is like the image below:

The recovery Services vault is a service used for virtual machine replication. You can check more details about the Recovery Services Vault on the Microsoft website.

The storage account, for its part, has a container and many files used during the move process

A screenshot of a cell phone Description automatically generated

As you noticed before, the steps of the move were applied as deployments over this resource group. Checking the list of deployments, you will find something like the image below:

A screenshot of a cell phone Description automatically generated

Azure Resource Mover used Replication Policies to replicate the virtual machine. You can read more details about Replication Policies on the Microsoft website.

Discarding a move

The move needs to be done in steps according to the dependency of the objects, the discarding of the move also needs to be done in steps, in reverse, according to the dependencies

  • Change the context to East US-North Europe

A screenshot of a cell phone Description automatically generated

  • Select all the objects except for the resource group.

All the objects depend on the resource group, so the objects need to be removed first, and the resource group will be left for last

A screenshot of a cell phone Description automatically generated

  • Click the Discard move top button

A screenshot of a cell phone Description automatically generated

  • Click the Discard button on the bottom of the screen

A screenshot of a cell phone Description automatically generated

  • Wait the discard to be completed

After the discard, the objects return to the status ‘Initiate Move’ pending. They still need to be removed from the context

  • Select all the objects but the resource group

A screenshot of a computer Description automatically generated

  • Click the top Remove button

A screenshot of a cell phone Description automatically generated

  • Click the Remove button on the bottom of the screen

A screenshot of a cell phone Description automatically generated

  • After the remove is completed, select the resource group

A screenshot of a computer screen Description automatically generated

  • Click the Discard move top button

A screenshot of a cell phone Description automatically generated

  • Click the Discard button on the bottom of the screen
  • After the discard, select the resource group again
  • Click the top Remove button

A screenshot of a cell phone Description automatically generated

  • Click the Remove button on the bottom of the screen

Deleting source objects

The move from UK South to North Europe is completed, committed. The last step is to delete the source objects. However, there is no automated way to do that, deleting the source is up to you.

  • Change the context to UKSouth-North Europe

Besides deleting the source, you also need to remove everything from the context, exactly as you did with the other context, East US to North Europe.

Deleting the metadata resource group

Returning to the home of the Azure Portal and looking for the resource groups, you will notice the destination resource group was removed, but the metadata resource group is still in place.

A screenshot of a cell phone Description automatically generated

Azure Resource Mover is an environment for a wizard, leaving many details hidden in background objects. The metadata resource group may appear to be empty, but checking in more details, you will discover the resource group has deployments.

Clicking on the link of the image above, you can see these deployments in more details.

Clicking on the successful deployment on this list, you can see details about the objects deployed.

A screenshot of a social media post Description automatically generated

As you may notice on the type column, the objects deployed are MoveResources, deployed inside a MoveCollection. Each object included in the move context generates a MoveResource.

The move collection is still in place, although it doesn’t have any move resources. You can open cloud shell and execute the following statement to check:

((az resource list --resource-type Microsoft.Migrate/moveCollections --output table) | wc -l) -1

The result, count of move collections, is still 2, both move collections are still present. You can drop the metadata resource group, but the group has a lock. You need to delete the lock first, as you may notice on the image below.

A screenshot of a cell phone Description automatically generated

After removing the lock, you can remove the resource group with no further problem

A screenshot of a cell phone Description automatically generated

A screenshot of a cell phone Description automatically generated

When the removal of the metadata resource group is completed, you can execute the count again, this time we will get only a single move collection.

Conclusion

This is a preview version, probably while reading and testing this article you may have noticed many details which could be improved. You can leave a comment on this article, and let’s talk about what could be improved.

You may also be interested in the following documentation of this new feature:

Overview

Support matrix for VM & networking resources

VM and Networking tutorial

Support matrix for SQL resources

SQL tutorial

The post Let’s move: Azure Resource Mover appeared first on Simple Talk.


from Simple Talk https://ift.tt/2FMZbtx
via