Setting up and managing SQL Server security is an important part of building and maintaining your SQL Server environment. SQL Server security is a vast topic that cannot be covered in a single article. This article starts with a few foundation topics of SQL Server security: SQL Server Authentication methods, logins and database users.
Authentication methods supported
There are two different authentication methods for connecting to SQL Server: Windows and SQL Server.
Windows authentication requires a user to first authenticate to Windows with their login and password. Once a user has been authenticated to Windows, they can then connect to SQL Server using Windows authentication. That is, provided their Windows account has been granted access to SQL Server via a login (more on logins later). Windows authentication is tightly coupled with Windows Security and is also known as Integrated Security. Windows authentication works great when a person is part of a Windows domain.
But there are times when people can’t connect to Windows; this is where SQL authentication comes in. SQL Authentication is less secure than Windows Authentication. In order to connect to SQL Server using SQL authentication, a person needs to provide a login and password when they connect. The password for a SQL Authenticated login is stored in the master database. Because the password is stored in a SQL database, it is more easily hacked. It can also be backed up and restored with a database backup which is why it is less secure than using Windows authentication.
Windows Authentication is the default authentication mode when installing a SQL Server instance. In order to support SQL authentication, you need to configure SQL Server to support mixed mode authentication. When mixed mode is used, both Windows and SQL authentication can be used to connect to SQL Server. If SQL Server is not set up to support mixed mode, then only Windows accounts can connect to SQL Server.
Because SQL authentication is less secure than Windows Authentication, it is recommended that you only set up your SQL Server instance to support mixed mode if you have a requirement to support users or applications that can’t connect to Windows. Even though Windows Authentication is more secure and the recommended practice for connecting to SQL Server, many custom application software vendors still don’t support connecting via Windows authentication.
Setting up SQL Server to support different authentication modes
When installing SQL Server, you have the choice to support only Windows authentication or both authentication methods, which is known as mixed mode. During the installation process, you decide whether or not to use mixed mode when defining the database engine configuration, as shown in Figure 1.
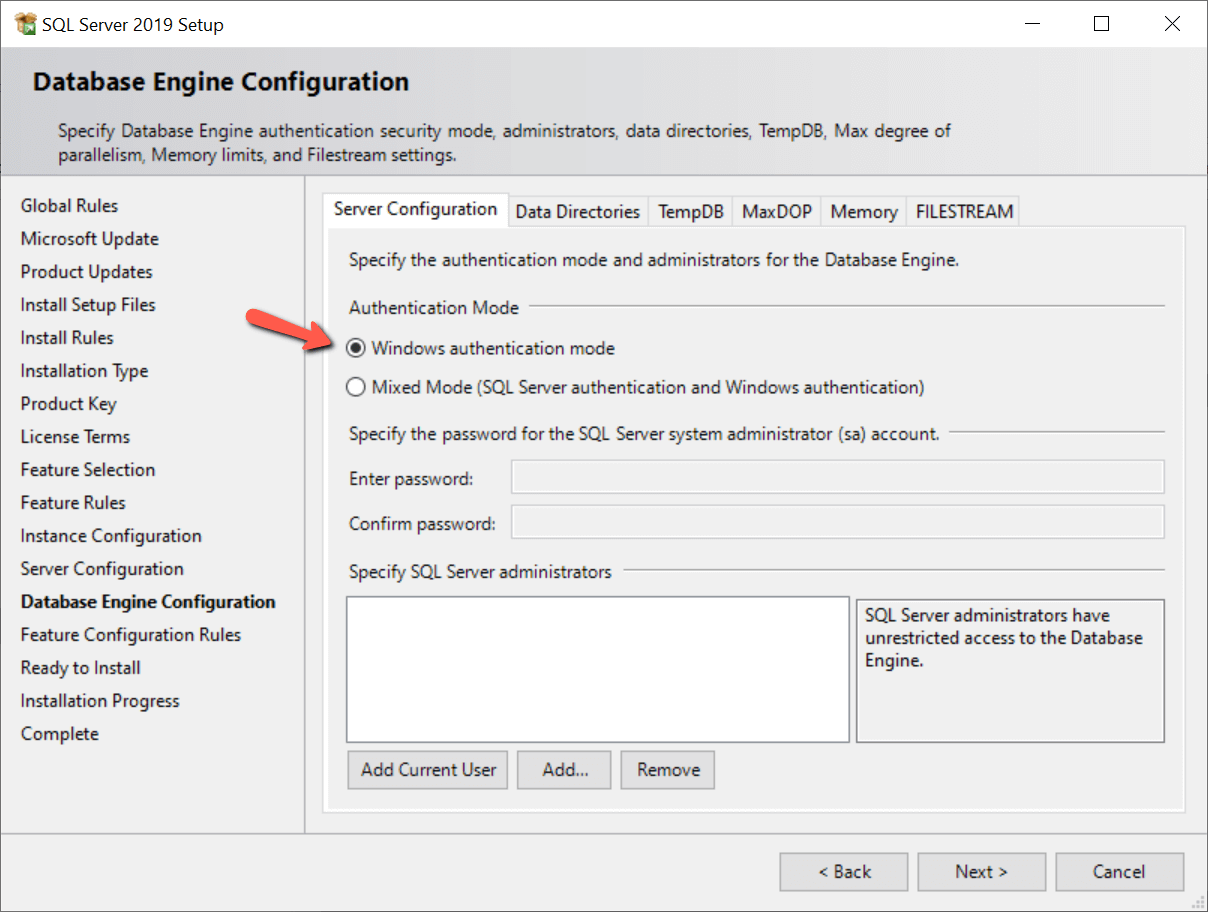
Figure 1: Selecting Authentication Methods
Windows Authentication is selected as the default shown with the red arrow in Figure 1. If you need to support both Windows and SQL Server authentication, then you would select the “Mixed Mode” radio button. Upon clicking this button, the SA account password boxes would become enabled, and you would need to specify a password for the SA account. When only Windows authentication is selected, the SA account is disabled. To secure the SA account when you are using mixed mode you can disable the SA account after it is enabled.
How to determine which authentication methods are supported
You can check to see which authentication method is configured in several ways. One of those ways is to use SQL Server Management Studio (SSMS). To use SSMS, first right click on the Instance name and select the Properties option. When I do that on my instance, the properties page in Figure 2 is displayed.
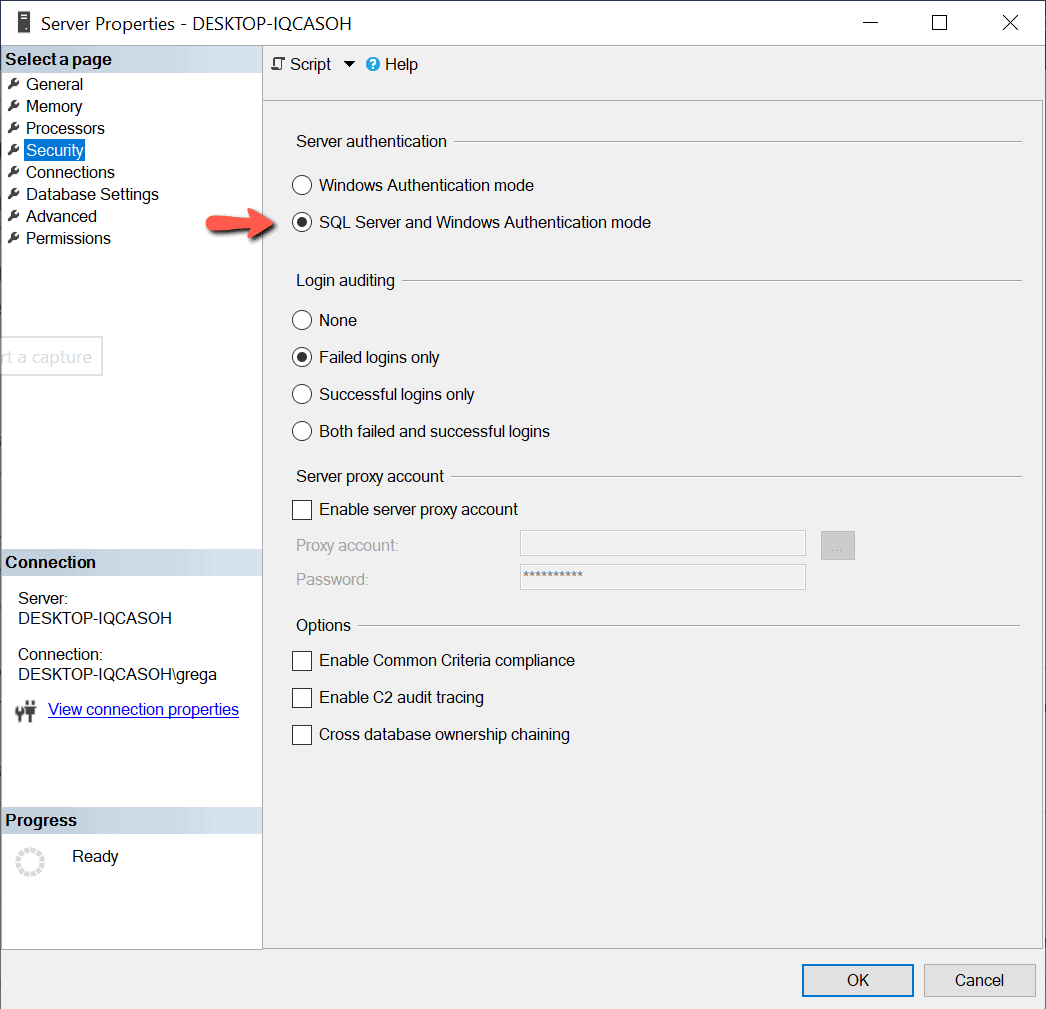
Figure 2: Determining Authentication Mode
Figure 2 shows that my instance supports mixed mode authentication because the radio button next to the red arrow is enabled.
Another method to check which authentication modes are set up is to use TSQL code. The code in Listing 1 displays the Authentication mode setup.
SELECT CASE SERVERPROPERTY('IsIntegratedSecurityOnly')
          WHEN 1 THEN 'Windows Authentication Only'
          WHEN 0 THEN 'Windows and SQL Server Authentication'
       END as [Authentication Mode];
Listing 1: Displaying Authentication mode
Changing authentication methods After SQL Server is installed
There are times when you might want to change the authentication settings for a SQL Server instance. This might occur if you used the default settings during installation to support Windows authentication only and later acquired some software that can only connect using SQL Server authentication. Or possibly you want to make your instance more secure by removing support for SQL Server authentication. The authentication options can be easily changed using the properties page in SSMS shown in Figure 2.
If I wanted to change my instances to support only Windows authentication, all I would need to do is click on the “Windows authentication mode” button in Figure 2, and then click on the “OK” button to apply that change. After making this property change, I would need to restart my instance for this change to take effect.
SQL Server logins
In order to connect to SQL Server, one must have access to SQL Server. Access is granted via a login. A login is also known as a security principal, and is stored in the master database. There is one exception, and that is accessing a contained database. With contained databases users connect directly to database without the need for a login in the master database. More on contained databases in future articles.
There are three types of logins that are stored in the master database: Windows user, Windows group, and SQL. Let’s review each of these different types of logins.
A Windows user login provides access for a single Windows user. When creating this type of login, no password is needed when defining the login in SQL Server. This type of login requires the user to first validate their login by logging into the Windows domain. The Windows domain stores the password.
A SQL Server login is similar to a Windows login in that it provides access to SQL Server for a single user, but it is different than a Windows login because the password for a SQL login is stored in the master database. Therefore, when setting up a SQL Server login, a password needs to be provided for the login along with a few other password options, as shown in Figure 3.
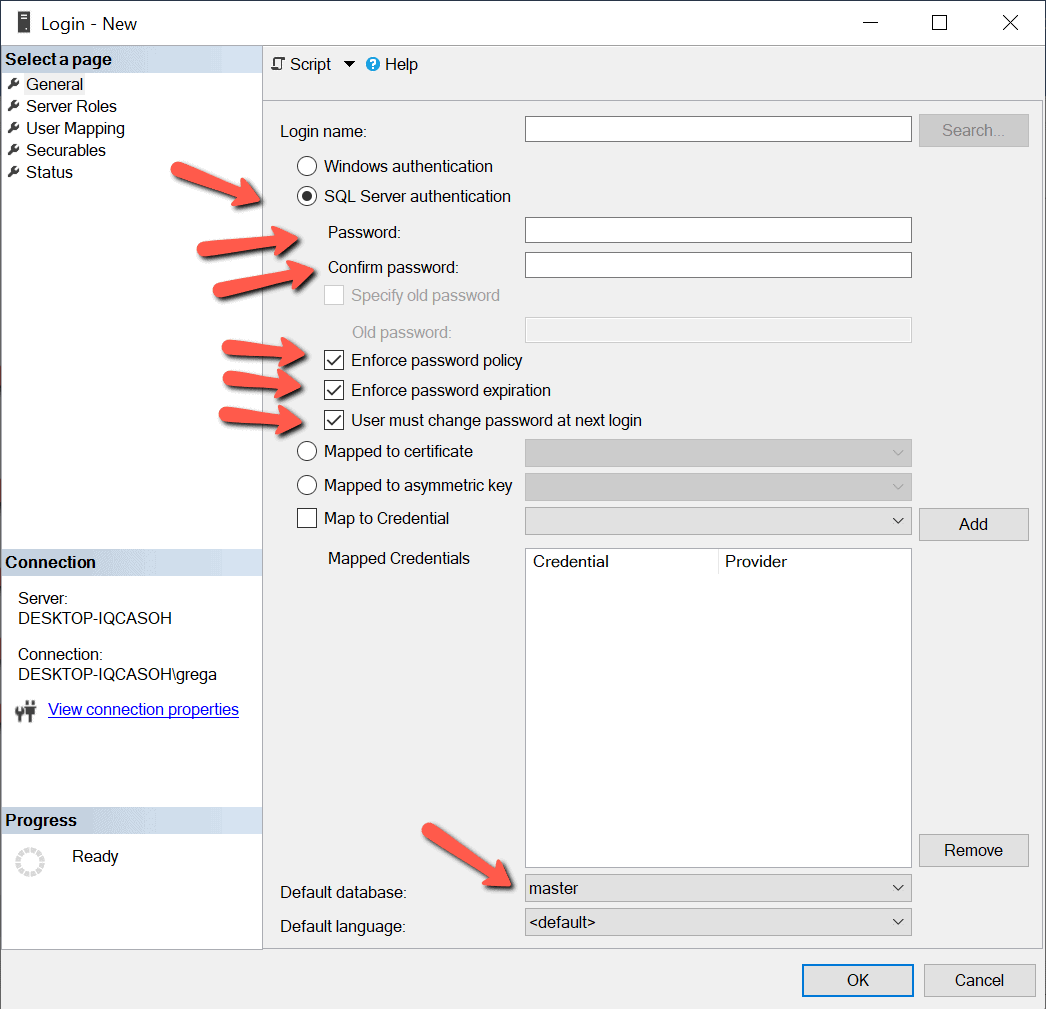
Figure 3: Setting up a SQL Server Authenticated Login
Figure 3 shows that a SQL Server Login can be enabled to enforce Windows password policies and expiration and can require a user to change the password upon their first login. Microsoft added these new password features when SQL Server 2005 was released. For applications to support these new password features, they can use the NetValidatePasswordPolicy API.
The last type of login, a Windows group login, is similar to a Windows login but slightly different. A Windows group login provides access to a SQL Server instance for every Windows login that is a member of the group. Windows groups are a great way to provide access to many Windows logins with only having to define a single login in SQL Server. Using a Windows group, access to the SQL Server instance can be maintained by adding or removing group members. Using Windows groups helps minimize security management efforts and troubleshooting login related security issues.
If you look at the bottom of the screenshot in Figure 3, you will notice a “Default Database” setting for a login. The default database setting when creating a login is the “master” database. When setting up a login, the default database can be changed to any database on the server. Best practice is to set the default database to a database that the user will use when connecting to SQL Server.
Windows logins are considered more secure because of the way the password for the login is stored. The password for a Windows login is stored using true encryption. Where as the password for a SQL Login is not encrypted, instead it is hashed. Because a SQL login is hashed makes it easier to crack the password. Windows logins also require domain admin’s to set up the login and password, where as SQL logins the database administrators set up the login and password. By having the domain admin’s managing login passwords provides another layer of security, commonly called separation of duties. By separating the duties of creating and managing Windows logins from managing databases and access to databases, provides an additional security controls to gain access to data stored in SQL Server.
Creating a login to SQL Server allows users to connect to SQL Server. But a login alone doesn’t provide users access to any data in the different databases on the server. For a login to read and/or write data to a database, the login will need access to one or more databases. A login can be set up to have access to many databases on an instance if required.
Database users
A database user is not the same as a login. A login provides to a user or application the ability to connect to a SQL Server instance, whereas a database user provides the login rights to access a database. Each database a login needs access to will require a database user to be defined, except when a login has been given sysadmin rights. When a login has sysadmin rights, they have access to all database, without being mapped to a database user. This association between a login and a database user is known as a user mapping. User mappings for a login can be created during login creation or later for logins that have already been set up.
Creating a database user while creating a new login
To show how to provide user mapping when a new login is created, I will create a new SQL Server login named “Red-Gate”. The screenshot shown in Figure 4 shows the “Login – new” window where I will define this new login. To bring up this window, I expand the “Security” tab under my instance, and then right-click on the “Logins” option and then select the “New Login…” item from the drop-down.
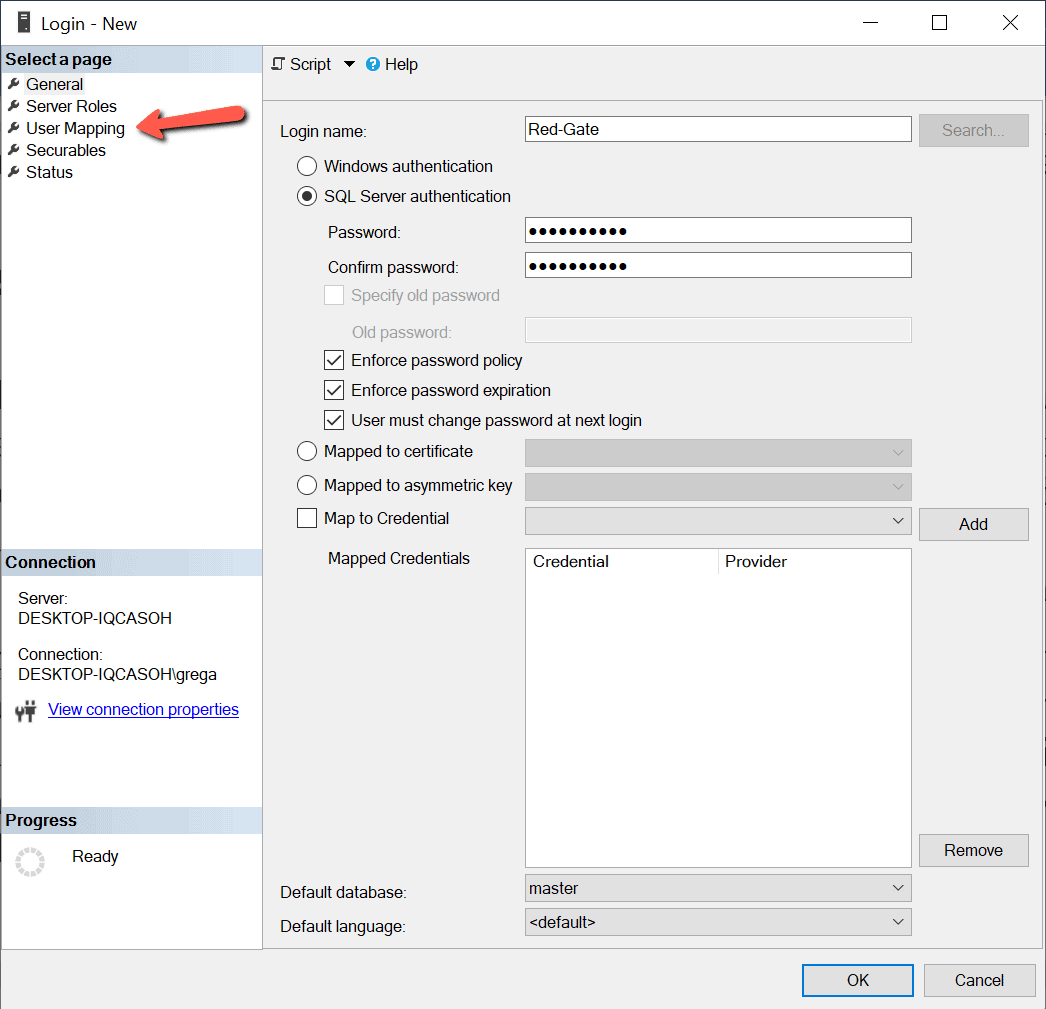
Figure 4: Creating Red-Gate Login
In figure 4, I enter “Red-Gate” for the login name and entered the password for this SQL login in the dialog boxes provided. To provide database access for this new login, I click on the “User Mapping” option in the left pane. When I do this, the window in Figure 5 is displayed.
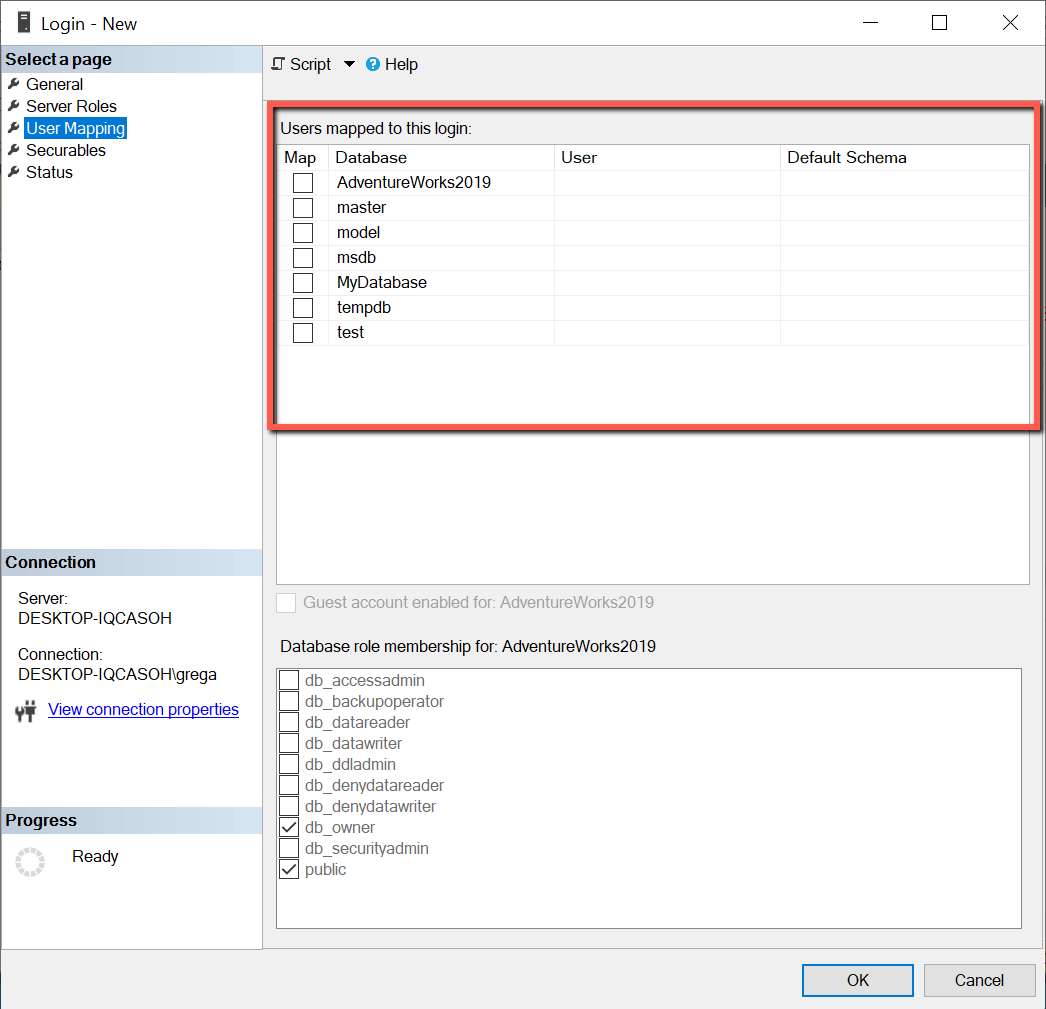
Figure 5: User Mapping Window
A red box shows the list of databases in Figure 5, where my new login can be mapped. In order to map my “Red-Gate” login to the “AdventureWorks2019” database, I would just need to click on the “Map” checkbox next to the AdventureWorks2019 database. When I do that, the screenshot in Figure 6 is displayed.
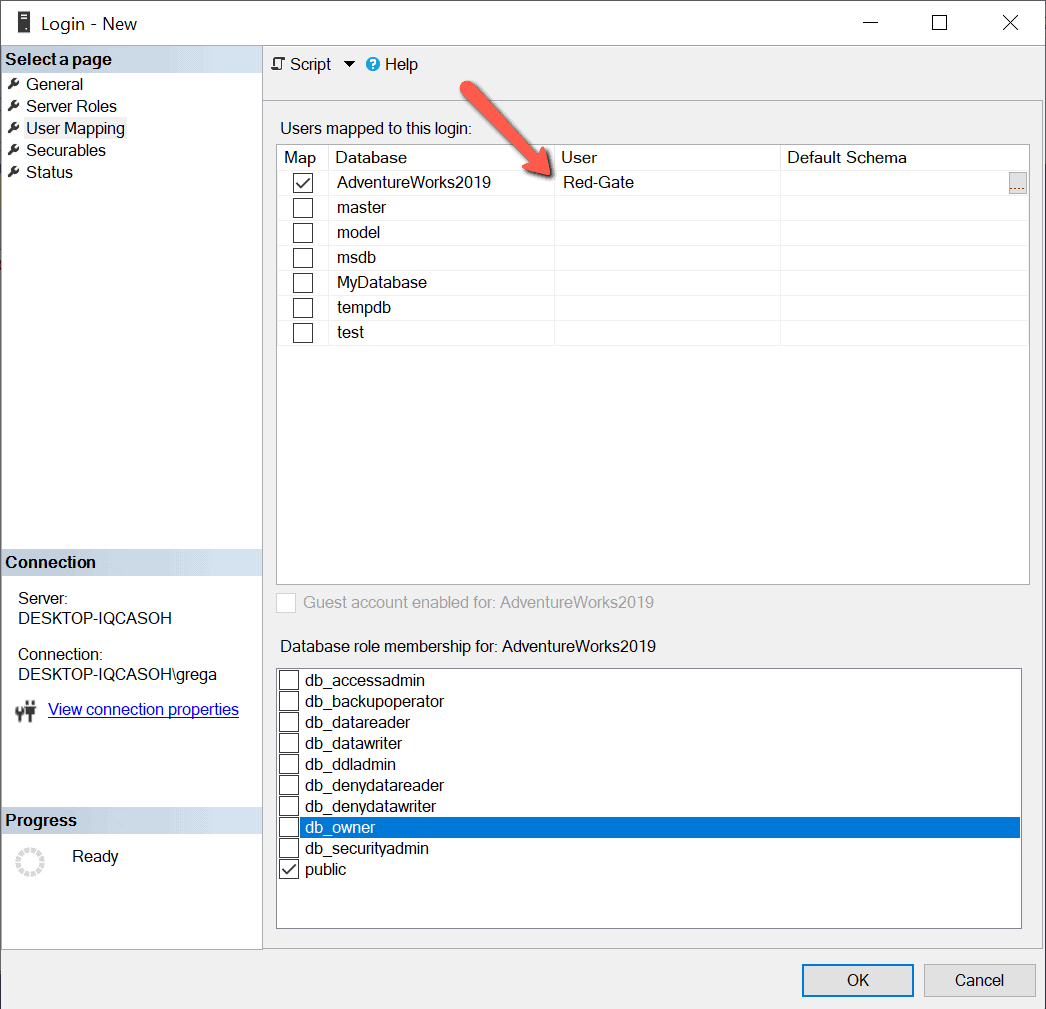
Figure 6: Mapping Login to database
After checking the Map box, the name “Red-Gate” is automatically populated in the “User” column for the AdventureWorks2019 database. This interface automatically generates a database user name the same as the login to which it is mapped. Database user names don’t need to be the same as the login. If I wanted my database user name to be different, I could just type over the “Red-Gate” name and specify whatever database user name I wanted. Mapping a login to a database users only provides that login access to the database, but it doesn’t give the login access to read or update data in the database. In future articles I will be discussing how to provide read/write access to database objects.
Suppose I wanted to map my new “Red-Gate” login to additional user databases. In that case, I could do that by just checking on another “Map” checkbox next to the additional databases. For this example, I only want to map my new “Red-Gate” login to the “AdventureWorks2019” database. To finish up mapping my “Red-Gate” login to the “Red-Gate” database user I just need to click on the “OK” button.
Creating a new database user and mapping it to an existing login
There are times when a login has already been created, and it just needs access to one more database. For example, suppose I now wanted my established Red-Gate SQL Server login to access the database named “MyDatabase”. To give the Red-Gate login additional database access, I have a number of options. One option would be to just modify the user mappings by changing the properties on the login. This would be similar to how I just added the user mapping when I created the Red-Gate login.
Another option is to add a new database user to the “MyDatabase” and then mapping that new database user to the Red-Gate login. To create a new user in the database “MyDatabases” I would first expand the database, right-click on the “Security” item, hover over the “New” item, and then click on the “User…” item, as shown in Figure 7.
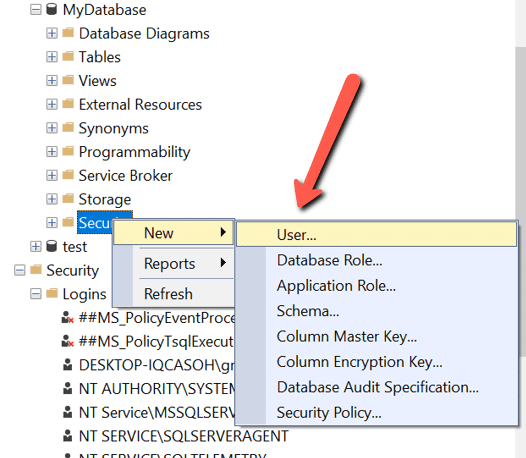
Figure 7: Bring up the new database user dialog
When I click on the new “User…” menu item, the window in Figure 8 is displayed.
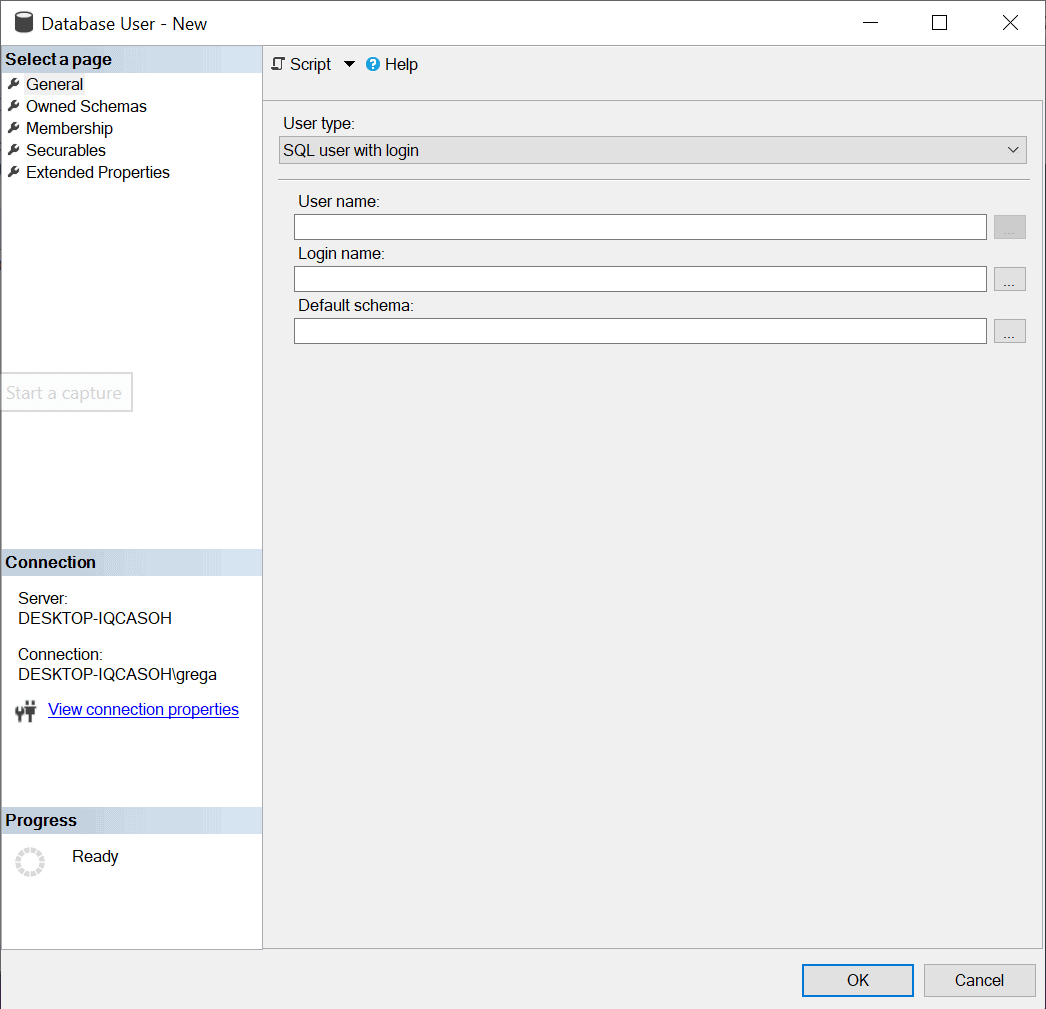
Figure 8: Adding a new database user
To give the Red-Gate login access to MyDatabase, I need to fill out the form in Figure 8. The first item in Figure 8 to consider is the “User Type”. This field defaulted to “SQL User with Login”. There are four other types: SQL user without login, User mapped to a certificate, User mapped to an asymmetric key, and Window users. Since I am creating a database user that will be mapped to a SQL login, I use the default. Next, I enter the database user name for the user I am creating. It could be any name, but I prefer to make the database user name match the same name as the login it is associated with. Therefore I enter “Red-Gate” in the “User Name” field. I next map my new users to a login. To do the mapping, I can either type in “Red-Gate” for the login or use the ellipsis button (…) to browse through the list of logins already created and select one.
The last item needed is to define a default schema for this login. A schema name is associated with a database object collection owned by a database user. By default, each database has a schema named “dbo” owned by the “dbo” user account. You don’t need to specify a schema when you define a new database user. If one is not specified when defining the database user, the “dbo” schema will be the default schema. Since this article is just a primer, I will discuss the different aspects of schemas. I’ll leave that for another article. When I create my new Red-Gate database user, I’ll leave the default schema item empty and let the create new users process set the default schema automatically to “dbo”.
Once I’ve created my new user, I can verify it exists in the database by expanding the “User” item under the “Security” folder in Object Explorer. You can also create a new database user and map it to a login using a script. Listing 2 is an example of using TSQL to create the same login I just created using the point and click method.
USE [MyDatabase]
GO
CREATE USER [Red-Gate] FOR LOGIN [Red-Gate]
GO
Listing 2: Create a Red-Gate database user using a TSQL script
SQL Server authentication methods, logins, and database users
To connect to SQL Server, a person or process needs to authenticate. There are two different methods to authenticate to SQL Server: Windows and SQL Server. Windows is the more secure and recommended method for connecting to SQL Server. Each connection that authentications to SQL Server gains access to the instance via a login. Logins are defined at the server level. Logins by themselves don’t provide access to data within SQL Server. To gain access to data in a database, a login needs to be mapped to a database user. The authentication methods, logins, and databases users provide the basic security foundations for SQL Server security.
If you liked this article, you might also like Understanding SQL Server Recovery Models.
The post SQL Server authentication methods, logins, and database users appeared first on Simple Talk.
from Simple Talk https://ift.tt/3aI58Ev
via
No comments:
Post a Comment