Thursday, September 30, 2021

Testing is not a popularity contest

Commentary Competition

Enjoyed the topic? Have a relevant anecdote? Disagree with the author? Leave your two cents on this post in the comments below, and our favourite response will win a $50 Amazon gift card. The competition closes two weeks from the date of publication, and the winner will be announced in the next Simple Talk newsletter.

The post Testing is not a popularity contest appeared first on Simple Talk.


from Simple Talk https://ift.tt/3mj2YQy
via

Cybersecurity threats

Organizations are under greater threat than ever. It doesn’t matter the type of industry or size of the organization. Threat actors of all kinds—whether governments, criminals, corporate spies, or your everyday hackers—are out to disrupt operations and compromise sensitive data. They might be in it for the money or competitive edge or political gain or an assortment of other reasons. And they’re getting better at it all the time, with attacks becoming more sophisticated, targeted, aggressive, and costlier for the victim. No organization is safe in today’s climate of cybersecurity threats, and every indication is that it will only get worse in the years to come.

What is a cybersecurity threat?

A cybersecurity threat can be defined as any potential action driven by malicious intent that could result in damaged or stolen data, disrupted services or operations, or the destruction of computer or network resources. Cybersecurity threats might target individuals, organizations, industries, or governments, and they might be carried out for any of the following reasons:

  • Steal sensitive data or intellectual property
  • Destroy, corrupt, or manipulate data
  • Hold data and systems hostage
  • Damage computer or network systems
  • Disrupt or disable operations
  • Gain a competitive advantage
  • Make money

Whatever the reason, a successful cyberattack can have dire consequences. It can stop supply chains, disrupt utility services, paralyze transportation, bankrupt a business, or threaten national security. Organizations that fall victim to cyberattacks might end up paying large ransoms or be subject to lawsuits or regulatory penalties. They might also have to contend with tarnished reputations and lost revenue—fallout from which they might never recover.

The Covid pandemic has only fueled the threat momentum. Cybersecurity teams must contend with larger attack surfaces and users connecting from less secure environments with more people working from home. Cybercriminals have been quick to take advantage of the new vulnerabilities by carrying out Covid-themed attacks, often in the form of socially engineered phishing scams. In the US alone, such attacks rose to 30,000 per day early in the pandemic, according to the Microsoft 365 Defender Threat Intelligence Team.

But this figure tells only part of the story. Cisco’s 2021 Cyber security threat trends report paints a particularly grim picture of what today’s organizations are up against:

  • 86% had at least one user try to connect to a phishing site.
  • 70% had users who were served malicious browser ads.
  • 69% experienced some level of unsolicited cryptomining.
  • 50% encountered ransomware-related activity.
  • 48% found information-stealing malware.

The report also states that cryptomining, phishing, ransomware, and trojans averaged 10 times the activity of all other threat types, reaching internet query volumes of around 100 million each month. And such attacks have serious financial consequences. According to IBM’s Cost of a Data Breach Report 2021, the average cost of a data breach rose from US$3.86 million to US$4.24 million in the past year, the highest average in the report’s history. IBM has been publishing this report for 17 years.

Sources of cybersecurity threats

Cybersecurity attacks come from an assortment of threat actors using various tactics and techniques to infiltrate secure systems in organizations of all types and sizes. An organization might come under attack from any of the following types of groups or individuals:

  • Nation states. Government-sponsored cyberattacks might target individuals, organizations, or other countries in an attempt to steal data, inflict damage, disrupt communications, or in other ways undermine operations.
  • Terrorist groups. Similar to nation states, terrorists might go after individuals, organizations, or governments, often with the goal of compromising national security and stability, disrupting economies and infrastructure, or gathering intelligence for carrying out other types of attacks.
  • Criminal groups. Criminals are in it for the money and will use whatever means possible to gain access to data for their financial gain, whether they go after trade secrets, blackmail material, financial records, or personally identifiable information (PII).
  • Hackers. Hackers exploit vulnerabilities in computer and network systems to carry out different types of actions, depending on their motives, which might include revenge, financial gain, thrill-seeking, or bragging rights.
  • Hacktivists. These types of hackers also exploit system vulnerabilities but do so specifically to support their political agendas rather than for the other reasons hackers might have for infiltrating secure systems.
  • Corporate spies. Corporate spies gain access to their competitors’ systems in order to disrupt their operations, steal trade secrets, gather blackmail material, or take other actions that might lead to a competitive edge.
  • Insider threats. Employees, contractors, and other individuals with legitimate access to an organization’s network can also represent a threat to security, whether the individuals are malicious insiders who knowingly set out to cause harm or untrained workers who are careless with communications or system settings.

Clearly, there is no shortage of individuals or groups that might try to undermine an organization’s defenses, leaving IT and security teams under greater pressure than ever to protect their systems and data from both seen and unseen threats.

Types of cyberattacks

Threat actors use a wide range of cybersecurity attacks to access secure systems, and these attacks are continuously evolving and growing more intelligent and sophisticated by the day. Many of today’s cyberattacks fall into the following categories.

Malware

Malware is malicious software introduced into computer and network systems through various means. Malware can take many forms, including spyware, ransomware, trojans, viruses, worms, adware, and botnets. Once malware has been downloaded onto a system, it might change how the system behaves, monitor user behavior, steal information, or damage or lock data. It might also spread to other systems on the network.

Although any type of malware is a concern, the rise in ransomware in the past couple of years has been particularly chilling, with attackers gaining access to secure systems, encrypting critical data, and then demanding exorbitant ransoms to unlock the data. Even if an organization pays the ransom, there’s no guarantee that the data will be unlocked or that it won’t be locked again. The problem has grown even worse lately, with criminals now stealing the data along with locking it.

Social engineering

Threat actors use social engineering techniques to gain access to sensitive information by tricking users into taking actions that will somehow compromise their systems. For example, cybercriminals might send out an email that appears to its recipients to come from a legitimate source. The email might include an attachment that contains malware or a link to a rogue website where users enter their login credentials, believing they’re accessing the actual site.

This type of email represents a form of social engineering attack called phishing—one of the most common types of cyberattacks being carried out. Phishing is often used to get recipients to reveal sensitive information such as credit card numbers, login information, or sensitive PII. It is also used to get them to inadvertently load malware. In many cases, recipients don’t realize that they’ve been duped. More recently, there’s been a surge in spear phishing—a more targeted and sophisticated form of phishing.

Denial of service

A denial of service (DoS) attack attempts to overwhelm computer and network systems with a flood of traffic, overburdening resources and making it impossible for those systems to respond to legitimate requests. DoS attacks are primarily used to disrupt operations rather than get at sensitive data, although in some cases, they might be used to prepare the environment for another type of attack by making the systems more vulnerable.

One DoS variation that’s been growing in popularity is the distributed DoS (DDoS) attack, which is just like a basic DoS threat except that the attack is launched from multiple compromised devices, such as client computers on a network. The proliferation of Internet of Things (IoT) devices has significantly increased the risk of DDoS attacks.

Man-in-the-middle

Man-in-the-middle (MITM) attacks occur when hackers insert themselves into the communications between two parties, allowing them to steal sensitive data or filter the data and modify the responses. Such attacks might also be used to install malware on either party’s system, or they might be used simply to eavesdrop on conversations.

Communications across public Wi-Fi networks are particularly susceptible to MITM attacks, which are often used to hijack sessions between client and server systems. For example, an attacker might substitute the client’s Internet Protocol (IP) address in the middle of a trusted connection, making it possible for the attacker to access restricted server resources. Cybercriminals might use a similar strategy to spoof email addresses in an attempt to get users to reveal sensitive information.

Code injection

Code injection refers to a type of attack in which malicious code is inserted into viable code. The most common type of code injection attack is SQL injection (all SQL language database systems), which occurs when an attacker inserts destructive code into queries that target SQL databases. A hacker could conceivably delete or modify data, update database permissions, or change the database structure by modifying the queries.

Another type of code injection attack is cross-site scripting (XSS). In this case, hackers take advantage of vulnerable user input forms in a web application to inject malicious client-side scripts that are then passed on to legitimate users. Formjacking is another type of code injection attack. In this scenario, hackers inject malicious JavaScript code into a website. Criminals might also use OS command injection attacks, taking advantage of an application’s vulnerabilities to execute malicious commands against the operating system.

Domain Name Service

Attacks against a network’s Domain Name Service (DNS) is a common type of threat that target’s the DNS to exploit its vulnerabilities. For example, an attacker might redirect web traffic to a malicious website by taking advantage of DNS vulnerabilities without needing to hack into the website itself.

DNS attacks come in many variations, including specific forms of DoS and DDoS attacks, although there are other types of DNS attacks as well. For example, hackers might use DNS tunneling to hide data in DNS queries and carry out malicious commands, or they might use DNS spoofing to modify DNS records and alter a domain’s traffic. On the other hand, an attacker might use a fast flux DNS attack to obscure the origin of malicious sites in order to launch a botnet attack.

Plenty of other threats lurking out there

Although I’ve covered some of the more common cyberattacks being waged against today’s organizations, these are by no means the only ones out there. Threat actors are looking for any way possible to exploit known or newly discovered security vulnerabilities to carry their agendas:

  • As more companies move to the cloud, cybercriminals are following suit, hijacking accounts, exploiting misconfigurations, looking for security holes in cloud platforms, or taking advantage of any other opportunities that arise.
  • The proliferation of IoT devices also means a proliferation in network vulnerabilities, as an increasing number of connected devices offer access points for hackers to gain a foothold into secure systems.
  • As long as vulnerable web applications are being deployed, threat actors will continue to exploit those vulnerabilities by injecting code, intercepting responses, tampering with parameters, or taking advantage of them however they can.
  • Not all hardware, firmware, and software vulnerabilities are known or understood, and hackers from across the globe stand ready to carry out zero-day attacks as soon as they uncover new vulnerabilities.
  • Password use still predominates, often without the benefit of multi-factor authentication, and attackers are more than happy to use social engineering, interception, brute-force methods, dictionary attacks, or any other means available to get those passwords for themselves.
  • Cybercriminals are not above taking advantage of systems running unpatched or unsupported software containing known security vulnerabilities, especially when there are also well-publicized paths to exploitation.

In addition to these types of hazards, organizations must also remain vigilant for the assortment of emerging threats as attacks continue to grow more sophisticated and aggressive. We’re already seeing examples of what organizations are up against in attacks such as cryptojacking and wiper malware. Organizations will also have to contend with the growing number of threats against everything from firmware to IoT devices to supply chain networks. And there’s nothing to stop threat actors from taking advantage of the many advancements in artificial intelligence, machine learning, deep learning, and other AI technologies to wage their attacks.

Protecting against cybersecurity threats

The growing threat of cyberattacks will continue to put pressure on IT and security teams to safeguard their systems and data. It will also require due diligence from developers, administrators, knowledge workers, managers, and other key players to keep security at the forefront of their thinking. Any type of cyberattack can have far-reaching implications on an organization’s ability to operate, carry out business, and perhaps even survive.

But protecting against cyberattacks is no small matter. It requires a comprehensive plan that incorporates server, network, application, and endpoint security and ensures that data is protected throughout its lifespan, whether generated by IoT devices, stored in the cloud, accessed via smartphones, or managed by on-premises database systems. It also requires the use of cyber threat intelligence to effectively understand and respond to the threat landscape. Above all, organizations must understand the types of threats they’re up against now and in the foreseeable future and take whatever steps necessary to safeguard their systems and data against the onslaught of cybersecurity threats.

If you like this article, you might also like What to monitor for SQL Server security.


The post Cybersecurity threats appeared first on Simple Talk.


from Simple Talk https://ift.tt/3otJf2W
via

Wednesday, September 29, 2021

How to successfully deploy databases with external references

Most database developers are dealing with databases that contain external references. Even if the database code is in source control, these external references can make it very difficult to deploy to new environments. In these multi-database environments, tools like SQLCompare and SQL Change Automation do not automatically resolve object-order across databases, resulting in errors during deployment.

One way to tackle this, which works especially well for CI pipelines, is to create facades for all externally referenced databases. A facade in this context is a database with the expected name, with the expected objects, but those objects are hollowed out and do not contain any dependencies. You can compare this concept to an interface in an object-oriented language. Once you have these facades, they can be used in a pre-deployment step, simplifying the rest of the deployment by effectively removing object-order dependencies with these external databases.

This article shows you how to find all references to external objects in your database and build the necessary facade scripts.

There are three steps:

  1. Find all dependencies on external databases, meaning all objects which live in a different database which are referenced by your database. This includes tables, views, stored procedures, and functions.
  2. Create shell objects for each module identified.
  3. Add the creation of these facades to source control and make them part of your build process.

We’ll also touch on how to keep these scripts in sync without creating a maintenance nightmare.

Find all dependencies

The first step is to find all objects in other databases that your databases reference. To do so, use the following script. You will need to replace the list of databases (found in lines 7 through 9 below) with a list of all of your project’s databases.

While the example below lists multiple databases, in most cases, this list will contain only one (your) database. In other words, you don’t need to have a list of referenced databases; you need to provide only the name of the databases you are searching.

The result will be a list of all external database objects requiring a shell object to be created as part of the facade script.

Listing 1. FindDependencies.SQL

IF OBJECT_ID('tempdb..#dbs') IS NOT NULL DROP TABLE #dbs;
CREATE TABLE [#dbs]
(
  [database_name] NVARCHAR(MAX)
);
INSERT INTO #dbs
VALUES('SomeRandomDB1'),
      ('ServerB.SomeRandomDB2'),
      ('SomeRandomDB3');
GO
IF OBJECT_ID('tempdb..#t') IS NOT NULL DROP TABLE #t;
CREATE TABLE [#t]
(
[referencing_object] NVARCHAR(MAX),
[referenced_object] NVARCHAR(MAX),
[referencing_class_desc] NVARCHAR(60),
[referenced_class_desc] NVARCHAR(60),
[is_schema_bound_reference] BIT NOT NULL
);
GO
DECLARE @cmd1 NVARCHAR(MAX) = 
'
INSERT INTO #t
SELECT 
    QUOTENAME(CAST(SERVERPROPERTY(''MachineName'') AS VARCHAR(MAX))
       +''\''+CAST(SERVERPROPERTY(''InstanceName'') 
       AS VARCHAR(MAX)))+''.''+
      QUOTENAME(DB_NAME())+''.''+
      QUOTENAME(OBJECT_SCHEMA_NAME(SED.referencing_id))+''.''+
      QUOTENAME(OBJECT_NAME(SED.referencing_id)) referencing_object,
    QUOTENAME(ISNULL(SED.referenced_server_name,
      CAST(SERVERPROPERTY(''MachineName'') AS VARCHAR(MAX))+''\''
      +CAST(SERVERPROPERTY(''InstanceName'') AS VARCHAR(MAX))))+''.''+
      QUOTENAME(ISNULL(SED.referenced_database_name,DB_NAME()))+''.''+
      QUOTENAME(SED.referenced_schema_name)+''.''+
      QUOTENAME(SED.referenced_entity_name) AS referenced_object,
    SED.referencing_class_desc,
    SED.referenced_class_desc,
    SED.is_schema_bound_reference
  FROM sys.sql_expression_dependencies AS SED
 WHERE SED.referenced_database_name IS NOT NULL;
';
DECLARE @cmd2 NVARCHAR(MAX) = 
(SELECT 
   STRING_AGG('EXEC '+DBs.database_name+
      '.sys.sp_executesql @cmd,N'''';','')
     WITHIN GROUP(ORDER BY DBs.database_name) AS cmd
  FROM #dbs DBs
);
EXEC sp_executesql @cmd2,N'@cmd NVARCHAR(MAX)',@cmd1;
--SELECT * FROM #t AS T
SELECT DISTINCT T.referenced_object FROM #t AS T;

Create shell objects

For each external database, create a single facade script that contains all shell objects. Start by scripting out the objects as-is and place them into the file, separated by GOs. You will encounter four different object types: tables, stored procedures, views, and functions.

Tables

Tables can be left as is, but it is advisable to remove foreign key constraints:

Example Table with Foreign Key and its facade object

Original Table

Image showing the original table

Facade Table

Image showing facade table

Stored procedures

Stored procedures require the body to be replaced with a single return statement, as in the following example:

Example Stored Procedure and its facade object

Original procedure

Shell procedure for facade

Image showing original stored proc

Images showing shell proc

Views

For views, the facade needs to match the original in the following:

  • the same name
  • the same return column names
  • the same return data types

One way to take care of the return columns is to generate a SELECT statement that returns NULLs converted into the correct data types with the correct column names.

If you use Redgate SQLPrompt, this can be achieved easily by following these steps.

  1. Open a new query window connected to the database with the original object and write the following two lines, but don’t execute them. Be sure to replace dbo.View1 with the name of the original object.

Image showing lines of code to write

  1. Hover over the second #t and click on the yellow box that appears.

Image showing how to get table def

  1. In the box that opens, make sure that the Script tab is selected and click on the Copy button.

Image showing create table script

  1. Open a new query window and paste the resulting script.
  2. Highlight the list of columns
  3. Run the following search and replace. Make sure that regular expressions are enabled (the .* button is highlighted) and Selection is selected in the scope dropdown. Please note that this search and replace RegEx will handle the majority of cases, but not all, so make sure you review the results. This is particularly important if you have non-word characters, like spaces, in your column names.

Search

^\s*(\S+)\s+(\w+\s*([(][^)]*[)])?)\s*(\s(NOT\s+)?NULL)?(,?)\s*$

Replace

$1 = CAST(NULL AS $2)$6

Image showing replacement

  1. After executing replace-all, you should see something similar to the following. Make sure that you don’t change the selection.

Image showing replacement

  1. Click OK, and again without changing the selection, copy the result of the replacement.

Image showing replacement

  1. Now paste the list into the facade object’s create statement as shown in the following screenshot:

Image showing table, view and proc create scripts

Functions

Similar to views, table-valued functions must match the original in the following:

  • the same name
  • the same parameters
  • the same return column names
  • the same return data types

The same process shown above for views can be used for table-valued functions. However, when dealing with a function, SQL Server requires that all parameters are specified. For these purposes, though, it is enough to use DEFAULT for each parameter. In the example below dbo.Function2 has one parameter specified:

Image showing create temp table script

Note: Both multi-statement and inline table-valued functions can be replaced with an inline shell function like this:

Image showing inline function script

Should one of the objects be a scalar-valued function, you can just replace the body with a RETURN NULL as shown below.

Facade of a Scalar-Valued Function

Original function

Shell function for facade

Image showing function creation

Image showing shell function

Facade scripts in source control

In the end, your facade script for each external database should look something like this:

Image showing final facade script

Once the facade scripts are complete, check them into source control alongside your database code to be kept in sync and always available.

Now when creating an environment from scratch, you will first create all the databases involved (without any objects). Then you will need to run the appropriate facade script in each external database to create all shell objects. Once you have done that, you will be able to create all actual objects in your database.

One way to achieve this is to execute the following steps in your pre-deployment:

  1. Drop all existing databases, or better yet, get a new SQL Server instance altogether – for example, by using Docker containers or Spawn.
  2. Create empty databases, both your database and all databases to which there is an external reference.
  3. Execute the facade scripts in their respective databases to create the shell objects.

After these pre-deployment steps are complete, you will be able to create all objects in your database using your tool of choice.

But what about maintenance?

These facade scripts are created manually and, as such, have to be maintained manually. This might feel like extra work. However, in our experience, this overhead tends to be minimal because the referenced databases do not dramatically change on short notice.

If you are using TDD (test-driven design), your facade will be naturally updated as part of your development activities. If you are not using TDD, your CI environment should still alert you to all necessary changes.

Deploy databases with external references

If you’ve followed the steps above, you’ll be able to deploy your database into a new environment or a CI environment with ease.

If you are writing tests (please write tests), you need to consider that the external objects are just a shell. Your tests cannot rely on the original implementation of these shell objects. However, this is a best practice to follow anyway, because writing tests that depend on code outside of your control can make your tests fragile and significantly increase the cost to maintain them.


The post How to successfully deploy databases with external references appeared first on Simple Talk.


from Simple Talk https://ift.tt/3Fdco8T
via

Monday, September 27, 2021

10 things everyone needs to know about Azure Cost management

1 – Azure Hybrid Benefit

Azure services related to servers and direct infrastructure reservation require software licenses, such as Windows Server and SQL Server.

Microsoft offers what’s called Hybrid Benefit. When the software license is required, the service provisioning process asks if you would like to use the hybrid benefit.

If you already have on premises license of Windows or SQL Server, or both, the hybrid benefit is for you. It allows you to migrate your license from on premises to the cloud. After provisioning the resource you have 6 months to completely migrate your resources and disable the license on premises.

The price difference between enabling a resource with hybrid benefit or not is considerable. When you don’t use hybrid benefit you are leasing the license.

Virtual Machines need the license, but not only them. Azure SQL is an example. If you choose to provision your server based on vCores, the license will be required. The DTU provisioning doesn’t require a license.

Reference: https://azure.microsoft.com/en-us/pricing/hybrid-benefit/?WT.mc_id=AZ-MVP-4014132

2- Dev/Test Subscriptions

We always need multiple environments for development and test purposes. Microsoft is aware of this and provide us with a special subscription called Dev/Test subscription.

All the resources will provision on the dev/test subscription will be charged in a different way. Software licenses will not be charged on this subscription.

You can request a dev/test subscription from a MSDN Subscription. Once the subscription is enabled, you may provision all dev/test environments on it. The production environments will stay on your regular subscription.

If you use your regular subscriptions for development and tests your are wasting money.

Reference: https://azure.microsoft.com/en-us/pricing/dev-test/?WT.mc_id=AZ-MVP-4014132

3- Resource Reservation

If you know in advance you will need to use a resource for a specific amount of time, you can make a resource reservation.

Making a resource reservation you pay in advance for the use of an amount of resources for one year, 3 years or even more. The longer you make a reservation, more savings you have with your resources.

The reservation can be done for both IaaS resources, such as Virtual Machines, and PaaS resources as well, such as Azure SQL, CosmoDB. It’s an important solution to save money.

Reference: https://docs.microsoft.com/en-us/azure/cost-management-billing/reservations/save-compute-costs-reservations?WT.mc_id=AZ-MVP-4014132

4- Pricing Calculator

Azure provides a pricing calculator you can use to estimate your expenses with azure services.

You can build your solutions on the pricing calculator, specifying the details of each service and receiving an estimate of the cost, including the total for the solution.

The pricing calculator allows you to build many different estimates, keep them saved and export to excel.

Reference: https://azure.microsoft.com/en-us/pricing/calculator/?WT.mc_id=AZ-MVP-4014132

5- Azure Cost Management

Azure has a feature called cost management. You can find cost management on every subscription, but it can analyse information across subscriptions as well. Cost Management includes many other features to manage the cost of the services:

  • Forecast: You can analyse a forecast of the service costs according the current costs
  • Budgets: Budget objects are an expending limit broke down by each project the company is developing. This can be identified by subscription, resource group or even by tags used on the resources to identify the projects they belong to. The budget objects will generate alerts when some thresholds are reached.
  • Alerts: You can create alerts over the costs to notify the correct employee if something goes different than usual
  • Advisor: The advisor analyses your Azure usage and give you suggestions to optimize your usage


Reference: https://docs.microsoft.com/en-us/azure/cost-management-billing/cost-management-billing-overview?WT.mc_id=AZ-MVP-4014132


6- Power BI Cost Application and Power BI Cost Access

Sometimes, specially in big environments with multiple projects, the Cost Management in the portal may not be enough to analyse the costs with the cloud. Here comes Power BI.

Microsoft offers an Azure Cost Management Power BI App ready to analyse Cost Management data. The app can only be used by companies with Enterprise Agreement with Microsoft.

However, Power BI can connect to Cost Management even without an Enterprise Agreement, allowing you to build your own Cost Management solution.

7- Using Policies and Tags for Cost Management

Every Azure resource can receive tags, a set of key/value pair you can customize for you own purpose, to mark and classify resources according your own needs.

One of the pillars considered when planning the Cost Management feature is accountability. Who is responsible for each expense made in the cloud?

Using tags, we can classify each resource by project, department, company branch, or any kind of classification the company needs. The Cost Management features, such as budgets, alerts and many more can use the tags on the resources to break down reports by accountability.

Where the policies fit on this scenario? The policies can check and automatically add tags to the resources, ensuring the governance of the environment, making sure every resource will have the correct tags to be analysed by Cost Management.

I wrote a blog about policies, take a look on https://www.red-gate.com/simple-talk/blogs/how-essential-are-azure-policies/ and https://www.red-gate.com/simple-talk/blogs/azure-sql-tightening-the-security-using-integrated-authentication-only/

8- Optimize Resource Usage

Each resource on Azure has its own tricks about how to optimize the usage. We are not talking about small and simple tricks, but sometimes complex charging plans that requires a good amount of analysis to be used correctly. I will mention some of them:

Azure SQL

Azure SQL has the elastic pools. You can include a set of Azure SQL databases into a single resource configuration, sharing the resources, specially when the databases have a different usage pattern.

Besides that you also have the Serverless database, which introduce some advantages but needs to be used very carefully, an unpredictable call to the database will put the server on.

The correct choice between DTU’s or vCores is also an important decision that will affect the cost of the service.

Azure Storage

The storage has three different storage layers, Hot, Cold and Archive. If you use them correctly, you will save money, but if you make mistakes, you may be charged the double for each mistake made.

Virtual Machines

The most basic option is to ensure the virtual machine will be turned off when it’s not being used. For example, VM’s intended to be used during work hours can be turned off at night.

Besides that, the correct choice of the series and the spot machines feature are also important choices to control the costs

Synapse Analytics

The first thing to be sure is if your workload can’t run in  a simple Azure SQL Database.

Besides that, you still need to ensure to pause the Dedicated SQL Poll and Spark Poll when possible. This is very important to save money.

These examples illustrate how important a good amount of planning and monitoring is to ensure the costs will not go out of control.

9- Use policies to ensure Resource Usage Optimization

All the resource optimizations mentioned above and many more can be checked and enforced by the use of policies. The policies will show which services are following the best practices defined. They can also enforce them, actively changing the services configuration to make the services compliant.

Of course, you probably can’t enforce the same practices for the entire company. The practices may be different according the departments, projects, company branches and more. The policies support this scenario as well, you can enforce different policies in different levels of the organization.

The secret is to correctly manage the effect and remediation policies, responsible for changing the service to be compliant.

10- Regional Impact

The region of your services can affect the charges in two different ways:

1) The price of the same service in different regions can be different

2) Data transfers across regions are charged on a different rate than data transfers on the same region

The post 10 things everyone needs to know about Azure Cost management appeared first on Simple Talk.


from Simple Talk https://ift.tt/3ieZWvd
via

Saturday, September 25, 2021

Working with SQL Server identity columns

In my last article, I introduced some of the basic information about SQL Server identity columns. This article goes beyond the basics of the identity column and discusses more advanced topics. It covers how to manually insert identity values, how to avoid duplicate identity values, how to reseed the identity value, how to identify functions and variables, and more.

Manually inserting identity values

By default, it’s not possible to manually insert a value directly into an identity column value, but identity values can be manually entered if you turn on a session option. To find out what happens when you try to insert an identity value without turning on the Identity Insert property, run the code in Listing 1.

Listing 1: Attempting to insert an identity value

CREATE TABLE Widget(WidgetID INT NOT NULL IDENTITY, 
       WidgetName NVARCHAR(50), WidgetDesc NVARCHAR(200));
INSERT INTO Widget    
VALUES (110,'MyNewWidget','New widget to test insert');

Inserting the identity value 110 into the identity column along with values for the rest of the columns in the Widget table returns the error shown in Report 1.

Report 1: Error reported when code in Listing 1 is run

An image showing the error when inserting a value into a SQL Server identity column

The error message clearly states that you cannot explicitly insert an identify value unless you specify a column list along with the INSERT statement, and the IDENTITY_INSERT property for the Widget table is set to ON.

The IDENTITY_INSERT property is a session property that controls whether or not an identity value can be inserted. The default value for this property is OFF, but it can be turned on for the Widget table by using the code in Listing 2.

Listing 2: Turning on the IDENTITY_INSERT property

SET IDENTITY_INSERT Widget ON;

After turning ON the IDENTITY_INSERT property for the Widget table, it’s possible to run the code in Listing 3 without getting an error.

Listing 3: Code with column list required to insert identity value

INSERT INTO Widget(WidgetID,WidgetName,WidgetDesc) 
 VALUES (110,'MyNewWidget','New widget to test insert');

Only one table in a session can have the INDENTITY_INSERT property turned on at a time. If you need to insert identity values in more than one table, you will first need to turn OFF the IDENTITY_INSERT property on the first table using the code in Listing 4 before turning ON the IDENTITY_INSERT property for another table.

Listing 4: Turning off IDENTITY_INSERT session property

SET IDENTITY_INSERT Widget OFF;

Care must be taken when manually inserting identity values. SQL Server does not require identity values to be unique. Because of this, you need to take care when manually inserting identity values to make sure you don’t insert an identity value that already exists.

Avoiding Duplicate Identity Values

Duplicate identity values can occur in a table when inserting identity values or reseeding the identity value. Having duplicate identity values isn’t necessarily a bad thing, provided there isn’t a requirement that each identity value is unique. If all identity values need to be different, this requirement can be enforced by creating a PRIMARY KEY, UNIQUE constraint, or a UNIQUE index.

Using IDENTITY function

SQL Server provides the IDENTITY function to define an identity column when creating a new table using the SELECT statement with an INTO clause. The IDENTITY function is similar but not the same as the IDENTITY property used in a CREATE or ALTER TABLE statement. The IDENTITY function can only be used in a SELECT statement containing an INTO clause that creates and populates a new table.

Below is the syntax for the IDENTITY function:

IDENTITY (data_type [ , seed , increment ] ) AS column_name

Where:

data-type – a valid numeric data type that supports integer values other than bit or decimal.
seed – identifies the first identity value to be inserted into the table.
increment – integer value to be added to the seed value for each successive row added.
column_name – the name of the identity column that will be created in the new table.

To show how the IDENTITY function works, run the code in Listing 5.

Listing 5: Using IDENTITY function in SELECT INTO command

USE AdventureWorks2019;
GO
SELECT  IDENTITY(int, 90000, 1) AS Special_ProductId,  
        Name AS Special_Name,  
        ProductNumber, 
        ListPrice
INTO Production.SpecialProduct
FROM Production.Product
WHERE Name like '%LL Road Frame%Black%';  
-- Display new table
SELECT * FROM Production.SpecialProduct;

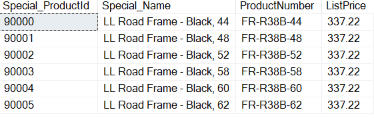
The output from Listing 5 is displayed in Report 2.

Report 2: Output when the code in Listing 5 is executed.

Output from listing 5

Peeking into Identity Column Definition and ValuesBy reviewing Report 2, you can see that the column named Special_ProductID is the identity column that was created using the IDENTITY function. The first row in this table was populated with the seed value. Each identity value for subsequent rows was calculated by adding the increment value to the identity value of the proceeding row that was inserted.

There are times when you might need to programmatically peek into SQL Server internals to find out the seed or increment value or the value for the last identity column inserted. To find this kind of identity information, SQL Server has provided several functions for returning this information.

To find the seed value, you can use the IDENT_SEED function. This function uses the following syntax:

IDENT_SEED ( 'table_or_view' )

Even if you reseed the identity value using the DBCC CHECKIDENT command, the value returned from this function is the original seed value assigned when the identity column was first created.

A companion function named IDENT_INCR with the following syntax can identify the increment value.

IDENT_INCR ( 'table_or_view' )

To see these two functions in action, run the code in Listing 6.

Listing 6: Viewing the original seed, and increment value

SELECT IDENT_SEED('Production.SpecialProduct') AS OriginalSeed,
       IDENT_INCR('Production.SpecialProduct') AS IncrementValue;

Report 3 shows the results of Listing 6.

Report 3: Output created when the code in Listing 6 is run

Output from listing 6

Finding the Last Identity Value InsertedBy looking in Report 3, you can see the OriginalSeed and IncrementValue are the same as the arguments used when creating the SpecialProduct table using the code in Listing 5.

There are times when you might need to find the last identity value inserted into a table. This is a common requirement when you have two tables with parent-child record relationships, where the child record needs to be linked to the parent record using the identity value of a parent record. There are three different ways to return the identity value of the last record inserted that are reviewed in this article: @@IDENTITY, IDENT_CURRENT, and SCOPE_IDENTITY,

@@IDENTITY

The @@IDENTITY system function returns the last identity value inserted. If the last statement that inserted an identity value inserted multiple identity values, then only the last identity value inserted is returned by this function. If no new identity values have been inserted for the session, this function returns a NULL value. If a trigger is fired due to a row being inserted, and the trigger, in turn, inserts a row in a table that contains an identity column, then the identity column inserted by the trigger will be returned.

SCOPE_IDENTITY

The SCOPE_IDENTITY function also returns the last identity value inserted, just like @@IDENTITY with one difference. The difference is that the SCOPE_IDENTITY function only returns an identity value for the last INSERT statement executed in the same session and scope. In contrast, the @@IDENTITY function returns the last identity inserted regardless of scope.

To better understand how the scope affects the identity value returned by these two functions, execute the code in Listing 7.

Listing 7: Code to show difference between SCOPE_IDENTITY and @@IDENTITY

DROP TABLE IF EXISTS TestTable1, TestTable2;
CREATE TABLE TestTable1(
  ID INT IDENTITY(1,1),
  InsertText1 VARCHAR(100)
);
CREATE TABLE TestTable2(
  ID INT IDENTITY(100,100),
  InsertText2 VARCHAR(100)
);
GO
CREATE TRIGGER MyTrigger ON TestTable1 AFTER INSERT AS
BEGIN
  INSERT INTO TestTable2(InsertText2) VALUES ('Trigger Insert 1');
  INSERT INTO TestTable2(InsertText2) VALUES ('Trigger Insert 2');
END
GO
INSERT INTO TestTable1(InsertText1) VALUES ('Original Insert');
GO
-- Review Identity values returned
SELECT @@IDENTITY AS [@@IDENTITY], SCOPE_IDENTITY() AS [SCOPE_IDENTITY];

The code in Listing 7 first inserts 1 record into TestTable1 table in the current scope, then 2 more records are inserted into the TestTable2 table in a different scope when the trigger is fired. After the insert and insert trigger have fired, a SELECT statement is executed to show the values returned from the @@IDENTITY and the SCOPE_IDENTITY() functions. The output when the code in Listing 7 is executed is shown in Report 4.

Report 4: Output from Listing 7

output from Listing 7

Therefore, if you want to know the last identity value regardless of scope, you can use @@IDENTITY. If you need the last identity value inserted in the current scope, you need to use the SCOPE_IDENTITY() function.By reviewing Report 4, you can see that the @@IDENTITY function returned a 200. This value is returned because the @@IDENTITY function returns that last identity value inserted, regardless of scope. The identity value for the second record was inserted into the TestTable2 table via the after insert trigger. The SCOPE_IDENTITY() function returned a 1, the identity value assigned when the record was inserted into TextTable1, which is in the same scope.

Keep in mind that both the @@IDENTITY and SCOPE_IDENTITY() functions return the last identity value inserted without considering which table the identity value was inserted. If you need to know the last identity value inserted for a specific table, you should use the IDENT_CURRENT() function.

IDENT_CURRENT

The IDENT_CURRENT() function returns the last identity value inserted for a specific table, regardless of which session or scope it was inserted. Using the IDENT_CURRENT() function, you can easily determine the last identity value created for a specific table as shown in the code Listing 8.

Listing 8: Determining Last Identity values inserted into TestTable1, and TestTable2

SELECT IDENT_CURRENT('TestTable1') AS IdentityForTestTable1, 
       IDENT_CURRENT('TestTable2') AS IdentityForTestTable2;

When the code in Listing 8 runs, you will see the output in Report 5.

Report 5: Output when Listing 8 is run

output from listing 8

Consecutive ValuesThe @@IDENTITY and SCOPE_IDENTITY() functions do not require a table name to be passed as a parameter, so you can not easily identify which tables the identity value returned came from. In contrast, the IDENT_CURRENT() requires a table name to be passed. Therefore, if you want to know the last identity value inserted for a specific table regardless of session or scope, you should consider using the IDENT_CURRENT() function.

When inserting multiple rows into a table with an identity column, there is no guarantee that each row will get consecutive values for the identity column. This is because other users might be inserting rows at the same time. If you really need to get consecutive identity values, you need to ensure your code has an exclusive lock on the table or use the SERIALIZE isolation level.

You might also find that identity values are not always consecutively assigned. One reason this occurs is when a transaction is rolled back. When a rollback occurs, any identity values rolled back will not be reused. Another reason you might have gaps is because of how SQL Server caches identity values for performance reasons.

Identity Caching for Performance Reasons

To finding the next identity value, SQL Server requires some machine resources to peek at the internals to find that value. Therefore to optimize performance and to save on machine resources, SQL Server caches available identity values. By caching available identity values, SQL Server doesn’t have to figure out the next available identity value when a new row is inserted.

Identity cache was introduced in SQL Server 2012. The problem with identity caching is that when SQL Server aborts or is shut down unexpectedly, SQL Server loses track of the values stored in the internal cache. When the cached values are lost, those identity values will never get used. This can cause gaps in identity values.

A new database configuration option was introduced with SQL Server 2017 named IDENTITY_CACHE to help with the identity gap issues that the caching feature can cause. The IDENTITY_CACHE option is ON by default but can be turned OFF. By having it OFF, SQL Server doesn’t cache identity values; thereby, identity values will not get lost when SQL Server crashes or is shut down unexpectedly. Of course, when turning off identity caching, there will be a performance hit.

To identify the current IDENTITY_CACHE setting for a database, run the code in Listing 9.

Listing 9: Displaying IDENTITY_CACHE setting for the current database

SELECT * FROM sys.database_scoped_configurations
WHERE NAME = 'IDENTITY_CACHE';

The output of running Listing 9 against a SQL Server 2017 database is shown in Report 6.

Report 6: The output of Listing 9

output from listing 9

Listing 10: Turning off Identity Caching

The IDENTITY_CACHE value in Report 6 is set to 1, which means the identity cache is enabled. To disable the identity cache for the current database, run the code in Listing 10.

ALTER DATABASE SCOPED CONFIGURATION SET IDENTITY_CACHE=OFF;

If you find lots of gaps in your identity values, and that is a problem, you might consider disabling identity caching.

Drawbacks of identity columns

Identity columns are a great way to automatically populate a numeric integer column with a different number every time a new row is inserted. Still, there are a few drawbacks to using identity columns:

  • Only one identity column can be defined per table.
  • An identity column cannot be altered or deleted once it has been created.
  • Identity columns are not unique by default. To make them unique, you need to define a primary key, or a unique constraint, or a unique index.

The SQL Server identity column

Identity columns are a great way to automatically populate a numeric column with an ever-increasing number value when a row is inserted into a table. But identity columns have some inherent issues, like they might contain duplicates or have gaps in their values. One big drawback of an identity column is that there can only be one identity column on a table. Suppose you need to have a column automatically populated with different numeric values, but the issues and features of a identity column don’t meet your needs. In that case, you might consider looking at the sequence number feature available in SQL Server.


The post Working with SQL Server identity columns appeared first on Simple Talk.


from Simple Talk https://ift.tt/3i3sVlA
via

Thursday, September 23, 2021

What is ViewData and implement ViewData in ASP.NET MVC?

ViewBag, ViewData, and TempData all are Dictionary objects in ASP.NET MVC and these are used for data passing in various situations.

The following are the situations where we can use TempData and other objects.

  1. Pass the data from Controller to View.
  2. Pass the data from an action to another action in Controller.
  3. Pass the data in between Controllers.
  4. Pass the data between consecutive requests.

What is Dictionary Object?

In C#, Dictionary is used to store the key-value pairs. The Dictionary is the same as the non-generic hashtable. It can be defined under System.Collection.Generic namespace. It has a dynamic nature which means the size of the dictionary grows according to the need.

Here is an example:

using System;
using System.Collections.Generic;  
  
class Demo {
  
    static public void Main () {
          
        Dictionary<int, string> My_dict1 =  
                       new Dictionary<int, string>(); 
            
          My_dict1.Add(1123, "Welcome");
          My_dict1.Add(1124, "to");
          My_dict1.Add(1125, "Programming");
            
          foreach(KeyValuePair<int, string> ele1 in My_dict1)
          {
              Console.WriteLine("{0} and {1}",
                        ele1.Key, ele1.Value);
          }
          Console.WriteLine();
            
      Dictionary<string, string> My_dict2 =  
              new Dictionary<string, string>(){
                                  {"a.1", "Dog"},
                                  {"a.2", "Cat"},
                                {"a.3", "Pig"} }; 
           
          foreach(KeyValuePair<string, string> ele2 in My_dict2)
          {
              Console.WriteLine("{0} and {1}", ele2.Key, ele2.Value);
          }
    }
}

What is ViewData?

In MVC, when we want to transfer the data from the controller to view, we use ViewData. It is a dictionary type that stores the data internally.

ViewData contains key-value pairs which means each key must be a string in a dictionary.

The only limitation of ViewData is, it can transfer data from controller to view. It can not transfer in any other way and it is valid only during the current request.

Syntax:

public ViewDataDictionary ViewData { get; set; }

When we want to use the key-value pair to ViewData,

ViewData["DemoText”]="This is syntax.";

We can also use ViewData in the razor view from controller. Here is the syntax for that:

<h1>@ViewData["PageTtitle"]</h1>

When we want to add custom objects, array, list, etc, in ViewData, and cast them back in the View. We can use the code snippet as below:

public ActionResult actionViewData()
{
ArrayList alCit
y = new ArrayList();
alCity.Add("Ahmedabad");
alCity.Add("Rajkot");
alCity.Add("Amreli");
alCity.Add("Bhavnagar");
alCity.Add("Surat");
alCity.Add("Junagadh");
alCity.Add("Vadodara");
ViewData["City"] = alCity;
return View();
}
@{
ArrayList _city = ViewData["City"] as ArrayList;
    foreach (string city in _city)
    {
        <div>@city</div>
    }
}

Figure 1: ViewData Flow

Here is an example of ViewData which shows how to transfer data from controller to view using ViewData.

public ActionResult Index()
{       
    IList<Employee> employeeList = new List<Employee>();
    employeeList.Add(new Employee(){ EmployeeName = "Hemanshu" });
    employeeList.Add(new Employee(){ EmployeeName = "Harsh" });
    employeeList.Add(new Employee(){ EmployeeName = "Hiren" });
    ViewData["employees"] = employeeList;
  
    return View();
}

In this example, ViewData[“employees”] is assigned to an employeeList where “employees” is a key and employeeList is a value.

To access the ViewData[“employees”] in the view, here is the snippet of code you can use.

<ul>
@foreach (var std in ViewData["employees"] as IList<Employee>)
{
    <li>
        @emp.EmployeeName
    </li>
}
</ul>

In simple terms, these are the ways to store and retrieve data to and for respectively ViewData as shown:

Storing :

ViewData[“employees”] = employeeList;

Retriving :

string employee = ViewData[“Employee”].ToString();


In MVC, ViewData does not check compile-time errors. If we misspell the key names, we would not get any errors but we can identify them at the run time.

For example,

Controller:

using System.Collections.Generic;
using System.Web.Mvc;
namespace DemoMvcApplication.Controllers{
   public class HomeController : Controller{
      public ViewResult Index(){
         ViewData["Countries"] = new List<string>{
            "India",
            "Malaysia",
            "Dubai",
            "USA",
            "UK"
         };
         return View();
      }
   }
}

View

@{
   ViewBag.Title = "Countries List";
}
<h2>Countries List</h2>
<ul>
@foreach(string country in (List<string>)ViewData["Countries"]){
   <li>@country</li>
}
</ul>

Figure 2: Output

What is ViewBag?

ViewBag is an object which is dynamically passing the data from Controller to View and this will pass the data as the property of object ViewBag. We do not need to typecast to read the data for null checking here.

Controller:

Public ActionResult Index()  
{  
    ViewBag.Title = “Hello”;  
    return View();  
}

View:

<h2>@ViewBag.Title</h2>&nbsp;&nbsp;

Here is an example:

Controller:

using System;  
using System.Collections.Generic;  
using System.Web.Mvc;  
namespace ViewBagExample.Controllers  
{  
    public class ViewBagController : Controller  
    {  
        public ActionResult Index()  
        {  
            List<string> Courses = new List<string>();  
            Courses.Add("J2SE");  
            Courses.Add("J2EE");  
            Courses.Add("Spring");  
            Courses.Add("Hibernates");  
            ViewBag.Courses = Courses;  
            return View();  
        }  
    }  
}

View:

<!DOCTYPE html>  
<html>  
<head>  
    <meta name="viewport" content="width=device-width" />  
    <title>Index</title>  
</head>  
<body>  
    <h2>List of Courses</h2>  
    <ul>  
        @{  
            foreach (var Courses in ViewBag.Courses)  
            {  
                <li> @Courses</li>  
            }  
        }  
    </ul>  
</body>  
</html>

ASP View bag 2

Figure 3: Output

What is TempData?

TempData is a dictionary object derived from TempDataDictionary which contains key-pair values. It is useful when we want to transfer the data from the Controller to the View in ASP.NET MVC Application. It stays for a subsequent HTTP request as opposed to other options we discussed prior who stay only for the current request.

Although it removes the key-value pair once it is accessed, we can keep it using

Here is an example:

Controller:

public class HomeController : Controller
{
    public ActionResult Index()
    {
        TempData["name"] = "Ishan";
        return View();
    }
    public ActionResult About()
    {
        string name;
        
        if(TempData.ContainsKey("name"))
            name = TempData["name"].ToString();
        return View();
    }
    public ActionResult Contact()
    {
        return View();
    }
}

View:

public class HomeController : Controller
{
    public ActionResult Index()
    {
        TempData["name"] = "Ishan";
        return View();
    }
    public ActionResult About()
    {
        return View();
    }
    public ActionResult Contact()
    {
        return View();
    }
}

Differences between ViewData, ViewBag and TempData:

ViewData

ViewBag

TempData

Key-Value Dictionary Object

Type Object

Key-Value Dictionary Collection

A property of ControllerBase class

A Dynamic property of ControllerBase class

A property of the controllerBase class

Faster

Slower

Introduced in MVC 1.0, Available in MVC 1.0 and above

Introduced in MVC 3.0,

Available in MVC 3.0 and above

Introduced in MVC 1.0,

Available in MVC 1.0 and above.

Works with .NET Framework 3.5 and above

Works with .NET framework 4.0 and above

Works with .NET framework 3.5 and above

Type Conversion code is required

Type Conversion code is not required

Type Conversion code is required

Value becomes null if a redirection has occurred

Value becomes null if a redirection has occurred

TempData is used to pass data between two consecutive requests

Lies only during the current request

Lies only during the current request

Only works during the current and subsequent request

Conclusion

Figure 4: Summary

To conclude, it is clear that ViewData is used to pass the data from Controller action to View. Here, we discussed ViewData properties and how to use that in any MVC application.


The post What is ViewData and implement ViewData in ASP.NET MVC? appeared first on Simple Talk.


from Simple Talk https://ift.tt/3CI2nOz
via

Wednesday, September 22, 2021

Building an ETL with PowerShell

Recently a customer asked me to work on a pretty typical project to build a process to import several CSV files into new tables in SQL Server. Setting up a PowerShell script to import the tables is a fairly simple process. However, it can be tedious, especially if the files have different formats. In this article, I will show you how building an ETL with PowerShell can save some time.

Typically a project like this is broken into two parts: write the PowerShell code to read the CSV file and insert the data into the appropriate table and writing the SQL Schema (and possibly stored procedure) to hold the data.

First, I want to note that this is far from the only way to handle this process. In some cases, writing this in an SSIS package or other third-party tool may be better. Also, if you deal with very large data files, there are faster ways of handling the data.

The Problem

I’ll be honest. I find the process of building an ETL for a CSV file to be tedious. There’s nothing super hard about it, but one has to be attentive to details such as the name of the columns, what delimiters are used, and how quotes, both single and double, are used. I may craft everything by hand if I have just one or two files to import.

In my most recent case, though, I had to import approximately two dozen files. After doing one or two by hand, I finally gave in and decided to leverage some code to semi-automate the process. That said, this code is a work in progress (and is available on Github) and is far from a complete solution. Doing it this way decreased my time to write the code and schema to import a file from 10-15 minutes to under 2 minutes.

CSV Files

I’ll start by stating the obvious: for a so-called standard, CSV files often vary in format. The two most significant variances tend to be how a value is defined and how it’s separated. Generally, two values are separated by a comma, hence the name Comma Separated Values. Instead, you may often see a file that has a CSV extension with values separated by a semicolon ; or a vertical bar | or another character. One could argue these aren’t technically CSV files, but given they often share the same extension of either .csv or .txt, I’ll consider them CSV files.

Sometimes the files can get very complicated. Often when data is exported to a CSV file, it may contain numbers or other values that have embedded commas. The value in the source may be $12,689.00 and get exported exactly like that, complete with the comma, and it may or may not include the $. However, if it is exported with the comma, it’s important not to read that as two separate values, one with a value of $12 and the other with a value of 689.00.

A common solution is to encapsulate values with a delimiter such as single quotes ‘ or double quotes “. These can help, but single quotes, in particular, can cause problems when you have names such as O ‘Brian. Does that get exported as ‘O’Brian’ or ‘O”Brian’ or even ‘O”’Brian’? The middle one may seem nonsensical to some, but doubling the ‘ is a common way to escape the quote in SQL. For others, though, that may cause additional parsing problems, so it ends up being doubly escaped. Of course, then one has trouble parsing that and wonders if it really should be two fields, but the comma was missed.

There’s a final complication that I have often found. Above the assumptions are that the data is valid and makes sense but is simply a bit complicated. But what happens when a text field is being exported, and the original field has data that might be considered weird but exists. For example, I’ve never seen the name O, ‘Neill in the real world, or an address of 4,230 “Main Street, Everytown, ‘USA, but I can assure you, you’ll eventually come across a CSV file that has a similar address exported, and it’ll mess everything up.

This discussion is not meant to be a primer on CSV files but a warning that any solution to automate their import will have to deal with many messy edge conditions and often simply bad data. This means my solution below is far from perfect, and you will most likely have to adapt it to your specific needs. If you feel so inclined, I welcome additions to the script in Github.

Create Some Data

Before continuing, you will need some fake data. Create a text file called User_Database.csv and add the following (or download it from Github):

“First_Name”,”Last_Name”,”City”,”Payment”,”Payment_Date”,”Notes”

“Bruce”,”Wayne”,”Gotham”,”1,212.09″,”3/12/2021″,”Is a millionaire who’s into bats.”

“Clark”,”Kent,Metropolis,”310.56″,”2/10/1999″,”Newspaper reporter who wears fake glasses.”

“Diana”,”Prince”,”DC”,”$1,947.22″,”8/8/2015″,”Has her own plane, she claims. No one’s seen it.”

“Hal”,”Jordan,Coast City,”$1,967.10″,”6/12/2020″,”Likes pretty jewelry”

“Oliver”,”Queen”,”Star City”,,”6/13/2020″,”Rich dude with an arrow fetish”

There is a typo or two in there as well as various other possible issues that might need to be dealt with.

Next Steps

Imagine you’ve been tasked with importing the above file into SQL Server on a daily basis. If it were just this one file, you most likely would create the SQL Server table by hand and then perhaps write up a PowerShell script to read the data and insert it into the database. If you’re proficient, it might take you no more than 30 minutes. As I mentioned above, however, often the case isn’t importing a single file type; you might be charged with importing a dozen or two different types of files. Creating the tables and ETL scripts for this could take a day or more.

Before you can import the data from the file, you need to create the table.

If I’m working with a single table, I’d create the script for this table by hand, and it would look something similar to the following:

Create Table Users_By_Hand
(
        First_Name nvarchar(100),
        Last_name nvarchar(100),
        City nvarchar(100),
        Payment Decimal(10,3),
        Payment_Date Date,
        Notes nvarchar(max)
)

This script didn’t take long to create, less than 5 minutes, and it’s exactly what I want in this case. Again, if I’m writing an ETL for 20 or 30 or more different files, that time adds up. Because I’m a fan of stored procedures over direct write access to tables, I still have to write the stored procedure to insert data.

This time I will take a different approach and use the source file itself to help me do my work. Create the following script and call it Create-SQL_Table.ps1 replacing the file location.

$object = "Users"
$filename = "User_Database.csv"
$first_line = get-content P:\$filename -First 1
$fields = $first_line.split(",").Replace('"','')
$table = "Create Table $object`_by_PowerShell
(
" 
foreach ($field in $fields)
{
    $table += "  $field nvarchar(100)
"
}
$table += ")"
write-host $table

When you execute it, you will see that it has built a script for table creation with the following format:

Image showing the create table script

If you wanted to, you could add an invoke-sqlcmd and cause the table to be created automatically. I don’t recommend this because it’s not exactly the same as the handcrafted table, but with a few minor edits, you can make this the same as the handcrafted table.

It doesn’t take much of a leap to imagine how one could wrap the above script in a foreach loop and have it create a table script for every file in a directory. Before you do that, I want to expand this script, making it a bit more useful and to clean up the code.

Save the following script as Create-SQL_from_csv.ps1.

$object = "Users"
$filename = "User_Database.csv"
$first_line = get-content P:\$filename -First 1
$fields = $first_line.split(",").Replace('"','')
function create-Sql_table($object, $fields)
{
    $table = "Create Table $object`_by_PowerShell
    (
    " 
    foreach ($field in $fields)
    {
        $table += "  $field nvarchar(100)
    "
    }
    $table += ")"
    return $table
}
function create-Sql_Insert_Procedure($object, $fields)
{
    $procedure = "Create or Alter Procedure Insert_$object "
    foreach ($field in $fields)
    {
        $procedure += "@$field nvarchar(100)`, 
        "
    }    
    $procedure = $procedure.TrimEnd(", 
    ") 
    $procedure += "
    AS
    Insert into $object ("
    foreach ($field in $fields)
    {
        $procedure += "$field`, 
        "
    }
    $procedure = $procedure.TrimEnd(", 
    ") + ")
    values ("
    foreach ($field in $fields)
    {
        $procedure += "@$field` ,
        "
    }    
    $procedure = $procedure.TrimEnd("
    , ") + ")"
    
    return $procedure
}
$createdTable = create-Sql_table -object $object -fields $fields
$createdProcedure = create-Sql_Insert_Procedure -object $object -fields $fields
Write-Host $createdTable
write-host $createdProcedure

Notice that I’ve added code to create the stored procedure and moved it and the previous code into functions. This makes the code a bit more readable and easier to edit and update.

When you run this, it will create the same table as before, but it will also create a stored procedure that looks like below:

Image showing the create procedure script

Once again, you may need to edit details, such as the datatypes and sizes, but those are minor edits compared to creating the stored procedure from scratch.

If you need other stored procedures, for example, one to select data or another to update or delete data, you can script out the stored procedures in a similar manner. Note that these will require you to hand-edit them as your primary key will no doubt change from file to file, so it’s harder to write a generic set of procedures for this.

The above code handles creating the SQL side, but you still need to import the data into the table. A common method I use to handle data like this is to create a PowerShell Object and then read in a row of data into the object and then insert that. Note that this is flexible but far from the fastest way of doing things. That said, it does allow me to leverage the stored procedure.

For this step, add the following function to the above script and save it as Create-SQL_and_PS_from_csv.ps1.

function create-PS_Object($Object, $fields)
{
$objectcreate = "$object  = New-Object -TypeName psobject
"
foreach($field in $fields)
    {
        $field = $field.trim('"')
        $objectcreate += "$object_name | Add-Member -MemberType NoteProperty -name $($field.replace(' ','_'))  -Value $("`$"+$object).'$($field)'.Replace(""'"",""''"") 
"
    }
    return $objectcreate
}

And then below the line: $createdProcedure = create-Sql_Insert_Procedure -object $object -fields $fields

add $createdPS_Object = create-PS_Object -object $object -fields $fields

This will create the code to create a new PowerShell Object. Notice that there’s some extra code appended to the end of each line which handles cases where a field may include a single quote, such as O’Brian or, in the above data the field: “Has her own plane, she claims. No one’s seen it.” You can add further Replace expressions as required to fit your data.

When this script runs, you will now have all the pieces available to cut and paste into scripts to create the necessary SQL scripts and to create the necessary PowerShell Object. It should look similar to below:

Image showing the full script

However, I think this is a bit hard to read. At Github there is a final version of this script called: Create-SQL_and_PS_from_csv_Final.ps1.

This adds some simple formatting for the output and also prompts for the name of the CSV file. Running this on the test file looks like this:

Image showing the script with color formatting in Building an ETL with PowerShell

As you can see now, each of the objects the file creates are clearly color coded and easier to cut and paste as needed.

Conclusion

This sort of script is ripe for customization for your specific needs and can be expanded as required (for example, perhaps creating a deletion sproc as part of it.)

The value is not for setting up ETL for a single file but for when you have a dozen or more and want to automate much of that. With enough effort, a script such as this could do all the work for you. However, before you reinvent the wheel, I would also recommend checking out the dbatools cmdlet Import-DbaCSV. It may do much of what you need. In the meantime, happy importing!

If you like this article, you might also like How to Use Parameters in PowerShell Part I – Simple Talk (red-gate.com)

The post Building an ETL with PowerShell appeared first on Simple Talk.


from Simple Talk https://ift.tt/3u64KIe
via

Tuesday, September 21, 2021

The challenges of ever-growing estates

Each year Redgate runs a survey to determine the state of database monitoring. This year, instead of one large report, we are publishing four insight reports, each on a different topic. The first came out this month: The real-world challenges of growing server estates.

The respondents reported several trends:

  • DBAs are managing more instances than before at 65% of organizations surveyed
  • Teams are growing – more organizations reported teams of three or four DBAs rather than one lone DBA
  • Organizations are mostly concerned about security, performance, and cloud migrations
  • Over the next 12 months, organizations expect to have trouble recruiting database professionals

DBAs are responsible for more data

It’s not surprising that data is growing, but the number of DBAs responsible for managing the data is not necessarily increasing enough to keep pace. The tools that DBAs use for monitoring and administration must be able to scale and evolve. The worst case is having no tools in place at all which might be adequate for one or two instances, but often means manually looking at each server at least daily for issues. Some DBAs rely on homegrown or downloaded scripts to monitor their servers. These can work, but it’s not easy to keep them up to date as they upgrade to new versions of the database platform or use more features.

DBA teams are growing

The respondents in previous years reported more single DBAs being responsible for the databases, so this increase in team size is good news. The difference between a lone DBA and even a two-person team is immense as duties such as on-call schedules can be shared. A standard set of tools, especially for monitoring, can help the team work together better and more efficiently.

Protecting data is job one

The top challenges for database administrators are not surprising as security and performance are arguably the most important aspects of the job. In the past few years, migrating to cloud platforms such as Azure and AWS brings a new way of working and new challenges. Protecting data has always been crucial, but with new regulations such as the GDPR or CCPA and the increase in data breaches, DBAs must protect sensitive data, not just in production, but in any downstream systems. Having a tool that can monitor both cloud hosted and on-premises databases can simplify administration of the estate for the DBA team.

Looking for DBAs

While security and protection of data is still the top concern for respondents, staffing and recruitment is the second most popular answer on the survey. With more organizations accepting remote employees, it might be easier to recruit DBAs outside their immediate area. In general, database administration is a growing field, and salaries are high. As long as data continues to grow, there will be a demand for DBAs. Having the right tools can free up their time to make them available for other projects and initiatives like DevOps.

Our survey shows that the workload of DBAs has increased as data grows in most organisations. Cloud and hybrid environments can also increase the complexity their jobs. Without tools to monitor growing database estates, DBAs may find they spend their time putting out fires instead of proactively working to prevent the fires in the first place.

To read more insights from The State of Database Monitoring Insights Report: The real-world challenges of growing server estates, get your free copy here.

Commentary Competition

Enjoyed the topic? Have a relevant anecdote? Disagree with the author? Leave your two cents on this post in the comments below, and our favourite response will win a $50 Amazon gift card. The competition closes two weeks from the date of publication, and the winner will be announced in the next Simple Talk newsletter.

The post The challenges of ever-growing estates appeared first on Simple Talk.


from Simple Talk https://ift.tt/3ExFLCp
via

Monday, September 20, 2021

C# XML Comments in Visual Studio Code

Visual Studio Code appeared years ago as a light option to the full Visual Studio Environment. Being light, there are some features that we don’t have or at least took some time to appear. C# XML Comments is one of them.

If a code needs to be full of comments, it’s possible the code is not good enough to be read. However, this doesn’t mean we should totally avoid comments. Some explanations on business logic may be useful. If we manage to include these explanations in a standard format that could even be extracted later, even better.

In the past there was an extension for C# XML Comments but since version 1.23.8 the C# XML comments are naively support on Visual Studio Code, but not enabled by default.

In order to enable them, we need to enable the configuration Format On Type on File->Preferences->Settings->Text Editor->Formatting

Basically, we are telling the editor to format our code, in this case the XML Comments, immediately after typing.


I confess I don’t know for sure what other formatting features are included when we enable this option but I would love to discover this. If you find this out, drop a comment on this blog.

The post C# XML Comments in Visual Studio Code appeared first on Simple Talk.


from Simple Talk https://ift.tt/3Ctbi6p
via