Thursday, February 23, 2023

Find 40 Problems in this SQL Server Stored Procedure

I’ve been at this for a while now, and have a very particular set of rules and coding conventions that I follow when writing and, more importantly, reviewing T-SQL code. I often perform code reviews and thought it would be fun to frame this exercise: a completely fictitious stored procedure hits my desk, I’ll reject it of course, and enumerate the reasons why. The procedure might pass review in a lot of shops, but not in mine.

We’re going to use the AdventureWorks sample database (get your copy here), where the folks in marketing requested a list of users to e-mail a new promotional campaign. The customers need to meet at least one of the following criteria:

  • last placed an order more than a year ago
  • placed 3 or more orders in the past year
  • have ordered from a specific category in the past two weeks

These criteria don’t have to make sense! They just need to make the query a little bit more complex than your average CRUD operations.

First, we’re going to update Sales.SalesOrderHeader to modern times so that dates make sense relative to today. We only care about OrderDate here, but there are check constraints that protect a couple of other columns (as well as a trigger that sometimes fails on db<>fiddle but that I have no energy to troubleshoot):

DISABLE TRIGGER Sales.uSalesOrderHeader ON Sales.SalesOrderHeader;
GO

DECLARE @months int;

SELECT @months = DATEDIFF(MONTH, MAX(OrderDate), GETDATE()) 
    FROM Sales.SalesOrderHeader;

UPDATE Sales.SalesOrderHeader SET DueDate   = DATEADD(MONTH, @months-1, DueDate);
UPDATE Sales.SalesOrderHeader SET ShipDate  = DATEADD(MONTH, @months-1, ShipDate);
UPDATE Sales.SalesOrderHeader SET OrderDate = DATEADD(MONTH, @months-1, OrderDate);
GO

ENABLE TRIGGER Sales.uSalesOrderHeader ON Sales.SalesOrderHeader;

This stored procedure that someone wrote will now return data (without the update, it would be hard to write predictable queries based on, say, some offset from GETDATE()).

create proc sp_find_customers(@paramIntCategoryId INT)
as
select customerid, firstname, emailaddress from
(
  -- last placed an order more than a year ago

  select distinct customerid, firstname, emailaddress
  from sales.customer a (nolock), person.person b(nolock), 
  person.emailaddress c(nolock) where personid = b.businessentityid 
  and b.businessentityid = c.businessentityid and (select max(orderdate) 
  from sales.salesorderheader (nolock) 
  where customerid = a.customerid) < dateadd(yyyy,-1,convert(DATE,getdate()))

union -- placed at least 3 orders in the past year

  select distinct customerid, firstname, emailaddress 
  from person.person p (nolock) join person.emailaddress e (nolock)
  on p.businessentityid = e.businessentityid
  join sales.customer c (nolock) on personid = p.businessentityid
  where customerid in (select customerid from sales.salesorderheader (nolock)
  where orderdate between dateadd(yy, -1, convert(DATE,getdate())) and getdate()
  group by customerid having count(*) >= 3)

union -- ordered within specified category in past two weeks

  select distinct customerid, firstname, emailaddress 
  from person.emailaddress em (nolock) join person.person pp with (nolock)
  on em.businessentityid=pp.businessentityid
  join sales.customer cu (nolock) on personid = pp.businessentityid
  where customerid in (select top (2147483647) customerid 
  from sales.salesorderheader oh (nolock)
  join sales.salesorderdetail od (nolock) on oh.salesorderid = od.salesorderid
  and datediff(day, oh.orderdate, convert(DATE,getdate())) <= 14
  join production.product pr (nolock) on od.productid = pr.productid
  inner join production.productsubcategory AS sc (nolock)
  on pr.productsubcategoryid = sc.productsubcategoryid
  and sc.productcategoryid = @paramIntCategoryId order by customerid)
) 
x 
order by 1

You laugh. Or maybe you cry. But I do see all of this, all the time, just maybe not always all at the same time.

While the stored procedure itself is only 40 lines, I’m sure a quick skim will reveal some things you don’t like. But do you think I can find 40 problems?

Challenge Accepted.

Before we start, I can’t emphasize enough that just about any convention in T-SQL is completely subjective, and you may or may not agree with any of mine. And that’s okay. Still, I’ll tell you the problems I spotted, line by line, and why I think they’re problems (with helpful links to more details, where appropriate).

Line 1
create proc sp_find_customers(@paramIntCategoryId INT)

On the very first line, there are multiple problems:

  1. All lower case keywords – I’m only going to mention this once, but reading a wall of code in all lower case (or all upper case!) is hard on the eyes. Personally, I like upper casing T-SQL keywords, Pascal case for entity names, and lower case for data types (to be mentioned in a moment).
  2. Shorthand – The abbreviation proc is grating to me because people start to talk that way, too. “Can you create a prock?” It’s a procedure; just spell it out.
  3. Missing schema prefix – Leaving out the schema can be problematic both for performance and for other users and maintainers. While the performance issue is less relevant during object creation, it’s a mindset and we should all be consistent.
  4. Bad procedure name – Not just the sp_ prefix, which should be avoided but, also, what does “find_customers” mean? This name should be more specific to the task at hand, and also match your existing naming scheme. Something like Customer_GetListForCampaignXYZ, for example. (Generally, I prefer entity_action, like Customer_Find, over action_entity, like Find_Customer, primarily due to sorting and grouping. I’m very rarely looking for all the stored procedures that find anything.)
  5. Parentheses for nothing – It’s a minor gripe, but I don’t like adding extra control characters for the sake of it. Stored procedure parameter lists do not need to be enclosed in parentheses, so add them only if your team agrees that they actually make the procedure more readable.
  6. Bad parameter name (i) – It doesn’t need to start with @param – that is obvious from where it is and, later in the procedure, the source isn’t likely to be important anyway.
  7. Bad parameter name (ii) – It also doesn’t need to be prefixed with its data type – that is also obvious from the definition, and naming it this way locks it in (making future changes to that data type harder).
  8. Bad parameter name (iii) – In AdventureWorks, the IDs are upper case, so it should be @CategoryID just to be consistent and avoid any confusion or ambiguity.
  9. Upper case data type – I learned the hard way the best pattern for data types is to match the case in sys.types exactly, which is arguably more important if you ever deal with case sensitive databases or instances. While it doesn’t affect the basic native types, for consistency, this means you would use int, not INT.
  10. Everything on one line – For formatting purposes I kept the parameter list short, but I’ve seen lists of 10+ parameters scroll way off the screen to the right, and I don’t have to tell you what a headache that is during a fire drill. Strive to be more liberal with white space – the goal shouldn’t be to keep the line count short at the cost of readability.
Line 2
as

It’s only two characters, but it’s more about what’s missing here:

  1. No BEGIN/END – I prefer to wrap my procedure body in clear block elements that are even more explicit about where the procedure ends than indentation and the (non-T-SQL!) GO batch separator could ever be.
  2. No SET NOCOUNT – I always add SET NOCOUNT ON; to the beginning of every stored procedure to suppress all of those chatty DONE_IN_PROC messages. While in modern versions of SQL Server and various transport layers the benefits aren’t as pronounced as they used to be, the extra chatter still can’t possibly help anything.
Line 3
select customerid, firstname, emailaddress from

Only one new problem here:

  1. Lower case columns – In the metadata, those columns are named CustomerID, FirstName, and EmailAddress. Every single reference to them should match.
Line 5
-- last placed an order more than a year ago
  1. Single-line comments – While it’s actually refreshing to see comments inside of queries, not all comments are the same. As Brent Ozar explains in Never, Ever, Ever Start T-SQL Comments with Two Dashes, single-line comments cause many problems downstream – for example, when reviewing queries from the plan cache or monitoring tools, or even returning the definition to a grid in Management Studio. I’m far from perfect, especially in quick throwaway fiddles, but I’ve been trying harder to always use /* this form */. Contradicting Brent a little bit, Andy Mallon has a great productivity use case of combining the two forms in slide 28 of this presentation.
Line 7
select distinct customerid, firstname, emailaddress
  1. Unnecessary DISTINCT – This query is part of a UNION which – by default, and possibly not commonly known – has to perform a DISTINCT against the output of the concatenation anyway, so doing so inside any of the inputs to the UNION is redundant. This query is littered with these and they can all be avoided – typically they are used to suppress duplicate rows from joins that should have been implemented as EXISTS checks instead and/or deferring the joins until later.
Line 8
from sales.customer a (nolock), person.person b(nolock),

All right, now we’re getting warmed up! A few new problems here:

  1. Lower case object names – These tables are called Sales.Customer and Person.Person, and it’s important for code to match what is in the metadata since it may be destined for case sensitive environments. IntelliSense and other tools make missing this detail hard to excuse these days. If you have a case sensitive database, being cavalier about this can lead to problems, especially if production is case sensitive and your development environment is not. I’m a big advocate of always developing in case sensitive because surprises are easier to fix locally and up front than after they’ve been deployed.
  2. Bad aliases – Why is customer aliased as a and person as b? In longer and more complex queries, reverse engineering this bizarre (but common!) mapping pattern is a recipe for migraines. As an aside, I detest aliases that are added in this form without using the AS keyword – while optional, I think it gives an important visual cue.
  3. Littering of NOLOCK – This hint is not a magic go-faster switch; it is just bad news in general. Placing it next to every table reference throughout all queries is even worse. If you have some reason you can’t use READ COMMITTED SNAPSHOT (RCSI), at the very least set the isolation level once at the top of the procedure (and maybe even add a comment explaining why this is necessary). Then, when you come to your senses, it’s just one line to fix. (I collected a treasure trove of resources detailing the many perils of NOLOCK here.)
  4. Old-style joins – I still see these all the time, even though better syntax replaced them more than 30 years ago! FROM a, b is less desirable than explicit joins for a couple of reasons. One is that it forces you to group join criteria and filter predicates together (and an argument there that is only partially true is that it can invite unintended Cartesian products). The other is that it forces inconsistency because in SQL Server there is no longer a way to perform deterministic outer joins without switching to explicit OUTER JOIN syntax.
Line 9
person.emailaddress c(nolock) where personid = b.businessentityid
  1. Missing alias – Why is there no alias reference associated with personid? When writing the initial query, this might not be a problem, because you’d get an ambiguous column name error if it were. But what about when someone comes back later and adds another table to the query? Now they have to go fix all unreferenced columns and possibly go look up all the tables to unravel. I talked about how we should always reference all columns for a recent T-SQL Tuesday.
Line 10
and b.businessentityid = c.businessentityid and (select max(orderdate)

There’s definitely a code smell starting to waft from this line:

  1. Correlated subquery in a predicate – Running an aggregate against another table as part of a WHERE clause has the potential to scan that other table completely for every row in the current query (which could be a cross product for all we know).
  2. Subquery indentation – Any time you introduce an IN or EXISTS or other type of correlated anything, you should use white space to make it clear something radical is happening here – start it on the next line, make the left margin wider, do something to make it obvious and easier to follow.
Line 12
where customerid = a.customerid) < dateadd(yyyy,-1,convert(DATE,getdate()))
  1. DATEPART shorthand – I don’t even know if you could call this “shorthand,” as I certainly see no advantage to typing four letters (yyyy) instead of four different letters that form a self-documenting word (year). A shorthand habit here can lead to problems, e.g. play with date parts like W and Y. I talk about abusing shorthand and several other date-related topics in Dating Responsibly.
  2. Repeated non-deterministic variable – A minor thing but if getdate() is evaluated multiple times in the query, it could give a different answer, especially if the query is run right around midnight. Much better to pull these calculations out into a variable – not necessarily for better estimates, but to make sure all the predicates are speaking the same language.
Line 21
where orderdate between dateadd(yy, -1, convert(DATE,getdate())) and getdate()

No new problems until we hit line 21:

  1. DATEPART shorthand – I’m mentioning this again not because of the shorthand itself but because it’s inconsistent. If you’re going to use yyyy then always use yyyy. Don’t get even lazier about it sometimes.
  2. BETWEEN {some time} and … {now}? – I’m already not a big fan of BETWEEN for date range queries (it can lead to lots of ambiguity), but I certainly see no reason to include the current time as the upper bound, rather than the whole clause just being >= {some time}. Orders generally aren’t placed in the future and, if they are, all the queries in this procedure should use that same upper bound. And if there is some reason the query should filter out future dates, there should be a comment here explaining why.
Line 27
from person.emailaddress em (nolock) join person.person pp with (nolock)
  1. Inconsistent join ordering – in the previous section, the tables were listed person then emailaddress. Now the order is swapped, and maybe there’s a reason, but it causes the reader to pause and wonder what it is.
  2. Inconsistent aliasing – In the previous section of the query, person was aliased as p, and emailaddress as e. Now they’ve changed to pp and em – while they are technically different queries, it is much better for future maintainers to adopt a consistent aliasing strategy (including what to do when a single query is aliased multiple times in the same query), so that there is less reverse engineering every time a query is reviewed.
  3. Inconsistent hinting – All the other NOLOCK hints in the query are just added to the table alias. This one is done more correctly, with the proper WITH keyword, but it’s a variation that can be disruptive to a reviewer.
Line 28
on pp.businessentityid=em.businessentityid
  1. Inconsistent clause ordering – Getting nit-picky here perhaps, but in the previous section, the clauses were listed in the same order the tables were introduced to the join; this time, they’re swapped. If there’s a reason the order has changed, there should be a comment to help a future maintainer understand.
  2. Inconsistent spacing – I like white space around my keywords and operators, so it really stands out to me when there is a change in pattern – in this case, there is no helpful white space around the = operator.
Line 30
where customerid in (select top (2147483647) customerid
  1. TOP (2 billion) – This seems a holdover from the SQL Server 2000 days, where you could fool the engine into returning data from a view in a specific order without having to say so, simply by putting TOP 100 PERCENT ... ORDER BY into the view definition. That hasn’t worked in 20 years, but I see this technique sometimes used to try to defeat row goals or coerce a specific index. Most likely it was just copied and pasted from somewhere else, but it has no place here.
Line 33
and datediff(day, oh.orderdate, convert(DATE,getdate())) <= 14
  1. Expression against a column – SQL Server won’t be able to use an index on OrderDate because it will have to evaluate the expression for every row. This is a pattern I see quite a bit, and it can be hard to explain to newer users because, rightly so, they expect SQL Server to be able to rewrite the expression so that it can use an index. Always question when a WHERE or ON clause has to change what’s in the column in order to perform a comparison. In this case, much better (and more logical) to say WHERE oh.OrderDate >= @TwoWeeksAgo.
Line 35
inner join production.productsubcategory AS sc (nolock)
  1. Inconsistent join syntax – This one wasn’t really a problem for me until it became inconsistent – don’t say join sometimes, and inner join other times. Personally, I prefer being more explicit about the type of join, but pick one or the other and always use that form.
  2. Another table alias issue – Suddenly we get an AS here, seemingly out of nowhere. I think this is another case where inconsistency is borne from queries being copied & pasted from other sources or multiple authors contributing to a query. It may seem trite but take the time to step through the query and make sure all of the conventions match your established style (and if you don’t have one, create one).
Line 37
and sc.productcategoryid = @paramIntCategoryId order by customerid)
  1. Filter as a join clause – Technically, that and should be a WHERE, since that is not a part of the join criteria. When we’re talking about OUTER joins, there is more nuance depending on which table the predicate applies to, but for an INNER join, the join and filter criteria shouldn’t mix.
  2. Misplaced ORDER BY – Merely mentioning this because when the TOP is removed this pointless clause will actually cause a compilation error.
Line 39
x
  1. Meaningless alias name – This alias should be more descriptive about the subquery it references. And trust me, I’m guilty of this too; you’ll see x as an alias or CTE name in many of my solutions on Stack Overflow (but never in production code). I never said some of the problems I’d point out here aren’t my own problems too!
Line 40
order by 1
  1. ORDER BY ordinal – Using ordinal numbers to define sorting is convenient, sure, but it’s very brittle and not self-documenting. Anyone reading the code now has to go parse the SELECT list to work it out, and anyone modifying the SELECT list might not realize that adding or rearranging columns just introduced a bug in the application.
  2. No statement terminator – This is one of the things I’ve been harping on throughout a decent portion of my career – we should always be terminating statements with semi-colons. Though, personally, I don’t like adding them to block wrappers, like BEGIN/END, because to me those aren’t independent statements (and try adding a semi-colon to BEGIN/END TRY and BEGIN/END CATCH – one of these things is definitely not like the others.

See, That Wasn’t So Hard.

I looked at a 40-line stored procedure and identified 40 problems (not counting the ones that occurred multiple times). That’s a problem per line! And it wasn’t even that hard to come up with this “crazy” stored procedure – it’s actually quite believable that something similar could have crossed your desk as part of a pull request.

But How Would You Write It, Aaron?

Well, that’s a good question.

I would certainly start by stepping back to understand what the procedure is actually trying to accomplish. We have three separate queries that all do similar things: they join order and customer tables and include or exclude rows based on dates and counts and other criteria. Doing this independently and then combining them with multiple distinct sorts to remove duplicates is wasteful and could lead to unacceptable performance at scale.

So, I would attack the problem with the goal of touching each table only once – and of course cleaning up all the other things I noticed (most of which, admittedly, are aesthetic and have no bearing on performance). Taking a quick swing at it, and keeping in mind there are a dozen ways to write this, I came up with the following:

CREATE PROCEDURE dbo.Customer_GetListForCampaignXYZ
  @CategoryID int
AS
BEGIN
  SET NOCOUNT ON;
 
  DECLARE @AYearAgo    date = DATEADD(YEAR, -1, GETDATE()),
          @TwoWeeksAgo date = DATEADD(WEEK, -2, GETDATE());
 
  WITH CandidateCustomers AS
  (
    SELECT CustomerID, 
      IsAnOrderOlderThanAYearAgo     = MAX  ([old]),
      OrdersInPastYear               = COUNT([new]),
      RecentOrderFromDefinedCategory = MAX  ([cat])
    FROM
    (
      SELECT CustomerID,
         [old] = CASE WHEN OrderDate <  @AYearAgo THEN 1 END,
         [new] = CASE WHEN OrderDate >= @AYearAgo THEN 1 END,
         [cat] = CASE WHEN OrderDate >= @TwoWeeksAgo 
             AND EXISTS 
             (
               SELECT 1 FROM Sales.SalesOrderDetail AS d
               WHERE d.SalesOrderID = h.SalesOrderID 
               AND EXISTS
               (
                 SELECT 1 FROM production.product AS p
                 INNER JOIN Production.ProductSubcategory AS sc 
                         ON p.ProductSubcategoryID = sc.ProductSubcategoryID
                 WHERE sc.ProductCategoryID = @CategoryID 
                   AND p.ProductID = d.ProductID
               )
             ) THEN 1 END
      FROM Sales.SalesOrderHeader AS h
    ) AS agg GROUP BY CustomerID
  )
  SELECT cc.CustomerID, pp.FirstName, em.EmailAddress 
    FROM CandidateCustomers AS cc
    INNER JOIN Sales.Customer AS cu
      ON cc.CustomerID = cu.CustomerID
    INNER JOIN Person.Person AS pp
      ON cu.PersonID = pp.BusinessEntityID
    INNER JOIN Person.EmailAddress AS em
      ON pp.BusinessEntityID = em.BusinessEntityID
  WHERE (cc.IsAnOrderOlderThanAYearAgo = 1 AND cc.OrdersInPastYear = 0) 
     OR (cc.OrdersInPastYear >= 3) 
     OR (cc.RecentOrderFromDefinedCategory = 1)
  ORDER BY cc.CustomerID;
END

Total cost (in terms of line count): 10 additional lines (20%). Character count is actually slightly lower: 1,845 -> 1,793. But the improvement to readability, maintainability, and grokability: priceless.

What About Performance?

After confirming that they return the same results, I compared execution times and a few plan characteristics. Here are the raw metrics observed at runtime (click to enlarge):

Runtime metrics comparison

On my system, which has modern NVMe drives, the original query is a lot faster than I thought (even with a cold cache). But notice the much higher number of reads, which could be an issue on systems with slower or more contentious I/O, or not enough memory to always have the data in the buffer pool. Let’s look at the execution plans a little closer.

For the old query, here is the plan (click to enlarge):

Original, busy plan

And here is the new plan, which is far simpler (click to enlarge):

New, simpler plan

You can get a general sense for the differences by looking at the plans casually, but we can also take a quantitative comparison of the operators and other information the plans provide (with the worse figure highlighted in this salmon-y color):

Metric Original New Notes
Estimated Cost % 40.9% 59.1% Given everything else below, this demonstrates why estimated cost % can be misleading (a.k.a. garbage).
Estimated Rows
(Actual: 2,313)
25,700
1,111%
6,920
299%
Neither estimate was a bullseye, but the UNION query was off by more than an order of magnitude.
Reads 9,626 1,902 This can be a good warning for systems that are I/O-bound and/or memory-bound.
Clustered Index Scans
7 4 Scans against SalesOrderHeader: 3 vs. 1
Hash Matches 8 5 This can be a good warning for systems that are memory-bound (more info).
Sorts 5 1 And one sort in each plan (the final ORDER BY) isn’t necessary.
Spills 1 0 There was one level 2 spill in the original plan, nothing disastrous; likely a result of bad estimates.
Spools 0 1 The spool in the new plan is the only operator that is concerning – it only handles ~7K rows, but represents 13% of overall CPU.
Residual I/O Warnings 2 0 These are two bright yellow signs that the original query is reading a lot more data than it should.

Given all that, there’s very little redeeming about the original approach to union three separate queries – and I would still feel that way even without the unnecessary distinct sorts. The code review created a much more readable procedure and made the query perform better in nearly every measurable aspect. And it could potentially be tuned even further, even though a one-off lead generation procedure isn’t likely to be performance critical. The important thing is that making these conventions and processes commonplace will make it more likely that the next procedure won’t face such a rigorous review.

What If The Problems Aren’t Obvious?

As I stated at the beginning, I’ve developed a sense of code smells and best practices through experience over my entire career, and I’m still adjusting my techniques. So nobody expects you to be able to spot all of these problems out of the gate. One way to get a head start is to try out an add-in like SQL Prompt, which certainly did identify several of the above issues.

Wrapping Up

Now, would I torture a co-worker with a code review this thorough and pedantic? Of course not. But if the code raises my left eyebrow this many times, now I have a blog post I can point them at. 🙂

The post Find 40 Problems in this SQL Server Stored Procedure appeared first on Simple Talk.


from Simple Talk https://ift.tt/KrIq9GC
via

Wednesday, February 22, 2023

PostgreSQL Basics: Object Ownership and Default Privileges

In the first security article, PostgreSQL Basics: Roles and Privileges, I discussed how roles (users and groups) are created and managed in PostgreSQL Depending on your background with permissions, particularly in other database products, some of those nuances in how permissions work may have been surprising.

Understanding how roles and privileges work in Postgres is key to understanding the next, and often more confusing part of security, object ownership. Although there are many privileges that can be assigned in Postgres, object ownership comes with a specific level of privilege that cannot be transferred to other roles. Understanding the implications of this is essential to the management of your database schema, and access to the objects it contains, over time.

Who owns database objects?

In PostgreSQL, the role that creates an object (table, view, function, etc.) becomes the owner. It can be altered after the fact, but initially, the creator is the owner. We can see the owner of objects in the database using the psql interactive terminal or querying the pg_catalog tables that correspond to the object type.

SET ROLE user1; --impersonate user1
CREATE TABLE public.example_tbl (
  id INT NOT NULL,
  notes TEXT NULL
);
SET ROLE none;

In psql, use the “describe” meta command:

\d

On a clean server, this will show you (if you have other objects on your server, you may get additional rows of output.):

A picture containing table Description automatically generated

As we can see, the table’s owner is set to user1 because that role created it.

The \d meta-command in psql executes the following query under the covers to show us the list of relations (including the table we created) and who owns each relation.

SELECT n.nspname as "Schema",
  c.relname as "Name",
  CASE c.relkind 
        WHEN 'r' THEN 'table' 
        WHEN 'v' THEN 'view' 
        WHEN 'm' THEN 'materialized view' 
        WHEN 'i' THEN 'index' 
        WHEN 'S' THEN 'sequence' 
        WHEN 't' THEN 'TOAST table' 
        WHEN 'f' THEN 'foreign table' 
        WHEN 'p' THEN 'partitioned table' 
        WHEN 'I' THEN 'partitioned index' END as "Type",
  pg_catalog.pg_get_userbyid(c.relowner) as "Owner"
FROM pg_catalog.pg_class c
     LEFT JOIN pg_catalog.pg_namespace n 
         ON n.oid = c.relnamespace
     LEFT JOIN pg_catalog.pg_am am 
         ON am.oid = c.relam
WHERE c.relkind IN ('r','p','v','m','S','f','')
      AND n.nspname <> 'pg_catalog'
      AND n.nspname !~ '^pg_toast'
      AND n.nspname <> 'information_schema'
  AND pg_catalog.pg_table_is_visible(c.oid)
ORDER BY 1,2;

Tip: As you can see, the catalogs in PostgreSQL contain a lot of useful information. Learning how to query them effectively, however, takes time and experience. This is why the psql meta-commands are particularly useful and very popular among PostgreSQL developers. We’re working on a “what you need to know about psql” article, but until then, check out psql-tips.org for some great tips.

I can hear what you’re thinking already.

“You keep saying that object owners are important, but you haven’t said why that matters! Surely any other role that has appropriate privileges on the same schema can work with that table. Right?

It depends.

There are three major points you need to understand about object ownership:

  1. Only a superuser or the owner of an object (table, function, procedure, sequence, etc.) can ALTER/DROP the object.
  2. Only a superuser or the owner of an object can ALTER the ownership of that object.
  3. Only the owner of an object can define default privileges for the objects they create.

Let’s give each of these a look to better describe how ownership and privilege play together, and what you can do to proactively manage this in PostgreSQL.

Setting up users and groups for demonstration

For the following examples, we will assume that your Postgres instance has the normal superuser principal with the name postgres. We’ll then take a cue from the first article to set up two development users and a development group to manage privileges more easily.

--NOTE: don’t execute test code like this on a cluster that 
--has personal information on it, especially if the cluster 
--can be accessed by the Internet
CREATE ROLE devgrp WITH NOLOGIN;
CREATE ROLE dev1 WITH LOGIN PASSWORD 'secretpw' IN ROLE devgrp;
CREATE ROLE dev2 WITH LOGIN PASSWORD 'secretpw' IN ROLE devgrp;
-- This will allow our developers to create objects
-- in the public schema
GRANT CREATE ON SCHEMA public TO devgrp;
-- For example purposes only. You should be selective on
-- privileges based on your needs
GRANT ALL ON SCHEMA public TO devgrp;
GRANT ALL ON ALL TABLES IN SCHEMA public TO devgrp;

Now check with psql that the users are part of the group

\du

This will return:

A picture containing text Description automatically generated

After running this SQL, the database has two developers that can login to the database, and each is a member of the devgrp group role. We’ve granted privileges to the group that allows members to create objects in the public schema and they have all basic DML privileges on all tables.

Now let’s explore how to overcome a couple of common security issues in PostgreSQL by watching this team of developers begin to implement a new feature.

Problem #1: Altering an object

The first developer is ready to dig into the new project, tracking social media user handles for various networks. To get started, they create a table to store Twitter and Facebook handles.

-- as the 'postgres' super user we can set the
-- session to impersonate any role
SET ROLE dev1;
CREATE TABLE user_social (
   user_id INT NOT NULL,
   twitter_handle TEXT NULL,
   facebook_handle TEXT NULL );

In psql, use the “describe” meta command:

\d

This will return:

A picture containing table Description automatically generated

As expected, the table was created and is owned by dev1. As the developers get to work on the feature, they quickly realize that a new social network is rising in popularity, and they need to track user handles for it. dev2 offers to add the new column to keep things moving forward.

SET ROLE dev2;
ALTER TABLE user_social ADD COLUMN mastodon_handle TEXT NULL;

This will cause the following error to occur:

ERROR: must be owner of table user_social

Hopefully this first, straightforward example helps to clarify why object ownership is so important in your PostgreSQL schema. There is no privilege that can be granted to the second developer which allows them to make modifications to the table. Altering the object is an inherent privilege reserved for the owner (or a superuser).

Most development teams that start using Postgres with roles for each developer hit this problem during migrations and day-to-day development. Because there is no privilege that can be set which allows other roles to alter the object, a different approach needs to be taken.

The most common solution is to set the ownership of all objects to a consistent role and then grant membership in that role to users that need to modify objects. In our example setup a reasonable choice is the devgrp role because all developers are members of this role. In a more complex environment and development team structure, you’ll likely have to create a few more groups to appropriately manage ownership and access. I’ll provide a starting template of how to manage groups are the end of the article.

To provide an example using our small development team, we can change the owner of this table to a group that all developers are members of, in our case the devgrp role. Once the owner is changed, dev2 should be able to ALTER it because they are members of the group.

-- as the 'postgres' superuser OR the object owner
ALTER TABLE user_social OWNER TO devgrp;
SET ROLE dev2;
ALTER TABLE user_social ADD COLUMN mastodon TEXT NULL;
SELECT * FROM user_social;

The output of this query is:

Alternatively, you can temporarily set the role of your session to the common owner role before creating the object (assuming you are a member of that role). Any objects that are created will be owned by the role in force at the time of creation. To demonstrate, I’ll drop the table and try the same process again, but this time setting the role before creating the table.

-- as dev1 or 'postgres' superuser
DROP TABLE user_social;
-- as dev1 or the 'postgres' superuser we can set the
-- session to impersonate the devgrp role
SET ROLE devgrp;
CREATE TABLE user_social (
   user_id INT NOT NULL,
   twitter_handle TEXT NULL,
   facebook_handle TEXT NULL );

In psql, use the “describe” meta command:

\d

Now you will see:

Chart, line chart Description automatically generated

And now, as the second dev user

SET ROLE dev2;
ALTER TABLE user_social ADD COLUMN mastodon_handle TEXT NULL;
SELECT * FROM user_social;
SET ROLE none; --otherwise, very easy to forget your role context

This returns:

The key here is that ownership is an essential component in maintaining and altering objects in a PostgreSQL database. Whether you set the roles before creating objects or alter ownership after the fact, only members of the role that own an object can alter the object.

Lesson learned; we can now move on to the second common problem many teams run into when they are working with multiple logins in PostgreSQL. Default object privileges

Problem #2: Default Object Privileges

We solved our first problem by setting the table owner to a role that all developers are members of. Essentially, the owner of an object is analogous to a superuser of that object.

But what happens when we add a new role to the database that will be used for reporting or read-only purposes?

The development team has decided that a new role is needed to facilitate reporting functionality for some of the data that will be generated by this new feature.

-- As superuser or a role that has CREATEROLE attribute
CREATE ROLE rptusr WITH LOGIN PASSWORD 'secretpw';

-- Set the session to the new role
SET ROLE rptusr;

-- Count the number of users that have handles for Mastodon
SELECT count(*) FROM user_social 
WHERE mastodon_handle IS NOT NULL;

This causes the error:

ERROR: permission denied for table user_social

This shouldn’t be much of a surprise given what we’ve learned so far. The new rptusr role was created after the table existed and hasn’t been granted any privileges to the table. The superuser or owner of an object must specifically grant the necessary privilege.

-- As a superuser or owner of the required object
GRANT SELECT ON TABLE user_social TO rptusr;

-- Set the session to rptusr role
SET ROLE rptusr;

-- Count the number of users that have handles for Mastodon
SELECT count(*) FROM user_social 
WHERE mastodon_handle IS NOT NULL;
SET ROLE none;

This returns:

In the first article in this series, we referred to the process of ensuring users have only the minimum right necessary as the Principle of Least Privilege. Setting permissions, object by object, will quickly become a tiresome task.

Adding a group role doesn’t help either because the same problem will exist. Privileges are only granted for objects in existence at the time of the GRANT. Stated another way, GRANT is not a forward-looking action. Instead, we need a way to have PostgreSQL apply privileges every time an object is created.

Enter default privileges.

Each role can create a set of default access privileges that are applied whenever they create an object in a specific database. This gives complete control to each role, ensuring that objects are created with the correct privileges each time.

To illustrate, let’s create new default access privileges before creating another new table that the rptuser should be able to query.

First, check that there are no default access privileges using psql:

\ddp

On my demo server, this shows no default access privileges.

Next, we will set security context to the group that you want to set default privileges for, which will be applied when they create new objects in certain schemas.

-- As the role that will create objects, create 
-- default privileges
SET ROLE devgrp;
ALTER DEFAULT PRIVILEGES IN SCHEMA public
        GRANT SELECT ON TABLES TO rptusr;
SET ROLE none;

Once again, check to see if the default privilege was created:

\ddp

This returns:

Diagram Description automatically generated with medium confidence

We can see that the default access privilege was created which will grant SELECT (read) privilege to the rptusr role for any tables that are created in the public schema. To verify that it works, we can now create a new table and attempt to select from it as rptusr without additional intervention using GRANT statements.

-- As the devgrp role that will own the table
SET ROLE devgrp;
CREATE TABLE rpt_log (
id int NOT NULL,
rpt_date timestamptz NOT NULL,
notes TEXT null
);
SET ROLE rptusr;
-- select from the table to verify that privileges 
-- were applied correctly
SELECT * FROM rpt_log;

This returns:

Success! The devgrp was able to create the table and the new rptusr was able to select from it without error. Moving forward, as long as the devgrp is the one to create and own tables (our example object), the rptusr will be able to select from them.

Unfortunately, we’ve only solved our problem for this one “read-only” role named rptusr. As soon as another read-only user needs access to database objects, we’ll have to grant privileges to existing tables and then create another default access privilege for future actions. That’s not very sustainable and simply highlights what we discussed in the first article.

One common approach to deal with is to create a read-only group role and set default access privileges for it. Then, as new read-only users are created in the database, they can be granted membership into the read-only group role, inheriting the same privileges.

First, check the current default access privileges using psql:

\ddp

This returns:

Table Description automatically generated with medium confidence

Now we will undo the current configuration before creating the new one.

-- REVOKE the current default access privilege for the single user
ALTER DEFAULT PRIVILEGES IN SCHEMA public
        REVOKE SELECT ON TABLES FROM rptusr;

Check that the access privilege was removed:

\ddp

This will return:

Now create the new group, and security setup:

-- Create a new read only group role
CREATE ROLE read_only WITH NOLOGIN;

-- Grant select on all current tables in public schema
-- Remember: this is just for current tables, not future ones
GRANT SELECT ON ALL TABLES IN SCHEMA public TO read_only;

-- Grant membership to the read_only role
GRANT read_only TO rptusr;

-- Now create the same default access privilege for 
-- As the role that will create objects, create 
-- default privileges
SET ROLE devgrp;
ALTER DEFAULT PRIVILEGES IN SCHEMA public
        GRANT SELECT ON TABLES TO read_only;

Once again, check to see if the default privilege was created:

\ddp

This will return the following:

Diagram Description automatically generated with low confidence

At this point, any tables that the devgrp user creates will have this default access privilege applied and all members of the read_only role will be able to select data.

With regards to read-only users, PostgreSQL 14+ does provide new default roles to more easily manage access to table data. There are enough nuances to setting it up correctly in a multi-tenant environment that it warrants a separate article in the near future.

Managing ownership and privileges at scale

Between these first two articles we’ve covered a lot of ground on PostgreSQL roles and security.

  • PostgreSQL has roles. Users and groups are synonyms.
  • By convention, user roles can login while group roles cannot.
  • Superusers bypass all privilege checks and can access or modify any object and cluster setting.
  • Access to data and objects must be specifically granted (or revoked) for every role, except the object owner or a superuser.
  • Roles can be granted the permissions of other roles through inheritance.
  • All roles have automatic, non-revokable membership in the PUBLIC role
  • Owners of an object (or superusers) are the only role that can ALTER or DROP the object.
  • Each role can create default access privileges for any objects they create (like tables) so that other roles have access automatically, rather than applying privileges each time an object is created.

That’s a lot of information to think about and manage if PostgreSQL security is new to you, making it challenging to manage PostgreSQL privileges in a larger team. Having a plan or starting template in place for managing PostgreSQL privileges and object ownership as early as possible is a helpful first step. Many times, I’ve seen teams begin a project without understanding the long-term implications of not having a security plan, often because they didn’t fully understand the things we’ve been discussing.

That said, here’s a sample role and security setup to consider as you get started. Use your knowledge of the things we’ve discussed so far (and the official documentation), mixed with the requirements of your organization, to modify and craft a scheme that’s right for you.

In the next article, we’ll look at how you can put all of this together to create a set of privilege templates each time you create a new database. This will ensure that you have consistent, reproducible access privileges across databases and roles.

Conclusion

PostgreSQL has a security and ownership model that can be confusing to new users. Understanding how roles are created, privileges are assigned, and how to prepare your database for consistent access as time marches on will help you use PostgreSQL effectively and keep your teams working without friction.

The post PostgreSQL Basics: Object Ownership and Default Privileges appeared first on Simple Talk.


from Simple Talk https://ift.tt/T34mtMo
via

Thursday, February 16, 2023

Azure Machine Learning Introduction: Part 1 Overview and prep work

The five-part series is designed to jump-start any IT professional’s journey in the fascinating world of Data Science with Azure Machine Learning (Azure ML). Readers don’t need prior knowledge of Data Science, Machine Learning, Statistics, or Azure to begin this adventure.

All you will need is an Azure subscription and I will show you how to get a free one that you can use to explore some of Azure’s features before I show you how to set up the Azure ML environment.

  • Part 1 introduces readers to Azure ML and walks through the prep work of setting up an Azure ML workspace.
  • Part 2 demonstrates the vital steps of data ingestion, data cleaning, and exploratory data analysis with Azure Machine Learning Studio.
  • Part 3 walks readers through the core Machine Learning steps of training and scoring models.
  • Part 4 demonstrates Azure ML capabilities for deploying trained models.
  • Part 5 familiarizes readers with the easy-to-use Automated Machine Learning feature in Azure ML.

Azure Machine Learning (Azure ML), part of Microsoft’s public cloud offerings, is a set of managed cloud services and tools to help Data Science and Machine Learning professionals build, test, deploy and share machine learning solutions.

This first article in the Azure Machine Learning series covers the fundamentals of Azure Machine Learning, walks readers through setting up their Azure ML workspace, and gets them familiar with Azure ML studio, Azure ML Datastores, and Data assets.

Overview of Azure Machine Learning

Azure ML is a cloud service intended for Machine Learning professionals, data scientists, and engineers to train and deploy machine learning models, manage Machine Learning Operations (MLOps) and enhance their daily workflows. It’s designed to help accelerate and manage machine learning project lifecycles with collaboration, automation, deployment, scaling, integration, and security tools. Azure Machine Learning enables professionals to create models natively, or use models built from open-source platforms like Pytorch, TensorFlow, scikit-learn, etc., and monitor, retrain and redeploy models using its MLOps tools.

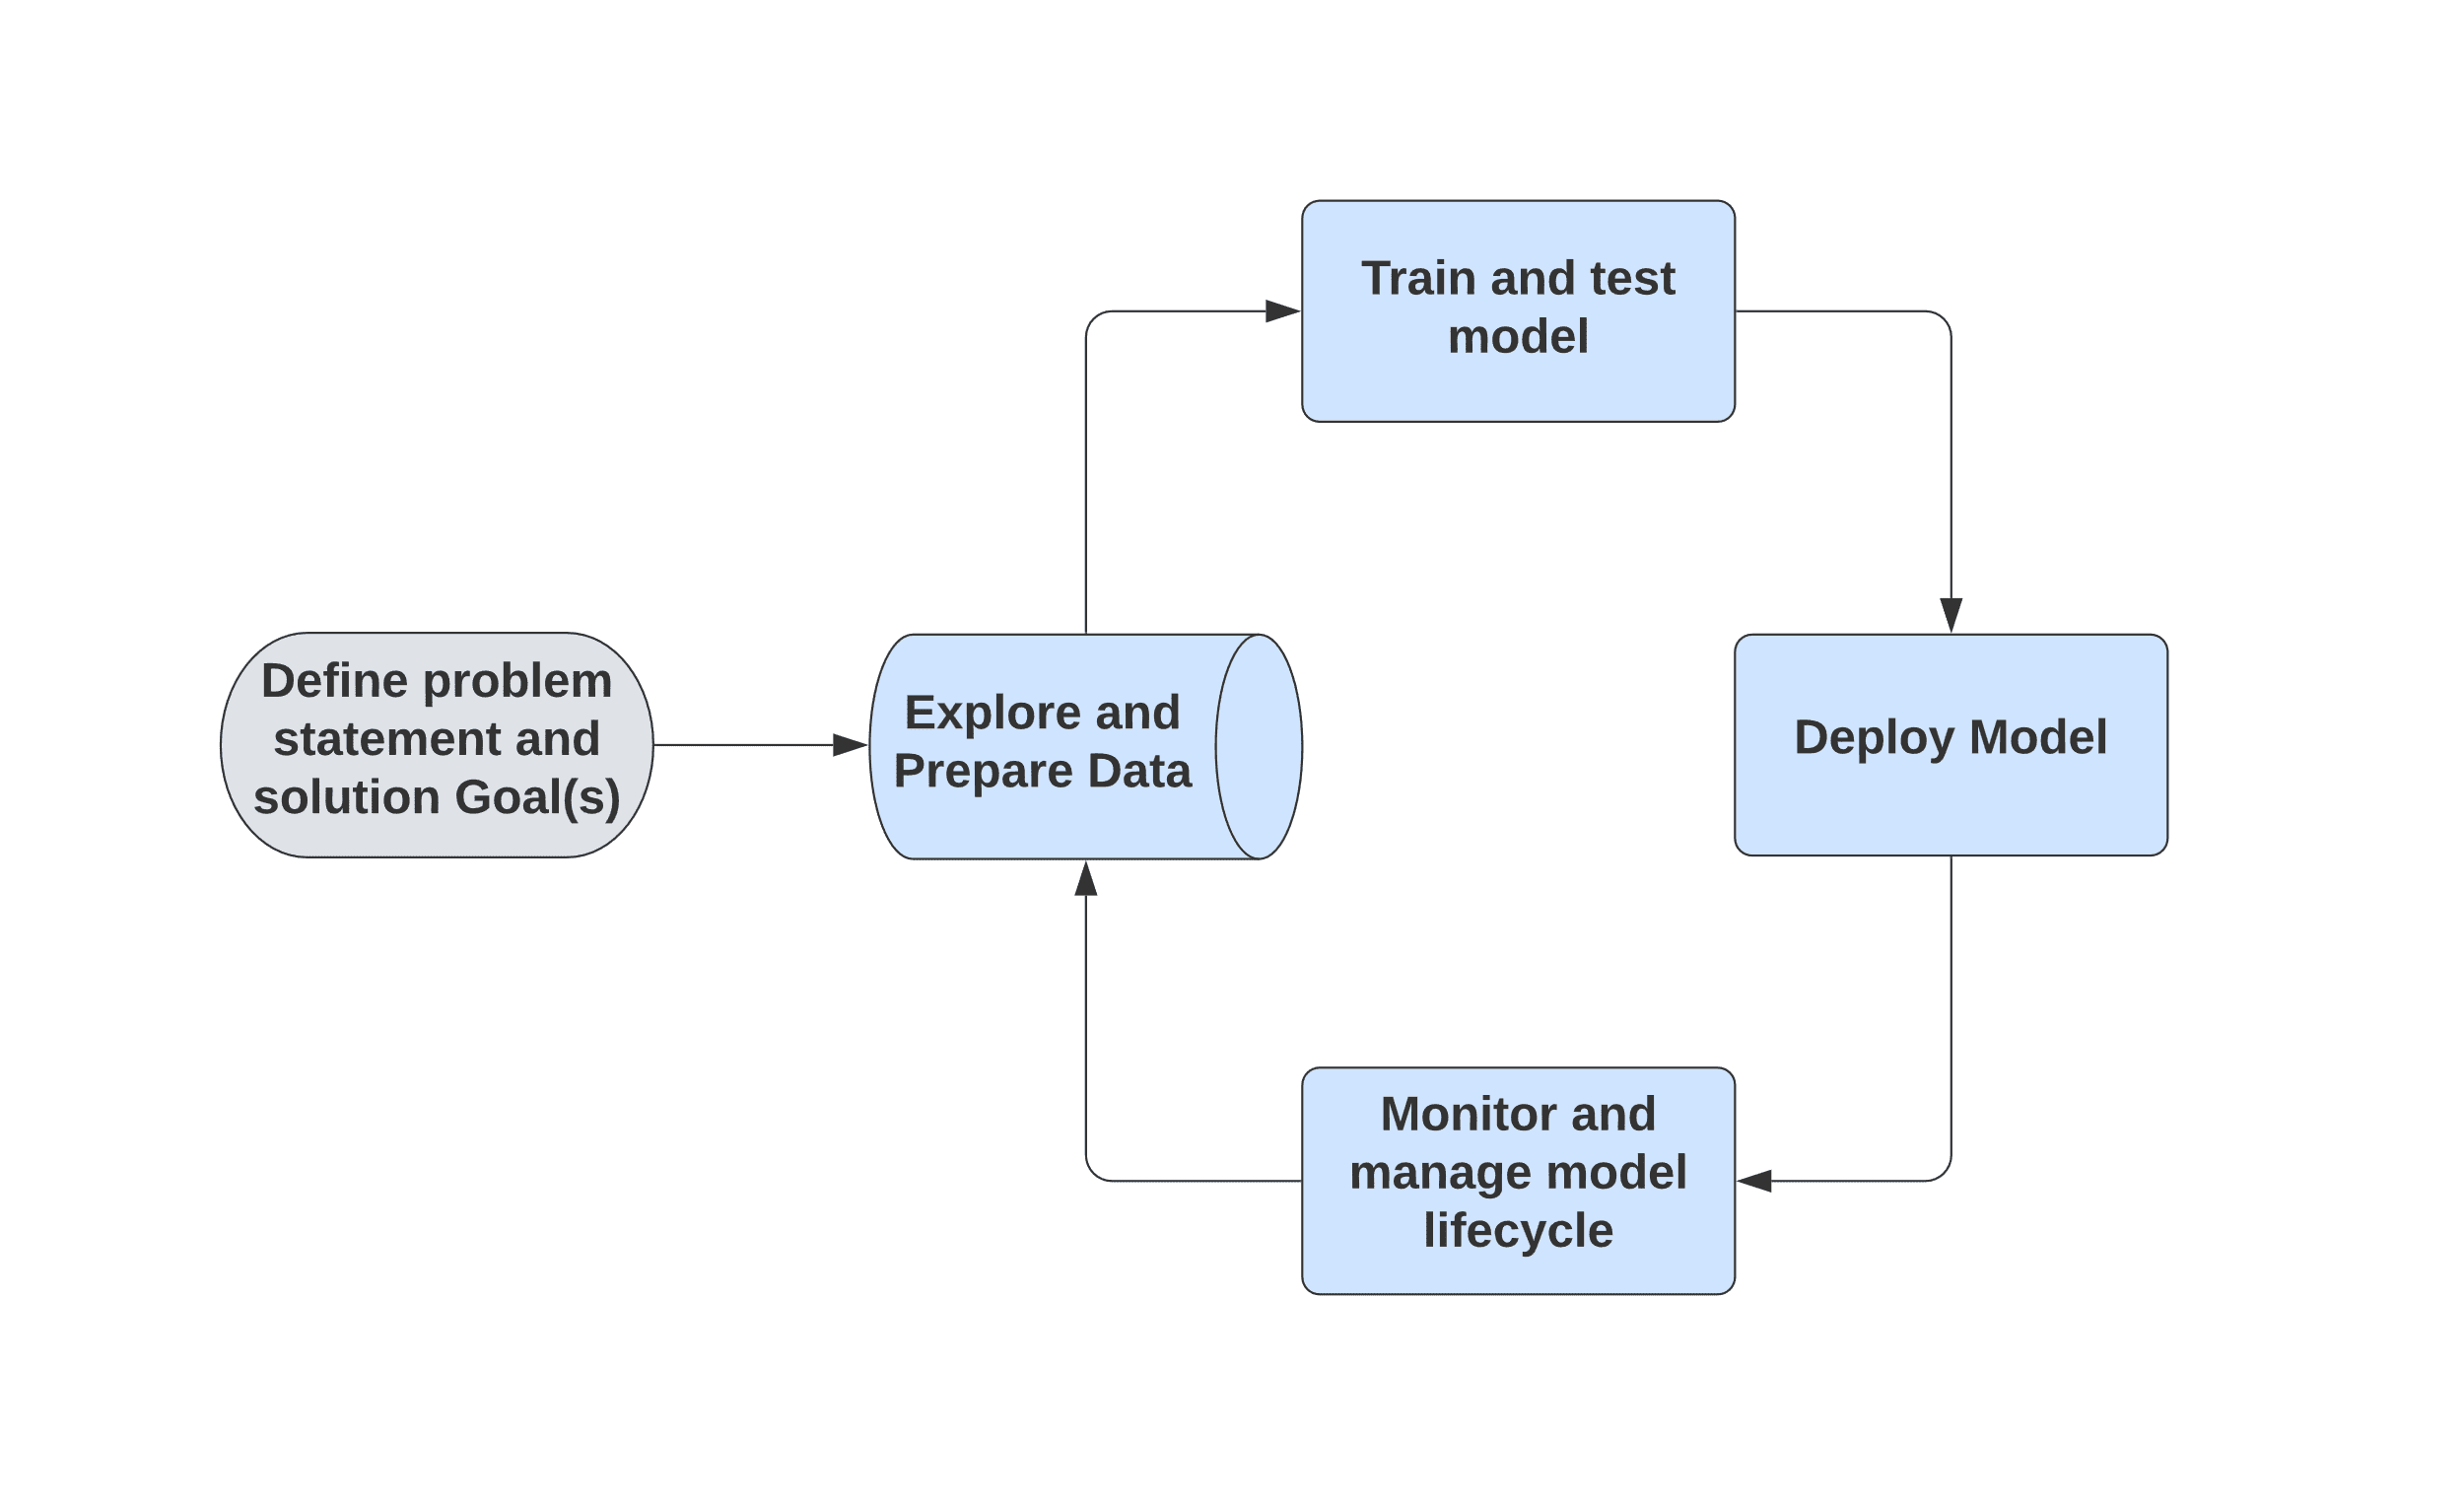
The typical flow for a machine learning process is shown in Figure 1.

Figure 1. Typical Machine Learning project lifecycle

The Azure Machine Learning Studio (Azure ML Studio) facilitates quick model creation and deployment, with an easy-to-use graphical user interface (GUI). The automated Machine Learning (AutoML) feature in Azure ML speeds up the repetitive and time-consuming process of feature and algorithm selection.

While Azure ML comes with a large selection of pre-built Machine Learning algorithms and modules, it also allows for extending your models with custom R and Python scripts. Azure ML facilitates easy deployment of models as web services, to be consumed by applications in real-time as well as batch processing modes. All these tasks can be done using Azure ML Studio Graphical User Interface (GUI) or Python SDK.

Azure Machine Learning Architecture Overview

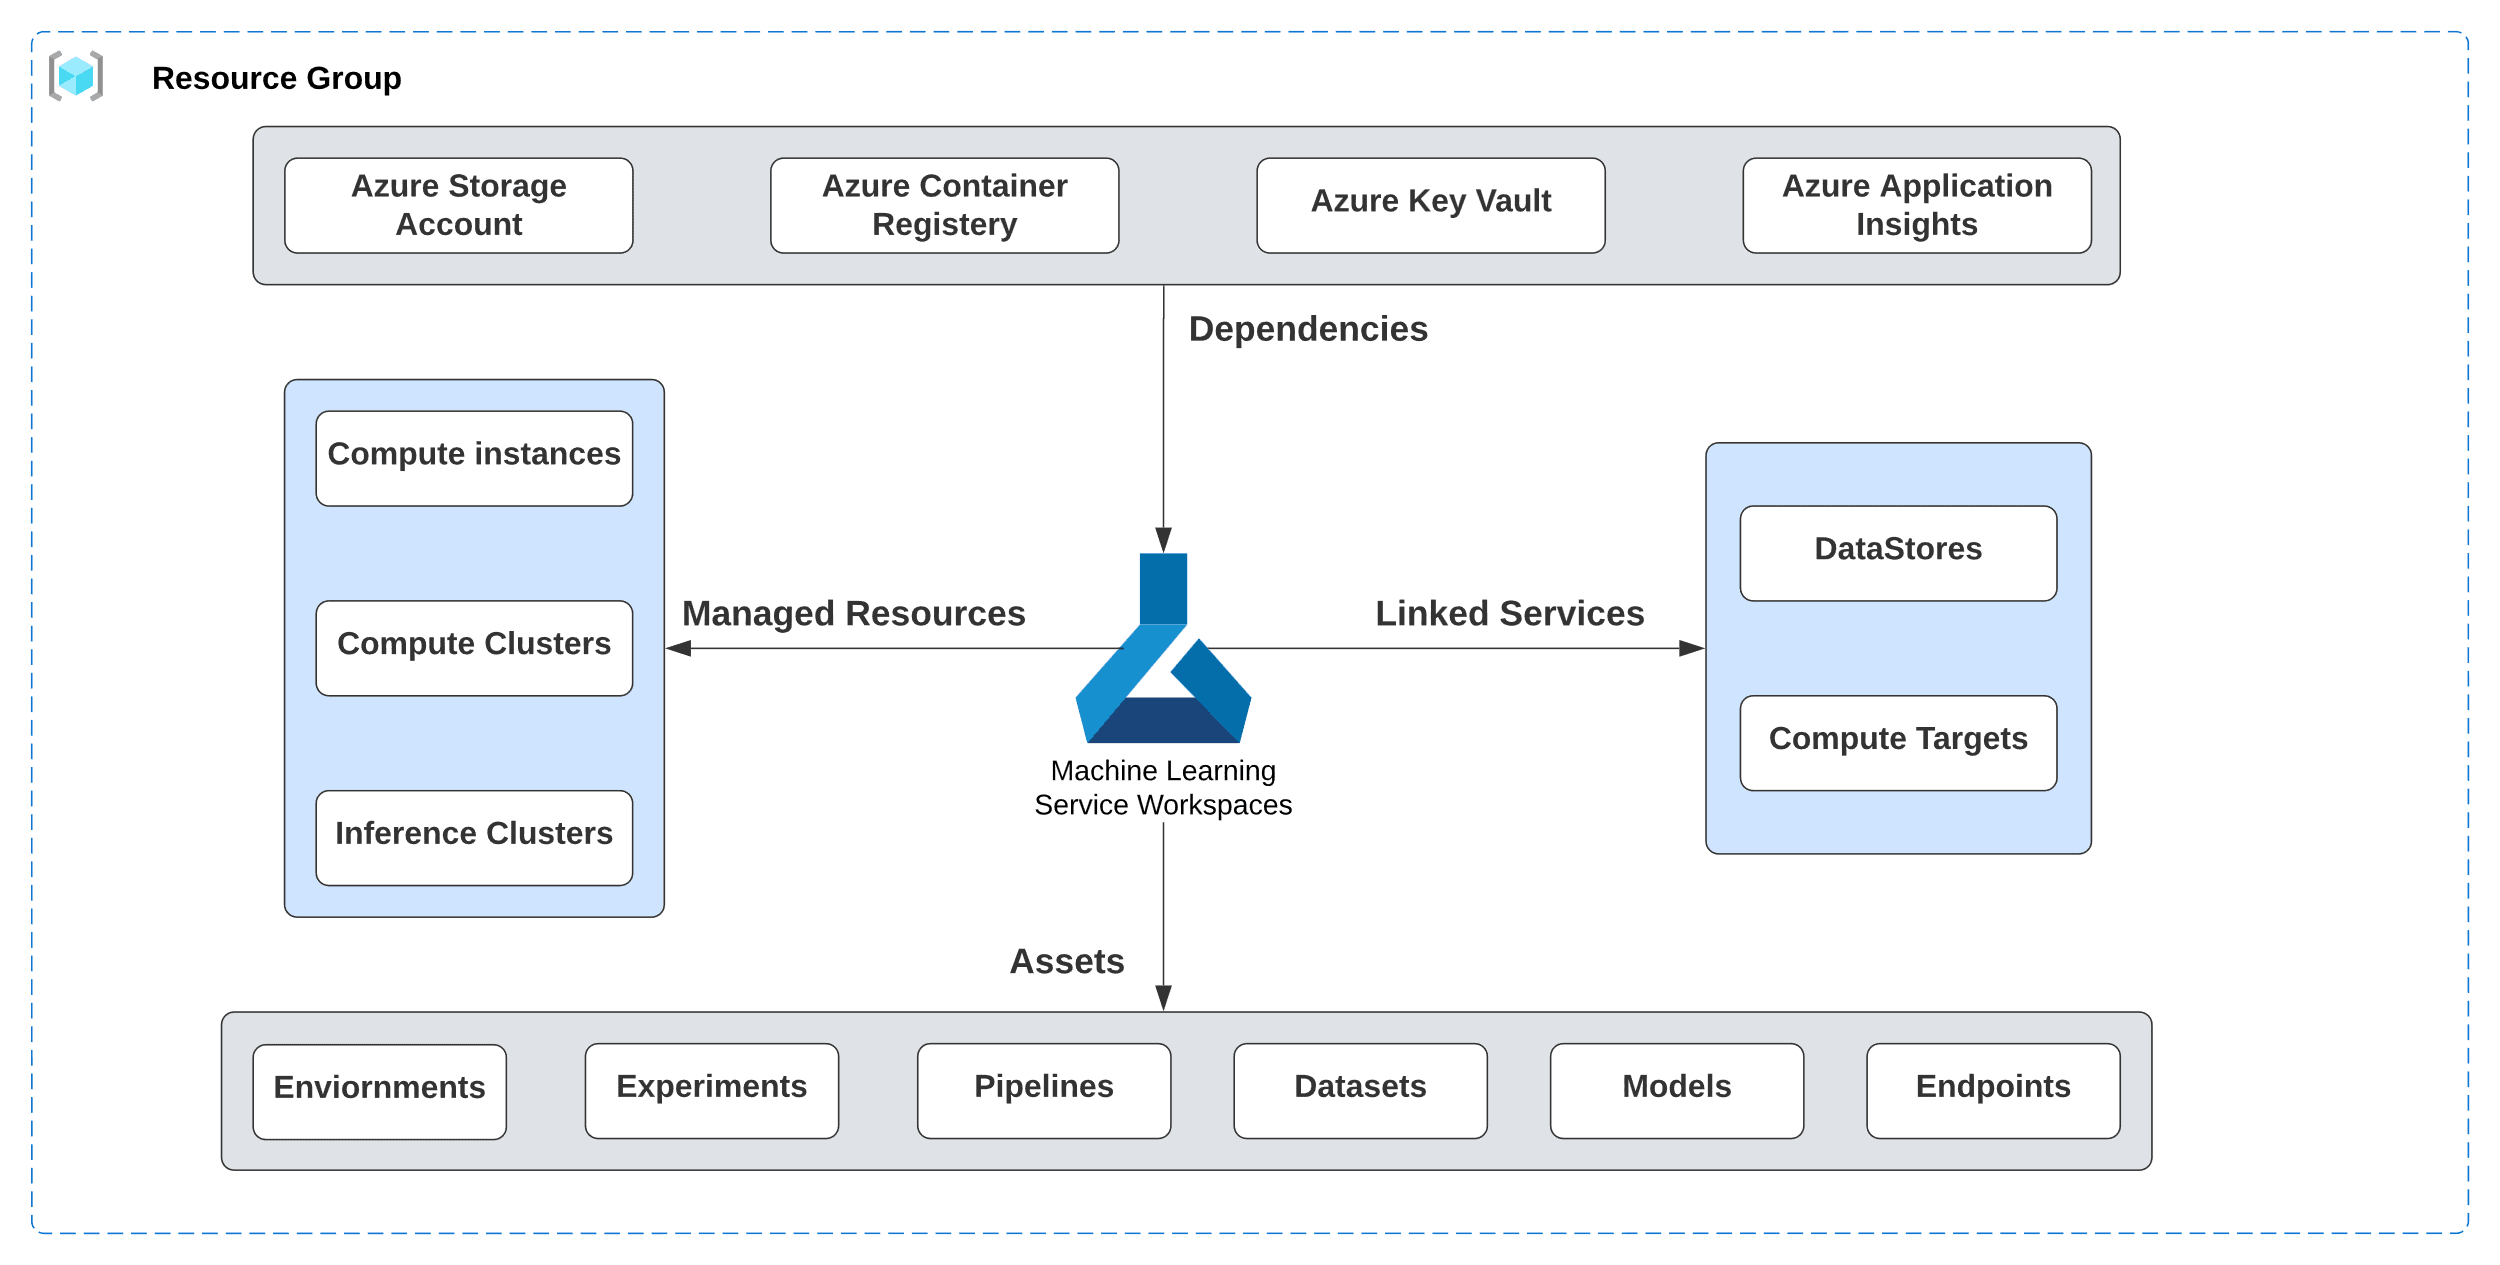
Figure 2. Azure Machine Learning high-level architecture

A high-level architecture overview of Azure ML will familiarize readers with its

various components and how they work together.

Note: There are a lot of terms and concepts, but throughout the series, it should become clearer as I make user of these concepts to build out examples.

An Azure “Resource group” is a container of related resources for a solution, that typically share the same solution lifecycle. It stores metadata about your resources and is tied to a geographical region.

  • Azure “Machine Learning workspace” is a top-level resource for Azure ML and is the centralized place to manage resources used to train and deploy models.
  • Azure ML “Assets” like Environments, Experiments, Pipelines, Datasets, Models, and Endpoints are created while using Azure ML.
    • An “Environment” is a collection of Python or R packages and libraries, environment variables, and various settings that encapsulate the needs of the machine learning model’s training and scoring scripts
    • A single execution of a training script, along with the record of its metadata, metrics, and output, is called a “Run”. An “Experiment” is a collection of multiple runs of a particular training script.
    • Machine Learning “Pipelines” are used to create and manage workflows that orchestrate various phases of machine learning like data preparation, model training, model deployment, scoring, etc.
    • An Azure ML “Dataset” is a reference to the data source location and a copy of its metadata. It is also known as a “Data Asset”.
    • Creating a Machine Learning model involves choosing an algorithm, training it with data, and hyperparameter tuning. A trained “Model” can accept input and produce (infer) the output, which is commonly referred to as a prediction.
    • Machine learning models are registered in the Azure Machine Learning workspace and deployed from the registry as a service “endpoint”, which is simply an instance of the model hosted in the cloud as a web service. It can be a “Real-time” or “batch-processing” endpoint
  • An Azure ML “Datastore” is a reference to an existing storage account on Azure and secures the connection information without risking the authentication credentials and integrity of the source of data. It is used by Data Assets (also known as datasets) to securely connect to Azure storage services.
  • Dependencies” are the other Azure Resources like “Azure Storage Account(s)”, “Azure Container Registry”, “Azure Key Vault” and “Azure Application Insights”, used by Azure ML workspace.
  • A “Compute target” is a designated compute resource of the environment where the ML model training script is run, or inference service is deployed to and hosted. It’s called a “Linked Service” when its location is the Machine Learning professional’s local machine, on-premises resources, or cloud-based resources not hosted on Azure. When the compute target is hosted in and fully managed by Azure Machine Learning, it’s called a “Managed Resource”. Azure Machine Learning offers two fully managed cloud-based Virtual Machines (VM) for machine learning development tasks.
  • Compute instance” is intended to serve as the Machine Learning professional’s development workstation. It’s a VM with multiple tools and environments pre-installed for common machine-learning tasks
  • Compute cluster” is a set of VMs capable of scaling to multiple nodes when needed for large workloads. It scales up automatically when a job is submitted and is well-suited for dev/test deployments

When the compute target used to host production deployment of an ML model for performing inference is fully managed by Azure Machine learning, it’s called an “inference cluster”. This currently includes “Azure Machine Learning endpoints” and “Azure Machine Learning Kubernetes”. Both can be used for Real-time and Batch inference.

Azure Machine Learning Workflow Design

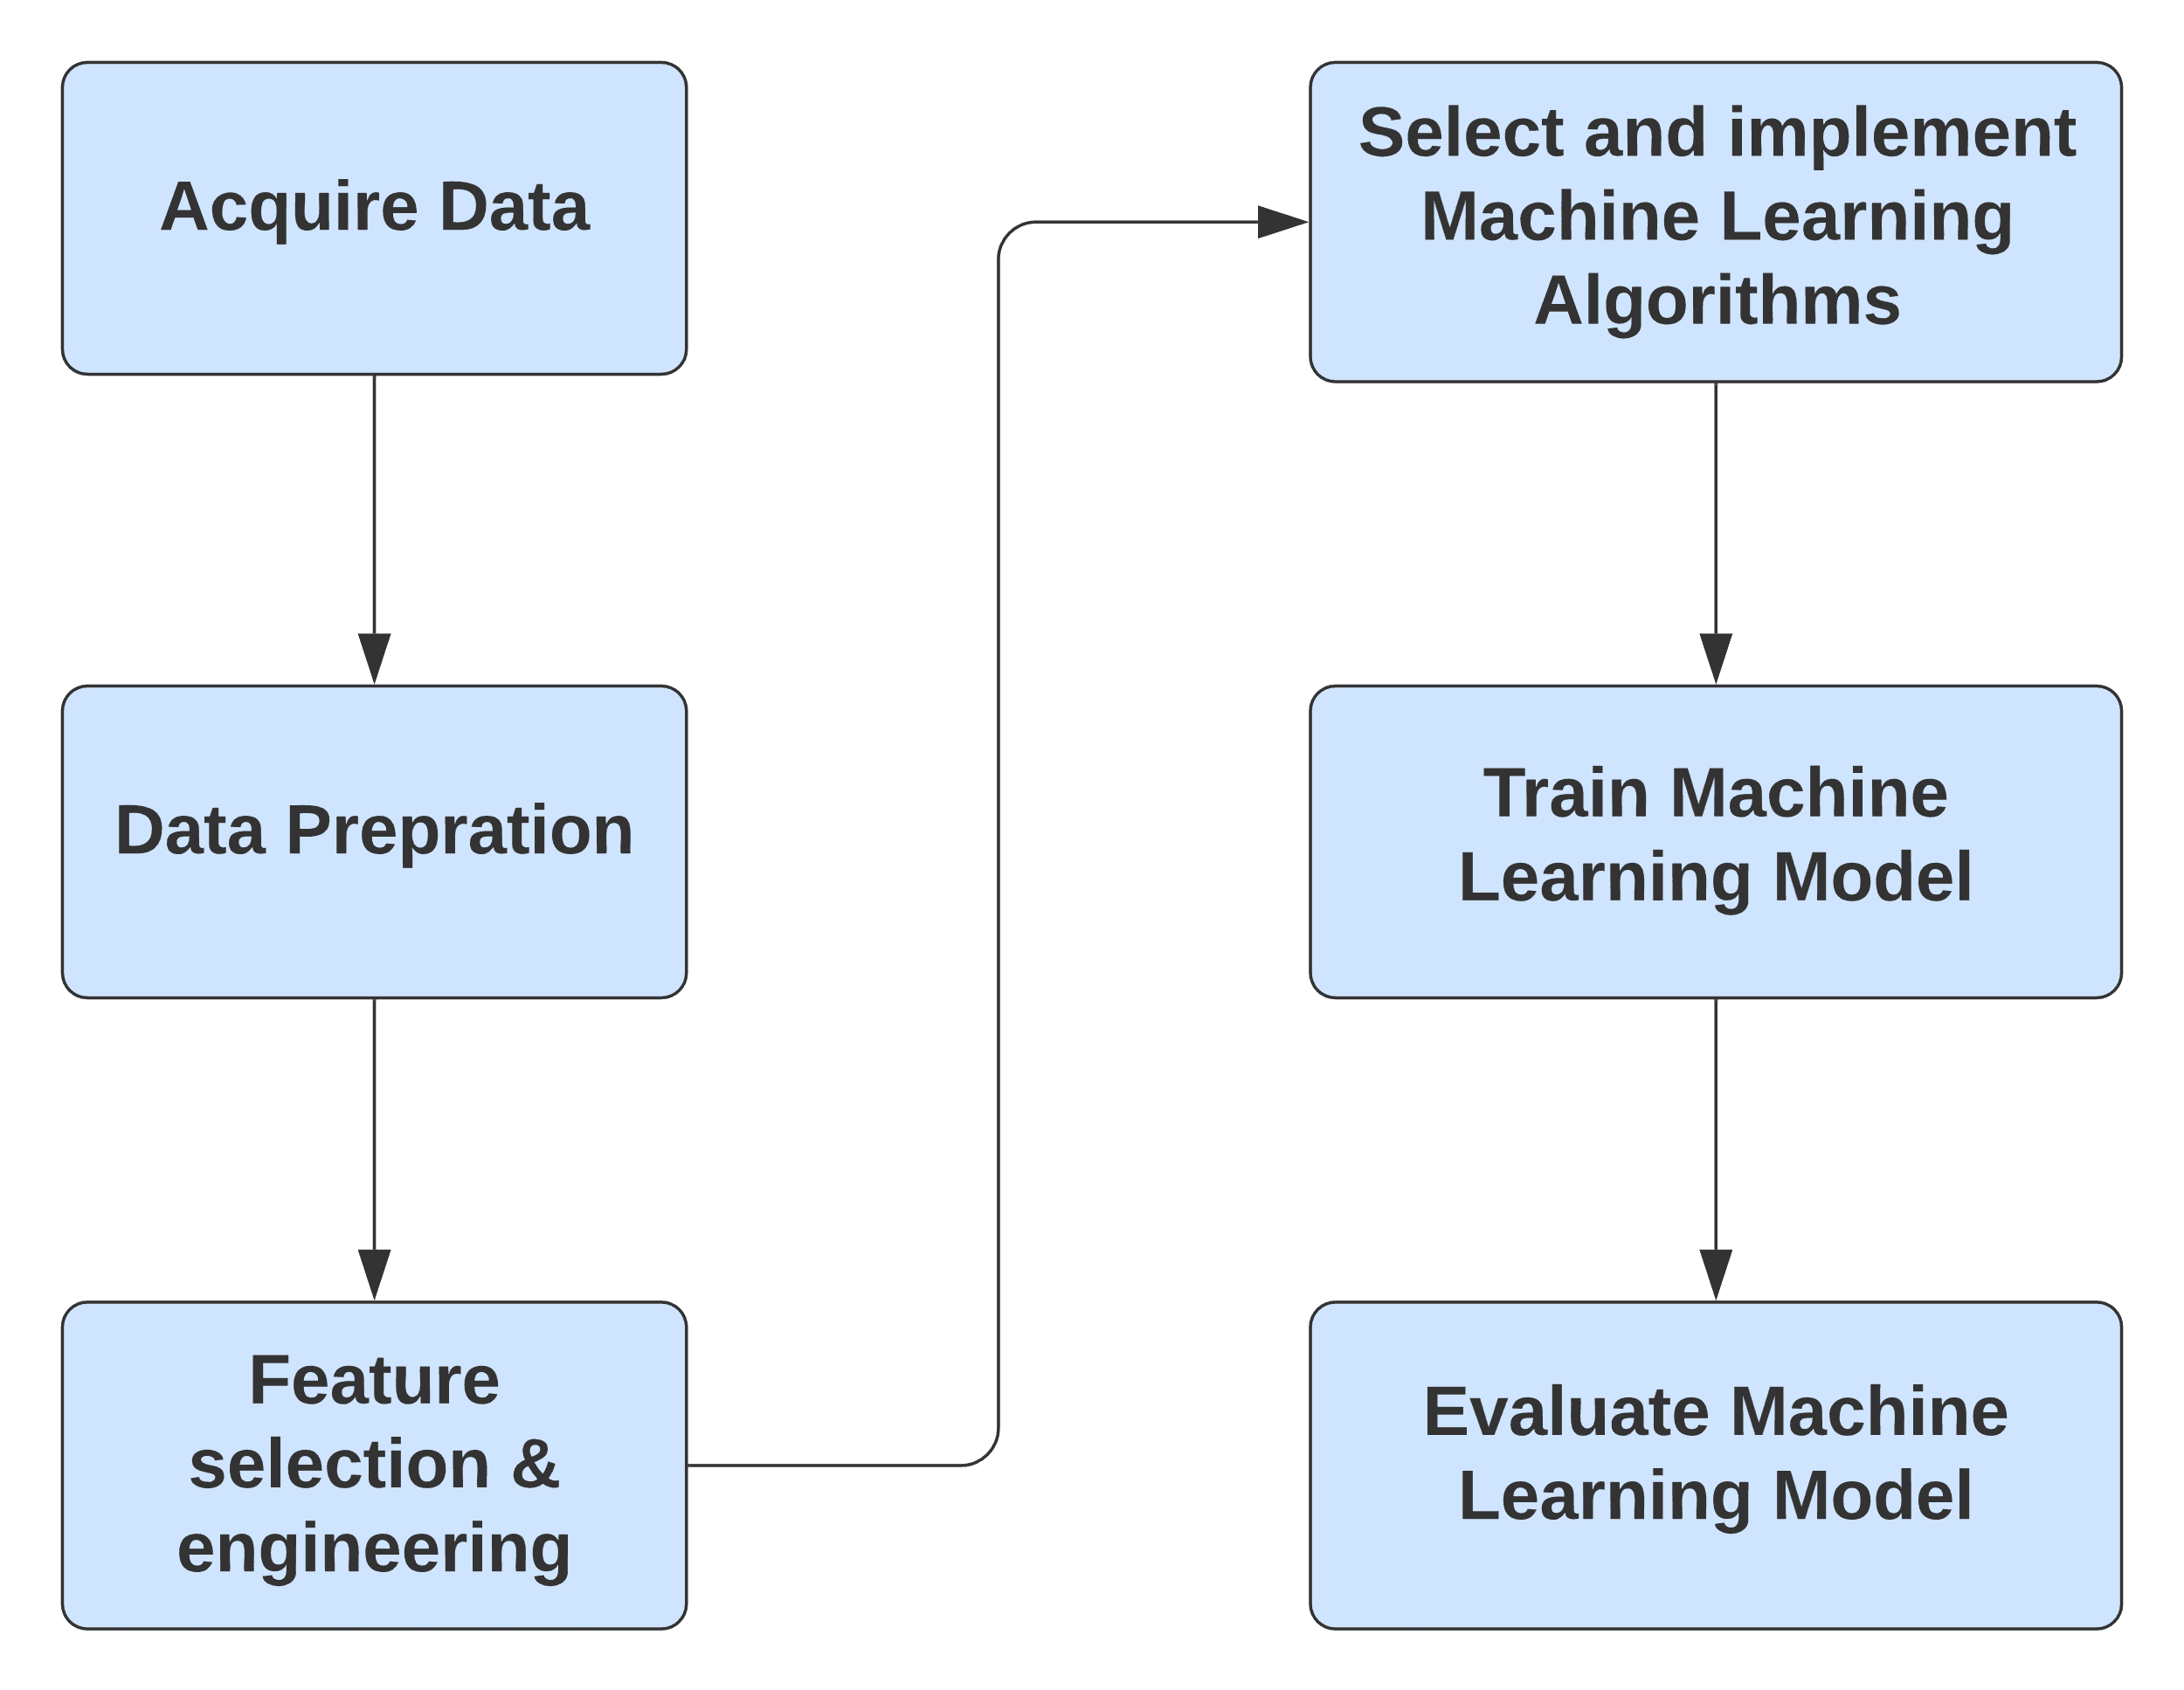
Figure 3. High-Level steps of typical Azure Machine Learning Workflow

The typical high-level design of an Azure Machine Learning Workflow involves the following steps:

  1. Acquire Data – This is typically the first step for any Machine Learning workflow and involves making the raw data available to the Azure Machine experiment. Azure ML offers several options to gather data including manual data entry, Azure Blob storage, Azure SQL Database, Web URLs, compressed files, etc.
  2. Data Preparation – Azure ML offers numerous modules to prepare and transform data. It includes tools for filtering, cleaning missing values, adding rows and columns, changing data types, splitting the data set for training and testing, etc.
  3. Feature Engineering – Azure ML provides various methods for Feature engineering like Filter-based feature selection, Fisher Linear Discriminant Analysis, Permutation Feature Importance, etc.
  4. Select and implement Machine Learning Algorithms – Azure ML comes with a wide array of built-in Machine Learning Algorithms and options to tune their parameters.
  5. Train Machine Learning Model – Azure ML provides modules to quickly train and score Machine Learning Models
  6. Evaluate Machine Learning Models – Azure ML provides modules to easily evaluate the performance of a trained model using industry-standard metrics.

In the rest of this article, we are going to start the process of building an Azure ML example.

Azure Machine Learning workspace setup

Azure Machine Learning workspace is the central hub for all Azure ML artifacts and the repository for storing experiments, logs, etc. This section walks you through the steps of setting up their Azure Machine Learning workspace and upload a demo file in their storage account.

Note: An Azure account with access to the Azure Portal is needed to perform these steps. Please follow this link to learn more about creating your free account with Microsoft Azure.

This first step is designed to help you understand the process of setting up your workspace and upload data to be processed.

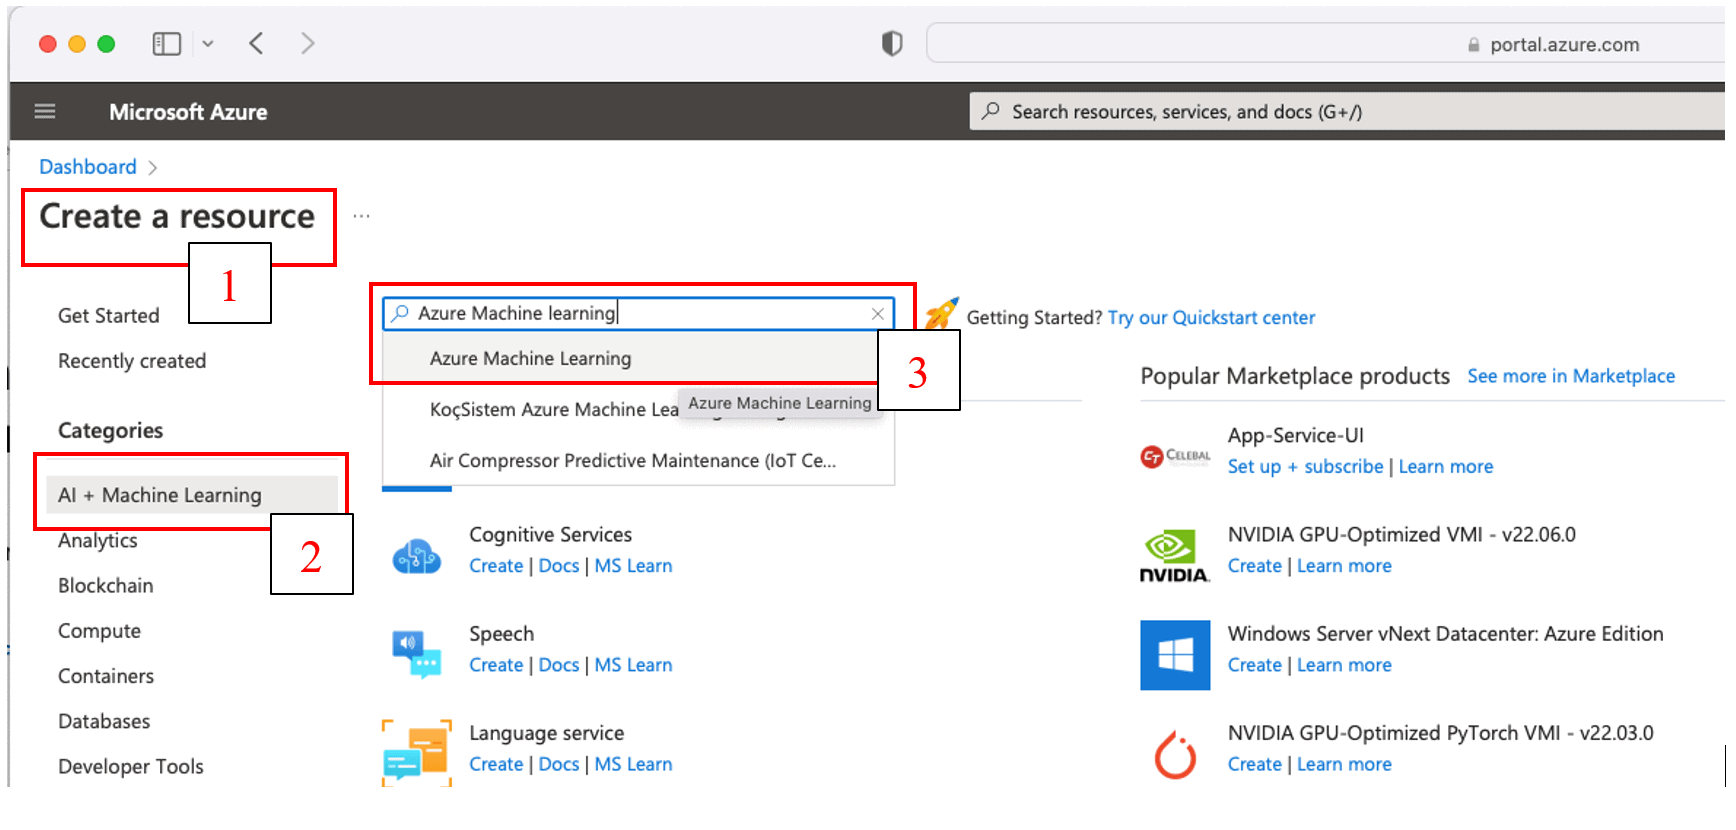
  1. Log into the Azure Portal and click on “Create a resource” > select the “AI + Machine Learning” category > Type “Azure Machine Learning” in the search bar as shown in Figure 5, then select “Azure Machine Learning” from the list of results:

Graphical user interface, application Description automatically generated

Figure 4. Create the Azure Machine Learning Resource

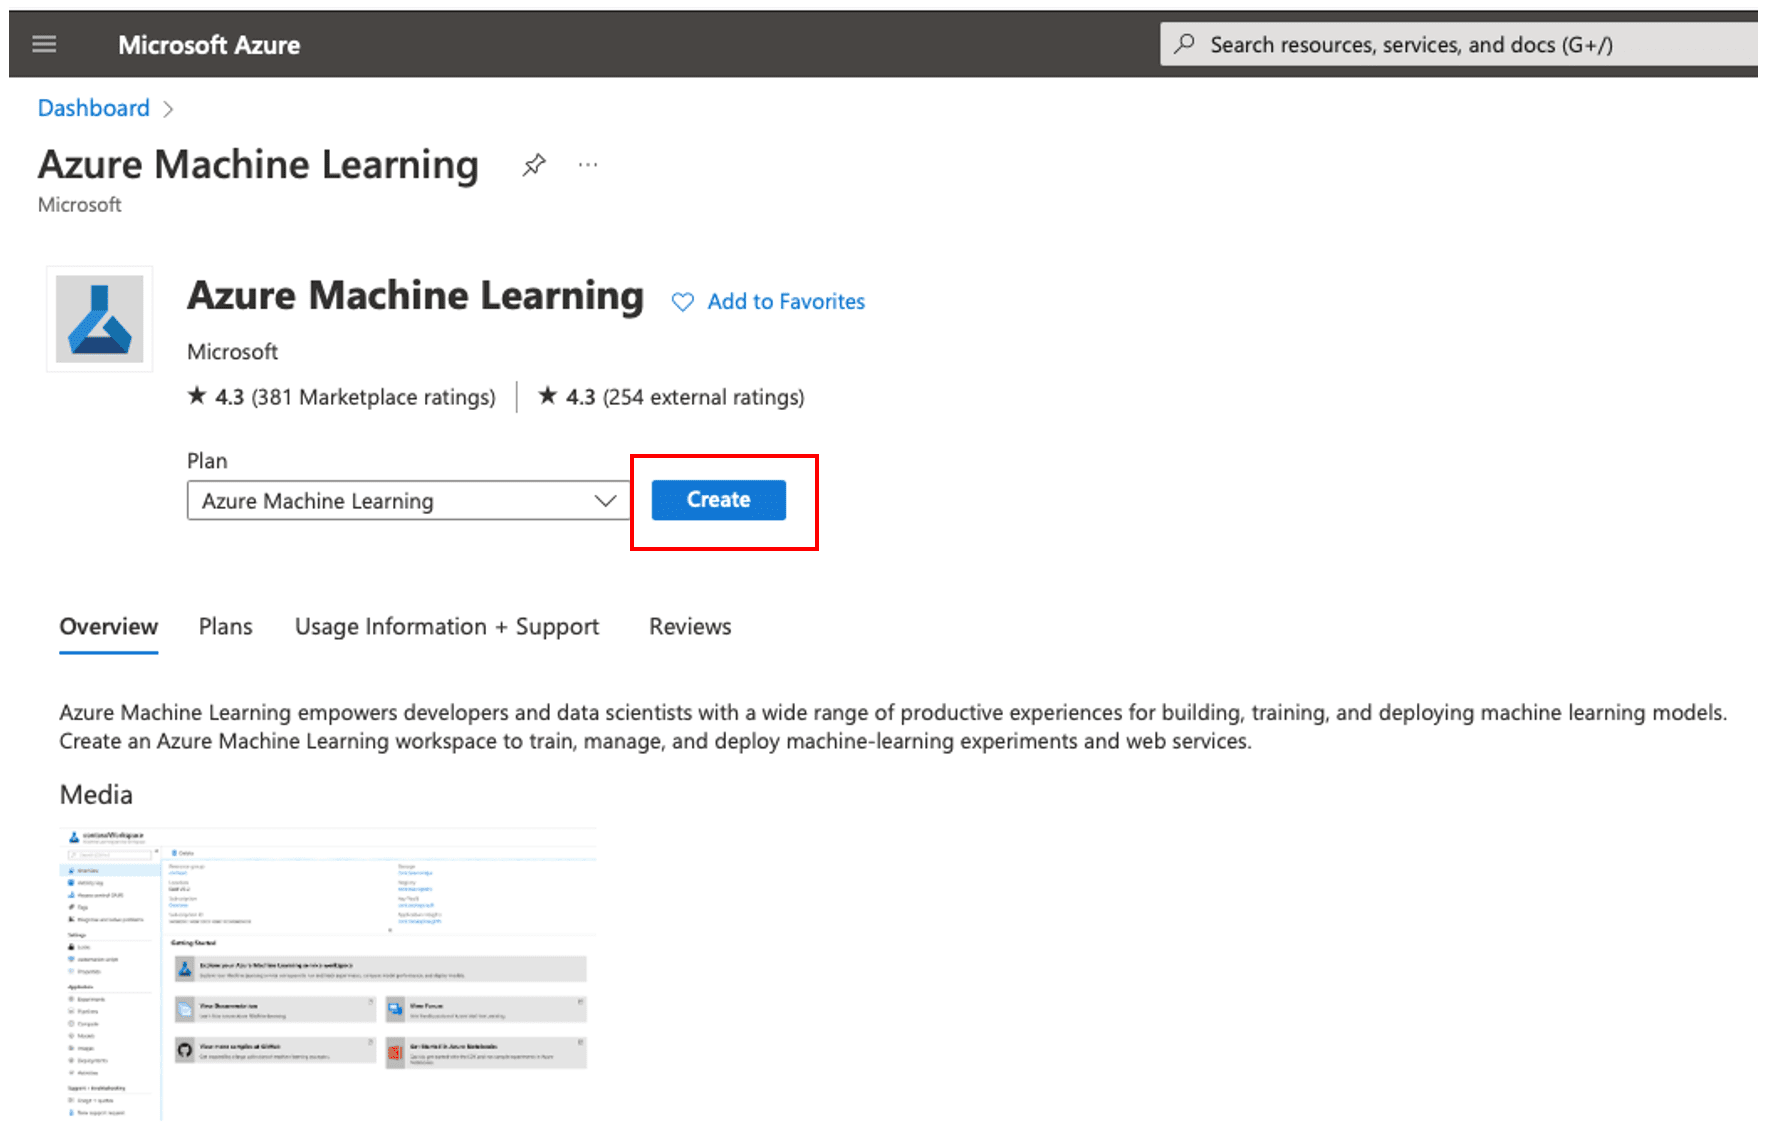
  • This brings up the “Azure Machine Learning” product page with a product overview and tabs for additional details about Plans, Usage Information, Support, and product reviews. Click the ‘Create’ button to launch the machine learning creation wizard, as shown in Figure 5.

Graphical user interface, application, email Description automatically generated

Figure 5. Azure Machine Learning product page

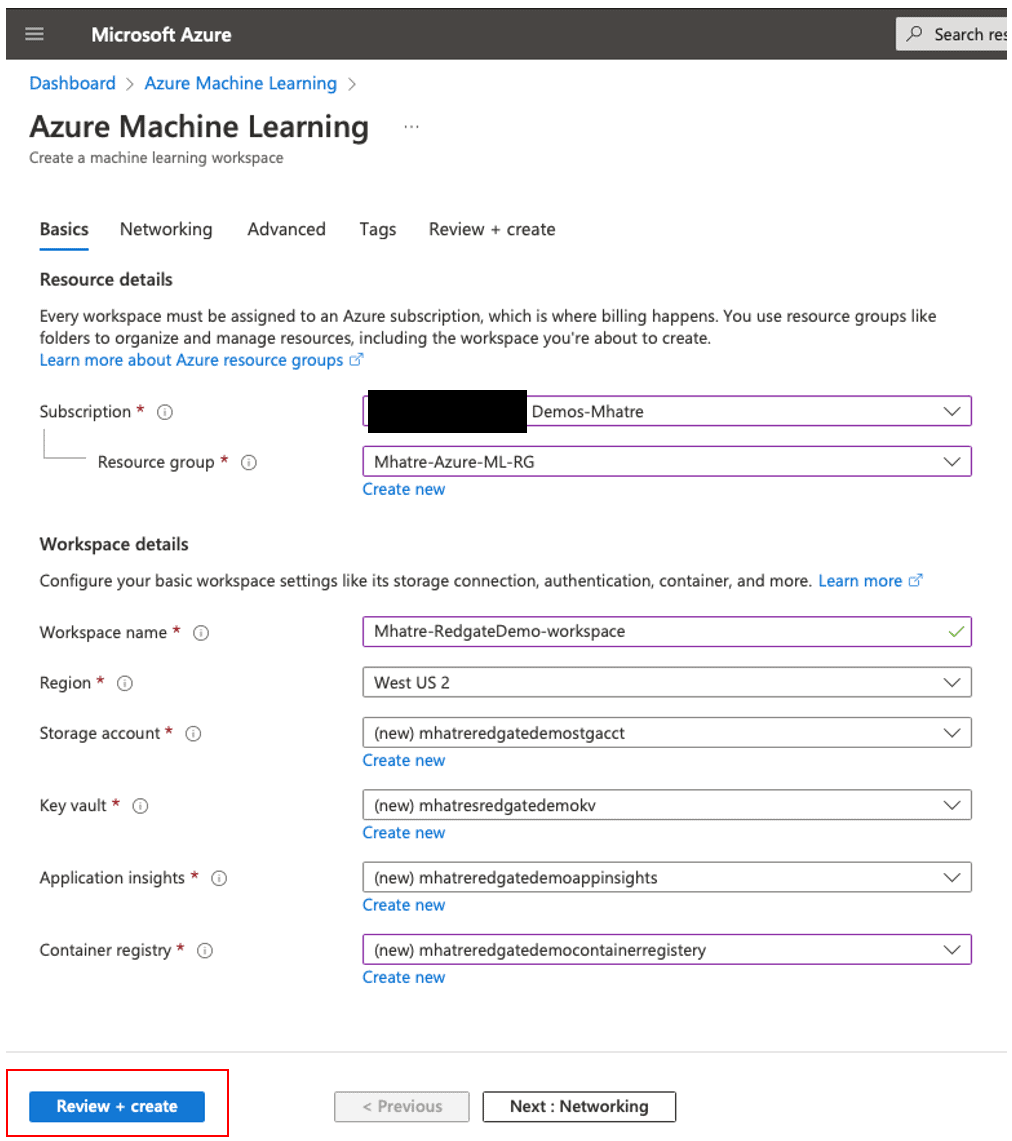
  1. On the “Basics” tab for the machine learning workspace creation wizard. You can see my choices in Figure 6, but your values will likely vary some. Names are not important if they work. Many of the names will give you a default that will work for the example, especially if you plan to delete everything after following along with the article.
  • Select your “Subscription” from the dropdown list.
  • Select your “Resource group” from the dropdown list (You can also opt to create a new resource group using the “create new” option under this field)
  • Enter the “Workspace name” you like to create (Please follow the prompts for naming rules)
  • Select “Region” for your workspace from the dropdown list.
  • Enter the name for your “Storage account” (or create a new one. Please follow prompts for naming rules)
  • Enter the name for your “Key vault” (or create a new one. Please follow the prompts for naming rules)
  • Enter the name for your “Application insights” (or create a new one. Please follow the prompts for naming rules)
  • Enter the name for your “Container registry” (or create a new one. Please follow the prompts for naming rules)
  • Then click the ‘Review + create’ button, which runs validation on your entries.


Graphical user interface, application Description automatically generated

Figure 6. Create Machine Learning workspace

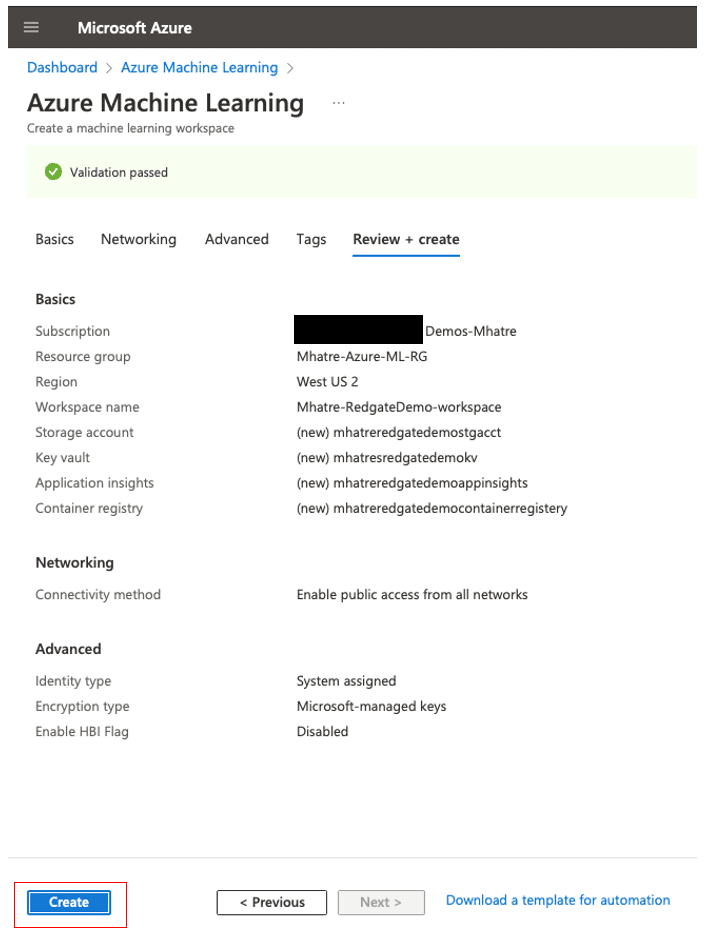
  • In Figure 7, after validation has passed, you will be presented with a summary of your entries for review. Click the ‘Create’ button.

Graphical user interface, text, application, email Description automatically generated

Figure 7. Review entries and create machine learning workspace

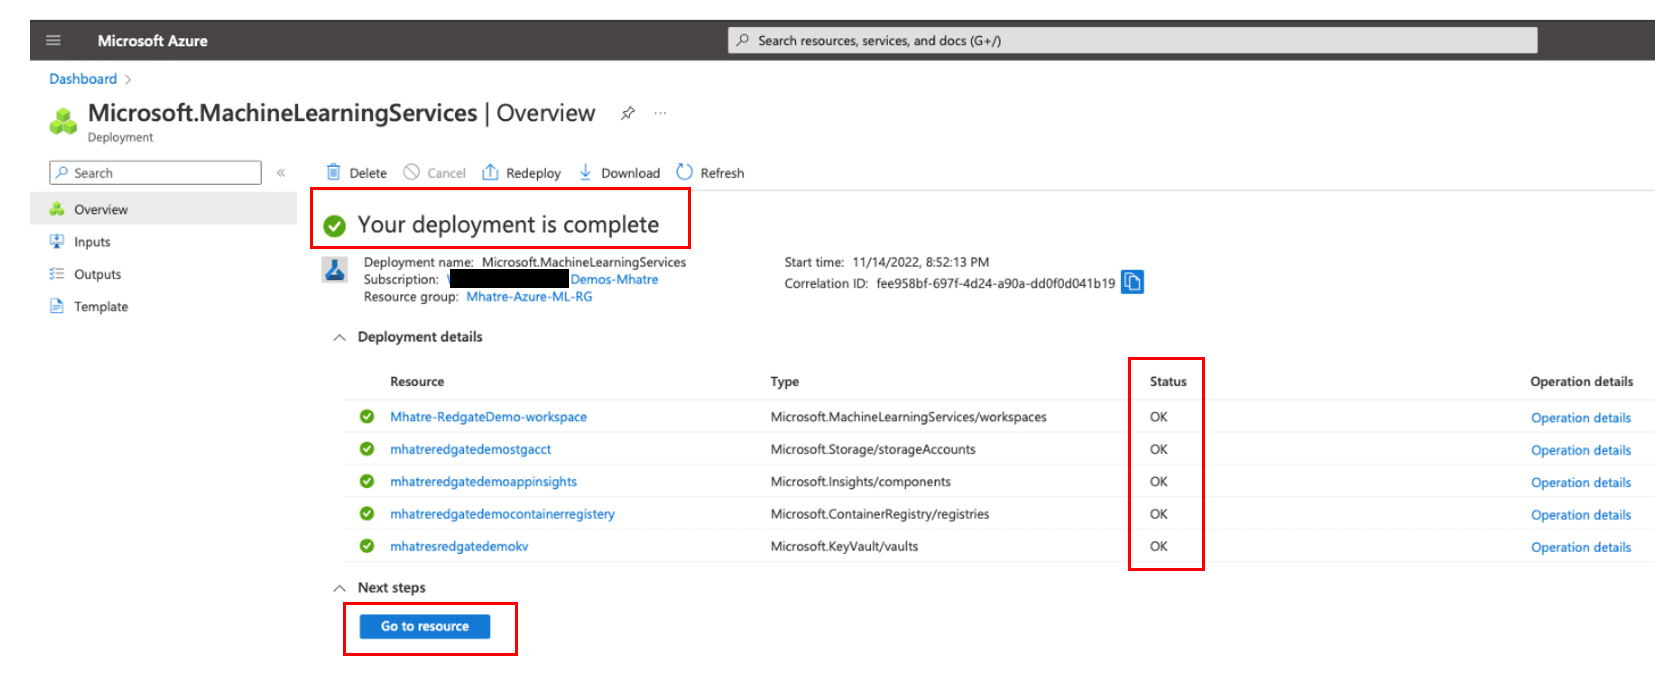
  • This initiates a deployment to create your machine-learning workspace. Once your deployment is complete (typical run time is under one minute, but it may take a few minutes), Azure will take you to the deployment overview screen, as shown in Figure 8.

    Please review this page to confirm the green check mark against all Resources and the Status “OK

Graphical user interface, text, application Description automatically generated

Figure 8. Azure Machine Learning workspace deployment status

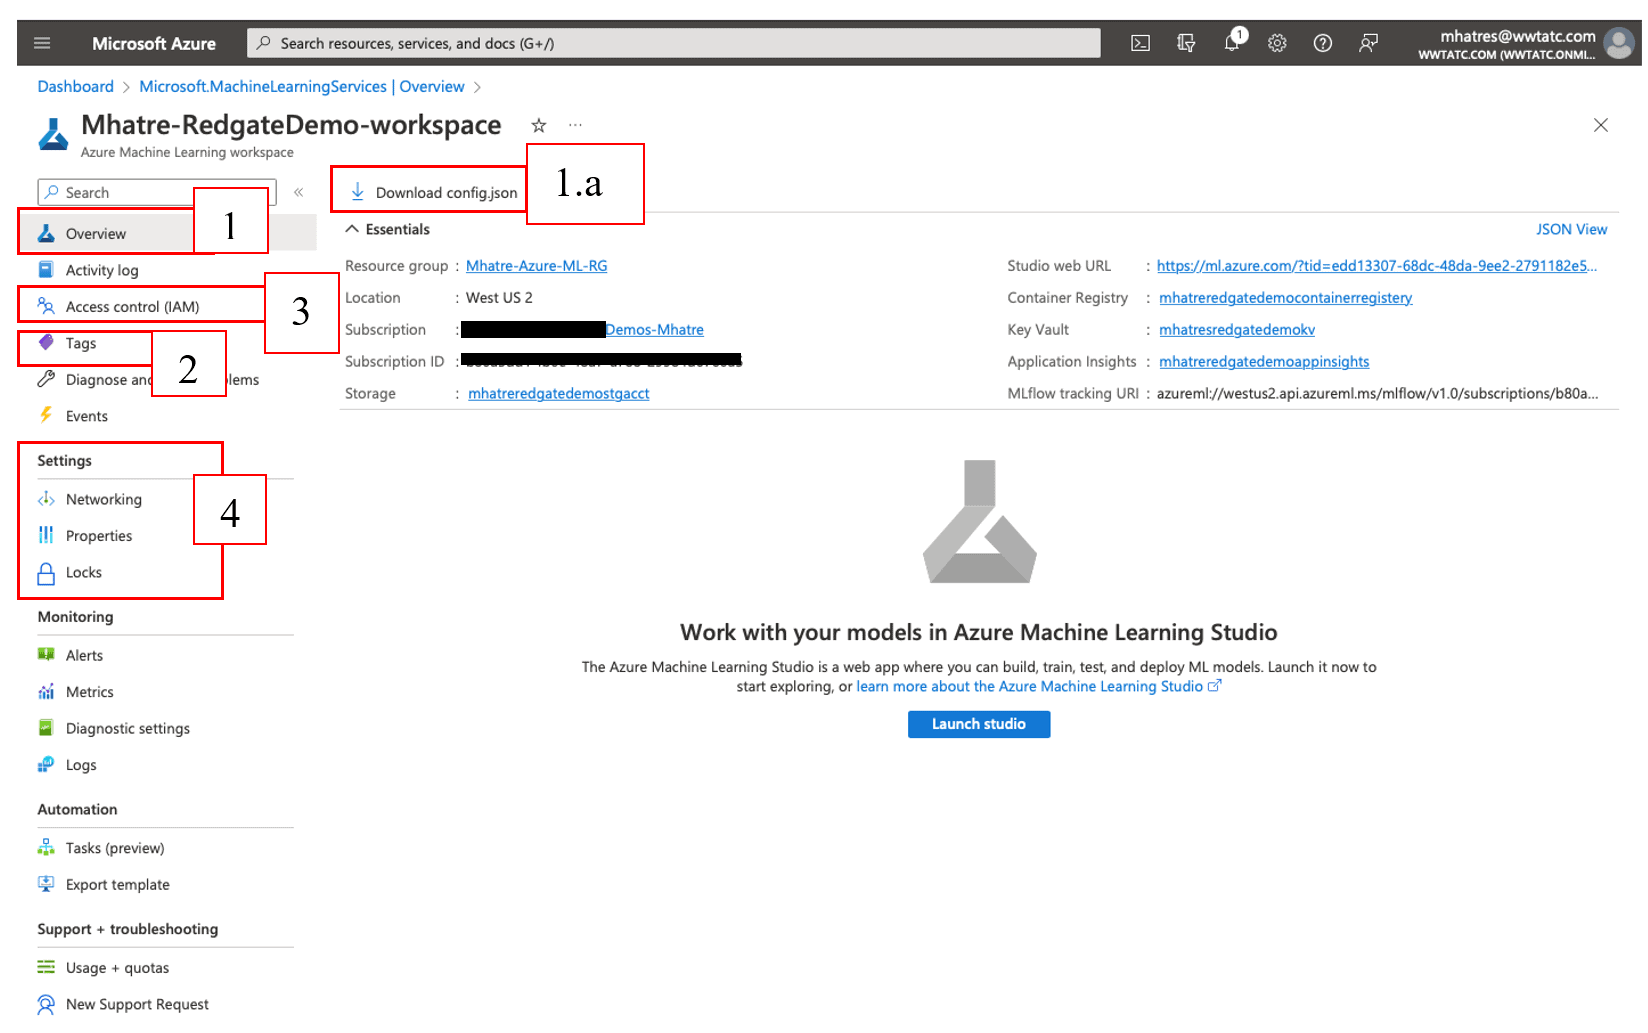
Click on the “Go to resource” button to navigate to your newly created machine learning workspace. This section will familiarize readers with the newly created machine-learning workspace. Figure 9 shows the screen that should follow, with the values that match your choices.

Graphical user interface, text, application, email Description automatically generated

Figure 9. Azure Machine Learning workspace overview

  1. The “Overview” section gives basic details of the Machine Learning workspace. The “Studio web URL” or “Launch studio” button is used to launch the Azure ML Studio
    1. The “Download config.json” button downloads a file containing workspace configuration details, for use in Python scripts or Azure ML SDK notebooks that are outside of your workspace. This is used to connect to the workspace from any laptop or desktop.
  2. The “Tags” menu is used to create, update, and delete tags associated with your workspace. Tags help organize, identify, and maintain azure resources based on your company’s needs like grouping by department, application, functionality, purpose, etc.
  3. Access Control (IAM)” has options to manage access for other users/groups to the workspace, defining various access levels via roles and assigning roles to users/groups. In addition to granting access to users/groups, you can block individual users or entire groups from accessing your workspace with “Deny”. Such fine-grain access controls help implement complex scenarios like “all members of the team except the quality assurance tester, should have direct access to the team’s workspace”.
  4. The “Settings” menu has
    1. Networking” option for enabling/disabling public network access to your workspace, and configuring “private endpoint connections
    2. The “Properties” option listing out all details of the workspace.
    3. Locks” option to configure workspace as “Read-only” or blocking users from “Delete” action
  5. The remaining menu options include “Monitoring and alerts”, “Automation” and “Support and troubleshooting”.

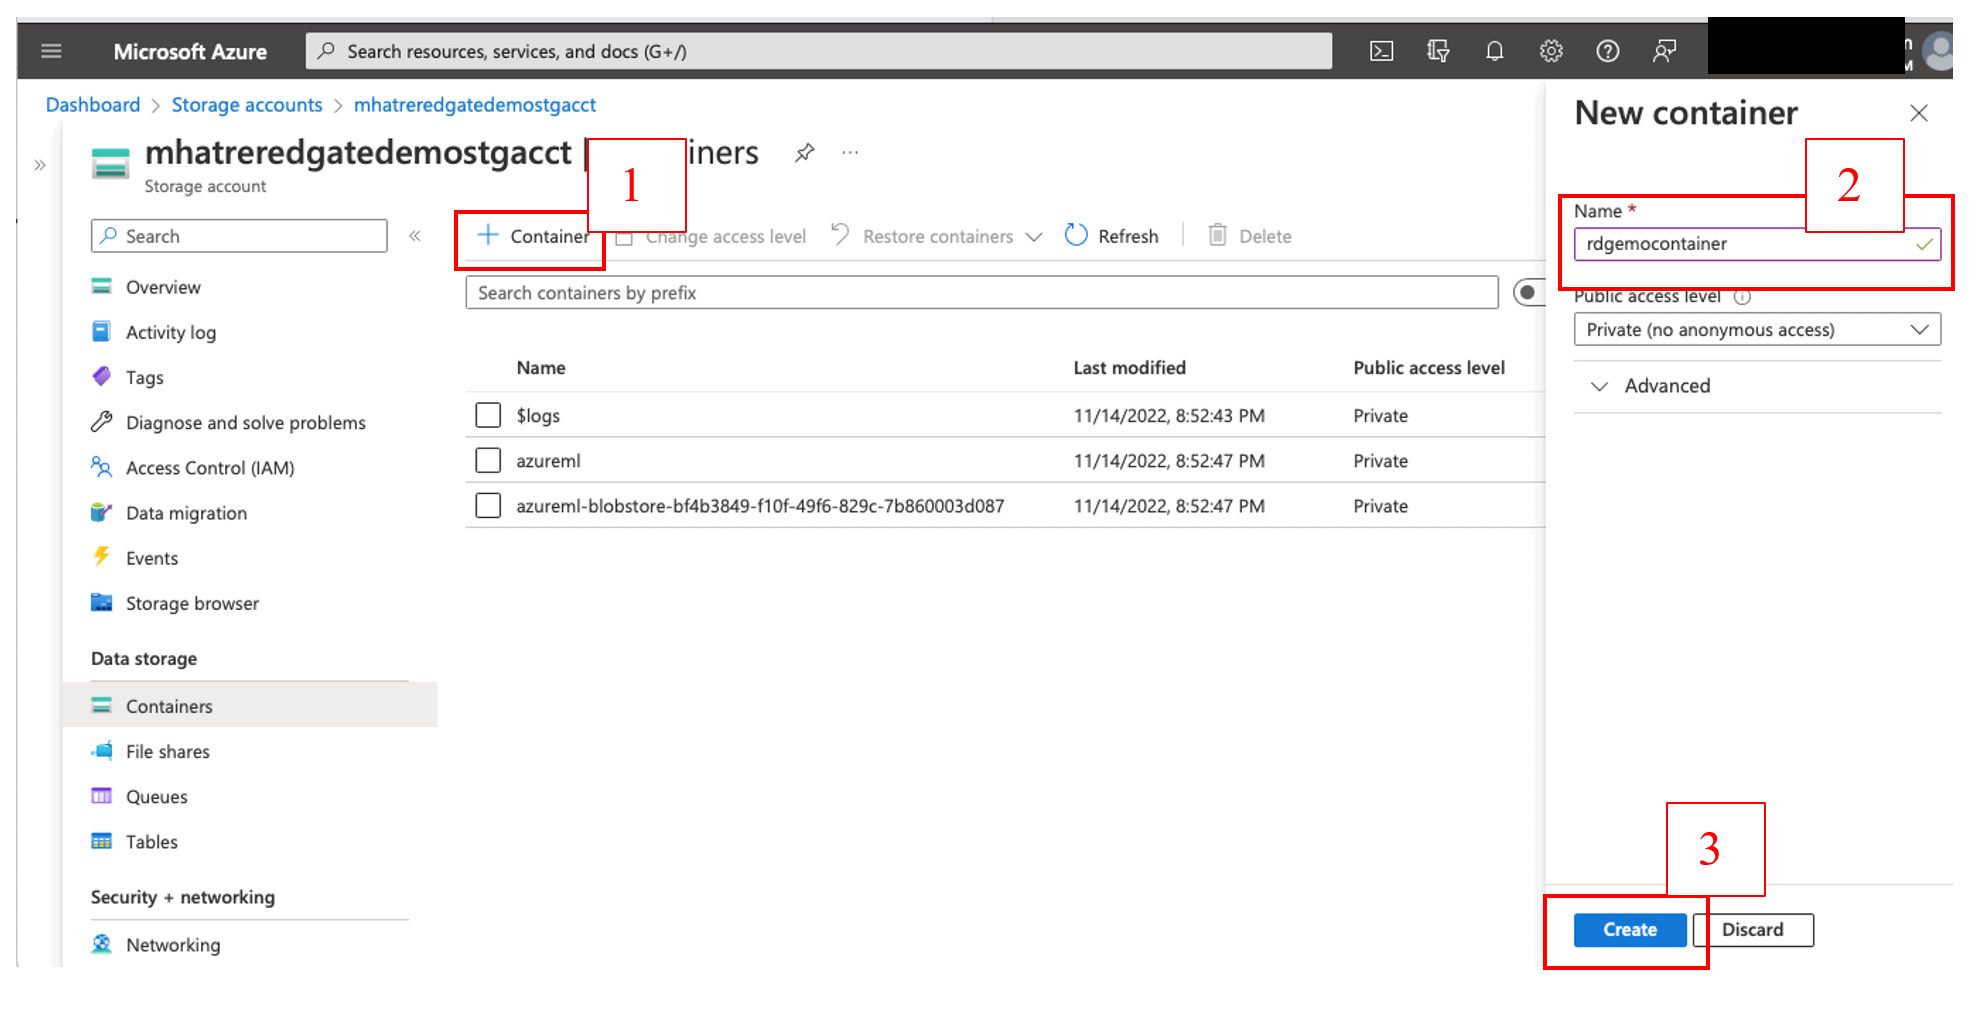
Let’s upload a test data file into the storage account (I will use it to create a Datastore). Navigate to the Azure Portal’s left side Main menu > Storage accounts > mhatreredgatedemostgacct > Containers, to review the list of existing blob storage containers.

Graphical user interface, text, application, email Description automatically generated

Figure 10. Create a new Blob storage container

As shown in Figure 10, click the ‘+ Container’ button on the top left > Enter a unique name in the Name text box for the new container > click the ‘Create’ button. Once the new container is created and shows up under the container list, click to open it.

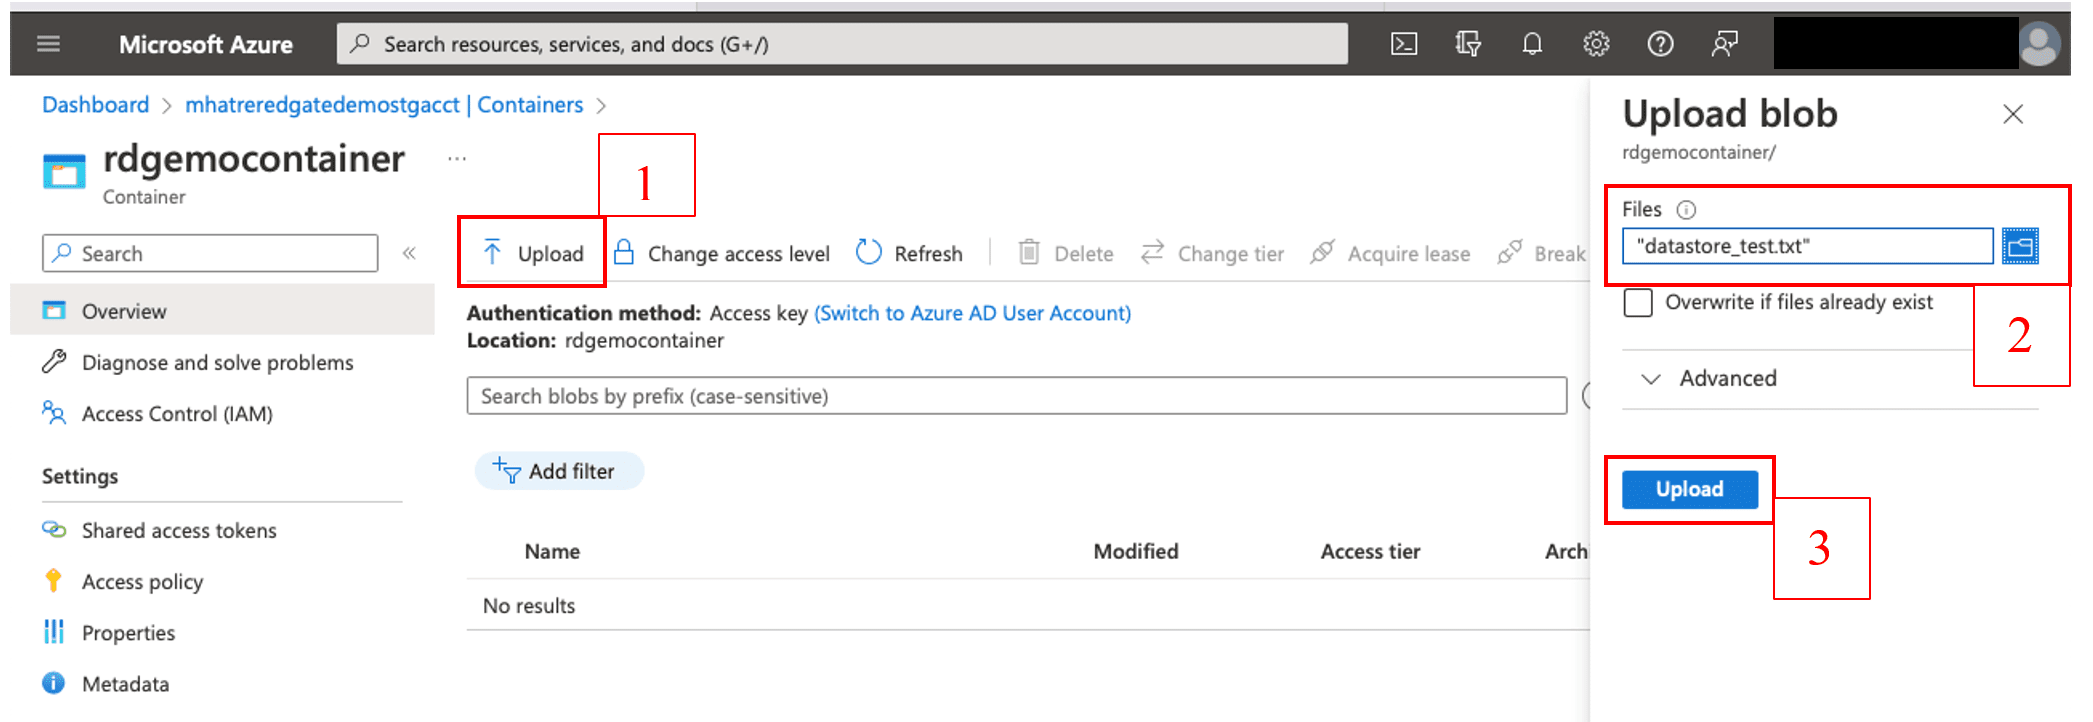
Download the “datastore_text.txt” file from my GitHub repository using this URL and upload it to this container as shown in Figure 11. Note that the file is very small and just contains one record.

Graphical user interface, text, application, email Description automatically generated

Figure 11. Upload text file to the Azure blob storage container

After the file upload completes, navigate back to the storage account (I will use this file in a subsequent step to create the data asset).

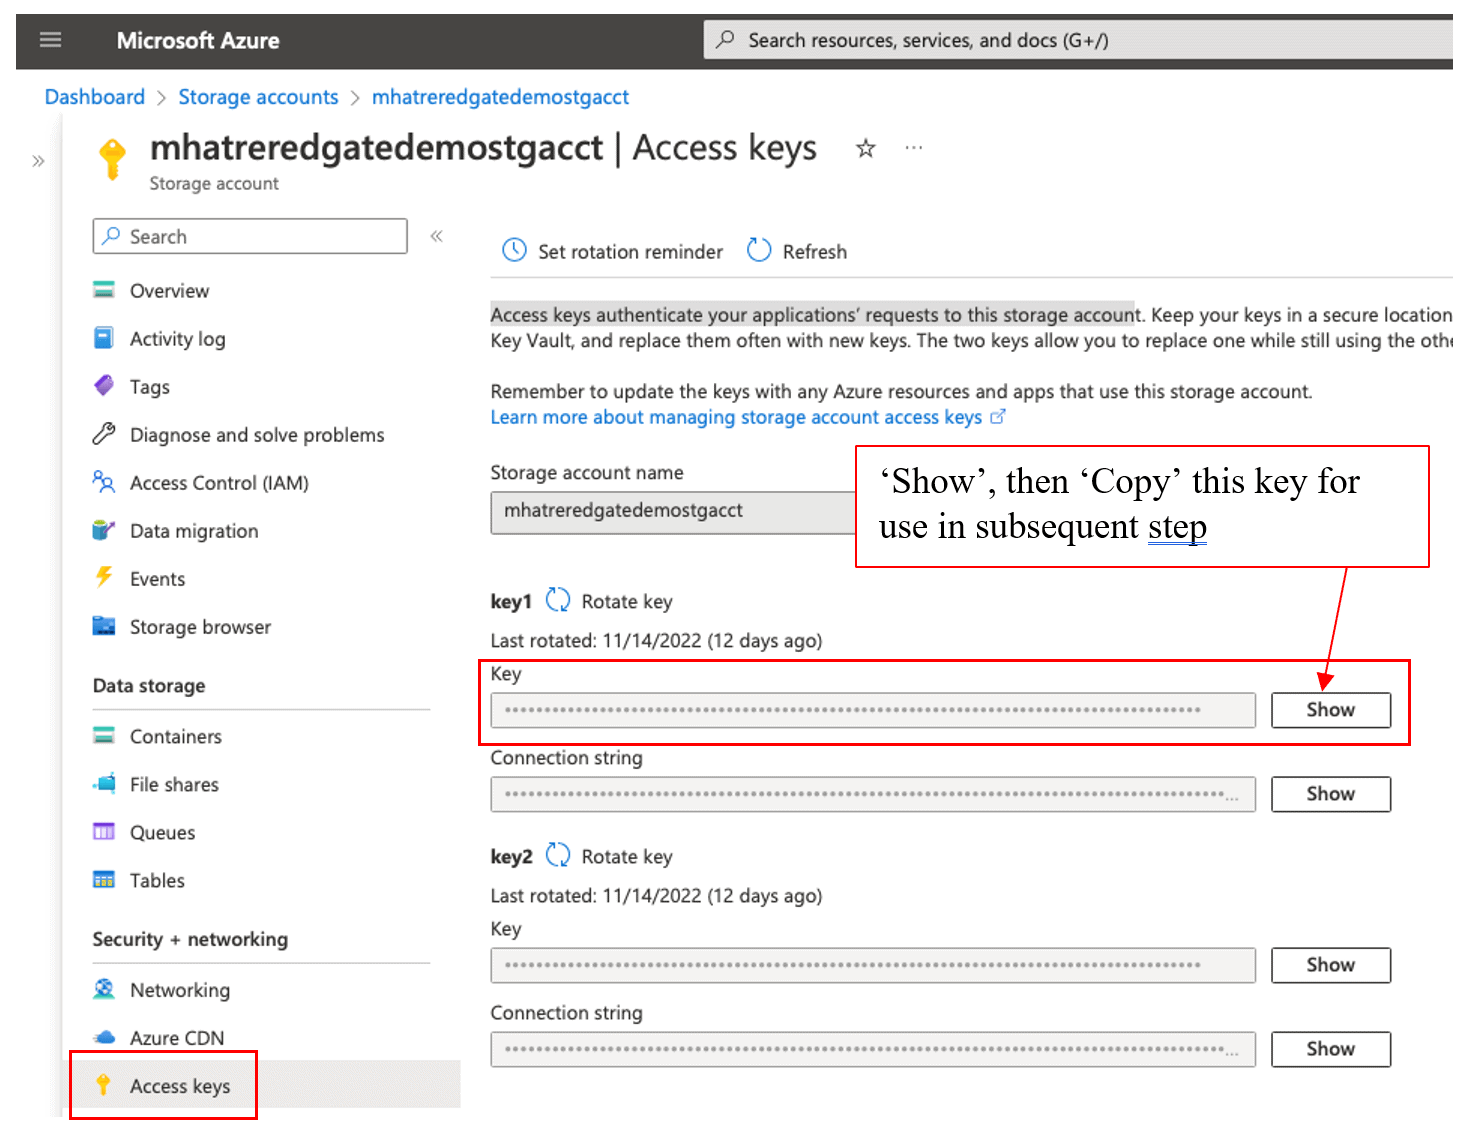
Navigate the left side menu of the storage account, to “Access keys” under the “Security +” networking section as shown in Figure 12. Access keys can be used to authenticate your application’s requests to this storage account. Copy one of the keys, to use in the subsequent step to create the Datastore.

Graphical user interface, text, application Description automatically generated

Figure 12. Copy the Storage account access key

Azure Machine Learning Studio

Azure ML Studio (the successor of Machine Learning Studio classic) is the pivotal platform for most machine learning tasks in Azure. This powerful platform enables a wide gamut of machine learning professionals with varying levels of skills and preferences, to work with a range of no-code to extensive-coding options.

Graphical user interface, text, application, email Description automatically generated

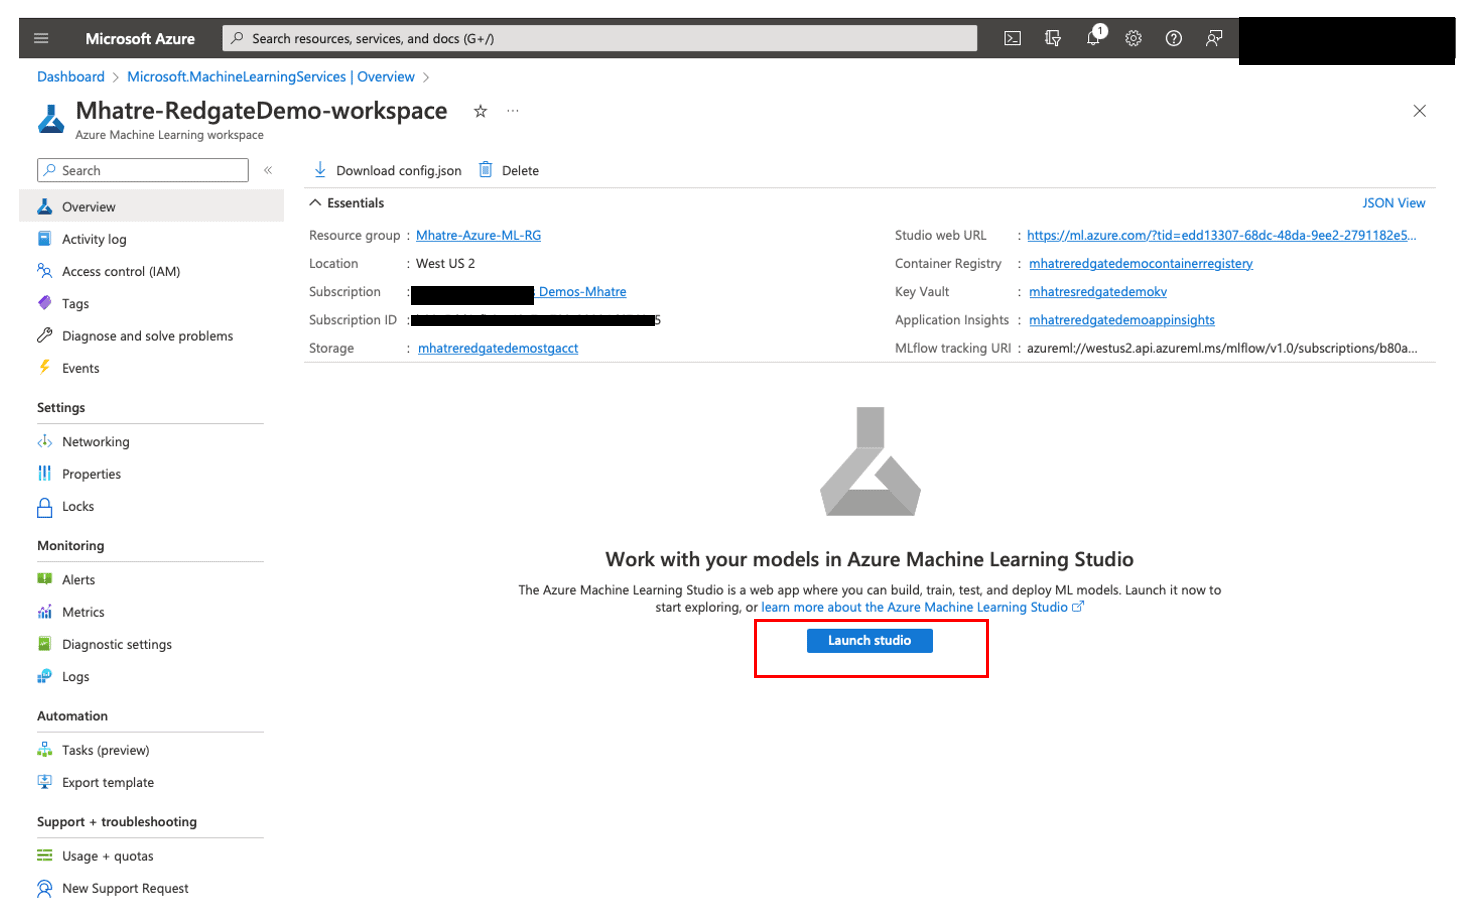
Figure 13. Launch Azure Machine Learning Studio

Click on the ‘Launch Studio’ button to open the Azure ML Studio as shown in Figure 13 (Note: you may be prompted to log in again as you are going to a different tool in a different window.) This opens the tool as shown in Figure 14.

Graphical user interface, application Description automatically generated

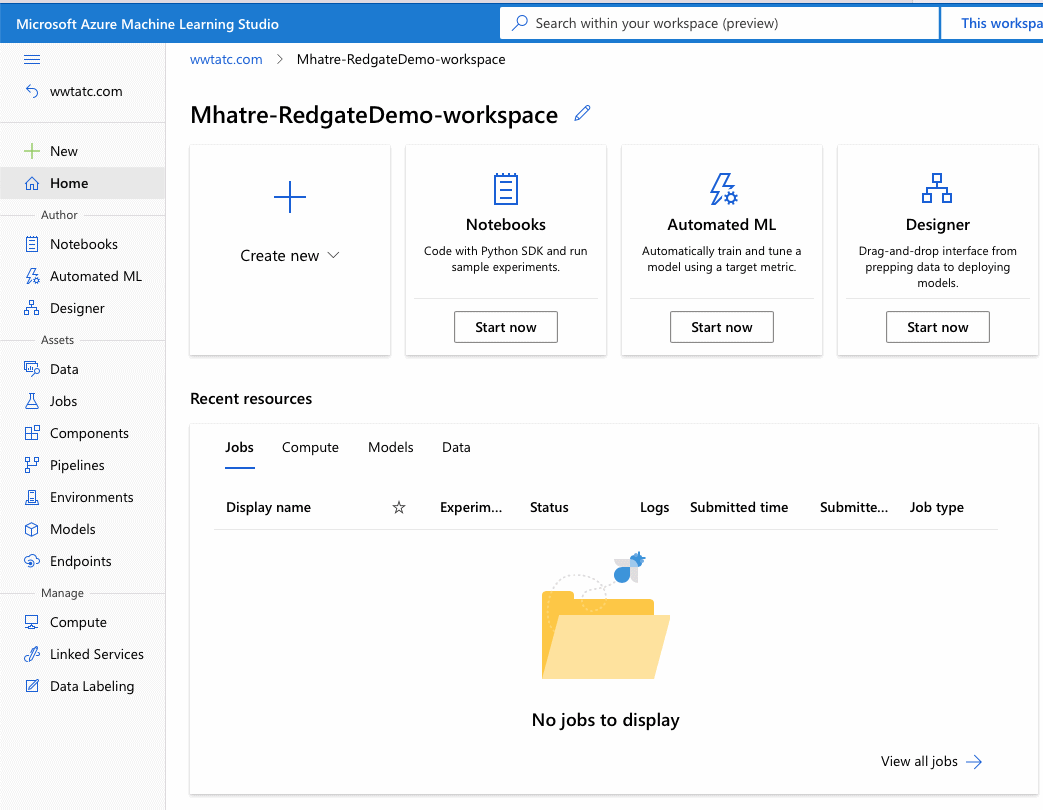
Figure 14. Azure Machine Learning Studio

The left side menu consists of three key sections: Author, Assets, and Manage

The “Author” section is geared towards creators of Machine learning pipelines and currently offers three authoring experiences.

  • Notebooks” is the code-first experience popular with seasoned machine learning professionals who are comfortable coding with Python. The notebooks created here are stored in the default storage account associated with the workspace. The notebook user interface experience is fully integrated within Azure ML studio. Azure offers numerous tutorials and samples to help accelerate model development
  • Designer” is the Drag and Drop tool for creating and deploying machine learning models. The Graphical User Interface look and feel is comparable to Azure Data Factory studio. Experiments are created using pipelines in the designer interface, which offers a wide array of pre-built and configurable components for numerous tasks.
  • Automated ML” is the no-code approach to building machine learning models. It takes dataset, problem class, evaluation metric, and prediction target as inputs and automatically performs steps of data preprocessing, feature selection and engineering, algorithm selection, model training, testing, and hyper-parameter tuning. A machine learning professional can review the performance of various models trained through this process and directly deploy the best one.
  • The “Assets” section enables machine learning professionals to create, customize and manage the numerous assets generated during the authoring process.
    • The “Data” sub-section is used to register and manage Datastores. Datastores enable a secure connection to storage services on Azure by storing the connection information, thus eliminating the need to provide credentials in scripts for data access. The “Dataset monitor” feature (currently in preview when this article was published) can be configured to detect data drift between training and inference data.
    • The “Jobs” sub-section is used to create new experiments, or run sample experiments with Notebooks and with code using the Python SDK
    • Components” are the basic building blocks used to perform a given task like data processing, model training, scoring, etc. They have predefined input/output ports, parameters, and environments that can be shared and reused in multiple pipelines. This sub-section enables machine learning professionals to register code from GitHub, Azure DevOps, or local files to create shareable components that can be used as building blocks for several machine learning projects.
    • Pipelines authored using the designer can be viewed and orchestrated via the “Pipelines” sub-section. The “Pipeline jobs” tab shows details of the pipeline run, while the “Pipeline drafts” tab list pipelines that have never run so far. When Azure ML pipelines are published as a REST endpoint (for parameterized reuse or invoking jobs from external systems), they are listed under the “Pipeline endpoints” tab.
    • Environments specify the Docker image, Python packages, and software settings for executing your training and scoring scripts. They are managed and versioned entities that enable reproducible, auditable, and portable machine-learning workflows across different compute targets. The “Environments” sub-section contains a list of “curated environments”, and an option for machine learning professionals to create their own user-defined “custom environments”. Curated environments are predefined environments that offer good starting points for building your environments. Curated environments are backed by cached Docker images, providing a reduced run preparation cost. Custom environments are user-defined environments created from a Docker image, a Docker build context, and a conda specification with a Docker image.
  • The “Models” sub-section enables machine learning professionals to create, manage and track their registered models. The model registry provides useful features like version tracking and metadata tagging. All models created under the workspace are listed here
  • Azure Machine Learning “Endpoints” empower machine learning professionals to deploy machine learning models as web services.
    • Real-time endpoints are endpoints that are used for real-time inferencing. Real-time endpoints contain deployments ready to receive data from clients and send responses back in real time. They are listed under the “Real-time endpoints” tab.
    • Batch endpoints are used to run inference on large volumes of data in batch processing mode that could run for long durations. They take pointers to data and run batch jobs asynchronously to distribute the workload on compute clusters. Their outputs can be stored for further analysis in a data store. Batch endpoints are listed under the “batch endpoints” tab.
  • The “Manage” section is equipped with options for creating and managing Compute, connecting with external Linked Services, and managing the labelling of data sets.
    • Machine learning professionals use the “compute” sub-section to create and manage various types of compute targets like “compute instances”, “compute clusters” and “Inference clusters”. The “Attached computes” tab allows machine learning professionals to bring their own compute like HDInsight clusters, Virtual machines, Databricks clusters, etc. to use as compute targets in the Azure Machine Learning workspace.
    • Linked Services” is a collection of external (cloud services that are outside of the Azure ML workspace) Azure services that can connect with the Azure Machine learning workspace. The guided integrations experience for linked services is currently in preview.
    • The “Data Labeling” sub-section helps machine learning professionals to create, scale, and manage labeling efforts for projects involving image classification, object identification, text classification, and text Named Entity Recognition. Its “ML Assist” feature improves the speed and accuracy of labeling large datasets by leveraging the power of machine learning.

Azure Machine Learning Datastore and Data asset

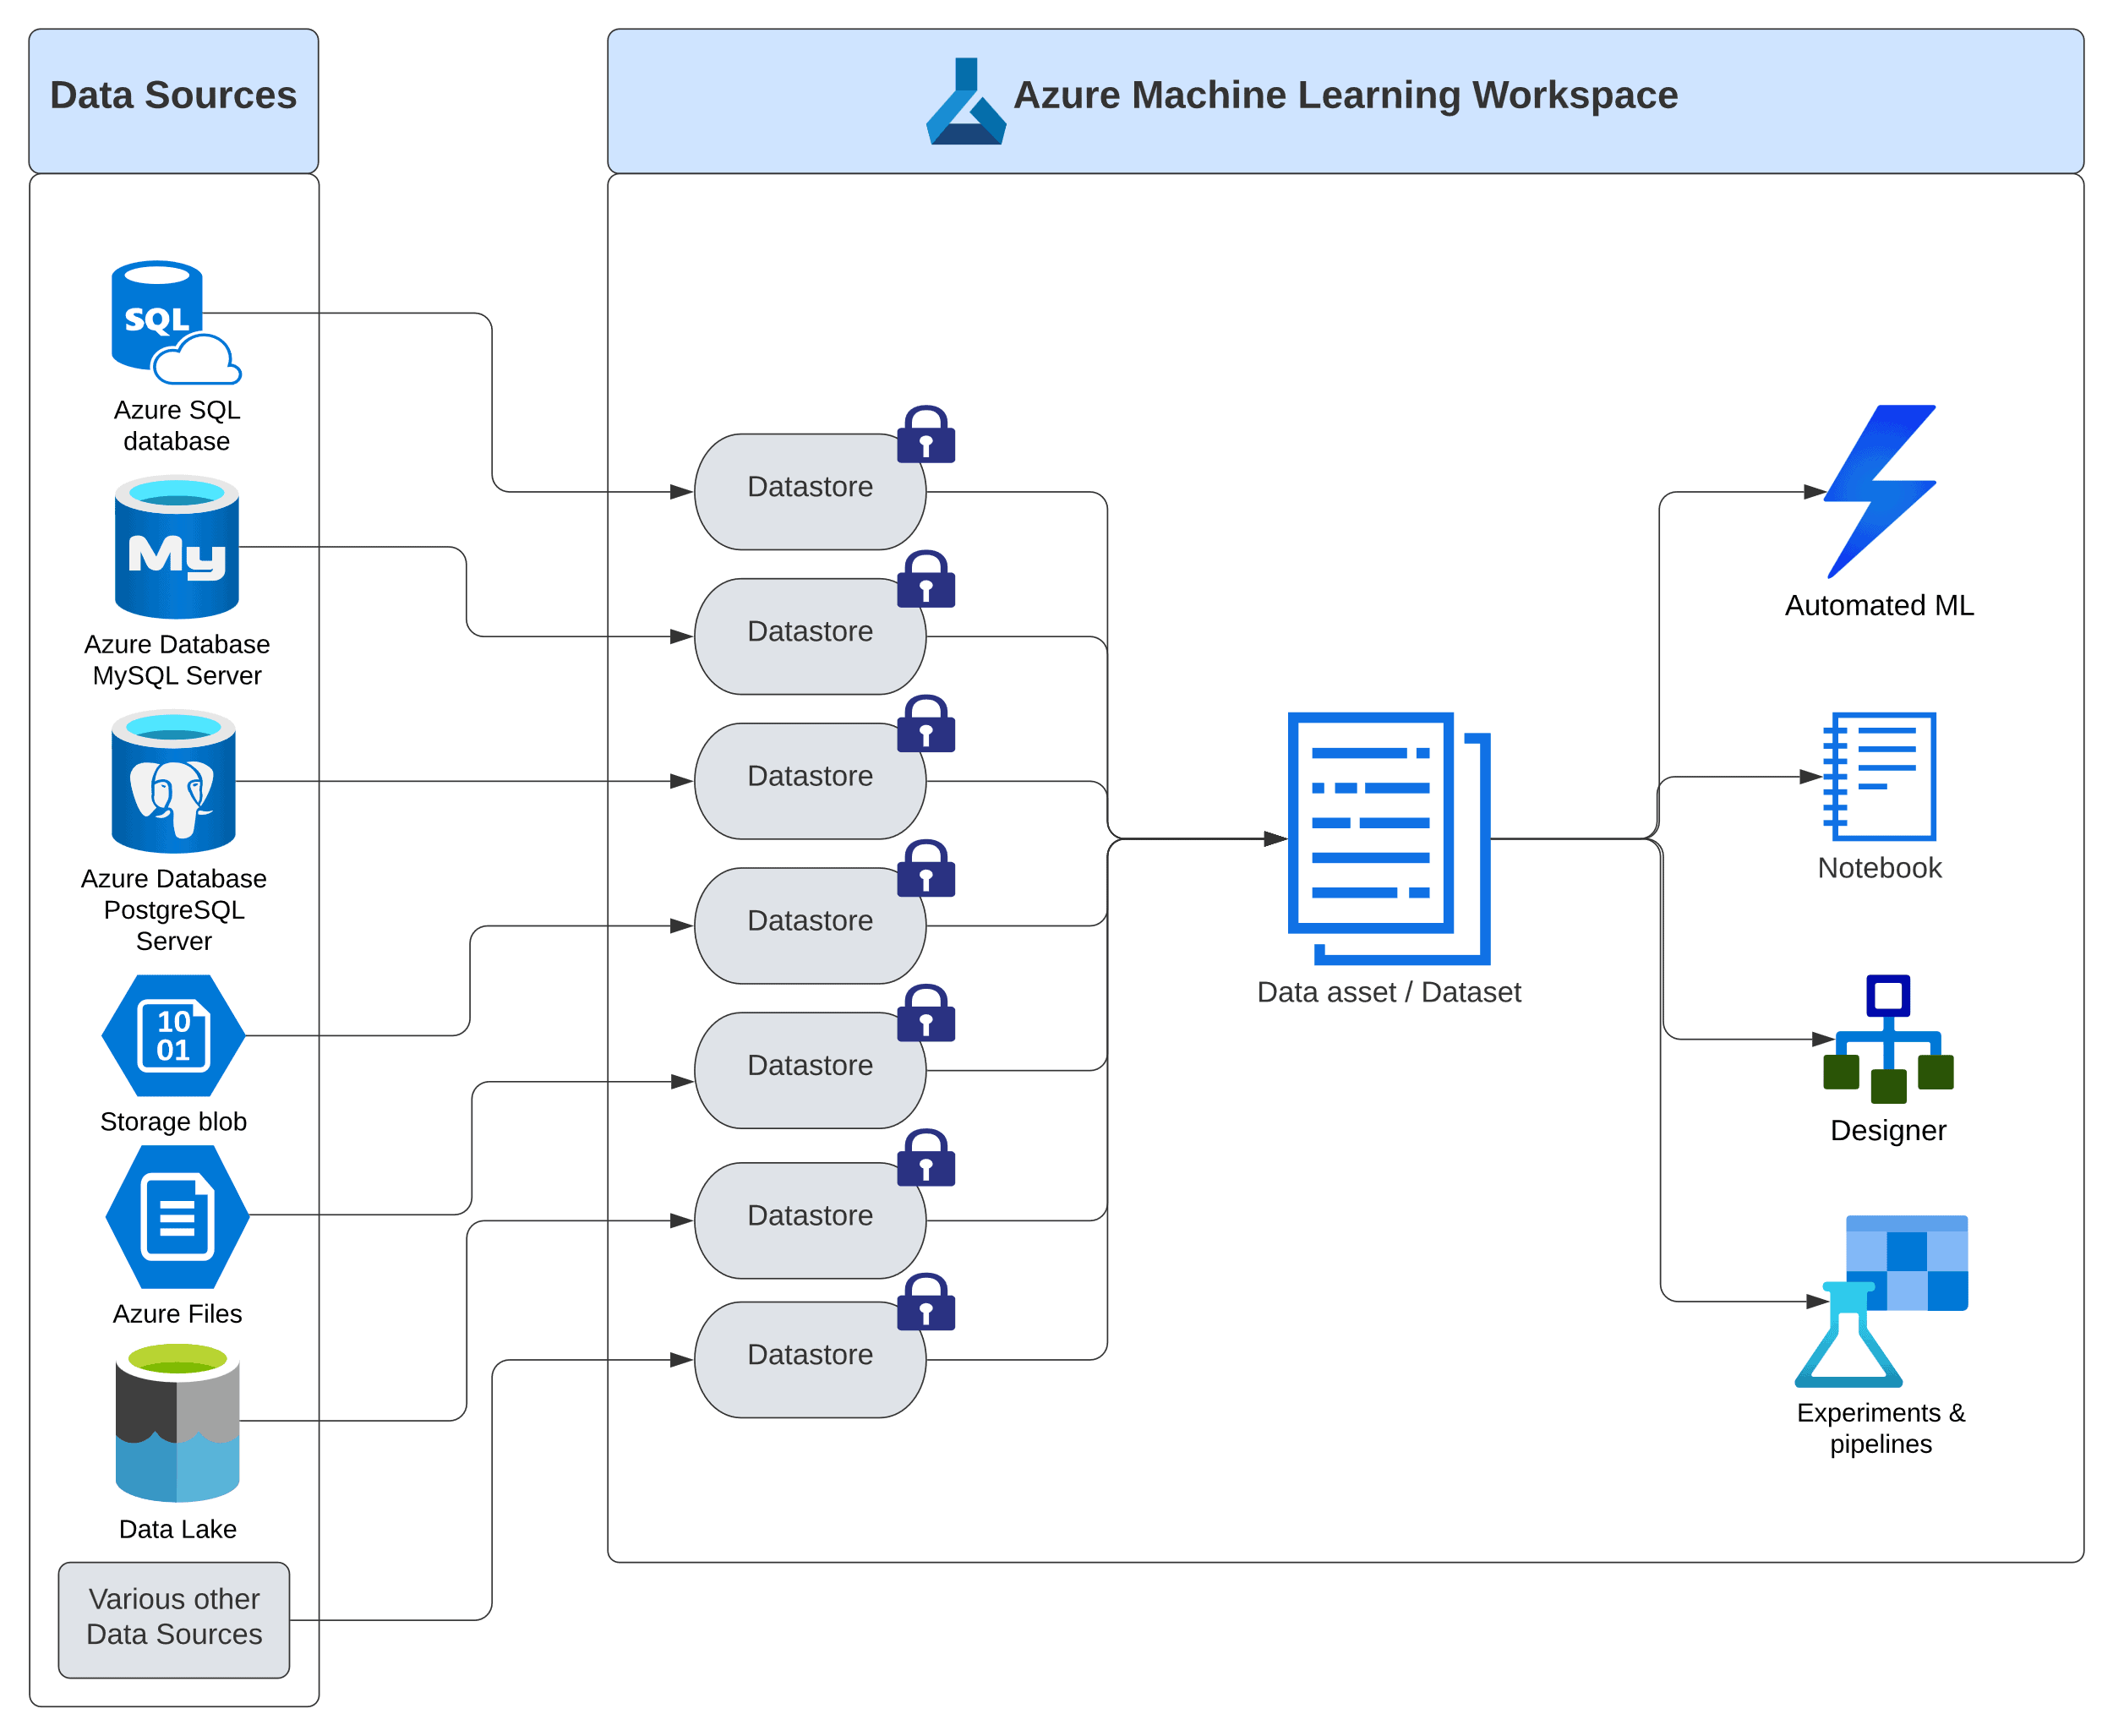
Figure 15. Azure Machine Learning Datastores and Data assets (Datasets)

Data Asset and Datastore are the two key components in Azure ML workspace, to connect the actual sources of data with the machine learning authoring tools. Figure 15 shows how Data Asset encompasses a logical representation of the actual sources of data, while the Datastore safeguards the connection details to the actual sources of data by keeping the credentials in a separate secure location (represented by the lock icon)

Data asset” (also known as a dataset) in Azure Machine Learning studio is a reference to the collection of related data sources, used in various authoring mechanisms like Automated ML, Notebooks, Designer, and Experiments. The data referenced in any Data asset can come from a wide variety of Data Sources like local or web files, Azure blob storage and datastores, Azure Open Datasets, Azure Data Lake, numerous cloud databases, and an array of other data sources.

Datastore” in Azure Machine Learning facilitates the connection between Data assets and the various sources of data, by securely storing the connection and authentication information. With Datastores in the picture, machine learning professionals no longer need to provide credentials and data source connection details in their scripts, pipelines, or any other authoring tools.

Azure best practices recommend storing business data in a separate storage account to store, manage, secure, and access control it separately from workspace data. However, for the simplicity of demonstrations in these articles, I am using the same storage account “mhatreredgatedemostgacct” for storing my demo files.

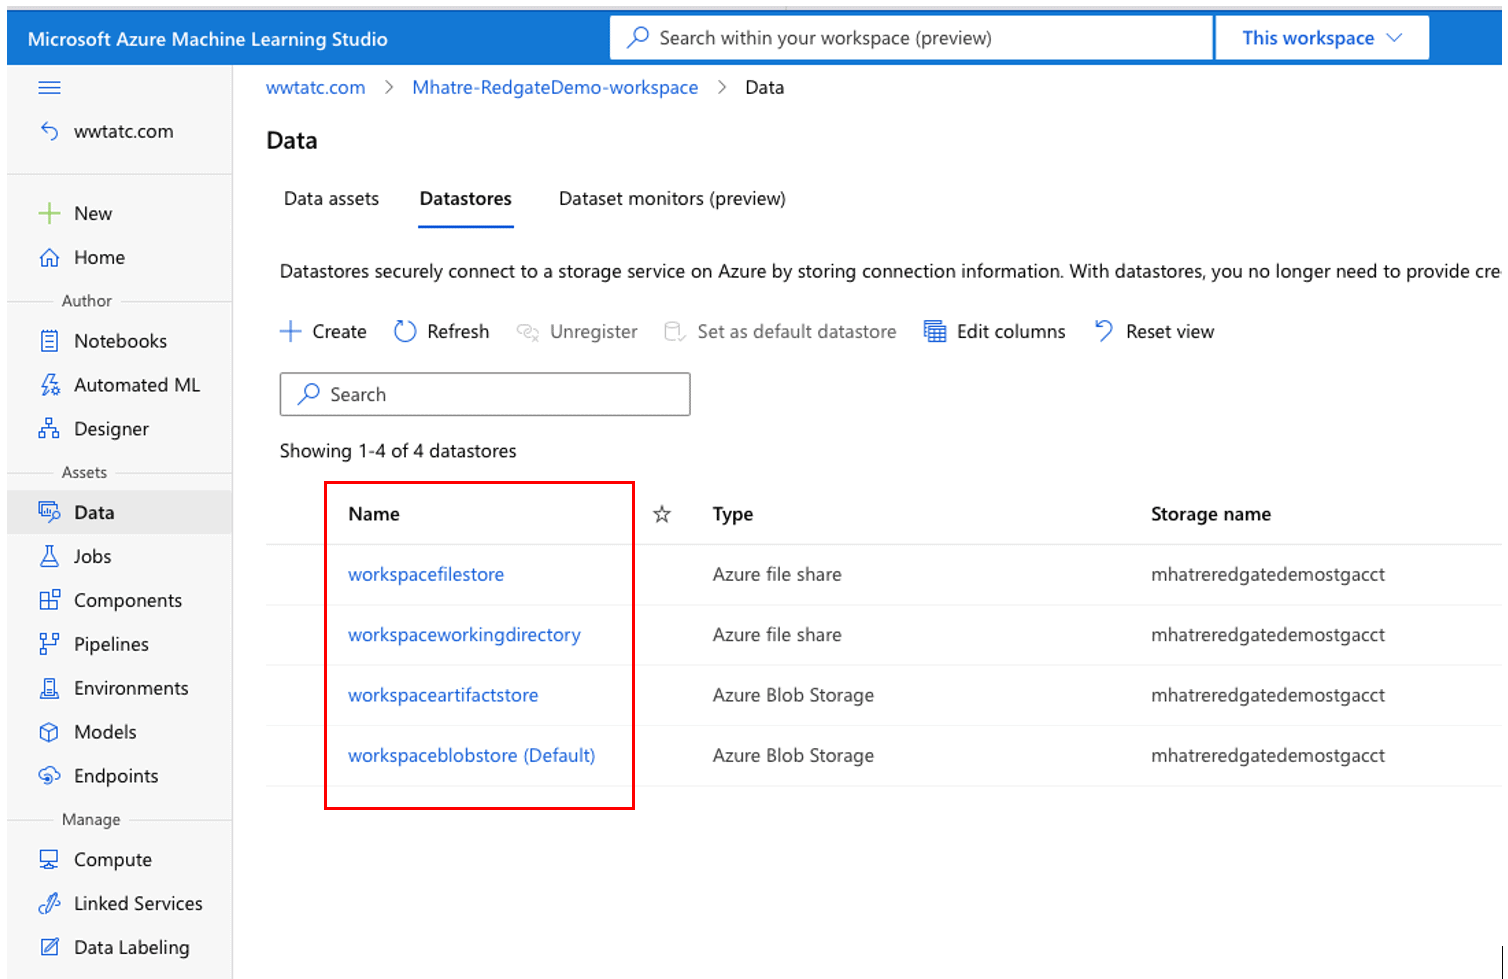
In Azure Machine Learning Studio, navigate to Data > Datastores as seen in Figure 16.

Graphical user interface, text, application Description automatically generated

Figure 16. Azure Machine Learning Datastores list

The Azure Machine Learning workspace has a default Azure Blob Storage Datastore “woekspaceblobstorage(Default)” for temporarily saving various files generated during the authoring process. Three other Datastores “workspacefilestore”, “workspaceworkingdirectory” and “workspaceartifactstore” found in the Storage Account are set up as part of creating the workspace. Click on each one of them to reveal details such as storage account name, Storage URI and creation date.

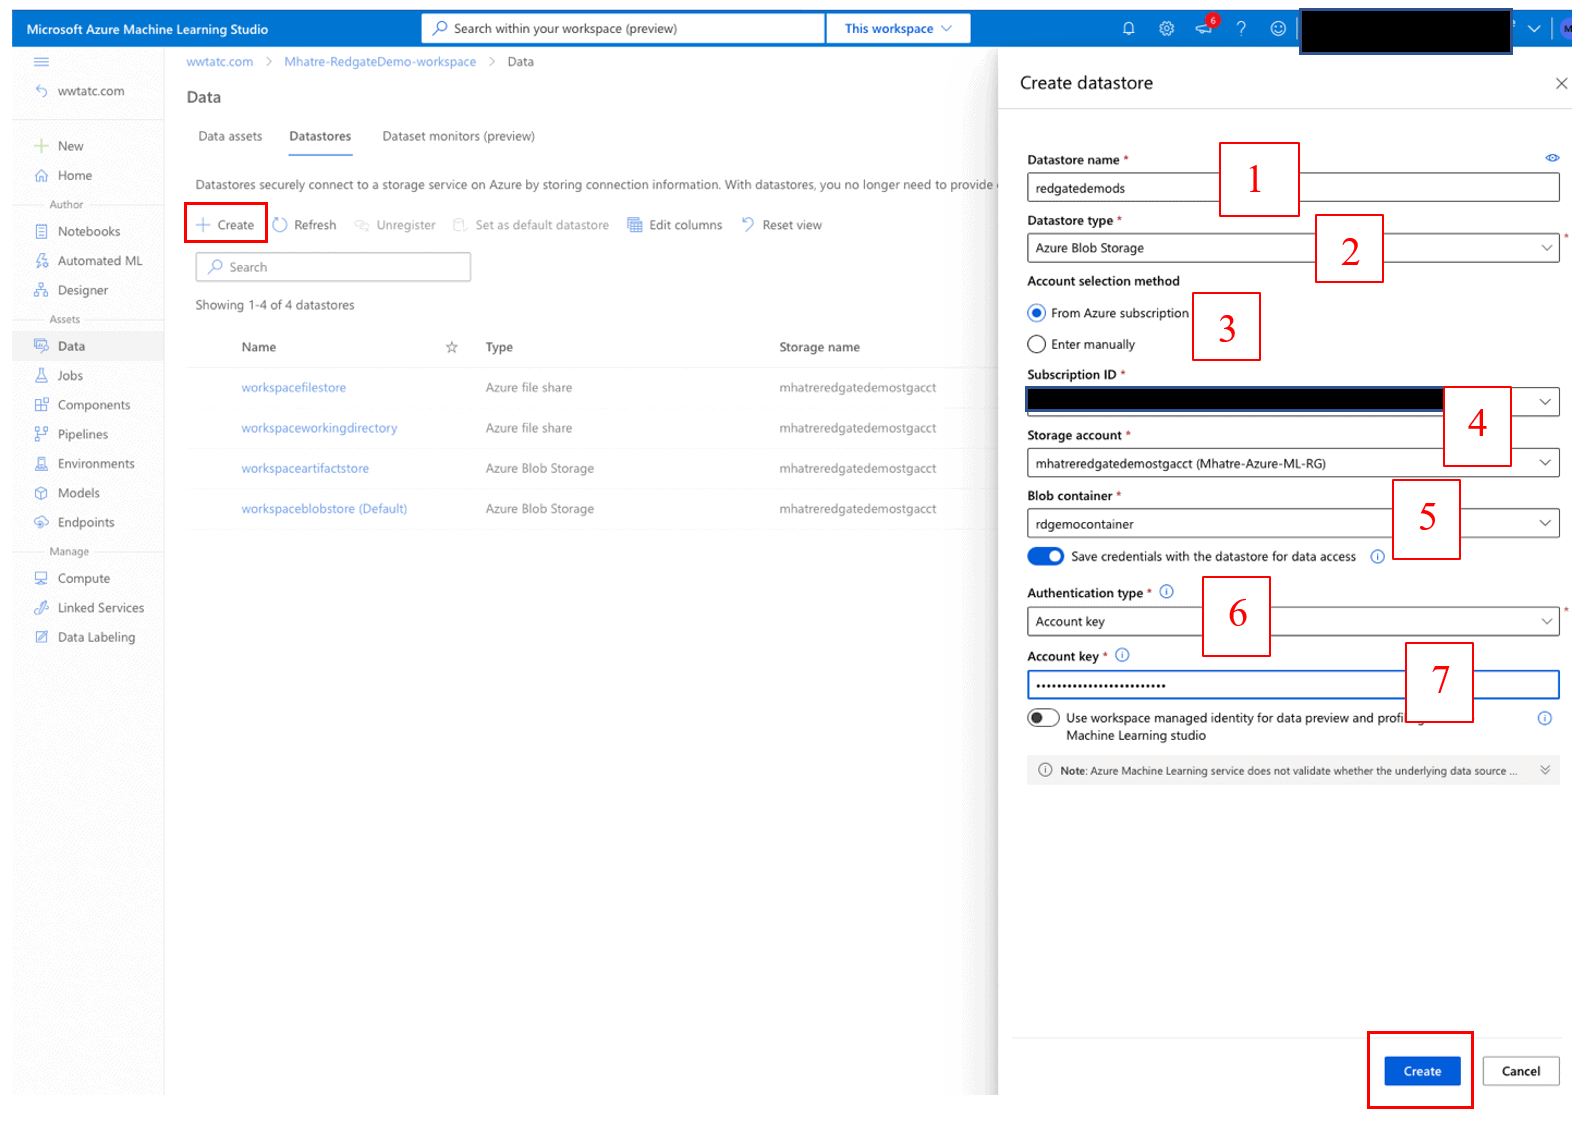
To create a new datastore and link it to the blob storage container created previously, click on the ‘+ Create’ button as shown in Figure 17.

Graphical user interface, text, application, email Description automatically generated

Figure 17. Create Azure Machine Learning Datastore

On the “Create datastore” screen

  1. Enter a name for the new datastore
  2. Select Datastore type “Azure Blob Storage” from the drop-down list.
  3. Choose “From Azure subscription” as the Account selection method.
  4. Select your “Subscription ID” and “Storage account” values from the drop-down list.
  5. Select the “Blob container” name from the drop-down list (I am using the blob container created earlier in this article, which is part of the Storage account)
  6. Set the “Authentication type” value as “Account key” from the drop-down list.
  7. Paste the Access Key copied from the earlier step, into the “Account Key” field.
  8. Then Click the ‘Create’ button at the bottom of the screen.

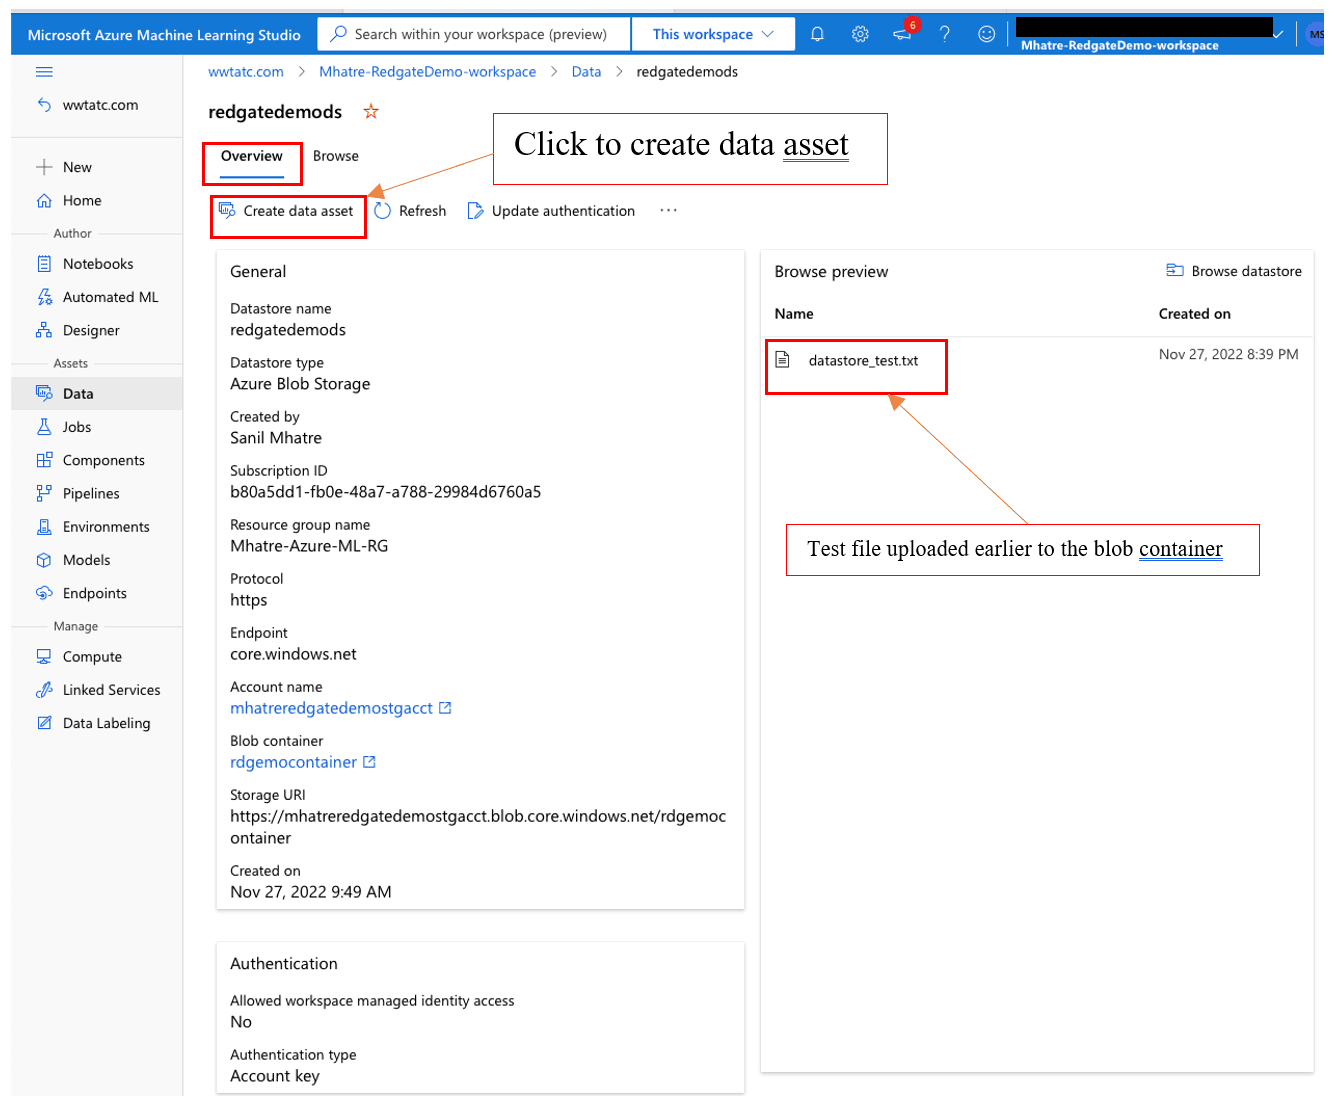
Once the new datastore is created, it shows up under the list of datastores. Click to open the “Overview” page > navigate to the “Browse preview” section to confirm the “datastore_test.txt” file is listed as shown in Figure 18.

Graphical user interface, text, application, email Description automatically generated

Figure 18. Datastore with test file from a blob container

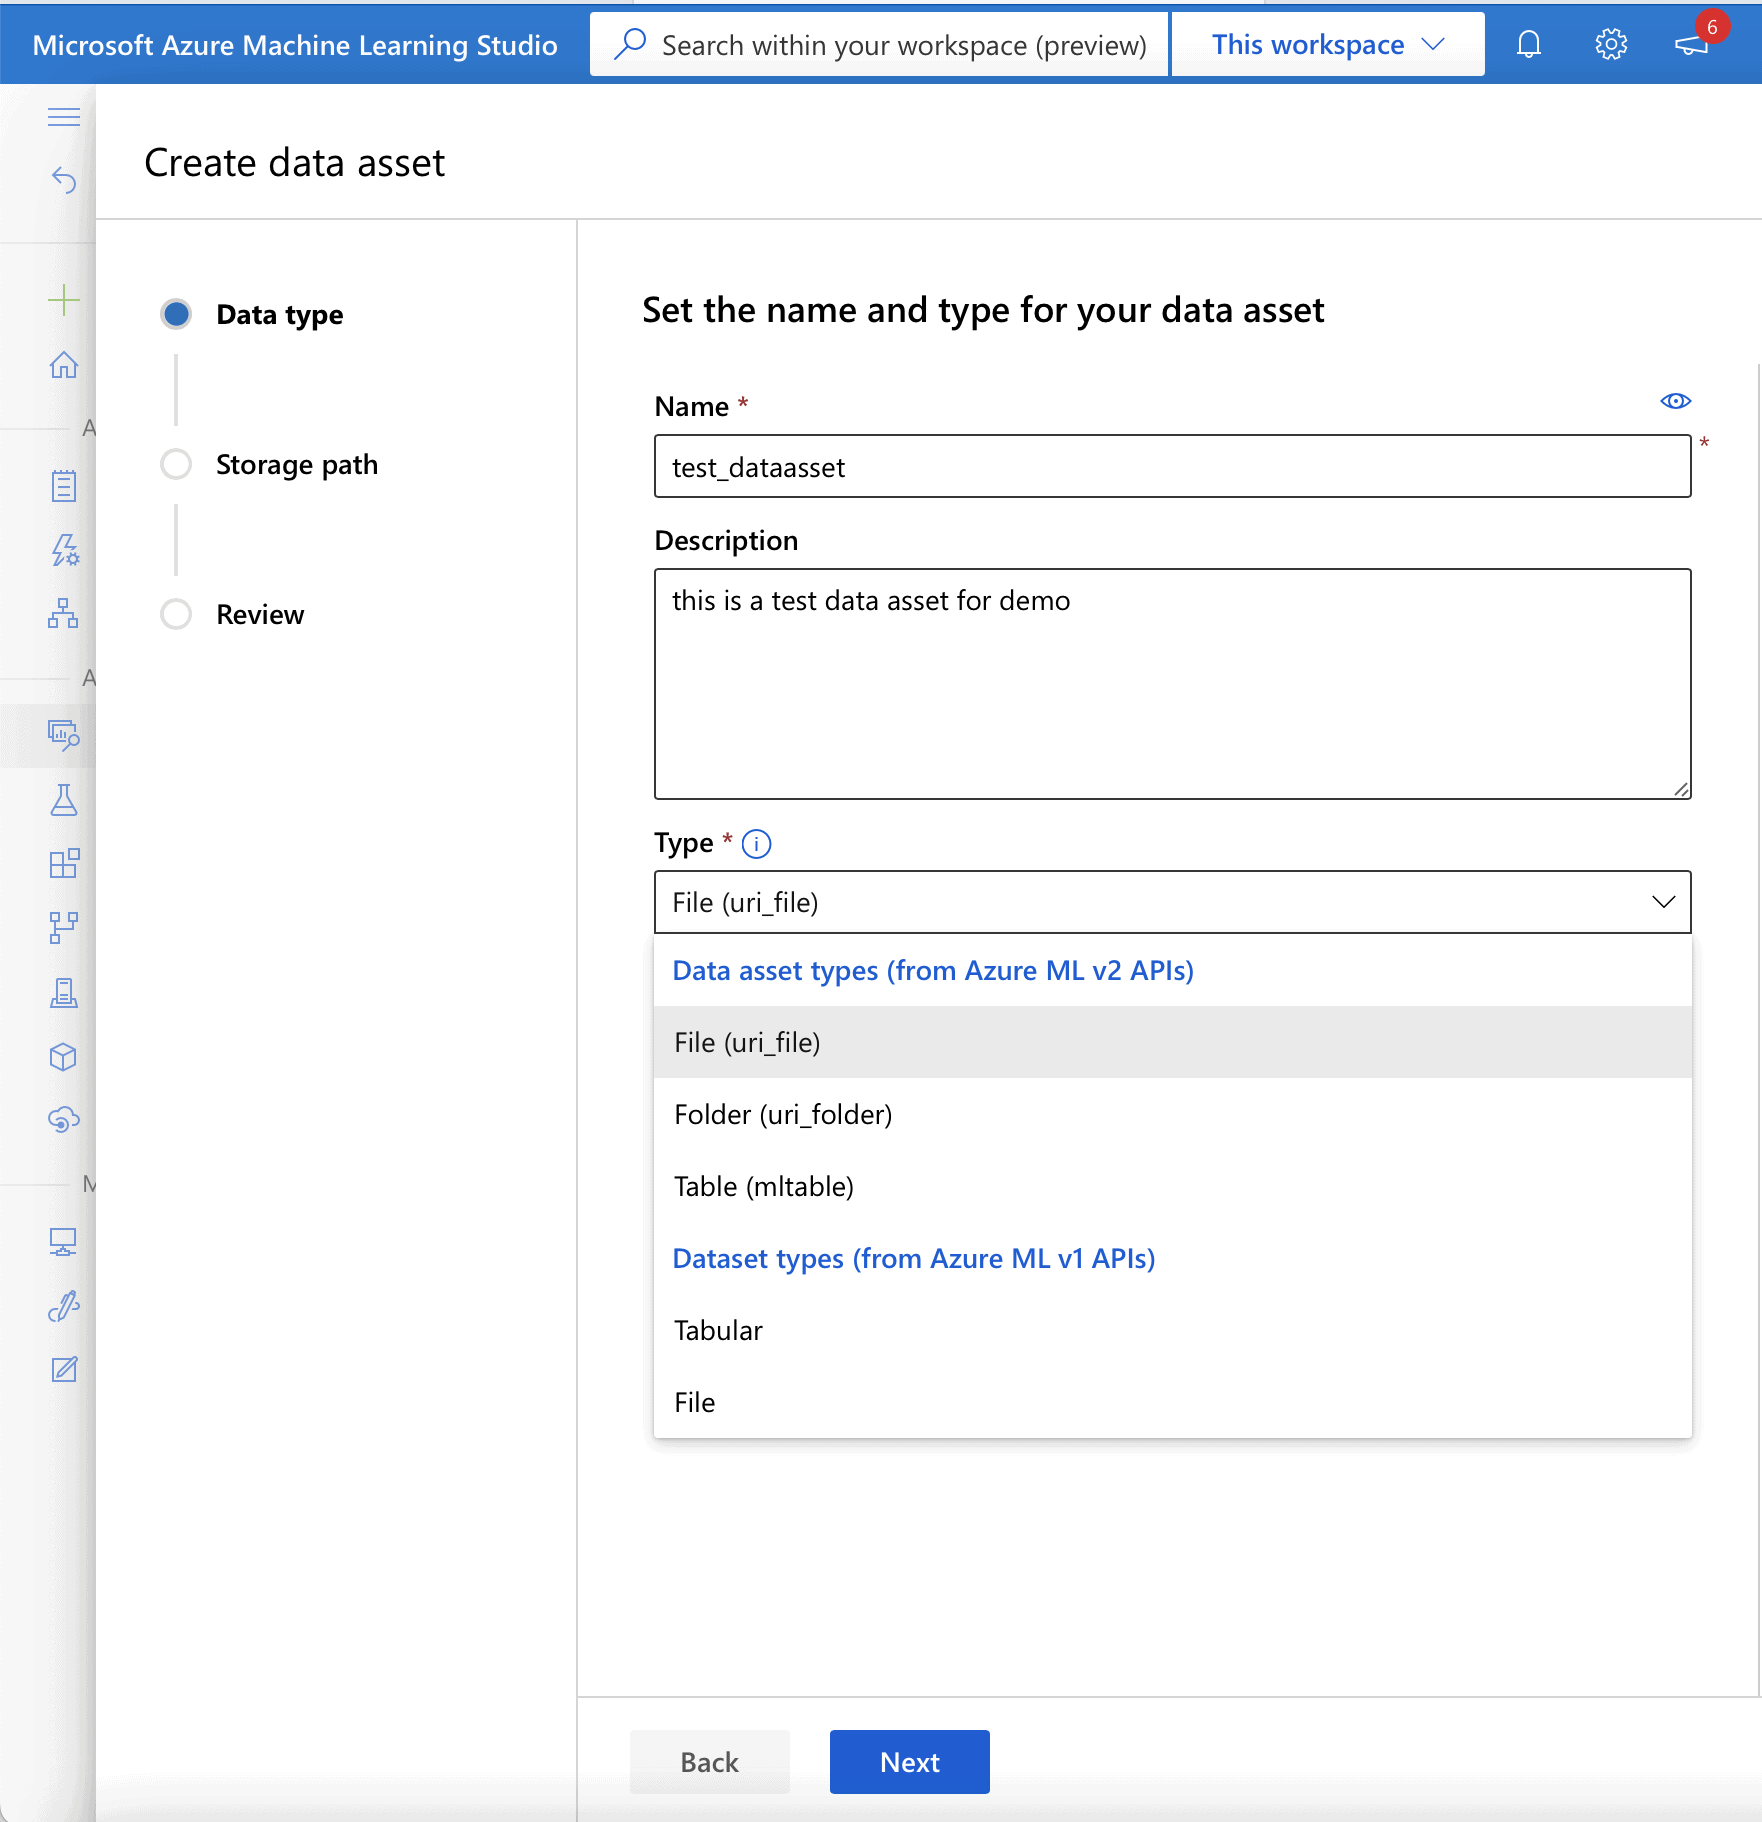
To create the data asset from this datastore, click the ‘create data asset’ button and in the “Data type” section.

  • enter a name for the new Data asset into the “Name” field.
  • enter a description for the Data asset into the “Description” field.
  • select “File (uri_file)” from the drop-down list in the “Type” field.

Click ‘Next’ to navigate to the “Storage path” section as seen in Figure 19.

Graphical user interface, application Description automatically generated

Figure 19. Create data asset

After setting the values, click Next to choose the storage path.

  • Choose the “Browse to storage path” radio button option.
  • Select the “datastore_text.txt” file.

Click Next to navigate to the “Review” section > Review the data asset settings > Click the ‘Create’ button.

This creates the data asset for the test_dataasset.txt file and makes it available for the machine learning authoring processes and tools in Azure Machine Learning.

Conclusion

This article introduced readers to Azure Machine Learning and gives an overview of its various components and high-level architecture. It showcases key features and capabilities of the platform that enable machine learning professionals to build, deploy and manage high-quality machine learning models. I demonstrated the steps for setting up an Azure Machine Learning workspace, Azure Blob storage container, Datastore, and Data asset and got readers familiar with the Azure Machine Learning studio.

References/Further reading:


The post Azure Machine Learning Introduction: Part 1 Overview and prep work appeared first on Simple Talk.


from Simple Talk https://ift.tt/RHaVMPB
via