Database and development teams often load data from plain text files into their MySQL databases. The files might be used to add lookup data, support test and development environments, populate new MySQL instances, load data from regular feeds, or in other ways support their operations. To help with the import process, MySQL provides the LOAD DATA statement, which reads rows from a text file and inserts them into the target table.
In this article, I show how to use the LOAD DATA statement to add data from comma-separated values (CSV) files and other plain text files. Although the examples are fairly basic, they demonstrate the fundamental components that go into a LOAD DATA statement and some of the issues you might run up against along the way. Each example retrieves data from a file on the local system and adds the data to the manufacturers table in the travel database, which you’ve seen in previous articles in this series.
Note: The examples in this article are based on a local instance of MySQL that hosts a very simple database and table. The last section of the article—“Appendix: Preparing your MySQL environment”—provides information about how I set up my system and includes a SQL script for creating the database and table on which the examples are based.
Connecting to the MySQL server
Importing data from a text file into a MySQL database is in itself a fairly straightforward process. Often the most difficult part of the operation is setting up your environment to ensure that it will allow you to run a LOAD DATA statement and import the data into the target table. As with any SQL statement in MySQL, you must have been granted the privileges necessary to carry out your operations (a topic beyond the scope of this article). However, there are a few other issues to be aware of in order to import data, starting with the LOCAL option.
When you create a LOAD DATA statement, you can include the LOCAL option as part of the statement definition. The option determines the statement’s security requirements as well as whether the source text file is located on the client system or the server hosting the MySQL instance:
- If you do not specify the
LOCALoption, the source text file must be located on the MySQL host. When you run theLOADDATAstatement, MySQL reads the file directly from the directory and inserts the data into the target table. This approach generally performs a little better than when you include theLOCALoption because the data is loaded more directly. However, getting the connection right is much more difficult (and the topic for many online discussions). - If you specify the
LOCALoption, the source text file must be located on the client machine. The client reads the file and sends the content to the server, where it is stored in a temporary file until it is loaded into the target table for processing. TheLOCALoption also works if the client and MySQL are on the same machine, which is the approach I’ve taken for this article. Connectivity is typically much easier to establish when you use theLOCALoption.
For the examples in this article, I have used the LOCAL option. Not only are the MySQL connectivity requirements more complicated without it, but they are also not well documented, adding to the frustration should you run into any glitches. If you check out the various forum postings that discuss connectivity issues around the LOAD DATA statement, you’ll find that in many cases, people responding to a post suggest the use of the LOCAL option as a simple workaround to the various challenges.
I also think that for many database administrators and developers, locating source files on the client side is preferable to uploading those files to the MySQL server, if they’re even permitted to do so. If you use the LOCAL option, you do not need the FILE privilege to run a LOAD DATA statement, and you can store the source text file in any local folder that can be accessed by the client application, which in this case, is MySQL Workbench.
Note: The MySQL documentation states that “if LOCAL is specified, the file must be located on the client host.” However, I was able to run a LOAD DATA statement that included the LOCAL option and that pulled data from other systems on my network. The first was another Mac computer and the other was Windows 11 virtual machine. I have not tested this capability beyond that.
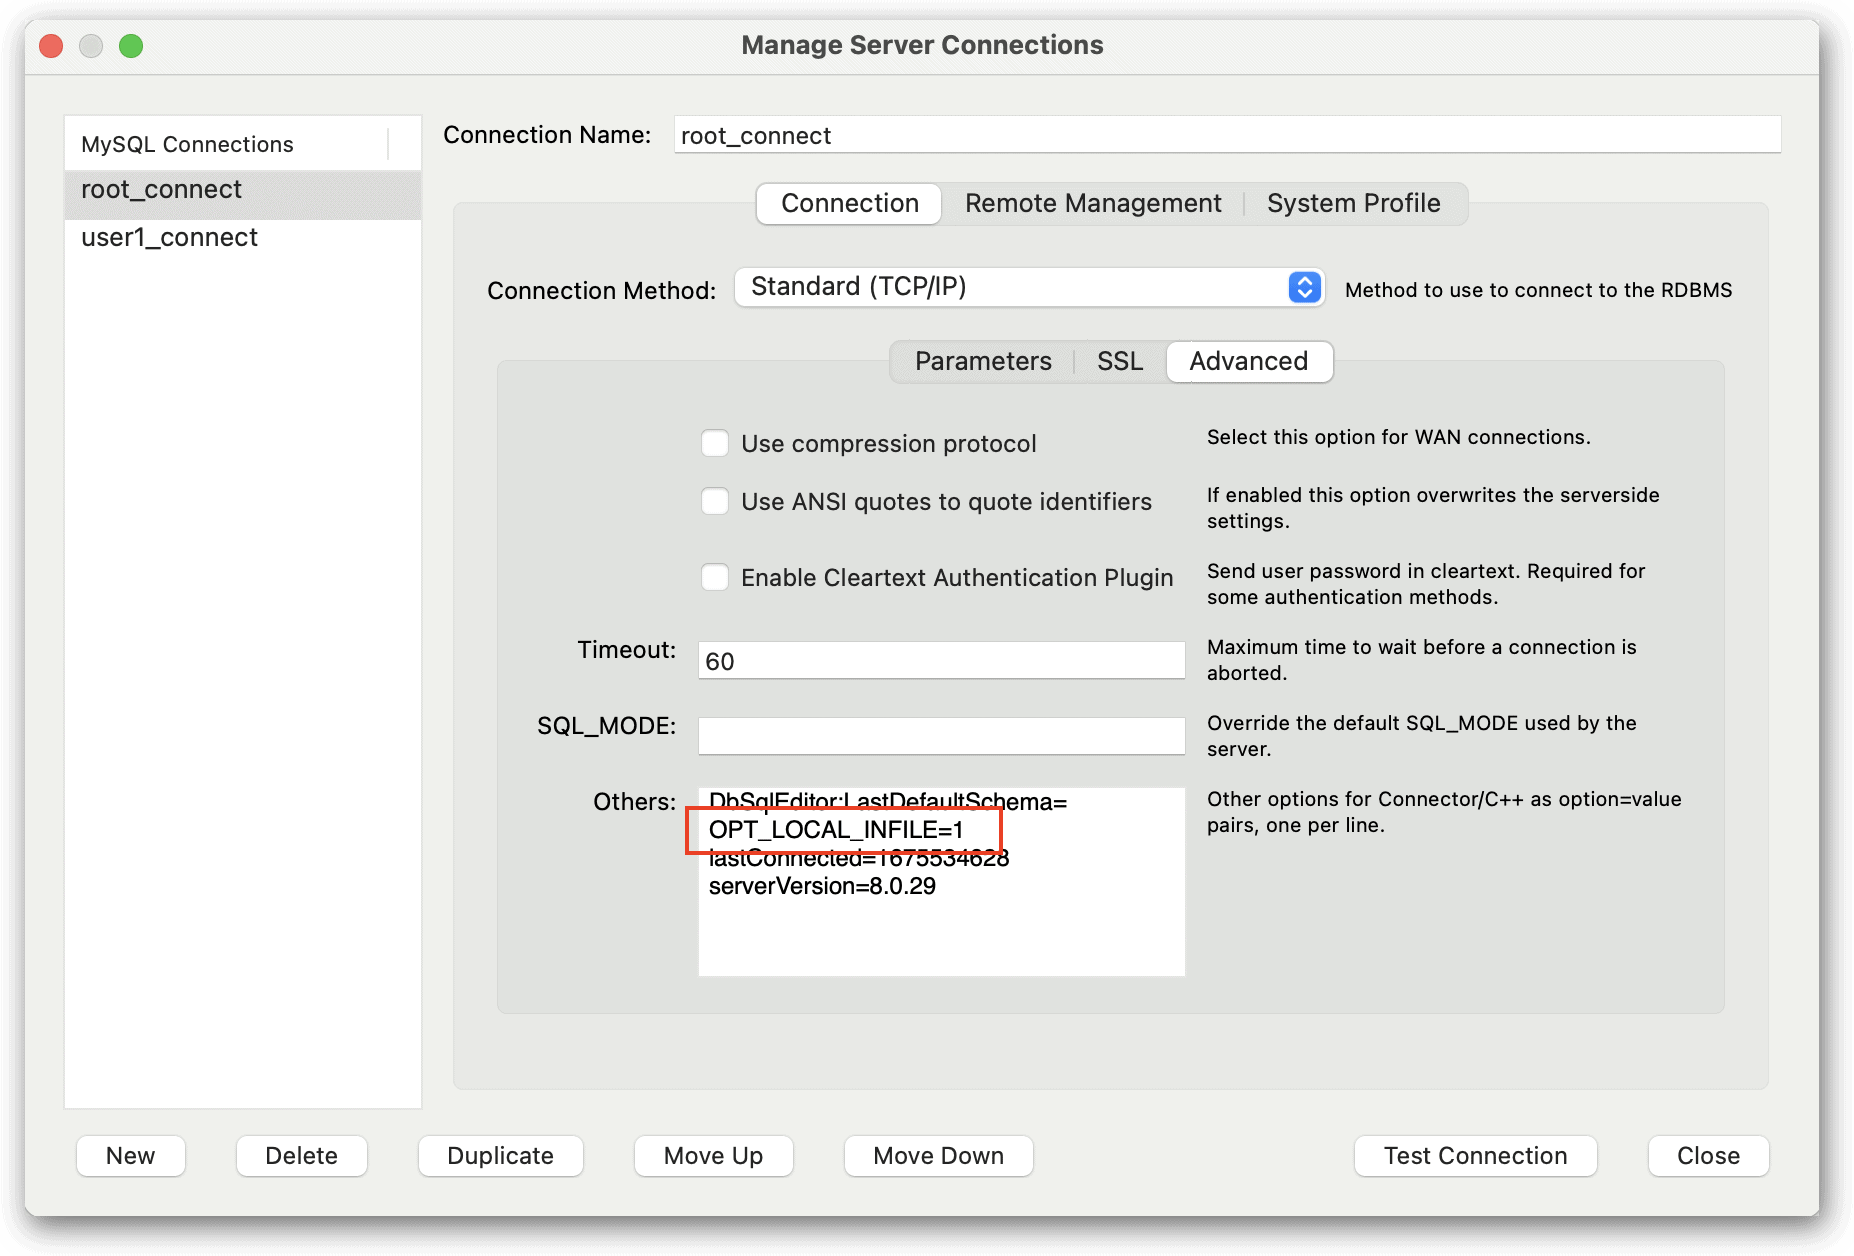
When using the LOCAL option, you must ensure that data-loading is enabled on both the client side and server side. To enable it on the client side in Workbench, you should modify your connection on the tool’s home screen. In the main window, right-click the connection and click Edit connection. On the Connection page of the Manage Server Connections dialog box, select the Advanced tab and add the following command in the Others box:
OPT_LOCAL_INFILE=1
The command sets the local-infile option to ON, making it possible to run a LOAD DATA statement that includes the LOCAL option. The following figure shows the setting (outlined in red) as it appears on the connection’s Advanced tab. This setting applies only to this user’s connections in Workbench. Other connections must be configured individually.
In addition to enabling the local-infile option, you must also enable the local_infile global variable on the server, if it’s not already enabled. (The only difference between these two names is that the global variable uses an underscore rather than a dash.) To confirm the variable’s setting, you can run a SHOW GLOBAL VARIABLES statement against your MySQL instance:
SHOW GLOBAL VARIABLES LIKE 'local_infile';
If the statement returns a value of ON, then you’re all set. If the statement returns OFF, then you should run the following SET statement to enable the variable:
SET GLOBAL local_infile = 1;
Once you’ve enabled local data-loading on both the client and server, you should be ready to run your LOAD DATA statements. The examples that follow demonstrate different aspects of importing data from a text file. I’ll show you the contents of each file as we work through the examples. You can then create them on your own system if you want to try out the examples for yourself.
Introducing the LOAD DATA statement
Before we get into the first example, it’s important to understand the basic components that go into a LOAD DATA statement, which includes a number of clauses and subclauses. The following syntax simplifies the statement somewhat to give you an overview of the statement’s essential elements and how they fit together:
LOAD DATA [LOCAL]
INFILE 'file_name'
[REPLACE | IGNORE]
INTO TABLE table_name
FIELDS
  [TERMINATED BY 'string']
  [[OPTIONALLY] ENCLOSED BY 'char']
  [ESCAPED BY 'char']
LINES
  [STARTING BY 'string']
  [TERMINATED BY 'string']
IGNORE n LINES
[(column_list)]
The LOAD DATA clause is where you specify whether to include the LOCAL option. As I mentioned earlier, this is the approach I’ve taken in this article. The next clause, INFILE, specifies the path and filename (in quotes) of the source text file. You can provide an absolute path or relative path. If relative, the path is relative to the invocation directory.
You can then specify either REPLACE or IGNORE, which are both optional. The REPLACE option tells MySQL to replace existing rows that have the same unique key value. The IGNORE option tells MySQL to ignore rows with the same key value. The IGNORE option has the same effect as the LOCAL option, so if you’re using LOCAL, you never need to use IGNORE. However, you can use the REPLACE option with LOCAL.
The INTO TABLE clause specifies the name of the target table. The main thing here is to be sure that you’ve been granted the privileges necessary to add data to that table.
The FIELDS clause comes next, and it supports one or more of the following three subclauses:
- The
TERMINATEDBYsubclause specifies the string used in the text file to terminate each field. The string can be one or more characters. The default value is\tfor tab, which means that tabs are used to separate field values. - The
ENCLOSEDBYsubclause specifies the character used in the text file to enclose values, such as quotation marks around string values. TheOPTIONALLYkeyword, which itself is optional, is used “if the input values are not necessarily enclosed within quotation marks,” according to MySQL documentation. (More on that in a bit.) The default value for theENCLOSEDBYsubclause is an empty string, indicating that the fields are not enclosed in quoting characters. - The
ESCAPEDBYsubclause specifies the character used in the text file for escaping characters that could impact how MySQL interprets the data. The default value is a backslash (\), which is also used in MySQL to escape characters, including the backslash itself. Many programming languages also use the backslash to escape characters.
The FIELDS clause is itself optional, but if you include it, you must specify at least one of the subclauses.
Note: The OPTIONALLY option in the ENCLOSED BY subclause is one of the most confusing elements in the LOAD DATA statement. Its use made no difference in the various tests I ran. For example, in one test, I enclosed all the values in the manufacturer fields in double quotation marks except for one. MySQL imported the data correctly whether or not I included the OPTIONALLY option. I also tested the option using NULL values and empty strings and received the same results. There might be use cases in which the option does make a difference, but I have yet to discover them. However, the FIELDS and LINES clauses in the LOAD DATA statement are the same as the SELECT…INTO OUTFILE statement, and much of the discussion in the MySQL documentation about the OPTIONALLY option is related to SELECT…INTO OUTFILE, so perhaps that is where it is most relevant.
Like the FIELDS clause, the LINES clause is also optional. The LINES clause supports the following two subclauses:
- The
STARTINGBYclause specifies the common prefix used at the beginning of each line in the text file. The default value is an empty string, indicating that no specific prefix is used. If a prefix is specified and a line does not contain that prefix, MySQL skips the line when importing the data. - The
TERMINATEDBYclause specifies the string used in the text file to terminate each line. The string can be one or more characters. The default value is\n, which refers to a newline character (linefeed). I created my text file in Apple’s TextEdit app, so the default worked on my system, but not all systems operate the same. For example, if you create the text files in Windows, you might need to specify'\r\n'as theTERMINATEDBYvalue.
If you include both the FIELDS clause and LINES clause, the FIELDS clause must come first. The IGNORE n LINES clause comes after these two clauses. The IGNORE n LINES clause specifies the number of lines to skip at the beginning of the file when importing the data. The clause is commonly used when the file contains a header row, in which case, the clause would be written as IGNORE 1 LINES.
The final clause is the list of columns, which are enclosed in parentheses and separated by commas. Although this clause is optional, you will likely include it in most of your statements, unless you’re source data contains a field for every column and the fields are in the same order as the columns.
The LOAD DATA statement contains a few other clauses, but the ones I’ve shown you here are plenty for you to get started. Even so, I recommend that you review the MySQL topic LOAD DATA Statement to learn more about the statement’s various elements.
Importing a CSV file
Now that you’ve been introduced to the LOAD DATA statement, let’s look at some examples that show it in action. You can refer back to the previous section if needed as you work through the following sections.
In preparation for the first example, I created a file named manufacturers1.csv and added the following data:
101,Airbus
102,Beagle Aircraft Limited
103,Beechcraft
104,Boeing
105,Bombardier
106,Cessna
107,Embraer
I saved the file to the folder /Users/mac3/Documents/TravelData/ on my local computer. If you plan to try out the examples for yourself, you can save the files to any location on your system that Workbench can access. Just be sure to update the file path in the examples before you run your statements.
After I created the manufacturers1.csv file, I ran the following LOAD DATA statement, which saves the data to the manufacturers table in the travel database:
LOAD DATA LOCAL INFILE
  '/Users/mac3/Documents/TravelData/manufacturers1.csv'
INTO TABLE manufacturers
FIELDS TERMINATED BY ','
(manufacturer_id, manufacturer);
As you can see, the LOAD DATA clause includes the LOCAL option, and the INFILE clause specifies the source file. These are followed by the INTO TABLE clause, which points to the manufacturers table.
The next clause, FIELDS, includes the TERMINATED BY subclause, which specifies that a comma is used as the field separator, rather than the default tab. The statement then provides the names of the two target columns—manufacturer_id and manufacturer—which are enclosed in parentheses.
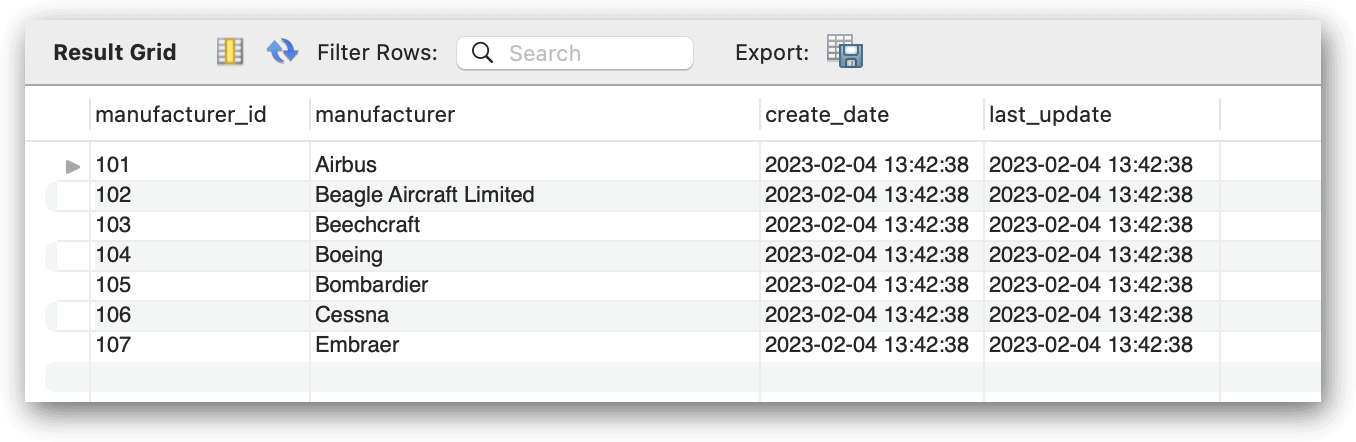
When you run the statement, MySQL extracts the data from the file and populates the manufacturers table. You can verify that the data has been added to the table by running the following SELECT statement:
SELECT * FROM manufacturers;
The SELECT statement returns the results shown in the following figure, which indicates that the data was successfully inserted into the table. Keep this statement handy because you can use it to verify your results for the remaining examples.
To keep things simple for this article, you can also run the following TRUNCATE statement to remove the data from the manufacturers table in preparation for the next example:
TRUNCATE TABLE manufacturers;
You should keep this statement handy as well. You’ll want to run it after most of the following examples, except in a couple instances where I demonstrate specific concepts, in which case, I’ll let you know not to run it.
Ignoring the first lines in an import file
Some of the source files that you work with might contain a header row that lists the field names or include other types of information, such as comments about when and where the file was generated. You can skip these rows when importing the data by including the IGNORE n LINES clause in your LOAD DATA statement.
To see how this works, create a text file named manufacturers2.csv file, add the following data to the file, and save it to the same location as the manufacturers1.csv file:
manufacturer_id,manufacturer
101,Airbus
102,Beagle Aircraft Limited
103,Beechcraft
104,Boeing
105,Bombardier
106,Cessna
107,Embraer
Now run the following LOAD DATA statement, which includes an IGNORE 1 LINES clause that tells MySQL to skip the first row:
LOAD DATA LOCAL INFILE
  '/Users/mac3/Documents/TravelData/manufacturers2.csv'
INTO TABLE manufacturers
FIELDS TERMINATED BY ','
IGNORE 1 LINES
(manufacturer_id, manufacturer);
After you execute the LOAD DATA statement, you can again run your SELECT statement to verify that the correct data has been added. The results should indicate that the header row has been omitted. You can then run your TRUNCATE statement again in preparation for the next example.
The IGNORE n LINES clause is not limited to one row. For instance, the following IGNORE n LINES clause specifies five rows rather than one:
LOAD DATA LOCAL INFILE
  '/Users/mac3/Documents/TravelData/manufacturers2.csv'
INTO TABLE manufacturers
FIELDS TERMINATED BY ','
IGNORE 5 LINES
(manufacturer_id, manufacturer);
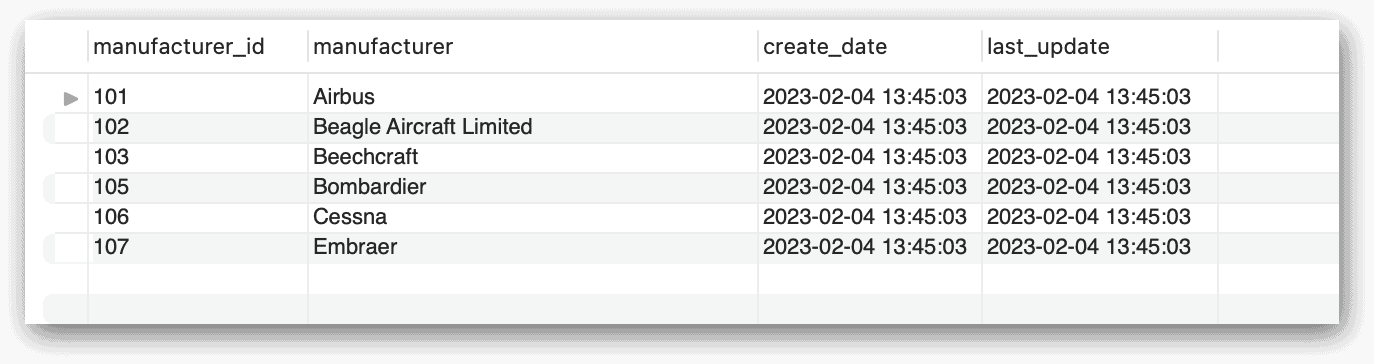
When you run the SELECT statement this time, you should get the results shown in the following figure. (Don’t truncate the table for this example or the next one because I want to point out of a couple other issues.)
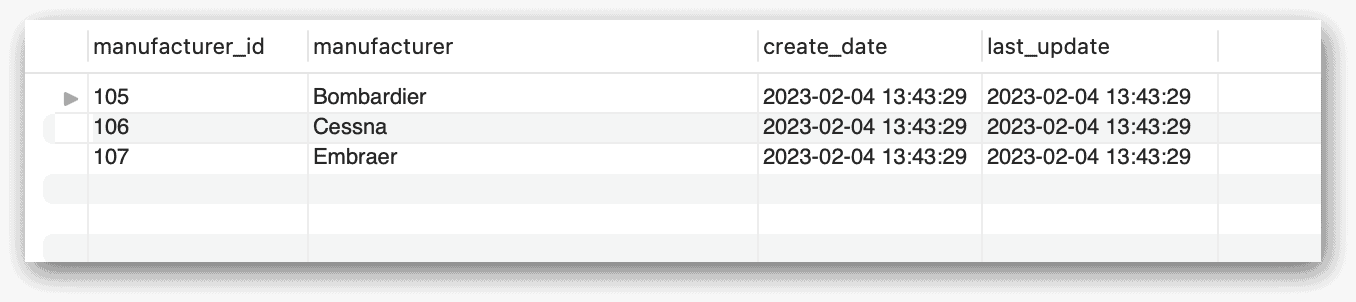
As you can see, the table contains only the last three rows from the source file. However, suppose that you were to run the statement again, only this time, specifying only one row in the IGNORE n LINES clause:
LOAD DATA LOCAL INFILE
  '/Users/mac3/Documents/TravelData/manufacturers2.csv'
INTO TABLE manufacturers
FIELDS TERMINATED BY ','
IGNORE 1 LINES
(manufacturer_id, manufacturer);
When you execute the statement, MySQL tries to insert all seven rows of data into the target table, but only the first four rows succeed. After running the statement, MySQL returns the following message:
4 row(s) affected, 3 warning(s): 1062 Duplicate entry '105' for key 'manufacturers.PRIMARY' 1062 Duplicate entry '106' for key 'manufacturers.PRIMARY' 1062 Duplicate entry '107' for key 'manufacturers.PRIMARY' Records: 7 Deleted: 0 Skipped: 3 Warnings: 3
The message indicates that the existing rows with manufacturer_id values of 105, 106, and 107 were skipped. That is, no new rows with these values were inserted into the table. Only the first four rows were added. If you run the SELECT statement again, you should receive results similar to those shown in the following figure. (Once again, don’t truncate the table; leave it for the next example.)
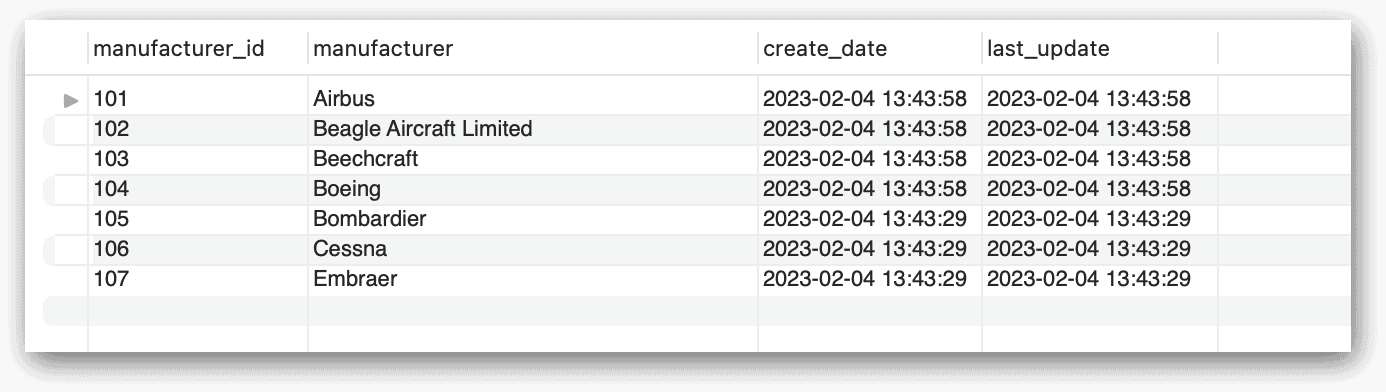
The table now contains all seven rows of data, but if you look closely at the timestamps in the figure, you’ll see that the last three rows precede the first five rows by nearly 30 seconds. (I ran the last two LOAD DATA statements fairly close together.)
Now suppose you run the same LOAD DATA statement again, only this time you include the REPLACE option:
LOAD DATA LOCAL INFILE
  '/Users/mac3/Documents/TravelData/manufacturers2.csv'
REPLACE
INTO TABLE manufacturers
FIELDS TERMINATED BY ','
IGNORE 1 LINES
(manufacturer_id, manufacturer);
When you execute the statement, MySQL now returns the following message:
14 row(s) affected Records: 7 Deleted: 7 Skipped: 0 Warnings: 0
The message indicates that 14 rows were processed. However, only seven records were affected, and seven were deleted. This means that the database engine deleted the seven existing records and re-added them to the table. You can verify this be running the SELECT statement again. Your results should show different timestamps than in the previous results, with the all values very close, if not the same.
You can now rerun your TRUNCATE TABLE statement to prepare the manufacturers table for the next example.
Working with quoted fields in the import file
When importing data, your text files might include some or all fields enclosed in quotation marks. For example, I created the manufacturers3.csv file using the following data, which includes single quotation marks around the string values:
manufacturer_id,manufacturer
101,'Airbus'
102,'Beagle Aircraft Limited'
103,'Beechcraft'
104,'Boeing'
105,'Bombardier'
106,'Cessna'
107,'Embraer'
To handle the quoted fields, you can add an ENCLOSED BY subclause to your FIELDS clause, as shown in the following example:
LOAD DATA LOCAL INFILE
  '/Users/mac3/Documents/TravelData/manufacturers3.csv'
INTO TABLE manufacturers
FIELDS TERMINATED BY ',' ENCLOSED BY '\''
IGNORE 1 LINES
(manufacturer_id, manufacturer);
The ENCLOSED BY subclause specifies that a single quotation mark is used to enclose fields. The quotation mark is preceded by a backslash to escape the character when submitting it to the database engine. If you don’t use the ENCLOSED BY subclause, the database engine will treat the quotation marks as literal values and store them along with the rest of the values.
After you execute the LOAD DATA statement, you can run your SELECT statement to verify the results and then run your TRUNCATE statement to prepare the manufacturers table for the next example.
When you specify a single quotation mark in the ENCLOSED BY subclause, you can enclose it in double quotes, rather than escaping it with a backslash:
LOAD DATA LOCAL INFILE
  '/Users/mac3/Documents/TravelData/manufacturers3.csv'
INTO TABLE manufacturers
FIELDS TERMINATED BY ',' ENCLOSED BY "'"
IGNORE 1 LINES
(manufacturer_id, manufacturer);
In some cases, the text file will use double quotation marks to enclose field values, rather than single quotation marks. To demonstrate how to handle these, I created the manufacturers4.csv file using the following data:
manufacturer_id,manufacturer
101,"Airbus"
102,"Beagle Aircraft Limited"
103,"Beechcraft"
104,"Boeing"
105,"Bombardier"
106,"Cessna"
107,"Embraer"
To handle this file, the ENCLOSED BY subclause should be modified to specify a double quotation mark, enclosing it in single quotation marks:
LOAD DATA LOCAL INFILE
  '/Users/mac3/Documents/TravelData/manufacturers4.csv'
INTO TABLE manufacturers
FIELDS TERMINATED BY ',' ENCLOSED BY '"'
IGNORE 1 LINES
(manufacturer_id, manufacturer);
After you run this LOAD DATA statement, you can once again run your SELECT statement to verify the results. Once you’ve reviewed them, you can then run your TRUNCATE statement in preparation for the next example. (You should do this for all the remaining examples.)
Working with different formats in your text files
The text files that you work with might be table-delimited rather than comma-delimited, and they might include other elements that require special handling. Consider the manufacturers5.txt file, which I created with the following data:
manufacturer_id        manufacturer
*,*101  "Airbus"
*,*102  "Beagle Aircraft Limited"
*,*103  "Beechcraft"
*,*104  "Boeing"
*,*105  "Bombardier"
*,*106  "Cessna"
*,*107  "Embraer"
In this case, a tab is used as the field separator, and each line is preceded by the *,* characters. As a result, you don’t need to specify the TERMINATED BY subclause in the FIELDS clause because the tab is the default value, but you do need to take steps to handle the line prefix. For this, you should add a LINES clause with a STARTING BY subclause that specifies the prefix characters:
LOAD DATA LOCAL INFILE
  '/Users/mac3/Documents/TravelData/manufacturers5.txt'
INTO TABLE manufacturers
FIELDS ENCLOSED BY '"'
LINES STARTING BY '*,*'
IGNORE 1 LINES
(manufacturer_id, manufacturer);
When you run this statement, MySQL will use the prefix characters to determine which rows to add, while stripping out the characters in the process.
As already pointed out, the preceding example does not include a TERMINATED BY subclause in the FIELDS clause. It also does not include a TERMINATED BY subclause in the LINES clause because the text file uses the default linefeed value. However, you can still include both clauses if you want:
LOAD DATA LOCAL INFILE
  '/Users/mac3/Documents/TravelData/manufacturers5.txt'
INTO TABLE manufacturers
FIELDS TERMINATED BY '\t' ENCLOSED BY '"'
LINES TERMINATED BY '\n' STARTING BY '*,*'
IGNORE 1 LINES
(manufacturer_id, manufacturer);
When using the STARTING BY subclause, be aware that your text file must use these prefixes consistently or you might get unexpected results. For example, the following text file, manufacturers6.txt, includes a line with two records but no prefix in front of the first record:
manufacturer_id        manufacturer
*,*101  "Airbus"
*,*102  "Beagle Aircraft Limited"
*,*103  "Beechcraft"
104     "Boeing" *,*105 "Bombardier"
*,*106  "Cessna"
*,*107  "Embraer"
After you’ve created the file on your system, you can run the following LOAD DATA statement to see what happens:
LOAD DATA LOCAL INFILE
  '/Users/mac3/Documents/TravelData/manufacturers6.txt'
INTO TABLE manufacturers
FIELDS ENCLOSED BY '"'
LINES STARTING BY '*,*'
IGNORE 1 LINES
(manufacturer_id, manufacturer);
When you execute this statement, MySQL skips the record with a manufacturer_id value of 104 but still adds the record with a value of 105. You can verify this by again running your SELECT statement, which returns the results shown in the following figure.
In some cases, you might run into text files whose lines are terminated with nontraditional characters (as opposed to the usual linefeeds or returns). For example, I created the manufacturers7.txt file using the following data, which separates the lines with triple hash marks (###):
manufacturer_id manufacturer###101 "Airbus"###102 "Beagle Aircraft Limited"###103 "Beechcraft"###104 "Boeing"###105 "Bombardier"###106 "Cessna"###107 "Embraer"
To accommodate this file, you need to include a TERMINATED BY subclause in your LINES clause that specifies the hashmarks:
LOAD DATA LOCAL INFILE
  '/Users/mac3/Documents/TravelData/manufacturers7.txt'
INTO TABLE manufacturers
FIELDS ENCLOSED BY '"'
LINES TERMINATED BY '###'
IGNORE 1 LINES
(manufacturer_id, manufacturer);
When you run this statement, the database engine will know how to interpret the hashmarks and will insert the data accordingly, stripping out the hashmarks in the process.
In some cases, you might also run into a text file that uses a character other than the backslash to escape characters within fields. For example, the manufacturers8.txt file contains seven lines of comma-delimited fields, one of which includes a comma in the manufacturer name:
manufacturer_id,manufacturer
101,Airbus
102,Beagle Aircraft Limited
103,Beechcraft
104,Aviat Aircraft^, Inc.
105,Bombardier
106,Cessna
107,Embraer
In this case, the name’s comma is escaped with a caret (^). Because this character is not a backslash (the default escape character), you need to add an ESCAPE BY clause that specifies the caret, as shown in the following example:
LOAD DATA LOCAL INFILE
  '/Users/mac3/Documents/TravelData/manufacturers8.txt'
INTO TABLE manufacturers
FIELDS TERMINATED BY ',' ESCAPED BY'^'
IGNORE 1 LINES
(manufacturer_id, manufacturer);
If you do not include the ESCAPE BY clause, the database engine will retain the caret but truncate the manufacturer name, as in Aviat Aircraft^. However, if you include the clause, MySQL will strip out the caret and treat the comma as a literal value, resulting in a column value of Aviat Aircraft, Inc., rather than the truncated version.
Getting started with importing data in MySQL
As mentioned earlier, the LOAD DATA statement includes other elements than what I’ve shown you here. There are also other options for importing data, such as the mysqlimport command-line utility, which generates and sends LOAD DATA statements to the MySQL server. Most of the utility’s options correlate directly to the LOAD DATA statement. Another option is the Table Data Import wizard in MySQL Workbench. The wizard walks you through the process of importing data from a CSV or JSON file.
If you work with MySQL databases on a regular bases, chances are good that you’ll want to import data from text files, even if only to set up test or development environments. In most cases, what I’ve shown you here will be enough to get you started with the LOAD DATA statement. Just know that that you might run into situations that I haven’t covered, in which case, it’s always a good idea to review other MySQL documentation to help you fill in the gaps.
Appendix: Preparing your MySQL environment
When creating the examples for this article, I used a Mac computer that was set up with a local instance of MySQL 8.0.29 (Community Server edition). I also used MySQL Workbench to interface with MySQL. The examples import data from a set of sample text files that I created in Apple’s text editor, TextEdit.
I provide you with the files’ contents throughout the article, along with the example LOAD DATA statements. If you plan to try out these examples, you can create the files on your own system as you work through those examples. Before you get started, however, you should run the following script against your MySQL instance:
DROP DATABASE IF EXISTS travel;

CREATE DATABASE travel;
USE travel;
CREATE TABLE manufacturers (
  manufacturer_id INT UNSIGNED NOT NULL,
  manufacturer VARCHAR(50) NOT NULL,
  create_date TIMESTAMP NOT NULL DEFAULT CURRENT_TIMESTAMP,
  last_update TIMESTAMP NOT NULL
    DEFAULT CURRENT_TIMESTAMP ON UPDATE CURRENT_TIMESTAMP,
  PRIMARY KEY (manufacturer_id) );
The script creates the travel database and adds the manufacturers table. Otherwise, that’s all you need for the try out the examples (in addition to creating the source text files). For most of the examples, I simply truncated the data to prepare the table for the next example. If you already created the database and table for previous articles, I recommend that you re-create them now or at least truncate the manufacturers table before getting started.
The post Importing data into a MySQL database using LOAD DATA appeared first on Simple Talk.
from Simple Talk https://ift.tt/jGM42Nz
via
No comments:
Post a Comment