Friday, December 7, 2018

How to Linux for SQL Server DBAs — Part 3

The series so far:

  1. How to Linux for SQL Server DBAs — Part 1
  2. How to Linux for SQL Server DBAs — Part 2
  3. How to Linux for SQL Server DBAs — Part 3

As you jump into Part 3, you’ll begin to realize how involved your education will be with Linux, and how it is taking over the world. The previous articles just scratched the surface with your new Docker container with Linux and SQL Server. You have embraced how users are created in a Linux system and what a group is. You’ve begun to understand the power of the Linux kernel and the pure simplicity of it. This takes you to the next step in your education: ownership and permissions.

Unlike Windows, there’s no registry layer when working with Linux. As an operating system, Linux expects that if you’ve been granted rights to perform a task, you should have the knowledge and skills to be trusted to perform the task. Every object in Linux is treated as a file, and permissions are at the core of this. Understanding how permissions work is essential, and this is the next step in your Linux journey.

In the following section, you’ll create:

  • A Unix user
  • A home directory
  • A lesson directory
  • And empty files to work with ownership and permission assignments.

As you proceed into the next sections of the article, you may need to check users on your Linux host and what groups exist. You can do this by typing in the following command after you open a bash shell to your container:

>cat /etc/passwd

To view groups, you can do this by cat’ing the group file:

>cat /etc/group

The following commands will take you through these steps. The first step will be to create a user for the test, with a home directory, using the adduser command:

>adduser jsmith2

Fill in the password, etc., for jsmith2 and retain the password for future logins.

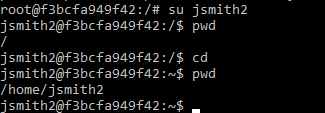
SU, (switch user) to jsmith2.

>su jsmith2

Check your current location and verify that you’re in the /home/jsmith2 directory:

>pwd

If you find yourself at the root directory, (/) perform the following:

>cd

Now check with the pwd command again to verify that you’re in the /home/smith2 home directory.

Create a new directory in jsmith2’s home directory and set permissions

>mkdir part3
>chmod 744 part3

I’ll explain more about the chmod command and numeric value later in the article. Switch over to the new directory:

>cd part3

Create a new file:

>touch test.txt
>ls -la

You should see the following in your new directory:

Identity Crisis

There are two main commands that are connected to permissions:

Change Owner chown Changes the owner of a file(s)

Change Modify chmod Modifies permissions of a file(s)

Each file will have three designations of ownership. One will be the owner; the second will be the group assignment, (which can also be assigned to the owner) and lastly, all others. The third designation isn’t an assignment, but the first two, owner and group, are.

When creating a file, ownership and group are defaulted to the user that created it. To reassign permissions, you must first have the rights to do so. Secondly, the user and group must exist. If you are the owner of the file, you can do both, but if the file is owned by another and you don’t have permissions, you will have to use “super user” (su) to perform the task. To perform an ownership change, you would run the following:

>sudo chown <new owner>:<new group> <filename/folder>

As root, (domain owner) you would be able to change the owner of any file or switch permissions. You can also do this as the user if they have SUDO, (Switch User to Domain Owner). As you’re currently logged in as jsmith2, exit out of the current shell from user jsmith2 back to root.

The second choice, if you want to run everything with the SUDO command, is to grant SUDO to jsmith2 as ROOT. To do either, you must exit out of the current shell back to ROOT.

>exit

Note that the prompt returns to displaying the root login at the very left. If you want to grant SUDO, it can be done with the following command. Recognize that jsmith2 now has root privileges on the host and, although his sudo executions can be audited, this user will now have these privileges.

>usermod -a -G sudo jsmith2

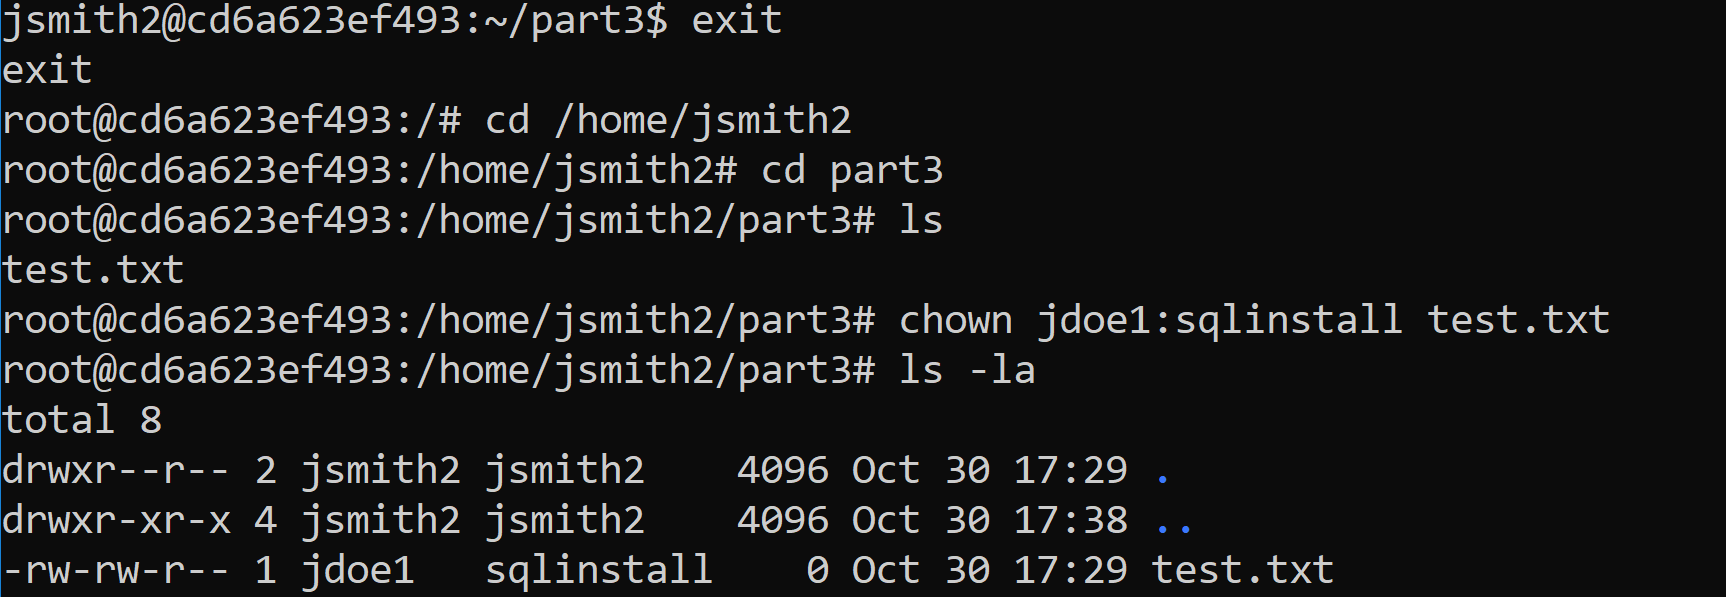
You can now change the owner and group of the files in the existing directory. The example displayed below demonstrates what would be required if you weren’t root and using the SUDO command as jsmith2, but if you are logged in as root, the SUDO is left off the command. In this example, you’ll change the owner to jdoe1 and the group to sqlinstall. Note that the account and group were created in the last article.

>cd /home/jsmith2/part3
>sudo chown jdoe1:sqlinstall test.txt

Or as ROOT, then you’d simply leave the SUDO off the command:

>chown jdoe1:sqlinstall test.txt

If the SUDO command returns an error about not being available, you will have to install it:

>apt-get install sudo

This is all there is to changing the ownership on a file, as well as the group in one command.

Permissions and Modes

As a DBA, you put in significant time into understanding database level security and permissions. It’s as important to understand how OS level permissions impact the security of your database residing on the host. On Linux, you change permissions to files and folders by using the change modify, (chmod) command. There are different categories of user ownership and escalation of privileges to each file in Linux. The categories of user ownership are:

  • User/Owner=u
  • Group=g
  • Other/all users=o
  • ALL=A

Similar to Microsoft Windows, there are three main categories of ownership that can be assigned singularly or in combination to create the correct allocation of ownership to any file. There’s also a global grant to “ALL” that encompasses all categories as one.

From here, permissions are granted to perform tasks. As with a database, the least required privilege(s) to perform the action should be considered. Although three simple grants are all that are available, in combination, they create the complexity required to secure the users internal to the OS.

  • Read
  • Write
  • Execute

There are multiple modes to allocate permissions to files and directories. I’ll discuss the two main ones- numeric and alpha mode.

Numeric Mode

In this mode, there is a numerical value that is assigned to each permission to simplify grants. Where this might sound confusing at first, when you see the values clearly displayed by grant, it begins to make sense.

Read,(r)= 4

Write,(w)= 2

Execute, (x)=1

For the first run through the permissions, log back in as a jsmith2 user and switch to the user’s home directory if you are not already there:

>su jsmith2
>cd 
>cd part3

The numerical values for permissions are used in conjunction with the chmod command to assign privileges to the owner, group and other for an individual or group of files. Using the example file, test.txt, you can request that permissions be set for the following to meet requirements:

  • Owner has read, write and execute
  • Group has read and execute
  • Other has no privileges to the file.

The command would be:

>chmod 750 test.txt

If you typed this command in, you should receive the following error, but why?

chmod: changing permissions of 'test.txt': Operation not permitted

Check the ownership and group permissions on the file:

>ls -la

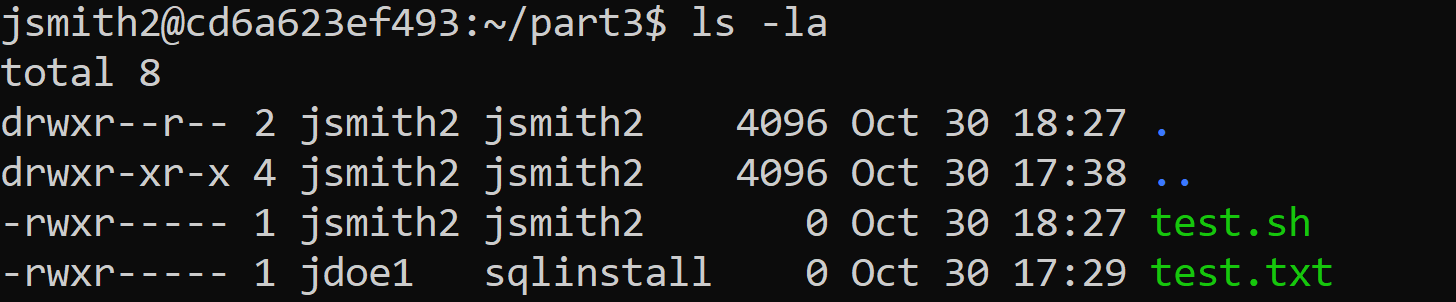
The file is no longer owned or even part of a group that jsmith2 is part of. You could switch back the ownership of the file, but for this exercise, you’ll understand the importance of ownership and create a new file to work with, this time calling it test.sh and changing the permissions on this new file.

>touch test.sh
>chmod 740 test.sh
>ls -la

This command comes from the numerical values per grant in the list above, calculated for each category- owner, group and other and results in the following:

  • owner has 4+2+1=7
  • group has 4+0+0=4
  • other has 0+0+0=0

Unlike a standard ls, (list) command, a ls -la, (list all) command will display the permissions for the files contained in any directory broken down by owner, group, other and by individual grants.

jsmith2@cd6a623ef493:~/part3$ ls -la
total 8
drwxr--r-- 2 jsmith2 jsmith2    4096 Oct 30 17:29 .
drwxr-xr-x 4 jsmith2 jsmith2    4096 Oct 30 17:38 ..
-rwxr----- 1 jsmith2 jsmith2       0 Oct 30 18:27 test.sh
-rwxr----- 1 jdoe1   sqlinstall    0 Oct 30 17:29 test.txt

A “d” in the beginning columns signifies that this is a directory, vs. a file. Notice that there are ten fields that are populated by the output- one for type and nine for permissions to the three categories, owner/user, group and other.

In the example above, you’ll note the directories without a name, just marked with “.”. These are directory identifiers. The first “.” is to identify the current directory and the privileges granted to it. To translate this to a numeric mode command, it would look like the following:

>chmod 744 .

The directory identified with “..” is the directory above the current one and Linux is displaying that it has more privileges to the groups and other categories, both read and execute. If you translated this to numeric mode, it would result in the following:

>chmod 755 ..

You can view how changes to permissions via numeric mode occur by again, changing the permissions on the shell script:

>chmod 764 test.sh
>ls -la test.sh

The owner has read, write and execute on the file, the group has read and write to the file and all others are only allowed read access. Understanding these privileges is essential to a DBA so you can manage the privileges to system and data files, subsequently securing your database server at the OS level.

Now that you know how to change the owner and grant privileges on a file, it may be helpful to have a reminder on a few ways to create a file. Below are the most common ways users create a file, most often for write at the time or later.

Create an empty file touch <filename>

Create empty file and open for edit vi(m) <filename>

Common editor to create files nano <filename>

You may choose any of these methods, vi(m) being an older method, and nano, emacs and other editors being newer ones. Touch is most often used to verify write privileges to a location, as it efficiently creates an empty file in the directory and will fail if privileges are missing.

Alpha Mode

The secondary mode for granting privileges is Alpha mode, which uses letters to identify the category of user and privilege.

You will again work with your jsmith2 user and part3 directory from the home/jsmith2/part3 location.

The difference when working with alpha mode, is that the permissions are a bit more complicated in their execution. Unlike numeric mode that simply rewrites over existing permissions, alpha requires a + or a -, along with the initial of the permissions to grant:

  • r(Read)
  • w(Write)
  • x(Execute)

This method can be used to remove permissions as easily as grant them, simply executing the chmod command, a “-“, the alpha mode permission and the file or directory name to remove privileges to the owner. To assist in why you would want to remove privileges from yourself, a use case is a file or directory you want to protect yourself from an accidental write or execution of, you can change the permissions to help ensure this.

This command ends with the name of the file, and when no user/group/category is added, it only addresses permissions for the user executing the chmod command.

>chmod -wx test.sh

You would then be required to change the permissions and add read and write on the file for the owner before you’d be able to perform either or if you have SUDO, then this would suffice. Always remember, SUDO, (Switch User Domain Owner is GOD.)

The next command adds execute to the owner, group and other category for file ownership. This would result in everyone being able to execute the shell script.

Example:

>chmod +x test.sh

At this point in the process, exit back out and become root to perform the next commands.

>exit

The root user should be at the left of your prompt if you’re using the Docker image to work along with this article.

>cd /home/jsmith2/part3
>chmod -w test.sh

This would remove jsmith2’s write privileges to the test.sh file. This might seem counter intuitive. Why would you wish to remove write privileges from your own file? Removing write or execute could protect from mistakes in processing or remind the user which script is the active one, while retaining historical code.

To perform permissions changes using alpha mode for a group, or other, then you use the initial format and add the category before the permissions change:

Example:

>chmod g+x test.sh
>chmod g-w test.sh

The above commands have added execute to the test.sh file for the group assigned, but then removed write from the test.sh file. You can do the same for o, (others) by changing its permissions to read and no write or execute on the file:

>chmod o+r test.sh
>chmod o-wx test.sh

You can combine the privilege change for owner, group and other at once. Just as:

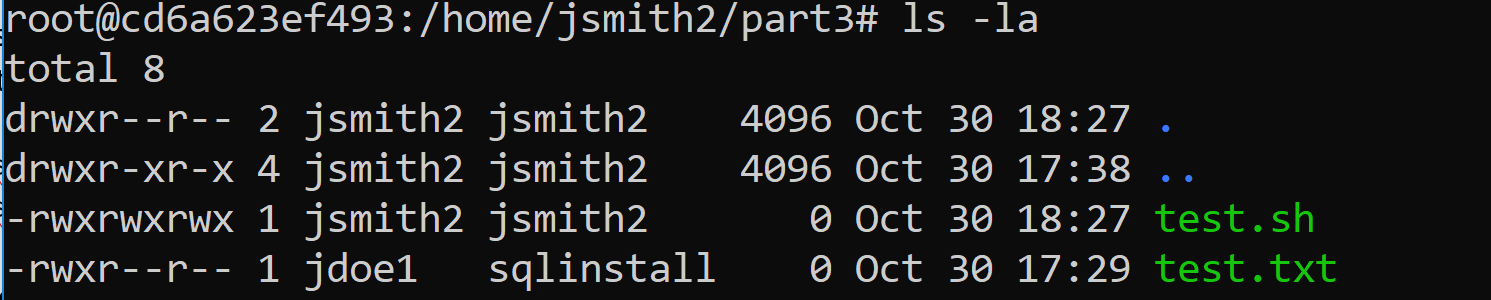
>chmod 777 test.sh

This would result in the owner, group and other having read, write and execute on a file, the same would be in alpha mode:

>chmod ugo+rwx test.sh

This also could be done with the a(All) category:

>chmod a=rwx test.sh

At the end of this exercise, all users- owner, group and other have permissions to read, write and execute the shell script test.sh:

Group Shift

Beyond chmod, is chgrp, (Change Group) which unlike chown, (change owner) that allows for a group allocation at the time of the command, can change the group with a separate command.

>chgrp sqlinstall ./test.sh
>chgrp sqlinstall ../part3

Notice that you can change the group on a file or a directory, (remember, everything is treated as a file in Linux) as easily as I can change owner, permissions, and groups for a single file. You are able to do all of this from the current directory, using the “.” and “..” to tell Linux that you want to work in the current directory or the directory one up from where you are.

Wildcards are permissible for all these commands as well. If you wish to change the owner of all the files in a directory:

>chown jsmith2:sqlinstall *

You can change the permissions on all files with the .sql extension in a directory:

>chmod 744 *.sql

You can also grant ownership to all files and subfolders with the -R, (recursive) argument.

If you go up one folder:

>cd ..
>chmod 774 .
>chown -R jsmith2:sqlinstall .

The above command just granted read, write and execute to the owner and the group, and read to others. The second command changed ownership of everything in the current folder, (.) and files in subfolders to jsmith2.

Conclusion

As you can see, there’s a lot more to permissions than meets the eye. Learning how to change permissions, either by alpha or numeric mode is enough, but make sure you understand the permissions and how they translate in whichever mode you’re going to use. A secure database system is essential down to the operating system level, so as a DBA your understanding of how Linux does this allow you to secure your Linux host for SQL Server and help everyone sleep at night.

The next article will start working with navigation and processes in Linux. There’s a lot to come and, hopefully, you’re able to work through these scenarios on your Docker image.

The post How to Linux for SQL Server DBAs — Part 3 appeared first on Simple Talk.


from Simple Talk https://ift.tt/2SwBPJ5
via

Thursday, December 6, 2018

Building a Collaborative Platform to Speed up Data Analysis

The series so far:

  1. Understanding your Azure EA Billing Data and Building a Centralized Data Storage Solution
  2. Azure EA Financial Reporting and Granular Access to Data Through the Enterprise

Even today, many organizations are struggling to get value from their data in a prompt and coherent way. The topic is complex, and there are many bits and pieces which need to come into place before organizations even get to work with data and act on the learnings from it. There are usually substantial hurdles in the form of legacy systems, ancient ETL flows, non-trustworthy reproductions of data, security concerns, and manual data crunching processes with deeply embedded black-box functionality.

These challenges, however, translate clearly to a requirement/need: how can we have knowledge, ideas, and data openly available at the fingertips of an organization so it can prosper?

First, of course, the organization needs to recognize that openness and sharing are of great value. Second, a common foundation needs to be in a place where people can collaborate in a smart and engaging way. Moreover, the culture of openness needs to be promoted and maintained.

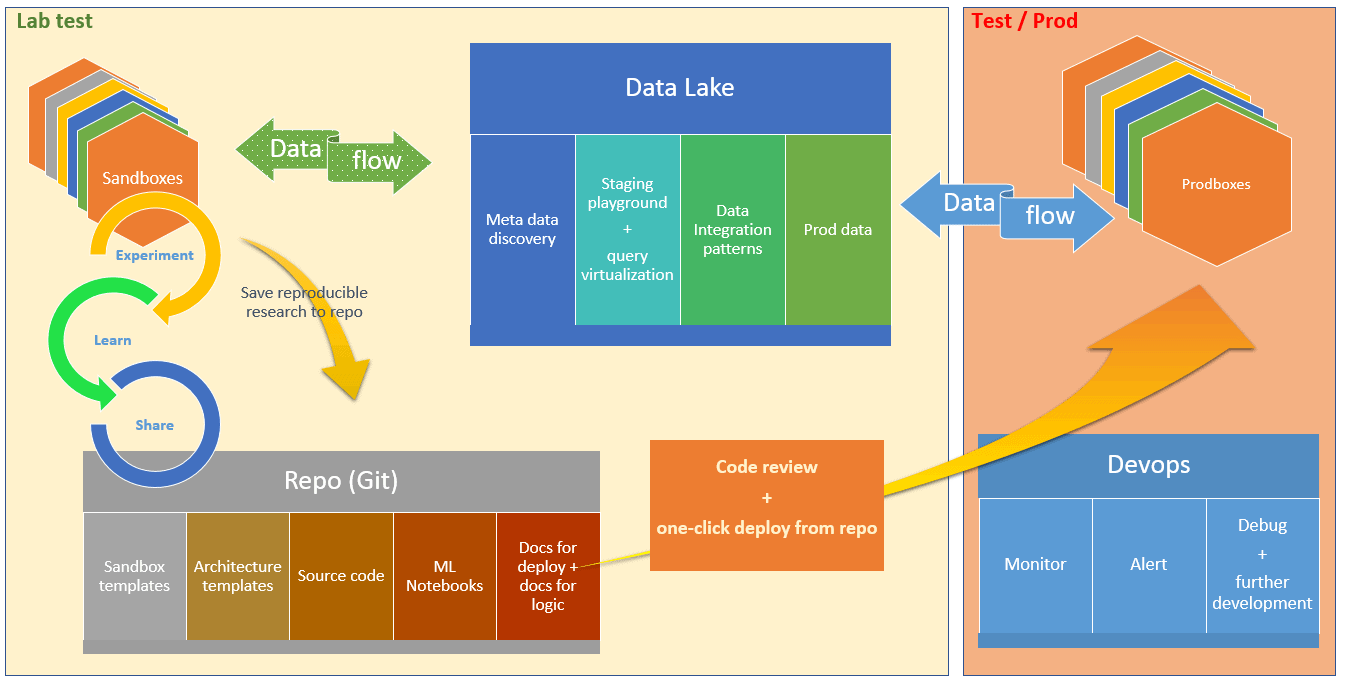
In this article, I will demonstrate the architecture, workflow and some of the challenges of such a collaborative platform. As an example, I will be using the EA Billing solution, which I presented in the previous articles of the series. The solution, in this case, will have two functions – one of them will be an application that someone in the organization is willing to develop, and the second will be an actual part of the cloud foundation platform since an important part is to manage the costs of the cloud foundation platform itself. For the purposes here, the article covers working with the Azure platform, but the abstracted concept is perfectly valid for any cloud platform or even for a private internal cloud setup.

Start with the Curious User

One of the main challenges in many organizations is that curiosity and the ability to explore does not really go beyond the work computer and the knowledge locked on it. There are monolithic production systems, data flows, and integrations, but the knowledge is not easily discoverable, and their building blocks are not modular enough to be dismantled, improved and reused.

The first component needed in place is a curious user, who is ready to discover, build and share.

For example, imagine a curious user who wants to build an app which helps the organization to manage their cloud platform costs better.

The curious user has questions like

  • Has anything been done in the area of cloud cost management within the organization?
  • Has anyone worked on the dataset?
  • How do I get a working integration for this data?
  • Is there any previous knowledge about billing data in the organization?
  • Is there any competence within the organization which can help me get started?

Getting the answers to all of these questions can easily keep the curious user busy for a while and thus away from actually working on developing the app.

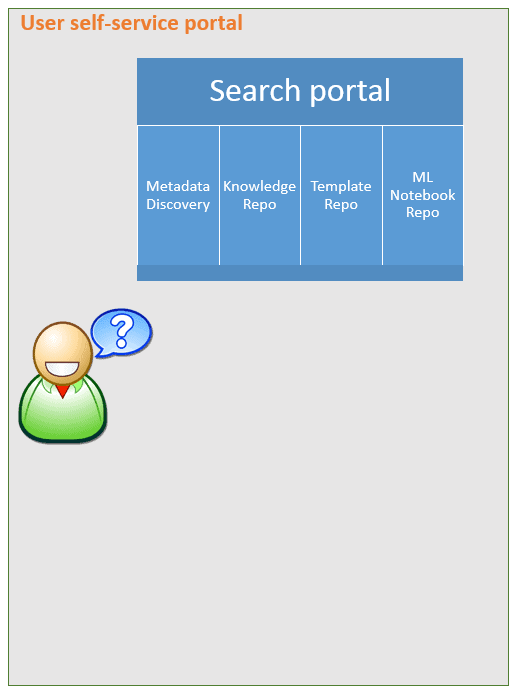
To solve this set of challenges and to make sure the curious user gets to do actual work, they need to be put into a context which helps them answer the questions above. The first thing they need is search functionality.

Search Platform

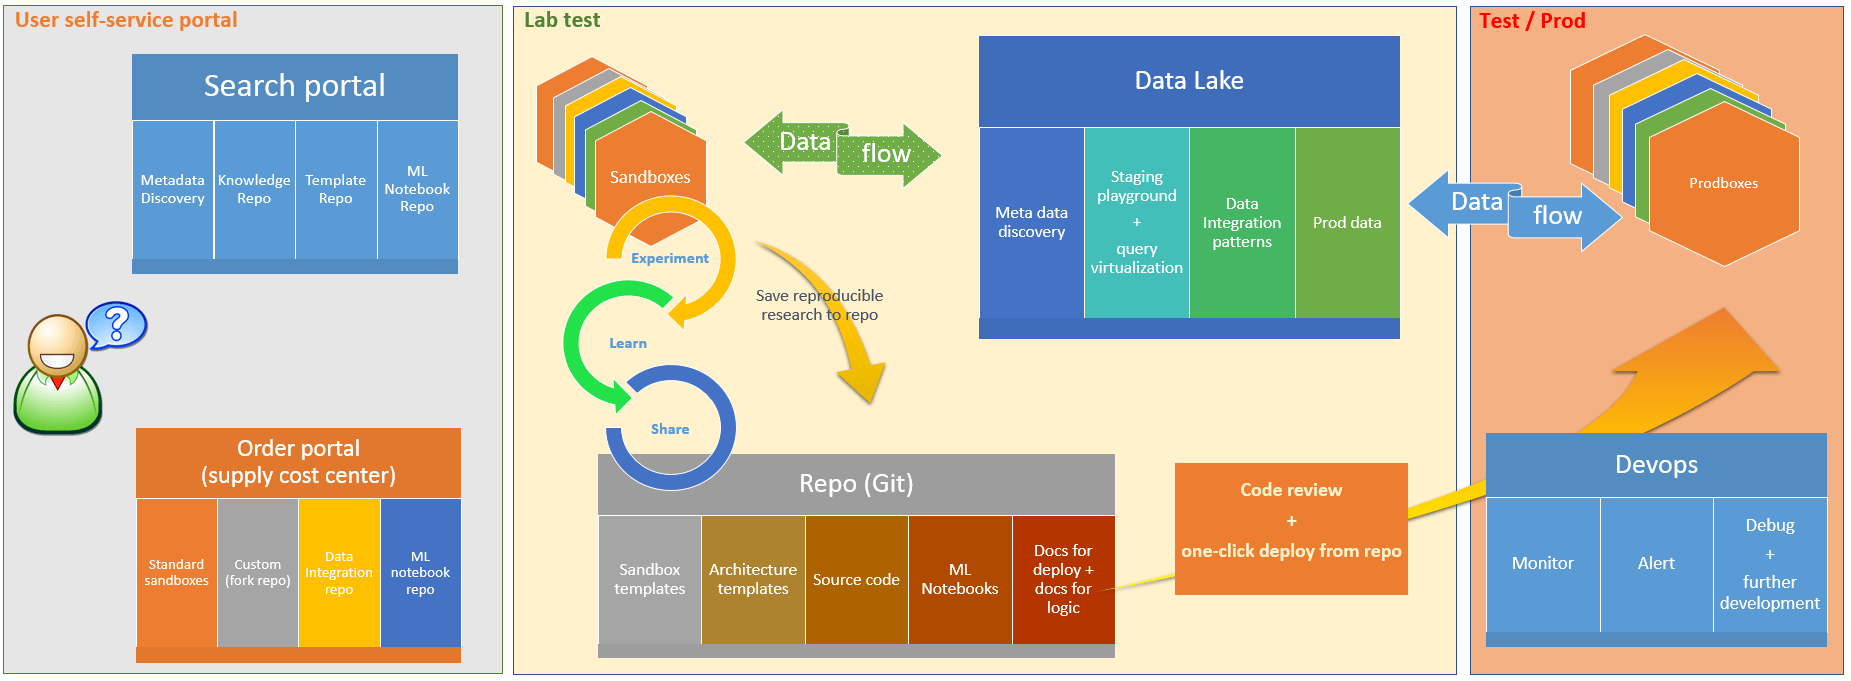
If the curious user has access to a search portal where they can search for metadata, knowledge, previous projects, machine learning notebooks, and resource deployment templates, then the path to doing actual work is shortened significantly.

As you can see in the picture above, there is a search portal where the curious user can discover if anyone in the organization has worked on EA Billing before, if there is any metadata, if anyone has documented anything on the topic.

In this case, suppose that there is nothing available. (I will close the loop at the end of this article with another curious user who is looking for a report on the subset of the EA billing data and finds this project.)

Order Portal

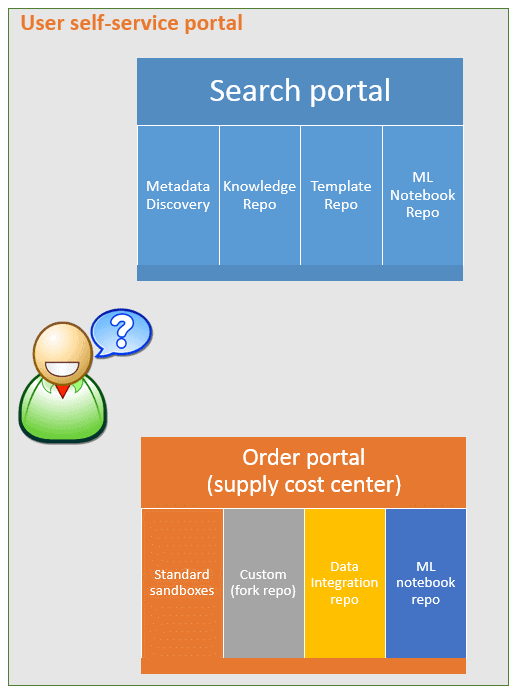
For the user to start working on this application, they will need the following:

  • A sandbox — This is where the development work will be done. This might be a Data Science Virtual Machine (DSVM) in Azure, which comes with all tools preinstalled.
  • An architecture environment which can be setup from a template — Architecture follows predictable patterns in 90% of the cases, and this means that a library of architecture solutions can be available and deployed from templates. For example, the curious user will know that to start; they will use a common pattern architecture where data will flow from an API and will be recorded in an Azure SQL database.
  • Integration patterns – The user will need to do data integration, i.e., the logistics of calling the source, transforming the data and writing the data to the destination.
  • ML notebooks – If machine learning or analysis is to be done on the data, then ML notebooks will be used.

All the user needs now is a cost center code, and with that code, they can get the bits and pieces they need from the Order Portal:

  • An ARM (Azure Resource Manager) template for deploying the appropriate size of the DSVM — This is a one-click deploy with a bit of configuration work.
  • An ARM template for the architecture, from API to Azure SQL database — The curious user can deploy the resources they need with one click; then they can configure, further develop and re-deploy.
  • Integration patterns – The user gets templates for Azure Data Factory integration flows which help them get started on getting a sample of data so they can start developing the API App.
  • ML notebooks – The curious user gets a set of sample notebooks which show some very common patterns for time series analysis. After all, billing data is expected to be a time series data set.

Sandbox Labs

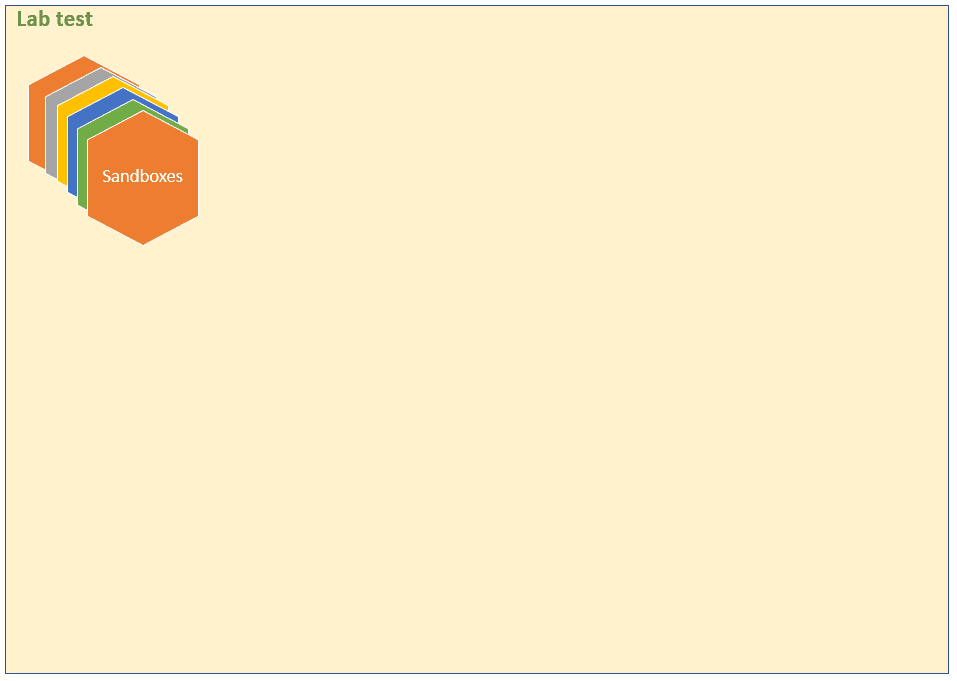
As mentioned, it is imperative to be able to provide the curious users across your organization with the ability to quickly access a lab environment where they can incubate and iterate ideas.

The DSVM in Azure, which is available from the portal, is already loaded with almost everything a curious user may need – there is an R environment, Python, Visual Studio Code, and so on. Also, keep in mind that the ARM templates for the sandboxes are kept in the GIT repository, which is a part of the Cloud Foundation platform. A user may have access to choose from a list of ARM templates for sandboxes, but they can’t change the code of the ARM template. And in the ARM template there is a functionality which limits the allowed values like this: “allowedValues”: [ “<array-of-allowed-values>” ]. This means that the curious user will not overspend and will not use a sandbox for production purposes.

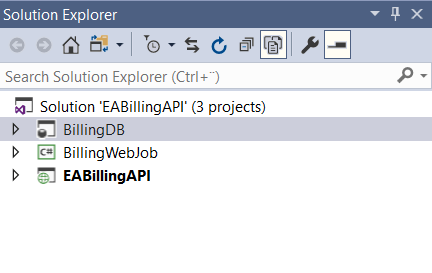
The user gets also a Visual Studio project which contains three solutions which are empty in this case. The empty solutions also come from the GIT repository, and they are configured according to the chosen architecture: API App + Web job + Azure SQL Database.

Another important part of the work is the data that the curious user needs for the project. To start the work, they get a small dataset from the EA Billing data so they can develop the SQL Database. They get this as a template from GIT which contains a template on how to call an API and save the data in the Data Lake.

Data Lake with Metadata Discovery

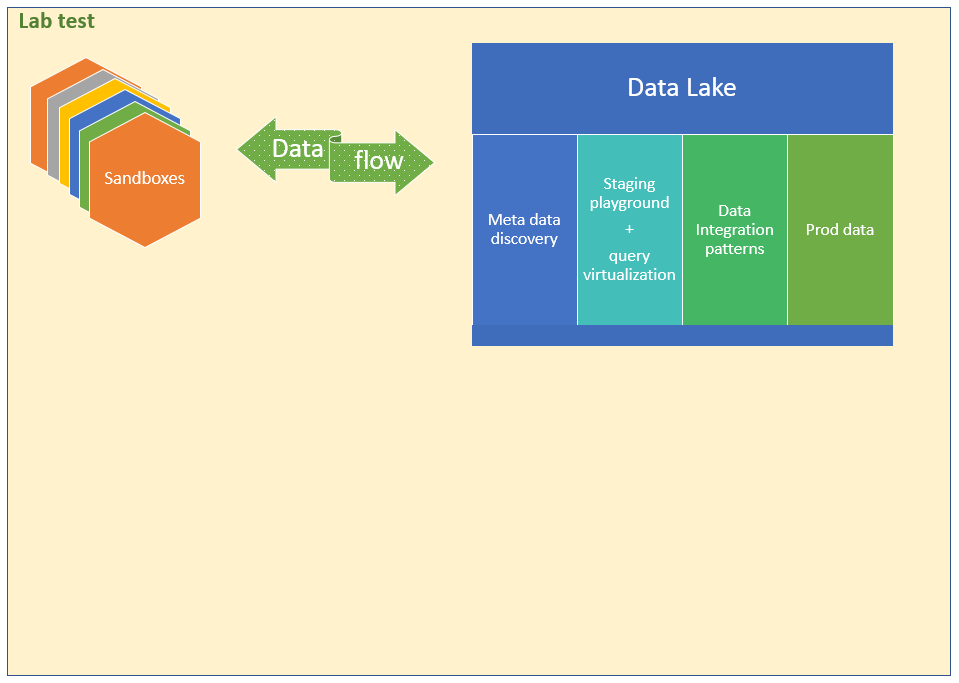
The Data Lake consists of two parts:

  1. Staging playground – sample data for PoCs which consists of subsets from prod or other large datasets
  2. Prod data – This part of the data lake contains full datasets which are used for production systems.

One important quality of the Data Lake is that it supports data virtualization, metadata catalog which is searchable, and it has a data integration repo which is maintained to follow the most common principles of data integrations.

In this case, the curious user gets a small corner of the data lake where they store a bit of EA billing data. They also have the Azure SQL Database which is empty for now.

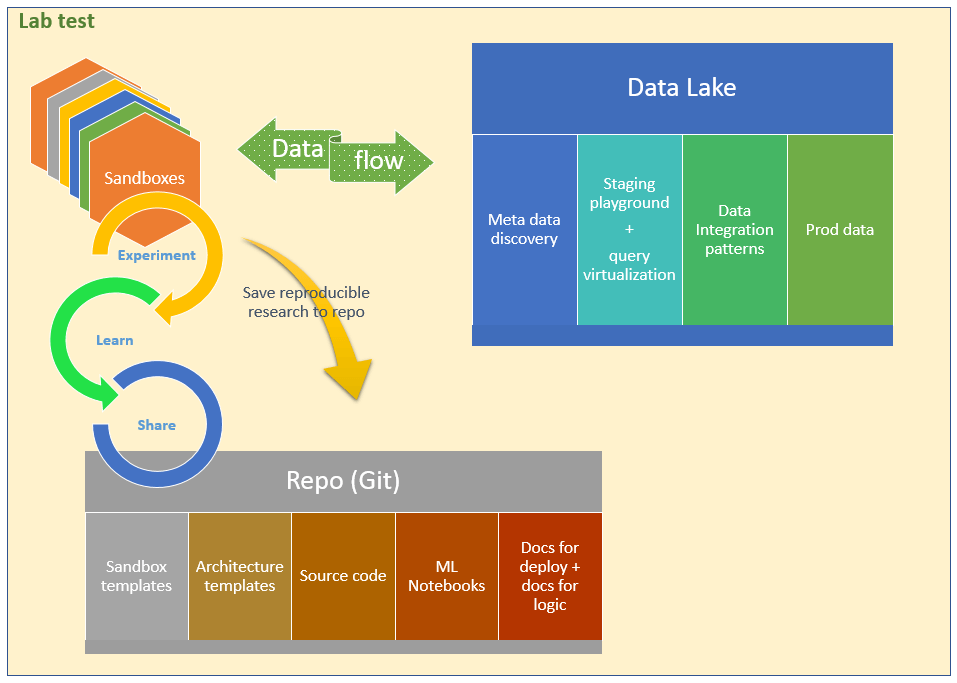
The curious user is working in the Sandbox environment. They are coding the API App, the Web Job, and the SQL Database. They are iterating through exploring, learning and sharing their work. The sharing is done in a GIT repository, where the user can check in their changes directly from Visual Studio.

Repository

As mentioned earlier, the repo is an essential part of the Cloud Foundation system because it contains the following

  • Templates for sandboxes
  • Templates for architecture (big part of the architecture follows predictable patterns)
  • Source code for work and research that has been done (successful and not so successful, in production or not)
  • ML notebooks templates including ML notebooks that are customized for different projects
  • Documentation – deployment procedures and app documentation used for reproducible experiments in sandbox environments and for deployment to production

The important part is that the GIT repo is searchable, and the search is available to any curious user to discover items, templates, and ideas; and more importantly, it will eventually prevent them from starting research from “Square one” if this has been worked on before.

Another critical part is the reproducibility and the disaster recovery aspects.

Of course, it is great to Experiment, Learn and Share, but to get real value out of it, the ideas which are turned into code have to be documented and reviewed.

The curious user checks in their solution which contains the Web App, the Web Job and the SQL Database code to GIT, and with it they submit the documentation for the solution and how to deploy it.

Code Review and Test / Prod Deploy from Repo

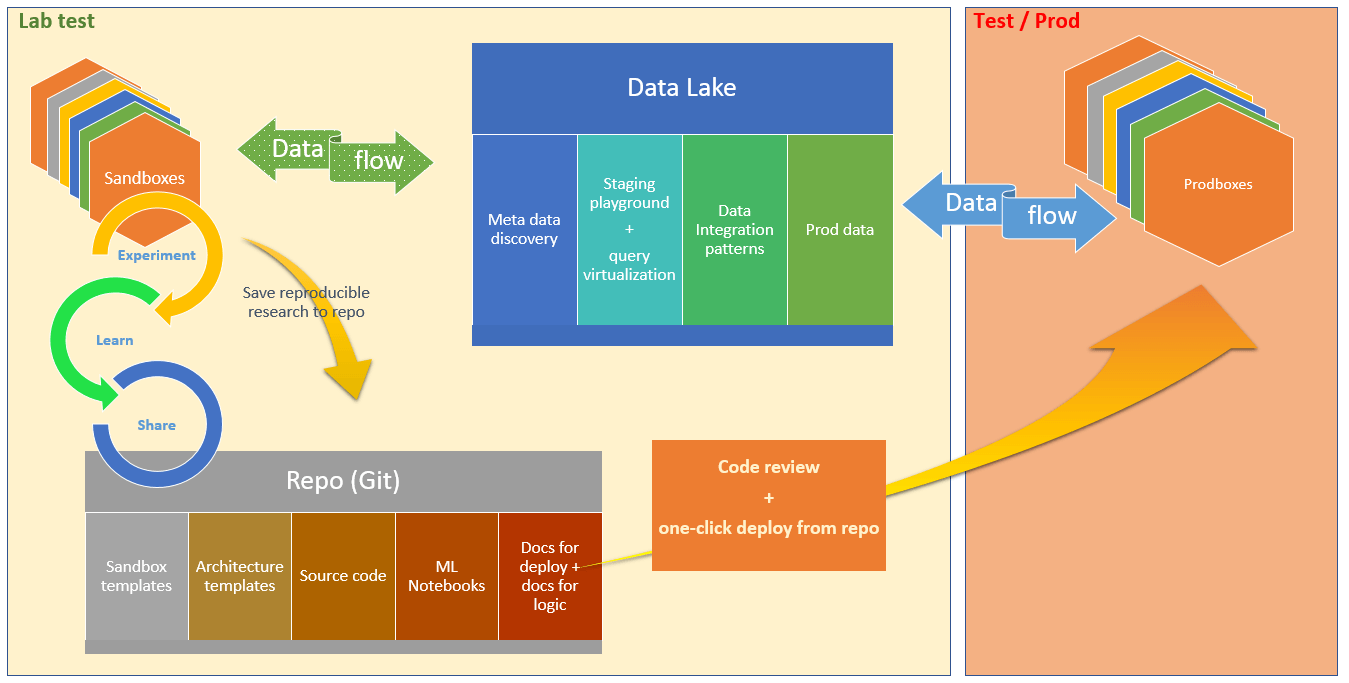
The Cloud Foundation structure supports a function which enforces peer reviews on the team or organizational unit levels. Also, there are guidelines which enforce certain best-practice rules.

For example, there are several architectures which would support the EA Billing solution, for example, it can use HDInsight clusters, Event Hubs or even a Cosmos DB database. All of the above approaches would solve the business demand, however, there is a big difference in complexity and price tag. The first tier of protection would be the peer review. The second tier would be the best-practice guidelines of the Cloud Foundation platform.

In other words, if a curious user comes with a cost center and wants to play around with a very expensive Cosmos DB database, they can do that. However, a solution like this will be reviewed before taking it to production, and some strategic questions need to be answered before clearing the path to the production environment.

As you can see, the deployment to production is quite easy, since all templates and code are checked in to the GIT repository. Also, the deployment documentation is checked in together with the configuration details.

Then the DevOps team takes the deployment to the test environment from there.

DevOps – Take Over the Monitoring and Alerting

Finally, when the DevOps team has deployed to Test and Production environments, it is time to monitor the solution and to alert the responsible team in case of failure. There are also questions about debugging and further development of the solution, however, these can be answered for each app and for each organization based on their needs and processes.

Closing the Loop

I am closing the loop with another curious user who is looking for a report on the subset of the EA billing data and finds this project.

Another curious user comes with a question about what resources are created in which Cloud regions. The user searches via the Cloud Foundation portal, and they find the metadata which contains information about resources and regions. They also find the EA Billing project, its documentation and the people who have worked on it. This way, instead of developing the entire app from scratch, the user contacts the developer, they exchange some knowledge and it turns out that the solution is simply to create a new Power BI report dashboard which visualizes the count and type of resources per region.

Finally, the whole picture of how curiosity is enabled to prosper and to deliver results within an organization is in place. And all of this is done in a collaborative manner, via experimentation, learning and sharing.

Conclusion

In this article, I explored the need and the benefits of a collaborative analytical platform. Such a platform is fundamental for speeding up the data analysis and the conversion of data into knowledge. More importantly, anyone in an organization should be able to find previous research, improve it and share it. A lot of time is saved this way by not “reinventing the wheel” and by speeding up the path from curiosity to production.

The post Building a Collaborative Platform to Speed up Data Analysis appeared first on Simple Talk.


from Simple Talk https://ift.tt/2Pkk8dW
via

Building Better HTML Forms in Vanilla-JS

Let’s state that, without any further ado, dealing with HTML forms is boring. For some time, when a full-page refresh was still acceptable to end users, forms were relatively simple to work with: just collect data and post. Today, validation is required on the client and the server, and posting should happen via Ajax which requires some additional script. As a result, many repetitive and boilerplate tasks such as layout, validation, submission and display of the response are on the list for each and every form your application may need.

Today, it’s a point of honor for most web frameworks to streamline the process by handling many of the inevitable chores. Angular, for example, does a good job with forms through the FormsModule and the NgForm directive. In this article, I’ll focus on what you can do to enforce the logic behind an HTML form before it can be submitted to the server. There are many little things that can make the user experience a bit smoother and even more pleasant. I’ll incorporate some of them into a small vanilla-JS framework you are welcome to use as-is or, if you like it, integrate into your own solutions.

Improving the Usability of HTML Forms

Whatever you can do through the sapient use of JavaScript and CSS styles will improve the experience of HTML forms for the user. CSS styles have only a cosmetic effect on the view being displayed to users—but graphics are quite important. JavaScript, adds additional behavior that the default implementation of HTML forms in browsers doesn’t provide. Some aspects of HTML forms that can be improved to smooth the friction of input fields and submit buttons are:

  • A coherent experience across browsers for common input fields such as those that accept dates and numbers
  • Prompt notification of when the form’s status has changed, i.e., when submit is valid
  • An easy to express validation layer that runs on the client and occasionally interacts with the server to perform remote validation of some fields being accepted
  • A compact and effective way to post the content of the form to some remote endpoint and an equally simple way for the developers to display the response of the post

In this article, I’m going to cover the first two aspects leaving the other two for a successive article. It is worth noting that the Angular FormsModule addresses the same concerns through the use of an advanced syntax backend supported by a gigantic and comprehensive framework.

Coherent Experience for Input Fields

HTML5 comes with a long list of new input types, but the implementation that browsers provide for all of them is not coherent and is the subject of endless debates between developers and users. Consider the following piece of HTML markup:

<input type="date" />

In the vision of the HTML5 committee, that should give developers a universal way to accept a date within their forms. It’s only a spec, though, that browsers rendered in different graphical ways and some old browsers (most notably Internet Explorer) didn’t transpose at all. In addition, even when the specs are implemented in full compliance, it might not be the ideal way that errors are rendered and configurability is supported. Finally, there’s the point that some developers reckon that users should get the user interface of the agent they’re used to, and others that would maintain that a uniform experience is always preferable.

As far as dates are concerned, if your stand is the former then all you do is use the date input type. Otherwise, you pick up your favorite calendar plugin and attach it to a plain text input field. For what it’s worth, my personal stand is the latter. Here’s the code I love to use when I need to grab a date from within a form.

if (isMobile) {
   $("#checkin").attr("type", "date");
} else {
   $("#checkin").datepicker();
}

I tend to distinguish the behavior between truly mobile devices and desktop browsers. On mobile devices, I’d go for the native calendar control. On laptops, instead, I’d go for a unified experience through some calendar plugin. To do mobile detection, I suggest you look into WURFL.JS, a free service that does a good job of detecting mobile devices. For more information, see http://wurfl.io.

A point to keep in mind is that no validation is applied consistently to entered values. While the browser’s user interface generally doesn’t let you enter patently invalid dates, it is still possible for the user to type or paste text into the field that doesn’t match a valid date and in the range of acceptable dates, you may have configured through the min and max attributes. In other words, you may get browser-led error messages (outside your programmatic control), but you might want to check that provided values are those you expect. To make a long story short, you can’t completely trust the browser’s implementation of date inputs. With a calendar plugin, instead, you have a lot more control.

A similar story can be told for numbers. In fact, I suggest using a similar script validation for numbers to guarantee that nothing but digits are entered and that they are within the given range of values.

$("input[data-digits-only]")
    .on("keypress", function(event) {
        if (event.charCode < 48 || event.charCode > 57) {
            event.preventDefault();
            return false;
        }})
    .on("keyup", function () {
        var buffer = $(this).val();
        var maxLength = parseInt($(this).attr("maxlength"));
        if (buffer.length > maxLength) {
            $(this).val("");
            return false;
        }
        var minVal = parseInt($(this).attr("min"));
        var maxVal = parseInt($(this).attr("max"));
        var number = parseInt(buffer);
        if (number < minVal || number > maxVal) {
            $(this).val("");
            return false;
        }
        return true;
    });

The input field can be either of type number or text as it’s the attached JavaScript role to control what happens with entered data. If you make it a number, though, you have an ad hoc keyboard on mobile devices and some additional UI support on desktop browsers. The code above is attached (via jQuery in the demo) to all INPUT elements with a custom data attribute and ensure that min and max are honored as well as the maxlength attribute (not covered by the HTML5 standard). Any non-digit character is just refused, and if more than the expected characters are typed, the buffer is automatically emptied. Users are forced to enter a valid number.

The lesson we learn from this is that beyond built-in form validation, it is only via a script that you can ensure that entered data is in the proper format.

Let’s say that you decide to go with the above approach for all your date and number input fields. How would you silently attach those handlers to all such fields in all HTML forms? Some preliminary work should be orchestrated before a form is displayed. Believe it or not, this is just what all libraries do, including the Angular form module.

Silent Configuration of the HTML Form

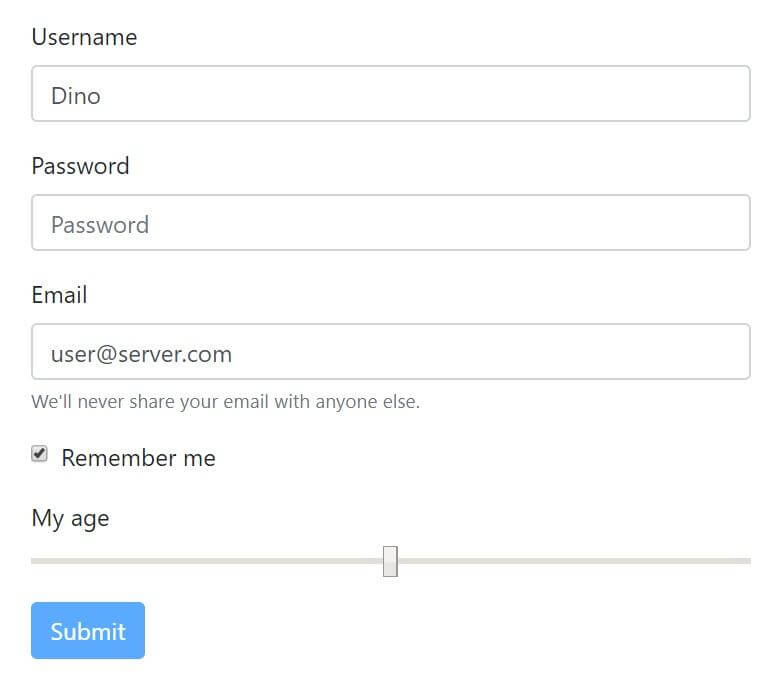
Let’s start from a canonical form just made of a few different input types. I’ll use Bootstrap 4 to make it look nicer. (See Figure 1.)

Figure 1: Bootstrap 4 form

Here is the code for the form:

<form method="post" action="...">
    <div class="form-group">
        <label for="username">Username</label>
        <input type="text" class="form-control" id="username" 
               placeholder="User name" value="Dino">
    </div>
    <div class="form-group">
        <label for="password">Password</label>
        <input type="password" class="form-control" id="password" 
          placeholder="Password">
    </div>
    <div class="form-group">
        <label for="email">Email</label>
        <input type="email" class="form-control" id="email" 
               placeholder="Email address" value="user@server.com">
        <small class="form-text text-muted">
           We'll never share this with anyone else.
        </small>
    </div>
    <div class="form-group form-check">
        <input type="checkbox" class="form-check-input" 
               id="rememberme" checked>
        <label class="form-check-label" for="rememberme">Remember me</label>
    </div>
    <div class="form-group">
        <label for="age">My age</label>
        <input type="range" class="form-control-range" id="age">
    </div>
    <button type="button" class="btn btn-primary">Submit</button>
</form>

Whether you want to attach some ad hoc configuration to a form or some individual input elements, you must first find a way to easily select them. CSS selectors are an excellent approach. By adding a custom, even empty, CSS class to the form, you make it simpler and, more importantly, general for developers to attach some script code to initialize the form in the page.

<form class="ybq-form">

Now you can append a script file at the bottom of the file, or bound to document.ready if you use jQuery, that hooks up the form and manipulates it in a way that is completely transparent to users and even other developers. Let’s say you create a ybq-forms.js file with the following content:

$(".ybq-form").each(function () {
   ...
});

The code in the each repeater depends on the custom behavior you want to enable on the form. For example, you can add a mechanism to detect whether the original content of the form has been changed by the user. The first thing to do is store the current value of each input field. Angular and other MVVM frameworks do this through the JavaScript artifact (or TypeScript class) they use to bind data to the form. In a vanilla-JS solution, you can use a custom data attribute on each input field.

$(".ybq-form").each(function () {
    var form = $(this);
    form.find("input").each(function () {
        __preserveOriginalValue($(this));
    });
})

// Add data-attributes with original values
function __preserveOriginalValue(field) {
    field.data("orig", __getCurrentValue(field));
}

function __getCurrentValue(field) {
    if (field.prop("checked"))
        return true; 
    else
        return field.val();
}

After finding all INPUT elements within the form, the code iterates and adds a data-orig custom attribute set to the current value of the field. Note that the jQuery val() function doesn’t return Boolean, so some additional work is required to support checkboxes and possibly other specific types.

Adding a User Interface to Show Pending Changes

Another necessary step consists of adding some user interface elements that will be responsible for showing the current status of form, in other words, whether it has pending changes. The structure of this user interface is entirely up to you, but in some way, a reference to it must be communicated to, or discoverable by, the script. A simple way to achieve this is by assigning a CSS class to the container of the user interface. The DIV below is then the container of any user interface message from the form.

<form class="ybq-form">
    <div class="ybq-form-header"></div>
    ...
</form>

What you put in the DIV depends on how sophisticated you want the form to be. At the very minimum, the DIV will show a message that tells about the changed or pristine state of the form. However, you can add a timer that counts the time the user spends on the form and even a button to reset the state of the input fields to the original values. The changed/pristine state of the form will reasonably affect the state of the submit button(s). In the end, the script will be extended with a new function.

function __stateHasChanged(form, state) {
    var header = form.find(".ybq-form-header");
    if (state) {
        header.html("CHANGED").addClass("bg-warning");
        form.find(".ybq-form-submit").removeAttr("disabled");
    } else {
        header.html("NO CHANGES PENDING").removeClass("bg-warning");
        form.find(".ybq-form-submit").attr("disabled", "disabled");
    }
}

The function is invoked as first thing in the initialization script.

$(".ybq-form").each(function () {
    var form = $(this);
    __stateHasChanged(form, false);
    form.find("input").each(function () {
        __preserveOriginalValue($(this));
    });
    
    // Timer to detect changes here
    ...
})

The header bar at the top of the form will be styled as dictated by the custom ybq-form-header class. However, the style changes to Bootstrap’s bg-warning state when the state of the form becomes changed and will be restored if the state returns to pristine. The final step is finding a way to detect changes. There’s not just one way to do it, but the one I’ve chosen here is adding a timer. Fired every one or two seconds, the timer may serve two purposes. One is checking that the values in the various input fields are different from the original values. The other is calculating the time the user has spent on the form.

window.setInterval(function() {
        __stateHasChanged(form, false);
        form.find("input").each(function() {
            if (__isChanged($(this))) {
                __stateHasChanged(form, true);
                return false;
            }
        });
    },
    1000);

Take a quick look at how the __isChanged helper function being used. It invokes the __getCurrentValue defined earlier and checks its value against the pristine value stored in the data-orig attribute.

function __isChanged(elem) {
    var outcome = __getCurrentValue(elem) != elem.data("orig");
    return outcome;
}

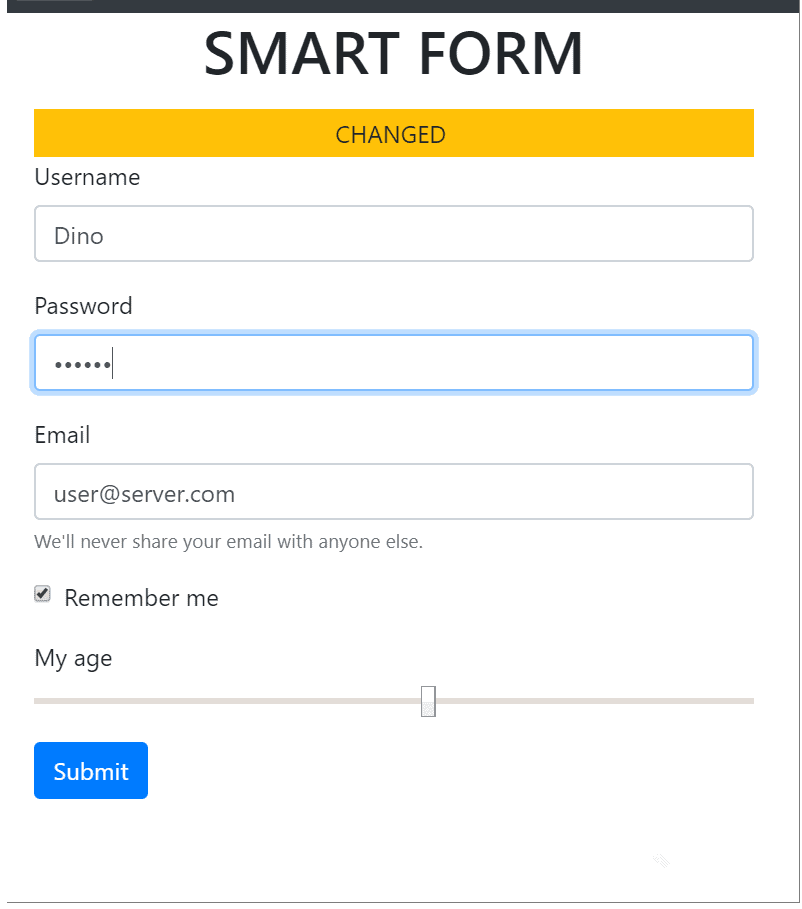
Enriched with the above (and silently attached) script, the relatively scanty original form will now look like the one in Figure 2.

Figure 2: The new form

If you compare Figure 1 and Figure 2, you will see that state of the button is different if the form contains changes to be posted to the server.

Summary

This article identified four aspects that, if improved, would produce more user-friendly HTML forms, even in ASP.NET or any vanilla-JS programming environments. Type-specific input fields and detection of changes in the form are covered in the article while form validation and posting will be covered in a future column.

Related to the problem of detecting changes in the form, is the problem of validation that also the Forms module of Angular addresses. If there’s a way to validate the content being posted, in fact, then the form should not post any invalid content. Validation, though, is a more delicate matter that is easier to deal with in an overall MVVM model. Some good results, however, can be obtained even with vanilla-JS within ASP.NET or maybe PHP web pages, but you’ll read about it in the next article.

The post Building Better HTML Forms in Vanilla-JS appeared first on Simple Talk.


from Simple Talk https://ift.tt/2G3Obat
via

I Have an Exclusive Lock, My Row Is Safe, Right?

Note: This is an update of a blog I posted in 2006 with a lot of additional information (I was less wordy in my 30s apparently). It is just as relevant today.

I have a presentation I do occasionally on concurrency entitled “Let Me Finish” that covers many of the different types of concurrency behaviors that SQL Server uses, both in the on-disk and in-memory tables (you can get that from the latest link here). One of the demos that gets the most attention is probably the least typical scenario, having a reader not blocked by an exclusive lock.

The in-memory engine doesn’t use locks, so this will not pertain with any in-memory tables. But for on-disk tables, it seems obvious that anything exclusively locked will not be touchable by any other user, since an exclusive look (XLOCK) is incompatible with all other lock types, right?

Note: READ UNCOMMITED and the NOLOCK hint are also generally not blocked by an exclusive lock, but let’s try to believe that doesn’t exist.

Well, not exactly, and the reason for this lies in the actual name of the default isolation level READ COMMITTED. Data that is on a page that has not been marked as dirty will (generally, for reasons to come) be available because SQL Server knows that the page has not been changed as that point, so it reads through the exclusive lock (which are most often used by the query processor to mark when a page is being written to).

Note, too that SQL Server has a setting to allow READ COMMITTED isolation level to read the last committed version of a row using statement level snapshot isolation level with the database setting READ COMMITTED SNAPSHOT, in which case even a dirty page would be skipped by a reader. I will discuss that further later in the blog.

For example. say you have the following database:

USE master
GO
CREATE DATABASE TestReadCommitted
GO
ALTER DATABASE TestReadCommitted
  SET READ_COMMITTED_SNAPSHOT OFF; --To make 100% sure
GO
USE TestReadCommitted;

Then we create the following schema and table with a single row to give us something to lock:

CREATE SCHEMA Demo;
GO
CREATE TABLE Demo.Test
(
        TestId int PRIMARY KEY
)
GO
INSERT INTO Demo.Test(TestId)
VALUES(1);

Now, in one connection to SQL Server, run this following command:

SET TRANSACTION ISOLATION LEVEL SERIALIZABLE;
BEGIN TRANSACTION;
SELECT *
FROM   Demo.Test WITH (XLOCK);

By using the SERIALIZABLE isolation level, we have applied the most strict isolation level such that no other user can make any changes to this table. No new (phantom) rows, and no changed (non-repeatable read) rows either. Without the XLOCK hint, our row would have shared range locks on all existing rows, as well as any preventing any new rows in the table, but all users would have access to the row. Adding in the XLOCK hint to the query, and now all locks will be exclusive locks.

For more reading on this subject, go check Rodney Landrum’s blog here on the topic, which has techniques to see the locks, including using sp_lock and sys.dm_tran_locks.

Now, if you execute either of the following statements on a different connection:

SET TRANSACTION ISOLATION LEVEL READ COMMITTED;
SELECT *
FROM   Demo.Test WITH (XLOCK);
GO
SET TRANSACTION ISOLATION LEVEL READ COMMITTED;
UPDATE Demo.Test
SET    TestId = TestId;

You will be blocked from running your query. The first because the exclusive lock is not compatible with the already exclusively locked row. The second for the same reason, except we are actually trying to change the row.

However, if a typical reader were to come in and run a typical query:

SET TRANSACTION ISOLATION LEVEL READ COMMITTED;
SELECT *
FROM   Demo.Test;

You will find that the SELECT statement executes, ignoring the exclusive lock, because it is not a write lock, and the data on the page has not been changed.

The main reason people try to do this is to force access to a row in a single threaded manner. For example, building their own sequence number, either in a row they update, or by trying to do MAX() on all of the data in a table to make sure only one reader gets the same value.

This is generally a bad idea, since locking an entire table is a generally bad idea, but if you needed to block readers, you can couple the XLOCK with a PAGLOCK. So, change the first reader to:

BEGIN TRANSACTION;
SELECT *
FROM   Demo.Test WITH (XLOCK,PAGLOCK);

And retry the experiment. Now you will find the reader is blocked (Again thanks to Tibor Karazi for pointing this one out to me oh so many years ago, and it has been a lesson I still remember).

Just bear in mind that in a normal usage of a statement like this, you are probably trying to lock a single row. But by adding the PAGLOCK hint, you have now blocked 8060 byte exclusively. Maybe not an issue, but certainly could be in a highly contentious database with smaller row size.

In the start of this blog, I noted READ COMMITTED SNAPSHOT had an effect on being able to read exclusively locked rows. If we turn this setting on for the database, no user in READ COMMITTED isolation level will be blocked when reading this row.

ALTER DATABASE TestReadCommitted
  SET READ_COMMITTED_SNAPSHOT ON;

Now, even if the user executes, making the page the row sits on marked as dirty, and the row exclusively locked:

BEGIN TRANSACTION;
UPDATE Demo.Test
SET TestId = TestId * 100;

No matter if this user leaves the transaction open for all day, any user in the default isolation level of READ COMMITTED will not be blocked and will see the original value of 1 until the transaction is committed. (Ideally, your transactions are kept short so the version store can be flushed of needless versions, but long running transactions happen):

BEGIN TRANSACTION;
SELECT *
FROM   Demo.Test;

I include the BEGIN TRANSACTION for the second query to make a finer point about READ COMMITTED SNAPSHOT. If you use the full SNAPSHOT isolation level, readers will get the same result back every time once their transaction has started (meaning they have read anything from the database.) So:

SET ISOLATION LEVEL SNAPSHOT;
BEGIN TRANSACTION;
SELECT *
FROM   Demo.Test;
SELECT *
FROM   Demo.Test;

No matter how many times you run that SELECT statement in that same transaction, the results will be the same, or your transaction will be cancelled. The extends to other tables as well, your view of all of the tables in the database container (all of the on-disk tables in a database) will look like they did when your first statement accesses data (not when the transaction occurs).

However in READ COMMITTED SNAPSHOT readers are only guaranteed consistent results at the statement level. Once the rows are returned, the results of the UPDATE will be visible to the reader.

So in the case of:

SET ISOLATION LEVEL READ COMMITTED;
BEGIN TRANSACTION;
SELECT *
FROM   Demo.Test;
SELECT *
FROM   Demo.Test;

Once your query starts, it will see the table as it was when the statement started, but the second SELECT statement may return a completely different set of data if between the start of the first SELECT the data has changed.

Summary

The main thing to take away here is that locking is complicated, and the relational engine creators will do anything they can to improve performance. If you need certain guarantees of how your data is protected from change to your readers, you need to understand the isolation levels well enough to protect yourself.

Exclusively locked rows are not really exclusively locked from all other users. Just more exclusively locked than shared locks. (And READ UNCOMMITTED isn’t always allowed to see data in any scenario, such as seeing a table and data that is being created using SELECT INTO.) Be sure and test your code for how it will behave in concurrent processing scenarios, and when testing in a query tool, use WAITFOR statements to slow down time. For most situations you can devise a manner to slow down time and see what two statements will do to one another.


The post I Have an Exclusive Lock, My Row Is Safe, Right? appeared first on Simple Talk.


from Simple Talk https://ift.tt/2PjKQTP
via

Data Quality

Around the years 2000 to 2005, the trade press filled with articles on data quality. Several good books (see references) were written on the subject, and then it seemed to fade from the popular view. It really is something that should be taught in database classes, so the people will begin to design databases with quality in mind instead of trying to stick it on after something’s gone into production.

Data quality should be enforced data quality at the system level, but this assumes that each of the individual tables and data sources within the system doesn’t have data quality problems. Quality is essentially a bottom-up process; if the inputs in the raw sources of data are clean and trustworthy, then the system as a whole can produce clean and trustworthy results. This is not guaranteed, however. Clean data is necessary but not sufficient for a quality database.

Data Quality at the System Level

Let’s look back in a time before most technologists thought in terms of databases and using software to ensure quality. There is actually an international job title, Certified Records Manager (CRM), which has been granted by Institute of Certified Records Managers (ICRM) since 1975.

These people worked mostly with paper records and microfilm largely because 30 or 40 years ago, the laws required paper copies. And in some states, the color of the ink used was specified by law. One of the most important jobs of the records manager, particularly in insurance companies, was to make sure that you never kept anything too long. As a general rule, data is like vegetables; the fresher it is, the better it is and that if it gets too old, it’s useless. How long you had retained the old records was also a matter of law. In the insurance industry in the United States, this meant state-by-state differences in the laws and the retention cycles. The truth is that old data can be worse than useless. You could be required to produce documents in court cases, if you still had them, so all data became evidence against your company.

It was also expensive to store lots of paper or microfilm records. Magnetic media is pretty resilient and very dense, and, if worse comes to worst, can be moved on to laser disks. It’s also a lot easier to move a bunch of bytes than it is to move a pile of paper or microfiche. And I haven’t even started to talk about what searching paper can be like! I have horror stories about driving across the state of Georgia to a warehouse to look for banker boxes for weeks.

When digital storage with relatively simple retrieval became cheap, most companies stopped getting rid of obsolete data. The idea was that you could do data mining and get information out of it. After all, you had paid to collect that data. You should get something from it for your expense. However, now you have to worry about not just discovery in court cases, but privacy requirements. You now have to worry about PII (personally identifiable information), GDPR (General Data Protection Regulation) and whatever the next piece of legislation is.

Instead of putting your data through a shredder, like was done with the paper records, it could be anonymized in a legally acceptable way and send it over to a data warehouse for analysis. One approach is to scramble the unique identifiers, so the individual rows are still represented. Another approach is to aggregate the data in some way that is still granular enough to be useful for analysis, but so aggregated that you cannot find individuals even under a constructed identifier.

Data Quality at the Table and Schema Level

SQL has several advantages built into the language for data quality. Simple punch card and mag tape files that were used by COBOL depended on application programs to do any quality checks and to give meaning to the data. With SQL, much of this work can be put into the DDL. For example, decades ago a credit card company bought public records information and transcribed it on to punch cards. There was a small error in the punch card layouts. This resulted in the last column of a town name, which ended in the letter “D”, being punched one column over. Unfortunately, this was the encoding for “deceased” in the company files. The system began doing just what it was supposed to, closing out the accounts of dead people. Whoops!

This sort of error would not happen in a correctly designed SQL database. First of all, datatypes and size in SQL are a property of each column, not dependent on the host program reading the data. The use of DEFAULT clauses, CHECK() constraints and REFERENCES prevents certain low-level kinds of bad data from ever getting in the schema in the first place. It is my experience that these features are underused. Look at some of your own schemas; have you prevented zero or negative values in the integer columns in your tables? Have you added CHECK(x IN (..)) on columns where appropriate? You want to be able to get these restrictions and constraints from a data dictionary when you are designing the system. Unfortunately, people very often knowingly put bad data into their tables, and then try to scrub it in place. Another choice is to set up staging tables and clean the data before it gets into the database. If you’re lucky, you will have a good ETL tool that matches your problem. In the real world, you should probably expect to have to write code to clean the data. But first look for tools.

Some of these tools are third-party products, designed for particular types of data. The most common ones deal with mailing addresses, some standardized industry codes and regular expression software available from trade groups or the public domain.

Characteristics of Quality Data

At a higher level of abstraction, there are at least four characteristics to ensure data quality.

Completeness

Is a concept missing? This error is going to be hard to correct. If you didn’t properly design your schema at the start, then you’ve got to go back and add the missing parts.

Are there missing values in a column, rows in a table? Values can be missing because nobody knows what they are or because nobody bothers to collect them. One of the classic examples of that is when people do not fill out the repair history of capital equipment. Since the repair was quick and easy as part of a routine maintenance program, or for some other reason, it’s ignored.

Very often missing values are not skewed in one direction or the other, so the aggregate is close enough to be useful. In my equipment example, the mean time between failure (MTBF) might not be significantly affected. What might be important is the type of repair being done; was it a part of planned routine maintenance? Or was it a very unplanned disaster? Or was it within tolerance (those light bulbs were getting old and there were expected to start burning out about now)?

The rate of missing values is also significant. Once the missing data rate gets too high, the data has no value because the sample is not valid. You can do imputation with statistical models, but any time you try to use statistical smoothing techniques, you’re smuggling in many assumptions. How do you know what the statistical distribution of your data is? How do you know that what’s in your database currently is representative of the whole population?

A quick check that you may have a problem is to look at how many columns in your database are NULLable and how many NULLs each of those columns has. Lots of NULLs are not automatically proof of low-quality, but they’re a pretty good code smell.

Accuracy

How does the database compare with reality? Some things are easy to keep consistent in the database. Once you get a correct birthdate, it’s probably not going to change very much. However, you can expect at any time to have about 8% of the street addresses in error. Nobody’s particularly evil, but many people are mobile. This is especially true if the population is younger. Even if someone doesn’t move in a given year, there can be ZIP Code changes or streets renamed.

Sticking with the example of street addresses, you’ll want to put in procedures for maintaining the accuracy of the data. The easiest way is to simply do a mailing and wait for the post office to return that which was not deliverable or to give you change of address notices. However, you would probably prefer not to make your customers into your quality assurance group.

The bad news is that all too often, no one checks the accuracy of the data until the middle of an audit of some kind. There are sampling techniques which were developed for manufacturing applications. For example, during World War II, munitions had to be tested. Testing munitions is what’s called destructive testing; you cannot test 100% of your output. But what’s the right size sample? Sequential analysis is a technique that adjusts the size sample taken based on the results from each testing. The more errors you find, the larger your sample gets. Fewer errors mean smaller sample sizes.

Consistency

Data is going to come from many different sources. Ideally, if multiple sources are reporting on the same reality, then they ought to be consistent with each other. Since I’m writing this piece just after the US midterm elections, my current favorite example is the number of counties here in Texas where the number of registered voters is significantly less than the number of ballots cast in the election.

The different data sources don’t have to be external. Different parts of the same system can lack consistency. One common problem is when employees or your customers are counted in several different categories in such a way that things are double counted. Another source of bad counts is work in process differences in which the data simply gets lost in the shuffle.

Relevancy

Is the data useful for the task at hand? Imagine that you have a pretty typical inventory system. You’re pretty sure that your data is correct, current and everything is measured in the same way. However, you have nothing in the database to tell who supplied the parts; they become treated as a commodity. Then you get a recall notice from one of your suppliers telling you that one of their shipments is defective. The database is not going to help track down the bad parts and remove them from inventory or do the recall. You are missing a critical attribute that’s relevant to making decisions.

Data Quality at the Environment Level

Another concern for data quality is what environment you work in. If you are in an environment that has legal restrictions, then data quality is defined as keeping your database in a way that will not put you in jail. Today, ROI no longer means return on investment; it stands for risk of incarceration. In the United States, two of the most important sets of regulations they can face are defined by the Health Insurance Portability and Accountability Act of 1996 (HIPAA) and the Sarbanes-Oxley Act of 2002 (SOX). If you happen to work internationally, then you’re running into the GDPR regulations from Europe. Frankly, a database administrator is probably not qualified to handle the legal aspects of all of these things. This is why companies hire lawyers, accountants, and lobbyists.

SOX leaves it up to the individual corporation to come up with internal control mechanisms for complying with the regulations. My recommendation is that most of us should not even try this. Look for a package that has been developed by a financial services company and make them criminally liable for any errors, omissions or illegal procedures.

For an introduction, look at a series of online articles by Robert Sheldon (see references). The articles provide an overview of HIPAA and SOX and explain how these regulations affect DBAs.

Conclusion

If you are old enough, you might have bought a television from Zenith Electronics (part of LG Electronics since 1999) which had the famous slogan “The quality goes in before the name goes on.” This company got it exactly right! Quality, specifically data quality, has to be good from the start. Unlike physical goods, data cannot be isolated, easily replaced or repaired. Data permeates everything in the enterprise, so bad data effects operations, decisions, and projections. Fix problems before they become problems!

REFERENCES

Olson, J. E., “Data Quality:The Accuracy Dimension”, ISBN-10: 1-55860-891-5; 2003.

Redman, Thomas C., “Data Quality: The Field Guide”, ISBN-10: 1-55558-251-6; 2001.

Wald, Abraham, “Sequential Analysis”, ISBN 13: 9780486615790; `947.

Yang, R.Y., Ziad, M.,Lee, Y.W., “Data Quality”, ISBN-10: 0-7923-7215-8; 2001.

Robert Sheldon, R. “Introduction to HIPAA and SOX

The post Data Quality appeared first on Simple Talk.


from Simple Talk https://ift.tt/2rl3dhR
via

Wednesday, December 5, 2018

Producing Data and Schemas in JSON array-of-array format.

JSON was initially designed for the informal transfer of data that has no schema. It has no concept of a table, or of an array of identical arrays. This means that it must tell you each key for each object, even if the original data object was a table. With the happy minimum of key-value pairs, the JSON document that is produced will produce tabular data that tells you the column to which the data object belongs, and it will do a reasonable job of implying a data type. Sadly, that just isn’t enough for us because JSON only recognises just four base data types; string, number, Boolean and null. In SQL Server, we’re used to a lot more than that. BSON and other extensions supplement this with functions that coerce the string into the correct datatype, but we don’t need to do that because all of the data for any one column will be under the same constraints. In fact, there is a lot of redundant data in a JSON document produced by SQL Server that represents a table or result. Not only that, but there isn’t enough of the right sort of metadata until we add a JSON Schema.

CSV provides the most economical way of transferring tabular data as an ASCII file, but SQL Server doesn’t always support it properly to the rfc4180 standard. However, JSON can transfer tabular data in a way that is almost as economical in space, and more reliably. Here, just to convince you that it is compact, are the first three records of Adventureworks humanResources.employee table in array-of-array JSON.

[[1,"295847284","adventure-works\\ken0",null,null,"Chief Executive Officer","1969-01-29","S","M","2009-01-14",true,99,69,true,"F01251E5-96A3-448D-981E-0F99D789110D","2014-06-30T00:00:00"], 
[2,"245797967","adventure-works\\terri0","\/1\/",1,"Vice President of Engineering","1971-08-01","S","F","2008-01-31",true,1,20,true,"45E8F437-670D-4409-93CB-F9424A40D6EE","2014-06-30T00:00:00"], 
[11,"974026903","adventure-works\\ovidiu0","\/1\/1\/5\/",3,"Senior Tool Designer","1978-01-17","S","M","2010-12-05",false,7,23,true,"F68C7C19-FAC1-438C-9BB7-AC33FCC341C3","2014-06-30T00:00:00"] 
]

It is valid JSON (RFC 4627). It isn’t the usual way of storing table data, which is much more verbose, being an array of JSON objects of key-value pairs. We are no longer bound to do this the conventional way because we can now transfer the metadata with the data. The JSON Schema tells you how it is stored.

JSON can be persuaded into this array-of-array format, and if we can read and write it in SQL Server, then we can use it. To prove this, we need to be able to save a database in this format, and to save the schema in this format.

In this article, I’ll demonstrate how to produce an array-in-array JSON document, and the schema to go with it. With this, you have sufficient information to make it easy to transfer such data.

JSON Arrays to Relational Table

Before we turn to the task of producing this sort of data from a table or expression we ought to show to turn the specimen json document that I’ve just shown you back into a relational table. We’ll start by doing the task manually, without a schema, as if it were CSV. You might think I’m being ironic when you first see the code that performs this action, but no. We can then go on to generate all the laborious stuff automatically:

Let’s shred our sample JSON. We have two alternatives. We can do it the JSON_Value way, referencing array elements within the row rather than key/value pairs.

DECLARE  @MyJSON NVARCHAR(MAX) ='[
  [1,"295847284","adventure-works\\ken0",null,null,"Chief Executive Officer","1969-01-29","S","M","2009-01-14",true,99,69,true,"F01251E5-96A3-448D-981E-0F99D789110D","2014-06-30T00:00:00"],
  [2,"245797967","adventure-works\\terri0","\/1\/",1,"Vice President of Engineering","1971-08-01","S","F","2008-01-31",true,1,20,true,"45E8F437-670D-4409-93CB-F9424A40D6EE","2014-06-30T00:00:00"],
  [11,"974026903","adventure-works\\ovidiu0","\/1\/1\/5\/",3,"Senior Tool Designer","1978-01-17","S","M","2010-12-05",false,7,23,true,"F68C7C19-FAC1-438C-9BB7-AC33FCC341C3","2014-06-30T00:00:00"]
]
'
SELECT 
  Convert(int,Json_Value(value, 'strict $[0]')) as [BusinessEntityID],
  Convert(nvarchar(15),Json_Value(value, 'strict $[1]')) as [NationalIDNumber],
  Convert(nvarchar(256),Json_Value(value, 'strict $[2]')) as [LoginID],
  Convert(hierarchyid,Json_Value(value, 'strict $[3]')) as [OrganizationNode],
  Convert(smallint,Json_Value(value, 'strict $[4]')) as [OrganizationLevel],
  Convert(nvarchar(50),Json_Value(value, 'strict $[5]')) as [JobTitle],
  Convert(date,Json_Value(value, 'strict $[6]')) as [BirthDate],
  Convert(nchar(1),Json_Value(value, 'strict $[7]')) as [MaritalStatus],
  Convert(nchar(1),Json_Value(value, 'strict $[8]')) as [Gender],
  Convert(date,Json_Value(value, 'strict $[9]')) as [HireDate],
  Convert(bit,Json_Value(value, 'strict $[10]')) as [SalariedFlag],
  Convert(smallint,Json_Value(value, 'strict $[11]')) as [VacationHours],
  Convert(smallint,Json_Value(value, 'strict $[12]')) as [SickLeaveHours],
  Convert(bit,Json_Value(value, 'strict $[13]')) as [CurrentFlag],
  Convert(uniqueidentifier,Json_Value(value, 'strict $[14]')) as [rowguid],
  Convert(datetime,Json_Value(value, 'strict $[15]')) as [ModifiedDate]
FROM OpenJson(@myJSON) AS lines;
Go

 

You can make sure that it is returning all the data in the correct format, even the pesky hierarchy ID, by doing a SELECT INTO. There is a big, big, problem here, though, that they don’t warn you about. JSON_Value has a maximum of 4000 for a string.

For data of any size, we will need to use the second alternative, OPENJSON. This has the rather neater Explicit Schema syntax. Note that, in our rendition of the explicit schema used by OpenJSON, we need to reference array elements rather than key/value pairs

SELECT BusinessEntityID, NationalIDNumber, LoginID, OrganizationLevel,
  JobTitle, BirthDate, MaritalStatus, Gender, HireDate, SalariedFlag,
  VacationHours, SickLeaveHours, CurrentFlag, rowguid, ModifiedDate
  FROM
  OpenJson(@myJSON)
  WITH
    (
    BusinessEntityID INT 'strict $[0]',
    NationalIDNumber NVARCHAR(15) 'strict $[1]',
    LoginID NVARCHAR(256) 'strict $[2]',
    --[OrganizationNode] hierarchyid 'strict $[3]',
    OrganizationLevel SMALLINT 'strict $[4]',
    JobTitle NVARCHAR(50) 'strict $[5]', BirthDate DATE 'strict $[6]',
    MaritalStatus NCHAR(1) 'strict $[7]', Gender NCHAR(1) 'strict $[8]',
    HireDate DATE 'strict $[9]', SalariedFlag BIT 'strict $[10]',
    VacationHours SMALLINT 'strict $[11]',
    SickLeaveHours SMALLINT 'strict $[12]', CurrentFlag BIT 'strict $[13]',
    rowguid UNIQUEIDENTIFIER 'strict $[14]',
    ModifiedDate DATETIME 'strict $[15]'
    );
GO

Unfortunately, in this ‘explicit schema’ format, they haven’t yet got around to supporting CLR types so you can’t create a HierarchyID from JSON this way. Instead, you need to specify the CLR type as being NVARCHAR and coerce it into its CLR type in the result, thus with the OrganizationNode in the HumanResources.Employee table ….

SELECT BusinessEntityID, NationalIDNumber, LoginID, 
  Convert(HIERARCHYID,OrganizationNode) AS "OrganizationNode",
  JobTitle, BirthDate, MaritalStatus, Gender, HireDate, SalariedFlag,
  VacationHours, SickLeaveHours, CurrentFlag, rowguid, ModifiedDate
  FROM
  OpenJson(@myJSON)
  WITH
    (
    BusinessEntityID INT 'strict $[0]',
    NationalIDNumber NVARCHAR(15) 'strict $[1]',
    LoginID NVARCHAR(256) 'strict $[2]',
    [OrganizationNode] nvarchar(30) 'strict $[3]',
    OrganizationLevel SMALLINT 'strict $[4]',
    JobTitle NVARCHAR(50) 'strict $[5]', BirthDate DATE 'strict $[6]',
    MaritalStatus NCHAR(1) 'strict $[7]', Gender NCHAR(1) 'strict $[8]',
    HireDate DATE 'strict $[9]', SalariedFlag BIT 'strict $[10]',
    VacationHours SMALLINT 'strict $[11]',
    SickLeaveHours SMALLINT 'strict $[12]', CurrentFlag BIT 'strict $[13]',
    rowguid UNIQUEIDENTIFIER 'strict $[14]',
    ModifiedDate DATETIME 'strict $[15]'
    );


This works fine but complicates the code. If you are inserting into a table, you can rely on implicit coercion of the datatype to convert the NVARCHAR into a hierarchyid or geography.

As well as getting this from the JSON Schema if it is available, we can get the explicit schema as well as the JSON_Value() column list. We can use either the schema or the sys.dm_exec_describe_first_result_set directly. The latter approach allows you to create a JSON Schema from any expression, which greatly extends the usefulness of this approach. if you already have the table that matches the JSON data, you merely specify a SELECT * from your table ( we used Humanresources.Employee) and the result contains your spec which you can then paste into the browser pane. This time, just so it is a bit more obvious what’s going on, I’ll do it without the aggregation of the lines. It is a bit more manual because you need to cut and paste the result, and don’t forget to nick out that last comma.

/* the JSON_VALUE syntax */
DECLARE @TheExpression sysname='adventureworks2016.HumanResources.Employee'
DECLARE @SelectStatement NVARCHAR(200)=(SELECT 'Select * from '+@TheExpression)
SELECT 'convert('+System_type_name + ',Json_Value(value, ''strict $['+ Convert(VARCHAR(3),column_ordinal-1)+']'')) as ['+f.name+']'
FROM sys.dm_exec_describe_first_result_set
  (@SelectStatement, NULL, 1) AS f 
ORDER BY column_ordinal
go

/* the WITH Explicit Schema syntax */
DECLARE @TheExpression sysname='adventureworks2016.HumanResources.Employee'
DECLARE @SelectStatement NVARCHAR(200)=(SELECT 'Select * from '+@TheExpression)
SELECT '['+f.name+']'+ ' '+System_type_name + ' ''strict $['+ Convert(VARCHAR(3),column_ordinal-1)+']'','
FROM sys.dm_exec_describe_first_result_set
  (@SelectStatement, NULL, 1) AS f 
ORDER BY column_ordinal
Go

That select statement can be derived like this …

DECLARE @TheExpression sysname='adventureworks2016.HumanResources.Employee'
DECLARE @SelectStatement NVARCHAR(200)=(SELECT 'Select * from '+@TheExpression)
Select
  String_Agg(
    CASE 
         WHEN user_type_id in (128,129,130)  THEN  'convert('+system_type_name+','+name+') as "'+[name]+'"'   
         --hierarchy (128) geometry (130) and geography types (129) can be coerced. 
         WHEN user_type_id in (35)  THEN  'convert(varchar(max),'+name+') as "'+[name]+'"'   
         WHEN user_type_id in (99)  THEN  'convert(nvarchar(max),'+name+') as "'+[name]+'"'   
         WHEN user_type_id in (34)  THEN  'convert(varbinary(max),'+name+') as "'+[name]+'"'   
         ELSE quotename([name]) 
        END,', ')
 FROM 
   sys.dm_exec_describe_first_result_set
          (@SelectStatement, NULL, 1)

Relational table to JSON Array

You can store tables or results from SQL Server in this economical format, though the process of generating the data isn’t so pretty. FOR JSON doesn’t support this directly, which is sad. Somehow, I was hoping for FOR JSON RAW.

Just as with CSV, the array-within-array format is only valuable if both ends of the data transfer are aware of enough of the schema/metadata to transform the document into a table. We’ll go into the detail of how we do this with JSON Schema later. The first task is to squeeze the array-in-array format from the somewhat reluctant OpenJSON function.

To get the JSON in array-of-array format from a particular table, and we’ve chosen adventureworks2016.person.person, you do this in SQL Server 2017. I’ve used the String_Agg() aggregation function, but you can do it as easily, but more messily, via the XML trick if you are on SQL Server 2016. Here is a simplified version of the way that we’ll do it

DECLARE @TheData NVARCHAR(MAX)=(
SELECT '['+ String_Agg(f.EachLine,',')+']'
FROM 
  (SELECT '['+String_Agg (
     CASE WHEN shredded.type=1 
       THEN '"'+String_Escape(Coalesce(shredded.value,'null'),'json')+'"'
     ELSE Coalesce(shredded.value,'null') 
     END, ',') +']'
     AS TheValue
  FROM OpenJson((SELECT * 
                 FROM adventureworks2016.person.person 
         FOR JSON AUTO, INCLUDE_NULL_VALUES )) f
   CROSS apply OpenJson(f.value) shredded
   GROUP BY f.[Key])f(EachLine)
)

Note that we need to specify ‘INCLUDE_NULL_VALUES’ in that OpenJSON expression. This is because we need all the columns to be converted in that array, even if they are null in some rows. If we don’t we get the array in the right order but with maybe one or more fields missing, but without being able to know which!

This is much faster than the old way we did the conversion to JSON, using XML.

DECLARE @OurTable XML=(SELECT * FROM adventureworks2016.person.person FOR XML path, ROOT('root') )
DECLARE @Json nvarchar(MAX)=(SELECT 
  '['--create a list (rows) of lists (tuples)
  +Stuff( --we want to snip out the leading comma
    (SELECT TheLine from --this is to glue each row into a string
      (SELECT ',
      ['+ --this is the start of the row, representing the row object in the JSON list
        --the local-name(.) is an eXPath function that gives you the name of the node
        Stuff((SELECT ',"'+ b.c.value('text()[1]','NVARCHAR(MAX)') +'"' 
               -- 'text()[1]' gives you the text contained in the node      
               from x.a.nodes('*') b(c) --get the row XML and split it into each node
               for xml path(''),TYPE).value('(./text())[1]','NVARCHAR(MAX)')
          ,1,1,'')+']'--remove the first comma 
     from @OurTable.nodes('/root/*') x(a) --get every row
     ) JSON(theLine) --each row 
    for xml path(''),TYPE).value('.','NVARCHAR(MAX)' )
  ,1,1,'')--remove the first leading comma
  +'
  ]
')

Whereas the XML version is robust, The JSON version has a flaw, because the routine, because it uses OpenJSON dislikes tables with CLR Datatypes and ‘errors out’.

Msg 13604, Level 16, State 1, Line 3
FOR JSON cannot serialize CLR objects. Cast CLR types explicitly into one of the supported types in FOR JSON queries.

This is a shame. Where there are no CLR types, it is possible to save the entire contents of a database with a routine like this, which is very satisfying. Note we have a hard-wired directory path which we ought to avoid. You’ll need to alter that to a suitable server directory if you want to try this out.

EXEC sp_msforeachtable '
print ''Creating JSON for ?''
DECLARE @TheData NVARCHAR(MAX)=(
SELECT ''[''+ String_Agg(f.EachLine,'','')+'']''
FROM 
  (SELECT ''[''+String_Agg (
     CASE WHEN shredded.type=1 
       THEN ''"''+String_Escape(Coalesce(shredded.value,''null''),''json'')+''"''
     ELSE Coalesce(shredded.value,''null'') 
     END, '','') +'']''
     AS TheValue
  FROM OpenJson((SELECT * 
                 FROM ? 
         FOR JSON AUTO, INCLUDE_NULL_VALUES )) f
   CROSS apply OpenJson(f.value) shredded
   GROUP BY f.[Key])f(EachLine)
)
CREATE TABLE ##myTemp (Bulkcol nvarchar(MAX))
INSERT INTO ##myTemp (Bulkcol) SELECT @TheData
print ''Writing out ?''
EXECUTE xp_cmdshell ''bcp ##myTemp out C:\data\RawData\JsonData\adventureworks\?.JSON -c -C 65001 -T''
DROP TABLE ##myTemp'

Instead of this, We’ll add supporting temporary procedure to do the difficult bits that I’ve already illustrated

CREATE OR ALTER PROCEDURE #ArrayInArrayJsonDataFromTable
  /**
Summary: >
  This gets the JSON data from a table in Array
Author: phil factor
Date: 26/10/2018

Examples: >
  - use Adventureworks2016
    DECLARE @Json NVARCHAR(MAX)
    EXECUTE #ArrayInArrayJsonDataFromTable
      @database='pubs', 
          @Schema ='dbo', 
          @table= 'authors',
          @JSONData=@json OUTPUT
    PRINT @Json

  - DECLARE @Json NVARCHAR(MAX)
        EXECUTE #ArrayInArrayJsonDataFromTable @TableSpec='bigpubs.[dbo].[oldTitles]',@JSONData=@json OUTPUT
    PRINT @Json
Returns: >
  The JSON data
**/
  (@database sysname = NULL, @Schema sysname = NULL, @table sysname = NULL,
  @Tablespec sysname = NULL, @jsonData NVARCHAR(MAX) OUTPUT
  )
AS
  BEGIN
    DECLARE @Data NVARCHAR(MAX);
    IF Coalesce(@table, @Tablespec) IS NULL
    OR Coalesce(@Schema, @Tablespec) IS NULL
      RAISERROR('{"error":"must have the table details"}', 16, 1);

    IF @table IS NULL SELECT @table = ParseName(@Tablespec, 1);
    IF @Schema IS NULL SELECT @Schema = ParseName(@Tablespec, 2);
    IF @database IS NULL SELECT @database = Coalesce(ParseName(@Tablespec, 3),Db_Name());
    IF @table IS NULL OR @Schema IS NULL OR @database IS NULL
      RAISERROR('{"error":"must have the table details"}', 16, 1);

    DECLARE @SourceCode NVARCHAR(255) =
              (
              SELECT 'SELECT * FROM ' + QuoteName(@database) + '.'
                     + QuoteName(@Schema) + '.' + QuoteName(@table)
              );

    DECLARE @params NVARCHAR(MAX) =(
      SELECT String_Agg(
        CASE
                 WHEN user_type_id IN (128, 129, 130) 
                   THEN'convert(nvarchar(100),' + name + ') as "' + name + '"'
          --hierarchyid (128) geometry (130) and geography types (129) can be coerced. 
         WHEN user_type_id IN (35) 
                   THEN 'convert(varchar(max),' + name + ') as "' + name + '"'
         WHEN user_type_id IN (99) 
                   THEN 'convert(nvarchar(max),' + name + ') as "' + name + '"'
         WHEN user_type_id IN (34) 
                   THEN 'convert(varbinary(max),' + name + ') as "' + name + '"'
                 ELSE QuoteName(name) END, ', ' )
      FROM sys.dm_exec_describe_first_result_set(@SourceCode, NULL, 1) );


DECLARE @expression NVARCHAR(800) =     '
USE ' + @database + '
SELECT @TheData=(SELECT ' + @params + ' FROM ' + QuoteName(@database) + '.'
      + QuoteName(@Schema) + '.' + QuoteName(@table)
      + ' FOR JSON auto, INCLUDE_NULL_VALUES)';
    EXECUTE sp_executesql @expression, N'@TheData nvarchar(max) output',
            @TheData = @Data OUTPUT;

SELECT @jsonData ='['+ String_Agg(f.EachLine,',')+']'
FROM 
  (SELECT '['+String_Agg (
     CASE WHEN shredded.type=1 
       THEN '"'+String_Escape(Coalesce(shredded.value,'null'),'json')+'"'
     ELSE Coalesce(shredded.value,'null') 
     END, ',') +']'
     AS TheValue
  FROM OpenJson(@data) f
   CROSS apply OpenJson(f.value) shredded
   GROUP BY f.[Key])f(EachLine)
  END;
GO


DECLARE @ourPath sysname = 'C:\data\RawData\JsonData\AdventureWorks\';
Declare @command NVARCHAR(4000)= '
print ''Creating JSON file for ?''
DECLARE @Json NVARCHAR(MAX)
EXECUTE #ArrayInArrayJsonDataFromTable @TableSpec=''?'',@JSONData=@json OUTPUT
CREATE TABLE ##myTemp (Bulkcol nvarchar(MAX))
INSERT INTO ##myTemp (Bulkcol) SELECT @JSON
print ''Writing out ?''
EXECUTE xp_cmdshell ''bcp ##myTemp out '+@ourPath+'?.JSON -c -C 65001 -T''
DROP TABLE ##myTemp'
EXECUTE sp_msforeachtable @command
GO

Now this isn’t fast: it is two minutes rather than eighteen seconds to dump out Adventureworks in native mode or twenty-one seconds in tab-delimited mode. However we want JSON, especially as we can validate it and distinguish between blank strings and nulls, and attach a schema to the table

Adding a schema.

The schema that accompanies this is reasonably simple to generate, Here, just to illustrate how we do it, is a batch that does it for the query ‘SELECT * FROM adventureworks2016.HumanResources.Employee‘.

DECLARE @schema NVARCHAR(4000)
SELECT @schema=SELECT 'https://mml.uk/jsonSchema/HREmployeeArray.json’ AS id,--just a unique reference to a real place
  'http://json-schema.org/draft-04/schema#' AS [schema],--the minimum standard you want to use
  'Array (rows) within an array (table) of adventureworks2016.HumanResources.Employee' AS description,
  'array' AS type, 'array' AS [items.type],
  (
  SELECT  
      f.name, --the individual columns as an array of objects with standard and custom fields
      CASE WHEN f.is_nullable = 1 THEN Json_Query('["null","'+f.type+'"]') -- must be array!
      ELSE  Json_Query('["'+f.type+'"]') END AS [type],--must be an array!
      f.SQLtype, f.is_nullable, Coalesce(EP.value,'') AS description
    FROM
      (--the basic columns we need. (the type is used more than once in the outer query) 
      SELECT r.name, r.system_type_name AS sqltype, r.source_column, r.is_nullable,
             CASE WHEN r.system_type_id IN (58,52,56,58,59,60,62,106,108,122,127) THEN 'number' 
               WHEN system_type_id =104 THEN 'boolean' ELSE 'string' END AS type,
             Object_Id(r.source_database + '.' + r.source_schema + '.' + r.source_table) 
              AS table_id
        FROM sys.dm_exec_describe_first_result_set
               ('SELECT * FROM adventureworks2016.HumanResources.Employee', NULL, 1) AS r
      ) AS f
      LEFT OUTER  JOIN sys.extended_properties AS EP -- to get the extended properties
        ON EP.major_id = f.table_id
         AND EP.minor_id = ColumnProperty(f.table_id, f.source_column, 'ColumnId')
         AND EP.name = 'MS_Description'
         AND EP.class = 1
    FOR JSON PATH
  ) AS [items.items]
FOR JSON PATH, WITHOUT_ARRAY_WRAPPER;

This turns out a JSON Schema that, nicely formatted, looks like this

"id": "https://mml.uk/jsonSchema/HREmployeeArray.json",
  "schema": "http://json-schema.org/draft-04/schema#",
  "description": "Array (rows) within an array (table) of adventureworks2016.HumanResources.Employee",
  "type": "array",
  "items": {
    "type": "array",
    "items": [
      {
        "name": "BusinessEntityID",
        "type": [
          "number"
        ],
        "SQLtype": "int",
        "is_nullable": false,
        "column_ordinal": 1,
        "description": "Primary key for Employee records.  Foreign key to BusinessEntity.BusinessEntityID."
      },
      {
        "name": "NationalIDNumber",
        "type": [
          "string"
        ],
        "SQLtype": "nvarchar(15)",
        "is_nullable": false,
        "column_ordinal": 2,
        "description": "Unique national identification number such as a social security number."
      },
      {
        "name": "LoginID",
        "type": [
          "string"
        ],
        "SQLtype": "nvarchar(256)",
        "is_nullable": false,
        "column_ordinal": 3,
        "description": "Network login."
      },
      {
        "name": "OrganizationNode",
        "type": [
          "null",
          "string"
        ],
        "SQLtype": "hierarchyid",
        "is_nullable": true,
        "column_ordinal": 4,
        "description": "Where the employee is located in corporate hierarchy."
      },
      {
        "name": "OrganizationLevel",
        "type": [
          "null",
          "number"
        ],
        "SQLtype": "smallint",
        "is_nullable": true,
        "column_ordinal": 5,
        "description": "The depth of the employee in the corporate hierarchy."
      },
      {
        "name": "JobTitle",
        "type": [
          "string"
        ],
        "SQLtype": "nvarchar(50)",
        "is_nullable": false,
        "column_ordinal": 6,
        "description": "Work title such as Buyer or Sales Representative."
      },
      {
        "name": "BirthDate",
        "type": [
          "string"
        ],
        "SQLtype": "date",
        "is_nullable": false,
        "column_ordinal": 7,
        "description": "Date of birth."
      },
      {
        "name": "MaritalStatus",
        "type": [
          "string"
        ],
        "SQLtype": "nchar(1)",
        "is_nullable": false,
        "column_ordinal": 8,
        "description": "M = Married, S = Single"
      },
      {
        "name": "Gender",
        "type": [
          "string"
        ],
        "SQLtype": "nchar(1)",
        "is_nullable": false,
        "column_ordinal": 9,
        "description": "M = Male, F = Female"
      },
      {
        "name": "HireDate",
        "type": [
          "string"
        ],
        "SQLtype": "date",
        "is_nullable": false,
        "column_ordinal": 10,
        "description": "Employee hired on this date."
      },
      {
        "name": "SalariedFlag",
        "type": [
          "boolean"
        ],
        "SQLtype": "bit",
        "is_nullable": false,
        "column_ordinal": 11,
        "description": "Job classification. 0 = Hourly, not exempt from collective bargaining. 1 = Salaried, exempt from collective bargaining."
      },
      {
        "name": "VacationHours",
        "type": [
          "number"
        ],
        "SQLtype": "smallint",
        "is_nullable": false,
        "column_ordinal": 12,
        "description": "Number of available vacation hours."
      },
      {
        "name": "SickLeaveHours",
        "type": [
          "number"
        ],
        "SQLtype": "smallint",
        "is_nullable": false,
        "column_ordinal": 13,
        "description": "Number of available sick leave hours."
      },
      {
        "name": "CurrentFlag",
        "type": [
          "boolean"
        ],
        "SQLtype": "bit",
        "is_nullable": false,
        "column_ordinal": 14,
        "description": "0 = Inactive, 1 = Active"
      },
      {
        "name": "rowguid",
        "type": [
          "string"
        ],
        "SQLtype": "uniqueidentifier",
        "is_nullable": false,
        "column_ordinal": 15,
        "description": "ROWGUIDCOL number uniquely identifying the record. Used to support a merge replication sample."
      },
      {
        "name": "ModifiedDate",
        "type": [
          "string"
        ],
        "SQLtype": "datetime",
        "is_nullable": false,
        "column_ordinal": 16,
        "description": "Date and time the record was last updated."
      }
    ]
  }
}

Now, if you send the JSON schema with the JSON, either within the same JSON document or separately, you can create the OpenJSON explicit schema from the values in the JSON Schema. Let’s do this manually, just to show the ‘man behind the curtain’.

DECLARE @jsonSchema NVARCHAR(MAX) ='
{"id": "http:\/\/mml.uk\/json\/schemas\/ahemployee.json",
  "schema": "http:\/\/json-schema.org\/draft-04\/schema#",
  "description": "Array (rows) within an array (table) of adventureworks2016.HumanResources.Employee", "type": "array", "items": {"type": "array", "items": [{"name": "BusinessEntityID", "type": ["number"],"SQLtype": "int", "is_nullable": false,"column_ordinal": 1,"description": "Primary key for Employee records.  Foreign key to BusinessEntity.BusinessEntityID."},{"name": "NationalIDNumber", "type": ["string"],"SQLtype": "nvarchar(15)", "is_nullable": false,"column_ordinal": 2,"description": "Unique national identification number such as a social security number."},{"name": "LoginID", "type": ["string"],"SQLtype": "nvarchar(256)", "is_nullable": false,"column_ordinal": 3,"description": "Network login."},{"name": "OrganizationNode", "type": ["null", "string"],"SQLtype": "hierarchyid", "is_nullable": true,"column_ordinal": 4,"description": "Where the employee is located in corporate hierarchy."},{"name": "OrganizationLevel", "type": ["null", "number"],"SQLtype": "smallint", "is_nullable": true,"column_ordinal": 5,"description": "The depth of the employee in the corporate hierarchy."},{"name": "JobTitle", "type": ["string"],"SQLtype": "nvarchar(50)", "is_nullable": false,"column_ordinal": 6,"description": "Work title such as Buyer or Sales Representative."},{"name": "BirthDate", "type": ["string"],"SQLtype": "date", "is_nullable": false,"column_ordinal": 7,"description": "Date of birth."},{"name": "MaritalStatus", "type": ["string"],"SQLtype": "nchar(1)", "is_nullable": false,"column_ordinal": 8,"description": "M = Married, S = Single"},{"name": "Gender", "type": ["string"],"SQLtype": "nchar(1)", "is_nullable": false,"column_ordinal": 9,"description": "M = Male, F = Female"},{"name": "HireDate", "type": ["string"],"SQLtype": "date", "is_nullable": false,"column_ordinal": 10,"description": "Employee hired on this date."},{"name": "SalariedFlag", "type": ["boolean"],"SQLtype": "bit", "is_nullable": false,"column_ordinal": 11,"description": "Job classification. 0 = Hourly, not exempt from collective bargaining. 1 = Salaried, exempt from collective bargaining."},{"name": "VacationHours", "type": ["number"],"SQLtype": "smallint", "is_nullable": false,"column_ordinal": 12,"description": "Number of available vacation hours."},{"name": "SickLeaveHours", "type": ["number"],"SQLtype": "smallint", "is_nullable": false,"column_ordinal": 13,"description": "Number of available sick leave hours."},{"name": "CurrentFlag", "type": ["boolean"],"SQLtype": "bit", "is_nullable": false,"column_ordinal": 14,"description": "0 = Inactive, 1 = Active"},{"name": "rowguid", "type": ["string"],"SQLtype": "uniqueidentifier", "is_nullable": false,"column_ordinal": 15,"description": "ROWGUIDCOL number uniquely identifying the record. Used to support a merge replication sample."},{"name": "ModifiedDate", "type": ["string"],"SQLtype": "datetime", "is_nullable": false,"column_ordinal": 16,"description": "Date and time the record was last updated."}]}}'

SELECT 
  String_Agg(
    Json_Value(
      value,
      'strict $.name')+' '+Json_Value(value,'strict $.SQLtype')+
      ' $['+Convert(NvARCHAR(3),Json_Value(value,'strict $.column_ordinal')-1) +
       ']',',
')  
FROM OpenJson(@jsonSchema,'$.items.items')

Now so far, we’ve Managed to create a schema for a single table. We need to automate this now to do any table. Let’s create this now and try it out

CREATE OR ALTER PROCEDURE  #CreateJSONArrayInArraySchemaFromTable
/**
Summary: >
  This creates a JSON schema from a table that
  matches the JSON you will get from doing a 
  classic FOR JSON select * statemenmt on the entire table

Author: phil factor
Date: 4/12/2018

Examples: >
  DECLARE @Json NVARCHAR(MAX)
  EXECUTE #CreateJSONArrayInArraySchemaFromTable @database='pubs', @Schema ='dbo', @table= 'authors',@JSONSchema=@json OUTPUT
  PRINT @Json
  SELECT @json=''
  EXECUTE #CreateJSONArrayInArraySchemaFromTable @TableSpec='pubs.dbo.authors',@JSONSchema=@json OUTPUT
  PRINT @Json
Returns: >
  nothing
**/
    (@database sysname=null, @Schema sysname=NULL, @table sysname=null, @Tablespec sysname=NULL,@jsonSchema NVARCHAR(MAX) output)

--WITH ENCRYPTION|SCHEMABINDING, ...
AS

DECLARE @required NVARCHAR(max), @NoColumns INT, @properties NVARCHAR(max);
                        
        IF Coalesce(@table,@Tablespec) IS NULL
                OR Coalesce(@schema,@Tablespec) IS NULL
                RAISERROR ('{"error":"must have the table details"}',16,1)
                        
        IF @table is NULL SELECT @table=ParseName(@Tablespec,1)
        IF @Schema is NULL SELECT @schema=ParseName(@Tablespec,2)
        IF @Database is NULL SELECT @Database=Coalesce(ParseName(@Tablespec,3),Db_Name())
        IF @table IS NULL OR @schema IS NULL OR @database IS NULL
                RAISERROR  ('{"error":"must have the table details"}',16,1)
           
DECLARE @SourceCode NVARCHAR(255)=
  'SELECT * FROM '+QuoteName(@database)+ '.'+ QuoteName(@Schema)+'.'+QuoteName(@table)

SELECT @jsonschema= 
  (SELECT 
    'https://mml.uk/jsonSchema/'+@table+'.json' AS id,--just a unique reference to a real place
    'http://json-schema.org/draft-04/schema#' AS [schema],--the minimum standard you want to use
    'Array (rows) within an array (table) of'+@Schema+'.'+@table AS description,
    'array' AS type, 'array' AS [items.type],
    (
    SELECT  
      f.name, --the individual columns as an array of objects with standard and custom fields
      CASE WHEN f.is_nullable = 1 THEN Json_Query('["null","'+f.type+'"]') -- must be array!
      ELSE  Json_Query('["'+f.type+'"]') END AS [type],--must be an array!
      f.SQLtype, f.is_nullable, Coalesce(EP.value,'') AS description
    FROM
      (--the basic columns we need. (the type is used more than once in the outer query) 
      SELECT r.name, r.system_type_name AS sqltype, r.source_column, r.is_nullable,
             CASE WHEN r.system_type_id IN (58,52,56,58,59,60,62,106,108,122,127) THEN 'number' 
               WHEN system_type_id =104 THEN 'boolean' ELSE 'string' END AS type,
             Object_Id(r.source_database + '.' + r.source_schema + '.' + r.source_table) 
              AS table_id
        FROM sys.dm_exec_describe_first_result_set
               (@SourceCode, NULL, 1) AS r
      ) AS f
    LEFT OUTER  JOIN sys.extended_properties AS EP -- to get the extended properties
      ON EP.major_id = f.table_id
       AND EP.minor_id = ColumnProperty(f.table_id, f.source_column, 'ColumnId')
       AND EP.name = 'MS_Description'
       AND EP.class = 1
    FOR JSON PATH
  ) AS [items.items]
   FOR JSON PATH, WITHOUT_ARRAY_WRAPPER);
        IF(IsJson(@jsonschema)=0) 
        RAISERROR ('invalid schema "%s"',16,1,@jsonSchema)
        IF @jsonschema IS NULL RAISERROR ('Null schema',16,1)
GO

We can now try this out by writing the schemas of all the tables in AdventureWorks.

USE Adventureworks2016
DECLARE @ourPath sysname = 'C:\data\RawData\JsonSchema\AdventureWorks\';
Declare @command NVARCHAR(4000)= '
print ''Creating JSON file for ?''
DECLARE @Json NVARCHAR(MAX)
EXECUTE #CreateJSONArrayInArraySchemaFromTable @TableSpec=''?'',@JSONSchema=@json OUTPUT
CREATE TABLE ##myTemp (Bulkcol nvarchar(MAX))
INSERT INTO ##myTemp (Bulkcol) SELECT @JSON
print ''Writing out ?''
EXECUTE xp_cmdshell ''bcp ##myTemp out '+@ourPath+'?.JSON -c -C 65001 -T''
DROP TABLE ##myTemp'
EXECUTE sp_msforeachtable @command
GO

It takes 11 seconds to do them all on my machine. You aren’t limited to tables, you can do any SQL Query.

Conclusions

We seem to have used a lot of SQL to achieve our ends. However, we now have data that we can validate outside the database, share with JSON-friendly applications or import into JSON-savvy databases. We have a version of a JSON tabular document that is economical in storage.

The next stage is to use it to build a database. I’ve described elsewhere how to do it with the more conventional Object-within-array JSON document and schema but not in array-in-array JSON. That’s next.

SourceCode

The source to this article and various blogs on the topic of importing, validating and exporting both JSON Schema and data in SQL Server  is on github here

The post Producing Data and Schemas in JSON array-of-array format. appeared first on Simple Talk.


from Simple Talk https://ift.tt/2PlilVU
via
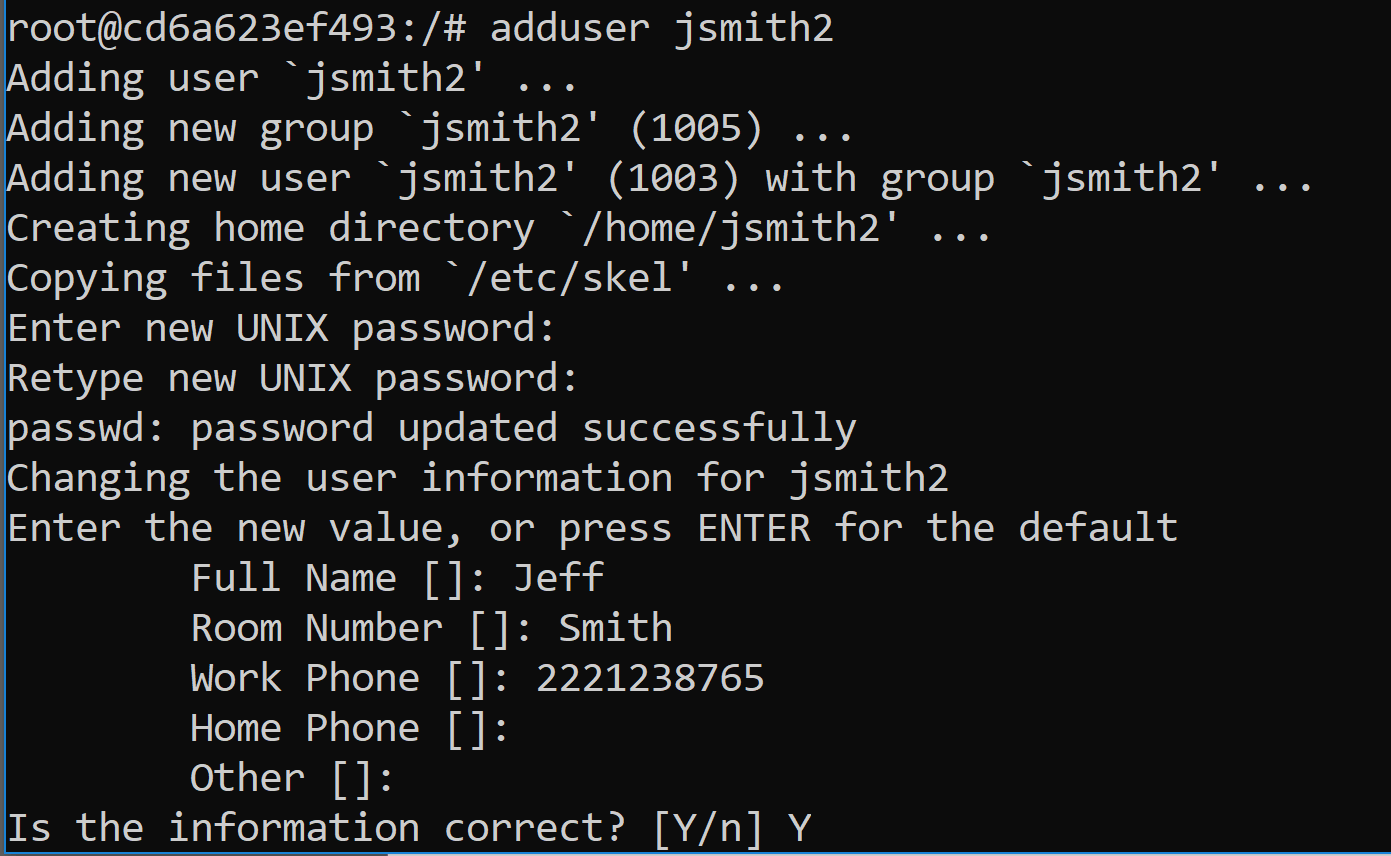
Monday, December 3, 2018

Three Books That Have Influenced My Career

I’m a lifelong learner. One of the ways I love to learn is by reading books. While I was making the transition to software development from my original career, I read the book “Code Complete” by Steve McConnell. This was back in the mid-90s before the Agile Manifesto was written or DevOps was a thing.

I did learn a ton from that book, however. It taught me the importance of making code readable with the use of naming conventions, formatting, and comments. Software methodology has evolved quite a bit since then, but these concepts are still important over 20 years later.

Once I became a DBA, I read the book “The 7 Habits of Highly Effective People.” This is not necessarily a book about technology, but there are quite a few habits that apply. My favourite lesson was about being proactive. As a DBA, it was important to spend time creating scripts to automate tasks. I had a rule that I didn’t want to do something manually three times, so I would try to find a way to automate it before I was asked the third time.

Another lesson that I gleaned from that book is that a tool that can help you do your job, maybe a monitoring tool for SQL Server, is going to save time and money in the long run. And when automating a task, a tool that can write a script for you is going to save development time and decrease the chance of errors.

Finally, I read the book “The Phoenix Project” about five years ago. This book is different. Instead of a pure technical or self-help book, it’s a novel. It’s the story of a company that has been working on this important project, called the Phoenix Project, for years. It’s late, overbudget, and hasn’t been tested. Unfortunately, the company decides it must roll it on a certain date out to disastrous consequences.

This book is the story of how a company embraces DevOps and saves the organization. There is also that one guy, named Brent in this story, who knows more about the infrastructure than anyone else. He is both a valuable asset and one of the reasons that the IT department is in such a mess since everyone depends on him so much. From this book, I learned don’t be a Brent, but also what is required to embrace DevOps, from developing trust between the teams, to automating deployments, to having a good change management system. All three of these books are worth reading if you have the time.

By the way, if you are interested in learning more about DevOps, be sure to sign up for Redgate’s SQL in the City Streamed. This is a free online event, and I’ll be presenting a session along with some fantastic speakers like Kendra Little, Grant Fritchey, Steve Jones, and The Two Chrises. I hope you can join us!

The post Three Books That Have Influenced My Career appeared first on Simple Talk.


from Simple Talk https://ift.tt/2DZ1bLJ
via