Wednesday, September 26, 2018

Calculating a Security Principal’s Effective Rights

Security. Oh that most painful of topics. I discussed it a few months earlier when I discussed the need to give rights only through roles to users, so everything is the same in dev and prod except the users who are placed in each role (SQL Server Database Security And Source Control). As I was updating some of our security to use this method, the problem arose that it is hard to know if we got it right. How to make sure that userX who had access to a certain set of objects, still does, even though we have given them access via a different method. This is something that we often wish to know. “Can user X access resource Y?”

So, I went about to build a small utility, most of which is part of this blog. SQL Server gives up tools to determine if a principal has access to an object, so I will introduce them, and then use them to check the “normal” security case, which is trying to determine a user’s rights to access to objects in the database. In a later blog, I will attempt to expand the security beyond object access to all of the various types of security a user may have that we need to track.

SQL Server provides us with two functions that can be used effectively to discover the rights that a user has to an object. It doesn’t tell us HOW the achieved this right, but it tells us if they do have it (how is a bit more complex, and something I plan to tackle some other day!) For example, say a user has SELECT access to TableY. This user could have it directly granted, inherited from a grant at the schema level, inherited through a user-defined role’s access, or even from a built-in role (database or server!)

This is fairly complex, but the general need I am aiming to solve today is to determine what a user has access to. The functions (available in the on-premises and Azure versions) allow you to determine what the current security principal has access to. They are:

  • HAS_PERMS_BY_NAME – This is a scalar function that you can pass in various things like tables and columns, database and server rights.
  • fn_my_permissions – This is a table valued function that you can use to return the rights you have for a certain object

The parameters for both include the securable you are checking, and securable class (and subclass for certain things like column level security. The securable class I will be focusing on in this blog is simply ‘OBJECT’, for objects in the database such as tables, procedures, etc. There are quite a few other ones, if you were interested in a complete view of all of the rights a user may have: APPLICATION ROLE, ASSEMBLY, ASYMMETRIC KEY, CERTIFICATE, CONTRACT, DATABASE, ENDPOINT, FULLTEXT CATALOG, LOGIN, MESSAGE TYPE, REMOTE SERVICE BINDING, ROLE, ROUTE, SCHEMA, SERVER, SERVICE, SYMMETRIC KEY, TYPE, USER, XML SCHEMA COLLECTION. For more details, check: HAS_PERMS_BY_NAME and fn_my_permissions.

To get started, I will build a small scenario that will allow me to grant rights, and then change rights around and verify that things match as desired.

CREATE DATABASE PermissionsTest;
GO
USE PermissionsTest;
GO
CREATE SCHEMA Demo;
GO
CREATE TABLE Demo.Table1 (Table1Id int);
CREATE TABLE Demo.Table2 (Table2Id int);
GO

CREATE PROCEDURE Demo.Procedure1 
AS SELECT Table1Id FROM Demo.Table1;
GO

--To this database, we will add a few logins users, and 
--give them direct access to several of the objects. 
CREATE LOGIN Login1 WITH PASSWORD = '12345';
CREATE USER User1 FROM LOGIN Login1;
CREATE LOGIN Login2 WITH PASSWORD = '12345';
CREATE USER User2 FROM LOGIN Login2;
CREATE LOGIN DboLogin WITH PASSWORD = '12345';
CREATE USER DboUser FROM LOGIN DboLogin;

--Give User1 access to Table1 and procedure, User2 to Table2
GRANT SELECT ON Demo.Table1 TO User1;
GRANT EXECUTE ON Demo.Procedure1 TO User1;
GRANT SELECT ON Demo.Table2 TO User2;

--put DboUser in the dbo role
ALTER ROLE db_owner ADD MEMBER DboUser;

If you want to check if a different user other than the one logged in has access to an object, you will either need to:

  1. Login as that user
  2. Impersonate that user

As we typically will be working as a database owner/system administrator when configuring security, we will usually use impersonation to check the user’s rights. For example, if you want to ask SQL Server about a particular object, you might use HAS_PERMS_BY_NAME, in the following manner:

EXECUTE AS USER = 'User1';

--verify the user that you are effectively executing as, 
--when testing to avoid mistakes
SELECT SUSER_NAME() AS server_principal, 
       USER_NAME() AS database_principal;

--There are additional parameters to check column level 
--permissions if you need them
SELECT HAS_PERMS_BY_NAME('Demo.Table1','OBJECT','SELECT');

This returns:

server_principal     database_principal
-------------------- ------------------------
Login1               User1

-----------
1

Now, checking to see if User1 can access Table2:

SELECT HAS_PERMS_BY_NAME('dbo.Table2','OBJECT','SELECT');

This returns:

———–
0

This function works great if you are checking one item, like from an application before trying to execute it. But if you want to see all of a user’s effective rights on an object, use fn_my_permissions.

For example, if we need to see User1 rights to Table1, we can execute (still in the security context of User1 from the previous code):

SELECT *
FROM   fn_my_permissions('Demo.Table1', 'OBJECT') AS permissions;

This returns the following, with the row with subentity_name as ” being table permissions, and Table1Id being the column permission:

entity_name      subentity_name    permission_name
---------------- ----------------- ------------------------
dbo.Table1                         SELECT
dbo.Table1       Table1Id          SELECT

Now, let’s change back to the security context of the user that is a member of the db_owner role:

REVERT;
EXECUTE AS USER = 'DboUser';

SELECT permission_name
FROM   fn_my_permissions('Demo.Table1', 'OBJECT') AS permissions
WHERE  permissions.subentity_name = ''; --ignore column rights

This will show that the dbo user has every possible, logical, right to the table:

permission_name
--------------------------------
SELECT
UPDATE
REFERENCES
INSERT
DELETE
VIEW CHANGE TRACKING
VIEW DEFINITION
ALTER
TAKE OWNERSHIP
CONTROL

Finally, taking this to the final step for this blog, let’s get all of the object level rights for a user in the entire database:

REVERT;

To get all of the user’s rights, take all of the objects in the database, ignoring any objects that have a parent_object_id such as triggers or constraints, and use CROSS APPLY to execute the function for every object.

To make this easier to user, I am going to compile this into a view, called Utility.EffectiveSecurity (and give rights to it to Public, so every user can execute it.)

CREATE SCHEMA Utility;
GO
CREATE OR ALTER VIEW Utility.EffectiveSecurity
AS
WITH objects AS (
        SELECT objects.name AS object_name,
                   schemas.name AS schema_name,
                   object_id, objects.type_desc AS object_type
        FROM   sys.objects
                 JOIN sys.schemas
                    ON objects.schema_id = schemas.SCHEMA_ID
        WHERE objects.parent_object_id = 0 
     --no constraints that have the parent_object_id reference
     --or triggers
                )
        SELECT object_type,
                   schema_name, 
                   object_name,
                   permissions.permission_name
        FROM   objects
                 CROSS APPLY fn_my_permissions(schema_name + 
                                     '.' +  OBJECT_NAME, 'Object') AS permissions   
        --I am ignoring column level permissions. 
        WHERE  permissions.subentity_name = '' 
        --hide this object from view
          AND NOT (objects.schema_name = 'Utility' 
               AND objects.object_name = 'EffectiveSecurity');
GO
--let every user check their permissions
GRANT SELECT ON Utility.EffectiveSecurity TO PUBLIC;

Now I can execute:

EXECUTE AS USER = 'User1';
GO
SELECT SUSER_NAME() AS server_principal, 
       USER_NAME() AS database_principal;

SELECT *
FROM   Utility.EffectiveSecurity;

REVERT;

This returns:

object_type             schema_name     object_name     permission_name
----------------------- --------------- --------------- ---------------------------
USER_TABLE              Demo            Table1          SELECT
SQL_STORED_PROCEDURE    Demo            Procedure1      EXECUTE

The real value here, is that what if we need to verify a change in security works.

The following example is similar to what I recently have done for our system (though a bit less derived!) Let’s take User1, and put the security that it currently has into two roles, one that can execute the stored procedure, one that can select from the table. We first execute:

EXECUTE AS USER = 'User1';

SELECT *
INTO   #preChangeSecurity --Or save to a permanent table
FROM   Utility.EffectiveSecurity;

REVERT;

This saves off the current security, giving us the ability to compare User1’s rights before the security change. Now, make your changes to the security:

REVOKE SELECT ON Demo.Table1 FROM User1;
REVOKE EXECUTE ON Demo.Procedure1 FROM User1;

Query from Utility.EffectiveSecurity as User1 and you will see no output as User1 has been stripped of all rights, other than the rights to select from the EffectiveSecurity view. Then execute the following:

--create a role to access Table1 (and “accidentally include Table2”)
CREATE ROLE Table1Reader;
GRANT SELECT ON Demo.Table1 TO Table1Reader;
GRANT SELECT ON Demo.Table2 TO Table1Reader;

--create the role to access Procedure1
CREATE ROLE Procedure1Executor;
GRANT EXECUTE ON Demo.Procedure1 TO Procedure1Executor;

--put User1 in the two roles
ALTER ROLE Table1Reader ADD MEMBER User1;
ALTER ROLE Procedure1Executor ADD MEMBER User1;

And now check to make sure you got the security right, in that it matches what User1 previously had for security:

EXECUTE AS USER = 'User1';

SELECT CASE WHEN EffectiveSecurity.object_name IS NULL 
                     THEN 'DELETED'
                        WHEN #preChangeSecurity.object_name IS NULL 
                     THEN 'NEW'
                        ELSE 'Same' END AS permission_disposition,
           COALESCE(#preChangeSecurity.object_type, EffectiveSecurity.object_type) AS object_type,
           COALESCE(#preChangeSecurity.schema_name, EffectiveSecurity.schema_name) AS schema_name,
        COALESCE(#preChangeSecurity.object_name,    EffectiveSecurity.object_name) AS object_name,
        COALESCE(#preChangeSecurity.permission_name, EffectiveSecurity.permission_name) 
                                                                              AS permission_name
FROM   #preChangeSecurity 
         FULL OUTER JOIN Utility.EffectiveSecurity
                ON EffectiveSecurity.object_name = #preChangeSecurity.object_name
                   AND EffectiveSecurity.object_type = #preChangeSecurity.object_type
                   AND  EffectiveSecurity.permission_name = #preChangeSecurity.permission_name
                   AND EffectiveSecurity.schema_name = #preChangeSecurity.schema_name
WHERE   EffectiveSecurity.object_name IS NULL 
   OR   #preChangeSecurity.object_name IS NULL;

REVERT;

You can see that I added a new permission in the mix when I was creating my roles, so this code outputs:

permission_disposition object_type     schema_name    object_name         permission_name
---------------------- --------------- -------------- ------------------- ----------------------
NEW                    USER_TABLE      Demo            Table2              SELECT

Remove that right:

REVOKE SELECT ON Demo.Table2 FROM Table1Reader;

Run the previous query again, and you will see that everything is the same in the current security configuration for User1 as it was before we started. So we have achieved the desired effect by removing rights from User1, and giving back rights through a couple of roles.

The post Calculating a Security Principal’s Effective Rights appeared first on Simple Talk.


from Simple Talk https://ift.tt/2IeD9wl
via

Monday, September 24, 2018

Is Certification Worth It?

I was recently asked if I thought getting a Microsoft certification was valuable. I see quite a few benefits. Certifications might help your company become a Microsoft Gold Partner, and certification may be a selling point when assigning consultants to engagements. For me, the big benefits have been about learning new features and getting to know features that I haven’t used much or at all. Before taking the exam, at a minimum, I’ll check the list of topics. If there is anything I’m not familiar with, or a new feature I haven’t played with, I’ll spend some time learning about those features. (Don’t tell anyone, but I have learned and forgotten XQuery so many times when prepping for SQL Server exams!)

What does passing a certification exam really mean? It actually means nothing more than you have passed a test. Back in the 90s and early 2000s, so many people had taken the MCSE exams, that the certification lost its value. The exams were quite easy, and it was possible to pass the exams without ever touching a Windows server. Theoretically, the exams should only be passable by those with experience, but even today some bootcamps guarantee that participants will pass just by taking their weeklong course. And, of course, there are those brain dump sites that supposedly have actual exam questions. Stay away from them!

Over time, the quality of the exams has improved, and new question types have been added. Instead of just multiple choice (guess) questions, some of the questions are hands on requiring that you perform actions and not just choose from a list of possible answers. Some of the sections also require quite a bit of reading. These changes have made the certifications more difficult and more valuable, in my opinion.

Microsoft have changed the premium certifications several times as well. For example, the big SQL Server cert was MCDBA (Microsoft Certified Database Administrator) when it was first introduced in 1999, but then it was changed to MCITP (Microsoft Certified IT Professional). It eventually became the current MSCE: Data Management and Analytics. This new cert has eight specialty options. Other areas, such as development and systems engineering, have also gone through similar transformations, especially to deal with cloud computing.

While the value of the current premier certifications is always up for debate, the ‘master-level’ certifications that were retired in 2014 were a different story. These certs, such as the Microsoft Certified Master, were earned by just a few hundred people before the program ended. At least in the data platform community, those who were able to achieve this status are highly respected for their knowledge. It’s a shame that these were retired.

There are some benefits to certification, and it’s nice to have an employer who gives you time to learn and study on the job – and will pay for materials, classes, and the exam. Just like having a degree, certifications are not necessary for working in tech. In my opinion, employers are always better off hiring people with experience, talent, and passion for tech over certifications or degrees.

The post Is Certification Worth It? appeared first on Simple Talk.


from Simple Talk https://ift.tt/2pxxNDQ
via
Wednesday, September 19, 2018

A Primer on Defect Managment

In a world driven to delight the customer, defect management plays a crucial role in generating a defect-free and bug-free software product. This primer intends to explain in detail the role of defect management in the software test life cycle.

Software exists as products or services provided via websites, mobile apps or desktop applications. However, the process of creating software has not changed much over the years. A general workflow of how a software project begins is with a customer approaching a software consultant with their requirements to build the software product for their business. The customer support consultant or the client manager then meets with the customer and documents their business requirements. Based on this document, a pseudo-model or a blueprint is created considering the budget, quantity, and schedule required to develop the project. This blueprint details the workflow of the desired application, critical path, the phases of product delivery, timelines for the project, approximate number of resources required to complete the project, development and maintenance costs, software or technology limitations and assumptions. Occasionally, it includes an alternate approach as well.
Once the client is happy with the specifications and agrees to the terms and conditions, a contract is established, and that triggers the initiation of the project. At this point, business analysts, developers, and testers are mobilized as per their availability and expertise required for the project. Business analysts coordinate with the client manager to develop the requirements specification document which details out the customer’s requirements for the first phase of delivery. Once reviewed and a sign off is provided, the project moves through the design and coding phases. Testers then start developing the test plan and test cases while the developers work on coding the product. Once the product or part of the product is reviewed and unit tested, it is moved to the test staging environment where testers can execute test cases to find defects. Let’s understand this process in detail.

What is a Defect?

A defect can be described as non-conformance to the requirements or deviation from the expected behavior. Thus, any behavior which does not meet the end user’s expectations can be classified as a defect.

Defects can be found throughout all phases of the software development life cycle. Hence, defect categorization is helpful to identify its type, impact, urgency and the cost to fix.

Types of Defects

There are different types of defects which can be found in any software application. However, its impact varies by the type.

UI Defects

UI Defects or User Interface defects are cosmetic defects. Some examples of UI defects are button controls overlapping caption text, misspelt text in the company logo, error messages shown in green color rather than red, etc.

Functional Defects

Every application has a specified happy path which ensures that the application is working as expected. However, when these functions do not perform as expected, it gives rise to functional defects. Some examples would be a user not being able to create an account, failed money transfer transaction on a banking website or flight booking website, etc.

Database Related Defects

Databases are an integral part of an application. It helps to store, manage, retrieve and validate data against user inputs. With the advent of big data and business intelligence systems, data takes a centerpiece and databases are used for analyzing and generating reports which help in the decision-making process.

Data accuracy, security, and integrity are some factors that are tested during the testing phase. Some examples of database related defects are connection failures to backend databases, SQL injection attacks from the user interface, etc.

Integration Related defects

Integration testing is testing of two or more components of the application to ensure that the data flow is accurate. Such defects can be found during the critical path testing, happy path workflows or during the negative testing as well.

Architectural Defects

Architecture is a baseline model of any software application which outlines its different components, key modules, connection and relationships between different modules as a part of an entire system. These details can be added into high-level and low-level design plans. High-level design plan describes the overall functionality of the components, its usage as well as limitations, details about the technology that is going to be used in building this software and describing the reason of choosing the same. Low-level design plan adds more granularity to the application design and tries to identify gaps in the system.

An invalid design or architectural flaw leads to unwanted/undesirable effects which require more efforts to fix, as the impact is more on the application. Defects at the architectural level can only be detected after major components in the system are ready for testing and are caught usually during system integration testing. Thus, requiring a lot of rework to fix them.

Requirement Related Defects

The requirements specification document is an artifact created and maintained by the business analysts. This document describes every component of a page or software application in details. It describes what technology will be used in developing the software, critical path scenarios, page look and feel, functions of every page and objects such as buttons, links, etc. which provides more clarity for developers and testers to understand the workflows and write code and test cases respectively.

During the requirement review phase, requirements are analyzed to find gaps and items with assumptions are flagged for further review. These gaps are then filled in future revisions of the requirements document before any development effort begins. It is also possible to find requirements related defects further down the development phase as the build process begins or even after testing begins if not all the gaps are accounted for.

Defects due to Invalid or Legacy Test Cases

In the world of Agile where software products are developed and delivered in fast, iterative phases, sometimes we might end up reusing test cases which were designed for the previous version of the application and are irrelevant for the new functionality that has been developed. This might result in presenting a wrong or invalid picture of the state of the test execution phase. Test case management by tracking and maintaining appropriate versions by releases and scenarios is essential to avoid such defects. Test case coverage and review techniques can also be helpful to overcome this issue in the early phase of test planning cycle.

Defect Logging and Tracking

It is necessary that the testing team logs the defects correctly on finding reproducible defects. This helps the developers in managing development efforts using the defect priority and to reduce the turnaround time by quickly debugging to find the root cause of the defects. So, it is of the utmost importance for each defect logged to be complete with information that would aid in defect resolution.

Defect Details

Listing here are all the details that are necessary while logging any new defect.

Field

Description

ID

An ID or identifier is usually created in a defect management system which is a sequential number for defects to be identified or tracked.

Description

Summarizes the behavior of the application at a very high level. One can also add details such as any constraints or desired user role with which you must reproduce the defect.

Version of the application tested

Providing the version of the application helps the developer in comparing codebase to see changes between working and defect producing code.

Steps to Reproduce

Describing detailed step by step actions to be performed to reproduce the defect is useful information for anyone who is trying to reproduce the defect. It saves time for both testers and developers to explain the defect and to retest the same after it’s been fixed.

Test Data used

Certain defects are generated only with some records of data. Hence adding the details of the test data which is being used during testing a scenario is necessary.

Preconditions

Preconditions are necessary in the following cases where for e.g.:

  1. the user needs to have the application in an initial state or
  2. it breaks only in particular browser or
  3. version of the browser

Hence adding these details makes it easier to reproduce the defect.

Environment details

Since the software goes through different testing phases and through different test environments such as pilot, test, beta and then finally production, it is necessary to add environment details

Date Created

As the name suggests its the date when the defect was found, and this field is usually generated by the defect management system automatically.

Created by

If the test team consists of multiple testers, it is useful to know who logged this defect.

Status

Knowing the status of the defect is useful for the team to decide the next steps to be actioned on the defect. This is explained in detail in the next section.

Date Closed

A system generated field automatically gets filled when the user changes the status of the defect as closed. It is useful information in cases where the tester must reopen or reference the same defect in the next release.

Severity

Severity can be defined as the impact on the system due to the introduction of the defect. It ranges from whether the defect can bring the entire system down or it can be a normal functionality drift.

Priority

Priority can be described as the urgency or a timeframe to resolve the defect. If it has an impact on a broader audience, then the probability to resolve it is likely to be soon or on an urgent basis. Also, higher severity defects do get higher priorities.

Expected Behavior

The expected behavior is the condition or the result we expect after performing the series of steps in the form of a test case. If it matches the requirement there are no issues however if there is any discrepancy with the requirement specified, then we need to add the details about what exactly we expected.

Actual Behavior

Actual behavior captures the current behavior of the application on performing the series of the test steps.

Artifacts

Artifacts are evidence that the testers can attach to the defect. It gives more clarity for developers to investigate the issue further. It can be test data used for testing, the application URL, logs, screenshots, actual error message displayed on the application, etc.

Defect Status

As the project progresses, each defect goes through several stages of development or resolution called the Defect Life Cycle. During this cycle, the status as well as the assignee (to whom the defect is assigned) keeps on changing. The table below shows the various states:

Status

Description

New

When the defect is created, it’s in the new status. Some systems also refer to this status as submitted. Since it has been just created, it sits with the reporter who logged this defect.

Assigned

Defect status turns into assigned when the team identifies the appropriate person to work on it.

Not a defect

The developer marks the defect to a “Not a defect” if the system behavior is as per expectations.

Fixed

When a developer identifies the root cause and makes necessary changes in the code, they make it available for testers to verify the changes by marking the defect status as fixed.

Not Fixed

Testers then look at the assigned defects and verify the new changes, but notices that it’s still breaking or not working as expected. At this point, the tester can change the defect status to not fixed and assign it back to the concerned developer.

Need more information

Sometimes the details added during the creation of defects are insufficient to dig deeper, and developers need more data to find the root cause. In such cases, they can mark the status of defect as needs more information.

Not reproducible

Sometimes a defect appears only once, and it becomes really challenging to reproduce it despite using all the specified details such as test data, browser, test environment, same version of the application, etc. In such cases, developers mark defects as not reproducible.

Deferred

If the defect is not in the scope of the current release, it can be marked as deferred to be fixed in the later releases.

Duplicate

If the same issue has been reported by the same or different reporter and it still has not been resolved and closed, it is marked as Duplicate or Existing.

Verified

Once developers fix the defect, they make it ready for testers to test. The tester then verifies the changes against the requirement and confirms that the behavior is as expected and if it conforms, they can mark it as Verified.

Closed

Once the defect has been verified and it generates the expected results, tester can mark the defect as Closed after all artifacts have been attached to the defect. Ideally, this should be the last status for a defect.

Reopen

If a defect which was found in the previous release or previous version of the test cycle is found again, testers might want to reopen existing closed defect. Such a defect goes through the different stages and can be marked as closed once the changes are verified and it works as expected.

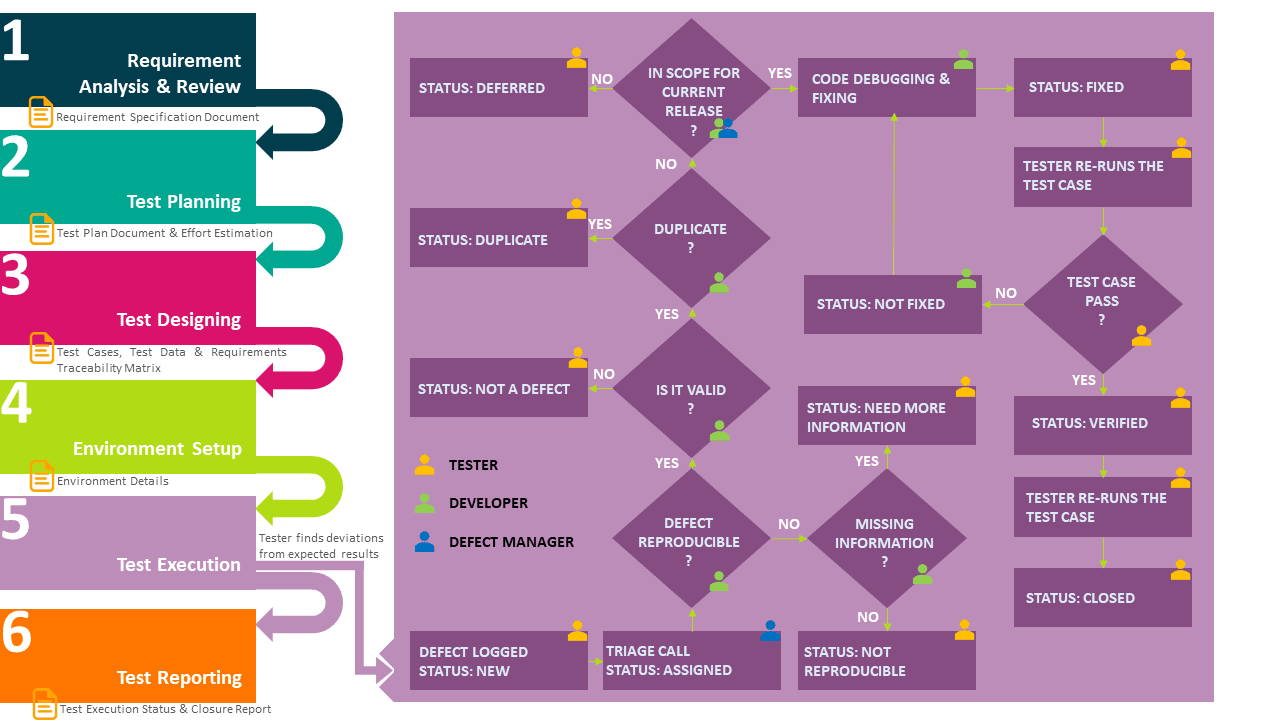
As we have seen so far, the software development life cycle comprises of several steps, with each step producing artifacts, which acts as an input for its subsequent phases. For e.g., the requirement specification document is the artifact produced after the Requirement Analysis and Review phase and so on. Once the test execution phase begins, a new defect is logged, and the triage call is initiated. This process is illustrated below:

Defect Triage and Assignment

During the test execution phase, project team members meet once a day to go over defects. The meeting is scheduled on a recurring basis until all the defects have been marked as deferred or closed. The Defect Manager usually conducts such meetings with the development and testing teams to discuss newly discovered defects, the number of test cases blocked or failed because of the defects, defects which worked as expected and closed, defects which have been fixed by developers and assigned back to the testing team and so on. Such meetings are called Defect Triage calls.

The defect manager considers various factors while assigning defects to the developers. Along with the priority and severity of the defect, the defect manager also checks the availability and expertise of the developers.

Priority of a defect has four different degrees which determine the requirement of how soon it needs to be resolved. Each of them has a general SLA (Service Level Agreement) timeline defined in the contract

Code

Type

Description

P0

Critical

Meaning it has the highest priority and we need to fix it immediately without any delays. Usually with SLA’s in hours rather than days.

P1

High

Meaning it’s not very critical but equally important to solve quickly. In this case, we can plan the time it requires to fix, assigned resources and solve it quickly.

P2

Medium

Required to be fixed but SLA’s are usually within a week.

P3

Low

Low priority defects are not at all urgent to resolve. Depending on the schedule of the development team, they can work on it to resolve the issue.

Similarly, we have different types of severities associated to the defects. Listed as below:

Code

Type

Description

S0

Critical

Defects that have a severe impact on the system like a failure of a critical functionality are marked as Critical. SLA’s are usually in hours.

S1

High

Defects found in the happy path can be classified as High severity.

S2

Medium

Medium severity defects are defects which pose issues, but it’s not that severe to be fixed immediately. Hence developers can decide the timelines to work on it. SLA’s are usually in weeks.

S3

Low

Low severity defects are again needed to be resolved, but since it’s of a low impact, it can be fixed later in the release or pushed to a future release.

To summarize, when a tester comes across an application which crashes on a happy path impacting a vast number of end users, it is marked as critical in priority and severity, i.e., P0S0 defect.

On the other hand, if we have a cosmetic defect like text on the website with underscores instead of a hyphen, then we can mark this defect with a low priority and severity, i.e., P3S3.

Defect Resolution Process

Once the defect has been discovered and assigned to a developer, the developer follows a process for root cause analysis.

A general process is to try to reproduce the defect using the details attached to the defect such as artifacts, test data, etc. The developers can reach out to the testers in case they need more information. Once the developer has all the details, they can try to find the code responsible for the functionality causing the defect. This is sometimes difficult; hence they can compare the code with a version without the defect. They can also check the logs, configuration files or even databases to see if it has any impact on the data. Debugging the application code by providing the same input values and verifying the data flows usually leads one to the root cause.

Defect Management Artifacts

Defect report and the traceability matrix are two main artifacts that get produced or updated for defect management.

Defect Report

Along with the test execution status reports, the test team also prepares defect reports. This report helps to keep all stakeholders updated and helps managers in estimation and planning the project release. It also can be used by Test Managers for resource planning and scheduling to complete the project as per deadlines.

Generally, a defect report includes the following details:

  • Number of new defects logged or reopened based on test cycles
  • Number of high priority and severity defects
  • Number of closed defects
  • Number of defects marked as duplicate, not reproducible or not a defect
  • Number of defects marked as deferred
  • Total number of defects created in a test cycle or release

This information is helpful to derive further conclusions such as defect density, defect rejection ratio, defect acceptance ratio, defect leakage ratio, etc. Let’s discuss some of these in details.

A defect acceptance ratio shows the valid number of defects discovered during a release. It can be calculated as:

Defect acceptance ratio (DAR) = (Number of valid defects discovered and accepted by the development team or client during the release / Total number of defects logged in the same release) * 100

For example, let’s say test team found 200 defects in a release out of which developers or client accepted 120 defects. So, the DAR ratio would be:

DAR = (120/200) *100 = 60%

Defect leakage ratio is another metric which can be described as a number of defects missed during the testing phase to the total number of defects discovered for the product.

The test manager can include as many metrics as required by the project stakeholders.

Traceability Matrix

A traceability matrix establishes a connection between the client requirements, test cases, and defects. Requirements are linked to the test cases to understand the test coverage for the specified requirement. Likewise, defects are linked to the test cases to know which test cases are failing or blocked because of new defects or existing ones which are not fixed or reopened. This map provides us with valuable insights like the number of requirements that have issues and would require more time to test while also tracking pending test cases because of the blocked, failed or untested defects. It also provides clarity for testers to put more test efforts on requirements that have been untested while it gives the developers an idea of which requirements need more attention.

One can create the requirement traceability matrix easily by adding the following details:

  • Business Requirement ID
  • Test Scenario for the business requirement
  • Number of test cases based on the derived scenarios
  • Test case ID
  • Priority of the test cases
  • Test case status
  • Defect ID
  • Defect status
  • Comments

The structure of the traceability matrix is specific to an organization, and a company-specific template is usually available with the company PMO (Project Management Office). The end goal, however, is to back trace the defects through the linked relevant requirements via test cases.
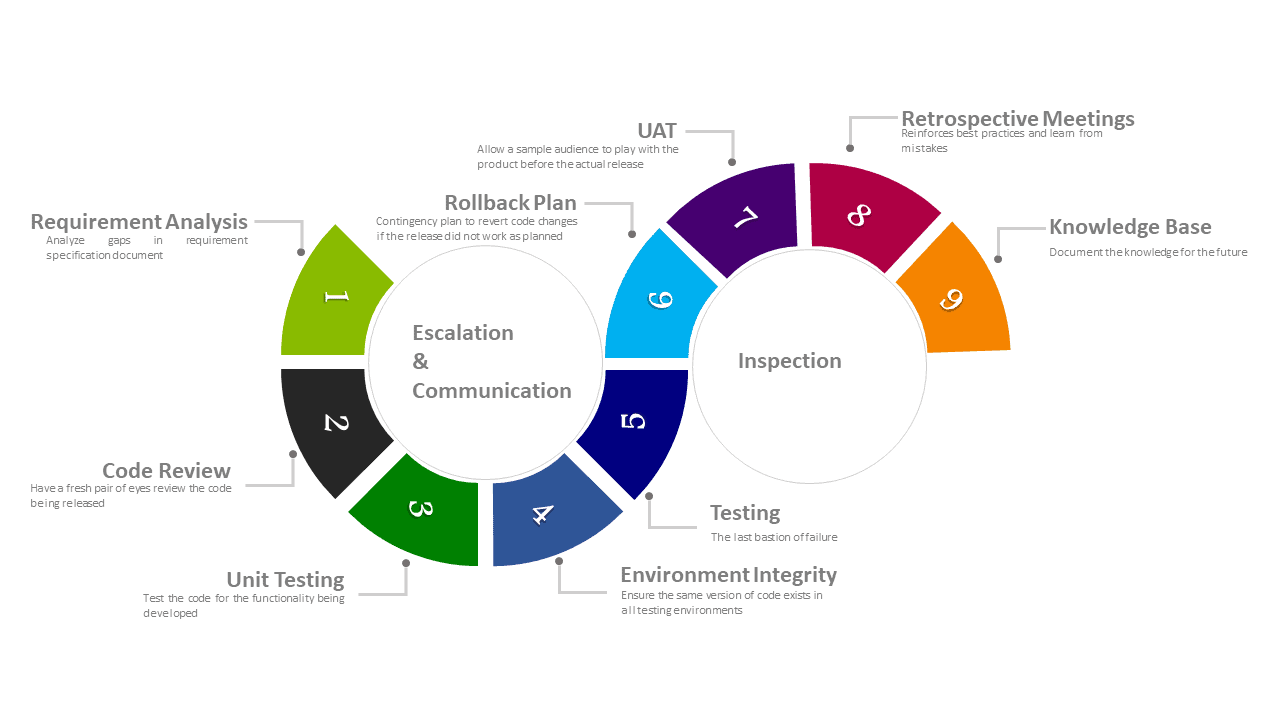
Steps to Prevent Defects

Fixing defects that turn up in later phases of the software development life cycle are expensive since it requires a whole lot of retrospective coding and testing which simply adds to the development time. Hence, it’s always better to identify problems and provide solutions or workarounds in the early stages of software development. This saves time and money by reducing the efforts to rework. Although defects and bugs cannot be avoided completely, here are some precautionary steps that we can take to minimize their occurrence at later stages.
Requirement Analysis

This phase is critical in any project development. As the first and most important stage, care should be given to ensure the development and testing teams have the same understanding of the requirements. All doubts must be clarified, and any chances of dilemma should be addressed. Analysing the gaps in the requirements can lead us to find hidden defects and fix the issues in the first stage of the development.

Code Review

Code review is another technique to reduce the number of defects passing onto later phases of the life cycle. Analysing the data flow across various components, comparing it with the actual requirements, implementing an optimized solution and analyzing critical path scenarios can lead us to find issues at the code level. Pair programming is a good programming practice to adopt.

Unit Testing

Unit testing is performed by the developer to ensure that the code satisfies the requirements. This can be a combination of test scenarios to check input and output values, application workflows, data flows and can have checks to see if certain functions or variables return the expected values. Test Driven Development (TDD) is a good programming practice to adopt.

Environment Integrity

It is necessary to ensure that all environments for the development cycle have the same version of the application being released. Companies usually have Continuous Integration tools to keep track of deployment build and versions. Container technologies like Docker, Kubernetes and Virtual Machines can be leveraged to make this work.

Testing

Testers are the last bastions of detecting defects from being released to production. It is imperative that testers plan and validate all workflows starting from basic happy paths to the more complex ones. It’s important to discover defects in the early phases of testing life cycle. Testers must ensure that defects are re-tested and verified after being fixed.

Inspection

Inspection is an effective technique to review the test cases and identify test coverage as per requirements. It helps to identify gaps in test cases and helps improve product quality.

Rollback Plan

It is obvious that people are excited about a new product being launched. However, sometimes severe problems can be found after the production release as well. In such cases having a rollback plan can be helpful to revert to a previous working version until the issue is fixed.

Issue Escalation and Communication

Showstoppers have a serious impact on the delivery schedule of the projects hence it’s necessary to escalate such obstacles to managers so that all the stakeholders are made aware of the same.

User Acceptance Testing (UAT)

It is a type of testing where a sample of the user audience is given access to use the product with the intent to find defects. Generally, they have a list of real-world scenarios which they target on. Identifying defects after UAT phase is useful to know if the application will be successful with a larger audience without any issues. Sometimes companies also release beta versions of the application to go through such a testing phase before launching a product globally.

Review or Retrospective Meetings

One benefit of having retrospective meetings is to assess the project performance. Listing all the issues that the team has faced and learning from them is helpful. This reinforces processes that work and evolves the team by helping them understand what doesn’t.

Knowledgebase

Creating knowledge repositories of the lessons learnt is necessary to document for future. This is helpful to train new members joining the team and can help by introducing good standards to other teams as everyone strives to find the optimum solution that works.

Conclusion

Understanding defects and managing them is thus crucial in software test life cycle. If performed correctly it aids in streamlining the project assembly line and helps the manager in project delivery. This results in delivering a quality product which meets the customer’s needs, elevates trust, and boosts business growth.

The post A Primer on Defect Managment appeared first on Simple Talk.


from Simple Talk https://ift.tt/2NXjy9h
via

Fifty Different Ways to Enact Data Privacy Laws?

“We do not and never will sell any of your information to anyone.” Mark Zuckerberg, Facebook: Washington Post Monday, May 24, 2010

When the full horror of the implications of the Data Hijacking scandal involving Facebook and Cambridge Analytica was eventually revealed in March 2018, the public mood towards privacy legislation finally hardened against the abuses of the IT giants. The most alarming aspect to the scandal was that there seemed to be no internationally-accepted legislation capable of allowing a successful prosecution.

The EU Data Protection Directive 1995, and the subsequent General Data Protection Regulation 2018 (GDPR) seemed at the time to be the only legislative framework capable of even laying down a common understanding of the morality about the use of personal information, despite the fact that many countries and federations around the world had been attempting to define such a thing for decades. Why has it been so difficult?

The US State of California has a history of introducing pioneering legislation that protected the individual against the abuses of big corporations. However, even California had struggled so much to provide up-to-date legislation that was comparable in scope to the GDPR, that voters had shown every indication of approving an alternative law via a ballot initiative: A law that was drawn up by privacy campaigners.

This article attempts to explain the main reasons for the passive resistance of the elected representatives to voting through effective privacy legislation, and the vehement opposition to the new laws that came from many media, telco and tech companies. I’ll try to recount some of the compromises to the law that were made as a result. Out of it all, I’ll try to extract some sensible advice on steps that data professionals can reasonably take, to ensure the data stores and processing complies with these new State laws, as far as possible.

Data Privacy Legislation in California

Everyone was expecting California to be the first to pass privacy legislation in line with the GDPR, having already amended its constitution to include the “inalienable” right of privacy. California were the first to introduce laws requiring notifications of data security breaches (2002), and in 2003, including the ‘Shine the Light’ law that required businesses to explain how they handled consumers’ personal information. They followed this, in 2004, with the, sadly rather inadequate, California Online Privacy Protection Act (CalOPPA). In 2015, California also introduced the Business & Professions Code 22580-22582 (“BPC 22580-22582”) law, a.k.a. the Privacy Rights for California Minors in the Digital World Act.

In 2013, CalOPPA was amended to give the legislation some bite, but it was still in obvious need of replacement, to reflect advances in technology and work on Assembly Bill 375 (AB-375), the draft of the new act, began in February 2017. It attempted to redefine the way that businesses who have customers in California could collect and sell the personal information of those customers.

However, the size and strength of the opposition to this new, more comprehensive privacy act was a surprise, and the bill suffered delays. After a great deal of prevarication, voters and privacy groups became concerned that meaningful and enforceable legislation wasn’t going to emerge, so an organization called ‘Californians for Consumer Privacy’ created proposed legislation called the CCPA (California Consumer Privacy Act).

The CCPA and AB-375

The proposed CCPA was a far-reaching consumer privacy initiative, similar in its main points to the GDPR. It was placed on the California ballot, as proposed initiative measure No. 17-0039, for November 2018. If it passed successfully, and every indication from polling suggested that it would, then it would come into effect in August 2019. The initiative gained more than 600,000 signatures of support from Californian residents, which was remarkable, in the face of well-funded opposition from the IT Giants.

CCPA was opposed by organizations called ‘The Committee to Protect California Jobs’, as well as ‘the Internet Association’ and ‘Technet.’ These were backed by various media, telco and tech companies, including Amazon, AT&T, Comcast, Facebook, Google, Microsoft, and Verizon. Rumors spread of a ‘war chest’ to fund a campaign against CCPA of around $100m. FaceBook had evidently spent $200,000 opposing it until the Cambridge Analytica data scandal blew up in their faces, and they suffered a PR disaster over their privacy policies. Unsurprisingly, Facebook did an abrupt U-turn and supported the CCPA.

The detractors explained their opposition by complaining that the CCPA added the right for Californians to sue companies directly, for data misuse and rule infringement. They also disliked the idea of being forced to include a prominent “Don’t Sell My Data” homepage button, and the obligation to provide the same services, whether or not the user exercised this right. The restrictions in the way that personal data could be used for advertising by third parties was also unpopular with the IT behemoths.

The chief sponsor of the CCPA, Alastair Mactaggart, then stated that he would withdraw the CCPA ballot initiative if California’s nascent AB-375 was passed before a deadline. AB-375 was kicked back into life and was rushed unopposed through both the State Assembly and the Senate, by State Assembly member, Ed Chau, and State Senator, Robert Hertzberg. It was signed into law by Governor Jerry Brown.

NOTE:
Once AB-375 was passed and signed, it also became known as the CCPA. In order to compare it to the original CCPA initiative, the current law is referred to as AB-375 in this article.

The most significant consequences of all this are, firstly, that the law comes into effect on January 1, 2020, rather than in August 2019. Secondly, AB-375 can be amended until 2020, the point that it passes into law. The CCPA, like all ballot initiatives, would have been far more difficult to change once it had achieved the two-thirds majority and been passed because the amendment would likewise require a two-thirds majority vote on the ballot. Also, amendments to the CCPA would only have been allowed that were ‘consistent with and further the intent of this Act.’ Hence the rush with AB-375.

In fact, AB-375 is already changing slightly. It initially required businesses to share ‘accurate names and contact information‘ of third parties that bought user data over the previous year. It is now much more relaxed, requiring nothing more than merely disclosing the “categories of third parties” that bought the data.

Although this seems to have been done after representation from the industry that such a task was too onerous, it is more likely due to the unwillingness of IT companies to disclose to competitors who in the industry is actively buying personal data. It is most unlikely that anyone in the business of selling data on to third parties would lack a mechanism to keep track of whom they’re sharing with!

The other disadvantage was that AB-375 compromised some of the more radical elements of the CCPA, such as the idea that the individual whose personal data was compromised could take direct legal action against the offending company. AB-375 leaves the task of enforcing the law to the attorney general and gives the citizen of California the right to private action only in the case of data breaches that weren’t subsequently fixed.

In a sense, nobody won this skirmish. AB-375 can be amended for the next two years, so it is still possible for its teeth to be extracted by the IT giant corporates, ‘…to address the many unintended consequences of the law‘, as one of them recently stated.

In the meantime, the initiative on privacy concerns remains with the EU’s GDPR legislation, at a time when the States could be taking the lead. However, AB-375 has exposed some issues that need to be debated by politicians and electors, but which are impossible for the technical side to decide. This includes whether the public should have a right to sell information about themselves, or whether they should be protected from the temptation to do so. It also raises questions about whether service providers should be allowed to penalize the user of a system who refuses to allow the use of their data by advertisers. Should they get a ‘lite’ rather than ‘pro’ level of service as a consequence? The ‘Spotify exception’ is an example of this.

The Spotify Exception

The main difference between the CCPA and AB-375 is that the latter creates what state senator Hertzberg calls the “Spotify exception,” allowing IT companies to offer different services or subscription rates to users, depending on the amount of personal data that they actively opt to share, or the advertising that they can tolerate.

AB-375 states that the difference in service must be “reasonably related to the value provided to the consumer by the consumer’s data.” The problem with forcing internet companies to provide the same level of service to people who opt out of allowing them to use or sell their data is that for some companies this it is their only revenue stream, and the only one possible with their business model. (See AB-375 Right to Equal Service and Price. 1798.103.) If users are getting a service that is paid for only by allowing targeted advertising, or the sale of data, then it might seem unfair to insist that users are entitled to the service even if they opt out of the use of their data.

The CCPA explained it like this:

“Your decision to request information from a business about its collection and sale of your personal information, or to tell a business to stop selling your personal information, should not affect the price, quality, or level of the goods or services you receive. It is possible for businesses both to respect your privacy and provide a high level of quality and service and a fair price.”

Whereas the original CCPA prevents businesses from discriminating against consumers who opt out of the sharing of their data, the AB-375 allows them to offer consumers financial incentives, if they do agree to share their data. They can also charge consumers reasonable fees for not sharing their data with advertisers or other third parties, which could accelerate the move towards subscription businesses.

Differences between AB-375 and the GDPR

It is difficult to make a direct comparison between the new law and the GDPR, because of the difficulty in getting a precise ruling. The people who drafted the new law could not deal with any overlap or inconsistencies between the new law and California’s existing privacy laws. Instead, they inserted a clause that says that wherever there is a conflict with California’s existing laws, the law that gives the greatest privacy protections shall take precedence. The law “shall be liberally construed to effectuate its purposes.” In order to fathom the true meaning of the new law, you need to study all the existing laws as well!

With that proviso, the differences with the GDPR seem to be only ones of emphasis, rather than substance:

  • The definition of the individual person is clearer in AB-375, so that it includes not just Californian residents as users or consumers of IT applications, but also as employees, patients, tenants, students, parents, and children
  • The exceptions to the rights of deletion of personal data are different from the GDPR
  • Whereas AB-375 is clear about when parental consent is required, GDPR (article 8) does not require parental consent in every case: only when offering information society services (ISS) directly to children;
  • With AB 375, adult users have the right sell their personal information (section 1798.125), whereas the GDPR allow only ‘explicit opt-in and opt-out’ in particular circumstances to a known destination for a legitimate reason. There is nothing in the GDPR legislation that allows general data brokerages
  • AB 375 insists that businesses disclose to their users that they would like to sell their personal data. If the users are unwilling to consent, then a business has the right to increase the fee for the service and offer a different package. They can also offer incentives for the sale of their data. The GDPR does not condone data brokerage at all.
  • In the case of an avoidable data breach, users can recover damages of $100-$750 per instance, or actual financial damages, whichever is the greater. However, businesses can avoid statutory damages or class-wide actions being pursued if they rectify any breach within 30 days of notice being provided by the user. There is also a great deal of latitude in the term ‘avoidable.’
  • AB 375 does not allow discrimination against users who opt out, exercising their rights in accordance with the bill. The GDPR is not explicit on this point.
  • AB 375 introduces the concept of ‘de-identified’ data. A business is free to collect, store, process, and transfer data that has been deidentified, by aggregating it into a summary report for use in marketing and advertising.
  • AB 375 is much more prescriptive about such things as disclosures and communication channels, such as toll-free numbers.
  • AB 375 has a broader definition of personal data and includes information about households, families, and devices.

What Should a Data Professional Do in Light of AB-375?

There is no point in panicking about a law that can be amended for two years and must be, well, ‘liberally construed to effectuate its purposes’ and to fathom its meaning. However, it is as well to:

  • Make sure that your systems can work out if any data you hold is about Californian residents.
  • Plan for systems that can provide different levels of service, according to the extent of opt-out (or opt-in, in GDPR parlance)
  • Find ways of avoiding Nagware for requesting opt-in to the sale of data. (repeated requests within a year would be ‘nagging.’
  • Provide alternative, cost-free ways of allowing users to specify their general opt-in or opt-out to the sale of personal data, including the prominent link to a ‘Do not sell my personal Information’ page, with an effective verification system. (Note that there is no such thing as a general permission to sell data in the GDPR. Data brokerage isn’t compliant)
  • Plan to update your privacy policies within the next two years to ensure that they comply.
  • Determine the age of your internet users who are California residents, to comply with the law regarding the age of consent for opt-in.

Conclusion

Any company with an international Internet-based business that holds personal data will be very suspicious of any state-based law. Not only would it be a nightmare to comply with different detail in every state, but the experience of trying to make sense of the Californian initiative could be multiplied by as many as fifty times if each state concocts its own legislation.

Although Congress has an obvious, and justifiable, dislike of federal privacy legislation, the alternative of having fifty divergent state privacy laws is unthinkable, especially if they follow the experience of California’s attempts. IT professionals will remember the forty-nine different state laws on data breach notifications that gradually followed California’s 2002 Data Breach law. They will look enviously at the way that the counties within the EU sphere of influence sensibly all fell in line behind the GDPR. I certainly wouldn’t relish having to provide forty-nine more summaries like this, and I can’t imagine many readers looking forward to having to read them.

The post Fifty Different Ways to Enact Data Privacy Laws? appeared first on Simple Talk.


from Simple Talk https://ift.tt/2OChdOd
via

Tuesday, September 18, 2018

Using Azure Storage Explorer

While working on Azure Storage, you may want to quickly access the data and tweak it the way you need it. Azure Storage Explorer is a GUI-based tool that comes with a bunch of features to ease your development experience. In this article, I am going to go over core technical details of Azure Storage and then will introduce you to one of the very useful storage tools called Azure Storage Explorer. You are going to get answers to all your questions such as what Azure Storage is and what kinds of data can be stored into Azure Storage. You will also learn how to manage your Storage through Storage Explorer. For this, you will access, create and modify Table Storage through Azure Storage Explorer. Additionally, you will create a client application using the Azure Storage .NET SDK and further access the uploaded data through Azure Storage Explorer.

Windows Azure Storage

As per Microsoft’s documentation “Azure Storage is Microsoft’s cloud storage solution for modern data storage scenarios.” Azure Storage provides the most efficient, scalable and reliable solution for the data storage and accessibility in the modern data storage world. It’s really made of four different types:

  • Table Storage: Table storage stores large amounts of structured data. This gives you the ability to store entities with name and value pairs. You can easily access the data using a clustered index. It has an extraordinary ability to scale as per needs.
  • Blob Storage: This is for larger files and has the capability to store a massive amount of unstructured data. Anything that you come across on the computer or phones such as images, video files, audio files, pdfs and larger documents. Blob storage allows you to access them very efficiently in a variety of ways. You can access them like a hard drive; you can even store virtual hard drives in blob storage. Blob storage is a massively scalable object store for text and binary data. Blobs take advantage of Content Delivery Network to give you more scale internationally.
  • Queue Storage: Queues are primarily created for messaging, where you can put a small piece of data into the queue and then read and process the information on a first come first serve fashion. After the message is processed, you can recycle that message, or you can keep it in the storage so that you can do additional work on it. Queues can be considered as shorter-term storage, the message on queues can live for a maximum of seven days. Storage queue APIs are lease based; you can renew or update the lease using appropriate API method calls. In addition to this, you can access the message from any corner of the world by HTTP or HTTPs method calls.
  • File Storage: This storage type is mainly used to store files in the cloud, and they are typically accessible through the SMB (Server Message Block) protocol. These can be thought of as an efficient alternative to traditional on-premises file server storage.

Azure Storage Account

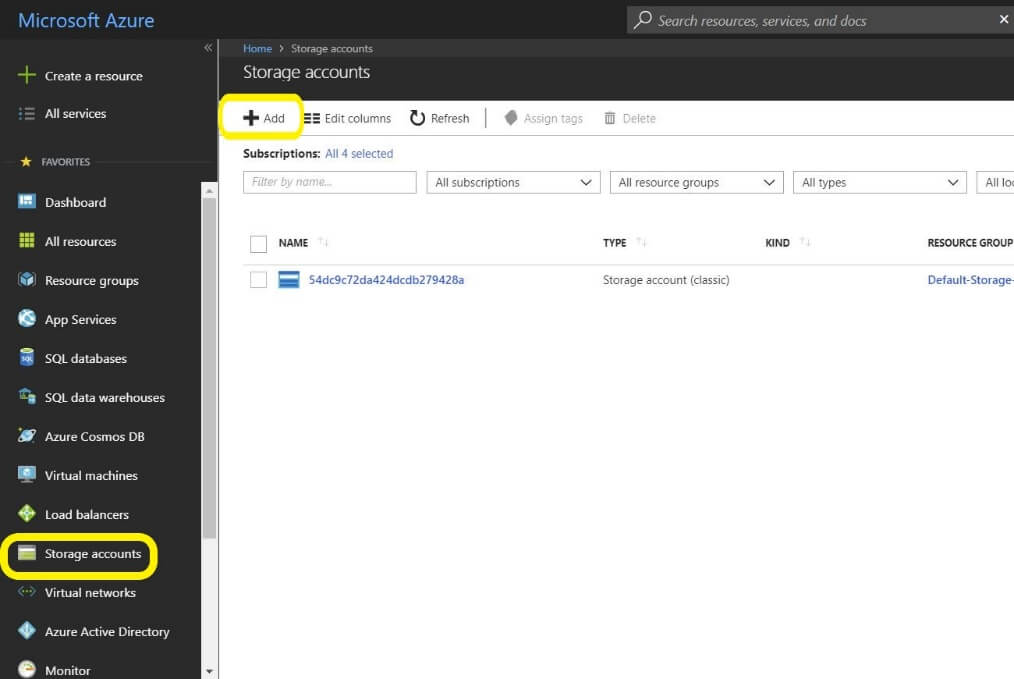
A storage account houses all these types of storage. You will need to set up your Azure Storage Account in your Azure Subscription. This can be done by adding a new Storage account using the Azure portal. Once you create your storage account, you will have all the Queues, Blobs, Tables and Files underneath that account. You can choose which of the options suits your requirements. The first step is to create the storage account in your Azure Subscription. Once you login to Azure Portal, you will see all the services that Azure provides on the left panel of the page. You will then notice that there is an option called Storage Account. If you don’t see it, click All services and then filter for storage. After you click Storage Account, you will see an option to add a new one.

C:\Users\spande\AppData\Local\Microsoft\Windows\INetCache\Content.Word\A3AZPortaledited.jpg

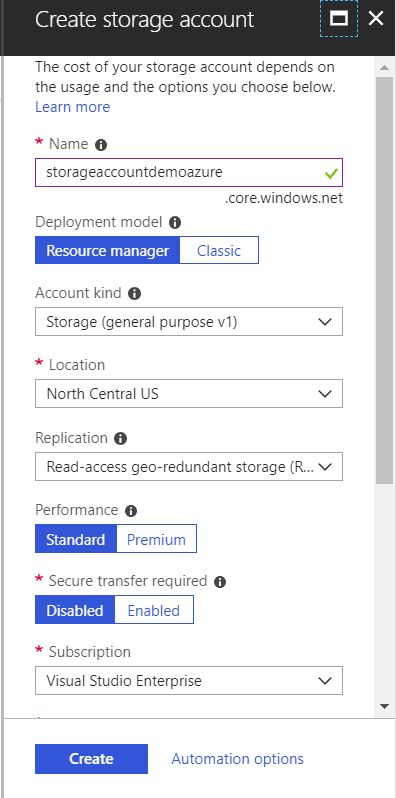
Once you click the Add button, you can fill in all the details for your account. As this article is more about the Azure Storage Explorer, I am not going into each and every detail of creating a storage account. One thing to keep in mind is that the storage account name must be unique across Azure. After you have all the details in the required fields filled in, you can click the Create button.

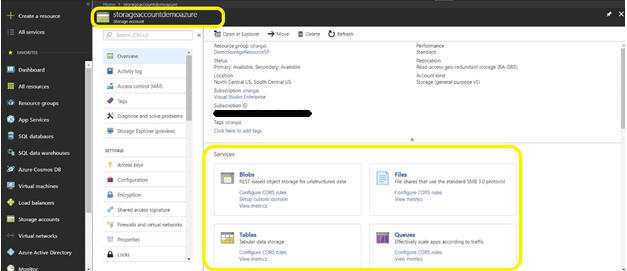
As I mentioned before, once the Azure Storage account is created and you click on it to see the properties, you will see that it supports services for Blobs, Files, Tables, and Queues.

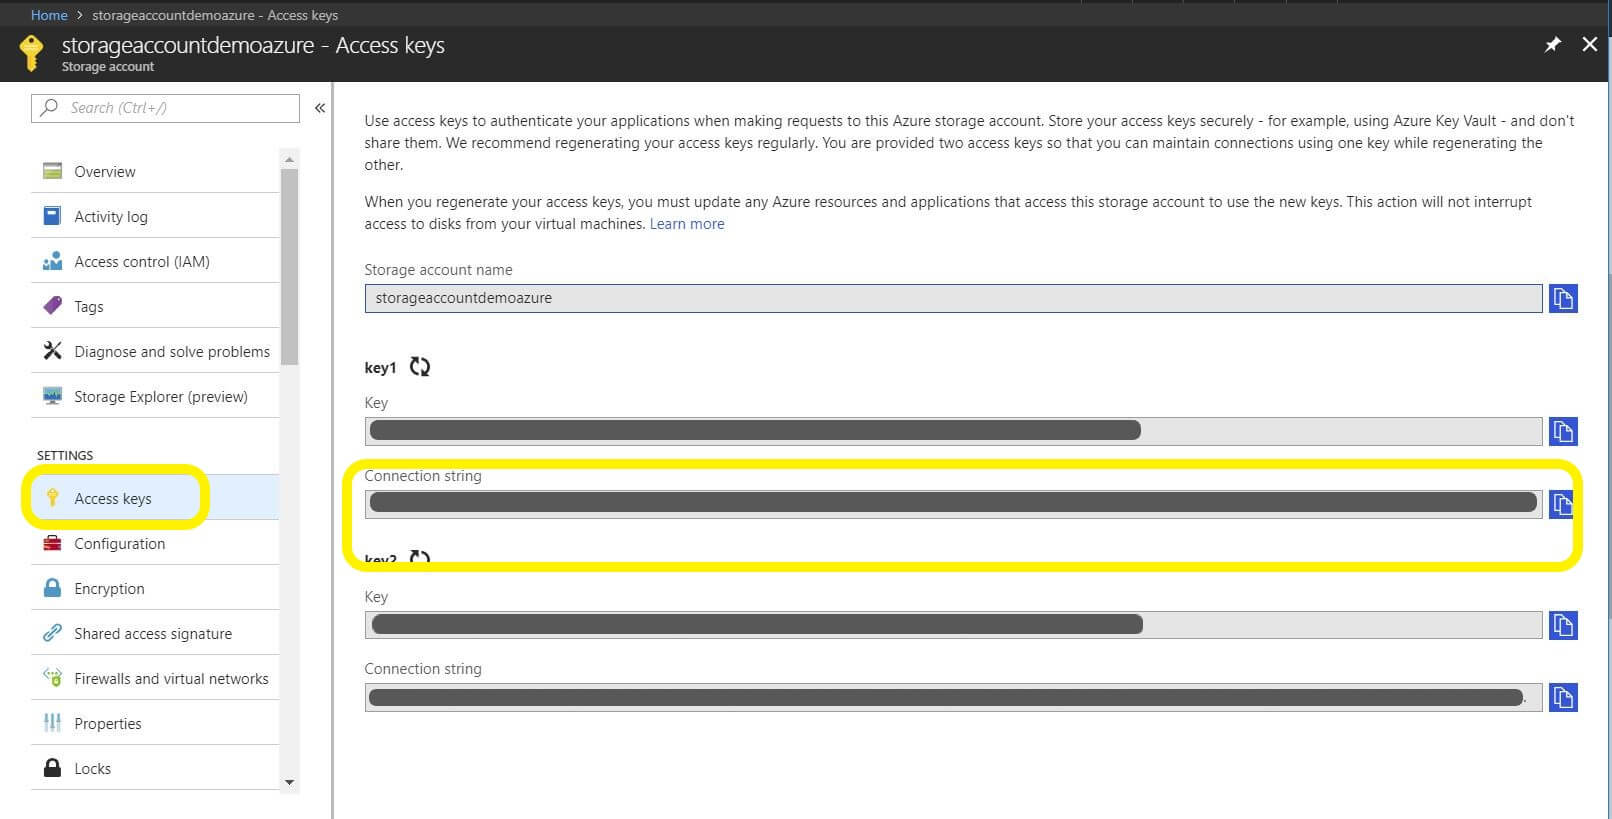
You can find connection strings for your client applications by clicking Access keys.

C:\Users\spande\AppData\Local\Microsoft\Windows\INetCache\Content.Word\A3AzureStorageConnStringEdited.jpg

All the Azure storage services are accessible through the REST API which is the HTTP API that can be accessed from devices. You can just create HTTP requests from your devices to Storage Uris and then access tables, blobs, and queues. Any device that knows how to speak through HTTP can access the storage. Now to access this information, you definitely need to implement standard security to ensure there are no man in the middle attacks. To prevent this, the storage services use standard SSL security to protect the communication between the clients and servers. If somebody is manipulating the data in an account, they should have rights to do that, and that means they should have valid keys. When you make a request to the Storage service, you will have to provide the security information for the storage account in the header of the message. You will have to take the authorization information of the keys and provide those inside the message.

In addition to security on the HTTP requests, versioning is also needed if there is an update to the data already in place. Azure again uses HTTP protocols for this in the form of E-tags, so when you get an item from Azure services, they are marked with E-tags. Then you can check the details to deduce whether that data has changed as compared to previously uploaded versions. Azure Storage provides storage, security, and versioning all layered on the top of standard HTTP protocol requests and responses.

Azure Storage Explorer

Now as that your storage account has been created, let me introduce you to the tool, Azure Storage Explorer, that will improve your overall development experience with Azure Storage.

Azure Storage Explorer is an application which helps you to easily access the Azure storage account through any device on any platform, be it Windows, MacOS, or Linux. You can easily connect to your subscription and manipulate your tables, blobs, queues, and files. In addition to these, you can connect to and manipulate Azure Cosmos DB Storage and Azure Data Lake Storage as well.

Benefits of Using Azure Storage Explorer:

  • Easily connect and manage one or multiple Storage accounts.
  • User-friendly UI to view and update entities of not just storage accounts but also Azure Cosmos DB and Azure Data Lake.
  • Increased productivity with quick access to your data and management of the objects in your storage with ease.

How to Set up the Explorer?

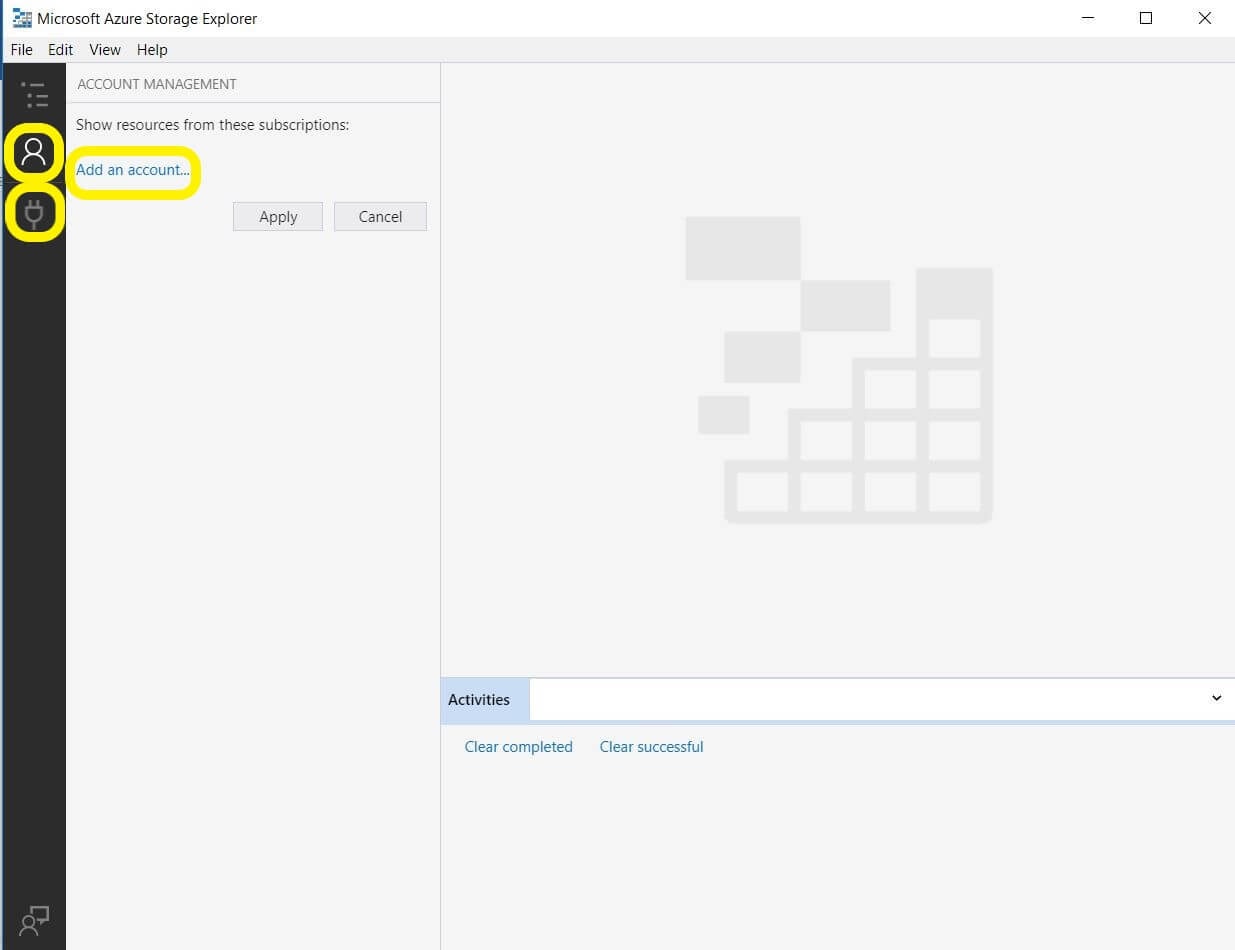
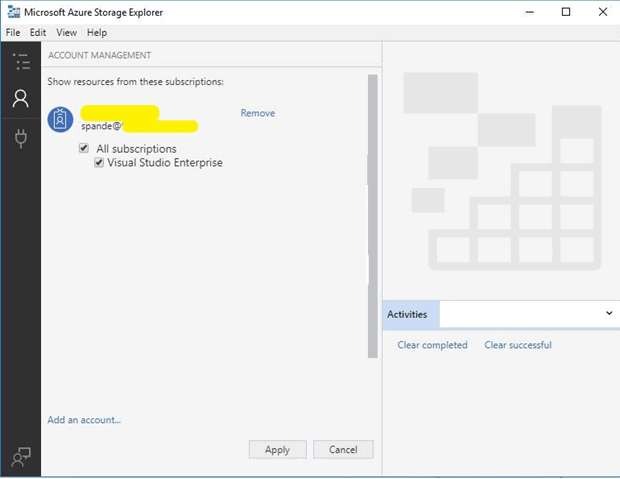
You can download it from here. After it has installed successfully, you can launch Azure Storage Explorer through the Start menu. You will see the screen below once it opens up for you and you click the Account Management icon.

C:\Users\spande\AppData\Local\Microsoft\Windows\INetCache\Content.Word\A3AzureExplorerAddNewEdited.jpg

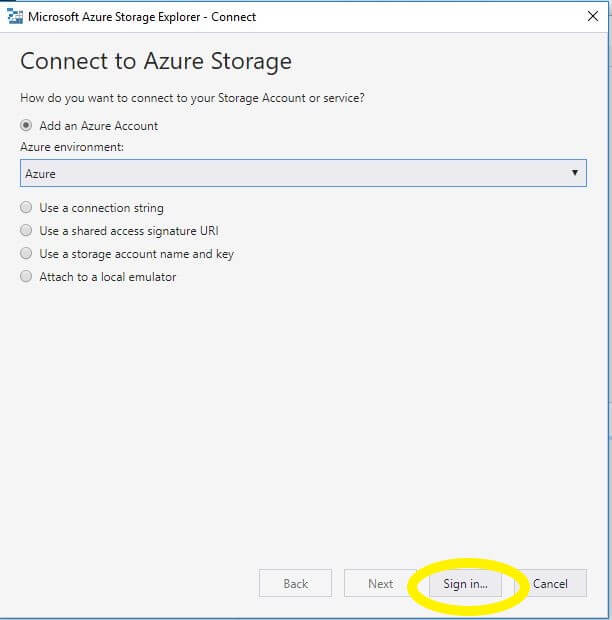
Once you click Add an account, you will notice that there are multiple options for connecting to your storage account. You can connect by signing in with your Azure account credentials, using a connection string, using storage account name and key, and many more. For now, just sign in with your Azure credentials.

C:\Users\spande\AppData\Local\Microsoft\Windows\INetCache\Content.Word\A3ExplorerConnectionEdited.jpg

Once you Sign in you will get an option to select all the list of resources from your subscription that you can select so that they will get added to the Azure Storage Explorer. Tick the options appropriate to the accounts that you want to use. Select the account that holds the storage account added in the previous section.

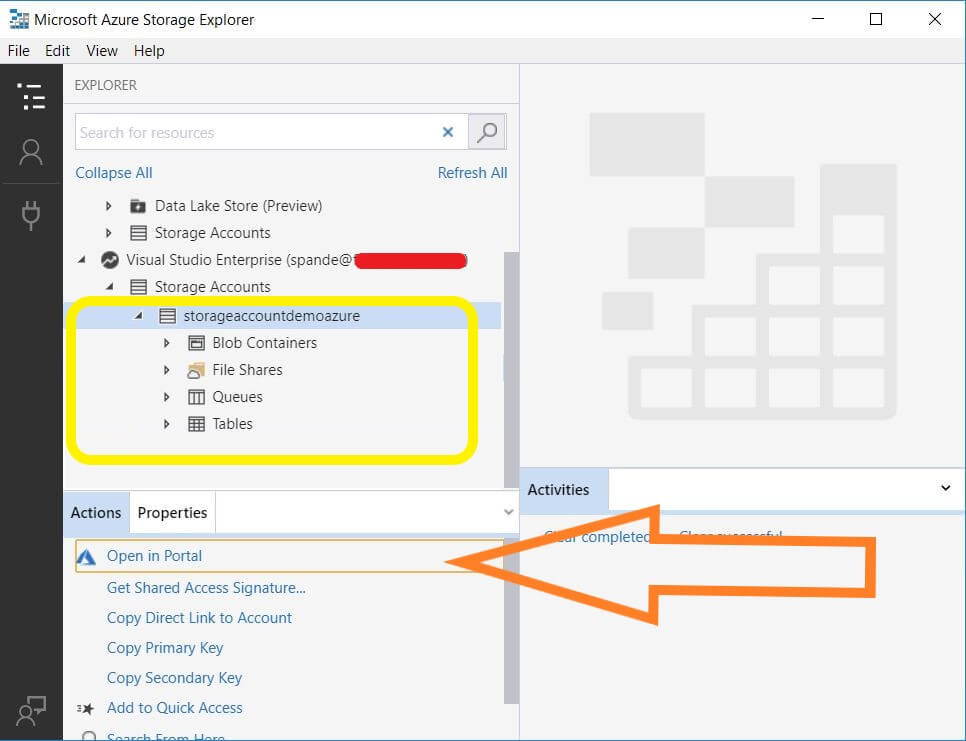
Once you locate the storage account, you will see that you can access all four storage options through Explorer. Also, you will see a link in the options to open these storage account components in Azure Portal. You can easily do that by clicking Open in Portal.

C:\Users\spande\AppData\Local\Microsoft\Windows\INetCache\Content.Word\A3COnnectSuccEdit.jpg

Why use Azure Storage Explorer?

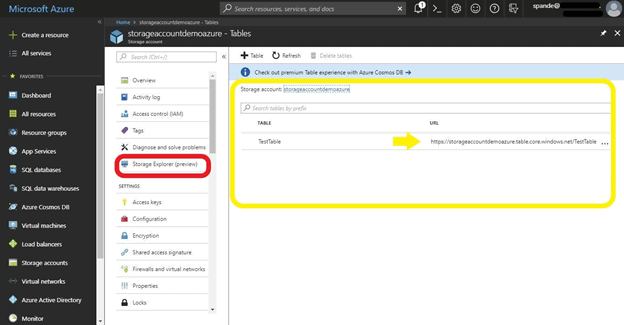
If you navigate down to the Table storage in your storage account in the Azure Portal (on the Storage accounts page, click on Tables Service to see the list of tables), it will bring you to the page shown in the screenshot below. You will be able to see the list of tables in your storage account and their respective URLs. Also, you will notice that Storage Explorer is available in preview mode. That tells us that the Storage Explorer will be added to Azure Portal very soon. But for now, just keep using the Azure standalone application for this article. To add new data to these tables, you will have to pass on the entities through your client application code by using the appropriate URLs. This approach will create the data for you, but Azure Storage Explorer plays an important role to make it easily accessible by User-friendly UI.

C:\Users\spande\AppData\Local\Microsoft\Windows\INetCache\Content.Word\AZST7.png

Additionally, developers often want the ability to tweak the data according to the project needs. Azure Storage Explorer provides the ability to modify the data in the most efficient manner. Storage Explorer enables you to perform relevant operations on the storage by providing different options based on the type of storage. Here is the list of operations for different storage options:

Table Storage:

-Query, Add, Edit and Delete Entities

-Import the entities and export the tables and results of the query filters.

C:\Users\spande\AppData\Local\Microsoft\Windows\INetCache\Content.Word\AZST10.png

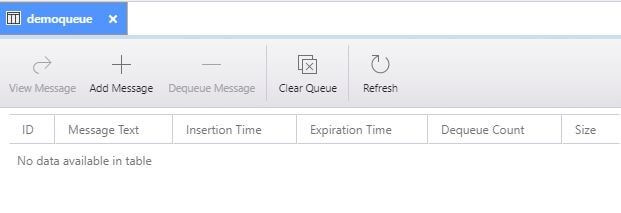
Queue Storage:

-Enqueue/Add and Dequeue Message and View the message

– Clear the queue

C:\Users\spande\AppData\Local\Microsoft\Windows\INetCache\Content.Word\A3queuee.jpg

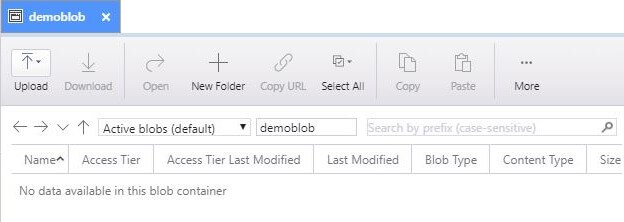
Blob Storage:

-Uploading and Downloading Blobs

-Copy Blobs and folders

-View Blobs

-List Blob Containers

-Delete Blobs

C:\Users\spande\AppData\Local\Microsoft\Windows\INetCache\Content.Word\A3Blobe.jpg

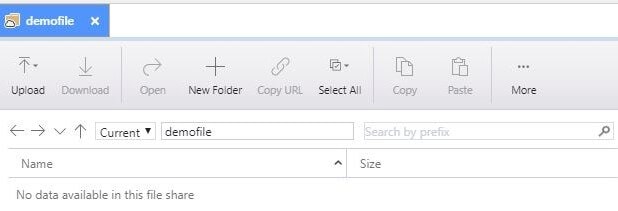
File Storage:

-Upload and Download files or directories

-Easily view or open the files

-Rename and modify the files

-Create and Delete Directory

C:\Users\spande\AppData\Local\Microsoft\Windows\INetCache\Content.Word\A3Demofilee.jpg

By Now, you probably understand how Azure Storage Explorer makes storage access so easy and hassle-free. You just connect to your storage account, and you are all set to perform any operation on it.

Using Azure Storage Explorer

To help you understand how Azure Storage explorer works, I’ll demonstrate how to access, create and modify Table storage through Storage Explorer.

Before creating the Table Storage, let me first clarify the various components involved in this storage pattern. You might think that Table storage is the same as that of relational or traditional database, but this is instead a schema-free collection of entities. An entity is an object which consists of properties. By default, each entity has a partition key, a row key, and a timestamp. Properties are the key-value pairs.

What is a Partition Key?

The partition key is a unique identifier for the partition in a given table. This can be considered as the first part of the primary key, and another part is row key.

What is a Row Key?

Row key is the other part of the primary key. In combination with the partition key, the row key forms a unique combination to uniquely identify the entity within the table.

Each entity has a Partition Key and a Row Key which can be used to form a clustered index which enables very fast lookup through the storage.

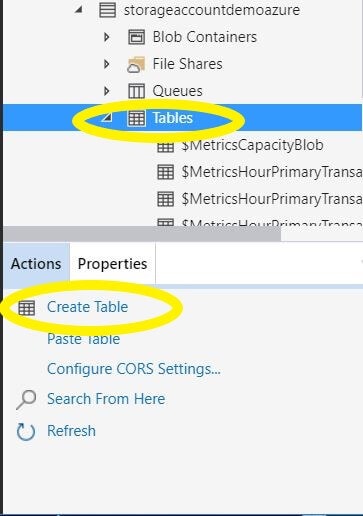
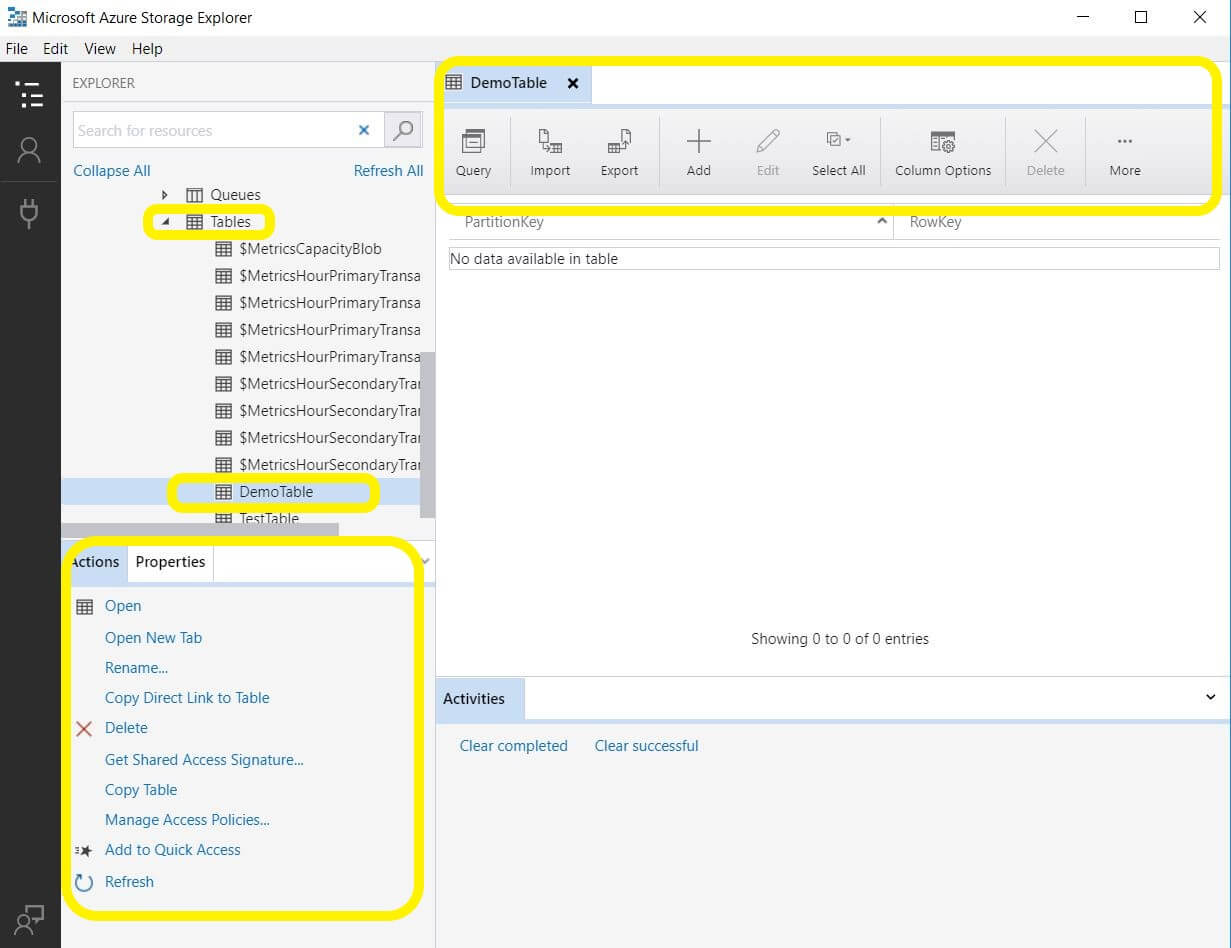
Now to focus back on Azure Storage Explorer. To add a new table, select the Tables option and then click on Create Table.

C:\Users\spande\AppData\Local\Microsoft\Windows\INetCache\Content.Word\A3Tablesedited.jpg

After clicking Create Table, provide the appropriate name of the table. Here, the name of the new table is DemoTable.

C:\Users\spande\AppData\Local\Microsoft\Windows\INetCache\Content.Word\A3TableCreateedited.jpg

There are various options that Explorer provides such as a Query on the table, Import/Export data, adding a new entity and many more. You will notice that the newly created table has no data; the Partition key and Row Key do not hold any data currently.

Let’s add some data to this DemoTable.

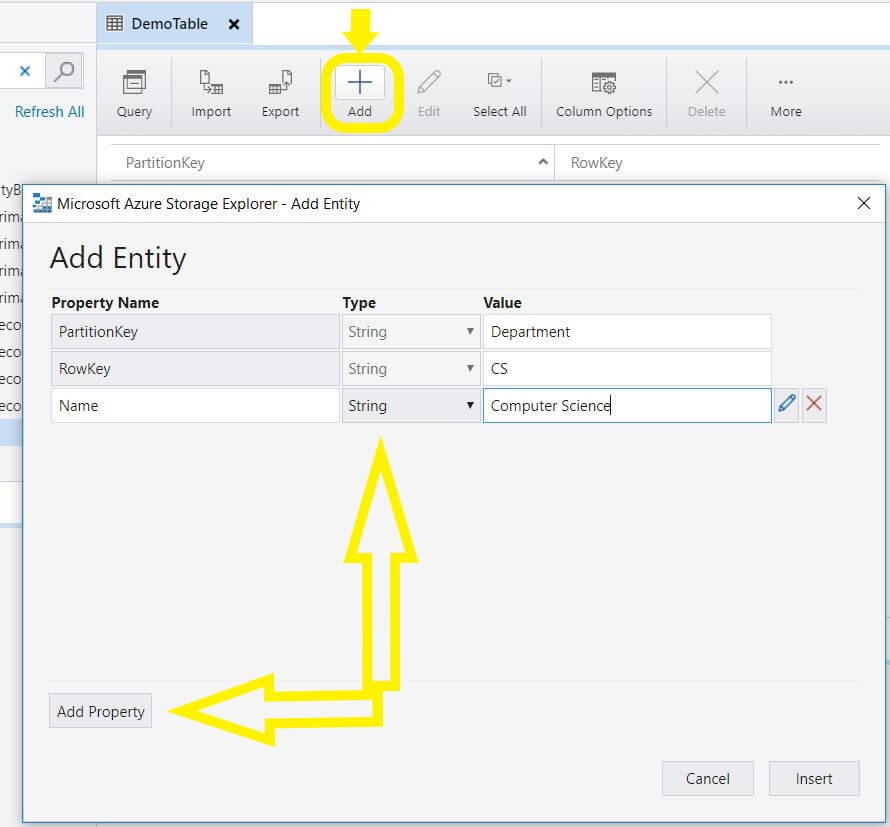
Click on the Add option found in the menu at the top. You will see the PartitionKey and RowKey properties which every entity will have. Type Department as the partition key and CS as the row key. Department and CS form a unique combination.

To add a new property, click on the Add Property button on the bottom of the page. As you can see, I have added a property called Name with a value Computer Science. You can select the type of property from the Type dropdown.

Properties support following types:

Byte[]

Bool

DateTime

Double

Guid

Int32 or int

Int64 or long

String

After you have added all the properties, click on the Insert button.

C:\Users\spande\AppData\Local\Microsoft\Windows\INetCache\Content.Word\A3AddEntitiesEdited.jpg

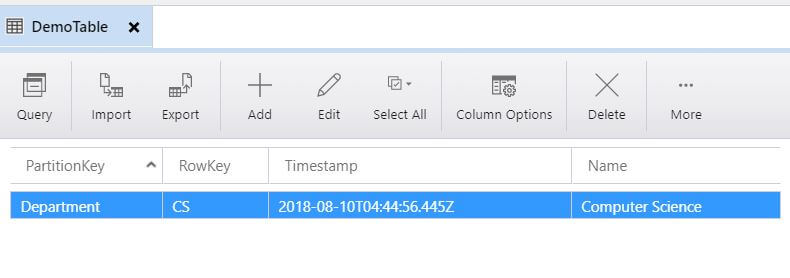
You will see that a new entity is added to DemoTable as below:

C:\Users\spande\AppData\Local\Microsoft\Windows\INetCache\Content.Word\A3NewRow.jpg

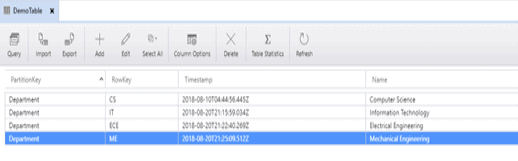
Add three more entities to the table and query the table. This is how my table looks like after adding the entities:

C:\Users\spande\AppData\Local\Microsoft\Windows\INetCache\Content.Word\AZST.PNG

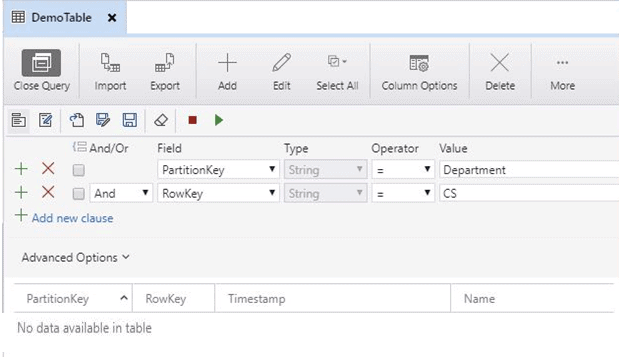
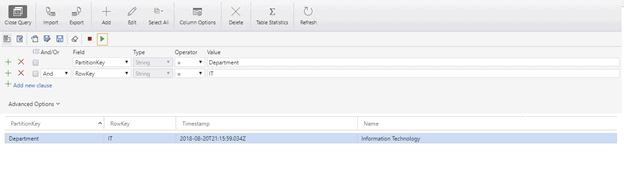
To filter the IT department data, you can add a new clause by clicking the Add new clause option.

C:\Users\spande\AppData\Local\Microsoft\Windows\INetCache\Content.Word\AZST2.png

Creating a .NET Application with the Azure Storage .NET SDK

You can use Azure Storage to store your client application data onto the Cloud. Microsoft’s Azure Storage SDK enables you to access the storage accounts using simple method calls. It hides all the complexities behind the scenes making the development experience smooth. You can imagine a simple accounting website built on the .NET platform which asks the user to upload an image of the bills then process it and further makes it available for download. This scenario can be achieved using Azure Storage. The .NET web application can store the image file as blobs to Azure Blob Storage then process it using some code, store the output to the Azure Storage and finally make it available to the users. With Azure Storage explorer you will be able easily to download the files for accounting purposes.

For the scope of this application, instead of developing a .NET web application we will develop a console application that will upload the files stored locally on the computer to the Azure Storage. You will see how convenient it is to upload the files through a client application using the storage client using .NET SDK.

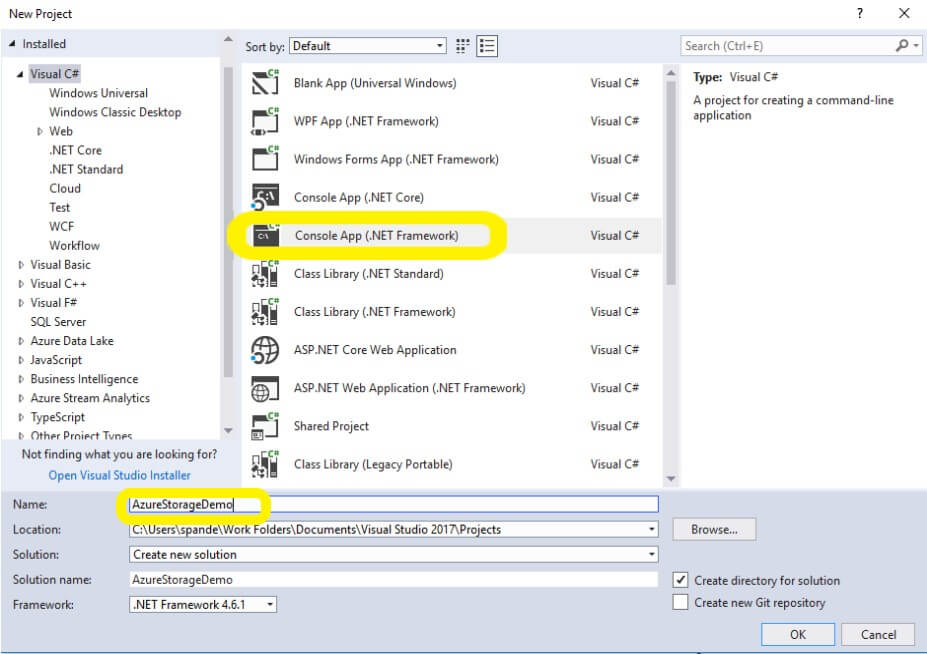
In Visual Studio, create a new Console application named AzureStorageDemo. Go to File => New => Project => Visual C# => Console App (.NET Framework).

C:\Users\spande\AppData\Local\Microsoft\Windows\INetCache\Content.Word\A4NewProj.jpg

Once the project is created, the first step is to add keys to the App.config file you will find under your project folder structure in Solution Explorer. You need to add these keys so that they can be easily accessed multiple times through the code. Also, it will be very convenient to change these keys if you need to replace them with another storage account keys in the future.

<?xml version="1.0" encoding="utf-8" ?>
<configuration>
    <appSettings>
      <add key="StorageAccountName" value="your storage account name"/>
      <add key="StorageAccountKey" value="your storage account key"/>
    </appSettings>
    <startup> 
        <supportedRuntime version="v4.0" sku=".NETFramework,Version=v4.6.1" />
    </startup>
</configuration>

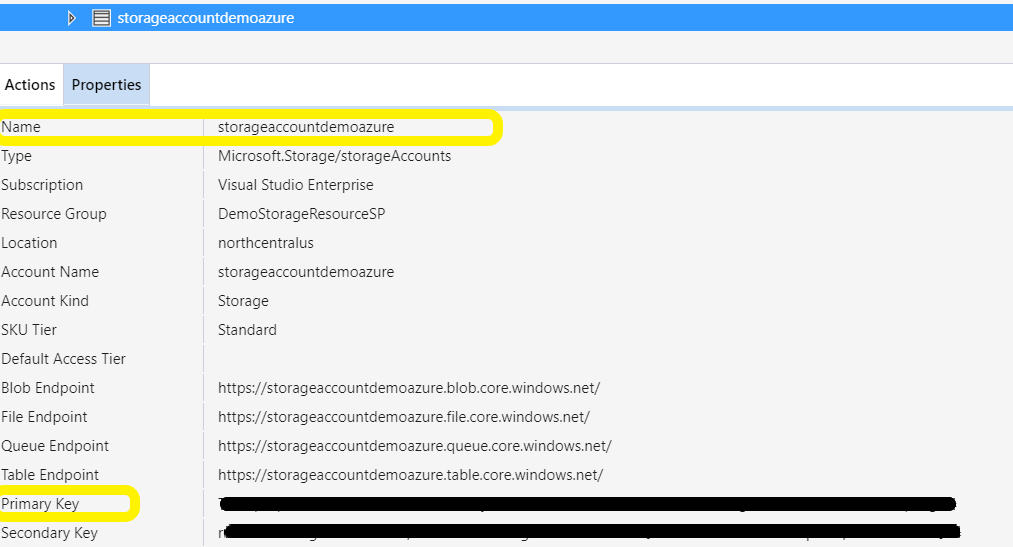
The keys include the Storage Account name, and Storage Account Key details that you must grab from the Azure Portal or Azure Storage Explorer. For this demo, I am going to access the keys from Azure Storage Explorer. Just click on the storage account, and you will see that all the information related to your storage account will be easily accessible to you in the Properties section. Now, you can copy the Storage Account Name and Storage Account Key and paste them in your App.config file.

C:\Users\spande\AppData\Local\Microsoft\Windows\INetCache\Content.Word\AZST3.png

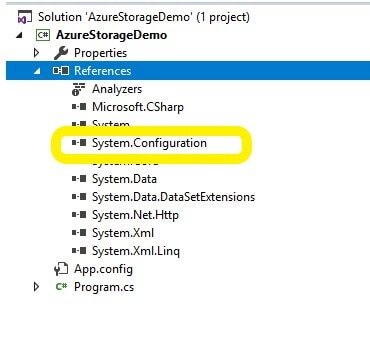
The next step is to add a reference in System.Configuration to the project in order to access the keys that you added to App.config. To add a reference, go to the Solution Explorer Window, right-click on References=>Add reference=> Select Framework. Then select System.Configuration from the list. You should then see the new reference added to the project.

C:\Users\spande\AppData\Local\Microsoft\Windows\INetCache\Content.Word\A3Addedref.jpg

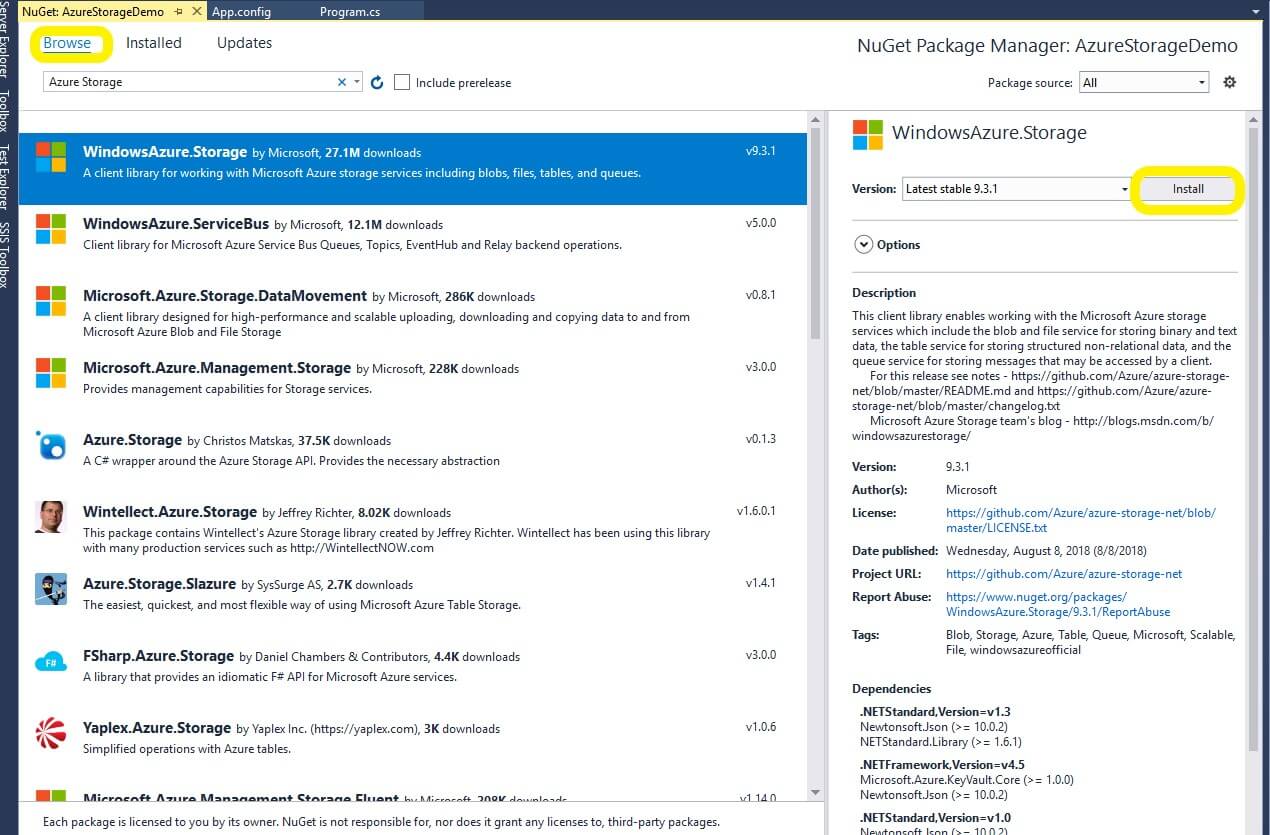
To talk to Azure Storage, a NuGet package must be installed. Right-click the project in the Solution Explorer and select Manage NuGet Packages. Find WindowsAzure.Storage in the list and click Install.

C:\Users\spande\AppData\Local\Microsoft\Windows\INetCache\Content.Word\A3Installedit.jpg

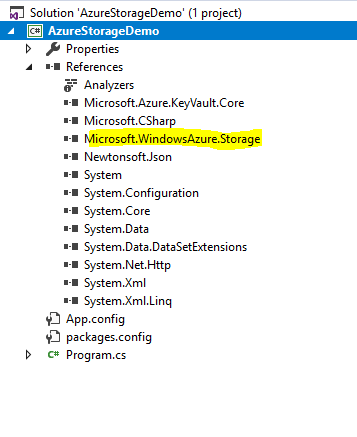
After you click the Install button, you will notice that the reference is added to the project.

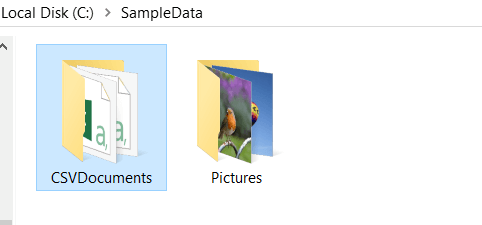
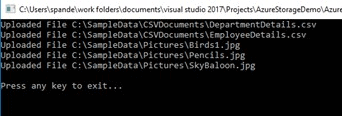
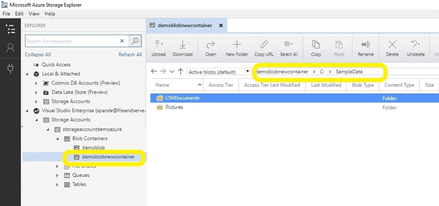
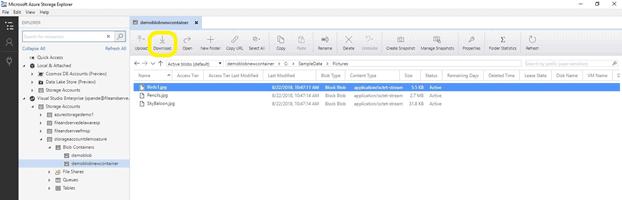
Now that the references have been added to the project, it’s time to write some code to upload blob files from a directory over to the Azure Blob Storage. As you can see in the image below, I have created a SampleData directory which has 2 folders, CSVDocuments and Pictures. What we are going to do next is upload all the files from SampleData using C# code and then download these files from Azure Storage Explorer.

Brief Overview of the Code:

To upload data through .NET, you must implement the following in your code:

  • Create an instance to the storage account by using storage credentials such as storage account name and key.
  • To perform various tasks on the blob, create a blob client for the storage account using CreateCloudBlobClient
  • To get a reference to the container in the blob storage, pass the name of the container to the GetContainerReference method. The code will make sure that the container exists. You can always look in the Azure Storage Blob containers to see if it already exists, but for code safety use a CreateIfNotExists call on the container object.
  • To upload the files from a directory, create a blob object using GetBlockBlobReference and further upload the files from the specified file path to Azure Storage using the UploadFromFile method.

Code for Uploading Blobs to Azure Storage

Replace the original code found in the Program.cs file with this code:

using System;
using System.Collections.Generic;
using System.Configuration;
using System.Diagnostics;
using System.IO;
using System.Linq;
using System.Text;
using System.Threading.Tasks;
using Microsoft.WindowsAzure.Storage;
using Microsoft.WindowsAzure.Storage.Auth;
using Microsoft.WindowsAzure.Storage.Blob;
namespace AzureStorageDemo
{
    class Program
    {
        //get the storage keys from app.config
        private static readonly string StorageName = ConfigurationManager.AppSettings["StorageAccountName"];
        private static readonly string StorageKey = ConfigurationManager.AppSettings["StorageAccountKey"];
       
        //File path to upload all the files
        private static readonly string path = @"C:\SampleData";
        static void Main(string[] args)
        {
            Debugger.Break();
            //initalize new instance of storage account based on the name and key combination
            var stoageAccount = new CloudStorageAccount(new StorageCredentials(StorageName, StorageKey), true);
            //create a blob storage client
            var blobStorageClient = stoageAccount.CreateCloudBlobClient();
            //get container reference ,create new if it does not exists
            var container = blobStorageClient.GetContainerReference("demoblobnewcontainer");
            container.CreateIfNotExists();
            //get all the directories from filepath and upload one by one
            foreach (var fp in Directory.GetFiles(path,"*.*",SearchOption.AllDirectories))
            {
                var blobRef = container.GetBlockBlobReference(fp);
                blobRef.UploadFromFile(fp);
                Console.WriteLine("Uploaded File {0} ",fp);
            }
            Console.WriteLine();
            Console.Write("Press any key to exit...");
            Console.ReadKey(true);
        }
    }
}

Run the project, and you will see that csv files have been uploaded one by one to their respective folders on the Azure Storage account:

After all the code has been executed successfully, refresh your Azure Storage Explorer and navigate to your Blob containers section. You will see that new blob container, demoblobnewcontainer has been created. Browse to the Sample data directory, and you will notice that the two folders are uploaded to Azure Blob Storage successfully.

You can download the files from Azure Storage Explorer with just a single click, i.e., using the Download button and saving to your local machine.

C:\Users\spande\AppData\Local\Microsoft\Windows\INetCache\Content.Word\AZST8.png

You may sometime come across a scenario where your application is uploading the documents to Azure Storage, and you want to download, edit, or access those files. There might also be a scenario where you want to update your test data and easily update your blobs through GUI. Azure Storage Explorer has the answer to all these situations. Through the user-friendly and feature-rich UI, Azure Storage Explorer makes data modifications so easy.

Summary

Azure Storage is a scalable and reliable solution to store varied forms of data. Be it Structured or unstructured, Azure Storage has the capacity and ability to store all of it. To add more flavor to it, Azure Storage Explorer enables the user to efficiently manage the data by providing various features depending on the type of storage. Azure Storage Explorer is a feature-rich application that you can just download on your machine, connect to your subscription and access your storage account without actually using the Azure portal. It also enables you to connect to other data storage features provided by Azure such as Azure Data Lake and Azure Cosmos DB.

References

https://docs.microsoft.com/en-us/azure/vs-azure-tools-storage-manage-with-storage-explorer?tabs=windows

https://azure.microsoft.com/en-us/features/storage-explorer/

https://docs.microsoft.com/en-us/dotnet/api/microsoft.windowsazure.storage.blob.cloudblobcontainer.getblockblobreference?view=azure-dotnet


The post Using Azure Storage Explorer appeared first on Simple Talk.


from Simple Talk https://ift.tt/2MEHt8F
via

Introducing the Unity Job System

Made available to everyone starting with Unity 2018.1, the C# Job System allows users to write multithreaded code that interacts well with Unity. For many Unity users, this was a big deal. Better performance is so important to many people playing video games that players will often set their game’s graphics settings to something low so that the game will run optimally. But who says you have to force players to tweak their game’s settings to get the performance they want? Why not have peak performance from the start?

With Unity’s C# jobs, this is made much easier for the developer. This is especially true if you plan to create a game that requires many objects in the game’s world, with all of them doing something at the same time. Normally, this would be incredibly taxing for the machine running this game, but thanks to the newly implemented Job System, you can now more easily achieve this scenario without taking a performance hit. Unity’s C# jobs have been touched on before back when Unity 2018.1 was first released, but it only went skin deep. This time jobs will be explained in much more detail along with a tutorial showing you how to create a job that moves 3,000 cubes around in a scene. Note: you may need to adjust this number depending on the power of your computer.

Setting Up

Once you’ve started Unity, create a new project.

Figure 1: Creating a new project.

After that, name the project 3000Cubes. Then set your file path of choice. You’ll also want to make sure you’re using the 3D project template. After this has been done, click Create Project.

Figure 2: Setting project name, location, and template.

Unity will then do some work, then present you with a blank project like that shown in Figure 3.

Figure 3: A new blank project

Believe it or not, there are only two things that need to be done before jumping into the code. First, in the Hierarchy menu, click the Create button and select Create Empty to create a new object.

Figure 4: Creating a new object.

Name this object JobObject. After that, with JobObject selected in the Hierarchy, click the Add Component button in the Inspector window. In the window that appears, scroll to the very bottom and select New Script.

Figure 5: Creating and adding a new script component.

In the next window, name this script CubeMovementJob, then click Create and Add.

Figure 6: Naming the script and creating it.

With that finished, JobObject should now look like what’s shown in Figure 7.

Figure 7: JobObject with the new script attached.

Setup is now complete! Yes, even the process of setting up a project is made faster thanks to Unity jobs. In the Inspector window, double click the Script field in the newly added Cube Movement Job component to open up Visual Studio and create your new C# job!

The Code

This project aims to show you two things: the first is to show how to create jobs. The second is to show off how much of a boost using C# jobs can give you compared to what you might usually do. Before declaring variables and creating your first job, you will need to enter some using statements. At the top of the script, before the class declaration, add the following lines of code:

using UnityEngine.Jobs;
using Unity.Collections;
using Unity.Jobs;

UnityEngine.Jobs and Unity.Jobs are required to access and utilize the job functionality in your script. They’ll also be required for certain variables you will declare later. Unity.Collections allow you to make use of the NativeArray<> struct type, which will be required when working with C# jobs. Next, declare the following variables:

public int count = 3000;
public float speed = 20;
public int spawnRange = 50;
public bool useJob;
private Transform[] transforms;
private Vector3[] targets;
private List<GameObject> cubes = new List<GameObject>();
private TransformAccessArray transAccArr;
private NativeArray<Vector3> nativeTargets;

The first four public variables will be used to dictate how many cubes will be spawned, the speed at which it moves, the range that the cubes can be spawned in, and, finally, if you wish to use C# jobs or not. They have been made public so that they can be edited later from within the Unity editor in case you wish to add more cubes or increase the area they can spawn in. After these have been declared, a handful of private arrays will be created. The first two, transforms and targets, are arrays that will store the transform and Vector3 data of the various cubes you create.

Next, you’ll have a new List named cubes, followed by the creation of the TransformAccessArray and a NativeArray<Vector3>. Cubes will simply be a list kept of all the cubes spawned and will be used later when creating the same project in non-job code. Then there’s transAccArr and nativeTargets. These two arrays will store the information gathered from transforms and targets and send them to the job you shall soon create. But why can’t we use the transforms and targets arrays instead? This is because, according to Unity’s own debugger, the type of Transform and Vector3 is not a value type, and jobs cannot contain any reference types. Put simply, jobs can only work with other structs, which Transform and Vector3 are not.

So now you may be wondering why you would declare those first two arrays at all? They will be needed to fill the transAccArr and nativeTargets arrays, as you cannot simply add a new item to a TransformAccessArray and NativeArray. Instead, you will fill the transforms and targets arrays then hand the data over to transAccArr and NativeTargets to put to use in the job. In addition, you’ll also want them for later in the project when you use non-job code to perform the same task.

Quite a bit of explanation to be done here! Let’s take a break and see where your code should be now.

Figure 8: All using statements and variable declarations.

Now seems like a good time to create the C# job. Underneath your variable declarations, add the following:

struct MovementJob : IJobParallelForTransform
{
        public float deltaTime;
        public NativeArray<Vector3> Targets;
        public float Speed;
        public void Execute(int i, TransformAccess transform)
        {
                transform.position = Vector3.Lerp(transform.position, Targets[i], deltaTime / Speed);
        }
}

Let’s break this down. For starters, all jobs are structs and must inherit from either IJob, IJobParallelFor or IJobParallelForTransform. In this case, it’s inheriting from IJobParallelForTransform because you will use this job to move objects, which IJobParallelForTransform allows you to do.

Next, a few variables are declared. The first, deltaTime, will simply keep track of what is currently in Time.deltaTime. You can’t simply say Time.deltaTime in the job, so you get the value of deltaTime and store it as a float in the job. Next is a NativeArray that will store an array of Vector3s called Targets. Finally, there’s another float named Speed, which will simply get the value of the public variable speed.

Then comes the interesting part. Execute is a function all jobs are required to have. As you may have guessed, whatever is inside Execute is what the job will actually do. In this case, you have the job doing a simple task. It will get all the cube objects and have them Lerp (meaning to smoothly move from one position to the next) from one point to another at a certain speed. Within the () of the Execute function lies two parameters, an integer simply named i, and a TransformAccess simply named transform. The variable i will be treated much like i would if this were a for loop, and transform will contain a given object’s transform.

At this point, the script should now look something like what’s shown in Figure 9.

Figure 9: Your new C# job!

Before working on the Start and Update functions, there are two more variables to declare, and they’re both important to the job you just created. Beneath your new job and above the Start method, enter these lines:

private MovementJob job;
private JobHandle newJobHandle;

The first variable is pretty simple. You’re simply declaring a reference to the MovementJob. After that you declare a JobHandle that you’ll just call newJobHandle. A JobHandle is almost exactly what it sounds like. It handles jobs, doing so by scheduling and completing the jobs you assign it. With everything declared and ready to roll, it’s time to work on the Start function.

transforms = new Transform[count];
for (int i = 0; i < count; i++)
{
        GameObject obj = GameObject.CreatePrimitive(PrimitiveType.Cube);
        cubes.Add(obj);
        obj.transform.position = new Vector3(Random.Range(-spawnRange, spawnRange), Random.Range(-spawnRange, spawnRange), Random.Range(-spawnRange, spawnRange));
        obj.GetComponent<MeshRenderer>().material.color = Color.green;
        transforms[i] = obj.transform;
}
targets = new Vector3[transforms.Length];
StartCoroutine(GenerateTargets());

You create the Start function by first taking the transforms array and creating a new array of Transform with count defining the number of elements in the array. Count is the variable that keeps track of how many cubes you will spawn. Speaking of which, the next part of the function has you creating a for loop. Within this for loop, you create a cube, add it to the cubes list, give it a random starting position, and give it a green color. Of course, feel free to change the color if you wish.

After that, the transforms array gets its next value by getting the recently created cube’s transform. This process continues until every cube is spawned. Then, the targets array gets a new array of Vector3 using transforms.Length to define the number of elements within this array. Finally, a Coroutine will be run to fill the targets array. But that Coroutine has not yet been defined, so no doubt Visual Studio will start telling you it has no idea what this is. It’s now time to create this Coroutine, but first, check to make sure your code looks like Figure 10 below.

Figure 10: The Start function and the final variable declarations.

A Coroutine is created by creating an IEnumerator. It then operates very similarly to a function except that it can pause execution and return control to Unity, but then carry on wherever it left off on the next frame. It is required that a yield return statement is included somewhere within the body of the Coroutine. The yield return line is the point when an execution pauses and can be resumed in the following frame. Now that you know what a Coroutine is, it’s time to create one! Place the following code underneath the Update function.

public IEnumerator GenerateTargets()
{
        for (int i = 0; i < targets.Length; i++)
                targets[i] = new Vector3(Random.Range(-spawnRange, spawnRange), Random.Range(-spawnRange, spawnRange), Random.Range(-spawnRange, spawnRange));
        yield return new WaitForSeconds(2);
}

In this case, your GenerateTargets coroutine will simply create the cubes within the range you specify. This is among one of the simpler tasks you can do with coroutines. You can also create a typewriter effect with text and more using coroutines. Now, move on to the Update function and input this code.

transAccArr = new TransformAccessArray(transforms);
nativeTargets = new NativeArray<Vector3>(targets, Allocator.Temp);
if (useJob == true)
{
        job = new MovementJob();
        job.deltaTime = Time.deltaTime;
        job.Targets = nativeTargets;
        job.Speed = speed;
        newJobHandle = job.Schedule(transAccArr);
}
else
{
        for (int i = 0; i < transAccArr.length; i++)
                cubes[i].transform.position = Vector3.Lerp(cubes[i].transform.position, targets[i], Time.deltaTime / speed);
}

Your Update function will do one of two things depending on the value of the useJob boolean. If you set it to true, then your project will utilize the job you created to move the various cubes around the scene. When using jobs, you create a new instance of MovementJob and assign the different variables in the job. Next, you utilize the JobHandle called newJobHandle to schedule the job you created. When scheduling the job, you give transAccArr as the TransformAccessArray that the job will use in its Execute function.

If you set useJob to false, then the program will instead accomplish the same task without using the C# job system. You’ll see later that, especially with many objects in the scene at once, that using jobs can greatly improve your project’s performance at runtime. Once you’re finished, the Update function and GenerateTargets coroutine should look similar to the figure below.

Figure 11: The Update function and GenerateTargets coroutine.

There is still one last task to complete before you can test out the project. Between the Update function and GenerateTargets coroutine, create a new function called LateUpdate and give it the following code.

private void LateUpdate()
{
        newJobHandle.Complete();
        transAccArr.Dispose();
        nativeTargets.Dispose();
}

There’s not much to this code, but it’s important to include this function to properly finish jobs and prevent memory leaks. LateUpdate is called whenever all Update functions have been called. It can be useful to order script execution. Some examples of where LateUpdate can be used include moving a camera or, in your case, disposing native collections. There’s also the act of calling newJobHandle's Complete function. This function simply ensures that the job has been completed before moving on to another job you may give Unity. Once you’ve added this code, your script should look like this:

Figure 12: Script with LateUpdate added.

The time has now come to finish this project. Save your code and return to the Unity editor.

Finishing the Project

Much like the setup, finishing the project has very little to it. Select jobObject in the Hierarchy window, then navigate to the Inspector window and check out the Cube Movement Job script component. All the variables shown dictate the number of cubes spawned, how quickly they move, and the range that they can spawn in. There is also a checkbox that toggles your useJob boolean to true or false. For the moment, leave this boolean as false (unchecked). The rest of the variables can be left at their default values if you wish, but the example will assume you kept the cube count at 3,000.

Figure 13: The complete CubeMovementJob script component.

Before playing the project, it would be helpful to open the Profiler window to view the performance of your project. To do this, click Window->Analysis->Profiler or simply press Ctrl + 7. Place the profiler anywhere you wish on your screen.

Figure 14: Opening the Profiler window.

After you’ve pulled up the Profiler window, save your project. If your computer finds itself unable to handle 3,000 cubes, it could lead to Unity crashing. Saving the project will, therefore, prevent any time and effort being lost. Should Unity crash, lower the number of cubes created. Begin the project by clicking the Play button at the top of the editor.

Figure 15: Starting the project.

While the project runs, click anywhere in the top part of the Profiler window to view more information about how much time it takes to do specific tasks. The blue area in the Profiler window represents how much CPU usage is going towards performing the tasks in your script.

Figure 16: Unity Profiler when not using jobs. Time to finish script functions is 4.2 ms.

Remember, you should have it set up where you are currently not using jobs. Now, either pause the project or stop it to go back and set the useJob boolean to true, then run your program again to see the difference.

Figure 17: Unity Profiler while using jobs. Time to finish script functions is now 2.89 ms.

Notice how when using jobs, the amount of time the CPU takes to complete the task is cut almost in half. The difference is even more noticeable when increasing the number of cubes to spawn. On my computer, when increasing the number of cubes to 10,000 and not using jobs, the process could take 18 ms. Utilizing jobs in the same set of circumstances brought that time down to 13 ms. Of course, how much of a performance improvement one sees can depend on their individual CPU and what its capabilities are. Regardless, there’s no denying the improved performance that came once C# jobs entered the picture.

Figure 18: The finished project in action.

Conclusion

Multi-threaded code offers better performance to the developer though can be difficult to write. Thanks to Unity Technologies’ latest offerings, creating multi-threaded code is more easily achievable for the developer. Though situations demanding the C# job system may vary, the performance boost it can bring is immense. Another new tech for Unity, the Entity Component System, can also be utilized to further increase performance. ’Performance by default’ is the tagline for Unity 2018, and it’s easy to see why.

Some examples of where the job system can be put to great use include battle simulators, ocean simulators, and more. This example shows the job system moving around objects in a scene but can also be used to deform meshes and other tasks. Many tasks with a heavy load on your CPU can be lightened thanks to C# jobs, and it all starts by simply creating a struct and inheriting from a job interface.

The post Introducing the Unity Job System appeared first on Simple Talk.


from Simple Talk https://ift.tt/2xnk6La
via