Friday, October 7, 2022

Introducing the MySQL INSERT statement

Entry in Robert Sheldon's series on Learning MySQL. The series so far:

  1. Getting started with MySQL
  2. Working with MySQL tables
  3. Working with MySQL views
  4. Working with MySQL stored procedures
  5. Working with MySQL stored functions
  6. Introducing the MySQL SELECT statement

In the previous article in this series, I introduced you to the SELECT statement, one of several SQL statements that fall into the category of data manipulation language (DML), a subset of statements used to query and modify data. Another DML statement is the INSERT statement, which lets you add data to MySQL tables, both permanent and temporary. This article covers the INSERT statement and the different ways you can use it to add data.

Earlier in this series, I introduced you to the INSERT statement, but most mentions were fairly brief because the statement was included only to support other concepts. This article focuses exclusively on the INSERT statement and the primary components that you should understand when getting started with this statement.

Preparing your MySQL environment

For the examples in this article, I used the same database, tables, and data that I used in the previous article. If you have not set up that database and want to try out the examples in this article, you can download the MySQL_06_setup.sql file and run the script against your MySQL instance. For your convenience, I’ve included the SQL for the manufacturers and airplanes tables here so you can reference their definitions when trying out the INSERT statements in the examples throughout this article:

CREATE TABLE manufacturers (
  manufacturer_id INT UNSIGNED NOT NULL AUTO_INCREMENT,
  manufacturer VARCHAR(50) NOT NULL,
  create_date TIMESTAMP NOT NULL DEFAULT CURRENT_TIMESTAMP,
  last_update TIMESTAMP NOT NULL 
    DEFAULT CURRENT_TIMESTAMP ON UPDATE CURRENT_TIMESTAMP,
  PRIMARY KEY (manufacturer_id) ) 
ENGINE=InnoDB AUTO_INCREMENT=1001;

CREATE TABLE airplanes (
  plane_id INT UNSIGNED NOT NULL AUTO_INCREMENT,
  plane VARCHAR(50) NOT NULL,
  manufacturer_id INT UNSIGNED NOT NULL,
  engine_type VARCHAR(50) NOT NULL,
  engine_count TINYINT NOT NULL,
  max_weight MEDIUMINT UNSIGNED NOT NULL,
  wingspan DECIMAL(5,2) NOT NULL,
  plane_length DECIMAL(5,2) NOT NULL,
  parking_area INT GENERATED ALWAYS AS ((wingspan * plane_length)) STORED,
  icao_code CHAR(4) NOT NULL,
  create_date TIMESTAMP NOT NULL DEFAULT CURRENT_TIMESTAMP,
  last_update TIMESTAMP NOT NULL 
    DEFAULT CURRENT_TIMESTAMP ON UPDATE CURRENT_TIMESTAMP,
  PRIMARY KEY (plane_id),
  CONSTRAINT fk_manufacturer_id FOREIGN KEY (manufacturer_id) 
    REFERENCES manufacturers (manufacturer_id) ) 
ENGINE=InnoDB AUTO_INCREMENT=101;

If you don’t want to mess with downloading and running the script, you can simply create these two tables without populating them. They include everything you need to test out the INSERT statements in the following examples.

The INSERT statement syntax

A MySQL INSERT statement is one of the fundamental DML statements in MySQL. You can use it to add one or more rows of data to a table. The following syntax shows that basic elements that go into an INSERT statement:

INSERT [IGNORE] [INTO] table_name
[(column_list)]
VALUES (value_list) [, (value_list)]...

The syntax does not include all the elements in an INSERT statement, but it does provide the ones that will be most useful to you when first learning how to use the statement:

  • The INSERT clause specifies the table in which the data will be inserted. The INTO keyword is optional, but it is used quite commonly with INSERT. Its use does not impact the statement one way or the other. The IGNORE keyword determines how certain exceptions are handled when running the INSERT statement, which will be covered later in the article.
  • The second line in the syntax specifies the columns into which the data will be inserted. The column list must be enclosed in parentheses, and if there is more than one column, they must be separated by commas. The column list is optional, but it is generally a good idea to include it in case there are underlying schema changes. If the column list is not included, a value must be provided for every column in the table, in the order the columns are listed in the table definition.
  • The VALUES clause specifies the values to be inserted into the target table. The values themselves must be enclosed in parentheses and, if there is more than one, separated with commas. The values must correspond to the columns in the column list, if one is present. If not, you must include a value for every column. You can specify multiple rows of data (value lists) in the VALUES clause. If you do, each value list must be enclosed in its own set of parentheses, and the value lists must be separated by commas.

The INSERT statement also supports the INSERT…SELECT format, which enables you to add data to a table using the results returned by SELECT statement, rather than including a VALUES clause. Although there’s more to the INSERT statement than the basic elements I’ve described here, this should be enough to get you started and, in fact, enable you to add a wide range of data to your MySQL tables. This will also provide you with a good foundation for when you’re ready to learn more advanced statement features.

Inserting a single row into a table

In most cases, adding a single row of data to table is a reasonably straightforward process. You define the INSERT clause and VALUES clause and usually specify the column list in between. The column list should include only those columns for which you provide values. The list can include the primary key column, generated columns, or columns defined with default constraints, but you must be careful how you handle them, as you’ll see later in the article.

When specifying the column values, be sure that they conform to the data types defined on the target column. To demonstrate what I mean, take a look at the following example:

INSERT INTO manufacturers (manufacturer)
VALUES ('Bombardier');

The INSERT statement adds a row to the manufactures table. In this case, the column list includes only the manufacturer column, which is defined with the VARCHAR(50) data type. Because only one column is specified, the VALUES clause contains only one value, Bombardier, which is passed into the clause as a string (as indicated by the single quotations). The string is treated as character data, which can be inserted into the VARCHAR column, as long as the string is within the 50-character limit.

You don’t need to pass values into the other columns in the table because MySQL assigns their values by default. The manufacturer_id column is automatically assigned a value through the AUTO_INCREMENT operator, and the create_date and last_update columns each include a DEFAULT constraint that uses the CURRENT_TIMESTAMP operator to automatically assign the current timestamp to the column.

After you run the INSERT statement, you can verify that the row has been added by running the following SELECT statement.

SELECT * FROM manufacturers WHERE manufacturer = 'Bombardier';

Figure 1 shows the statement’s results, which includes only one row because the SELECT statement includes a WHERE clause that specifies Bombardier as the manufacturer.
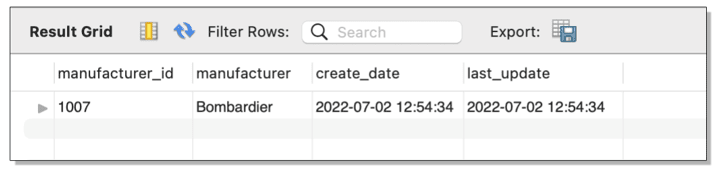
Figure 1. Adding a row to the manufacturers table

Notice that the manufacturer_id value is 1007. You will need to know this value when you add data to the airplanes table, if the data is related to the Bombardier manufacturer. This is because the airplanes table includes a foreign key that references the manufacturer_id column in the manufacturers table. For example, the following INSERT statement adds a row of data to the airplanes table, specifying 1007 as the value for the manufacturer_id column (note that if you are following along, your value may not be 1007 in the statements, depending on what you have done with the table, so you may need to alter the value as you work with the code):

INSERT INTO airplanes 
  (plane, manufacturer_id, engine_type, engine_count, 
    wingspan, plane_length, max_weight, icao_code)
VALUES ('Learjet 24',1007,'Jet',2,35.58,43.25,13000,'LJ24');

As you can see, the column list includes many more columns than the previous example. In fact, it includes all the table’s columns except the primary key column (plane_id), the generated column (parking_area), and the two columns defined with default constraints (create_date and last_update).

The VALUES clause contains a value for each specified column. The value list includes 1007 for the manufacturer_id value because the row data describes one of Bombardier’s planes. If you try to insert a row that includes a nonexistent manufacturer_id value, MySQL will throw an error.

After you run the INSERT statement, you can verify that the row has been added by running the following SELECT statement:

SELECT * FROM airplanes WHERE manufacturer_id = 1007;

Figure 2 shows the results returned by the SELECT statement. Because only one plane has so far been added for Bombardier, the results include only that row.

Figure 2. Adding a row to the airplanes table

The two examples in this section demonstrated the basic elements that go into an INSERT statement. The biggest issue to watch for is to ensure that you correctly match your column list and value list. If you don’t, your statement is likely to generate an error or, worse still, add incorrect data to your database.

Working with primary keys

Even if you define your primary key column with the AUTO_INCREMENT operator, you can still insert a specific value into that column, as long as the value doesn’t already exist and it conforms to the column’s data type. For example, the following INSERT statement adds another row to the airplanes table, only this time it specifies a plane_id value, rather than letting the operator automatically generate the value:

INSERT INTO airplanes 
  (plane_id, plane, manufacturer_id, engine_type, engine_count, 
    wingspan, plane_length, max_weight, icao_code)
VALUES (401,'Learjet 24A',1007,'Jet',2,35.58,43.25,12499,'LJ24');

In this case, the plane_id value is 401, but you could have specified any unsigned integer, as long as it’s not already being used. If you now run the preceding SELECT statement, you should get the results shown in Figure 3 .

Figure 3. Specifying the primary key value (outlined in red) when inserting data

If you just created the table, the plane_id value for the first row should be 101, but if you had created (and populated) the table in the previous article, the value should be 342.

When adding a value manually to an AUTO_INCREMENT column, be aware this will set a new starting point for the operator. You can see this in action in the following example, which adds another row to the table, but without specifying the plane_id value:

INSERT INTO airplanes 
  (plane, manufacturer_id, engine_type, engine_count, 
    wingspan, plane_length, max_weight, icao_code)
VALUES (‘Learjet 24E’,1007,’Jet’,2,35.58,43.25,12900,'LJ24');

If you were to query the airplanes table after running the INSERT statement, you would see that the plane_id value for the new row is 402, not 343, which would have been the old starting point for the AUTO_INCREMENT operator.

Figure 4. Viewing the primary key values (outlined in red) on the inserted data

In most cases, a new starting point will probably not be a big deal, but it could cause a bit of confusion for someone reviewing the data because it might appear as though rows are missing. You can’t go back, either. For instance, you can add a row that manually specifies 343 as the plane_id value, but the next auto-incremented value will still be 403, not 344.

Whatever value you add to a primary key column, you must ensure that you don’t specify a value that’s currently being used, as in the following example:

INSERT INTO airplanes 
  (plane_id, plane, manufacturer_id, engine_type, engine_count, 
    wingspan, plane_length, max_weight, icao_code)
VALUES (401,'Learjet 25',1007,’Jet’,2,35.58,47.58,15000,'LJ25');

Because the plane_id value 401 already exists, MySQL will stop execution and return the following error:

Error Code: 1062. Duplicate entry ‘401’ for key ‘airplanes.PRIMARY’

That said, if a primary key value has been deleted from the table or changed to another value, the original value can be reused.

At times, you might want to prevent a statement from generating an error even if there is a problem with a value. In these situations, you can add the IGNORE modifier to the INSERT statement to instruct MySQL to return a warning rather than generate an error and stop execution. To use the modifier, add the IGNORE keyword directly after INSERT, as in the following example:

INSERT IGNORE INTO airplanes 
  (plane_id, plane, manufacturer_id, engine_type, engine_count, 
    wingspan, plane_length, max_weight, icao_code)
VALUES (401,'Learjet 25',1007,’Jet’,2,35.58,47.58,15000,'LJ25');

The IGNORE modifier applies only to certain types of errors. Fortunately, a duplicate primary key is one of those. Now the INSERT statement will return the following warning, rather than stopping execution:

0 row(s) affected, 1 warning(s): 1062 Duplicate entry ‘401’ for key ‘airplanes.PRIMARY’

The data is still not inserted into the table, but statement execution can continue if necessary. This probably won’t have much of an impact when adding only one row to a table. However, if you were running an INSERT statement that adds multiple rows, the modifier makes it possible for the statement to still add the other rows even if one of them fails.

Overriding default values

There will likely be times when you’ll want to override a column’s default value with your own, in which case, you simply specify the value as you would any other column. For example, the following INSERT statement overrides the default value assigned to the create_date column:

INSERT INTO airplanes 
  (plane, manufacturer_id, engine_type, engine_count, 
    wingspan, plane_length, max_weight, icao_code, create_date)
VALUES ('Learjet 25',1007,'Jet',2,35.58,47.58,15000,
        'LJ25','2022-06-12 08:30:00');

As you can see, I’ve included create_date in the column list and the new value in the value list. If you query the airplanes table after running the INSERT statement, you’ll see that the specified value has been inserted into the create_date column, as shown in Figure 5.

Figure 5. Overriding a column’s default value (outlined in red)

The INSERT statement also supports the use of the DEFAULT keyword. This can be handy when including a column that automatically generates a value. For example, you can use the keyword in your value list for primary key columns, generated columns or columns defined with default constraints.

The main advantage of this approach is that you don’t have to specify the table’s columns after the INSERT clause. For example, the following INSERT statement achieves the same results as the preceding example, but without the column list:

INSERT INTO airplanes 
VALUES (DEFAULT,'Learjet 25',1007,'Jet',2,15000,35.58,47.58,
  DEFAULT,'LJ25','2022-06-12 08:30:00',DEFAULT);

That statement uses the DEFAULT keyword for the primary key column (plane_id), the generated column (parking_area), and the last_update column, which is defined with default constraint. However, the statement still specifies a value for the create_date column.

Although this approach might make it easier to write certain types of INSERT statements, you must ensure that you specify values for all columns and that you list them in the correct order (as they appear in the table definition), otherwise, your statement might generate an error or insert incorrect data. Be aware this approach does not protect against underlying schema changes. For example, if a column is added to the table, the INSERT statement would break. That’s why it’s usually better to specify the column list.

Getting the values right

An INSERT statement will fail if the number of specified values in the VALUES clause does not match the number of specified columns in the column list. For example, the following INSERT statement includes a value list that contains one more value than the column list:

INSERT INTO airplanes 
  (plane, manufacturer_id, engine_type, engine_count, 
    wingspan, plane_length, max_weight)
VALUES ('Learjet 25A',1007,'Jet',2,35.58,47.58,12499,'LJ25');

In this case, the missing column is icao_code, but it could have been any column. The statement will still return the following error:

Error Code: 1136. Column count doesn’t match value count at row 1

The reference to row 1 in the error message means that the first error to be encountered was the first row of values that you tried to add to the table. If you were trying to add five rows and the error occurred at the third row, the error message would reference row 3. However, if you try to insert multiple rows and more than one row contains incorrect values, the error message will reference only the first row that caused MySQL to stop execution and generate the error.

You’ll also receive this error if you specify more columns than values, as in the following INSERT statement:

INSERT INTO airplanes 
  (plane, manufacturer_id, engine_type, engine_count, 
    wingspan, plane_length, max_weight, icao_code, create_date)
VALUES ('Learjet 25A',1007,'Jet',2,35.58,47.58,12499,'LJ25');

This time, the column list includes the create_date column, but the value list does not include a value for the column. The number of columns must match the number of values. If they don’t, MySQL generates an error and stops statement execution. Unfortunately, the IGNORE keyword does not prevent this type of error from being generated.

In addition to getting the number of columns and values right, you must also ensure that your values are the correct data types. For example, the following INSERT statement attempts to insert the value multiple tons in the max_weight column:

INSERT INTO airplanes 
  (plane, manufacturer_id, engine_type, engine_count, 
    wingspan, plane_length, max_weight, icao_code)
VALUES ('Learjet 25A',1007,'Jet',2,35.58,47.58,'multiple tons','LJ25');

The statement generates the following error because it’s trying to insert a character string into a column configured with the MEDIUMINT data type:

Error Code: 1366. Incorrect integer value: 'multiple tons' for 
column 'max_weight' at row 1

Unlike the first two examples in this section, the IGNORE keyword will work in this situation, changing the error into a warning. However, rather than inserting multiple tons into the max_weight column, MySQL will insert 0.

Another issue to be aware of is the column order. You must ensure that your column list and value list are in the same order to avoid inserting the wrong data into the wrong column. For example, the airplanes table includes the wingspan and plane_length columns, both of which are defined with the DECIMAL(5,2) data type. In a situation such as this, it would be easy to invert the values when inserting them into the columns, without generating an error, resulting in the database storing the wrong wingspan and length.

Because the columns are configured with the same data type, this type of error can be difficult to catch. This is similar to what you might see when first names and last names get reversed in a database. You might be able to define check constraints on the table to help eliminate some risks (depending on the nature of the data), but it basically comes down to taking extra care to ensure that the values correctly match their respective columns.

Inserting multiple rows in a table

The INSERT statement lets you add multiple rows of data to a table, without having to define multiple statements. You need to include only one VALUES clause, but you must include a value list for each row, enclose each value list in parentheses, and separate those value lists with commas. For example, the following INSERT statement adds four rows to the airplanes table:

INSERT INTO airplanes 
  (plane, manufacturer_id, engine_type, engine_count, 
    wingspan, plane_length, max_weight, icao_code)
VALUES 
  ('Challenger (BD-100-1A10) 300',1007,'Jet',2,63.83,68.75,38850,'CL30'),
  ('Challenger (BD-100-1A10) 350',1007,'Jet',2,69,68.75,40600,'CL30'),
  ('Challenger (CL-600-1A11) 600',1007,'Jet',2,64.33,68.42,36000,'CL60'),
  ('Challenger (CL-600-2A12) 601',1007,'Jet',2,64.33,68.42,42100,'CL60');

As you can see, each row is enclosed in parentheses, and commas separate the rows. If you query the table after running the INSERT statement, you should see the newly added rows, as shown in Figure 6.

Figure 6. Adding multiple rows to a table

Adding multiple rows is a straightforward process, but you must ensure you take the same precautions as when adding a single row. Each value list must include the same number of values as the number of specified columns. The values must also be in the correct order and conform to the data types defined on the target columns. However, you can use the IGNORE keyword if you want the INSERT statement to continue to execute even if one row fails, although this depends on the nature of the error.

Inserting data into a temporary table

MySQL also lets you use the INSERT statement to add data to a temporary table. It works the same as adding data to a regular, permanent table, except that a temporary table exists only during the current session and is dropped as soon as the session ends. To create a temporary table, you can use the CREATE TABLE statement, but you must include the TEMPORARY keyword after CREATE, as shown in the following example:

CREATE TEMPORARY TABLE airplanes_temp (
  plane VARCHAR(50) NOT NULL,
  manufacturer_id INT UNSIGNED NOT NULL,
  engine_type VARCHAR(50) NOT NULL,
  engine_count TINYINT NOT NULL,
  wingspan DECIMAL(5,2) NOT NULL,
  plane_length DECIMAL(5,2) NOT NULL,
  max_weight MEDIUMINT UNSIGNED NOT NULL,
  icao_code CHAR(4) NOT NULL);

The statement creates the airplanes_temp table, which includes many of the same columns as the airplanes table. After you create the airplanes_temp table, you can use an INSERT statement to add data to that table, following the same format as you saw in earlier examples:

INSERT INTO airplanes_temp 
  (plane, manufacturer_id, engine_type, engine_count, 
    wingspan, plane_length, max_weight, icao_code)
VALUES 
  ('Challenger (CL-600-2B16) 601-3A and -3R',1007,'Jet',2,64.33,68.42,43100,'CL60'),
  ('Challenger (CL-600-2B16) 604',1007,'Jet',2,64.33,68.42,47600,'CL60'),
  ('Challenger 604-605',1007,'Jet',2,64.33,68.42,48200,'CL60'),
  ('Challenger 650',1007,'Jet',2,64.33,68.42,48200,'CL60');

The INSERT statement adds four rows, as indicated by the value lists in the VALUES clause. After running the statement, you can query the table to verify that the rows have been properly inserted:

SELECT * FROM airplanes_temp;

The SELECT statement should return the results shown in Figure 7.

Figure 7. Adding data to a temporary table

You can access the temporary table just like a regular table, as long as you’re still in the same session in which the table was created. The temporary table retains the data until you explicitly drop the table or end the session.

Inserting data from a SELECT statement

Another handy feature of the INSERT statement is its ability to use the results of a SELECT statement to add data to a table. For this, the INSERT statement takes a slightly different syntax:

INSERT [IGNORE] [INTO] table_name
[(column_list)]
select_statement

Many of the statement’s base elements are the same. The main difference is that you substitute the VALUES clause with a SELECT statement. For example, the following INSERT statement replaces the VALUES clause with a SELECT statement that retrieves data from the airplanes_temp temporary table:

INSERT INTO airplanes 
  (plane, manufacturer_id, engine_type, engine_count, 
    wingspan, plane_length, max_weight, icao_code)
SELECT plane, manufacturer_id, engine_type, engine_count, 
  wingspan, plane_length, max_weight, icao_code
FROM airplanes_temp
WHERE manufacturer_id = 1007;

The SELECT statement itself is just a standard query. The main thing to be aware of in this case is that it’s retrieving data from a temporary table, so you must run the INSERT statement in the same session that the temporary table was created. After you run the INSERT statement, you can then run the following SELECT statement (which is the same one we’ve been using) to verify that the data has been added:

SELECT * FROM airplanes WHERE manufacturer_id = 1007;

The SELECT statement returns the results shown in Figure 8. Notice that the four rows that were in the temporary table are now in the airplanes table.
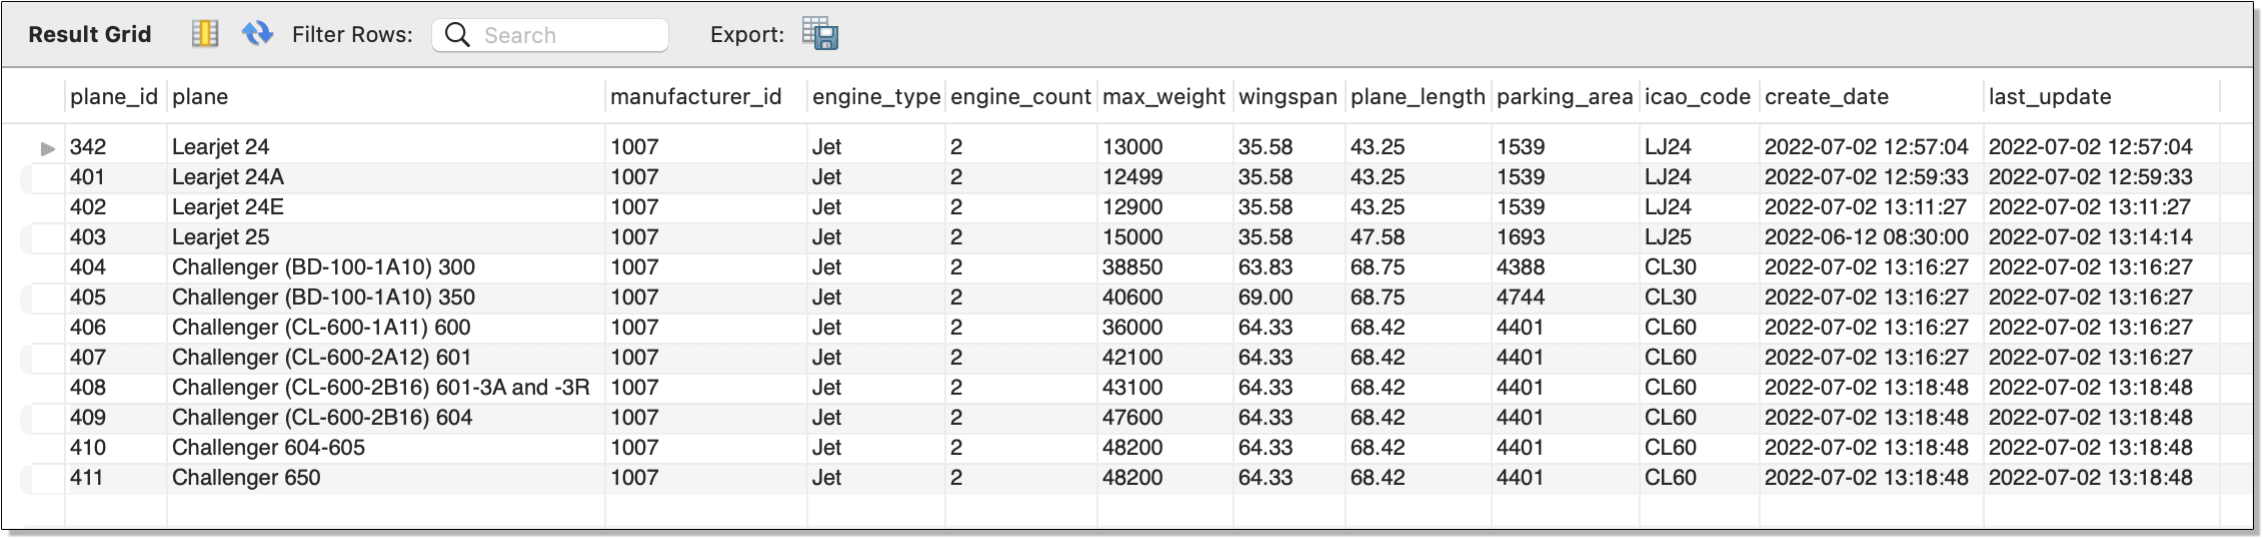
Figure 8. Inserting data from a SELECT statement

You might have noticed that the SELECT statement embedded in the INSERT statement was retrieving all rows and columns from the airplanes_temp table. In situations such as this, you can use a TABLE statement instead of a SELECT statement:

INSERT INTO airplanes 
  (plane, manufacturer_id, engine_type, engine_count, 
    wingspan, plane_length, max_weight, icao_code)
TABLE airplanes_temp;

This INSERT statement achieves the same results as the preceding INSERT statement. The TABLE statement itself is comparable to the following query:

SELECT * FROM airplanes_temp;

Although the TABLE statement simplifies the INSERT statement, you must be sure that the columns in the column list are in the same order as those returned by the TABLE statement and that there are the same number of columns.

Working with the INSERT statement

For the most part, you should have little problem working with the INSERT statement, as long as you’re careful when specifying your column list and value list. Once you get comfortable with the basics, you can then incorporate the statement into other objects. For example, you might create a stored procedure that inserts data into a table.

You can also explore other aspects of the INSERT statement, such as adding data to a partitioned table or updating a row with a duplicate primary key. To learn more about the options available to the statement, check out the INSERT Statement topic in the MySQL reference manual. Just be sure you have a good handle on the basics before moving on to the more advanced features available to that statement.

The post Introducing the MySQL INSERT statement appeared first on Simple Talk.


from Simple Talk https://ift.tt/Hk8tvUG
via

Wednesday, October 5, 2022

The Basics of Inserting Data into a SQL Server Table

Entry in Greg Larsen series on Learning T-SQL. The series so far:

  1. The basic T-SQL Select Statement
  2. Ordering a result set in SQL Server
  3. The ins and outs of joining tables in SQL Server
  4. Summarizing data using GROUP BY and HAVING
  5. The Basics of Inserting Data into a SQL Server Table

Before data can be read from of a SQL Server database table, the table needs to contain rows of data. One of the most typical ways to get data into a table is to use the INSERT statement. One row or multiple rows can be inserted with a single execution of an INSERT statement. You can even use the output of a stored procedure to insert rows. In this article, I will explore the basics of inserting data into a SQL Server table using the INSERT statement.

Syntax of the basic INSERT statement

As with most SQL Server commands, there are multiple ways to use them. The INSERT statement is no different. For this article, let’s review the syntax of the basic INSERT statement found in Figure 1.

INSERT [INTO] <object >[ (<column_list>)] 
  VALUES (<value_list1>)[,(<value_list2>)…,(<value_list N>)];

Figure 1: Basic Insert statement

Figure 1 only contains the syntax for the basic INSERT statement. For the complete syntax of the INSERT statement, refer to the Microsoft Documentation. You will see that there is quite a bit more syntax available, but in this article, I will include only the basics.

The object is the name of the table or view in which a single row or multiple rows will be inserted. The column_list contains the comma delimited names of the columns that will be populated with values identified in the VALUES parameter. The column_list is only required if a subset of the object’s columns is populated with values, although it can also be included if all the columns in the table are being populated.

value_list1 will include the values used to populate the columns inserted in the first row. If multiple rows are inserted with a single INSERT statement, then value_list2 through value_listN will be used to identify the additional sets of values for any other rows to be inserted.

A few examples are provided to better understand how to use this basic syntax to insert data into a SQL Server table.

Creating table to insert rows of data

Before the examples in this article can be executed, a target table for insert rows needs to be created. The code in Listing 1 will create that table.

USE tempdb;
CREATE TABLE dbo.Cars 
(
   CarID tinyint NULL, 
   Manufacture varchar(30) NULL, 
   Model Varchar(30) NULL,
   ModelYear int NULL, 
   PurchaseDate date NULL
);

Listing 1: Code to create target table

The code in Listing 1 creates a table named dbo.Cars, that will be created in the tempdb database. If you want to follow along and run the example code in this article, then run the code in Listing 1 to create the dbo.Cars table on your SQL Server instance. Any database, even tempdb as included in the code, will suffice.

Populating each column in a table

An INSERT statement can be used to insert a value for every column in a table, or a subset of columns. In this section, two examples will be shown that populate values for all the columns in the dbo.Cars table. The code for the first example can be found in Listing 2.

INSERT INTO dbo.Cars (CarID, 
           Manufacture,
           Model, 
           ModelYear, 
           PurchaseDate)
VALUES (1, 'Ford', 'F250', 2017, '2021-11-25');

Listing 2: Populating each column using the column list parameter

The code in Listing 2 inserts a single row into the dbo.Cars table. This INSERT statement uses the optional column_list parameter, which in this case identifies every column in the table. Since every column in the dbo.Cars table is being populated, the column list is not required. But including the column_list parameter is a common practice for clarity and reducing breaking changes as it allows new columns with DEFAULT constraints to be added without affecting existing code.

The VALUES clause in Listing 2 contains only the value_list1 parameter since only one row is being inserted. The first value in column_list1 specifies the numeric value 1. This value will be used to populate the first column identified in the column_list, which in this case is CarID. The second column in the column list Manufacture is populated with the second value in column_list1 parameter, “Ford”. Each of the following values in value_list1 are used to populate each additional column listed in the column_list parameter.

The code in Listing 3 shows adding a second row to the dbo.Cars table, where every column is populated with a value. But this example doesn’t include the column_list parameter.

INSERT INTO dbo.Cars 
VALUES (2, 'Subaru', 'Outback', 2019, '2018-12-31');

Listing 3: Populating each column without using the column_list parameter

When no column_list parameter is specified, the values in the column list must be specified in a specific order to ensure the correct column gets populated with the correct value. The order to specify the values is based on the column’s ordinal position in the table. The first value specified places a value in the first column in the table, the second value goes in the second column, and so on.

Populating only a few columns with an INSERT statement

There are times when a row needs to be inserted, but there are no values available for every column in the table. For instance, suppose the dbo.Cars table tracks the inventory of cars on a car dealer’s parking lot. Typically, cars on a car lot have not yet been purchased. Because of this, the purchase date for a car will not be known until the car is bought by a customer. You can create a new row in the dbo.Cars table without including a value for the PurchaseDate column, the INSERT statement in Listing 4 can be run. The value will either be NULL or use a DEFAULT constraint value if one exists.

INSERT INTO dbo.Cars (Manufacture, Model, ModelYear, CarID)
VALUES ('Chevrolet', 'Suburban', 2005,3);

Listing 4: Inserting a row without populating the PurchaseDate column.

In Listing 4, a new Chevrolet Suburban was added to the dbo.Cars table, without a purchase date. The code in Listing 4 didn’t have the PurchaseDate column listing in the column list parameter or a matching purchase data value in the VALUES parameter. Therefore, this INSERT statement populated all columns but the PurchaseDate column.

One other thing worth mentioning about Listing 4 is the first column listed in the column_list and first value listed value_list1 parameters are not for populating the first column, ordinal position-wise in the dbo.Cars table. The first ordinal column in the dbo.Cars table is CarID, which is specified last in the column_list of this example. Therefore, this example demonstrates that the columns listed in the column_list parameter and value list don’t have to be specified in the ordinal position order relative to the other column/value pairs listed. If you’d like to know the ordinal positions of each column in the dbo.Cars table, then you can run the code in Listing 5.

SELECT column_id, name
FROM  sys.columns
WHERE OBJECT_ID = OBJECT_ID('dbo.Cars')
ORDER BY column_id;

Listing 5: Showing the original position for columns

To verify that each column was populated with the correct value and the PurchaseDate column didn’t get a value the code in Listing 6 can be run.

SELECT * FROM dbo.Cars where CarID = 3;

Listing 6: Reviewing the row inserted by the code in Listing 4

In Report 1 is the output when the code in Listing 6 is executed.

Report 1: Output produced when Listing 5 is executed

Report 1 shows the PurchaseDate column value was not populated with a value. Plus, all the other columns were correctly populated even though the columns in the column_list parameter were specified in a different order then their ordinal position in the dbo.Cars table.

Automatically generating an identity column value when inserting rows

A table definition might have at most one column identified as an identity column. When a column has been defined as an identity column, the values assigned for the column will typically be automatically generated when each new row is inserted. The values generated are based on the seed and increment value associated with the identity column. The seed value identifies the value of the identity column for the first row populated. Whereas the increment value identifies the value that will be added to the previous inserted identity value to obtain the next identity value.

When an identity column is defined on a table, the value for that column can’t be manually populated with an insert statement. In order to demonstrate this, the dbo.Cars table will need to be dropped and recreated by running the code in Listing 7.

USE tempdb;
GO
DROP TABLE dbo.Cars;
GO
CREATE TABLE dbo.Cars 
(
   CarID tinyint identity, 
   Manufacture varchar(30), 
   Model Varchar(30),
   ModelYear int, 
   PurchaseDate date
);

Listing 7: Dropping and recreating dbo.Cars table

In Listing 7, the new dbo.Cars table created specified that the CarID column is an identity column without specifying an seed and increment value. When the seed and increment values are not identified, the default values of 1 will be used for the seed and increment values. The seed value is the first value used, and the increment is how much will be added to the previous value for the next value.

If an INSERT statement tries to manually insert an identity column value, an error will occur. To demonstrate this, the code in Listing 2 can be executed again. This second execution produces the error shown in Report 2.

Report 2: Error received when inserting row

This error occurs because the code in Listing 2 tried to insert the value “1” into the identity column while the IDENTITY INSERT property for the dbo.Cars table is set to off. Before discussing this property first let’s show the correct way to automatically insert rows when a table contains an identity column.

The code in Listing 8 demonstrates how to automatically generate identity column values when using the basic INSERT statement without providing the value for the CarID column.

INSERT INTO dbo.Cars (Manufacture, Model, ModelYear, PurchaseDate)
VALUES ('Ford', 'F250', 2017, '2021-11-25');

INSERT INTO dbo.Cars 
VALUES ('Subaru', 'Outback', 2019, '2018-12-31');

SELECT * FROM dbo.Cars;

Listing 8: Automatically generating identity values when inserting a row

Report 3 shows the output from SELECT statement when Listing 8 is run.

Report 3: Output when Listing 8 is run

The code in Listing 8 has the INSERT statements that were included in Listing 2 and 3, but with one exception. It doesn’t contain the CarID column in the column list parameter. Report 3 shows how the identity value on the first row inserted was assigned the value 1 and the next row inserted got an identity value of 2.

IDENTITY_INSERT property and manually assigning identity values

Identity value can be assigned manually if needed. It is generally not a good practice to manually insert identity values. But there are times when you might need to assign an identify column manually, like if you need to recreate some missing data (for example an errantly deleted row).

To do this, the IDENTITY_INSERT option needs to be turned on for the table in which identity columns are going to be inserted. To demonstrate this, execute the code in Listing 9.

SET IDENTITY_INSERT dbo.Cars ON;

INSERT INTO dbo.Cars (CarID,Manufacture, Model, ModelYear)
VALUES (10,'Chevrolet', 'Suburban', 2005);

SET IDENTITY_INSERT dbo.Cars OFF;
SELECT * FROM dbo.Cars;

Listing 9: Manually inserting an identity value.

This code first turned on the IDENTITY_INSERT property on dbo.Cars table using a SET command. Turning on IDENTITY_INSERT tells the SQL Server database engine that an INSERT statement will supply the identity value in an INSERT statement. The INSERT statement in Listing 9, inserts a new dbo.Cars row, and supplies value of 10 for the CarID column. Lastly, the code uses another SET command to turn off the IDENTITY_INSERT property.

Note: The best practice is to turn on IDENTITY_INSERT just before inserting identity values and turning it off immediately following the last INSERT statement that assigns an identity value.

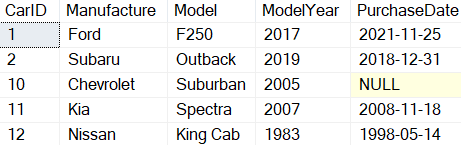
Report 4 shows the output produced when the SELECT statement is Listing 9 was executed. See how the third row has a value of 10 for the CarID column.

Report 4: Output when Listing 9 was executed

Care should be taken when manually setting identity values because it is possible to insert a row with an identity value that already exists.

When identity values are assigned manually, SQL Server keeps track of the highest identity value added. It then uses this highest value to generate the next identity value when a new row is inserted (this is demonstrated in the next section).

Add multiple rows to a table using a single INSERT statement

Prior to SQL Server 2008, only one row could be added to a table using the VALUES clause of an INSERT statement. With SQL Server 2008 or above, multiple rows can be inserted using a single INSERT statement when it contains multiple items in the VALUES clause. The code in Listing 10 shows how to insert 2 new rows into the dbo.Cars table with a single INSERT statement.

INSERT INTO dbo.Cars (Manufacture, Model, ModelYear,PurchaseDate)
VALUES ('Kia', 'Spectra', 2007,'2008-11-18'),
    ('Nissan','King Cab',1983,'1998-05-14');

SELECT * FROM dbo.Cars;

Listing 10: Inserting two rows with a single INSERT statement

By reviewing Listing 10, you can see there are two different sets of values listed in the VALUES parameter. Each set of values is contained inside a set of parathesis, with a comma between them. When Listing 10 is executed, two rows will be inserted. The SELECT statement in Listing 9 produced the output in Report 5.

Report 5: Output when Listing 9 is run

The last two rows, with identity values 11 and 12, were the ones added with the single INSERT statement.

Using a SELECT statement to feed an INSERT statement

In all the examples so far, the values for each new row added were supplied by using the VALUES parameter. But that is not the only way to provide values. A SELECT statement can also provide new row values for an INSERT statement, as is shown in Listing 11.

INSERT INTO dbo.Cars(Manufacture, Model, ModelYear,PurchaseDate)
  SELECT Manufacture, Model, ModelYear, SYSDATETIME()
  FROM dbo.Cars 
  WHERE CarID = 1 OR CarID = 2;

SELECT * FROM dbo.Cars;

Listing 11: Using a SELECT statement to identify values for new rows

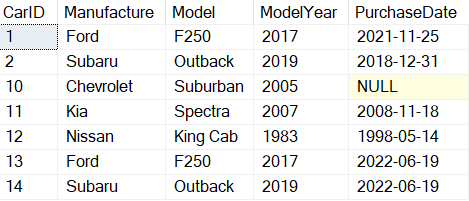
In Listing 11, a SELECT statement was used to select the column values for two rows from the dbo.Cars table that have CarID values 1 and 2. The two rows selected provided the values for the INSERT statement. The last two rows added can be seen in Report 6.

Report 6: Output when code in Listing 11 was executed

The rows with CarID values of 13 and14 are the rows that were added. These rows have the same Manufacture, Model, and ModelYear as the first two rows, except the PurchaseDate is different. The PurchaseDate values were set by using the SYSDATETIME() function in the VALUES clause.

Inserting data from the output of a stored procedure

There are times when more complicated logic is needed to prepare rows for insert. For example, an application might need to run a stored procedure that reviews a table or a series of tables to determine what rows need to be inserted into a table.

In this example code in Listing 12, a stored procedure is created that will determine what rows and values to insert. The stored procedure makes multiple passes through a WHILE loop. Each pass through the loop programmatically determines if information will be inserted into a temporary table or not. Once the WHILE loop completes, all the rows in the temporary table are displayed.

Instead of outputting the rows to the screen, the output from the stored procedure will then be used to feed values into an INSERT statement to create new rows in the dbo.Cars table. The code for the described stored procedure can be found in Listing 12.

CREATE PROC dbo.RecsToInsert
AS
DECLARE @I int = 0;
CREATE TABLE #T (
Manufacture varchar(30), 
MadeUpModel Varchar(30),
MadeupModelYear int, 
PurchaseYear date);
WHILE @I < 2 BEGIN
  SET @I = @I + 1;
  INSERT INTO #T 
   SELECT CASE WHEN @I = 1 THEN 'Ford'
         WHEN @I = 2 THEN 'Tesla' END AS Manufacture,
       CAST (@I as CHAR(1)) AS MadeUpModel,
       YEAR(SYSDATETIME()) AS MadeupModelYear,
       SYSDATETIME() AS PurchaseDate;
END 
SELECT * FROM #T;
DROP TABLE #T;

Listing 12: Sample Stored Procedure

The stored procedure created in Listing 11 will insert two rows into the temporary table #T. Those two rows will then be displayed using a SELECT statement. To execute this stored procedure and insert the two rows contained in the temporary table, execute the code in Listing 13.

INSERT INTO dbo.Cars 
EXEC RecsToInsert;

Listing 13: Inserting the output of a stored procedure into a table.

The stored procedure dbo.RecsToInsert was executed by specifying the “EXEC” statement in conjunction with the INSERT statement, similar to how the SELECT statement was executed in Listing 11. The output produced by this stored procedure provides the values for the different rows and their values for the INSERT statement. In this example, two rows output by the store procedure were inserted into the dbo.Cars table.

Note: While this method will not be available for other statements, it is very common to create a temporary table to receive the output of a stored procedure, then use that in an UPDATE, DELETE, MERGE, etc. statement.

Basic of Inserting Data into a SQL Server Table

If an application plans to capture data and store it in a SQL Server table, one of the primary ways to accomplish that task is with an INSERT statement. INSERT statements allow storing a single column value, multiple column values or all the column values into a table. It is also possible to insert multiple rows with a single INSERT statement or a stored procedure. Knowing the basics of inserting data into a SQL Server table using the INSERT statement is a key skill that every T-SQL programmer should have.

The post The Basics of Inserting Data into a SQL Server Table appeared first on Simple Talk.


from Simple Talk https://ift.tt/3auvHtR
via

Friday, September 30, 2022

Generating Repeatable Sets Of Test Rows

In order to test graph structures, I needed a large set of random data. In some ways, this data will resemble the IMDB database I will include later in this chapter, but to make it one, controllable in size and two, random, I created this random dataset. I loaded a set of values for an account into a table and a set of interests. I wanted then to be able to load a set of random data into edge, related one account to another (one follows the other), and then an account to a random set of interests.

In this article, I will discuss a few techniques I used, starting with the simplest method using ordering by NEWID(), then using RAND() to allow the code to generate a fixed set of data.

The Setup

As the base data, I am going to create a table named: Demo.FetchRandomDataFrom that will serve as my stand-in for any table you want to randomly fetch data from.

USE Tempdb; 
GO
CREATE SCHEMA Demo;
GO
SET NOCOUNT ON;
DROP TABLE IF EXISTS  Demo.FetchRandomDataFrom
GO
CREATE TABLE Demo.FetchRandomDataFrom
(
    --this value should be the primary key of your table, 
    --ideally using the clustered index key for best 
    --performance, but definitelu unique.
    FetchRandomDataFromId INT IDENTITY(2,4) 
        CONSTRAINT PKFetchRandomDataFrom PRIMARY KEY,
    SomeOtherData CHAR(1000) NOT NULL
)
GO
--Make the rows of a consequential size. Small row size often
--is an issue with random sets of data you want to use because 
--it performs different than real tables.
INSERT INTO Demo.FetchRandomDataFrom
( SomeOtherData )
VALUES (REPLICATE('a',1000));
GO 100000 --create 100000 rows

Let’s take a look at a few rows in my table. Note that I made the surrogate key start at 2 and increment by 4. the goal was to make good and sure that the data was obviously not a sequential number. If your keys are pretty much sequential, you may not need to do some steps I have included, but unless it is a perfect set without gaps, that may come into play when trying to make repeatable outcomes from the same data.

SELECT TOP 10 *
FROM   Demo.FetchRandomDataFrom
ORDER BY FetchRandomDataFromId

This returns:

FetchRandomDataFromId SomeOtherData
--------------------- ----------------------------------
2                     aaaaaaaaaaaaaaaaaaaaaaaaaaaaaaaaaa
6                     aaaaaaaaaaaaaaaaaaaaaaaaaaaaaaaaaa
10                    aaaaaaaaaaaaaaaaaaaaaaaaaaaaaaaaaa
14                    aaaaaaaaaaaaaaaaaaaaaaaaaaaaaaaaaa
18                    aaaaaaaaaaaaaaaaaaaaaaaaaaaaaaaaaa
22                    aaaaaaaaaaaaaaaaaaaaaaaaaaaaaaaaaa
26                    aaaaaaaaaaaaaaaaaaaaaaaaaaaaaaaaaa
30                    aaaaaaaaaaaaaaaaaaaaaaaaaaaaaaaaaa
34                    aaaaaaaaaaaaaaaaaaaaaaaaaaaaaaaaaa
38                    aaaaaaaaaaaaaaaaaaaaaaaaaaaaaaaaaa

This will be my stand in for a more realistic set of data where SomeOtherData would actually have been number, dates, values, etc.

Using NEWID()

If you simply need a random set of rows from a table, you can simply do something like this:

SELECT TOP 10 FetchRandomDataFromId
FROM   Demo.FetchRandomDataFrom
ORDER BY NEWID();

This just sorts the data in a random order based on the NEWID() GUID values being generated. It is a wonderful technique you can do with almost any set of data, Executing the previous statement will return a random set of rows each time you execute it, such as:

FetchRandomDataFromId
---------------------
177818
138446
272154
171854
195266
105330
314422
203530
395666
365046

There are data sampling code types in SQL Server syntax, which you can read about here in an article by Derek Colley, but like this article also quotes, if you want a random set, most basic methods use NEWID() to get truly random outputs.

The biggest pro with that method is that it is simple and very much random. However, there are two downfalls to this method. First, no duplicated values will be found in that set. For most cases, that is great, but in other cases, you may wish to have the chance of the same value being generated multiple times (in my real case, I absolutely want the same node to end up connected to more than one node. Second, it is non repeatable. If you want to send this code to someone else, they will always get a different answer. Obviously, this may or may not be an issue, but I can’t count how many times I have generated a set, found something interesting about it and then lost the set.

Repeatable Random values

In order to make a random enough set that was repeatable, I then decided to take advantage of the RAND() function and one of its most interesting capabilities. This being that it isn’t really technical random as you can pass any number into it as a seed, and then all the next values generated are technically deterministic.

For example, execute the following code on any SQL Server:

SELECT RAND(1)
UNION ALL
SELECT RAND()
UNION ALL
SELECT RAND()
UNION ALL
SELECT RAND()
UNION ALL
SELECT RAND()
UNION ALL
SELECT RAND()

The output will be:

----------------------
0.713591993212924
0.472241415009636
0.943996112912269
0.0088524383111658
0.343443392823765
0.210903950196124

I got the same output on SQL Server 2019 and 2022 RC0. Even if you execute RAND(1) and then an hour later, the rest of the code, the “random” value that is output will be the same. So, in the following code, I will use this by letting the user set a seed (or just take a random seed when exploring data sets, but then telling the user the seed in case they wish to use it again). The following code builds on this concept using RAND() and loading a temp table of random data:

It is a lot of code, but I included quite a bit of comments to make it clear:

DROP TABLE IF EXISTS #HoldFetchRandomDataFrom
GO
CREATE TABLE #HoldFetchRandomDataFrom
(
    FetchRandomDataFromId INT PRIMARY KEY
)
DECLARE @FetchRandomDataFromId INT, --hold the fetched value
                @RowsLoopCounter INT = 0, --number of rows fetched
                @LoopCounter INT = 0, --number of loops made, 
                                --to stop if too many
                @RowsInTableCount INT, --Used to be able to set the 
                                 --RAND value
                @SafetyFactor NUMERIC(3,1) = 2, --this times the loop 
                                         --counter for max loops
                
                @DesiredRowCount INT = 100, --number of rows you want 
                                            --in output
                @Seed INT = 1; --set specific value if you want 
                              --repeatability
                --default the seed (doing this, I give it a seed that 
                --is repeatable and will override the one that was set 
                --in the next execution unless you reconnect.
                SET @seed = COALESCE(@seed,2147483647 * RAND())
                --sets the seed to start generating

                DECLARE @SetSeed INT = RAND(@seed)

                SELECT CONCAT('Seed used: ',@seed);

--load all of the data into this table. The PrepId column will 
--hold a sequential value to make random number easier
DROP TABLE IF EXISTS #PrepFetchRandomDataFrom 
CREATE TABLE #PrepFetchRandomDataFrom
(
     --Start at 0 because RAND can produce 0
        PrepId INT IDENTITY(0,1), 
        FetchRandomDataFromId INT NOT NULL
)
INSERT INTO #PrepFetchRandomDataFrom
(
    FetchRandomDataFromId
)
SELECT FetchRandomDataFromId
FROM  Demo.FetchRandomDataFrom;
--the random number will be this times RAND. (it has to be 
--captured in a generic bit of code because you could choose a 
--value > the number of rows
SET @RowsInTableCount = (SELECT COUNT(*) 
                         FROM #PrepFetchRandomDataFrom);
WHILE 1=1
 BEGIN
        --this tells you the number of loops done.
        SET @Loopcounter = @LoopCounter + 1;
        --this way, if some error keeps happening, you will 
     --eventually stop
        IF @LoopCounter >= @DesiredRowCount * @SafetyFactor
          BEGIN
                 RAISERROR('Loop stopped due to safety counter',10,1); 
                 BREAK;
          END;
        --fetch one random row
        SELECT @FetchRandomDataFromId = RAND() * @RowsInTableCount
        --do the insert in a try. You may have criteria in your 
     --table that needs to be met (uniqueness, for example)
        BEGIN TRY
        --join to get the real value from the table
        INSERT INTO #HoldFetchRandomDataFrom(FetchRandomDataFromId)
        SELECT FetchRandomDataFromId
        FROM    #PrepFetchRandomDataFrom
        WHERE  PrepId = @FetchRandomDataFromId
        
        --this is set inside the try, because the row has been 
     --added
        SET @RowsLoopCounter = @RowsLoopCounter + 1;
        --this is then end if the rows inserted match the desired 
     --rowcount
        IF @RowsLoopCounter = @DesiredRowCount
         BREAK;
        END TRY
        BEGIN CATCH
           --most likely error is a duplicated value
           DECLARE @msg NVARCHAR(1000);
           --display the message in case you do something such 
           --that the loop can never complete
           SET @msg = CONCAT('Some error occurred:' 
                                             ,ERROR_MESSAGE())
           RAISERROR(@msg,10,1) WITH NOWAIT; --immediate message 
           --Note, we keep going. This is what the safety factor 
          --was for, because an error could cause infinite loop
        END CATCH;
END;

Output the rows:

SELECT *
FROM   #HoldFetchRandomDataFrom
ORDER BY FetchRandomDataFromId;

Now since I set the seed value to 1, you will see the same output:

-----------------------
Seed used: 1

FetchRandomDataFromId
---------------------
1670
2870
3542
4606
6982
10626
12846

Clearly this is a LOT more code than simply TOP 1 ORDER BY NEWID(). Am I saying this is always necessary? Not at all. But it is a technique that you can use to generate a repeatable random set of data (as far as you care it to be random).

For example, you could test some code with a random set of data that you find an error. Instead of having to save that data off for the next person, you could just use the script. My reason for doing this is for a book I am working on. I want to be able to send a set of edges to the reader without making this huge script. So I needed two correlated random values. This method made that pretty easy.

Multiple Related Repeatable Random values

What made me first try this was I wanted to generate edges, which need a from value and a to value. When I tried to do this with the NEWID() method in a loop 300000 times, it took close to forever to complete (I gave up at 150000 rows after that executed all night).

That is how this next piece of code was written:

DROP TABLE IF EXISTS #HoldFetchRandomDataFrom
GO
CREATE TABLE #HoldFetchRandomDataFrom
(
         FetchRandomDataFromId1 INT NOT NULL,
         FetchRandomDataFromId2 INT NOT NULL,
         --no duplicate rows
         PRIMARY KEY (FetchRandomDataFromId1,
                                 FetchRandomDataFromId2),
         --no self relationship. Needs to be different values
         CHECK (FetchRandomDataFromId1 <> FetchRandomDataFromId2)
)
DECLARE @FetchRandomDataFromId1 INT, --hold the first fetched 
                                     --value
           @FetchRandomDataFromId2 INT, --the second fetched value
           @RowsLoopCounter INT = 0, --number of rows fetched
           @LoopCounter INT = 0, --number of loops made, to stop if 
                              --too many                
        @RowsInTableCount INT, --Used to be able to set the RAND 
                               --value
        @SafetyFactor NUMERIC(3,1) = 2, --this times the loop  
                               --counter for max loops
                
        @DesiredRowCount INT = 100, -- number of rows you want 
                                    --in output
        @Seed INT = 1; --set specific value if you want 
                        --repeatability
                --default the seeds (doing this, I give it a seed that 
          --is repeatable and will override the one that was set 
          --in the next execution unless you reconnect.
                SET @seed = COALESCE(@seed,2147483647 * RAND())
                --sets the seed to start generating
                DECLARE @SetSeed INT = RAND(@seed)
                SELECT CONCAT('Seed used:',@seed);
--load all of the data into this table. The PrepId column will 
--hold a sequential value to make random number easier'
DROP TABLE IF EXISTS #PrepFetchRandomDataFrom 
CREATE TABLE #PrepFetchRandomDataFrom
(
      --Start at 0 because RAND can produce 0
        PrepId INT IDENTITY(0,1), 
        FetchRandomDataFromId INT NOT NULL
)
INSERT INTO #PrepFetchRandomDataFrom
(
    FetchRandomDataFromId
)
SELECT FetchRandomDataFromId
FROM  Demo.FetchRandomDataFrom;
--the random number will be this times RAND. (it has to be 
--captured in a generic bit of code because you could choose a 
--value > the number of rows
SET @RowsInTableCount = (SELECT COUNT(*) 
                         FROM #PrepFetchRandomDataFrom);
WHILE 1=1
 BEGIN
        --this tells you the number of loops done.
        SET @Loopcounter = @LoopCounter + 1;
        --this way, if some error keeps happening, you will 
     --eventually stop
        IF @LoopCounter >= @DesiredRowCount * @SafetyFactor
          BEGIN
                 RAISERROR('Loop stopped due to safety counter',10,1); 
                 BREAK;
          END;
    --fetch one random row
    SELECT @FetchRandomDataFromId1 = RAND() * @RowsInTableCount;
    SELECT @FetchRandomDataFromId2 = RAND() * @RowsInTableCount;
        --do the insert in a try. You may have criteria in your 
     --table that needs to be met (uniqueness, for example)
        BEGIN TRY
        --join to get the real value from the table
        INSERT INTO #HoldFetchRandomDataFrom
              (FetchRandomDataFromId1,FetchRandomDataFromId2)
        VALUES((SELECT FetchRandomDataFromId
                        FROM    #PrepFetchRandomDataFrom
                        WHERE  PrepId = @FetchRandomDataFromId1),
                                        (SELECT FetchRandomDataFromId
                                        FROM    #PrepFetchRandomDataFrom
                                        WHERE  PrepId = 
                                   @FetchRandomDataFromId2));
        
        --this is set inside the try, because the row has 
     --been added
        SET @RowsLoopCounter = @RowsLoopCounter + 1;
        --this is then end if the rows inserted match the desired 
     --rowcount
        IF @RowsLoopCounter = @DesiredRowCount
         BREAK;
        END TRY
        BEGIN CATCH
                --most likely error is a duplicated value
                DECLARE @msg NVARCHAR(1000);
                --display the message in case you do something such 
          --that the loop can never complete
                SET @msg = CONCAT('Some error occurred:' 
                                             ,ERROR_MESSAGE())
                RAISERROR(@msg,10,1) WITH NOWAIT; --immediate message 
                --Note, we keep going. This is what the safety factor 
          --was for, because an error could cause infinite loop
        END CATCH
END;
--Output the rows:
SELECT *
FROM   #HoldFetchRandomDataFrom
ORDER BY FetchRandomDataFromId1;

Executing this returned:

---------------------
Seed used:1
FetchRandomDataFromId1 FetchRandomDataFromId2
---------------------- ----------------------
3542                   137378
4606                   301534
9346                   31374
10626                  110734
14702                  106954
14978                  279338

If you do a little digging, you can see the values from the previous generation in here since I used the same seed:

SELECT FetchRandomDataFromId1
FROM #HoldFetchRandomDataFrom
UNION ALL
SELECT FetchRandomDataFromId2
FROM #HoldFetchRandomDataFrom
ORDER BY FetchRandomDataFromId1

This returns:

FetchRandomDataFromId1

----------------------
1670
2870
3542
4606
6982
9346
10626

And the first, single row query returned (copied from earlier in the document:

FetchRandomDataFromId
---------------------
1670
2870
3542
4606
6982
10626
12846

You can see a new value in the sequence (which makes sense because here are 2X the number of random values generated), but still the same values.


The post Generating Repeatable Sets Of Test Rows appeared first on Simple Talk.


from Simple Talk https://ift.tt/NDqvOoi
via

Thursday, September 22, 2022

Mighty Tester: Why it doesn’t need to be fixed…

Image showing comic strip. In each frame, the tester is speaking with another developer. She says "I found a bug." Dev1: "It was working yesterday." Dev2: "It works on my machine" Dev3: "It's not a bug, it's a feature" Dev4: "It's not in the requirements." Dev5: "It's only a nice-to-have" Dev6: "Did you try restarting your machine?" Dev7: "The user would never do that" Finally in the last frame, the tester says to herself: "And that concludes our developer bingo"

Commentary Competition

Enjoyed the topic? Have a relevant anecdote? Disagree with the author? Leave your two cents on this post in the comments below, and our favourite response will win a $50 Amazon gift card. The competition closes two weeks from the date of publication, and the winner will be announced in the next Simple Talk newsletter.

The post Mighty Tester: Why it doesn’t need to be fixed… appeared first on Simple Talk.


from Simple Talk https://ift.tt/EYlrPfI
via

Wednesday, September 14, 2022

T-SQL Tuesday #154 – SQL Server 2022, IS DISTINCT FROM

Despite my recent job change from full time T-SQL code jockey/architect to website editor for Simple-Talk, I will always be at heart at T-SQL programmer. While I will mostly be writing professionally in the foreseeable future will in support of an article, I will also continue writing code for several databases that I use for multiple personal reason housed on a SQL Server Express server on the desk beside me.
The Invitation: T-SQL Tuesday #154 Invitation – SQL Server 2022 (glennsqlperformance.com)

When I saw the topic of this T-SQL Tuesday was to write about what I have been doing with SQL Server 2022, I figured I would note the two things I have been doing recently. First, I wrote a chapter about security changes in SQL Server 2002 for a forthcoming book entitled “SQL Server 2022 Administration Inside Out” for Pearson with a great group of people that should be out later this year, early next at the latest. There are a few things I found out writing that chapter that I am keen to use, one of them being the more granular UNMASK permissions for the Dynamic Data Masking feature, but since I won’t be writing multi-user production code in the future, I probably won’t be masking any data, much less need granular masking capabilities.

The other thing I have been doing is trying out some of the new features coming in SQL Server 2022 that I will absolutely be using even in my hobby databases. There are tons of new features in 2022, as there always is. But the ones that excite me are the T-SQL improvements. In this article I am going to highlight 1 feature that is immediately a standout.

IS (NOT) DISTINCT FROM

The MOST exciting change from a T-SQL standpoint is: IS NOT DISTINCT FROM. This feature solves an age-old issue for T-SQL programmers and is worth its weight in gold. It is basically an equals comparison operator like =, but treats NULL as an individual value. Unlike =, this new operator returns only TRUE or FALSE, but not UNKNOWN. Writing queries that compare to values that can contain NULL is tedious, mostly because of code like the following:

SELECT CASE WHEN 1 = NULL THEN 'True' Else 'False' end,
       CASE WHEN NOT(1 = NULL) THEN 'True' Else 'False' end

The fact that both of these comparisons return False is confusing at times even to me, and I have written on the whole NULL comparison and negating NULL values things about as many times as I have dealt with it in production code. But using IS DISTINCT FROM, this is no longer the case:

SELECT CASE WHEN 1 IS DISTINCT FROM NULL 
               THEN 'True' Else 'False' end,
       CASE WHEN NOT 1 IS DISTINCT FROM NULL
               THEN 'True' Else 'False' end

Where this is really important is doing a query where you are looking for differences between two sets of data (often for a merge type operation). So consider the following table (from WideWorldImporters, which you can get here) :

SELECT COUNT(*), 
       SUM(CASE WHEN LatestRecordedPopulation IS NULL 
           THEN 1 ELSE 0 END)
FROM Application.Cities;

This returns 37940 total rows and 11048 rows with a NULL population value. Now, let’s join the table to itself on the PK and the population value

SELECT *
FROM   Application.Cities
          JOIN Application.Cities AS C2
            ON C2.CityID = Cities.CityID
WHERE.LatestRecordedPopulation 
                         = Cities.LatestRecordedPopulation;

This returns 26892 rows, which you can do the math, is 37940-11048. Looking at this, without thinking about NULL values (who does initially?), this has to return every row in the table. But clearly not. Usually this becomes obvious when a few customers living in one of those cities isn’t showing up on a report (or maybe even not getting their shipments.)

The pre-SQL Server 2022 way of handling this properly this was to do something like this:

SELECT *
FROM   Application.Cities
          JOIN Application.Cities AS C2
               ON C2.CityID = Cities.CityID
                  AND C2.LatestRecordedPopulation = 
                                      Cities.LatestRecordedPopulation 
                    OR (C2.LatestRecordedPopulation IS NULL
                        AND Cities.LatestRecordedPopulation IS NULL);

Now we have checked the either they are the same value, or they both have a value of NULL. This query returns every row in the table, but it is kind of tricky code. And looking for differences is even more difficult, because you have to check to see if the values are different, if column 1 is null and column2 is not, and again vice versa. Another way this is often done is to change the population comparison to

AND COALESCE(C2.LatestRecordedPopulation.-100) = 
             COALESCE(Cities.LatestRecordedPopulation,-100)

Which is safe from a correctness standpoint (assuming you can coalesce your values to something that is 100% not possible), but not from a performance one. This eliminates index seek utilization for these columns and makes it slower. That isn’t always an issue, but for larger data sets, you may end up with more scans than you hoped.

Using the new syntax, we can simply write this as:

SELECT *
FROM   Application.Cities
         JOIN Application.Cities AS C2
           ON C2.CityID = Cities.CityID
              AND C2.LatestRecordedPopulation 
                    IS NOT DISTINCT FROM 
                           Cities.LatestRecordedPopulation;

The name of the operator might be a little bit confusing because of the words FROM and DISTINCT, it really makes sense. DISTINCT has a seemingly different usage here, but really it is the same meaning. If the value is the same, it is not distinct from one another, and if it is different, it is distinct. And the DISTINCT operator in the SELECT clause honors NULL values as a single bucket too. Now, go back and change the previous query to IS DISTINCT FROM and 0 rows will be returned.

This feature would have saved me many many hours over the years! Is this alone a reason to upgrade to SQL Server 2022 alone? Since I have never been the one to write those checks, and I use the free Express edition for my hobby databases… I can say an unqualified “Yes” to that!


The post T-SQL Tuesday #154 – SQL Server 2022, IS DISTINCT FROM appeared first on Simple Talk.


from Simple Talk https://ift.tt/KlvCY6d
via

Monday, September 5, 2022

Synapse Analytics: When you should use (or not use) Synapse

Synapse is a great data lake house tool. This means in a single tool we have resources to manage a data lake and data warehouse.

The Synapse Serverless Pool is great to manage data lakes and for a great price: around us$ 5,00 for each TB of data queried. This makes it a great choice.

For the data warehouse, on the other hand, it’s a bit different. Before Synapse, there was Azure SQL Data Warehouse. This product was rebranded as SQL Dedicated Pool. The change on the product name helped to put down an old mistake: People believe that for a Data Warehouse in the cloud they need to use Azure SQL Data Warehouse.

The idea was reduced, but a lot of people still think they need to use Synapse for a Data Warehouse. This is a mistake. A data warehouse is not related to a tool. It’s a database. Some tools may be better or worse for the data warehouse. In relation to Synapse, as the usual answer from every specialist, “It depends”.

What’s the Synapse SQL Dedicated Pool

Understanding what is the SQL Dedicated Pool is the key to understand when you need to use it or not. The most common misconception is to believe the SQL Dedicated Pool is only a simple database. It’s not.

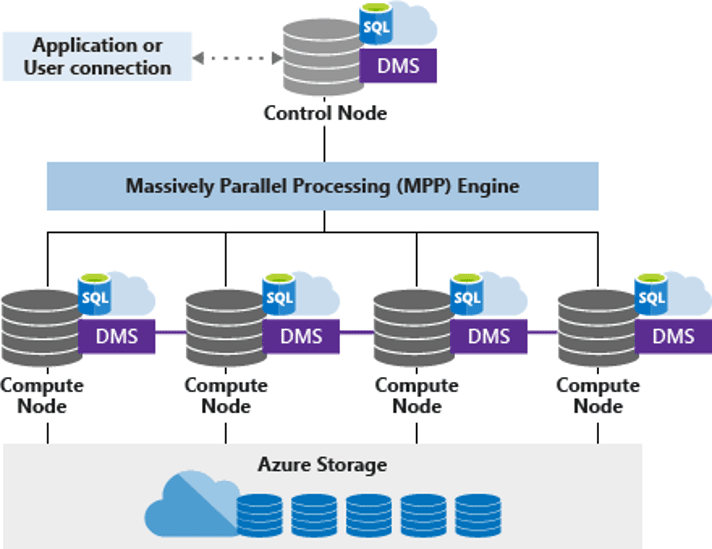
The SQL Dedicated Pool is a MPP tool. MPP stands for Massive Parallel Processing. This is an architecture intended to break down a processing request between many processing nodes, join the processing result from the individual nodes and return the final result. It’s much more than simple parallel processing, its’s a distributed processing broke down in many physical nodes.


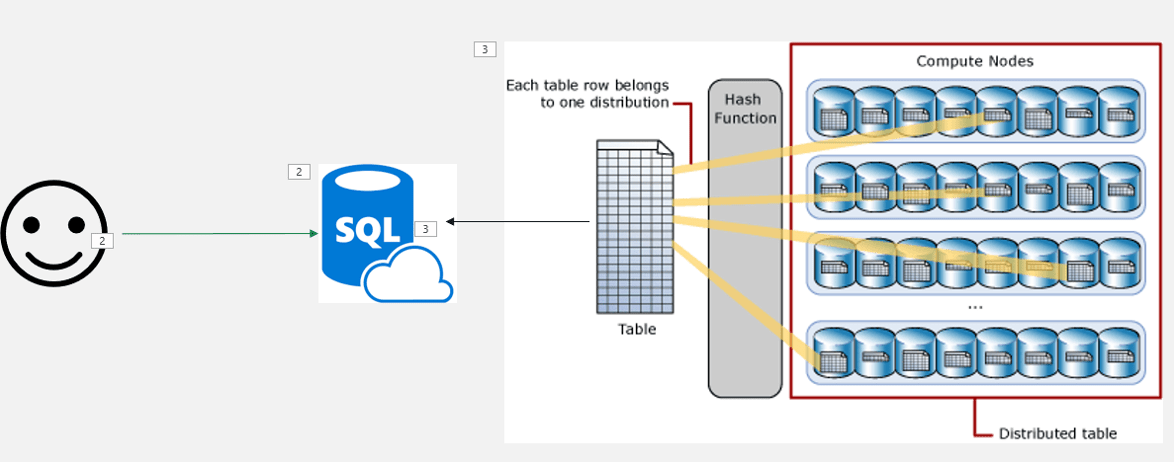
The data is stored in a structure optimized for the MPP execution. What you may see as a single database is in fact a total of 60 databases. Each table is broken down in 60 pieces. This can be a great organization for the MPP execution, but there are more details to analyse.

Synapse Dedicated Pool Service level

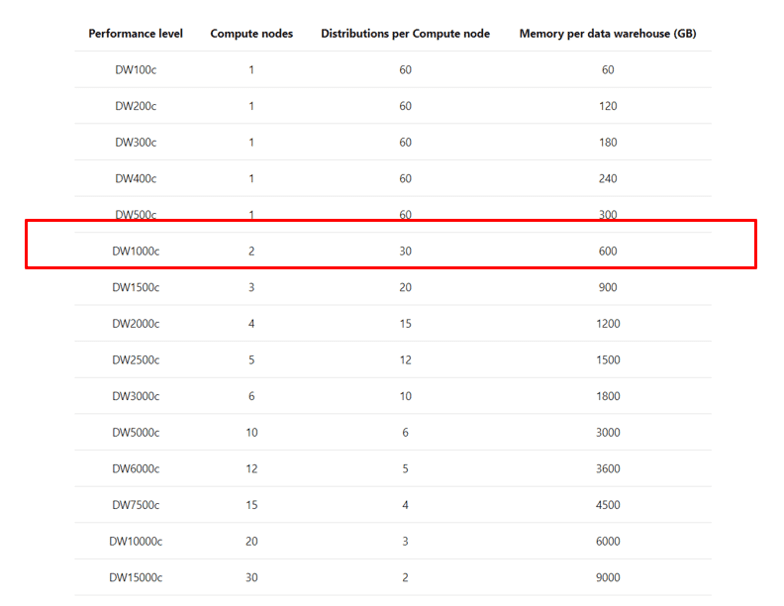
The service level of the SQL Dedicated Pool defines the number of physical nodes the dedicated pool will have. Any service level below DW 1000 will use only one node. DW 1000 is the first level with 2 nodes and the number grows up to 60 nodes.

The number of databases used to broke down the data is fixed, always 60. These databases will be spread among the physical nodes the dedicated pool contains. For example, if the dedicated pool has two nodes (DW 1000), each node will contain 30 databases.

The first important point is the service level: You should should never use a dedicate pool with less than DW 1000.


Below DW 1000, there is no real MPP. However, your data is optimized for MPP. Your data is broken down is 60 pieces. Without using a MPP, you will be losing performance instead of getting better performance.

If for any reason you believe you need a SQL Dedicated Pool below DW 1000 in production, that’s because you don’t need a SQL Dedicated Pool, a simple Azure SQL Database may do the job.

Data Volume

Synapse usually makes an interesting recommendation to us: Never use a clustered columnstore index on a table with less than 60 million records in Synapse. If we analyse this recomendation, we may discover some rules about when to use or not use Synapse.


First, it’s important to better understand the columnstore indexes and how important they are.

Let’s columnstore indexes features and behaviours:

  • They are specially optimized for analytical queries
  • The index is compressed
  • They are in memory
  • Allow batch mode execution and optimization

The columnstore indexes are very important for data warehouses. We would be losing a lot by not using them. Why Synapse doesn’t recommend them for tables smaller than 60 millions ?

The physical structure of the columnstore indexes use segments with 1 million rows each. The segments are “closed” and compressed on each million records. That’s why the 60 million recomendation: Synapse breaks down each table in 60 pieces. 60 pieces with 1 million rows each makes a total of 60 millions. Any table with less than 60 million rows will have less than 1 million rows on each of their pieces, resulting in incomplete segments and affecting the work of the columnstore index.

Is this a rule to be always followed? Not at all, that’s why it’s just a recommendation. A data warehouse uses star schemas. Usually, the fact table is way bigger than the dimension tables. It’s ok if we have some small dimension tables around a very big fact table, this is not a problem. The problem is when your entire model has no table with the size which requires Synpase for a better processing.

Consumers

Synapse can be very good as a central data source for BI systems such as Power BI, Qulick and more. However, if there is no directly BI system consuming the data, if most of the consumers are other applications receiving data through ETL processes, maybe Synapse is not the better option. Data lakes could perform the same task for a lower cost in this situation.

Summary

Should you use Synapse ? Your volume of data, the need for an MPP and the consumers of your data can provide a good guidance about whether Synapse is a good choice for your solution or not.

The post Synapse Analytics: When you should use (or not use) Synapse appeared first on Simple Talk.


from Simple Talk https://ift.tt/9SzEZwV
via

Thursday, September 1, 2022

Starting my dream job…

A new adventure, there in your eyes.

It’s just beginning,

Feel your heart beat faster.

Reach out and find your

Happily ever after!

Well, here I am. My first new job in over 20 years and it is a dream come true. I have always wanted to do more to help people learn about technology and being the Editor of the Simple Talk website is going to be a great place to do that. I have admired the heck out of the people who I am following and I have worked with them all over the years.

How that dream comes out, who knows? I won’t pretend the back of my head isn’t filled with the little voices telling me “you are the imposter” like we are playing a game of Clue only we are looking for the person who shouldn’t be there rather than a murderer. As I said, I have known the previous editors and they were all the greatest… can I keep up.?

I have come to realize that practically everyone has that same voice echoing frustrations in their cavernous skull boxes. And it is okay. It probably is the only thing standing between some of us trying to fly without wings over the edge of the Grand Canyon (or since Redgate is headquartered across the pond from me, the White Cliffs of Dover). Doubt makes us work smarter along with harder when it isn’t making us doubt our ability to do anything.

I don’t want to be better than my predecessors, or worse, or even the same. I want to be me and do the things that I am good at and surround myself with people who make me look (but not feel) dumb.

I wrote this the night before I start at Redgate and am publishing it 10 minutes before my first meeting. As I often do,  I read this to my editor (my wife Dr Valerie Davidson, real Dr of Education, not like my drsql Twitter handle!), she asked “do you really want to come off sounding so scared?” I just want to be honest about how I feel the night before I start.

I want to say that I feel like a 10 year old kid about to board their first roller coaster with an inversion. Excited beyond words and also scared to death. Will this be the most amazing thing, or will it kill me? I have experienced first roller coaster rides with several people who were scared of it for too long, some with tears (ok, maybe that was me). Most get finished with that first ride and it becomes something they like. A few hate it. Others, it becomes an obsession (this was me.)

Did I mention I am a theme park fanatic? I often do! This was the picture I took for the company directory. Fun fact, my first interview was from Dollywood where I was about to do some article interviews of some of their hosts. I have a YouTube channel and a theme park blog too.


My experience with roller coasters is very similar to my experience with the SQL Server community for the past 20 years (or maybe more, you can see I am not 22 in the picture). I was scared silly to get involved, then I did, then it changed my life forever. I hope I can live up to task of helping others do the same. Either way, I will give it my all and do my best to have no regrets.

Lets go!

The post Starting my dream job… appeared first on Simple Talk.


from Simple Talk https://ift.tt/m590eWl
via