Thursday, September 27, 2018

Extended Events Workbench

A lot of the information about the way that SQL Server is working that can only be provided by Extended Events (XEvents). It is such a versatile system that it can provide a lot more than would otherwise require SQL Trace. If done well, Extended Events are so economical to use that it takes very little CPU. For many tasks, it requires less effort on the part of the user than SQL Trace.

Extended Events (XEvents) aren’t particularly easy to use, and nothing that involves having to use XML is likely to be intuitive: In fact, many DBAs compare XML unfavourably in terms of its friendliness with a cornered rat. SSMS’s user-interface for Extended Events, thankfully, removes a lot of the bite. For the beginner to XEvents with a background in SQL, it is probably best to collect a few useful ‘recipes’ and grow from that point. Templates and snippets are invaluable.

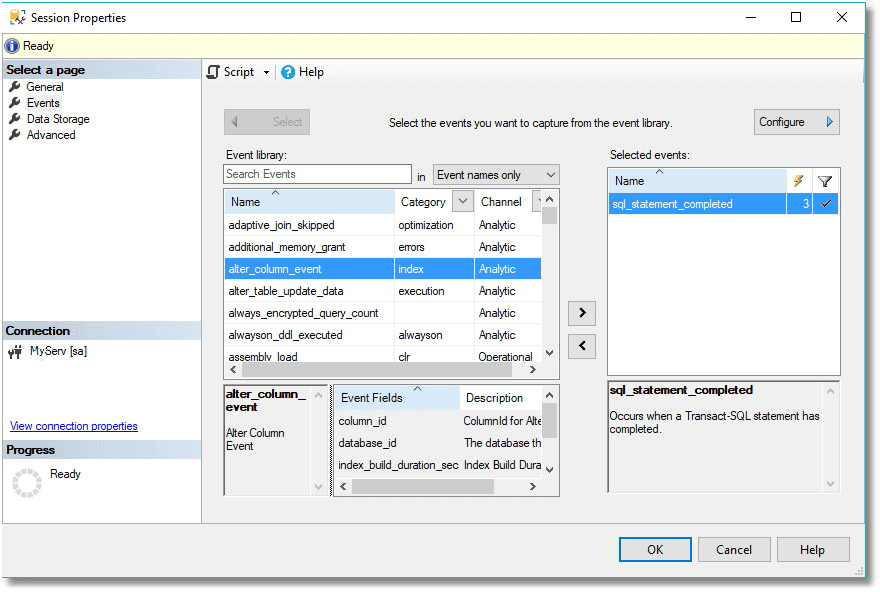
SSMS has a very good GUI that is perfectly usable to get an XEvents session up and running in order to see what is in the current queries. Its use is well covered by various articles such as Advanced Viewing of Target Data from Extended Events in SQL Server and Robert Sheldon’s Getting Started with Extended Events in SQL Server 2012. I particularly like the ‘New Session’/’session properties’ screen, which allows you to create a new session, to view and to change the properties of a session.

The reason that XEvents is more like a box of Lego bricks than like a complete model of the Starship Enterprise is that there is a huge range of requirements. It is difficult, for example, to get developers to agree on what constitutes a poor-performing query that is hogging resources or to get DBAs to come up with a consensus on the definition of a system resource contention. We want specific questions answered, and for this, XEvents is ideal because we can frame the question exactly.

The Anatomy of Extended Events

The data that is collected by Extended Events is stored in data documents; each individual session has a corresponding document. These documents are an array of events. If you specify more than one event in your session, then you will have entries for each event, which are likely to have different attributes. You might also want to add common attributes to the predicates that are special to the event.

A picture containing text, map Description generated with very high confidence

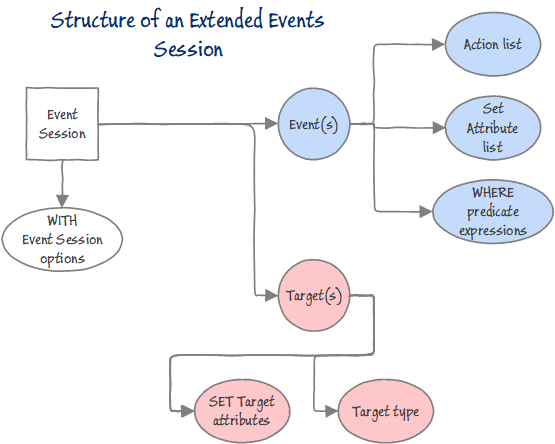
To deal with this, it makes sense to use a data document language such as XML for storing the data, because each event is likely to have its own special data schema, containing both predicates and common attributes.

Most Extended Events sessions consist of two main parts. Firstly, the session is set up and started, and secondly, the results are queried. The session creation is done in SQL, and this is easily available even if you use the GUI. As part of the setup of the session, the session needs to be defined along with the actions that are to be used, and any filtering, the target, and the settings. The target of the event is the destination for all of the information that is captured by the session and depends on what your requirements are. Targets can write to a file, store event data in a memory buffer, or aggregate the event data in a series of ‘buckets.’ Probably the simplest is the asynchronous Ring buffer which is a memory-based FIFO. More familiar to users of SQL Trace is the asynchronous Event file, which writes from memory to disk. The Histogram target increments bucket counters to count the number of times that a specified event occurs, based on an attribute of the event. Event pairing is designed for events that occur in pairs such as sql_statement_started and sql_statement_completed and is useful to detect when a specified paired event does not occur in a matched set.

The built-in sessions aren’t always of immediate use. Why not? For a start, they include a lot of different events, so they cannot be viewed as tables because each event will have different values. Also, they can have bewildering characteristics such as those occasions when data comes and goes from the ring buffer, which seems to be due to a syntax error in the NT Service/SQLTelemetry.

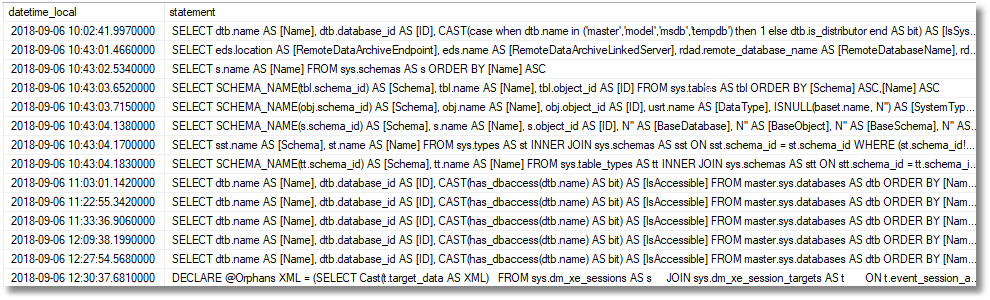
You can see what is currently active in the way of sessions by means of the query

SELECT xs.name, xst.target_name, xst.execution_count,
  xst.execution_duration_ms, Cast(xst.target_data AS XML) AS targetdata
  FROM sys.dm_xe_session_targets AS xst
    INNER JOIN sys.dm_xe_sessions AS xs
      ON xst.event_session_address = xs.address;

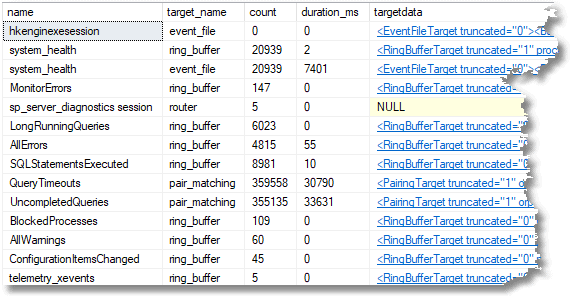
If you are using the grid for results, you can click on the targetdata column to view the XML file.

To start with, I suggest that it is worth starting simply with a session that has just a single event.

We’ll try that with sqlserver.error_reported.

Catching Those Pesky Errors

For our first Extended Events session, we will try something with just one event. This records all errors, including those from scheduled tasks and client applications. To do this, I used the SSMS Create Session wizard. Although it is those error messages with low severity numbers that are interesting, I added a filter so that we didn’t need to see anything less than severity eleven.

In order to do our best to track where the error happened, and who caused it, I’ve added some fields from the general pool of event parameters to give you more information in the ACTION clause.

IF EXISTS --if the session already exists, then delete it. We are assuming you've changed something
  (
  SELECT * FROM sys.server_event_sessions
    WHERE server_event_sessions.name = 'AllErrors'
  )
  DROP EVENT SESSION AllErrors ON SERVER;
GO
CREATE EVENT SESSION AllErrors -- the name of the session 
ON SERVER
  ADD EVENT sqlserver.error_reported --just the one event
    (ACTION
       (
       sqlserver.client_app_name, sqlserver.client_connection_id,
       sqlserver.database_name, sqlserver.nt_username, sqlserver.sql_text,
       sqlserver.username --all these are useful for tracking an error
       )
    WHERE ([severity]>(10)) -- it is boring looking at the information messages
        )
  ADD TARGET package0.ring_buffer --we will rwrite it to a ring buffer targwet only
    (SET max_memory = (4096))
WITH
  (
  MAX_MEMORY = 4096KB, EVENT_RETENTION_MODE = ALLOW_SINGLE_EVENT_LOSS,
  MAX_DISPATCH_LATENCY = 30 SECONDS, MAX_EVENT_SIZE = 0KB,
  MEMORY_PARTITION_MODE = NONE, TRACK_CAUSALITY = OFF, STARTUP_STATE = on
  );
GO
ALTER EVENT SESSION AllErrors ON SERVER STATE = START;
GO

Now we can test it very easily. Right-click the Extended event window and hit refresh. Make sure that the AllErrors session is there and started. Then start the live data window by right-clicking the started session and choosing Watch Live Data.

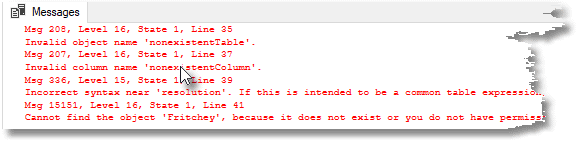
/* We will now put some data in the buffer */ 
SELECT * FROM nonexistentTable
GO
SELECT nonexistentColumn FROM sys.tables
Go
SELECT * FROM sys.tables WITH resolution
GO 
GRANT SELECT ON OBJECT::Fritchey TO Phil;  
Go

Depending on which version of SSMS you are using, you may or may not see the data show up in the Live Data pane right away. If you don’t see it, try running the batch again.


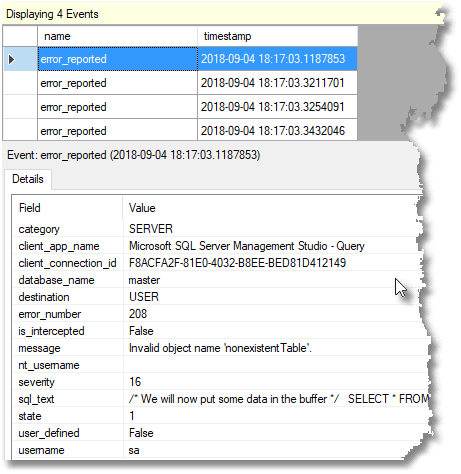
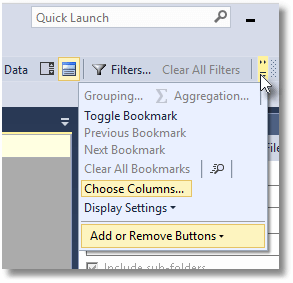
You can see that a number of event fields are shown in the details tab. You can add more columns to the trace window by clicking the Choose Columns button on the Extended Events toolbar.

With the Choose Columns screen, you can then decide which columns you see in the list.

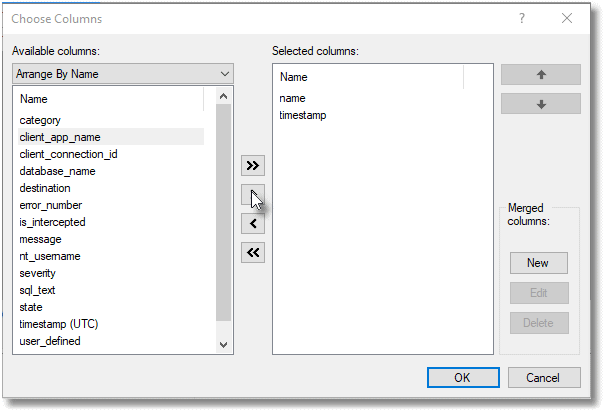
You can also right-click on the data in the list in the lower pane to add it to, or remove it from, the table in the upper pane.

You can also view the target data as an XML document. To do this, expand the session to see the targets. Right-click on the target and select View Target Data. This display is updated occasionally. If you right-click the target data and then select Refresh Interval from the context menu that appears, you can select the refresh interval from the interval list. Likewise, from this context menu, you can pause and resume the automatic refresh.

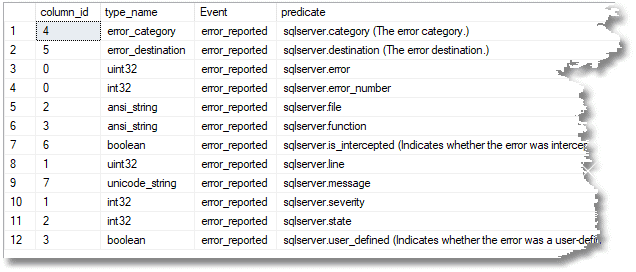
As well as using the events properties window, you can find out what is available as a built-in field and predicate source for any event via a query like this, and (hopefully when they’ve filled in the column) an explanation of what it is about. This query is set to tell you what is available for error_reported.

Predicate Source Query

SELECT c.column_id, c.type_name, c.object_name AS Event,
  p.name + '.' + c.name
  + Coalesce(' (' + c.description + ')', ' (' + po.description + ')', '') AS predicate
  FROM sys.dm_xe_object_columns AS c
    JOIN sys.dm_xe_objects AS o
      ON o.name = c.object_name
    JOIN sys.dm_xe_packages AS p
      ON p.guid = o.package_guid
    LEFT OUTER JOIN sys.dm_xe_objects AS po
      ON c.name = po.name AND po.object_type = 'pred_source'
  WHERE c.column_type = 'data'
    AND o.object_type = 'event'
    AND o.name = 'error_reported'
    AND p.name = 'sqlserver'
  ORDER BY predicate;

All we need now is some SQL code so we can see the errors in a relational way and maybe do some reporting and investigating. Actually, it is strange to see the errors that crop up.

DECLARE @Target_Data XML =
          (
          SELECT TOP 1 Cast(xet.target_data AS XML) AS targetdata
            FROM sys.dm_xe_session_targets AS xet
              INNER JOIN sys.dm_xe_sessions AS xes
                ON xes.address = xet.event_session_address
            WHERE xes.name = 'AllErrors'
              AND xet.target_name = 'ring_buffer'
          );
SELECT 
CONVERT(datetime2,
        SwitchOffset(CONVERT(datetimeoffset,xed.event_data.value('(@timestamp)[1]', 'datetime2')),
                DateName(TzOffset, SYSDATETIMEOFFSET()))) AS datetime_local,
--xed.event_data.value('(@timestamp)[1]', 'datetime2') AS time_UTC,
--xed.event_data.value('(@name)[1]', 'varchar(50)') AS event_type,
--xed.event_data.value('(data[@name="category"]/text)[1]', 'varchar(255)') AS Category,
xed.event_data.value('(data[@name="error_number"]/value)[1]', 'int') AS [Error_Number],
xed.event_data.value('(data[@name="severity"]/value)[1]', 'int') AS Severity,
xed.event_data.value('(data[@name="message"]/value)[1]', 'varchar(255)') AS [Message],
xed.event_data.value('(action[@name="username"]/value)[1]', 'varchar(255)') AS UserName,
xed.event_data.value('(action[@name="nt_username"]/value)[1]', 'varchar(255)') AS NT_Username,
xed.event_data.value('(action[@name="sql_text"]/value)[1]', 'nvarchar(max)') AS SQL_Text,
xed.event_data.value('(action[@name="database_name"]/value)[1]', 'varchar(255)') AS [Database_Name],
xed.event_data.value('(action[@name="client_connection_id"]/value)[1]', 'varchar(255)') AS client_conn,
xed.event_data.value('(action[@name="client_app_name"]/value)[1]', 'varchar(255)') AS client_app_name
FROM @Target_Data.nodes('//RingBufferTarget/event') AS xed (event_data)

We now have an effective solution. It is possible to create a view from the SQL if you forgo the creation of the temporary variable (it is quicker to run with the temporary variable), or you might create a stored procedure. You will probably need to add various WHERE clauses, the most obvious being how long ago you want to see errors. Here is an example that lets you see the last twenty minutes worth of errors.

WHERE DateDiff
           ( MINUTE,Convert
              (DATETIME2,
          SwitchOffset(
              Convert(DATETIMEOFFSET,xed.event_data.value('(@timestamp)[1]', 'datetime2')
                     ),
           DateName(TzOffset, SysDateTimeOffset())
                      )
           ),
        GetDate()
       ) < 20;

A Performance Test Harness

Very often, we want to understand in some detail where slow SQL code happens in a particular batch or set of batches, and why. To do this, you need to have information about the duration and I/O. You also need to be able to access the execution plan for the batch. An obvious candidate event for this is the sql_statement_completed event. We are here setting up a session, starting it, running our test, and immediately stopping it again. We identify the batch we are interested in by putting a unique string at the beginning of the batch and filtering the event to happen only if the statement is part of this batch. Because we know what batch the statement belongs to, we can get the execution plan. This means that we can see what is in the execution plan to get as much detail as we need. In this example, I’m only doing one batch, but if you run several batches as part of the test, it will catch them all if the batch starts with the same unique string.

The sql_statement_completed event has some very useful fields/predicates. (These come from executing the Predicate Query I showed earlier.)

  • sqlserver.cpu_time (Indicates the CPU time in microseconds that is consumed by the statement.)
  • sqlserver.duration (The time in microseconds that it took to execute the statement.)
  • sqlserver.last_row_count (The last row count for this statement.)
  • sqlserver.line_number (The statement line number, in relation to the beginning of the batch.)
  • sqlserver.logical_reads (The number of logical page reads that were issued by the statement.)
  • sqlserver.offset (The statement start offset, in relation to the beginning of the batch.)
  • sqlserver.offset_end (The statement end offset, in relation to the beginning of the batch. The value will be -1 for the last statement.)
  • sqlserver.parameterized_plan_handle (The plan handle of the cache entry of the parameterized query plan.)
  • sqlserver.physical_reads (The number of physical page reads that were issued by the statement.)
  • sqlserver.row_count (The number of rows that were touched by the statement.)
  • sqlserver.statement (The text of the statement that triggered the event.)
  • sqlserver.writes (The number of page writes that were issued by the statement)

What we are doing here is to test whether the hints for GROUP BY are at all useful. To test it, we run the same GROUP BY query against AdventureWorks, using hints, and not using hints. We then create an index on the column being aggregated and run the queries again. We end up with a report that tells us the resources used every time, and how long the query takes. We can then drill into the detail. Note that you need to change the AdventureWorks2016 database to whatever version you have and also change the name of your test database, here artfully called YourTestDatabase.

IF EXISTS --if the session already exists, then delete it. We are assuming you've changed something
  (
  SELECT * FROM sys.server_event_sessions
    WHERE server_event_sessions.name = 'SQLStatementsExecuted'
  )
  DROP EVENT SESSION SQLStatementsExecuted ON SERVER;
GO
CREATE EVENT SESSION SQLStatementsExecuted --call it what you wish, of course
ON SERVER
  ADD EVENT sqlserver.sql_statement_completed --we just have one event
    (ACTION (sqlserver.database_name, sqlserver.sql_text, sqlserver.plan_handle)-- and these global vars
     WHERE (sqlserver.like_i_sql_unicode_string(sqlserver.sql_text, N'--Test the value of GROUP BY options%'))
         --we just want the batch and nothing else so we put an identifying string at the start
    )
  ADD TARGET package0.ring_buffer 
  --we don't need a more permanent record or a bucket count
WITH (STARTUP_STATE = OFF);
GO
--To test the session, run this:
USE YourTestDatabase --Alter to whatever database you use. We used AdventureWorks data.
ALTER EVENT SESSION SQLStatementsExecuted ON SERVER STATE = START;
--The Batch being tested starts here ---V
GO --don't change this next line without changing the WHERE clause above
--Test the value of GROUP BY options    
DECLARE @bucket TABLE 
  (suffix VARCHAR(10) NOT NULL, quantity INT NOT NULL);
--this is purely done so we don't have the extra results
--we've already checked these 
INSERT --1/ no options, no suitable index
  INTO @bucket(suffix,quantity)
SELECT  
                Coalesce(p.Suffix,'(none)') , 
        Count(*) AS SuffixUsageCount
 FROM    AdventureWorks2016.Person.Person AS p
GROUP BY p.Suffix 
INSERT  --2/ order group option, no index
  INTO @bucket(suffix,quantity)
SELECT 
                Coalesce(p.Suffix,'(none)') ,
        Count(*) AS TheSuffixUsageCount
 FROM    AdventureWorks2016.Person.Person AS p
GROUP BY p.Suffix
OPTION  ( ORDER GROUP ) 
INSERT  --3/ Hash group option, no index
  INTO @bucket(suffix,quantity)SELECT  -- hash group no index 
                Coalesce(p.Suffix,'(none)') ,
        Count(*) AS TheSuffixUsageCount
 FROM    AdventureWorks2016.Person.Person AS p
GROUP BY p.Suffix
OPTION  ( HASH group ) 
CREATE INDEX DeleteMePlease -- build an index 
    ON AdventureWorks2016.person.person
    (Suffix)
INSERT  --4/ no option, a suitable index
  INTO @bucket(suffix,quantity)
  SELECT  -- re-execute the code
        Coalesce(p.Suffix,'(none)') , 
        Count(*) AS TheSuffixUsageCount
 FROM    AdventureWorks2016.Person.Person AS p
GROUP BY p.Suffix 
INSERT  --5/ order group option, suitable index
  INTO @bucket(suffix,quantity)
  SELECT  -- order group with index
                Coalesce(p.Suffix,'(none)') , 
        Count(*) AS TheSuffixUsageCount
 FROM    AdventureWorks2016.Person.Person AS p
GROUP BY p.Suffix
OPTION  ( ORDER GROUP ); 
INSERT  --6/ hash group option, suitable index
  INTO @bucket(suffix,quantity)
SELECT  -- hash group with index 
                Coalesce(p.Suffix,'(none)') ,
        Count(*) AS TheSuffixUsageCount
 FROM    AdventureWorks2016.Person.Person AS p
GROUP BY p.Suffix
OPTION  ( HASH group ); 
INSERT  --7/ no option, suitable index
  INTO @bucket(suffix,quantity)
SELECT -- re-execute the code with index        
           Coalesce(p.Suffix,'(none)') ,
        Count(*) AS TheSuffixUsageCount
 FROM    AdventureWorks2016.Person.Person AS p
GROUP BY p.Suffix 
GO
USE AdventureWorks2016
DROP INDEX Person.Person.DeleteMePlease
USE YourTestDatabase --Alter to whatever test database you use.
DECLARE @Target_Data XML =
          (
          SELECT TOP 1 Cast(xet.target_data AS XML) AS targetdata
            FROM sys.dm_xe_session_targets AS xet
              INNER JOIN sys.dm_xe_sessions AS xes
                ON xes.address = xet.event_session_address
            WHERE xes.name = 'SQLStatementsExecuted'
              AND xet.target_name = 'ring_buffer'
          );
SELECT 
CONVERT(datetime2,
        SwitchOffset(CONVERT(datetimeoffset,the.event_data.value('(@timestamp)[1]', 'datetime2')),
                DateName(TzOffset, SYSDATETIMEOFFSET()))) AS datetime_local,
CONVERT(DECIMAL(6,3),round(the.event_data.value('(data[@name="duration"]/value)[1]', 'bigint')/1000000.0,3,1))  AS duration,
the.event_data.value('(data[@name="statement"]/value)[1]', 'nvarchar(max)') AS [statement],
--the.event_data.value('(action[@name="sql_text"]/value)[1]', 'nvarchar(max)') AS sql_text,
--the.event_data.value('(action[@name="database_name"]/value)[1]', 'nvarchar(80)') AS [database_name],
qp.query_plan,
the.event_data.value('(data[@name="cpu_time"]/value)[1]', 'bigint') AS [cpu_time(microsSecs)],
the.event_data.value('(data[@name="physical_reads"]/value)[1]', 'bigint') AS physical_reads,
the.event_data.value('(data[@name="logical_reads"]/value)[1]', 'bigint') AS logical_reads,
the.event_data.value('(data[@name="writes"]/value)[1]', 'bigint') AS writes,
the.event_data.value('(data[@name="row_count"]/value)[1]', 'bigint') AS row_count
--the.event_data.value('(data[@name="last_row_count"]/value)[1]', 'int') AS last_row_count,
--the.event_data.value('(data[@name="line_number"]/value)[1]', 'int') AS line_number,
--the.event_data.value('(data[@name="offset"]/value)[1]', 'int') AS offset,
--the.event_data.value('(data[@name="offset_end"]/value)[1]', 'int') AS offset_end,
FROM @Target_Data.nodes('//RingBufferTarget/event') AS the (event_data)
  OUTER APPLY sys.dm_exec_query_plan(
   Convert(varbinary(64),--convert to valid plan handle
          '0x' + the.event_data.value('(action[@name="plan_handle"]/value)[1]', 'nvarchar(max)')
                  ,1)) as qp
ALTER EVENT SESSION SQLStatementsExecuted ON SERVER STATE = STOP;

This gives a result in SSMS that I’ll show in full and then divide it in half so you can read it.

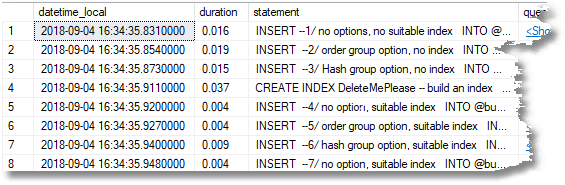
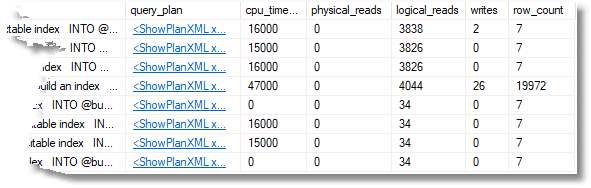
Although I’ve converted the duration from microseconds to seconds, the time is a bit misleading because it isn’t the same as the elapsed time measured from the application, and the batch duration is longer than the individual durations of the queries in the batch. However, it is proportional to the elapsed time. We can, of course, click on the query plan to see the details of execution. In this case, we have monitored only one batch, so there is only one query plan.

To get the explanations for each query visible, I put a comment into the batch as close as possible to the beginning of the query, so it showed up in the result grid.

One point that needs emphasizing is that the batch or batches that we want to be traced are marked by a string at the start of the batch. --Test the value of GROUP BY options.

--The Batch being tested starts here ---V
GO --don't change this next line without changing the WHERE clause above
--Test the value of GROUP BY options

If you leave that out, the test won’t work.

In order to filter just those batches that we wanted to report on, we had to search the start of the batch. To make the comparison, we used the rather obscure LIKE comparison sqlserver.like_i_sql_unicode_string. You can see a list of all these predicate comparisons in the GUI, or by a query like this.

List the Predicate Options

-- list predicate comparisons
SELECT p.name AS package_name, o.name AS source_name, o.object_type,
  o.description
  FROM sys.dm_xe_objects AS o
    JOIN sys.dm_xe_packages AS p
      ON o.package_guid = p.guid
  WHERE o.object_type LIKE 'pred_compare'
  ORDER BY o.object_type, source_name;

In the first example, we did just one batch. You can turn the example into several batches all with their own execution plan simply by adding

GO
--Test the value of GROUP BY options

Here is the same test with each query that you want to measure in its own batch

USE YourTestDatabase --Alter to whatever database you use. We used AdventureWorks data.
SET STATISTICS IO off
--Test the value of using the HASH | ORDER GROUP query hints
CREATE table #bucket 
  (suffix VARCHAR(10) NOT NULL, quantity INT NOT NULL);
GO
--Test the value of GROUP BY options:  First one is no options, no suitable index
INSERT --1/ no options, no suitable index
  INTO #bucket(suffix,quantity)
SELECT  
        Coalesce(p.Suffix,'(none)') , 
        Count(*) AS SuffixUsageCount
 FROM    AdventureWorks2016.Person.Person AS p
GROUP BY p.Suffix 
GO
--Test the value of GROUP BY options:  Second is order group option, no index
INSERT  --2/ order group option, no index
  INTO #bucket(suffix,quantity)
SELECT 
        Coalesce(p.Suffix,'(none)') ,
        Count(*) AS TheSuffixUsageCount
 FROM    AdventureWorks2016.Person.Person AS p
GROUP BY p.Suffix
OPTION  ( ORDER GROUP ) 
GO
--Test the value of GROUP BY options:  third is Hash group option, no index
INSERT  --3/ Hash group option, no index
  INTO #bucket(suffix,quantity)SELECT  -- hash group no index 
        Coalesce(p.Suffix,'(none)') ,
        Count(*) AS TheSuffixUsageCount
 FROM    AdventureWorks2016.Person.Person AS p
GROUP BY p.Suffix
OPTION  ( HASH group ) 
GO
CREATE INDEX DeleteMePlease -- build an index 
    ON AdventureWorks2016.person.person
    (Suffix)
GO
--Test the value of GROUP BY options:  - fourth is no option, suitable index
INSERT  --4/ no option, suitable index
  INTO #bucket(suffix,quantity)
  SELECT  -- re-execute the code
        Coalesce(p.Suffix,'(none)') , 
        Count(*) AS TheSuffixUsageCount
 FROM    AdventureWorks2016.Person.Person AS p
GROUP BY p.Suffix 
GO
--Test the value of GROUP BY options:  - fifth is order group option, suitable index
INSERT  --5/ order group option, suitable index
  INTO #bucket(suffix,quantity)
  SELECT  -- order group with index
        Coalesce(p.Suffix,'(none)') , 
        Count(*) AS TheSuffixUsageCount
 FROM    AdventureWorks2016.Person.Person AS p
GROUP BY p.Suffix
OPTION  ( ORDER GROUP ); 
GO
--Test the value of GROUP BY options:  last is hash group option, suitable index
INSERT  --6/ hash group option, suitable index
  INTO #bucket(suffix,quantity)
SELECT  -- hash group with index 
        Coalesce(p.Suffix,'(none)') ,
        Count(*) AS TheSuffixUsageCount
 FROM    AdventureWorks2016.Person.Person AS p
GROUP BY p.Suffix
OPTION  ( HASH group ); 
GO
USE AdventureWorks2016
DROP INDEX Person.Person.DeleteMePlease
USE YourTestDatabase
DROP TABLE #bucket

Notice the string --Test the value of GROUP BY options at the start of each batch. It doesn’t have to be that of course as long as you use whatever string you choose in the session event filter. Notice too that we’ve replaced the table variable with a temporary table because it is visible across batches.

I’ve written an article about using this technique with SQL Prompt snippets. This gives more details of the technique.

Tracking Troublesome Statements

Using the same SQL report, you can alter this predicate to look for a comment within a SQL statement, rather than looking at the start of a batch. I use the comment --troublesome.

IF EXISTS --if the session already exists, then delete it. We are assuming you've changed something
  (
  SELECT * FROM sys.server_event_sessions
    WHERE server_event_sessions.name = 'TroublesomeSQLStatements'
  )
  DROP EVENT SESSION TroublesomeSQLStatements ON SERVER;
GO
CREATE EVENT SESSION TroublesomeSQLStatements --call it what you wish, of course
ON SERVER
  ADD EVENT sqlserver.sql_statement_completed --we just have one event
    (ACTION (sqlserver.database_name, sqlserver.sql_text, sqlserver.plan_handle)-- and these global vars
    WHERE ([sqlserver].[like_i_sql_unicode_string]( [sqlserver].[sql_text],N'%--troublesome%'))
         --we just want this statement to be recorded and nothing else so we put an identifying string in the query
    )
  ADD TARGET package0.ring_buffer 
  --we don't need a more permanent record or a bucket count
WITH (STARTUP_STATE = OFF);
GO
ALTER EVENT SESSION TroublesomeSQLStatements ON SERVER STATE = START;

To get a report of the execution of any query that has the comment you specify, you need to change the query that fetches the XML of the target data so that the name of the session is altered.

DECLARE @Target_Data XML =
          (
          SELECT TOP 1 Cast(xet.target_data AS XML) AS targetdata
            FROM sys.dm_xe_session_targets AS xet
              INNER JOIN sys.dm_xe_sessions AS xes
                ON xes.address = xet.event_session_address
            WHERE xes.name = 'TroublesomeSQLStatements'
              AND xet.target_name = 'ring_buffer'
          );

The query that then shreds the XML will work without change.

Long-running Queries

These filters on the event can become addictive. Do you fancy tracking queries that took a long time to complete? Well, all you need to do is to change the filter to…

WHERE duration > 5000000 -- longer than 5 seconds

… or whatever you consider a long-running query, and you can track them too. You can see that all you need to alter is the name of the session and the query that gets the XML of the target data, just as we did with the troublesome queries. You might have your own notion of what constitutes an expensive query. There is likely to be a predicate that will suit you.

We can also change the event on the fly, while the session is running. This, obviously, could lead to all sorts of odd things happening if the session data was being consumed by other processes or other processes were stopping or starting the process. The advantage, though, is that you can create simple views to shred the XML and display the results. It also means that you don’t then suffer from session bloat either.

ALTER EVENT SESSION [SQLStatementsExecuted] ON SERVER 
DROP EVENT sqlserver.sql_statement_completed
ALTER EVENT SESSION [SQLStatementsExecuted] ON SERVER 
ADD EVENT sqlserver.sql_statement_completed(SET collect_statement=(1)
    ACTION(sqlserver.database_name,sqlserver.plan_handle,sqlserver.sql_text)
    WHERE duration > 5000000)
GO

Queries That Haven’t Ended

Queries can fail to end as they should for a variety of reasons. It could be, for example, that they are being blocked, that they have been timed-out by the client or have exceptionally poor performance. It could just be an error. It is useful to find out what these queries are and how long they’ve hung there.

It is also a useful introduction to the pair matching target. We’ll match sql_statement_starting and sql_statement_completed. There are a number of obvious pairs that tell us about execution, such as sp_statement, sql_batch, begin_tran, commit_tran, and sql_statement.

IF EXISTS --if the session already exists, then delete it. We are assuming you've changed something
  (
  SELECT *
    FROM sys.server_event_sessions
    WHERE server_event_sessions.name = 'UncompletedQueries'
  )
  DROP EVENT SESSION UncompletedQueries ON SERVER;
GO
CREATE EVENT SESSION UncompletedQueries
ON SERVER
  ADD EVENT sqlserver.sql_statement_completed
    (ACTION
       (
       sqlserver.session_id, sqlserver.tsql_stack, sqlserver.client_app_name,
       sqlserver.client_connection_id, sqlserver.database_name,
       sqlserver.nt_username, sqlserver.sql_text, sqlserver.username 
           --all these are useful for tracking an error
       )
    ),
  ADD EVENT sqlserver.sql_statement_starting
    (ACTION
       (
       sqlserver.session_id, sqlserver.tsql_stack, sqlserver.client_app_name,
       sqlserver.client_connection_id, sqlserver.database_name,
       sqlserver.nt_username, sqlserver.sql_text, sqlserver.username 
           --all these are useful for tracking an error
       )
    )
  ADD TARGET package0.pair_matching
    (SET begin_event = 'sqlserver.sql_statement_starting', 
             begin_matching_actions = 'sqlserver.session_id, sqlserver.tsql_stack', 
                 end_event = 'sqlserver.sql_statement_completed', 
                 end_matching_actions = 'sqlserver.session_id, sqlserver.tsql_stack', 
                 respond_to_memory_pressure = 0)
WITH (MAX_DISPATCH_LATENCY = 5 SECONDS, TRACK_CAUSALITY = ON,
STARTUP_STATE = OFF
);
ALTER EVENT SESSION UncompletedQueries ON SERVER STATE = START;

Now you can see what queries there are that are still executing or have died. Basically, all orphaned queries for which there is no matching sql_server_completed event.

DECLARE @target_data XML;
SELECT @target_data = Cast(t.target_data AS XML)
  FROM sys.dm_xe_sessions AS s
    JOIN sys.dm_xe_session_targets AS t
      ON t.event_session_address = s.address
  WHERE s.name = 'UncompletedQueries' AND t.target_name = 'pair_matching';
-- Query the XML variable to get the Target Data
SELECT CONVERT(datetime2,
        SwitchOffset(CONVERT(datetimeoffset,the.event_data.value('(@timestamp)[1]', 'datetime2')),
                DateName(TzOffset, SYSDATETIMEOFFSET()))) AS WhenStarted,
  DateDiff(SECOND, the.event_data.value('(@timestamp)[1]', 'datetime2'), GetUtcDate()) AS [RunTime(secs)],
  the.event_data.value('(action[@name="session_id"]/value)[1]', 'int') AS session_id,
  the.event_data.value('(@name)[1]', 'sysname') AS event_name,
  the.event_data.value('(data[@name="statement"]/value)[1]', 'nvarchar(max)') AS statement,
  the.event_data.value('(action[@name="client_app_name"]/value)[1]', 'varchar(80)') AS [App Name],
  the.event_data.value('(action[@name="client_connection_id"]/value)[1]', 'varchar(80)') AS connection_id,
  the.event_data.value('(action[@name="database_name"]/value)[1]', 'sysname') AS [Database],
  the.event_data.value('(action[@name="nt_username"]/value)[1]', 'sysname') AS [NT Username],
  the.event_data.value('(action[@name="sql_text"]/value)[1]', 'nvarchar(max)') AS [SQL Text],
  the.event_data.value('(action[@name="username"]/value)[1]', 'sysname') AS username,
  DateAdd(
           hh,
           DateDiff(hh, GetUtcDate(), CURRENT_TIMESTAMP),
           the.event_data.value('(@timestamp)[1]', 'datetime2')
         ) AS datetime_local
 FROM @Target_Data.nodes('//PairingTarget/event') AS the(event_data)
  --Excluding anything on this Session (like this query which is still running!).
  WHERE the.event_data.value('(action[@name="session_id"]/value)[1]', 'int') <> @@Spid
  ORDER BY WhenStarted;
Now you can try a few long queries such as…
 WAITFOR Delay '00:01:00'

… so you can see them appear and disappear.

Finding Queries That Failed to Complete Due to an Error

A lot of the orphaned queries from this event are simply those which have terminated with errors. If you still have your AllErrors session running at the same time as the UncompletedQueries queries session, you can relate the two with a SQL Inner join, because both of them track the client connection ID and the SQL Text.

--get the latest XML document for the orphans
DECLARE @Orphans XML = (SELECT Cast(t.target_data AS XML)
  FROM sys.dm_xe_sessions AS s
    JOIN sys.dm_xe_session_targets AS t
      ON t.event_session_address = s.address
  WHERE s.name = 'UncompletedQueries' AND t.target_name = 'pair_matching');
--get the latest XML document for the errors
DECLARE @Errors XML = (SELECT TOP 1 Cast(t.target_data AS XML)
 FROM sys.dm_xe_sessions AS s
    JOIN sys.dm_xe_session_targets AS t
      ON t.event_session_address = s.address
  WHERE s.name = 'AllErrors' AND t.target_name = 'ring_buffer'
  );
SELECT 
CONVERT(datetime2,
        SwitchOffset(CONVERT(datetimeoffset,Error.event_data.value('(@timestamp)[1]', 'datetime2')),
                DateName(TzOffset, SYSDATETIMEOFFSET()))) AS datetime_local,
Error.event_data.value('(data[@name="error_number"]/value)[1]', 'int') AS [Error_Number],
Error.event_data.value('(data[@name="severity"]/value)[1]', 'int') AS Severity,
Error.event_data.value('(data[@name="message"]/value)[1]', 'varchar(255)') AS [Message],
Error.event_data.value('(action[@name="username"]/value)[1]', 'varchar(255)') AS UserName,
Error.event_data.value('(action[@name="nt_username"]/value)[1]', 'varchar(255)') AS NT_Username,
Error.event_data.value('(action[@name="sql_text"]/value)[1]', 'nvarchar(max)') AS SQL_Text,
Error.event_data.value('(action[@name="database_name"]/value)[1]', 'varchar(255)') AS [Database_Name],
Error.event_data.value('(action[@name="client_connection_id"]/value)[1]', 'varchar(255)') AS client_conn,
Error.event_data.value('(action[@name="client_app_name"]/value)[1]', 'varchar(255)') AS client_app_name
FROM @Errors.nodes('//RingBufferTarget/event') AS Error(event_data)
INNER JOIN 
     @Orphans.nodes('//PairingTarget/event') AS Orphan(event_data)
ON Orphan.event_data.value('(action[@name="client_connection_id"]/value)[1]', 'varchar(80)') 
   =Error.event_data.value('(action[@name="client_connection_id"]/value)[1]', 'varchar(80)') 
AND Orphan.event_data.value('(action[@name="sql_text"]/value)[1]', 'nvarchar(max)') 
= Error.event_data.value('(action[@name="sql_text"]/value)[1]', 'nvarchar(max)')

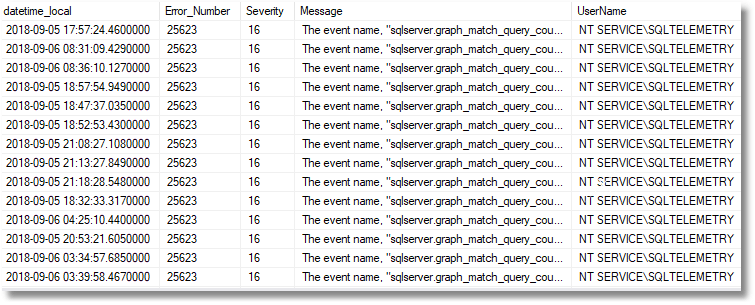
In this case, we can see that there is a SQL Telemetry task that is repeatedly retrying and failing to create the telemetry_XEvents task because of the event name, sqlserver.graph_match_query_count, is invalid, or the object could not be found. This now tells me why it is repeatedly vanishing.

Finding Queries That Failed to Complete but Had No Error

In fact, it is probably as interesting to see those that aren’t simple errors as well. I’ve left out most of the columns from the table to save space.

--get the latest XML document for the orphans
DECLARE @Orphans XML = (SELECT Cast(t.target_data AS XML)
  FROM sys.dm_xe_sessions AS s
    JOIN sys.dm_xe_session_targets AS t
      ON t.event_session_address = s.address
  WHERE s.name = 'UncompletedQueries' AND t.target_name = 'pair_matching');
--get the latest XML document for the errors
DECLARE @Errors XML = (SELECT TOP 1 Cast(t.target_data AS XML)
 FROM sys.dm_xe_sessions AS s
    JOIN sys.dm_xe_session_targets AS t
      ON t.event_session_address = s.address
  WHERE s.name = 'AllErrors' AND t.target_name = 'ring_buffer'
  );
--SELECT @Errors
SELECT 
Convert(datetime2,
        SwitchOffset(CONVERT(datetimeoffset,Orphan.event_data.value('(@timestamp)[1]', 'datetime2')),
                DateName(TzOffset, SYSDATETIMEOFFSET()))) AS datetime_local,
Orphan.event_data.value('(data[@name="statement"]/value)[1]', 'nvarchar(max)') AS statement
FROM 
 @Orphans.nodes('//PairingTarget/event') AS Orphan(event_data)
        LEFT outer JOIN 
@Errors.nodes('//RingBufferTarget/event') AS Error(event_data)
  
ON Orphan.event_data.value('(action[@name="client_connection_id"]/value)[1]', 'varchar(80)') 
   =Error.event_data.value('(action[@name="client_connection_id"]/value)[1]', 'varchar(80)') 
AND Orphan.event_data.value('(action[@name="sql_text"]/value)[1]', 'nvarchar(max)') 
= Error.event_data.value('(action[@name="sql_text"]/value)[1]', 'nvarchar(max)')
WHERE Error.event_data.value('(data[@name="error_number"]/value)[1]', 'int') IS NULL
ORDER BY Orphan.event_data.value('(@timestamp)[1]', 'datetime2')

Blocking

My final example of an event isn’t that new. It simply checks for blocked and blocking processes and allows you to see each unique blocking to spot what got blocked and what did the blocking.

It is very lightly edited from the code generated by the wizard. I just selected the sqlserver.blocked_process_report and sqlserver.xml_deadlock_report

The objective is to show each blockage together with a blocked process report, together with how long the blockage has lasted.

I’ve created two blocked processes artificially by starting a query in one window

BEGIN TRANSACTION
SELECT * FROM Adventureworks2016.person.person  WITH (TABLOCK, XLOCK, HOLDLOCK)

But not executing the…

COMMIT TRANSACTION

Then in another browser pane, I execute…

SELECT * FROM Adventureworks2016.person.person

…which is blocked by the uncommitted transaction

The events session is set up by this code

IF EXISTS --if the session already exists, then delete it. 
  (
  SELECT *
    FROM sys.server_event_sessions
    WHERE server_event_sessions.name = 'BlockedProcesses'
  )
  DROP EVENT SESSION BlockedProcesses ON SERVER;
GO
CREATE EVENT SESSION BlockedProcesses
ON SERVER
  ADD EVENT sqlserver.blocked_process_report
    (ACTION
       (
       sqlserver.client_app_name, sqlserver.client_hostname,
       sqlserver.database_name, sqlserver.sql_text
       )
    ),
  ADD EVENT sqlserver.xml_deadlock_report
    (ACTION
       (
       sqlserver.client_app_name, sqlserver.client_hostname,
       sqlserver.database_name, sqlserver.sql_text
       )
    )
  ADD TARGET package0.ring_buffer
    (SET max_events_limit = (0), max_memory = (10240))
WITH
  (
  MAX_MEMORY = 4096KB, EVENT_RETENTION_MODE = ALLOW_SINGLE_EVENT_LOSS,
  MAX_DISPATCH_LATENCY = 30 SECONDS, MAX_EVENT_SIZE = 0KB,
  MEMORY_PARTITION_MODE = NONE, TRACK_CAUSALITY = ON, STARTUP_STATE = ON
  );
GO
EXEC sys.sp_configure 'show advanced options', 1;
GO
RECONFIGURE;
GO
/* Enabled the blocked process report */
EXEC sys.sp_configure 'blocked process threshold', '20';
RECONFIGURE;
GO
/* Start the Extended Events session */
ALTER EVENT SESSION BlockedProcesses ON SERVER STATE = START;

And this can then be queried by code such as this

DECLARE @Target_Data XML =
          (
          SELECT TOP 1 Cast(xet.target_data AS XML) AS targetdata
            FROM sys.dm_xe_session_targets AS xet
              INNER JOIN sys.dm_xe_sessions AS xes
                ON xes.address = xet.event_session_address
            WHERE xes.name = 'BlockedProcesses'
              AND xet.target_name = 'ring_buffer'
          );
DECLARE @reports TABLE
  (
  DateAndTime DATETIME2,
  object_id INT,
  transaction_id INT,
  blocked_process_report XML
  );
INSERT INTO @reports (DateAndTime, object_id, transaction_id, blocked_process_report)
  SELECT CONVERT(datetime2,
        SwitchOffset(CONVERT(datetimeoffset,xed.event_data.value('(@timestamp)[1]', 'datetime2')),
                DateName(TzOffset, SYSDATETIMEOFFSET()))) AS datetime_local,
      xed.event_data.value('(data[@name="object_id"]/value)[1]', 'int') AS object_id,
      xed.event_data.value('(data[@name="transaction_id"]/value)[1]', 'int') AS transaction_id,
      xed.event_data.query('(data[@name="blocked_process"]/value/blocked-process-report)[1]') 
            AS blocked_process_report
    FROM @Target_Data.nodes('//RingBufferTarget/event') AS xed(event_data);
SELECT r.DateAndTime, DateDiff(SECOND, uniqueTransactions.first, uniqueTransactions.latest) AS Duration, r.object_id, r.transaction_id, r.blocked_process_report
  FROM @reports AS r
    INNER JOIN
      (
      SELECT Max(DateAndTime) AS latest,Min(dateAndTime)AS [first], object_id, transaction_id
        FROM @reports
        GROUP BY object_id, transaction_id
      ) AS uniqueTransactions(latest, [first], object_id, transaction_id)
      ON uniqueTransactions.latest = r.DateAndTime
     AND uniqueTransactions.object_id = r.object_id
     AND uniqueTransactions.transaction_id = r.transaction_id;
go

The blocked process report, when clicked on in the results pane, gives you all the information you need about the block.

<blocked-process-report monitorLoop="132098">
  <blocked-process>
    <process id="process1d31d207468" taskpriority="0" logused="0" waitresource="OBJECT: 6:2085582468:0 " waittime="29868" ownerId="15083861" transactionname="SELECT" lasttranstarted="2018-09-07T09:47:27.860" XDES="0x1d206071ac0" lockMode="IS" schedulerid="3" kpid="312" status="suspended" spid="54" sbid="0" ecid="0" priority="0" trancount="0" lastbatchstarted="2018-09-07T09:47:27.860" lastbatchcompleted="2018-09-07T09:47:27.857" lastattention="1900-01-01T00:00:00.857" clientapp="Microsoft SQL Server Management Studio - Query" hostname="PhilsComputer" hostpid="15904" loginname="sa" isolationlevel="read committed (2)" xactid="15083861" currentdb="1" lockTimeout="4294967295" clientoption1="671090784" clientoption2="390200">
      <executionStack>
        <frame line="1" stmtend="90" sqlhandle="0x020000005c67aa158ea1640c6784c822b2eba355f6cd6ff70000000000000000000000000000000000000000" />
      </executionStack>
      <inputbuf>
SELECT * FROM Adventureworks2016.person.person
   </inputbuf>
    </process>
  </blocked-process>
  <blocking-process>
    <process status="sleeping" spid="51" sbid="0" ecid="0" priority="0" trancount="1" lastbatchstarted="2018-09-07T09:47:16.230" lastbatchcompleted="2018-09-07T09:47:19.220" lastattention="1900-01-01T00:00:00.220" clientapp="Microsoft SQL Server Management Studio - Query" hostname=" PhilsComputer" hostpid="15904" loginname="sa" isolationlevel="read committed (2)" xactid="15083830" currentdb="1" lockTimeout="4294967295" clientoption1="671090784" clientoption2="390200">
      <executionStack />
      <inputbuf>
BEGIN TRANSACTION
SELECT * FROM Adventureworks2016.person.person  WITH (TABLOCK, XLOCK, HOLDLOCK)   </inputbuf>
    </process>
  </blocking-process>
</blocked-process-report>

Conclusion

Extended Events can unravel and analyse complex Database development problems. The problem with many of the examples available is that they are designed for people making the transition from SQL Trace, or for people who are very familiar with the SQL Server dialect of XML. This shouldn’t put you off using XEvents. I tried to keep the event sessions relatively simple and focused on a particular purpose, and I try to reuse as much as possible from successful reports. A collection of useful XEvent session scripts should be part of the toolkit of every developer.


The post Extended Events Workbench appeared first on Simple Talk.


from Simple Talk https://ift.tt/2NHYKTO
via

Wednesday, September 26, 2018

How to Linux for SQL Server DBAs — Part 2

The series so far:

  1. How to Linux for SQL Server DBAs — Part 1
  2. How to Linux for SQL Server DBAs — Part 2

Part 1 of this series covered a little history about Linux, how to set up a Docker container with Linux to utilize as a demo environment and some basic docker commands to maintain your Linux host. Part 2 is going to dig deeper into Linux to ensure you understand the power of root, logins/users and groups to then connect all of these areas to help you understand how Linux functions differently than Windows at the user level.

To log into a Linux host, you must have a login. That login may be root (aka God), but you must have a username and password or a certificate authenticating your access to log into the Linux host, or the authentication will fail. Each login is assigned a default group, which is similar to roles in a database. You can have more than one group assigned to a user login on the host and a default group is set by the administrator, commonly at the time of the user creation.

A user login is created with one of two commands:

  • adduser
  • useradd

As Linux is the descendant of decades of Unix, it’s good to know the difference and the similarities of these two commands that appear to simply switch the order of the words.

  1. Both commands will create a user login.
  2. Only one, (adduser) will ask you to interactively create a password, add a group and other pertinent information for the user.
  3. Useradd will simply create a user, and all other steps must be performed separately if not added via arguments at the time of the command.
  4. If you need to remember which one is which, remember that the one that comes first alphabetically is the one that’s interactive, requiring less manual work post the user creation.

If you have your Docker container set up, work with these commands and see the difference between them. No, you might not have to do this in real life, but then again, how many SQL DBAs have a Linux administrator on staff to set up a box properly? How many of you may be the ones to help your Windows administrator set up a Linux box properly to support your new SQL Server environment? It’s worth it to know how.

Start by opening a Command Prompt, (or you can do this from Putty or PowerShell Interface. These steps won’t be impacted like the build of the Docker container covered in the last article.)

Now it may have been a while since you worked with your docker container. You’ll need to check on the status of your container first and if it’s Exited, then start it:

The command to check your container status is:

docker ps -a

Note the name of your container under the NAMES column. In the example above, my container is named ‘kellyn.’

You can start your container with the following command:

docker start <container name>

Then check the status again- you should see in the status that it is Up and how long it’s been in that status.

Log into Your Container

A simple command gets you logged into your container and at the command line:

docker exec -it <container name> "<shell choice>"

Using my own docker container, I can offer an example:

What you see to the left of the prompt, (#) is the <user>@<container identifier>. This isn’t a standard configuration for a command prompt, but it is one I prefer and find helpful when working with multiple hosts in an environment.

Notice that no password is requested to log into your container. It may alarm you that you’re able to do this, but the docker exec command used the -it argument. This is a request to keep the standard input open and interactive and the docker container you created as root. All other users would require a password, and only you can do this.

We’ll begin with a few navigation commands to help familiarize ourselves with Linux navigation and basic commands:

Command

What it Does

Warnings or Hints

whoami

Tells you who you are logged in as

If you’re switched users, it will show you the user you ARE currently.

pwd

Directory path you currently are in

No, it’s not for password. No, don’t attempt to make an alias to try to make it a password. Bad idea.

df -h

File system, directory and storage information in appropriate size format

You can perform this same command with a -k instead of the -h if you like really big numbers to calculate from kilobytes.

ls

ls -la

ls -ltr

To list

To list all, including permissions

To list all, most recent last

Notice the differences in these commands and what DOESN’T show up when you don’t add the -a argument.

cd <directory>

cd ..

cd

Change directory

Change directory one dir up

Change directory to home dir

cd to /var/tmp, then perform the next two and see how the location changes. Note that there is a space between cd and the two dots

Profile or bash.rc file

Run commands at login to set environment variables and settings.

.bash_rc is default with .profile called secondary by the .bash_rc to perform specific settings for aliases, environment variables, and links. Best practice is to use a .profile with any additions and add that to the .bash_rc file. Home for this file is /home/<user>

id <user>

User login information

Tells basic information about a user on the Linux host. Without the <user> argument, it returns information about the current user

ps

ps -ef

Process information

Utility to report on processes running on a Linux host.

/etc

Directory containing configuration and system files

The common user would not have access to the files in this directory, and many files are protected from a DBA from even reading and most likely writing to the files. Any files owned by the database software would be given rights to the dba group.

su

sudo

Switch user

Switch user domain owner

One is a command to switch to another user. The second is a command placed in front of a second command that asks that command to be run with root privileges, similar to running “as administrator” in Windows.

Creating Users

Create a user, named jdoe1 for John Doe with the useradd command and jdoe2 for Jane Doe with the adduser command.

useradd jdoe1
adduser jdoe2

Note the difference with the useradd command for John’s user, jdoe1. After typing in the username, it’s complete. No request for a password or additional information.

For the adduser command for Jane’s user, jdoe2, I was asked for a password, to confirm the password and additional information about the user. You can use the id command to view the user:

id jdoe1
id jdoe2

Notice that the user logins look the same and note that they’ve been assigned a group that is the same as their login.

Inspect the difference with passwords. For this, you’re going to ‘pipe’ two commands together. The first is cat, (concatenate) and the second is grep, which allows you to filter information from the first data captured from the file we’ll pass to it. You’re going to use the password file and return only the rows that have information about user logins and passwords that have jdoe in them:

cat /etc/passwd | grep jdoe

Notice that jdoe1 is missing user name information, phone number, a shell, etc. The directory /home/<user name> is the user’s home directory assignment. This is their directory that includes their login settings, (aka bash profile or run commands) and often the location where they will save their personal files. Could the adduser and useradd commands create the same output results? Yes, but it would have taken numerous arguments and information at the command line vs. interactively. If you’re curious to find out more, refer to the following link.

As you can see, jdoe1 is incomplete, and you’ll need to assign much of his full profile manually.

Setting a Password

Jdoe1 will require a password, and the following command works as root to either set a password or update a password for any user:

passwd <user>

The password for the jdoe1 user is now set, and they could successfully login. It may be alright to simply set these users to having groups the same as their login, but traditionally, there will be a group, (i.e., role in the database world) that each user will be allocated to.

Creating and Setting a Group

To create a group, use the groupadd command. After creating groups, you can then assign privileges to files and directories to this group, which will then be assigned to users. It’s really not that different than roles in a database.

groupadd <group name>

Add two groups, one for the database owners and database, called sqlinstall and a second called devgroup for developers working on this ‘development box.’

groupadd sqlinstall
groupadd devgroup

You will then need to modify the user to assign a group to them with the usermod command with the -a, (add) and -G, (group) arguments:

usermod -a -G <group name> <user name>

Assign jdoe1 to the dba group, (sqlinstall) and jdoe2 to the developer group, (devgroup).

usermod -a -G sqlinstall jdoe1
usermod -a -G devgroup jdoe2

How do the users look now that their groups have been updated? Run the id command to find out.

id jdoe2
id jdoe1

You can now see the groups have been added, but what if you didn’t want the users to have groups with their name and what if you wanted the devgroup and sqlinstall groups to be their primary groups? You’ll then need to modify the user and add the group to the user configuration:

usermod -g devgroup jdoe2
usermod -g sqlinstall jdoe1

Inspect the user with the id utility again:

id jdoe2

Now the user shows as only having the devgroup as the primary and the devgroup ID assigned to it. If you wanted to add more groups to this user, just as you saw previously, you could do that, but now the user’s login is set up as a proper manager of the database installation, (sqlinstall) as jdoe1. And jdoe2 is in the development group, (devgroup).

One thing you may be asking yourself is about the identifiers assigned to each user and group. The Linux kernel identifies not by name, but by ID. The Root user is ALWAYS 0. All users added after that are added from 1001 on, but as an Oracle DBA, it’s standard to have Oracle as 503 with the orainstall group being 504 in most organizations. Why is this? It was around 2006 that Oracle became a standard in the Unix world, and it became common for the creation to be the third login, fourth login for the group created at a time that it started with 501. As new systems were added, and legacy systems were still in place, it became a common UID to see for Oracle. The reason for keeping it the same across hosts is each host recognizes the synchronized login as the same user by the identifier. Using the same usermod command you used earlier, the UID can be updated for a user, and the groupadd command can do the same to synchronize the groups to ensure this is consistent across a network that may require it. This may be valuable to know as MSSQL logins are created to own SQL Server software across hosts on a network and need to identify the user as the same login for remote access, etc.

Being God Isn’t Good

Let’s begin with discussing WHY it’s not a good idea to be root on a Linux host unless absolutely necessary to perform a specific task. Ask any DBA for DB Owner or SA privileges, and you will most likely receive an absolute “No” for the response. DBAs need to have the same respect for the host their database runs on. Windows hosts have significantly hardened user security by introducing enhancements and unique application users to enforce similar standards at the enterprise server level, and Linux has always been this way. To be perfectly blunt, the Docker image with SQL Server running as root is a choice that shows lacking investigation to what privileges are REQUIRED to run, manage and support an enterprise database. This is not how we’d want to implement it for customer use.

Unlike a Windows OS, the Linux kernel is exposed to the OS layer. There isn’t a registry that requires a reboot or has a safety mechanism to refuse deletion or write to files secured by the registry or library files. Linux ASSUMED if you are root or if you have permissions to a file/directory, you KNOW what you’re doing. Due to this, it’s even more important to have the least amount of privileges to perform any task required.

Proper deployment would have a unique MSSQL Linux login owning the SQL Server installation and a DBAGroup as the group vs. the current configuration of ROOT:ROOT owning everything. With all the enhancements to security, this is one area that as DBAs, we should request to have adhered to. Our databases should run as a unique user owning the bin files and database processes.

Processes running as root aren’t logged or audited the same way as it would be if you used commands to switch over or ran with the SUDO, (switch user domain owner) command. All users logging into a Linux host should have their own login and then switch user (su) over so that it is a fully logged and audited step in the system log files. As you further enhance your environment design, you should then consider utilizing more advanced features, such as stick bit, iptables, SGID and advance group creation and allocation whenever required.

Never as Root

If you’re still unsure why this is such a sticking point, consider the following example to assist in demonstrating the risks. With the SQL Server and all support files owned by root, our example will load data via Excel spreadsheets as part of the workload. A hacker has discovered this and builds malware to attach to the Excel spreadsheet, and as the files are owned by the same owner as SQL Server, the malware is able to take advantage of the vulnerability, and subsequently running scripts on the host as root. If SQL Server had been installed as the OS user MSSQL, with limited privileges and proper group affiliation, this type of attack would be isolated, and impact lessened, along with clear logging of who/what/when of the attack.

Linux administrators will consistently demand you justify why you need to run anything as root.  No matter if it’s access to update files, run scripts, modify applications or execute system tasks to any directory or non-owned location on the host. By having a proper user/group configuration, your database server will:

  1. have the ability to track via an audit who has switched over to any user or to super user.
  2. be more likely to eliminate human mistakes by executing catastrophic commands, often unintentionally.
  3. simplify identifying what processes are part of an application stack
  4. provide a second layer of security that could save the company from becoming the next security breach.
  5. limit the amount of data the application/any user is privy to on the host.

Create a proper MSSQL OS User on Linux and create a DBA and SQLINSTALL group.  As Microsoft matures its SQL Server offering on Linux, features are going to increase and be enhanced.  Microsoft will embrace mature practices, so get ahead of the game and start now, building proper security from the beginning.

Connecting to SQL Server

For our last step, we’ll learn how to log into the SQL Server on our container. The assumption is that you’re connected to the container at the command line, and you’re at the command prompt, (username@hostname#). The environment isn’t set up as optimally as we’d like yet, so we’ll need to use the full path to the SQLCMD tool to log into SQL Server. To do so, type in the following command:

<path to sql command> -S localhost -U <Username> -P '<password>'

As an example:

/opt/mssql-tools/bin/sqlcmd -S localhost -U SA -P 'T3st1ng!'

If you’re thinking to yourself, “I don’t remember setting a password!” look back on your command that you used to create your container with. There was an argument for MSSQL_SA_PASSWORD=. The value for this argument is your password that was set for the SA login for your SQL Server. If you need to reset the password to a new password or to one that meets requirements for the SA password, then use the following command:

opt/mssql-tools/bin/sqlcmd -S localhost -U SA -P "<old password>" -Q "ALTER LOGIN SA WITH PASSWORD='<NewPassword>'"

There is a second way to log into the container, including from a remote location, (if the container has been configured to allow remote connections) through the following command, which again, should look familiar, but with just a few differences when concerning a container environment:

<path to sql command> -S <ip address,port> -U <username> -P  '<password> '

Capture the IP Address for your container with the following command:

ifconfig -a | grep inet

Once you have the container IP address, connect to your own container, using the following example as a guide:

opt/mssql-tools/bin/sqlcmd -S 172.17.0.5,1433 -U SA -P 'T3st1ng!'

Notice that there is a ‘,’ between the host IP and the port for the SQL Server. That’s the only change required and everything else is the same. You should see the 1> prompt, prepared for you to execute SQL. To verify, type in the following statement to check the SQL Server version:

1> select @@version
2> go

You should see the following output or similar, (if you have a different version for your image):

Conclusion

Congratulations — in the previous two articles, you’ve successfully built out, updated, maintained and set up logins on your SQL Server environment. All these steps are important as you build out your foundation of knowledge by working with SQL Server on Linux. As a database administrator, you should continue to practice what we’ve covered to build your comfort level with the operating system. Part II ended with how to log into the SQL Server from the command prompt so you may explore the database you already know and love, experiencing it on this new platform. In part III, you’ll be ready to move onto files, navigation, and permissions, an important aspect to knowing the Linux environment.

The post How to Linux for SQL Server DBAs — Part 2 appeared first on Simple Talk.


from Simple Talk https://ift.tt/2OT1ZEK
via

Creating Machine Learning Applications using Azure Cognitive Services

You may have come across some of the popular buzzwords going around in the field of computer science such as machine learning and artificial intelligence (AI). As the world of computing is progressing, humans are now prone to delegate many of their tasks to machines. Machine learning and AI are making computers perform tasks that human intelligence can do. In this article, I am going to give you a brief introduction to machine learning and then we will take a deep dive into Azure Cognitive Services. I will also introduce you to the list of Cognitive Services APIs that can be used to solve business problems. To understand how these APIs can be used to build client .NET applications, we will create an intelligent application that will analyze the user text input and provide the Sentiment Analysis using Text Analytics API. Without further delay let’s move on and start our journey into the world of Cognitive Services.

What is Machine Learning (ML)?

As per Arthur Samuel, one of the pioneers of ML “Machine Learning is the field of study that gives computers the ability to learn without being explicitly programmed.” You want computers and applications to learn this without explicitly programming all the possibilities. Machine learning is used in many applications these days, in fact, you are using Machine learning on a daily basis through a smartwatch or smart devices. Let me introduce you to the main components of machine learning.

  • Training Data: Machine learning is used to analyze the data. This data contains the patterns which determine the goodness and badness of an entity. The training data must always contain the correct answer that you want to predict. For instance, if you think from a text analytics perspective, you will have to know which word pattern falls in a positive connotation and which ones fall under negative pattern. The machine learning algorithm finds the patterns in training data, further analyzes it, and maps these attributes to the correct answers or output.
  • Learning Algorithm: Learning algorithms find the patterns in the training data that maps the user inputs to the correct answers. This process is called ‘training.’ After it has found the models, it can then create a training model.
  • Training Model: The model can be considered as an output of the training process. During the training process, the algorithm analyzes the inputs and training data. Further, it generates a function that maps input to desired outputs. These will be fed to the training model which can recognize the correct patterns. After the model is trained, it is further exposed to the client applications which can send the data to the model and then get the desired response /recognized pattern as the output. The entire training process remains as a black box to the user, and just the trained model is exposed to the outside applications.

The diagram below shows the components and process involved in machine learning

C:\Users\spande\AppData\Local\Microsoft\Windows\INetCache\Content.Word\AML44.png

Figure: Machine learning Overview Diagram

What are Azure Cognitive Services?

You probably realize that machine learning is very useful. It can be used it to make applications more intelligent because it helps us to detect patterns in the input provided. You will have to create the patterns and create an algorithm to detect these patterns to end up with the machine learning model. Developing the model through the training process is a very tedious and tough job. Azure Cognitive Services can provide big-time savings by determining the patterns and tedious algorithm and training the data. Azure Cognitive Services are REST APIs that expose a machine learning model to the outside world. Your application can just consume the Cognitive Service API methods to get the desired output.

C:\Users\spande\AppData\Local\Microsoft\Windows\INetCache\Content.Word\AMI1.jpg

Figure: Azure Cognitive Services

The Benefits of Azure Cognitive Services

  • Ready-made machine learning models that your applications can consume using REST APIs
  • No need to gather the training data, create a learning algorithm, or train the model. Everything is taken care of by Microsoft.
  • These APIs are hosted in the Azure Cloud which makes them easily accessible and scalable. Because Cognitive Services come under your Azure subscription, they can easily be consumed on pay per use basis.
  • Many available APIs to solve the business problems.

Now let’s move our focus to the various APIs provided by Azure Cognitive Services. You can imagine the Cognitive Services as multiple APIs that are programmed to do specific tasks. Cognitive Services are mainly divided into 5 different categories, and they are further divided into function-specific regular APIs. In addition to regular the APIs, they also have Custom Services. Custom services use your data instead of Microsoft data patterns. So, you can design your own model based on your based on what specifications you need.

List of Cognitive Services

  • Vision (Service for Analyzing Videos & Images)
    • Computer Vision- Mainly Analyzes image and recognizes the scene and activity in an image.
    • Face – Detect faces and emotion in an image.
    • Content Moderator – To check for offensive content in an image or video. Used to allow or block some specific content in an image or video.
    • Video Indexer – Analyze video content and extract the text spoken in video or detect other objects in a video.
    • Custom Vision – Used for customized image recognition where a programmer can tune the data as needed.
  • Speech (Services for Speech Synthesis & Voice Recognition)
    • Speech to Text – Recognizes speech and converts it into text.
    • Text to Speech – Converts text into speech
    • Speaker Recognition API – It identifies speaker based on their speech.
    • Speech Translation – It recognizes the speech and translates into a different language.
    • Custom Speech – Used for building customized speech recognition model.
  • Language (Services to Process Natural Language)
    • Bing Spell Check – It can detect and correct spelling mistakes
    • Content Moderator – To check for offensive content in the text. This is one of the features from Custom Moderator specified in Vision services.
    • Translator Text – Automatically detects the language and translates it into the customizable language.
    • Text Analytics – Extracts and recognizes sentiments from User Input.
    • Language Understanding Service – You can this of this as a Custom API for Language Category. This consists of your data, and you train the model by feeding it the meaning of the data. This will help our application to understand the meaning of what a speaker is saying.
  • Knowledge (Services for making Intelligent Recommendations)
    • QnA Maker – Process text into question and answers. It can be used by bots to respond back with knowledgeable answers.
    • Custom Decision – Uses your data and learns the way of making the correct decision with every usage.
  • Search (Services helping to search the stuff)
    • Bing Autosuggest – Suggest search terms and help autocomplete the search query.
    • Bing News Search – Search specifically in the news section.
    • Bing Web Search – Search in the web section for the provided input values.
    • Bing Entity Search – Identify the entity types such as people or places mentioned in the input and return the results.
    • Bing Image Search – Searches for images that match the phrase in the input.
    • Bing Video Search – Searches for videos that match the phrase in the input.
    • Bing Custom Search API – You can customize the search area where you want to search and get the results for your input.

Besides all these services, there are many more services that will be added in the future. They are present in Cognitive Services Labs which are available here. These are not included currently in the production services. These services might still be in construction and may be added to the regular services in the near future,

By now, I assume that you understand the basics of Cognitive Services. The next thing that I want to focus your attention on is how to leverage these Cognitive Services APIs in client applications. For this, I will show you how to a C# application and use the Text Analytics API to analyze the sentiments of the input text. Before building this client application, here is an overview of the Text Analytics API.

Text Analytics API

The Text Analytics API is one of the services present in the Language Category of Cognitive Services. It provides the advanced natural language processing for the text input. The main functions included in Text Analytics APIs are sentiment analysis, key phrase extraction, language detection, and entity linking. Let’s just briefly go over these functions:

  • Sentiment Analysis: This feature is mainly used to analyze the positive or negative information from the text. Once the user sends the input text, the sentiment analysis returns a numeric value between 0 and 1 depending on the information/text provided. For instance, if the input is “I am very happy” the sentiment Analysis output will be very close to 1. However, if the input is “I don’t like going to the circus,” will return value close to 0 which indicates the negative sentiments.
  • Key-Phrase Extraction: This feature extracts the keywords form the input which in turn may help in finding results for sentiment analysis.
  • Language Detection: This detects the language of the input text. There are 120 languages supported.
  • Entity Linking (Preview): This feature is available currently as a preview version which will soon be released as a regular feature. Entity linking maps the words from your text to additional information on the web. For example, in an input “We had an awesome view of Golden Gate when we visited San Francisco” San Francisco is an entity which is linked to the Golden Gate entity. This improves the overall user experience and correctness of the results. You will understand it better when we go through an example.

To see this in action, run a demo of Text Analytics APIs through the Microsoft Azure Portal. When you are on the webpage, you will notice that there are few samples available for the demo purposes with the English or Spanish Language. For demo purposes, enter this text “We had an awesome view of Golden Gate when we visited San Francisco.”

C:\Users\spande\AppData\Local\Microsoft\Windows\INetCache\Content.Word\AML21.png

Once you click Analyze, the analysis results will be displayed on the right-side section of the webpage. As you can see, that for this input text, the APIs detected that it’s the English Language, Through the key phrases, it has come to the conclusion that the input has a positive sentiment index of 0.95. Another thing to notice is that entities such as Golden Gate and San Francisco are linked appropriately through the Linked Entities feature.

C:\Users\spande\AppData\Local\Microsoft\Windows\INetCache\Content.Word\AML22.png

By now, you probably see how efficient Cognitive Services are. Now it’s time to try running Text Analytics APIs through a .NET client application.

Building the C# Client Application Using Text Analytics API (Sentiment Analysis)

The first step to begin working on Text Analytics API is setting up the Cognitive Services in Azure, and for this, you would need a subscription to the Azure Portal.

After you have logged in, locate Cognitive Services by going to the All Services tab shown in the screenshot below. After you are on the All services page, scroll down to the AI + Machine Learning Section and then select Cognitive Services.

Once you have selected Cognitive services, a page will open where you can add a new Text Analytics Service. Click on the Add button and then, to be sure that you are subscribing to the correct service, search for the keywords Text Analytics.

Now select the Text Analytics service that is shown in the previous screenshot. After selection, you will see all the details about the service. It shows that this service supports Sentiment analysis, Key phrase extraction, and Language detection which confirms that this is the exact service that we are looking for. Just click Create to get the ball rolling.

To create the service, provide the necessary details in the form. For the Pricing tier, you can click on View full pricing details, and you will be provided with all the relevant options you can make according to the requirements and usage of your project. I have selected the free F0 tier that serves my purpose for a demo application. I selected West US for the Region.

Note: There seems to be an issue happening on Text Analytics services on South Central and East US. If the Text Analytics service in your region does not work, try recreating the service in the West US region.

C:\Users\spande\AppData\Local\Microsoft\Windows\INetCache\Content.Word\A5TextAnalyticsCreateNew.jpg

Once you click Create, Azure will do all the necessary deployments and set up a service for you. Go back to the Cognitive services page where you can search for your cognitive service that was just created.

C:\Users\spande\AppData\Local\Microsoft\Windows\INetCache\Content.Word\A5TextAnalyticsCreated.jpg

Creating the Project

To demonstrate sentiment analysis from the Text Analytics API, create a simple console application. This application will feed in the text and send it to the service to retrieve the sentiment index.

Create a Console App (.NET Framework) in C# and name it DemoCognitiveTextApp.

Adding NuGet Packages for Text Analytics API

After you have successfully created the project, go to the Solution Explorer tab and right click on References/ Select Manage NuGet Packages. Add the Text API .NET SDK packages which will install all the necessary DLLs to talk to Azure Cognitive Services.

You will need to Browse for the correct package and look for the keyword Microsoft.Projectoxford.Text. Then just install the correct version of the package suitable for your .NET version.

After the installation, you will notice that a reference is added to your project.

C:\Users\spande\AppData\Local\Microsoft\Windows\INetCache\Content.Word\A5PackageInstalled.jpg

Now that the Text API package reference is added to the project, you will need to get the API keys that are needed in the project. Go to Solution Explorer and open the app.config file to create a new key. You will need to grab the keys for your Text Analytics API from Azure portal.

C:\Users\spande\AppData\Local\Microsoft\Windows\INetCache\Content.Word\A5TexKeys.jpg

The app.config should look like this

<?xml version="1.0" encoding="utf-8" ?>
<configuration>
    <appSettings>
      <add key="TextAPIKey" value="your key"/>
        
    </appSettings>
    <startup> 
        <supportedRuntime version="v4.0" sku=".NETFramework,Version=v4.6.1" />
    </startup>
</configuration>

Also, to read these keys, you will have to add System.Configuration as a reference to your project. Go to Solution Explorer, right-click References => Add New Reference. Click on Frameworks and select System.Configuration.

Create a Sentiment Document

To demonstrate Sentiment Analysis using Text API, add a new class file TestAnalysis.cs to the project. This class has the RunSentimentAnalysis( string language, string id, string input) method which takes three parameters. You might be wondering what the three parameters are used for. The answer to this is for creating the requested document. The important thing that you need to keep in mind here is that all the Text API requests take some form of document Array. In the case of Sentiment Analysis, the document is made up of three properties: Language, Text, and ID.

  • Language: This tells what the language of the text is. This is default set to “en” English.
  • Text: The actual text that needs to be analyzed, in our example use provides it through the Console Window.
  • ID: This is a unique random value. The application will use a GUID for this.

The document object is in JSON format with these three properties.

{
    "Documents":[
            {
                "language" : "en",
                "id"    : "1",
                "text"  : "I am very happy today"
            }
    ]
}

Creating a SentimentDocument object will use this code:

var doc = new SentimentDocument()
            {
                Id = id,
                Text = input,
                Language = language
            };

This document will need to be added to the sentiment request that will be passed on to the Text Analytics API. For adding the document, you will use the code below:

sentimentRequest.Documents.Add(doc);

Create the Sentiment Client:

For talking successfully with text APIs, you need to create a client using the API keys that you have placed in the app.config file. The below code below will create a sentiment client which will be used to make all relevant API calls.

var sentimentClient = new SentimentClient(apiKey);

Sending Over the Sentiment Request and Getting the Response Back:

The code uses a SentimentClient object to make a call to the Text API, uses the GetSentimentAsync(sentimentRequest) method to make an API call. after the text is processed, the response will be returned in the response document. This document will have the Sentiment Analysis Score. According to Microsoft documentation, “Text Analytics API returns a numeric score between 0 and 1 along with the sentiment string from the text. Scores close to 1 indicate positive sentiment and scores close to 0 indicate negative sentiment. Sentiment score is generated using classification techniques. The input features of the classifier include n-grams, features generated from part-of-speech tags, and word embeddings.” Cognitive services are under constant improvements. You might see more new features being added to these services regularly.

Here is the complete code for the TextAnalysis.cs file

using System;
using System.Collections.Generic;
using System.Configuration;
using System.Linq;
using System.Text;
using System.Threading.Tasks;
using Microsoft.ProjectOxford.Text.KeyPhrase;
using Microsoft.ProjectOxford.Text.Sentiment;
namespace DemoCognitiveTextApp
{
    public class TextAnalysis
    {
        static readonly string apiKey = ConfigurationManager.AppSettings["TextAPIKey"];
        public static async Task RunSentimentAnalysis( string language, string id, string input)
        {
            //Prepare document object
            var doc = new SentimentDocument()
            {
                Id = id,
                Text = input,
                Language = language
            };
            //get the client and request handler
            var sentimentClient = new SentimentClient(apiKey);
            var sentimentRequest = new SentimentRequest();
            //Add document to the request
            sentimentRequest.Documents.Add(doc);
            
            try
            {
                //call Azure service for sentiment analysis on given text
                var response =await sentimentClient.GetSentimentAsync(sentimentRequest);
                Console.WriteLine("**Sentiment Analysis Results** ");
                //get the response document
                foreach (var resdoc in response.Documents)
                {
                    Console.WriteLine();
                    Console.WriteLine("Sentiment Score: {0}", (resdoc.Score));
                    Console.WriteLine();
                    Console.WriteLine("Sentiment Score in Percentage: {0}", (resdoc.Score * 100));
                }
            }
            catch (Exception ex)
            {
                Console.WriteLine(ex.Message);
            }
        }
    }
}

Here is Program.cs file

The Program.cs file asks for the user’s input, and it has a call to a method in the TextAnalysis.cs class. Here is the code for Program.cs file:

using System;
namespace DemoCognitiveTextApp
{
    class Program
    {
        static void Main(string[] args)
        {
            //ask for input text
            Console.WriteLine("Provide the Text: ");
            string input = Console.ReadLine();
            //generate guid
            string id = Guid.NewGuid().ToString();
            //run the sentiment analysis for input value
            TextAnalysis.RunSentimentAnalysis("en", id, input).Wait();
            Console.WriteLine();
            Console.Write("Press any key to continue...");
            Console.ReadKey(true);
            Console.Clear();
        }
    }
}

Results After Running the Application

Positive Text: As you can see the text with positive meaning has a value close to 1 or 100%.

Negative Text: For the negative text the value is farther lesser than 1.

Similar to Sentiment Analysis, you can write code for Key Phrase Analysis and Language Detection. By now you probably understand that you can easily set up your environment for the Cognitive Services APIs and use them effectively in your client applications.

Usage in the Real World

Now that you have a feel for Text Analytics in action, there are many real-world scenarios where Text Analytics are very effective, and it really helps to solve real-world problems. It can reduce manual work to a large extent and can do wonders in analyzing the data quickly. Because of the heavy adoption of social media, it is easy to get to know directly from the customers what they feel about your product. Text Analytics would be very helpful in this scenario. Text Analytics can be run on the product reviews from any social media sites such as Twitter, Facebook or E-Commerce sites. This will help you to understand people’s opinions about the product. You can write an application that can scan through social media feeds, look for keywords, detect the language, and perform sentiment analysis. Text analytics can also help analyze surveys to gain feedback about your product.

Conclusion

After reading this article, you should understand some of the core concepts involved in machine learning and how you can use Azure Cognitive Services to leverage its prebuilt services and customizable features to build intelligent and analytical client applications.

References

https://azure.microsoft.com/en-us/services/cognitive-services/

https://labs.cognitive.microsoft.com/

https://azure.microsoft.com/en-us/services/cognitive-services/text-analytics/

The post Creating Machine Learning Applications using Azure Cognitive Services appeared first on Simple Talk.


from Simple Talk https://ift.tt/2R3tmNw
via

Getting Started with CQRS – Part 1

Most developers are used to creating and handling CRUD (create, read, update, delete) systems for operations that divide tasks into updating and searching for data. When it comes to the problems this kind of well-known practice causes when considering the huge number of different frameworks, solutions, and infrastructural issues that arise every day, the life of those same developers can get tricky.

One of the main concerns regarding this is the increasing number of representations that your models can have when the application must serve more and more clients. Most of the time, the architectural design of the applications is made in the common CRUD-like way, that is, a single database (whether it is relational or not) that’ll both store and serve as the querying center of all requirements.

That concern about aligning these worlds every time a new microservice is born, for example, ties the developer’s hands to create each side in a more specialized manner when it comes to performance issues, object model complexities, resilience, and scalability independence, etc.

The term CQRS, (Command Query Responsibility Segregation) is based on the famous CQS idea. It is the closest architecture available to split these responsibilities to accomplish more and simplify the design. It’s all about separating things, especially if they’re very different conceptually when it comes to reading and updating models.

The pattern basically divides into two categories:

  • Queries: get the information only, and never change anything within the model;
  • Commands: that’s when you perform the writes, updates, and deletes (along with all the logic’s complexities inherent to the business rules).

Figure 1 illustrates how this communication usually happens. Notice, specifically, the event sync in white that’ll take the written model data and send it asynchronously to another module in order to save the same data to the materialized view (NoSQL database, in this case).

Figure 1. CQRS architectural representation.

CQRS goes a bit further allowing you to have both worlds deployed and working structurally and physically separated from each other, even on different hardware, cloud, etc. There’s a lot of flexibility here since you can define your own toolset, along with event-driven and message-driven architectures, DDD, etc. to make it more dynamic depending on your reality.

In this series, you’ll learn how to create and gradually enhance one basic CQRS-like application, created upon ASP.NET Core. It consists of a Web API, a REST web service that will deal with customers data in a CRUD fashion, however, sending each of the commands to its respective handler. Then, you can decide where to manage the data flows: whether it is on the command or query’s database/datastore.

In this first part of the article, you’ll get started with the project setups. The project relies on a REST-like application that handles customer information (basically user’s data and a list of phones) to demonstrate how a single model lives within a CQRS structure.

Setting up the environment

The first thing you must install is the latest version of Visual Studio (the Community edition is good to go). For this article, Visual Studio 2017 is the chosen version, since it is the latest. The prerequisites consist of two workloads:

  • ASP.NET and web development;
  • .NET Core cross-platform development.

Also, make sure that the .NET Core SDK (latest version) is properly installed on your machine.

If you have already installed VS, you can change the IDE setup by launching the installer, running it again, and selecting the proper workloads.

Setting up SQLite

SQLite is used as the relational database to store the customer’s data – the ‘write’ side of the project. First, go to the download page of DB Browser (a famous GUI tool to manage the SQLite databases) and install it.

Setting up MongoDB

For the querying side of the model, we’ll use MongoDB as the database. First of all, you need to download and install it on your Windows machine. Follow the default installation steps and don’t forget to keep the option that installs MongoDB Compass (the default GUI for MongoDB) as well. Once it’s finished, open Compass and create a new database with the Figure 2 configurations.

Figure 2. Configuring MongoDB new database.

Setting up RabbitMQ

RabbitMQ is going to be the default message broker to the Event processing side of the CQRS model. You can pick up another broker that you feel more comfortable with, just be sure to keep the same (similar) configurations. For this, go to the installation page, and following the instructions to install and sets it up.

Additionally, don’t forget to install the Erlang dependency for Windows. Once the installer finishes the process, RabbitMQ will be a Windows service that starts up along with your machine, through its default configurations: guest as both user and password. To access the administration page, just go to http://localhost:15672/ in your browser (Figure 3).

Figure 3. RabbitMQ administration page.

In case this page doesn’t show up the first time, you can force the RabbitMQ Management plugin to restart. For this, go to the RabbitMQ installation \sbin folder and run the following command:

rabbitmq-plugins.bat enable rabbitmq_management

Figure 4 goes back step by step. Then, restart your computer and try to access the URL again.

Figure 4. Enabling RabbitMQ Management plugin.

Creating the Project

Create a new Web Application project by going to File > New > Project. Then, select the template ASP.NET Core Web Application and name it as CustomerApi (Figure 5).

Figure 5. Creating a new ASP.NET Core Web Application.

You’ll be prompted to select a template for your Web Application, like that shown in Figure 6. Since the application just needs to expose endpoints for the tests, you can select the API option and, if you wish to deploy your application on a local Docker container, you can select the Enable Docker Support. Remember that this option will require you to have Docker previously installed on your computer. 

Figure 6. Selecting the application template.

Note: You can download the completed project from the link at the bottom of the article.


Next, you need to add the Entity Framework dependencies to your NuGet dependencies, specifically the one that refers to the SQLite integration. For this, go to menu View > Other Windows > Package Manager Console and run the following commands:

install-package Microsoft.EntityFrameworkCore
install-package Microsoft.EntityFrameworkCore.Sqlite
install-package Microsoft.EntityFrameworkCore.Tools.DotNet

Then, do the same to the Extensions.Configuration in order to enable the binding of our objects based on predefined key-value pairs; as well as the ASP.NET Core package:

install-package Microsoft.Extensions.Configuration
install-package Microsoft.Extensions.Configuration.Json
install-package Microsoft.AspNetCore.All

Next, add the MongoDB C# Driver dependency to your NuGet dependencies going again to View > Other Windows > Package Manager Console and running the following command:

install-package mongocsharpdriver

Finally, let’s config the Web API project to have the RabbitMQ Client (once we need it to post and consume messages) installed as a NuGet dependency going once more to the Package Manager Console and issuing the command:

install-package RabbitMQ.Client

At the end of all these setups, you’ll have the same NuGet Dependencies structure as shown in Figure 7.

Figure 7. Final NuGet Dependencies tree.

Let’s get started with the project configurations letting it know how to interpret the initial launching and app settings. By default, the files launchSettings.json (which defines the rules for the ISS server, build, profiling, etc.) and appsettings.json (which is responsible for defining the settings in app scope like database connections, amqp, etc.) are created to enable your project configuration customization.

Take a look at the following code listing, starting by the launchSettings.json file found in the Properties folder. Make a note of the original ports in your file. Change it according to this code and add the original HTTP port back:

{
        "iisSettings": {
                "windowsAuthentication": false,
                "anonymousAuthentication": true,
                "iisExpress": {
                        "applicationUrl": "http://localhost:58751/",
                        "sslPort": 0
                }
        },
        "buildOptions": {
                "emitEntryPoint": true,
                "preserveCompilationContext": true,
                "copyToOutput": {
                        "include": [ "appsettings.json" ]
                }
        },
        "profiles": {
                "IIS Express": {
                        "commandName": "IISExpress",
                        "launchBrowser": true,
                        "launchUrl": "api/customers",
                        "environmentVariables": {
                                "ASPNETCORE_ENVIRONMENT": "Development"
                        }
                },
                "CustomerApi": {
                        "commandName": "Project",
                        "launchBrowser": true,
                        "launchUrl": "api/customers",
                        "environmentVariables": {
                                "ASPNETCORE_ENVIRONMENT": "Development"
                        },
                        "applicationUrl": "http://localhost:58752/"
                }
        }
}

Notice too that we have two ISS configurations in the file:

  • The first defined in a global ISS server scope, for you to access as a Windows service deployed every time you run the application. This way, it’s not necessary to be in debug mode to access the application;
  • The second is focused on the development process itself, that is, VS starts the app in a different port in order to allow you to debug the app on that address:port.

The second file, appsettings.json, must be changed to the following:

{
  "Logging": {
    "IncludeScopes": false,
    "LogLevel": {
      "Default": "Debug",
      "System": "Information",
      "Microsoft": "Information"
    }
  },
  "ConnectionStrings": {
    "DefaultConnection": "Filename=./customer_db.db"
  },
  "amqp": {
    "username": "guest",
    "password": "guest",
    "hostname": "localhost",
    "uri": "amqp://localhost:5672/",
    "virtualhost": "/"
  }
}

Some configurations are familiar and come within the file when it is created by VS, like the Debug, Console and Logging settings. Here, we’ve added a few others, like:

  • ConnectionStrings: The default connection configuration for your SQLite database (you’ll see how to create the file customer_db.db further in the article);
  • amqp: Default settings for the RabbitMQ connection. Here, no vhost was created to evict greater complexities. The rest are just the default key:values pairs of the broker (pay attention to change this to your broker or own properties if they’re not the default ones). Note that the configs, including the port, are the defaults for RabbitMQ. If you have installed it with different properties, so change them here too.

Plus, once you’re running this example in a local development environment, make sure to copy the same properties to the file appsettings.Development.json.

SQLite Integration

Once all the environment frameworks and tools are configured, let’s move on to the model definitions. We’ll start by creating the C# class of our Repositories and Entities since these integrations require some work regarding their complexities until we have all of them properly working along with the ASP.NET project.

Before going to the classes creation, you need to create the database file. SQLite was chosen as the CQRS relational database because it is serverless (unlike many other databases, it doesn’t need the common client/server architecture), that is, it works inside the applications, allowing the reads and writes directly from the file that represents the database itself. It’s perfect for test and quality assurance environments, so we’ll pick it up in order to evict complexity increasing.

So, first, open the DB Browser for SQLite, click on New Database, navigate to the root folder of the CustomerApi project and save this connection there with the name of customer_db.db. Leave the database empty for now.

Get back to the project and create a new project folder called Models. Then, another called SQLite under Models. This is to keep the files of each repository approach separated (since we’re not creating an independent project for each solution). And finally, create three new files called CustomerRecord.cs, PhoneRecord.cs and PhoneType.cs. They must have the following contents:

CustomerRecord.cs

using System.Collections.Generic;
namespace CustomerApi.Models.SQLite
{
        public class CustomerRecord
    {
                public long Id { get; set; }
                public string Email { get; set; }
                public string Name { get; set; }
                public int Age { get; set; }
                public List<PhoneRecord> Phones { get; set; }
        }
}

PhoneRecord.cs

namespace CustomerApi.Models.SQLite
{
        public class PhoneRecord
    {
                public long Id { get; set; }
                public PhoneType Type { get; set; }
                public int AreaCode { get; set; }
                public int Number { get; set; }
        }
}

PhoneType.cs

namespace CustomerApi.Models.SQLite
{
        public enum PhoneType
        {
                        HOMEPHONE, CELLPHONE, WORKPHONE
        }
}

The structure is lean: some simple attributes and a list phones represented by the second record entity. This one, specifically, needs to have the back-relation to the customer defined in order for the Entity Framework migration feature be able to understand and create the proper relationship between them.

The Entity Framework First Migration is a feature that allows you to migrate the structure of your Entities models to the original database. Once you’ve defined the model classes, Entity Framework will be able, through this feature, to read the entities structure metadata and execute the corresponding scripts to create the tables, columns, etc. in the final datastore.

To use this, go to the project root folder and edit the file CustomerApi.csproj. Search for the tag <ItemGroup> and add the following item to it:

<DotNetCliToolReference Include=”Microsoft.EntityFrameworkCore.Tools.DotNet” Version=”2.0.2″ />

Restart your IDE. Now, you need to create the database context that’ll command the rules of the migration. In the Models/SQLite folder, create a new class and name it as CustomerSQLiteDatabaseContext.cs. Add the following content:

using Microsoft.EntityFrameworkCore;
namespace CustomerApi.Models.SQLite
{
        public class CustomerSQLiteDatabaseContext : DbContext
        {
                public CustomerSQLiteDatabaseContext(DbContextOptions<CustomerSQLiteDatabaseContext> options)
                        : base(options)
                {
                }
                protected override void OnModelCreating(ModelBuilder modelBuilder)
                {
                        modelBuilder.Entity<CustomerRecord>()
                                                .HasMany(x => x.Phones);
                }
                public DbSet<CustomerRecord> Customers { get; set; }
        }
}

It basically defines the model builder and how it is going to consider the customer -> phones relation when generating the database structures. Here, it’s important to correctly set up the one and many sides of the entity relationships, as well as the foreign keys.

Then, go again to the Models/SQLite folder and create the repository class, called CustomerSQLiteRepository.cs. This one will be responsible for holding the context object and managing the operations of the SQLite database file:

using System.Collections.Generic;
using System.Linq;
namespace CustomerApi.Models.SQLite
{
        public class CustomerSQLiteRepository
        {
                private readonly CustomerSQLiteDatabaseContext _context;
                public CustomerSQLiteRepository(CustomerSQLiteDatabaseContext context)
                {
                        _context = context;
                }
                public CustomerRecord Create(CustomerRecord customer)
                {
                        Microsoft.EntityFrameworkCore.ChangeTracking.EntityEntry<CustomerRecord> entry = _context.Customers.Add(customer);
                        _context.SaveChanges();
                        return entry.Entity;
                }
                public void Update(CustomerRecord customer)
                {
                        _context.SaveChanges();
                }
                public void Remove(long id)
                {
                        _context.Customers.Remove(GetById(id));
                        _context.SaveChanges();
           }
               public IQueryable<CustomerRecord> GetAll()
               {
                     return _context.Customers;
              }
                public CustomerRecord GetById(long id)
                {
                        return _context.Customers.Find(id);
                }
        }
}

Note that the methods are common CRUD operations performed onto the Customers object of the context.

Finally, you must adjust the Startup.cs file of the project to understand the new configs, by adding a new DBContext as well as a repository transient to the ConfigureServices method:

services.AddDbContext<CustomerSQLiteDatabaseContext>(options =>           options.UseSqlite(Configuration.GetConnectionString("DefaultConnection")));
services.AddTransient<CustomerSQLiteRepository>();

Don’t forget the proper using statements in the beginning of the file:

using CustomerApi.Models.SQLite;
using Microsoft.EntityFrameworkCore;

To guarantee that the database is in fact created, you can also add the following code to the Configure method:

using (var serviceScope = app.ApplicationServices.GetService<IServiceScopeFactory>().CreateScope())
                        {
        var context = serviceScope.ServiceProvider.GetRequiredService<CustomerSQLiteDatabaseContext>();
        context.Database.EnsureCreated();
}

Now, let’s test the migrations feature. Open the command prompt, navigate to the project root folder and issue the following commands:

dotnet ef migrations add CreateDatabase
dotnet ef database update

The first command will build the project, read the entity models and create the migration files to migrate the model. The second command triggers the commands to be executed directly into the database.

After that, open the DB Browser again for SQLite and observe the tables generated automatically.

First Hints with the API

To give you a taste of how this API must operate the command side of the CQRS application, let’s create the controller facade for the API to handle basic CRUD operations.

For this, in the /Controllers folder, rename the default generated controller class to CustomersController.cs and change its content to the following:

using CustomerApi.Models.SQLite;
using Microsoft.AspNetCore.Mvc;
namespace CustomerApi.Controllers
{
    [Route("api/[controller]")]
        public class CustomersController : Controller
        {
                private readonly CustomerSQLiteRepository _sqliteRepository;
           public CustomersController(CustomerSQLiteRepository sqliteRepository)
                {
                        _sqliteRepository = sqliteRepository;
                }
                [HttpGet]
                public IActionResult GetAll()
                {
                   var customers = _sqliteRepository.GetAll();
                   if (customers == null)
                   {
                        return NotFound();
                   }
                   return new ObjectResult(customers);
                }
                [HttpGet("{id}", Name = "GetCustomer")]
                public IActionResult GetById(long id)
                {
                        var customer = _sqliteRepository.GetById(id);
                        if (customer == null)
                        {
                                return NotFound();
                        }
                        return new ObjectResult(customer);
                }
                [HttpPost]
                public IActionResult Post([FromBody] CustomerRecord customer)
                {
            CustomerRecord created = _sqliteRepository.Create(customer);
                        return CreatedAtRoute("GetCustomer", new { id = created.Id }, created);
                }
                [HttpPut("{id}")]
                public IActionResult Put(long id, [FromBody] CustomerRecord customer)
                {
                        var record = _sqliteRepository.GetById(id);
                        if (record == null)
                        {
                                return NotFound();
                        }
                        customer.Id = id;
            _sqliteRepository.Update(customer);
                        return NoContent();
                }
                [HttpDelete("{id}")]
                public IActionResult Delete(long id)
                {
                        var record = _sqliteRepository.GetById(id);
                        if (record == null)
                        {
                                return NotFound();
                        }
            _sqliteRepository.Remove(id);
                        return NoContent();
                }
        }
}

Notice that the same endpoints (each HTTP method) are created based on the RESTful principles to facilitate the pattern and make it more understandable for the clients to integrate.

Now, you can test each endpoint and check the data being saved to the SQLite database, as well as being queried from there when it comes to the GET operation. You can use Postman, or any other REST-like testing tool of your preference, to test the calls to the API. For example, let’s create a new customer just like shown in Figure 8. Make sure to modify the port. Here is the JSON code you will need to create the customer:

{
                "phones": [
                        {
                                        "type":0,
                                        "areacode":321,
                                        "number": 0003010
                        }
                        
                        
                        ],
                        "email":"georgi@michales.com",
                        "name": "Georgia Michales",
                        "age": 12
}


Figure 8. Testing the customer’s creation with Postman.

Now, go and check the database where you should see the new record added to the table. Also, call the GET (and the other HTTP verbs) operation with this URL to see if the result is coming correctly.

Conclusion

This will give you that notion of CRUD that most developers are used to when it comes to application development. In fact, that sense is part of the CQRS nature, which means that one thing doesn’t need to live without the other. Actually, they refer to each other in a way that are complementary operations.

In the next part of this series, we’ll dive into event processing, the NoSQL side of the querying model and how everything can work together.

The post Getting Started with CQRS – Part 1 appeared first on Simple Talk.


from Simple Talk https://ift.tt/2ONrwyW
via