Monday, December 31, 2018

Introduction to SQL Server Security — Part 1

Security can be one of the most complex issues to contend with when managing a SQL Server instance, yet it’s also one of the most important, especially when sensitive and personal data are on the line. In fact, for many organizations, security is their number one priority, which should come as no surprise, given what’s at stake.

Fortunately, SQL Server includes a variety of tools for protecting data from theft, destruction, and other types of malicious behavior. In this article, the first in a series about SQL Server security, I introduce you to many of these tools, with the goal of providing you with an overview of the options available for safeguarding your data. In subsequent articles, I’ll dig deeper into the different technologies, providing a more in-depth look at how they work and what it takes to protect a SQL Server instance.

SQL Server Authentication and Authorization

Protecting data starts with the ability to authenticate users and authorize their access to specific data. To this end, SQL Server includes an authentication mechanism for verifying the identities of users trying to connect to a SQL Server instance, as well as an authorization mechanism that determines which data resources that authorized users can access and what actions they can take.

Authentication and authorization are achieved in SQL Server through a combination of security principals, securables, and permissions. Before I get into these, however, it’s important to note that SQL Server supports two authentication modes: Windows Authentication, sometimes referred to as integrated security, and SQL Server and Windows Authentication, sometimes referred to as mixed mode.

Windows authentication is integrated with Windows user and group accounts, making it possible to use a local or domain Windows account to log into SQL Server. When a Windows user connects to a SQL Server instance, the database engine validates the login credentials against the Windows principal token, eliminating the need for separate SQL Server credentials. Microsoft recommends that you use Windows Authentication whenever possible.

In some cases, however, you might require SQL Server Authentication. For example, users might connect from non-trusted domains, or the server on which SQL Server is hosted is not part of a domain, in which case, you can use the login mechanisms built into SQL Server, without linking to Windows accounts. Under this scenario, the user supplies a username and password to connect to the SQL Server instance, bypassing Windows Authentication altogether

You can specify the authentication mode when setting up a SQL Server instance or change it after implementation through the server’s properties, as shown in Figure 1.

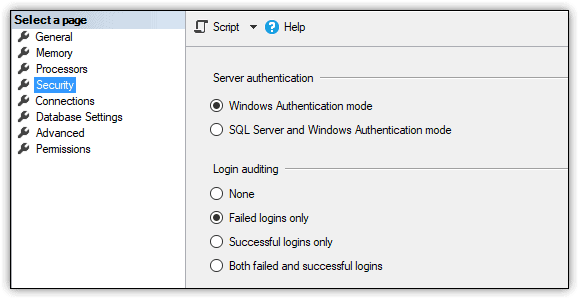
Figure 1. Selecting an authentication mode for a SQL Server 2017 instance

At the heart of the authentication and authorization mechanisms are the principals, securables, and permissions that must be configured to enable users to access the data they need, while preventing unauthorized users from accessing data they shouldn’t.

You can view and work with principals, securables, and permissions through SQL Server Management Studio (SSMS), using either the built-in GUI tools or the available T-SQL statements. Figure 2 shows Object Explorer in SSMS with the expanded Security folder for the WideWorldImporters database and, below that, the expanded Security folder for the SQL Server instance.

Figure 2. Working with security features in Object Explorer

Principals are individuals, groups, or processes that are granted access to the SQL Server instance, either at the server level or database level. Server-level principals include logins and server roles, which are listed in the Logins and Server Roles subfolders in the Security folder:

  • A login is an individual user account for logging into the SQL Server instance. A login can be a local or domain Windows account or a SQL Server account. You can assign server-level permissions to a login, such as granting a user the ability to create databases or logins.
  • A server role is a group of users that share a common set of server-level permissions. SQL Server supports fixed server roles and user-defined server roles. You can assign logins to a fixed server role, but you cannot change its permissions. You can do both with a user-defined server role.

Database-level principals include users and database roles, which are listed in the Users and Roles subfolders in the database’s Security folder:

  • A database user is an individual user account for logging into a specific database. The database user commonly maps to a corresponding server login in order to provide access to the SQL Server instance as well as the data itself. However, you can create database users that are independent of any logins, which can be useful for developing and testing data-driven applications, as well as for implementing contained databases.
  • A database role is a group of users that share a common set of database-level permissions. As with server roles, SQL Server supports both fixed and user-defined database roles.

For each security principal, you can grant rights that allow that principal to access or modify a set of securables. Securables are the objects that make up the database and server environment. They can include anything from functions to database users to endpoints. SQL Server scopes the objects hierarchically at the server, database and schema levels:

  • Server-level securables include databases as well as objects such as logins, server roles, and availability groups.
  • Database-level securables include schemas as well as objects such as database users, database roles, and full-text catalogs.
  • Schema-level securables include objects such as tables, views, functions, and stored procedures.

Permissions define the level of access permitted to principals on specific securables. You can grant or deny permissions to securables at the server, database, or schema level. The permissions you grant at a higher level of the hierarchy can also apply to the children objects, unless you specifically override the permissions at the lower level.

For example, if you grant the SELECT permission to the user1 principal on the Sales schema in the WideWorldImporters database, the user will be able to query all table data in that schema. However, if you then deny the SELECT permission on the Sales.Customers table, the user will not be able to query that table, but will still be able to access the other tables in that schema.

You can use SSMS or T-SQL to view the permissions that have been explicitly granted to a user on a securable. For example, Figure 3 shows the permissions granted to the user2 principal on the Sales.Customers table. In this case, the user has been granted the DELETE, INSERT, SELECT and UPDATE permissions, with no permissions explicitly denied.

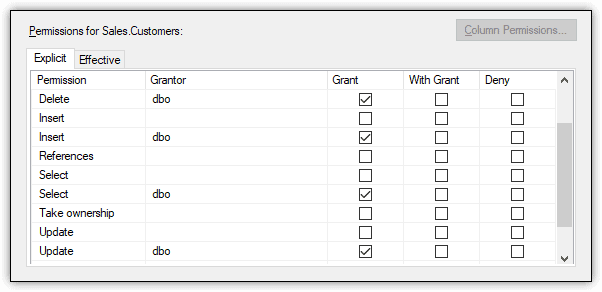
Figure 3. Viewing a user’s permissions granted on a schema object

Configuring permissions for multiple principles on multiple securables can be a complex and sometimes frustrating process. If you don’t get it right, you could end up denying permissions to users who should have access to specific data or, worse still, granting access to users who should not. The safest bet is to follow the principles of least privilege, working at the most granular level practical for a given situation.

Additional Access Control Features

SQL Server also provides several other features for controlling access to data. For example, you can implement row-level security on a specific table by creating a security policy that calls one or more predicates. A security policy defines the structure necessary to apply row-level security to a table. A predicate is a table-value function that provides the logic necessary to determine which rows the security policy applies to.

A security policy supports two types of predicates: filter and block. A filter predicate filters the rows available to read operations, and a block predicate blocks write operations that violate the predicate. You can include both filter and block predicates within a security policy, and you can call the same or different predicate functions within that policy.

For example, the WideWorldImporters database includes the FilterCustomersBySalesTerritoryRole security policy, which defines both a filter predicate and block predicate. Figure 4 shows the security policy as it is listed in Object Explorer, along with the policy definition. In this case, both the filter predicate and block predicate call the DetermineCustomerAccess function, which determines which rows the current user can access.

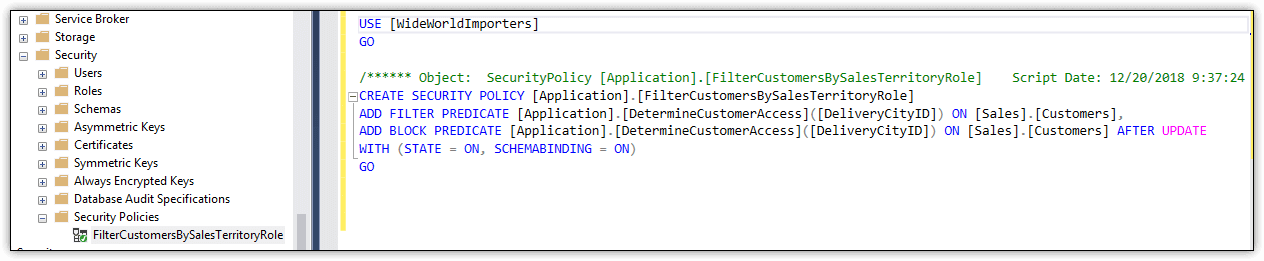
Figure 4. Viewing a security policy definition in SSMS

Another SQL Server security feature is the application role, which is similar to the database role, except that it is used specifically to assign permissions to an application. However, unlike database roles, application roles do not contain members. In addition, they’re invoked only when an application connects to SQL Server and calls the sp_setapprole system stored procedure, passing in the name of the application role and password. SQL Server enforces the permissions granted to the application role for the duration of the connection.

Another access mechanism that SQL Server provides is the credential, a server-level object (record) that contains authentication information such as a username and password. The credential makes it possible for a SQL Server user to connect to a resource outside of the SQL Server environment. For example, you can use a credential to run an external assembly or to access domain resources if you’ve logged in using SQL Server Authentication.

SQL Server Data Encryption

Also important to SQL Server security are the encryption capabilities built into the database engine. Encryption provides a way to encode—or obfuscate—data so that only authorized users can view the data in an unencrypted state. To everyone else, the encrypted data looks like gibberish.

Encryption is not an access-control mechanism, that is, it does not prevent unauthorized users from accessing data. However, encryption can limit the exposure of sensitive data should unauthorized users manage to break through SQL Server’s access-control defenses. For example, if cybercriminals acquire encrypted credit card information from a database, they will not be able to make sense of that data unless they’ve also figured out a way to decrypt it.

SQL Server supports several approaches to encryption to accommodate different types of data and workloads. For example, you can encrypt data at the column level by taking advantage of SQL Server’s built-in encryption hierarchy and key management infrastructure. Under this model, each layer encrypts the layer below it, using a layered architecture made up of a public key certificate and several symmetric keys. In this way, the column data is always protected until it is specifically decrypted.

Another tool available to SQL Server is Transparent Data Encryption (TDE), which encrypts and decrypts both data and log files in real-time, working at the page level to ensure that data at-rest is protected. The database engine encrypts the pages before writing them to disk and decrypts them when reading the pages into memory. Unlike column-level encryption, an application does not have to take specific steps to decrypt the data. The entire process occurs behind the scenes.

SQL Server also supports the Always Encrypted feature, which makes it possible for a client application to handle the actual encryption operations, without the encryption keys being revealed to the database engine. However, to implement Always Encrypted, you must first generate the column encryption keys necessary to support Always Encrypted. To do so, you can use the Always Encrypted wizard in SSMS, as shown in Figure 5.

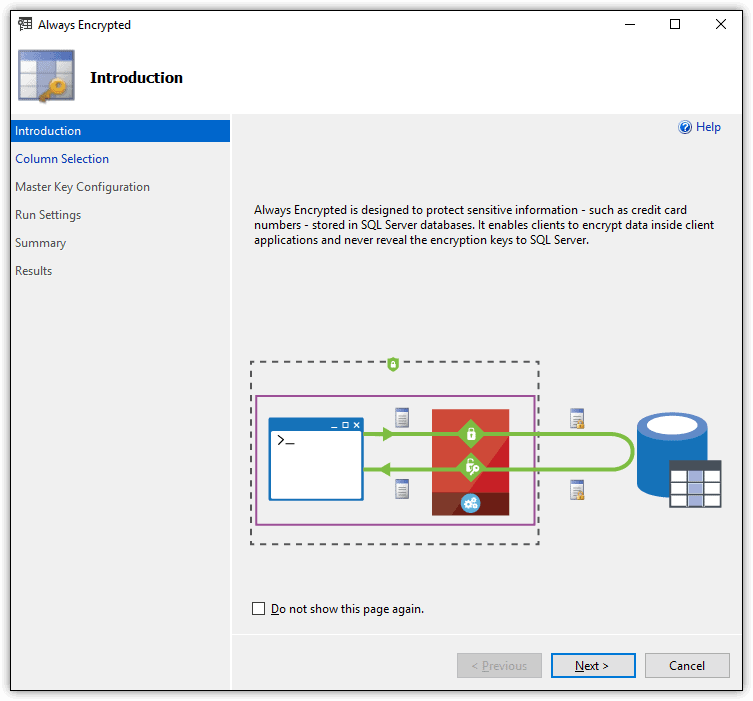
Figure 5. Running the Always Encrypted wizard

Once the columns have been encrypted, the data is ready for client access. However, for a client application to connect to encrypted data, it must incorporate a driver that is enabled for Always Encrypted and can handle the encryption and decryption operations.

Another useful SQL Server security feature is Dynamic Data Masking (DDM), a tool for masking all or part of data values. Although DDM doesn’t actually encrypt the data, it does limit the amount of exposed data to non-authorized users. For example, you can use DDM to mask all but the last four digits of a credit card number or national identifier such as a social security number.

SQL Server Tools

SQL Server includes a number of other tools to help protect data and limit risks. For example, you can use SQL Server Configuration Manager to configure startup or connection options, or use the sp_configure stored procedure to configure global SQL Server settings. SQL Server also provides the Surface Area Configuration facets for enabling or disabling features at the instance level, as shown in Figure 6.

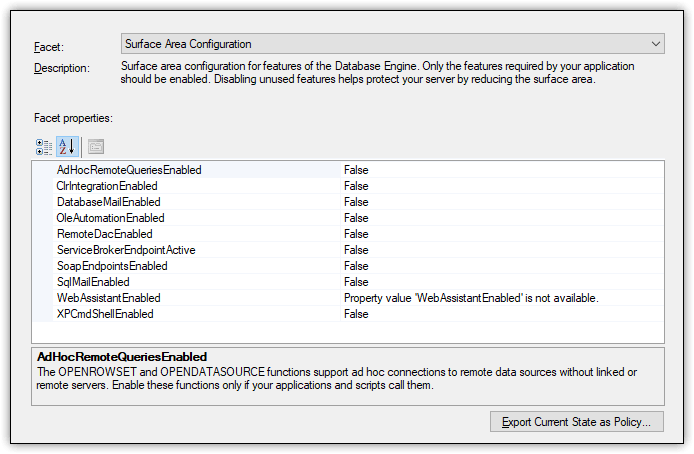
Figure 6. Accessing the Surface Area Configuration facets for a SQL Server 2017 instance

You can use these tools to ensure that only those features essential to supporting your users and applications are enabled at any given time, helping to reduce the exposed surface area and consequently the level of risk.

SQL Server also provides tools for identifying potential database issues. For instance, SQL Server provides the TRUSTWORTHY property as one of its database properties. The property shows whether the current SQL Server instance can trust the database and its contents.

In addition, SSMS provides the Data Discovery & Classification feature for classifying, labeling, and reporting on potentially sensitive data in a database, as well as the SQL Vulnerability Assessment (SVA) tool for discovering, tracking, and addressing potential database vulnerabilities. Figure 7 shows the results of running an SVA assessment against the WideWorldImporters database in SQL Server 2017.

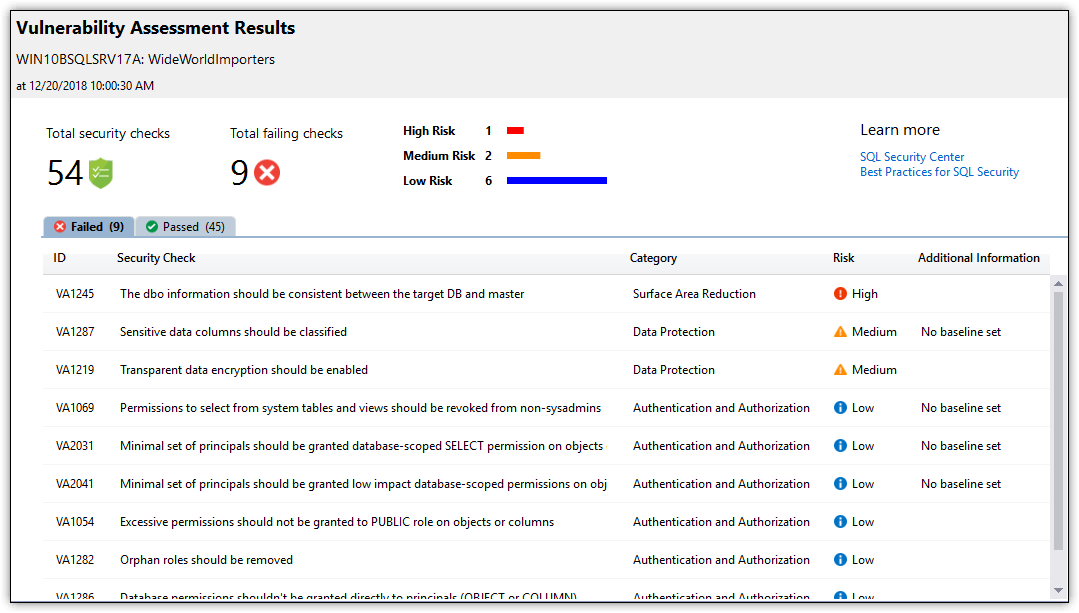
Figure 7. Viewing a SQL Vulnerability Assessment report

One of the most valuable SQL Server security tools is SQL Server Audit, which provides a structure for tracking and logging events that occur within the database engine. With SQL Server Audit, you can monitor events at the server level, database level, or both.

SQL Server Audit comprises three primary component types. The first is the audit object, which provides a structure for carrying out the auditing process. The audit object defines a target for the audited events. The target can be log files, the Application log, or the Security log. The audit object also includes configuration settings such as the number and size of the log files.

In addition to the audit object, an audit usually includes a server audit specification, a database audit specification for each applicable database, or a combination of any of these. The specifications determine which events should be audited at the server level or database level. For example, Figure 8 shows a database audit specification that audits UPDATE and DELETE events on the Sales.Customers table.

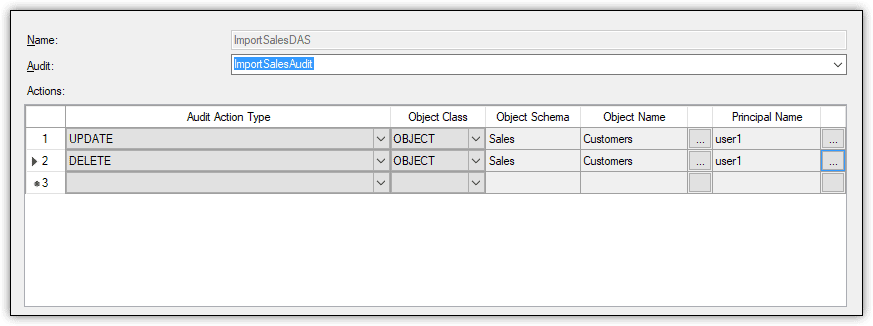
Figure 8. Viewing the audited actions defined in a database audit specification

In this case, both events are specific to the user1 database user. If the user tries to update or delete data in the Customers table, SQL Server Audit will log the event to the target repository.

Along with all these tools, SQL Server also provides a number of catalog views and dynamic management views for accessing security-related data. For example, you can retrieve details about the permissions granted and denied to a specific database user.

Protecting a SQL Server instance

In addition to taking steps within SQL Server to protect data, DBAs should also be certain to implement protections related to the SQL Server instance as a whole, such as disabling unused SQL Server components, applying security patches and service packs in a timely manner, and ensuring that database and backup files are fully protected and secure at all times.

But a protection strategy should not be limited only to SQL Server. The host operating system should also be kept up-to-date and properly patched, with just as much attention paid to surface area reduction.

In addition, DBAs and IT administrators must ensure that the host server is physically protected and that network safeguards such as firewalls and intrusion detection are in place. A SQL Server instance must be both physically and logically protected to achieve the maximum security.

Development teams must also ensure that the applications connecting to a SQL Server instance are properly vetted for security issues. A data-driven application is at risk for a number of attacks, including connection string injections, elevation of privileges, and SQL injections. The teams should factor in data security from the start, when first designing the application, not after it’s been implemented.

Securing SQL Server

SQL Server security is a huge topic, and what I’ve covered here barely skims that surface. You should view this article as only a starting point, meant to alert you to the many security considerations to take into account and the different SQL Server tools available for protecting data.

As this series progresses, I’ll dig deeper into the various security components, fleshing out what I’ve covered here and introducing you to concepts I’ve yet to explore. In the meantime, I recommend you learn as much about SQL Server security as possible, beginning with Microsoft’s own documentation.

The post Introduction to SQL Server Security — Part 1 appeared first on Simple Talk.


from Simple Talk http://bit.ly/2AmO9Fm
via

Getting Started with CQRS – Part 2

The series so far:

  1. Getting Started with CQRS – Part 1
  2. Getting Started with CQRS – Part 2

The first article of the series dove into the main concepts of CQRS along with the project configuration and setup. You learned how to create a basic CRUD-like application with ASP.NET and integrate it with a simple data source structure that relies on the Entity Framework and SQLite.

It’s important to notice, until here, that no CQRS concept was applied yet, since the whole implementation is about CRUD operations. This is intentional, for you to better understand how this pattern can apply in existing REST applications as well as web and even desktop applications that want to take advantage of it.

For the second part of the tutorial, you’ll finish the CQRS configurations by creating the MongoDB code, which is going to be responsible for the query side of the pattern. Also, you are going to create the commands that will operate over the creation and update of the data through normal relational database operations; finish the customer controller, which, in turn, will access the commands and queries to serve each appropriate endpoint; and, finally, set up the event-driven architecture with RabbitMQ for the publishing and subscribing of all the events the application has to deal with.

Creating the Query Side

Start by creating the MongoDB configurations, necessary for the Query side of the CQRS model. Open the CustomerAPI application in Visual you created in the first article and open your Startup.cs class. (You can find the code for this article here.) Add another transient repository setting, right below the SQLite one:

services.AddTransient<CustomerMongoRepository>();

Don’t forget the proper using statement at the beginning of the file:

using CustomerApi.Models.Mongo;

Add a new folder to the project: \Models\Mongo. Create a new class, CustomerMongoRepository in the new folder. This new class will accommodate the same CRUD operations you’ve created in the SQLite repository. However, using the specific configurations provided by the previously imported Mongo driver library. Replace the code:

using System.Collections.Generic;
using MongoDB.Driver;
namespace CustomerApi.Models.Mongo
{
    public class CustomerMongoRepository
        {
                private const string _customerDB = "CustomerDB";
                private const string _customerCollection = "Customers";
                private IMongoDatabase _db;
                public CustomerMongoRepository()
                {
                        MongoClient _client = new MongoClient("mongodb://localhost:27017");
                        _db = _client.GetDatabase(_customerDB);
                }
                public List<CustomerEntity> GetCustomers()
                {
                        return _db.GetCollection<CustomerEntity>(_customerCollection).Find(_ => true).ToList();
                }
                public CustomerEntity GetCustomer(long id)
                {
                        return _db.GetCollection<CustomerEntity>(_customerCollection).Find(customer => customer.Id == id).SingleOrDefault();
                }
                public CustomerEntity GetCustomerByEmail(string email)
                {
                        return _db.GetCollection<CustomerEntity>(_customerCollection).Find(customer => customer.Email == email).Single();
                }
                public void Create(CustomerEntity customer)
                {
                        _db.GetCollection<CustomerEntity>(_customerCollection).InsertOne(customer);
                }
                public void Update(CustomerEntity customer)
                {
                        var filter = Builders<CustomerEntity>.Filter.Where(_ => _.Id == customer.Id);
                        _db.GetCollection<CustomerEntity>(_customerCollection).ReplaceOne(filter, customer);
                }
                public void Remove(long id)
                {
                        var filter = Builders<CustomerEntity>.Filter.Where(_ => _.Id == id);
                        var operation = _db.GetCollection<CustomerEntity>(_customerCollection).DeleteOne(filter);
                }
        }
}

Notice that, this time, you have more operations for retrieving/searching elements from the database than in the SQLite repository. It happens because, as the Query side of the model, some flexibilities like searching by the id or email must exist in order to accommodate the different types of searches the client may perform.

The other operations will help with tests, like creating, updating and removing items from the database for checking purposes.

Also, it’s important to attain to the name of the database and the collection (_customerDB and _customerCollection, respectively). They must be exactly the same as the ones you created before at MongoDB Compass in the previous article. Thanks to the lambda functionalities .NET provides, you can pass summarized functions as arguments to most of the methods of MongoDB database.

Next, it’s time to create the Mongo entities, mapping exactly the same values to expose to the clients, in response to the values saved in the SQLite entities. Inside the \Mongo folder, create a new class called CustomerEntity.cs and add the following code:

using MongoDB.Bson;
using MongoDB.Bson.Serialization.Attributes;
using System.Collections.Generic;
namespace CustomerApi.Models.Mongo
{
        public class CustomerEntity
    {
                [BsonElement("Id")]
                public long Id { get; set; }
                [BsonElement("Email")]
                public string Email { get; set; }
                [BsonElement("Name")]
                public string Name { get; set; }
                [BsonElement("Age")]
                public int Age { get; set; }
                [BsonElement("Phones")]
                public List<PhoneEntity> Phones { get; set; }
        }
}

The class is basically composed of the same properties found in the corresponding SQLite code. The annotation BsonElement is provided by the MongoDB library and specifies the element name of each field of the entity. This is important, because this is how Mongo will identify each field when saving the document-based values to the database through a key-value system. Add another class to folder, PhoneEntity.

Here is the code for PhoneEntity.cs:

using MongoDB.Bson.Serialization.Attributes;
namespace CustomerApi.Models.Mongo
{
        public partial class PhoneEntity
    {
                [BsonElement("Type")]
                public PhoneType Type { get; set; }
                [BsonElement("AreaCode")]
                public int AreaCode { get; set; }
                [BsonElement("Number")]
                public int Number { get; set; }
        }
}

Both SQLite and MongoDB use the same PhoneType.cs class from the previous article. Make sure that it is in the \Models folder.

Setting up the Event Handler

In order for RabbitMQ to work in an ASP.NET project, besides having a proper RabbitMQ client dependency configured on the project, it’s also necessary to register the publisher and the subscriber beans in the Startup.cs class (ConfigureServices() method):

services.AddTransient<AMQPEventPublisher>();
services.AddSingleton<CustomerMessageListener>();

Don’t forget to import the proper using statements at the beginning of the class.

using CustomerApi.Models.Mongo;

Start with the publisher by creating a new \Events folder on the root folder. Then, create a class called AMQPEventPublisher.cs and add the following code:

using Microsoft.AspNetCore.Hosting;
using Microsoft.Extensions.Configuration;
using Newtonsoft.Json;
using RabbitMQ.Client;
using System.Text;
namespace CustomerApi.Events
{
        public class AMQPEventPublisher
    {
                private readonly ConnectionFactory connectionFactory;
                public AMQPEventPublisher(IHostingEnvironment env)
                {
                        connectionFactory = new ConnectionFactory();
                        var builder = new ConfigurationBuilder()
                                .SetBasePath(env.ContentRootPath)
                                .AddJsonFile("appsettings.json", optional: false, reloadOnChange: false)
                                .AddEnvironmentVariables();
                        
                        builder.Build().GetSection("amqp").Bind(connectionFactory);
                }
                public void PublishEvent<T>(T @event) where T : IEvent
                {
                        using (IConnection conn = connectionFactory.CreateConnection())
                        {
                                using (IModel channel = conn.CreateModel())
                                {
                                        var queue = @event is CustomerCreatedEvent ? 
                                                Constants.QUEUE_CUSTOMER_CREATED : @event is CustomerUpdatedEvent ? 
                                                        Constants.QUEUE_CUSTOMER_UPDATED : Constants.QUEUE_CUSTOMER_DELETED;
                                        channel.QueueDeclare(
                                                queue: queue,
                                                durable: false,
                                                exclusive: false,
                                                autoDelete: false,
                                                arguments: null
                                        );
                                        var body = Encoding.UTF8.GetBytes(JsonConvert.SerializeObject(@event));
                                        channel.BasicPublish(
                                                exchange: "",
                                                routingKey: queue,
                                                basicProperties: null,
                                                body: body
                                        );
                                }
                        }
                }
        }
}

A few important points to notice here include the ConnectionFactory object. It is part of RabbitMQ Client library and responsible for creating and managing the connections, models and channels to publish the events. The ConfigurationBuilder helps with importing the proper configurations from the appsettings.json file (see its code below). And, finally, the PublishEvent() method was built upon a generic implementation; in other words, the generic T tells this method to expect any type of object to be published, which makes it also reusable for other more abstract constructions you may want.

Once the connection is opened, and the model is created, you can declare the queue, its configs, and perform a basic publish through the BasicPublish method of the model. Notice that three types of events will be published: when a customer is created, updated or deleted. Don’t worry about the compilation errors for now, you’ll soon create those classes as well.

Add the Constants class to the \Events folder:

namespace CustomerApi.Events
{
        public class Constants
    {
                public const string QUEUE_CUSTOMER_CREATED = "customer_created";
                public const string QUEUE_CUSTOMER_UPDATED = "customer_updated";
                public const string QUEUE_CUSTOMER_DELETED = "customer_deleted";
        }
}

The generic T you’ve seen before is also inheriting from an interface called IEvent. It helps to identify what is an event only in the project. Add the IEvent class. The following code represents it (yes, just a marking interface):

namespace CustomerApi.Events
{
        public interface IEvent
    {
    }
}

Now, create the events themselves starting with the CustomerCreatedEvent. The structure is very similar to the entities you created before, mainly because no big changes will be made to avoid adding complexity:

using CustomerApi.Models.Mongo;
using System.Collections.Generic;
using System.Linq;
namespace CustomerApi.Events
{
        public class CustomerCreatedEvent : IEvent
        {
                public long Id { get; set; }
                public string Email { get; set; }
                public string Name { get; set; }
                public int Age { get; set; }
                public List<PhoneCreatedEvent> Phones { get; set; }
                public CustomerEntity ToCustomerEntity()
                {
                        return new CustomerEntity
                        {
                                Id = this.Id,
                                Email = this.Email,
                                Name = this.Name,
                                Age = this.Age,
                                Phones = this.Phones.Select(phone => new PhoneEntity {
                                        Type = phone.Type,
                                        AreaCode = phone.AreaCode,
                                        Number = phone.Number
                                }).ToList()
                        };
                }
        }
}

NOTE: Architecturally, it’s common to give event class names of a past nature, meaning that the event has already happened and you’re dealing with something in the past.

Notice that a method to convert each event to an entity will be useful since they mostly must be persisted after being received and processed (Linq will be used as a good option to iterate and perform operations over the lists of your event models).

The phone created event class (it can be just a single value object if you desire):

using CustomerApi.Models;
namespace CustomerApi.Events
{
        public class PhoneCreatedEvent : IEvent
        {
                public PhoneType Type { get; set; }
                public int AreaCode { get; set; }
                public int Number { get; set; }
        }
}

Next, the updated event class:

using CustomerApi.Models.Mongo;
using System.Collections.Generic;
using System.Linq;
namespace CustomerApi.Events
{
        public class CustomerUpdatedEvent : IEvent
        {
                public long Id { get; set; }
                public string Name { get; set; }
                public int Age { get; set; }
                public List<PhoneCreatedEvent> Phones { get; set; }
                public CustomerEntity ToCustomerEntity(CustomerEntity entity)
                {
                        return new CustomerEntity
                        {
                                Id = this.Id,
                                Email = entity.Email,
                                Name = entity.Name.Equals(this.Name) ? entity.Name : this.Name,
                                Age = entity.Age.Equals(this.Age) ? entity.Age : this.Age,
                                Phones = GetNewOnes(entity.Phones).Select(phone => new PhoneEntity { AreaCode = phone.AreaCode, Number = phone.Number }).ToList()
                        };
                }
                private List<PhoneEntity> GetNewOnes(List<PhoneEntity> Phones)
                {
                        return Phones.Where(a => !this.Phones.Any(x => x.Type == a.Type
                                && x.AreaCode == a.AreaCode
                                && x.Number == a.Number)).ToList<PhoneEntity>();
                }
        }
}

This class has a structure similar to that of the previous one, except for a bolder approach to deal with the phones updating. You’ll only update phones that had, in fact, suffered any change whether it was in the area code or the number. So, for the update in the database, they’ll be overwritten every time. Plus, don’t forget to always check if each attribute inside the event had really changed compared to the received entity object.

The deleted event class:

namespace CustomerApi.Events
{
        public class CustomerDeletedEvent : IEvent
        {
                public long Id { get; set; }
        }
}

The only thing that’s needed to delete an object to the database is the customer id.

Be aware that, in real world applications, it’s against the event-storing patterns to update/delete data in any situation. Events must be preserved in their original precedence as much as possible, to simulate exactly what happened. Here, the implementation tries to go, initially, through the old-fashion design most applications used to be built.

And finally, create the consumer class, CustomerMessageListener, responsible for listening to the events and processing them:

using CustomerApi.Models.Mongo;
using Microsoft.Extensions.Configuration;
using Newtonsoft.Json;
using RabbitMQ.Client;
using RabbitMQ.Client.Events;
using RabbitMQ.Client.MessagePatterns;
using System;
using System.Text;
using System.Threading;
namespace CustomerApi.Events
{
        public class CustomerMessageListener
        {
                private readonly CustomerMongoRepository _repository;
                public CustomerMessageListener(CustomerMongoRepository repository)
                {
                        _repository = repository;
                }
                public void Start(string contentRootPath)
                {
                        ConnectionFactory connectionFactory = new ConnectionFactory();
                        var builder = new ConfigurationBuilder()
                                .SetBasePath(contentRootPath)
                                .AddJsonFile("appsettings.json", optional: false, reloadOnChange: false)
                                .AddEnvironmentVariables();
                        builder.Build().GetSection("amqp").Bind(connectionFactory);
                        connectionFactory.AutomaticRecoveryEnabled = true;
                        connectionFactory.NetworkRecoveryInterval = TimeSpan.FromSeconds(15);
                        using (IConnection conn = connectionFactory.CreateConnection())
                        {
                                using (IModel channel = conn.CreateModel())
                                {
                                        DeclareQueues(channel);
                                        var subscriptionCreated = new Subscription(channel, Constants.QUEUE_CUSTOMER_CREATED, false);
                                        var subscriptionUpdated = new Subscription(channel, Constants.QUEUE_CUSTOMER_UPDATED, false);
                                        var subscriptionDeleted = new Subscription(channel, Constants.QUEUE_CUSTOMER_DELETED, false);
                                        while (true)
                                        {
                        // Sleeps for 5 sec before trying again
                                                Thread.Sleep(5000);
                                                new Thread(() =>
                                                {
                                                        ListerCreated(subscriptionCreated);
                                                }).Start();
                                                new Thread(() =>
                                                {
                                                        ListenUpdated(subscriptionUpdated);
                                                }).Start();
                                                new Thread(() =>
                                                {
                                                        ListenDeleted(subscriptionDeleted);
                                                }).Start();
                                        }
                                }
                        }
                }
                private void ListenDeleted(Subscription subscriptionDeleted)
                {
                        BasicDeliverEventArgs eventArgsDeleted = subscriptionDeleted.Next();
                        if (eventArgsDeleted != null)
                        {
                                string messageContent = Encoding.UTF8.GetString(eventArgsDeleted.Body);
                                CustomerDeletedEvent _deleted = JsonConvert.DeserializeObject<CustomerDeletedEvent>(messageContent);
                                _repository.Remove(_deleted.Id);
                subscriptionDeleted.Ack(eventArgsDeleted);
                        }
                }
                private void ListenUpdated(Subscription subscriptionUpdated)
                {
                        BasicDeliverEventArgs eventArgsUpdated = subscriptionUpdated.Next();
                        if (eventArgsUpdated != null)
                        {
                                string messageContent = Encoding.UTF8.GetString(eventArgsUpdated.Body);
                                CustomerUpdatedEvent _updated = JsonConvert.DeserializeObject<CustomerUpdatedEvent>(messageContent);
                                _repository.Update(_updated.ToCustomerEntity(_repository.GetCustomer(_updated.Id)));
                subscriptionUpdated.Ack(eventArgsUpdated);
                        }
                }
                private void ListerCreated(Subscription subscriptionCreated)
                {
                        BasicDeliverEventArgs eventArgsCreated = subscriptionCreated.Next();
                        if (eventArgsCreated != null)
                        {
                                string messageContent = Encoding.UTF8.GetString(eventArgsCreated.Body);
                                CustomerCreatedEvent _created = JsonConvert.DeserializeObject<CustomerCreatedEvent>(messageContent);
                                _repository.Create(_created.ToCustomerEntity());
                                subscriptionCreated.Ack(eventArgsCreated);
                        }
                }
                private static void DeclareQueues(IModel channel)
                {
                        channel.QueueDeclare(
                                queue: Constants.QUEUE_CUSTOMER_CREATED,
                                durable: false,
                                exclusive: false,
                                autoDelete: false,
                                arguments: null
                        );
                        channel.QueueDeclare(
                                queue: Constants.QUEUE_CUSTOMER_UPDATED,
                                durable: false,
                                exclusive: false,
                                autoDelete: false,
                                arguments: null
                        );
                        channel.QueueDeclare(
                                queue: Constants.QUEUE_CUSTOMER_DELETED,
                                durable: false,
                                exclusive: false,
                                autoDelete: false,
                                arguments: null
                        );
                }
        }
}

Please, keep in mind that for most real CQRS applications, the event subscriber objects/components are usually built out of the publisher application for resiliency purposes. Here, they’ll be together just for simplification.

The class starts with the same RabbitMQ connection factory configs, connections and models. However, two new configs are used:

  • AutomaticRecoveryEnabled: its value is already true, but you’ll use it here to enforce the setup of the auto recovery feature, that instructs RabbitMQ to retry the current connection once it is lost or dealing with connectivity issues;
  • NetworkRecoveryInterval: defines the time it will wait to retry the connection when facing network issues.

There are several approaches, including external frameworks, to consume events from a queue in RabbitMQ. The focus is on simplicity, so basically the queues are going to be declared (just in case they don’t exist yet in RabbitMQ server, so they’ll be automatically created), along with subscription objects.

Subscription objects control a model channel over a specific queue, as well as the acknowledge mode the delivery will be made with. In the example, each queue has its own subscription object set with autoAck mode to false, so you’re the one who must manually acknowledge the channel once the event consuming is done.

Then, an infinite loop will happen (with 5 seconds of delay from one iteration to another) opening three different threads, one for each event type can be received over the subscription objects. The reason for the loop is because new events can arrive at any moment, so you have to guarantee they will be consumed. And the threads are just to make sure no event will delay or alter the state of the others.

In the end, the only action to be performed will be the respective operation in the repository object.

Setting up the Commands

The Command pattern is well known to every OO developer, mainly because it helps to construct structures to process separately objects that act in similar ways. In this case, start with the abstract class that’ll represent it. Create a new folder \Commands and add the Command class.

namespace CustomerApi.Commands
{
    public abstract class Command
        {
                public long Id { get; set; }
        }
}

The Id will be useful since it is used everywhere to identify a customer. Then, the customer created command object, CreateCustomerCommand class, that’ll support the data transit:

using CustomerApi.Events;
using CustomerApi.Models.SQLite;
using System.Collections.Generic;
using System.Linq;
namespace CustomerApi.Commands
{
        public class CreateCustomerCommand : Command
        {
                public string Name { get; set; }
                public string Email { get; set; }
                public int Age { get; set; }
                public List<CreatePhoneCommand> Phones { get; set; }
                public CustomerCreatedEvent ToCustomerEvent(long id)
                {
                        return new CustomerCreatedEvent
                        {
                                Id = id,
                                Name = this.Name,
                                Email = this.Email,
                                Age = this.Age,
                                Phones = this.Phones.Select(phone => new PhoneCreatedEvent { AreaCode = phone.AreaCode, Number = phone.Number }).ToList()
                        };
                }
                public CustomerRecord ToCustomerRecord()
                {
                        return new CustomerRecord
                        {
                                Name = this.Name,
                                Email = this.Email,
                                Age = this.Age,
                                Phones = this.Phones.Select(phone => new PhoneRecord { AreaCode = phone.AreaCode, Number = phone.Number }).ToList()
                        };
                }
        }
}

They are very similar to the event objects regarding the attributes but carry auxiliary methods to construct SQLite records and event objects, translating from one type of model schema to another.

Notice that, here, you’re using a second command for phone data, CreatePhoneCommand. Create the class and add the following code:

using CustomerApi.Models;
namespace CustomerApi.Commands
{
        public class CreatePhoneCommand : Command
        {
                public PhoneType Type { get; set; }
                public int AreaCode { get; set; }
                public int Number { get; set; }
        }
}

See the code for the updated and deleted commands, as well:

using CustomerApi.Events;
using CustomerApi.Models.SQLite;
using System.Collections.Generic;
using System.Linq;
namespace CustomerApi.Commands
{
        public class UpdateCustomerCommand : Command
        {
                public string Name { get; set; }
                public int Age { get; set; }
                public List<CreatePhoneCommand> Phones { get; set; }
                public CustomerUpdatedEvent ToCustomerEvent()
                {
                        return new CustomerUpdatedEvent
                        {
                                Id = this.Id,
                                Name = this.Name,
                                Age = this.Age,
                                Phones = this.Phones.Select(phone => new PhoneCreatedEvent {
                                        Type = phone.Type,
                                        AreaCode = phone.AreaCode,
                                        Number = phone.Number
                                }).ToList()
                        };
                }
                public CustomerRecord ToCustomerRecord(CustomerRecord record)
                {
                        record.Name = this.Name;
                        record.Age = this.Age;
                        record.Phones = this.Phones.Select(phone => new PhoneRecord
                                {
                                        Type = phone.Type,
                                        AreaCode = phone.AreaCode,
                                        Number = phone.Number
                                }).ToList()
                                ;
                        return record;
                }
        }
}

For the deleted one, remember that only the id is important to be passed on:

using CustomerApi.Events;
namespace CustomerApi.Commands
{
        public class DeleteCustomerCommand : Command
        {
                internal CustomerDeletedEvent ToCustomerEvent()
                {
                        return new CustomerDeletedEvent
                        {
                                Id = this.Id
                        };
                }
        }
}

All the command objects need a handler object, that will take care of receiving and distributing the operations through the different service/repository layers. Start with the command handler interface code:

namespace CustomerApi.Commands
{
        public interface ICommandHandler<T> where T : Command
        {
                void Execute(T command);
        }
}

The method Execute() receives the specific command represented by its interface declaration and calls the proper operations for each one. See the following code for the implementation:

using CustomerApi.Events;
using CustomerApi.Models.SQLite;
using System;
namespace CustomerApi.Commands
{
        public class CustomerCommandHandler : ICommandHandler<Command>
        {
                private CustomerSQLiteRepository _repository;
                private AMQPEventPublisher _eventPublisher;
                public CustomerCommandHandler(AMQPEventPublisher eventPublisher, CustomerSQLiteRepository repository)
                {
                        _eventPublisher = eventPublisher;
                        _repository = repository;
                }
                public void Execute(Command command)
                {
                        if (command == null)
                        {
                                throw new ArgumentNullException("command is null");
                        }
                        if (command is CreateCustomerCommand createCommand)
                        {
                                CustomerRecord created = _repository.Create(createCommand.ToCustomerRecord());
                                _eventPublisher.PublishEvent(createCommand.ToCustomerEvent(created.Id));
                        }
                        else if (command is UpdateCustomerCommand updateCommand)
                        {
                                CustomerRecord record = _repository.GetById(updateCommand.Id);
                                _repository.Update(updateCommand.ToCustomerRecord(record));
                                _eventPublisher.PublishEvent(updateCommand.ToCustomerEvent());
                        }
                        else if (command is DeleteCustomerCommand deleteCommand)
                        {
                                _repository.Remove(deleteCommand.Id);
                                _eventPublisher.PublishEvent(deleteCommand.ToCustomerEvent());
                        }
                }
        }
}

Here, roughly, you can already see the command running the code that’ll deal with relational database operations, and its segregation from the event publishing, always at the end of each command processing.

Finally, you need to add the handler as a scoped service. So, open the Startup.cs file again and add the following using command to the beginning of the file and AddScope() operation to the ConfigureServices() method:

using CustomerApi.Commands;
// …
services.AddScoped<ICommandHandler<Command>, CustomerCommandHandler>();

Testing the New Controller

To make sure the new structures are fully working together, change the current customer controller to support the new commands, along with the proper REST results. This is the final CustomersController class:

using CustomerApi.Commands;
using CustomerApi.Models;
using CustomerApi.Models.Mongo;
using CustomerApi.Models.SQLite;
using Microsoft.AspNetCore.Mvc;
using System.Collections.Generic;
namespace CustomerApi.Controllers
{
    [Route("api/[controller]")]
    public class CustomersController : Controller
    {
        private readonly ICommandHandler<Command> _commandHandler;
        private readonly CustomerMongoRepository _mongoRepository;
        private readonly CustomerSQLiteRepository _sqliteRepository;
        public CustomersController(ICommandHandler<Command> commandHandler,
            CustomerSQLiteRepository sqliteRepository,
            CustomerMongoRepository repository)
        {
            _commandHandler = commandHandler;
            _sqliteRepository = sqliteRepository;
            _mongoRepository = repository;
            if (_mongoRepository.GetCustomers().Count == 0)
            {
                var customerCmd = new CreateCustomerCommand
                {
                    Name = "George Michaels",
                    Email = "george@email.com",
                    Age = 23,
                    Phones = new List<CreatePhoneCommand>
                    {
                        new CreatePhoneCommand { Type = PhoneType.CELLPHONE, AreaCode = 123, Number = 7543010 }
                    }
                };
                _commandHandler.Execute(customerCmd);
            }
        }
        [HttpGet]
        public List<CustomerEntity> Get()
        {
            return _mongoRepository.GetCustomers();
        }
        [HttpGet("{id}", Name = "GetCustomer")]
        public IActionResult GetById(long id)
        {
            var product = _mongoRepository.GetCustomer(id);
            if (product == null)
            {
                return NotFound();
            }
            return new ObjectResult(product);
        }
        [HttpGet("{email}")]
        public IActionResult GetByEmail(string email)
        {
            var product = _mongoRepository.GetCustomerByEmail(email);
            if (product == null)
            {
                return NotFound();
            }
            return new ObjectResult(product);
        }
        [HttpPost]
        public IActionResult Post([FromBody] CreateCustomerCommand customer)
        {
            _commandHandler.Execute(customer);
            return CreatedAtRoute("GetCustomer", new { id = customer.Id }, customer);
        }
        [HttpPut("{id}")]
        public IActionResult Put(long id, [FromBody] UpdateCustomerCommand customer)
        {
            var record = _sqliteRepository.GetById(id);
            if (record == null)
            {
                return NotFound();
            }
            customer.Id = id;
            _commandHandler.Execute(customer);
            return NoContent();
        }
        [HttpDelete("{id}")]
        public IActionResult Delete(long id)
        {
            var record = _sqliteRepository.GetById(id);
            if (record == null)
            {
                return NotFound();
            }
            _commandHandler.Execute(new DeleteCustomerCommand()
            {
                Id = id
            });
            return NoContent();
        }
    }
}

Basically, what changed is that the commands are now being handled by the REST automatic conversions and a new customer is being added once the constructor of the class runs, to make sure you’ll have some data in the database as soon as the application starts.

Before you run the application, make sure everything is up and running (the MongoDB and RabbitMQ servers) and, once Visual Studio finishes the starting up, you’d have the data stored in the SQLite database (just like you can see in Figure 1).

Figure 1. SQLite data after app started up.

Then, after persisting to the SQLite database, the customer_created event will be published. The RabbitMQ queue will receive the event (Figure 2), prepare a consumer to deliver it directly to the message listener.

Figure 2. RabbitMQ event consuming.

And finally, when the event is received at the listener, process the MongoDB data persisting, to guarantee the data is safe there, all in an asynchronous way.

Figure 3. MongoDB data after event being consumed.

Conclusion

It is now time to go and create more tests. Make sure to try each of your REST API operations with Postman (like the POST to create a new customer), checking to make sure each customer was stored in the SQLite database and, then, posted to RabbitMQ and, subsequently, to the MongoDB database asynchronously.

Some other structures of the architecture could be improved as well. If the application itself (or one of the nodes it is hosted when in a clustered environment) crashes in the very right moment the event would be published. For this, a couple of options are available such as considering a bigger transactional design that thinks of the processing as a whole that’s complete only when everything important is done. Or you could pick up a different messaging tool that guarantees, with more consistency, the delivery of the events (like Apache Kafka, for example, a very popular player at the moment). Just be sure to play with different scenarios, considering that they can happen in the real world.

The next part of this series will explore a totally new architecture considering the paradigm of Event Sourcing and Processing to map the events the application receives, reduce them when necessary, and make the application more scalable.

The post Getting Started with CQRS – Part 2 appeared first on Simple Talk.


from Simple Talk http://bit.ly/2EVCGQQ
via

Friday, December 28, 2018

Creating Measures Using DAX

The series so far:

  1. Creating Calculated Columns Using DAX
  2. Creating Measures Using DAX

A measure is any formula which aggregates data, whether it be counting the number of transactions in a database, summing the sales figures for a region, or working out the highest-earning salesperson for each division of a company. A measure always involves aggregating data in some way. In Power BI (and PowerPivot and SSAS Tabular) you create measures using the DAX formula language.

It takes a while – and a few bites of the cherry – to understand DAX properly (I’ve been teaching Power BI for some years now, and still haven’t come up with a way to make it intuitive to understand). The crucial thing is to comprehend two concepts called filter context and row context. In this article, I’ll explain what measures are, where and how to create them, and I’ll explain the difference between filter and row context in DAX.

The Example Database for this Article

This article uses the same simple database as its predecessor. This database shows sales of three toys for different cities around the world:

You can import this data into your own Power BI data model by first downloading this Excel workbook, or by running this SQL script in SQL Server Management Studio.

What are Measures?

The easiest way to think of a measure is by reference to a pivot table in Excel – like this one:

The value 4 shown in the coloured box represents the total quantity of sales of the Olly Owl product in Cape Town. If you double-click on the cell, you’ll see the underlying data:

The selected values sum to 4 and represent all the sales for this product (Olly Owl) and this city (Cape Town). This represents the filter context for this cell. The pivot table doesn’t sum all of the sales in this cell – just the ones which are for the product and city for this particular row and column of the pivot table.

The formula in the red box below – summing the quantity of goods sold for each cell in the pivot table – is a measure. Microsoft flirted with the idea of calling it a calculated field instead in Excel 2013, but they wisely reverted to using the term measure for Excel 2016):

The underlying formula for this implicit measure – if you could but see it – would be =SUM(Sales[Quantity]).

You’ve Already Created Measures

If you’ve been using Power BI at all, you’ll already have created measures. When you drag a field onto a table, matrix or chart, you create a hidden measure. In the diagram below, someone is about to drag the Quantity column into the Values section of a matrix, which will by default sum the quantity for each product and country:

Adding the Quantity field to the Values section of the matrix would show this ‘measure:’

In Power BI there is no way to see the DAX formula underlying this measure, but believe me, it exists, somewhere hidden away behind the scenes. PowerPivot has an advanced option allowing you to view implicit measures like this, but the Power BI elves don’t want to confuse you by letting you do this.

Creating a Measures Table

Before you create a measure, you need somewhere to put it. You can add measures to any table in your data model, but the best solution is to create a separate table to hold only measures. One way to do this is to create a new table by clicking on the Enter Data tool in Power BI:

Leave everything as it is but overtype the name Table1 with your own name. All measures is a good choice to ensure the table appears high up in the list alphabetically:

After clicking Load, you’ll now have a nearly-empty table, in which you can create measures:

Note that you should resist the temptation to remove the useless column Column1 at this stage since Power BI would then helpfully remove the now empty table too. As soon as you’ve created at least one measure in your new table, you can delete Column1.

Creating a Measure

To avoid being too ambitious to start with, begin by creating a basic measure to sum the quantity of goods sold. This example is completely pointless, because I’ve just shown that you can get this figure by dragging the existing [Quantity] column onto a visual, but it is a nice simple example to get you started. First, right-click on your new All measures table, and choose to add a new measure:

There are many other ways to do the same thing, but this seems the easiest. I’ve covered creating new calculated columns in the previous article in this series, and I’ll show what quick measures are towards the end of this article. Here’s what you’ll see after choosing to create a new measure:

You can now type in any measure name and any valid formula. It’s up to you whether you include blank lines and comments. Here is the formula for Total quantity sold:

Total quantity sold = 
// sum the quantity column
SUM(Sales[Quantity])

Your new measure will look like this in the formula bar.

After pressing Enter, you can now choose to display your squeaky-clean new measure in your visual:

It would be worrying if this didn’t give the same results as the implicit measure I showed earlier since it’s doing the same thing:

Finally, it would be a good idea to set default formatting for your measure, so that it will look good wherever you show it. To do this first select the measure:

You can now choose an appropriate default format:

Here I’ve said that a comma will appear for sales of more than 999 items.

Aggregation Functions Allowed

Here are the main aggregation functions that you can use in DAX:

Function

What it does for a column’s values

AVERAGE, AVERAGEA

Returns the average (arithmetic mean), ignoring or taking account of text entries (see hint below)

COUNT

Returns the number of cells that contain numbers

COUNTA

Returns the number of non-empty cells

COUNTBLANK

Returns the number of blank cells

COUNTROWS

Returns the number of rows in a table

DISTINCTCOUNT

Returns the number of different distinct values

GEOMEAN

Returns the geometric mean

MAX, MAXA

Returns the largest value

MEDIAN

Returns the median (the halfway point)

MIN, MINA

Returns the smallest value

PERCENTILE.INC, PERCENTILE.ENC

Two similar functions which return the nth percentile in a set of values

STDEV.P

Returns the standard deviation of the entire population

STDEV.S

Returns the sample standard deviation

SUM

Adds the cells’ values

VAR.P

Returns the variance of the entire population for a column

VAR.S

Returns the sample population variance for a column

Aggregating Expressions – Why You Should Use Measures

Suppose now that you want to sum sales, not quantities. One way to do this is to create a calculated column in the underlying table, and sum this column:

Summing the [Sales value] column for the above table would give the correct result, however, the method above has two main disadvantages – it will slow loading data, and it will consume more memory. I’ll explain each of these disadvantages in turn.

When you click on a button to refresh your data, Power BI will do this in two stages although the nitty-gritty of this is hidden from you:

Processing — Power BI reloads the data for each of the tables in your data model.

Calculation — Power BI builds any calculated columns that you’ve added to tables, among other things.

It’s this second stage which will run more slowly since Power BI will have to reconstruct the [Sales value] column in the [Sales] table, even though you may never use it.

The second disadvantage is that the calculated column will take up more memory – probably much more memory. To see why, suppose you have data like this:

The granularity of the columns are as follows:

[Price] – 3 unique values (2.50, 3.00 and 5.00)

[Quantity] – 3 unique values (1, 2 and 3)

[Sales Values] – 7 unique values (2.50, 3.00, 5.00, 7.50, 9.00, 10.00 and 15.00)

Thus, the dictionaries for the calculated column will consume more memory than the original two columns’ dictionaries combined. You can see much more discussion about how DAX uses column storage rather than row storage in the first article in this series.

In summary, there’s a trade-off between aggregating the values in a calculated column (using functions like SUM) and aggregating the underlying expression (using a function like SUMX). The first method uses more memory but will then run more quickly, while the second method consumes less memory but may run more slowly. There doesn’t seem a clear consensus as to which method is better, so I would (as they say in the UK) “suck it and see”.

Creating Measures Using AggregateX Functions

A solution to the above problem is to sum the expression [Price] * [Quantity] from the Sales table, but the humble SUM function won’t do this, as the IntelliSense below shows (the function is expecting a single column, not an expression):

Instead, you need something which will sum an expression, and for that, you just add an X onto the end of your function name:

Here are the common function names that you can use to sum an expression across a table:

Function

What it does for a column’s values

AVERAGEX

Returns the average (arithmetic mean) of an expression

COUNTX

Returns the number of cells that contain numbers

COUNTAX

Returns the number of non-empty cells

GEOMEANX

Returns the geometric mean

MAXX

Returns the largest value

MEDIANX

Returns the median (the halfway point)

MINX

Returns the smallest value (named after Minnie from The Beano)

PERCENTILEX.INC, PERCENTILEX.ENC

Two similar functions which return the nth percentile in a set of values

STDEVX.P

Returns the standard deviation of the entire population

STDEVX.S

Returns the sample standard deviation

SUMX

Adds the cells’ values

VARX.P

Returns the variance of the entire population for a column

VARX.S

Returns the sample population variance for a column

In this example, you could create a new measure in the [All measures] table like this:

Total sales = 
    // sum the product of price and quantity
    SUMX(
        Sales,
        [Price]*[Quantity]
    )

AggregateX Functions are Iterator Functions

Why does Power BI have a different library of functions in order to accomplish something which is essentially the same? The answer is that, from the point of view of the DAX database, the two measures are completely different. The first function was this:

SUM(Sales[Quantity])

Consider what this does for this cell containing the number 4:

To calculate this, Power BI works out the filter context for this cell:

It then sums the numbers in the Quantity column for the filter context. Because these numbers are all stored in one place, the calculation is very quick: 1 + 1 + 2 = 4.

Now consider the second measure – the one which sums an expression:

SUMX(Sales, [Price]*[Quantity])

Here’s the equivalent figure for UK sales of Olly Owl products:

To calculate this figure, DAX can’t just sum the value of a column. Instead, it must work its way down the rows for the filter context, multiplying the price for each product by the quantity sold:

This will take much longer. The calculation is:

4.10 * 1 = 4.1

4.40 * 1 = 4.4

4.00 * 2 = 8.0

DAX then sums the results to get 4.10 + 4.40 + 8.00 = 16.50. To do this, it iterates over the rows, creating a row context for each. This is such an important statement that I’m going to spell it out in detail. First DAX creates a row context for the first row in the filter context:

Here’s what DAX can now see:

It multiplies the price by the quantity, stores the total and ends the row context, moving on to the next row in the filter context.

A function which behaves like this, which iterates down all the rows of a table, creating a row context for each row and performing some calculation before going on to the next row, is called an iterator function.

Creating a Measure to Calculate a Ratio

The database for this example contains two price fields. There’s the price at which goods are actually sold in the Sales table:

However, there’s also the list price for each product in the Product table:

A reasonable question to ask is this: for any given cell in a table or matrix, or any given data point in a chart, what is the ratio between the actual sales values of all the goods sold and what the sales value would have been if everything had sold at its list price? The answer should look like this:

The top matrix shows the value of the sales that actually took place, the middle matrix shows what the value of these sales would have been if the list price was charged for each product in each case and the bottom matrix shows the ratio between the two values.

To calculate this ratio, first create a measure to sum actual sales:

Discounted sales values = SUMX(
// from the sales table, sum the 
// price * the quantity for each row
        Sales,
        [Price]*[Quantity]
)

Now create another measure which will sum the product of two figures:

The sales quantity from the Sales table; and

The product’s list price from the Purchase table.

Here’s what this formula could look like:

Undiscounted sales value = SUMX(
    Sales,
    // multiply the product's list price times
    // the quantity sold
    RELATED('Product'[ListPrice])*[Quantity]
)

Why is the RELATED function needed to look up the list price for each product from a separate table? You’ve already seen that measures create filter context– you don’t have to specify how the underlying tables are linked together, as this is done automatically in DAX. However, the SUMX function is an iterator function which creates a row context for each row of the specified table (in this case Sales). Although the [Undiscounted sales value] measure above doesn’t need to cross-reference different tables, the SUMX function within it does, since all each row knows about by default is the columns within that table:

To find out for any row what the purchase list price was, you need to pull in a value from another table for this row context, and for that, you need to use the RELATED function.

The final measure just divides one measure by another:

% of full value = 
DIVIDE([Discounted sales values],[Undiscounted sales value] )

Or, if you prefer not to use any intermediate measures, you could do everything in one formula:

% of full value (version 2) = 
    DIVIDE(
        SUMX(
            // from the sales table, sum 
            // the price * the quantity for each row
            Sales,
            [Price]*[Quantity]
        ),
        SUMX(
            Sales,
            // multiply the product's list price times
            // the quantity sold
            RELATED('Product'[ListPrice])*[Quantity]
        )
    )

Variables

The above all-in-one formula is getting a bit complicated. Here it is again in colour:

What it’s doing for each cell of a matrix or table, or for each data point in a visual, is as follows:

Calculating one number (total sales for the filter context) – call this A;

Calculating a second number (total sales for the filter context, but using the product’s list price) – call this B;

Dividing the first number by the second number.

You could make this formula easier to read by dividing this into separate stages, using variables to hold the value of the numbers calculated along the way. For this example, you’ll create the following two variables:

DiscountPriceSales to hold the value of A; and

ListPriceSales to hold the value of B.

Then divide one variable by the other to get the answer. The syntax for creating variables in a DAX measure is as follows:

MeasureName =
VAR Variable1 = expression
…
VAR VariableN = expression
RETURN expression

You can declare as few or as many variables as you like in a measure, but you must finish up by returning a value (every measure must calculate a single value for each filter context).

Given the above, here’s what the measure could look like using variables:

% of full value 3 = 
VAR DiscountPriceSales = 
    SUMX(
        // from the sales table, sum 
        // the price * the quantity for each row
        Sales,
        [Price]*[Quantity]
    )
VAR ListPriceSales = 
    SUMX(
        Sales,
        // multiply the product's list price times
        // the quantity sold
        RELATED('Product'[ListPrice])*[Quantity]
    )
    
RETURN DiscountPriceSales / ListPriceSales

It’s important to realise that the two variables retain their value only while each measure is being calculated. A matrix displaying the above two measures might show this after formatting as a percent:

DAX will generate different values of the DiscountPriceSales and ListPriceSales measures for each cell in the filter context. Those who are experienced in programming in other languages should note that there’s no such thing as a public, static or global variable in DAX – at least, not yet.

Using Variables for Debugging

Variables are worth using in their own right since they break complicated formulae up into smaller, more manageable chunks. However, they also have another advantage – they allow you to debug code. Suppose you think you have a problem with the formula above (the version using variables). You could comment out some lines to experiment:

The above example will just show the value of the first variable, but when you’re happy that this is working OK, you could change things to show the value of the second variable:

When you’re happy about this too, you could reinstate the original formula.

DAX Studio

I’d like to show how I managed to produce many of the code diagrams above quickly, using a free standalone DAX editing tool called DAX Studio. You can download DAX Studio here (one of a few possible download sites, actually), and then install it in the standard Windows way.

To use DAX Studio, first create a Power BI Desktop report – I’ve saved the one I’m working on as Variables example.pbix:

When you run DAX Studio, you can choose to connect to this data model:

As the above diagram shows, you can link directly to a Power BI or SSAS Tabular data model. To link to a model in PowerPivot, you should install the Excel add-in option for DAX Studio which is out of scope for this article.

Here’s a quick run-down of some of the things you can do in DAX Studio. Firstly, it gives you great colour-coding:

Secondly, you can zoom in and out by holding down the Ctrl key and using your mouse wheel, or by using this dropdown, although Power BI has just introduced this feature, at long last):

Thirdly, you can drag table and column names from the model’s Metadata on the left into the formula window:

This example would give the following:

And fourthly, you can easily comment out or comment back in blocks of code which is how I produced my variable measure so quickly. To do this just select the block of text that you want to comment out, or back in, then click on the appropriate tool in the DAX Studio ribbon:

Here’s what this would give:

However, the single best thing about DAX Studio – and the reason I use it extensively – is a very simple one. When you press the ENTER key in DAX Studio, it adds a new line rather than assuming that you’ve finished creating your formula and hence trying to validate it.

DAX Studio does have one big drawback, however – you can’t use it to test a measure. After having painstakingly created a formula, it’s then up to you to select the text which comprises the formula, and then copy this back into Power BI Desktop. It’s worth noting that when you’re writing DAX queries as shown in this article by Robert Sheldon the exact opposite is true – you can run the DAX Queries in DAX Studio, but not within Power BI Desktop).

Quick Measures

Future articles in this series are going to take you a long way down the murky rabbit-hole that is DAX, but it’s worth mentioning that you don’t actually have to write a single formula yourself – you could let Power BI do it for you, using a built-in wizard called Quick Measures. Opinion in Wise Owl is deeply divided on this subject (it’s the Marmite of the DAX world, although I’m not sure that a UK cultural reference like this will travel well!). Some of our trainers love quick measures; I confess I don’t. On the plus side, they allow you to create complicated formulae very quickly, and without any typing. My objections to them are threefold:

They won’t help you to learn DAX, in fact, they might do exactly the opposite, as the formulae that they create can be quite off-putting;

Like all wizards, they generate over-complicated solutions; and

It’s not always obvious which calculation you should choose to use.

Using a quick measure is thus very similar to recording a macro in VBA: you’ll save yourself lots of typing, but the resulting code may be hard to understand, and it may well be written in a way which is often more complicated than a human would choose.

However, why not judge all this for yourself? Take a look at a couple of reasonably typical case studies of using quick measures: one to show the difference between each city’s sales and the sales figure for London, and one to show the chosen values for a slicer in a card.

For the first one, suppose you have a column chart showing the quantity of goods sold for each city:

You now want to show this figure relative to the figure for London, to produce this:

To do this, first create a quick measure by right-clicking on any table and choosing to create a new quick measure (although it makes sense to put your quick measures – just like your normal measures – into a dedicated table such as the All measures table we’ve been using):

Choose the calculation you want to perform – in this case, it’s to show the difference from a filtered value, although I don’t think this is that obvious!

Now drag the field in that you want to aggregate, summing the quantity of goods sold:

Finally, drag the field that you want to filter by from the fields on the right onto the Filter section of the dialog box to get this:

Power BI creates a new measure, automatically giving it a reasonably sensible name:

The measure generated – like many quick measures – makes copious use of variables. It probably won’t make a great deal of sense to you at the moment, as you haven’t yet seen the all-important CALCULATE function in this series of articles:

Quantity difference from London = 
VAR __BASELINE_VALUE = CALCULATE(SUM('Sales'[Quantity]), 
      'City'[CityName] IN { "London" })
VAR __MEASURE_VALUE = SUM('Sales'[Quantity])
RETURN
    IF(NOT ISBLANK(__MEASURE_VALUE), __MEASURE_VALUE - __BASELINE_VALUE)

For the second example, suppose you have a slicer by country:

You want to show the countries selected in a card:

To do this, you could create a quick measure using the same method as above and choose to concatenate the country values selected. You have to scroll right down to the bottom of the list of calculation options to find this quick measure:

You could now drag the CountryName field from the list of fields on the right onto your formula:

The number of values before truncation determines how many countries you’ll need to select before Power BI stops listing them, showing “etc.” instead. For example, if you leave this as the default value 3 – as above – and choose all of the countries, here’s what you’ll see:

Here’s what the measure generated for this example looks like:

List of CountryName values = 
VAR __DISTINCT_VALUES_COUNT = DISTINCTCOUNT('Country'[CountryName])
VAR __MAX_VALUES_TO_SHOW = 3
RETURN
    IF(
        __DISTINCT_VALUES_COUNT > __MAX_VALUES_TO_SHOW,
        CONCATENATE(
            CONCATENATEX(
                TOPN(
                    __MAX_VALUES_TO_SHOW,
                    VALUES('Country'[CountryName]),
                    'Country'[CountryName],
                    ASC
                ),
                'Country'[CountryName],
                ", ",
                'Country'[CountryName],
                ASC
            ),
            ", etc."
        ),
        CONCATENATEX(
            VALUES('Country'[CountryName]),
            'Country'[CountryName],
            ", ",
            'Country'[CountryName],
            ASC
        )
    )

This is pretty hard-core DAX and probably won’t make any sense at all at the moment. It’s basically doing the same thing twice – once for the case where the number of countries chosen is more than 3, and once for when it’s 3 or less.

Conclusion

In this article, you’ve seen that the best place to put measures that you create is in a separate table. You’ve seen that measures always involve aggregation, whether this be for a single column using functions like SUM, AVERAGE, and COUNT or for an expression using the same functions, but with an X suffix. These last functions are called iterator functions and create a row context for every row in the table to which they refer. I then showed how you can create and use variables, and how you can use DAX Studio to edit your measures. Finally, finishing with two case studies of how to create quick measures to avoid typing any DAX in at all. In the next article in the series, I’ll show how you can use the CALCULATE function to change the filter context, and I’ll even explain what that sentence means!


The post Creating Measures Using DAX appeared first on Simple Talk.


from Simple Talk http://bit.ly/2ETNkXL
via