It’s happened to every developer at some point; you’re trying to accomplish a simple task but the method to accomplish said task requires more lines of code than you would like. Surely it doesn’t have to be this way. This is often especially true in the world of game development, where there are often many steps required to accomplish one large goal. For example, suppose you wish to fade an object while your game is running. Two common ways to do this would be to tie the fade action to an animation and call this animation in code or interpolate some color values in your script to create the fade effect. While they get the job done, both methods require several steps to accomplish. What if there was something out there that could do all that work in a single line of code?
You might think this is wishful thinking, but the reality is that such a feat is very possible. A plugin for Unity, iTween, can give you the result you want with minimal effort required on your end. iTween is an animation plugin that uses interpolation systems to create animations that look and feel good. The goal of the plugin, according to its website, is to streamline the production of your Unity project and put you in the mindset of an action-movie director instead of a coder. Here you’ll be shown a small project demonstrating iTween’s simple use and what it can bring to your Unity project.
Setup
Of course, to use iTween, you’ll have to create a project (Figure 1) and import the iTween plugin into said project.

Figure 1: Creating a new project
Name the project iTween Demo. To better show off iTween’s use, it is recommended that the project be in 3D. Decide on a location for the project, then create it as shown in Figure 2.
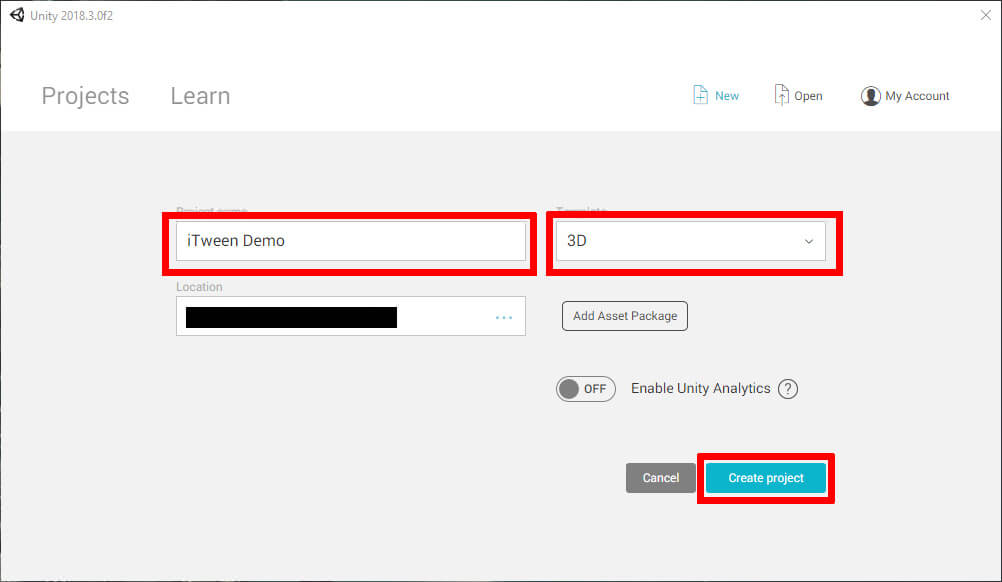
Figure 2: Project name, template, and creation.
First, you’ll have to get the iTween asset into your project. The easiest way to do this would be through Unity’s Asset Store. In the top menu, navigate to Window->Asset Store as shown in Figure 3.
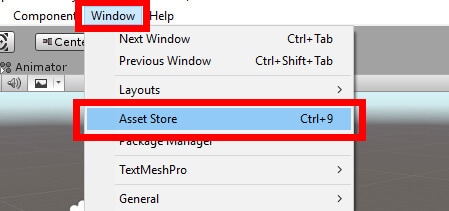
Figure 3: Opening the Unity Asset Store
Once the Asset Store has loaded, you will need to search for iTween. The item you’ll be looking for will have a matching name created by PixelPlacement and should be free. After selecting the asset, click the download button. Once the asset has finished downloading, you’ll be able to press the button again to import iTween into the project. Once the plugin is extracted you’ll be able to import it into the project, as shown in Figure 4.
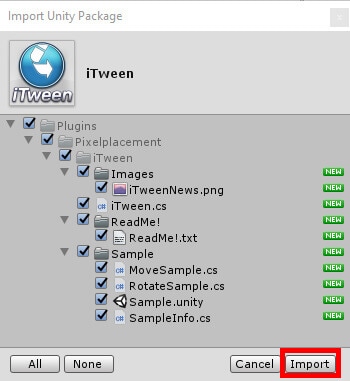
Figure 4: Importing iTween
After the package manager is finished loading, click Import near the bottom of the window to put iTween into your project. The example project will also need some music and a single sound to test out iTween functionality. If you need some recommendations, Loop & Music Free by Marching Dream and Sound FX – Retro Pack by Zero Rare will have what you need for sound effects. With all your assets in place, close out the Asset Store and begin setting up the project. The Assets window should look similar to Figure 5.
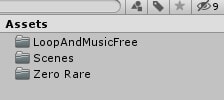
Figure 5: The current Assets window
To begin, two objects will need to be placed within the game world. The first will be a regular cube that will showcase the iTween animations. Your cube object can be created by going to the Hierarchy and selecting Create->3D Object->Cube, as shown in Figure 6.
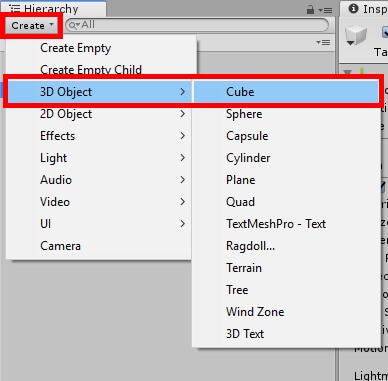
Figure 6: Creating a cube.
In its Transform component in the Inspector window, set the rotation to x -10, y 45, and z -30. After that, set the scale to 2 across all axes. Figure 7 shows how that should look.

Figure 7: Setting the rotation and scale of the cube.
Create another 3D object, this time a sphere. This object will give the Cube object something to look at in a specific iTween animation. Supposing the sphere was the moon, it can be placed in the sky. The exact coordinates are x -6, y 11, z 15. The scale and rotation remain the same. When complete, the scene should look similar to Figure 8.
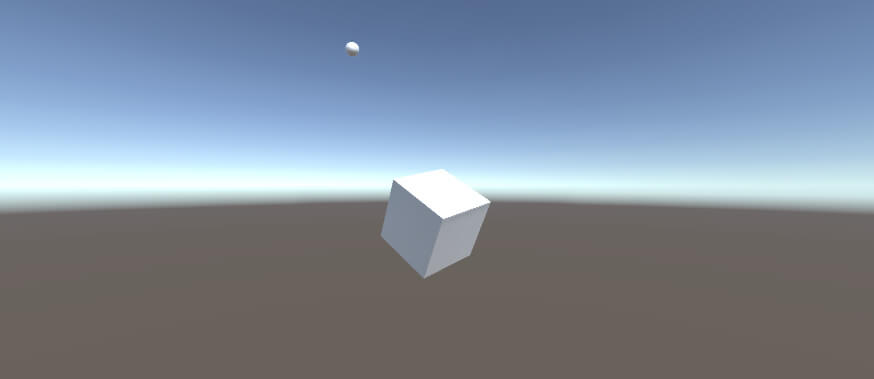
Figure 8: How the project currently looks
One last task remains before the coding part begins. Among other things, the Cube object will be able to fade in and out as though it used a cloaking device. However, its default material will not allow the fading. Instead, a new material will be created. In the Assets window right-click, then choose Create->Material as shown in Figure 9 and name the material FadeMat.
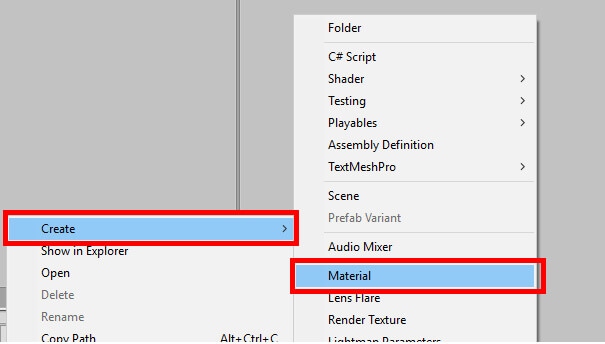
Figure 9: Creating a new material
Immediately after creating the material, navigate to the Inspector window and set its rendering mode to Transparent like Figure 10.

Figure 10: Setting the material’s rendering mode
Finally, the new material will need to be assigned to Cube. Select the Cube object, go to the Mesh Renderer component in the Inspector window, and click the arrow next to Materials. Then click and drag the FadeMat material from the Assets window into the Element 0 field under Materials. Figure 11 shows you how to do this.
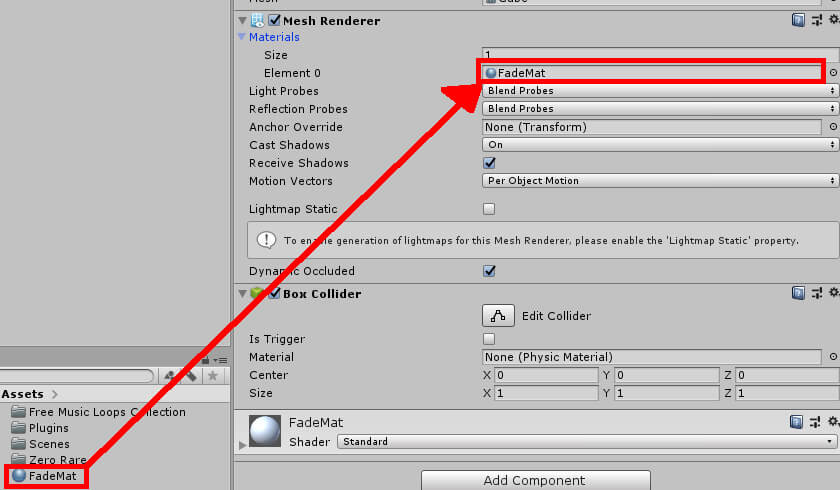
Figure 11: Setting Cube’s material
All that’s left is a sound manager for the sound effect that will be played later. Create a new object, this time an Audio Source object. It can be created via Create->Audio->Audio Source. Name it SoundManager, and then the setup will be complete. To begin coding the project, create a new asset in the Assets window, this time a script, and call it Actions. Once created, double click the script to open it in Visual Studio.
The Code
To start, you want to make this script require the object it’s attached to have an AudioSource component. Doing this requires the following line of code above the class declaration:
[RequireComponent(typeof(AudioSource))]
Once the Actions script is attached to the object, it will automatically add this AudioSource component for you. In addition, it will prevent the removal of this component so long as the Actions script component is also attached. Next, the Start and Update functions can be removed or commented out as they will not be needed. Then you get variable declaration out of the way.
public Transform lookObject;
public AudioSource otherAudio;
public AudioClip stabSound;
public MeshRenderer mr;
The Transform variable, lookObject, will hold the Transform information from the Sphere object created earlier. One of the iTween animations the project will use will involve the Cube looking at the Sphere, but in order to do that, it will need to know where the Sphere is. Following this is the otherAudio variable, which will reference SoundManager‘s AudioSource component and stabSound which, despite the violent sounding name, has nothing to do with sharp objects. This is in reference to a sound that will be played using iTween’s Stab command, which will be covered later. Finally, there’s mr, which will contain information about the Cube object’s MeshRenderer component. This is how the object’s colour will be reset when you want to stop an iTween animation.
At this point, the script should look similar to Figure 12.
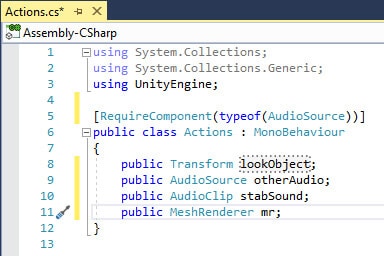
Figure 12: Beginning of Actions script.
With everything prepared, the first thing to do is to develop a UI that will display some buttons and text. Ordinarily you might do this in the Unity Editor rather than in code, but for this project using Unity’s OnGUI method will work nicely. But what does OnGUI do? OnGUI is a method that handles the creation and execution of UI elements and functionality. It’s a helpful method for when you need a quick UI or to create showcases such as this.
private void OnGUI()
{
        GUI.Label(new Rect(600, 10, 150, 50), "# of iTweens running: "
            + iTween.Count());
}
After creating the method, the very first thing done is to create a GUI label. A new rectangle is created in this label that will contain some text. This text will display the number of iTween animations currently running using iTween’s Count method. Now several buttons will be created in the OnGUI function that the user can press to begin an iTween animation. The first three all relate to an object’s transform and look like this:
if (GUI.Button(new Rect(10, 10, 100, 20), "Move Object"))
        iTween.MoveBy(gameObject, iTween.Hash("x", 4, "easeType",
        "easeInOutExpo", "loopType", "pingPong", "delay", 0.3f,
        "onStart", "PlaySound"));
if (GUI.Button(new Rect(10, 30, 100, 20), "Rotate Object"))
        iTween.RotateBy(gameObject, iTween.Hash("y", 0.5f, "easeType",
        "easeInOutExpo", "loopType", "pingPong", "delay", 0.5f));
if (GUI.Button(new Rect(10, 50, 100, 20), "Scale Object"))
        iTween.ScaleBy(gameObject, iTween.Hash("x", 3, "y", 3, "z", 3,
        "easeType", "easeInOutExpo", "loopType", "pingPong",
        "delay", 1f));
Now would be a good time to break down what all of these are doing. First, you’re creating a new button in code and checking if this button is clicked. The button’s size and position are defined in the new Rect‘s parameters. Some text is created within this rectangle, and then you get to the button’s functionality the next line down. As you can see, all three buttons operate very similarly to each other. You first select which iTween action you wish to take, followed by setting which object should perform this action. In this case, the object is the one this script will be attached to, so the code just says gameObject.
Next, an iTween hash is defined. This is where you set what part of an object is to be animated, such as the x-axis, and how it will animate. In the MoveBy iTween for instance, you’ve told Unity to move the object on its x-axis to four and set the easeType to easeInOutExpo. The easeType in an iTween, as the name implies, is how the object will ease in and out of its animation. There is also loopType, which has been set to pingPong in all three animations. Using pingPong will cause the animation to play forward then backward over and over. You can also set the loopType to none and loop. Next is delay which allows you to set how much time you want to pass before the animation begins, and finally in MoveBy, you have an onStart parameter. OnStart is where you can define a method to perform upon the start of an iTween, in this case a currently undefined method named PlaySound. Speaking of which, perhaps now is a good time to create this method.
void PlaySound()
{
        iTween.Stab(gameObject, iTween.Hash("audioClip", stabSound,
              "audioSource", otherAudio, "volume", 1, "delay",
              0.35f, "loopType", "none"));
}
A new iTween has been introduced, named Stab. Admittedly it sounds rather vicious, but all it does is play a sound effect of your choosing. Like the earlier iTweens, Stab first asks you to select a game object then create a hash. This time the hash has you setting audioClip to the previously defined stabSound, which will come from the otherAudio AudioSource. The volume is set to 1, a delay is set, and Unity is told that there will be no looping. At this point, the script should so far look like the one in Figure 13.
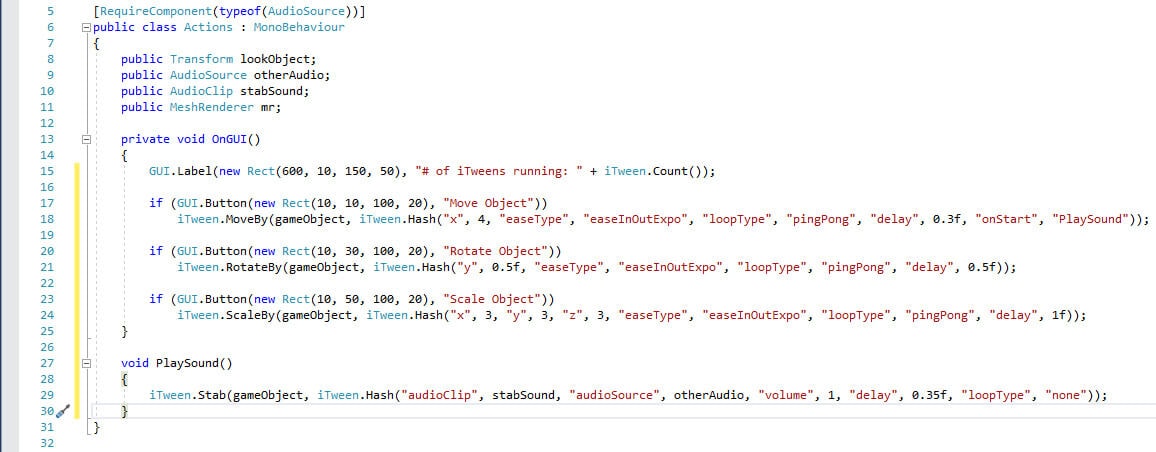
Figure 13: OnGUI and PlaySound methods.
Returning to the OnGUI method, the next few iTweens will deal with changing an object’s appearance as well as playing with the game’s music.
if (GUI.Button(new Rect(10, 70, 100, 20), "Color Object"))
        iTween.ColorTo(gameObject, iTween.Hash("r", 5, "easeType",
        "easeInOutExpo", "loopType", "pingPong", "delay", 0.5f));
if (GUI.Button(new Rect(10, 90, 100, 20), "Change Pitch"))
        iTween.AudioTo(gameObject, iTween.Hash("pitch", 0, "delay",
        1, "time", 3, "easeType", "easeInOutExpo", "onComplete",
        "ReturnAudio"));
if (GUI.Button(new Rect(150, 10, 100, 20), "Fade Object"))
        iTween.FadeTo(gameObject, iTween.Hash("alpha", 0, "time", 1,
        "delay", 0.35f, "easeType", "easeInOutExpo", "loopType",
        "pingPong"));
Perhaps you’re noticing a pattern here? Barring a few key differences, almost every iTween is structured the same way. The most significant difference is in which value is being changed. For example, in ColorTo, the object’s r (red) value is changing while RotateBy is adjusting the object’s y rotation value. This is one more reason for iTween’s appeal – that being the universal rules to using an iTween command. There are of course some exceptions such as Stab, and you can add or remove complexity of the commands on a whim like what was done with the AudioTo line. In this iTween, the opposite of the MoveBy's onStart parameter is being performed, onComplete. Once this iTween has finished its task, it will perform the ReturnAudio method. That method performs a slightly different iTween that demonstrates how you can control as much or as little of the iTween command as you wish.
void ReturnAudio()
{
        iTween.AudioTo(gameObject, iTween.Hash("pitch", 1, "time",
        1.6, "delay", 0.5f));
}
There are a few other animations this project is looking to demonstrate before the script is complete. The following code shows how you can create an animation that rapidly shakes the object, “punches” the object, and how an object can be made to look at another point in the world. Once again, all this is to be entered in the OnGUI method.
if (GUI.Button(new Rect(150, 30, 100, 20), "Look Object"))
        iTween.LookTo(gameObject, iTween.Hash("lookTarget", lookObject,
        "time", 1, "delay", 1, "easeType", "linear", "loopType",
        "pingPong"));
if (GUI.Button(new Rect(150, 50, 100, 20), "Shake Object"))
        iTween.ShakePosition(gameObject, iTween.Hash("amount",
        new Vector3(2, 2, 2), "time", 2, "delay", 0.5f, "easeType",
        "easeInBounce", "loopType", "loop"));
if (GUI.Button(new Rect(150, 70, 100, 20), "Punch Object"))
        iTween.PunchPosition(gameObject, iTween.Hash("amount",
        new Vector3(5, 5, 5), "time", 2, "delay", 1,
        "loopType", "loop"));
All of these animations involve feeding the code some kind of position or transform data to complete the task. For instance, LookTo has you giving lookTarget the transform data for lookObject, also known as the Sphere object created earlier. Similarly, ShakePosition and PunchPosition ask for Vector3 data to accomplish their goals. Now, the script is mostly finished but you might be wondering what one can do about all these looping animations. Naturally, there’s a way to stop all these animations immediately if so desired.
if (GUI.Button(new Rect(450, 10, 110, 20), "Stop Everything"))
{
        iTween.Stop();
        transform.position = new Vector3(0, 0, 0);
        transform.localScale = new Vector3(2, 2, 2);
        transform.eulerAngles = new Vector3(-10, 45, -30);
        mr.material.color = Color.white;
        iTween.AudioTo(gameObject, iTween.Hash("pitch", 1,
            "time", 1.6, "delay", 0.5f));
}
The code, in particular, is iTween.Stop which, you guessed it, stops all currently running iTweens. The remainder of the code resets the object’s position, scale, rotation, and colour. It also uses the same AudioTo command from the ReturnAudio method in case this is pressed in the middle of the audio’s pitch being brought down. Now that the script is complete, the only task left to do is save the script and go back to the Unity editor to finish some last-minute tasks.
Finishing the Project
Very little remains to be done before the project is complete. First, you’ll need to attach the Actions script to the Cube object. To make it easier to work with the Cube properties, you might want to lock the inspector. Figure 14 shows where to drag the Actions script.

Figure 14: Attaching the Actions script component to Cube
Notice an AudioSource component is attached to the Cube at the same time thanks to the RequireComponent class attribute from earlier.
In the AudioSource component, place a song of your choice into the AudioClip field, as shown in Figure 15. This is the song that will receive a pitch change thanks to the AudioTo command from earlier. You can also set Loop to true if you wish, but it is not required.

Figure 15: Selecting a music track
All that’s left is to fill in the fields from the Action script component. Look Object will be given the Sphere object’s Transform data, while SoundManager will fill the Other Audio field, as shown in Figure 16.
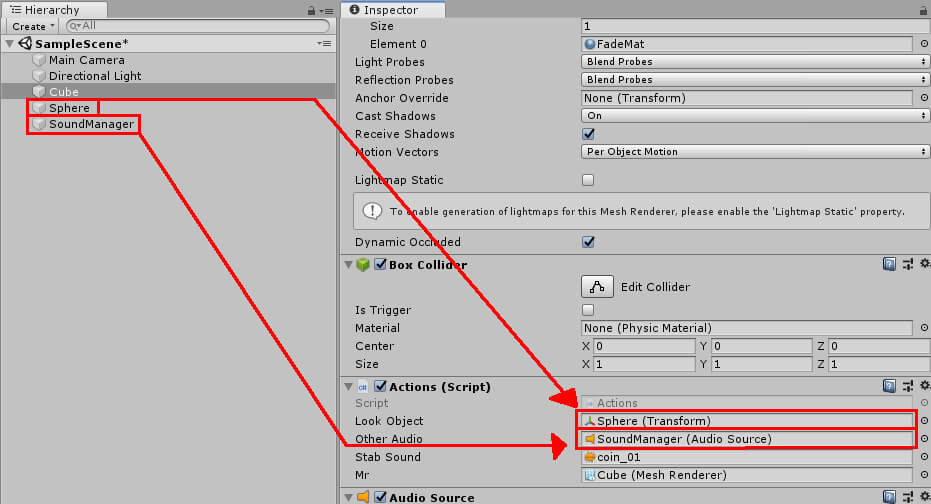
Figure 16: Filling Look Object and Other Audio fields
Stab Sound will be a sound effect of your choosing. Like when selecting the music for Cube‘s AudioSource component, you’ll need to drag some audio file from the Assets window into Stab Sound. Finally, Mr is filled by dragging Cube’s Mesh Renderer component into the Mr field shown in Figure 16.
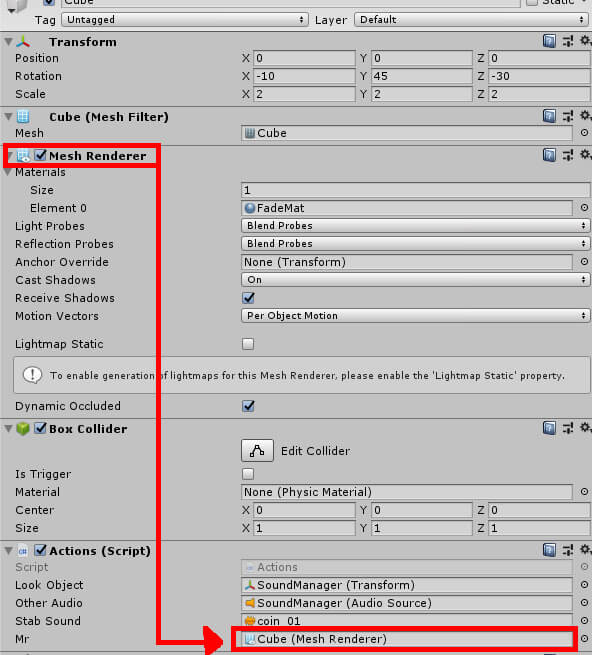
Figure 17: Filling the Mr field
Once all the fields are filled, you are ready to test out the project. The GUI you created in code will instantly appear and clicking any of the buttons will perform their respective tasks. Try mixing and matching iTweens so, as an example, you can have it changing size while rotating. You can also adjust the position of the Sphere object to get a slightly different result when clicking the Look Object button. Figure 18 shows the GUI once you are playing the game.
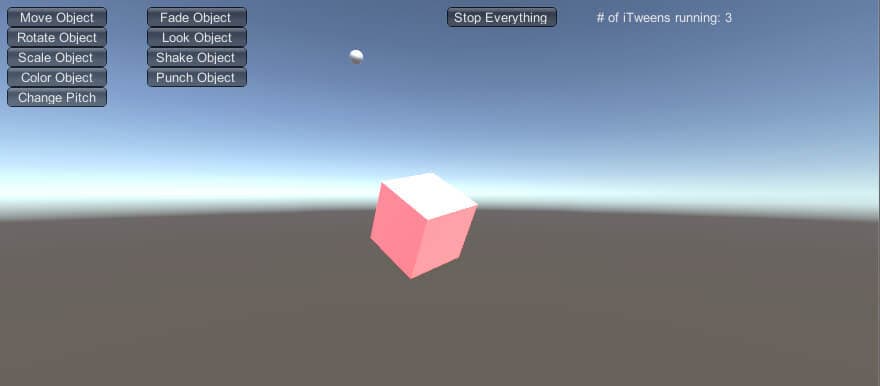
Figure 18: The finished project
Conclusion
It almost feels like cheating when using iTween, doesn’t it? What’s normally a three to five-step process can be simplified into one step, consisting of one line of code. The examples shown here are just a small sampling of what iTween can do. You can check out iTween’s website to see more examples as well as some documentation showing all the different commands available to you. Whether it be used for prototyping or giving your current development a nice boost, there’s plenty of reason to consider having the iTween plugin on hand for any project.
The post Using the iTween Plugin for Unity appeared first on Simple Talk.
from Simple Talk https://ift.tt/2mmTl8n
via
No comments:
Post a Comment