Thursday, April 30, 2020

Right-Sizing Row Mode Query Memory Requirements

In older versions of SQL Server (prior to SQL Server 2019, aka 15.x), SQL Server memory grant feedback supported was added, but only for batch mode queries. Queries that use batch mode performing scanning and calculations on up to 900 rows at a time, versus row mode that only processes one row at a time. With the introduction of version 15.x, memory grant feedback has been expanded to support row mode queries as well.

What is memory grant feedback? At a high level, memory grant feedback is the process of tuning the memory grant requirements of a given query based on how much memory was used the last time the query ran. Meaning if a cached query used too much memory the last time it executed, then SQL Server uses the memory grant feedback information to reduce the memory for the next execution of the same query. Or if SQL Server detected a query spilled to disk because not enough memory was allocated the last time, then it increases the amount of memory for the next execution to hopefully eliminate the costly spill to disk operation. The goal of memory grant feedback is to adjust the memory requirements of a cached query each time a query is executed until the query uses the appropriate amount of memory based on the number of rows being processed.

The Memory Grant Feedback features (batch and row mode) are part of the into the Intelligent Query Processing (IQP) feature set. See Figure 1 for a diagram that shows all the IQP features introduced in Azure SQL Database and SQL Server 2019, as well as features that were originally part of the Adaptive Query Processing feature included in the older generation of Azure SQL Database and SQL Server 2017.

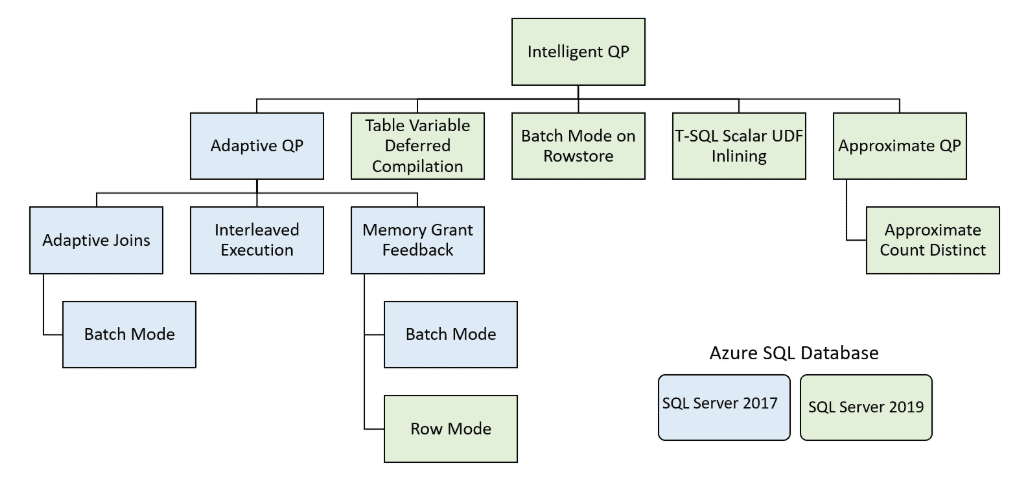
Figure 1: Intelligent Query Processing

To better understand how memory grant feedback works, let me explore the memory grants required for a specific query as it is executed the first time and then is adjusted over time for each subsequent execution.

Exploring How Memory Grants Change Over Time

In order to explore how memory grants change over time, I will execute a given query over and over again. Each time it runs, I will show you how much memory was allocated and used by the query, as well as the additional feedback provided to help the databases engine adjust the memory requirement each time the query runs. To explore how the new version of SQL Server, version 15.x, adjusts memory requirements over time, I will run a query that executes against the WideWorldImporters database which can be downloaded here. The specific query to test the row mode memory grant feedback feature can be found in Listing 1.

Listing 1: Test Query

USE WideWorldImporters;
GO
SELECT * FROM Sales.Orders 
ORDER By  OrderDate;

Before testing this query, let me review why the memory grant information is incorrect and perform a few setup steps to prepare for testing the new row mode memory grant feedback feature.

Why is the Memory Grant Information Incorrect in the First Place?

There are many factors that make up how much memory a given query requires. The query optimizer needs to consider the memory requirements of each operation of an execution plan when calculating the total amount of memory to grant. Here is a list of some of those things the optimizer considers when calculating the amount of memory to grant to a query:

  • Cardinality numbers of tables involved in query
  • Column being selected
  • Estimated size of each row.
  • Will the data read need to be sorted and/or joined
  • Does the query go parallel

SQL Server needs to consider all the different aspects of where memory will be needed to successfully process a given query, in order to calculate the amount of memory to grant. If too much memory is granted then SQL Server is wasting memory that could be used for other processes. Or if to little memory is granted then a query will spill to disk, which is an costly operation.

SQL Server doesn’t always do a good job of calculating the amount of memory to grant the first time around. Out of date or inaccurate statistics are the most common reasons why SQL Server calculates the wrong amount of memory to grant. But even when the statistics are correct SQL Server might over or underestimate the amount of memory to grant for some other reason. One of those other reasons is when SQL Server calculates incorrectly calculates the Estimated Row Size for columns being returned. My code used for testing this new memory grant feedback feature will show how an over estimation on row size causes my test query to get an excessive grant warning, due to the three NVARCHAR(MAX) columns I included that are always NULL.

At least now when SQL Server incorrectly calculate the amount of memory to grant, the memory grant feedback feature can be used to improve memory allocation for subsequent runs. Each time a query is executed, the memory usage feedback information from the prior execution is used to determine if the memory allocation needs to be adjusted for the current query. If the memory allocation used the last time around was less than ideal, then the database engine adjusts the memory allocation appropriately for the query.

Setup for Initial Execution of Test Query

To show you how memory allocation is adjusted over time for the test query, I will need to do a few things first. The first requirement is to set the compatibility level of the WideWorldImporters database to 150. I have to do this because the Memory Grant Feedback – Row Mode is only available if the database is running in compatibility level 150. The code in Listing 2 sets the database to compatibility level 150.

Listing 2: Setting Compatibility Level to 150

ALTER DATABASE WideWorldImporters SET COMPATIBILITY_LEVEL = 150;
GO

The next thing to do is clear out the procedure cache with the code in Listing 3. I do this so when I run the test query, the engine will create a new cached plan for the test.

Listing 3: Clear the procedure Cache

USE WideWorldImporters;
GO
ALTER DATABASE SCOPED CONFIGURATION CLEAR PROCEDURE_CACHE;
GO

With the environment all set up, I’m ready to perform the initial execution of the test query in Listing 1.

Initial Execution of Test Query

To show the amount of memory that is used by the test query and the feedback that the database engine provides, I will review information from the actual execution plan from each execution of the test query.

When I run the code in Listing 1 the first time, I get the execution plan displayed in Figure 2.

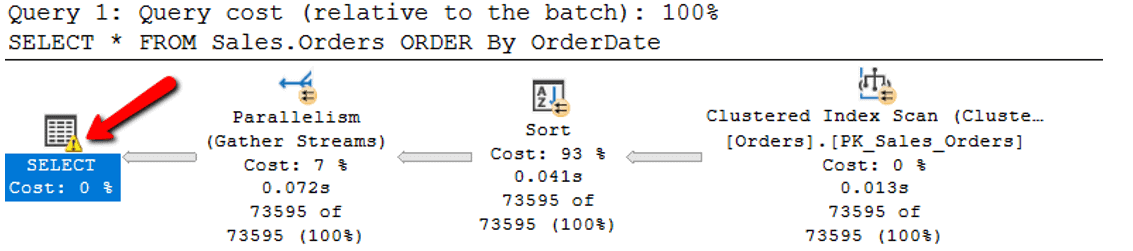
Figure 2: Execution plan for initial execution of Listing 1

As you can see, the SELECT icon shows a warning sign, as pointed to by the red arrow in Figure 2. Hovering over the SELECT icon shows the information in Figure 3.

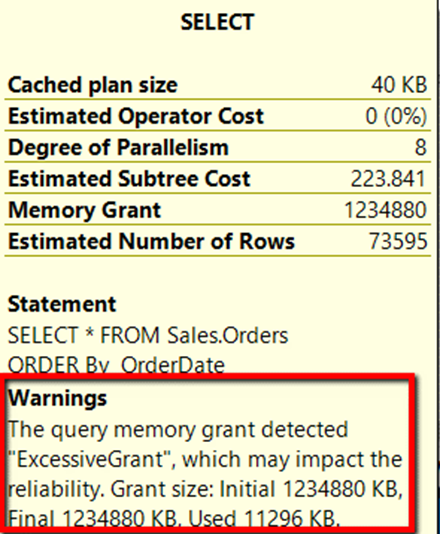
Figure 3: Select properties of first execution.

The SELECT statement information shows an excessive grant warning. The query was granted 1,234,880 KB of memory, but it only used 11,296 KB. This means the query allocated much more memory than what the query needed.

With version 15.x of SQL Server, two new attributes were added to the MemoryGrantInfo section of the SELECT properties of the execution plan. These two new attributes are IsMemoryGrantFeedbackAdjusted and LastRequestedMemory. These two attributes provide the feedback required to adjust memory for the next execution of the query. You can find these two new attributes by viewing the MemoryGrantInfo in the graphical execution plan. To display this information, first hover over the SELECT icon in the execution plan, right-click and then select the Properties option from the menu displayed. These new properties for the query display in the expanded view of the MemoryGrantInfo item, as shown in Figure 4.

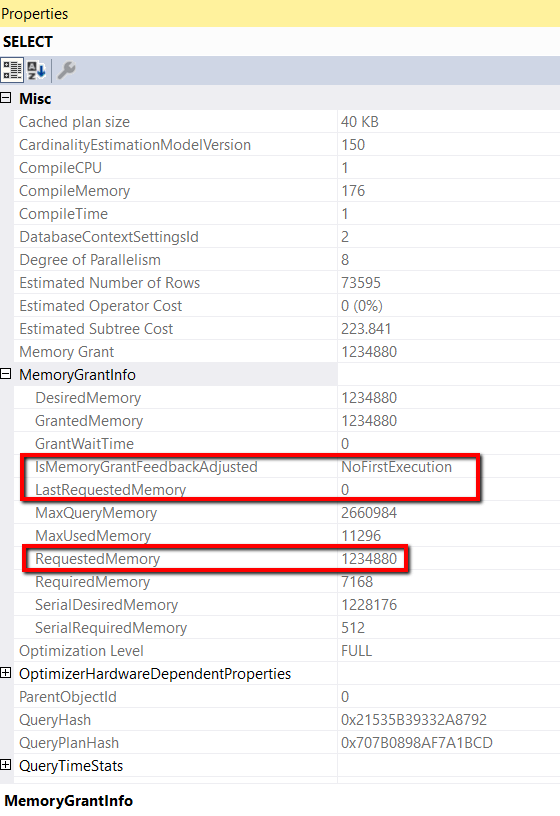
Figure 4: Memory Grant Information

In the initial run of the test query, the IsMemoryGrantFeedbackAdjusted property is set to NoFirstExecution and the LastRequestedMemory property value is set to 0. The RequestedMemory setting has a value of 1234880. This is the amount of memory that was requested when I ran the query the first time. To better understand the new feedback properties, let me explore the values these properties could have.

Understanding the new MemoryGrantInfo Feedback Properties

These two new feedback properties are set each time a query runs. The values set for these feedback properties are based on what the database engine learned during the execution of the query. The feedback information is stored in the cached plan for the next execution of the particular query from the cache. When the next execution is starting, it uses this feedback to determine if the memory should be adjusted.

The IsMemoryGrantFeedbackAdjusted property has 5 different values, which can be found in Table 1.

Table 1: Description of possible IsMemoryGrantFeedbackAdjusted values

IsMemoryGrantFeedbackAdjusted Value

Description

No: FirstExecution

Memory grant feedback does not adjust memory for the first compile and associated execution.

No: Accurate Grant

If there is no spill to disk and the statement uses at least 50% of the granted memory, then memory grant feedback is not triggered.

No: Feedback disabled

If memory grant feedback is continually triggered and fluctuates between memory-increase and memory-decrease operations, we will disable memory grant feedback for the statement.

Yes: Adjusting

Memory grant feedback has been applied and may be further adjusted for the next execution.

Yes: Stable

Memory grant feedback has been applied and granted memory is now stable, meaning that what was last granted for the previous execution is what was granted for the current execution.


By using Table 1, I can verify that when I ran the test query above it was the first time the query had been run from the procedure cache because the value displayed in Figure 4 was NoFirstExeuction.

The LastRequestedMemory property shows the amount of memory requested, in Kilobytes (KB), the last time the query was run. Since I was running the test query for the first time, the value was set to 0.

Let me run the test query a second time to see how the database engine uses these feedback properties to improve the memory allocation for the second execution.

Second Execution of Test Query

After running the test query a second time, the yellow warning sign shown in the first execution has now gone away, as shown in Figure 5.

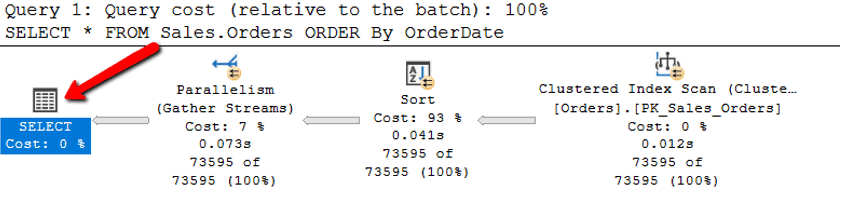
Figure 5: Execution Plan for Second Execution of the test query

The MemoryGrantInfo properties of the SELECT icon for the second execution of the test query shows that some of the feedback property values have changed as well as the amount of RequestedMemory. The MemoryGrantInfo properties from this second execution can be found in Figure 6.

in

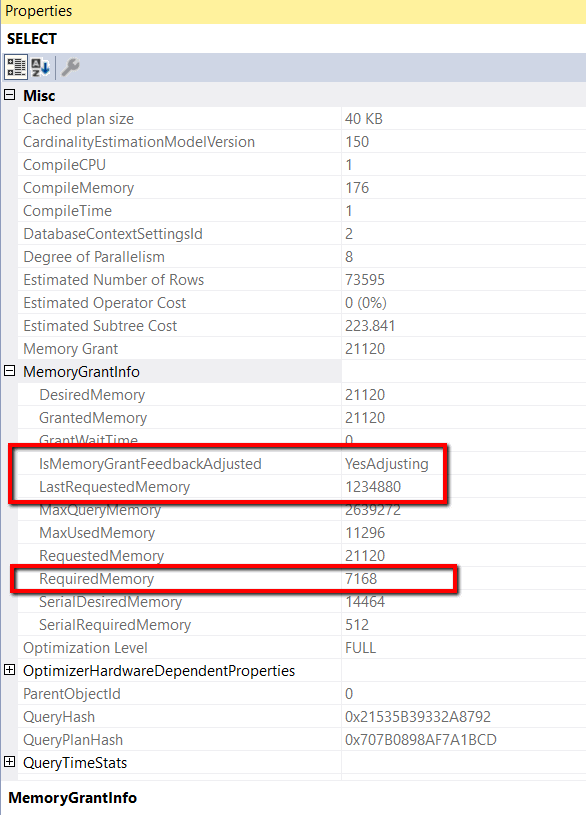
Figure 6: MemoryGrantInfo properties for the second execution

The IsMemoryGrantFeedbackAdjusted property in Figure 6 shows that this property is now set to YesAdjusting. This status means that memory feedback was applied to the second execution of the query. Additionally, the LastRequestedMemory is now set to 1234990, which is the amount of RequestedMemory from the first execution of this query. The RequestedMemory property shows that the second execution of the query requested only 2304 KB of memory. This value is considerably less than the amount of memory requested for the first execution.

Before rerunning the query, I should probably note something I ran into when testing memory grant feedback properties between different runs of the test query. What I found was, that if I waited too long between subsequent query execution, that the execution plan might be evicted from the procedure cache between executions. When this happens, the IsMeoryGrantFeedbackAdjusted property value will be set to NoFirstExecution, which indicates that the subsequent runs were really the first execution since being placed in the procedure cache. Therefore, to see the progression of memory grant feedback working between executions, I had to execute each of subsequent execution fairly quickly after the prior execution to avoid the cached plan eviction problem. By doing this, the test query stays in the procedure cache.

Third Execution of Test Query

After executing the query a third time, the MemoryGrantInfo properties can be found in Figure 7.

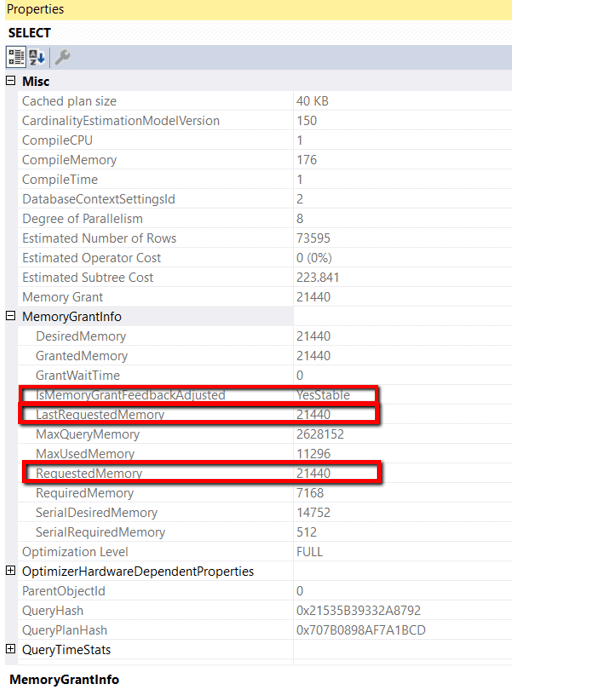
Figure 7: SELECT properties for the third execution of Listing 1

The IsMemoryGrantFeedbackAdjusted now says YesStable. This means the third execution had the same memory allocation as the second execution. I verified this by comparing the LastRequestedMemory and the RequestedMemory values to make sure they are the same. For the test query, the memory grant feedback feature allowed the query to request the appropriate amount of memory after three executions.

When Memory is Not Stable

There are some queries where the memory allocation amounts might never be consistent between executions of the same cached plan. When this occurs, SQL Server gives up trying to adjust memory and disables memory grant feedback for the query. One situation where this occurs is when you have a stored procedure that might have different parameters values passed for each execution.

To show a situation when SQL Server disables memory grant feedback, I will execute a test stored procedure multiple times. For each execution, I will vary a parameter for the stored procedure. By doing this, the query within the procedure will require different amounts of memory for each execution, due to different numbers of records being processed for each of the different parameter values. The code for the test stored procedure can be found in Listing 4.

Listing 4: Test Stored Procedure

USE WideWorldImporters;
GO
CREATE OR ALTER PROC TestProc (@KeyValue int)
AS 
SELECT * FROM Sales.Orders 
WHERE OrderID > 1 and OrderID < @KeyValue
ORDER By  OrderDate

The stored procedure in Listing 4 accepts a parameter named @KeyValue. The code to test the stored procedure can be found in Listing 5.

Listing 5: Code to call Test Stored Procedure

DECLARE @I INT = 1;
DECLARE @TestKeyValue INT;
WHILE @I < 35
BEGIN
        IF @I % 2 = 0
         EXEC TestProc @KeyValue = 20000;
        ELSE 
         EXEC TestProc @KeyValue = 100;
        SET @I = @I + 1; 
END

By looking at the code in Listing 5, you can see I will be executing the stored procedure 35 times. For each execution of the test stored procedure, this code alternates the @KeyValue parameter value between the 20000 and 100. When the parameter is set to 20000, the query returns 19,998 rows, but when then parameter value is 100, it returns only 98 rows. As you can guess, each execution requires different amounts of memory, because the number of rows processed is so drastically different for each parameter value.

To test the code in Listing 5, I will execute it from an SSMS query window and will display the actual execution plan. After I executed the code, I reviewed each of the execution plans to determine how the memory grant feedback feature affected the execution plan attributes for each execution. What I found was, from the 2nd execution of the test stored procedure through the 32nd, the IsMemoryGrantFeedbackAdjust property of the SELECT statement had a value of YesAdjusting. Eventually, on the 33rd execution, SQL Server gave up trying to adjust the memory for the test stored procedure and disables memory grant feedback. In Figure 8, you can see the MemoryGrantInfo proprieties for the 33rd execution of the stored procedure.

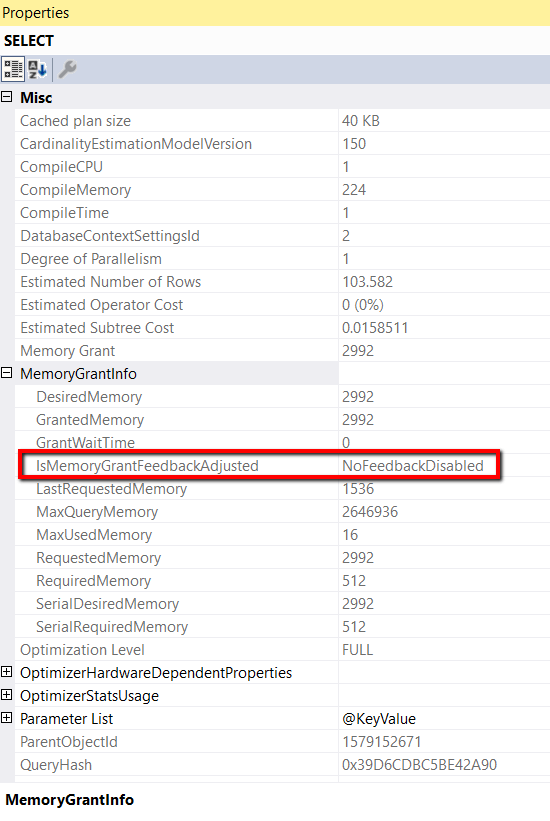
Figure 8: Memory Grant Feedback Disabled on 33rd Execution

As you can see that the IsMemoryGrantFeedbackAdjusted setting is set to NoFeedbackDisabled. This means that the database engine was not able to use the feedback to get a stable memory allocation for the stored procedure, so it decided to disable memory grant feedback for the query. All the subsequent executions of the test stored procedure after the 33rd execution all have memory grant feedback disabled.

Not All Queries Need to use Memory Grant Feedback

Sometimes SQL Server guesses the amount of memory correctly the first time around, so memory grant feedback is not used in subsequent queries. Let me demonstrate this by running the code in Listing 6.

Listing 6: Test Code for Correct Memory Allocation

USE WideWorldImporters;
GO
SELECT * FROM Sales.Orders
WHERE OrderID < 3
ORDER BY OrderDate;

When I run the code in Listing 6, I get the execution plan in Figure 9.

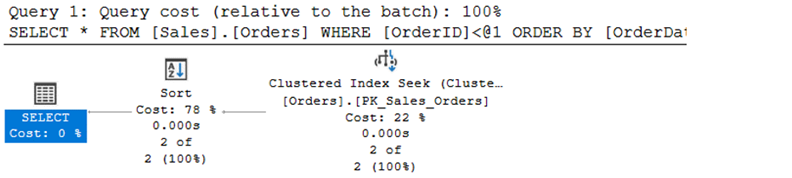
Figure 9: Execution plan when running code in Listing 6

The MemoryGrantInfo properties of the execution plan when running the code in Listing 6 shows that this is the first execution by looking at the IsMemoryGrantFeedback adjusted. Also, the query requested 1024 KB of memory shown by looking at the Requested Memory property. These values can be seen by reviewing Figure 10.

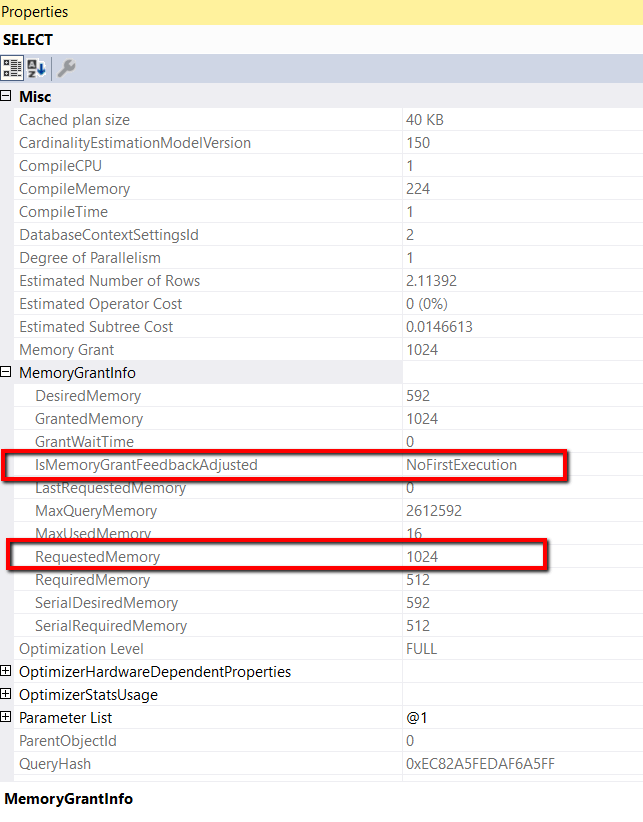
Figure 10: MemoryGrantInfo for the first execution of the query

The memory grant information for the second execution can be seen in Figure 11.

Figure 11: MemoryGrantInfo for the second execution

For the second execution, the IsMemoryGrantFeedbackAdusted is now set to NoAccurateGrant. This status means the second execution didn’t need any more memory, so memory grant feedback was not triggered. This can be verified by noting that the RequestedMemory is the same in Figure 10 and 11.

Turning off Memory Grant Feedback

If for some reason, you would like to turn off memory grant feedback for row mode, there are a couple of ways to do this. The first one is to set the database to a compatibility level of less than 150. The only problem with this is that it also turns off all the other features that come with version 15.x. Alternatively, if you only wanted to turn off memory grant feedback for the WideWorldImporters database, you could set the ROW_MODE_MEMORY_GRANT_FEEDBACK database scoped configuration option to off, by using the script in Listing 7.

Listing 7: Turning off Memory Grant Feedback for a database

USE WideWorldImporters;
GO
ALTER DATABASE SCOPED CONFIGURATION SET ROW_MODE_MEMORY_GRANT_FEEDBACK = OFF;
GO

Listing 7 changes the database configuration to turn off the memory grant feedback feature at the database level. By doing this, no queries will use row mode memory grant feedback when running against the WideWorldImporters database. This is not the only way to disable row mode memory grant feedback. You can also disable memory grant feedback for row mode on a single query by using a query hint, as shown in Listing 8.

Listing 8: Using a Query Hint to Disable Memory Grant Feedback

USE WideWorldImporters;
GO
SELECT * FROM Sales.Orders 
ORDER By  OrderDate
OPTION
 (USE HINT ('DISABLE_ROW_MODE_MEMORY_GRANT_FEEDBACK'));

In Listing 8, the DISABLE_ROW_MODE_MEMORY_GRANT_FEEDBACK query hint disables Memory Grant Feedback for a single query.

Right-Sizing Row Mode Query Memory Requirements

Memory grant feedback for batch mode has been around for a while. But it wasn’t until the rollout of version 15.x that memory grant feedback was available for row mode queries. To enable memory grant feedback for row mode queries, all that is needed is to set a database to run under compatibility level to 150, which of course only works if you are running on the current version of Azure SQL database, or SQL Server 2019. When Row Mode Memory Grant Feedback is enabled, SQL Server uses the memory allocation feedback information for the last execution of a cached query to adjust the memory allocations for the current execution. By adjusting memory, for each execution of a query, using the memory grant feedback feature, a given row mode queries will automatically have their memory allocation right-sized over time.

The post Right-Sizing Row Mode Query Memory Requirements appeared first on Simple Talk.


from Simple Talk https://ift.tt/3cYCnSj
via

Integrating ASP.NET Core with gRPC

Have you ever dealt with RPC? It stands for Remote Procedure Call, a famous term from distributed computing for when you need to call a service routine from one machine to another . It’s like the basics for anyone who wishes to create REST/SOAP requests or GraphQL architectures. You need to understand a bunch of concepts like parallelism, clusters, network latency, failover and fallbacks, just to get started.

Although it’s an interesting topic to discuss, that’s not the focus here. I’ll talk about gRPC, the official Google’s modernization of the protocol into a powerful framework. It is modern, open source and can run in any type of environment. It adds inherent load balancing, tracing, health checking and authentication (this one, by the way, is required right at the beginning).

Before you start thinking that Google wants to “remake” the web, since you already have HTTP and web services to provide such features, gRPC goes a bit beyond. It’s based in HTTP/2 which, automatically, says it’s much faster. Besides that, Google redesigned it in a way speed is at the top of the priority list.

In always-needy architectures like those huge companies (like Netflix, Cisco and Google itself) have, efficiency is a must. Microservices and distributed systems may communicate with each other through protocols and channels that should be fast.

Think about it: if you choose RESTful, there’s a couple of design patterns and rules you need to obey. In turn, you’re going to be working under HTTP (verbose) and making hundreds of calls because your code design can’t be messed up by ugly endpoints. While there are already have options like GraphQL, for example, does it really need to communicate with HTTP-only?

If your client and server applications are made by you (or your company), and there’s no need to expose it out there (still, options would be available through public Web Services, API Gateway, etc.), why not?

It’s faster, available to 10 programming languages (including web, i.e., JavaScript into Docker images), bi-directional (for cases where you need constant data flowing through streams from both sides) and so much more.

All the magic happens with Protocol Buffers and stubs. Of course, protobuf is Google’s as well. It’s their language/platform-neutral mechanism for data serialization and deserialization. The good news is that you’re not stuck into the proto universe, gRPC is encoding agnostic too, which means that JSON, XML, etc. can also be used to serialize the data if you prefer so.

Like everything else, there are pros and cons. While it is good to have the familiar JSON syntax, protobuf allows validations, data types, service creation. On the other hand, it is not human readable, hard to decode and takes more time to process compared to JSON.

This is how a gRPC workflow takes place:

Protobufs > protoc > generated code/stubs > client/server

First, you create your proto files, defining not only the data structure, types and validations but also the services to be implemented by the server app along with the contract to be followed by the client stubs.

Then, depending on the language and platform you’re using, and after you compile it (protoc, the proto compiler), some code is going to be autogenerated, based on those definitions. After that, you can create your server and client code.

It’s time to stop talking now and move to action. For this article, I’ll demonstrate how to create a gRPC server based in a proto contract, as well as two clients: one for a Console App and another for a fully-functional web application (made with ASP.NET Web MVC), for you to check how this type of integration works for the two worlds.

Setup

Please, make sure you have the latest version of Visual Studio (Community Edition). When installing it, check the ASP.NET and web development workload. If you already have VS installed, but not this workload, please refer to this link. Finally, .NET Core 3.0 SDK (or later) is also needed.

There’s no need to install anything related to gRPC. Visual Studio already has presets for it, and the rest are NuGet dependencies.

Open Visual Studio and go to “Create a new project” option. (The completed project can be found here.)Then, search for the “grpc” term and select the option like below:

Tela de celular com publicação numa rede social Descrição gerada automaticamente

Figure 1. Creating a new gRPC service project

Click Next. Then, type the name of the project like in Figure 2, select the directory of preference and click Create.

Tela de celular com texto preto sobre fundo branco Descrição gerada automaticamente

Figure 2. Giving the project a name

For the next screen, select the only available option “gRPC Service” and, finally, click the Create button.

Take a look at the generated files:

  • greet.proto: this is the protobuf file I mentioned earlier. Here, you get to see:
    • The syntax. It’s important because it tells which version of protobuf syntax is used in the file.
    • The optional namespace for the C# service. This option comes just because it’s using the VS gRPC template. Giving a proper namespace is important since the autogenerated code reflects this setting.
    • The service, Greeter. This config sets the methods (types, params and returns) of the interface contract. It’s here where you say how clients and servers communicate with each other.
    • The types. For each different object that is not a primitive type, you need to declare it as a message. It is like the class you’re used to. Note also that each message’s attribute must receive a type (primitive or another message), a name and a number. The number refers to the order of that attribute in the message.
  • The Services folder: the implementation, also autogenerated, of each service declared in the proto.
  • The rest of the files are just the common ones.

Have a look at Startup.cs. There, the methods to configure the services add gRPC services to the service collection, mapping to the generated service class. You don’t need to change anything here.

Now move to the Console App client. Open a new instance of Visual Studio and create a new project again. This time, a Console App (.NET Core). Click Next, enter a name for the project and click Create.

Nothing new. However, note that no gRPC template was applied to this project. It means that you still need to add the dependencies via NuGet. For that, open the Package Manager Console (via Tools > NuGet Package Manager) and run the following command:

Install-Package Grpc.Net.Client
Install-Package Google.Protobuf
Install-Package Grpc.Tools

Those are important because they implement the client for gRPC in .NET Core projects, as well as the API for protobuf handling in C# and the autogenerating code features.

Since the proto file is the contract between both worlds, you need to copy the greet.proto (along with the folder) generated in the server project to this one. Then, edit the .csproj file by right-clicking the project and, then, “Edit Project file”. Add the following:

<ItemGroup>
  <Protobuf Include="Protos\greet.proto" GrpcServices="Client" />
</ItemGroup>

That reference is important so the gRPC tools can autogenerate code by the proto file. For that, after everything’s saved, build the project. No code file is visible in the project tree; they’ll be in the background.

Now, update your Program.cs file to the following:

Listing 1. Calling the gRPC service.

using System;
using Grpc.Net.Client;
using SimpleTalkGrpcService;
namespace GrpcGreeterClient
{
    class Program
    {
        static async Task Main(string[] args)
        {
            using var channel = GrpcChannel.ForAddress("https://localhost:5001");
            var client = new Greeter.GreeterClient(channel);
            var reply = await client.SayHelloAsync(
                              new HelloRequest { Name = "GreeterClient" });
            Console.WriteLine("Greeting: " + reply.Message);
            Console.WriteLine("Press any key to exit...");
            Console.ReadKey();
        }
    }
}

Everything works around the GrpcChannel class. It opens the channel (if it is on, obviously) and returns the channel to that connection. Now, it’s time to make use of the autogenerated object via Greeter class: you instantiate its service constructor by passing the channel as a parameter. The rest is just methods and attributes created in the proto before being used in C# code.

In order to test, just start first the service and wait for it to print the info messages at the console, then start the client. You’ll see the following message:

Greeting: Hello GreeterClient
Press any key to exit...

Congrats! This is your first client-server example working.

Simple, isn’t it? Time to complicate a bit more with a web application involved.

Creating the ASP.NET example

The second example includes a web page that is going to be managed by jQuery and Ajax calls. Even though it is now possible to work with gRPC calls from the web browser, the backend of the API (made in ASP.NET) will handle that. First, because you can get to see how an API can orchestrate remote procedure calls and, second, because this part of the gRPC framework still has some limitations.

However, before proceeding, create the proto file. This is the one which defines the methods and signatures for the CRUD of products. It is the contract ruler, so neither the client nor the service can do anything without the proper protobuf settings.

Go back to the services project. Listing 2 shows how it’ll look. Make sure to add the code after creating the product.proto file into the existing Protos folder.

Listing 2. The product.proto file.

syntax = "proto3";
option csharp_namespace = "ProductsService";
package products;
service ProductService {
    rpc GetAll (Empty) returns (ProductList) {}
    rpc Get (ProductId) returns (Product) {}
    rpc Insert (Product) returns (Product) {}
    rpc Update (Product) returns (Product) {}
    rpc Delete (ProductId) returns (Empty) {}
}
message Empty {}
message Product {
    int32 productId = 1;
    string name = 2;
    int32 amount = 3;
    string brand = 4;
    float value = 5;
}
message ProductList {
    repeated Product products = 1;
}
message ProductId {
    int32 id = 1;
}

Some things are new this time. The service is wider, with more methods than the previous version. Most of them deal with new messages as well which, in turn, have new attributes (like int32 for integers and float for decimal numbers). Go ahead and have a look over the possible data types for protobufs.

Since you’re already in the server project, take this chance to update the project to the CRUD needs. It’s going to be an in-memory CRUD; it means that you’ll maintain a list of the products in the memory that’ll survive until the server project stops. While it’s better to store the data permanently (feel free to upgrade in such way with a database of your choice), for this example, the in-memory list is enough. The web client will be restarted from time to time, but the server is going to be up all the time, so it emulates how a database in production would look.

Remember that Visual Studio needs to know it is a gRPC project, for client and server, too. So, again, right-click the project, go to Edit Project file and add the following:

<ItemGroup>
  <Protobuf Include="Protos\product.proto" GrpcServices="Server" />
</ItemGroup>

First, change the service. You can decide to create a new one or change the current one to the shown in Listing 3.

Listing 3. The GrpcCrudService.cs code.

using System;
using System.Collections.Generic;
using System.Linq;
using System.Threading.Tasks;
using Grpc.Core;
using Microsoft.Extensions.Logging;
namespace ProductsService
{
    public class GrpcCrudService : ProductService.ProductServiceBase
    {
        private readonly List<Product> _products = new List<Product>();
        private int idCount = 0;
        private readonly ILogger<GrpcCrudService> _logger;
        public GrpcCrudService(ILogger<GrpcCrudService> logger)
        {
            _logger = logger;
            _products.Add(new Product()
            {
                ProductId = idCount++,
                Name = "Farm Flour",
                Amount = 10,
                Brand = "Bill's Corn",
                Value = 2.33f
            });
        }
        public override Task<ProductList> GetAll(Empty empty, ServerCallContext context)
        {
            ProductList pl = new ProductList();
            pl.Products.AddRange(_products);
            return Task.FromResult(pl);
        }
        public override Task<Product> Get(ProductId productId, ServerCallContext context)
        {
            return Task.FromResult( //
                (from p in _products where p.ProductId == productId.Id select p).FirstOrDefault());
        }
        public override Task<Product> Insert(Product product, ServerCallContext context)
        {
            product.ProductId = idCount++;
            _products.Add(product);
            return Task.FromResult(product);
        }
        public override Task<Product> Update(Product product, ServerCallContext context)
        {
            var productToUpdate = (from p in _products where p.ProductId == product.ProductId select p).FirstOrDefault();
            if (productToUpdate != null)
            {
                productToUpdate.Name = product.Name;
                productToUpdate.Amount = product.Amount;
                productToUpdate.Brand = product.Brand;
                productToUpdate.Value = product.Value;
                return Task.FromResult(product);
            }
            return Task.FromException<Product>(new EntryPointNotFoundException());
        }
        public override Task<Empty> Delete(ProductId productId, ServerCallContext context)
        {
            var productToDelete = (from p in _products where p.ProductId == productId.Id select p).FirstOrDefault();
            if (productToDelete == null)
            {
                return Task.FromException<Empty>(new EntryPointNotFoundException());
            }
            _products.Remove(productToDelete);
            return Task.FromResult(new Empty());
        }
    }
}

First, and most importantly, note the extends made in the class declaration. After you save everything and rebuild the project, the autogenerated classes are re-generated. Don’t forget to update the extends alike. The namespace must also change according to what’s informed in the proto file. You’re creating a product and adding it to the initial list, in order to have some data for testing.

The rest are just methods corresponding to each one of the declarations made in the proto. Since gRPC works with an async API, you must provide signatures that attend the same (by the use of System.Threading.Tasks.Task class). The manipulation over the list makes use of Linq, to simplify your life. Plus, for the cases where the given id was not found in the list, the code throws exceptions via FromException method, provided by Task class. Feel free to customize with your own exceptions.

Note that, for this part of the code, you’re also using the same classes declared in the proto, because they were re-generated. In case your VS can’t find them, comment any line of code with compilation errors and try to build the project again. Repeat it until the proto classes become recognizable by Visual Studio.

Final changes belong to the Startup class. Open it and change the name of the service in the generics of the MapGrpcService method. Change it to GrpcCrudService, the new service. Also, add the following to the ConfigureServices method:

services.AddSingleton<GrpcCrudService>();

And the respective import at the beginning of the file:

using ProductsService;

You need this to transform the service in a singleton, in order to maintain the list and its values every time a new request arrives. Otherwise, the list would be created for each request, since each request represented a new instance of the service.

Move on to the web project. For this, open a new window of Visual Studio and create another project. Search for ASP.NET Core Web and select it like in Figure 3.

Tela de computador com texto preto sobre fundo branco Descrição gerada automaticamente

Figure 3. Creating a new ASP.NET Core Web Application.

Click Next. Give it the name of SimpleTalkGrpcWebClient and click Create.

In the next screen, make sure to select the options .NET Core and ASP.NET Core 3.1 right at the beginning. Then, locate the option Web Application (Model-View-Controller), as you see in Figure 4. Regarding the HTTPS configuration, it’s ok to leave it selected unless you want to keep only HTTP.

Tela de celular com texto preto sobre fundo branco Descrição gerada automaticamente

Figure 4. Selecting options for the web application.

The project is created. If you’re not familiar with MVC in ASP.NET (which is not the focus of this article), I’d advise you to read this.

Again, the proto file is the most important so, first, make sure to copy the folder Protos from the server project to this one.

Then, run the following commands to install all the needed NuGet dependencies:

Install-Package Grpc.Net.Client
Install-Package Google.Protobuf
Install-Package Grpc.Tools

Those are the only ones you need since the nature of the project already injected the Microsoft.NETCore.App and Microsoft.AspNetCore.App frameworks for the API and MVC files.

Then, edit the project (right-click at the project > Edit Project File) and add the following:

<ItemGroup>
  <Protobuf Include="Protos\product.proto" GrpcServices="Client" />
</ItemGroup>

Rebuild it. Visual Studio has already created a controller, error model and a basic home view made of a good templating system. Leave them as they are. The wwwroot also stores CSS and JavaScript files, along with jQuery and Bootstrap (which you’ll use for the CRUD page). Go ahead and explore a bit the files; it’s very straightforward.

Start by the ProductsController.cs. In the Controllers folder, create this class and add the code in Listing 4.

Listing 4. Creating the ProductsController class.

using Grpc.Net.Client;
using Microsoft.AspNetCore.Mvc;
using ProductsService;
using System.Collections.Generic;
using System.Linq;
namespace SimpleTalkGrpcWebClient.Controllers
{
        [ApiController]
        [Route("api/[controller]")]
        public class ProductsController : Controller
        {
                private readonly GrpcChannel channel;
                public ProductsController()
                {
                        channel = GrpcChannel.ForAddress("https://localhost:5001");
                }
                [HttpGet]
                public List<Product> GetAll()
                {
                        var client = new ProductService.ProductServiceClient(channel);
                        return client.GetAll(new Empty()).Products.ToList();
                }
                [HttpGet("{id}", Name = "GetProduct")]
                public IActionResult GetById(int id)
                {
                        var client = new ProductService.ProductServiceClient(channel);
                        var product = client.Get(new ProductId { Id = id });
                        if (product == null)
                        {
                                return NotFound();
                        }
                        return new ObjectResult(product);
                }
                [HttpPost]
                public IActionResult Post([FromBody] Product product)
                {
                        var client = new ProductService.ProductServiceClient(channel);
                        var createdProduct = client.Insert(product);
                        
                        return CreatedAtRoute("GetProduct", new { id = createdProduct.ProductId }, createdProduct);
                }
                [HttpPut]
                public IActionResult Put([FromBody] Product product)
                {
                        var client = new ProductService.ProductServiceClient(channel);
                        var udpatedProduct = client.Update(product);
                        if (udpatedProduct == null)
                        {
                                return NotFound();
                        }
                        return NoContent();
                }
                [HttpDelete("{id}")]
                public IActionResult Delete(int id)
                {
                        var client = new ProductService.ProductServiceClient(channel);
                        client.Delete(new ProductId { Id = id });
                        return new ObjectResult(id);
                }
        }
}

This controller differs a bit from the Home controller. Mainly because it was made to be an API controller, not a controller to serve models and views. HomeController is important the way it is because it serves the entry point for the index HTML page.

The REST endpoints, in turn, communicates to the gRPC service. You can also create your own client services to organize it better but stick to this structure for the sake of simplicity.

First thing, you need the channel, remember? Create it at the controller’s constructor. Then, for each request, a new client must be instantiated. The client has all the methods defined in the proto, so you’ll just make use of each one in the corresponding HTTP operation.

Move on to the CSHTML code. Open the Index.cshtml, located into Views/Home folder, and change its content to the one in Listing 5.

Listing 5. Index.cshtml code.

@{
    ViewData["Title"] = "Home Page";
}
<div class="container">
    <div class="py-3 text-center">
        <img class="d-block mx-auto mb-4" src="https://www.bloorresearch.com/wp-content/uploads/2019/04/REDGATE-logo-300x470-.png" alt="" width="272">
        <h2>Product's List</h2>
        <p class="lead">A CRUD made with ASP.NET Core, Bootstrap and gRPC</p>
    </div>
    <button type="button" class="btn redgate" data-toggle="modal" data-target="#productModal" onclick="clearStuff();">New Product</button><br /><br />
    <table class="table table-bordered table-striped table-hover">
        <thead>
            <tr>
                <th>
                    ID
                </th>
                <th>
                    Name
                </th>
                <th>
                    Amount
                </th>
                <th>
                    Brand
                </th>
                <th>
                    Value
                </th>
                <th>
                    Actions
                </th>
            </tr>
        </thead>
        <tbody class="tbody">
        </tbody>
    </table>
</div>
<div class="modal fade" id="productModal" role="dialog">
    <div class="modal-dialog">
        <div class="modal-content">
            <div class="modal-header">
                <h4 class="modal-title">Add Product</h4>
                <button type="button" class="close" data-dismiss="modal">×</button>
            </div>
            <div class="modal-body">
                <form>
                    <div class="form-group">
                        <label for="ProductId">ID</label>
                        <input type="text" class="form-control" id="ProductID" placeholder="Id" disabled="disabled" />
                    </div>
                    <div class="form-group">
                        <label for="Name">Name</label>
                        <input type="text" class="form-control" id="Name" placeholder="Name" />
                    </div>
                    <div class="form-group">
                        <label for="Amount">Amount</label>
                        <input type="number" class="form-control" id="Amount" placeholder="Amount" />
                    </div>
                    <div class="form-group">
                        <label for="Brand">Brand</label>
                        <input type="text" class="form-control" id="Brand" placeholder="Brand" />
                    </div>
                    <div class="form-group">
                        <label for="Value">Value</label>
                        <input type="number" step="0.01" min="0" class="form-control" id="Value" placeholder="Value" />
                    </div>
                </form>
            </div>
            <div class="modal-footer">
                <button type="button" class="btn redgate" id="btnAddProduct" onclick="return AddProduct();">Add</button>
                <button type="button" class="btn redgate" id="btnUpdateProduct" style="display:none;" onclick="UpdateProduct();">Update</button>
                <button type="button" class="btn btn-default" data-dismiss="modal">Close</button>
            </div>
        </div>
    </div>
</div>

Since the jQuery, Bootstrap and common CSS/JS files are already imported in the _Layout.cshtml file, you only need to provide the content for the CRUD.

This code is made basically of the table to display results from the server (the header only, because the body is going to be mounted by the JavaScript code), and a modal you’ll use to add and update the data.

Speaking of JavaScript code, copy the code presented in Listing 6 to the site.js (under the wwwroot/js folder).

Listing 6. Content of site.js file.

function LoadProducts() {
    $.ajax({
        url: "/api/products",
        type: "GET",
        contentType: "application/json;charset=utf-8",
        dataType: "json",
        success: function (result) {
            var output = '';
            $.each(result, function (key, item) {
                output += '<tr>';
                output += '<td>' + item.productId + '</td>';
                output += '<td>' + item.name + '</td>';
                output += '<td>' + item.amount + '</td>';
                output += '<td>' + item.brand + '</td>';
                output += '<td>' + item.value + '</td>';
                output += `<td><a href="#" class="btn redgate" onclick="SetUpEditModal(${item.productId})">Edit</a> |
                        <a href="#" class="btn redgate" onclick="DeleteProduct(${item.productId})">Delete</a></td>`;
                output += '</tr>';
            });
            $('.tbody').html(output);
        },
        error: function (message) {
            console.log(message.responseText);
        }
    });
}
function AddProduct() {
    var res = validateForm();
    if (res == false) {
        return false;
    }
    var productObj = {
        name: $('#Name').val(),
        amount: parseInt($('#Amount').val()),
        brand: $('#Brand').val(),
        value: parseFloat($('#Value').val())
    };
    $.ajax({
        url: "/api/products",
        data: JSON.stringify(productObj),
        type: "POST",
        contentType: "application/json;charset=utf-8",
        success: function () {
            LoadProducts();
            $('#productModal').modal('hide');
        },
        error: function (message) {
            console.log(message.responseText);
        }
    });
}
function SetUpEditModal(id) {
    $('form input').css('border-color', 'grey');
    $('#productModal h4').text('Edit Product');
    $.ajax({
        url: "/api/products/" + id,
        typr: "GET",
        contentType: "application/json;charset=UTF-8",
        dataType: "json",
        success: function (result) {
            $('#ProductID').val(result.productId);
            $('#Name').val(result.name);
            $('#Amount').val(result.amount);
            $('#Brand').val(result.brand);
            $('#Value').val(result.value);
            $('#productModal').modal('show');
            $('#btnUpdateProduct').show();
            $('#btnAddProduct').hide();
        },
        error: function (message) {
            console.log(message.responseText);
        }
    });
    return false;
}
function UpdateProduct() {
    if (!validateForm()) {
        return false;
    }
    var productObj = {
        ProductID: parseInt($('#ProductID').val()),
        Name: $('#Name').val(),
        Amount: parseInt($('#Amount').val()),
        Brand: $('#Brand').val(),
        Value: parseFloat($('#Value').val()),
    };
    $.ajax({
        url: "/api/products",
        data: JSON.stringify(productObj),
        type: "PUT",
        contentType: "application/json;charset=utf-8",
        dataType: "json",
        success: function () {
            LoadProducts();
            $('#productModal').modal('hide');
            clearStuff();
        },
        error: function (message) {
            console.log(message.responseText);
        }
    });
}
function DeleteProduct(id) {
    if (confirm("Are you sure?")) {
        $.ajax({
            url: "/api/products/" + id,
            type: "DELETE",
            contentType: "application/json;charset=UTF-8",
            dataType: "json",
            success: function () {
                LoadProducts();
            },
            error: function (message) {
                console.log(message.responseText);
            }
        });
    }
}
/** Utility functions **/
function clearStuff() {
    $('form').trigger("reset");
    $('#btnUpdateProduct').hide();
    $('#productModal h4').text('Add Product');
    $('#btnAddProduct').show();
}
function validateForm() {
    var isValid = true;
    if ($('#Name').val().trim()      == "") {
        $('#Name').css('border-color', '#c00');
        isValid = false;
    }
    else {
        $('#Name').css('border-color', 'grey');
    }
    if ($('#Amount').val().trim() == "") {
        $('#Amount').css('border-color', '#c00');
        isValid = false;
    }
    else {
        $('#Amount').css('border-color', 'grey');
    }
    if ($('#Brand').val().trim() == "") {
        $('#Brand').css('border-color', '#c00');
        isValid = false;
    }
    else {
        $('#Brand').css('border-color', 'grey');
    }
    if ($('#Value').val().trim() == "") {
        $('#Value').css('border-color', '#c00');
        isValid = false;
    }
    else {
        $('#Value').css('border-color', 'grey');
    }
    return isValid;
}
LoadProducts();

Note that for each one of the HTTP requests for the CRUD operations, you also have a different JavaScript function to handle it. It helps to simplify the separation. Here, you’re using jQuery ajax function to help with the remote requests and responses to the Products API.

This function takes a bunch of inputs regarding the URL, content type, headers, params and two functions for success and error handling in the requesting/responding process.

The first function, LoadProducts(), makes an HTTP GET over the respective API endpoint to retrieve the list of products from the gRPC server project. If the request is successful, the results must come as a parameter, which will be iterated to get each one of the values and, finally, display them in the table’s tbody. Due to Ajax’s async nature, you may notice that the list takes a bit to appear. In case any error occurs, it’ll be displayed in the console.

Both adding and updating functions make use of the utility function validateForm(). This auxiliary function is just to make sure the data is correct and filled, before sending to the API. You can change it to your own code or lib.

For the adding, updating and deleting actions, you need to re-render the list of products by calling the loading function again. And, then, hide the modal.

When loading the table’s elements, you also need to create the links for editing and deleting calls. Note that the first triggers the function SetUpEditModal() which, in turn, will seek for that specific product by the provided id and fill each of the modal form’s inputs with the returned values. That’s important since you want to show each input prefilled with the respective value before updating them.

The UpdateProduct() function is the one that, in fact, summarize the updated input values and send them to the server. Here, in case of success, and after hiding the modal and refreshing the product’s table, you also need to rename the title of the modal (remember, it’s one single modal for both operations). The clearStuff() function exists to reset the form and show/hide proper buttons and texts.

At the end of the JS file, you also make sure to call the LoadProducts() function, since every time the page loads, you need the table filled.

Before going to the tests, check two things. First, make sure to have the following snippet just after the jQuery and Bootstrap JavaScript imports (not before), located in Views/Shared/_Layout.cshtml:

<script src="~/js/site.js" asp-append-version="true"></script>

Second, open the site.css file under wwwroot/css folder and add the following class:

.redgate {
    background-color: #c00;
    color: #fff;
}

It’s important to add the background color effect related to the RedGate website.

Test it now. With the server project up and running, start your web application (Ctrl + F5). When the browser window open, you should see something like Figure 5.

Figure 5. Web client application running in the browser.

Conclusion

This is it. Go ahead and play with the other operations. Feel free to customize the way you prefer the screen and the overall architecture.

Please, also refer to the official docs for more on what (and how) you can do with gRPC in .NET. It’s the most complete and trustworthy source for your studies. Regarding tests and performance, please also refer to their Benchmarking page.

As a challenge, you can try to upgrade your implementation to integrate it with the Web version of gRPC, along with the current CRUD page. Good luck with the studies!


The post Integrating ASP.NET Core with gRPC appeared first on Simple Talk.


from Simple Talk https://ift.tt/35erQjm
via

Implementing a Data Quality Monitoring Framework

I. Introduction

Data Quality is imperative to the success of any Business Intelligence solution. In today’s era, where the data is being ingested from multiple sources, the quality of the data might differ between sources. The first step to a successful reporting application implementation is to ensure that only the highest quality data makes it to the reporting tables. In order to achieve this, a Data Quality Monitoring framework should be implemented.

Some of the characteristics of the Data Quality Framework are as follows:

  • The Data Quality Monitoring framework should have a predefined set of rules specific to a Data Domain.
  • The Data Quality Monitoring framework should be scalable, i.e., it should support the addition of new rules and should be able to support data quality monitoring across multiple data domains.
  • The Data Quality Monitoring framework should have the ability to enable and disable rules to be executed against the data.
  • All the results from Data Quality monitoring should be stored in a rules results repository.

II. Data Quality Monitoring Framework Process Flow

The process starts with the source data file(s) landing on the SQL Server or any ETL Server. Once files are detected, the Pre-Stage Data Quality rules are executed. Data Stewards receive a notification once Pre-Stage rules are executed, and results are available for data stewards for review. The processing stops if any of the Pre-Stage “Gating” Data Quality rules have failed. The process continues to load data into Stage table only if none of the Pre-Stage Gating rules has failed or if the Data Steward has chosen to override the failure. The process then loads data into Stage Table. After this, the post-stage Data Quality Rules are executed, and Data Stewards are notified when the results are available for review. If there is NO Gating rules failure, then the process automatically publishes a validated data file for the downstream systems to use. If any of the post-stage Gating rules have failed, then the Data Steward could decide to either abandon the cycle and request a new file from source or override the failure in order to publish data files for downstream systems.

Figure 1: Process Flow Diagram for Data Quality Monitoring Framework. Data

The following section of the article will concentrate on the Implementation of Data Quality Rules (Pre-Stage & Post Stage) using Database tables.

III. Data Quality Monitoring Data Mart:

To implement Data Quality Monitoring Framework, a Data Quality Data Mart is needed.

A Data Quality Data Mart would have tables to provide the following capabilities.

  • A table to store all predefined Data Quality rules. (DATA_QUALITY_RULE table)
  • A table to provide the ability to turn on and turn off rules and store threshold percentages for each rule for its corresponding data domain (DATA_QUALITY_RULE_EXECUTE table).
  • A table to store the results of Data Quality Rules to serve as a Data Quality Rule Monitoring results repository (DATA_QUALITY_RULE_RESULTS).

A possible model would look like Figure 2

Figure 2: The data quality model

Here are the definitions for the three tables.

A. DATA_QUALITY_RULE Table

This table holds all the predefined Data Quality Rules. These rules could be for one data domain or multiple data domains.

DDL for creating the DATA_QUALITY_RULE table:

CREATE TABLE DATA_QUALITY_RULE
(
    DATA_QUALITY_RULE_ID INTEGER  NOT NULL,
    RULE_NAME VARCHAR(60)  NOT NULL,
    RULE_DESCRIPTION VARCHAR(256)  NOT NULL,
    RULE_TYPE_CODE VARCHAR(20) NOT NULL,
    RULE_LEVEL_CODE VARCHAR(20) NOT NULL,
    SCHEMA_NAME VARCHAR(60),
    TABLE_NAME VARCHAR(60),
    DATA_NAME VARCHAR(60),
    RULE_SCRIPT_TYPE_CODE VARCHAR(20),
    RULE_SCRIPT_TEXT VARCHAR(256), 
    CREATE_PROCESS_ID BIGINT NOT NULL,
    CREATE_PROCESS_NAME VARCHAR(35) NOT NULL,
    CREATE_RECORD_USER_NAME VARCHAR(35) NOT NULL,
    CREATE_RECORD_SYSTEM_TIMESTAMP DATETIME NOT NULL,
    CONSTRAINT [PK_DATA_QUALITY_RULE_ID] PRIMARY KEY  ([DATA_QUALITY_RULE_ID])
);

Column Name

Column Details

DATA_QUALITY_RULE_ID

Unique Rule Identifier

RULE_NAME

Name of the Rule

RULE_DESCRIPTION

Details about the Rule

RULE_TYPE_CODE

Describes if Rule is “GATING” or “PASSIVE”

RULE_LEVEL_CODE

Level at which rule is executed at file or table or column level.

SCHEMA_NAME

Schema of the Table or Schema of File.

TABLE_NAME

Table that holds the data on which Data Quality Rules need to execute.

DATA_NAME

Column Name on which rule is executed

RULE_SCRIPT_TYPE_CODE

Code for Detecting if Rule shall pass or Fail

RULE_SCRIPT_TEXT

Description regarding RULE_SCRIPT_TYPE_CODE

CREATE_PROCESS_ID

Process ID that loaded data in DATA_QUALITY_RULE Table

CREATE_PROCESS_NAME

Process Name that loaded data in DATA_QUALITY_RULE Table

CREATE_RECORD_USER_NAME

Service Account that loaded data in DATA_QUALITY_RULE Table

CREATE_RECORD_SYSTEM_TIMESTAMP

Timestamp when data that rule got inserted in DATA_QUALITY_RULE table

B. DATA_QUALITY_RULE_EXECUTE Table

This table holds information related to whether the rule is active or not, and the threshold percentage values against which data quality is measured to pass or fail a rule.

DDL for creating DATA_QUALITY_RULE_EXECUTE table

CREATE TABLE DATA_QUALITY_RULE_EXECUTE
(
    DATA_QUALITY_DATA_SOURCE_CODE VARCHAR(20) NOT NULL, 
    DATA_QUALITY_RULE_ID INTEGER  NOT NULL,
    RULE_PROCESS_STEP_CODE VARCHAR(256)  NOT NULL,
    RULE_EXECUTE_STATUS_CODE VARCHAR(20) NOT NULL,
    THRESHOLD_PASS_PERCENT VARCHAR(20) NOT NULL,
    CREATE_PROCESS_ID BIGINT NOT NULL,
    CREATE_PROCESS_NAME VARCHAR(35) NOT NULL,
    CREATE_RECORD_USER_NAME VARCHAR(35) NOT NULL,
    CREATE_RECORD_SYSTEM_TIMESTAMP DATETIME NOT NULL,
    FOREIGN KEY ([DATA_QUALITY_RULE_ID]) REFERENCES [DATA_QUALITY_RULE] ([DATA_QUALITY_RULE_ID]) 
   ON DELETE NO ACTION ON UPDATE NO ACTION
);

Column Name

Column Details

DATA_QUALITY_DATA_SOURCE_CODE

Data Domain or Source of the Data

DATA_QUALITY_RULE_ID

Unique Rule Identifier

RULE_PROCESS_STEP_CODE

Step at which data rule is being applied on Data (PRE_STAGE/POST_STAGE)

RULE_EXECUTE_STATUS_CODE

Indicates the Status of Rule. “P” Indicates “Pass”; “F” Indicates “Fail”, “O” Indicates “Override”

THRESHOLD_PASS_PERCENT

Threshold Percent that if met cause causes rule to “Pass” else will cause it to “Fail”

CREATE_PROCESS_ID

Process ID that loaded data in DATA_QUALITY_RULE Table

CREATE_PROCESS_NAME

Process Name that loaded data in DATA_QUALITY_RULE Table

CREATE_RECORD_USER_NAME

Service Account that loaded data in DATA_QUALITY_RULE Table

CREATE_RECORD_SYSTEM_TIMESTAMP

Timestamp when data that rule got inserted in DATA_QUALITY_RULE table

C. DATA_QUALITY_RULE_RESULTS Table

This table is a repository to store the results of Data Quality Rule monitoring.

DDL for creating DATA_QUALITY_RULE_RESULTS table:

CREATE TABLE DATA_QUALITY_RULE_RESULTS
(
        DATA_QUALITY_RESULT_ROW_ID BIGINT NOT NULL,   
        DATA_QUALITY_DATA_SOURCE_CODE VARCHAR(20) NOT NULL,
        DATA_QUALITY_RULE_ID INTEGER  NOT NULL,
        RULE_PROCESS_STEP_CODE VARCHAR(20) NOT NULL,
TABLE_ROW_IDENTIFIER BIGINT,
         SCHEMA_NAME VARCHAR(60),
         TABLE_NAME VARCHAR(60),
         DATA_NAME VARCHAR(60),
         DATA_VALUE VARCHAR(250),
          RULE_TYPE_CODE VARCHAR(20),
          RULE_LEVEL_CODE VARCHAR(20),
          PASS_FAIL_OVERRIDE_CODE CHAR(1),
         PASS_COUNT INTEGER,
         FAIL_COUNT INTEGER,
         SYSTEM_PARTITION_IDENTIFIER VARCHAR(60),
        CREATE_PROCESS_ID BIGINT NOT NULL,
         CREATE_PROCESS_NAME VARCHAR(35) NOT NULL,
         CREATE_RECORD_USER_NAME VARCHAR(35) NOT NULL,
         CREATE_RECORD_SYSTEM_TIMESTAMP DATETIME NOT NULL,
         CONSTRAINT [PK_DATA_QUALITY_RESULT_ROW_ID] PRIMARY KEY  ([DATA_QUALITY_RESULT_ROW_ID]),
         FOREIGN KEY ([DATA_QUALITY_RULE_ID]) REFERENCES [DATA_QUALITY_RULE] ([DATA_QUALITY_RULE_ID]) 
        ON DELETE NO ACTION ON UPDATE NO ACTION
);

Column Name

Column Details

DATA_QUALITY_RESULT_ROW_ID

Unique Identifier for each record in DATA_QUALITY_RULE

DATA_QUALITY_DATA_SOURCE_CODE

Data Domain or Source of the Data

DATA_QUALITY_RULE_ID

Unique Rule Identifier

RULE_PROCESS_STEP_CODE

Step at which data rule is being applied on Data (PRE_STAGE/POST_STAGE)

TABLE_ROW_IDENTIFIER

Unique Identifier from the Source table.

SCHEMA_NAME

Schema of the Table or Schema of File.

TABLE_NAME

Table that holds the data on which Data Quality Rules need to execute.

DATA_NAME

Column Name on which rule is executed

DATA_VALUE

Data Value

RULE_TYPE_CODE

Describes if Rule is “GATING” or “PASSIVE”

RULE_LEVEL_CODE

Level at which rule is executed at file or table or column level.

PASS_FAIL_OVERRIDE_CODE

Status of Data Quality Rule (Pass or Fail or Override)

PASS_COUNT

Count of Records that Passed the Rule

FAIL_COUNT

Count of Records that Failed the Rule

SYSTEM_PARTITION_IDENTIFIER

Partitioning key for DATA_QUALITY_RULE table

CREATE_PROCESS_ID

Process ID that loaded data in DATA_QUALITY_RULE Table

CREATE_PROCESS_NAME

Process Name that loaded data in DATA_QUALITY_RULE Table

CREATE_RECORD_USER_NAME

Service Account that loaded data in DATA_QUALITY_RULE Table

CREATE_RECORD_SYSTEM_TIMESTAMP

Timestamp when data that rule got inserted in DATA_QUALITY_RULE table

IV. Understanding Data Quality Monitoring Implementation with an Example:

In order to understand the above Data Quality Framework, I will walk through an example as follows:

A. Source File

The Source File is a pipe-delimited file with Invoice data and its corresponding Control file.

InvoiceId|CustomerId|InvoiceDate|BillingAddress|BillingCity|BillingState|BillingCountry|BillingPostalCode|Total|StoreID
100|23|2007-01-11|69 Salem Street|Boston|MA|USA|2113|13.86|1
200|16|2007-02-19|1600 Amphitheatre Parkway|Mountain View|CA|USA|94043-1351|0.99|2
300|17|2007-03-04|1 Microsoft Way|Redmond|WA|USA|98052-8300|1.98|3
400|19|2007-03-05|1 Infinite Loop|Cupertino|CA|USA|95014|1.98|4
500|21|2007-03-06|801 W 4th Street|Reno|NV|USA|89503|3.96|5


B. Control File

The Control File has details related to the source file like record counts and other important details.

DataFileName|ControlFileName|DataFileCount|MinInvoiceDate|MaxInvoiceDate|TotalAmount
Invoice_202001.dat|invoice.ctl|5|2007-01-11|2007-02-28|22.77


C. DATA_QUALITY_RULE Table

The Data Quality Rule table is a repository of all rules that need to be executed against the data to gauge the quality of data.

There are 2 types of data quality rules.

  1. Gating Rules
  2. Passive Rules

Gating Rules: Gating Rules are critical rules. These are rules that are critical to certify the quality of data. If any one of these rules fails, that means the data is not good enough to be loaded into application tables. The source data should be either corrected, or a new version of file needs to be requested from the source system. In that case, the data quality rules need to be rerun on new file and gating rules should pass for the data to be loaded into underlying reporting application tables. When “Gating” data quality rule fails, the ETL cycle would stop and would not proceed until either the new data is requested or that gating rule passes, or data stewards do a manual override.

Passive Rules: Passive Rules are the rules that are good to have but are not very critical. That means data is still useful for analytical reporting. If a passive data quality rule fails, then also data would be allowed to flow down to downstream applications.

In order to understand I’ll walk you through the following five rules.

Rule 1:

Data Quality Rule to Check the Source Schema/Layout matches the expected layout.

Rule 2:

Data Quality Rule to verify the same file has not been processed earlier (Duplicate File Check)

Rule 3:

Data Quality Rule to verify each record in the data file has an Invoice Date between the Minimum Invoice Date and Maximum Invoice Data and write failed records to the results table.

Rule 4:

Data Quality Rule to provide a count of passed/failed records for Invoice Date between the Minimum Invoice Date and Maximum Invoice Data.

Rule 5:

Data Quality Rule to provide a count of passed/failed records for StoreID being null.

Please refer to DataQuality_InsertStatements.txt for insert statements.

Note: I am inserting rules in the DATA_QUALITY_RULE table using Insert Statement (for demonstration/explanation purposes for each record). A preferable way would be to load all rules from a pipe separated file using an ETL tool or script.

RULE_SCRIPT_TYPE_CODE: The rule script type code field defines when a rule passes or fails and when records are supposed to be loaded to the DATA_QUALITY_RULE_RESULTS table.

To understand how this works, review this example:

RULE_SCRIPT_TYPE_CODE is set to “COMP_THRE_VAL_NE_F_F”

‘COMP_THRE_VAL’ stands for Compare Threshold values, i.e. compare the threshold value of the actual threshold vs the expected threshold.

NE – Stands for Not Equal, i.e. if the actual data threshold percent % and expected threshold percent (from DATA_QUALITY_RULE_EXECUTE) are not equal. Other possible values are

“EQ” stands for “Equal to”

“GE” stands for “Greater than or equal to”

“GT” stands for “Greater than”

“LE” stands for “Less than or equal to”

“LT” stands for “Less than”

F – Stands for action to be taken regarding the status of the rule. In this case, if the expected threshold percent is not equal to actual the data threshold percent, then fail the rule. The other possible value is “P”.

F – Stands for write the failed records to the DATA_QUALITY_RULE_RESULTS table. “P” Stands for write-only passed records and “E” stands for loading everything, i.e. both pass and fail records to be written to DATA_QUALITY_RULE_RESULTS table.

D. DATA_QUALITY_RULE_EXECUTE

This table is used to control the activation and inactivation of a data quality rule. If a rule is marked as active in the DATA_QUALITY_RULE_EXECUTE table, then that rule will be executed against the data, and corresponding data metrics would be captured and loaded in DATA_QUALITY_RULE_RESULTS table. If a rule is marked inactive in the DATA_QUALITY_RULE_EXECUTE table, then that rule will NOT be executed against the source data, and its metrics are not captured in the table.

Data Quality rules would be executed mostly at two places in the process as follows:

  1. Pre-Stage DQ Rules – Before loading into the Stage Table
  2. Post Stage DQ Rules – After loading into the Stage Table

Pre-Stage DQ Rules:

The Pre-Stage DQ rules are executed before the data gets loaded into the Stage Table.

The intent of having Pre-Stage DQ rules is to avoid loading bad data in stage tables and to avoid abortion of the ETL load process because of an unexpected file layout.

Some of the examples for Pre-Stage Data Quality rules are:

  1. Schema/layout validation of input file.
  2. Duplicate File Check
  3. Control File and Data File Count Match.

Post-Stage DQ Rules: Post-Stage DQ rules are executed after the data is loaded into the staging table. Post-Stage DQ rules would typically validate data against business-critical fields and produce metrics.

Please refer to DataQuality_InsertStatements.txt for insert statements.

Below is an explanation for each Insert statement into DATA_QUALITY_RULE_EXECUTE table

Rule 1 (Schema Layout Verification Rule):

The rule belongs to the “Invoice” Data Domain as apparent from DATA_QUALITY_DATA_SOURCE_CODE set to “Invoice”. It is a “PRE_STAGE” rule that means it should be executed before the Invoice data file is even loaded into an Invoice Stage table

Rule 2 (Duplicate File Validation Rule):

The rule belongs to the “Invoice” Data Domain as apparent from DATA_QUALITY_DATA_SOURCE_CODE set to “Invoice”. It is a “PRE_STAGE” rule that means it should be executed before the Invoice data file is even loaded into Invoice Stage table. The rule is “Active” as RULE_EXECUTE_STATUS_CODE is set to “A”. The Threshold Pass Percentage is set to 100, meaning that even if a single record does not meet the criteria, the rule will fail.

Rule 3 (Invoice Date Validation Rule):

The rule belongs to the “Invoice” Data Domain as apparent from DATA_QUALITY_DATA_SOURCE_CODE set to “Invoice”. It is a “POST_STAGE” rule meaning that it should be executed after the Invoice data file is loaded into Invoice Stage table. The rule is “Active” as RULE_EXECUTE_STATUS_CODE is set to “A”. The Threshold Pass Percentage is set to 100, meaning that even if a single record does not meet the criteria, the rule will fail.

Rule 4 (Invoice Date Summary Rule):

The rule belongs to the “Invoice” Data Domain as apparent from DATA_QUALITY_DATA_SOURCE_CODE set to “Invoice”. It is a “POST_STAGE” rule that means it should be executed after the Invoice data file is loaded into the Invoice Stage table. The rule is “Active” as RULE_EXECUTE_STATUS_CODE is set to “A”. The Threshold Pass Percentage is set to 100, meaning that even if a single record does not meet the criteria, the rule will fail.

Rule 5 (Store ID Summary Rule):

The rule belongs to the “Invoice” Data Domain as apparent from DATA_QUALITY_DATA_SOURCE_CODE set to “Invoice”. It is a “POST_STAGE” rule that means it should be executed after the Invoice data file is loaded into the Invoice Stage table. The rule is “Active” as RULE_EXECUTE_STATUS_CODE is set to “A”. The Threshold Pass Percentage is set to 90%, meaning that 90% or more of the records should have StoreID populated for the rule to pass.

E. DATA_QUALITY_RULE_RESULTS

The DATA_QUALITY_RULE_RESULTS table is a repository where all the data quality metrics for the rule executions are stored. The table is partitioned on SYSTEM_PARTITION_IDENTIFIER. A new partition is created for each month for each data source.

Data Quality Rule Results are generated by calculating the expected and actual results. Both expected and actual results are compared, and if the actual results match the expected results, the rule pass else would be marked as failed.

F. Expected Results:

Multiple steps are involved in generating expected results.

Figure 3: The expected results

In order to generate expected results, three steps are involved.

  1. Join the Data Quality Rule table with Data Quality Rule Execute table.
  2. Pivot the Control File Data
  3. Join the Data Quality Rule tables data with control file data

1. Join Data Quality Rule and Data Quality Rule Execute table as follows:

The SQL query below joins the Data_Quality_Rule table to the Data_Quality_Rule_Execute table on Rule ID to create a flattened record with all Data Quality Rules Information.

Please Note: You could add a where condition on DATA_QUALITY_DATA_SOURCE_CODE to filter the application for which you like to run the data quality rule.

select 
dq.DATA_QUALITY_RULE_ID,
dq.RULE_TYPE_CODE,
dq.RULE_LEVEL_CODE,
dq.SCHEMA_NAME,
dq.TABLE_NAME,
dq.DATA_NAME,
dq.RULE_SCRIPT_TYPE_CODE,
dq.RULE_SCRIPT_TEXT,
dqr.RULE_PROCESS_STEP_CODE,
dqr.RULE_EXECUTE_STATUS_CODE,
dqr.THRESHOLD_PASS_PERCENT
from data_quality_rule dq inner join DATA_QUALITY_RULE_EXECUTE dqr on dq.DATA_QUALITY_RULE_ID=dqr.DATA_QUALITY_RULE_ID

The joined data would look something like this.

DATA_QUALITY_RULE_ID|RULE_TYPE_CODE|RULE_LEVEL_CODE|SCHEMA_NAME|TABLE_NAME|DATA_NAME|RULE_SCRIPT_TYPE_CODE|RULE_SCRIPT_TEXT|RULE_PROCESS_STEP_CODE|RULE_EXECUTE_STATUS_CODE|THRESHOLD_PASS_PERCENT
1|GATING|FILE|Invoice_schema.txt|Invoice_YYYYMM.dat|SCHEMA_VALIDATION|COMP_THRE_VAL_EQ_P_E|Val_SchemaFile_Chk|PRE_STAGE|A|100.00
2|GATING|FILE|Invoice_schema.txt|Invoice_YYYYMM.dat|DUPLICATE_VALIDATION|COMP_THRE_VAL_EQ_P_E|Val_DuplicateFile_Chk|PRE_STAGE|A|100.00
3|GATING|COLUMN|dbo|Invoice|InvoiceDate|COMP_THRE_VAL_NE_F_F|Val_InvoiceDate_Chk|POST_STAGE|A|100.00
4|PASSIVE|TABLE|dbo|Invoice|InvoiceDate|COMP_THRE_VAL_EQ_P_E|InvoiceDate_Chk_Summary|POST_STAGE|A|100.00
5|PASSIVE|TABLE|dbo|Invoice|StoreID|COMP_THRE_VAL_EQ_P_F|StoreID_CHK|POST_STAGE|A|90.00


2. Pivot the Control File Data.

This step pivots the data in the control file. Pivoting is nothing more than converting columns to rows.

Control File before pivoting (Also shown in above sections)

DataFileName|ControlFileName|DataFileCount|MinInvoiceDate|MaxInvoiceDate|TotalAmount
Invoice_202001.dat|invoice.ctl|5|2007-01-11|2007-02-28|22.77


Control File After pivoting:

DATA_NAME|DATA_VALUE
DataFileName|Invoice_202001.dat
ControlFileName|Invoice.ctl
DataFileCount|5MinInvoiceDate|2007-01-11
MaxInvoiceDate|2007-02-28
TotalAmount|22.87


Pivoting helps joining control file details with corresponding Data Quality Rule Information (from step 1).

3. Joining the Data Quality Rule Tables Data with Control File Data

This is the final step to create the expected results. In this, you join the pivoted control file data (Step2) with Data Quality Rule tables information (Step1) on “DATA_NAME.” This creates the expected results as follows. Expected results are nothing but control file data associated with corresponding data quality rule information.

DATA_QUALITY_RULE_ID|RULE_TYPE_CODE|RULE_LEVEL_CODE|DATA_NAME|DATA_VALUE|RULE_SCRIPT_TYPE_CODE|RULE_SCRIPT_TEXT|RULE_PROCESS_STEP_CODE|RULE_EXECUTE_STATUS_CODE|THRESHOLD_PASS_PERCENT
1|GATING|FILE|Schema_Validation|Y|COMP_THRE_VAL_EQ_P_E|Val_SchemaFile_Chk|PRE_STAGE|A|100.00
2|GATING|FILE|Duplicate_Validation|Y|COMP_THRE_VAL_EQ_P_E|Val_DuplicateFile_Chk|PRE_STAGE|A|100.00
3|GATING|COLUMN|InvoiceDate|2007-01-11:2007-03-06|COMP_THRE_VAL_NE_F_F|Val_InvoiceDate_Chk|POST_STAGE|A|100.00
4|PASSIVE|TABLE|InvoiceDate|2007-01-11:2007-03-06|COMP_THRE_VAL_EQ_P_E|InvoiceDate_Chk_Summary|POST_STAGE|A|0.00
5|PASSIVE|TABLE|StoreID|NOTNULL|COMP_THRE_VAL_EQ_P_F|StoreID_CHK|POST_STAGE|A|90.00


G. Actual Results:

There are two steps involved in creating the actual results as follows:

  1. Pivot the source data file.
  2. Join pivoted source data with Data Quality Rule table and ETL Process Metadata

Figure 4: The actual results

1. Pivot the source data file:

Below is the source file that has been mentioned in an earlier section of this article.

Source File

InvoiceId|CustomerId|InvoiceDate|BillingAddress|BillingCity|BillingState|BillingCountry|BillingPostalCode|Total|StoreID
100|23|2007-01-11|69 Salem Street|Boston|MA|USA|2113|13.86|1
200|16|2007-02-19|1600 Amphitheatre Parkway|Mountain View|CA|USA|94043-1351|0.99|2
300|17|2007-03-04|1 Microsoft Way|Redmond|WA|USA|98052-8300|1.98|3
400|19|2007-03-05|1 Infinite Loop|Cupertino|CA|USA|95014|1.98|4
500|21|2007-03-06|801 W 4th Street|Reno|NV|USA|89503|3.96|5


Pivot the source file data with InvoiceID as the key for each record. Pivoting is a process for transforming row column-level data to the row level. The data would look like below.

Please Note: This is a sample set and not the entire data set.

InvoiceID|DataName|DataValue
100|InvoiceDate|2007-01-11
200|InvoiceDate|2007-02-19
300|InvoiceDate|2007-03-04
400|InvoiceDate|2007-03-05
500|InvoiceDate|2007-03-06
100|StoreID|1
200|StoreID |2
300|StoreID |3
400|StoreID |4
500|StoreID |5

2. Join Source File Pivot Data with Data Quality Rule table and ETL Process Metadata

In this step, take the pivoted source data (step 1) and join with the Data Quality Rule table to attach Rule ID to each pivoted source data record.

Please Note: The join to ETL process metadata is optional. If there are no Data Quality Rules related to ETL metadata, this join is not needed.

The ETL process metadata is standard metadata information captured by ETL processes like start and end time of ETL executions, if the source file met the expected schema, if the source file is a new file or a duplicate file based on the file name.

Once joining pivoted source data with Data Quality Rule table, you would then join it with ETL process metadata to get information related to Rule 1. This is related to file layout/schema verification of source file and also for Rule 2 that is related to duplicate source file names.

The following shows after validating for Rule 1, there is a Data Value of 5 and Pass Count as 5. This indicates that there were 5 rows in the file, and all 5 of them passed the validation. This information is coming from the ETL process metadata. Similarly, for Rule 2 related to Duplication Validation, the pass count is 1, and a fail count is 0. If this were a duplicate file, there would be a pass count of 0 and fail count of 1. For all the other rules, Pass count and Fail count are not populated yet because they are dependent on matching this actual data with expected data.

Data After Joining source pivoted data with Data Quality rule and ETL process metadata.

RuleID|InvoiceID|DataName|DataValue|Pass_Count|Fail_Count
1|0|Schema_Validation|5|5|0
2|0|Duplicate_Validation|0|1|0
3|100|InvoiceDate|2007-01-11|NULL|NULL
3|200|InvoiceDate|2007-02-19|NULL|NULL
3|300|InvoiceDate|2007-03-04|NULL|NULL
3|400|InvoiceDate|2007-03-05|NULL|NULL
3|500|InvoiceDate|2007-03-06|NULL|NULL
4|100|InvoiceDate|2007-01-11|NULL|NULL
4|200|InvoiceDate|2007-02-19|NULL|NULL
4|300|InvoiceDate|2007-03-04|NULL|NULL
4|400|InvoiceDate|2007-03-05|NULL|NULL
4|500|InvoiceDate|2007-03-06|NULL|NULL
5|100|StoreID|1|NULL|NULL
5|200|StoreID |2|NULL|NULL
5|300|StoreID |3|NULL|NULL
5|400|StoreID |4|NULL|NULL
5|500|StoreID |5|NULL|NULL


H. Generating Data Quality Rule Results.

Data Quality Rule Results are generated by comparing the Expected Results with Actual Results. The ETL logic compares expected results with actual results to derive Data Quality metrics and then loads it into the Data Quality Rule Results table.

Expected Results (These were derived in above section of article):

DATA_QUALITY_RULE_ID|RULE_TYPE_CODE|RULE_LEVEL_CODE|SCHEMA_NAME|TABLE_NAME|DATA_NAME|DATA_VALUE|RULE_SCRIPT_TYPE_CODE|RULE_SCRIPT_TEXT|RULE_PROCESS_STEP_CODE|RULE_EXECUTE_STATUS_CODE|THRESHOLD_PASS_PERCENT
1|GATING|FILE|Invoice_schema.txt|Invoice_YYYYMM.dat|SCHEMA_VALIDATION|NULL|COMP_THRE_VAL_EQ_P_E|Val_SchemaFile_Chk|PRE_STAGE|A|100.00
2|GATING|FILE|Invoice_schema.txt|Invoice_YYYYMM.dat|DUPLICATE_VALIDATION|NULL|COMP_THRE_VAL_EQ_P_E|Val_DuplicateFile_Chk|PRE_STAGE|A|100.00
3|GATING|COLUMN|dbo|Invoice|InvoiceDate|2007-01-11:2007-03-06|COMP_THRE_VAL_NE_F_F|Val_InvoiceDate_Chk|POST_STAGE|A|100.00
4|PASSIVE|TABLE|dbo|Invoice|InvoiceDate|2007-01-11:2007-03-06|COMP_THRE_VAL_EQ_P_E|InvoiceDate_Chk_Summary|POST_STAGE|A|100.00
5|PASSIVE|TABLE|dbo|Invoice|StoreID|NULL|COMP_THRE_VAL_EQ_P_F|StoreID_CHK|POST_STAGE|A|90.00

Actual Results (These were derived in above section of article):

RuleID|InvoiceID|DataName|DataValue|Pass_Count|Fail_Count
1|0|Schema_Validation|5|5|0
2|0|Duplicate_Validation|0|1|0
3|100|InvoiceDate|2007-01-11|NULL|NULL
3|200|InvoiceDate|2007-02-19|NULL|NULL
3|300|InvoiceDate|2007-03-04|NULL|NULL
3|400|InvoiceDate|2007-03-05|NULL|NULL
3|500|InvoiceDate|2007-03-06|NULL|NULL
4|100|InvoiceDate|2007-01-11|NULL|NULL
4|200|InvoiceDate|2007-02-19|NULL|NULL
4|300|InvoiceDate|2007-03-04|NULL|NULL
4|400|InvoiceDate|2007-03-05|NULL|NULL
4|500|InvoiceDate|2007-03-06|NULL|NULL
5|100|StoreID|1|NULL|NULL
5|200|StoreID |2|NULL|NULL
5|300|StoreID |3|NULL|NULL
5|400|StoreID |4|NULL|NULL
5|500|StoreID |5|NULL|NULL


Comparing Expected Results with Actual Results

The expected results are joined with actual results on column Data Quality Rule ID, and the other ETL process compares the actual vs expected and produces Data Quality Rule Metrics.

Rule 1: For Rule 1, the expected threshold is set to “100”. If the schema validation has passed for the data file, then the Actual Threshold would also be derived as “100” in the ETL logic. RULE_SCRIPT_TYPE_CODE is set to “COMP_THRE_VAL_EQ_P_E”. That means if both thresholds are equal, set the rule status to pass “P”, and “E” represents that rule results are to be loaded into the table irrespective of rule status.

Rule 2: For Rule 2, the expected threshold is set to “100”. If the data file is not a duplicate file, i.e. if the same file name has not been processed earlier, then the Actual Threshold would also be derived as “100” in the ETL logic. RULE_SCRIPT_TYPE_CODE is set to “COMP_THRE_VAL_EQ_P_E”, so if both thresholds are equal, set the rule status to pass “P”. “E” means that rule results are to be loaded into the table irrespective of rule status.

Rule 3: For Rule 3, the expected threshold is set to “100”, and the InvoiceDate of each record from the actual results dataset is compared with the expected InvoiceDate range of 2007-01-11 to 2007-02-28. As each row is checked, any record that has an InvoiceDate outside the range is marked as failed with the “F” status code. Since the RULE_SCRIPT_TYPE_CODE is set to “COMP_THRE_VAL_NE_F_F”, any record that fails would be loaded into the Data Quality Rule Results table.

Please Note: Pass count and Fail count loaded as “0” as this is column level rule and not a table-level rule. It is possible to increment the fail count with each row being loaded to into Data Quality Rule results table, but as this will require sorting and ranking rows. It is preferable that pass_count and fail_count be used for table level rules where the aggregation is done and total pass and fail count can be easily identified.

Rule 4: For Rule 4, the expected threshold is set to “100” and from the actual results records for which InvoiceDate does not fall within the expected range of 2007-01-11 to 2007-02-28 are counted, and Actual Threshold percentage is derived at 40. If no records have failed, then the actual Threshold percentage would be 100. As this is a table-level rule, only one record for the entire batch load will be loaded in the Data Quality Rule Results table. RULE_SCRIPT_TYPE_CODE is set to “COMP_THRE_VAL_EQ_P_E”, so that means if both thresholds are equal set the rule status to pass “P” and “E” (Everything) represents that rule results to be loaded into the table irrespective of rule status.

Rule 5: Rule 5 is to check if the StoreID column is not null. The expected threshold is set to “90” and RULE_SCRIPT_TYPE_CODE is set to “COMP_THRE_VAL_GE_P_F”. In the data file, there are no records that have StoreID as null. In this case, the ETL would calculate the actual threshold as “100” which is greater than 90% (expected threshold), and the rule will pass “P”. Since the final character is “F” in COMP_THRE_VAL_GE_P_F, it means only failed rules should be loaded in the data quality results table. In this case, no results would be loaded for Rule5. The final rule results table would look like this.

select * from DATA_QUALITY_RULE_RESULTS


In the above example, I have walked through all the 5 data quality rules. Rules 1 and 2 are pre-stage rules, and they should be executed before data is loaded in-to stage table and the Rules 3, 4 and 5 are post-stage data quality rules and should be executed after the data is loaded to stage table.

A dashboard could be created on DATA_QUALITY_RULE_RESULTS table to provide data quality metrics to data stewards for review.

V. Conclusion

By implementing the above Data Quality Monitoring Data Framework, an organization can ensure that the highest quality data is loaded into underlying application tables. Detail metrics related to data quality could be made available to data stewards by building dashboard on top of DATA_QUALITY_RULE_RESULTS table.


The post Implementing a Data Quality Monitoring Framework appeared first on Simple Talk.


from Simple Talk https://ift.tt/2yWxFWo
via