Saturday, January 30, 2021

Using a Modeling Tool to Draw and Import a Graph into SQL Server

As I am starting to prep for writing about graphs in SQL Server, I have reached the most challenging part of the process… demo data. That’s right, the code, the words, etc., all so much easier than making an example that demonstrates everything you want it to and has an easy way to present it (and is malleable for when you realize you forgot about a case that you meant to cover but have spent 10 hours honing your point already). For some of the data in the book, I have created data generators that will spit out huge amounts of data to test performance, but most of the sample data needs to be interesting to the reader to go beyond the technical details and into the problem being solved and give them a story to hand the concept on.

To visualize graphs for my Database Design book and blogs, I have been using a tool name yEd (https://www.yworks.com/products/yed) that does a pretty great job of letting you visualize a graph. For example, say I have drawn the following graph to cover the fairly simple test case:

The problem was, if I wanted to recreate this graph in data, I had to type in a bunch of SQL statements (something I generally enjoy to a certain point, but one of my sample files cover the geography of Disney World, and it would take a very long time to manually type that into a database as it took quite a while just to do one section of the park). 

So I went hunting for a tool to do this for me, but ended right back with yEd. The default file type when you save in yEd is GraphML, which is basically some pretty complex XML that was well beyond my capabilities using XML in SQL or Powershell. Realistically I don’t care that much about anything other than just the nodes and edges, and what I found was that you can save graphs in the tool a format named Trivial Graph Format (TGF). TGF is a very simple format that you can read more about here (https://en.wikipedia.org/wiki/Trivial_Graph_Format) but from that article, but format is simply:

1 First node
2 Second node
#
1 2 Edge between the two

Be careful to not save the graph as TGF only, unless you are fine having to reformat constantly. This is only the nodes and edges with name data, so when you open the TGF file in yEd, all the nodes will be on top of each other.

The node and edge names are optional, and while I would not desire to have empty node names (and my importer will fail if that occurs), my plan for the a model will be that, all nodes will be the same type, but edge types could vary. For example, say you have this basic structure:

Each of these edges represents a containership, so I don’t want to enumerate that on the diagram. However, if I add another municipality to the graph, I might want to say it is adjacent to another node, so I model the following, giving the edge a name.:

To do this extra metadata, I will use a filename pattern of “NodeType-DefaultEdgeType-Description or Uniqueifier” (the Uniqueifier basically is there to make because we might have duplicate node types and edges, but all the file names obviously have to be unique.

Going back to my original model, it is stored in the TGF file as:

1 1
2 2
3 1
4 3
5 4
6 Node Name
7 7
8 6
9 5
10 Possesssive's Node Name
11 8
#
4 5
3 5
2 3
2 4
1 3 Possessive's Edge Name
6 3
5 9
8 9
7 8
7 10
10 10 Self Reference
10 11

Simple enough, but it does have a few complexities in the parsing. All of the fields in this file are space delimited, but the names have spaces in them… Not a terribly large deal, but it did make it more interesting.

To solve the problem, I decided to make some reasonably primative Powershell that could take a directory of TGF files and import them into SQL Server. I stopped short of automatically importing the data, but instead made the code generate a set of SQL Files that create a staging table and insert the data. I didn’t make it a module or function, but just a simple ps1 script to run interactively (hardcoding directories) as this is the kind of process that if you need to do something similar, you probably will make a change or two. (And adding automatic inserting of the data would not be terribly difficult, but typically wouldn’t be necessary).

I will include the Powershell code at the end of the post (and provide a link to github to fetch it), but the output is most interesting. The first block creates the tables if they don’t exist in your database (a USE statement is added and is parameterizable in the ps1 file), and a DELETE statement removes data from a file of the same name (for when you are running this over and over getting it just right):

Note: the code was formatted using SQL Prompt, it is a lot more spread out from the generator.

USE tempdb;
GO
SET NOCOUNT ON;
GO
--create the schema and tables if they have not been created in the schema you chose
IF NOT EXISTS (   SELECT *
                  FROM   sys.schemas
                  WHERE  schemas.name = 'NodeStaging')
    EXEC('CREATE SCHEMA NodeStaging');
GO
IF NOT EXISTS (   SELECT *
                  FROM   sys.tables
                  WHERE  tables.object_id = OBJECT_ID('NodeStaging.Node'))
    CREATE TABLE NodeStaging.Node
    (
        Filename nvarchar(200) NOT NULL,
        NodeId   int           NOT NULL,
        Name     nvarchar(100) NOT NULL,
        NodeType nvarchar(100) NOT NULL,
        PRIMARY KEY(
            Filename,
            NodeId)
    );
GO
IF NOT EXISTS (   SELECT *
                  FROM   sys.tables
                  WHERE  tables.object_id = OBJECT_ID('NodeStaging.Edge'))
    CREATE TABLE NodeStaging.Edge
    (
        Filename   nvarchar(200) NOT NULL,
        FromNodeId int           NOT NULL,
        ToNodeId   int           NOT NULL,
        EdgeType   varchar(100)  NULL
    );
GO
--delete previous data staged from this filename to let this run repeatedly
DELETE FROM NodeStaging.Node
WHERE Node.Filename = 'NodeType-DefaultEdgeType-Sample';
GO
DELETE FROM NodeStaging.Edge
WHERE Edge.Filename = 'NodeType-DefaultEdgeType-Sample';
GO

Next there are two sets of inserts. Nodes:

--Nodes
INSERT INTO NodeStaging.Node (FileName, NodeId,Name,NodeType) 
VALUES ( 'NodeType-DefaultEdgeType-Sample',1,'1','NodeType');
INSERT INTO NodeStaging.Node (FileName, NodeId,Name,NodeType) 
VALUES ( 'NodeType-DefaultEdgeType-Sample',2,'2','NodeType');
INSERT INTO NodeStaging.Node (FileName, NodeId,Name,NodeType) 
VALUES ( 'NodeType-DefaultEdgeType-Sample',3,'1','NodeType');
…

And then edges:

--Edges
INSERT INTO NodeStaging.Edge (FileName, FromNodeId, ToNodeId, EdgeType) 
VALUES ('NodeType-DefaultEdgeType-Sample',4,5, COALESCE (NULL,'DefaultEdgeType'));
INSERT INTO NodeStaging.Edge (FileName, FromNodeId, ToNodeId, EdgeType) 
VALUES ('NodeType-DefaultEdgeType-Sample',3,5, COALESCE (NULL,'DefaultEdgeType'));
INSERT INTO NodeStaging.Edge (FileName, FromNodeId, ToNodeId, EdgeType) 
VALUES ('NodeType-DefaultEdgeType-Sample',2,3, COALESCE (NULL,'DefaultEdgeType'));
…

The final bit of code shows you the data for your imported nodes:

--Queries to output the nodes that have been created
SELECT *
FROM   NodeStaging.Node
WHERE  Node.Filename = 'NodeType-DefaultEdgeType-Sample'
SELECT *
FROM   NodeStaging.Edge
WHERE  Edge.Filename = 'NodeType-DefaultEdgeType-Sample'
ORDER BY Edge.FromNodeId,Edge.ToNodeId
GO

Run this code with the sample file, the output is:

Now I can use this data to easily load a set of nodes in a tree, using SQL Graph or an adjacency list. 

The following code (and two sample files, one that is the first graph in the blog, the second a subgraph of that graph) is available here: https://github.com/drsqlgithub/TGFImport/:

#######################################################################################
## Louis Davidsson drsql@hotmail.com
## Use at your own risk. Produces SQL script files from TGF files.
## Parameters
$directory = "E:\TGF Files\" #Location of the TGF files for importing
$outputDirectory = "E:\TGF Files Output\" #directory where the .SQL files are sent
#Configuration
$StagingDatabase = 'Tempdb' #Defaulted to tempdb so someone doesn't add objects to master or some other database and 
#it be my fault
$StagingSchema = 'NodeStaging'
$filter = "*.TGF" #used to limit to certain file names
#Debugging is easier with a lot of output, but mute normally
$VerboseMode = $True
$VerboseCountAnnounce = 100
#########################################################################################
$Files = Get-ChildItem $directory -Filter $Filter
"Processing directory: $directory for '.TGF' files"
if ($VerboseMode) {
    ""
    "Import start time: $(Get-Date)" 
}
for ($i = 0; $i -lt $files.Count; $i++) {
    $Request = $files[$i].FullName #file to be processed
    $BaseName = $files[$i].BaseName #filename without path or extension to identity data in import
    #filename should include NodeType-DefaultEdgeType-Unique, identifying info.tgf
    $NodeType, $EdgeType = $BaseName.split('-')[0,1] 
    
    #some output for testing
    if ($VerboseMode) {
        ""
        "Processing file:" + $Request
    }
    
    #sql file that will be put out for the import
    $OutputFile = $outputDirectory + $BaseName + '.SQL'
    
    #code to create the staging table if required. #filename is included so you can have > 1 copy of the same 
    #graph imported
    $WriteThis = 
    "
USE $StagingDatabase;
GO
SET NOCOUNT ON;
GO
--create the schema and tables if they have not been created in the schema you chose
IF NOT EXISTS (SELECT * FROM sys.schemas where name = '$StagingSchema')
    EXEC ('CREATE SCHEMA $StagingSchema')
GO
IF NOT EXISTS (SELECT * FROM sys.tables where object_id = OBJECT_ID('$StagingSchema.Node'))
    CREATE TABLE $StagingSchema.Node (Filename nvarchar(200) NOT NULL, NodeId int NOT NULL, Name nvarchar(100) NOT NULL, NodeType nvarchar(100) NOT NULL, PRIMARY KEY (FileName, NodeId))
GO
IF NOT EXISTS (SELECT * FROM sys.tables where object_id = OBJECT_ID('$StagingSchema.Edge'))
    CREATE TABLE $StagingSchema.Edge (Filename nvarchar(200) NOT NULL, FromNodeId int NOT NULL, ToNodeId int NOT NULL, EdgeType varchar(100) NULL)
GO
--delete previous data staged from this filename to let this run repeatedly
DELETE FROM $StagingSchema.Node WHERE Filename = '$BaseName'
GO
DELETE FROM $StagingSchema.Edge WHERE Filename = '$BaseName'
GO
--Nodes"
    #Write the start of the file, clobbering existing file 
    $WriteThis | Out-File -FilePath $OutputFile #-NoClobber
    $RowCount = 0; $Section = "Nodes"; #RowCount is just for progress monitoring if it is a very large file. 
    #The first section of the TGF file is the nodes. The second is edges, denoted by a row with "#"
    #read in the file, row by row
    $reader = [System.IO.File]::OpenText($Request)
    while ($null -ne ($line = $reader.ReadLine())) {
        #in the TGF file, it has nodes first, then edges. This changes us to edges when we reach #
        if ($line -eq '#') {
            if ($VerboseMode) {
                "Changing to Edges"
            }
            $Section = "Edges"            
            
            $WriteThis = "`r`n--Edges"
            $WriteThis | Out-File -FilePath $OutputFile -Append
        }
        else {
            $line = $line + " " * 100 #added 100 space characters to make the substring easier 
            if ($Section -eq "Nodes") {
                
                #pull the node name out of the string
                $NodeName = $line.Substring($line.indexOf(' '), 100 ).trim()
                #Make name safe for output if it has an ' in it
                $NodeName = $NodeName.Replace("'","''");
                $NodeType = $NodeType.Replace("'","''");
                #write the Node
                $WriteThis = "INSERT INTO $StagingSchema.Node (FileName, NodeId,Name,NodeType) `r`n" + 
                "VALUES ( '$BaseName'," + $line.Substring(0, $line.indexOf(' ')).trim() + ",'" + $NodeName + "','" + $NodeType + "');"
                $WriteThis | Out-File -FilePath $OutputFile -Append
            }
            else {
                #Write the Edge
                
                #Parsing this line is not as simple as using split because the third part of the line is 
                #the name and the name can have spaces (and the fields are split on space)
                #From Node is Simple, char 0 to first space
                $WriteFromNodeId = $line.Substring(0, $line.indexOf(' ')).trim()
                
                #get the value after the from node. it may or many not have additional information after it
                $AfterFromNode = $line.Substring($line.indexOf(' ') + 1, 100 )
                #pad for the substring
                $AfterFromNode = $AfterFromNode + " " * 100
                #Get the numeric surrogate of the from node for the insert
                $WriteToNodeId = $AfterFromNode.Substring(0, $AfterFromNode.indexOf(' ')).trim()
                
                #Fetch any additional data from the string, and trim it
                $AdditionalInfo = $AfterFromNode.Substring($line.indexOf(' ') + 1, 100 ).Trim()
                #if the data has no length, set it to NULL in the output
                if ($AdditionalInfo.Length -eq 0) {
                    $AdditionalInfo = 'NULL'
                }
                ELSE {
                    #otherwise, add single quotes and double up single quotes
                    $AdditionalInfo = "'" + $AdditionalInfo.Replace("'","''") + "'"
                }
                #double up single quotes and surround by a '
                $DefaultEdgeType = "'" + $EdgeType.Replace("'","''") + "'"
                #Edgetype is defaulted to the edge name, or the default
                $WriteEdgeType = "COALESCE (" + $AdditionalInfo.Trim() + "," + $DefaultEdgeType.Trim() + ")";
                #The script to output the edge
                $WriteThis = "INSERT INTO $StagingSchema.Edge (FileName, FromNodeId, ToNodeId, EdgeType) `r`n" + 
                "VALUES ('$BaseName'," + $WriteFromNodeId + "," + $WriteToNodeId.trim() + ", "  +  $WriteEdgeType + ");"
                #write this line
                $WriteThis | Out-File -FilePath $OutputFile -Append
            }
        }
        
        if ($VerboseMode) {
            if ((($Rowcount + 1) % $VerboseCountAnnounce) -eq 0) {
                "Processed " + $RowCount + " lines in the file"
            }
        }
        $RowCount++; 
    }
    $WriteThis = 
    "
GO
--Queries to output the nodes that have been created
SELECT *
FROM   NodeStaging.Node
WHERE  Node.Filename = '$BaseName'
SELECT *
FROM   NodeStaging.Edge
WHERE  Edge.Filename = '$BaseName'
ORDER BY Edge.FromNodeId,Edge.ToNodeId
GO
    "
    
    #Write the start of the file, clobbering existing file 
    $WriteThis | Out-File -FilePath $OutputFile -Append
    if ($VerboseMode) {
        "Finished file:" + $Request + " with " + $RowCount + " lines. Wrote script to " + $OutputFile
    }
}

if ($VerboseMode) {
    ""
    "Import End time:  $(Get-Date)" 
    ""
}

Hop this is a help as you start using graph tables also.  If you are keen to export a graph,  Arvind Shyamsundar has the basis of that code in a project that was done to visualize Pass Summit sessions in 2017, to output the graph as a GRAPHML file. (https://deep.data.blog/2017/11/03/how-we-did-it-pass-2017-summit-session-similarity-using-sql-graph-and-python/) .


The post Using a Modeling Tool to Draw and Import a Graph into SQL Server appeared first on Simple Talk.


from Simple Talk https://ift.tt/3pv8dNm
via

Ten tips for building a collaborative DevOps culture

Articles about DevOps often mention the importance of establishing the right team culture, one in which collaboration and communication replace functional silos and competing interests. In many cases, however, the articles provide few details about what steps you can take to establish that culture, focusing instead on the technology side, such as how to implement DevOps processes or the tools needed to support those processes.

But cutting-edge technology isn’t going to save your DevOps efforts if you don’t establish the right team culture. You need teams made up of development and operations professionals that work together as a unified group to build software faster and with fewer errors. To make this happen, the individual members must share a common vision and set of goals, which can help facilitate communication and collaboration, the building blocks on which DevOps is built.

A DevOps team should be more than just a collection of individuals who happen to be working on the same project. The organization must make a concerted effort to ensure the team’s effectiveness, creating a culture that facilitates collaboration and seeks to unify the team into a cohesive whole. To help you with that process, this article provides a set of guidelines for building DevOps teams that work together toward a common vision to achieve the best results possible.

1. Get leadership on board from the start.

Building an effective DevOps team culture is not possible without the full support and engagement of the organization’s leadership. If they’re not fully behind the DevOps effort, it stands a good chance of failing. A culture of collaboration and communication starts with the right leadership, people who remove roadblocks and encourage cross-team cooperation. The organization’s leaders must be DevOps evangelists, championing its cause and promoting its benefits, while making it clear why DevOps is being implemented and what everyone stands to gain.

At the same time, leadership should not try to implement DevOps based only on what they’ve read in a book. DevOps is an organic process that continuously grows and evolves. It requires a keen sense of the nourishment and patience it takes to build the proper culture. DevOps is not a one-size-fits-all solution that’s implemented the same way in each organization, nor is one DevOps team the same as the next. Leadership should make it possible for each team to flourish in its own right, ensuring that they have the resources they need to operate while knowing when it’s time to step back and let them do their jobs.

2. Assemble the right people for the team.

The DevOps team provides the foundation on which all other efforts are built. The better that team members cooperate with each other, the more effectively they can create and deploy applications. Everyone on the team must come with a willingness to collaborate and communicate with the other members. Whether developers, testers, operations professionals, or security experts, each individual needs to adopt a mindset that values the importance of working together toward the same common goals.

A team’s diversity can also contribute to a collaborative culture. A diverse team helps the individual members step out of their routine ways of looking at problems and finding solutions. Individuals from different backgrounds and with different experiences bring with them new perspectives, unique insights, and innovative thinking. When given the necessary training and opportunities, most people can make the adjustment necessary to adopt a collaborative mindset and a DevOps way of working. In some cases, however, an individual might not be willing or able to embrace this mindset, in which case, you’ll likely need to reassign that person somewhere else.

3. Provide the necessary training and education.

Ensuring that team members come with the right mindset is only part of the process of creating a collaborative culture. They must also receive the training and education necessary to be able to participate effectively on the team. This begins with making certain everyone fully understands what DevOps is and how it can benefit the organization and each person individually. They must also be trained in the DevOps processes themselves and the tools used to carry out these processes. The more thoroughly each team member understands what DevOps is and how it works, the more likely the effort will succeed.

Training and education should also take into account the importance of improving soft skills. For example, team members often benefit from training in communication and interpersonal skills. Some individuals, such as junior engineers, might also need training in specific areas. For them, an organization might also consider a mentoring program. That said, training and education should be ongoing for all team members and should include frequent feedback to help them improve in their jobs and grow more adept at collaborating with one another.

4. Work toward a common vision and goals.

A DevOps team works best if the members share a common vision with the organization as a whole. Team members should have a big-picture understanding of where the organization is heading so they can make better decisions when developing and deploying applications. The organization’s leadership plays an essential role in communicating this vision and helping team members understand how their efforts should progress. By working toward a shared vision, the team has more solid footing when trying to collaborate on their individual projects and communicate with other team members.

Just as important as a shared vision is a shared understanding of the individual goals they’re trying to achieve. Not only do these include goals at the organizational level, but also at the team and project levels. In addition, they can include goals for the DevOps effort itself, which might include multiple teams and widely diverse software projects. DevOps teams should not need to contend with different priorities, nor should they have to deal with competing goals. Again, the organization’s leadership will play a pivotal role in communicating goals at the various levels, along with sharing the overarching vision.

5. Prioritize open and transparent communication.

Open and transparent communication is essential to team collaboration. Although a shared vision and set of goals can go a long way in fostering this communication, they’re not enough on their own. Team members need a safe environment in which they can share information and express their ideas. Everyone should have the opportunity to communicate their opinions, even if they don’t agree with the other team members. They should also feel comfortable going to other members to ask questions or discuss project specifics.

To help foster communication, everyone on the team should be included in planning meetings and other essential gatherings. They should all have an opportunity to talk about what they’re working on and contribute to the larger discussion. At the same time, meetings should be focused and kept to a minimum (in terms of number and time) to ensure that team members have the uninterrupted space necessary to focus on their work. Information sharing should also be a part of the team’s communication strategy so that everyone has access to what others have learned. DevOps works best when you avoid knowledge silos.

6. Establish an environment of trust and respect.

A DevOps team can communicate effectively only if the individual members trust and respect each other. This means respecting differences as well as similarities. People come with different cultural backgrounds, personal experiences, learning styles, problem-solving skills, education, and work histories, but they should all be treated with an equal level of trust and respect. It will, of course, take time for team members to learn to fully trust each other, but this will steadily increase as long as they’re working in a collaborative and supportive environment.

Training and education can also help team members better trust and respect each other. For example, they can be trained in how to listen to each other more carefully or resolve personal conflicts more effectively. But trust and respect must also come from the organization’s leadership. Team members are less likely to treat each other with respect if they’re not getting that respect from their managers. A team can’t operate effectively in a culture of blame nor in an environment that fails to recognize them for their accomplishments. Trust and respect must be built into the system at every level.

7. Empower the team with a sense of autonomy and ownership.

One of the most important steps in creating an environment of trust and respect is to instill the DevOps team with a sense of autonomy, ownership and empowerment. Team members should be able to operate with enough independence to get their jobs done as efficiently and effectively as possible. This doesn’t mean they get to do whatever they want, but it does mean they have the ability to figure out what it will take to deliver software that adheres to the project’s overall goals.

In a functioning DevOps environment, each team member has direct insight into what it takes to develop, test, deploy, and maintain an application throughout its lifecycle. Rather than development throwing the product over the wall to operations, everyone is invested in the outcome and recognizes that they all benefit by delivering the application as quickly and efficiently as possible. The only way to make this work is to empower the team with the autonomy and sense of ownership it needs to figure out the best way to deliver their applications, without having to navigate a convoluted hierarchy of approval processes that can bring an operation to its knees.

8. Instill a sense of shared responsibility.

As a DevOps team becomes more autonomous and takes greater ownership for its projects, the individual members adopt an increasing sense of shared responsibility for the entire operation. At this point, there should be no silos between development and operations, but rather a realization that they’re all in this together and have a vested interest in ensuring the best possible outcome. The development side better appreciates what it takes for successful operations, and the operations side better appreciates what it takes for successful development.

To gain a sense of shared responsibility, the team must avoid blame-game politics and instead work together toward productive problem-solving and process improvement. Members must recognize that their tasks are all interconnected and dependent on each other and that any misstep along the way affects everyone. At the same time, they should be encouraged to experiment with new processes and technologies and to challenge current methodologies and not be afraid of failure. By sharing in the risks, they also share in the responsibility for ensuring the best possible results.

9. Implement the right tools and technologies.

Team collaboration takes a lot more than just the state-of-the-art tools; however, those tools still play an important role in facilitating that collaboration. If everyone is expected to work together to implement an effective continuous integration/continuous delivery (CI/CD) operation, they must have the right tools in place to ensure that all team members can participate in the delivery process as efficiently as possible. At the same time, they need tools that facilitate communication between members and support where and how they work.

One of the most important considerations when planning tools and technologies is to ensure that the systems you put into place support a high degree of automation. Without extensive automation, team members must perform numerous manual and repetitive tasks, which can slow operations, introduce errors, and lead to inconsistencies between deployment environments. Automation helps to standardize operations and free up team members to focus on improvement and innovation, while leading to better software, faster delivery, and greater job satisfaction.

10. Establish a pattern of continuous learning and improvement.

DevOps is on an ongoing process, not a one-off operation. It should be continuously refined and improved and updated, with the goal of constantly making it better. The same goes for sustaining a collaborative team culture. Team members should be continuously learning, improving their skills, and working to enhance collaboration. The better they work as a team, the more effectively they can improve DevOps processes and achieve their goals. With each project, they should assess what has worked and what has not and then come up with ways to make operations better.

A team’s sense of shared goals and responsibility will go a long way in driving them toward ongoing learning and improvement. But members also require continuous feedback (both formal and informal) that provides them with insights into where and how they can improve operations. Feedback can come from the CI/CD tools themselves, such as error messages, build failures, or key performance indicators (KPIs), but it can also come from other sources, including the other team members, which is why effective communication skills are so essential.

Building a collaborative DevOps culture

Like DevOps itself, an effective team culture doesn’t happen overnight. The team must be nurtured and provided the training and tools necessary to accomplish its goals. Ultimately, the team’s motivation for its success will come from the members themselves, working together in a collaborative manner to deploy applications faster and with fewer errors. But to get to that point, they’ll need the commitment of the organization’s leadership and assurance they’ll receive the support and environment they need to work together in a cooperative and cohesive manner. Only then will they be able to deliver quality software as efficiently and quickly as possible.

If you like this article, you might also like Ten tips for attracting and retaining DevOps talent.

The post Ten tips for building a collaborative DevOps culture appeared first on Simple Talk.


from Simple Talk https://ift.tt/2YsBbS4
via

Thursday, January 28, 2021

DBA in training: SQL Server under the hood

The series so far:

  1. DBA in training: So, you want to be a DBA...
  2. DBA in training: Preparing for interviews
  3. DBA in training: Know your environment(s)
  4. DBA in training: Security
  5. DBA in training: Backups, SLAs, and restore strategies
  6. DBA in training: DBA in training: Know your server’s limits 

You are now more familiar with your environment, how to secure it, and how to keep it from breaking. It’s time to begin delving into the weeds and learn more about SQL Server under the hood. (Well, sort of. You can spend a lifetime learning internals). This article will deal with basic internals, indexing, tuning, and sins against SQL Server, which should be avoided.

SQL Server – the house that Microsoft built

To get an idea of how SQL Server works, let’s start at the bottom and work our way up. Here is a 10,000-mile view to help us get started:

SQL Server under the hood architecture

The basic anatomy of a SQL Server instance

The more rows of data that can fit on a page, the better performance will be for everything up the tree. This is the reason that you need to look at what kind of data types are making up your tables – even a small difference might not end up scaling. We’ll go more into that point when we start talking about tables.

So, a query walks into the parser….

….and SQL Server will see if it parses or not. If it does parse, it is sent off to the Query Optimizer. The Query Optimizer sees if it already has a plan that will work for the query. If it does, it uses it. If not, it will look through the options until it finds a good enough plan (not necessarily the best one!). To do that, it looks through table structures and indexes; it combs through statistics to figure out what (if any) indexes can be used, and if they can, will it be a quick seek or a row-by-agonizing-row proposition. It coordinates with the Query Execution layer. Meanwhile, waaaaay down the stack, the Engine is reading pages into memory (if they aren’t already there), locking tables or rows of data (if needed), and generally carrying out the nuts and bolts that make the query happen. The protocol layer takes the results and translates them back into a language that the end-user can understand.

This, of course, is the 10,000 mile-high view of it, but you get the idea.

The DMVs and system objects

There are many built-in ways to find out what’s going on under-the-hood: DMVs (dynamic management views) and other system objects.

Dynamic Management Objects

The Dynamic Management Objects are a set of views and functions supplied by Microsoft to help you look inside SQL Server. They need a bit of manipulation to present the data in an immediately useable way. Glenn Berry has done the work for you. Unless you just love a challenge, don’t reinvent the wheel. You can find his diagnostic queries here, or if you like PowerShell, DBATools will run his queries and even export them to Excel for you. They are the source of invaluable information on your servers, and I have used them countless times when trying to troubleshoot issues or to baseline metrics.

INFORMATION_SCHEMA views

Microsoft also gives you something called the INFORMATION_SCHEMA views. These are a fast and easy way to get the answer when you have questions such as what table has what column, or how to find occurrences of a string anywhere on a server instance. It can also give you information on column-level permissions, constraint column usage, and more.

System functions

SQL Server comes equipped with a set of useful functions that are good to know. Some examples include the invaluable GETDATE(), which returns the current date as a datetime:

They may also include @@ROWCOUNT, which does what you would expect: it returns the number of rows affected by your last code statement. In an admittedly contrived example, say you work for AdventureWorks and want to liquidate some inventory. You’re considering the possibility of having a sale in a particular area, but it won’t make sense to do so for a population under 200 people. You could use @@ROWCOUNT in your decision logic:

If you think your statement will return a huge number of rows (over two billion), ROWCOUNT_BIG() will be the function to use instead. I have used all of these system function examples more often than I can count. You likely will as well, or you will find others more useful to you.

Note: You may have noticed the system functions are not consistently written: some of them are prefaced with “@@”, and some are appended with “()”, so be careful to check which is which when you are using them.

System stored procedures

Like the system functions, the system stored procedures are Microsoft’s internal stored procedures. There are a metric ton of them – so many that Microsoft lists them by category rather than listing them separately. In SSMS, you can find them by going to the Programmability tab, then expanding the Stored Procedures tab, then expanding the System Stored Procedures tab. Most are for internal processes and shouldn’t be used unless you know what you are doing. Some examples that you can use include sp_helpdb, which will give you basic information about all your databases:

image.png

Or, just more detailed information on one database in particular:

image.png

Another example would be sp_helpserver, which will give you info on your server or linked servers on your instance. If you are a new DBA, stick to the sp_help procedures for now.

Databases in SQL Server

So, we’ve taken the server-level, 10,000 mile-high view of SQL Server. Let’s begin talking about databases.

There are two types of databases in SQL Server: system databases and user databases.

There are five system databases that you will typically see in a SQL Server instance:

  1. master – this is where you’ll find all the basic information of your SQL Server instance, including the logins, databases, settings – everything. SQL Server doesn’t start without this database, so it is paramount that this (as well as all of the other system databases except resource and tempdb) are regularly backed up.
  2. model – this is, yes, the “model” for what all your other databases will look like. Whatever you do here happens to any new database made afterward.
  3. msdb – this is where all the SQL Agent job information is located. It’s also the home of database mail and service broker and the backup history. Jeremiah Peschka suggests limiting the amount of backup history you keep, but be very careful with this. Know what the business expectations are for backup history retention, and never assume that is your decision to make – it isn’t.
  4. tempdb – this is SQL Server’s scratchpad, where temp tables are made and discarded, where versioning is used for some of the isolation levels, and where query processing goes to do its work (and to spill data from badly performing queries). It is remade every time SQL Server reboots. You want to give tempdb plenty of room to work, and of course, it is the only database (along with the Resource database) you do not back up.
  5. Resource – this database will be invisible to you unless you know some special queries to look at it. This is where the system objects are kept. It is best to let it do its job and leave it alone.
  6. Distribution – you will see this special system database on the distribution server instance if you use replication.


User databases are just what they sound like – databases that were created by SQL Server users.

Filegroups

Data files are grouped into filegroups on databases. This allows for better organization and efficiency. There is always one filegroup – PRIMARY – that houses the main data file, or .mdf. But you can have as many as are needed. Jess Borland does a great job of discussing filegroups here.

Why would you have more than one filegroup? Aside from the obvious organizational benefits, if you have multiple filegroups, you can leverage piecemeal or partial restores in an emergency. Paul Randal goes into this in his “Advanced Corruption Recovery Techniques” course on Pluralsight. It’s highly recommended that you listen to his course “SQL Server: Detecting and Correcting Database Corruption” first.

Tables, data types, and referential integrity

Just like there are system and user databases, there are system and user tables.

  • System tables – here’s an article from Tom LaRock explaining them.
  • User tables – just what they sound like! These are tables created by users.

When you query the content of a table in SSMS, the output looks a great deal like an Excel spreadsheet. One of the many advantages that SQL Server has over Excel lies in its ability to allow its tables to “talk” to each other. Millions of rows and huge numbers of columns can be joined together from tables to give the end-user the data they need (although again, this is not a goal!).

Why is this not a goal? Because as a DBA, one of your goals is to get the right data to the right user at the right time, as quickly as possible. To accomplish the “as quickly as possible” piece, it’s important to use the right architecture from the beginning.

Kimberly Tripp of SQL Skills illustrates the point of using the smallest data type that can reasonably be used to accomplish the objective here. A small difference in bytes saved can equal GB saved at scale. Moreover, there can be huge savings in IO, CPU, and other metrics. I highly recommend this course, which can save a great deal of pain and suffering later.

So now that you realize how important they are, a review of data types is in order. When new tables come through development, it’s an opportunity for you to help ensure efficiency from the start, by looking at the data types and offering suggestions for more efficient ones that should accomplish the same business purpose.

With very few exceptions, your tables should have a primary key – one or more fields that guarantees a record (row) is unique. Any field that you choose for the primary key must have data in it (in other words, it cannot be NULL). You are only allowed one primary key per table. Whatever primary key or clustering key you choose, it should be unique, narrow, static, and ever-increasing. This ensures that new rows have the best chance of being inserted at the end of the data page, rather than at different points in it. This is important (and we’ll discuss why soon).

When you create the primary key, you create a primary key constraint by default. A constraint is nothing more than a rule in SQL Server. This constraint ensures that every row is unique – preventing duplicate data. The primary key in one table can be used to link to another table. When that happens, it’s called a foreign key.

SQL Server will try to ensure that the data in related tables is correct (with your help). For instance, let’s say you have a database to track bicycle orders (if this sounds suspiciously like AdventureWorks, well, it’s not paranoid if it’s true). In that database, you have tables for your CustomerID, CustomerName, CustomerAddress, and OrderIDs. If you have an order for a bicycle, you can make the relationship between the customer number, name and shipping information, and order number. So now, for every order number, there must be a customer number, a name, and shipping information. That relationship is called referential integrity. It is usually enforced by constraints but can also use things like triggers or defaults (although constraints are preferred). Triggers can have performance overhead and can be tricky to maintain. For those reasons (among others), I don’t recommend using them as a first course of action.

Indexing

So far, we’ve taken SQL Server down to the bare bones and started building back up again. We have tables with the right data types to fit the most data possible on to our 8k data pages. The right relationships between the tables are established. That ensures that when the tables are queried, we have fewer pages to spin up into memory for processing, and performance will be great, right?

Not yet. For one thing, we haven’t indexed our tables.

What are indexes in SQL Server?

Indexes are just what you think they would be – sort of. SQL Server has two basic types of indexes: the clustered index and nonclustered indexes.

The clustered index is the data: it’s the order the data is physically sorted in. It is roughly analogous to the table of contents in a book. It is not, however, necessarily the same thing as the primary key. When you create a primary key in SQL Server, you create a unique clustered index by default. However, you could opt to create a unique nonclustered index to enforce the primary key constraint (not that I would recommend it in most cases).

So, what is a nonclustered index, and how is it different? A nonclustered index is a copy of some of the table columns (with the clustering key tacked on under the covers). It doesn’t have to be unique – and often is not. Why would you want that? Because frequently, when you query SQL Server, you don’t want to look through every row of every column of the table in the clustered index – or even most of them – if you could find it faster by looking through a few rows in a few columns.

Because nonclustered indexes are, in effect, copies of the tables, they need to be maintained, and they’ll grow as the tables grow. So, you don’t want too many of these per table. It’s important to create the nonclustered indexes that you know will be used by most of your queries (which is the art, versus the science, of indexing).

Underneath clustered and nonclustered indexes there are other possibilities that you will probably see as your career progresses:

  1. Unique clustered index (the default clustered index)
  2. Non-unique clustered index
  3. Unique nonclustered index
  4. Non-unique nonclustered index (the default nonclustered index)
  5. Unique filtered indexes
  6. Non-unique filtered indexes

Finally, there is a thing called a HEAP. Heaps are tables without clustered indexes. When you are inserting records into a heap, it will be blazing fast. This is because SQL Server won’t try to put the records in any sort of order. First come, first served! That seems great until you try querying a table sitting on a heap. Then, prepare to sit and watch the grass grow while SQL Server frantically tries to retrieve the records you asked for. Unless you’re doing ETL work, you want your table to have a clustered index.

Index maintenance

Since you’re a good DBA and your tables are well-indexed, do you know how SQL Server figures out which indexes to use? That is where statistics come in! Statistics are just units of measure that keep track of things such as data distribution in tables and how often indexes are accessed. In this way, SQL Server can look at a table named dbo.Employee and know things such as there are 11 rows of data for employees whose last name falls between Ba-Bl, and that there is a nonclustered index on that table that is used 15% of the time, but there is another index that could be there that would constitute a 93% improvement. SQL Server uses these numbers to determine its execution plans, to make indexing recommendations, etc. These recommendations are not perfect, but they can be a starting place to point you in the right direction.

On tables where data is being inserted, updated, or deleted, your indexes and statistics are going to go through some wear and tear. Index wear and tear is called fragmentation, and there are two types:

  • Logical fragmentation – the physical data page no longer matches the index key order, due to the data page splits that happen during INSERT or UPDATE queries.
  • Physical fragmentation – there is more free space on the data page than there should be, due to page splits (usually through DELETE queries, but also during INSERT or UPDATE operations).

As your indexes grow (or shrink) and change, statistics can get out of date as well. All of these things can cause performance problems unless you have a process to keep it all current. There are several options out there to help, but the best way to keep your indexes and statistics tuned is to use Ola Hallengren’s Maintenance Solution. His scripts will set up all the SQL Server Agent Jobs you need to maintain your indexes, statistics (and will even manage your backups and database integrity checks, if you like). They are free, well-vetted, and safe to use in production.

Database Objects

We have discussed a couple of types of database object already – tables and indexes. But there is much more to SQL Server than just those two things. Let’s touch on some of the database objects you can expect to see and work with as a DBA.

Views

Say that you want to see two columns from Table A, three columns from Table B, a column from Table C, and four columns from Table D joined together, but you don’t want to retype the code to make that happen every single time you need it. You don’t need to! You can make a view. There are system views and user-made views.

A view is just that – a virtualized table. They can be materialized, though, in special circumstances. Those kinds of views are called indexed views. Indexed views do have some limitations, but are a valuable tool to have in your toolbelt. They are particularly useful for aggregations.

Synonyms

A synonym is nothing more than a nickname. Rather than saying, SELECT TOP 10 * FROM SERVERINSTANCE.DatabaseName.dbo.ObjectName over and over in your code, you could just use a synonym: SELECT TOP 10 * FROM ObjectName. When you create the code for the synonym, you “point” it, like this:

CREATE SYNONYM dbo.ObjectName FOR SERVERINSTANCE.DatabaseName.dbo.ObjectName

Aside from saving you the tedium of typing a fully qualified name over and over, synonyms offer a significant advantage: if the location of the object ever changes, just repoint the synonym, and all the code still works. If you don’t use synonyms, and a referring object location ever changes, better hope you found every occurrence in every piece of code ever, or something will break, and it will probably be a long time before you find it.

Stored procedures

A stored procedure (also commonly called a “sproc”) is a script that is stored on SQL Server. As with the other database objects we have discussed, there are system stored procedures and user-made sprocs. Aside from saving you the time and labor of retyping code every time, stored procedures have other upsides:

  • They are usually flexible because they use parameters and variables.
  • They are compiled in SQL Server, so the execution plans can be reused (this should be a good thing, but sometimes is not).
  • They have been tested, and it is generally recommended that end-users use a stored procedure over ad-hoc code for this reason as well as performance reasons (precompiled code, prevention of cache bloat, etc.).

Functions

Functions are routines that will take a parameter, perform some sort of action on it (usually a calculation), and return the result of that action. Other code will see the output, but not the code of the function itself, making it somewhat like a miniature program in and of itself. Like stored procedures, they are compiled at runtime, and SQL Server can remember that the execution plan is there (if you query the cached_plans DMV, you’ll see an object type of “Proc”, though, which can be a little misleading).

Aside from the system functions and aggregate functions, you’ll be primarily dealing with two types: table-valued functions and scalar-valued functions. A table-valued function returns a result set in the form of a table. It is executed once per session (usually making it more performant than a scalar-valued function). A scalar-valued function will execute once per row of data returned, making it costly to use. We will go into this in more detail in the Query Tuning Basics section.

Triggers

Triggers are stored procedures that automatically fire when an event “triggers” them. They are attached to tables and are not visible unless you go looking for them in SSMS. When triggers break or act in unanticipated ways, their very nature (the fact that they go off automatically when triggered and are largely invisible) makes them somewhat difficult to troubleshoot. They are typically used for auditing or to keep corresponding tables current, but they should be used sparingly and with caution.

Assemblies

Assemblies are objects that are compiled together and then deployed as a single unit in the form of a .dll file. They can be made of up stored procedures, functions, triggers, types, and/or aggregates. They are created in .NET instead of using T-SQL. They can present a security risk, so it’s important to know how the business feels about them before using them and how to do it safely.

Types

Types in SQL Server can be system data types, or user-defined. Sometimes, users need to define custom data types or table types, and here is where SQL Server allows that to happen.

Rules

Rules are just what you’d think they are. They are a type of constraint that forces data to comply with its conditions. They are a deprecated feature as of 2012.

Sequences

A sequence is a schema-bound object that creates a list of numbers, beginning with a specified value, then increments and returns them, according to user specifications.

Agent Jobs: Getting the right data to the right people at the right time

Database jobs take multiple actions that SQL Server performs automatically for you at a specific time that you schedule. They are run by the SQL Server Agent. Job steps can be run as T-SQL, from the command prompt, using SSIS, PowerShell, or many other options. I will cover some examples of jobs and practice creating some as well in a future article.

Query tuning basics: Getting the right data to the right user at the right time, as quickly as possible

By this point, you have a basic understanding of SQL Server and how it works (I know you are thinking, basic!!?? The good news is that you’ve chosen a field that will ensure that you are a lifelong learner. At least you will never be bored!) We’ve learned how to build tables with the right data types, and how to use primary and foreign keys to effectively define, link, index, and protect our data. We have a basic idea of the types of indexes and why they are used, and how SQL Server uses statistics to keep track of the data and optimize query plans. We understand database objects and how they are used.

You would think we’d be all ready to go. But we’ve only laid the foundation.

Because now, we’re letting people into our database to query it. And people write evil, awful queries sometimes.

It’s usually not their fault. SQL works on a different paradigm than many other programming and scripting languages. SQL works best when it is used for set-based operations – getting batches of data at once. That means that some of the basics developers learn like cursors, which go through every row of a table – or even a group of tables- to return data can bring a SQL Server pain and suffering. As a DBA, you are a resource to help developers get the right data to the right people as quickly as possible.

It’s not uncommon for a horribly performing query to come to your attention that is bringing the server to its knees. The developer swears that it ran fine in test. There could be many reasons this is happening, but we’ll focus on six of the most common ones. These are known as antipatterns. Future articles will address more specific query tuning techniques.

The query is bringing it ALL back

The first example that comes to mind is the dreaded SELECT * FROM…. query, but it can be any query that is bringing back more columns than it needs. SELECT * in particular is discouraged because it can be a performance hit. This query can also bring back unexpected results if the underlying table structure has changed as well.

The problem with a query that “brings it all back” is that it causes unnecessarily increased IO and memory. I worked on a case some time ago where a query was timing out. SQL Server on that instance had been restarted a couple of times due to the stress on the server, with no help in sight. When my colleague and I first went to work on the issue, the problem query was generating over 217 million logical reads per execution. Refining the query to bring back only the columns needed resulted in 344,277 reads. CPU went from 129,031 to 1.470. If the vendor had allowed us to index the table needed, we could have gotten the reads down to 71.

Moral of the story: Make sure the query brings back only what it needs.

Nested Views

This is the case where you find views calling views calling whatever else until – finally -the tables are called. SQL Server will try to help figure out what you need, but there is a performance hit just on that effort, and the execution plan will be needlessly complex. It can (and probably will) also cause prolonged execution times, returning more data than you needed in the first place. Finally, they are a nightmare to troubleshoot, and when one of the underlying views break, they can return unexpected results.

Some time ago, I had a developer come for help with an application that was using a linked server to query our stage environment when he was expecting it to hit dev. He couldn’t figure out why it was happening. It turned out that the code was calling a nested view. Every synonym in every view (and there were a lot of them) had to be scripted to find the culprit. It also meant that his result set could have been inaccurate. I’ve also seen nested views that went seven views deep, bringing back huge amounts of data, running the same risks. That is one example. They can be worse.

Moral of the story: Let your views be viewed as views only. Don’t use them as reference objects.

Use the right temporary structures

Usually, this means using a temp table, but not always. Temp tables have the advantage of honoring statistics, having the ability to be indexed, and are generally more performant. However, if you’re working with SSIS, if you need your table to survive a transaction rollback, or if you’re working with functions, table variables can be the only way to go. They have a major drawback – the optimizer will always assume that a table variable will return just one row (which may be great if that’s all you expect, or horrible if it returns hundreds of rows). SQL Server 2019 does help with table variables; you will get the correct estimate on row return on the first execution. However, it will use that estimate for the next one, so you come up against a parameter sniffing issue. Its query optimizer is getting smart enough to “learn”, so over time, performance will improve some.

However, in some cases, using temp tables or table variables can hurt rather than help. For instance, if you are only going to query the data you are compiling once, you don’t need the cost of loading a temp table or a table variable. This is where a CTE can be your best friend, or a subquery with a CROSS APPLY might work better There are a lot of options at your disposal. Test and see what works best for your query.

Death by a Thousand Cuts – Non-SARGable Queries

Non-SARGable queries are those queries that require row-by-agonizing-row (RBAR) processing. I’ll focus on scalar-valued functions here, but any functions in the WHERE clause (that are on the column side of an operator) will do this as well.

Scalar valued functions are query killers because they execute row-by-row. Where at all possible, either rewrite these as table-valued functions or inline the logic. You might not easily see the damage to the query by looking at an execution plan, but a Profiler trace (make sure reads are included) will show you just how evil they can be.

Implicit Conversions – the Silent Killer

Implicit conversions happen when a query is comparing two values with different data types. This forces SQL Server to figure out what you’re talking about. The conversion is based on data type precedence and causes increased CPU, but the real performance hit comes from the forced index scans. In rare cases, implicit conversions can even give inaccurate or misleading query results. Worse yet, they aren’t always obvious (even in the execution plans). The fix is to CAST or CONVERT one of the data types to match the other.

Parameter Sniffing

The first time SQL Server gets a stored procedure, it optimizes for the parameter it receives from the end-user. Maybe it’s looking for the EmployeeID of anyone with the last name of Smith (not a real selective query). But the next time the sproc is used, it’s now looking for the EmployeeID of anyone with the last name of Meshungahatti. But the optimizer sees it has a plan it has already stored for Smith, and it uses that. The problem is, now SQL Server is estimating that it will return thousands of rows instead of one, wasting resources, memory, and IO. This can also work in reverse: SQL Server can assume that only a few rows will be returned when maybe millions actually will be. There are a few options to fix parameter sniffing – click here and here for more info. Also, be aware of these:

  1. In SQL Server 2016, there is an option to turn parameter sniffing off per database (ALTER DATABASE SCOPE to set PARAMETER_SNIFFING =OFF) but it works a lot like OPTIMIZE FOR UNKNOWN under the covers. It can impact the performance of other queries, so be careful with this one.
  2. You can enable trace flag 4136 (SQL Server 2008 R2 CU2 and up) to disable parameter sniffing at the instance level – again, be careful with this.

SQL Server under the hood

SQL Server is a big product, and there is a lot to learn. This article covered how SQL Server is built and some of the anti-patterns to look for when query tuning.


The post DBA in training: SQL Server under the hood appeared first on Simple Talk.


from Simple Talk https://ift.tt/3iXuvoc
via

Wednesday, January 27, 2021

Falling out of the zone

If you are lucky enough to enjoy the work you do, it could be because you are frequently “in the zone.” The zone is a state of complete concentration, also called “flow,” where time seems to stand still, and performance is at its peak. Before I heard these terms, I often experienced deep concentration while coding and called it “being one with the computer.” Not only is the zone a great state to be in while solving problems, it feels energizing and amazing. Sceptics may think there is nothing to this, but specific brain waves can be measured in studies about flow. If you are interested in learning more about the zone, check out The Rise Of Superman by Steven Kotler (Quercus Publishing, 2015).

Moving into the zone is not something you can switch on and off; it takes time, without interruptions, to get there. That’s one reason I’ve never been a fan of the vast “sea of cubicles” in many offices. Between the harsh lighting and noise, it isn’t easy to concentrate. Back when I was a DBA, I would often go into the office on Saturdays or minor holidays when no one else would be around so I could get some work done without interruptions. (I don’t recommend this!) For a few months at that job, I shared a small office with one other person and could avoid all the distractions.

I’ve been able to work from home for almost 10 years. Working remotely with the occasional trip to an event or the office has helped me stay in the zone more often. I can do my job more efficiently and also spend time recording classes and writing books, thanks to the zone. Of course, it’s challenging to get in the zone when interrupted by meetings or childcare. For the last few months, I’ve been helping grandchildren with remote school, and my day has been disrupted much more than usual.

Lately, I’ve wondered why I haven’t felt as much joy with my work. Maybe it’s because I haven’t travelled since last February, or maybe it’s because I’ve started to develop some new interests. I finally figured it out – I have fallen out of the zone.

Commentary Competition

Enjoyed the topic? Have a relevant anecdote? Disagree with the author? Leave your two cents on this post in the comments below, and our favourite response will win a $50 Amazon gift card. The competition closes two weeks from the date of publication, and the winner will be announced in the next Simple Talk newsletter.

The post Falling out of the zone appeared first on Simple Talk.


from Simple Talk https://ift.tt/3sUJbcq
via

Mastering TempDB: The basics

I regularly deliver a presentation called “Mastering TempDB”. I wrote it based on what I wish I knew about TempDB “growing up” in my career as a SQL Server DBA. It really is a breakdown of what TempDB is, how it is used, what problems actually occur within it, and how to best configure it. With advice from my colleagues, I have decided to break that down into this article to educate you.

What is TempDB?

TempDB is a global resource used by everyone and everything inside SQL Server. Think of it as a dumping ground for anything that doesn’t fit in memory. It is always database_id number two in sys.databases.

It’s non-durable, meaning that the database is recreated every time SQL Service restarts. A new set of data and log files are recreated each time. So, what does this mean to you? First of all, you shouldn’t put any objects in the TempDB database that you need to be persisted. Don’t use TempDB as a development database (except for maybe a quick throwaway test), because once services restart, you will lose your work.

TempDB works in a round-robin fashion known as proportional fill; it writes data in all files based on free space in each file and alternates between files to find the best place to do its work. I’ll talk more about this later in the article.

TempDB is just like other user databases for the most part except for logging and durability. It is minimally logged. There is still a transaction log, but that log is used for rollback only, not recovery. TempDB is non-durable because there is no need for recovery since a new one is created each time.

TempDB needs to be on fast storage with low latency. There is a very high concurrency rate of transactions that write data to TempDB that are happening all the time, so you need to ensure it is pinned to the fastest possible disk. In addition, as a best practice, I recommend isolating TempDB data files and log file on their own disks.

What’s stored in TempDB?

I find this easier to break down in bullet points. When looking at this, keep in mind that each time you write code, it can cause data to take up space in TempDB. When determining what type of operation to use, take a minute to determine if it is needed, such as a sort. In addition, watch for spills to TempDB—this is similar to an operating system paging memory to disk. Spilling to disk means there was not enough memory granted, and the operation was forced to “spill” or dump to TempDB to do its work. I also recommend when performance tuning stored procedures you use SET STATISTICS IO on to see the amount of data being processed in your work files and worktables. These too are processed inside TempDB as you will see.

Temporary user objects that are explicitly created

  • Global or local temporary tables and indexes,
  • Temporary stored procedures
  • Table variables
  • Tables returned in table-valued functions
  • Tables used in cursors.

Internal objects

  • These are objects that are created by the database engine.

Worktables to store intermediate results

  • Spools
  • Cursors
  • Sorts
  • Temporary large object (LOB) storage.

Work files for hash join or hash aggregate operations

  • Hash joins or hash aggregate operations

Intermediate sort results

  • Rebuilding indexes (if SORT_IN_TEMPDB is specified)
  • Certain GROUP BY, ORDER BY, or UNION queries.

Version Stores

  • RSCI- Read-Committed Snapshot Isolation using row versioning isolation or snapshot isolation- This is a big user of TempDB resources!
  • Online index operations
  • AFTER triggers

Availability Groups

Availability Group replicas use Snapshot Isolation by default which uses row versions of each transaction. These transactions are stored in the Version Store within TempDB. They do this on secondary replicas to avoid blocking, which could prevent transactions from the primary replica from being applied. However blocking can still be an issue for long-running transactions that lead to the version store clean up process being block and possibly causing your TempDB to fillup. When this happens, you will not be able to failover. Be sure you educate yourself on how this all works. Here is a great reference link.

When using a secondary read-only replica, the query optimizer also creates temporary statistics within TempDB. The statistics from the primary database are replicated to the secondary. SQL Server also needs statistics on read-only data based on queries that run on the secondary. You will find these inside TempDB with the suffix of _readonly_database_statistics. The query optimizer uses these statistics to optimize the workload on your secondary.

What causes issues within TempDB?

Many think it is the I/O that is the main cause of issues within TempDB, but it is not. I/O can be an issue when it comes to the disk and latency, but it is really not the big bottleneck. The cause is is latching and contention. All the tasks coming through TempDB fight for the same resources and working space. That work requires latches to the three special pages that manage this: GAM (Global Allocation Map), SGAM (Shared Global Allocation Map), and PFS (Page Free Space). These pages are responsible for determining where work takes place within the TempDB data files. Operations waiting for this determination, especially when a lot of processes come in at one time, can quickly queue up resulting in “contention”. Below are three kinds of contention that can happen:

Object Allocation Contention– This is where the system is looking for space to work. It is contention for metadata pages used to manage space allocation.

Metadata Contention – This is contention for pages that belong to system object used to track metadata. The data relates to the creation and destruction of temp tables and deallocating them.

Temp Table Cache Contention-Temp table cache helps with metadata and object allocation. It allows for reuse of temp tables.

Pam Lahoud (B|T) has a fantastic blog and session on this where she deep dives into contention; be sure to take a look.

How do you fix contention?

Now that you understand the causes of Tempdb issues, here are some things to consider when trying to fix them.

Proper configuration

To take advantage of the round-robin processing of TempDB, it is essential to have multiple data files so that the workload can be spread proportionally across them. To ensure this happens, you must make sure your files are also equal sizes and autogrowths are the same. If you have one file larger than the other, you have contention. The system will place all the work in the biggest file, thinking it has the most free space. In addition, when adding a new file plan to do a restart. Though you do not need a restart to add a file, the engine will end up using the new file only because it now has the freest space. You want to reset TempDB with a restart to ensure the proportional file usage is maintained. I make it a practice to check in on my TempDB regularly to make sure they are all aligned.

Besides enabling the proper use of round-robin logic, adding more files gives you more of these special pages work with. With each data file you add, you get one GAM page and one SGAM page for every 4 GB of space allocated to those files. The question I always get is how I know what size to make them to ensure I have the perfect amount of these pages. Unfortunately, there is no concrete answer to that. There is no script or algorithm I can offer to determine a magic number for your environment. Like with any other setting, you need to know your workloads to make that determination. I encourage you to monitor your TempDB usage and growth rates as a starting point. Another great tool I like to use to keep an eye out on your Virtual Log Files (vlf’s) as an indicator of these events. Here is a blog to learn more about these.

The new versions of SQL Server help simplify this for us. During the install, it helps you determine the number of files you need and lets you create them as part of the setup process.

Finally, how do you configure your disk? TempDB processing happens on the actual disk, not memory for most operations. Since TempDB is highly concurrent and is used by so much inside the engine, it is critical to make sure it is placed on the fastest possible disks available. Use flash drives if you can. These are high-speed storage based on non-volatile memory; you may see it referred to as NVMe, Non-volatile Memory Express. These are SSD, solid-state drives. One thing to keep in mind is that NVMe’s are SSDs, but not all SSDs are NVMe’s there are different types of SSDs.  No matter what type of enterprise grade SSD it is, these are great for TempDB workloads. If you want to learn more about the types of storage and what questions you should ask your storage admin as you try to determine the best configuration for your SQL Server TempDB, I have a beginners storage blog for you to read up on it.

Trace flags

Prior to SQL 2016 ,using trace flag 1118 and 1117 helped to reduce contention by ensuring that when one file grows, they all grow at the same time as well as changing the mixed extents algorithm which reduces contention on the SGAM pages. There is no downside to enabling 1118. For 1117, keep in mind this trace flag applies to all file groups, not just TempDB. When enabling 1117, if you have other file groups in your user databases and one of those files grows, it will trigger a growth event for the other files within that group and that database. If you are using an older version of SQL Server, I HIGHLY recommend these are added. It is so important, that these have now been defaulted.

Cumulative Updates

Metadata is out of the hands of the database admin, but how it is handled is critical to our workloads. It is in the hands of the SQL Engine team to identify issues and make improvements to how it works. However, you as a DBA can ensure you have the best code base for this simply by applying the most recent CUs (cumulative updates). You can take advantage of the fixes Microsoft provides to help alleviate this issue by applying the CUs. Over the years, the metadata tracking and object allocation methods have evolved to ease contention issues; the only way to take advantage of these changes is to upgrade and patch. There are several notable CUs where metadata contention was fixed: SQL 2016 SP1 CU8, SQL 2017 CU5, just to name a couple.

SQL Server 2019

TempDB got some real attention in SQL Server 2019. They introduced improvements to Temp Table Caching, Concurrent updates to PFS pages and provided two exciting new things In-Memory OLTP TempDB Metadata (Opt- in) and Table Variable Deferred Compilation. Like with all new features introduced, there are some growing pains with the In-Memory system table, so make sure you are on 2019 CU2 as they fix some contention that arose in this feature. You can read about it here.

To take advantage of the new In-Memory OLTP TempDB Metadata feature, you must enable it:

ALTER SERVER CONFIGURATION SET MEMORY_OPTIMIZED 
TEMPDB_METADATA = ON;

How do I see what is happening in TempDB?

You can take a peek inside your TempDB database to see what is happening. As you now know, TempDB is about allocating spaces on pages for tasks to happens. You need to be able to view those space allocations and identify those queries taking up that space. The below DMVs (dynamic management views) give you a way to just that. Note I have also included DMVs for looking inside the version stores which, if you recall, are also stored inside TempDB.

sys.dm_db_file_space_usage -Space usage of files in the databases

sys.dm_db_session_space_usage -Exclusive to the TempDB database, it returns the number of pages allocated and deallocated by each.

sys.dm_db_task_space_usage -Exclusive to the TempDB database, it returns information about the number of pages allocated and deallocated by each task.

sys.dm_tran_active_snapshot_database_transactions – Returns active transactions that generate and may access row versions.

sys.dm_tran_version_store- Version records in the version store

Mastering Tempdb

This introduction was just the beginning of mastering TempDB; understanding the fundamentals are a good start. There is a ton more to learn as you dive into Temp Tables, Table Variables, Spills to TempDB, and ways to peak into TempDB to see the transactions and page allocations through Dynamic Management Views, DMVs. I encourage you to take the time to dive deeper.

Redgate’s SQL Monitor now has a section dedicated to TempDB. Learn more about SQL Monitor here!


The post Mastering TempDB: The basics appeared first on Simple Talk.


from Simple Talk https://ift.tt/3sXEvTa
via

Tuesday, January 26, 2021

Handling Textual Unstructured Data using DataStage

What is Unstructured Data?

Structured data is represented by tables, rows, columns, attributes mostly like relational database. Many of us might have spent the better part of our careers working on structured data and it is heavily used for analytical purposes.

Unstructured data is often best described in contrast to structured data. It is an information that does not have a predefined data model and does not fit well into relational tables. It is classified into two types Non – Textual unstructured data and Textual unstructured data.

We going to discuss how to handle Textual unstructured data using DataStage.

What is Textual Unstructured Data?

Textual Unstructured Data is a textual data found in reports, emails, financial records, medical records, spreadsheets etc.

Why can’t we use Sequential file stage to handle Unstructured Data?

Flat flies are commonly used as source/target file and using sequential file stage, we process flat flies. We can use sequential file stage to read the data in excel file, but only if the excel contains data in a single sheet.

We can use Unstructured Data stage to pull data from excel file, when the data is spread across multiple sheets or even when excel contains data in a single sheet

Implementation in ETL (DataStage)

Unstructured Data stage can be used only in parallel job not in server or sequence job. This stage can be found under “File” section in Palette in the Designer. Data can be written or read from this stage

Step 1:

  • Select New Parallel Job from Toolbar

Step 2:

  • Select and drag an Unstructured Data stage from the File section of Palette and a target stage to write data and link source and target stages with transformer stage.

Source File: Excel spreadsheet with loan information, “SBA_PPP_MasterList.xlsx”

Sheet 1:

Step 3:

  • Define properties to extract data. Below is the snapshot of properties tab.

By clicking on the Configure button highlighted in the above snapshot, we will get the properties window of configuration.

Below is the snapshot for configure properties

Give file name of the source file along with the path in the File name field.

In the Range expression field from the Read options, give the range of the data in the sheet

Before selecting Range expression, you need to select an option in Range option. The Range option property of Unstructured Data stage allows you to specify the data range either by selecting the “Specify the start row” option or the “Specify the entire data range” option.

  • By selecting the Specify the start row, you need to identify the start row and Data stage identifies the end row of the range.
  • By selecting the Specify the entire data range, you must specify the start and end rows of the range to be extracted.

Using Sheet names to skip, we can skip the sheets which are not required.

Once we select the Range option, Range expression, Sheet names to skip and Column header, click on the load button for importing the metadata.

Click on Import to load metadata into Map tab

Step 4:

  • I have used the Transformer stage connected to the Unstructured Data stage to apply conditions/transformations and to rename/drop columns if needed and mapped to target files.

I have filtered the records based on “Disbursement_Type”, “DocuSign_Status” and “Withdraws”. You can find constraints in the above snapshot.

Step 5:

  • There are five target systems for this job design. Out of these five, two are Sequential stages and three are Unstructured Data stages.

Job Design:

Here DataStage job has been designed with seven stages.

  • Unstructured Data Stage (Source)
  • Transformer
  • Sequential File Stage (Target)
  • Unstructured Data Stage (Target)

  • Load Data into target Sequential File stage

  • Load Data into Unstructured Data stage

Select an Option from “Modify an existing file” or “Create a file” from Write mode in Properties tab. Then click on “Configure” to select a file name.

Select either “Specific file” or “Generate multiple files” from Write method and “Overwrite” or “Create (Error if exists) from File update mode.

You can set “Yes” or “No” to Adjust column width from Properties tab in Configuration Window and Set the same property for all links. You can also, rename the Sheet name in Sheet order tab

An Unstructured Data stage as a target system, allows multiple input links. This property allows us to write data into multiple sheets in one or more MS Excel spreadsheets.

This process can be widely used to process enterprise data especially in financial domain like Banks etc., to join transactional or accounts data from multiple sheets or to load data into multiple sheets for reporting purposes


The post Handling Textual Unstructured Data using DataStage appeared first on Simple Talk.


from Simple Talk https://ift.tt/39hmUh8
via

SQL Server triggers: The good and the scary

SQL Server triggers are a subject of both functionality and controversy on any database platform. They can provide immense utility at a low cost, but are often misused by developers, DBAs, and architects alike, resulting in performance bottlenecks or maintainability challenges.

This article briefly reviews DML (data manipulation language) triggers and delves into a discussion about how triggers can be efficiently and effectively used as well as when triggers can dig developers into holes that are hard to escape.

While all demos in this article are in SQL Server, the advice presented here is universal across database platforms. The challenges posed by triggers are also seen in MySQL, PostgreSQL, MongoDB, and many others.

What are triggers?

SQL Server triggers can be defined on the server, database, or table and allow code to automatically execute when specific actions occur. This article focuses on DML triggers on tables as they tend to bear the brunt of over-usage. In contrast, DDL (data definition language) triggers on the database or server are typically more focused and less harmful to performance.

A trigger is a set of code that is evaluated when a data change is made to a table. Triggers may be defined to execute on INSERT, UPDATE, DELETE, or any combination of those operations. MERGE operations fire triggers based on the operations performed by each operation within the MERGE statement.

Triggers may be defined as INSTEAD OF or AFTER the write operation. AFTER triggers take place after data is written to the table and are a distinct and separate set of operations that execute as part of the same transaction that wrote to the table, but after that write occurs. If the trigger fails, the original operation also fails. INSTEAD OF triggers replace the calling write operation. In these scenarios, the INSERT, UPDATE, or DELETE operation never occurs, and the contents of the trigger are executed instead. Each can be valuable depending on the circumstances and the type of code that needs to be managed via triggers.

Ultimately, triggers allow TSQL to be executed when write operations occur, regardless of the source of those writes. They are typically used to run critical operations such as logging, validation, or additional DML in scenarios where there is a desire to ensure that the added code always executes. This is convenient as the source of code does not matter. It could be from an API, application code, release script, or an internal process, and triggers would fire regardless.

What do triggers look like?

Consider the Sales.Orders table in the WideWorldImporters sample database. Imagine that a need arose to log all update or delete actions on this table, along with some detail as to who and when the change occurred. This action could be done via a stored procedure or code, but doing so would require changes to every place in code writes to the table.

To solve this problem via triggers, the following steps could be taken:

1. Create a log table to accept data as it is written. The following TSQL creates a simple log table with all original columns, as well as a few added data points to help understand the source and cause of the change:

CREATE TABLE Sales.Orders_log
(       Orders_log_ID int NOT NULL IDENTITY(1,1) 
            CONSTRAINT PK_Sales_Orders_log PRIMARY KEY CLUSTERED,
        OrderID int NOT NULL,
        CustomerID_Old int NOT NULL,
        CustomerID_New int NOT NULL,
        SalespersonPersonID_Old int NOT NULL,
        SalespersonPersonID_New int NOT NULL,
        PickedByPersonID_Old int NULL,
        PickedByPersonID_New int NULL,
        ContactPersonID_Old int NOT NULL,
        ContactPersonID_New int NOT NULL,
        BackorderOrderID_Old int NULL,
        BackorderOrderID_New int NULL,
        OrderDate_Old date NOT NULL,
        OrderDate_New date NOT NULL,
        ExpectedDeliveryDate_Old date NOT NULL,
        ExpectedDeliveryDate_New date NOT NULL,
        CustomerPurchaseOrderNumber_Old nvarchar(20) NULL,
        CustomerPurchaseOrderNumber_New nvarchar(20) NULL,
        IsUndersupplyBackordered_Old bit NOT NULL,
        IsUndersupplyBackordered_New bit NOT NULL,
        Comments_Old nvarchar(max) NULL,
        Comments_New nvarchar(max) NULL,
        DeliveryInstructions_Old nvarchar(max) NULL,
        DeliveryInstructions_New nvarchar(max) NULL,
        InternalComments_Old nvarchar(max) NULL,
        InternalComments_New nvarchar(max) NULL,
        PickingCompletedWhen_Old datetime2(7) NULL,
        PickingCompletedWhen_New datetime2(7) NULL,
        LastEditedBy_Old int NOT NULL,
        LastEditedBy_New int NOT NULL,
        LastEditedWhen_Old datetime2(7) NOT NULL,
        LastEditedWhen_New datetime2(7) NOT NULL,
        ActionType VARCHAR(6) NOT NULL,
        ActionTime DATETIME2(3) NOT NULL,
UserName VARCHAR(128) NULL);

This table logs the old and new values for all columns. This is very thorough and realistically we could simply log the old version of the rows and be able to infer changes by joining new and old versions together. The choice is up to the developer to determine if the extra columns are acceptable or wasteful and this decision will vary based on each situation. The last 3 columns are new and provide context as to the type of action performed (INSERT, UPDATE, or DELETE), the time, and which user did it.

2. Create a trigger to log changes to the new table:

CREATE TRIGGER TR_Sales_Orders_Audit
        ON Sales.Orders
        AFTER INSERT, UPDATE, DELETE
AS
BEGIN
        SET NOCOUNT ON;
        INSERT INTO Sales.Orders_log
                (OrderID, CustomerID_Old, CustomerID_New, 
                 SalespersonPersonID_Old, SalespersonPersonID_New, 
                 PickedByPersonID_Old, PickedByPersonID_New,
                 ContactPersonID_Old, ContactPersonID_New, 
                 BackorderOrderID_Old, BackorderOrderID_New, 
                 OrderDate_Old, OrderDate_New, ExpectedDeliveryDate_Old,
                 ExpectedDeliveryDate_New, 
                 CustomerPurchaseOrderNumber_Old, 
                 CustomerPurchaseOrderNumber_New, 
                 IsUndersupplyBackordered_Old, 
                 IsUndersupplyBackordered_New,
                 Comments_Old, Comments_New, 
                 DeliveryInstructions_Old, DeliveryInstructions_New, 
                 InternalComments_Old, InternalComments_New, 
                 PickingCompletedWhen_Old,
                 PickingCompletedWhen_New, LastEditedBy_Old, 
                 LastEditedBy_New, LastEditedWhen_Old, 
                 LastEditedWhen_New, ActionType, ActionTime, UserName)
        SELECT
                ISNULL(Inserted.OrderID, Deleted.OrderID) AS OrderID,
                Deleted.CustomerID AS CustomerID_Old,
                Inserted.CustomerID AS CustomerID_New,
                Deleted.SalespersonPersonID AS SalespersonPersonID_Old,
                Inserted.SalespersonPersonID AS SalespersonPersonID_New,
                Deleted.PickedByPersonID AS PickedByPersonID_Old,
                Inserted.PickedByPersonID AS PickedByPersonID_New,
                Deleted.ContactPersonID AS ContactPersonID_Old,
                Inserted.ContactPersonID AS ContactPersonID_New,
                Deleted.BackorderOrderID AS BackorderOrderID_Old,
                Inserted.BackorderOrderID AS BackorderOrderID_New,
                Deleted.OrderDate AS OrderDate_Old,
                Inserted.OrderDate AS OrderDate_New,
                Deleted.ExpectedDeliveryDate 
                          AS ExpectedDeliveryDate_Old,
                Inserted.ExpectedDeliveryDate 
                          AS ExpectedDeliveryDate_New,
                Deleted.CustomerPurchaseOrderNumber 
                          AS CustomerPurchaseOrderNumber_Old,
                Inserted.CustomerPurchaseOrderNumber 
                          AS CustomerPurchaseOrderNumber_New,
                Deleted.IsUndersupplyBackordered 
                          AS IsUndersupplyBackordered_Old,
                Inserted.IsUndersupplyBackordered 
                          AS IsUndersupplyBackordered_New,
                Deleted.Comments AS Comments_Old,
                Inserted.Comments AS Comments_New,
                Deleted.DeliveryInstructions 
                         AS DeliveryInstructions_Old,
                Inserted.DeliveryInstructions 
                         AS DeliveryInstructions_New,
                Deleted.InternalComments AS InternalComments_Old,
                Inserted.InternalComments AS InternalComments_New,
                Deleted.PickingCompletedWhen 
                        AS PickingCompletedWhen_Old,
                Inserted.PickingCompletedWhen 
                        AS PickingCompletedWhen_New,
                Deleted.LastEditedBy AS LastEditedBy_Old,
                Inserted.LastEditedBy AS LastEditedBy_New,
                Deleted.LastEditedWhen AS LastEditedWhen_Old,
                Inserted.LastEditedWhen AS LastEditedWhen_New,
                CASE
                        WHEN Inserted.OrderID IS NULL THEN 'DELETE'
                        WHEN Deleted.OrderID IS NULL THEN 'INSERT'
                        ELSE 'UPDATE'
                END AS ActionType,
                SYSUTCDATETIME() ActionTime,
                SUSER_SNAME() AS UserName
        FROM Inserted
        FULL JOIN Deleted
        ON Inserted.OrderID = Deleted.OrderID;
END

The trigger’s sole function is to insert rows into the log table, one for each row affected by a given write operation. It is simple, set-based, and easy to document and maintain as time passes, and the table changes. Additional columns could be added if needed to track other details, such as database name, server name, a list/count of columns affected, or the calling application.

3. The last step is to test and validate that the log table is populating correctly. The following is a test of an UPDATE on the table after the trigger is added:

UPDATE Orders
        SET InternalComments = 'Item is no longer backordered',
                BackorderOrderID = NULL,
                IsUndersupplyBackordered = 0,
                LastEditedBy = 1,
                LastEditedWhen = SYSUTCDATETIME()
FROM sales.Orders
WHERE Orders.OrderID = 10;

Selecting * from Sales.Orders_log shows the results of the trigger’s execution:

results of SQL Server triggers

results of sql server triggers

Some columns are omitted above, but we can quickly confirm that the changes were captured, including the added action, user, and time columns at the end of the log table.

INSERTED and DELETED tables

In the previous example, data used in the log table was read from INSERTED and DELETED. These are special tables that are available as part of any relevant write operation. INSERT operations will include an INSERTED table, DELETE operations will include a DELETED table, and UPDATE operations will include both an INSERTED and DELETED table.

For INSERT and UPDATE operations, the INSERTED table will include a snapshot of the new values for each column in the table. For DELETE and UPDATE operations, the DELETED table will contain a snapshot of the old values for each column in the table prior to the write operation.

For INSERT operations, the DELETED table will exist but contain no data. Similarly, for DELETE operations, the INSERTED table will not contain any data. Because of this, it is possible to determine programmatically in a trigger what the calling operation is against the table. If DELETED contains no data, then the operation is an INSERT; if INSERTED contains no data, then the operation is a DELETE; if both tables contain data, then the operation is an UPDATE.

These tables are exceptionally convenient as they provide a way to access data affected by a write operation without needing to go back to the underlying table and query for it. Note that INSERTED and DELETED both reside in tempdb and are subject to any space or performance limitations that tempdb has on a given SQL Server.

Because INSTEAD OF INSERT triggers act on data that has yet to be written to a table, identity values will not yet have been determined. If a table contains an identity value, then it will be NULL within an INSTEAD OF INSERT trigger.

When are triggers most useful?

The optimal use of DML triggers is for short, simple, and easy to maintain write operations that act largely independent of an applications business logic.

Some great uses of triggers include:

  • Logging changes to a history table
  • Auditing users and their actions against sensitive tables.
  • Adding additional values to a table that may not be available to an application (due to security restrictions or other limitations), such as:
    • Login/user name
    • Time an operation occurs
    • Server/database name
  • Simple validation.

The key to these examples is for trigger code to remain compact enough that it is maintainable. When triggers grow to thousands or tens of thousands of lines, they become black boxes that developers fear to disturb. As a result, more code is added, but old code is rarely reviewed. Even with documentation, this can be challenging to maintain.

For triggers to function efficiently, they should be written to be set-based. If a trigger contains loops (WHILE or CURSOR) or scalar-parameter stored procedures, then operations on multiple rows will be forced to operate on data one row at a time.

If stored procedures must be used within a trigger, ensure that they use table-valued parameters when needed so that data can be moved in a set-based fashion. The following is an example of a trigger that iterates through IDs in order to execute an example stored procedure using the resulting Order IDs:

CREATE TRIGGER TR_Sales_Orders_Process
        ON Sales.Orders
        AFTER INSERT
AS
BEGIN
        SET NOCOUNT ON;
        DECLARE @count INT;
        SELECT @count = COUNT(*) FROM inserted;
        DECLARE @min_id INT;
        SELECT @min_id = MIN(OrderID) FROM inserted;
        DECLARE @current_id INT = @min_id;
        WHILE @current_id < @current_id + @count
        BEGIN
                EXEC dbo.process_order_fulfillment 
                        @OrderID = @current_id;
                SELECT @current_id = @current_id + 1;
        END
END

While relatively simple, performance on INSERT operations against Sales.Orders will suffer when multiple rows are inserted at once as SQL Server will be forced to iterate one-by-one as it executes the process_order_fulfillment stored procedure. An easy fix is to rewrite the stored procedure and this code to pass a set of Order IDs into the stored procedure, rather than doing so one-at-a-time:

CREATE TYPE dbo.udt_OrderID_List AS TABLE(
        OrderID INT NOT NULL,
        PRIMARY KEY CLUSTERED 
(       OrderID ASC));
GO
CREATE TRIGGER TR_Sales_Orders_Process
        ON Sales.Orders
        AFTER INSERT
AS
BEGIN
        SET NOCOUNT ON;
        DECLARE @OrderID_List dbo.udt_OrderID_List;
        EXEC dbo.process_order_fulfillment @OrderIDs = @OrderID_List;
END

The result of these changes is that the full set of IDs is passed from trigger to stored procedure and processed. As long as the stored procedure manages this data in a set-based fashion, then iteration will be avoided,

That being said, there is great value in avoiding stored procedures within triggers as they add an additional layer of encapsulation that further hides the TSQL that executes when data is written to a table. They should be considered a last resort and used only when the alternative would be to rewrite TSQL many times across many places in an application.

When are triggers dangerous?

Triggers are like Pringles: Once you pop, you can’t stop. One of the greatest challenges for architects and developers is to ensure that triggers are used only as needed, and to not allow them to become a one-size-fits-all solution for any data needs that happen to come along. Adding TSQL to triggers is often seen as faster and easier than adding code to an application, but the cost of doing so is compounded over time with each added line of code.

Triggers can become dangerous when:

  • There are too many. Maintain as few triggers as possible to minimize complexity.
  • Trigger code becomes complex. If updating a row in a table results in thousands of lines of added trigger code to execute, then it becomes hard for developers to fully understand what happens when data is written to a table. Even worse, troubleshooting can be very challenging when things go wrong.
  • Triggers go cross-server. This introduces the network into trigger operations and can result in writes becoming slow or failing when connectivity problems occur. Even cross-database triggers can be problematic if the target database is the subject of maintenance.
  • Triggers call triggers. The greatest pain of triggers is when a single row is inserted, and that write operation results in 100 triggers across 75 tables to execute. When writing trigger code, ensure that triggers can perform all necessary logic without triggering more triggers. The extra trigger calls are often unnecessary, but it may be hard to avoid once this deep in the rabbit hole.
  • Recursive triggers are set to ON. This is a database-level setting that is set to off by default. When on, it allows the contents of a trigger to call the same trigger. If recursion is needed, implement it using a less obfuscated method. Recursive triggers can greatly harm performance and are exceptionally confusing to debug. Often, recursive triggers are used when DML within one trigger fires other triggers as part of an operation. Reducing the number of write operations against a table can eliminate the need for this. Consider INSTEAD OF triggers as a way to allow data to be altered once, without additional operations after-the-fact being required.
  • Functions, stored procedures, or views are in triggers. Encapsulating more business logic in triggers makes them more complicated and provides a false impression that a trigger’s code is short and simple, when, in fact, it is not. Avoid using stored procedures and functions when possible in triggers and limit views to scenarios where they are simple and straightforward.
  • Iteration occurs. WHILE loops and CURSORs by nature operate row-by-row and may result in an operation against 1000 rows occurring one row at a time, 1000 times, greatly harming query performance.

This is a long list, but generally can be summarized by stating that short and simple triggers will perform better and avoid most of the pitfalls above. If triggers are used to maintain complex business logic, then it will become more likely with time that more and more business logic will be added, and inevitably best practices above will be violated.

It is important to note that in order to maintain atomic, durable transactions, any objects impacted by a trigger will hold a transaction open until that trigger (and any subsequent triggers) are complete. This means that long triggers will not only make transactions last longer, but will hold locks and cause contention to last longer as well. Therefore, when testing triggers, the effect they have on locking, blocking, and waits should be understood when creating or adding additional logic to existing triggers.

How to improve triggers

There are many ways to make triggers more maintainable, easier to understand, and more performant. The following are some additional thoughts on how to manage triggers effectively and avoid falling into traps.

Document!

The trigger itself should be well documented:

  • Why does this trigger exist?
  • What does it do?
  • How does it work (if it is not blatantly obvious)?
  • Are there any exceptions or caveats to how the trigger works?

In addition, if any TSQL within a trigger is confusing or hard to understand for anyone not already familiar with it, then add inline comments to assist developers that may be viewing it for the first time. The following is a sample of how documentation in a trigger can look:

/* 12/29/2020 EHP
        This trigger logs all changes to the table to the Orders_log
        table that occur for non-internal customers.
        CustomerID = -1 signifies an internal/test customer and 
        these are not audited.
*/
CREATE TRIGGER TR_Sales_Orders_Audit
        ON Sales.Orders
        FOR INSERT, UPDATE, DELETE
AS
BEGIN
        SET NOCOUNT ON;
        INSERT INTO Sales.Orders_log
                (OrderID, CustomerID_Old, CustomerID_New, 
                 SalespersonPersonID_Old, SalespersonPersonID_New,
                 PickedByPersonID_Old, PickedByPersonID_New,
                 ContactPersonID_Old, ContactPersonID_New, 
                 BackorderOrderID_Old, BackorderOrderID_New, 
                 OrderDate_Old, OrderDate_New, 
                 ExpectedDeliveryDate_Old,
                 ExpectedDeliveryDate_New, 
                 CustomerPurchaseOrderNumber_Old, 
                 CustomerPurchaseOrderNumber_New, 
                 IsUndersupplyBackordered_Old, 
                 IsUndersupplyBackordered_New,
                 Comments_Old, Comments_New, 
                 DeliveryInstructions_Old, DeliveryInstructions_New, 
                 nternalComments_Old, InternalComments_New, 
                 PickingCompletedWhen_Old, PickingCompletedWhen_New, 
                 LastEditedBy_Old, LastEditedBy_New, 
                 LastEditedWhen_Old, LastEditedWhen_New, 
                 ActionType, ActionTime, UserName)
        SELECT
                ISNULL(Inserted.OrderID, Deleted.OrderID) AS OrderID, 
                 -- The OrderID can never change.  
                 --This ensures we get the ID correctly, 
                 --regardless of operation type.
                Deleted.CustomerID AS CustomerID_Old,
                Inserted.CustomerID AS CustomerID_New,
                Deleted.SalespersonPersonID AS SalespersonPersonID_Old,
                Inserted.SalespersonPersonID AS SalespersonPersonID_New,
                Deleted.PickedByPersonID AS PickedByPersonID_Old,
                Inserted.PickedByPersonID AS PickedByPersonID_New,
                Deleted.ContactPersonID AS ContactPersonID_Old,
                Inserted.ContactPersonID AS ContactPersonID_New,
                Deleted.BackorderOrderID AS BackorderOrderID_Old,
                Inserted.BackorderOrderID AS BackorderOrderID_New,
                Deleted.OrderDate AS OrderDate_Old,
                Inserted.OrderDate AS OrderDate_New,
                Deleted.ExpectedDeliveryDate AS ExpectedDeliveryDate_Old,
                Inserted.ExpectedDeliveryDate AS ExpectedDeliveryDate_New,
                Deleted.CustomerPurchaseOrderNumber 
                    AS CustomerPurchaseOrderNumber_Old,
                Inserted.CustomerPurchaseOrderNumber 
                    AS CustomerPurchaseOrderNumber_New,
                Deleted.IsUndersupplyBackordered 
                    AS IsUndersupplyBackordered_Old,
                Inserted.IsUndersupplyBackordered 
                    AS IsUndersupplyBackordered_New,
                Deleted.Comments AS Comments_Old,
                Inserted.Comments AS Comments_New,
                Deleted.DeliveryInstructions 
                    AS DeliveryInstructions_Old,
                Inserted.DeliveryInstructions 
                    AS DeliveryInstructions_New,
                Deleted.InternalComments AS InternalComments_Old,
                Inserted.InternalComments AS InternalComments_New,
                Deleted.PickingCompletedWhen AS PickingCompletedWhen_Old,
                Inserted.PickingCompletedWhen 
                     AS PickingCompletedWhen_New,
                Deleted.LastEditedBy AS LastEditedBy_Old,
                Inserted.LastEditedBy AS LastEditedBy_New,
                Deleted.LastEditedWhen AS LastEditedWhen_Old,
                Inserted.LastEditedWhen AS LastEditedWhen_New,
                CASE -- Determine the operation type based on whether 
                     --Inserted exists, Deleted exists, or both exist.
                        WHEN Inserted.OrderID IS NULL THEN 'DELETE'
                        WHEN Deleted.OrderID IS NULL THEN 'INSERT'
                        ELSE 'UPDATE'
                END AS ActionType,
                SYSUTCDATETIME() ActionTime,
                SUSER_SNAME() AS UserName
        FROM Inserted
        FULL JOIN Deleted
        ON Inserted.OrderID = Deleted.OrderID
        WHERE Inserted.CustomerID <> -1 
         -- -1 indicates an internal/non-production 
         --customer that should not be audited.
        OR Deleted.CustomerID <> -1; 
        -- -1 indicates an internal/non-production 
        --customer that should not be audited.
END

Note that the documentation is not extensive, but includes a brief header and explains a few key pieces of TSQL within the trigger:

  • The exclusion of CustomerID = -1. This would not be obvious to anyone who does not happen to know it, so it is an excellent comment.
  • What the CASE statement for ActionType is for.
  • Why ISNULL is used on the OrderID column between Inserted and Deleted.

Use IF UPDATE

Within triggers, the UPDATE function provides the ability to determine if an update or insert operation attempted to write data to a given column. This can allow a trigger to check to see if a column changed prior to joining tables and performing operations. The following is an example of this syntax:

CREATE TRIGGER TR_Sales_Orders_Log_BackorderID_Change
        ON Sales.Orders
        AFTER UPDATE
AS
BEGIN
        SET NOCOUNT ON;
        IF UPDATE(BackorderOrderID)
        BEGIN
                UPDATE OrderBackorderLog
                SET BackorderOrderID = Inserted.BackorderOrderID,
                PreviousBackorderOrderID = Deleted.BackorderOrderID
                FROM dbo.OrderBackorderLog
                INNER JOIN Inserted
                ON Inserted.OrderID = OrderBackorderLog.OrderID
        END
END

By checking first if BackorderID was updated, the trigger can bypass the subsequent operations when not needed, thus avoiding the need to query Inserted and OrderBackorderLog. For triggers where TSQL is not needed often, this is a great way to improve performance by allowing the trigger to skip the code altogether based on the UPDATE values for columns needed.

COLUMNS_UPDATED is a VARBINARY bit pattern that indicates which columns within a table were updated as part of a write operation and can be used within a trigger to quickly determine if a specific set of columns was affected by an INSERT or UPDATE operation. While documented and a legitimate way to determine the columns affected by a write operation, it is complex to use and hard to document. I generally advise against using it as it is almost guaranteed to confuse developers unfamiliar with it.

IF UPDATE may be more verbose, but it is efficient and easy to understand, even if many columns are involved.

Note that it does not matter if a column changes or not for UPDATE or COLUMNS_UPDATED to flag that column as updated. An operation that writes to a column, even if the value does not change will still return 1 for UPDATE or a 1 in the bit pattern for COLUMNS_UPDATED. These bits only track if a column was the target of a write operation, not whether the value itself changed.

One trigger per operation

Keep trigger code as simple as possible. Maintain a single insert, update, and delete trigger at most. Allowing the number of triggers on a table to grow greatly increases the complexity of the table and makes understanding its operation harder. One-trigger-per-action ensures that trigger order is never an important consideration, also improving maintainability of code and reducing complexity.

A trigger that covers multiple actions is useful, but avoid triggers that mix and match action types repeatedly. For example, consider the following table trigger definition stubs:

CREATE TRIGGER TR_Sales_Orders_I
        ON Sales.Orders
        AFTER INSERT
CREATE TRIGGER TR_Sales_Orders_IU
        ON Sales.Orders
        AFTER INSERT, UPDATE
CREATE TRIGGER TR_Sales_Orders_UD
        ON Sales.Orders
        AFTER UPDATE, DELETE
CREATE TRIGGER TR_Sales_Orders_UID
        ON Sales.Orders
        AFTER UPDATE, INSERT, DELETE
CREATE TRIGGER TR_Sales_Orders_ID
        ON Sales.Orders
       AFTER INSERT, DELETE

What happens when a row is inserted? What about a MERGE operation that inserts and updates? In what order do triggers fire? The answer to these questions requires some head-scratching and research. This complexity is not worth the headache it causes. Maintaining less triggers is an easy solution and removes the guesswork from understanding how writes occur within a given table.

For reference, trigger order can be modified by using the system stored procedure sp_settriggerorder, though this only applies to AFTER triggers.

Keep it simple

Optimal triggers perform straightforward operations, perform quickly, and do not cause more triggers or modules to fire due to their execution.

There is no firm rule on how simple or complex a trigger should be, but a simple guideline is that the ideal triggers are simple enough that, if the logic contained within had to be removed from a trigger to elsewhere, the move would not be prohibitively expensive. That is, if the business logic in a trigger is so complex that moving it becomes too expensive to consider, then it is likely that those triggers have become too complex.

Using our earlier example, consider a trigger that logs changes to an audit table. This could easily be moved from the trigger to a stored procedure or to code, and the effort to do so would not be significant. The convenience of that logging process residing in a trigger makes it worthwhile, but at the same time, we could quantify how many hours it would take developers to migrate that TSQL from trigger to another location.

That count of hours can be seen as part of the maintainability cost for any given trigger. That is, the price that would need to be paid to get rid of the trigger if needed. This may sound abstract, but database migrations between platforms are common. A set of triggers that perform well in SQL Server might not be effective in Oracle or PostgreSQL. Similarly, migrating to a database variant that does not support the same level of trigger functionality might necessitate removing or simplifying triggers.

Memory optimized table variables

Sometimes, temporary tables are needed within a trigger to allow multiple updates against data or to facilitate clean inserts from an INSTEAD OF INSERT trigger. Temporary tables are stored in tempdb and are subject to whatever size, speed, and performance constraints are present on the tempdb database.

For temporary tables that are accessed often, a memory-optimized table variable is an excellent way to maintain temporary data in-memory, rather than in tempdb.

The following TSQL configures a database for memory-optimized data (if needed):

ALTER DATABASE WideWorldImporters 
SET MEMORY_OPTIMIZED_ELEVATE_TO_SNAPSHOT = ON;
ALTER DATABASE WideWorldImporters ADD FILEGROUP WWI_InMemory_Data 
    CONTAINS MEMORY_OPTIMIZED_DATA;
ALTER DATABASE WideWorldImporters ADD FILE 
    (NAME='WideWorldImporters_IMOLTP_File_1', 
     FILENAME='C:\SQLData\WideWorldImporters_IMOLTP_File_1.mem') 
     TO FILEGROUP WWI_InMemory_Data;

Once configured, a memory-optimized table-type can be created:

CREATE TYPE dbo.SalesOrderMetadata
AS TABLE
(       OrderID INT NOT NULL PRIMARY KEY NONCLUSTERED,
        CustomerID INT NOT NULL,
        SalespersonPersonID INT NOT NULL,
        ContactPersonID INT NOT NULL,
        INDEX IX_SalesOrderMetadata_CustomerID NONCLUSTERED HASH 
         (CustomerID) WITH (BUCKET_COUNT = 1000))
WITH (MEMORY_OPTIMIZED = ON);

This TSQL creates a table needed by the trigger demonstrated below:

CREATE TABLE dbo.OrderAdjustmentLog
(       OrderAdjustmentLog_ID int NOT NULL IDENTITY(1,1) 
        CONSTRAINT PK_OrderAdjustmentLog PRIMARY KEY CLUSTERED,
        OrderID INT NOT NULL,
        CustomerID INT NOT NULL,
        SalespersonPersonID INT NOT NULL,
        ContactPersonID INT NOT NULL,
CreateTimeUTC DATETIME2(3) NOT NULL);

The following is a demo of a trigger that makes use of a memory-optimized table:

CREATE TRIGGER TR_Sales_Orders_Mem_Test
        ON Sales.Orders
        AFTER UPDATE
AS
BEGIN
        SET NOCOUNT ON;
        DECLARE @OrderData dbo.SalesOrderMetadata;
        INSERT INTO @OrderData
                (OrderID, CustomerID, SalespersonPersonID, 
                 ContactPersonID)
        SELECT
                OrderID,
                CustomerID,
                SalespersonPersonID,
                ContactPersonID
        FROM Inserted;
        
        DELETE OrderData
        FROM @OrderData OrderData
        INNER JOIN sales.Customers
        ON Customers.CustomerID = OrderData.CustomerID
        WHERE Customers.IsOnCreditHold = 0;
        UPDATE OrderData
                SET ContactPersonID = 1
        FROM @OrderData OrderData
        WHERE OrderData.ContactPersonID IS NULL;
                
        INSERT INTO dbo.OrderAdjustmentLog
                (OrderID, CustomerID, SalespersonPersonID, 
                 ContactPersonID, CreateTimeUTC)
        SELECT
                OrderData.OrderID,
                OrderData.CustomerID,
                OrderData.SalespersonPersonID,
                OrderData.ContactPersonID,
                SYSUTCDATETIME()
        FROM @OrderData OrderData;
END

The more operations required within the trigger, the more savings will be seen as the memory-optimized table variable requires no IO to read/write. Once the initial data from the INSERTED table is read, the remainder of the trigger can leave tempdb alone, reducing the potential contention that would be caused if standard table variables or temporary tables were used.

The following code sets up some test data and runs an update to demonstrate the results of the above code:

UPDATE Customers
        SET IsOnCreditHold = 1
FROM Sales.Customers
WHERE Customers.CustomerID = 832;
UPDATE Orders
        SET SalespersonPersonID = 2
FROM sales.Orders
WHERE CustomerID = 832;

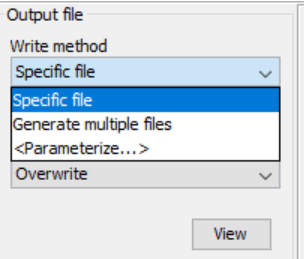
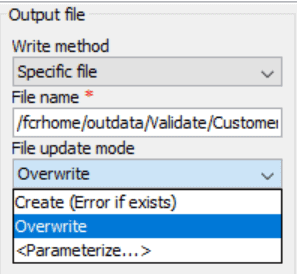
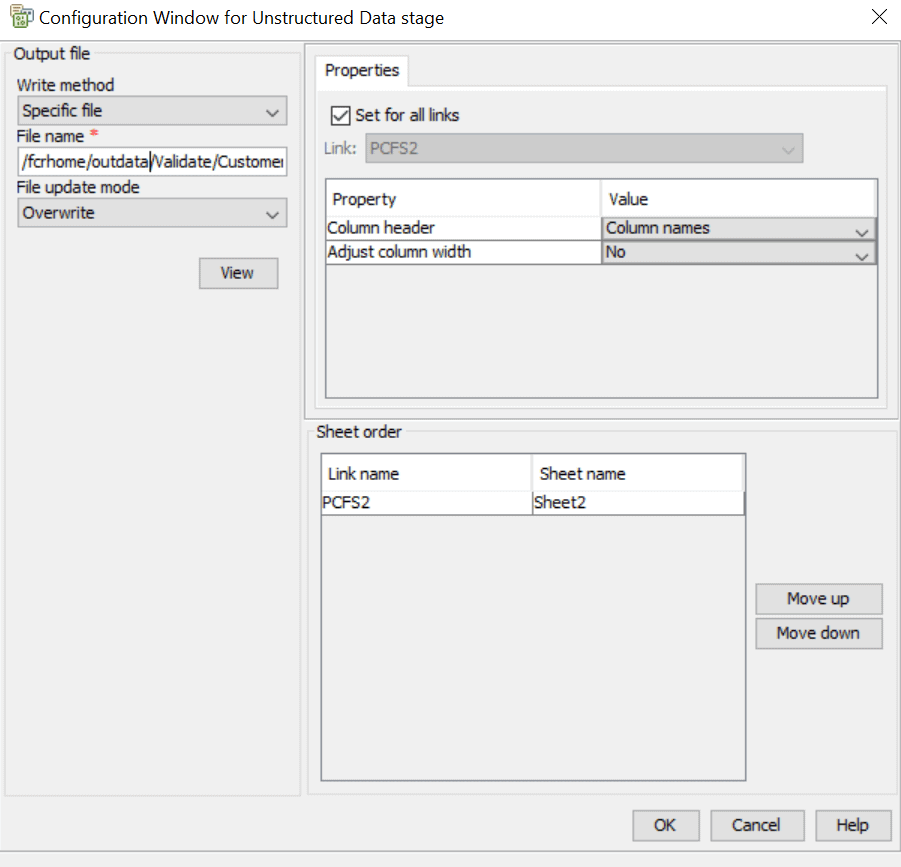
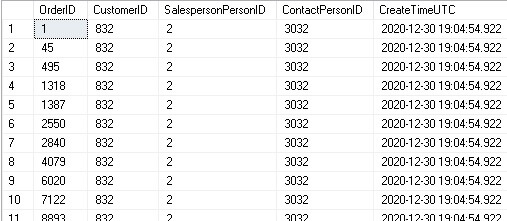
Once executed, the contents of the OrderAdjustmentLog table can be validated:

The results are as expected. Memory-optimized tables provide a way to greatly improve trigger speeds by reducing reliance on standard storage and moving intermediary tables into memory. This is limited to scenarios where there will be a great deal of contention or IO against temporary objects, but can also be useful in stored procedures or other procedural TSQL.

Alternatives to triggers

Like all tools, triggers can effectively tackle the problems that they are optimized for conquering. Similarly, they can be misused and become the source of confusion, performance bottlenecks, and maintainability nightmares. Many alternatives exist that are preferable to triggers and should be considered prior to implementing (or adding onto existing) triggers.

Temporal tables

Temporal tables were introduced in SQL Server 2016 and provide an easy way to add versioning to a table without building your own data structures and ETL. This logging is invisible to applications and provides full versioning support that is ANSI compliant, allowing it to be an easy way to solve the problem of saving old versions of data.

A temporal table is defined with its own history table, as well as columns that are populated with the times that the data is valid from/to.

This is a rich SQL Server feature that provides a set of expressions to quickly return data for a point in time or any period of time. A full demo of it would be quite space-consuming here, but more info can be found here.

Check constraints

For simple data validation, check constraints can provide exactly what is needed without the need for functions, stored procedures, or triggers. A check constraint is defined on a column and validates data automatically when it is created. The following is an example of a check constraint:

ALTER TABLE Sales.Invoices WITH CHECK ADD CONSTRAINT
CK_Sales_Invoices_ReturnedDeliveryData_Must_Be_Valid_JSON
CHECK ([ReturnedDeliveryData] IS NULL OR 
ISJSON([ReturnedDeliveryData])<>(0))

This code checks to see if a column is valid JSON or not. If it is, then execution proceeds normally. If not, then an error will be thrown by SQL Server and the write operation would fail. Check constraints can check for any combination of column and values, and therefore can manage both simple or complex validation tasks.

Check constraints are inexpensive to create and easy to maintain. They are also easier to document and understand as the scope of a check constraint is limited to validating incoming data and ensuring data integrity, whereas triggers can do practically anything imaginable!

Unique constraints

If a column needs to be unique and is not the primary key on the table, then a unique constraint is an easy and efficient way to accomplish the task. A unique constraint is the combination of an index and enforcement of uniqueness. The index is necessary to allow for uniqueness to be validated efficiently (without it, a table scan would be required anytime the unique columns were written).

The following is an example of a unique constraint:

ALTER TABLE Warehouse.Colors ADD CONSTRAINT 
UQ_Warehouse_Colors_ColorName UNIQUE NONCLUSTERED (ColorName ASC);

Whenever a row is inserted into the Warehouse.Colors table, the color name will be checked for uniqueness. If the write operation happens to result in duplication of a color, then the statement will fail and data will not be changed.

Unique constraints are built for this purpose and are the easiest way to enforce uniqueness on a column. This functionality has no place in triggers and the built-in solution will be more efficient, easier to maintain, and easier to document. Any developer seeing a unique constraint will immediately understand what it does without the need to dig deeper into TSQL to figure out how things work and that simplicity makes this an ideal solution.

Foreign key constraints

Like check constraints and unique constraints, foreign key constraints are another way to validate data integrity before data is written. A foreign key links a column in one table to a source table. Whenever data is inserted into the target table, its value is checked against the referenced table. If the value exists, the write operation proceeds normally. If not, then an error is thrown, and the statement fails.

This is a simple foreign key example:

ALTER TABLE Sales.Orders WITH CHECK ADD CONSTRAINT
FK_Sales_Orders_CustomerID_Sales_Customers FOREIGN KEY (CustomerID)
REFERENCES Sales.Customers (CustomerID);

When data is written to Sales.Orders, the CustomerID column will be checked against the CustomerID column in Sales.Customers.

Similar to unique constraints, foreign keys have only one purpose: validate that data being written to one table exists in another table. It is easy to document, simple to understand, and is efficient in its implementation.

Additionally, foreign keys can be configured to CASCADE, allowing the removal or parent data to automatically remove/NULL the child data. This is a convenient way to maintain data integrity when a set of data involved in relationships should all be changed at once.

Triggers are not the correct place to perform these validation checks and will be the less efficient solution compared to using foreign keys.

Stored procedures

Oftentimes the logic implemented in triggers can easily be moved into a stored procedure that is executed by the calling application. This removes the contention, complexity, and obfuscation that extensive trigger code can result in while allowing developers to maintain their processes accordingly.

Stored procedures provide the freedom to structure operations to ensure as much (or as little) atomicity as possible. One of the rationales often used for implementing triggers is ensuring a set of operations occur in line with a write operation. All successes or failures fail as part of an atomic transaction. Applications do not always require this level of atomicity. If necessary, the appropriate isolation levels or table locking can be used from within a stored procedure to guarantee a transaction’s integrity.

While SQL Server (and most RDBMS) provide the ACID guarantee that transactions will be atomic, consistent, isolated, and durable, sets of transactions within our own code may or may not need to follow the same rules. Real-world applications vary in their data integrity needs, anywhere from Real-time & Atomic to Eventually Consistent.

A stored procedure allows code to be customized to achieve the data integrity required by an application, ensuring that performance and computing resources are not wasted on unneeded data integrity. For example, a social media app that allows users to post cat photos is not likely to need its transactions to be fully atomic and consistent. If my cat photo arrives a second before or after yours, no one will care. Similarly, if you comment on my photo while I am editing it, the timing likely won’t matter to anyone using this data.

On the other hand, a banking app that manages monetary transactions would need to ensure that transactions are carefully executed so that there is no way for money to go missing or numbers to be reported incorrectly. If I have a bank account containing $20 and I withdraw $20 at the same time that someone else does, there can be no way for us to both succeed. One of us goes first and gets $20, and the other encounters an appropriate error message regarding the $0 balance.

Functions

Functions provide an easy way to encapsulate important logic into a single place where it can then be applied to data. They are often a superior option to triggers when they can be reused repeatedly and do not cause performance bottlenecks. A single function that is reused in 50 table inserts is far easier to code and maintain than 50 triggers, one per table, that all perform the same logic.

Consider the following function:

CREATE FUNCTION Website.CalculateCustomerPrice
        (@CustomerID INT, @StockItemID INT, @PricingDate DATE)
RETURNS DECIMAL(18,2)
WITH EXECUTE AS OWNER
AS
BEGIN
    DECLARE @CalculatedPrice decimal(18,2);
    DECLARE @UnitPrice decimal(18,2);
    DECLARE @LowestUnitPrice decimal(18,2);
    DECLARE @HighestDiscountAmount decimal(18,2);
    DECLARE @HighestDiscountPercentage decimal(18,3);
    DECLARE @BuyingGroupID int;
    DECLARE @CustomerCategoryID int;
    DECLARE @DiscountedUnitPrice decimal(18,2);
    SELECT @BuyingGroupID = BuyingGroupID,
           @CustomerCategoryID = CustomerCategoryID
    FROM Sales.Customers
    WHERE CustomerID = @CustomerID;
    SELECT @UnitPrice = si.UnitPrice
    FROM Warehouse.StockItems AS si
    WHERE si.StockItemID = @StockItemID;
    SET @CalculatedPrice = @UnitPrice;
    SET @LowestUnitPrice = (
           SELECT MIN(sd.UnitPrice)
           FROM Sales.SpecialDeals AS sd
           WHERE ((sd.StockItemID = @StockItemID) 
           OR (sd.StockItemID IS NULL))
           AND ((sd.CustomerID = @CustomerID) 
           OR (sd.CustomerID IS NULL))
           AND ((sd.BuyingGroupID = @BuyingGroupID) 
           OR (sd.BuyingGroupID IS NULL))
           AND ((sd.CustomerCategoryID = @CustomerCategoryID) 
           OR (sd.CustomerCategoryID IS NULL))
           AND ((sd.StockGroupID IS NULL) OR EXISTS (SELECT 1 
           FROM Warehouse.StockItemStockGroups AS sisg
           WHERE sisg.StockItemID = @StockItemID
           AND sisg.StockGroupID = sd.StockGroupID))
           AND sd.UnitPrice IS NOT NULL
           AND @PricingDate BETWEEN sd.StartDate AND sd.EndDate);
    IF @LowestUnitPrice IS NOT NULL AND @LowestUnitPrice < @UnitPrice
    BEGIN
        SET @CalculatedPrice = @LowestUnitPrice;
    END;
    SET @HighestDiscountAmount = (
              SELECT MAX(sd.DiscountAmount)
              FROM Sales.SpecialDeals AS sd
              WHERE ((sd.StockItemID = @StockItemID) 
              OR (sd.StockItemID IS NULL))
              AND ((sd.CustomerID = @CustomerID) 
              OR (sd.CustomerID IS NULL))
              AND ((sd.BuyingGroupID = @BuyingGroupID) 
              OR (sd.BuyingGroupID IS NULL))
              AND ((sd.CustomerCategoryID = @CustomerCategoryID) 
              OR (sd.CustomerCategoryID IS NULL))
              AND ((sd.StockGroupID IS NULL) OR EXISTS 
             (SELECT 1 FROM Warehouse.StockItemStockGroups AS sisg                                                                                
              WHERE sisg.StockItemID = @StockItemID
              AND sisg.StockGroupID = sd.StockGroupID))
              AND sd.DiscountAmount IS NOT NULL
              AND @PricingDate BETWEEN sd.StartDate AND sd.EndDate);
    IF @HighestDiscountAmount IS NOT NULL AND (
        @UnitPrice - @HighestDiscountAmount) < @CalculatedPrice
    BEGIN
        SET @CalculatedPrice = @UnitPrice - @HighestDiscountAmount;
    END;
    SET @HighestDiscountPercentage = (
             SELECT MAX(sd.DiscountPercentage)
             FROM Sales.SpecialDeals AS sd
             WHERE ((sd.StockItemID = @StockItemID)
               OR (sd.StockItemID IS NULL))
               AND ((sd.CustomerID = @CustomerID) 
               OR (sd.CustomerID IS NULL))
               AND ((sd.BuyingGroupID = @BuyingGroupID) 
               OR (sd.BuyingGroupID IS NULL))
               AND ((sd.CustomerCategoryID = @CustomerCategoryID) 
               OR (sd.CustomerCategoryID IS NULL))
               AND ((sd.StockGroupID IS NULL) OR EXISTS 
                (SELECT 1 FROM Warehouse.StockItemStockGroups AS sisg
                WHERE sisg.StockItemID = @StockItemID
                AND sisg.StockGroupID = sd.StockGroupID))
                AND sd.DiscountPercentage IS NOT NULL
                AND @PricingDate BETWEEN sd.StartDate AND sd.EndDate);
    IF @HighestDiscountPercentage IS NOT NULL
    BEGIN
        SET @DiscountedUnitPrice = ROUND(@UnitPrice * 
            @HighestDiscountPercentage / 100.0, 2);
        IF @DiscountedUnitPrice < @CalculatedPrice 
           SET @CalculatedPrice = @DiscountedUnitPrice;
    END;
    RETURN @CalculatedPrice;
END;

That is an absolute beast in terms of complexity. While it accepts scalar parameters to determine a calculated price, the operations it performs are vast and even include additional reads to Warehouse.StockItemStockGroups, Warehouse.StockItems, and Sales.Customers. If this is a critical calculation that is used against single rows of data often, then encapsulating it in a function is an easy way to get the needed calculation without introducing the added complexity of triggers. Use caution with functions and be sure to test with large data sets. A simple scalar function will generally scale well with larger data, but more complex functions can perform poorly. Scalar UDF Inlining in SQL Server 2019 helps with this challenge, but sufficient testing should be performed, regardless of SQL Server version.

A stored procedure could also be used, but the function might provide the added benefit of inlining the operation, allowing the calculation to occur as part of a write operation. An added benefit of this approach is that the code resides in one place and can be altered whenever needed in one place. Similarly, places that utilize the function can be adjusted to stop using it, or change how they use it. All of this can be accomplished independently of triggers, ensuring that code remains relatively easy to document and maintain, even if the logic underneath it is as complex as in the function presented above.

Code

When data is modified in a table from an application, it can also perform additional data manipulation or validation prior to writing the data. This is generally inexpensive, performs well, and helps reduce the negative impact of runaway triggers on a database.

The common rationale for putting code into triggers instead is that it avoids the need to modify code, push builds, and otherwise incur the time and risk of making application changes. This runs directly counter to any risk related to making changes within the database. Often this is a discussion between application developers and database developers as to who will be responsible for new code.

In general, if a trigger’s function addresses solely change coming from an application, then the application is the ideal place for that code (and not a trigger). If a trigger’s function addresses DML that could originate anywhere (application, API, stored procedures, etc…), then a trigger may very well be a better solution as it avoids the need to try and add code to all of those places and then be forced to maintain it after-the-fact.

This is a rough guideline but helps in measuring maintainability and risk after code is added either to an application or a trigger.

Computed columns

Computed columns are exceptionally useful ways to maintain metrics in a table that stay up-to-date, even as other columns change. A computed column can include a wide variety of arithmetic operations and functions. They can be included in indexes, and if deterministic, then they can be included in unique constraints and even primary keys.

Computed columns are automatically maintained by SQL Server when any underlying values change and cannot be inserted or updated.

The following are some examples of computed columns in WideWorldImporters:

[ConfirmedDeliveryTime]  AS 
(TRY_CONVERT([datetime2](7),json_value([ReturnedDeliveryData],
N'$.DeliveredWhen'),(126))),
[ConfirmedReceivedBy]  AS 
(json_value([ReturnedDeliveryData],N'$.ReceivedBy')),
[IsFinalized]  AS (case when [FinalizationDate] 
IS NULL then CONVERT([bit],(0)) else CONVERT([bit],(1)) end) PERSISTED,

Note that each computed column is ultimately determined by the values of other columns in the table. The PERSISTED keyword stores the computed column physically in the table, rather than calculating its value as needed at runtime.

This is an excellent alternative to using triggers to maintain special column values. Computed columns are efficient, automatic, and require no maintenance. They simply work and allow even complex calculations to be integrated directly into a table with no additional code required in the application or in SQL Server.

Service Broker

Triggers are sometimes used for managing queues and messaging as a way to ensure that DML directly results in tasks to be processed asynchronously elsewhere in the future. While this works, it also ties together the source transactional process to a destination messaging process. This can be expensive, complex, and hard to maintain.

Service Broker is built to manage sending messages between queues and does so efficiently. It can be used for simple use-cases, such as queuing tasks to process or logging processes to execute at a future time. It can also be used to divide processing workloads between servers, allowing expensive ETL or other costly processes to be offloaded away from a critical production system and onto another system dedicated to those purposes.

Service Broker is a mature SQL Server feature, but one that includes quite a bit of new syntax to learn and use, therefore this article is not an ideal place to walk through its use. There is quite a bit of documentation out there, and Microsoft’s documentation is a good place to start.

When considering using triggers for queuing and/or messaging, consider Service Broker first. It will usually be the right tool for the job and avoids the need to manually maintain queue tables and queue-management processes. Databases are not designed to be good queues, so implementing Service Broker or a 3rd party utility designed for this purpose will provide an easier-to-maintain solution that performs better.

Using SQL Server triggers

Triggers are a useful feature in SQL Server, but like all tools, one that can be misused or overused. When deciding whether to use triggers or not, consider the trigger’s purpose, and if it is the correct solution to the problem it is attempting to resolve.

If a trigger is being used to write brief transaction data to a log table, it is likely a good use of a trigger. If the trigger is being used to enforce a dozen complex business rules, then odds are it is worth reconsidering the best way to handle that sort of validation.

With many tools available as viable alternatives to triggers, such as check constraints, computed columns, and temporal tables, there is no shortage of ways to solve a problem. Success in database architecture is choosing the correct tool for the job, knowing that the time spent on that decision will save far more time and resources in the future had a poor decision been made.

If you like this article, you might also like Triggers: Threat or Menace?


The post SQL Server triggers: The good and the scary appeared first on Simple Talk.


from Simple Talk https://ift.tt/2Yg7Zxz
via